"Official" Modding Guide
Overview
OMD 2 Steam Workshop support allows you to install, create, and rate custom mods to the game. Currently, we support art asset mods, weapon/character mods, and level wave changes.
Install Mods
Installing custom mods is done through the Steam Workshop interface. Navigate to the Orcs Must Die 2 Community Hub -> Workshop Tab. From there, you can install a mod by clicking the “Subscribe” button. It’s that easy.

Uninstall Mods
To remove a mod from your system, simply unsubscribe in Steam Workshop. It will be erased the next time you launch Orcs Must Die 2.

Playing with Mods
If you have any mods installed for Orcs Must Die! 2, you will automatically see the OMD2 Mod Launcher every time you run the game.
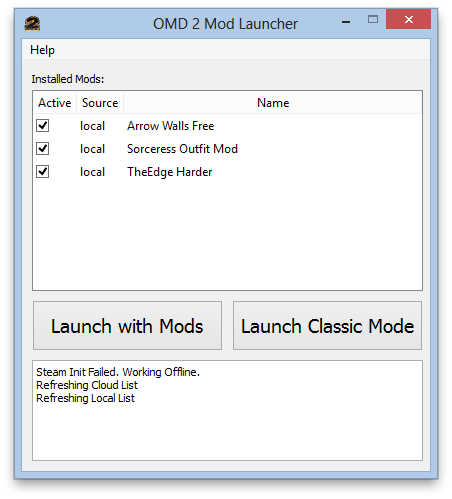
In the launcher, you can choose which mods you want enabled by selecting the check boxes. Launch the game using the “Launch with Mods” button.
Note: Please note that when mods are on, you can only play online with other people who are using the same mods, leader board scores will not be posted, and any changes to your user profile will not be saved (ex: Skulls earned or spent).
In the launcher, you can choose which mods you want enabled by selecting the check boxes. Launch the game using the “Launch with Mods” button.
Note: Please note that when mods are on, you can only play online with other people who are using the same mods, leader board scores will not be posted, and any changes to your user profile will not be saved (ex: Skulls earned or spent).
Tool Setup
To create mods, you must first install the Orcs Must Die 2 Workshop Tool which can be found in Steam under tools. If you already have the Workshop Tool installed, you can skip to the next section.
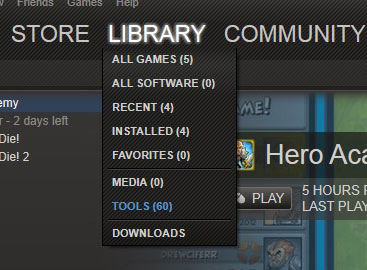
- Open your Steam client and select “Tools” from the “Library” drop-down menu.
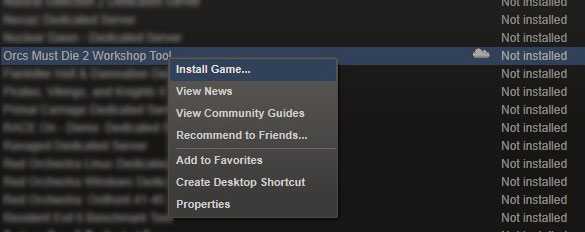
- Find the “Orcs Must Die! 2 Workshop Tool” and right click on it. From the menu that pops up, select “Install Game…” and install it to the default directory.
- After the tool is installed, run Orcs Must Die! 2. Running the game will automatically create a folder called “MyMods” in your documents folder. The path should be “C:\Users\<USERNAME>\Documents\Robot Entertainment\OMD2\MyMods”
Creating Mods
To create mods, you must first install the Orcs Must Die 2 Workshop Tool. If you have not already installed the Workshop Tool, please follow the directions in the “Tool Setup” section above.
To create a new mod, navigate to your “MyMods” folder and create a new folder inside of it. Name this folder whatever you want your mod to be called. The folder name will be treated as the title of your mod. For example if you want to create a mod called “Tar Trap Stops Enemies”, the folder path would look like this:
“My Documents\Robot Entertainment\OMD2\MyMods\Tar Trap Stops Enemies”
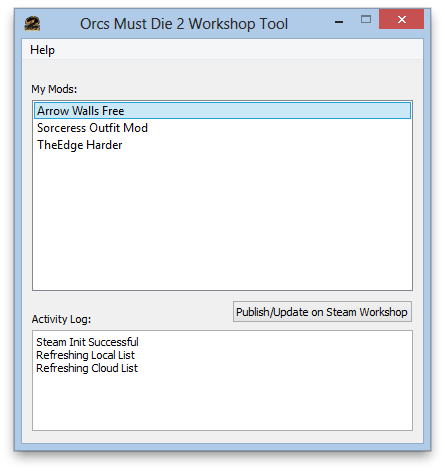
If you want to confirm that you’ve set the folder up correctly, you can relaunch the Orcs Must Die 2 Workshop Tool and your new mod should show up in the list of mods.
Preview file
“My Documents\Robot Entertainment\OMD2\MyMods\Wall Traps are Free\modpreview.jpg”
Mod folder
“My Documents\Robot Entertainment\OMD2\MyMods\Wall Traps are Free\mod\”
Note: The Workshop Tool matches the mod for updating based on the title of the mod matching on Steam Workshop. This means if you chose to change the title of the mod through the Steam Workshop interface, you’ll need to reflect that change in your mods folder by renaming the mod folder to match the new title before trying to update the mod. If the workshop title doesn’t match the MyMods folder name, the workshop tool will not know this is a mod update and will instead create an entirely new mod on Steam Workshop.
To create a new mod, navigate to your “MyMods” folder and create a new folder inside of it. Name this folder whatever you want your mod to be called. The folder name will be treated as the title of your mod. For example if you want to create a mod called “Tar Trap Stops Enemies”, the folder path would look like this:
“My Documents\Robot Entertainment\OMD2\MyMods\Tar Trap Stops Enemies”
If you want to confirm that you’ve set the folder up correctly, you can relaunch the Orcs Must Die 2 Workshop Tool and your new mod should show up in the list of mods.
Required Files and Folders
Mods require a “modpreview.jpg” file (640×360 pixels) which is the preview image used on steam workshop as well as a “mod” folder which will contain the actual mod files. Both of these items should be in the root directory of your mod. Using the Wall Traps are Free project as an example, the file paths look like this:Preview file
“My Documents\Robot Entertainment\OMD2\MyMods\Wall Traps are Free\modpreview.jpg”
Mod folder
“My Documents\Robot Entertainment\OMD2\MyMods\Wall Traps are Free\mod\”
Creating the actual mod
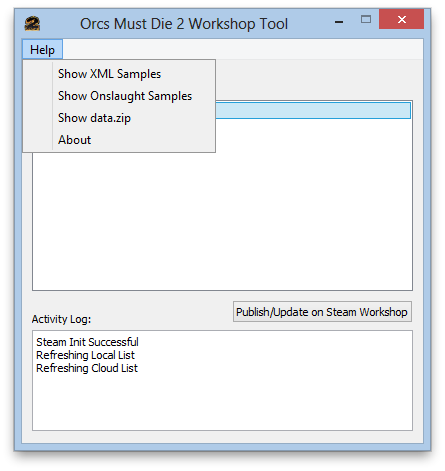
There are three general types of files that you can put in a mod. Each serves a different purpose.- Art Assets (.dds files) – Any .dds file that OMD 2 uses can be replaced with a custom version and you can also create entirely new .dds files under new names and reference them in a Weapon/Character mod.To replace an existing dds file from the main game bundle you place the new .dds file in the same relative path used in the game bundle. The game art bundle is zipped up in a file called “data.zip” which can be viewed from the Orcs Must Die 2 Workshop Tool help menu under “Show data.zip”.
The root of the zip is corollary to the root of a mod, so for example, inside data.zip there is a file: “art\avatar\Sorceress\sorceress_db.dds”To replace that file in your mod, you place a file in the identical relative location. Example path based on the Wall Traps are Free mod:“My Documents\Robot Entertainment\OMD2\MyMods\Wall Traps are Free\mod\ art\avatar\Sorceress\sorceress_db.dds”Note: Be careful not to modify the data.zip file while you are looking at it because the game verifies this file is unmodified at launch, and if you change it you will need to delete OMD 2 from steam and re-download it to get it back. - Weapon/Character mods (.xml files) – Weapon/Character mods are created by adding xml files to the game\ensembles folder of your mod. Example path based on the Wall Traps are Free mod:“My Documents\Robot Entertainment\OMD2\MyMods\Wall Traps are Free\mod\game\ensembles\”All xmls in that folder will be loaded when OMD 2 launches if the mod is enabled, and they will overwrite any matching XML tags that are found in the main game bundle. The best way to get a concept of how to modify these files is to look at the ones used in the game. These can be found from the Orcs Must Die 2 Workshop Tool help menu under “Show XML Samples”.
- Level wave mods (.onslaught and .timing files) – Level wave mods are created by adding .onslaught and/or .timing files to the game\onslaughts folder of your mod. Example path based on the Wall Traps are Free mod:“My Documents\Robot Entertainment\OMD2\MyMods\Wall Traps are Free\mod\game\onslaughts\”All onslaught and timing files in that folder will be loaded when OMD 2 launches if the mod is enabled, and they will overwrite onslaught/timing files under matching names in the main bundle. This is an important difference from XML files. These files are overwritten wholesale by name, while the Weapon/Character mods are overwritten on an XML tag by tag basis, not whole files. The best way to get a concept of how to modify these files is to look at the ones used in the game. These can be found from the Orcs Must Die 2 Workshop Tool help menu under “Show Onslaught Samples”.
Testing Your Mod
Any mod in the “My Documents\Robot Entertainment\OMD2\MyMods” folder will show up when you launch OMD 2, so once you’re ready to test simply start OMD 2, make sure the desired mod is active and launch using the “Launch with Mods” buttonUploading Your Mod to Workshop
Once your mod is ready to be uploaded, open the Orcs Must Die 2 Workshop Tool, select the mod, and click “Publish/Update on Steam Workshop”, then wait. It may take some time. The log will report once it’s finished, or if there was a failure of any kind.Publishing Your Mod
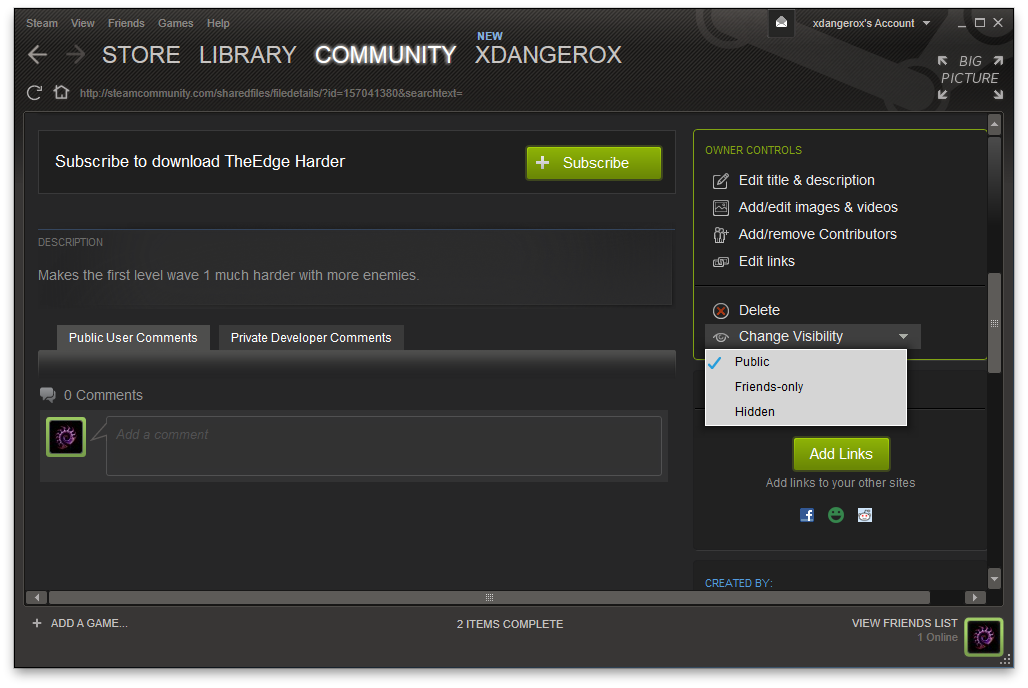
Uploaded workshop mods by default are only visible to you. This is so that you can first examine the mod yourself, add a description, and add additional screenshots. Once you’ve examined your mod in steam workshop and are ready to push it live, you can change the visibility to “public” from the visibility menu for the mod on Steam Workshop.Updating Your Published Mod
To update a mod on Steam, open the Orcs Must Die 2 Workshop Tool, select the mod, and click “Publish/Update on Steam Workshop”, then wait. It may take some time. The log will report once it’s finished, or if there was a failure of any kind.Note: The Workshop Tool matches the mod for updating based on the title of the mod matching on Steam Workshop. This means if you chose to change the title of the mod through the Steam Workshop interface, you’ll need to reflect that change in your mods folder by renaming the mod folder to match the new title before trying to update the mod. If the workshop title doesn’t match the MyMods folder name, the workshop tool will not know this is a mod update and will instead create an entirely new mod on Steam Workshop.
Source, Credits & Notes
>>>Source[web.archive.org]<<<
Credit
...goes obviously to Robot Entertainment, for this awesome Game and this Guide! (i have just Copied it!)Notes
Did you know that there is an Orcs Must Die! 3[robotentertainment.com] already Published? - sadly time exclusive to Google Stadia, but this has a reason - Google actually loves this game too, and without their support it won't even exist!(you can find and read the story online, just search "Orcs Must Die! 3 - Stadia Exclusive")
It might come to Steam at some point, so you could use the Trial (for wich you need a Credit Card 🙄) or wait and hope Robot Entertainment will release it somewhere else aswell! ¯\_(ツ)_/¯
If you have something to add, feel free to Contact me or just comment under this Guide :-)
gl:hf at Modding 🤗
More Orcs Must Die! 2 guides
- How to get Skulls!★ 5 (616)42k views361 ♥5 minUpdated Jan 24, 2013
- The Combo Bible★ 5 (327)27k views319 ♥24 minUpdated Dec 4, 2018
- The Order's Spellbook (Skull Farming, Traps, Weapons, Trinkets, Enemies)★ 5 (753)21k views646 ♥191 minUpdated Nov 3, 2024
- How to farm skulls in Orcs Must Die! 2, 15 skulls every 5 minutes! (Only need 2 traps!)★ 5 (236)18k views206 ♥1 minUpdated Jan 29, 2016
- [RUS] Выполнение достижений на русском★ 5 (529)12k views443 ♥4 minRussianUpdated Mar 15, 2018
- Pot of Gold (10x Combo)★ 4 (194)8.9k views90 ♥1 minUpdated Aug 31, 2015


This guide was created by its original author on the Steam Community. Are you the author and want it removed? Request removal.