Overview
A detailed (and personal) breakdown of what’s new and what’s not about the weapons you will come across in this Half-Life expansion by Gearbox Software. Covers (almost) everything you’ll need to know, from the basic stats to combat strategies and finally, how to nab those shiny-raddy goodies (AND, it’s in perfectly simple English :D).
Introduction
As far as any owners of Opposing Force knows, the game is split into 2 separate sections: Singleplayer and Multiplayer. Because some weapons featured in the Multiplayer maps does not appear anywhere (at all) during the singlepayer campaign, I will categorize them into the “Multiplayer” section in this list.
Because there are plenty of high-quality models found on the internet, I will replace most, if not all, original images with screenshots of my own gameplay with the improved weapons.
Table of Contents
==Singleplayer==
*This section includes any and all forms of obtainable weapons found in the singleplayer maps of Opposing Force*
-Melee Weapons-
+ [Pipe Wrench]
+ [Combat Knife]
+ [Barnacle Grapple]
-Sidearms-
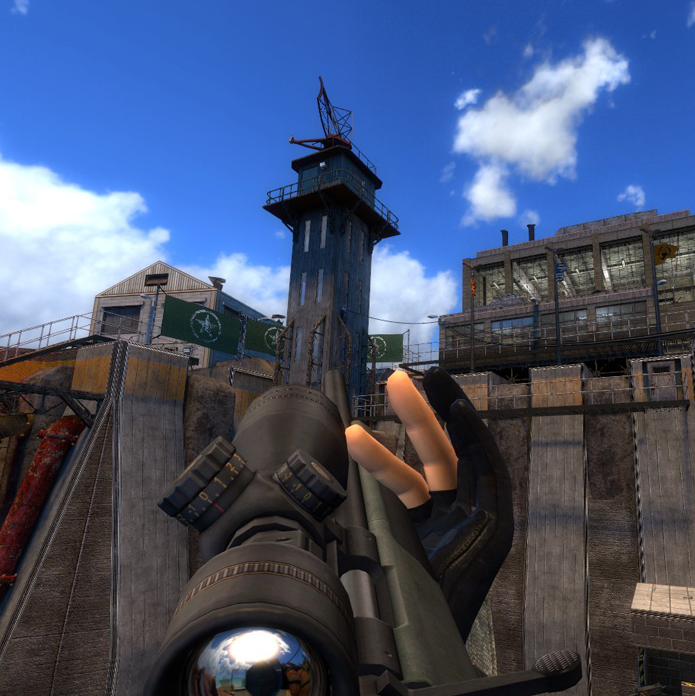
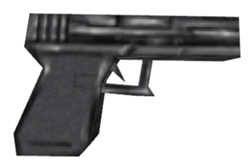
+ [Desert Eagle]
+ [9mm Beretta/Glock]
-Assault Equipments-
+ [H&K MP5A2/Colt M4A1]
+ [SPAS-12 Shotgun]
-Explosives-
+ [HECU Bazooka]
+ [Mk.2 Grenades]
+ [Laser Tripmines]
+ [Satchel Charges]
-Heavy Weapons-
+ [M249 Squad Automatic Weapon]
+ [M40A1 Sniper Rifle]
+ [XV11382 Displacer]
-Alien Weapons-
+ [Shock Roach]
+ [Snarks]
+ [Spore Launcher]
==Multiplayer==
In the single-player campaign, some of the weapons replace their Half-Life counterparts (Desert Eagle – Colt Python, M40A1 – Crossbow, Pipe wrench/Combat knife – Crowbar, Shock Roach – Hivehand). However, in the multiplayer game the player can carry both the new Opposing Force weapons and their Half-Life variants at the same time.
-Melee Weapons-
+ [Crowbar]
-Sidearms-
+ [Colt Python]
-Assault Equipments-
+ [Crossbow]
-Heavy Weapons-
+ [Tau Cannon]
+ [Gluon Gun]
-Alien Weapons-
+ [Hivehand]
Melee Weapons
From the humble Crowbar to the almighty Pipe Wrench, these solid baddies, while not being of much use at range, they can really make the difference between a live marine and a dead marine when it comes to close quarters.
[Pipe Wrench]
-Primary: cross-swing
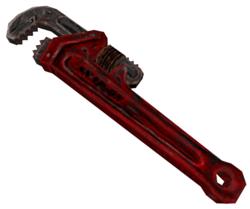
-Base DMG: 10 (primary) / 45 to 200+ (secondary)
-Range: Close
-Console name: pipewrench
This big boy is a HUGE (emphasize HUGE) step up from the lowly crowbar used by Gordon Freeman. One whack from this hunk of metal can seriously injure any creature foolish enough to try coming near, though caution must still be exercised since the primary swing might not be powerful enough to one-hit larger enemies and the secondary swing is too slow to be reliable.
Found in: Chapter 1: Welcome to Black Mesa, on the ground near the first fat security guard
[Combat Knife]
-Primary: slash
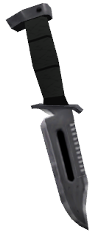
-Base DMG: 10 (primary) / Instant Kill (backstab)
-Range: Close
-Console name: knife (duh)
Being a standard issue does not mean being huge and overly OP, the Combat Knife serves as a last-ditch effort to shoo away enemies during a firefight, smacking headcrabs, or simply as a makeshift can-opener when crates are abundant (and you are bored, big time). However, the true power of the Combat Knife lies at its capability to backstab human enemies resulting in an insta-kill, provided you snuck up close enough behind your target.
Found in: Chapter 1: Welcome to Black Mesa, planted into a dead Vortigaunt near the Osprey crash site.
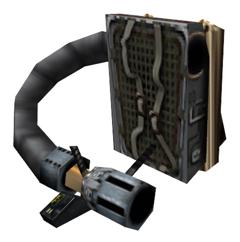
[Barnacle Grapple]
-Primary: tongue launch, if hooked onto an enemy then the Barnacle will bite them when retracted
-Secondary: extend tongue (when hooked on to Xen moss)
-Base DMG: + 25 per bite
-Range: Various
-Console name: grapple

Found in: Chapter 8: Vicarious Reality, in a display case.

-Primary: swing
-Secondary: N/A
-Base DMG: + 10 (primary)
-Range: Close
-Console name: crowbar
When it comes to whacking headhumpers, what else is more trusty than a red crowbar? This weapon is a cross between the Combat Knife’s high attack speed with the Wrench’s crate-bashing might. When used against players it is exceptionally useful.
*CANNOT BE FOUND IN SINGLEPLAYER*
Sidearms
Accurate, mildly powerful and are always by your side when the situation goes bad, sidearms are lifesavers (not bulletsavers).
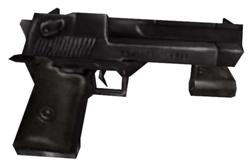
-Primary: repeated firing, mild accuracy
-Secondary: laser sight toggle, lowers fire rate but raises accuracy
-Base DMG: 35 per shot
-Clip size: 7/36
-Range: Various, preferrably mid-to-long range
-Console name: deserteagle
Whoohoo, now THAT’S a gun. Butt-kicking firepower coupled with pinpoint accuracy can make any enemy crumble at your feet. This is my personal favourite and ive never missed a single shot with this baby. Though optional, the laser sight should be toggled on at all times to maximize shot accuracy with the Eagle. It is a force to be reckoned with.
Found in: Chapter 1: Welcome to Black Mesa, near the dead security guard in the electrical fence.
*NOTE: The Eagle can be acquired MUCH sooner, from the first security guard found, but you will have to keep the doors from closing by jamming a chair between them, then run to the wrench, take it back to the guard, and whack him dead to nab the gun, easy peasy 😀
-Primary: repeated firing, mild accuracy
-Secondary: fires rapidly, significantly lowers accuracy
-Base DMG: 8 per shot
-Clip size: 17/250
-Range: Various, preferrably close-to-mid range
-Console name: 9mmhandgun
A loyal sidearm that serves as the Desert Eagle’s backup when plans go south, this 9mm grunt cant down most basic enemies with less than one magazine to the head.
Found in: Chapter 3: We Are Pulling Out, right outside the tram station.
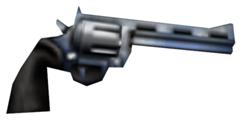
-Primary: repeated firing, high accuracy
-Secondary: N/A
-Base DMG: 40 per shot
-Clip size: 6/36
-Range: Various, preferrably mid-to-long range
-Console name: 357
A slower, more accurate version of the Desert Eagle with a standard 6-shot cylinder, the .357 Python is no chump, it can off a target at ranges only a sniper rifle can tackle.
*CANNOT BE FOUND IN SINGLEPLAYER*
Assault Equipments
Fully-automatic, buckshot banging, bolts shooting,…these rifles and shotguns are the standard issues of the US Marine’s finest divisions.
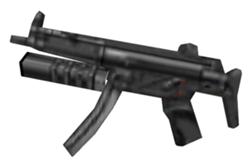
-Primary: Rapid firing, low accuracy
-Secondary: Launches contact-triggered 40mm grenades
-Base DMG: 5 per shot / 100 per grenade
-Clip size : 50/250 (primary) / 1/10 (secondary)
-Range: Various, preferrably close-to-mid range
-Console name: 9mmar
This US Army standard issue rifle/SMG packs a large amount of power within a 50-round magazine, any skilled user can raise hell with its automatic fire and complimentary grenades. Though simple, a respectable amount of skill is required to wield this weapon effectively, as its automatic spray is woefully inaccurate, and prolonged firing can leave a serious dent in the player’s ammo reserve. Moreover, the 40mm grenade has a rather large blast radius, so make sure there are no friendlies/explosives near the target.
Found in: Chapter 3: We Are Pulling Out, beside a dead marine
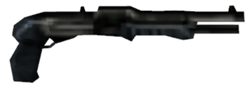
-Primary: Pump-action firing, high damage
-Secondary: Double-barrel blast, very high damage
-Base DMG: 30 (primary) / 60 (secondary)
-Clip size: 8/125
-Range: Close-to-mid range
-Console name: shotgun
The SPAS-12 makes (very) short work of anything that dares violates our personal zone, the primary fire can down zombies in one to two shots to the head, while the secondary fire can clear out whole rooms of Alien Grunts or Race X Shock Troopers. Be careful though, as the SPAS fires rather slowly and has a slight pause between shots, so take notice of anything outside of your crosshair when you pull that trigger.
Found in: Chapter 1: Welcome to Black Mesa, in the sewers next to a Vortigaunt and a dead marine.
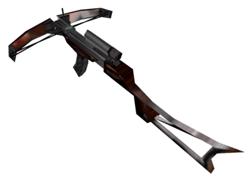
-Primary: Single-shot, high accuracy
-Secondary: Zoom
-Base DMG: 50 per bolt
-Clip size: 5/50
-Range: Long
-Console name: crossbow
The Black Mesa Crossbow is a long range sniper weapon featured in Half-Life and its expansions. It is very effective against distant targets, but is difficult to utilize in close quarters or against fast moving opponents due to its very slow reload time and the low velocity of the shot. The primary trigger fires a bolt; the secondary trigger utilizes the scope.
*CANNOT BE FOUND IN SINGLEPLAYER*
Explosives
“When in doubt, blow stuff up” – keep that in mind when you hold a bazooka in your hands, these big blowers have a knack of getting you in and out of places that are otherwise inaccessible. The explosives in the Half-Life universe serves a multitude of purposes, all of them involves blowing up tanks or taking out clusters of Black Ops digging in cover.

-Primary: Fires an unguided missile
-Secondary: Toggles laser-guidance on/off
-Base DMG: 100 per rocket
-Clip size: 1/5
-Range: Long
-Console name: rpg
This big baddie has enough firepower to takedown giants, just fire a focket at a tank and watch parts fly. If the direct rockets are too slow to handle, try switching on the laser for easier maneuverability around enemy flyers/covers. Gigantic creatures of Xen and X are no match for the devastating power of the RPG.
Found in: Chapter 4: Missing in Action, in a large crate in a room ful of Pit Drones.
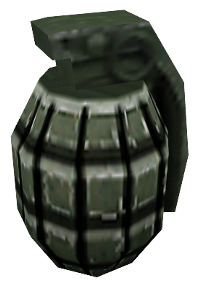
-Primary: Toss out a High-Explosive grenade
-Secondary: N/A
-Base DMG: 100 per explosion
-Clip size: 1/10
-Range: Mid
-Console name: handgrenade
The standard-issue Mk.2 “Pineapple” grenades are exceptionally useful when it comes to flushing enemies out of cover. It’s large blast radius coupled with the ability to toss out a hail of these fraggers ensures your enemies no chance of survival. However, a wrong toss into the wrong places can cause even bigger problems for yourself, so beware of explosive barrels in the immediate vincinity. Also don’t hold the grenades for too long, as they’ll explode as you release them.
Found in: Chapter 1: Welcome to Black Mesa, after the Barnacle-infested sewer area next to a box of 357 rounds.
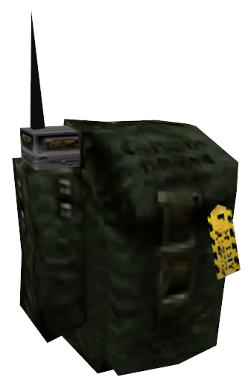
-Primary: Deploys an explosive charge/detonates already deployed charges
-Secondary: Deploys additional charges
-Base DMG: 100 per explosion
-Clip size: 1/5
-Range: Long
-Console name: satchel
Satchel Charges are basically very large grenades, or the equivalent of a C4 charge. As they are larger and heavier than hand grenades, they cannot be thrown as far: the result will however be a larger explosion whose radius can be at least 7m. Basic explosive rules applies to the Satchel as well, be cautious of surrounding explosives before setting any, as once the charges are set, they cannot be retrieved. One press of the detonator triggers all deployed charges, so careful placement of these can create a huge deathtrap for unsuspecting enemies.
Found in: Chapter 1: Welcome to Black Mesa, in the truck half-crushed by the garage gate.

-Primary: Plants a laser-triggered explosive
-Secondary: N/A
-Base DMG: 150 per explosion
-Clip size: 1/5
-Range: Mid
-Console name: tripmine
An area-denial weapon, I personally have a HUGE distaste for these weapons especially when I happen to trip the laser (I mean, doesn’t any first-timers?). Make a false retreat, then plant one of these boomers on the wall and wait for the fireworks to start. Any primitive enemies will make no attempts to dodge the laser. A side note is that you can actually jump ON these mines without blowing up (you will have to be ABOVE the mines).
Found in: Chapter 4: Missing in Action, in the same room as the first Bazooka, in a crate on a truck.
Heavy Weapons
When your sanctioned MP5 can’t quite cut it, it’s time to bring out “the big guns”.

-Primary: Rapid firing, high accuracy
-Secondary: N/A
-Base DMG: 15 per shot
-Clip size: 50/200
-Range: Various
-Console name: saw
If the Desert Eagle dominated in the sidearms section, then the SAW completely outperforms the entire assault category: high stopping power, large magazine size and manageable initial accuracy. However, this big champ is not without it’s weaknesses. Protracted firing can cause the recoil to run rampant and completely throw off your aim, therefore short (5-10) bursts are recommended. Also, the weapon’s heavy recoil will actually push you backwards while firing, so make extreme sure there are no mines, enemies, or pitfalls behind you.
If you are feeling extremely generous about your ammo spending, you can slow down falls by shooting downwards, that way you will land with your health intact (but not your ammo count).
Found in: Chapter 5: Friendly Fire, dropped by a M249-wielding ally if he falls.

-Primary: Precision firing with bolt-action
-Secondary: Zoom
-Base DMG: 100 per bullet
-Clip size: 5/15
-Range: Long-to-extreme range
-Console name: sniperrifle
The M40A1 is one of the most OP ballistic weaponry wielded by Shepard, as it can kill almost anything in one shot (provided its a headshot, otherwise it may take more). The rifle itself is stupendously accurate even without using the scope, so nailing a target at range becomes a whiff after the weapon is collected, pretty neat huh?
Found in: Chapter 10: Foxtrot Uniform, in the Marine’s hideout after clearing the Voltigore tunnel.
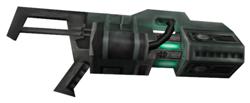
-Primary: shoots out a large, highly damaging sphere of energy
-Secondary: (map specific) teleports the player to pre-scripted rooms
-Base DMG: 250 per teleport
-Clip size: 100
-Range: Various, mid-to-long range is recommended
-Console name: displacer
One of the few “field-tested prototypes” of Black Mesa, this weapon completely redefines the concept of awesomeness. Doom fans will find much resemblance with their beloved BFG 9000 in this big dude, both insanely powerful, both acquired in space, both chomps up a MASSIVE amount of ammo per shot…
Remember to keep clear of friendlies and/or explosives around the target area when you fire.
Found in: Chapter 6: We Are Not Alone, on the ground of a floating island, after the scientist falls to his death.
-Primary: Shoots out a constant stream of devastating energy
-Secondary: N/A
-Base DMG: 14 per second
-Clip size: 100
-Range: Mid
-Console name: egon
Again a “field-tested protoype” of the nerds at Black Mesa, this cannon has caused chaos in the Xenian army by the hands Gordon Freeman, now get ready to blast your opponent to pieces while he tries to nab your team’s flag with the Gluon Gun
*CANNOT BE FOUND IN SINGLEPLAYER*

-Primary: Rapidly projecting beams of depleted Uranium-235
-Secondary: Charges the beam to greatly amplify its power
-Base DMG: 20 per shot / 25 to 200 per charge
-Clip size: 100
-Range: Various
-Console name: gauss
While a weapon in it’s own rights, the Black Mesa Tau Cannon can be used for much more “entertaining” purposes, such as sky-jumping and tank-blasting. The secondary charge burns up additional Uranium power to build up a much more powerful shot, but don’t forget to release the trigger or the gun will blow up and take you with it.
*CANNOT BE FOUND IN SINGLEPLAYER*
Alien Weapons
Not covered in any official military training, never before seen used by human subjects (aside from Gordon Freeman), these are the weapons that can really turn the tides to your favor. Why use the alien’s weapons against themselves? Why not?

-Primary: Shoots out a contact-triggered spore bomb
-Secondary: Shoots out a bouncing, 3-second delayed spore bomb
-Base DMG: 90 direct hit / 50 splash damage
-Clip size: 5/20
-Range: Mid-to-long range
-Console name: sporelauncher
The Spore Launcher, a.k.a baby Shock Trooper, and its habit of ingesting volatile Spore fruits can be used against a majority of enemies in-game, even adult Shock Troopers themselves (being killed by your own kids, sad). Though not as damaging as a frag grenade, these fruits can still tear off a huge chunk of health if you are caught in the explosion, so take care and stay away.
Found in: Chapter 8: Vicarious Reality, next to a broken stasis tank in the Biodome Complex.
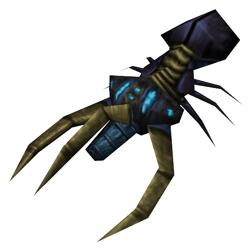
-Primary: Fires electric bolts
-Secondary: N/A
-Base DMG: 10 per shot
-Clip size: 10/infinite
-Range: Close-to-mid
-Console name: shockrifle
The Race X Shock Roach is a live, electrical bolt emitter used by Shock Troopers, but can also be “adopted” and used by Shepard himself. While not particularly powerful, the Roach has infinitely recharging energy, thus letting it have infinite ammo. The best way to use the Roach is, however, to shoot at enemy-infested water bodies, as this will instantly kill anything (player included) in one shot, followed by gibbing, so make sure you are on dry land before attempting this feat. Shock Roaches without a host can also attack like a headcrab until killed, bonded with a new host, or naturally dies.
As a side note: Do NOT use the Roach underwater, you will be “shocked” once you know why.
Found in: Chapter 7: Crush Depth, on the first Shock Trooper defeated.
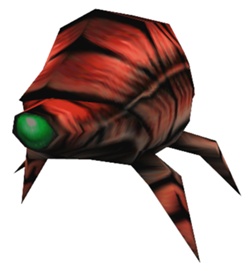
-Primary: release currently equipped Snark
-Secondary: N/A
-Base DMG: 5 per bite / 10 to 20 per explosion
-Clip size: 1/15
-Range, Close-to-mid range, preferrably from an elevated position
-Console name: squeak
Xenian Snarks, or what I’d like to call “squeaky little buggers” (haha, buggers, get it?) are often used as annoyances and distractions (in small numbers) or a relentless killing swarm (in packs of 10 or more). I myself have had lots of unpleasant encounters with these squeakers, enough to know the effectiveness they possess. Just pop some of these into a large crowd and enjoy the show (remember to bring popcorn :D).
Found in: Chapter 8: Vicarious Reality, in a sealed specimen holder of the Biodome Complex.
[Xenian Hivehand]

-Secondary: rapidly fires fast-moving hornets
-Base DMG: 8 per hornet
-Clip size: 8/infinite
-Range: Various
-Console name: hornetgun
The Xenian Hivehand, commonly found in the hands of the imposing Alien Grunts, not fully detached and operational to anyone who acquires it. Primary fire discharges 8 slow moving hornets that can chase targets around corners or home into them at close range. If you want to overwhelm your opponent with stings, use the secondary fire instead, rapid-firing projectiles dashes straight towards your aimed target and it is very hard to evade unharmed.
*CANNOT BE FOUND IN SINGLEPLAYER*
Wrapping up…
Even though Opposing Force was released 14 years ago, its still one of my most favorite games of all time. This is my first guide ever and is based largely on my own gameplay experiences, so mistakes and/or overlookings are unavoidable.
I hope this little weapon guide assisted you in any little way it can, I’m always open to comments and suggestions so feel free to drop me a note 😀