
Overview
Taken from /r/CODZombies and written by /u/The_Beebathttps://www.reddit.com/r/CODZombies/wiki/originsI do not own any of this
Zombies Chronicles
Zombies Chronicles
Origins is Remastered in Black Ops III’s ‘Zombies Chronicles’, bringing significant changes to the map.
Gameplay Changes
- PhD Flopper has been replaced by Widows Wine
- You can now hold 3 G-Strikes
- Double Pack-a-Punch has been added
- After the first Panzersoldat round, 2 can spawn in at a time in solo
- Jumping in the mud slows you down even more
- Thunder Fists no longer have elemental abilities depending on which Staff you upgraded them with
Gobblegum Machines
- In Spawn to the left of the Reward Box
- Generator 3
- Generator 4
- Generator 6
- Underneath the Church
- Next to Pack-A-Punch
- In the top floor of the Workshop
- Inside the Tank Station
General Map Guide
This is a Walkthrough of the general features of a map, such as the Map Layout, Power, Pack-a-Punch, etc. along with Origins-specific features.
Spawn holds a Generator and 2 pathways leading away from it, eeach of these pathways have a Generator, both pathways meet at the Workshop. From the Workshop you can enter No Man’s Land, which holds multiple Generators. In the center of Origins is the Excavation Site, on top of the Excavation Site is the Pack-a-Punch machine. Within the Excavation Site is the area where the Ancient Ancient Staffs are after completing their respective quests. Around the map are 4 Staff Tunnels that each lead to the Crazy Place.
Origins features 2 methods of transportation, one being the Tank and the other one being the Teleporters.
The Mark IV Tank can be purchased for 500 Points at the Church, and travels in a loop around majority of the map, stopping for a Cooldown at the Tank Station before returning to the Church.
While active, the Tank uses its 3 flamethrowers located on the sides and in front of the Tank so Zombies cannot enter the Tank from those directions. Beware of the flamethrowers as they will damage the player. Zombies will chase the Tank at high speed, eventually boarding the Tank.
There is a Teleporter located in each Elemental Staff Tunnel. While on the Overworld, only one Teleporter can be activated at a time. The Gramophone and each Staff Tunnel’s corresponding Record is required to use the Teleporter. However, you can still teleport to any Staff Tunnel while in the Crazy Place, even if that Teleporter is not active in the Overworld.
The Gramophone has a single spawn location:
Middle level of the Excavation Site, on the floor near a table
Power is generated by 6 different Generators scattered around the map. All Generators are powered after activation which costs 200 Points In Solo, 400 In 2 Player Co-Op, 600 In 3 Player Co-Op, and 800 in 4 Player Co-Op.
Upon initiating the conversion sequence for a Generator, Templar/Crusader Zombies will begin to spawn, the first 10 Templar Zombies killed that Round per player will reward 10 points. Templar Zombies will not award 10 points per non-lethal shot, unlike standard Zombies. Once the conversion sequence is complete, every player that is still standing on the Generator Pad is rewarded 100 points and the points for activating the Generator are returned to the player that paid for it.
You must stay on the Generator Pad to power the Generator or else it will begin to lose power. The more players there are on the Pad, the quicker the sequence will complete.
Below is a list of each Generator, relative to their in-game name (1 = Generator 1):
- Spawn on the top level near Quick Revive
- Out front of the Tank Station
- Between the Workshop and Fire Staff Tunnel
- Between the Wind Staff Tunnel and Juggernog
- Next to the Lightning Staff Tunnel
- Church 2nd floor near the Ice Staff Tunnel
The Pack-a-Punch Machine is located at the top of the Excavation Site, to activate it you must have every Generator on the map powered.
The Shovel is an equipable item used to dig the dirt and bone dig sites, which by doing so, can yield random results such as Weapons, Power-Ups, Zombies, or a live Grenade.
4 Shovels will spawn in the map, 1 for each player. However, there are 6 possible spawn locations:
- Spawn, next to the M14 Wallbuy
- Spawn, next to the door leading to Generator 3
- Wind Staff Tunnel, next to the building table
- Church, next to the building table
- Church, in front of the torch that has a number “3” beneath it
- Lighting Tubnel, next to a table
- Golden Shovel
The Golden Shovel is the upgraded variant of the Shovel, which gives you a higher chance of receiving a good item such as a Weapon or Power-Up.
To obtain the Golden Shovel, you must first obtain the Shovel then:
- Dig 30 dig sites, once complete you will get a confirmation ding and your Shovel will be Golden as indicated on your HUD.
Golden Helmet
The Golden Helmet provides protection against the Giant Robots, allowing you to be stepped on without dying.
- Obtain the Golden Shovel
- Continue to dig, eventually you will recieve the Golden Helmet as displayed on your HUD (and Character, in Zombies Chronicles).
Mystery Box
Box Locations:
- In the Laboratory, right where you spawn in at
- In the front corner of the bunker right next to Generator 2
- Right next to Generator 3
- Across from Juggernog, at Generator 4
- Across from the Wunderfizz Machine at Generator 5
- Nestled in the back at Generator 6
Brain
- In Spawn on a table
Body
- Ice Staff Tunnel
- Between Church and Generator 4
- Between Church and Generator 5
Rotor
- Excavation Next to AK74U Wallbuy
- Staircase near Mule Kick
- Oxygen Tanks in Excavation
Top Piece
- Next to a brown crate at Generator 3 (near the AK-74u wallbuy)
- Outside Spawn on the path to Generator 3 in the first room to the right
- In the Fire Staff Tunnel to the right of the portal
Middle Piece
- In each of Odin’s (Middle Robot) right-foot prints
Bottom Piece
- Roof of the Tank Station next to a pipe
- At the dead end near Generator 2
- Outside Spawn on the path to Generator 2 in the first room to the right
Staffs
Each Record has 3 spawn locations:
Staff / White Record
- Next to the Pack-a-Punch Machine
- When first entering No Man’s land from the spawn, below the sign that reads “Excavation Site”
- On the path to Church, on a pillar with boxes on top of it
Ice Staff Tunnel / Blue Record
- Tank Station, on a shelf to the right of the Mystery Box
- Tank Station, on a shelf to the right of the back exit
- Tank Station, on a shelf to the right of the front entrance
Fire Staff Tunnel / Red Record
- Church, between the Tank and the staircase
- Church, in a pile of burning pews on the 2nd floor
- Church, on top of some boxes near Generator 6 and the challenge chest
Wind Staff Tunnel / Yellow Record
- Generator 5, next to the Stamin Up machine
- Generator 5, on top of some boxes in front of the Lightning Staff Tunnel
- Generator 5, in the Lighting Staff Tunnel on the table near the entrance
Lightning Staff Tunnel / Purple Record
- Generator 4, next to the Wunderfizz machine
- Generator 4, on top of a wooden cart
- Generator 4, at the end of the Wind Staff Tunnel
Elemental Staffs
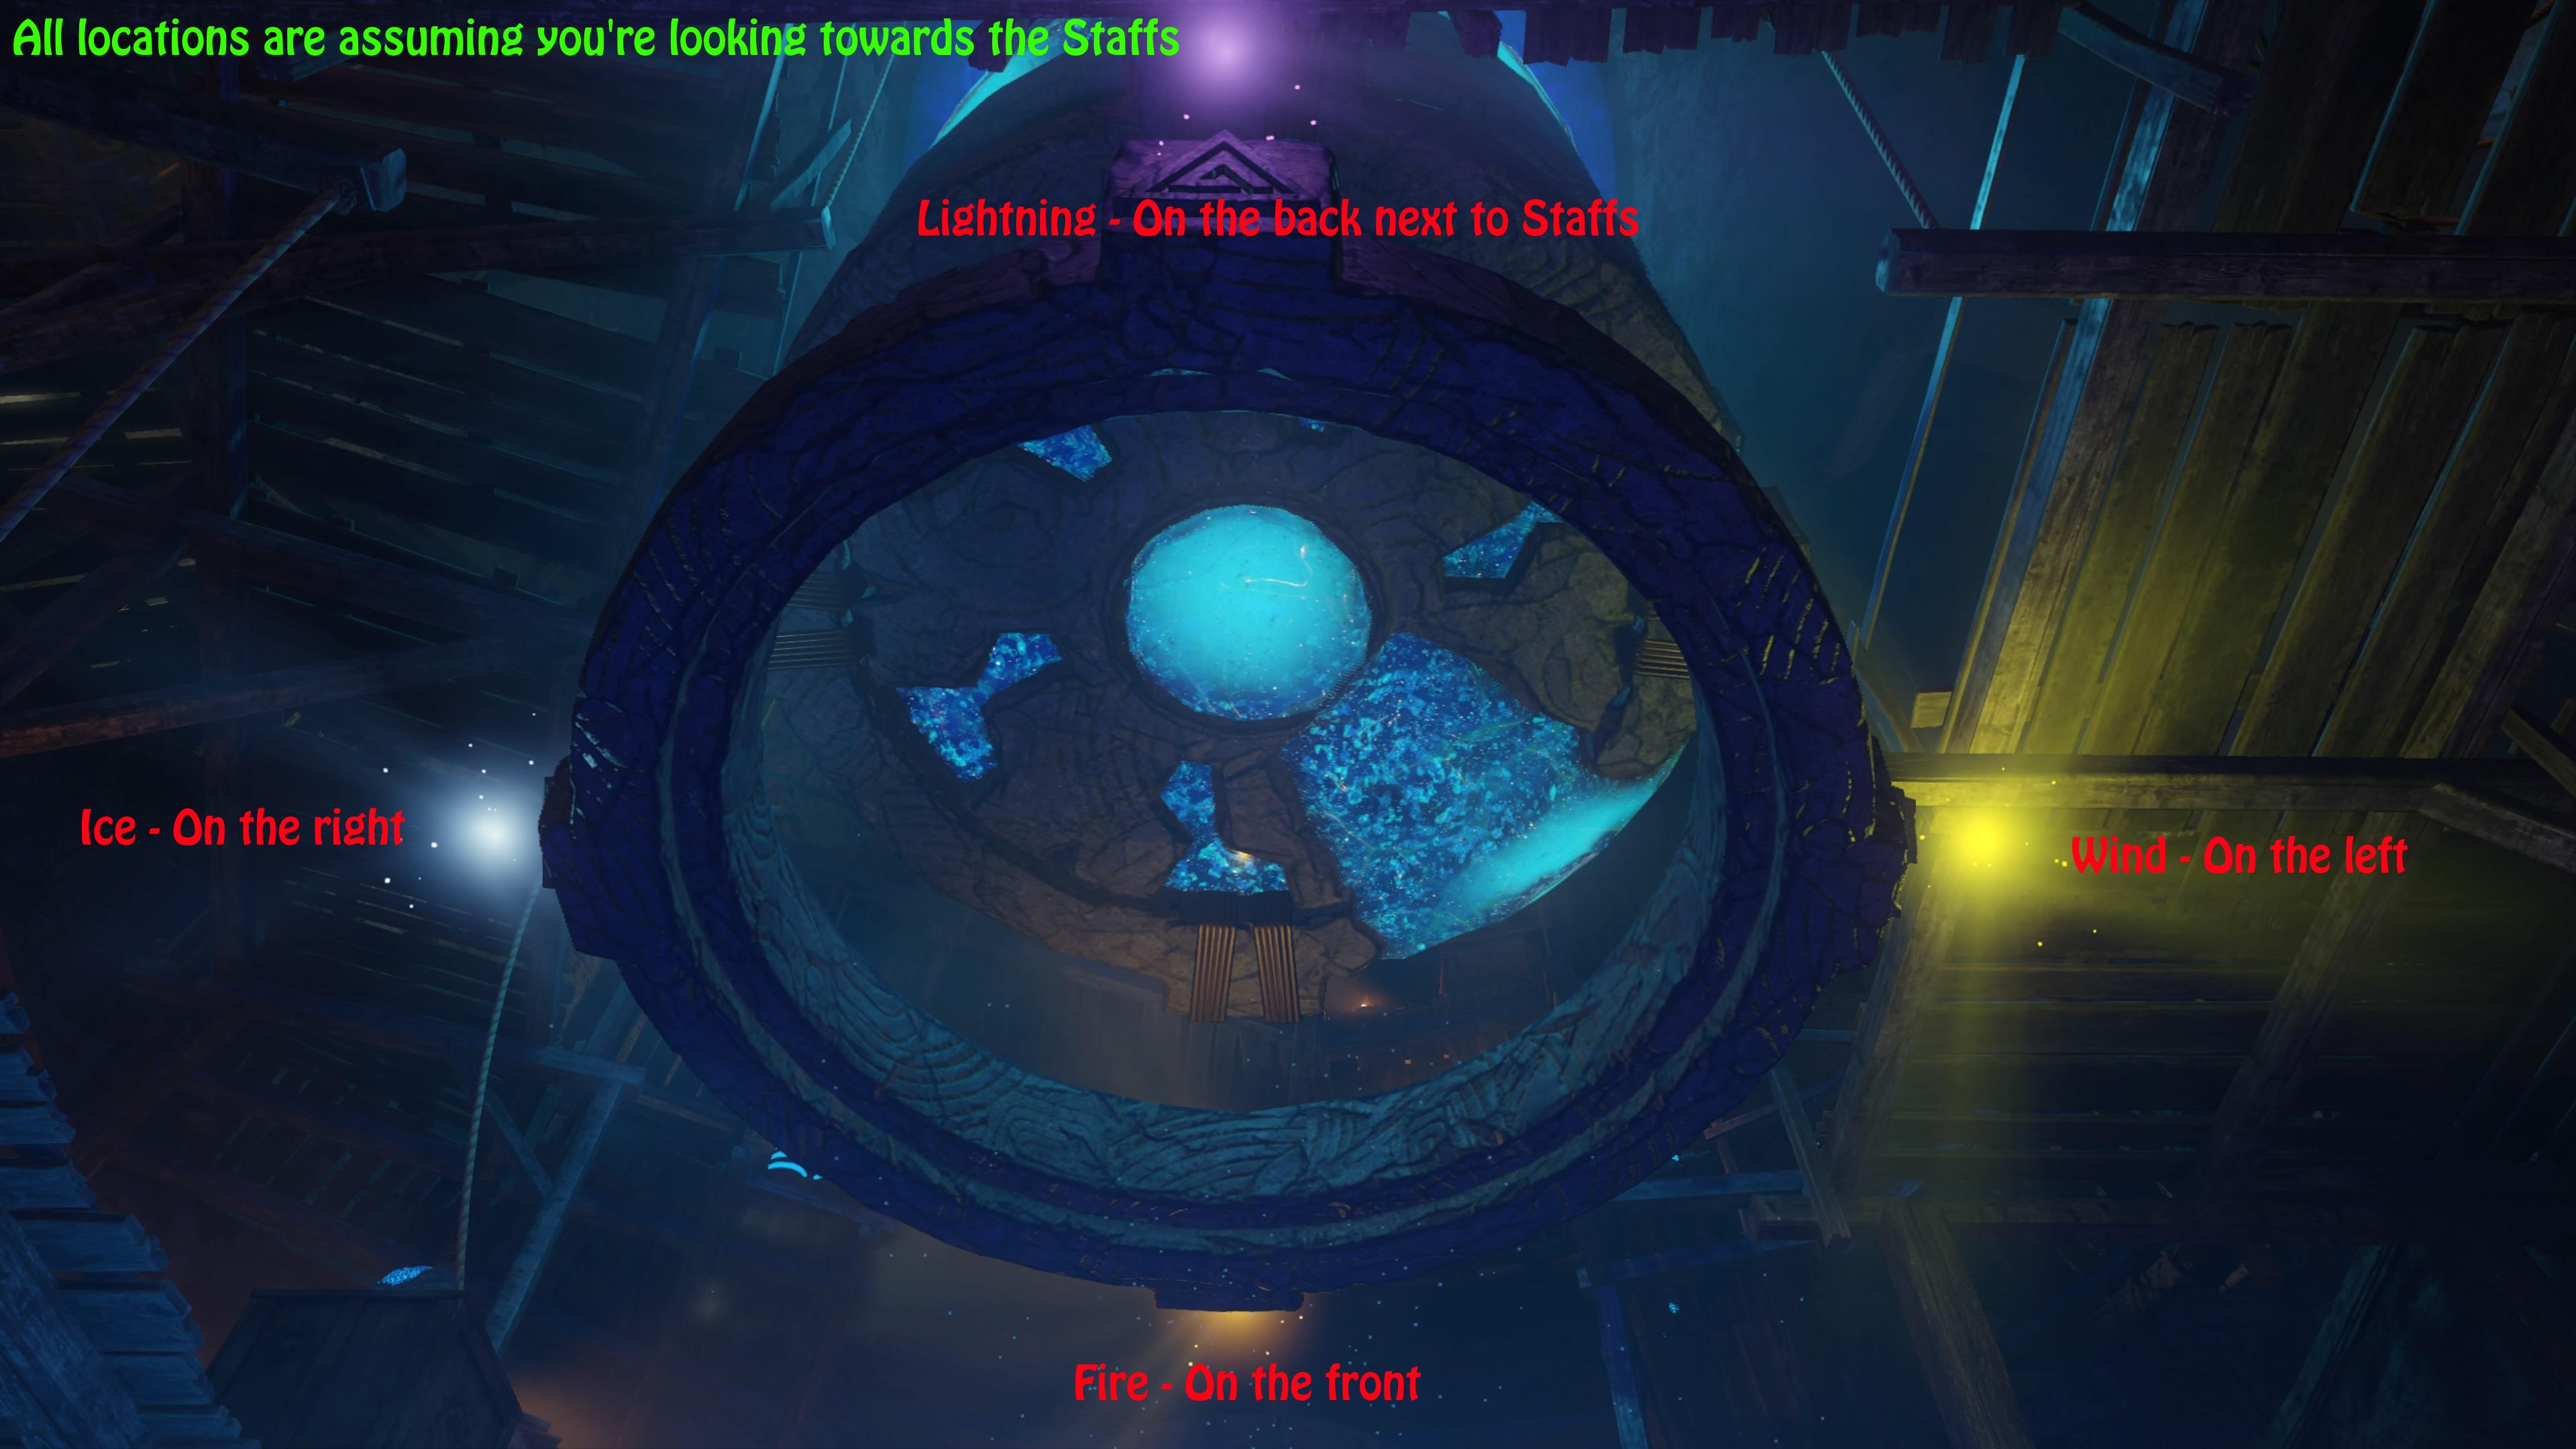
To obtain the Ancient Staffs you must first place the Gramophone at the table underneath Pack-a-Punch while having the White Record in order to open up the Excavation Site. Each Staff is built at the bottom of the Excavation Site, and Upgraded at the Crazy Place in its respective pedestal.
After Upgraded, each Staff earns the Right D-Pad Ability to Revive, called the Sekhmet’s Vigor.
Despite each Staff being obtainable with every Character, each Character has a favorite, as indicated by voicelines.
- The Staff of Fire is Takeo’s favorite Staff.
- The Staff of Wind is Dempsey’s favorite Staff.
- The Staff of Ice is Nikolai’s favorite Staff.
- The Staff of Lightning is Richtofen’s favorite Staff.
- Obtain the Fire Staff Tunnel / Red Record
•Church, between the Tank and the staircase
•Church, in a pile of burning pews on the 2nd floor
•Church, on top of some boxes near Generator 6 and the challenge chest - Obtain the Fire Crystal by navigating through the Fire Staff Tunnel to the Fire Staff Pillar in the Crazy Place
- Obtain the Head piece of the Fire Staff by activating Power and opening the Reward Chest at Generator 6
- Obtain the Staff piece of the Fire Staff by shooting down the flaming airplane in the sky with a ballistic weapon, the piece will fall at the Soul Chest near the Excavation Site
- Obtain the End piece of the Fire Staff by killing the first Panzer Soldat of the game
- Navigate to the bottom of the Excavation Site and build the Fire Staff at the Fire pedestal
Disc
- Near Generator 5 on the partially broken wall to the right of Stamin-Up
- On boxes near the entrance to Lightning Staff Tunnel
- In the Lightning Staff Tunnel on the table at the entrance
Staff Pieces
- Inside the Thor Robot, accessed by shooting open the foot of the robot and getting it to step on you
- Inside the Odin Robot, accessed by shooting open the foot of the robot and getting it to step on you
- Inside the Freya Robot, accessed by shooting open the foot of the robot and getting it to step on you
Crystal
- Inside The Crazy Place (Must go through the Wind Portal near Generator 4)
After obtaining all the pieces go down to the Excavation Site and build the Wind Staff at the Wind pedestal.
Disc
- In the Tank Station at the desk you see once you enter the room
- In the Tank Station on a shelf next to the Mystery Box location
- In the Tank Station on a shelf near the back entrance
Staff Pieces
- In order to find the pieces, you must wait until it’s snowing on the map. Once it’s snowing, you will be able to find the pieces randomly across the map by using a Shovel to dig up dig sites.
Crystal
- Inside the Crazy Place (must take Ice Portal behind the Church)
After obtaining all the pieces go down to the Excavation Site and build the Ice Staff at the Ice pedestal.
Disc
- Generator 4, next to the Wunderfizz machine
- Generator 4, on top of a wooden cart
- Generator 4, at the end of the Wind Staff Tunnel
Staff Pieces
- You must ride the Tank around the map, the pieces will be on paths that you must jump to from the Tank. Here are the following locations:
- Jump off Tank after Generator 4 and near Generator 3 onto a platform and get piece in footprint.
- Jump off at Generator 5 to the left and get inside excavation
- Jump off before Church Tank Station and get inside Church
Crystal
- Inside the Crazy Place (Must take Lightning Portal next to Generator 5)
After obtaining all the pieces go down to the Excavation Site and build the Lightning Staff at the Lightning pedestal.
Upgrading Staffs
Upgrading the Staff
- Go to The Crazy Place, once arriving, head to the Fire Place, and kill approximately 30 Zombies just while you are on the metal chain pad, in front of the Fire portal. Once this step is complete, your screen will vibrate and Samantha will congratulate you for solving the puzzle, and now you have to head over to the Church.
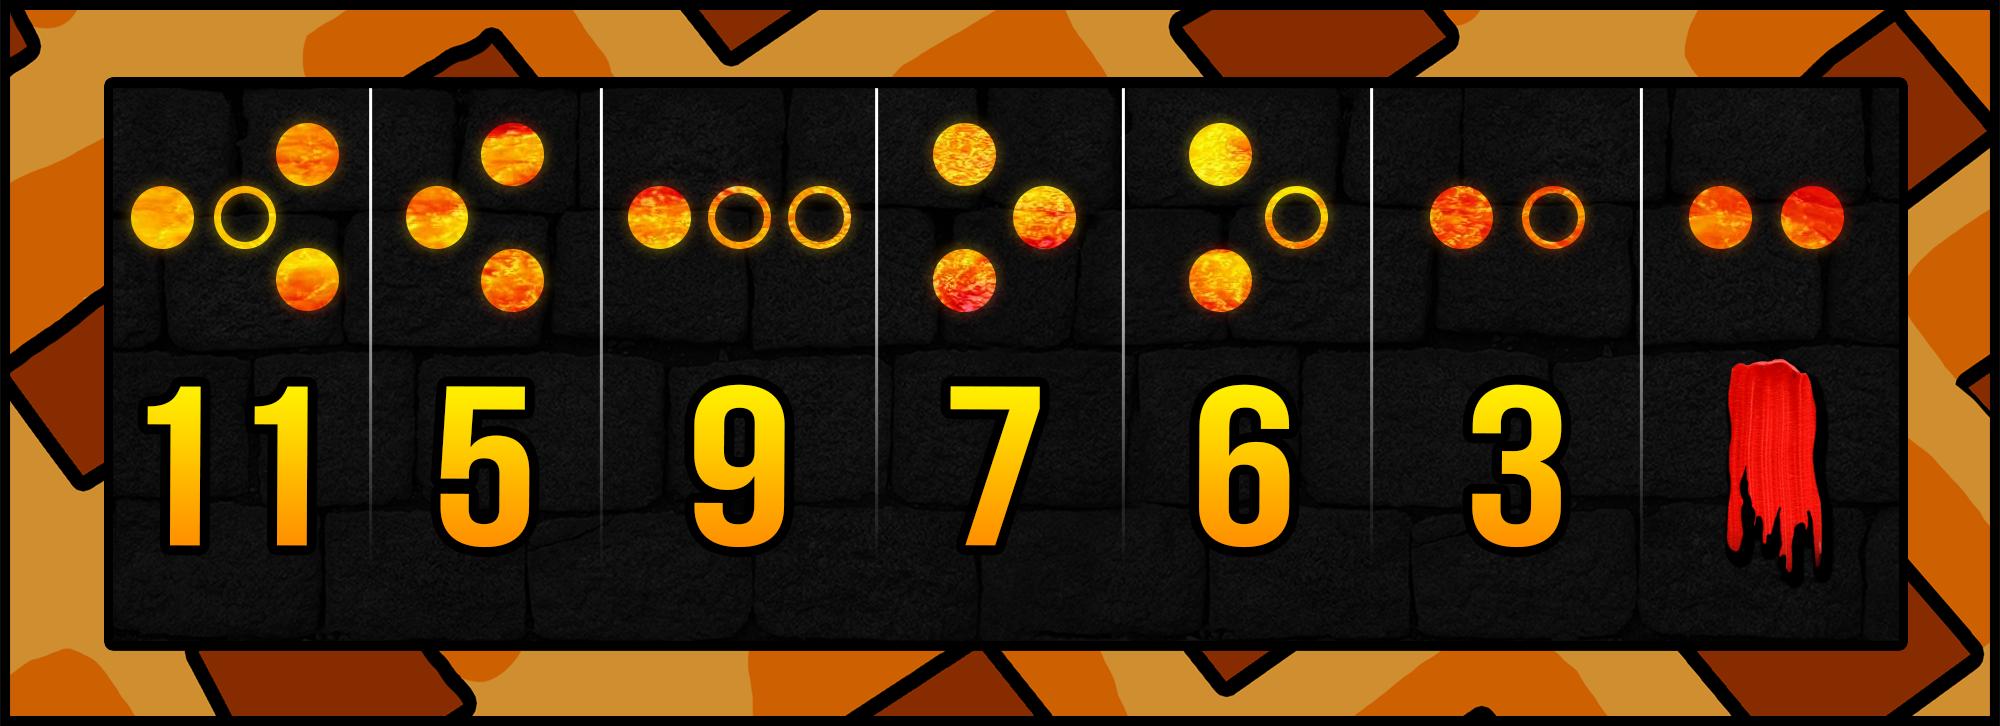
- Inside the Church you will find glowing dots and circles on the walls. These dots correspond to numbers. Use this[1] chart to figure out what numbers you have. Once you know your numbers head beneath the Church and shoot the torches with the numbers you have below them from left to right.
- Once the previous step has been completed head down to the Excavation Site and flip the switches around the place so that all the lights on the middle rings are red. Once all the lights are red shoot the ball below it with the Fire Staff.
- Once the previous step has been completed head down to the Crazy Place, place your Staff of Fire down at the pedestal and get 20 Zombie kills around it. Once completed you may pick up your upgraded Staff.
[1]
Upgrading the Staff
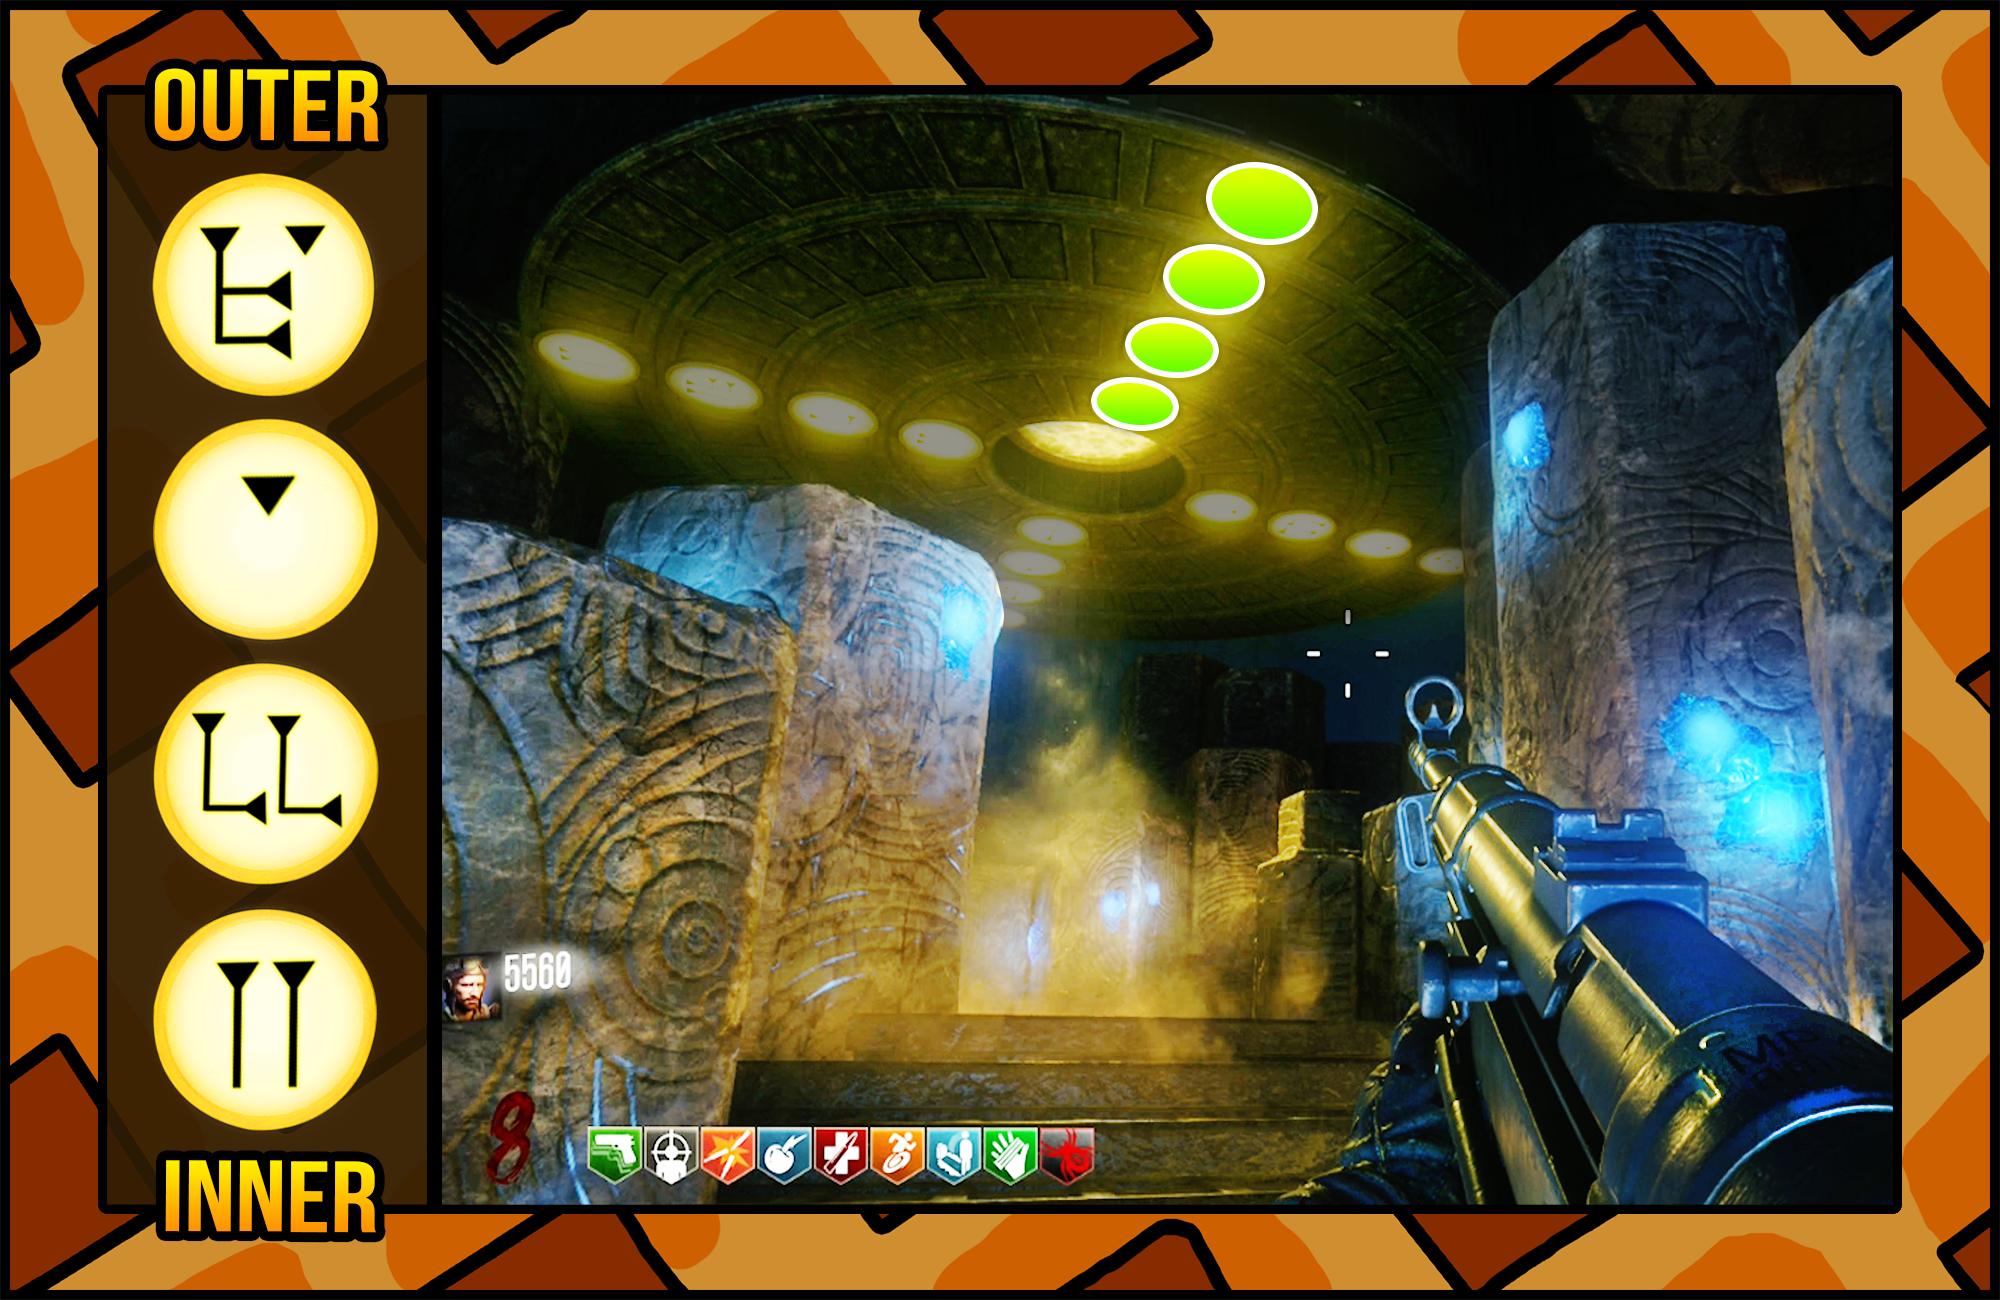
- Go down to the Crazy Place and shoot the symbols above the Wind Portal to match this[1].
- Go to Juggernog and shoot the smoking ball with the Wind Staff so that the smoke is blowing towards the dig site
- Do the previous step at the smoking ball near the Tank’s returning path on a mud trail and at the smoking ball near Generator 5
- Once the previous step has been completed head down to the Excavation Site and flip the switches around the place so that all the lights on the middle rings are yellow. Once all the lights are yellow shoot the ball below it with the Wind Staff.
- Once the previous step has been completed head down to the Crazy Place, place your Staff of Wind down at the pedestal and get 20 Zombie kills around it. Once completed you may pick up your upgraded Staff.
[1]
Upgrading the Staff
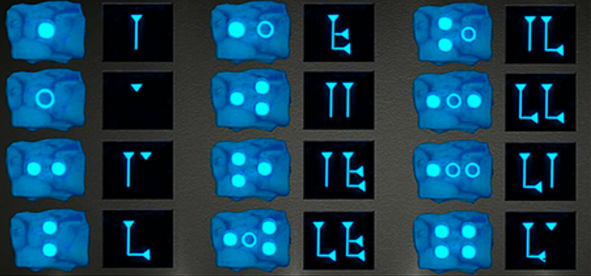
- Go to the Crazy Place, at the Ice Portal you will see Ice blocks floating in the air with lines on them. You must shoot the lines that correspond to the dots on the tablet to the back-right. Here is a chart of what lines match with the dots [1]
- You must shoot 3 Tombstones in the map with the Ice Staff and then destroy them by shooting them with a gun that uses bullets. The Tombstone locations are as follows:
• Back-Right corner of the Giant footprint near Generator 4
• Back-Left behind the Tank Station on the mud path
• Front-Middle of the Excavation Site mound near the Footprint - Once the previous step has been completed head down to the Excavation Site and flip the switches around the place so that all the lights on the middle rings are blue. Once all the lights are blue shoot the ball below it with the Ice Staff.
- Once the previous step has been completed head down to the Crazy Place, place your Staff of Ice down at the pedestal and get 20 Zombie kills around it. Once completed you may pick up your upgraded Staff.
[1]
Upgrading the Staff
- Go to the Crazy Place, at the Lightning portal you will see symbols representing a piano. You must shoot these symbols[1] in these specific orders.
• 1, 3, 6
• 3, 5, 7
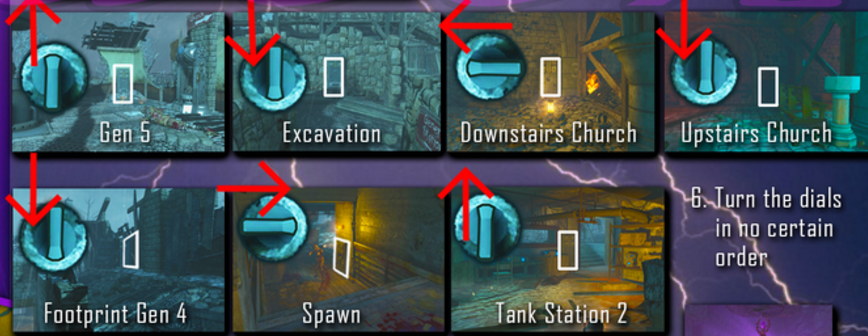
• 2, 4, 6 - You must turn the dials on electricity panels around the map until they do not spark anymore. The dials can be turned in any order. Use this chart[2] to see what direction to turn the dials to.
- Once the previous step has been completed head down to the Excavation Site and flip the switches around the place so that all the lights on the middle rings are purple. Once all the lights are purple shoot the ball below it with the Lightning Staff.
- Once the previous step has been completed head down to the Crazy Place, place your Staff of Lightning down at the pedestal and get 20 Zombie kills around it. Once completed you may pick up your upgraded Staff.
[1]
[2]

Mini Easter Eggs & Songs
Build all the Elemental Staffs
Inside the Excavation site above where you build the staffs there is a ring of rock. You must shoot the 4 squares on each side of the circle with a different staff. Use this picture[1] to see which side to shoot with which staff.
Go to the Crazy Place, on the inner blue 115 circle there will be a Samantha Doll, interact with it.
Samantha Dolls will spawn in the middle of the blue circle, shoot them all with a bullet based weapon.
A Samantha Doll will fly up into Agartha, do not shoot it as it needs to fly up into Agartha. As soon as it’s gone a Max Ammo will spawn and the song “Remember Forever” will play. Listen to it here
[1]
- Build and Obtain the Maxis Drone.
- Collect 4 Yellow Disks located around the map by deploying the Maxis Drone and aiming at each location
- On the Roof of the entrance into the Church
- Scaffolding on the Excavation Site
- On the roof at Generator 5
- Out of Spawn toward Generator 2, to the right in some flaming debris
- Once complete simply head to the Pack-a-Punch Machine on the Excavation Site, a Magna Collider will be in front of the Pack-a-Punch Machine, available to be equiped once for free.
Origins features a Jumpscare Easter Egg, the Jumpscare image can be seen here
[i.imgur.com].
- Obtain a scoped Sniper Rifle
- Navigate to the top of the Excavation Site
- Scope in on the Fire on top of the Church Tower and wait, if done correctly a scream audio que will play alongside the jumpscare image within your scope
Activate 3 green Element 115 rocks located around the map.
-
[i.imgur.com]
-
[i.imgur.com]
-
[i.imgur.com]
If done correctly, ‘Archangel‘ by Elena Siegman, Malukah, and Clark S. Nova will begin to play.
- Activate 3 red radios located around the map.
- On the scaffolding within the Excavation Site, above the possible Maxis Drone part location
- In the Giant Robot ‘Freya’, opposite of the the audio log
- On the left edge of the Fire area in the Crazy Place
If done correctly, ‘Shepard of Fire‘ by Avenged Sevenfold will begin to play.
Activate 3 Generator floor panels while prone in specific order around the map.
- “1” Panel at Generator 1
- 2nd “1” Panel at Generator 1
- “5” Panel at Generator 5
If done correctly, ‘Aether‘ will begin to play.
Main Easter Egg
In order to complete the Main Easter Egg you must first turn on the power by activating all 6 Generators around the map.
1. Turn on Power by activating all 6 Generators.
2. Upgrade all 4 of the Ancient Ancient Staffs.
3. Fill the 4 Soul Collection Boxes with 20 Souls each
Locations:
- Below Excavation Site
- Generator 5
- Generator 4
- Outside Church
4. Obtain the Thunder Fists from the Reward Box.
5. Navigate to Generator 2 inside the Bunker, pick up 1 of the 3 Tablets. Navigate to the Church, place the Tablet in the bath. Earn 20 Melee Kills while standing near the Bath to clense the Tablet.
6. Pick up the Tablet and Navigate back to Generator 2 inside the Bunker without touching any Mud on your way there, place the Tablet back on the table. Earn 20 Melee Kills while standing near the Tablets, once complete you will be rewarded with the G-Strike.
7. Build and Obtain the Maxis Drone.
8. Place each of the 4 Ancient Ancient Staffs into their corresponding Pedestals:
- Fire Staff: Excavation
- Ice Staff: Church Robot
- Wind Staff: Middle Robot
- Lightning Staff: Spawn Robot
9. Navigate into a Robot, activate the red Button, quickly get out of the Robot and G-Strike the hole in the ground near Generator 5, once the ground opens up deploy the Maxis Drone. If done correctly, 10 Panzer Soldat’s will spawn. Kill all 10 Panzer Soldat’s.
10. Obtain the Zombie Blood Powerup, look into the sky above Excavation Site for a glowing-yellow airplane, shoot it. If done correctly a Zombie Pilot will be ejected from the plane and land somewhere on the map, you must find and kill this Zombie before your Zombie Blood ends. If done correctly the Zombie will drop the Maxis Drone, pick it up to Obtain the Upgraded Maxis Drone.
11. Navigate to the bottom of the Excavation Site, Melee Kill 20 Zombies that have the white smoke with your Thunder Fists. If done correctly a Tablet will be dropped, pick it up to obtain the Upgraded Thunder Fists.
12. Navigate to Agartha and place all for Ancient Ancient Staffs into their pedestals, now obtain 100 kills in Agartha. If done correctly a Portal will open up on the ceiling, deploy the Upgraded Maxis Drone into the Portal. If done correctly this will begin the Outro Cutscene, you have completed the Main Easter Egg.
Credits
All of this is written by redditor /u/The_Beebat, I simply copy and pasted and formatted for this steam guide.
Huge shoutout to /u/The_Beebat for this amazing guide.