![[OUTDATED - MAY NOT WORK] Dying Light: Unlimited Weapon Durability and Other Modifications. for Dying Light](https://steamsolo.com/wp-content/uploads/2021/07/outdated-may-not-work-dying-light-unlimited-weapon-durability-and-other-modifications-dying-light.jpg)
Overview
Give your weapons unlimited durability, increase your maxiumum health, and change general weapon statistics.
What You’ll Need:
To use this guide effectively, you’ll need the following applications:
Dying Light Manager 0.10a
[link]
-Please download the latest file, as previous release does not work effectively as of the current Dying Light patch.
WinRAR or another archiver that can extract “.pak” files
[link]
-Click the 64bit GUI download if you’re using Windows 64bit, or 32bit GUI if you’re using Windows 32bit.
A legitimate Steam version of Dying Light
-You most likely have this already.
EDIT: AS OF THE LATEST DYING LIGHT PATCH, THE DYING LIGHT MANAGER IS NO LONGER REQUIRED. IF YOU ARE USING AN OLDER VERSION OF DYING LIGHT (Lower than V4) THEN YOU WILL STILL NEED TO USE THE MOD MANAGER.
Modifying Game Files
Now that you have the applications from above, navigate to:
“C:/Program Files (x86)/Steam/steamapps/common/Dying Light/DW“

You will then see a range of “.pak” files in this folder.

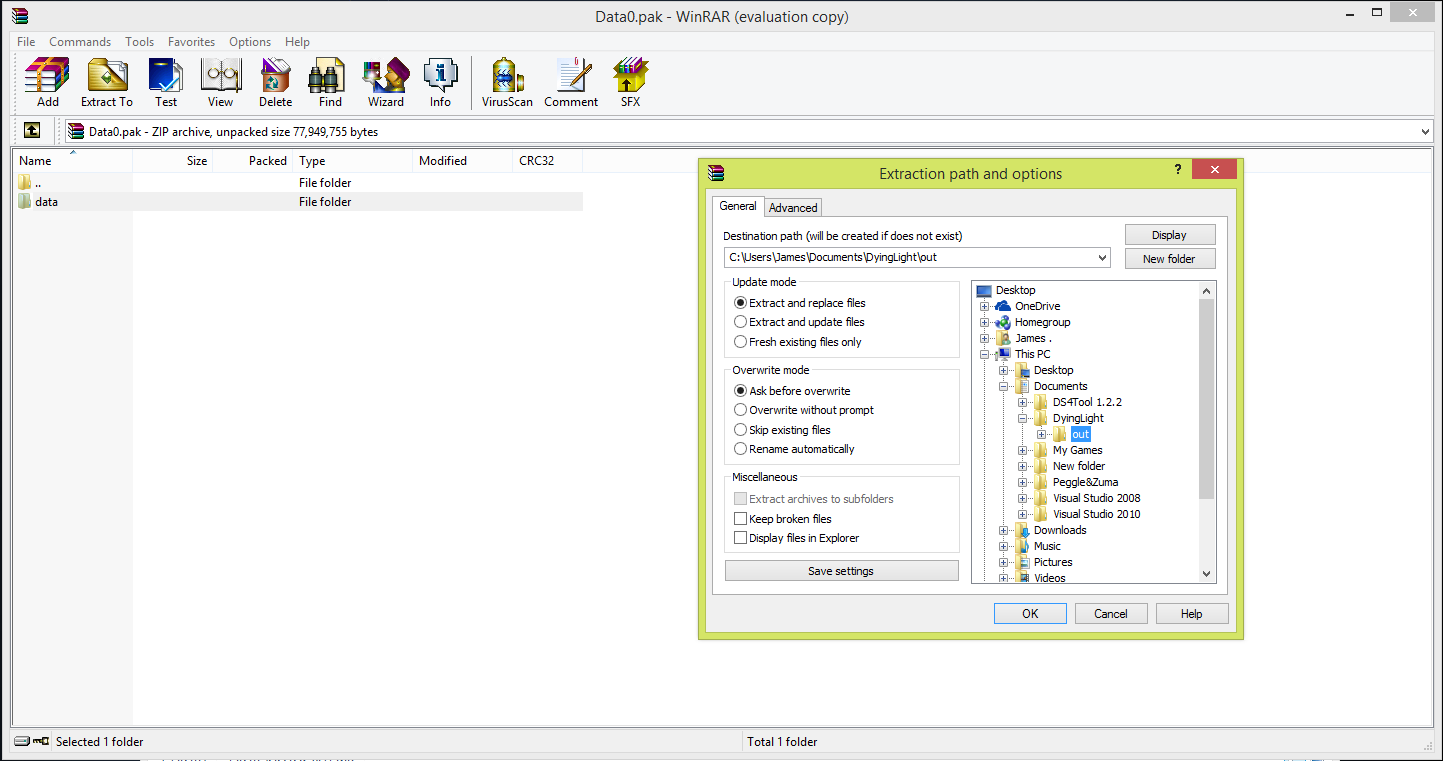
Double-Click on “Data0.pak” and click “Extract To”, you then need to select “Documents/DyingLight/out“. The click “OK” to extract it to that location.
Now go to the location we have just created:
“Documents/DyingLight/out/data“, and then navigate to the skills folder.
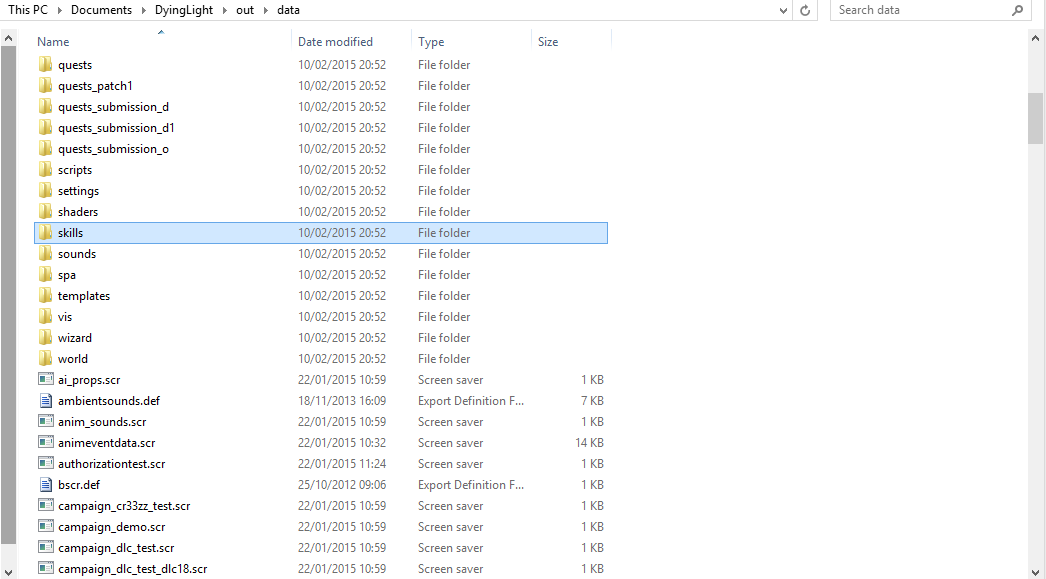
Once you’re inside the skills folder, you need to click on “default_levels.xml” and open it with Notepad.
Unlimited Durability and Weapon Modifications:
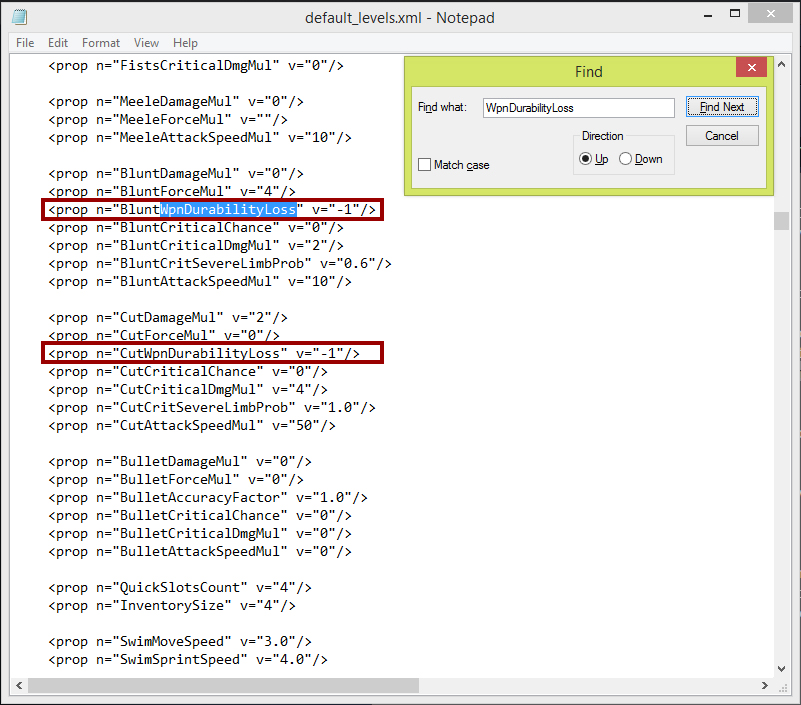
Press Ctrl+F to bring up the “Find” window, and search for “WpnDurabilityLoss”. This should highlight “BluntWpnDurabilityLoss”. You need to change it’s value from “1”, to “-1”. Press “Find Next” on the “Find” window and it should highlight “CutWpnDurabilityLoss”, where you’ll also need to change this value to “-1”.
As for weapon modifications, I will show you how to make sure a sharp weapon (i.e. a knife or an axe etc.) will cut a limb off of every zombie you use it on. Please note that if you’re using a weapon with relatively low damage, you’ll most likely only remove one limb until you land a fatal attack.
So, to make sure a limb is cut off with each strike – you will need to find the line “CutCritSevereLimbProb”, and set it’s value to “1.0” – meaning 100% of the time a limb will be slaughtered.

Now for damage and force multipliers:
A damage modifier basically increases the damage you will do per strike, while a force multiplier increases the force you can put behind each strike. By increasing the damage modifier your attacks will be more deadly, and by increasing the force multiplier your attacks will launch enemies further away.
Use the “Find” window to search for “DamageMul”, which should bring up “BluntDamageMul”, “CutDamageMul”, and “BulletDamageMul”. Change the value on these to whatever you want, providing it’s higher than its current value.

Use the “Find” window again to search for “BluntForceMul”. This should bring up “BluntForceMul”, “CutForceMul”, and “BulletForceMul”. In my tutorial I’m only applying this to the blunt objects, as it doesn’t look as good with a sharp object – however if you want to do this with a sharp object, search for “CutForceMul”.
Change the value of “BluntForceMul” to whatever you like, providing it’s higher than its current value. I’ve set it to “4” to give each zombie some lift; however “10” will launch a zombie a fair amount of distance.

Modifying Health Values
To modify health values, use “Find” to seach for “MaxHealth”. This should bring you to a section about health, starting with “<prop n=”MaxHealth” v=”XXXX”/>”.
Please Note: I have put “XXXX” where the value for “MaxHealth” should be.
To increase your max health, decrease the time it takes to regenerate health, and increase the amount of health you regenerate – use the values I have put in the lines below.
Quick Note: Don’t copy and paste this whole bit into the “default_levels.xml”, just copy over the values – i.e. only copy “250”, “250”, “25”, “500”, “1.0”, “1.0”, “2.0” and “0”. This is purely because I removed some of the spaces left in the XML formatting, so that it would look presentable on here.
<prop n=”MaxHealth” v=”250″/>
<prop n=”BaseMaxHealth” v=”250″/>
<prop n=”HealthCriticalLevel” v=”25″/>
<prop n=”HealthRegenerationMaxLevel” v=”500″/>
<prop n=”LowHealthEffectThreshold” v=”1.0″/>
<prop n=”HealthRegenerationDelay” v=”1.0″/>
<prop n=”HealthRegenerationTimeToMax” v=”2.0″/>
<prop n=”HealthPerSecond” v=”0″/>
Your health options should now look like this:

Now save the document and exit.
Now, run the Dying Light Manager. make sure you click “Enable Mods” at the bottom right or else these file modifications won’t work.
You can then click the button to run Dying Light FROM INSIDE THIS LAUNCHER.
Proof, via Screenshots.
Here’s some proof of the modifications working in action through screenshots.
Notice how high the health is, that the weapon durability hasn’t decreased and neither has the amount of repairs – proving that the modifications work and that I am not just re-repairing the weapon over and over again.


Thanks
Extra thanks to “VisMxOwnZ aka LeavesOwnZ” on Nexus Mods for creating the Dying Light Manager tool.