Overview
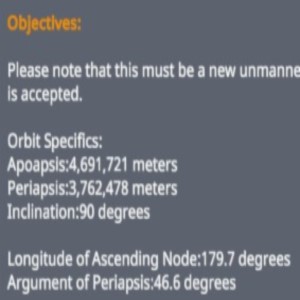
This guide is a walkthrough of how to do the “Position a Satellite in a Desired Orbit” contract for both Kerbin and other celestial bodies.
Quick Version
Rocket for this (only one Kickback needed)
This taught me how to do this contract.
The rest of this guide is a walkthrough of this and the version for other celestial bodies.
Stuff You Need to Know
This guide will assume you know the basics of KSP, as the contract itself semi-advanced, and won’t be offered if you haven’t accomplished some basic stuff, like getting to the moon.
Nonetheless, you may not know all of the terms and stuff used in this guide so here they are:
Skills:
- Building rockets (in-game tutorial available)
- Getting to orbit (in-game tutorial available)
- Using Maneuver Nodes (in-game tutorial available)
If you plan on doing this for celestial bodies other than Kerbin:
- Getting to the Mun (in-game tutorial available) (if applicable)
- Interplanetary Travel (if applicable)
Terms:
- ∆v – (DeltaV) Change in velocity. The maximum amount your craft can change its velocity. Eg. A probe core, FL-400 fuel tank, and a Terrier 909 engine has ~4000m/s of ∆v. Useful for knowing how far/where your rocket can go. (eg. you need ~3400m/s of ∆v to get to Low Kerbin Orbit and another ~930m/s of ∆v to get a Mun flyby).
- Orbital Plane – your orbit is an ellipse. An ellipse is a 2 dimensional shape that exists on a plane in 3 dimensional space. That plane is your “orbital plane.”
- Apoapsis (AP) and Periapsis (PE) The tips of the ellipse, if you will. The points where you are furthest and closest to the body you are orbiting, respectively.
- Ascending Node (AN) and Descenting Node (DN) The intersection of your orbit and the orbital plane of your target orbit.
- Burn/Maneuver Node Directions
- Yellow/Green – Prograde & Retrograde
Forward and backward, relative to your momentum.
Used for accelerating (raising opposite end of trajectory)
and decelerating (lowering opposite end of trajectory), respectively.
Usually burn at AP or PE, but you can burn anywhere if you don’t need to be precise.
- Purple – Normal & Anti-Normal
Up and down, relative to your orbit.
Used for rotating your orbital plane up and down, relative (or, more specifically perpendicular) to prograde.
Burn at AN or DN (doesn’t matter which).
- Blue – Radial-In & Radial-Out
In and out, relative to your orbit.
Used for rotating your orbit on its orbital plane.
Burn at the midpoint of your orbit; directly between the AP and PE. (The semi-minor axis of the ellipse).
- Yellow/Green – Prograde & Retrograde
- Gravity Turn – Progressively turning after launch so that as little fuel as possile is wasted fighting gravity instead of getting into orbit. You turn in a predetermined direction (usually East for an equatorial orbit), usually starting with 10° at 10km, then progress to 45° at about 20km, and full 90° (or more) once your AP reaches the desired height.


Kerbin
The first specific orbit contract you get is one for Kerbin, so that’s what we’re starting with.
1. Build Your Rocket.
- Build the satellite with required equipment,
- add a thermometer and barometer (to get ‘science from kerbin orbit’ contracts later),
- Put a high Δv orbital stage under it (an FL-400 and Terrier 909 will do),
- Put a first stage that’ll get it to a sub-orbital trajectory below (a Kickback & some fins will do),
- Put a launch clamp on (to keep the probe core charged while waiting for the launch window).

That should do.
2. Warp to the Launch Window.
Don’t worry, this step takes less than half a Kerbin day.
First, take a look at the orbit.

Then, set your focus to Kerbin,
And align your perpective with the desired orbit so that you see it as a solid line.

Now, time warp until the space center almost intersects the desired orbit.

Now, take a look at your orbit again.
See which way the bright part rotates; that’ll be your gravity turn direction.


3. Launch.
Launch your rocket, and begin a gravity turn in the previously decided direction.
You may wish to turn a bit west of the previously decided direction, to counteract the planet’s rotation. (You don’t have to, as the initial stage is rather difficult to control, and it is easily fixed during the sub-orbit -> orbit burn).


As usual, once you are in a sub-orbital trajectory, you burn prograde close to your apoapsis to get to orbit.
However, you will probably need to correct your trajectory because of planetary rotation.
As you can see, my orbit is somewhat off.
Because of this, I burned North North-West instead of straight North.


Make sure that the ascending/descending node is at 0.

Once aligned, burn into a stable orbit.

You may want to burn a bit more to help with the next step.

4. Align AP & PE with AP & PE of the Desired Orbit.
To align your apoapsis/periapsis with the desired orbit’s apoapsis/periapsis, you must perform a radial burn at the semi-minor axis (midpoint between apoapsis and periapsis) of your orbit.
5. Hohmann Transfer.

Warp to your apoapis and burn prograde to raise your periapsis to that of the desired orbit.
Warp to your periapsis and burn prograde to raise your apoapsis to that of the desired orbit.

Congradulations! You just completed a profitable contract for less than VF10,000.
Now, you should be able to find the next step up:

Other Celestial Bodies
The first non-Kerbin specifc orbit contract you will get is for the Mun, so that’s our example.
Other bodies should work the same way, provided you can get to them.
1. Build Your Rocket.

- Probe core & required equipment (usually includes materials bay[aka science jr.])
- High ∆v last stage (FL-400 & Terrier 909 will do)
- Interstage (doesn’t need to be massive; 1-2 FL-800s and a Swivel will do)
- Kickbacks to get to sub orbit
- Some fins
Look at the KSP ∆v Map.
Find out how much ∆v you’ll need, plan out your stages (eg. sub-orbital stage + boosters, orbital stage, inter-planetary stage, final maneuvering stage), figure out the necessary ∆v of each stage.
To calculate ∆v:
∆v = ISP * 9.8 * ln( M1 / M2 )
Where:
M1 = The mass of the stage and every stage above it when they’re all fully fueled
M2 = The dry (empty of fuel) mass of the stage and the mass of every (fully fueled) stage above it
Build your rocket, make sure it fits those ∆v requirements.
To find out how to fly there, and when it’s optimal, look up tutorials and videos, look on the wiki, etc.
Keep in mind that all you’re launching is an unmanned probe that isn’t coming back, so the rocket probably won’t be too huge or complicated.
2. Get to a Stable Orbit around Your Target.
First, get into a stable Kerbin orbit. See the in-game tutorial if you don’t know how to do this.
Just add a maneuver node on your orbit and drag the prograde until the planned orbit intersects the orbit of the Moon you’re targeting, then drag the node around until you get a flyby.

Once you get a flyby:

This is wrong. The orbit is going in the opposite direction from the flyby.
To fix this, adjust the maneuver node to get a flyby in the opposite direction. Just drag the maneuver node around, maybe add more to prograde, until you get an intersect from the opposite direction.
It may look awkward.

But it results in this:

Once you get a flyby in the correct direction, make sure the PE is at the highest it can be (eg. for the Mun, ~2Mm).
Proceed with the flyby until you enter that moon’s gravity, then burn retrograde at PE to get into a stable orbit. Don’t overburn. You want your orbit to be as high as possible, so it’s as slow as possible (you have to fight weaker gravity the higher you are), so that you use as little fuel as possible for adjusting that orbit in orbital maneuvers.

Get into a stable orbit of the target planet.
This is not a guide for interplanetary travel. Please, look for other guides for it.
Also, please make sure the orbit is in the right direction.
Get into a stable orbit of that planet, then do the same thing as was described in the moon section.
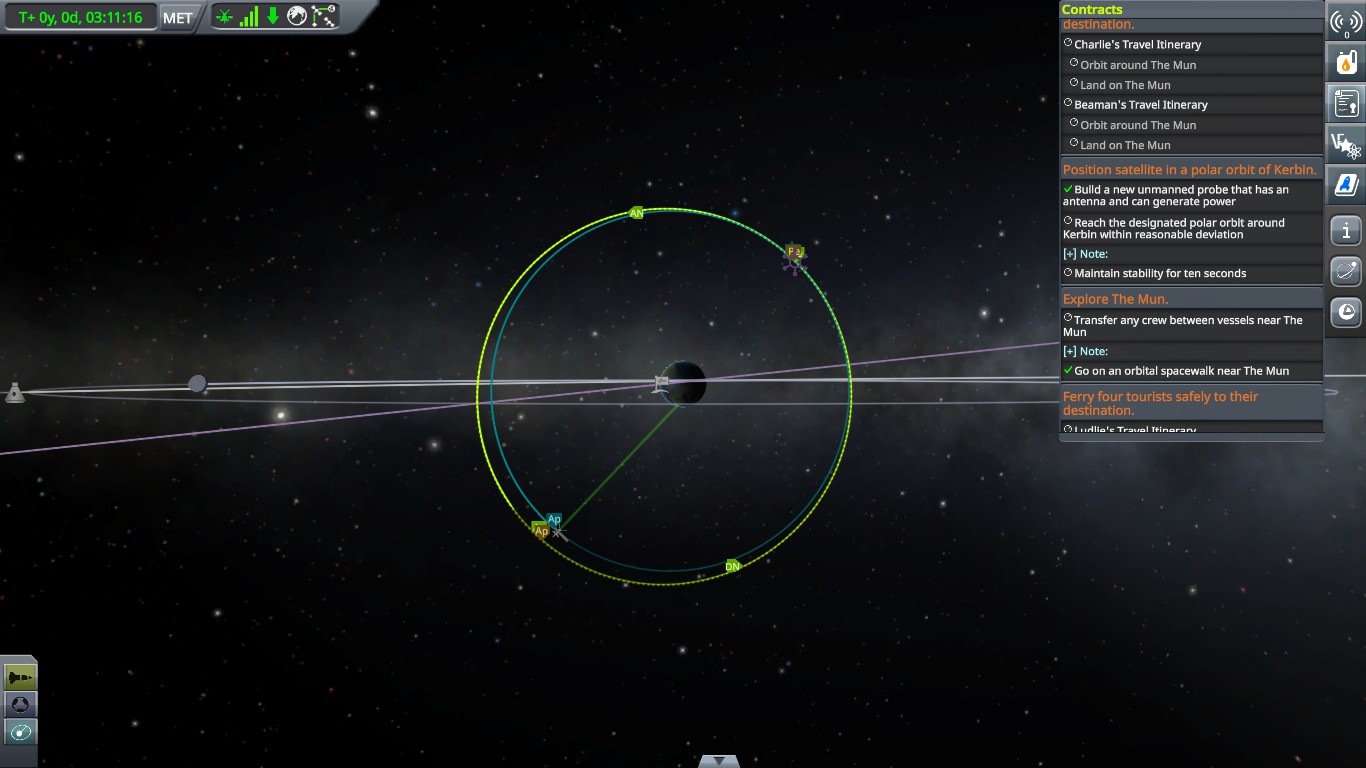
3. Align Orbital Planes
Once you are in a stable orbit around the target body, align your orbit with the orbital plane of your target orbit. To do that, you need to burn normal at the AN or DN.
If this sounds like jargon, look in the “Stuff You Need to Know” section.
To find the AN / DN, set your focus to the body you’re orbiting.
Then, visualy align the center of the body with the AN / DN displayed on the target orbit, and your orbit.
Put a maneuver node at that point.

Now, drag the Normal or Anti-Normal until your orbits align.
Perform the maneuver.
4. Align AP & PE with AP & PE of Desired Orbit
To do this, perform a radial (blue) burn at the midpoint of your orbit (b/w the AP & PE); the semi-major axis.

The burn isn’t very big in this case, so here’s a different example (from the Kerbin section):
5. Hohmann Transfer
Once your AP & PE and your target orbit’s AP & PE are all in one big line,
Warp to your AP, then burn prograde / retrograde to raise / lower (respectively) your periapsis to the desired height.
Warp to your PE, then burn prograde / retrograde to raise / lower (respectively) your apoapsis to the desired height.

There. Done!

Now, you might be able to find this mammoth of a task to take on:

Geocentric Orbits?
There are a few other guides out there for geocentric orbits, but this guide is a general formula for any specific orbit.
To get to a geocentric orbit, just treat the place you’re supposed to be above as the desired orbit’s apoapsis.
Just get to an equatorial orbit,
make sure your AN is 0°,
burn radial at the semi-minor axis (midpoint of your orbit, b/w AP & PE) to align your AP to be over the designated spot,
then Hohmann transfer to the desired height.