Overview
A quick reference map for locating cursed BB3 gear and armor designed for late-game loot farmers
Quick Reference Map
There are plenty of BBI farming routes to read online, but by late game, I wanted a simple post-Daimon map with just level 3 gear and armor that I could print out as a quick reference. That’s all this is. This map is not for everyone; it’s for those who already have all their hidden augments and just want the good stuff.
I did not create the (personally life-saving) all-in-one map[dragonsdogma.wikia.com] by Saurkrout2000; I only tweaked it here to include the chest locations. The listed percentages are from my own records. While I have listed a few chests with a low drop rate (that really aren’t worth the bother), I have left out some whose drop rates are so low they are in fact contested.
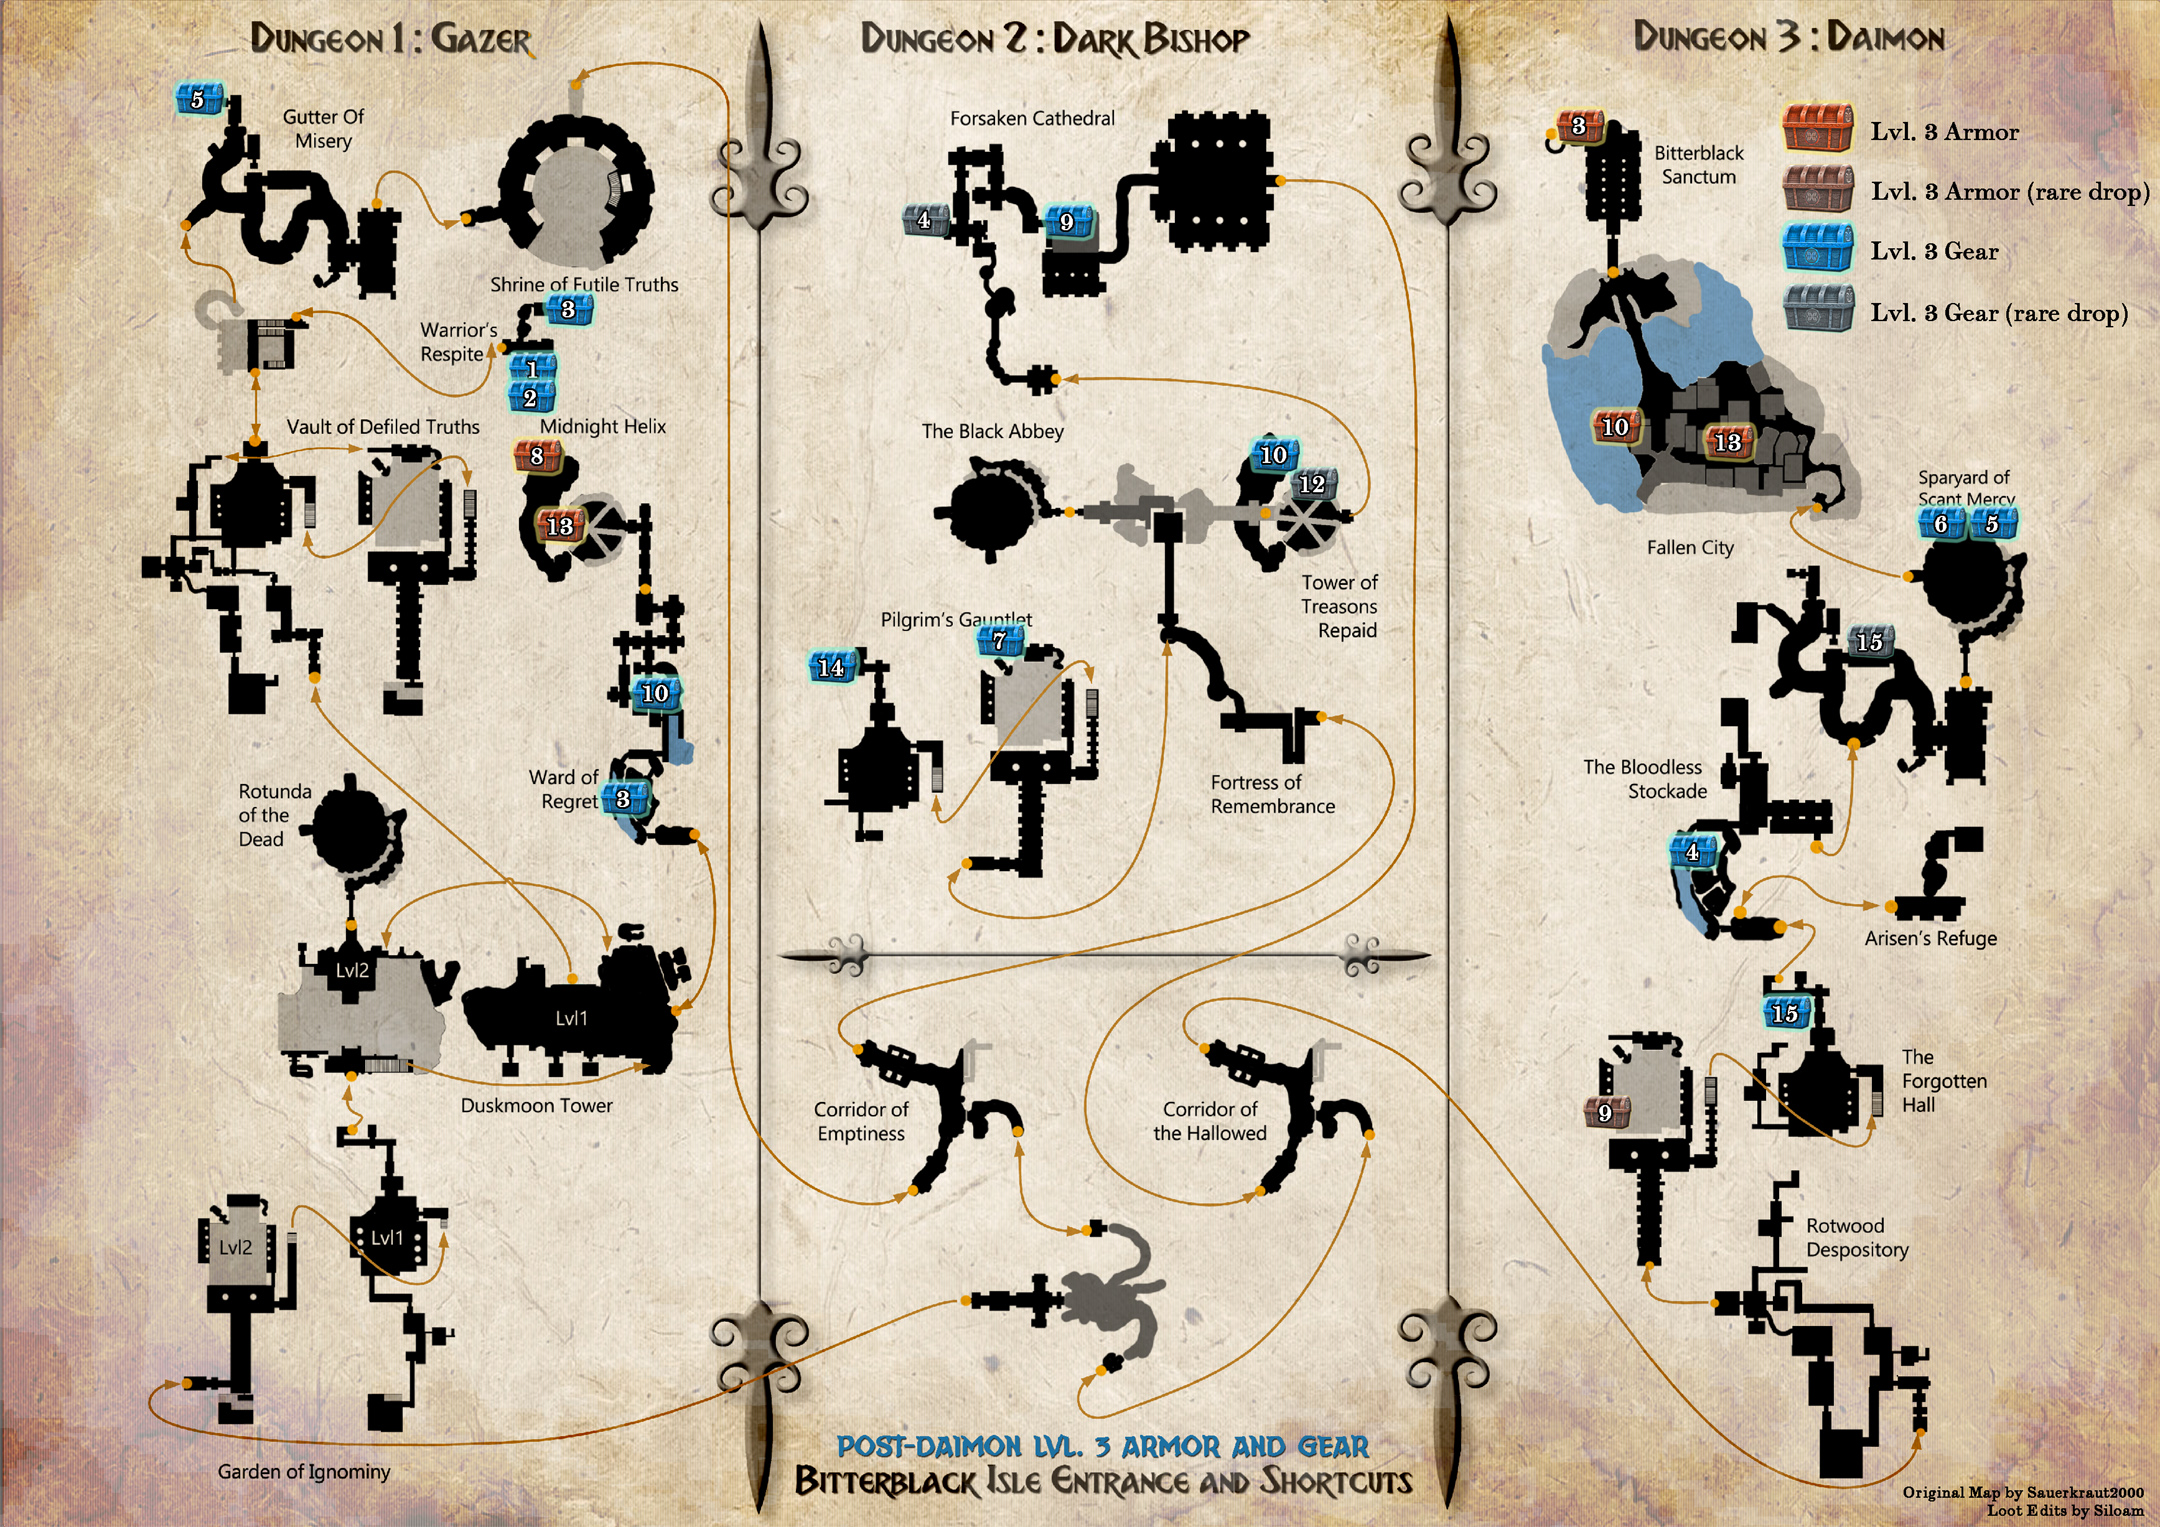
Because the map is already quite large, links to the wiki’s more detailed maps with matching chest numbers are in the room titles, however my hope is that the walking directions below will help with the initial identification of the chests so that, in the future, you will only need to reference the map as a reminder.
Dungeon 1: Gazer
Ward of Regret[dragonsdogma.wikia.com]
3 – Behind the first locked gate (requires a skeleton key); middle chest (you can also go around the back of the cells and loot chest 7 to replenish your key)
10 – First left after entering the flooded area (requires having flipped the gate lever on the other side)
Midnight Helix[dragonsdogma.wikia.com]
8 – (20% chance) Across the bridge over the poisoned pool; the first, fancy chest
13 – (25% chance) Last chest at the top of the helix
Warriors Respite[dragonsdogma.wikia.com]
1 – (rare drop) Across from the riftstone
2 – (rare drop) Across from the riftstone and up the rubble
Gutter of Misery[dragonsdogma.wikia.com]
5 – Last room to the left after entering the water
Dungeon 2: Dark Bishop
Pilgrims Gauntlet[dragonsdogma.wikia.com]
7 – On first entering the second floor mezzanine of the hall, make a double jump up the sloped stone to the northern walkway
14 – Bottom level, at the end of the northern hallway, climb up the rocks beyond the burning barrier
Tower of Treasons Repaid[dragonsdogma.wikia.com]
10 – Bottom floor, beneath the bridge that crosses over the poisoned pool.
12 – (rare dop) Bottom floor, second closest chest left of the door out
Forsaken Cathedral[dragonsdogma.wikia.com]
4 – (rare drop) Turn left after descending the spiral stairs; chest on the right
9 – Just prior to descending the square stairs; chest on the right
Dungeon 3: Daimon
The Forgotten Hall[dragonsdogma.wikia.com]
9 – (rare drop) Double jump from the right wing mezzanine up the slanted stone. Circle around (requires jumping) to the last chest on the left wing. Or be boring and take the stairs.
15 – (95% chance) Bottom floor before the exit, climb the fallen stones and circle around; chest on the left
The Bloodless Stockade[dragonsdogma.wikia.com]
4 – (70% chance) Last locked gate after the riftstone (requires a skeleton key, which chest 7 occasionally drops)
15 – (60% chance) Jump across the brine into the shortcut hole, go left then right and down the stairs; by the beacon
Sparyard of Scant Mercy[dragonsdogma.wikia.com]
5 and 6 – (50% chance) Side by side chests to the right of the exit. Beware of suicidal pawns.
The Fallen City[dragonsdogma.wikia.com]
13 – (10% chance) Lowest walled-in roof just to the east of where the wyvern likes to sit and roast you
10 – (10% chance) Climb over the broken wall just before and to the left of the bridge of pawn death
Bitterblack Sanctum[dragonsdogma.wikia.com]
3 – (75% chance) Furthest chest on the right in the rewards room
If you see any errors or missing information, I would be most happy if you would comment or message me.