Overview
A detailed list of power builds that can easily be used to beat the game.
Beginnings
Hello!
This guide will offer outline character builds.
Each of these builds are very specialised and most are starved of skill points, but there is nothing stopping you from straying from them or altering them in your own way.
This guide assumes an unmodded game. These builds are more than capable of being used in difficult mods such as JSawyers patch on Very Hard difficulty with Hardcore Mode active.
Please comment below and let me know any ideas for builds you have or any comments for improving the guide. Thank you.
1. Critical Guns/Energy Build
I showed you my big iron, answer me.
The aim here is to gain as much Critical Chance as we can.
Simple, but effective.
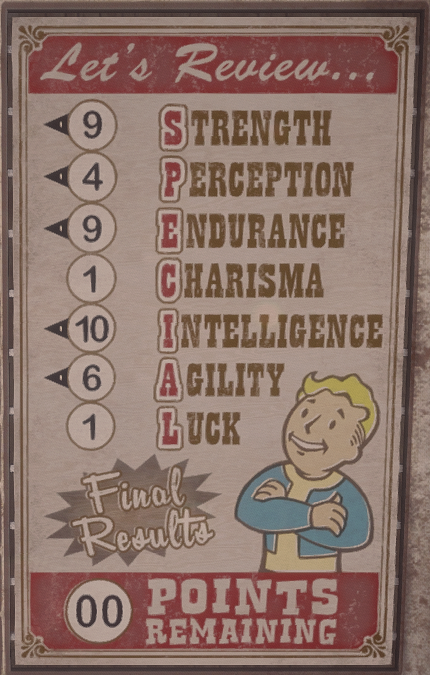
S.P.E.C.I.A.L (Critical Guns/Energy)
High Agility allows you to use V.A.T.S effectively and increases your Reload Speed.
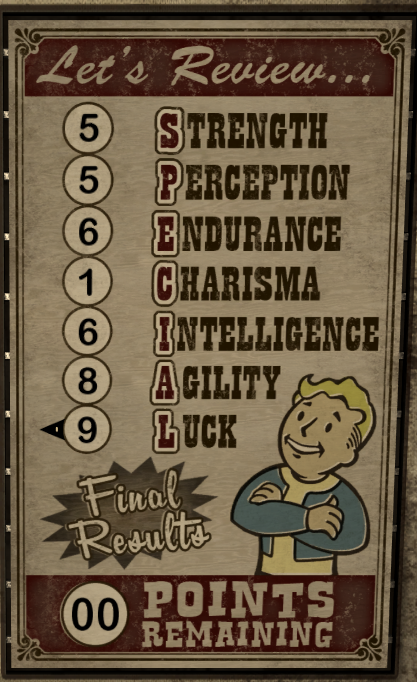
High Luck increases our Critical Chance as much as possible.
The other stats just perfectly sit at the number they need to be in order to make the most of your points and allow you the most freedom with Weaponry and Implants.
Strength can be lowered to 3 at minimum as you will gain +3 Strength from the Implant and the Reinforced Spine perk from Old World Blues DLC. However, I recommend you keep it at 5 as leaving it at 5 allows you to reach 8, which you’d use for heavy weapons like the Minigun and the The Smitty Special effectively.
Tags & Traits (Critical Guns/Energy)
Required:
Repair
Optimal:
Guns/Energy Weapons
Required:
Small Frame
The bonus +1 to Agility will allow you to reach 10 once you gain your Agility Implant.

The +3% Critical Chance stacks with your weapon multiplier, meaning if you have a weapon with a multiplier of x2.00, you will have a 6% bonus!
Perks & Skills (Critical Guns/Energy)
Be careful with your skill points, as some perks will require specific numbers such as 45 Repair or 70 Medicine, etc.
Plan ahead in order to make sure you have enough in required skills by the time you reach the level you unlock the perk!
To take some perks will require you to have aquired the Implants that raise your S.P.E.C.I.A.L from the New Vegas medical clinic. I have marked them below, make sure you have the 4000 caps to buy them!
- Level 2: Light Touch (45 Repair)
- Level 4: Educated
- Level 6: Hand Loader (70 Repair) OR Vigilant Recycler(70 Science)
- Level 8: Player Choice!
- Level 10: Finesse
- Level 12: Player Choice!
- Level 14: Player Choice!
- Level 16: Better Criticals (Requires Perception Implant.)
- Notes: Level 18-48: Player Choice!
- Level 50: Just Lucky I’m Alive (Neutral Karma Required)
There are not a lot of perks and skills required for this build to work. Anything goes, just make sure you get these perks and don’t wear Medium or Heavy armour. Stick to Light or nothing at all in order to keep the Light Touch bonus active.
Gear (Critical Guns/Energy)
As stated before, the main goal of this build is to stack Critical Chance in order to deal as much damage as possible.
Even when you factor in the DLC, there are very few items that add Critical Chance.
However, the optimal outfit would be:
1st Recon beret (5%)
Joshua Graham’s armor (3%) or Ulysses’ duster (5%)
There is one more item that adds +1 Luck that you can wear with this outfit but it requires you be “Liked” reputation with Caesar’s Legion, which may not be possible for all playthroughs so I have opted to leave it out. However, if you’d like to side with Caesar then youu can take 8 Luck, with 9 Agility and then you can feel free to take another Trait in place of Small Frame. This item is the Lucky Shades.
Weaponry (Guns/Energy)
Silenced .22 pistol
That Gun (Unique 5.56mm Revolver)
Lucky (Unique .357 Revolver)
A Light Shining in Darkness (Unique .45 Auto Pistol)
Maria (Unique 9mm Pistol)
Li’l Devil(Unique 12.7mm Pistol)
Ranger Sequoia (Unique .45-70 Gov’t Revolver)
La Longue Carabine (Unique .357 Sniper Rifle)
Ratslayer (Unique 5.56mm Sniper Rifle)
Christine’s CoS silencer rifle (Unique .308 Sniper Rifle)
Gobi Campaign scout rifle (Unique .308 Sniper Rifle)
Paciencia (Unique .308 Rifle)
Sleepytyme(Unique 10mm SMG)
Abilene Kid LE BB gun(Unique BB gun)
- Note: The Unique BB gun on a critical hit does 74 damage without Better Criticals, in comparison That Gun deals 60 on a critical. The only problem is the BB Gun hits 4 on a regular hit while That Gun would normally deal 30. Use at your own peril.
9mm SMG(Unique 9mm SMG)
- Note: Not to be confused with the Unique Vance’s 9mm SMG, as this unique version will provide less damage output than the regular version due to a slower fire rate and lower critical multiplier. However, if you’d prefer to utilise the unique version, it still puts out a respectable 221dps vs the regular version’s 200dps when you don’t factor in critical hits.
(Unique .308 Rifle)
- 55 Damage
- 110 Critical Damage
- x2.00 Multiplier
Wew, lad. This guns power can’t be described in words. With the Better Criticals perk this gun will be doing x4 damage on crits. That’s 220 damage. Once you reach level 50 and gain Just Lucky I’m Alive, you deal 302 damage. That’s x5.5 on a critical hit. Beautiful.
With maximum Critical Chance of 28% you will be getting quadruple/quintuple damage on 56%+5% from Light Touch(+5% more if you choose to shoot in V.A.T.S) of your shots. It is also extremely durable and even has x3.5 magnification when aiming down sights, the farthest zoom in the game, equal to the best scope on any gun. Throw in the Hand Loader ammo, .308 round, JSP (hand load) for a massive 30% damage boost to this. Not much will survive a critical hit.
(Unique 5.56mm Sniper Rifle)
- 23 Damage
- 23 Critical Damage
- x5.00 Multiplier
Bear with me on this one. While it has very low damage, you should easily be able to gain 100% crit chance with this thing which means it essentially has a base of 46 damage.
With its silencer and enhanced x3.5 scope attached, it’s not uncommon to be sneaking from a huge distance while rapidly firing headshots 100% on target as this gun has virtually zero spread when using 5.56mm JSP hand load (GRA) ammo. This ammo is extremely easy to make massive stores of and even provides a 15% damage increase as the icing on the cake. The gun is even easier to repair than it is to use, even without Jury Rigging, as the Varmint Rifle is super common.
This weapon is enough to take you all the way from level 1 to level 50.
- 14 Damage
- 14 Critical Damage
- x0.06 Multiplier
While it may not look like much and it may have a low Critical Multiplier, if you’re firing 14.3 shots per second with a 6.68% chance to crit or firing in V.A.T.S for 11.68%, you’re going to score big damage versus enemies with no DT.
This weapon shreds Cazador and Nightstalkers to pieces. Use 9mm round, JHP (hand load) or 9mm round, hollow point for an increased 65%/75% damage boost, respectively.
2. Explosives Build
This build almost blows as much as Fallout 4.

This one is all about working explosives into a main form of damage, as opposed to tossing the odd grenade here and there.
S.P.E.C.I.A.L (Explosives)
High Endurance is a simple one, lots of hp to let you get in your enemies face and blow yourself and your enemy up with reckless abandon!

High Intelligence is there for the points, we need so many skill points to get this build up and running as an Explosives build rather than just a guns build with a high explosives skill.
Above average Strength as you’ll need a high amount in order to carry all your explosives. You should reach 10 Strength by the end of the game.
High Agility allows you to reload your Grenade Rifle fairly quickly, which is important as you will have one shot before reloading. Normally it’ll only take one or two shots to kill enemies, but if it takes more than one then that quick second shot can make all the difference.
However, you can feel free to take points out of Agility if it doesn’t bother you too much and place them into Luck or Perception. With 6 or lower Agility you should replace your Grenade Rifle with a Grenade Launcher in order to increase your attack speed.
One thing to note about grenades is that V.A.T.S plays a very important part in using them.
Whether you have 1% chance to hit, or 100% chance, it doesn’t matter. You will throw your grenade and it will land at your opponents feet. The enemy that is targetted in V.A.T.S is slowed to a crawl, meaning they will take 100% damage from your grenade, the majority of the time.
This is another reason to take high points in Agility.
Tags & Traits (Explosives)
Required:
Repair, Explosives, Barter
Required:
Skilled
We require a lot of skill points for this build, and those points are spread thinly across a lot of skills. This Trait is excellent for us.
Pro-tip: Gaining the Well Rested bonus from a bed will allow you a 10% xp boost, so with this Trait and Well Rested you’ll only lose out on 1% xp, and won’t lose anything on xp gains below 100!
Recommended:
+15% damage when your health is below 50%. Excellent.
With plenty of splash damage flying around you’ll be able to activate this on a whim for that boost whenever needed. Small penalties to Agility and Perception are irrelevant, especially if you’re focused on using grenades, mines and Melee Weapons.
Hoarder
This can be useful, as your explosives have quite the weight to them and you’ll want to carry a lot of them.
For the average player this is a waste of a Trait but an extra +25 lbs. is perfect for fitting all that explosive crafting junk into your bag, as well as all those grenades. That’s 50 extra grenades, and 100 when you get the Pack Rat perk!
Logan’s Loophole

Please see the bottom section of this guide to get a detailed description of this Trait.
Loose Cannon
Not bad, you can throw grenades seriously fast with this perk. It’s just a shame you take an even more serious range penalty in a trade off. If you don’t mind fighting up close with grenades, go ahead and take this. The 30% attack speed increase increases your dps significantly.
Situational:
Heavy Handed
Perks & Skills (Explosives)
Be careful with your skill points, as some perks will require specific numbers such as 45 Repair or 70 Medicine, etc.
Plan ahead in order to make sure you have enough in required skills by the time you reach the level you unlock the perk!
To take some perks will require you to have aquired the Implants that raise your S.P.E.C.I.A.L from the New Vegas medical clinic. I have marked them below, make sure you have the 4000 caps to buy them!
- Level 2: Heave, Ho! (30 Explosives)
- Level 4: Educated
- Level 6: Mad Bomber (45 Explosives, 45 Repair)
^Notes: See the Pro-Tips section to learn how to use this effectively. - Level 8: Pack Rat (70 Barter)
- Level 10: Grunt (45 Guns, 20 Explosives) OR Strong Back
^Notes: All of the Grunt weapons are excellent damage that don’t rely on critical hits. If you like to use Guns rather than grenades for the majority of your damage and then use explosives from a Rifle/Launcher (that are boosted by the Grunt perk) for tougher foes, then take it. I would suggest you take Strong Back, however, as that’s up to 200 extra 40mm/regular Grenades, or anything else you can fit into your pack. - Level 12: Hit the Deck (70 Explosives)
- Level 14: Splash Damage (70 Explosives)
- Level 16: Demolitions Expert (50 Explosives)
- Level 18: Adamantium Skeleton
- Level 20: Demolitions Expert (50 Explosives)
- Level 22: Demolitions Expert (50 Explosives)
- Notes: Level 24-48: Player Choice!
- Level 50: Ain’t Like That Now (Bad Karma required)
^Notes: This perk is best for us as a 10% damage increase is great for weapons that do over 100 damage per hit. Bonus HP is also really nice to help you survive explosions.
Gear (Explosives)
There are two trains of thought here.
1. Stack as much DT as possible
2. Aim for maximum Movement Speed
1. Wear Heavy Armour and use it to reduce damage and walk (slowly) to your victory.
Simple.
2. Wear Light Armour and take the Travel Light perk.
This one needs a bit more explanation.
As explosions deal full damage at the centre of their blast and the damage drops the further away you are, you can easily use the perk Hit the Deck! to absorb the majority of your self-inflicted damage by aiming your explosions behind close enemies, effectively placing them closer to the explosion than you are, even at point blank range.
Having bonus movement speed is very effective for keeping yourself away from the explosion and the enemy. This is my personal choice.
Weaponry (Explosives)
There are way too many explosives in this game. I’ll just list the most notable ones in order to save us both time.
(Unique Grenade Rifle)
- 100 Explosion Damage
Probably the best general use explosive weapon we have access to. With plasma (x1.30 DMG), incendiary (x0.75 DMG, + 6DPS for 15 seconds) and pulse (x0.08 DMG +150 unblockable damage to robots, +60 unblockable damage to power armour) grenades, you’re sure to find an effective way to blow anything up.
However, if you have 6 or below Agility then you are better off using the Grenade Launcher, as it will have a faster fire rate because of the slower reload speed of the single shot Grenade Rifle. They are essentially the same weapon, other than Thump-Thump having 30% increased range.
(Mine)
- 250 Explosion Damage
A basic mine. Not much to tell here. Simple to make, simple to use. But it will absolutely cripple, if not outright kill anything it hits.
It takes a couple of junk items to make which makes it semi-limited, so use them to take out key targets.
(Grenade)
- 75 Explosion Damage
Another simple to make, simple to use weapon. You can make enough of these to use them as your primary weapon until you get a good enough supply of 40mm/25mm Grenades. There really isn’t much to say, just throw and boom.Bonus:
Esther(Unique Fat Man)
- 475 Direct Damage, 600 Explosion Damage
How could I make an explosive build and not mention this thing of beauty? With just a few perks this baby will obliterate anything it hits.
Just be aware that a large majority of its damage comes from the impact of the projectile actually making contact the enemy.
Just make sure you stand far enough away. The +10DT this weapon gives you along with +25DT from Hit the Deck! will not be enough to save you.
- 475 Direct Damage, 600 Explosion Damage
3. Melee Tank Build
Apparently there’s magic in Fallout and It’s called:
M U S C L E M A N C Y

S.P.E.C.I.A.L (Melee Tank)
High Strength as weapons in the Melee Weapons category (Not to be confused with Unarmed weapons) have their damage increased by +0.5 per point in Strength.
A bonus of +5 damage is nothing to scoff at, as melee weapon damage ranges from 3 to 100. It can be a tiny little 5% damage increase, a huge 267% damage increase or anywhere in between, depending on the weapon used. Just 5% damage is equivalent to Bloody Mess, an entire perk!
Below Average Perception; This can be dropped to 1, but there are a lot of spare points and it’s nice to have enemies appear on your compass.
High Endurance is obvious, more health means more chance to survive in the melee.
Above average Agility as 7 is required for the Slayer perk.
Maximum Intelligence; you can feel free to take points out of this and place them elsewhere, however I feel there is nowhere else to place the points that will benefit you as much as increased skill points will. The great perks for Melee Weapons also require points in Unarmed and having such huge Intelligence will stop you feeling starved of skill points.
Minimum Luck because critical damage is reduced by a Trait.
Critical hits are still good, but are not worth investing into due to this.
If you desperately want to squeeze every point of damage possible, you can take points out of Perception and/or Intelligence and place them here.
10 Luck normally would provide a 5% damage increase with the weapon Oh, Baby!, but with Heavy Handed, your Critical Damage is multiplied by x0.60. That leaves you with a 3% increase in damage. While it’s still a nice boost, you won’t really see a good return on investment until the last stages of the game when enemies take several hits to kill.
Minimum Charisma as companions are not the focus of this build.
Tags & Traits (Melee Tank)
Required:
Survival
Suggested:
Melee Weapons and/or Unarmed
Required:
Heavy Handed
This Trait is the backbone of this build and the reason we don’t take critical damage perks and have 1 Luck.
Like most things in FNV, this is multiplicative. This means that all +% damage bonuses stack and create an even larger bonus together. For example, the +5 damage from Strength is increased to +6 and so on.
Very powerful.
Recommended:
Hot Blooded
+15% damage when your health is below 50%.
You’re going to be in the melee taking damage anyway, why not get bonus damage for yourself?
When this is active and you have Heavy Handed, they together provide +3% more damage on top of their own bonuses due to being multiplicative. Small, but it all adds up.
Logan’s Loophole
In summary, it’s absolutely amazing for increasing the value of all food and medicine.
Please see the bottom section of this guide to get a detailed description of this Trait.
Perks & Skills (Melee Tank)
Be careful with your skill points, as some perks will require specific numbers such as 45 Repair or 70 Medicine, etc.
Plan ahead in order to make sure you have enough in required skills by the time you reach the level you unlock the perk!
To take some perks will require you to have acquired the Implants that raise your S.P.E.C.I.A.L from the New Vegas medical clinic. I have marked them below, make sure you have the 4000 caps to buy them!
Due to the lack of focus on critical hits, there are a lot of options in terms of Perks.
Instead of a level by level list, I have opted to write recommendations and which level they become available. Other than a few specific perks, feel free to take what you prefer at each level.
The specific Perks are as follows:
- Level 2: Lady Killer/Confirmed Bachelor OR Old World Gourmet (45 Survival)
^Notes: Take Old World Gourmet if you plan on using a lot of drugs and do not have the Logan’s Loophole trait. If you do have it, the optimal choice of the two gendered perks here is Confirmed Bachelor, as the majority of NPC enemies are male. - Level 4: Rad Child (70 Survival)
- Level 8: Super Slam! (45 Melee Weapons)
- Level 12: Piercing Strike (75 Unarmed)
- Level 24: Slayer (90 Unarmed)
- Level 50: Ain’t Like That Now (Bad Karma required)
^Notes: This perk is best for us as a 10% damage increase stacks with the other damage bonuses. Bonus HP is also really nice to help you survive in the melee.
Perks you should take and when they become available:
- Level 6: Bloody Mess, Toughness
Level 8: Stonewall, Living Anatomy(70 Medicine) - Level 10: Nerd Rage(50 Science)
- Level 12: Life Giver, Fast Metabolism
- Level 14: Adamantium Skeleton, Purifier, Chemist(60 Medicine)
- Level 16: Chem Resistant(60 Medicine)
- Level 30: Implant GRX
- The rest is up to you!
Gear (Melee Tank)
Wear Heavy Armour. Stack as much DT as you can in order to survive fights.
The only suggestion I have is to wear the Scorched Sierra power armor as it provides +2 health.
That’s pretty much it. Walk slowly, and carry a big hammer.
Weaponry (Melee Tank)
Chainsaw (GRA)
Ripper (GRA)
Thermic Lance
Rebar Club
Knock-Knock (Unique Fire Axe)
Blade of the East/West
Oh, Baby! (Unique Super Sledge)
The Humble Cudgel (Unique Lead Pipe)
War Club
- 100 Damage
- 10 Critical Damage
- x1.00 Multiplier
All automatic melee weapons completely bypass all DT and DR. The Thermal Lance in particular deals 100DPS.
That’s it, just hold your attack button and ram it into the enemy. There’s not much more to say.
Sadly, while they attack 5 times per second, automatic weaponry can’t take advantage of the Super Slam! Perk.
It is super satisfying to use though. Bzzzzz.
(Unique Super Sledge)
- 80 Damage
- 40 Critical Damage
- x1.00 Multiplier
A fantastic weapon with the highest base damage per hit in the game. With 10 Strength and Heavy Handed, you’ll reach over 100 damage per hit and be hitting twice per second. This is enough to smash through even the heaviest of armoured enemies.
- 19 Damage
- 19 Critical Damage
- x1.00 Multiplier
While it may not look like much, it is the fastest attacking weapon in the game when fully upgraded. 4 attacks per second. However, it is not the damage that makes it good. It is the fact that spamming power attacks mades this weapon faster than walking forward. Anything that makes you attack faster will make your movement faster. Slayer, Melee Hacker, even drugs such as Rushing Water can increase your speed and make you move as fast as the wind itself. So much fun.
(WIP) Stealth Build
Hidden in plain sight, the cowboy stalks his prey.

(WIP) S.P.E.C.I.A.L (Stealth)
So, with a bit of a preface here, there are multiple ways to do stealth.
You could take melee, unarmed, pistols and/or rifles and do just fine, but each requires different perks to optimise.
(WIP) Plasma Spaz (V.A.T.S Plasma)
(WIP) Shotgun Support
Benefit the gang by shooting huge loads out of your stick.
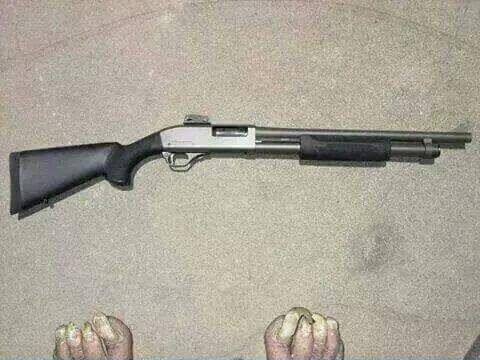
This one is all about using companions as crowd control and using knockdown to mitigate damage for both you, and them while outputting a large amount of damage. Handy, assuming you’re playing on hardcore mode where your companions have perma-death.
S.P.E.C.I.A.L (Shotgun Support)
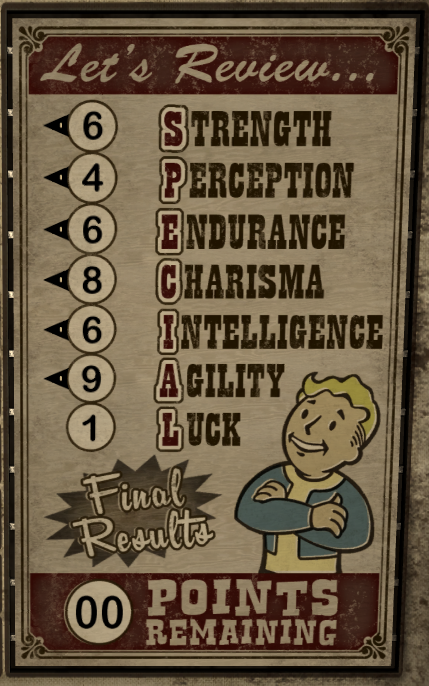
Above average Strength. It’s only slightly more useful than a dump stat, it’s only uses are it’s requirement to wield your shotguns accurately and obviously your carry weight. Carry weight however is not too important since you can just shove all your stuff into your companions. The highest Strength required is 7 for the Riot Shotgun. 6+1 Strength from the implant is just fine; you can also gain +2 Strength from Reinforced Spine or +1 from Spineless, so feel free to rearrange one or two points if you like. Optimally, you could put 1 into Charisma to prevent you being forced to wear an armour set with a Charisma bonus.
Below average Perception, with not much to say about it. It’s just nice to have red ticks on your map during combat. You could drop this to 1 and you probably wouldn’t miss it.
Above average Endurance in order to obtain more implants. If you drop Perception to 1, then add the points here.
High Charisma. Hopefully not a surprise in a companion focused build.
Rather than always dumping it to 1 (which i’d recommend for the majority of players as it has no downsides four your average do-it-yourself adventurer) it’s a useful stat for a niche build like this, I swear. Hear me out.
Every point in charisma increases your companions damage and DT by x1.05, or 5%. So, at 10 Charisma, that’s a 50% bonus to companion damage and DT.
As a practical example, one possible companion named Veronica gains a x1.95 attack speed multiplier and +4DT after she obtains her perks from her quests. So, with 95% more attack speed, add 50% more damage to that, then finally add +2DT for free. Not too shabby, huh?
If you prefer to take Rex as your non-human companion rather than ED-E, then on Hardcore Difficulty, him having 50% more DT is very important. His highest DT is 20. This means with 10 Charisma, he has a DT of 30. If you complete his quest (using a particular brain) he will have +10DT on top of his base 20DT. Suddenly your cute little pup has 45DT, now he can brawl with the baddies.
When he runs off to murder your enemies you can feel safe and secure in his stupidity bravery. What a good boy.
Above average Intelligence is useful for skill points. There’s no dire need for them or anything, so 6 is a comfortable number.
High Agility allows fast reloading, the majority of shotguns are loaded one shell at a time, which can be a pain. However, if you carry multiple shotguns, this problem can be alleviated slightly mid-combat, high Agility can also assist in quickly switching weapon as well.
While I normally don’t mention dump stats in too much detail, here I feel I should.
Luck. Sure, it has excellent synergy with the multiple pellets of the shotguns (4-8 chances to crit per shot!), but it costs too much to invest in and the base damage of critical hits with shotguns is mediocre, so you really need to invest in crit to get some value out of it. When your companions start hitting stuff, you’ll forget these were even a thing anyway.
Pro-tips (Using Perks Efficiently)

The ones worth making are:
.308 JSP hand load: x1.3 DAM, x1.5 CND
.357 JFP hand load: x1.25 DAM, x0.8 Spread, -3 DT
.44 SWC hand load: x1.2 DAM, -6 DT
.50 MG Match hand load: x1.15 DAM, x0.65 Spread
5.56mm Match hand load (GRA): x1.15 DAM, x0.65 Spread
These bullets are obviously superior to their regular bullet types.
However, one ammo type is often overlooked:
9mm JHP hand load (GRA) x1.65 DAM, x2 DT
If you are using the 9mm Pistol or the unique Maria, when your enemy has less than 11DT, you should be using these.
In comparison, the 9mm round, standard is useful on enemies up to 8DT.

It’s equivelant to a stick of Dynamite, plus it’s a holdout weapon that you can use regardless of your sneak skill. The only downside is that they weigh 0.5, which is a lot. This is why any build I use with it rushes the Pack Rat perk asap.
It’s also the only perk that’ll justify the Hoarder Trait since an extra 25 grenades is nothing to scoff at. On top of that, Hoarder will also let you carry around up to 50 more pieces of junk when combined with Pack Rat, which leads me to my next point.
Explosives require junk to make.
In no particular order, you should be collecting:
- sensor module
- scrap electronics
- duct tape
To make MFC cluster (a grenade thrown like a mine that splits into several MFC grenades!), and the all powerful Satchel Charge.
- Abraxo cleaner
- turpentine
- Nuka-Cola Quarts (or regular Nuka-Cola to turn into Nuka-Cola Quarts if you have the Nuka Chemist perk at level 22 and 90 Science.)
- tin can
Combine one of each of these to create the ultimate grenade that will destroy anything it touches. The Nuka-grenade.
At 100 Explosives with absolutely no damage perks or bonuses it will do 35% (and up to 60% with all damage perks!) to a Legendary Deathclaw. Maybe not that great, but just imagine throwing them at the enemy in rapid succession with just a few of the damage bonus perks.
Boom.
This perk also allows you to make the Fat Mine. Not as powerful as a shot from a Fat Man, but damn does it pack a punch. At 100 Explosives with absolutely no damage perks or bonuses it will do 45% to a Legendary Deathclaw (and up to 80% with all damage perks!) and also allows an option for you to use your mini nuke in tight areas such as caves, since you can place it and get to a safe distance before you begin a fight.
Kaboom.
It requires:
- mini nuke
- sensor module
- scrap electronics
- scrap metal
God, I love blowing stuff up.

The health regeneration from this perk kicks in when the you gain radiation sickness and becomes more powerful depending on the severity:
Minor (200 rads): +2 health per second
Advanced (400 rads): +4 health per second
Critical (600 rads): +6 health per second
Deadly (800 rads): +8 health per second
This perk does not heal limbs.
At 1000 rads you will still die, so be careful!
The most efficient way to use this perk is to hang around x50-x90 rads. This way you can simply gain a small amount of rads and push yourself into the next healing bracket.
For example, if you’re at 598 rads and have +4 health per second and need more healing, you can gain 2 rads to push yourself into the Critical (600 rads) range needed for +6 health per second, then heal your radiation when the danger is gone.
However, you can use it in any way you’re comfortable with it.
If you want to get 200-399 rads and have +2 health per second at the cost of only -1 Endurance, it’s perfectly viable. Having the healing of a Sunset Sarsaparilla at all times is pretty good!
Closure
Hopefully anyone reading this will try the builds contained within and find them useful.
If there is a specific type of build you would like me to add, feel free to leave a comment.
I will update this slowly over time, so feel free to check back for more!
Please comment below and let me know any ideas for builds you have or any comments for improving the guide. Thank you.