Overview
Image guides for 100% efficiency production ques and how many people each building can support
Credit to Markus Schonbein
Full credit to Markus Schonbein who created some of these images and posted them allong with a calculator at [link]
Also, Thanks to the Anno1404 Fan Wiki for posting a lot of good info on Tax Rates
To use the guide I strongly reccomend that you use the side bar to skip to the parts you need most.
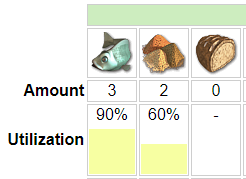
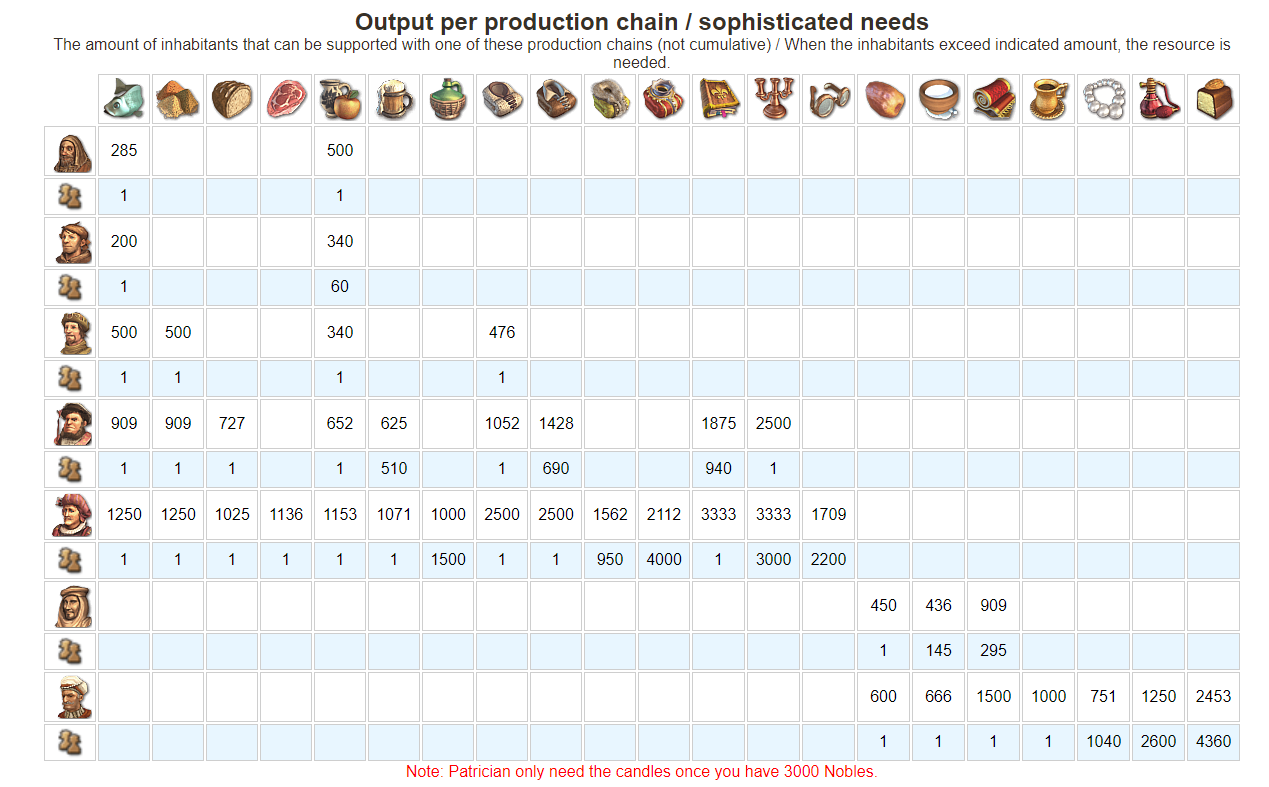
Supply Per Production Building
– The numbers in white are the number of people a single production building can support at 100% efficiency
– The numbers in blue are the number of people in each class before that item becomes an expectation for that populous type
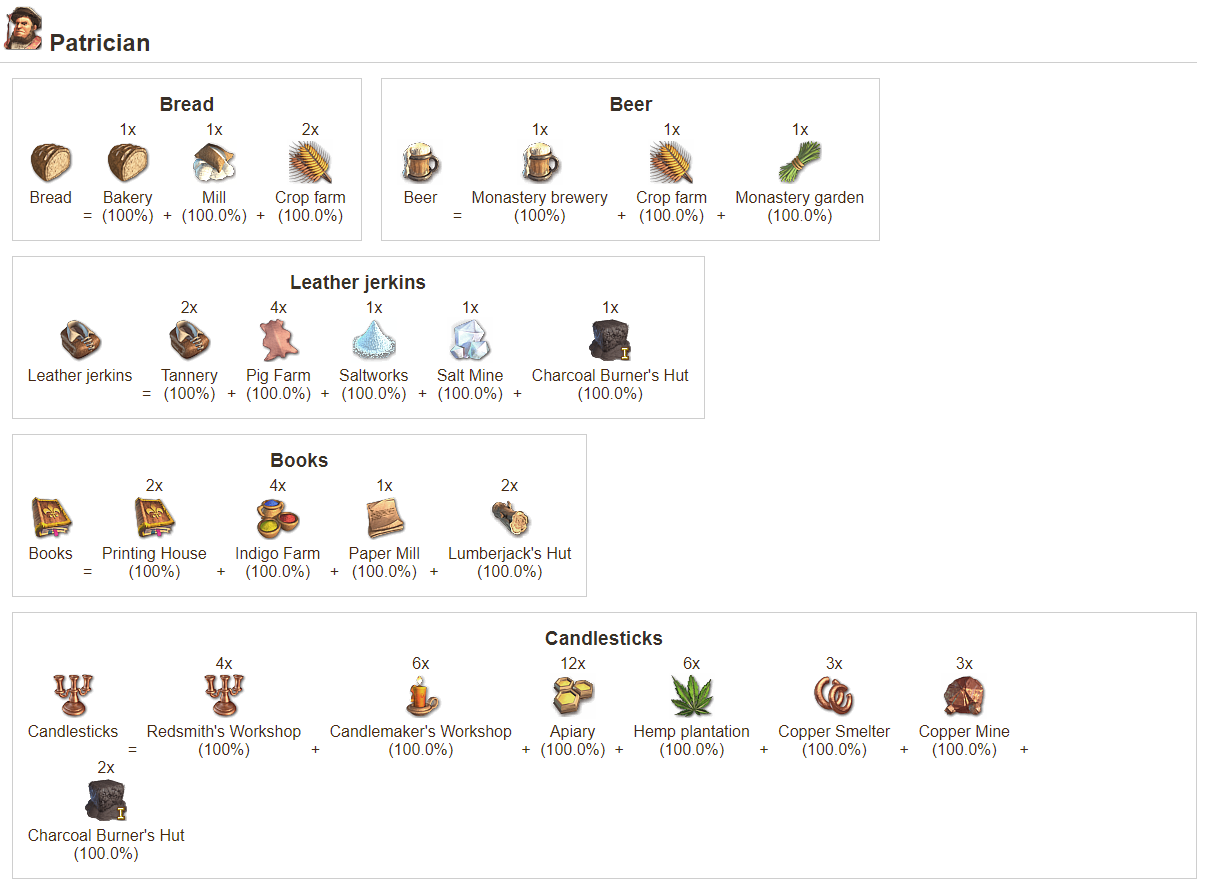
Production Lines (Empire)
Number of each building required to reach 100% efficiency for the output production building


Production Lines (Orient)
Number of each building required to reach 100% efficiency for the output production building

Production Lines (War)
Number of each building required to reach 100% efficiency for the output production building

Production Lines (Misc)
Number of each building required to reach 100% efficiency for the output production building

————————————————————————
Managing the Tax Bar

Light Green – Cannot Ascend, but people will move in (Use this while people are moving in)
Yellow – People will not move in, but they will also not leave unless they die in fire or war (This is the optimal setting unless you’re trying to get people to move in)
Orange and Red – Grants a momentary income boost but people will move out (Only use this if you’re planning on demolishing a housing complex anyways)
Tax Rates
Tax rates go down the more people of a certain class live there on a PER ISLAND basis, between a 100% efficiency rate at low pop to a 50% efficiency rate for Peasants at high pop (75% efficiency for Citizens at high pop). You typically wont be targeting higher level citizens specifically for income, but if anyone actually knows any of the data on Patricians and up, drop a comment and i’ll throw it in the guide.
Peasants
Low Pop – 300 (38 Buildings)
High Pop – 900 (113 Buildings)
Citizens
Low Pop – 600 (40 Buildings)
High Pop – 3000 (200 Buildings)
Patricians
Low Pop – 1500 (60 Buildings)
High Pop – 4000 (160 Buildings)


Nobles
Low Pop – 1000 (25 Buildings)
High Pop – 4000 (100 Buildings)
Nomads
Low Pop – 750 (50 Buildings)
High Pop – 2100 (140 Buildings)
Envoys
Low Pop – 2050 (82 Buildings)
High Pop – 7950 (318 Buildings)
Income Farms (Citizen Towns)
Tax rates go down the more people of a certain class live there on a PER ISLAND basis.
– This means it is most efficient to create a shanty town of up to 300 peasants (38 houses) and 600 citizens (40 houses) per island
– To support this efficient taxation rate income town you’ll need 3 fisheries / 2 spice farms / 3 cider farms / 2 garment shops all working at efficiency.
– Net income from this shanty town setup is $540 (Peasants) + $900 (Citizens) – $45 (Fish) – $45 (Cider) – $60 (Spice) – $80 (Hemp) – $50 (Garment) – $10 (market) – $20 (Warehouse+1) = $1130 Profit
– Using that same production you can supply up to 48 citizen houses and 38 peasant houses without increasing the fish and cider requirements.
– If you stick to 38/40 for the house types then you’ll run a surplus on all 4 resources as you can see below and use that as a stimulus in case any natural disasters come by.

Income Farms (Peasant Towns)
If you want to save space on production buildings but still want a chance to put an income farm on each island then this might be an easier option than setting up the Citizen Towns
– 50 Peasant houses supports 400 peasants for income of around $660 (400 peasant heads will start to effect the tax efficiency but this is all about easy set up)
– 2 Fisheries / 2 Cider Farms for $60 total upkeep
– $600 Net Profit
If you want to tripple the size of this income farm the tax rate will hit rock bottom at 900 peasants but…
– 150 Peasant houses supports 1200 peasants for income of around $1080 (Rock bottom peasant tax is .90 per head)
– 6 Fisheries / 6 Cider farms for $180 total upkeep
– $900 Net profit……..but this is gonna take up three times the space for only a $300 increase.
If you run a 2 fish / 2 cider peasant town the fish will be right at 100% efficiency so you may want to run a third fishery in case of natural disasters or anything else that could disrupt things.
Check out the Calculator to start doing your own math on things [link]

————————————————————————-
Just to divide the sections
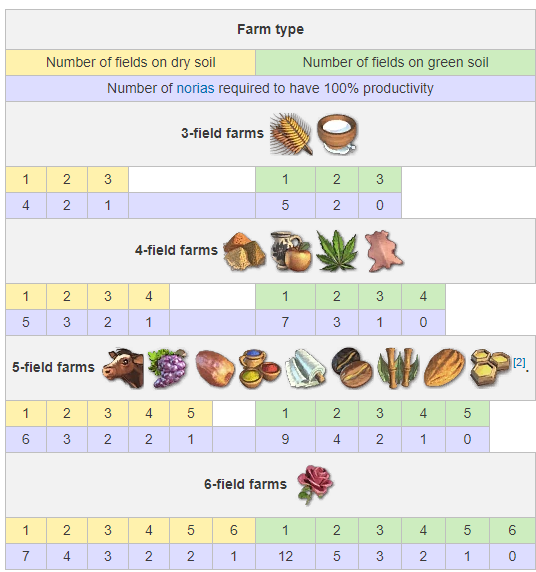
Layouts and Noria Efficiency
From here on out the rest of the guide will be full of layouts for field production in order to make both efficient and aesthetic field blocks. You can find more at
[link]
None of these layouts use the fact that several overlapping noria zones will increase the efficiency of each field above 100% which is expensive, but can lead to interesting space saving techniques and mega farms that you can find pictures of at the link above. For reference this is an image detailing how noria’s effect fields on both sand and lush islands.
For more info on Noria efficiency use this link [link]
Housing


Cider / Hemp / Spice

Wheat / Dairy

Hops

Hides

Cattle

Dates / Indigo / Silk / Coffee / Sugar / Grapes

Honey

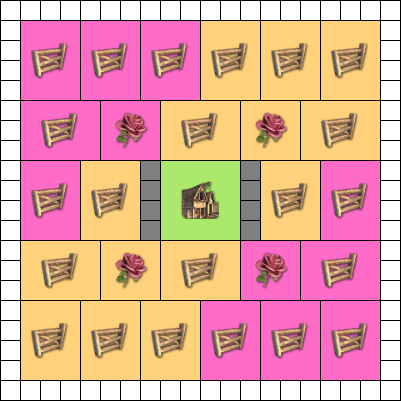
Roses
Conclusions?
Did you find this useful? Leave a thumbs up and a favorite so that this can stay at the top of the guide list
As always, if you think there’s anything I can change or fix to make this better, let me know below and I’ll try to update the guide.