
Overview
100% Achievement guide for: Project WarlockCreated on April 24th 2020 & Published on April 25th 2020
Introduction
This guide was made with the intention to provide guidelines on how to unlock all available achievements for Project Warlock. The achievements in this game are pretty straightforward and mostly involves completing the game on various difficulties or finding secrets / easter eggs. The content within this guide is subject to change in order to keep up with updates or correct inaccurate information.

There are spoilers within this guide but I’ll try to keep them contained in the boss sections. In addition, some of the achievements are hidden but for the convenience of this guide I’m revealing and listing them in their respective categories. I was initially going to include bosses in the Difficulty & Progression section but since I reached the character limit and gave them their own separate section instead.
Difficulty & Progression
Piece of Cake – Complete the game on the easiest difficulty

Come Get Some – Complete the game on the standard difficulty

Bring it on! – Complete the game on the hard difficulty

Evil Nightmare – Complete the game on the hardcore difficulty

The difficulty achievements are pretty straightforward and just like in other games you will also get the achievement for the difficulty below the one you played on when finishing the game. Just be aware that you have a limited amount of lives but you can find more in secret rooms. New players will probably struggle in the first few missions since they haven’t found any good weapons or upgrades yet. After that, the game becomes smooth sailing until episode 4 where it starts to pick up again.
As a general piece of advice I suggest you go to the options menu to enable crosshair and enemy health bar (why were they off to begin with?) and loot as much as possible as ammo can become a bit scarce sometimes. Furthermore, some enemies have additional stages when killed. You can completely deny them from entering such stage by using weapons like the flamethrower or the flak upgrade to the super shotgun.
As for Evil Nightmare, it’s without a doubt the hardest achievement in the game (at the time of writing only 0,7% of players have achieved it) and will require a lot of practice and patience. Like the description suggests, your death is permanent and you’ll have to start over from the beginning. It is crucial that you find as many secrets as possible since they will not only give you more upgrade tokens or XP, but also in some rare cases gives you access to powerful weapons early in the game.
That being said, there is a way to cheese it… It is up to if you wanna do it the legit way or the cheesy way.
The Legit Way:
I highly recommend that you take a look at the discussion thread below made by SmokeMcCloud who gives some pretty useful tips for hardcore. I followed the instructions myself and had a successful run. [link]
The Cheesy Way:
Ok, imagine you died to some stupid reason like killing yourself with your own dynamite and you just can’t get around giving it another go. Well, as PCMaker pointed out in the same steam discussion thread above, it’s possible to cheese the achievement:
Before you are able to attempt the exploit you must first complete the game on any difficulty to unlock level select (special thanks to tukana for confirming it). When you die in your hardcore run, simply select Exit to Main Menu. When you are in the main menu go to Select Single Stage and select the level you died on (or any other level for that matter) and finish the level. Now the game will boot you back to the main menu. However, there is now a continue option in the main menu and if you press it you will now play the same level again but this time when you finish the level it will continue your hardcore run normally and ignore your death. I tested it myself and found out that it doesn’t prohibit you from getting the achievement.
Lock ‘n’ Load – Buy 10 upgrades

There are 12 weapons you can upgrade in the game and you are only allowed to buy ONE out of two upgrades per weapon. In order to upgrade your weapons you need to collect 1UP stars that can be found throughout missions. Since they are limited and most of them can be found in secret rooms I suggest you take a look at the Secrets & Easter Eggs section for further information. Remember that purchasing spells also costs upgrade tokens, so spend them wisely!
Boss of Episode 1
Small step for a Warlock… – Slay The Sorcerer

This is the first boss of the game and during this battle zombies will spawn from the ground depending on where you are walking. They don’t pose any major threat to you other than blocking your path. The Sorcerer sometimes summons stronger enemies which you need to avoid. You should focus on killing the boss which has 3 stages.
Stage one
In the first stage he will be walking towards you while firing a beam in your direction, which you can easily avoid by strafing to the side. Sometimes he will also summon a rain of fireballs that you need to look out for. As soon as the battle starts you can either strafe towards the left to a “cubic” structure and use it as cover OR walk close to him and strafe in circles, just make sure you that your bullets don’t get blocked by the trees. By firing fully charge shots with your lance (hold down left click) you can kill him in 3-4 shots.
Stage two
The second stage is more or less the same expect he is a little bit faster and requires 4-5 fully charged lance shots to be killed. You can use the cubic structure I mentioned earlier as cover or continue strafing in circles.
Stage three
This stage is the most difficult one. He is a lot faster than you and has a very powerful melee attack. If you didn’t sustain any damage from the previous stages you will have no problem gunning down the rest of his HP, I suggest you use the super shotgun if you found it or the basic shotgun with auto-loader. Sometimes he can get stuck behind structures like the cubic one or the graveyard, but I wouldn’t rely on it as a strategy.
The two screenshots below are from two different instances because I forgot to take screenshots during the two first stages but the strategy remains the same.


Boss of Episode 2
Ah’n’gha throdog r’luhhor – Ph’nglui mglw’nafh Cthulhu R’lyeh wgah’nagl fhtagn

Cahf ah nafl mglw’nafh hh’ ahor syha’h ah’legeth, ng llll or’azath syha’hnahh n’ghftephai n’gha ahornah ah’mglw’nafh.
Ehyeog ye’bthnk
Ehyeog ah’n’gha r’luhhor’s yg’bthnknahh.
Ehyee ye’bthnk
Ngahnah bthnk l’ h’ ah’n’gha.
… what?
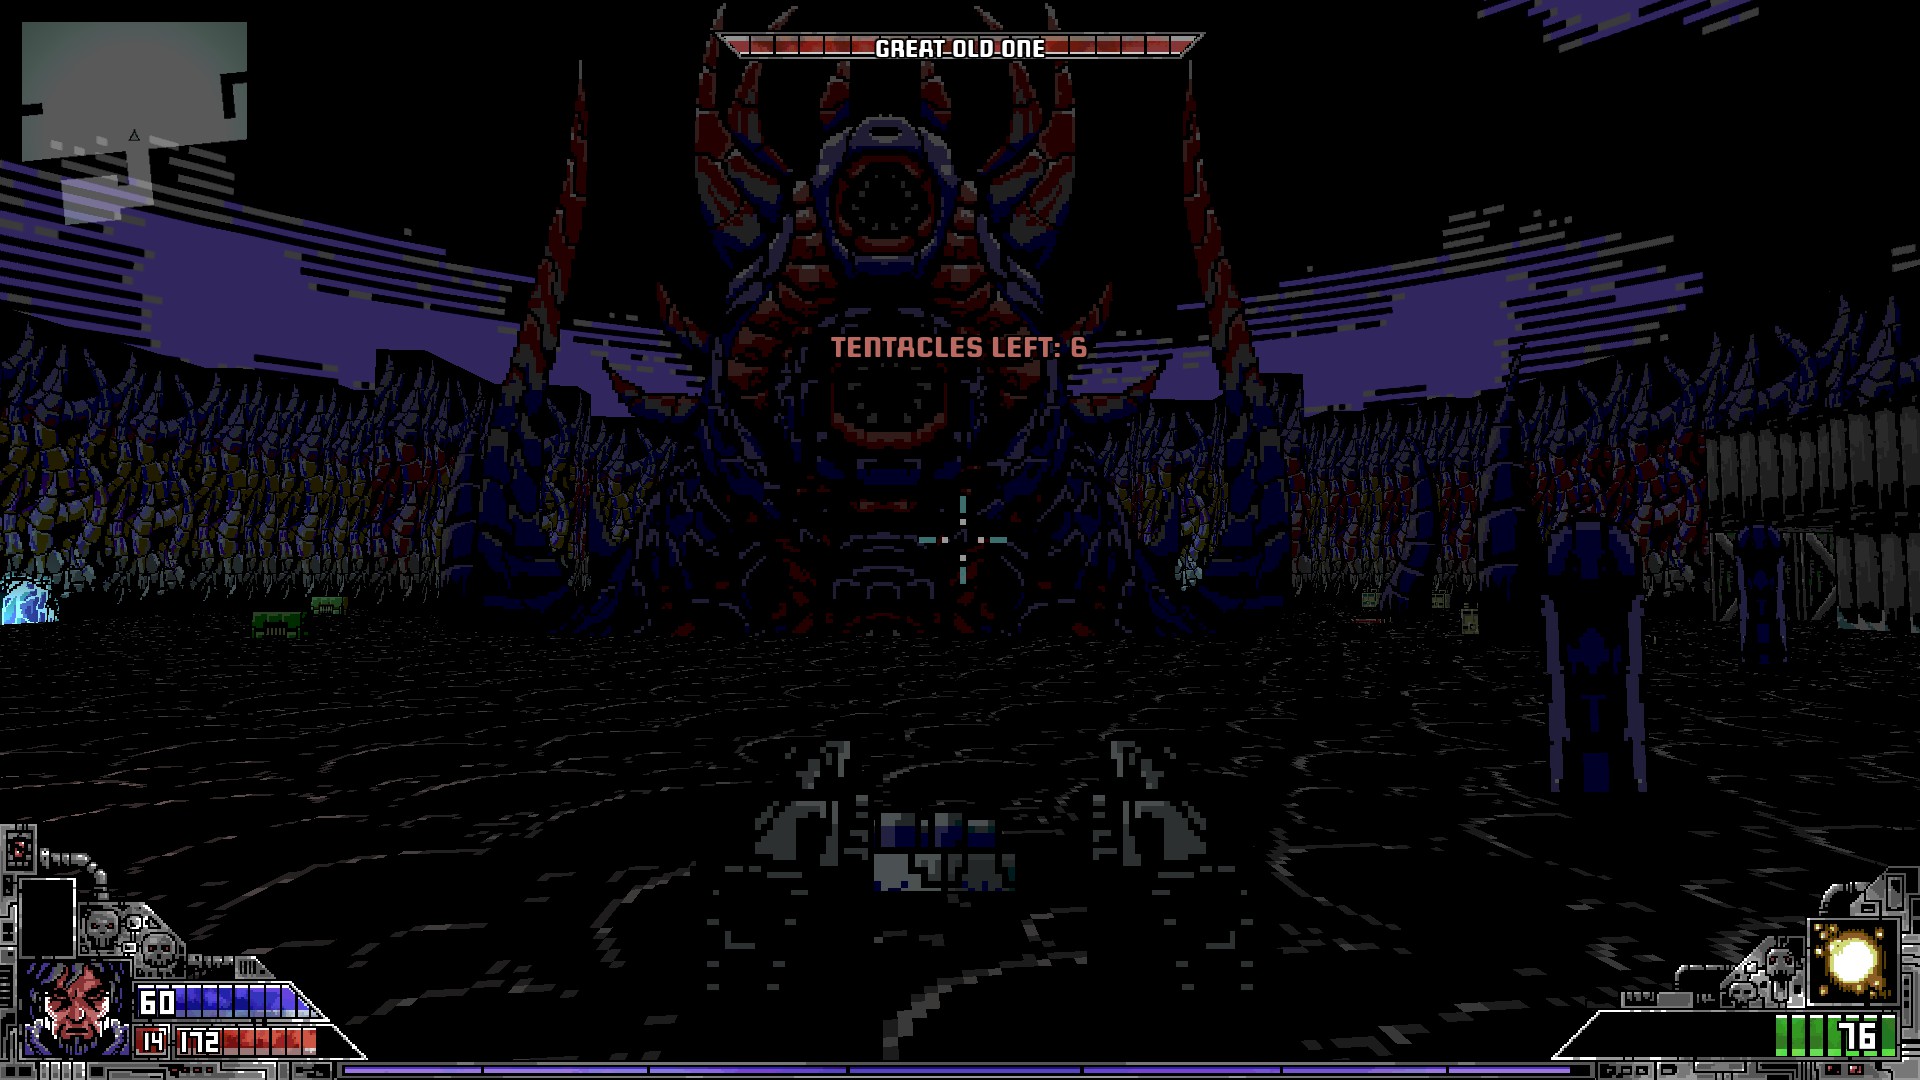
Ok, this boss fight is very easy compared to the first one and doesn’t really require a strategy other than that you should keep moving to avoid being hit. There are no health-packs that are easy to see and sometimes Lookers and Eldritch will spawn. The boss has 2 stages.
Stage one
In the first one all you have to do is to shoot the tentacles. It will give you a prompt on how many there are left each time you kill one. Shooting the boss itself does nothing so don’t waste you ammo doing that. I personally ran around with dual SMGs to clear out the tentacles and minions.
Stage two
When all the tentacles are dead the boss becomes vulnerable and at this point you can use whatever gun you feel like to shot his body, just remember to keep strafing.

Boss of Episode 3
Weird Cat – Slay the Sphinx

Boss of episode 3. This fellow can be a tricky one for unprepared players. He has 2 stages and like always, minions will aid him in battle.
Stage one
The boss is stationary and fires projectiles from its eyes that you can easily avoid by strafing in small circles or left and right. What gun you use is up to you but let it be known that the Sphinx has a lot of HP. I personally used the basic shotgun with auto-loader and walked up to the Sphinx and started dispensing all my ammo in its stupid face while strafing left and right. If all goes well you should manage to bring the boss to its second stage before the minions even have time to cause trouble.
Stage two
In the second stage the boss flies frantically around while it shoots faster and deals more damage. This is where you whip out the chaingun and start strafing in circles around the boss. The projectiles won’t hit you if you strafe in a large enough circle and if you are lucky the minions will be right under the Sphinx’s head, making it easier for you deal with the boss itself without having to worry about getting stuck.


Boss of Episode 4
Industrial Age – Destroy the Massive Tank

Unlike the other boss fights this one, in my experience, does not seem spawn minions and the only attack I’ve seen it perform is when it’s trying to ram into you. This is due to the boss fight being ridiculously easy if you have the laser weapon with the railgun upgrade or the rocket launcher with sonic-rocket upgrade. Since you will obliterate the tank within seconds the 3 boss stages don’t matter. If you have the ghost perk you are completely immune to its ramming attacks.
When the fight starts you need to get out of the elevator as soon as possible so you don’t get stuck inside it, then you should strafe to any corner and avoid its ramming attack. Kinda like a bullfight, but instead of a red blanket you have a devastating rocket launcher.


Boss of Episode 5
Double-edged Sword… – Slay the Satan himself

The last boss has a lot of HP and stages which might require you to have the sammoner spell if you don’t enter the fight with full ammo. Some more can be found during the fight but it is not much. Another great spell to have is the bomberman spell alongside the frag grenade upgrade. Since the level is so open there is little to no risk that you will injure yourself with your own explosives so spamming frag grenades in his face is very useful to quickly drain his HP. The boss has 5 stages and minions will start to spawn in the fourth stage.
Stage one
In his Little Demon form he will shot plasma projectiles and sometimes fire a beam from his eye similar to that of the sorcerer. Since his attacks are easy to avoid I suggest you use your weaker weapons such as the shotgun and chaingun, just make sure you are close to him with the shotgun if you don’t have the slug upgrade. The revolver don’t really do much even with the .50 caliber upgrade and you want to save your BFG for the later stages.
Stage two
In his second form, Turbo Satan, his attacks are even easier to avoid and if you got any ammo left for the aforementioned weapons I suggest you use them. When your ammo is depleted you can switch over to the big guns such as the rocket launcher.
Stage three
Injured Turbo Satan is more or less the same as Stage 2 but he now fires rockets opposed to a chaingun. Best course of action is to keep some distance between him and you. You can also “cheese” this stage by going to the “iceberg” in the corner of the map and kite him around it in such a way that his rocket launcher gets blocked by the iceberg. Examples provided in the screenshots below.
Stage four
He has now turned himself into a Cacodemon and his attack is now a triple laser beam or a body slam you if you get too close. He is also summoning minions in this stage that can get in the way and this is when you should sparingly use the BFG to clear them all out at once so you can focus on the boss, just save some ammo for the last stage. If you don’t have any sonic rockets left you can use your laser gun (railgun upgrade is very useful) to make quick work out of the boss without putting yourself in danger.
Stage five
This is his final form and The Fallen Lord will be stationary throughout the stage. He will swarm you with minions you which you can clear with the BFG. He will also “shoot” tentacles across the map to harm you but they can be easily avoided by strafing to the sides. Use whatever ammo you have left to finish him off.


Secrets & Easter Eggs
Marco Polo – Find your first secret

Ponce De Leon – Find 10 Secrets

Magellan – Find 30 Secrets

Galileo – Find 50 secrets

Finding secret rooms is very important for leveling up and upgrading your weapons. They are typically hidden behind walls that the player has to either interact with or destroy. You can spot these walls by looking for cracks or odd textures that stand out. An easy way to find secrets is to spam the interaction key (spacebar by default) as you are walking alongside the walls. You can see the total number of secrets on a level and how many you’ve found by pausing the game and looking at the statistics at the bottom. It is also common for secrets to be hidden within secrets, so be on the lookout for that as well.
Here are some examples:


If you don’t feel like searching for secrets you can refer to the guide below made by another steam user that provides videos for every secret on every episode.
[link]
I’m dead… again? – Find that guy who lived again

This easter egg is pretty straightforward (literally). In E1M5 (Graveyards – The Gates) walk forward right as you spawn and interact with the wall that stands out to reveal the secret.
This easter egg is a reference to Caleb from the Blood franchise.


Shadow of the East – Find that weird Chinese guy

This one can be found in E2M11 (Antarctica Labs – Antarctic Anomaly) and can’t be missed. Simply play until you find the red keycard, in the same room where the red keycard is located a large window can be seen that reveals a testing chamber where our friend is at. Continue to progress the level normally until it teleports you into that same room. Since it is tied to level progression this achievement can’t be missed.
The person in the chamber is Lo Wang who is the main protagonist from the original Shadow Warrior game.


Too Serious – Find the guy who took everything too seriously

This secret can be found in E3M1 (Deserts – Atsui) and is close to where you spawn. After you have cleared the enemies in the first area, walk forward and in to the first building. Interact with the hieroglyphs featuring an Egyptian god to the right side of the wall and the secret will be revealed to you.
This achievement is a reference to the Serious Sam franchise.


Those Alien Bastards Never Paid… – Find that gum-chewing and ass-kicking guy

After you have greeted the welcoming committee in E4M3 (City – Masochistic Metropolis), walk back to the point where you spawned and take the first door to your right. Continue to the second large room in the building where a couple of Security drones and Bladebots are throwing an after party and interact with the odd textured wall to the right to reveal the easter egg.
This achievement is a Duke Nukem reference.


Ripped and Torn – Find the one who was supposed to rip and tear until it was done

As soon as you spawn in E5M9 (City – The Gauntlet), take the first door to the left and then proceed down the corridor to the next door. Once you have fought off the enemies continue to the switch and interact with the wall to your right to find the secret.
This achievement is a reference to DOOM.


Wrong Slipgate – Find your double-barrel-and-axe-carrying friend

The easter egg is in E5M11 (Hell – The Lord of Hell) and it sort of just unlocks as you fight the boss. I have no screenshots of it because I couldn’t find it anywhere when walking around the map.
It turns out that the easter egg was hidden in plain sight. As sachdall pointed out in the comments the easter egg is slightly to the right of your spawn across a lava pool. The guy you’re looking for is in the middle of a group of crucified bodies. I initially mistook him for another doom reference.
This achievement is a reference to the Ranger from Quake.


Conclusion
Hopefully you found this guide useful. If you have any questions or suggestions let me know in the comment section.