Overview
Learn how to get started with Guild Wars: Prophecies. Create a character and learn basic gameplay mechanics in a limited tutorial area. This guide will cover creating a character, choosing a primary and secondary profession, the attributes system, map travel, zone info, and quest mechanics.
Introduction

This PvE guide is for new players starting out with Guild Wars: Prophecies. It is not a walkthrough, and instead will only help to teach players how to play the game well enough to succeed. I will not be covering class-specific mechanics or recommending skill combinations, but helping to focus your attention on your eventual role in a party, even if you’re playing alone, as Guild Wars is largely a team-based game. Whether that team consists of other players or computer-controlled allies is up to you.
Guild Wars has rich content and deep lore if you’re interested in seeking it out. The skill system is designed to fit your personal playstyle and rewards player skill with victory. Guild Wars is not a strategy game, but good players will need to employ effective strategies to succeed. Failing a mission, for example, might be a sign that players will need to bring different skills or a different party. Much of the joy of Guild Wars is finding the right party balance, skills, and strategy to succeed with your unique playstyle.
On its surface, Guild Wars appears to be an older RPG with standard genre elements. Talk to NPC, take quest, do quest, turn in, etc. Where it separates itself from other games is in its complexities. Restricted to 8 active skills at a given time, players find themselves with thousands of potential build combinations between their dual professions, meaning that if you’re willing to make the investment you can build out a character designed perfectly to fit your personal playstyle. The low level cap (20) means that the whole game is about perfecting your character to your own needs, and not about getting to the highest level or securing the best gear, both of which will just happen naturally as you play the game.
You might make a ranger that specializes in traps & rituals while you lie in wait for your prey, or one that focuses on heavy damage dealing and charging into enemy territory unannounced. Your ranger could focus on quick, perfectly-timed interrupts to decimate casters, or on causing painful conditions that weaken an entire enemy party. You could capture a pet in the wild and watch it level up alongside you and grow stronger until it evolves, commanding your companion to use powerful skills against your enemies. Or you could do a combination of everything, and that isn’t even taking secondary class skills into account!
All Guild Wars classes have amazing versatility and can be played in any way you see fit. The rangers described above are just one example of the many, many different ways a single class can be played.
Many new players are obsessed with “the best” — “what is the best skill,” or “what is the best weapon” — but ignore the fact that the question is subjective and depends on what the player personally wants out of the game. In the area of Guild Wars covered by this guide, players should be encouraged to try different things to see what they like the most, and be prepared to genuinely try and understand what they want from their character.
If you just want to win and get the best gear, perhaps Guild Wars is not for you.
If your interest runs deeper, there’s plenty of fun and engaging content awaiting you.
Creating a Character
If you need help creating your account, you may refer to my other guide: How To: Guild Wars & Steam.
After you’ve created your account, you need to create a character. After clicking the “Create” button near the bottom right of the screen, you will first be asked whether to create a Roleplaying Character or a PvP-Only Character. The roleplaying option will allow you to create a level 1 character and play through the game’s story and complete quests. PvP characters start at level 20 and can only be used to play in special matches against other players. For the purposes of this guide, select a Roleplaying Character.

The next screen will ask you to select the campaign you wish to play, and will display any campaigns unlocked on your account. The campaign you choose will affect your options for character creation (eg. specific hair styles) and class selection, as well as which story you will first participate in. For the purposes of this guide, new players should select Prophecies.

After reaching both level 10 and any campaign’s capital city, you will be given the option to travel to other campaigns unlocked on your account, and can choose to play through their separate story content even though your character is from a different campaign. The only content that will be inaccessible to you is each campaign’s initial tutorial area.
After selecting the campaign you want to play, your next option will be to decide on which class your character will be. Classes are discussed in more detail in my Introduction to Guild Wars guide (see: Classes / Professions), though I’ll reiterate here that new players would do well to begin with either warrior, ranger, or elementalist. These are some of the most powerful classes in the game and tend to have more straightforward attributes and skills than the other professions. These classes also include self-healing skills at early levels which can be helpful when getting started.
Unlike most online games, each class in Guild Wars can be tremendously flexible, meaning that you should not be too turned off if you do not like how a character initially plays. Your characters need to be customized to fit your playstyle, which tends to happen organically as you play the game.

The following screens will allow you to customize and name your character. For the purposes of this guide, I will be creating a warrior.
Don’t forget your character name. You will need it to login to your account after creating your first character.
Welcome to Ascalon
After enjoying the opening cinematic, you will find your character standing on the outskirts of Ascalon City. Just ahead of you and to the right will be the Town Crier who will give you your very first quest.
You can move about Tyria using WASD. Hold down the Right Mouse Button to move the camera, and click on people or objects with the Left Mouse Button to interact with them. Note that hovering over someone you can interact with will display their name. Take your first quest from the Town Crier.

After taking the quest, note the Compass in the upper right-hand corner of the screen. A green arrow will appear along the edge of your Compass to indicate where your next quest objective is. Once the objective is in range, a green starburst shows the exact location of the quest objective on your Compass.
NPCs and interactive objects related to quests will show a green symbol above them. This symbol will be either an exclamation point for new quests, or a downward-pointing arrow for quest objectives.
Find and talk to Sir Tydus to complete your first quest and take its follow-up. Once you’ve taken the follow-up quest, press “L” to display your Quest Log where you will see the quest you’ve just taken, which is listed under “Primary Quests.” Primary Quests are required to be completed to advance the game’s story. You can view your Quest Log at any time to keep track of any active quests you have. Note that left-clicking a quest title from your log will make the quest active and show an arrow on your Compass to the next quest objective, and that quest givers and objectives are not normally marked on your Compass except for those concerning your active quest.
Holding down the CTRL key on your keyboard will highlight players and enemies by displaying their name. Holding down the ALT key will highlight NPCs and objects. Both keys can be used to highlight targets through walls or other obstructions, which can be helpful if you’re having trouble finding a player, NPC, or quest objective.
Explorable Areas
Your next quest, “War Preparations,” will lead you outside the town into Lakeside County. Note the tip that appears when you enter this area:
When you adventure outside of town, you get your own private copy of the world. To play with a friend, simply form a party together before leaving town.
Lakeside County, along with most areas in the game, is instanced to your party. This means enemies you defeat will not respawn until you leave the area, and NPCs will come and go as pertains to your situation. For example, completing your next quest (“[Profession] Test”) will trigger the NPC Haversdan to appear through the portal from Ascalon City to give you your next primary quest (“Further Adventures”).
Just across the road is a resurrection shrine. There are often several in each game zone and they will light up when you get near them. If you are defeated, you will respawn at the nearest shrine activated.

Next to the shrine is an NPC called “Brownlow [Collector]” who will trade you various items for a specific enemy “trophy” (collectible drop). In this case he’ll trade you a Belt Pouch for 5 Skale Fins, which will give you 5 extra inventory spaces. There are Collectors all over Tyria, often several per zone, offering to trade various armor, weapons, or quest items for different things you pick up in the world. Even if you’re not trading to a Collector, random drops are your #2 source of income in the game after quest rewards, so be sure and pick up everything. Anything you haven’t picked up by the time you leave the zone will be lost forever.
After dealing with some Skale, getting some skills, and talking to Haversdan, continue on with your next quest objective to talk to Devona. On the way, press “U” to turn on your mission map (minimap). Red dots on this map show where you’ve been, and can help you to retrace your steps if you get lost.
Skills & Attributes
Talking to Devona will probably level you up if you haven’t already. You can open your Skills & Attributes window with “K.”
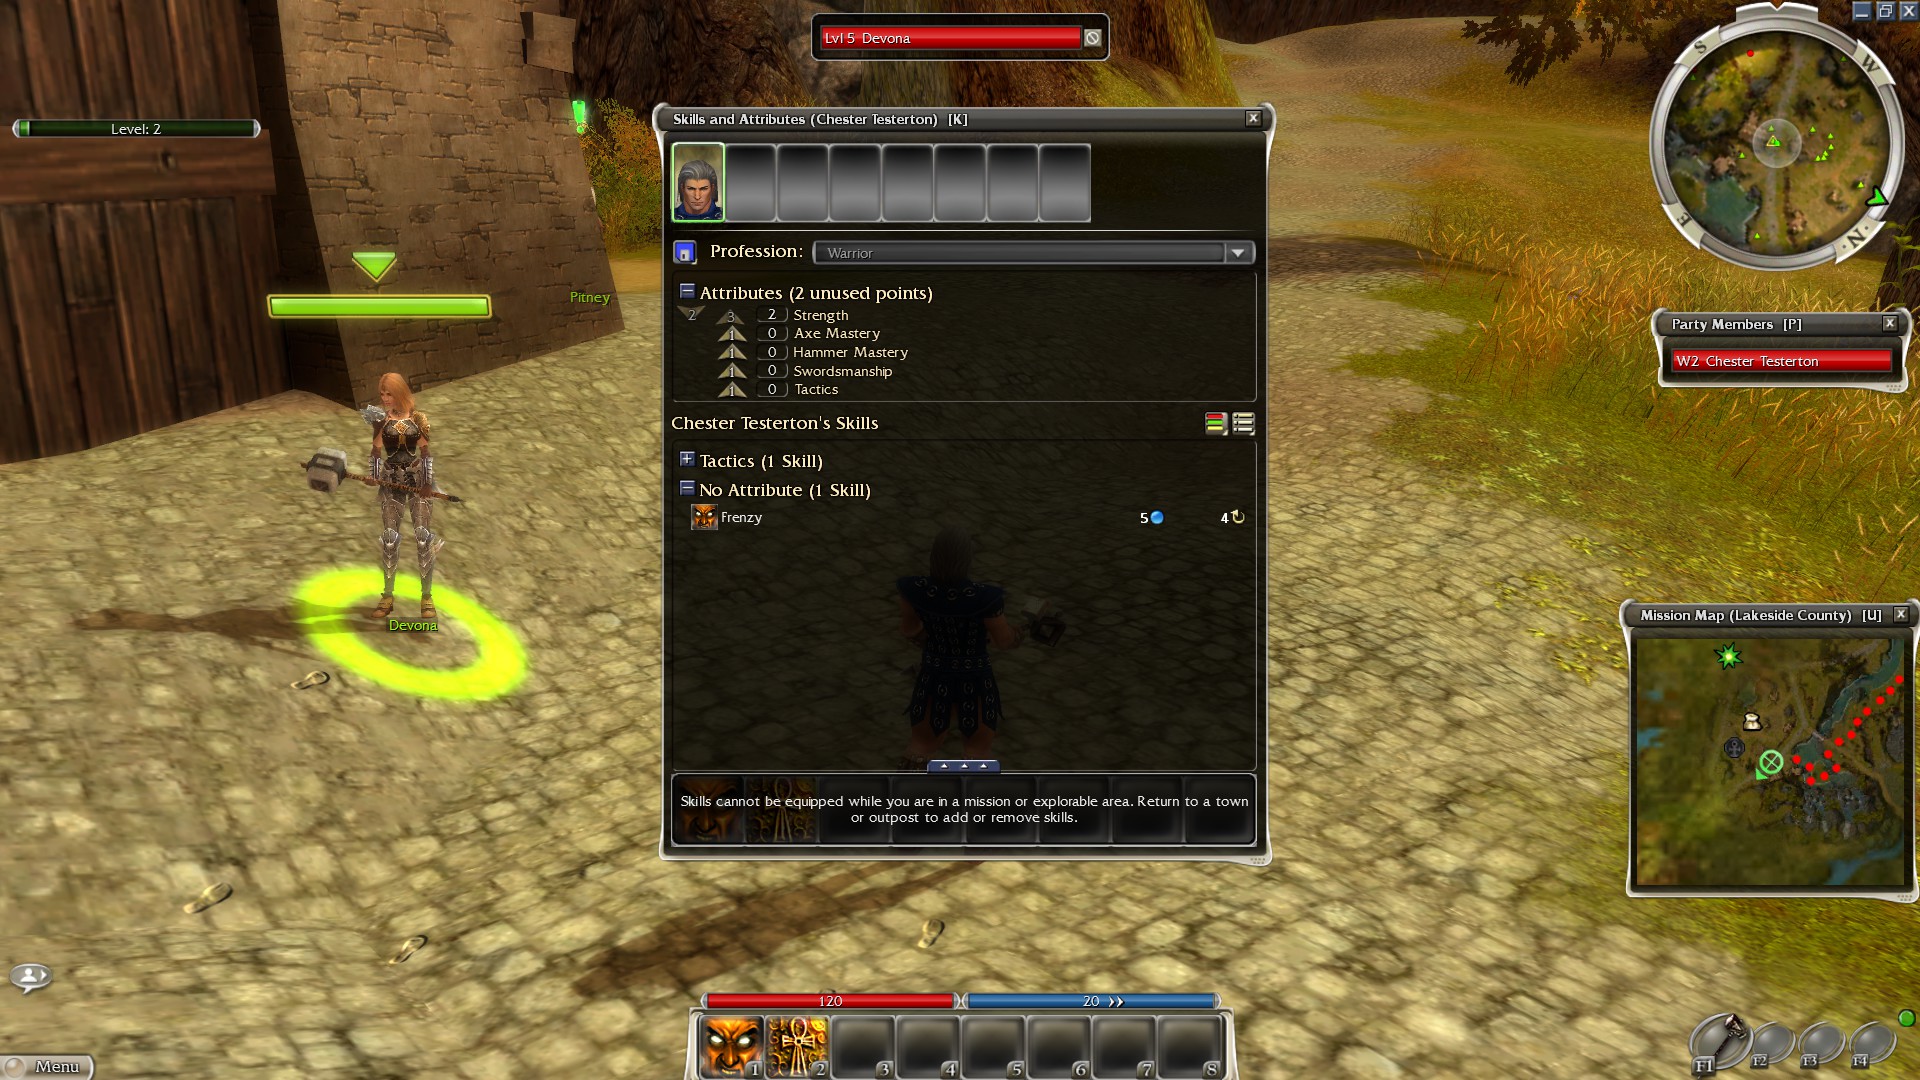
You will earn a skill point and attribute points every time you level up. You can assign your attributes using the arrows to the left of the attribute name, and the number in the arrow will show how many points are required to further increase that attribute. These points can be reassigned freely in any town or outpost, so you don’t need to worry about making mistakes.
Each profession has a single “primary attribute” which is specific to that class.
It is critically important to take advantage of the primary attribute for your class, as all skills for your profession will typically benefit. You’ll also notice in your Skills & Attributes panel that any skills you’ve unlocked are listed under their respective attributes. Adding points to any skill’s attribute line will often make that skill more effective.
Devona’s new quest, “Unsettling Rumors,” will lead you to Ashford Abbey where Meerak the Scribe will tell you about Map Travel. Use the “M” key to pull up the world map and travel back to Ascalon City where Armin Saberlin will tell you about secondary professions. You can map travel to any town or outpost you’ve previously visited from anywhere in the game at any time, though if you map travel from an explorable area it will be immediately “reset” the entire zone (all monsters will respawn).
Secondary Professions
Though secondary professions are one of the biggest boons to Guild Wars, they can also be unfortunately distracting for new players. Even veterans would do well to first learn how to play their primary class well before investing any time or resources into a secondary profession. At this point in the game, the primary purpose of the other profession is to help fill your skillbar until you get more skills for your own class to replace them, and to give you a taste of what other classes can do.
By design, and because of primary attribute exclusivity, no character will be as effective at their secondary profession as somebody who is playing that class primarily. For example, a poweful elementalist skill might cost 25 energy to cast, which is more energy than some classes will ever have. Some mesmer skills might take three seconds to cast, but a primary mesmer can cast the same skill almost instantly due to their primary attribute. Secondary monks will never be able to heal as effectively as a primary monk.
As you progress through the game, you’ll eventually be adventuring with NPC mercenaries (“henchmen”) who will be able to compliment your own skills. This means that you don’t need to take monk as your secondary profession just so you can heal yourself: a monk henchman will always be available to you, as will a warrior and an elementalist among others.
In this starting area, you will have the opportunity to try all of the available subclasses. For reference, My Introduction to Guild Wars guide details some of the other professions (see: Classes / Professions). Feel free to try any other classes if you’re curious, otherwise prepare to lock down your decision.
Beware this message:

Though technically true in that you will no longer be able to try a secondary profession, the statement is misleading. You will, in fact, be able to change your secondary profession later if you wish, just not until much further into the game.
Below is some information on secondary profession utility.
Warriors use shouts and stances to augment their defenses and support their party. An example is the tactics skill “Watch Yourself!” which temporarily grants your immediate party additional armor.
When players use ranger for their secondary profession, it is usually so that they can have a pet fighting alongside them, though they often bring no additional skills for it beside Comfort Animal. Wilderness survival spirits are also sometimes brought by secondary rangers, though the cast time can be seen as prohbitive.
Most players who select monk as a secondary do so to have a hard resurrection skill with them like Resurrect which can revive a fallen ally. Monk as a secondary is nowhere near as effective as it is as a primary, and healing is always better left to a designated healer. If you bring Mending as a secondary monk people will laugh at you and leave your party.
Necromancer is unusual because its primary attribute only deals with energy recovery. This means that any class can be an effective necromancer if they budget their energy effectively, though most players that select this as their secondary profession do so for curse spells or corpse exploitation skills like Well of Blood which grants health regeneration over a given area.
Mesmers have many useful skills with low energy costs and long cast times. Many might pick mesmer as a secondary for its interrupts, hex removal, energy recovery, or punishment skills. Defensive mantras like Mantra of Flame which temporarily reduces fire damage are also popular.
Any class can make a powerful elementalist, but many elemental skills are prohibitively expensive to cast and have unusually long cast times. Because of this, most people that select elementalist as a secondary profession do so for its unique energy management skills like Glyph of Lesser Energy which temporarily reduces the cost of spells.
Secondary professions are introduced at this point in the game to help you have better visibility into what other classes can do and what to be prepared for yourself as you lead your party. In my opinion, they can cause you to lose desperately needed focus on your primary class when you need it most and create an unnecessary and overwhellming distraction for new players. Though any class can make a good secondary profession, I strongly recommend against selecting elementalist because the energy cost of their skills will quickly bankrupt your skillbar. If in doubt on what to select, I suggest picking ranger as your secondary profession because it will allow you to charm a pet and focus on your primary profession. If ranger already is your primary profession, I suggest warrior or mesmer.
That said, I’ll reiterate again that most skilled players will often only adopt one or two skills from their secondary profession unless they are running very specialized builds. More than that, skilled players often won’t waste many attribute points in secondary trait lines. It might be fun to cast Meteor with your warrior, playing an “unstoppable” battle mage, but it’s really a waste of your core strengths as a warrior as there are many warrior skills that will better contribute to your party’s victory.
As a rule, every point you sink into a secondary profession’s attribute line is a point that would have been better spent on your primary attribute. If you follow my advice and select ranger, the only ranger skill you will need is Comfort Animal which will let you heal and revive your new pet.
When you are ready, lock in your choice for a secondary profession.
Moving Onward
With your secondary profession selected, you can choose to continue with the story or complete additional quests around Ascalon for experience. This entire area should be considered a tutorial area, and you will not have access to account storage or additional content until you continue by taking the quest “The Path to Glory” from Armin Saberlin in Ascalon City which comes handily with this warning:

We are mustering our forces now. The attack against the Charr will begin tonight. Let me know when you’re ready to go, but be sure that all of your affairs are in order before you do. Once we leave, there will be no turning back. You may not see friends or family for quite a while. If you have unfinished business, attend to it before we go.
After selecting “I am ready to leave everything behind,” you will begin the next part of the campaign and will no longer be able to access this entire area.
Given that this is a tutorial area, you shouldn’t feel obligated to stay longer than you have to. If you’d like to gain a few levels before continuing on or simply want to explore you need to do that before proceeding with Armin’s quest. This area is relatively large and there is lots to see and do if you’re interested, like The Northlands or Wizard’s Folly. There’s even a hidden NPC who collects a different monster trophy every day in exchange for delicious treats!
Specifically of note are a handful of collectors who will offer you upgraded armor in exchange for various trophies. If nothing else, you may want to upgrade your armor before continuing, though you will be able to buy the same upgraded armor shortly if you don’t want to work for it.
Next Up: Prophecies (Part 2): Joining The Fight
Map
