Overview
I will show you how to make and implement random maps to the game in a few steps.
Overview
The basic idea is the following:
1. We open any map already there in the game directory
2. We use Gimp to have different layers for editng
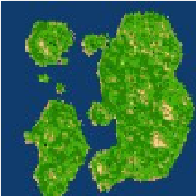
3. We import a random generated picture of a settlers 2 map
4. We adjust colours and size to our liking
5. We save it with a fitting configuration in the game directory
Setting up our Map in Gimp
– Go to your game directory
Example:
(C:Program Files (x86)SteamSteamAppscommonAurora Dusk – Steam Agemaps4)
– Copy a map you are familiar with on your desktop
(Get one with every type of terrain so we can use it as palette)
– Open it with Gimp
(Free to get on the net)
– Save it as .xcf
(This way it keeps layers)
– Rename your inital layer to “palette”
(From there you can get the colours you need later)
– Add 2 new layers and rename them to “actual map” and “background”

This way you get one layer for the actual map you want to save later.
The Background is to fill gaps when importing the settlers 2 map.
The palette is a palette.
Importing a Settlers 2 Map
– Go to this link [link]
– Adjust width and height to your maps size.
(It’s all in pixels so you don’t need to convert from one type of measurement to any other)
– You can also adjust the kind of terrain. It will put out other colours and thus other terrain.
(The maps in Aurora Dusk work as an indexed palette image. So it will adjust the image to the fitting colour)
– Create and do a right click on the new map’s image. Copy it to clipboard and paste it in Gimp to your “actual map” layer.

Editing the Map
– Go to your background layer and fill it with a colour/terrain.
(you want any possible holes existing in the imported settlers 2 map to be filled)
– Use “colour select” on every black pixel of “actual map” layer and replace it with some terrain colour.
(Every black pixel is a starting point. You don’t want 256341 starting points.)
– You can use the colour select and replace with other colour method also to replace unwanted terrain with something more to your liking.
(For example the rocky terrain which doesn’t allow building on it replaced with sand or grass)
– Now go to your palette and pick the black colour.
– Add starting points to your map. One black pixel is one starting point.
Saving
– Merge all layers to one in Gimp.
– Don’t let it change the size of the image even if one layer might be bigger then the actual map.
– Export it as .png in your map directory. Save it accordingly to it’s number of startpoints.
(You can use your .xcf as template to create new maps faster. Only save .png in your map directory,though!)
Final Words – Mappack
I’d love to add your made maps to make our own community made mappack!
I made this guide to help people get more maps and also to encourage them to upload there maps.
(For example on moddb or imgur)
Also this is my first guide. I’m sure there are things i could add or explain better. Feel free to leave a comment and help me help the community =)