Overview
Possible locations of the Ravaged Art pieces. – Work in progress!Please rate/vote up, if this was helpful – thanx!Apparently each map contains 3 pieces out of 20 possible locations.Currently, Engines of War (7), The Pit (2) and Blightreaper (4) maps are missing screenshots. I wrote down all locations though.
I, Righteous Stand
All locations
 This is around the corner from where you enter the market square.
 Short before the 1st tome. In a side alley of the first market square.
 Just up the ladder and above the last location. On the opposite end of the 1st tome.
 After the 1st tome, before the arena.
 After the arena up the platform inside the small room to the right.
 The same building, where the 1st grim is located. Downstairs near the grim.
 Upstairs in the same building.
 At the end of the long hallway. A few yards ahead from the above location.
 At the end of that building.
 Ramp up to the 2nd tome.
 On the opposite walkway of the one you have to climb up to release the cannon.
 Inside the building the cannon tore a hole in.
 Before the 2nd grim after that wooden ramp to the left.
 Before the building, you jump from to get the 2nd grim. The cannon is the one in the middle on the left side.
 Inside that building on the ground floor.
 After the 2nd grim in the last courtyard of the castle.
 Ontop of a tomb in the open area near the 3rd tome.
 Going downwards the final stone staircase.
 The final area with goodies. Looking backwards. Next to the corpse. (No art to see, screenshot will be replaced.)
 Diagonally opposite to the above location. Ontop of some lumber planks. (No art to see, screenshot will be replaced.)
I, Convocation of Decay
All locations
 Diagonally opposite to the 1st tome, but still in the sleeping quarters.
 The next larger room following the sleeping quarters with the 1st tome. This on the far side from where you enter this area.
 Inside an end of a corridor room. Ontop of a box. (No art to see, screenshot will be replaced.)
 Inside one of the cubicles before you enter the sewer area through the hole in the wall.
 This is the first sewer area.
 The next sewer area.
 Upstairs opposite to the above location.
 A bit further on in the same area.To the right.
 Under the first wall brick trigger.
 Short before you enter the area with the 2nd tome. In the parallel canal to the right.
 Awkward to describe. This is the canal area after the 2nd tome on the upstairs walkway. Behind me is an alcove with goodies you see through a grate.
 This right opposite across the canal from the previous area. Also on the upper floor.
 Short before the below area.
 This is this kinda semi-hidden area if you don’t enter the room on the right to jump down into the sewers, but head instead straight on into a roundish hall and through the tunnel on the left.
 On the right side after dropping down into the last sewer area.
 Area from where you get up to get the 2nd grim.
 At the bottom of the staircase in the next area. Inside the short cave. (No art to see, screenshot will be replaced.)
 Looking at the 3rd tome location.
 On the lower ledge on a rock. (No art to see, screenshot will be replaced.)
 At the very end of the cliff before crossing the bridge. (No art to see, screenshot will be replaced.)
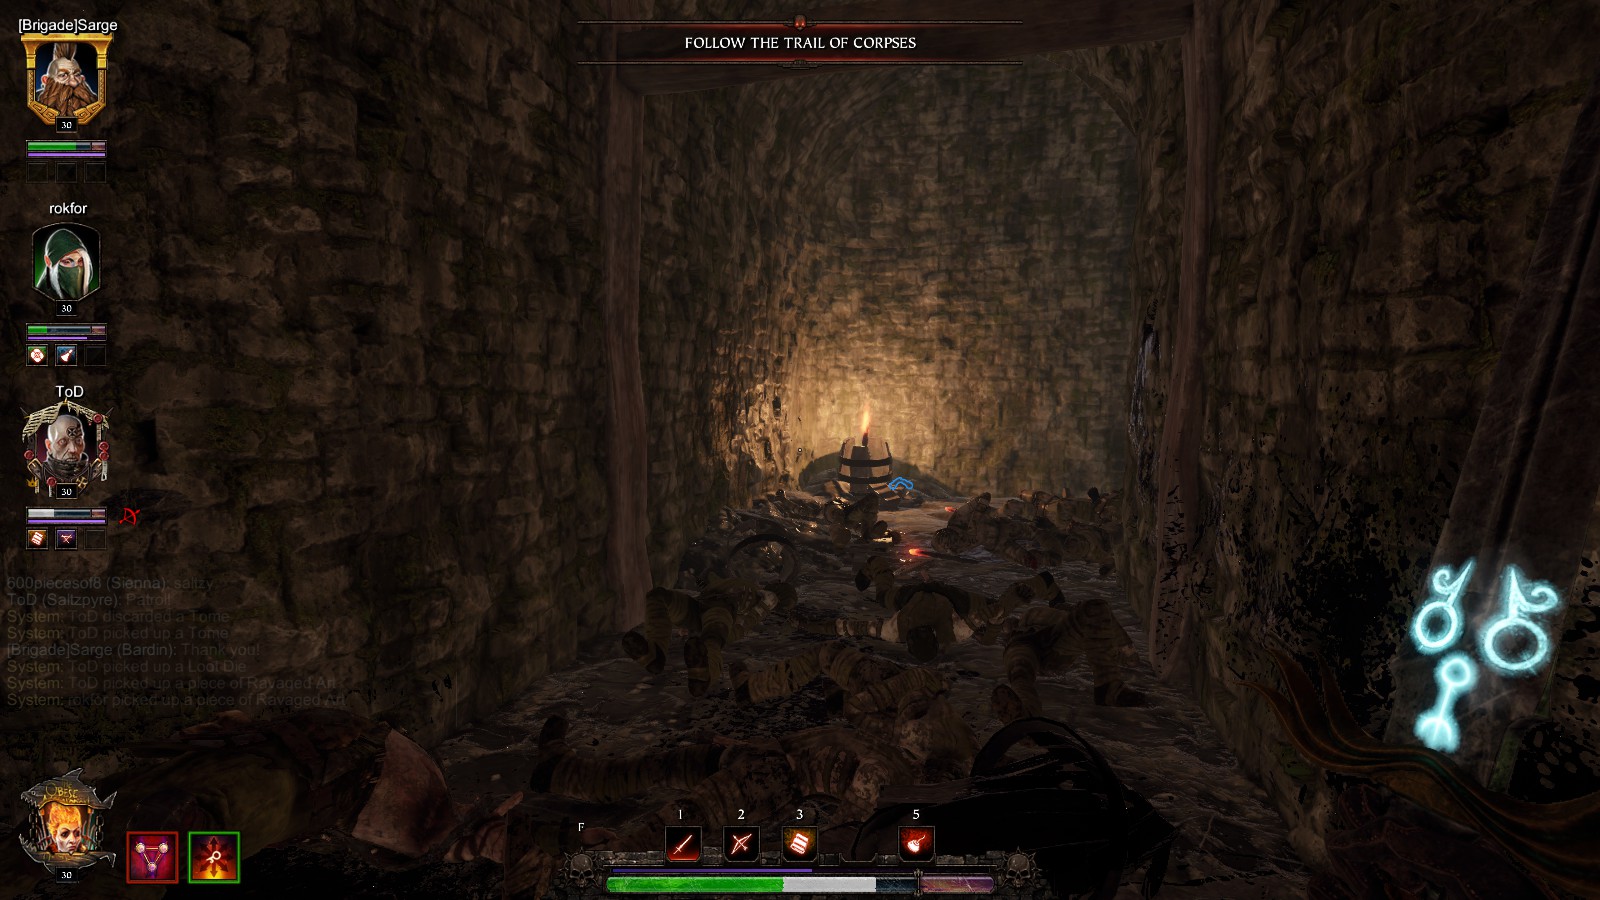
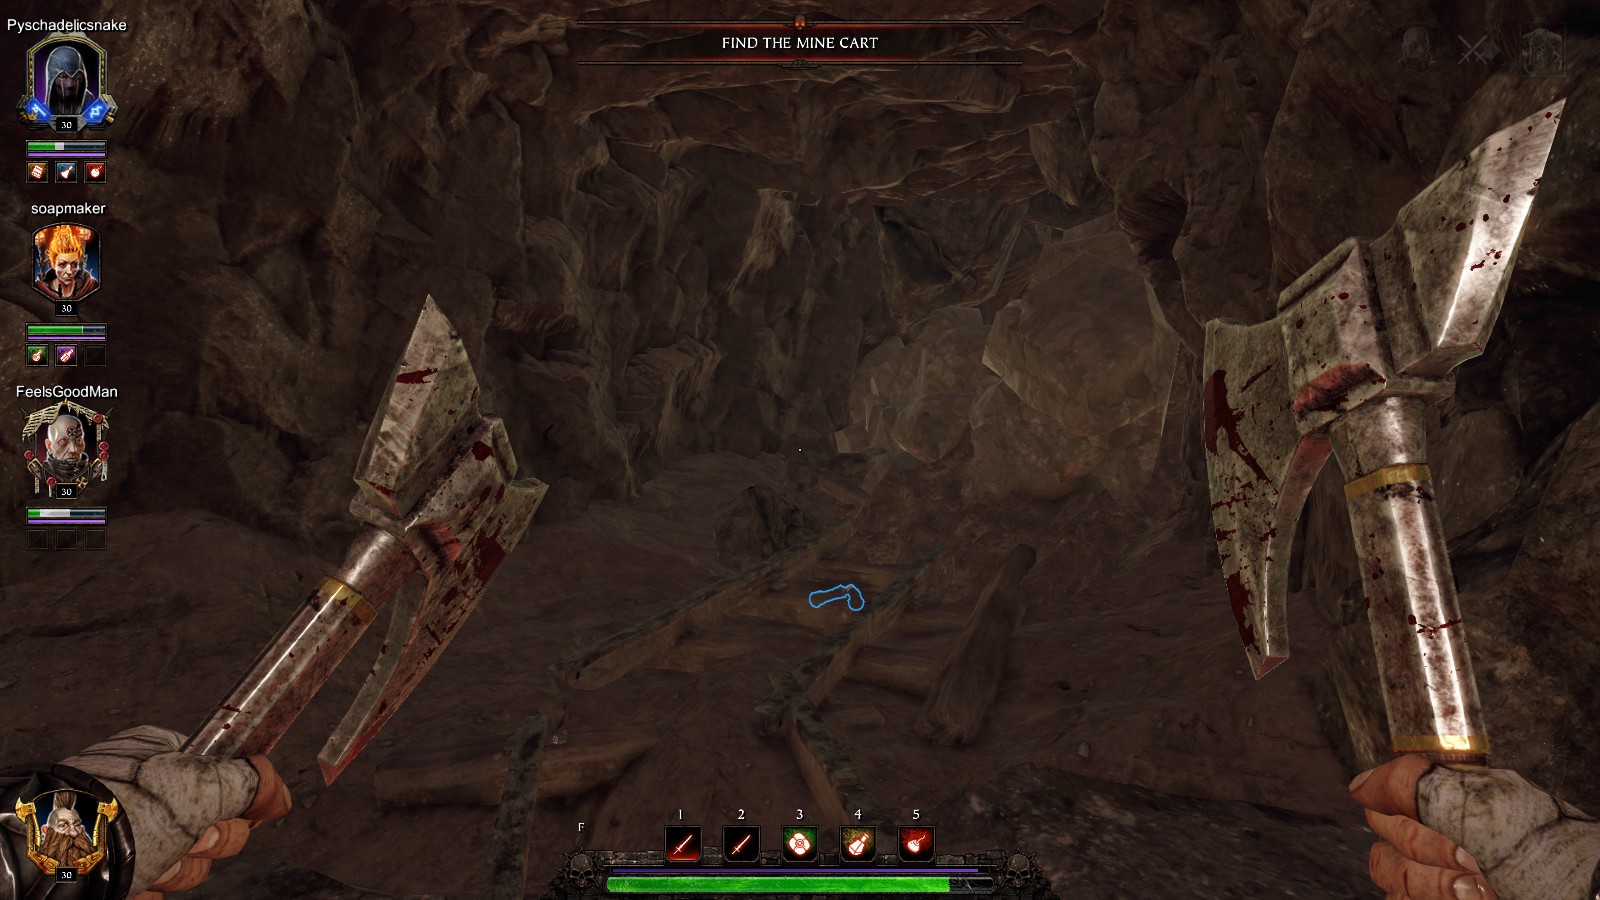
I, Hunger in the Dark
All locations
 Inside one of the wooden sheds in the area prior to the 1st tome area.
 Further ahead to the left of the above location.
 The tunnel left of the one containing the 1st tome.
 After the 1st tome. Right before you jump down to the cart/lore.
 Ontop of the left scaffolding. In the area you have to collect the 3 explosive barrels.
 First ladder to the upper level in the next area. To the right.
 Upstairs before the 1st grim.
 Also in one of those caves in the area of the 1st grim.
 In the first dark area. Inside a tunnel at the top right corner. The rails make a left turn and this is the other direction. Rather skip searching this location.
 Dark area. Inside the small side tunnel to the left between the first and second dark area. (No art to see, screenshot will be replaced.)
 At the other end from the one portrayed of the above tunnel. In the middle of the rails.
 Inside the small tunnel which is next to the lever right before the ramp starts in the second dark area. (No art to see.)
 After the ramp. In the last dark area at the beginning of the the right lower platform. (No art to see, screenshot will be replaced.)
 Diagonally opposite from the above location at the end of the left lower platform.
 Near the goodies in the area you jump down to after getting the 2nd grim. (No art to see, screenshot will be replaced.)
 Before the cave leading to the 3rd tome.
 Inside the cave with the 3rd tome. In the middle of the cave to the right.
 Same cave. At the end to the left. (Looking backwards.)
 After getting out of the above cave.
 Before the final goodies location to the left from the above location. (No art to see, screenshot will be replaced.)
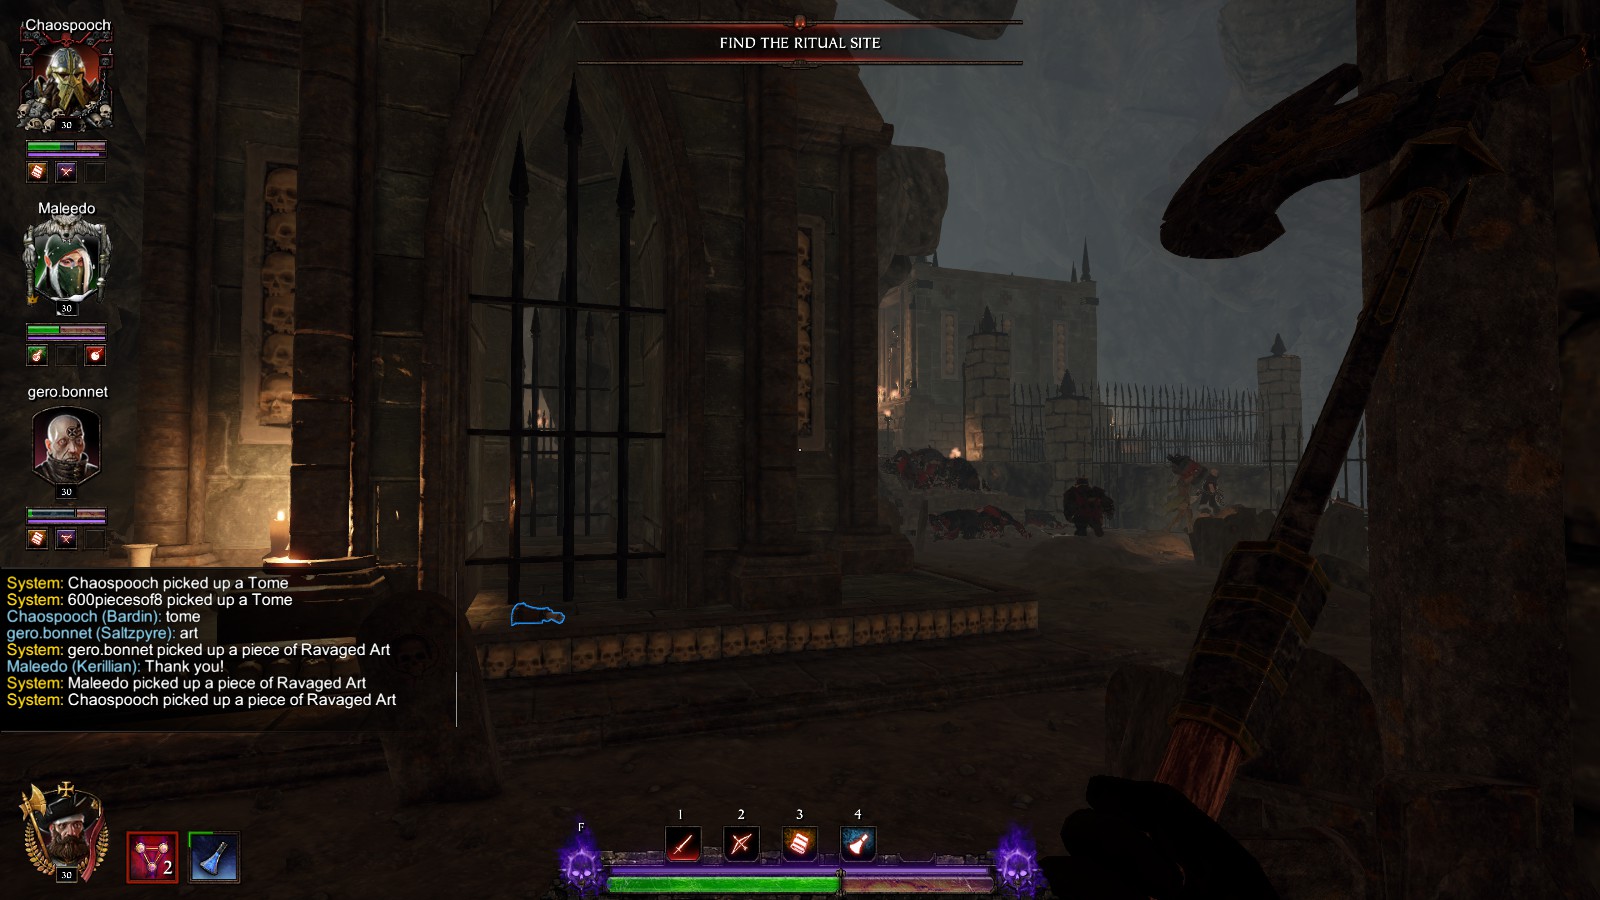
I, Halescourge
All locations
 In the last backyard to the left before getting down the staircase.
 Above the 1st tome location.
 The first street after getting down the stone staircase. On the upper level diagonally opposite of the location of the 1st tome.
 In the next area with the lifting platform. At the far end of the road.
 Short before the bridge area. In the right-turn of the road leading towards it. Looking back on the screenshot.
 After the lifting platform inside that parallel route through the cellar.
 After getting out of the cellar at the right wall.
 Over the stone bridge and to the right. Near the cliffs.
 In the same platform area, just in the opposite direction of the above location.
 Inside the ruin you have to pass through after collecting the 1st grim. Shame on Saltzy for jumping in front of that art piece.
 After the 3rd tome, before the 2nd grim.
 Straight on behind that house would be the 2nd grim.
 After getting the 2nd grim head towards the market square and then left. Ontop of that staircase.
 Similar setup in the same area as above. Just in the opposite direction to the right. (No art to see, screenshot will be replaced.)
 Short before the location described below. After the 2nd grim.
 Basically the pen-ultimate area before you face the boss. That “Set Free” marker is next to the final ammo & health stash.
 Across the street to the right. A few yards ahead of the above location. (No art to see, screenshot will be replaced.)
 To the left at end of a street.
 Looking backwards from that last ammo/health drop area.
 After you jump down into the final area before entering the arena building. The right way around it on a ledge. (No art to see, screenshot will be replaced.)
II, Athel Yenlui
All locations
 At the beginning near the goodies spawns on the far right side of the map going downhill.
 This is a few yards ahead of the above location. Looking backwards you see the tree trunk you can walk through on the far left.
 Straight down from the above location. At the border of the map before turning right into that valley.
 After you go down into that valley. On the upper ledge part to the left.
 The rock in the middle you can pass on both sides.
 Short before the point of no return after that little valley.
 At that weathered monument stone (obelisk) you turn right to get to the 1st tome. The tome would be behind me.
 Under the thin green arc. Coming from the 1st grim and heading towards the 2nd tome, it is somewhere in the middle. (To the right of Saltzy.)
 Near another (inclined) weathered obelisk just a few yards from the above location. (No art to see, screenshot will be replaced.)
 Near the entrance of the cave and the 2nd tome.
 Inside the cave. To the left near the end.
 This is just after leaving the same cave. To the left.
 Same area as above but to the right.
 The first and second triggers for the 2nd grim are near. This is the platform where one of them is located.
 Near the final trigger.
 On the right side ontop of those shiny bricks short before the ramp leading to the 3rd tome area. (No art to see, screenshot will be replaced.)
 After the 3rd tome.
 Next area, opposite the staircase. Looking backwards to where you came from.
 Pen-ultimate area.
 A few yards ahead from the above location. Behind that rock to the right side. Looking backwards.
II, The Screaming Bell
All locations
 After jumping down the roofs, on the far left side at the end of a street.
 Ontop of the first platform with a ladder before entering the first large town square
 At the beginning of the first market square.
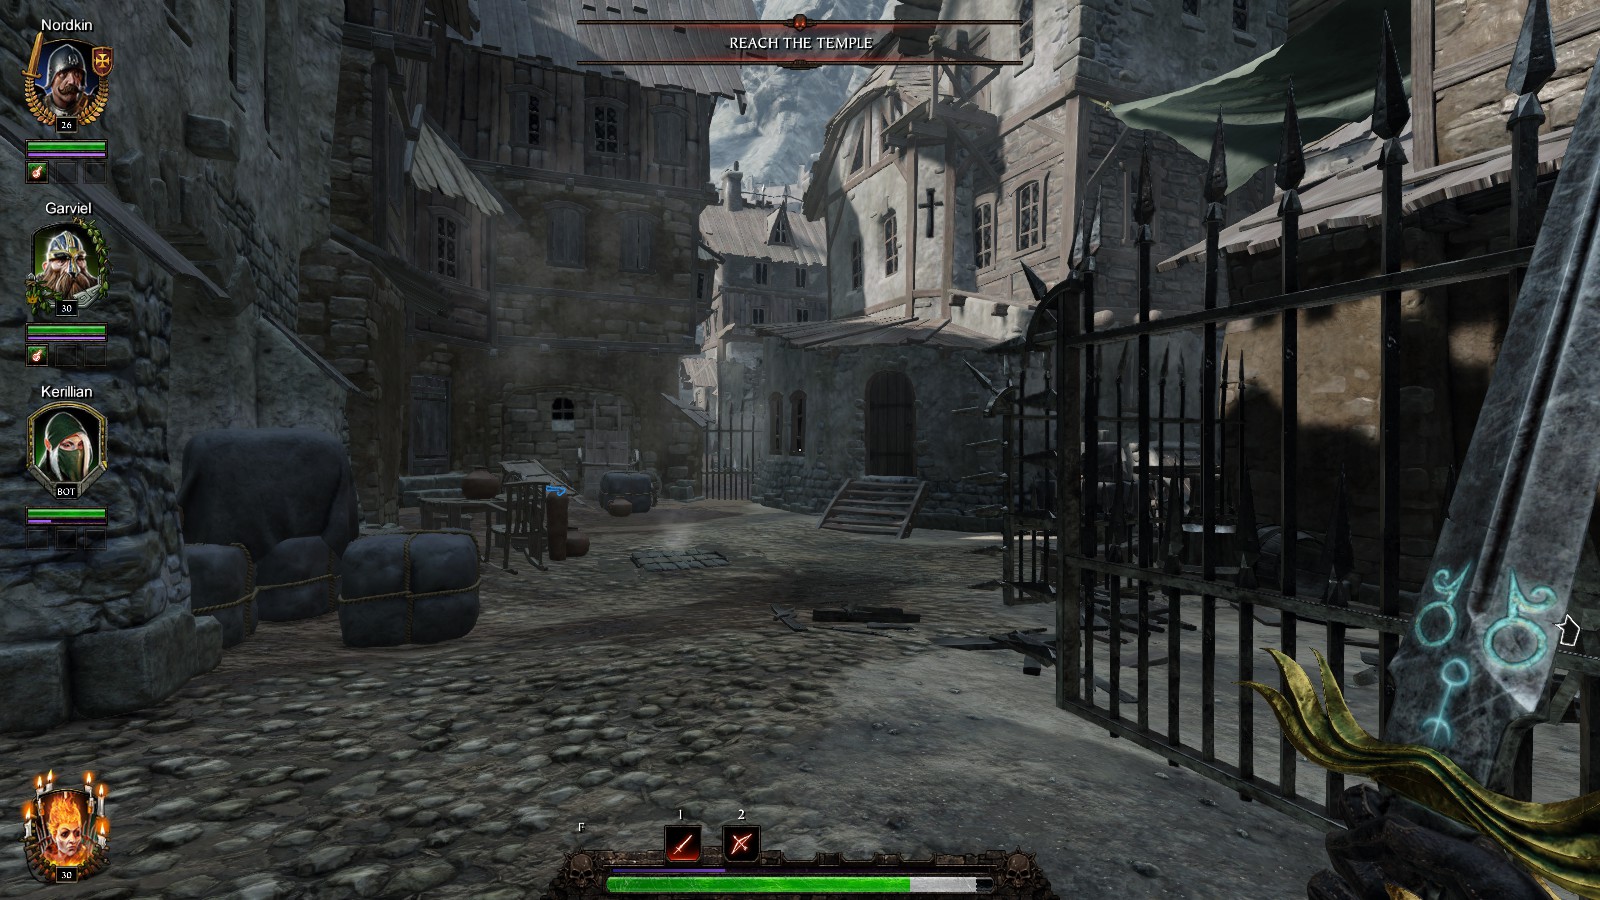
 The same market square at the far end near the gate.
 This is right around corner from the boxes you jump onto, in order to get the 1st grim.
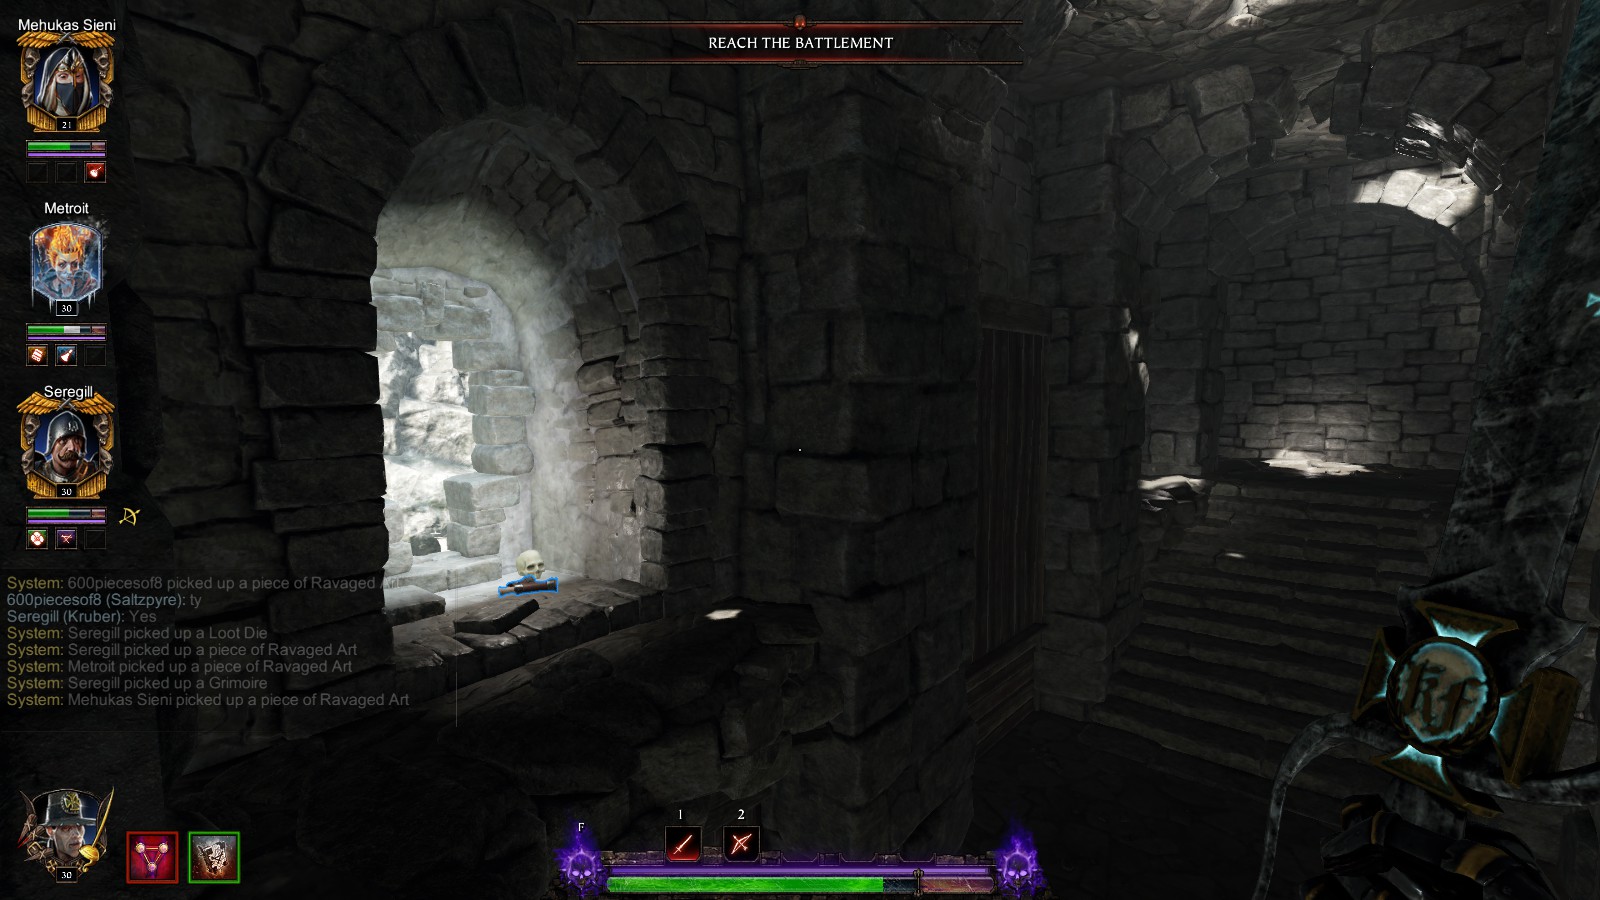
 At the far end of the alley where you enter the house to get to the 1st tome.
 On your way to the 1st tome.
 First box to the right entering the area with the merchant stalls and the 2nd tome.
 Opposite end to the above location. Near the 2nd tome.
 Entering the medieval “roundabout”, where you jump down to get the 2nd grim. On the left side.
 In the same area at the opposite end of the above location.
 In the house you have to pass through to reach the 3rd tome. (No art to see, screenshot will be replaced.)
 At the far end of the road. Across the street from the above location. (No art to see, screenshot will be replaced.)
 A few yards ahead up the road on the left side near the wall. (No art to see, screenshot will be replaced.)
 On the left side of the uphill road.
 Pretty much across the street from the above location.
 At the bottom of the staircase leading to the last (rectangular) square.
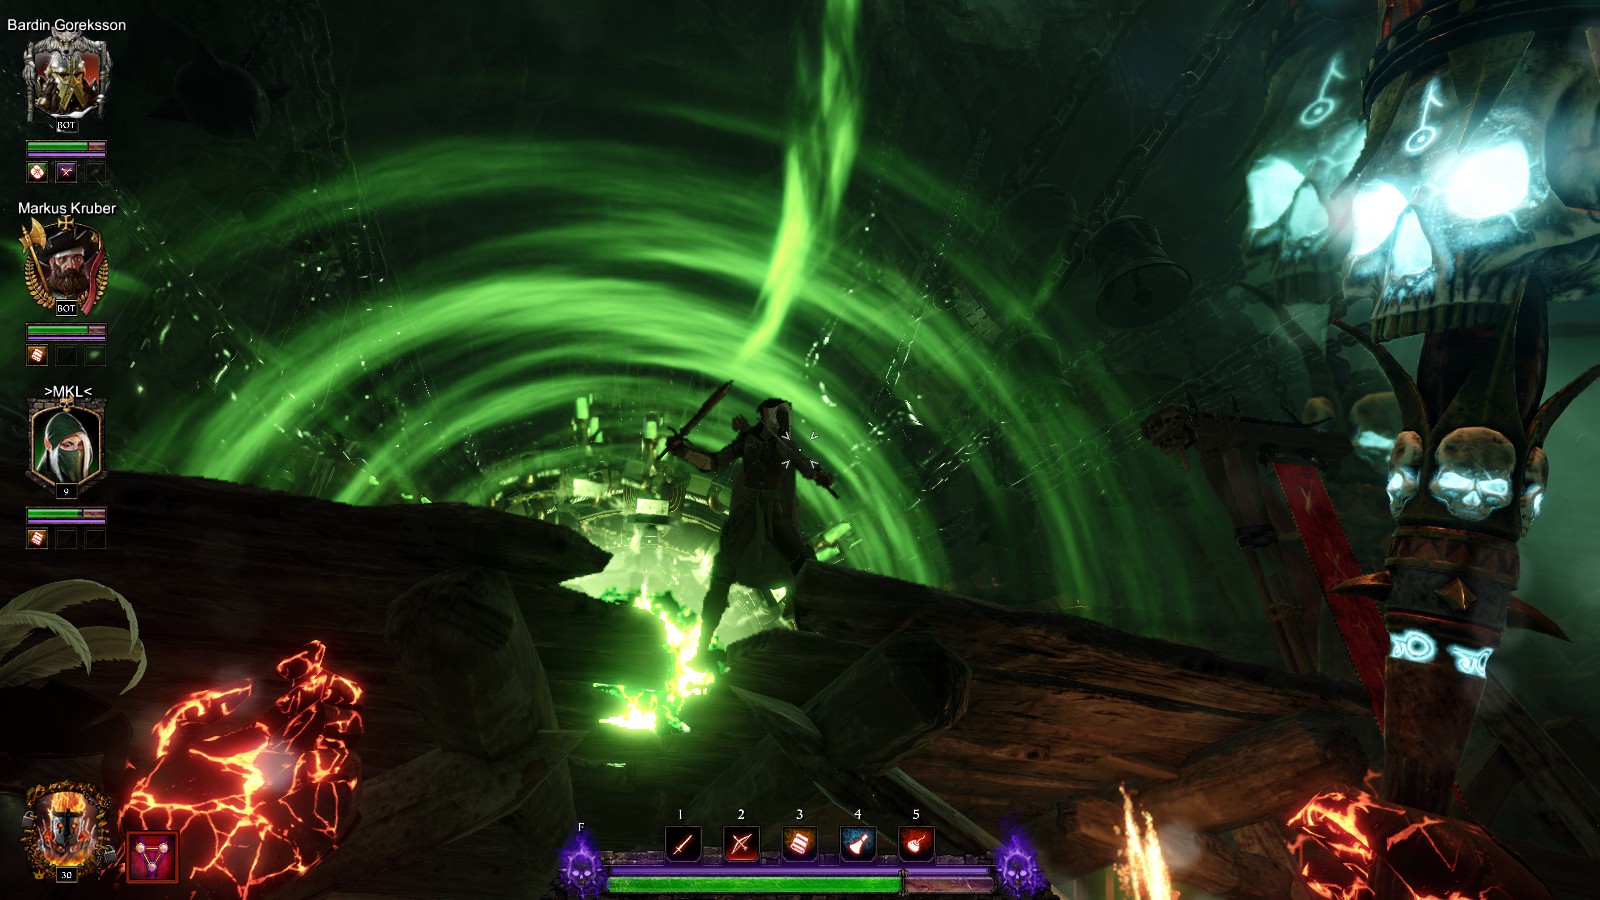
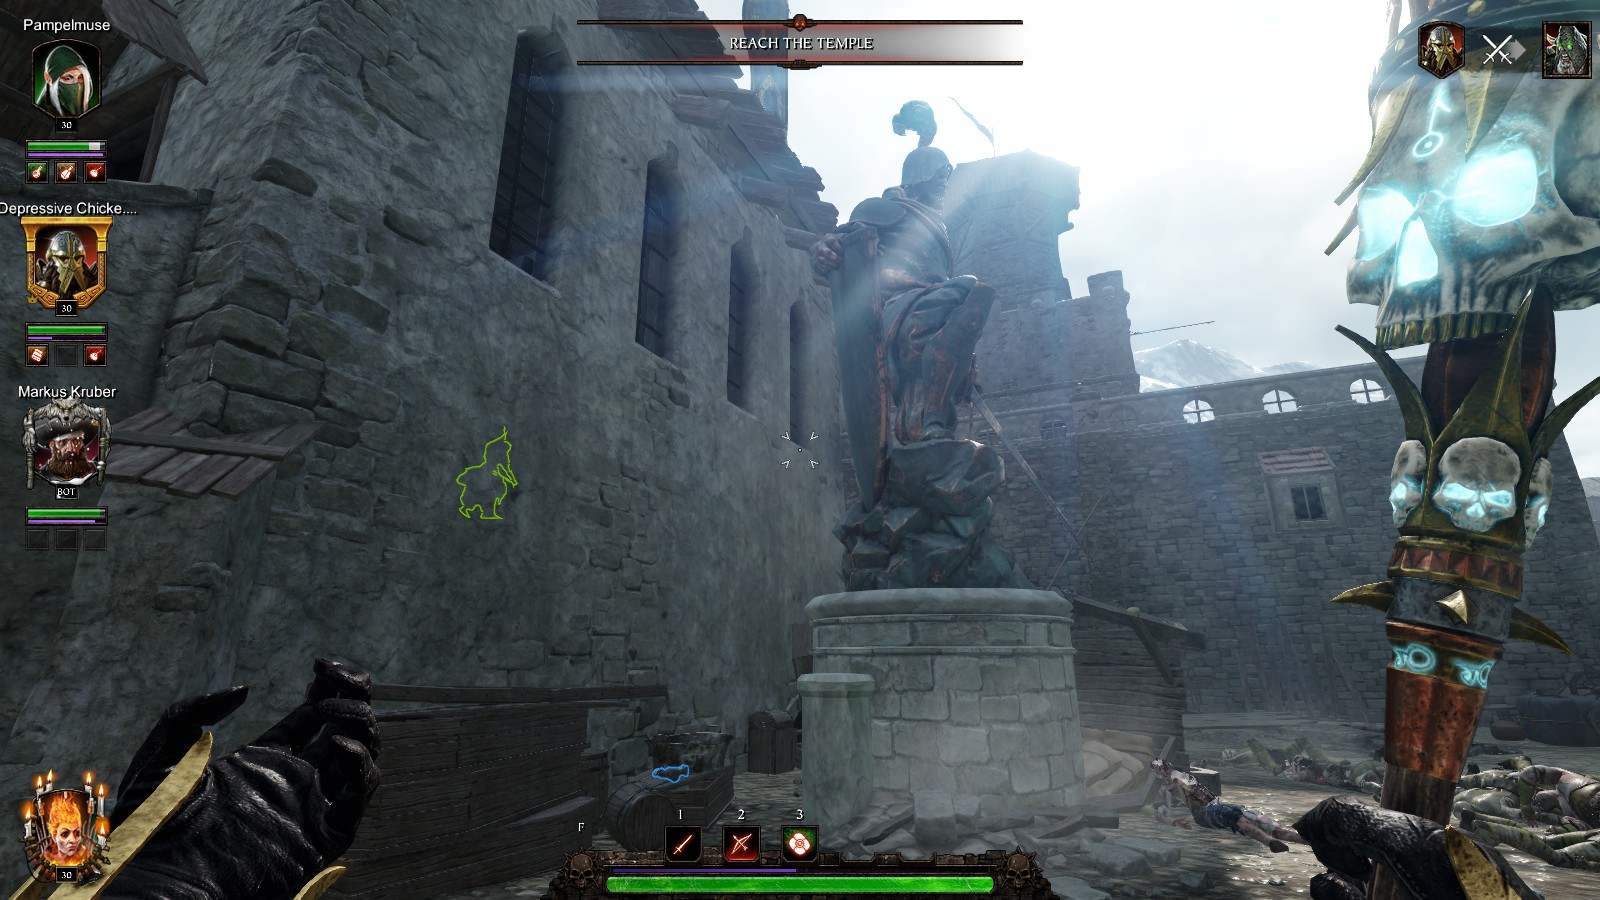
 Behind the statue in the last big square before you enter that long staircase that leads to the bells.
 Between the two houses in the same square.
 Bend of the staircase.
II, Fort Brachsenbrücke
All locations
 Just after the 1st tome. Short before that hut at the cliffs.
 Before going through the arch of the bridge to the right.
 At the end of the broken part of the first bridge you walk upon. Under a carriage. (No art to see, screenshot will be replaced.)
 Under the next carriage in the same area.
 On the other side of the road block next to some debris.
 Right opposite to the 2nd tome location.
 After the 2nd tome at the far end of the river bank next to a chest. (No art to see, screenshot will be replaced.)
 The cave under the hill right after the 2nd tome.
 Entering the forest bit after the 2nd tome and before the 1st grim. On a ledge to the left.
 Near that rock you jump onto to get to the 1st grim.
 Short before the 2nd grim. Inside that cave.
 Inside the boat at the lake inside the 2nd grim cave. (No art to see. Screenshot will be replaced.)
 Up the hill after the 3rd tome.
 Outer courtyard of the castle/fort.
 A few feet away from the above location near the metal gate.
 While shooting the cannon, this is about the 7 o’ clock direction. So basically upstairs on the opposite wall walking up the stone steps.
 Same side of the wall but opposite corner. 4 o’ clock from the cannon. (No art to see, screenshot will be replaced.)
 In the tunnel arc right to the ladder below the cannon. 11 o’ clock direction. (No art to see, screenshot will be replaced.)
 2 o’ clock from the canoniers position after walking over the roof top to the right.
 After exiting the castle in the top left corner of the map near the wooden spikes.
II, Into The Nest
All locations
 This is right at the beginning after triggering the switch. On ground level.
 After the 1st tome. To get this one, go back upstairs and jump down.
 After the first tome and short before the first grim and the railway bridge.
 This is after crossing the long two level railway bridge (after the 1st grim) right after you jump down.
 On your way to the 2nd grim.
 After crossing that walkway. Looking backwards.
 This is right after you jump down into the huge hall containing the 3rd tome. To the right.
 Ontop of the second square rock in the middle. You reach it by jumping to the first rock, while standing on the chest.
 Walking up the stairs, in a cubicle just before the 3rd tome.
 This is at the beginning of the wooden walkways. You can see the location from the stone bridge you crossed earlier.
 On a ledge somewhere below the last location.
 In the open more village like area ontop of the platform right opposite from where you jump down into this area. To get there, if you aren’t a Slayer or Handmaiden, use the staircase around the corner. (No art to see, screenshot will be replaced.)
 In the middle of the same area.
 You have to pass this area. On the right side.
 Short before the Rat Ogre Pen. (No art to see, screenshot will be replaced.)
 Turn left in the middle of the Rat Ogre Pen area. (No art to see, screenshot will be replaced.)
 This is basically facing backwards. On that wooden ramp/road to the right.
 Think the area is recognisable. Inside a wooden crate.
 Inside that building at the top left corner.
 On the left just before you jump down into the boss fight pit. (No art to see, screenshot will be replaced.)
III, Against The Grain
All locations
 Right at the beginning, if you take the right way around the corn field. (No art to see, screenshot will be replaced.)
 At the diagonally opposite end of the first location.
 Inside the first farm.
 Back side of the first farm.
 Near one of the hilltop tripods.
 Turn right after the forest bit starts.
 Near that huge tree in the middle of the hill.
 At the bend of the road between 1st and 2nd tome.
 The first shed to the right after jumping over the perimeter wall of the next farm area. Inside a wooden box. (No art to see, screenshot will be replaced.)
 At the far left end of the perimeter fence.
 Obvious, before that monster in the hay shed.
 Same area just on the opposite side near the river.
 After you jump down into the corn field at right passage over the stone wall. (No art to see, screenshot will be replaced.)
 At the beginning of the forest bit. Just before the 3rd tome (which would be on the left).
 To the right of the first twin mill tower near the cliffs.
 In the area with the first prisoner’s cage. At the base of the twin windmill tower you jumped down. On the far side.
 At the opposite end of the gate with the Chaos warrior.
 Inside the first shed holding prisoners.
 This is outside between the sheds, after you freed the first batch of prisoners inside. In this area are two group cages with prisoners.
 Inside the last prisoner’s shed. At the far end of the right walkway, you reach by passing through the small room to the right. (No art to see, screenshot will be replaced.)
III, Empire In Flames
All locations
 On the right end of the road in the open area.
 Inside that small house to the right.
 Right after going through the town’s main gate on the left.
 This is the first house, which has an accessible first floor. From there you jump down onto the road towards the 1st tome.
 Across the street from the 1st tome.
 Accessible first floor of a burning ruin with staircase across the street from the 1st grim.
 This is after the 1st grim and before the 2nd tome. The house is facing the open square with the hole where you jump into the wine cellar.
 In the middle of the open area in a ruin to the right.
 At the beginning of the wine cellar.
 At the same side of the wall at the opposite corner.
 After exiting the cellar on the ground floor of the first house to the left.
 Upper floor of one the next houses to the left ontop of a bed. (No art to see, screenshot will be replaced.)
 Can’t miss this one really. That house with all the goodies before you jump down to the outer perimeter of the manor.
 On the upper floor of the “2nd grim house”.
 After you jump down into the mansion’s outer courtyard, turn right instead of left into the top right corner.
 On the upper floor of the house containing the barrel in the cellar. (No art to see, screenshot will be replaced.)
 On the upper floor of the house you exit bringing the cellar barrel. Inside the last room to the right.
 At the end. The first house you walk through after destroying the manor. The next one contains the 3rd tome.
 Walking around the staircase you get down towards the building containing the 3rd tome.
 The ruin to the right after you exit the “3rd tome house”.
III, Festering Ground
All locations
 At the beginning. The first tree trunk you can walk up to.
 The left path of the first building structure you jump down to. Looking backwards.
 At the end of the long corridor divided by a stone wall leading to the wooden bridge.
 To the left of the wooden bridge. (No art to see, screenshot will be replaced.)
 Before you cross that brook to the left.
 Inside that short tunnel/cave near the brook in the open area.
 Going down the stone ramp inside the cave. Just right along the walls to the end corner.
 Basically the diagonally opposite corner of the above location. After you pick up the keys, left of the stone ramp leading up.
 This is right below the 1st tome.
 After getting out of the cave at the far end of the upstairs walkway. (No art to see, screenshot will be replaced.)
 Easy to miss: After jumping down the first of many platforms, turn around and inside a cave.
 At the bottom of the platform area inside the cave opposite to the 1st grim chest. (No art to see, screenshot will be replaced.)
 This is right after you enter the cave/tunnel after the 1st grim and before the wooden footbridges and the 2nd tome.
 Right after you jump out of the tunnel system inside a basket. (No art to see, screenshot will be replaced.)
 This is a few yards further ahead from the above location. But still before the 2nd tome.
 After you jump down from the 2nd tome footbridge. Opposite direction to where you have to go.
 At the end of the group of tipi tents. Right below the foot bridge leading to the 2nd grim.
 Right after the 3rd tome. This is after you jump down into the open swamp area.
 In the huge swamp area after the 3rd tome and before entering the final cave on the far left side inside a tree trunk.
 In the same area as above just to the far right ontop of that altar.
III, War Camp
All locations
 This right next to the 1st tome.
 Right way along the map borders near the wooden bridge.
 Short before that little village where the 1st grim is located, the left way around.
 Take the left path inside that small hamlet.
 Inside the ruin at the far right corner.
 The ruin opposite the one containing the 2nd tome.
 In the area with a couple of tipi tents. Between a tent and the river bank on the ground. (No art to see, screenshot will be replaced.)
 At the beginning of this area and to the right of the main path.
 Near a footbridge on your main path.
 Tipi tent near one of the candles.
 This is near the third candle for the 2nd grim.
 At the opposite side of the bridge on the river banks near some debris. (No art to see, screenshot will be replaced.)
 Before you enter the area with the ram. After the 2nd grim.
 Last area before the ram. Near the river bank and the boat. Next to crates. (No art to see, screenshot will be replaced.)
 Just before jumping down to the ram on the right ontop of a wheelbarrow.
 After you open the gate with the ram. On the upper walkway to the right.
 Top right corner of the second area with tipi tents.
 A few yards ahead.
 In the final area before you enter the tunnel to the fighting ground.
 Short before entering the final “tunnel” on the right side behind a fur blind.
Skittergate
All locations
 Between the 1st and 2nd grim under the wooden walkway.
 Inside a box on the same platform as the 2nd grim.
 After jumping out of the gate to the right.
 Right under the wooden footbridge leading to the key staff machine.
 Near the key staff machinery next to the yellow pipe.
 Basically the first ice cliff you jump down after walking up the hill past the key staff machinery.
 Before entering the ice cave. Before the 2nd tome.
 To the right inside the cave’s frozen lake area. On a ledge. (No art to see, screenshot will be replaced.)
 At the exit of the same ice cave.
 Jumping out of the cave behind an iceberg on the right.
 After the 2nd tome. The ice covered ship wreck.
 After the 2nd tome. The first pier after you get out of the ice cave ontop of that box.
 Behind the crate on the last pier. (No art to see, screenshot will be replaced.)
 To the left of where you enter the outer perimeter of the lord’s den. Inside a box. To the left of Bardin. (No art to see, screenshot will be replaced.)
 This right after you fight the first Lord and get out of the arena.
 Behind a snow covered flat tipi tent in the 3rd tome area. (No art to see, screenshot will be replaced.)
 At the opposite end of the path leading to the 3rd tome.
 The last tent after you leave that group of tents near the 3rd tome and this always spawning endless ammo box ontop of the hill. (No art to see, screenshot will be replaced.)
 On your way up the hill.
 After destroying the machinery to the right before you jump down. (No art to see, screenshot will be replaced.)
Bögenhafen DLC – The Pit
All locations
I hardly played it, so the description is kinda clumsy…
 Before entering this fish market. In the canals on the far left end next to a wheel. Looking backwards. (No art to see, screenshot will be replaced.)
 Close to the above location. Up the ladder on the upper floor of the next building to the right. Ontop of a table. (No art to see, screenshot will be replaced.)
 Leaving the fish market in a corner to the left. Ontop of the hand cart in the background. (No art to see, screenshot will be replaced.)
 Art would be ontop of those wooden pier planks. Right there the orange overcharge bar shows. (Picked it up already, none to see here.)
 Shortly after the above location. On the upper floor in one of the first houses in “Ostgrube”.
 Ontop of a stool. Near the carriage you explode for the 1st grim (seen in the background). (No art to see, screenshot will be replaced.)
 Near a wooden gate at the “Ostmauer”. Ontop of a crate. (No art to see, screenshot will be replaced.)
 In the canal area to the right of the above location in a corner. Ontop of a wheelbarrow. (No art to see, screenshot will be replaced.)
 A few yards ahead of the above location.
 Ontop of a boat in the “Lower Pit”. Also canal area. (No art to see, screenshot will be replaced.)
 At the end of the canal area. In a wooden house with a carriage in front of it. On the upper floor. Ontop of a bunk bed. (No art to see, screenshot will be replaced.)
 At the other end of the canals. Ontop of a wooden footbridge after you got some stairs up. (Screenshot courtesy of @Distance.)
(pic)
Short before an iron gate inside a house with an open ground floor. Ontop of a table.
 In an area with stones houses.
 In “Schwarzhagen Hideout” near a tree with red leaves and crates. Ontop of a stool. (No art to see, screenshot will be replaced.)
 Inside a house at the end of some other houses and to the right after you have to get to “Westendamm”.
 Some upper level…well.
 In the “Brückenweg” area ontop of a coffin in the far left corner. (No art to see, screenshot will be replaced.)
(pic)
Ontop of a bench outside of a stone house.
 Ontop of a greyish market stall. (No art to see, screenshot will be replaced.)
Bögenhafen DLC – Blightreaper
All locations
I hardly played it, so the description is kinda clumsy…
 A side corridor to the left in the beginning after a few turns. Under an inclined wall plank. (No art to see, screenshot will be replaced.)
 “Merchant Guild Cellar”.
 Somewhere in the dark…also in the “Merchant Guild Cellar” (Thx to @BiasedOpinion.)
(pic)
“Canalisation Tunnels” ontop of a barrel behind two stagged barrels.
 At the end of some canal. According to @BiasedOpinion: When you come to the second sewer tunnel after the Merchants Guild Cellar area, follow the left path.
 If you don’t cross the canals over the wooden plank but just jump down. It is to the right.
 In one of the final dark areas before you jump down. (No art to see, screenshot will be replaced.)
 “Nordostendamm”.
 Up the staircase from the above location and to the right.
(pic)
“Bögenblick Beer Garden” area. Next to some cargo inside an open box.
 “Rosenallee” in an outside corner of some buildings. (Old screenshot courtesy of @Distance – thx!)
 “Hafenstrasse Fish market”.
(pic)
“Dreieckplatz” area ontop of a bench near a stone wall.
(pic)
Same area. On the ground next to some wooden crates.
 “Bögenauer Steps” at the end of the staircase near a metal fence ontop of a box. (No art to see, screenshot will be replaced.)
 Up a long ladder on the rooftop area.
 In the “Eisenbahn” area.
 “Myrmidias’ Terrasse”.
 “Kaufmannsstraße”.
Back To Ubersreik DLC – Horn of Magnus
All locations
 At the beginning down at the pier.
 Opposite pier side. Ontop of a barrel.
 Ontop of the left walkway opposite the pigsty.
 Near the fountain on your way up. Inside an open box. (No art to see, screenshot will be replaced.)
 Inside that cellar where the 1st grim was located in Vt1. (No art to see, screenshot will be replaced.)
 Near that church which holds the 1st grim in Vt2 (and a tome in Vt1).
 In the main market square on the doorstep opposite the 3rd tome.
 At another doorstep left to the above location. (No art to see, screenshot will be replaced.)
 After the stone staircase. Outside the pub.
 Right corner on the first floor of the pub. Ontop of a barrel.
 First left corner in the rooftop area after leaving the pub.
 Inside that room which contains goodies, before you cross the first wooden footbridge on the roof area. (No art to see, screenshot will be replaced.)
 Before you cross the final bridge.
 Ontop of the window sill on the ground floor before the platform. Right side. (No art to see, screenshot will be replaced.)
 After the platform and getting up the first staircase.
 On a shelf on your way up the spiral staircase to the Magnus Horn.
 In the next area after the above location.
 In the last room with an endless ammo box. Ontop of a box. (No art to see, screenshot will be replaced.)
 At the very end after the event and the lifting platform at the bottom behind a sewer grate. (No art to see, screenshot will be replaced.)
 Next to boxes ontop of a loose stone a few yards from the above location. (No art to see, screenshot will be replaced.)
Back To Ubersreik DLC – Garden of Morr
All locations
 First outside area after the staircase.
 After leaving the above area to the left and uphill near a crypt. (No art to see, screenshot will be replaced.)
 The first building on the left with a ladder upstairs and most likely goodies. (No art to see, screenshot will be replaced.)
 This is right across on the other side of the above location. Near the last tomb. (No art to see, screenshot will be replaced.)
 Straight on and then left of the above location. Ontop of a tomb. (No art to see, screenshot will be replaced.)
 Inside the last crypt to the right of this area. Ontop of a tomb. (No art to see, screenshot will be replaced.)
 Very close to the last location. Ontop of a cart behind the metal fence. (No art to see, screenshot will be replaced.)
 Passing through the metal fence into the wide open meadow, to the right. In front of the first tombstone with lit candles. (No art to see, screenshot will be replaced.)
 Entering this crypt maze, go to the top left corner. It is ontop of a grave with a tombstone and many lit candles. (No art to see, screenshot will be replaced.)
 Following the map, at the end of this area before taking the steps. To the left ontop of a tomb. (No art to see, screenshot will be replaced.)
 Behind some altar in the area across from the 1st grim in Vt1. There is also a book near. (No art to see, screenshot will be replaced.)
 Before entering this huge open area. Around the corner next to the always spawning endless ammo box. (No art to see, screenshot will be replaced.)
 In the open area. Ontop of the building on the left you can climb up with a ladder. (No art to see, screenshot will be replaced.)
 This is after the 2nd tome next to the entrance you go down from the vast open area.
 Somewhere in the middle of the area in a left corner on the floor. (No art to see, screenshot will be replaced.)
 Ontop of a tomb. Behind the building you surface again. (No art to see, screenshot will be replaced.)
 Diagonally opposite of the above location in the top right corner of this area. To the right of a crypt ontop of the coffin. (No art to see, screenshot will be replaced.)
 In the middle of the next outside area. On the stone floor in front of the statues. (No art to see, screenshot will be replaced.)
 In the maze garden to the far left.
 At the same side but opposite corner from the above location. To the left from where you would enter the final building. Ontop of a stone. (No art to see, screenshot will be replaced.)
Back To Ubersreik DLC – Engines of War
All locations
EoW:
(pic)
Entering the first swamp area from the middle. Near a bend tree root. Short before you jump down. (No art to see, screenshot will be replaced.)
 At the far left end of the swamp area. Ontop of the pier. (No art to see, screenshot will be replaced.)
 Across the swamp on the other shore in the middle.
 On the far end of the river before you cross the small bridge into the cave.
 After crossing the bridge inside the adjacent small cave to the right. (No art to see, screenshot will be replaced.)
(pic)
At the far end of the left outside area, which held the first grim in Vt1. Next to a flat rock. (No art to see, screenshot will be replaced.)
 Before going to the upper part of the cave, there is a small straight path under a wooden footbridge. At the end of this path next to two half buried wheels. (No art to see, screenshot will be replaced.)
 This is the location of a tome in Vt1. After the cave and the wooden bridge. Then to the left at the cliff.
 To the opposite side of the above location after crossing the bridge. In the right bottom corner of the map near a cliff. (No art to see, screenshot will be replaced.)
 On the far left side again. Next to a corpse and two planted spears. (No art to see, screenshot will be replaced.)
 Next to the 2nd tome. (No art to see, screenshot will be replaced.)
(pic)
Next to a camp fire with a burning corpse over it. Same area as above, opposite side. (No art to see, screenshot will be replaced.)
(pic)
Ontop of a man-sized rock in a forest clearing. Before Grunewald Square. (No art to see, screenshot will be replaced.)
(pic)
Before a point of no return. Next to a staircase and ontop of a brick wall in the ruins. (No art to see, screenshot will be replaced.)
(pic)
Outer courtyard Grunewald Square. Under an inclined roof in an alcove. (No art to see, screenshot will be replaced.)
(pic)
Up the staircase from the above location to the right. Inside an destroyed open tomb. (No art to see, screenshot will be replaced.)
 This is after destroying the engines and before going downhill. On the far right end of the wooden fence. Next to some obelisk stones. (No art to see, screenshot will be replaced.)
 On your way down to the village.
 Before crossing the bridge to the village to the far right. Location of the third tome in Vt1. Ontop of wooden pier planks. (No art to see, screenshot will be replaced.)
 After crossing the wooden bridge but before jumping over the metal fence. Along the river to the left. (No art to see, screenshot will be replaced.)
Event: A Quiet Drink