Overview
This guide aims at power users which want to not just play the game but have their own “real” city rebuilt with it. For this it covers topics such as getting the necessary data, preparing the map, creating custom buildings (assets) and filling the city map with content. I will also tell which mods I have used for each step, note pitfalls and give tips for best results.It is assumed that the reader is familiar with the game and the game mechanics itself, familiar with the basics of mods (i.e. how to enable them) and the Steam workshop, which provides mods and much more required content for this game. Also basic image editing skills and knowledge is assumed. Regarding the creation of custom buildings a basic knowledge of Trimble SketchUp[en.wikipedia.org] is advantageous as this guide will not cover the complete usage of this software but only some basics and aspects specific for creating CS assets.Note that I intend to refine or extend the guide as I get more experience, learn about better tools/mods and workflows, but by now it can be considered complete and tested for those parts it contains.
Acknowledgments
This guide would be impossible without other users and modders which have done most of the work before me, discovered the steps I discribe, created the mods I recommend and so on. Only parts of this tutorial are based on my own tests and experience. I especially want to thank:
- zordork4 for his Tenderfoot Guide To Creating Your Own Assets in Cities: Skylines which serves as the base for my chapter about creating custom buildings.
- Aaron Cheng for his Google Map Customizer[www.chengfolio.com]
- BloodyPenguin for his many excellent and useful mods
- GCVos, Lazarus*Man, Positivity and BadPeanut for their Network Extensions 2 mod
- princekolt for his overlayer mod
- Blackwolf (Frdm920) and Jerenable for their improved tram tracks
- and others I might have forgotten …
First of all you might wonder if your town of choice is a good choice, if it is easy or possible at all to re-create it in Cities: Skylines.
I believe almost every city which fits the game map (max. ~17x17km) can be modeled, but with more or less compromises regarding how true to nature the result will be. Steep slopes might impose additional challenges, as does the absence of at least a medium sized river. If your city consists of buildings which aren’t anything like any buildings from the game, addons or at least some workshop assets it will be too huge an effort to create the custom buildings needed. Also medieval cities with only narrow roads and alleys pose an additional challenge as we will see. But when accepting compromises every city can serve as an original.
If you intend to model complete Los Angeles, Paris, Moskow or Peking, however, you better drop this idea. Neither do such cities fit on the game map (without scaling them down significantly), nor would I expect today’s graphics cards to handle such number of buildings. Maybe you can model one city district of them?
In order to create the base map onto which our city is to be built, certain data is needed. First we need a height map, also called digital elevation model (DEM) with sufficient resolution and quality. In order to being able to correctly place all the aspects of the city onto the game map we need of course … a map or an orthophoto/satellite image of the real city.
For this an understanding of the sizes within the game are essential:
- One grid cell is 8x8m.
- One city map tile is 240 x 240 units, thus 1920m x 1920m in size.
- There are 9×9 (=81) such map tiles, but by default only 9 of the center 25 tiles can be purchased.
- This means that the total area covered in a Cities:Skylines map is 17280m x 17280m.
Reference:
- Cities: Skylines Modding – Scale[cslmodding.info] or
- this Cities Skylines FAQ
Getting the map data
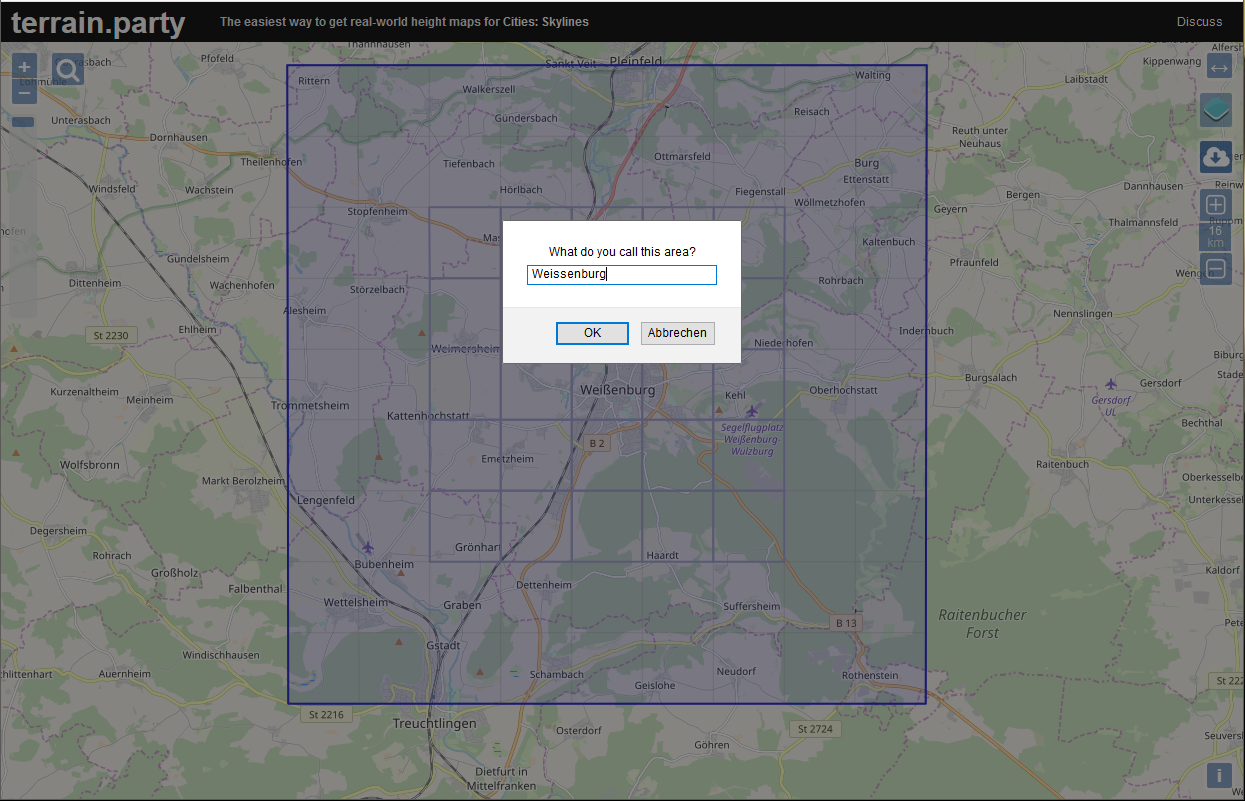
If you don’t happen to have a digital elevation model from a different source, such as your local or country’s land surveying office then you will be happy to know that there is a really simple way to acquire free elevation data just in the way we need them. The website “terrain.party” is as simple as it gets:
- Open terrain.party[terrain.party] in a browser of your choice
- Navigate the map to the town to be modeled using the mouse wheel (or the +/- buttons) for zooming out and by dragging the map with the center mouse button (on Windows), then zoom in as far as possible until you clearly see your city or town in the center of the map.
- Click the Download button with the cloud on the top right. This will prompt you to update the selected area and you should choose to do so.
- If you get prompted for a name, cancel this action for now as we want to fine-tune the selection before exporting. You now see a purple square on your map denoting the game’s map area. This can be dragged to the preferred map area. Remember in the game this area will be 17280m wide, but this web page lets you export a smaller or larger map area in case you want to get scaled map. You can adjust the exported area with the [+] and [-] buttons on the right. In between the website shows the current size, 18km by default.
- After adjusting position and size, click on the Download button with the cloud again. When prompted for a name be sure you avoid special characters as they might not be rendered correctly later in the file names.
- A download of a zip archive wills start. This archive contains several height maps from different freely available sources as well as a “combined” elevation model which uses the moste detailed data of all sources for every area within the selected map.
- Once you have chosen the data set to be used, copy this file to %localappdata%Colossal OrderCities_SkylinesAddonsMapEditorHeightmaps
Important notes

When fine-tuning the export area you see the central 25 tiles emphasized. This is the area from which players can purchase tiles in an unmodded game. Tiles outside this area have some limitations, especially the outermost tiles will appear with some fog towards the outer edge, tunnels don’t get rendered properly and similar glitches. Try to have your city or town within the central 5×5 area … but since you likely will use the 81 tiles mod, try at least to stay with the 7×7 zone.
Also, you will later note that the roads in the game are wider than the typical roads in reality, at least in central Europe. In order to avoid loosing too much space on roads in city centers (especially old towns) I recommend to export a slightly larger-than-scale terrain model. I chose a 16x16km wide area to work as the ~17.2×17.2km wide area in the game so I have a bit of extra space. If you want to model a large city and only care for the rough city layout (but not scale) you are free to choose any size. Just don’t expect to fit the real number of buildings in such layout.
In Europe you will likely find elevation data from “ASTER 30m”, “SRTM3 v4.1” and “SRTM30 Plus” in your archive (listed here in decreasing resolution). Although you might be tempted to use the ASTER[en.wikipedia.org] data because of its detailed look I have found this data to be unreliable in detail. Specifically even on flat areas it contains lots of bumps and dents of up to 10m which don’t exist in reality. Forests and larger buildings may appear in this height map – not something desired. You can correct all this in the map editor later, but that’s a tedious manual work. You might be better off with the more smooth SRTM3 v4.1[en.wikipedia.org] data. It might lack some details but saves you lots of time. And for CS a smooth terrain is better anyway.
There’s a readme included in the archive that explains more about the data sources if you are interested. Note that the height maps are provided as “normal” PNG files, viewable in any image viewer.
Caution: By default, if you import this terrain, the sun will be north at noon. To fix this, rotate the image by 180°!
Reference:
- The Cities:Skylines Planning Guide[www.skylinesplanningguide.com]
In order to correctly place trees, roads, buildings and so on onto the map we also need some visual reference. Some mods exist which allow to overlay an image onto the map. No matter which one you use – we need the image first. It should cover roughly the same area as the elevation model.
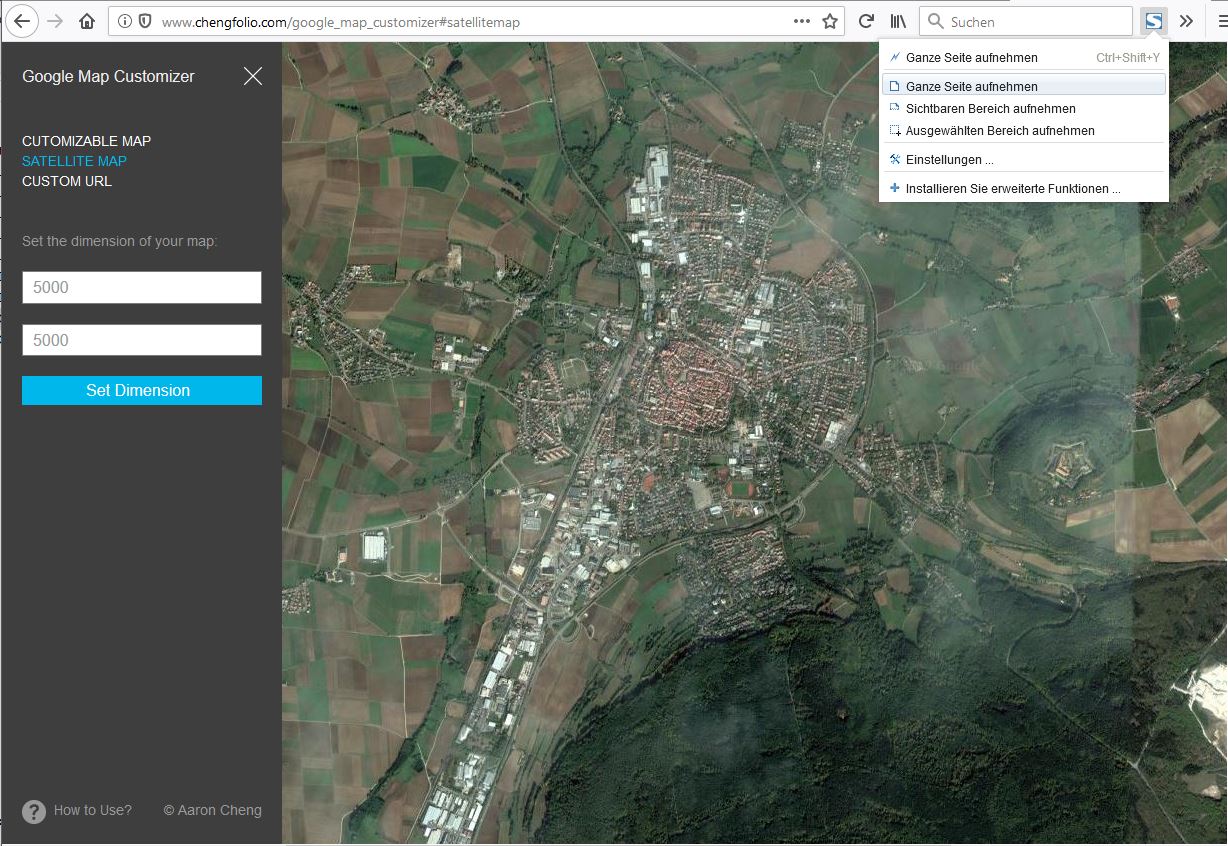
The easiest way to get such image is from another website, the Google Map Customizer[www.chengfolio.com], in conjunction with a browser addon which allows to take complete screenshots of larger-than-display web pages.
Here are the steps:
- Install a browser plugin which allows you to save a screenshot of a whole web page. For Mozilla Firefox and Chrome the “Fireshot” plugin works well, but similar plugins exist for every common desktop browser.
- Open the Google Map Customizer[www.chengfolio.com] webpage
- First decide if you want to export a map or a satellite photo. The former gives you more structured, but limited information which can be customzed to your needs whereas the latter shows everything (from vegetation over streets to buildings) without any generalization but might appear harder to “read” for the unpracticed. I personally prefer using an orthophoto. Use the buttons on the top left to change between the two.
- Navigate to your city. As there is no seach functionality, again the easieest way ot to zoom out (scroll wheel), then drag the map to show the desired area and zoom back in to your city. If using the satellite map you have to be familiar what you area looks like from above in order to find your town from space.
- Once you have your town centered, set the size of the overlay image you want. I have used an image of 5500×5500 pixels, but this depends on the image processing software and the performance of your PC. Mods like “OverLayer v2” can handle huge images but they may take a few seconds (only!) to load such image and you have to prepare it. Just try it out.
- When you click on “Set dimension” your webpage will get very large and you must use the scrollbars to pan over it. Now ensure that the area of the web page covers roughly the same area as your elevation model.
- Once done, close any sidebars and grab a full page screenshot. After panning and stitching the plugin will allow you to download the created full screenshot as an image file (PNG).
- Use an image processing software to make a semi-transparent PNG version, i.e. set it to 50% transparent (or a similar value). One way to do so is to import the image, create a new, completely transparent image of the same size, paste the image layer into it and set its layer opacity/ transparency to 50%. If necessary rotate this image by 180° so it fits the terrain!
Reference:

- How to customize Google Map and export high-quality images using Google Map Customizer?[www.chengfolio.com]
Mods for the map editor
In the following sections we’ll use the map editor to create the map which will later serve as the base on which to build the city. We will use the elevation model and overlay to add the terrain, basic vegetation, water, train routes and selected roads. A few mods make life easier or allow to circumvent limitations.
Oh, and although it should be obvious: Keep in mind to always read the full description of mods before installing them. Among others, it avoids confusion and a possibly instable game due to incompatibilities.
All modes listed here were found to be working well on game version 1.12 (Campus DLC update, 2019) but I do not guarantee them to be working on any other game version.
Needed mods:
- Overlayer v2 by princekolt or a similar mod (there’s more than one to try out). This one mod is not perfect in terms of usability but gets the job done.
Recommended mods (in order of personal importance, only install if needed)
- Map Editor Tunnels Enabler by BloodyPenguin – needed if your highways or train routes have tunnels.
- No Tree Brush Slope Limit by BloodyPenguin – allows to paint large numbers of trees even on steeper slopes. (Otherwise even medium slopes remain bare of vegetation.)
- More Network Stuff by BloodyPenguin – allows to place any roads in the map editor, not just a few selected highways.
- Fine Road Anarchy by Boogieman Sam – to circumvent some limitations of placing roads and intersections
- NetworkExtension 2 by Lazarus*Man et al. – offers additional useful types of roads. You only need this for now if you intend to place such roads already in the map editor, not later in the game.
- Advanced Toolbar – offers an expandable bottom toolbar for faster finding assets visually.
- You might as well use FindIt! mod, whch offers to find and filter assets easily by name. Also it has a tool for bulk-selecting and thus bulk deleting object (e.g. a large numbers of trees).
- Pause on load by MrLawbreaker – Whenever you load/continue your map, it will be initally paused. In map editor unpausing the game makes only sense when checking the correct flow of water (in my opinion) but it doesn’t hurt either.
Preparing the map
With the required mods in place for the map editor we can start to create the map.
Start up Cities Skylines and from the main menu select EDITORS -> MAP EDITOR and choose “New”. You will be prompted to select a map theme. Choose the one which best fits the climate of the city you are about to build.
Caution, pitfall: You might have heard in geography lesson that central Europe is in a temperate climate, so you might be tempted to think that “Temperate” and “European” is the same. I don’t know all of the differences but I found (by error) that the “Temperate” theme does not offer any needle-leaf trees. This is why for central Europe I recommend “European” indeed.
You will now enter the map editor.
The first thing we need to do is to get the terrain into the map. If you followed the previous section you should have copied your height map (elevation model) into the folder %localappdata%Colossal OrderCities_SkylinesAddonsMapEditorHeightmaps. All that is left to do is import it with the second button on the toolbar:

In the upcoming dialog select the image to import and confirm by clicking “Improt”. Another click on the toolbar icon closes the dialog. In order to admire your new terrain you might want to disable the fog with the option on the center bottom of the screen.

Caution, important pitfall: After you have imported your map, check that the directions are correct, that is, that north is north and south is indeed south. If you are on the northern hemisphere (Europe, North America, northern Asia) the sun must rise in the east, must be south ant noon and set in the west. Compare this to your terrain. If (as it happened to me) you realize the sun is located on the wrong side of the map, shining from the north at noon, you will have to rotate both the terrain image and the overlay by 180° in your image processing software. If you miss this check and later discover the sun’s shining from the wrong side, only the “TimeWarp Fix” mod can come to rescue by moving the sun.
The next step is to activate the overlay. If you are usingt he “overlayer v2” mod, ensure you have copied your semi-transparent PNG image to C:Program Files (x86)SteamsteamappscommonCities_SkylinesFilesoverlay.png. This mod looks for an image with exactly this name. (Other overlay mods allow to manage multiple overlays.) Then click the (i) symbol on the top left of the screen. After a few seconds the overlay image should show up. You can now disable and enable it quickly using the same button.
Almost certainly your overlay will not fit the terrain, so you have to adjust the overlay position and size, as described on the mod’s workshop page:
- . (Period): Increase overlay size
- , (Comma): Decrease overlay size
- Arrow Keys: Move the overlay image (Up/Down: North/South, Right/Left: East/West)
- Home: Reset overlay image size and position
- Shift: Holding it makes all actions above go faster (less precise)
- Control: Holding it makes all actions above go slower (more precise)
Caution, pitfall: The choice of keys for this mod is rather poor. You will note this when trying to enter elevation heights later when you realize that using the period will inadvertedly move your overlay. Same when using the arrow buttons in the dialog where you enter a file name for your map. Even worse, pressing “Home” accidentially resets the map so you have to align it again. And currently there is no locking mechanism provided. That’s why you should check if other mods work better for you.
Note that you can replace the overlay.png file while the map edtor or the game is running. You only have to disable the overlay and re-enable it to have the mod load the new image. This can be useful if you have both a coarse-resolution overview image for the general landscape and a detailed image of your city center for placing buildings and streets more accurately in this area.
A said, the challenge is now to allgn the image to the terrain. Look out for prominent features in the terrain such as steep valleys and gorges, river beds or anything you can see both on the terrain and on the map or the satellite image you use as overlay. Be sure you check the center and all four edges or corners for good alignment before you proceed.
Once you have aligned the map, do yourself a big favour and add some “marker features” on the map which eases the alignment next time you start up the game. The alignment is preserved when you exit to the main menu and continue building the map from there but not when you restart Cities Skylines.

What di I mean with “marker features”? Your overlay image surely contains some easy-to-recognize features, such as prominent crossings, small unique landmarks and such. Find one such landmark at (or very close to) the center of the map, e.g. a certain crossroad. Then find two or three other features at the edges of the map. Build some temporary roads or paths there or place a big three at a spot – anything you can later find easily on your map.
Now, next time you need to aligh the overlay “from scratch”, first align the central marker feature (in my case the crossing shown on the left above). Then go to any of the edge marker features and only use the increase/decrease overlay size keys (. and ,) to match this marker feature as good as possible. Go back to the central feature – if it is not exactly in the map center you may need to fine-tune its position now. Go back to the edge marker features and again only increase/decrease the overlay size to have this one aligned well. Last, check any other marker feature – they should now be aligned correctly too.


The next steps are to fullfill the basic map requirements – and chirper will be happy to show you your progress. It doesn’t matter in what order you place trees/vegetation, water, roads (and possibly train/ship/airplane routes), resources and all the rest onto your map. Just be sure to cover it all.

Creating forests and water
You can create forests now or you can create them later in the game, but unless you use mods there you have better tools for this here in the map editor.
For placing forests it is highly recommended to use a satellite photo as overlay. If you are lucky and this photo was taking outside the vegetation period (in winter or spring) you may easily tell apart needle-leaf and broad-leaf forests. In winter needle-leaf forests are green wheras broad-leaf forests are grey. In spring needle-leaf forests are typically darker than the broad-leaf forests with their fresh light green leaves. At least this holds true in central Europe…
Using the tree brush you can cover large areas with one tree species. Take your time to experiment with the brushes, typically a brush strength around 0.20 does a good job at a size of 50-100 and a brush strength around 0.10 at a size of 200 and above. (Thats because density seems to increase with the brush size.)

I typically only use few species at this stage – the beech (very common in Germany) and small needle-leaf trees, some times mixed with larger needle-leaf treas to give the forest a more natural look. But you are free to plant whatever grows in your city. (The warehouse offers dozens of additional tree species to choose from.)
Btw, in the screenshot above you can see the effect of the recommended No Tree Brush Slope Limit mod – I can paint forest on this slope which otherwise would remain more or less bare.
Tip: It can be very helpful to have Google Maps, Google Earth or somethins similar open to check a high resolution version of the landscape. Google Earth even offers to select the imagery by timestamp so you might find an older or newer image which makes separating the types of forests easier than the default image.
Soon your landscape might look like this (right side with overlay):

Time to release some animals to the wild: The toolbar button “Environment” allows you to place spawn points for some forest animals (or exotic animals if you prefer). You might want to set one or a handful if there is wildlife in the modeled area.

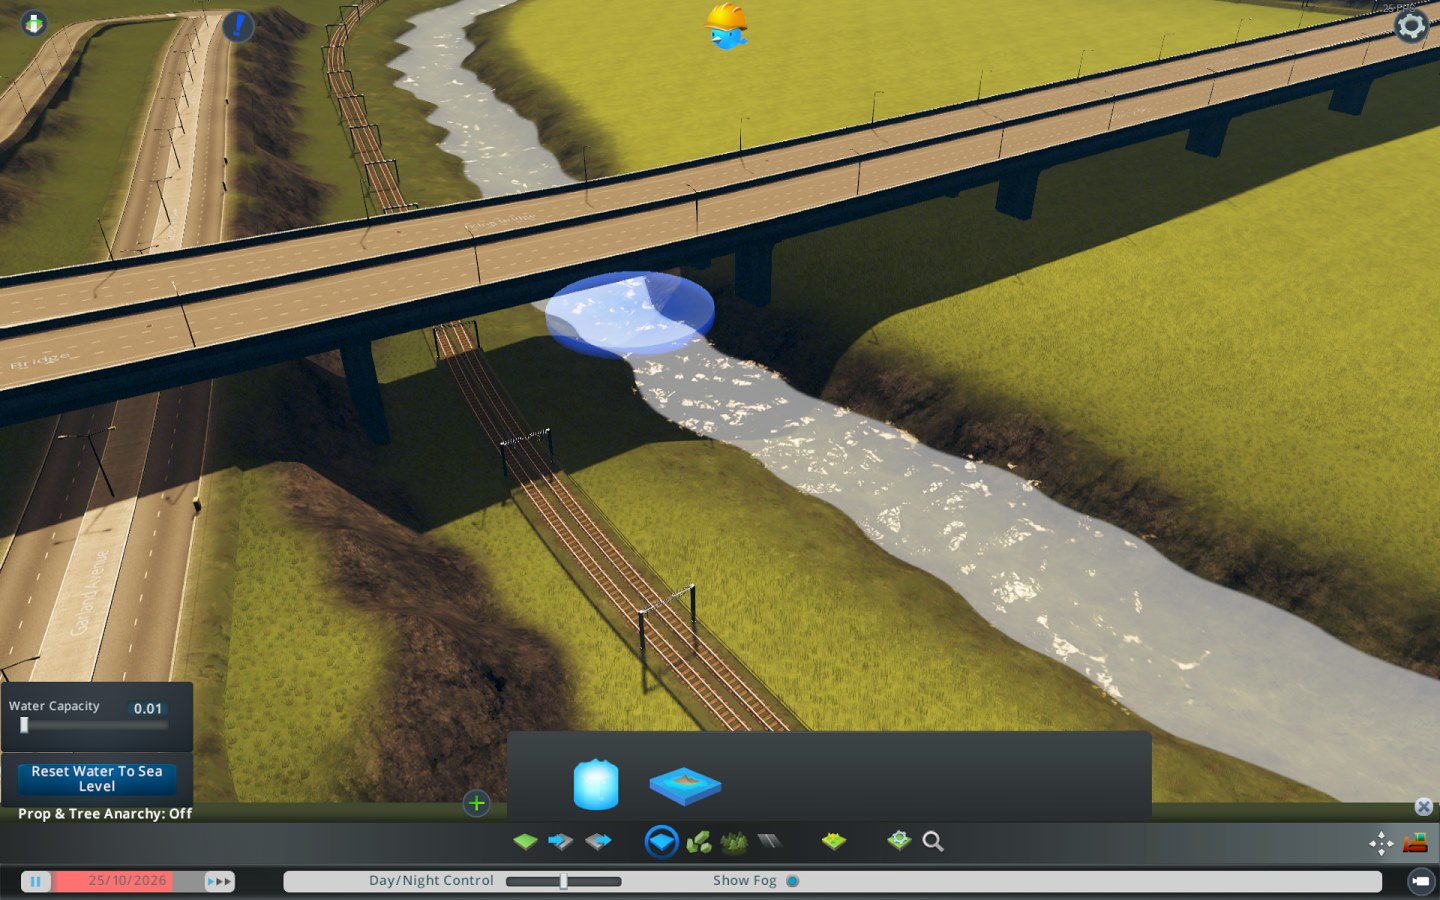
One of the requirements for a map to be released is to have flowing water in the starting tile. So its about time we get the water flowing. If you have not yet selected a starting cell, now is the time to decide: Where on the map will I create at least a road connection and flowing water?
If your city is located on a shore you should first use the “Raise sea level” tool in the “Water” section of the toolbar to adjust the sea level to a level which looks realistic with your terrain.

If there is a larger river (or multiple) in your map area then this is great because it provides the required flowing water. Note that you will not be able to reasonably create rivers narrower than 3-4 cells, that is about 30m wide. Sorry if you intended to model that small brook lovely crossing a village or the small channels as found in cities like Augsburg, Germany.
You start by digging the river’s trench using the “Level” tool. If you are not familar with this tool, you first have to select a height using the right mouse button, then you can draw exactly this height onto the map using the left button. Since river beds often are flat (except for mountain rivers) this is the perfect tool imho. Using brush settings as in the following screenshot (brush strength 0.10) you can carve a relatively narrow trench – as I said 3-4 cells is the minimum to get a useful water flow later. Again the overlay helps a lot for knowing where the river is located exactly. I recommend to “dig” the river bed at least ~8m deep. Otherwise it gets very difficult to get the water flow correct without flooding the surrounding areas.

Of course there must be some slight slope in a river, otherwise the water will have a hard time knowing which way to flow. Be sure to lower the river bed another meter at least every kilometer or so – of course if your river has a larger slope in reality then things are easier.
In order to ensure the river will not flow the wrong way out of the map you may stop the trench before it reaches the map border on the upstream side. This is the spot to place the first water source. I recommend pausing the game for this to avoid flooding your area until you have adjusted the water source.

Start with a very low capacity – 0.01 – if you have a narrow, shallow river as in the above screenshot. For deeper, steeper and wider rivers a higher flow of water is needed, of course. You can adjust the water capacity with the slider or enter a number into the dialog.
Now unpause the game and watch the water flow evolving. (You can increase the game speed if you like.) Adjust the water source as sees fit.
If you have a river that’s not very steep you will realize that, although the water is flowing in the right direction and the water source is constantly providing new water the flow seems to get less and less the more downstream you look. Basically, the water seems to seep away somehow. Quite realistically, actually. If you had a river without feeding brooks that add more and more water along the way, this river would never reach the ocean.
There’s two things to be done about this as creating little brooks is not an option. You can either increase the water capacity of the water source and hope this gets the river a bit further. But the better approach is to add more low-capacity water sources along the river. Just go downstreams and when you reach a point where you think the river looks too empty, add a small water source there. It helps if you slightly(!) raise the river bed before each water source so the water will more likely flow downstream.
Tip: Place additional water sources under bridges so they are less obvious.
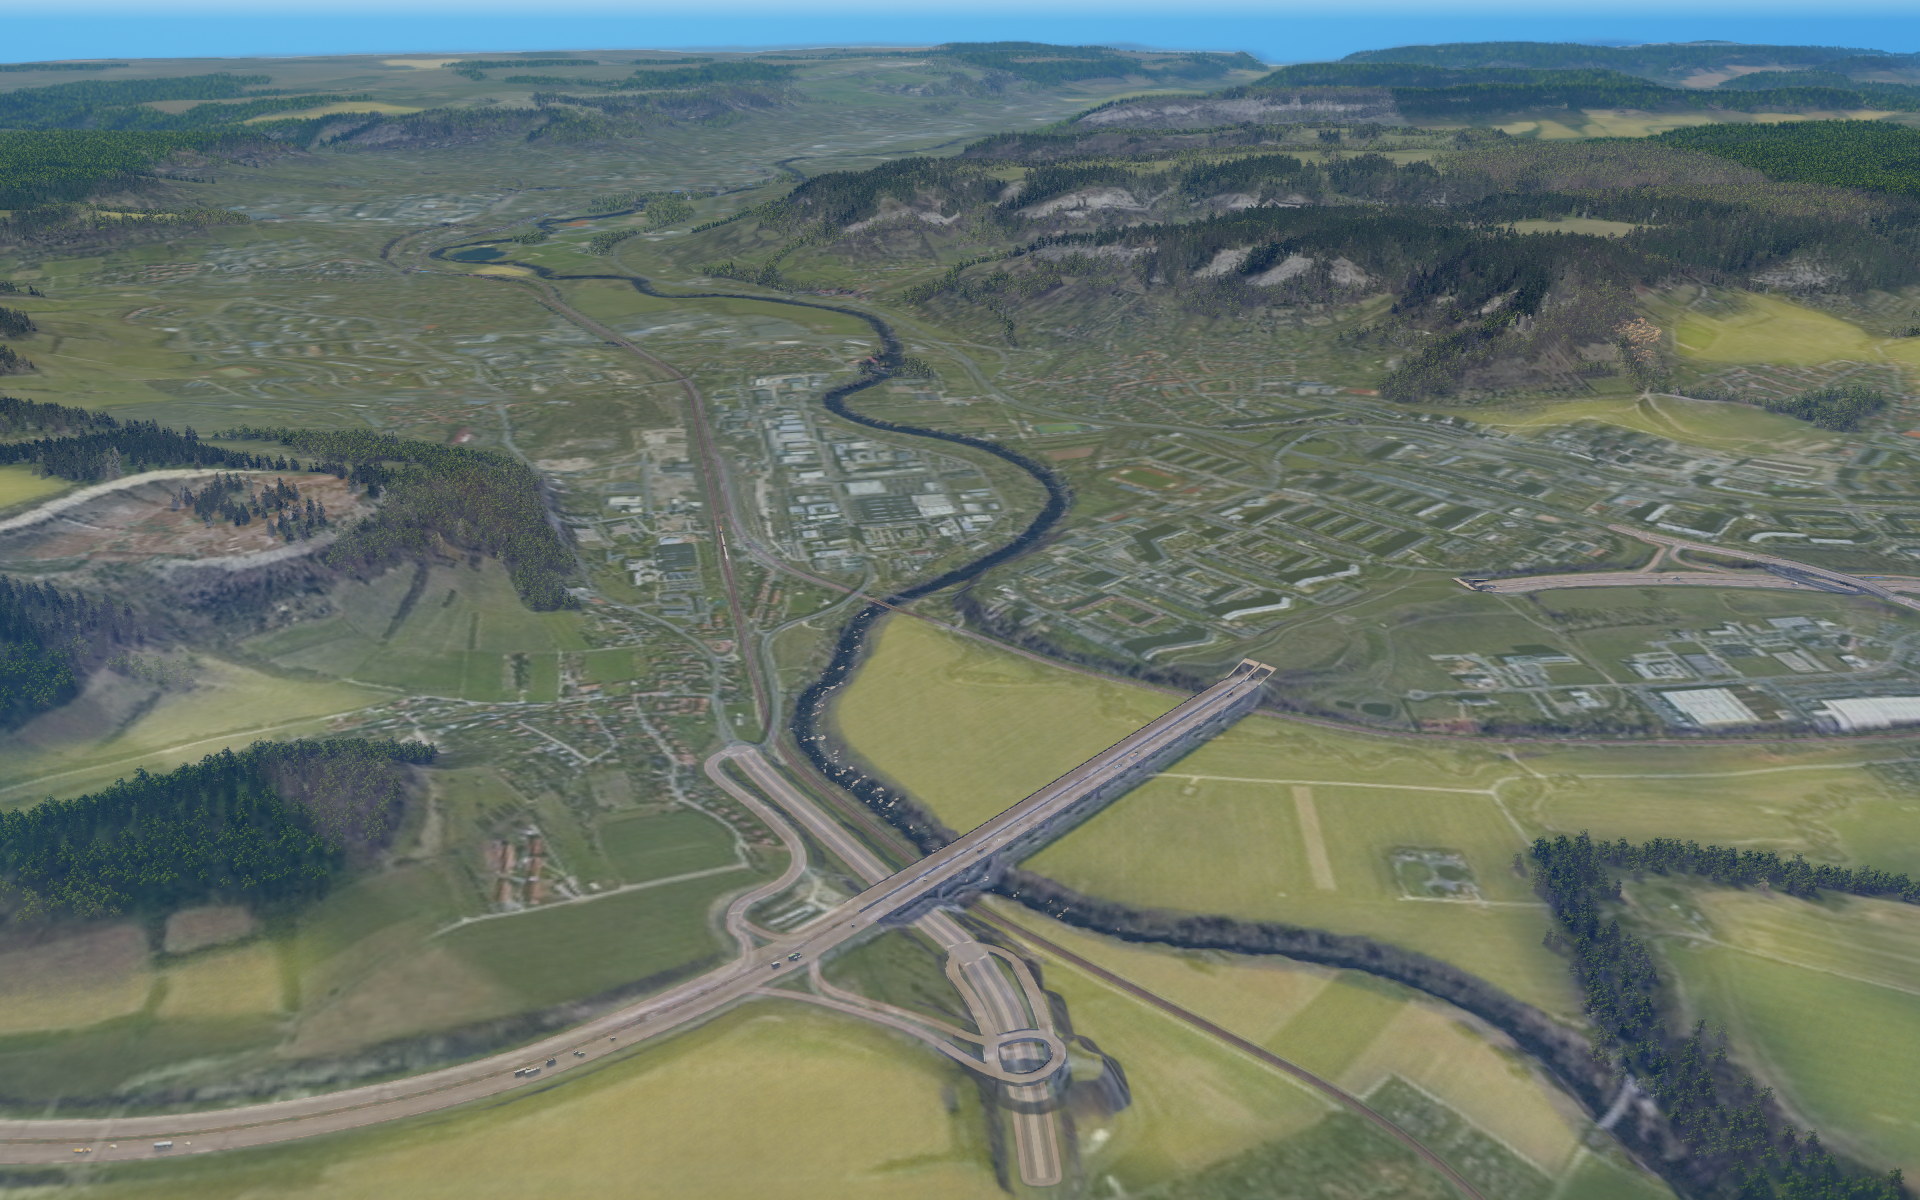
Okay, but what if there is no river in the city to be modeled? There is none in Las Vegas, for instance, and none either in the city of Weißenburg (Germany), which I chose to model.

Keep in mind you need the water in the starting cell so choose the starting cell where you have some water reservoir, treatment plant or just have some space to spare. You choose the start cell in the “Map settings” tab (second from right in toolbar).

By the way: No, you can’t spawn fishes in your rivers and lakes yet. This is not a fishing simulator.
Creating the basic road and train connections
Creating the outside road and train connections is rather straightforward and not different from building roads and trains in-game. Except that by default only few highways and national roads are available. If you intend to use other roads already in the map editor, the More Network Stuff mod is required. Although in normal maps only highways are supposed to be incoming and outgoing from the map, you can basically create outside connections with smaller roads as well, for examle with two-lane “national roads”. So don’t worry if your city has no highway in the area.
If the map is to be playable without mods, you must have at least one such road connection from the map border to the “start tile” – the tile that is initially visible to the player in a new game.
Note that roads are displayed in a simplified way in a map editor – they will look nicer later in-game. Also note that by default you cannot build tunnels (in contrast to overpasses) in the map editor – but the Map Editor Tunnels Enabler mod fixes this. Tunnel entrances also look simplified in the map editor:

Another mod which I can recommend is Fine Road anarchy. It allows you to create crossroads and place roads and train/tram tracks in ways not supported by the base game – often for good reason. So use this mod with caution! But in order to create more realistic highway intersections it can be very helpful as it allows to
- connect two roads in a sharp angle (But if the angle is too small this typically causes the roads to render ugly.)
- create more realistic intersections where a tram switches from the center of a road to the side of the road – which simply is a tram-road crossing with a rather sharp angle (see screenshot below). Same goes for more realistic train track switches/junctions.
- have a tram track run very close next to a street (by disabling the node snapping, see screenshot below)
- allow to branch roads very close to existing nodes by allowing very short road sections. Again, if overused ugly side effects such as overlapping pedestrian crossings and sidewalk corners can make the street look a bit strange.
A few tips for overpasses: In order to have one road (or train route) cross another via a bridge you need at least 10m of elevation difference between the two. You can most easily check this in the terrain tools, where you can use the “Level terrain” tool and a right click to “measure” the current game height on a spot.

It is not possible to create narrow (les than ~30m wide) overpasses as they do exist in reality because it is not possible to create vertical slopes or small tunnels in the game. You can circumvent this by creating a wider overpass and later – in game – use assets such as docks, stones or just walls to hide the slope behind some artificial “terrain”.
Also note that it’s not possible to use the “tiny roads” from the Network Extensions 2 mod as bridge – they don’t have elevated versions.
Finishing the map
Now that you placed trees, water, roads and possibly train, ferry and plane connections onto the map you are almost ready to complete your work in the map editor and head over to the actual game. There are a few things you might want to do or check before saving the final map, because once you started your game with this map there’s no way back to the map editor:
- Are the minimum requirements fulfilled? Ask chirper, he will show you the check list.
- If you don’t intend to use the map for gaming and just for re-building a real city you might not care about natural resources such as farmland, ore and oil. But it doesn’t hurt to place some anyway if and where they exist in reality. The yellowish patches of farmland might just give your map a bit of variety and thus a more realistic touch – and they allow to later “grow” farms in such areas instead of just being able to place them manually.

Tip: You might ask yourself what happens if you realize later – in game – that you forgot some natural resources, or you want to add natural resources, rivers etc. at a later stage when needed. Don’t worry, there is (of course) another mod for this: Extra landscaping tools, which adds all these functions of the map editor back into the in-game landscape tools.
Again – when re-building a real city it is not necessary to have a complete map that is “well playable” in an un-modded environment. But it can be a bonus if you intend to publish this map for other players to use.
The last thing to do is create some snapshot photos using the tools in the “Map options” of the toolbar. They will be shown when you select the map later as the base for a new game.
That’s it. You can now close the map editor and head over to the actual game. But before doing so, lets revisit the list of needed mods.
Mods for use in-game
The list of mods for use in-game is a bit different from the mods we required for the map editor. For one, we don’t need the “Map Editor Tunnels Enabler” any more for obvious reasons. “More Network Stuff” is also not required in my opinion, unless you use one of those features which apply in-game.
Required mods
- Overlayer v2 by princekolt or any similar mod – for using an overlay image/map in order to help placing stuff on the map.
- 81 Tiles (Fixed for 1.2+) by BloodyPenguin – allows you to purchase (or to enable right away) any of the 81 map tiles. You will likely want to do this, so you can start building anywhere on the map right from the start.
- Unlimited money – a built-in mod which allows you to forget about financial trouble (Sorry, doesn’t work for real life though.)
Recommended mods (in order of my personal importance)
- Extra landscaping tools by BloodyPenguin – allows to place water sources, natural resources and such in the game editor.
- Fine Road anarchy by Boogieman Sam – as explained earlier, this allows to create sharper intersections and to have tram tracks very close next to roads, among others.
- Network Extensions 2[http//Network+Extensions+2] by Lazarus*Man et al – provides several new road types, especially asymmetrical roads and more compact roads than the original game provides. For modeling European old towns I consider the “tiny roads” essential. Also included are some pedestrian-only roads which create cells for placing buildings next to them – in contrast to the game’s default “footpaths”.
- Traffic Manager: President Edition [STABLE] by LinuxFan (and others) – Lets you control lanes, street lamps, parking and other aspects. Required f.e. in order to create realistic highway/street intersections for only one direction of the highway/street. Advanced tool, requires to read the documentation and/or watch sample videos.
- Move it! by Quboid – Besides the capability to freely move placed objects this mod offers a function to deleted multiple objects selected via bounding box – ideal for removing several trees you just planted with the wrong tree species and for similar tasks.
- Find it! by Boogieman Sam – allows to filter and find any assets by their name. If you wish to place specific buildings or props quickly or want to find out f.e. what fences exist, you dont want to miss this one.
- Prop & Tree Anarchy by BloodyPenguin – Allows to place props (non-functional assets such as recycle bins, lamps, satellite dishes) anywhere.
- Building Themes by boformer – allows to define “Building themes” as collections of buildings to be used for a district. Basically an advanced version of “District Styles”. If interested, read my separate guide on this matter.
Recommended mods concerning the look of your city
- There are plenty of mods which affect the rendering, the color lookup tables (LUT), sky boxes and such stuff. I am not going to cover all such cosmetical mods and will list just a few which I consider relevant:
- TimeWarp Fix – Allows to set the latitude of your city and the size of the sun (among others), so the sun’s path is more realistic for your chosen location. If you forgot to rotate your terrain/overlay images rotated by 180° you can use the (inappropriately labeled) “Longitude” slider in the options to have the sun shine from the opposite side at noon.
- Daylight Classic – Removes the yellowish (sundown-like) tint introduced by the After Dark update and thus gives your city a more realistic appearance. As this also affects the asset editor your asset screenshots and preview images will look better without that yellow cast on them.
Attention: If you created your map with the terrain/overlay images rotated by 180° as I recommended, disable the “Classic sun position” option of this mod or your sun will again be 90° off.
Recommended assets
- Elite Tram Tracks (ETT) by Jerenable and Blackwolf (Frdm920) – A set of tram roads and tram tracks which look way more realistic than the game’s default tram tracks. Only needed if your city has a tram.
- If your city uses light rail commuter trains, the Light rail tracks (LRT) and assets by clus from the workshop might be helpful.
- Berlin inspired buildings – a collection and building theme for some typical inner-city residential buildings as found in many larger cities in Europe. Despite one or two errors in the collection I can reallly recommend it if it fits your city’s style.
A word of warning: The list of mods and assets in the workshop might be overwhelming and you might be tempted to subscribe and enable two dozen mods and hundreds of assets and collections right away. I do not recommend this, as the more mods you have the larger the chance they are incompatible or break something because you got some outdated mod or you get into trouble when a new game version is published. Also, more assets mean a longer game loading time and may even slow down your game. So start slowly and only add mods and assets if and when you really need them. And again, read their descriptions carefully before complaining they don’t work as intended or don’t do what you thought they would do!
Starting to build in-game
After you have started the new map and loaded your map template you will have to enable the overlay again (and possibly re-align it with the existing landscape – see the tips I gave for this earlier).
Tip: I find it very helpful to have Google Earth (or if you like, Google Maps or Bing Maps) running in a separate window in order to see a higher resolution of the area I work on. These applications resp. web pages allow you to see for example the number of lanes on a road or the look of specific intersections or the placement of buildings and trees in more detail.
Oh, and if you have not yet done so, you might want to give the roads their real-world names and adapt their route to match that in reality.
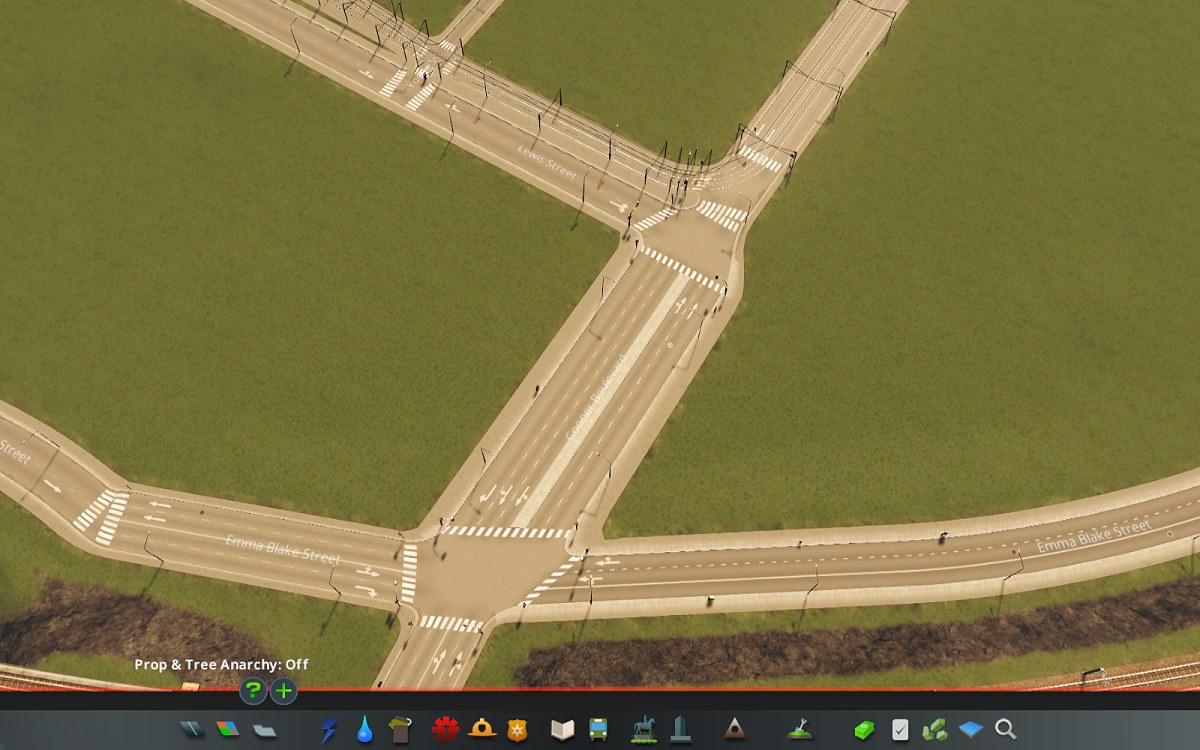
Once you start laying out roads in a city center you will likely realize that the roads in Cities Skylines appear wider than they are in reality – and you are right. Here are some examples:
w/ sidewalks
no parking, w/ sidewalks
parking on both sides, w/ sidewalks
asymmetric, w/ sidewalks
no parking, w/ sidewalks
no sidewalks
¹ measured from German cities. Values for other countries may vary.
² There’s no such road in the base game, the closest match is the two-lane one-way road.
So in some cases the “Small heavy roads” or the “Tiny roads” from the Network Extensions 2 mod can circumvent the discrepancy, in other cases – especially roads which allow one-side parking only – you’ll have to cope with the existing, wider roads. This is the reason why I recommended to slightly scale up when creating the elevation model by using only (for instance) a 16x16km map section instead of the ~17x17km you’d need for a real-scale map.
To build or not to build custom buildings
What is a “real” city without real buildings? Half as iconic, isn’t it? But creating custom buildings is a time-consuming task. Expect to work several hours for an average simple building from scratch. Even if you have an existing building model, correct re-texturing can take hours. No kidding!
In the end it is your decision: You might just use vanilla buildings (or buildings from addons and similar looking buildings from the workshop). If you are lucky, someone already built some unique building(s) from the city – or at least something similar. But even if you intend to create custom buildings yourself you should not even try to model every house in town separately, unless you intend to hire a whole company of modelers for your city.
Just focus on landmarks (city hall, train stations, churches, theaters, towers, schools etc. and maybe some unique city center building) and fill the rest of the city with vanilla buildings. If you have the highly recommended “European Suburbs” addon, then these buildings will work well for many central European suburbs and villages. The building theme “Berlin inspired buildings” provides good realistic assets for inner-city buildings. If large block buildings of the soviet area are involved, there exist collection with “soviet style” buildings, typically high-risers or large blocks with 4-6 floors.
Most likely you will have to create at least a few custom buildings. This tutorial tries to teach you an approch that is a simple as it gets and which can be achieved using only software which is free of charge.
I happen to have a collection of over one hundred buildings of the town of Weißenburg (Germany) sitting on my harddisk which were created a decade ago when Google was eager to have modelers create buildings for Google Earth. So my aim was to get these finished buildings into Cities Skylines. As expected this is not straightforward for several reasons: Cities Skylines does not accept SketchUp files and there is no compatible .fbx exporter for my old version of SU8. (There is one for newer SketchUp Pro versions which cost you quite a fortune.) Last but not least, Cities Skylines puts different demands onto your model than Google did: You have the cell size to take into accound and you should care about night lighes, reflections and such.
This section will explain how to adapt and convert an existing building created with Google/Trimble SketchUp for the use in Cities Skylines. It is not a full guide for Google SketchUp – there already exists guides and video tutorials which explain how to use the simple CAD software. But in my opinion SketchUp is one of the most simple and user friendly tools to get the job done. Creating a very simple house model is a matter of a few minutes. And yet, it has the tools to create even a complex medieval building where hardly any corner is rectangular.
The required steps I’ll cover in the next chapters are:
- Preparing the building texture(s)
- Creating the building model (in SketchUp)
- Texturing the model (in SketchUp)
- Converting the model to the required .fbx file using “Blender” (Open source) in the most simple way.
- Importing and configuring the building for use in CS
Custom buildings 1 – The base texture
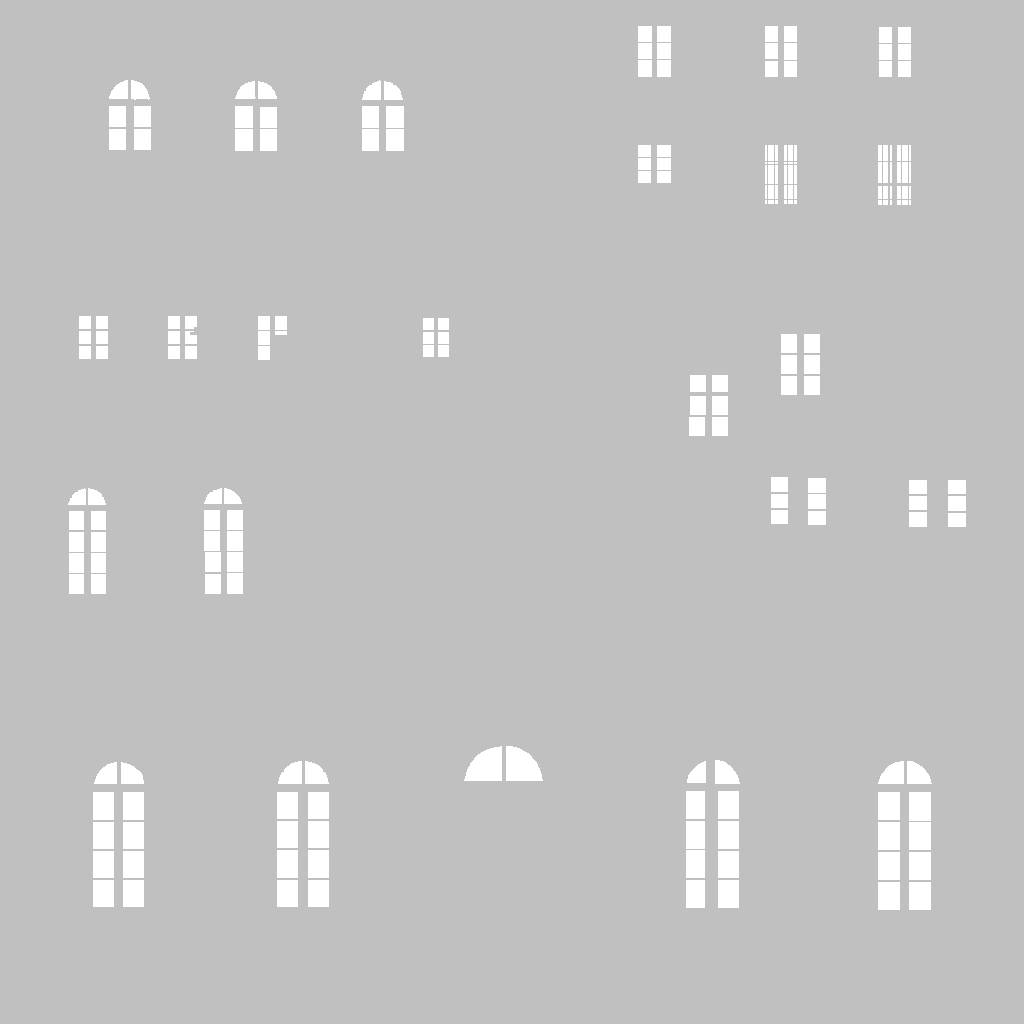
In order for a building to be usable in Cities Skylines you need to have only one texture – or more precisely one set of textures with the different suffixes as we will see later. This is a big difference and limitation compared to models created for Google Earth where you could use any number of custom and built-in textures. This not only means that if you have such existing building you have to completely re-texture it. 🙁 It also means that you have to create a single initial image containing all the small textures and photos you are about to use for all the different faces. Typically it will look a bit like a jigsaw puzzle.

- 512×512 for small buildings
- 1024×1024 for large buildings
- 2048×2048 for huge buildings
You can use any image processing software of your choice for this task (e.g. the open source software “Gimp”) as long as it supports layers or objects, has useful selection tools and can export PNG images. The Tenderfoot Guide To Creating Your Own Assets in Cities: Skylines shows these steps in Photoshop, for instance and shows some of the steps in Jasc Paint Shop Pro (starting from time 28:30).
A note on getting the textures: You can use generic textures such as the one offered by texture libraries (such as [link]) and you can use your own photos of the building and a mix of both. Using mainly generic textures reused for several facades allows for smaller texture files, but own photos usually makes the building look far more real. I personally only use generic textures for small faces such as chimneys.
When shooting images of the building try to shoot on an overcast day in order to avoid high contrasts and static shadows in your textures which look weird when not matching the shadows rendered by the game. Also try to avoid people, cars, lamp poles and other objects obstructing the facades of the building. This is difficult and can require several photo attempts but it makes the final building look more professional. Of course if you have the skills you may be able to edit out some objects from the image.
I recommend saving this base texture in a format which allows further editing if needed and as PNG or JPG file.
Tip: I recommend creating this “base texture” first, then building the 3D model and applying this texture onto it (see he following chapter) and only if this is done and you can be sure your diffuse texture is “final”, create the derived textures. This avoids doing that step again if you find your texture image is missing a face or needs some other correction.
Custom buildings 2 – Creating the model
In this section I will cover the SketchUp part – first creating the model geometry.
If you don’t have SketchUp installed, download Trimble SketchUp Make[www.sketchup.com] (registration required). Note that since 2017 Trimble offers its “SketchUp Free” as web application. I haven’t tested if this is suitable so I recommend the old desktop version (aka “Make”) from 2017. Even an old SketchUp 8 from 2010 will do! Note that all following screenshots were created with a German SketchUp 8.
If not yet familar with this software, read a basic tutorial. For a simple building you should know
- how to use the coordinate system
- how to draw vertices and polygons and how to move them. (Get acquainted with the key modifiers such as Shift and Ctrl.)
- how to use the extrude tool to create solids from polygons
- that the “offset” tool can be handy for create overhanging roofs
- how to tell “outside” (white) and “inside” (light blue by default) faces apart and ensure that faces are correctly oriented. (You can reverse the orientation in the context menu of a face.)
Start with choosing a suitable template. You can use any metric template, but the “Default” or “Earth Modelling” (if still available) will do nicely. If you start with the default template, delete the person model and then its associated texture from the “Window” -> “Materials” window.
The screen shows the coordinate system. When starting, red points to the right, green to the back and blue is upwards. If you build the model so the entrance is towards the red axis or (in case of a corner building) that the roads are in the foreground when looking from this direction (red axis and opposite of green axis) then I can tell you later how to import the model with correct orientation.
I recommend installing the Cities Skylines Tools[extensions.sketchup.com] from the SketchUp Extensions Warehouse into SketchUp. This can be done via “Windows”->”Preferences” under “Extensions”. At least in SU8 there’s a button to install a downloaded extension.
This addon helps you by creating grid guidelines for orientation and export a correct FBX file for use in the asset editor directly, but the latter requires the commercial SketchUp Pro 2015 or newer. The alternative is to do a conversion using Blender. I will describe this later – it’s not difficult.
Note that you can re-arrange the toolbars and enable more powerful toolbars if you like and disable others. Just check the menu under “View”->”Toolbars”.

For our sample building we start with a rectangular base, 6×4 meters. Use the “Rectangle” tool 
Either now or later you should use the “Move” tool to move the model to the correct spot within the grid guidelines or simply centered around the origin horizontally, unless you want it to be placed with some offset later in CS. Be sure to move the building, not the axes!
Then use the “Push/Pull” tool 


In order to give the building a gable, use the “Offset” tool 
Now use the “Line” tool 


In order to complete the roof, connect the four corners with the gable with lines and note how SketchUp automatically creates faces for all surrounded triangles and planar rectangles. The two vertical lines on each front can then be selected and deleted. (This will merge the co-planar faces next to them).

We’ll leave it at that, but just keep in mind that SketchUp has many more useful tools. You can move, scale and rotate selected objects, measure distance, you can create (pseudo-)spheres and cones using the “Circle” and the “Follow-me” tools, and you can group selected faces and edges in order to easily copy and paste them to a different position.
Again, ensure that your building is correctly positioned relative to the center of origin – this point will later be the center of the x × y grid you choose. Anything below the red-green plane will be below ground later unless on sloped terrain.
When modeling real buildings it helps to have a floor plan or at least a coarse footprint of the building to get the measures from. You can get detailed building maps from cadastral offices or you can look into Google Maps where the building footprints can be seen. It is your choice whether you create buildings as accurate as possible or slightly simplified so they fit the game and its 8x8m cell raster better. (Rectangular buildings are easier to place in a row than buildings with irregular shape, but if you intend to manually place them with the “Place it!” mod the cell raster might not be important to you. Just try it out.
Caution: When modeling buildings for Google Earth it was recommended to create groups and re-usable components for repeated parts of the building in order to keep the model simple. When creating a building for CS you can still use groups and components temporarily, but you have to “explode” them all before exporting the building for the conversion in Blender. Then ensure all parts are connected with each other via faces (forming one “mesh”), otherwise these parts will be missing in the asset editor.
I haven’t tested working on different layers but unless you know it works I’d also recommend sticking with just the default layer.
References:
- Export from SketchUp to Cities: Skylines[www.thomthom.net] with background infos on the SketchUp .FBX issue.
Custom buildings 3 – Texturing and exporting
So far you just have a white, untextured building. If you like you can export your building at this stage to .obj, import it into Blender and do the texturing there as described in Zordorks “Tenderfoot Guide To Creating your own assets”. But if you agree with the author’s and my own opinion that Blender is a bit awkward to use, concerning the use of the left vs. right mouse button, then you might try texturing the model in SketchUp – it is rather straightforward there … or, it could be if it wasn’t for Cities Skylines.
Always keep in mind that for CS you must only use your one texture image, not multiple.
Edit: In this forum[community.simtropolis.com] modder Elektrix describes an alternative workflow with a self-written Blender extension. It circumvents the “one texture image” limitation, “baking” the single texture later in Blender.

In the dropdown switch to the “In Model” view (the very first entry). If you imported an existing model and see more than one texture in this section (as in my old SketchUp models from Google Earth times), delete all these textures by selecting each end and choosing “Delete” in the context menu. (Answer yes when asked to use the default material instead.)
With the “Create material button” – the second one from top on the right hand side – you can import your orignal texture image (not the muted-down diffuse texture version). In the “texture” section of the “Create material” dialog, use the button on the right to import your texture image. The image you use here need not necessarily be the muted variant of the texture you’ll import into Cities Skylines later – just use the texture created in the first section of the “Custom buildings” chapter.
You might give your material a useful name, but there’s no need as you only use this one. Close the “Create material” dialog. The “Materials” dialog should now show your only texture.
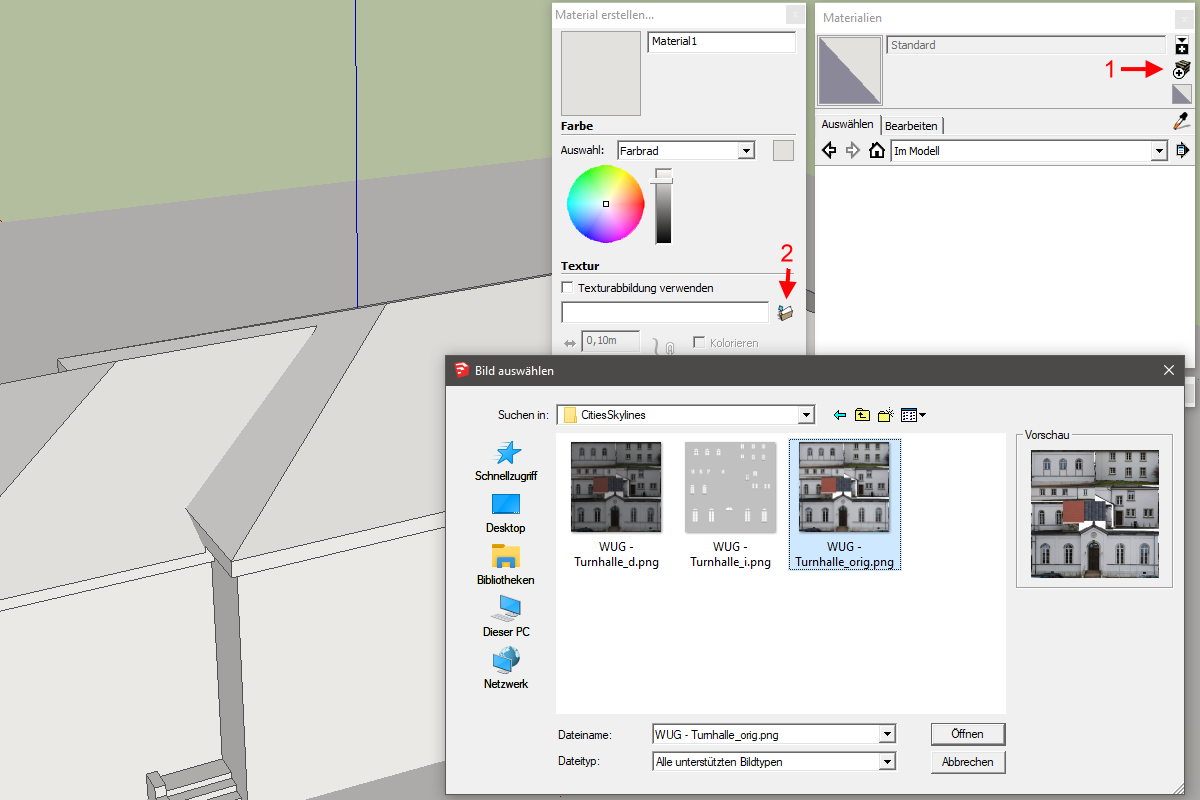
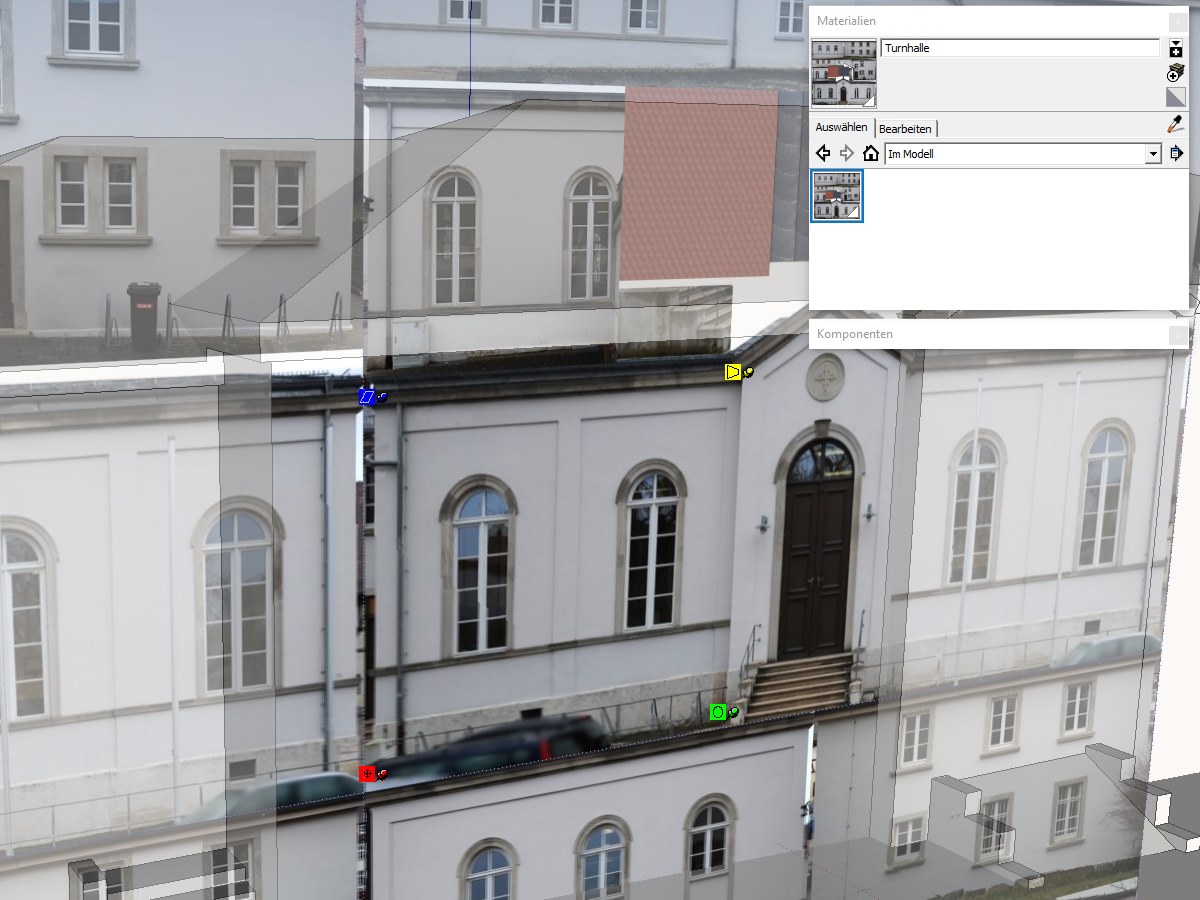
Then click on the image and the “fill bucket” tool will get enabled. Then click onto a face where you want to use this texture. The face wll get the texture applied, but its position will be wrong initially.
Right-click on the face and choose “Texture”->”Position”. Your texture will appear tiled now and you will see four pins. They either have different colors (“fixed pins”) or are all yellow (non-fixed pins). With the four pins you adjust the location, size and rotation, skew and distortion of the texture. Make sure your face will finally be located within these four pins.
I recommend starting with the fixed (colored) pins but this is a matter of taste. Assuming that a rectangular area is to be textured, place the four pins at the corners of the part of the texture image which will cover this face, as seen in the screenshot above. Then drag the four pins to the corresponding corners of the actual face of the model. If using fixed pins start with the bottom left (red) pint which moves the texture. Then continue with the bottom right (green) pin which rotates and scales the image. Chances are your texture is now already in place. If not, continue with the top left (blue) pin which skews the image and if necessary move the final yellow pin into place (but see note below). Now your texture should sit in place. Right-click and choose “Done” to exit the texturing mode.
Attention: Texturing in SketchUp (SU8 at least) is subject to a serious limitation, it seems. If textures are applied in a way they are distorted, this will cause the OBJ exporter to create separate textures – CS doesn’t support this.

The face should now appear as intended:

Continue this procedure for every face in the model. Don’t forget faces looking downward, such as on overhanging roofs. There’s no need to texture the building’s floor face or anything completely below terrain. You can even delete such face by selecting them and pressing “Del”.
Finally, before you export the model, check the “Components” dialog that your model doesn’t contain any components. Choose “In Model” in the second-left drop-down, and if components are listed, right click on each one, choose “Select instances” (if there are any), then right click on any of the selected instance in your model and choose “Explode” in the context menu. Tip: Do this after texturing, so you only have to texture one shared component, not x instances of it.

Close the options and export the file.

Just for convenience, here is the complete NO-GO checklist as far as I know. Ignore it and you will fail to import your model later…
- Multiple textures after OBJ export
- Components or groups.
- Any unconnected faces or groups of faces. (Ensure all faces are connected to your main model by other faces, not just by lines. Especially check chimneys, dormers, front stairs etc. A rough check is clicking onto the model, choose “Select”->”All connected”, press “Del” and check what remains … and undo, of course.)
Custom buildings 4 – Beware of the LOD
First of all – what is an LOD?
LOD stands for “level of detail” and commonly in 3D modeling refers to lower resolution versions of a model, texture or both. Using LOD versions means, that when you look at a model or texture from far away, you cannot see the details anyway, so it would be a waste to load them. Using a simplified version in this case can save RAM, improves the loading time and the scene complexity (in case of a model).
Typically the LOD model will have 50% or less triangles compared to the original models. Any details not visible from 1km away can be ommitted, including dormers, indented windows and such. In the above example the church had ~1600 triangles originally (being a lightweight model already), the LOD only has 700 triangles. As a rule of thumb, try sticking below 1000 for the LOD model.

Cities Skylines will generate an LOD version of your model if you don’t provide one. However this generated version might or might not look pleasing, depending on your model’s geometry.
If your model is simple (<1000 triangles, mainly large faces, faces typically oriented along axes, no round or irregular shapes) the chance is high that the generated version will be acceptable and you can save yourself the additional work.
Otherwise chances are good your model will look distorted like a pile of garbage from a distance. Of course, you can first try it and come back to this chapter if not satisfied, but I can tell you it’s hours of work to fix it afterwards.
In theory, everything is pretty simple. You just provide an additional .fbx model with the postfix “_lod” and for each relevant texture a separate image (usually PNG) file with the same postfix. So if you already have
- mymodel.fbx
- mymodel_d.png
- mymodel_i.png
- mymodel_s.png
you would add following additional files before importing the model into the asset editor as described later:
- mymodel_lod.fbx – a simplified version of the model
- mymodel_lod_d.png – a scaled down version of the diffuse texture
- mymodel_lod_i.png – same for the optional illumination texture
- mymodel_lod_s.png – same for the optional specular texture. Hardly useful in LOD.
I recommend to scale down the textures to about 1/4 of width/height for the LOD version, but typically a width/height of 256 is enough. Any larger textures will not improve the outcome since you will not be able to see the details anyway.
This sounds fairly straightforward, were there not a few limitations, one of which makes creating LODs with SketchUp a real pain (or precisely, a try-and-error game). These rules are:
- All LOD textures must have the same size. (If your diffuse texture is 512x512px, but your illumination texture is 256x256px, you will be able to create a model in the asset editor, but the model will fail in game with the error “LOD aci null”.) Well, this rule is simple enough to adhere to.
- LOD textures cannot use tiling. All UV coordinates must be in the range 0.0-1.0, which means, that they must be on your texture directly, not next to it.
This second rule – which does not apply to the primary model – is the problem. When positioning a texture SketchUp shows a texture as a repeated (tiled) pattern and does not show you which tile is the one with the 0.0-1.0 coordinates. What’s worse is, even if you think: I will stick with the initial tile surrounded by the four pins initially, this will lead you astray in >50% of all cases.
What this means is: SketchUp is not a good tool for texturing LOD models! Use Blender or another software which immediately shows you if your face is onto the texture or not.
Use the following steps to check your LOD model for correctly positioned textures:
- Export the model from SketchUp as .obj file as described in detail in the following chapter.
- Open blender and import the model (Click on file, then type “i” (import) and “w” (Wavefront), navigate to the previously exported .obj file.
- In the top toolbar, switch the perspective from “Default” to “UV editing”
- Click on the model (with right mouse button in Blender 2.7.9 or older)
- In the bottom right toolbar, change from “Object mode” to “edit mode”
- In the bottom left toolbar, change from “Vertex selection mode” to “Face selection mode”. You can now click on the black rectangle on any wrong face to see it “highlighted” in grey (!!!) on the right hand side. You now know which face texture has to be re-positioned in what way.
Note that I am not a Blender expert, so maybe there’s better ways to achieve this.

When I loaded an existing SketchUp model into Blender and checked the UV coordinates there I realized only about 30% were on the texture (in the correct range), 50% were left of it and 20% were right of it or anywhere else, some even further off.
You have two choices to correct this: Directly in Blender (if you are familiar with working in the UV Editing mode. I am not, unfortunately.) or in SketchUp by checking for each face where the texture currently is and moving the texture in SketchUp accordingly, re-exporting from SU, re-importing into Blender and verifying again, repeating until at least all larger faces are OK. This can be frustrating, this is why I don’t recommend SketchUp for this task.
Maybe if you have some experience, you can guess where to position the texture correctly in the first place in SU, but after a quick test am still not able to provide any useful rules for this up to now.
Custom buildings 5 – Model conversion with Blender
If you don’t have the possibility to use the Cities Skylines Tools[extensions.sketchup.com] because you don’t have a SketchUp Pro license, you have to follow this chapter to convert the .obj file to the required .fbx format.
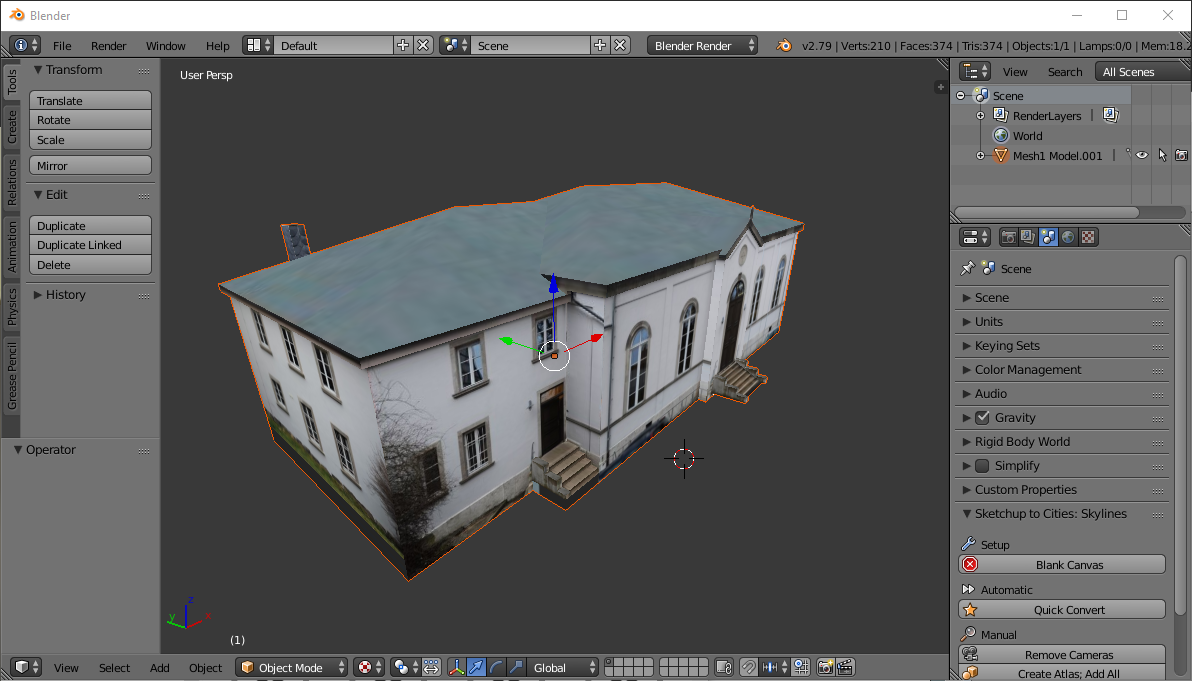
Start up Blender (I used Blender 2.79). Type “b” and drag a rectangle around the cube and the light in the scene. “Del” will delete them.
Then select “File”->”Import”->”Wavefront (.obj)” (or when in the file menu, press “i”, “w”), navigate to the folder with the .obj file or paste the folder in the upper text field. Tip: Add your folder to the “Bookmarks” with the “Add bookmark” option in the left sidebar so you find back there easier the next time.
Select and click “Import” (or press Return) to import the model. You should now see it, maybe after zooming out a bit. Most likely you won’t see any textures. To change this use the view mode option in the bottom bar right of “Object Mode” – if it shows a white dot, select “Texture” in the dropdown.


Unless you want or need to texture some faces here as described in the “Tenderfoot Guide”, you can just skip to the last steps to do in Blender:
If you haven’t triangulated your model yet, switch from the “Object mode” in the bottom toolbar to the “Edit mode” if your model is selected. (Right click model to select it.) Then in “Edit mode” press “Ctrl+T” and you’ll see your model get triangulated. You can now switch back to Object mode.

In the FBX export options on the bottom left, ensure “!Experimental! Apply transform” is enabled, otherwise your model will be completely out of scale and oriented wrong in Cities Skylines.
For the “Forward” axis choose “Y Forward”, for the “Up” axis choose “-X Up”. If you oriented your model as I recommended with the front side towards the red axis (or towads the red and the opposite green axes for a corner building) then you will later find your model in the needed orientation in the Cities Skylines asset editor, the door facing to the front right. (You can rotate the model there as well, but I ‘ve read this badly affects bump maps, in case you intend to use such.)
All other export options can be left to their defaults.
In order to have CS find your model and its textures in the next step, they have to be located …
- on Windows in %localappdata%Colossal OrderCities_SkylinesAddonsImport
- on Mac in /Users/<username>/Library/Application Support/Colossal Order/Cities_Skylines/Addons/Import
- on Linux in /home/<username>/.local/share/Colossal Order/Cities_Skylines/Addons/Import.
You confirm with “Export” and a second or so later you are done.
Custom buildings 6 – The derived textures
A building (e.g. named buidling.fbx) to be imported in CS supports the following textures to be supplied with it as PNG image files, each with a distinct filename suffix:
- Only the diffuse texture (e.g. “building_d.png”) is mandatory.
- The illumination (window lights) texture is highly recommended to have the building look well during night.
- Transparency can be useful, e.g. if you have the texture of a fence with “holes” and want to model this fence as a single rectangle, that is, not actually model the holes.
- The color texture is only relevant if you want to enable random colors on your building – not something we will cover here.
- The specular texture determines how much certain portions of the building reflect light. It is not really necessary but it can add more realism to your building’s look if windows, metal doors and fences show different levels of reflections.

In order for the building being lit at night I recommend creating an illumination texture (and optional a specular texture) from this last image. For this you need a greyscale image where the windows have certain range of grey values (e.g. 140 for always-on lights) whereas the rest (which will be dark at night) must use grey value 192
Below is my personal workflow using an old “PhotoImpact” software – other software might have other preferred ways of achieving this but I will not cover image processing in detail here.
I first convert the previous diffuse texture (with reduced brightness) to a greyscale copy. Then, use an appropriate selection tool (like the wand tool or any tool which allows to select areas of similar color) I select multiple window areas. It is important here to have anti-aliasing turned off for the selection, because I need a “pixel sharp” mask. Then I fill all these with one color brighter than the brightest color so far (e.g. 200 – aka light grey). I repeat the select – fill step for all windows or more general, all areas which are supposed to be light at least sometimes.
After I painted all illuminating areas white I can easily select these areas, reverse the selection and then paint this selection – all the remaining area – with grey value 0.
We now have a good specular map and might want to save this as <building_name>_s.png. (Windows now have a relatively high reflection of 200, the rest with value 0 no reflection.
Now lets create the The illumination map. By test I found out what the values in this greyscale image mean:
- 0 – No illumination (Only use this if you use the values 1-64 otherwise.)
- 1 … ~64 – Texture is showing its original color in increasing brightness. This can be used to simulate glowing surfaces or faces lit by external light, e.g. spot-lit facades of famous landmarks.
- 120 or so – Always lit with yellow (lamp) light.
- 192 – No illumination (use this if you use lit windows!)
- 121 … 192 … 255 – The closer the value is to 128 or 255, the longer (and on average, the brighter) the window will be lit during night. This is a random process, so you can not say that a value will be lit in the evening, another one at midnight or so.
Attention: You should avoid mixing values of below 120 and from 120 onwards because this causes ugly artefacts (bright lines) on the border between these two ranges. So if you create a face with lit windows (120+), use 192, not 0, as the “non-illuminated” value for these faces!
Here are some screenshots from a test roof face with all possible values at different times on different nights (the first screenshot is a static one from the asset editor):


If you want to keep it simple, choose 120 or 127 for windows (always lit) and 0 or 192 for the rest of the building.
Finally either select all window areas again and set them to 120 (always lit) or multi-select only some of the windows and give them different values. In a multi-story office building you might decide that some windows may not be lit at all, some will be lit often, most of them more seldom. Using values below 192 and above 192 will create two sets of windows lit at different times. This gives a more realistic appearance than having the building lit completely (or not at all) all night.
References:
- Cities: Skylines Modding – Building Asset Creation[cslmodding.info] (highly recommended to read)
- The Tenderfoot Guide To Creating Your Own Assets in Cities: Skylines
Custom buildings 7 – Creating the asset

- <building>.fbx – the model itself
- <building>_d.png – the diffuse texture showing the look of the faces, adapted for the needs of the game
- <building>_i.png – the optional illumination texture (lights at night)
- <building>_s.png – the optional specular texture (reflections)
Now start Cities Skylines an in the main menu select “Editors” -> “Asset Editor” and below this “New” (screenshot on the right). Select any theme (e.g. European). I don’t think it matters which one you choose, but I really don’t know.
For the asset type to create, select “building” and click “Continue”.
The following dialog is important to understand. You don’t configure the asset from scratch. Instead you choose a similar asset and basically copy over its settings with the option to modify (most of) them afterwards. Here you decide if your model will be a “ploppable” unique building later or a growable (e.g. light residential) or a public service building such as a fire station or school. So be sure you choose the very best template to match your model. You cannot change this template (or its implications) later! So make sure you are not creating a fire station as office building and such.
Tip: If you created a corner building you need another corner building as template. Alternatively you need to use the “ModTools” as described here[cslmodding.info] in order to change the zoning mode afterwards.
In my example I modeled a gym, so I choose the “Healthcare” tab and select the “Sports hall and … ” building as template.

In the next import dialog select the previously saved .fbx file (from %localappdata%Colossal OrderCities_SkylinesAddonsImport on Windows) and use the rotation arrows to rotate the model until its roof is indeed facing upwards and the main facade (e.g. the main entrance) is on the right hand (front) side in the preview image. That’s where the game will require the road to be.
Attention: Be sure the scale is set to 1, otherwise your model will appear larger (or smaller) than intended. Cities Skylines tries to compute a scale to scale your model to the size of the template, but this is not what we want if we created the model on scale.
You now see your building placed on a flat.
What if you choose your .fbx file in the import dialog and there is no preview of the model? Don’t blame me. As a matter of fact, Cities Skylines is very picky about models it accepts – and what’s worse, it doesn’t tell us what the specific issue is, except by try and error – that is, by clicking “Back”, exporting and converting a simplified version replacing the existing one and then continuing to the import dialog to check again.
Here are the cases known to me which can cause the model to be silently rejected:
- The .fbx file does not have the required format. There’s info on this on the web, but long stroy short: You can’t simply use the .fbx export from SketchUp Pro. For SketchUp Pro 2015 or newer there’s a plugin which modifies the file as required by CS, for older version’s you have to convert it using Blender.
- The model contains multiple meshes. When modeling for Google Earth I used the trick to place a small rectangle just a few cm in front of a larger rectangle in order to keep the polgon count low (example on the right), but CS chokes on this. Other examples might be chimneys, dormers or stairs not connected with the rest of the model via faces. (See the chapter on Blender on how to tell what model parts likely cause the issue.)

When using certain templates your model will appear with a strong color cast, reddish or blueish for example. The reason for this is the color variations used in the template. To “fix” this open the “Material” section at the bottom of the building settings dialog, click on any “Color variation” color and set it to white. The previewed model will reflect this change and show its normal color.
Custom buildings 8 – Configuring the asset
The first thing to do is to adjust the width and lengths (in cells). If you got the scale wrong in the previous step you will notice now that the building doesn’t occupy the expected rectangle of cells.
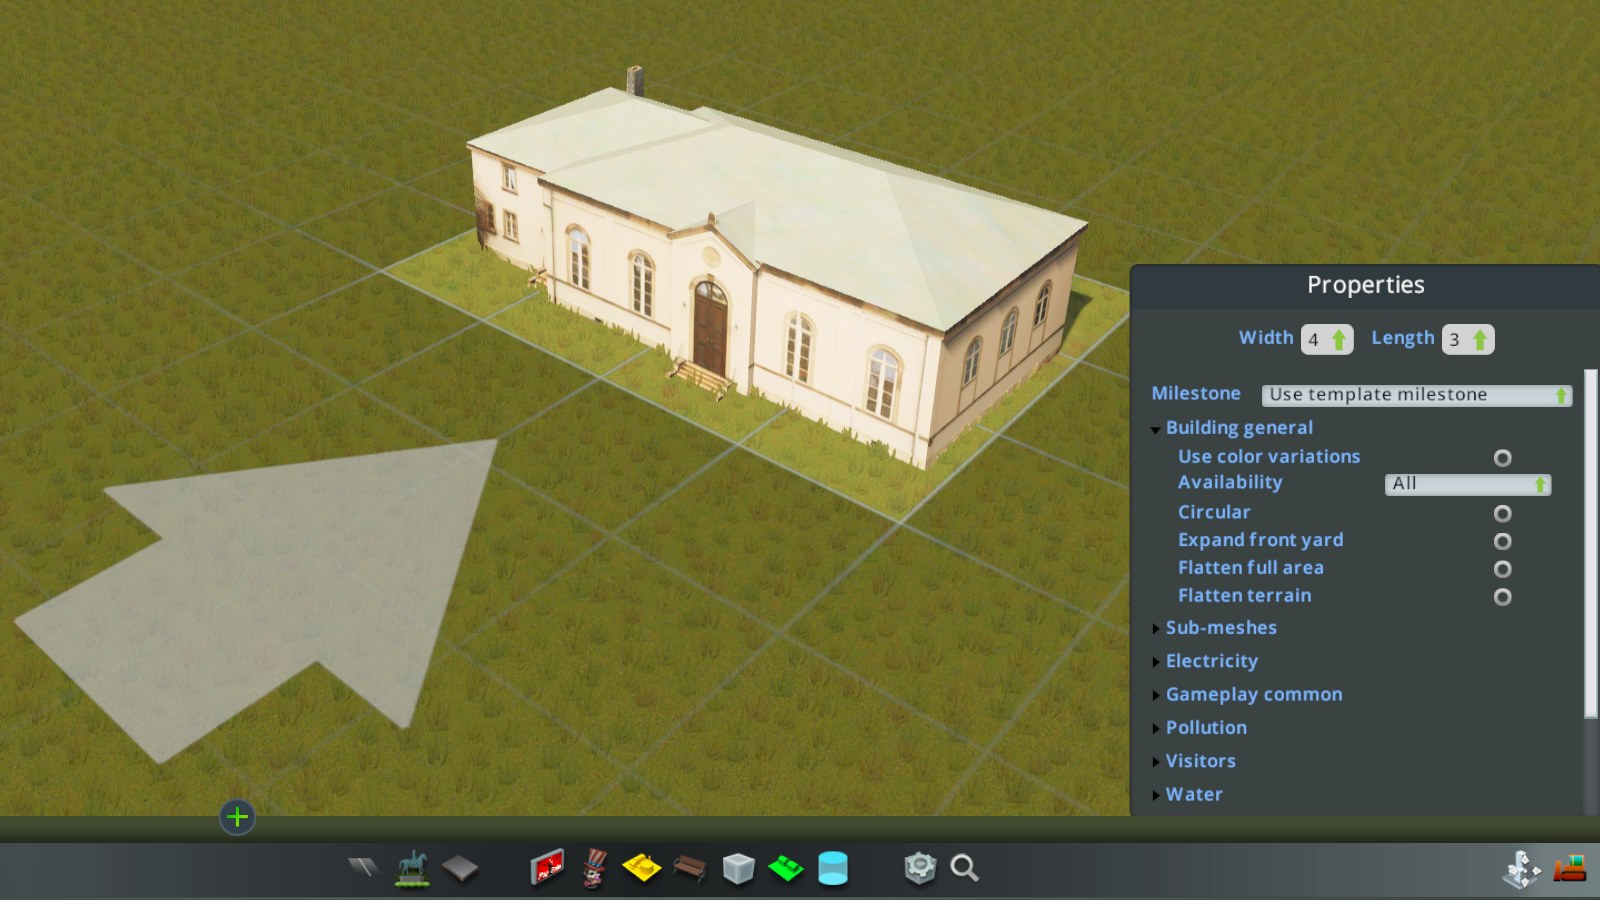
You should now check the many building properties. They differ for different type of buildings! You likely will want to disable color variations (unless you really want to have you building appear with a random color tint later) and possibly the “Flatten terrain” option if your building is located on a slope in reality and is to be placed on a slope in your model city as well.
You might want to adapt the number of tenants or workers and similar settings so you can better use the asset for its real purpose in game – not just to “look good”. If you want to better understand what certain values (e.g. “Attractiveness Accumulation”) mean and what the range of values suitable for them is, check out the Skylines Paradox Wiki: Asset Properties[skylines.paradoxwikis.com] page.
Concerning the floor variables in the “Material” section – they are needed (only) if your building contains a specular texture (“_s” postfix) which has completely specular areas (value 255). Such areas will show as transparant windows showing a “fake interior floor”. In order to place this fake floor correctly the game needs measures such as the height of the ground floor and following floors (in m). The incorrectly named “Floor count” must actually be the upper total height until which to generate fake floors. Details can be found in this forum thread[forum.paradoxplaza.com].
Check out the many options in the asset editor to add props (e.g. lamps, recycle bins, vegetation). It is recommended that you use the markers to identify doors into your building so that Cims can walk from the street to your buidling’s entrace. Parking markes let cars park at desired spots (near the road). Note that you can place only 64 props, including markers but not including paths and such.
When you think your model looks nice and is complete, create the preview images for it using the “Asset Editor Settings” from the toolbar. If you feel that your building looks yellowish – especially on these snapshots – then consider enabling the Daylight Classic mod which removes this “sunset-like” color cast.
You are now done and can save your asset via the cog icon on the top right. This building is now ready to be used in game. And this is probably the thing you should do now: Test it thoroughly:
- Is the placement correct (relative to the cells)?
- Does it look as expected (not to bright, too dark, too colorful)?
- Are there any missing textures or even missing parts?
- Does it look good at night?
- Does it “work” (hiring the correct workers, providing the expected beds for healthcare etc.)
Congratulations if you have come so far. Now you can start mass production of buildings … that is if you have the time to spare. 😉
References:
- Cities: Skylines Modding – Building Asset Creation[cslmodding.info] (highly recommended to read)
- Cities: Skylines Wiki – Asset Editor[skylines.paradoxwikis.com]
- The Tenderfoot Guide To Creating Your Own Assets in Cities: Skylines
- Tutorial : Floors for relective buildings… and others too.[forum.paradoxplaza.com]
- Skylines Paradox Wiki: Asset Properties[skylines.paradoxwikis.com]
Breathing life into the city
In this chapter I am going to describe tips for making the city come to life. It is one thing to create a city which looks good in pause mode by “just” placing building by building, adding prop by prop and by drawing roads. But it is another thing to re-build a real city that actually “works” as good (or almost as good) in the game as it does in reality.
I believe this is the “holy grail” of building a real city and it is your decision if you are up to this challenge.
The rules which apply in a normal game do apply for a “real” city as well. This includes the balance of residential, commercial and industrial areas, the coverage with public services, parks, a functioning traffic network etc.
TODO: This chapter will be expanded as I get more experienced on this myself. For the time being there are a whole bunch of (video) tutorials on several aspects of “real city building” for Cities Skylines you might want to read or watch.
References
- Discussion: How to create realistic cities? – Discusses pretty looking vs. “working” cities.
I hope you enjoyed my tutorial and found it helpful, even if it could not cover very single aspect in full detail.
I always embrace improvement suggestions and constructive criticism, so if you know additional tips, more streamlined workflows and such, or just found an ugly typo, just let me know in the comments so I can improve the guide. Thanks.