Overview
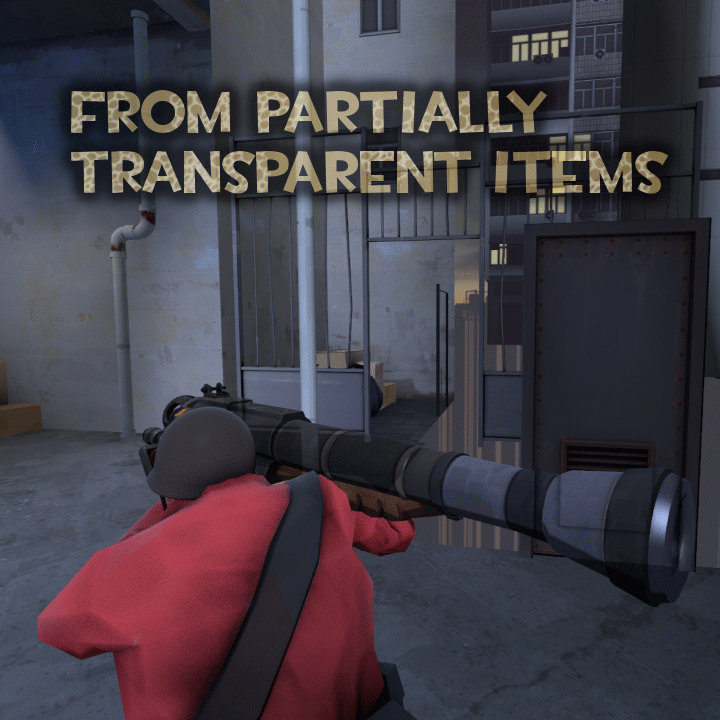
We’ve all been there, port a custom asset from some other source or spawn a community TF2 model, get it into SFM only to find that it’s a see-through type model. It doesn’t matter what we do to repair the textures, the model remains see-through or we lose some quality in the textures.The most common cause for this problem is that the model most likely has a texture that has an alpha channel in it and uses a translucent or alphatest command in one or more of the VMTs, however, the author of the model compiled it without adding a $mostlyopaque command to the QC.The Fix is relatively easy. Just follow the steps.The model used in this guide is the Rocket Launcher known as The Follower, uploaded to GameBanana by Svdl. It can be found here.https://gamebanana.com/skins/134469 I’ve chosen this model because there are actually 2 problems with it. The texture problem and the author created this as a replacement weapon for 1 of 4 weapons, The Beggars_Bazooka, The Direct_Hit, The Liberty_Launcher or The Rocket_Launcher.In this guide I will also show you how to make this weapon its own model, so you don’t lose the ability to use the other 4 in the same SFM project.As with all my guides I try to provide hi res pictures, if you need to see something in a little more detail, just click the image to blow it up.Note: I don’t have permission from the author to repair and upload this model to the workshop, nor am I about to ask for it. This guide will show you how to repair it (and models with the same problem) for use in SFM.
The Problem
In most cases you will already have the model ported to SFM (or you wouldn’t be able to see the problem). So I don’t have to go through the porting process in this guide.
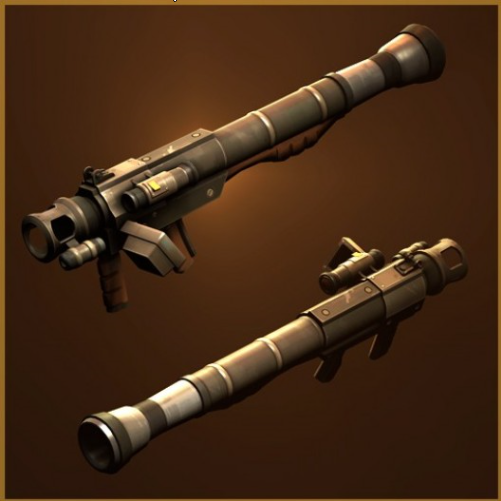
The model demostrated here is the the rocket launcher know as the Follower. It is available at the link I provided above. As I mentioned in the opening remarks, the model, when ported, is a replacement weapon for one of four different models that exist in the TF inventory.
The problem is apparent when a model is ported into SFM. The model spawns alright but ALL the textures it uses seem semi-transparent and the model does not throw shadows.
The assumption is, when the engine scans materials on these models, because it was compiled without a $mostlyopaque command in the QC, it only makes one pass over the materials. If it finds translucent materials, the engine assumes that all materials are translucent and displays the model this way. Some think it has to do with AO built into the textures, but none the less, most models with the problem appear like this in SFM.

When $mostlyopaque is added to the QC, as the model loads the engine does multiple passes over the materials. It looks for opaque materials then does a pass for translucent/alphatest materials. The resulting model looks like this.

Tools Required
The only tools usually required to fix these type of problem models permanently is Crowbar and a Pure text Editor (like NotePad ++).
Crowbar can be downloaded from the Crowbar [Source Modding Tool] Group right here on Steam. Here’s the link.
[link]Click on the Download link and follow the prompts.
If you need to learn how to use it, I have a complete guide on using Crowbar here.
[link]NotePad ++ can be found here. Make sure you download the proper version for your Computer’s Operating System.
[link]Decompile
If use other methods to “fix” the textures and don’t actually repair the model, you may have to “fix” the textures every time you use the model.
To permanently fix the model, it has to be decompiled, the QC ammended and the model recompiled.
Os here are the steps required to permanently “repair” the model:
- If you don’t already have Crowbar downloaded and installed, get it from the Crowbar [Source Modding Tool] group. If you need help installing, see my Using Crowbar guide. (The links are in the opening description above.)
- Launch Crowbar and select the Decompile tab (1)
- Use the MDL Input: Browse button (2) and point to where the model’s .MDL file is located. Select it (3) and click Open (4).
- Once you have the model selected, use the OutPut To: Browse button (1) to point to the folder you want to decompile the model to. (I usually use a folder on my desktop)
- Set up the Crowbar Decompile Options (2).
NOTE: In order to make sure you don’t mess the model decompile up and have the QC fail on recompile, you should select the items I have checked in the picture below. - Click Decompile (3)
- As the model decompiles, the Log Window will fill with information (4). When the model finishes its decompile, check this window for errors.
- Open theWindows File Browser and go to the decompile folder. In that folder you’ll find SMD, VTA (if any exist) and a QC files. You’ll also find an {MODELNAME}_ANIMS folder.
- Right Click on the .QC file and select Open With and find the text editor program you intend to use. (I’ll be using NotePad++)
This is the QC for the Follower weapon I’m working on and if you scroll through the code here, you’ll see that there isn’t a $mostlyopaque command in it. This is what is causing the problem with the weapon in SFM.


QC Edit
The primary fix I intended to show in this guide is how to repair the textures, so here it is,
- Somewhere in the QC enter the command
$mostlyopaque
on its own line. It doesn’t matter where you put it as long as it is on its own line. (I usually insert it just before the $cdmaterials command. )
Then save the file.

Now I mentioned that this particular model is a “Replacement” item for assets that already exist in the TF2 world. This is a common practice for most Valve Games (especially TF2 and GMod). Both assets have the exact same path and filenames from the mod folder that contains them.
If one wants to use it they place these model files into their Custom Folders for the game and instead of loading the regular game asset, the custom “Replacement” is used. This presents a problem for us in SFM. In order to use the asset we have to place the folder that contains the custom model into a higher hierarchy than the original model. Once this is done, the model that has the higher prioity can be loaded into SFM, but not the one that has the lower priority.
If you’re still confused, let me put it like this. I am using the c_directhit version of this model for the fix. If I were to extract the model files from the vpk into my TF models folders, they would overwrite the TF2 Direct Hit model. That model would cease to exist and the custom model would be loaded.
The same holds true for the materials they use. Most times, the author will give their model new material names so that they call their own materials (VMT files), however sometimes they don’t and they simply reuse the paths and material names of the original model they are replacing.
Since we have the model decompiled for editing anyway, why not fix this problem before we recompile? We can give the “Replacement” a new name or path and make it its own unique model allowing us to use it and the item it was suppose to replace in the same SFM project.
Again, another simple change to the QC.
- Change the $modelname statement to reflect the name you want to give your model.
In this case, I’ve changed the $modelname statement from
$modelname “weaponsc_modelsc_directhitc_directhit.mdl”
to
$modelname “weaponsc_modelsc_followerc_follower.mdl”After recompile this asset will now be known as c_follower.mdl instead of c_directhit.mdl when I look for it in the SFM model browser and both the Follower and the Direct Hit will be usable in my SFM project.
- For this particular model, I don’t have to worry about materials, the model uses unique VMT names. However, if the materials were using the same paths and names as the Direct Hit to fix it I would edit the $cdmaterials path in the QC to something unique.
For example I would change the
$cdmaterials “modelsweaponsc_items”
to something like
$cdmaterials “modelsweaponsc_itemsc_follower”
to make the path unique, I don’t have to worrry about the actual VMT names because the path makes them unique to this model.
There are other consequences to changing the material path that I’ll discuss in the After Recompile section.

DO NOT CHANGE ANYTHING ELSE in the QC and save it (overwriting the original QC).
Re-Compile
Now that the QC is amended and saved, it’s time to recompile the model. So Back to Crowbar.
- Select the Compile Tab in Crowbar
- Use the “Game that has the Model Compiler” drop down box to select the game your ompiling the model for. (in my case, SFM)
- Use the QC Input:’s Browse button to point to the qc you just saved.
- Use the OutPut To: Dropdown and select Game’s “Models Folder”, this should automatically change the path to the games default Custom Models folder (In SFM this is
“SourceFilmakergameUsermodModels” - The Compiler options I have checked should be Default
- Click Compile

As the model compile the Crowbar Log Window is going to ill with information. After it finishes, check it for any errors.
Only the model files required for the game you’re compiling for will end up in the Game’s default custom Models folder in the path specified by the QC’s $modelname statement. For SFM this is your UsermodModels Folder.

After the Recompile
Now that the model has been recompiled, if you didn’t change the materials path, you should be able to load your model in SFM and it should no longer be semi-transparent. All the materials should work as intended, opaque textures are solid, transparent and alphatest textures see- through as they should be.

If you still have material and textures issues, then it is the material files that are pooched and have to be repaired (and that is beyond the scope of this guide).
If you changed the $cdmaterials statement, if you haven’t moved your materials (VMTs) and textures (VTFs) to the proper folders, your model is going to be black and purple until you move them.
If you remember in my QC, I changed the $cdmaterials statement. Now I have to make sure the material files are moved to the proper folders.

So, In my case, I have to make sure to move thing into a folder path like

{modFoldermaterials}modelsweaponsc_itemsc_follower
So I’ve moved the materials files and run the command mat_reloadallaterials in the SFM console, moved the playhead, but the textures are STILL black and purple, but they’ve changed from a bright shade to a duller shade of black and purple.
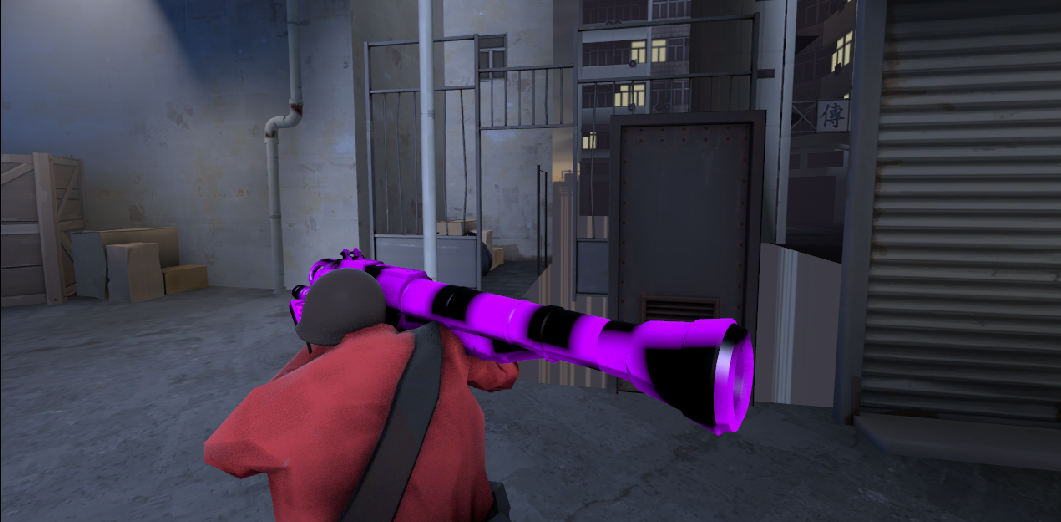
Here’s the reason. The Bright shade of Black and Purple means that the model is calling for VMTs that it can not find.
When I moved the VMTs and the VTFs into the new folder, The model can now find the VMTs, but the Duller shade of Black and Purple means the VMTs can’t find the VTF textures they are calling.
To fix this, we have to use the Text Editor again, and open the VTM files and fix the paths to the VTFs that need to be found.
These are the 2 VMTs for this particular model.


The areas in yellow are what we need to change, they are textures used by the model that can’t be found. The textures in the pinkish area are standard TF2 lightwarp VTFs and will be found based on the SFM file hierarchy.

To fix this, all we have to do is point the file paths in the VMTs at the missing VTFs and save them.
Now when we run mat_reloadallmaterials in the SFM console and move the playhead, TADA!
