Resident Evil 5 - All Treasures, Weapons and BSAA Emblems in Order
Welcome to the ultimate collectible guide for Resident Evil 5.
Here you’ll find the exact locations of all:
⇢ 23 Weapons
⇢ 30 BSAA Emblems
⇢ 50 Treasures↪︎ You must collect at least one of each type of treasure to obtain the 'They Belong in a Museum' achievement.
The guide is organized in chronological order so you can easily follow it during your playthrough without missing anything.
If you're aiming for 100% completion, this is your safe route through the chaos.
In this chapter you will find:
→ 2 Treasures
→ 0 BSAA Emblems
→ 1 Weapon
→ 2 Treasures
→ 0 BSAA Emblems
→ 1 Weapon
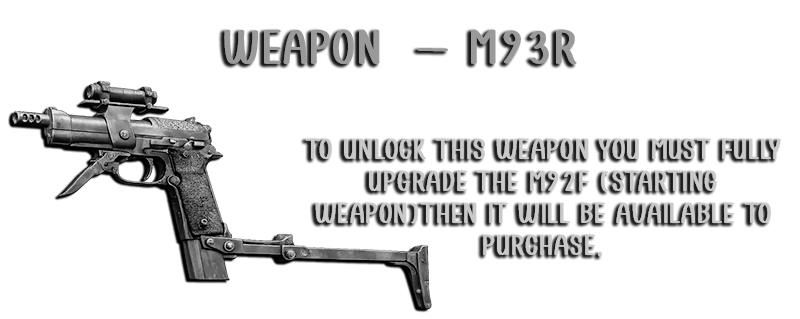
⇢ M93R

⇢ Topaz (Marquise)
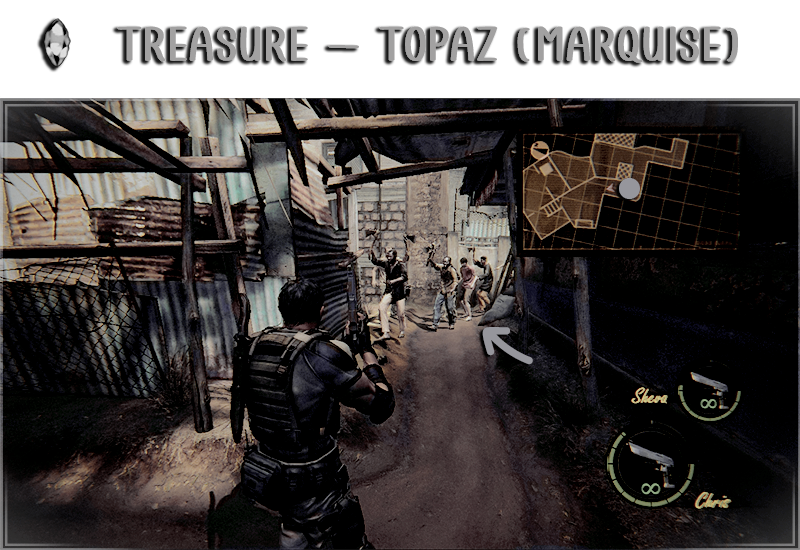
Location: When the Majini horde appears, don't run. Instead, kill them all and the last one will drops this.
⇢ Gold Ring
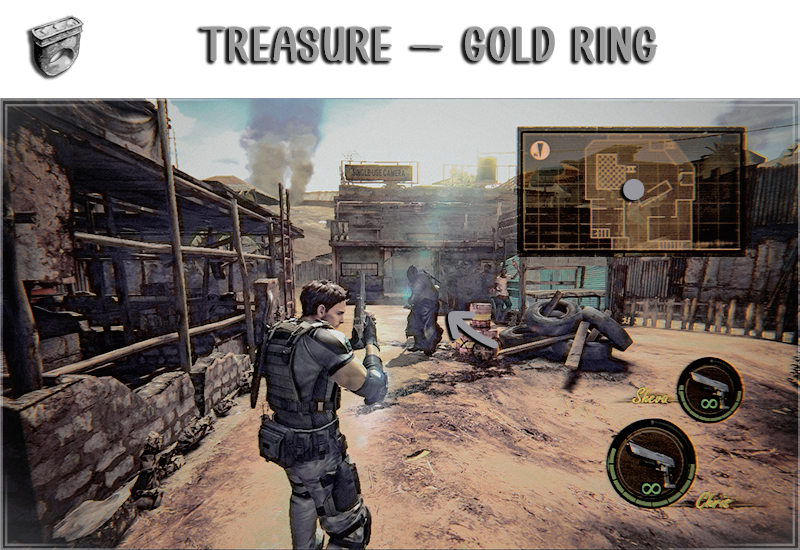
Location: Dropped by the Executioner when he is defeated.
⇢ VZ61 (MG)
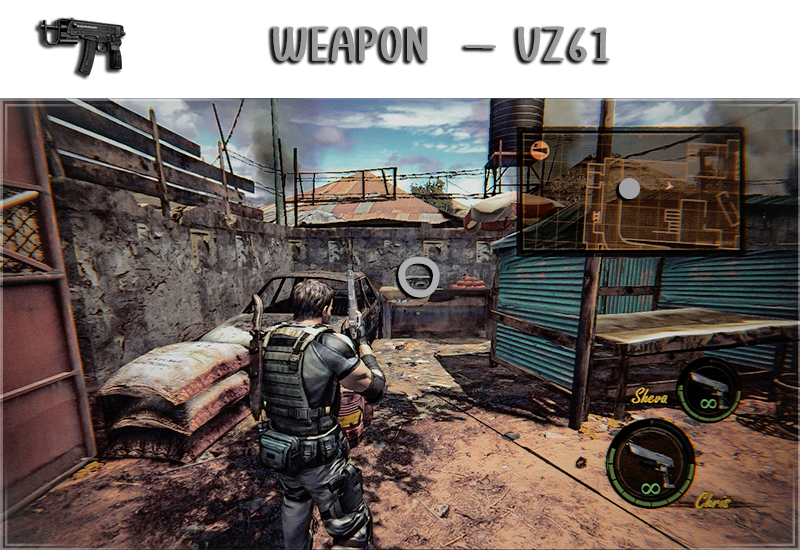
Location: Inside the case next to the exit.
⇢ Gatling gun
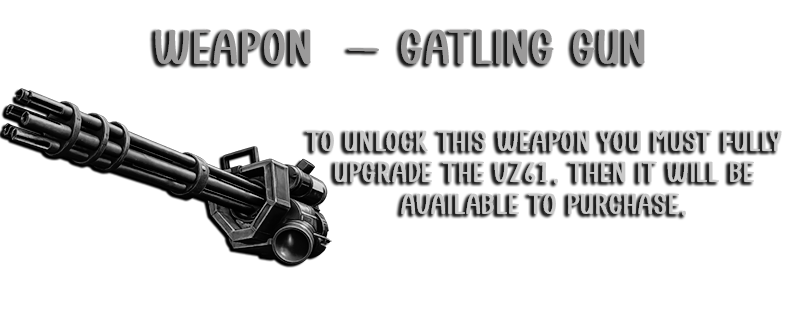
In this chapter you will find:
→ 3 Treasures
→ 3 BSAA Emblems
→ 1 Weapon
→ 3 Treasures
→ 3 BSAA Emblems
→ 1 Weapon
⇢ BSAA Emblem 1
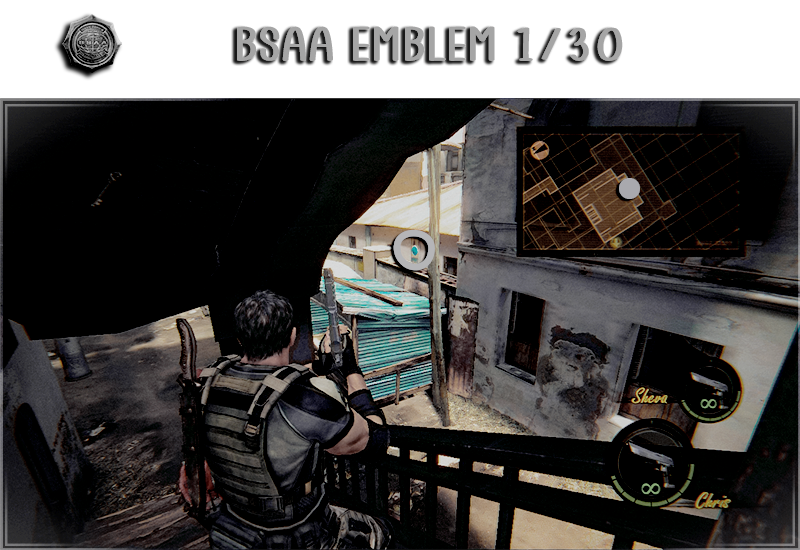
Location: When going up the stairs of the main building, turn back. You can see it from the left balcony too.
⇢ Antique Clock
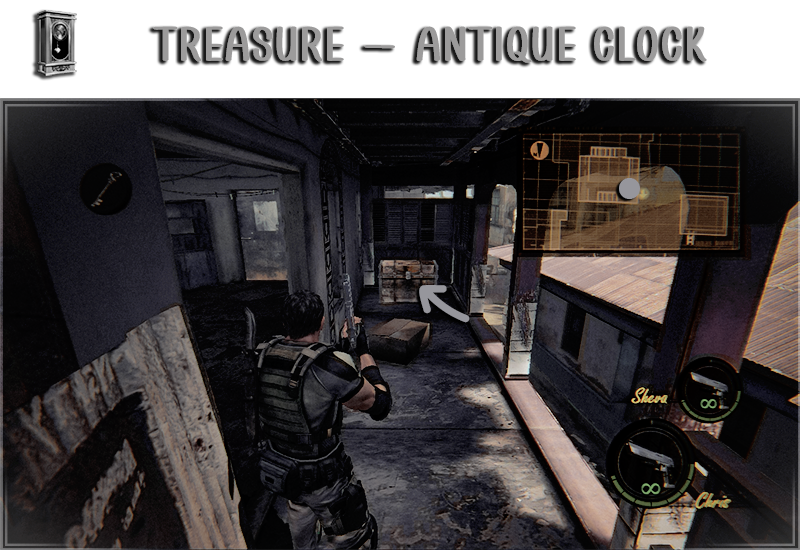
Location: Inside a chest in the right balcony of the main building.
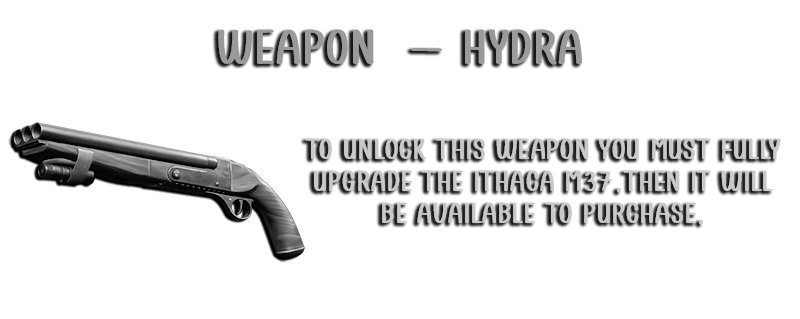
⇢ Ithaca M37 (SG)
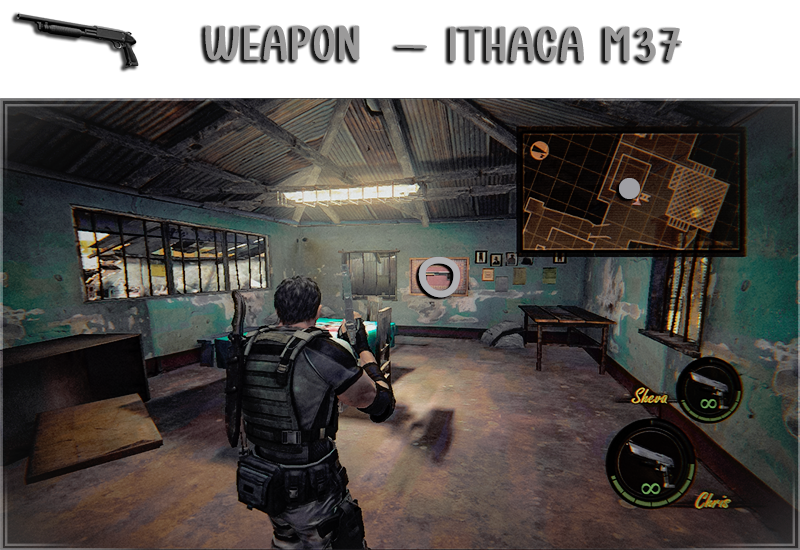
Location: Inside the house with the green door. You need the Old Building Key to unlock the door.
⇢ Hydra
⇢ Ivory Relief
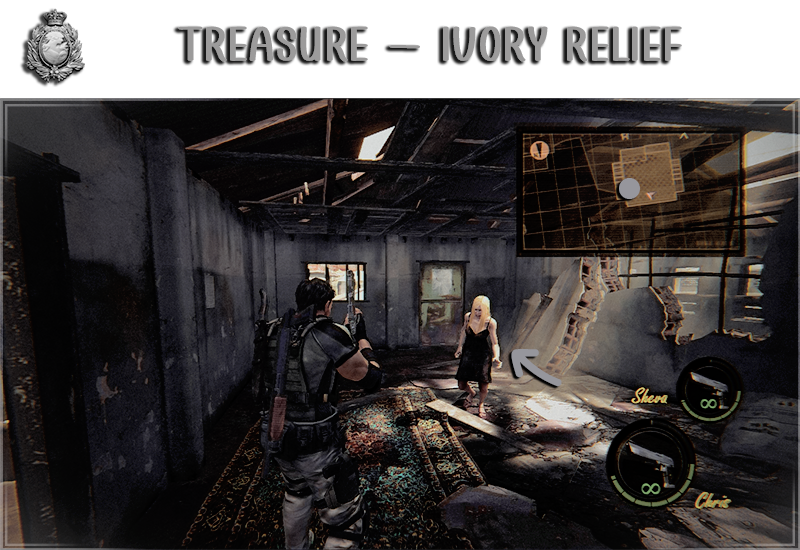
Location: Dropped by Allyson when she is defeated.
⇢ BSAA Emblem 2
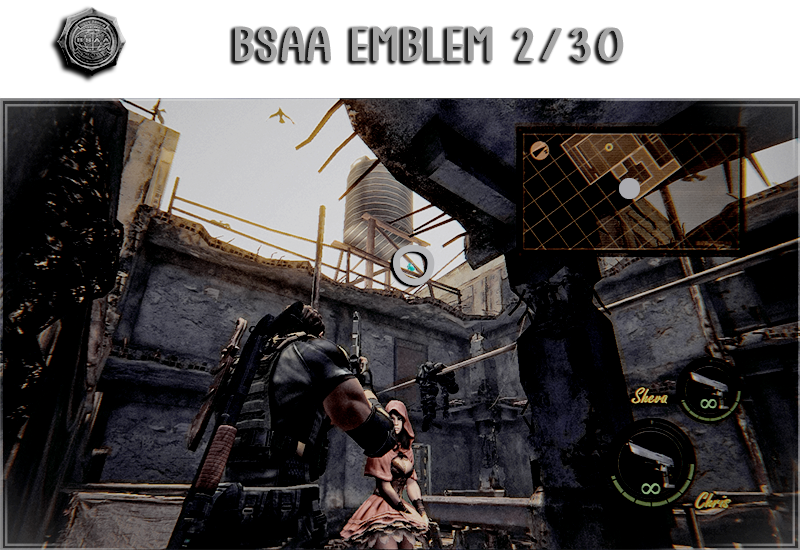
Location: When you reach the top of the ladder, look up.
⇢ Gold Ring
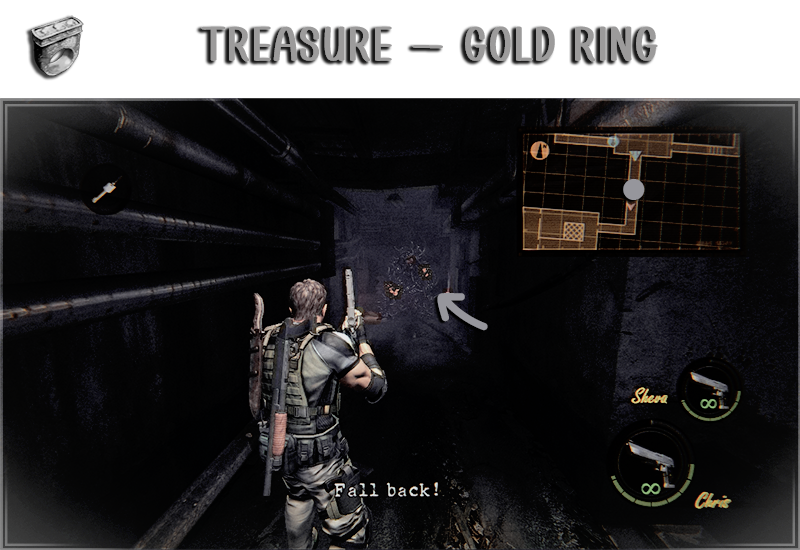
Location: Dropped by Uroboros when defeated without using the furnace.
⇢ BSAA Emblem 3
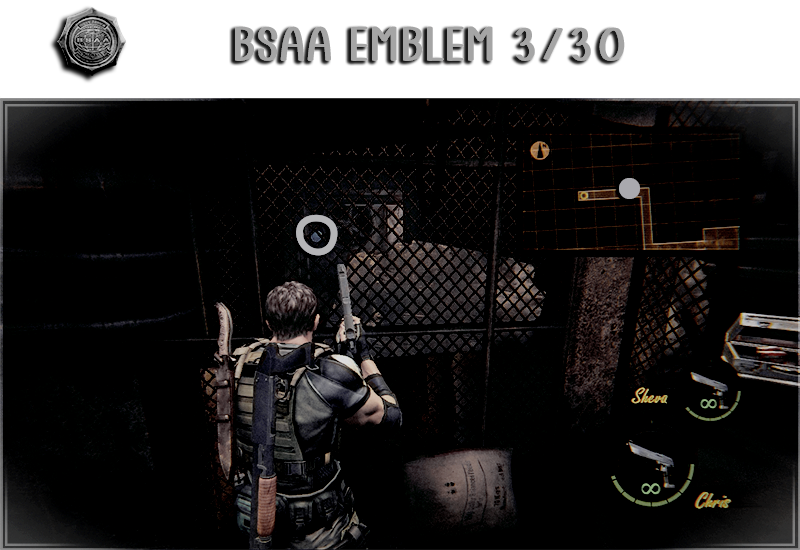
Location: Before getting on the elevator, look through the wire fence on your right.
In this chapter you will find:
→ 7 Treasures
→ 5 BSAA Emblems
→ 2 Weapons
→ 7 Treasures
→ 5 BSAA Emblems
→ 2 Weapons
⇢ H&K MP5 (MG)
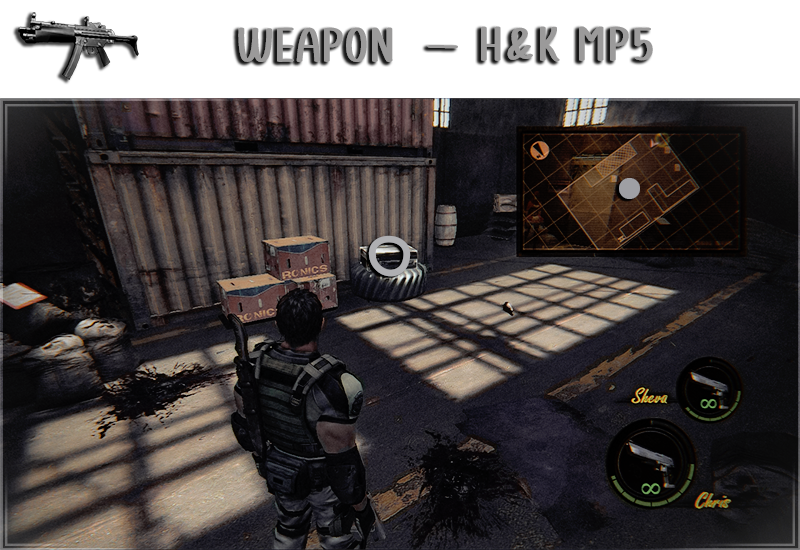
Location: Inside the case to the left.
⇢ BSAA Emblem 4
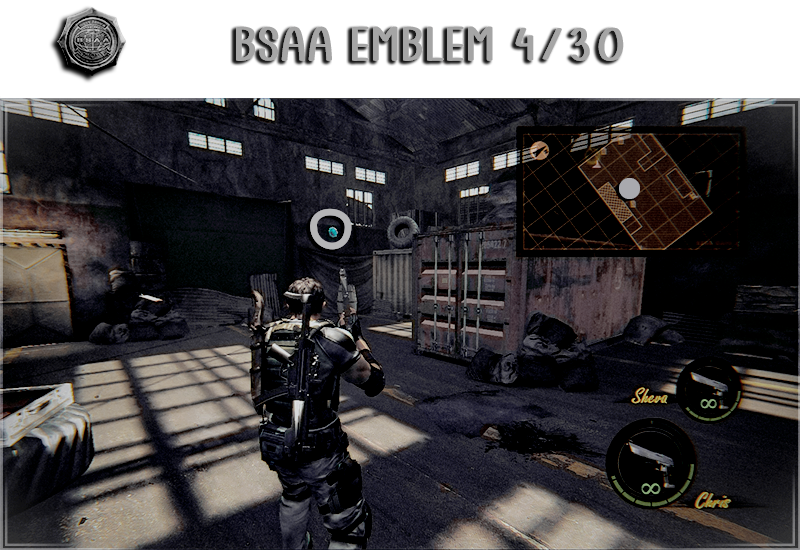
Location: On the right side wall of the warehouse.
⇢ Jewel Bangle
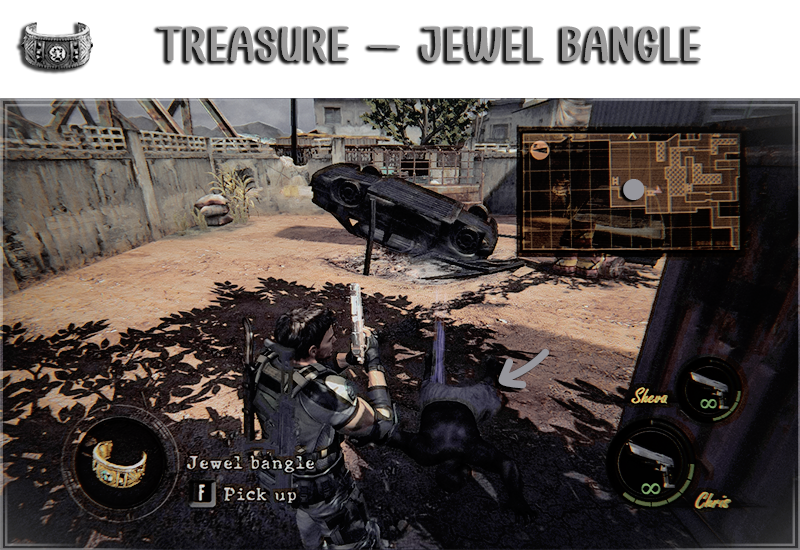
Location: Dropped by the Big Man Majini when defeated.
⇢ BSAA Emblem 5
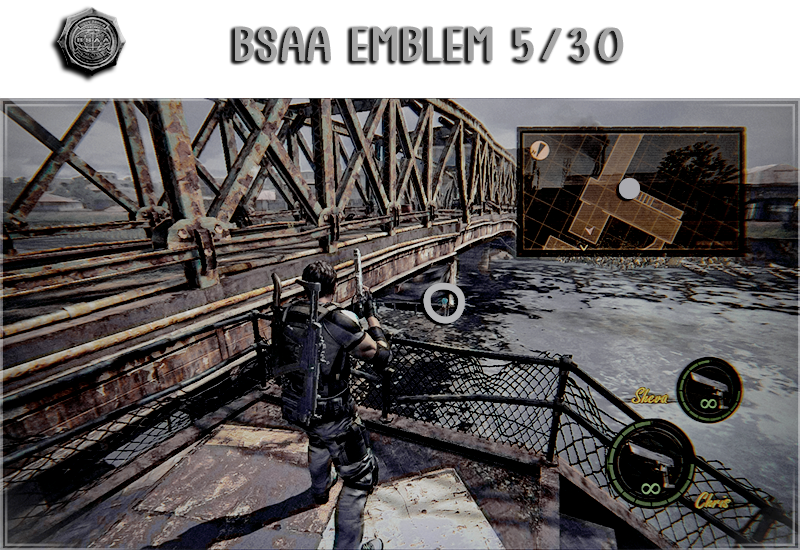
Location: After crossing the bridge, go left to find it underneath it.
⇢ Sapphire (Pear)
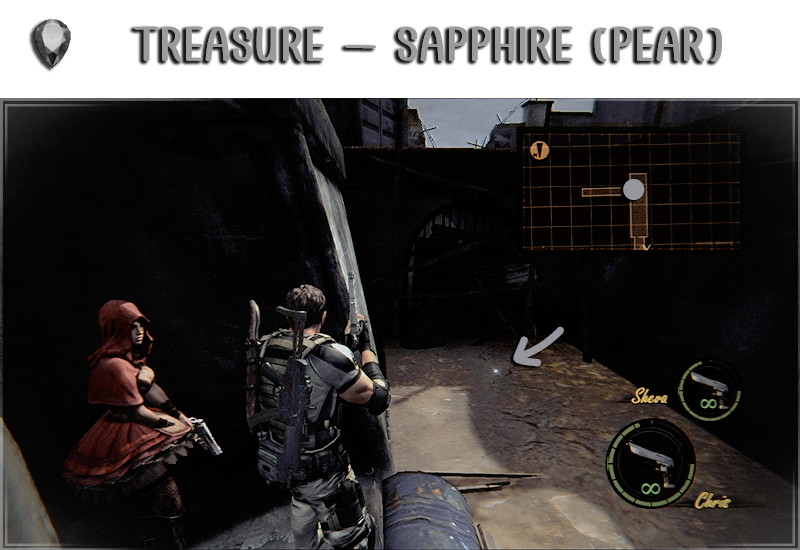
Location: After crossing the sewers, go left to find it in the water.
⇢ Topaz (Pear)
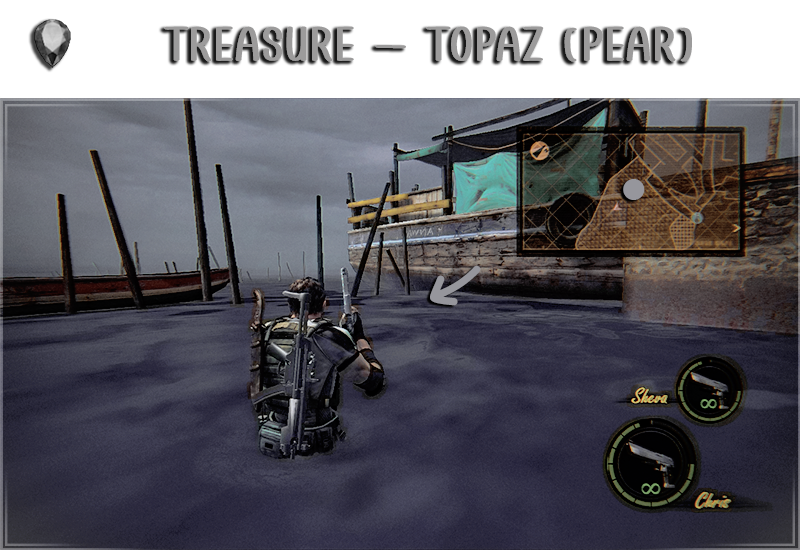
Location: Port, underwater next to the boat.
⇢ BSAA Emblem 6
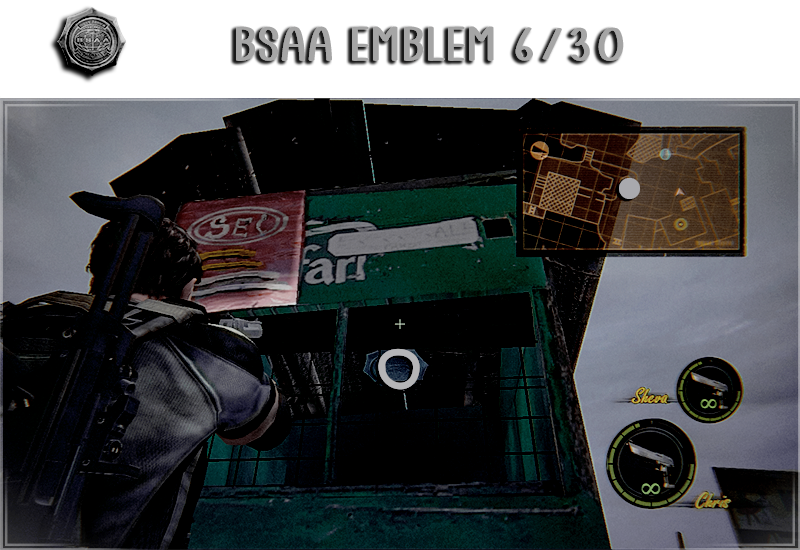
Location: Inside the first green stall.
⇢ Ruby (Marquise)
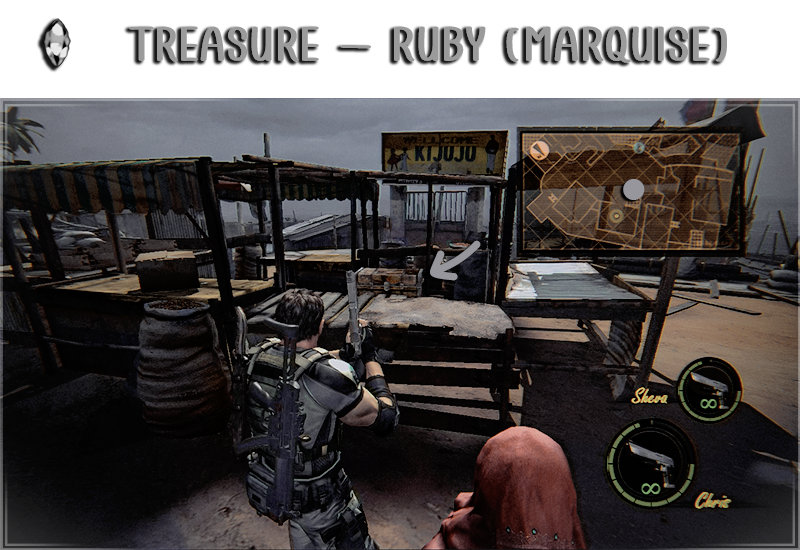
Location: In the middle of the stalls, you need to use a grenade to be able to enter (there's one in here if you need)
⇢ Emerald (Square)
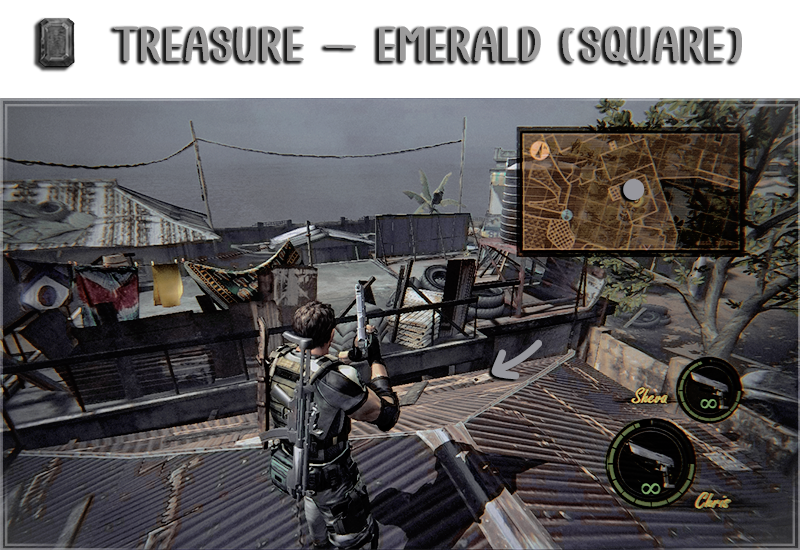
Location: Climb the ladder and go to the end of the rooftops to find it.
⇢ Jewel Bangle
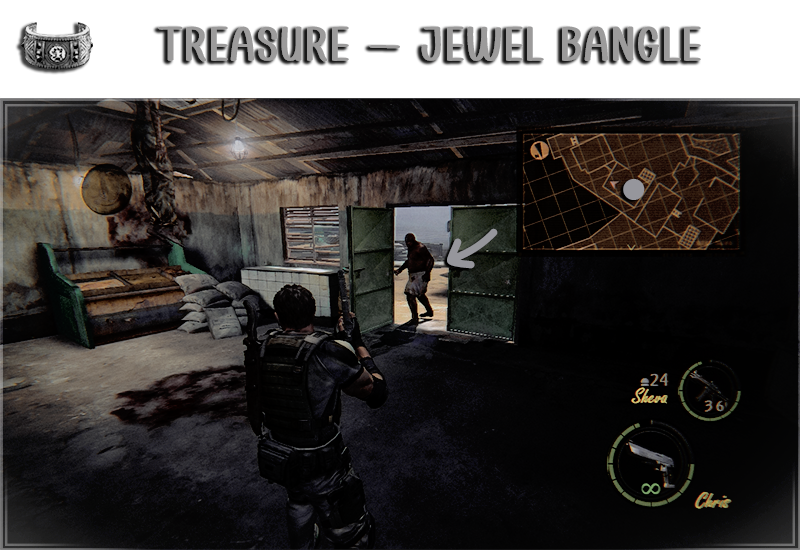
Location: Dropped by the Big Man Majini when defeated.
⇢ BSAA Emblem 7
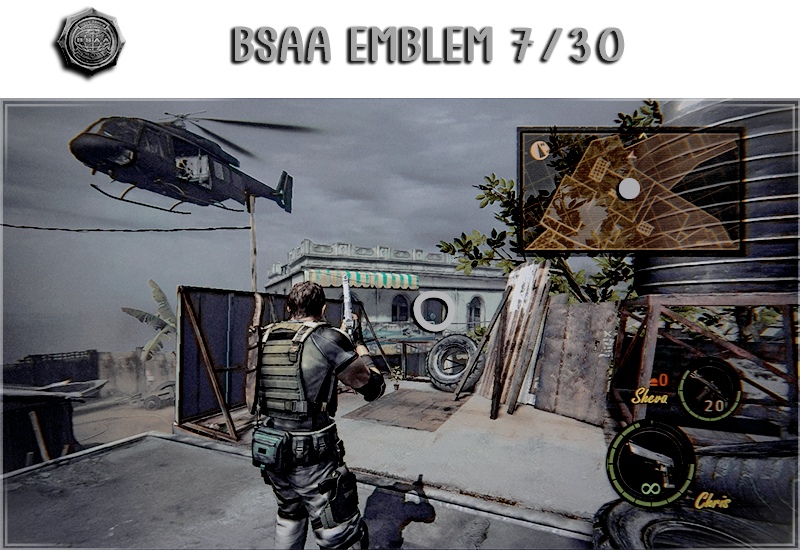
Location: In the second part of the helicopter, climb the ladder on the right and look at the balcony in front of you.
⇢ S75 (RIF)
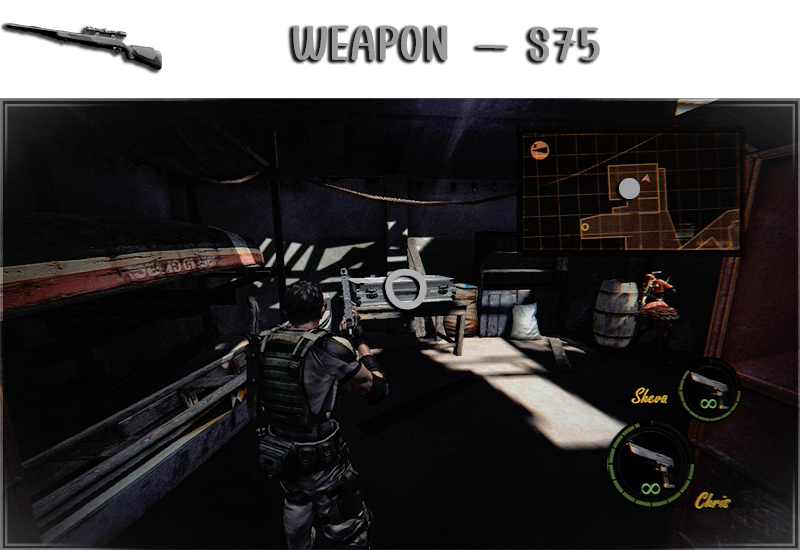
Location: Inside the building with the red door.
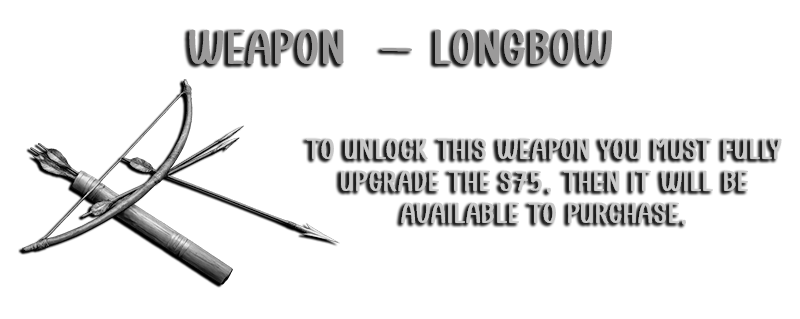
⇢ Longbow
⇢ BSAA Emblem 8
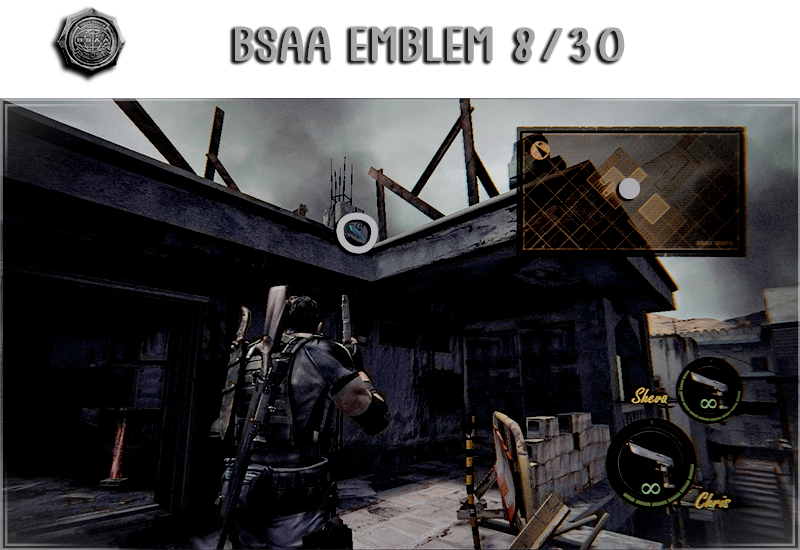
Location: Before helping Sheva jump to the other building, turn around and look up.
⇢ Treasures Chest
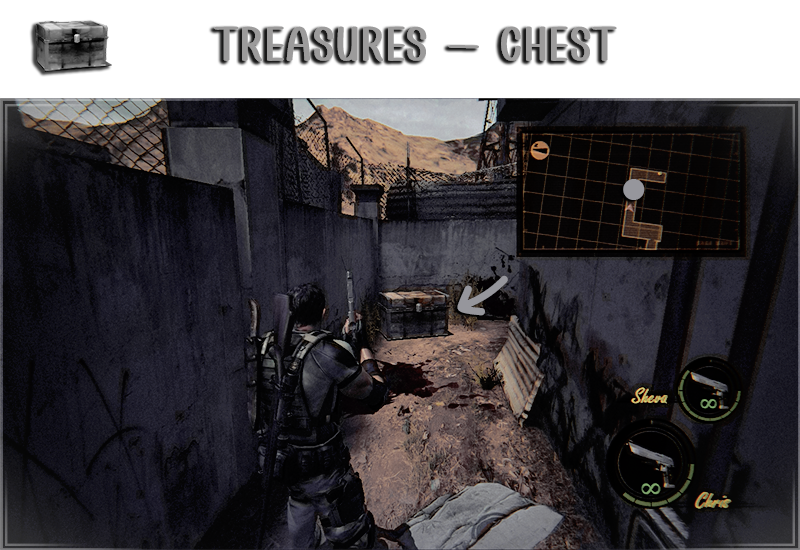
Location: Impossible to miss.
In this chapter you will find:
→ 11 Treasures
→ 3 BSAA Emblems
→ 1 Weapon
→ 11 Treasures
→ 3 BSAA Emblems
→ 1 Weapon
⇢ BSAA Emblem 9
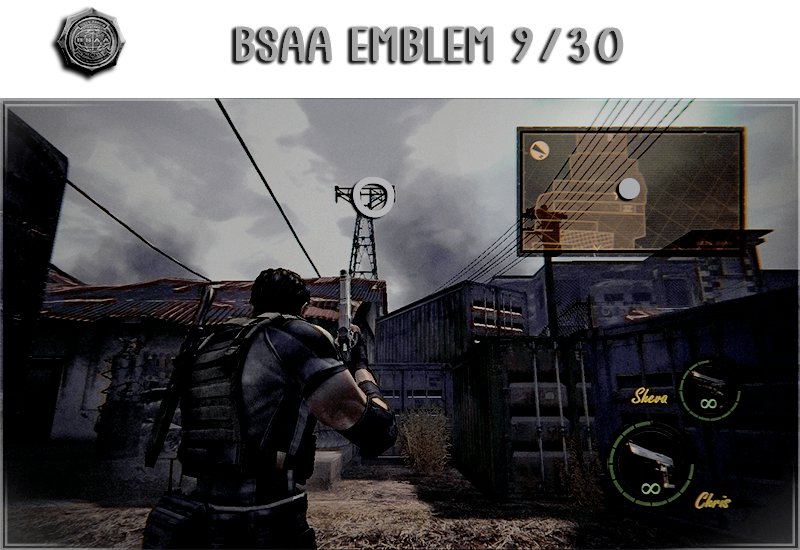
Location: In one of the antennas at the start of the section.
⇢ Jewel Beetle
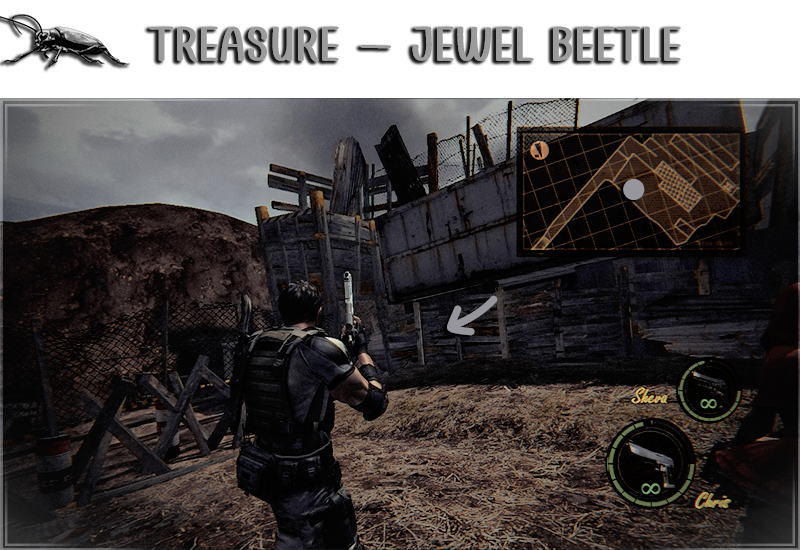
Location: Before climbing up the plataform, go around to the right to find this at the end.
⇢ Jewel Beetle
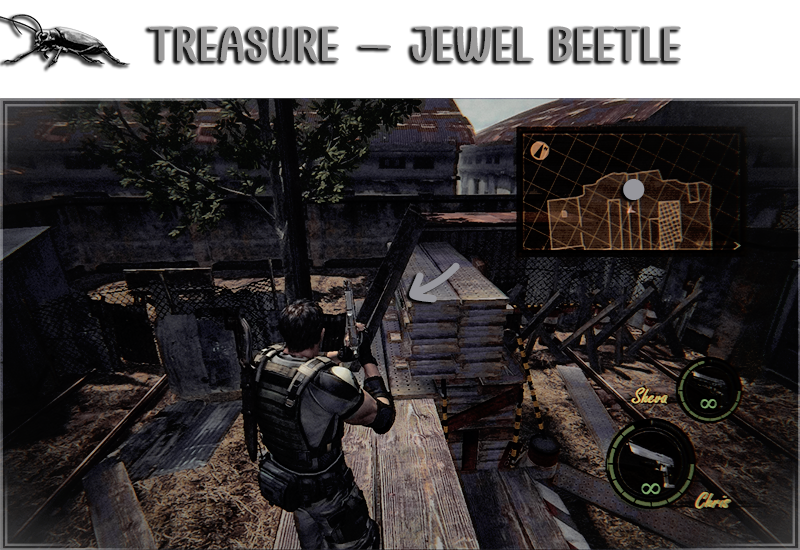
Location: Climb the plataform and look right.
⇢ Ruby (Pear)
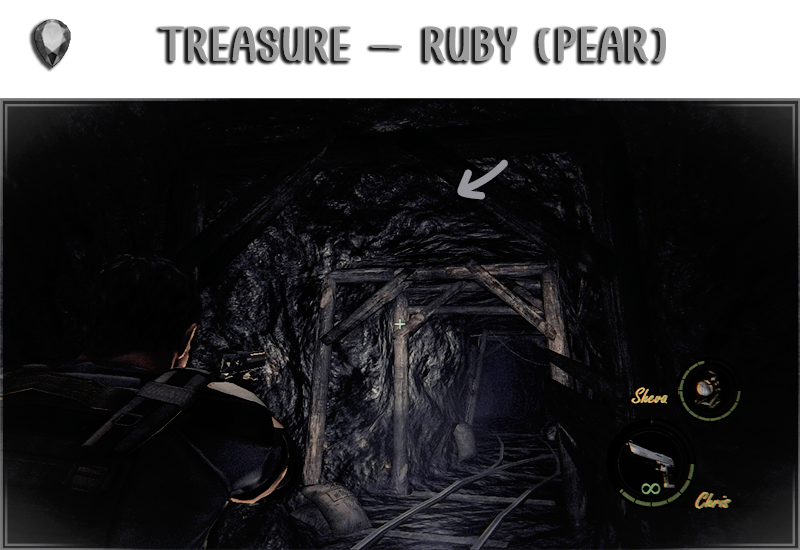
Location: Mines. This treasure is invisible, keep walking until you see sandbags on the left side. Look up and aim until your cursor turns red to be able to shoot it.
⇢ Ruby (Pear)
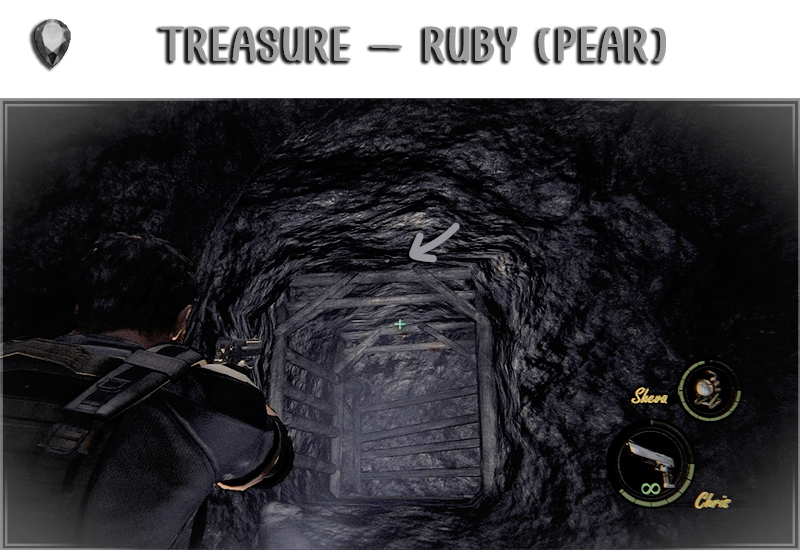
Location: Mines. After going through the water, keep looking up to find it shinning.
⇢ BSAA Emblem 10
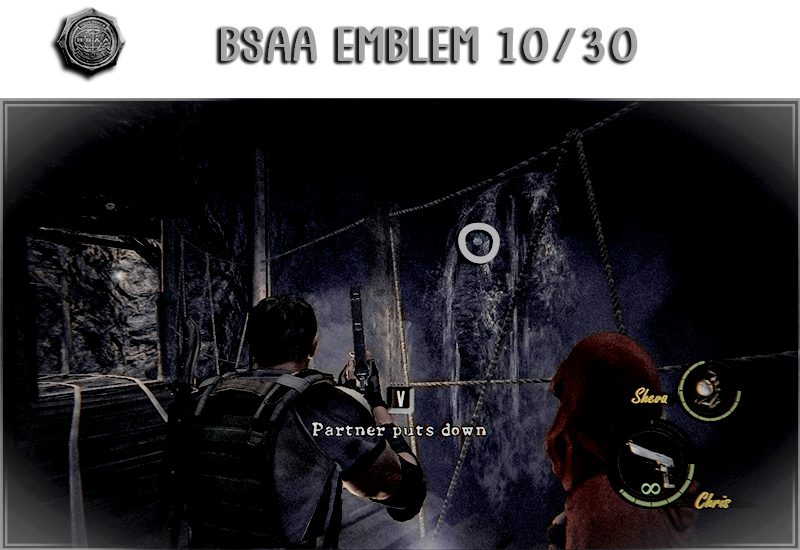
Location: Mines. On the right side of the bridge.
⇢ Ruby (Pear)
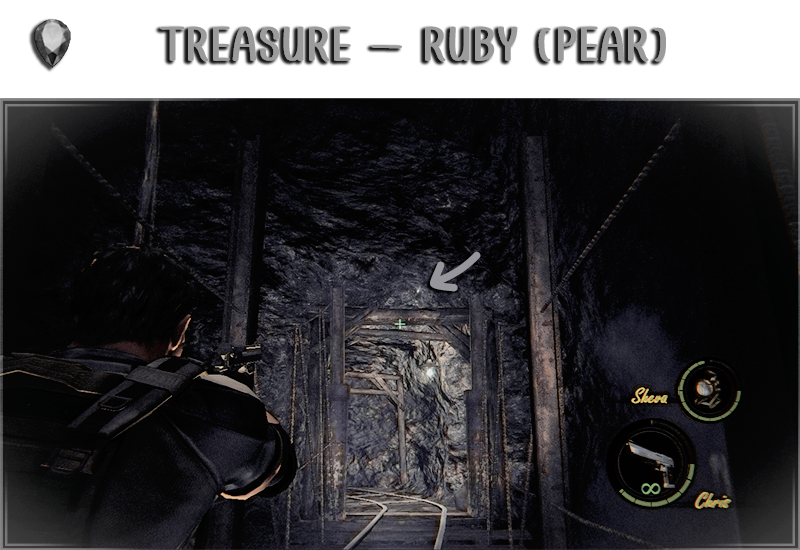
Location: Mines. At the end of the bridge.
⇢ Diamond (Oval)
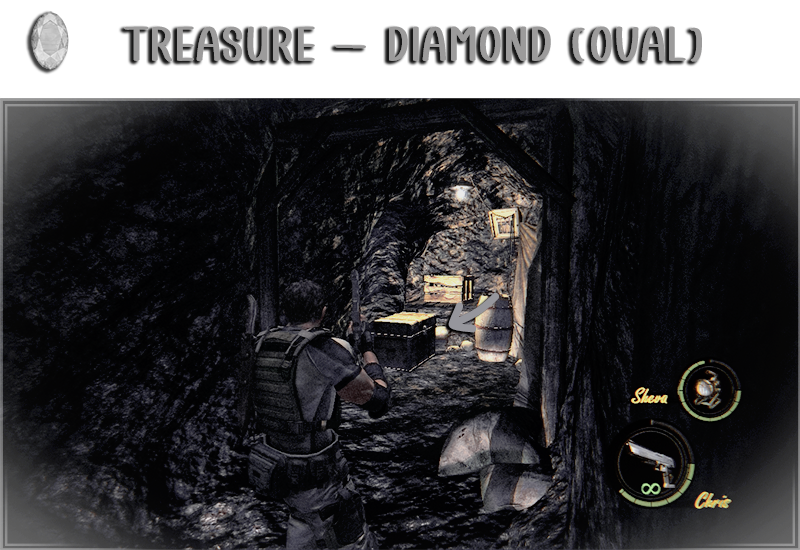
Location: Keep going left when the path splits.
⇢ Ruby (Square)
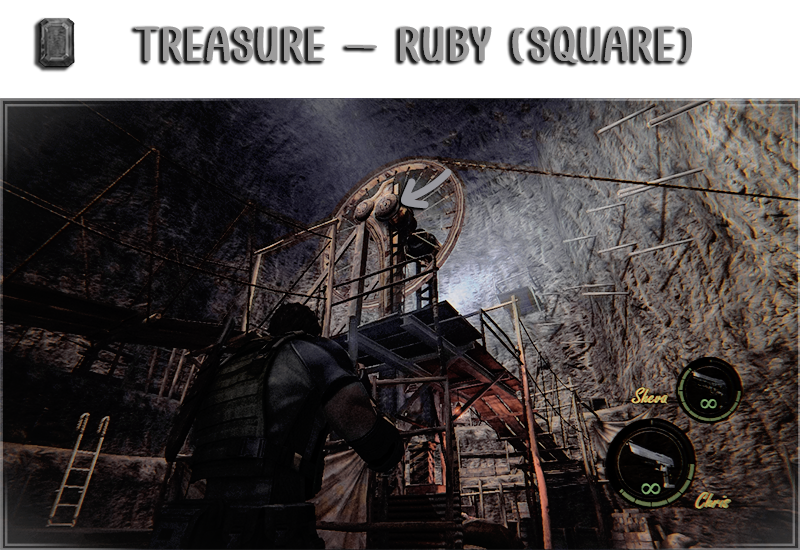
Location: Mines. On the back of the mechanical crane in the center.
⇢ Ruby (Square)
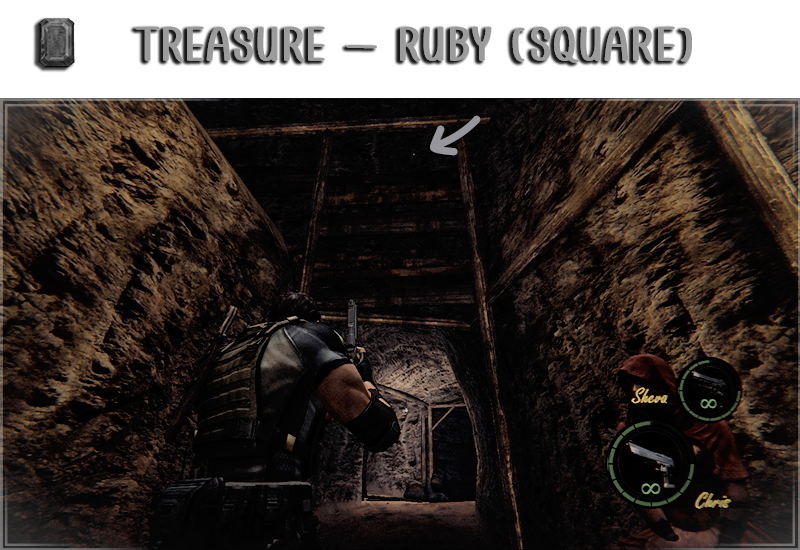
Location: Mines. Climb the ladders all the way up, then go inside the second entrance of the tunnel on the right. Look up and you will see it shinning.
⇢ Dragunov SVD (RIF)
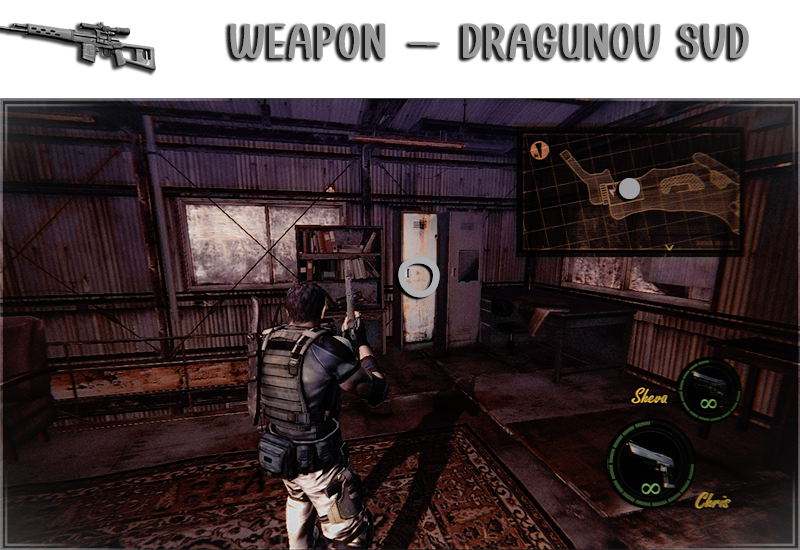
Location: Inside the locker on the left side.
⇢ Diamond (Brilliant)
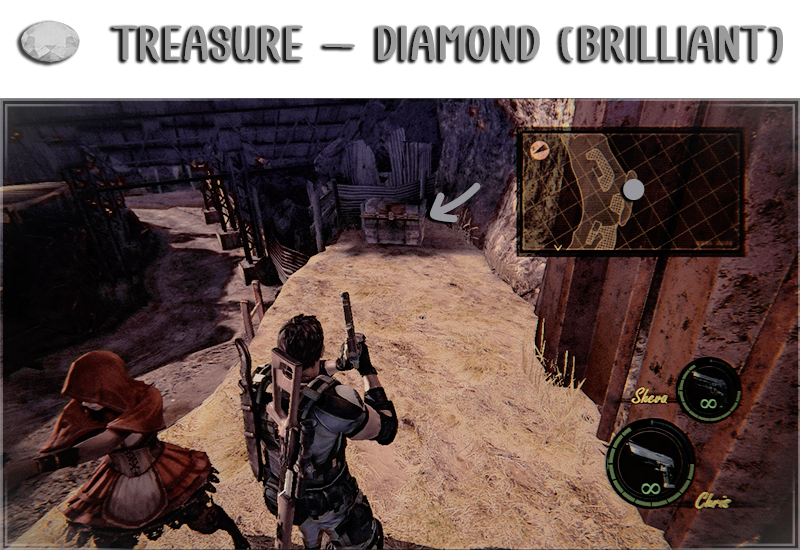
Location: Climb the first ladder on the left side.
⇢ Diamond (Pear)
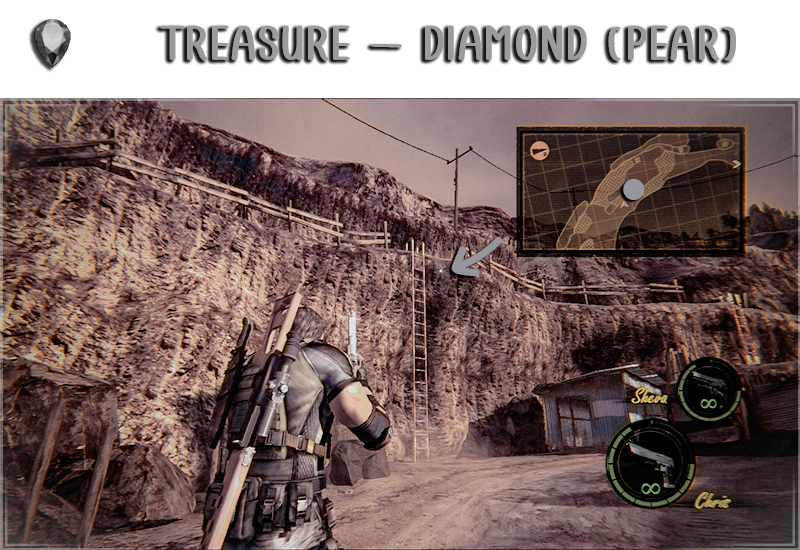
Location: On the right side of the long ladder.
⇢ BSAA Emblem 11
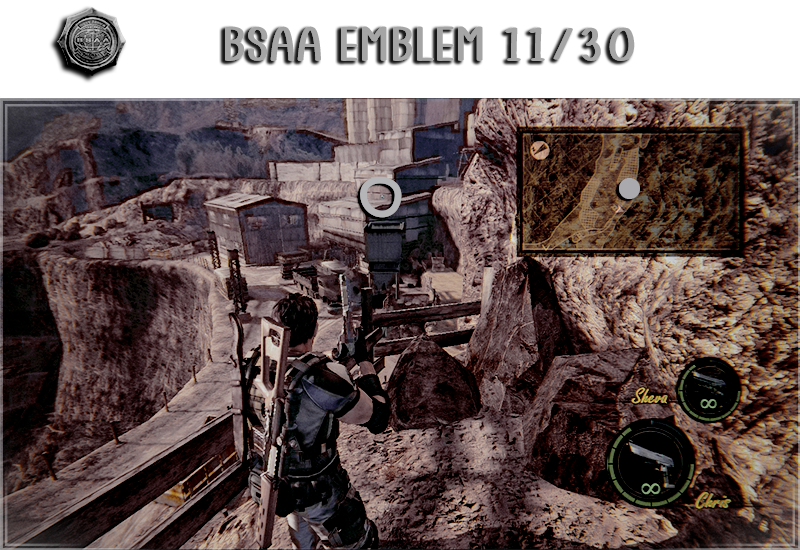
Location: Climb the ladder and go left, look at the building to find it.
⇢ Diamond (Square)
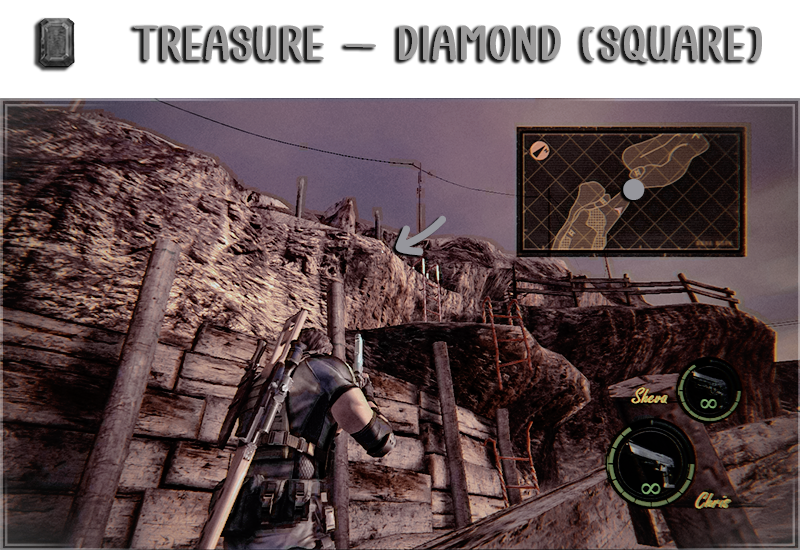
Location: On the left side of the ladder where you need to help Sheva jump.
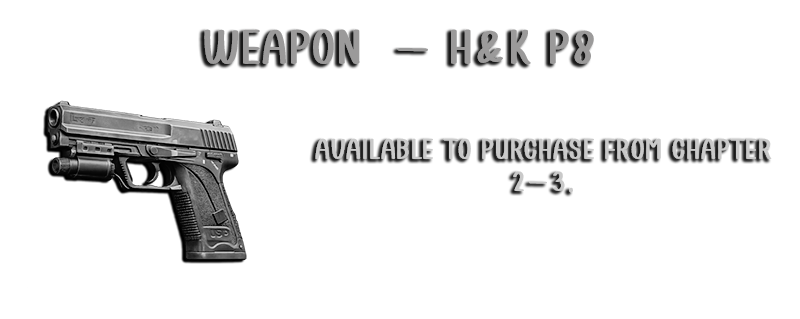
⇢ H&K P8
In this chapter you will find:
→ 19 Treasures
→ 4 BSAA Emblems
→ 2 Weapons
In this chapter you will need to bring a Sniper Rifle.
→ 19 Treasures
→ 4 BSAA Emblems
→ 2 Weapons
In this chapter you will need to bring a Sniper Rifle.
⇢ BSAA Emblem 12
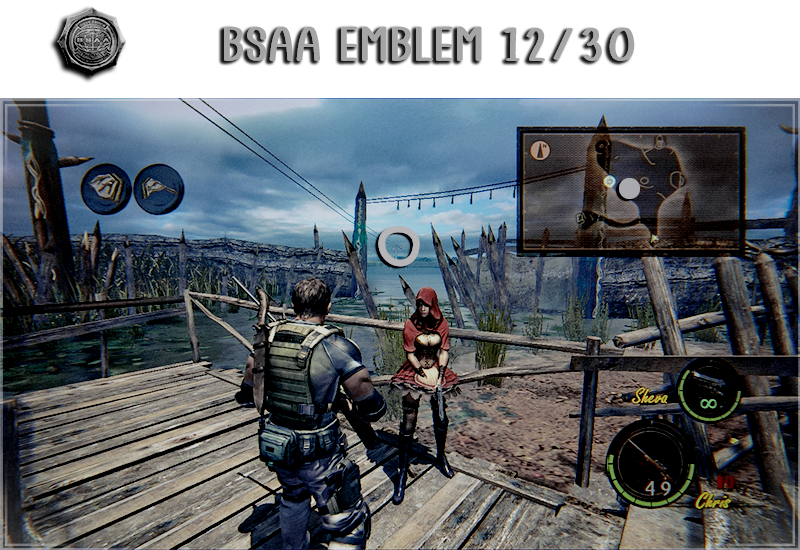
Location: On the wooden post on the west side of the starting point.
⇢ Ruby (Pear)
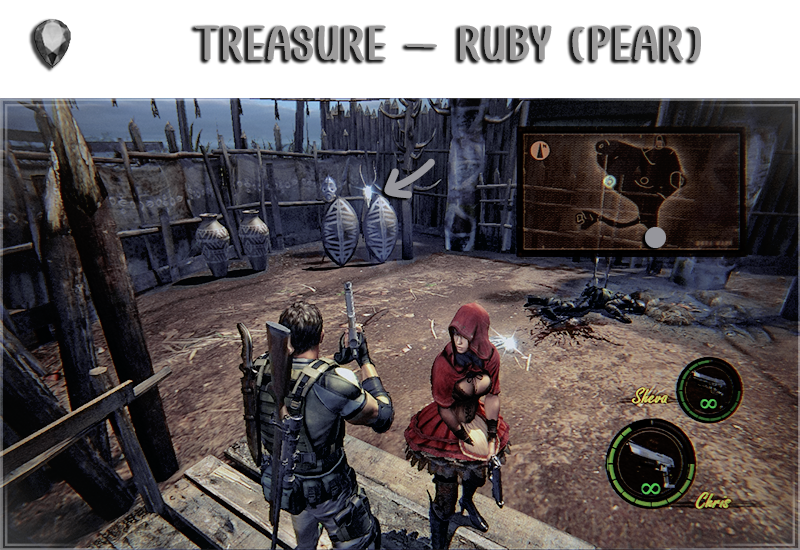
Location: On the skull to the left side.
⇢ Beetle (Brown)
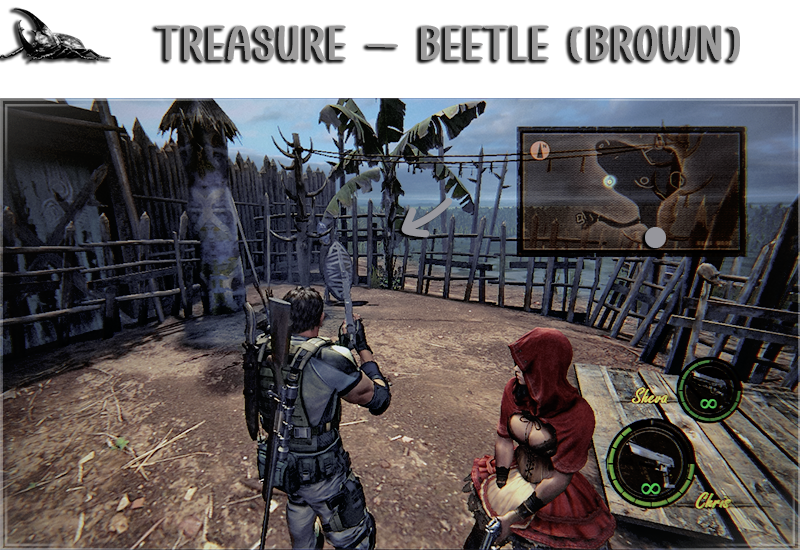
Location: On the right side.
⇢ Beetle (Brown)
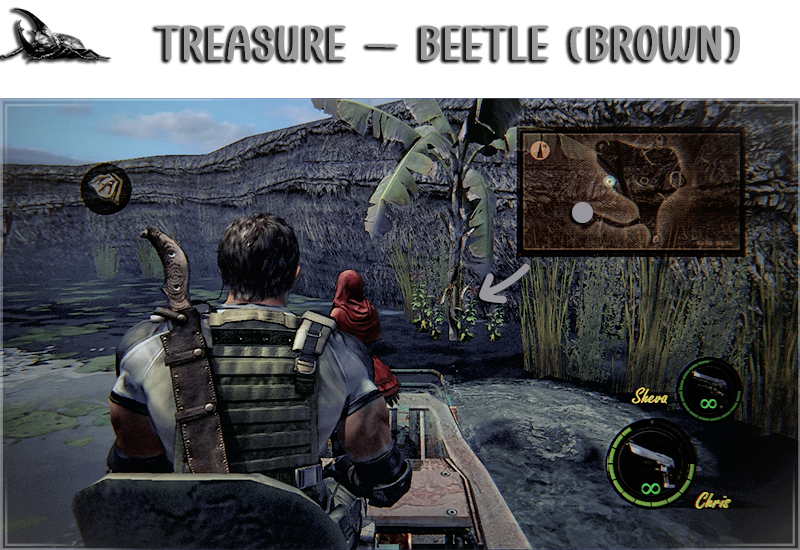
Location: Get close to this part and Sheva will pick it up.
⇢ Idol (Silver)
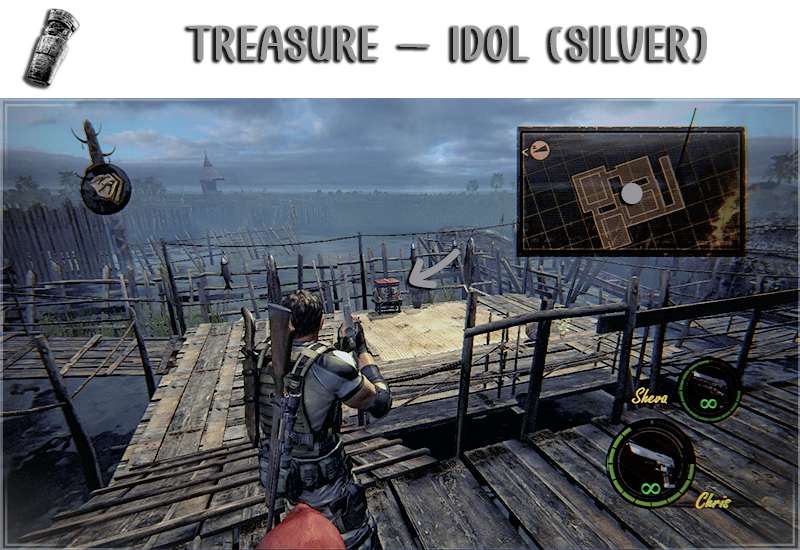
Location: Inside the chest.
⇢ BSAA Emblem 13
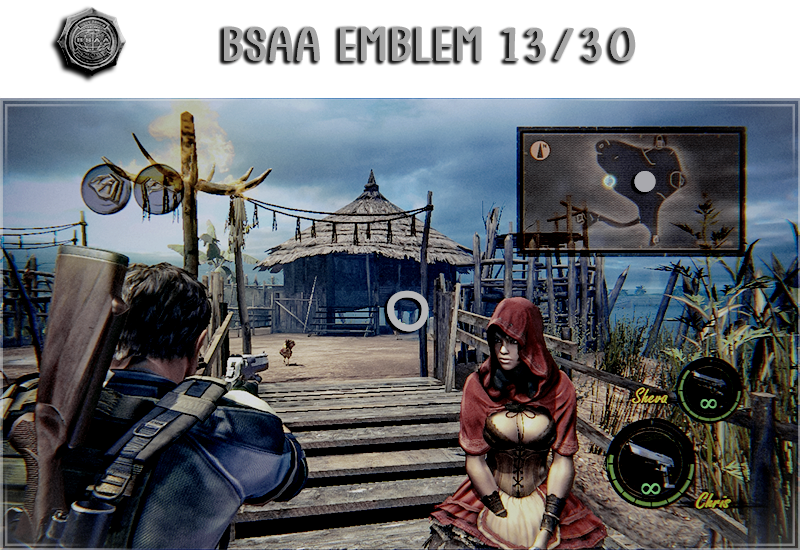
Location: Underneath the hut. You can shoot it from the entrance.
⇢ Beetle (Brown)
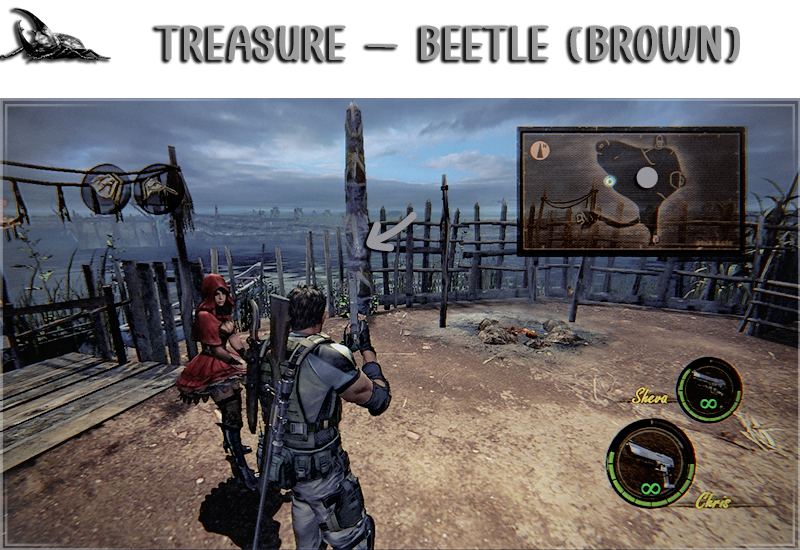
Location: On the left side.
⇢ Chalice (Silver)
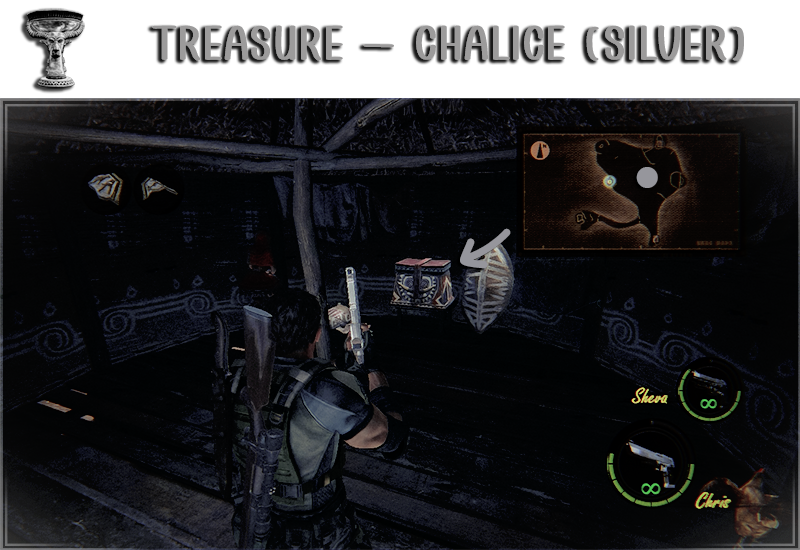
Location: Inside the chest in the hut.
⇢ Beetle (Brown)
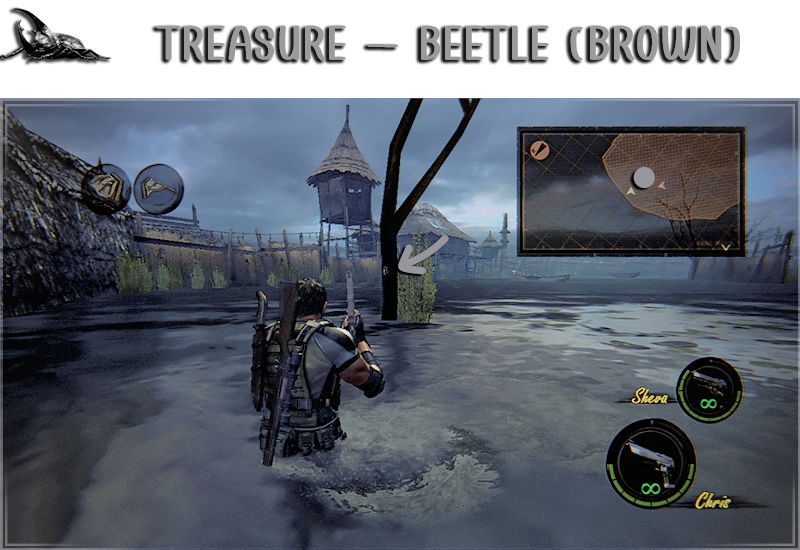
Location: Alligator area, as soon as you enter go left to this tree.
⇢ Ruby (Pear)
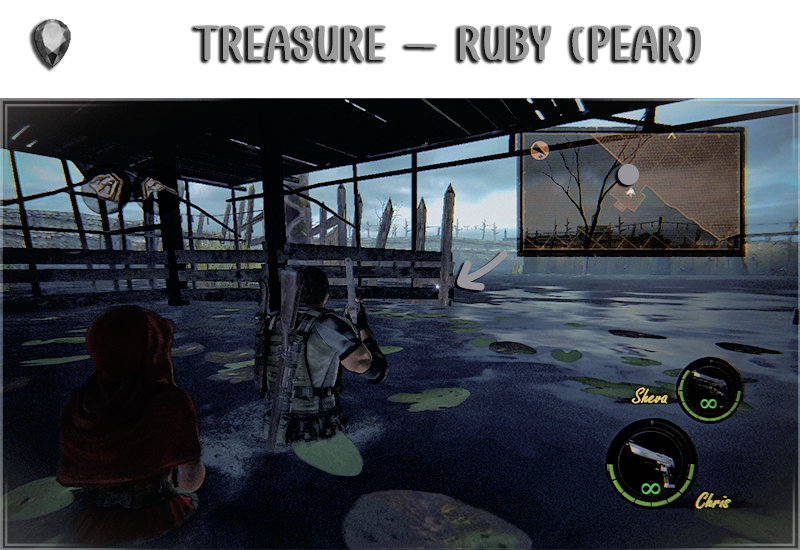
Location: On the right at the entrance.
⇢ Beetle (Brown)
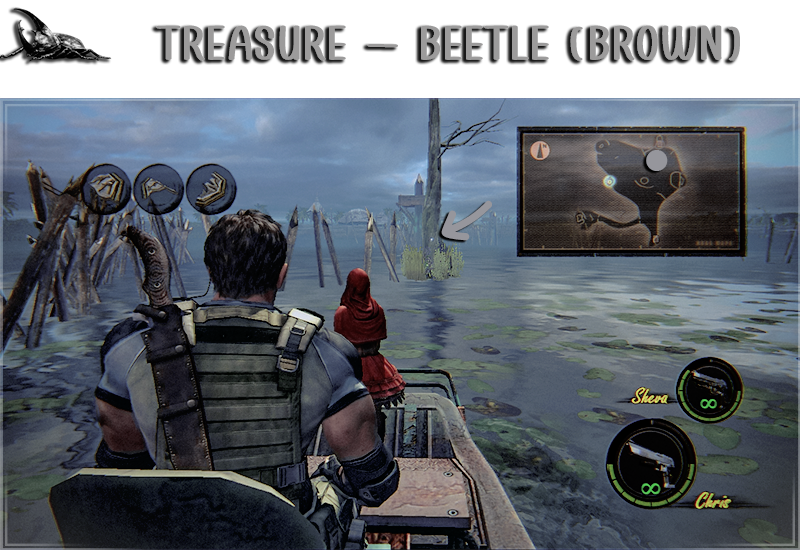
Location: Go to this tree and Sheva will pick it up.
⇢ Emerald (Pear)
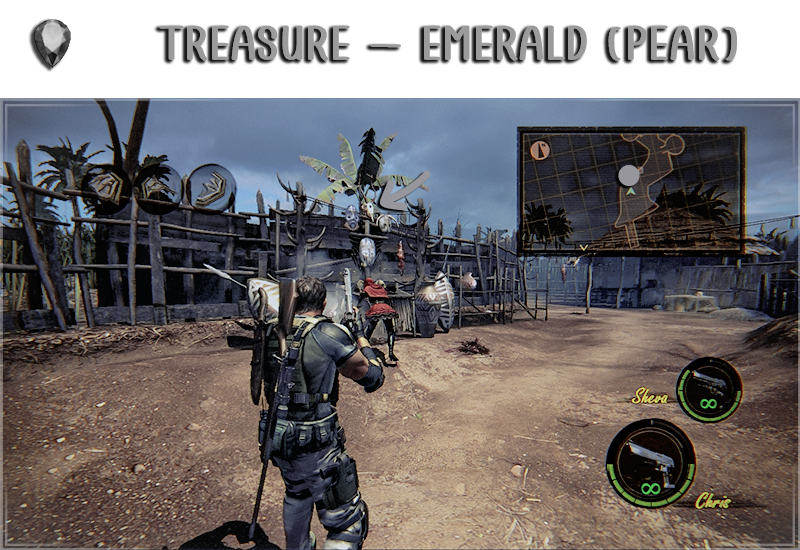
Location: On the skull in front of you when you enter.
⇢ Ruby (Pear)
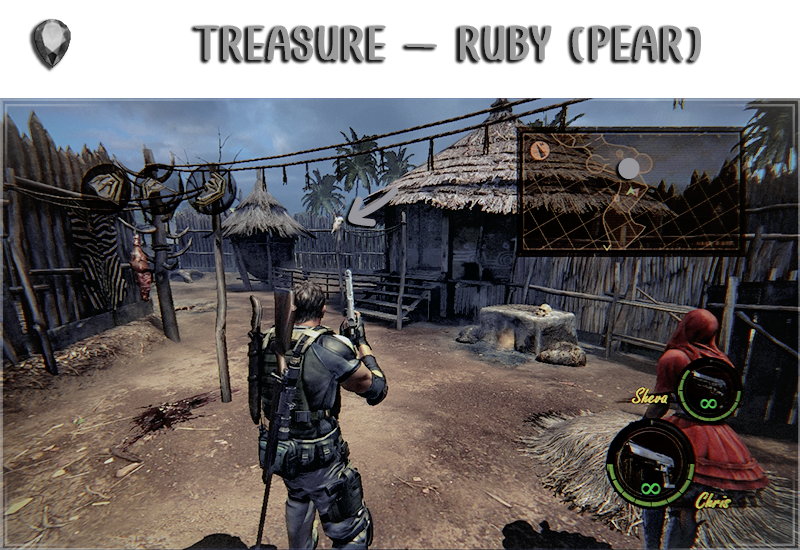
Location: On the skull on the right of the last one.
⇢ Idol (Silver)
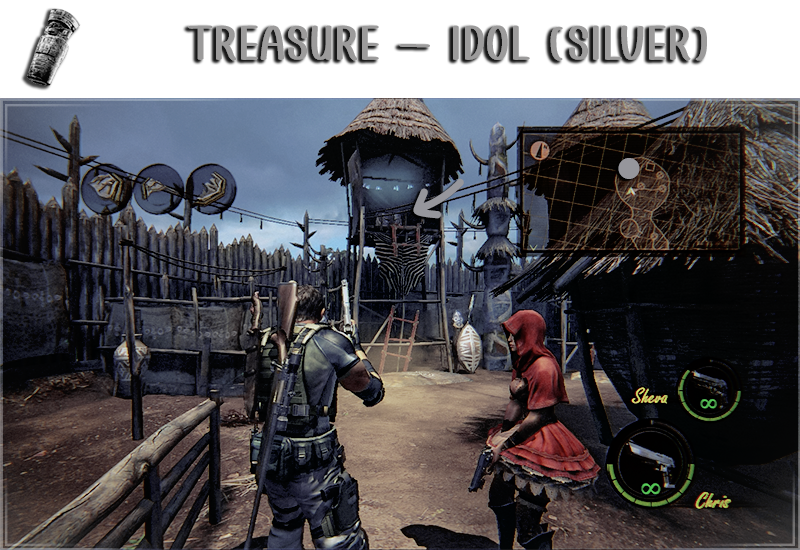
Location: Inside the chest where you need to help Sheva jump.
⇢ Beetle (Brown)
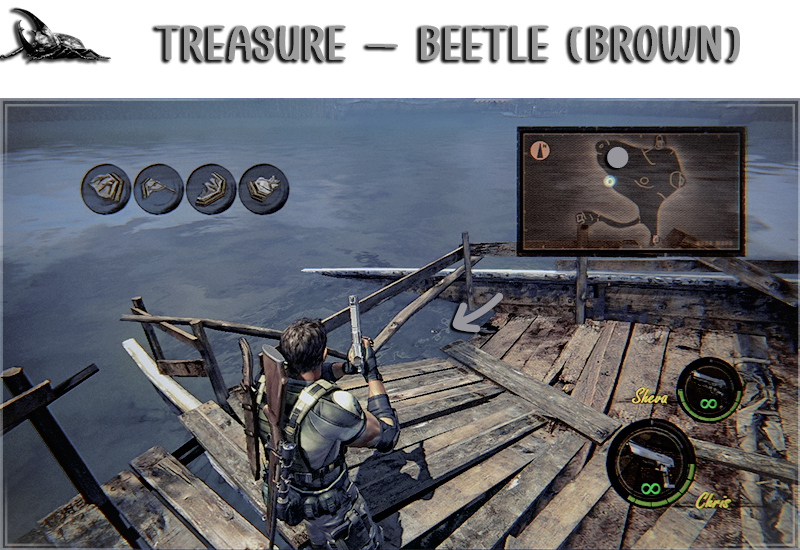
Location: On the left side of the broken boat.
⇢ Rocket Launcher
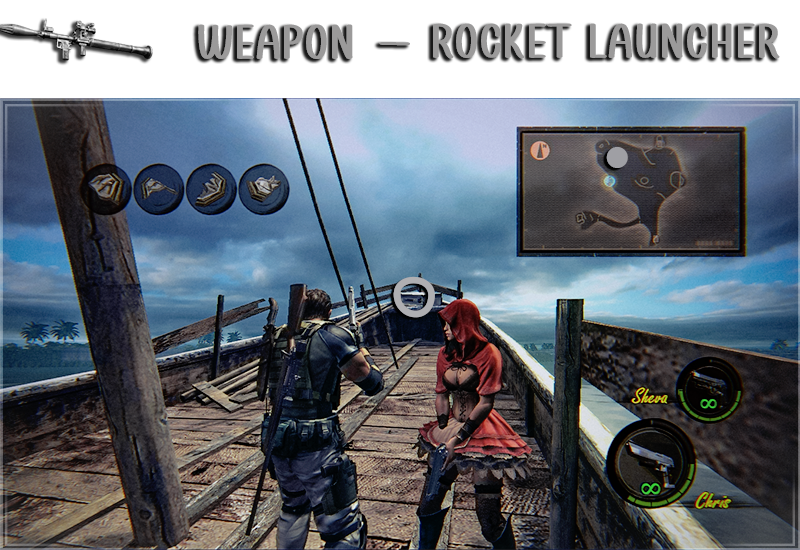
Location: At the end of the broken boat.
⇢ BSAA Emblem 14
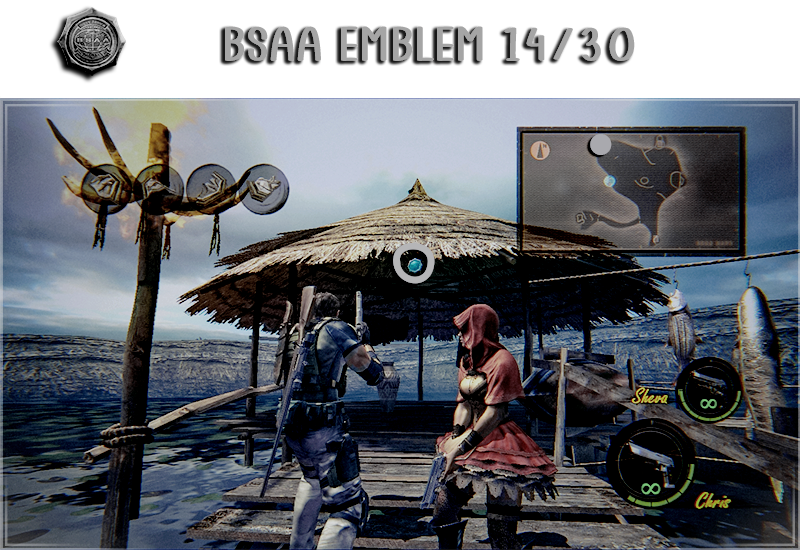
Location: Underneath the roof.
⇢ Beetle (Brown)
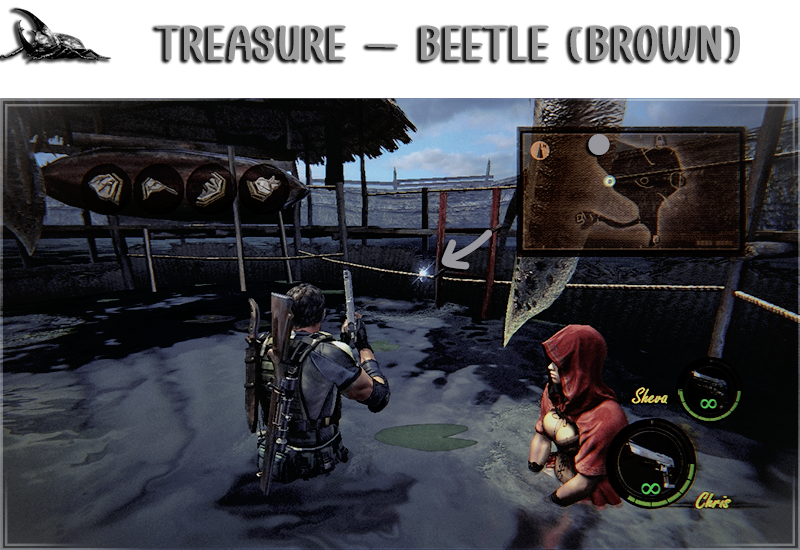
Location: Go down the ladder and turn around.
⇢ Chalice (Silver)
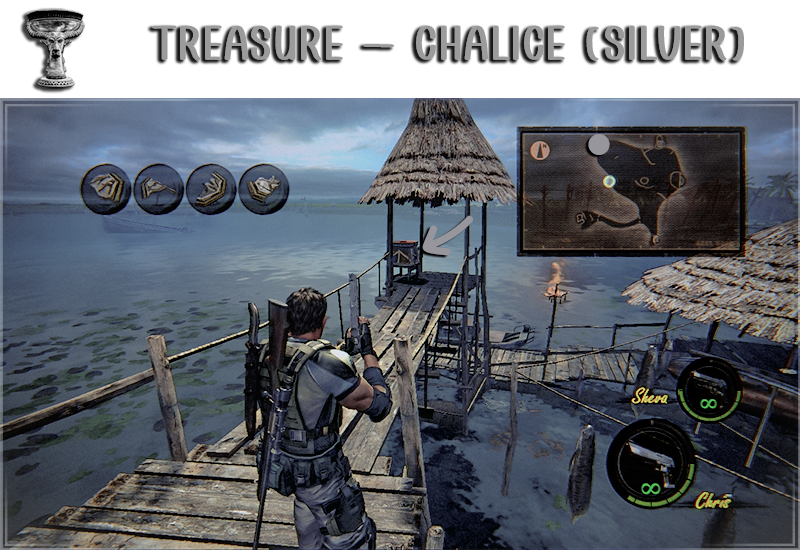
Location: Go up the other ladder. Inside the chest.
⇢ BSAA Emblem 15
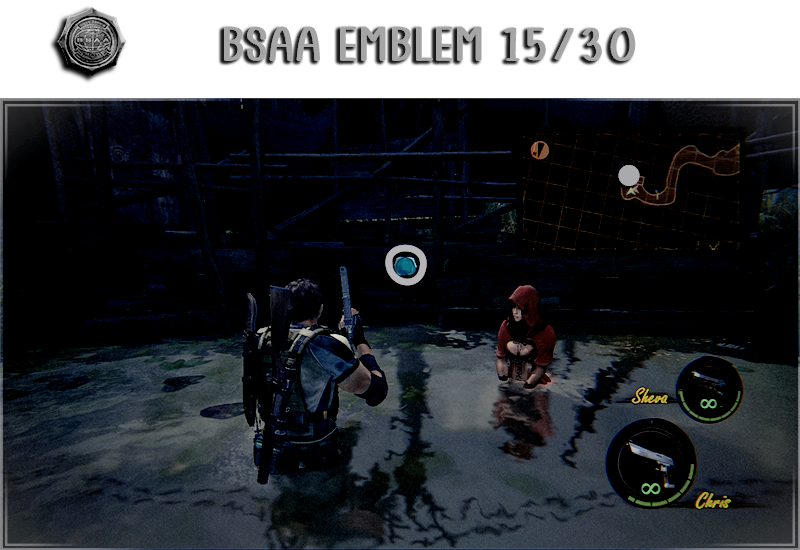
Location: Go down the ladder and right.
⇢ S&W M29 (MAG)
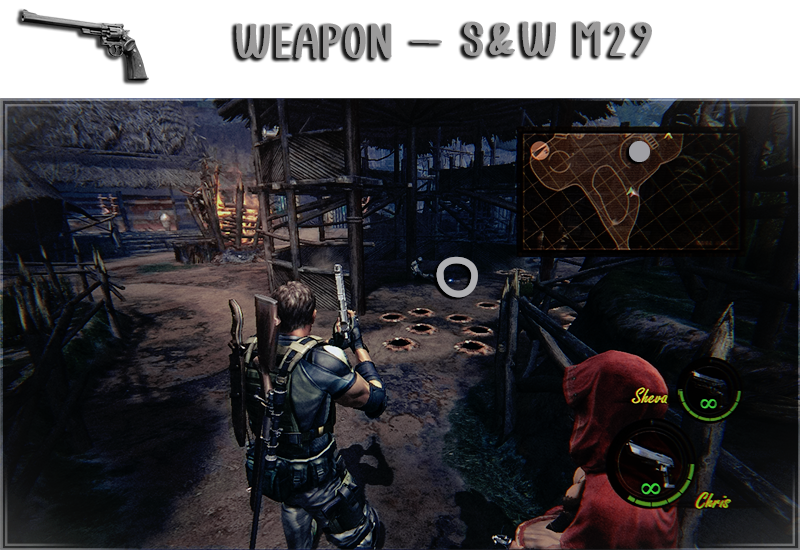
Location: Next to the corpse. (you will be ambushed when picking it up)
⇢ S&W M500 (MAG)
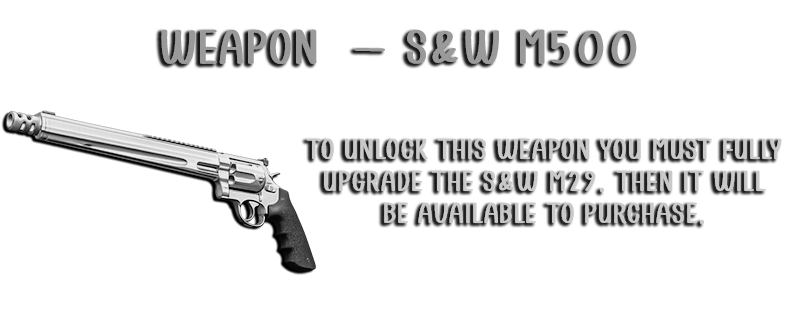
⇢ Blue Enigma 1 + 2
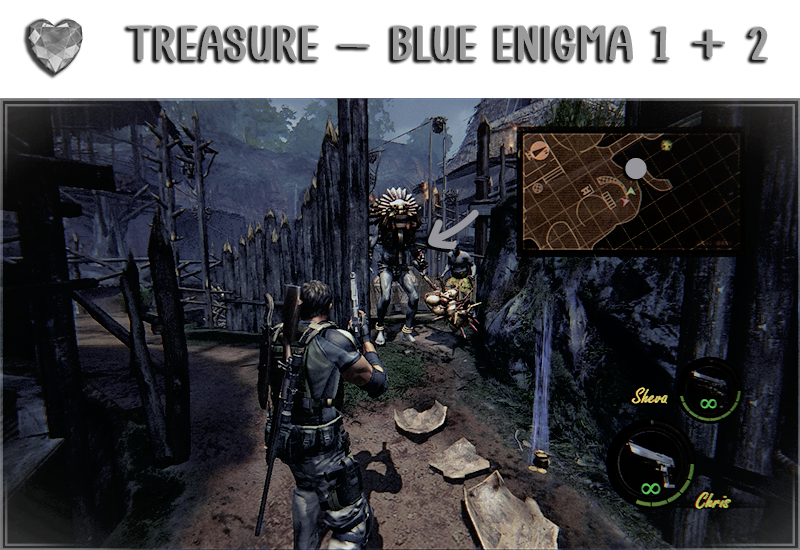
Location: Dropped when defeating the two Giant Majini.
⇢ Jewel Beetle
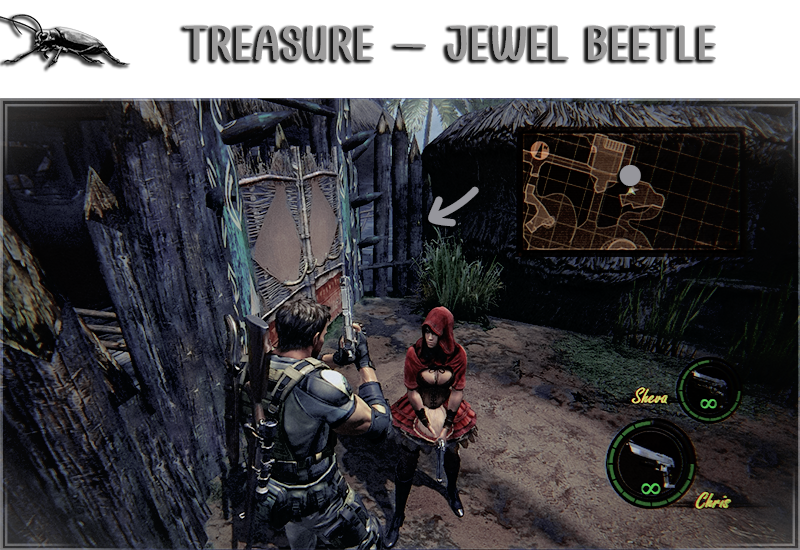
Location: On the right side of the locked door.
⇢ Ceremonial Mask
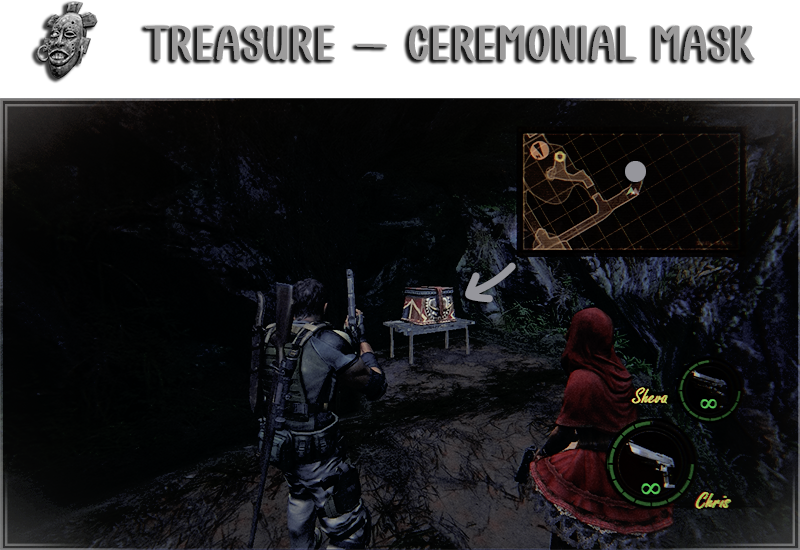
Location: At the end before the elevator, inside a cave.
In this chapter you will find:
→ 12 Treasures
→ 2 BSAA Emblems
→ 0 Weapons
→ 12 Treasures
→ 2 BSAA Emblems
→ 0 Weapons
⇢ Ruby (Pear)
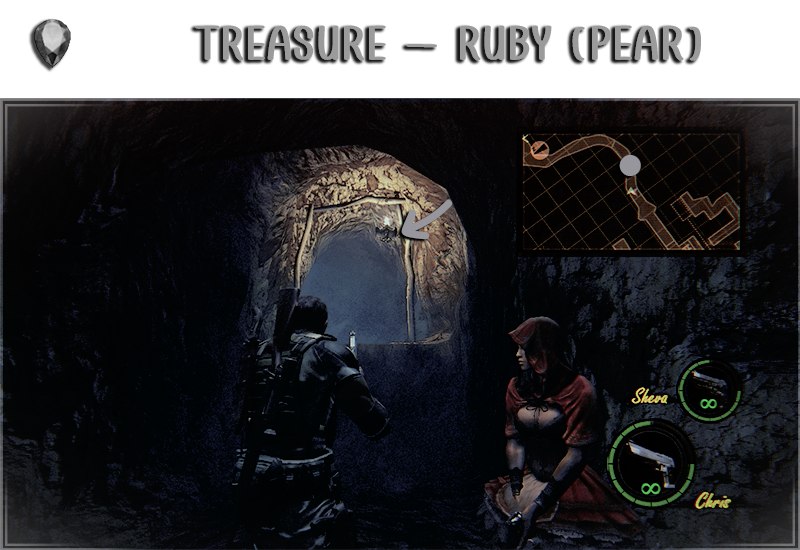
Location: Inside the skull torch.
⇢ Sapphire (Square)
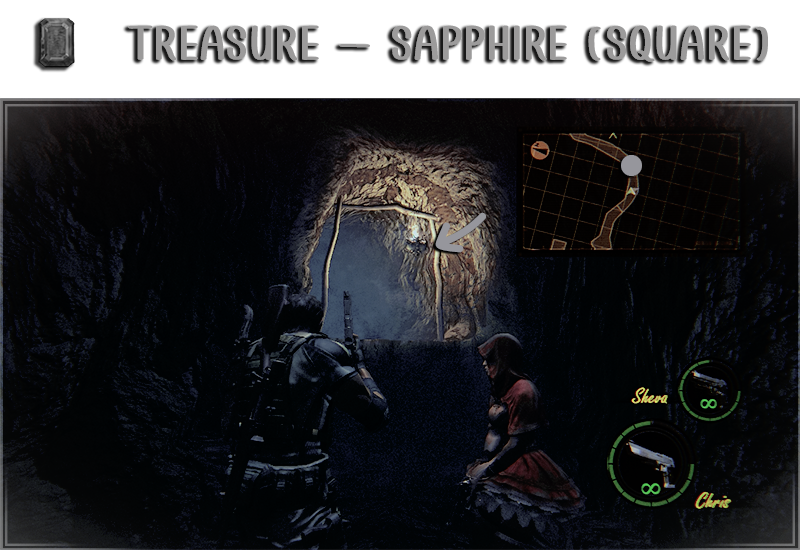
Location: Inside the next skull torch.
⇢ Jewel Beetle
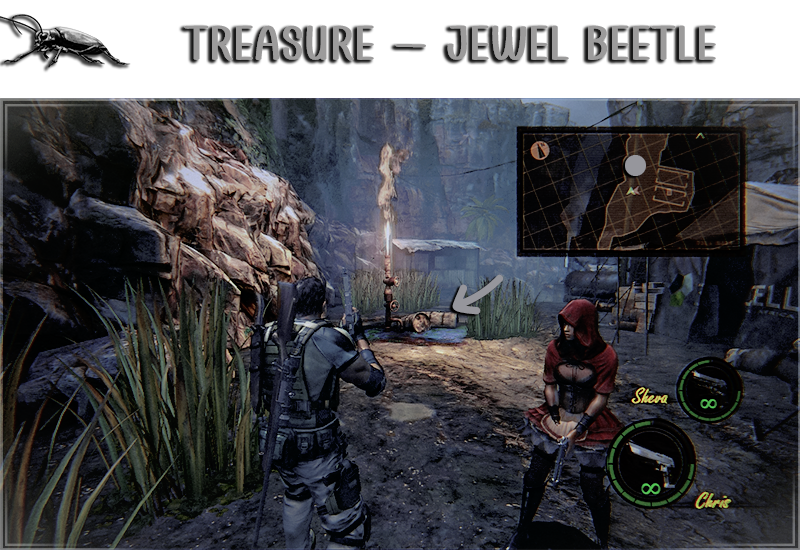
Location: On top of the barrel in the middle.
⇢ BSAA Emblem 16
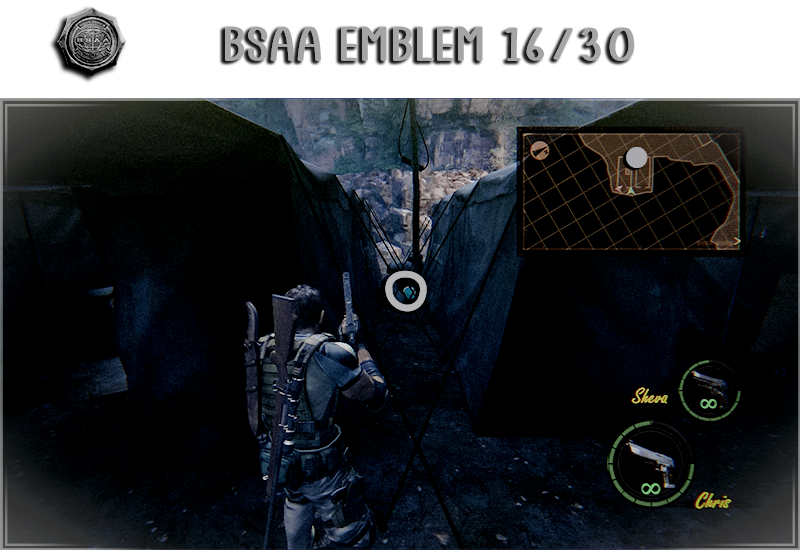
Location: In the middle of the two tents. You need to go to the back to see it.
⇢ Ruby (Square)
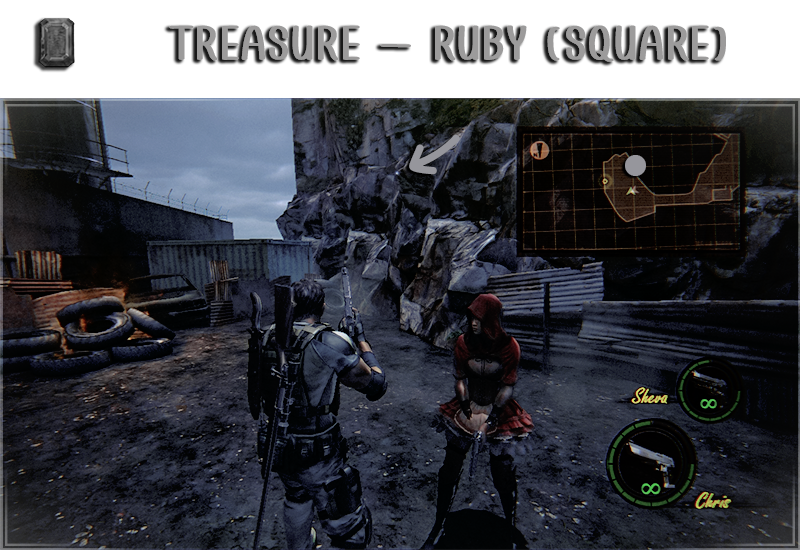
Location: Before leaving look up to the right side.
⇢ Jewel Beetle
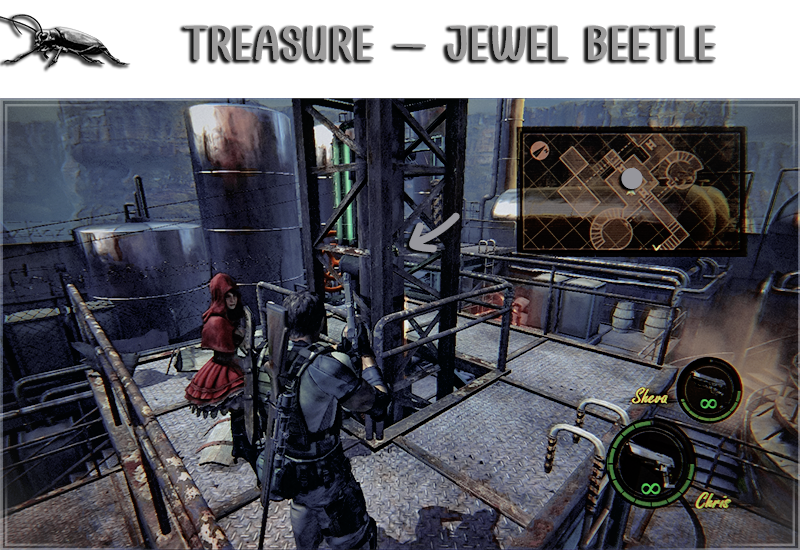
Location: Climb the stairs in the middle.
⇢ Venom Fang
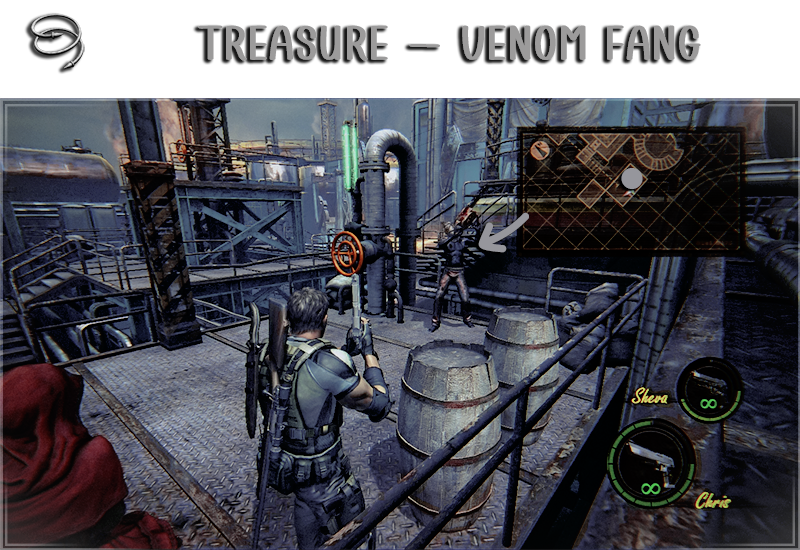
Location: Dropped by the Chainsaw Majini when defeated.
⇢ Venom Fang
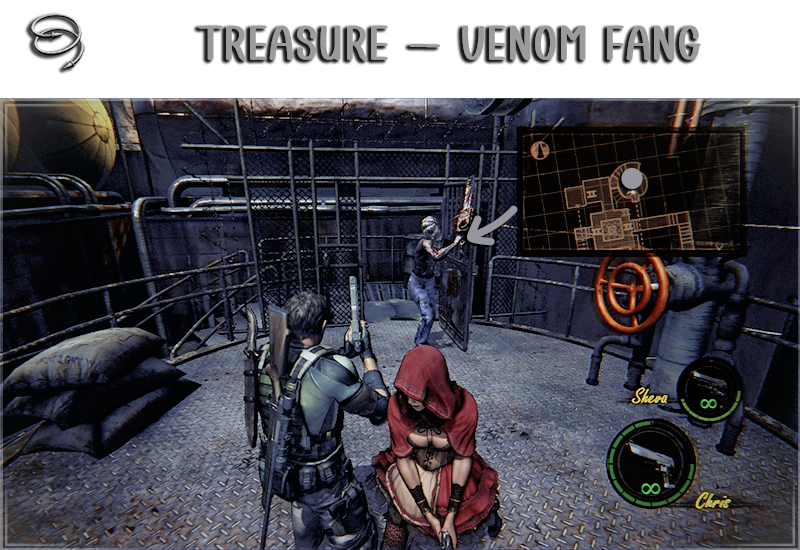
Location: Dropped by the Chainsaw Majini when defeated.
⇢ Jewel Bangle 1 + 2
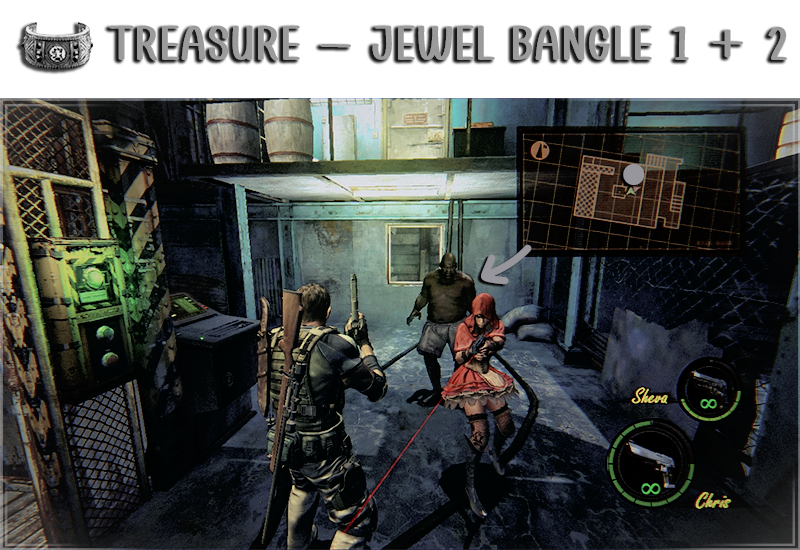
Location: Dropped by the Big Man Majinis when defeated.
⇢ Gold Ring
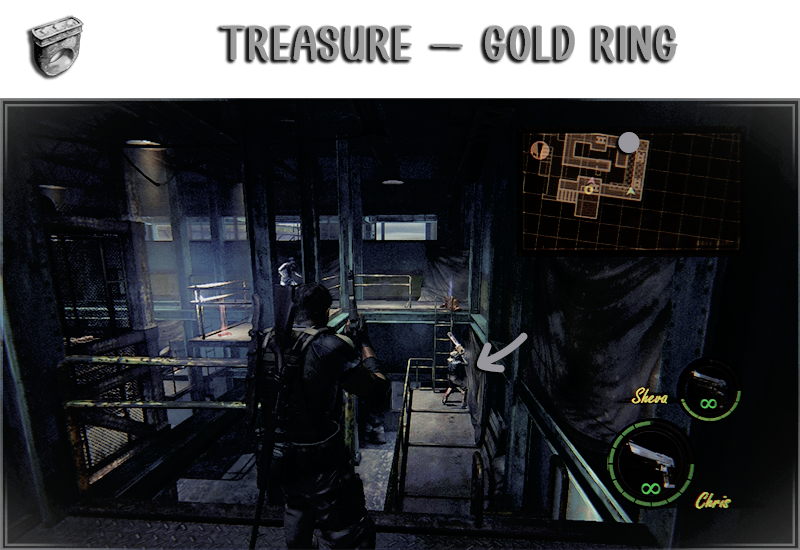
Location: Dropped by the Chainsaw Majini when defeated.
⇢ Gold Bars
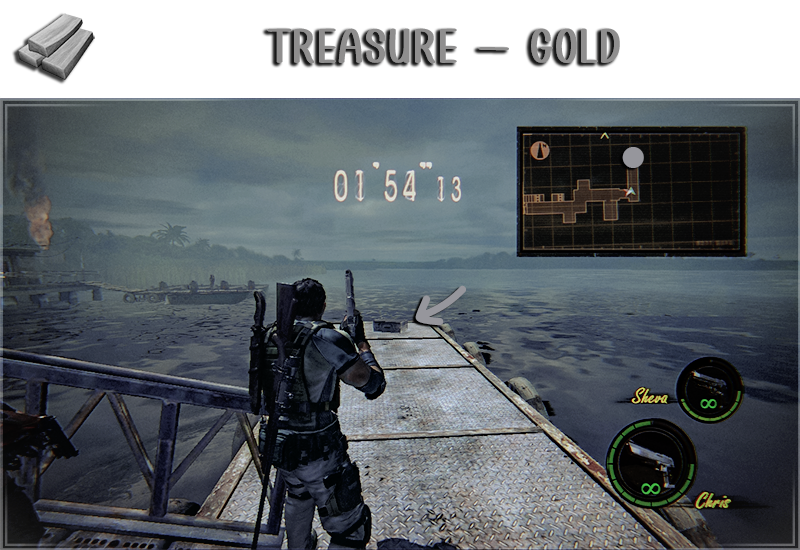
Location: Go to the right and all the way to the end of the docks.
⇢ BSAA Emblem 17
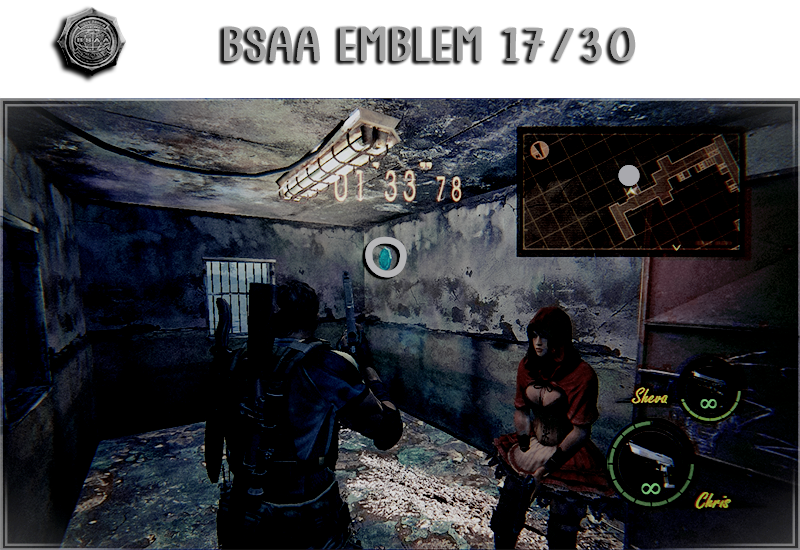
Location: Inside the room on the left side.
⇢ Gold Ring
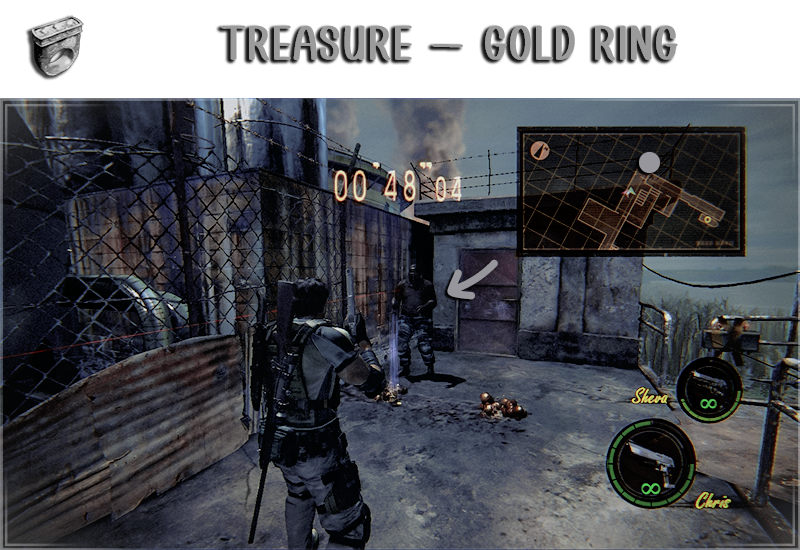
Location: Dropped by the Big Man Majini when defeated.
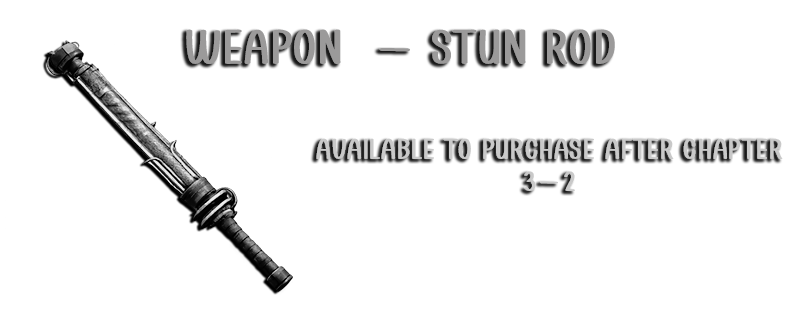
⇢ Stun rod
In this chapter you will find:
→ 2 Treasures
→ 1 BSAA Emblem
→ 1 Weapon
In this chapter you will need to bring a Sniper Rifle.
→ 2 Treasures
→ 1 BSAA Emblem
→ 1 Weapon
In this chapter you will need to bring a Sniper Rifle.
⇢ BSAA Emblem 18
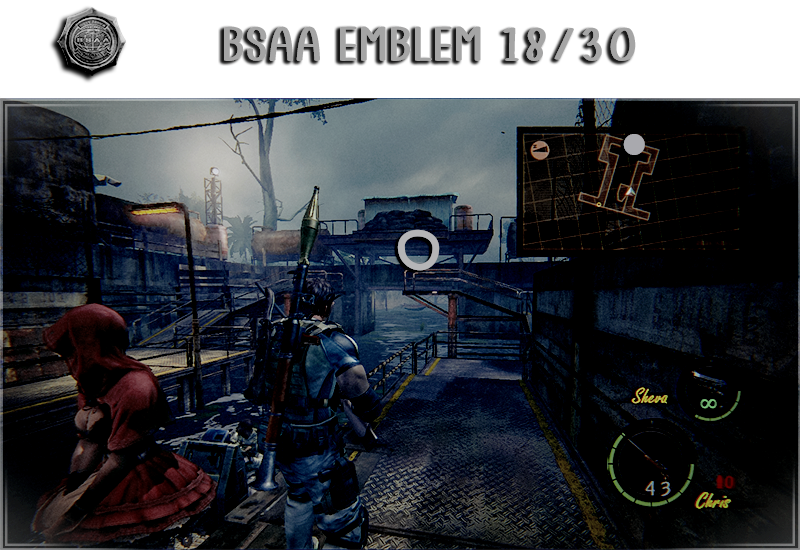
Location: After the boat stops, look at the gate where you came from.
⇢ M3 (SG)
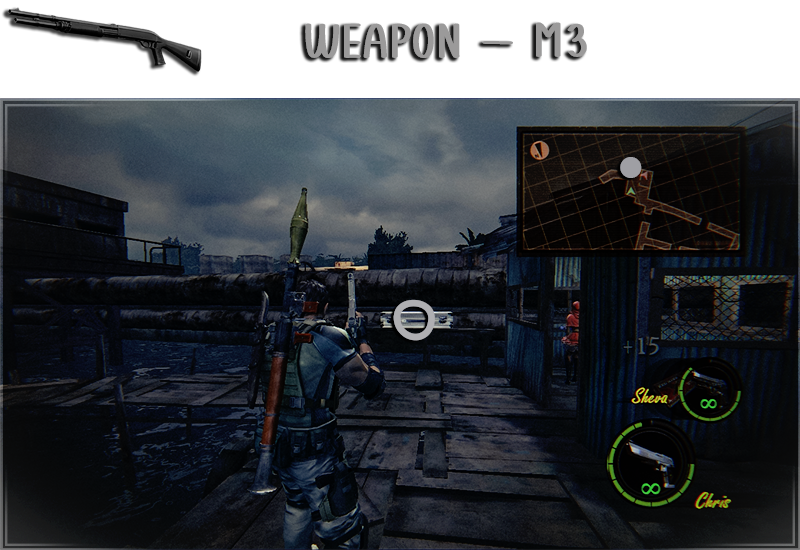
Location: When the boat stops again. Inside the case.
⇢ Sapphire (Pear)
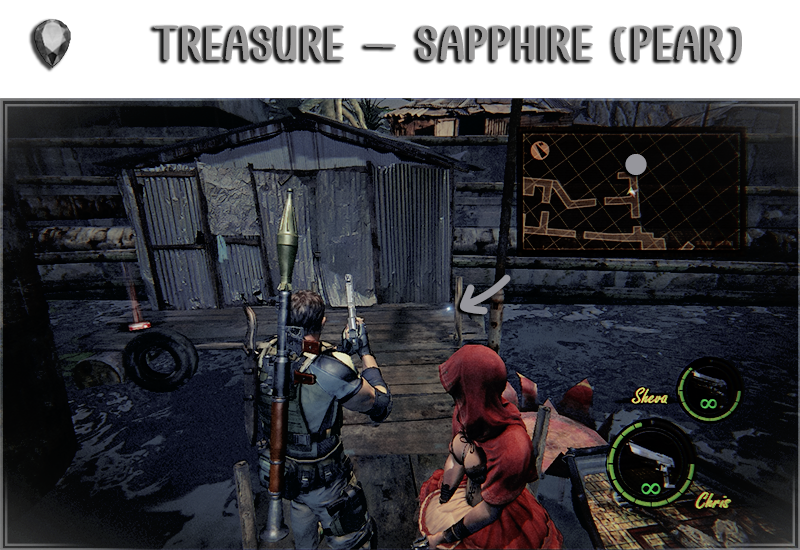
Location: Jump to the other side to find it on the ground.
⇢ Emerald (Pear)
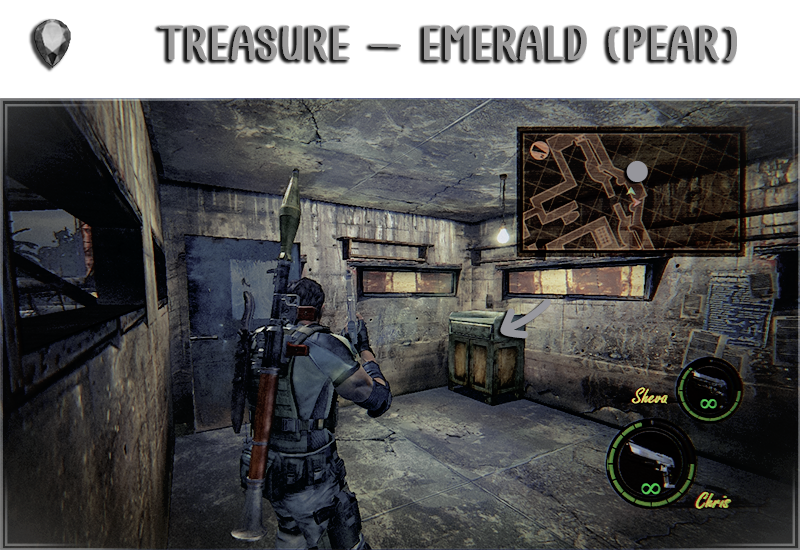
Location: Climb the ladders and go to the middle room to find it inside the drawer.
In this chapter you will find:
→ 27 Treasures
→ 3 BSAA Emblems
→ 1 Weapon
In this chapter you will need to bring a Sniper Rifle.
→ 27 Treasures
→ 3 BSAA Emblems
→ 1 Weapon
In this chapter you will need to bring a Sniper Rifle.
⇢ Sapphire (Pear)
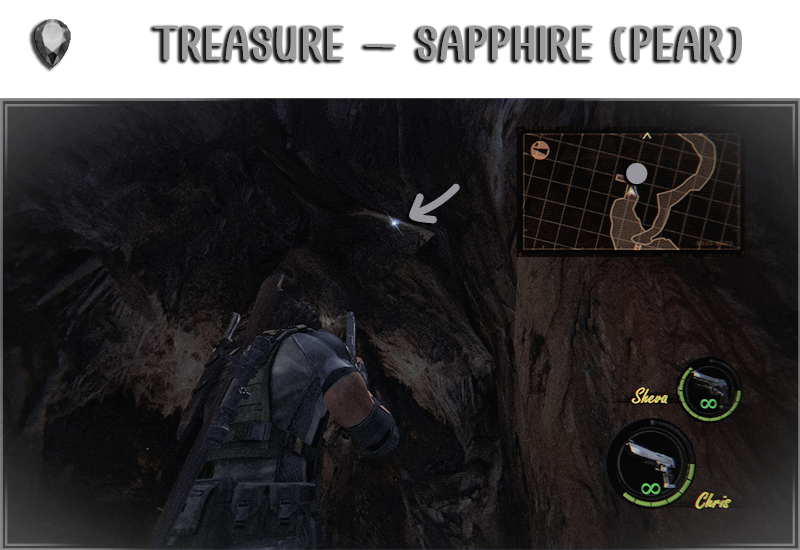
Location: Before going up the ladder, go all the way to the left and look up.
⇢ Topaz (Trilliant)
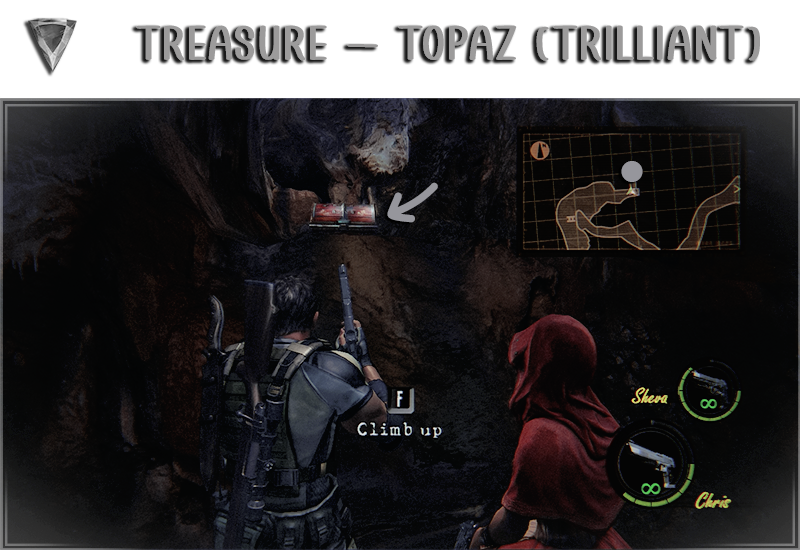
Location: Inside the chest at the same place as before.
⇢ BSAA Emblem 19
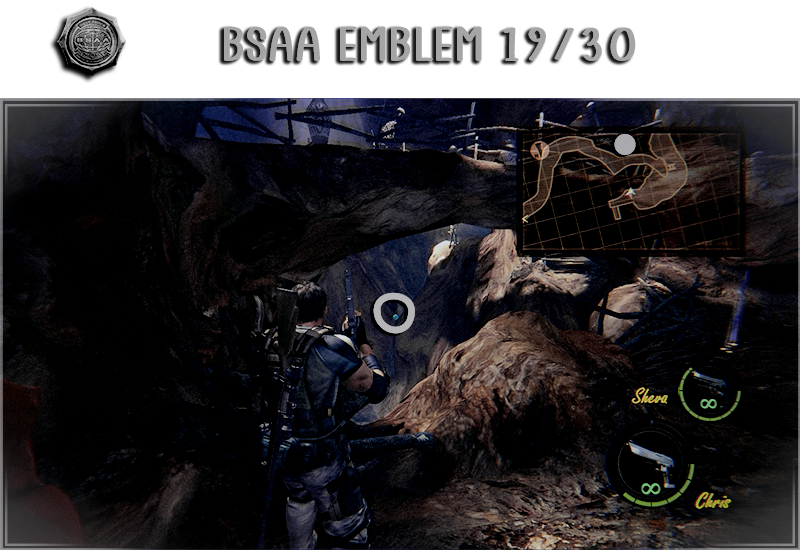
Location: After leaving look in front of you to see the Emblem far away.
⇢ Emerald (Pear)
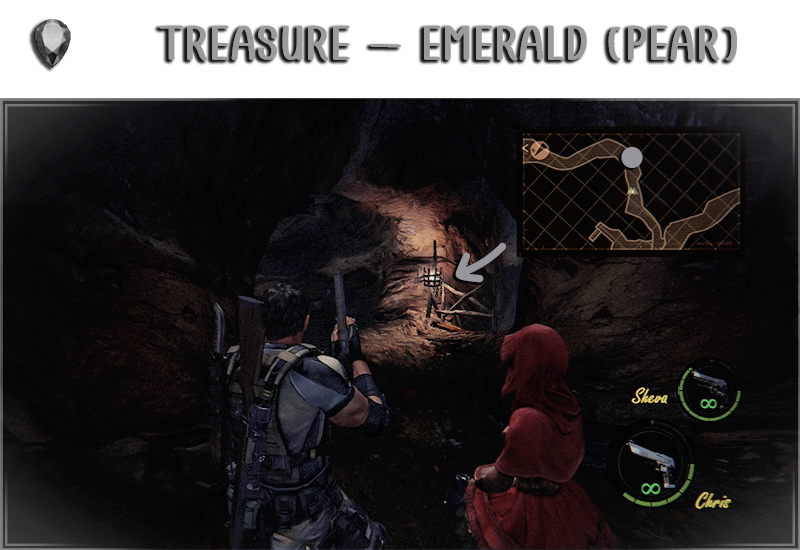
Location: Inside the first torch after crossing the bridge.
⇢ Sapphire (Square)
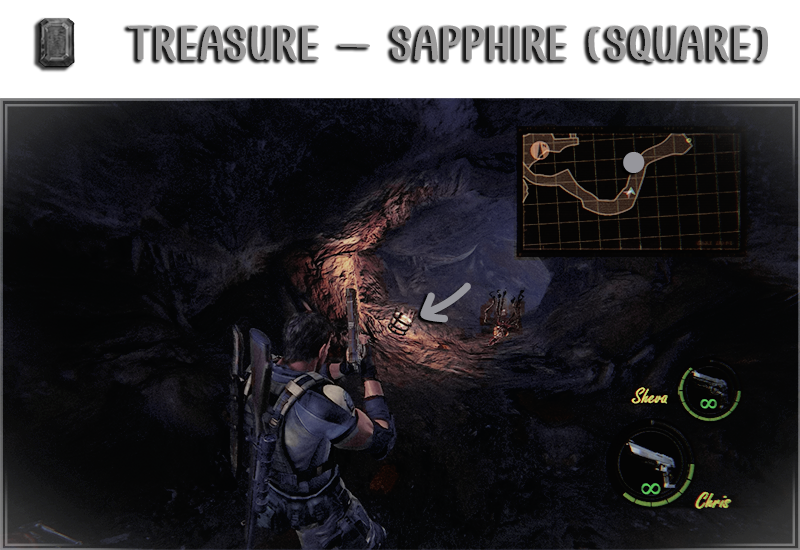
Location: Inside the next torch.
⇢ Ruby (Pear)
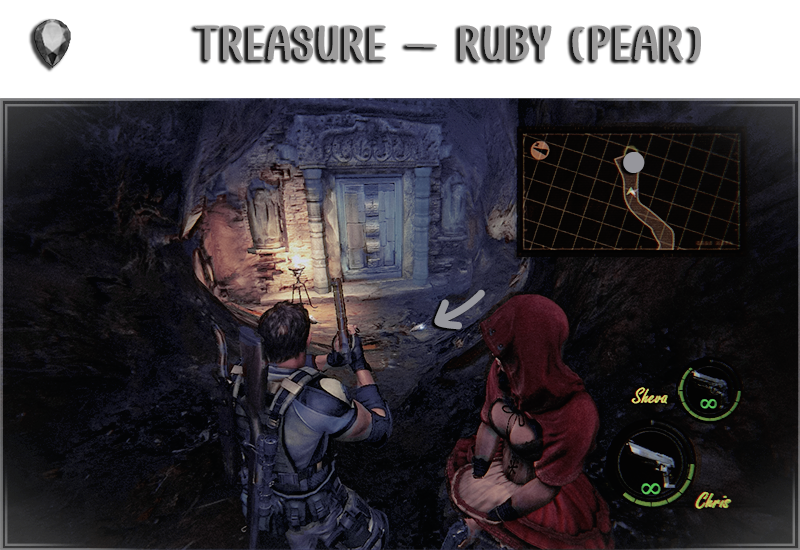
Location: Inside the skull laying on the ground.
⇢ Sapphire (Pear) + Topaz (Pear)
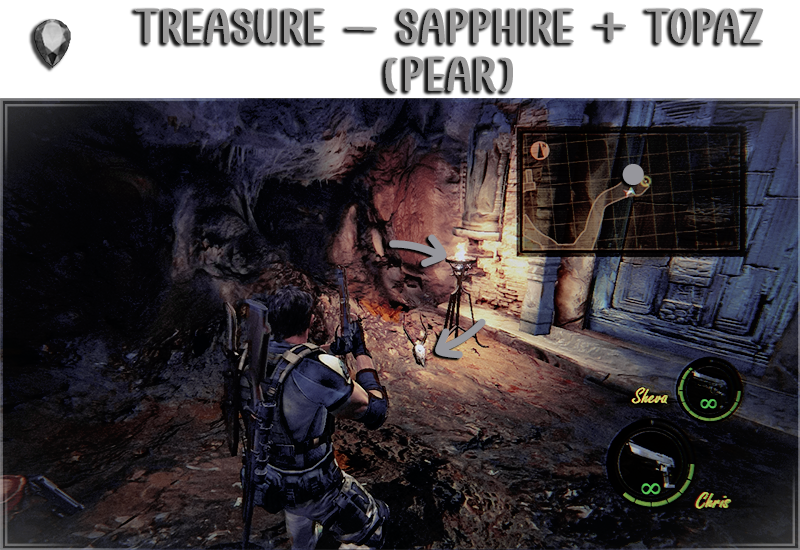
Location: Inside the torch and the skull laying on the ground.
⇢ BSAA Emblem 20
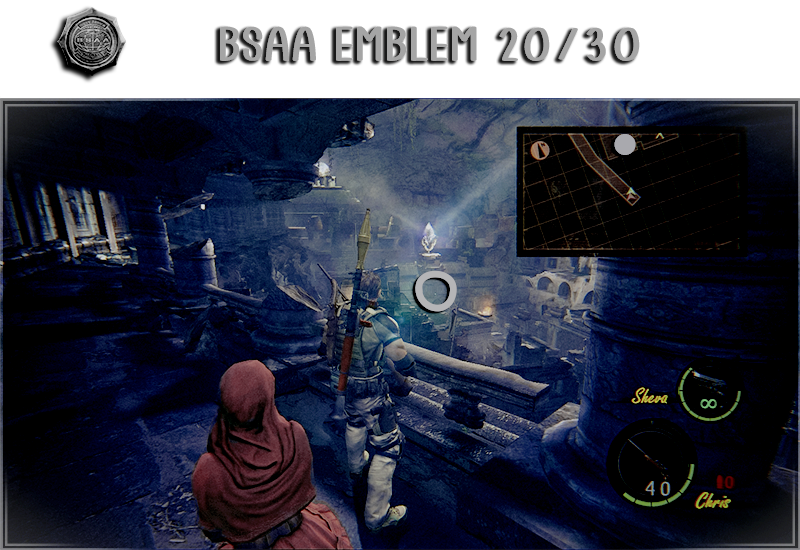
Location: You can shoot this Emblem now from afar or you will see it later more closely.
⇢ Topaz (Square)
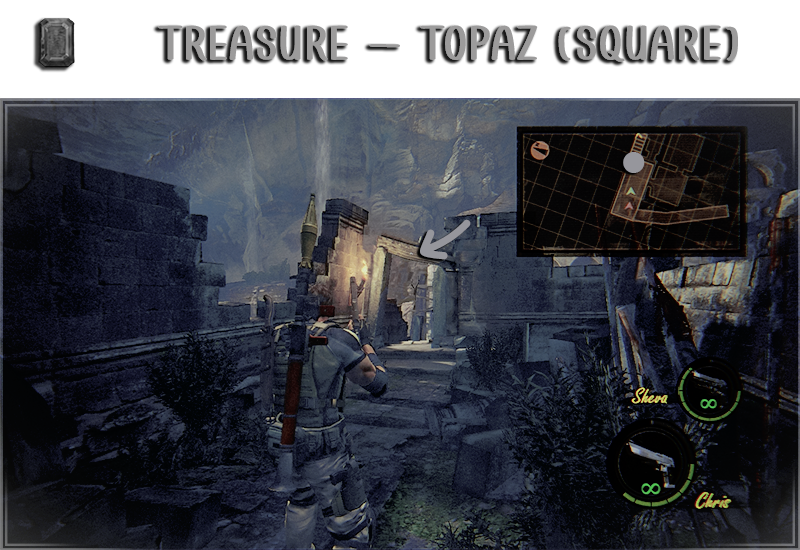
Location: On the archway.
⇢ Emerald (Pear)
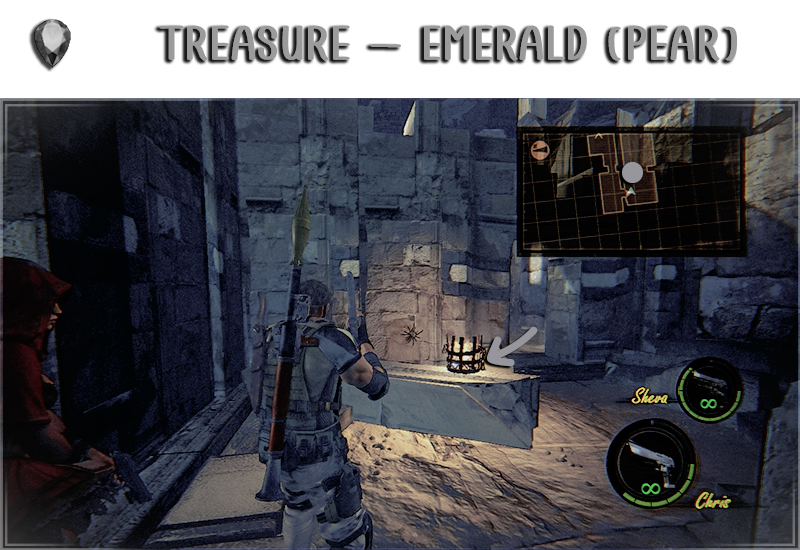
Location: Inside the torch after the room with the tomb.
⇢ Topaz (Pear)
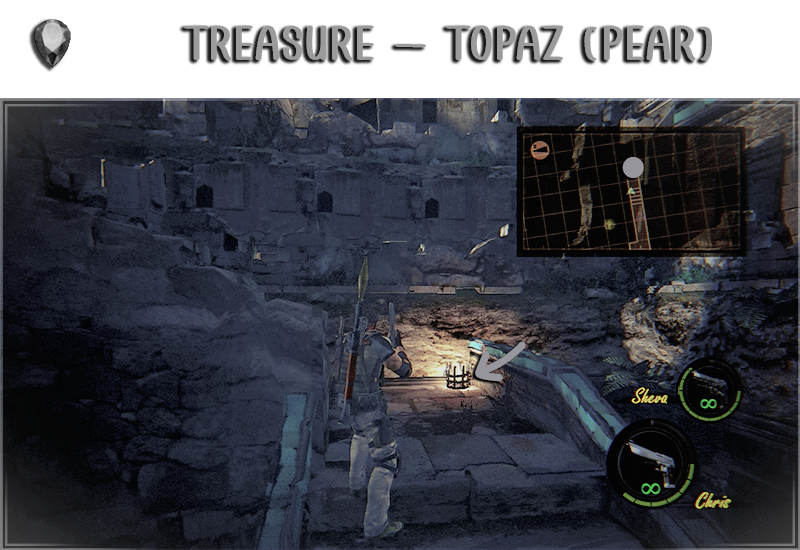
Location: After you get separated from Sheva, go upstairs to find it inside the torch.
⇢ Sapphire (Square) + Sapphire (Pear)
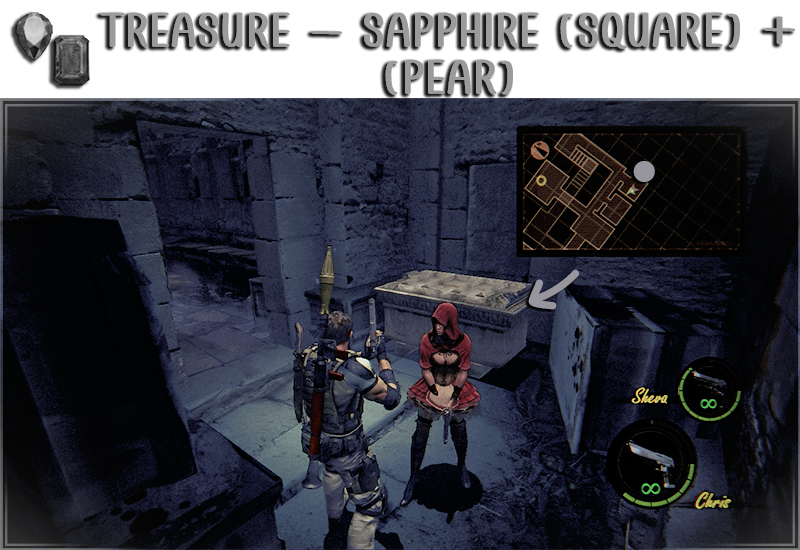
Location: Inside the tomb in the first room you will see.
⇢ Ruby (Pear) + Sapphire (Pear)
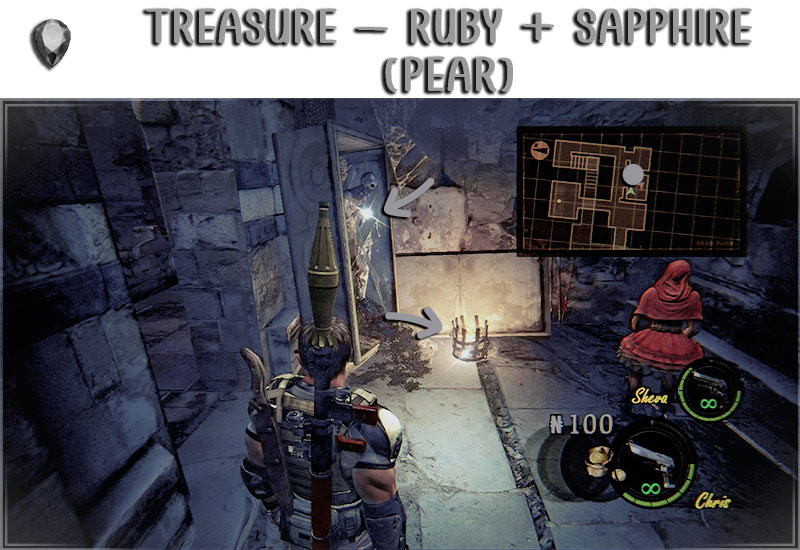
Location: Inside the middle room.
⇢ Ruby (Trilliant)
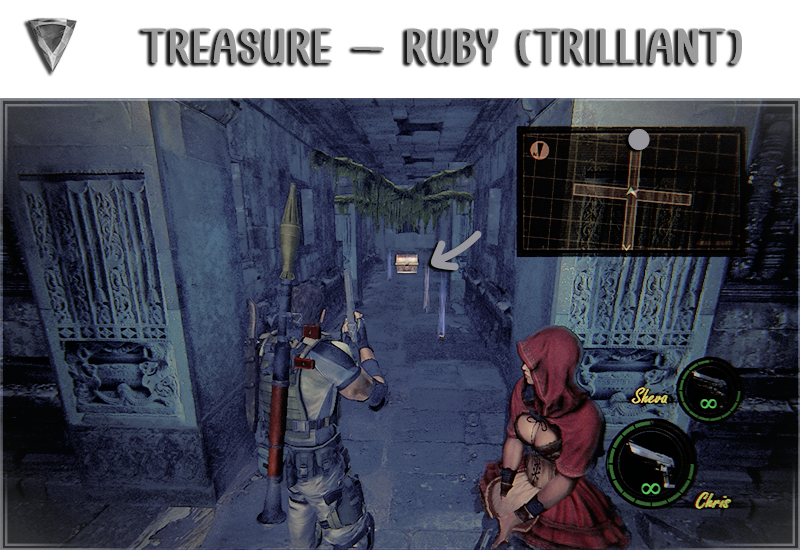
Location: After falling down you will see it.
⇢ Sapphire (Trilliant)
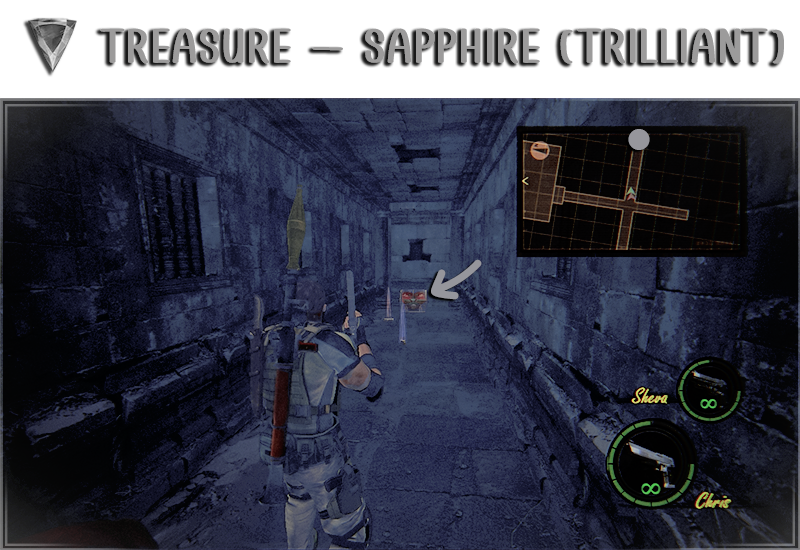
Location: After falling down you will see it.
⇢ Emerald (Trilliant)
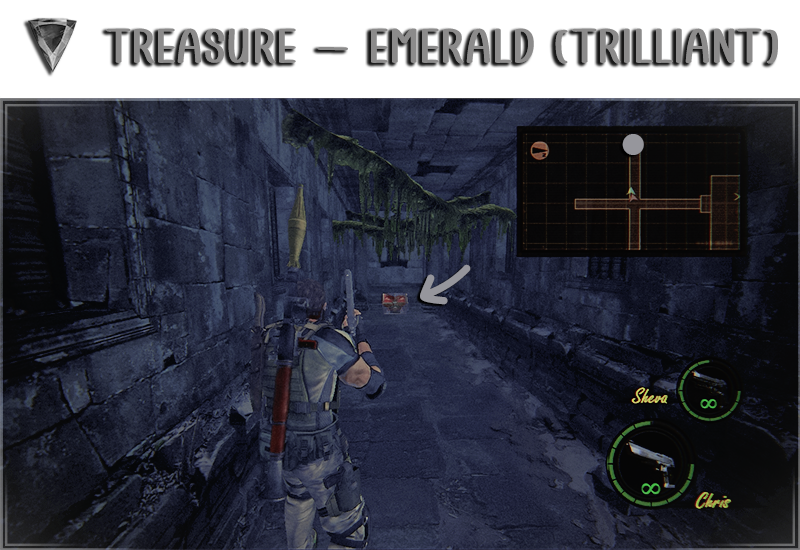
Location: After falling down you will see it.
⇢ BSAA Emblem 21
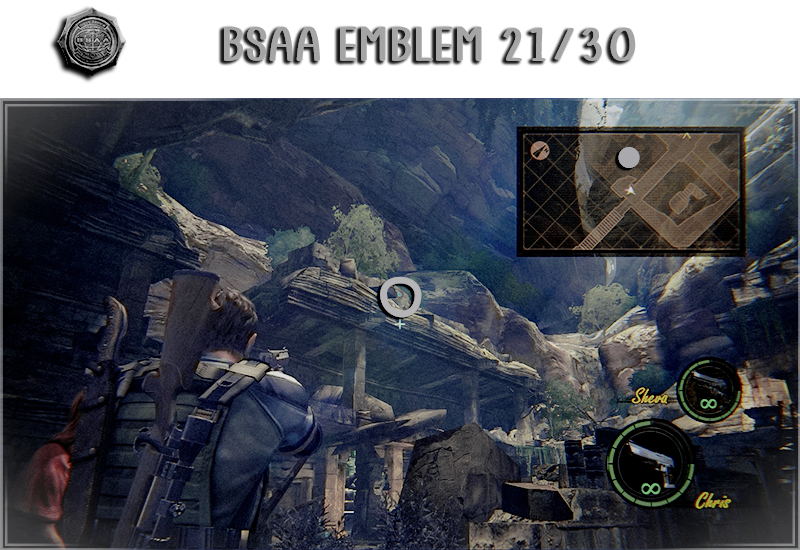
Location: After escaping the traps, you will enter this area. Look up to the left.
⇢ Grenade Launcher
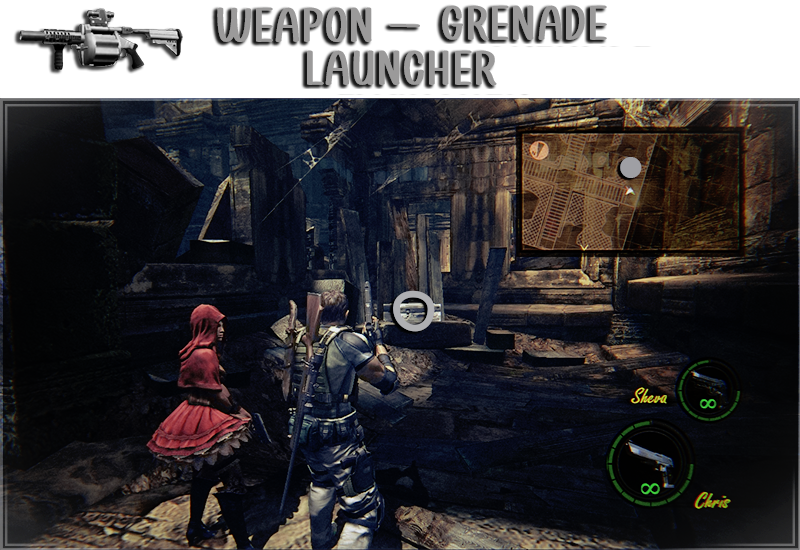
Location: Go downstairs and all the way to the left.
⇢ Emerald (Square)
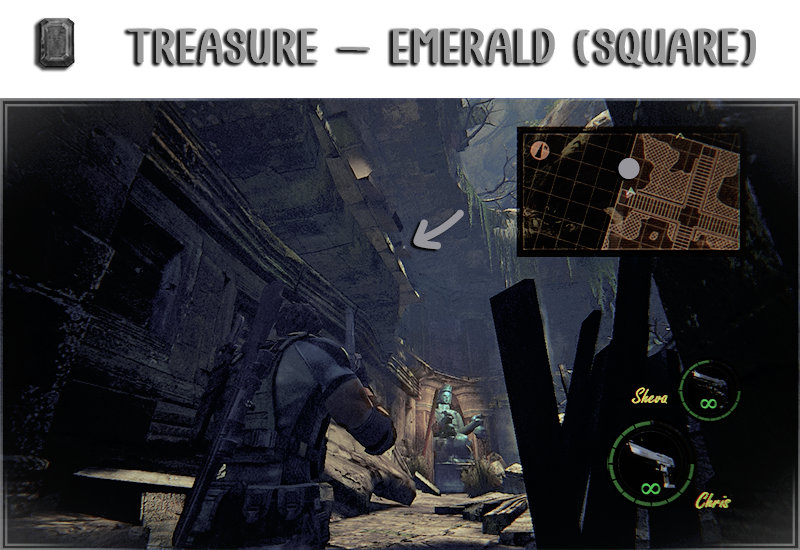
Location: Look up before the statue.
⇢ Sapphire (Square)
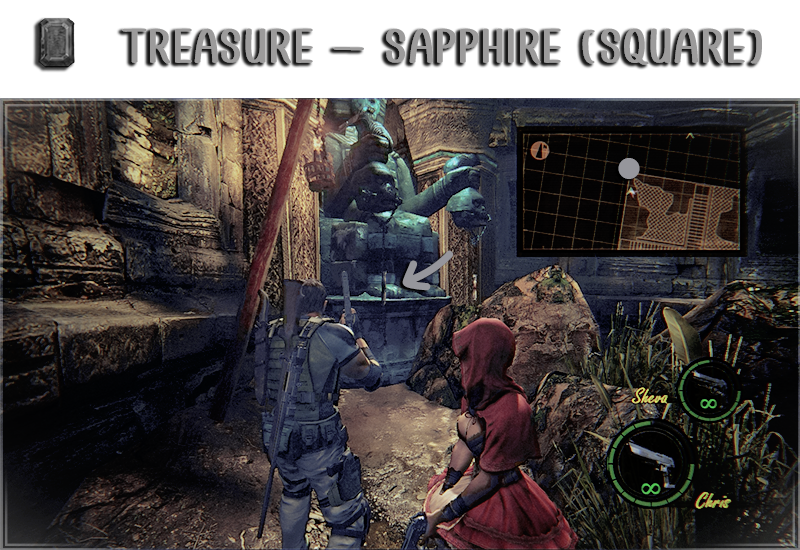
Location: Under the first statue.
⇢ Idol (Gold)
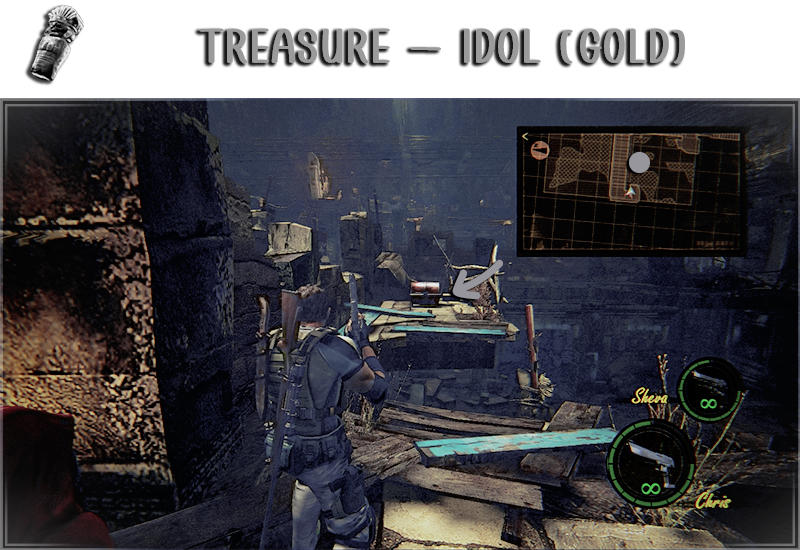
Location: Go upstairs and jump to the other side.
⇢ Emerald (Square)
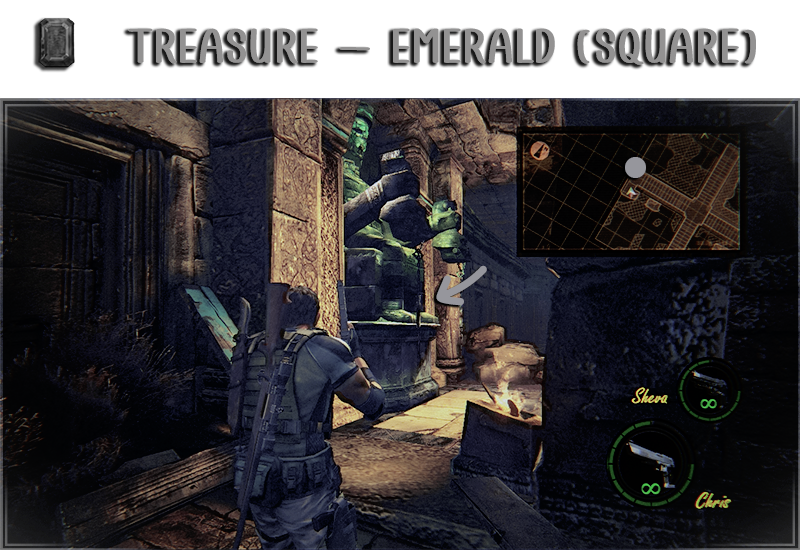
Location: Under the second statue.
⇢ Topaz (Square)
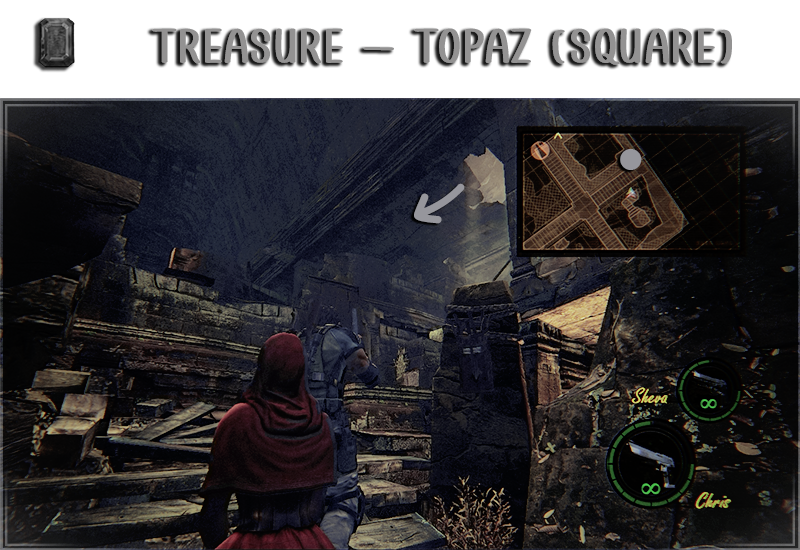
Location: After defeating a lot of Majinis, go upstairs and look up.
⇢ Topaz (Square)
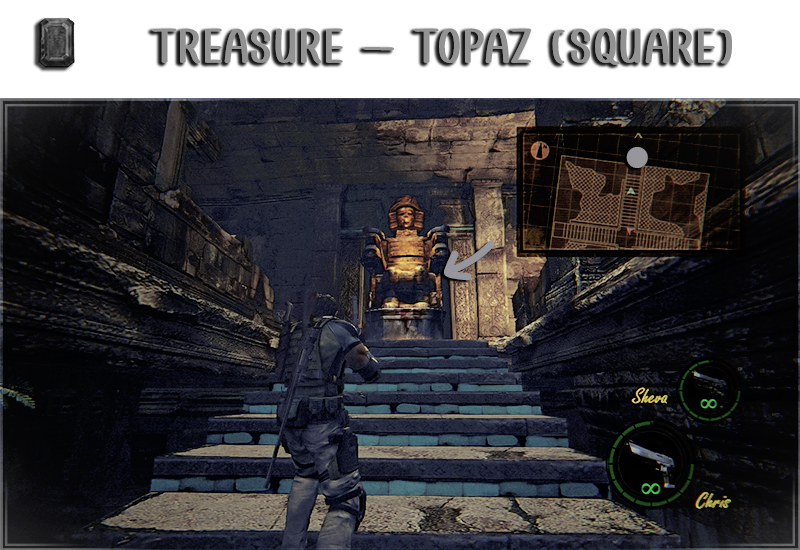
Location: Under the third statue.
⇢ Sapphire (Pear)
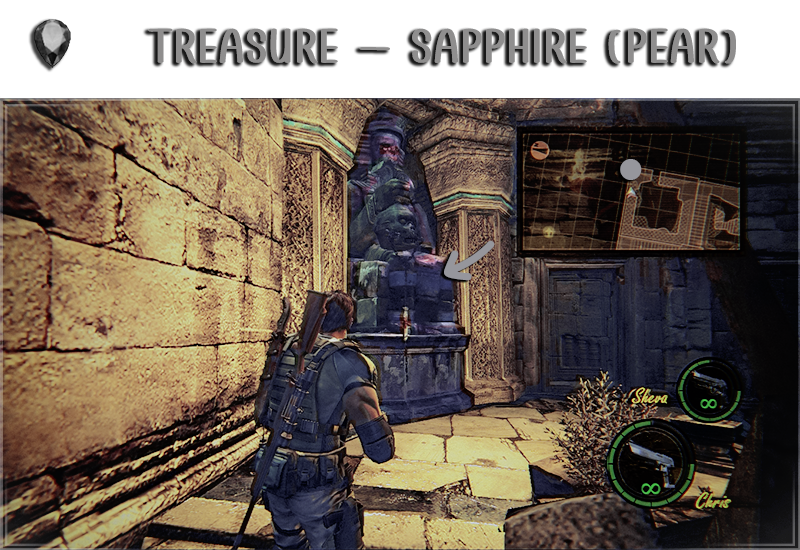
Location: Under the fourth statue upstairs.
⇢ Ruby (Pear)
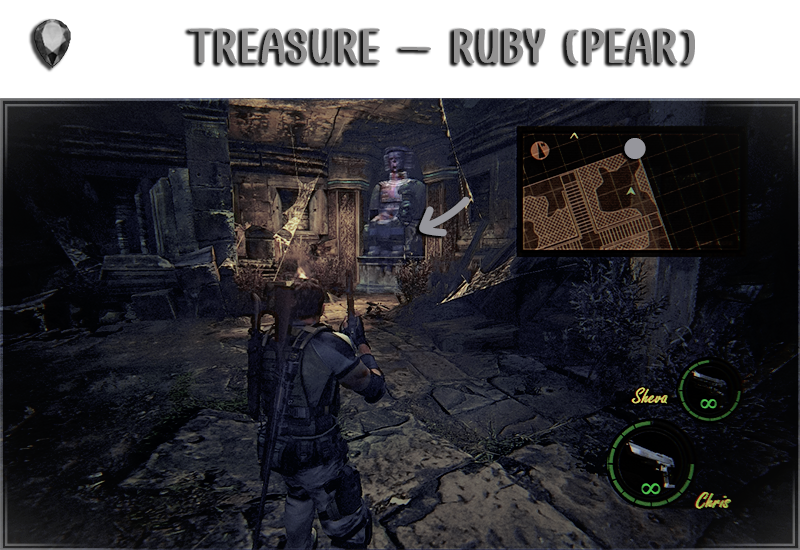
Location: Under the fourth statue downstairs.
⇢ Ruby (Oval)
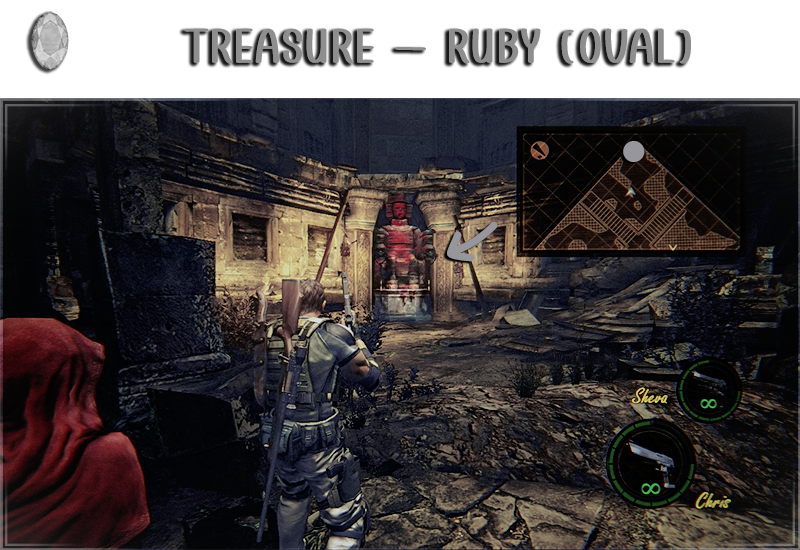
Location: Under the fifth statue.
⇢ Soul Gem
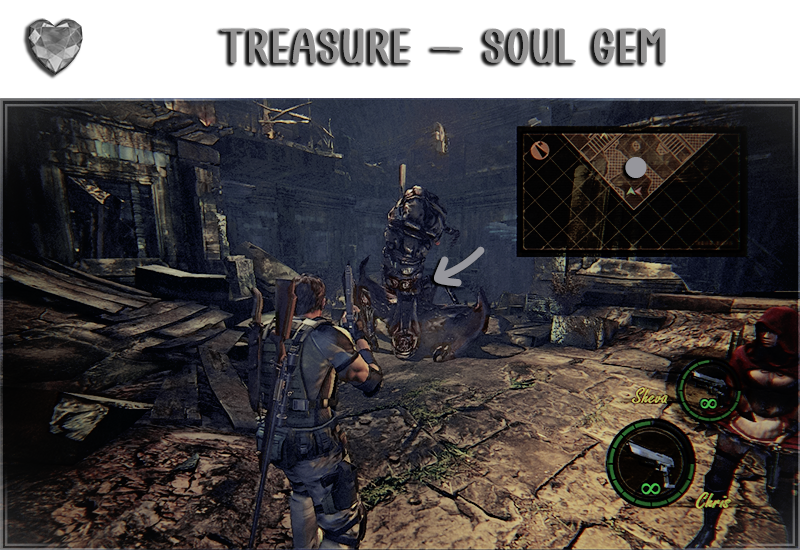
Location: Dropped by the Popokarimu when defeated.
In this chapter you will find:
→ 14 Treasures
→ 1 BSAA Emblem
→ 0 Weapon
→ 14 Treasures
→ 1 BSAA Emblem
→ 0 Weapon
⇢ Topaz (Pear)
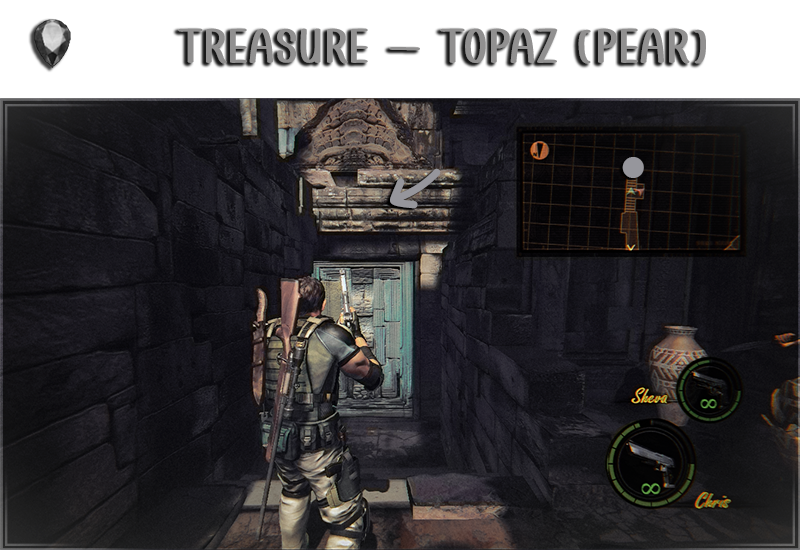
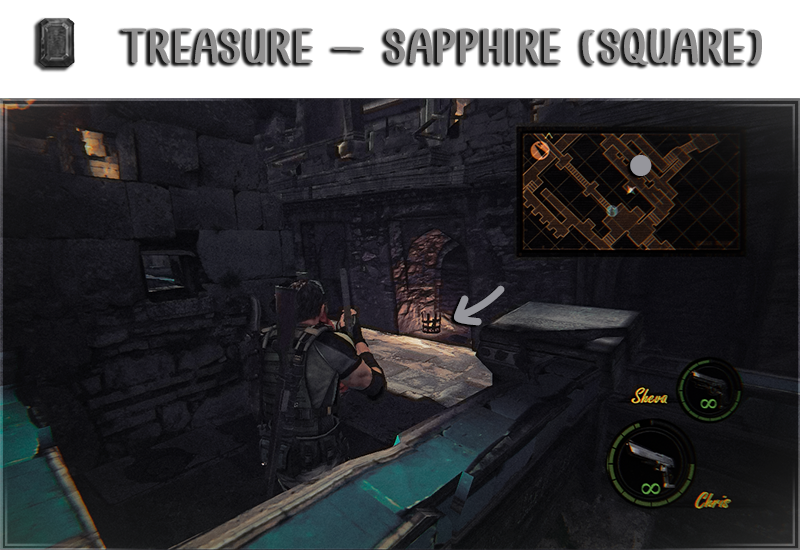
⇢ Sapphire (Square)
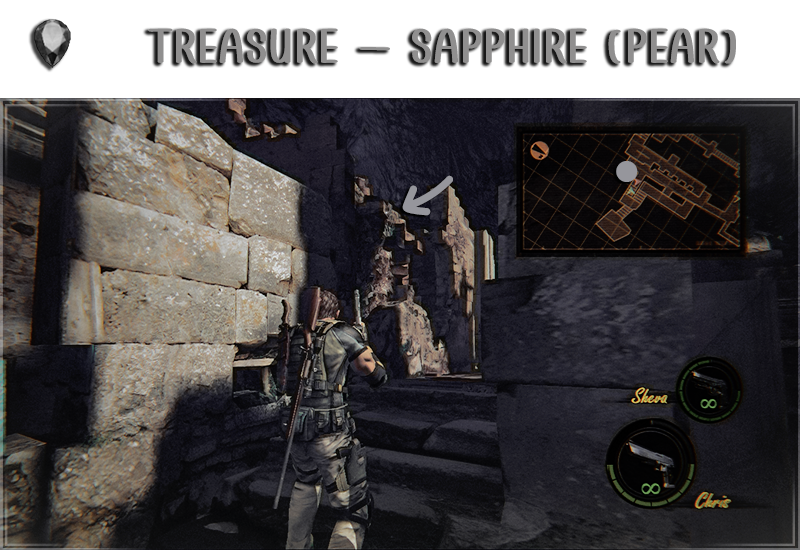
⇢ Sapphire (Pear)
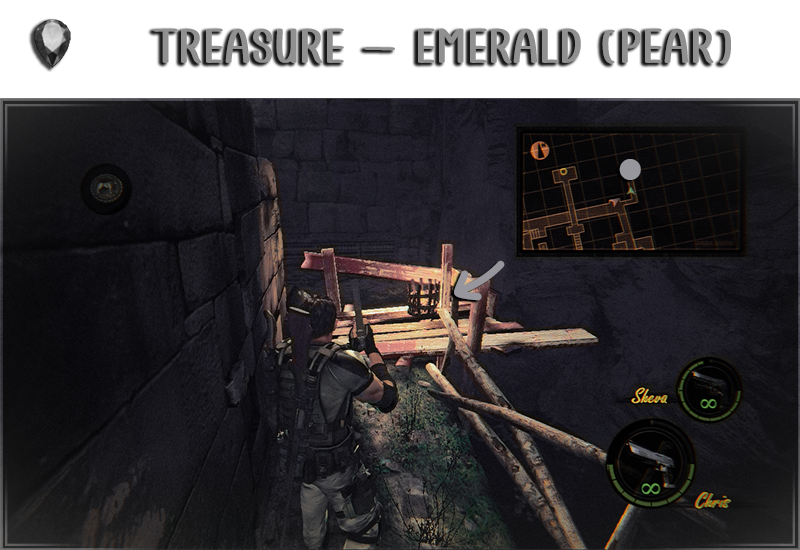
⇢ Emerald (Pear)
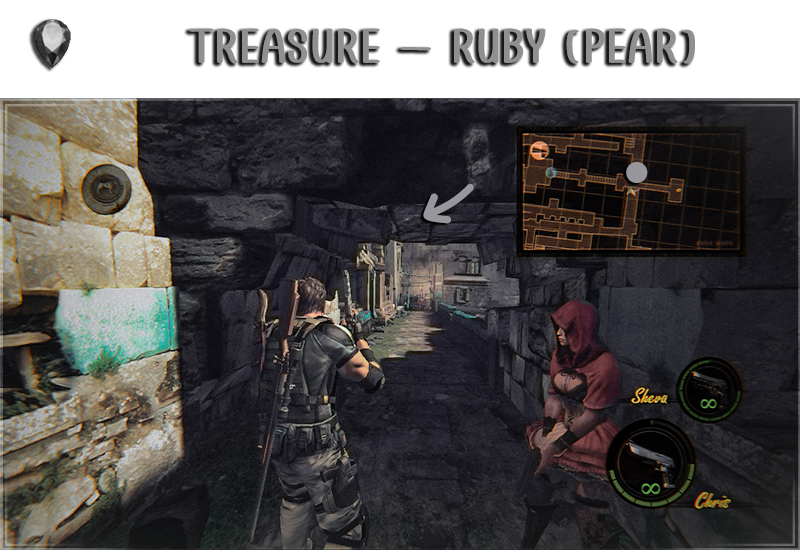
⇢ Ruby (Pear)
⇢ Blue Enigma
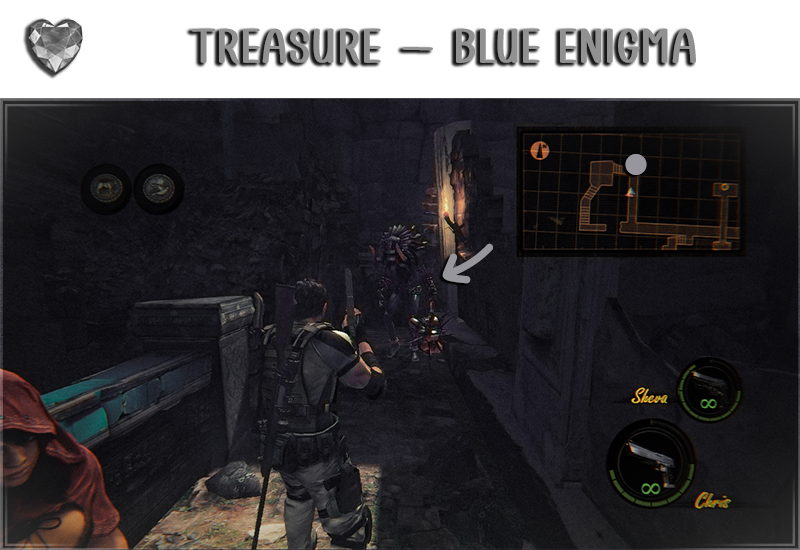
Location: Dropped by the Giant Majini when defeated.
⇢ Topaz (Square)
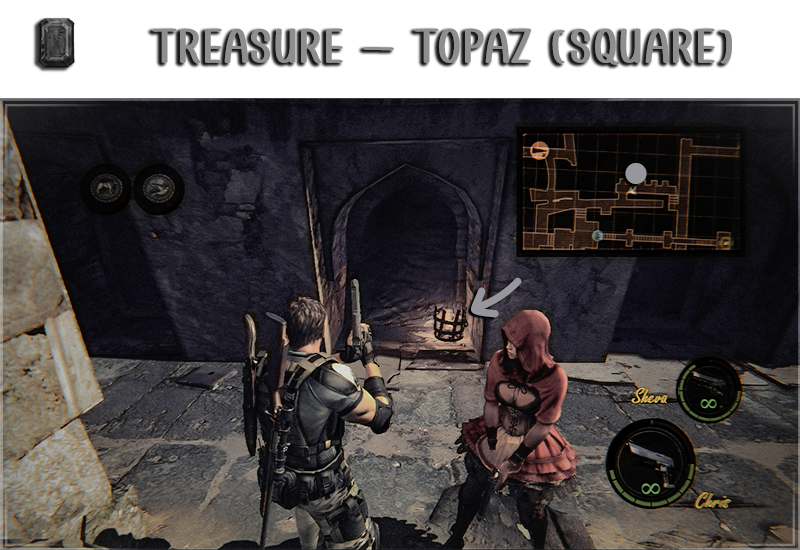
⇢ Blue Enigma
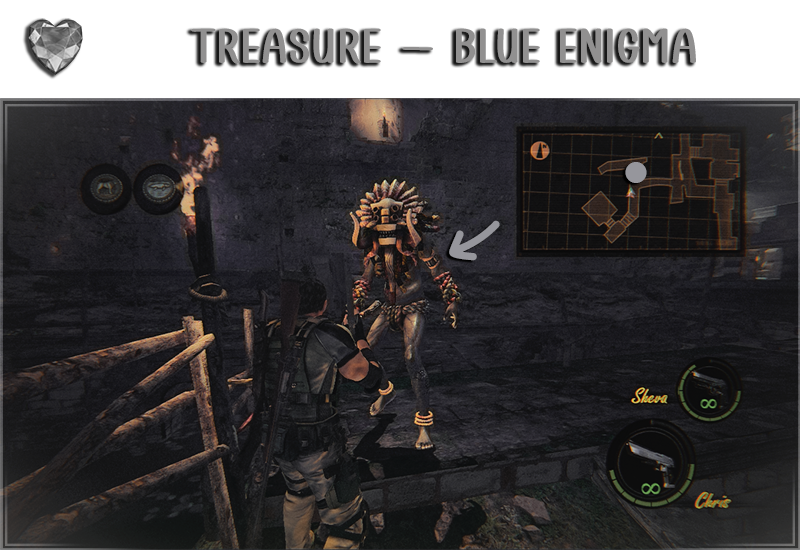
Location: Dropped by the Giant Majini when defeated.
⇢ Diamond (Trilliant)
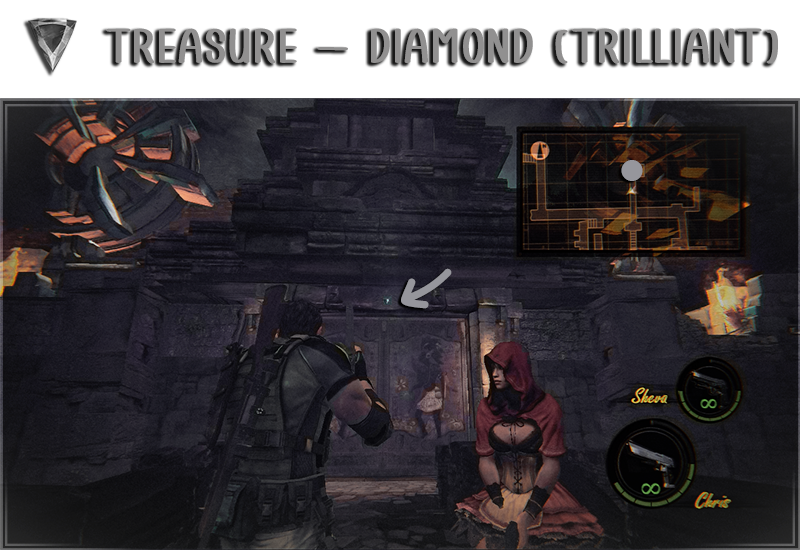
⇢ Ruby (Pear)
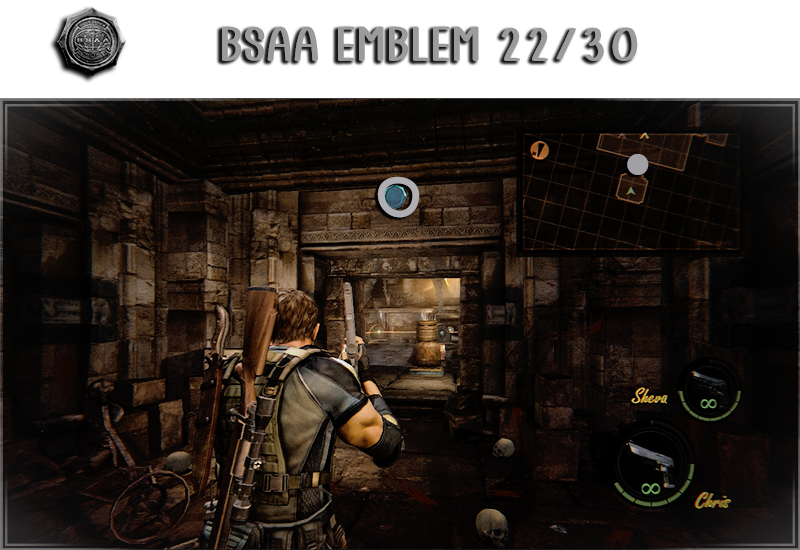
⇢ BSAA Emblem 22
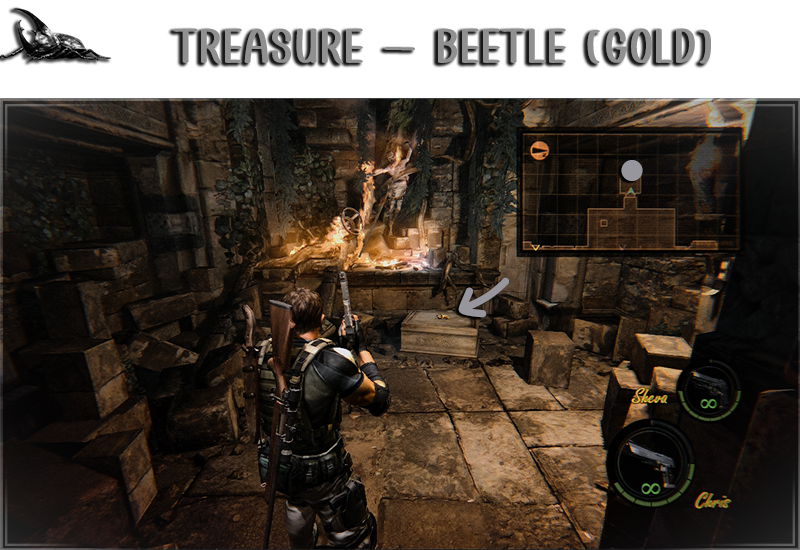
⇢ Beetle (Gold)
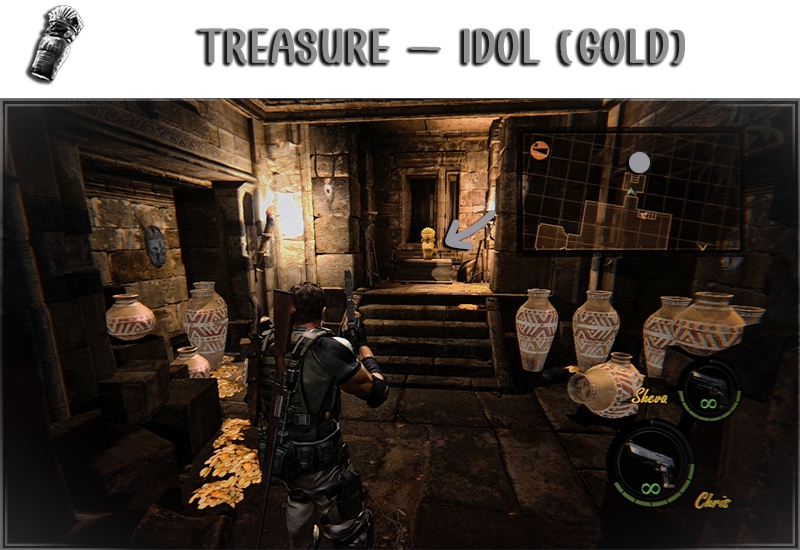
⇢ Idol (Gold)
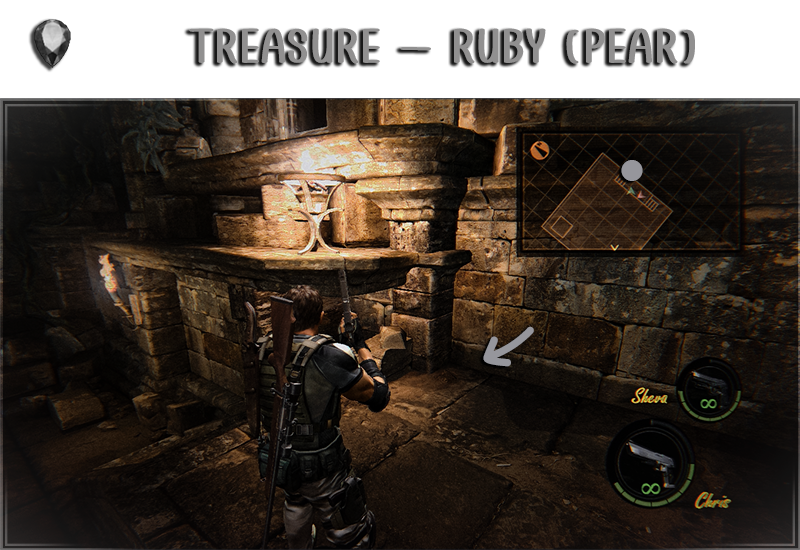
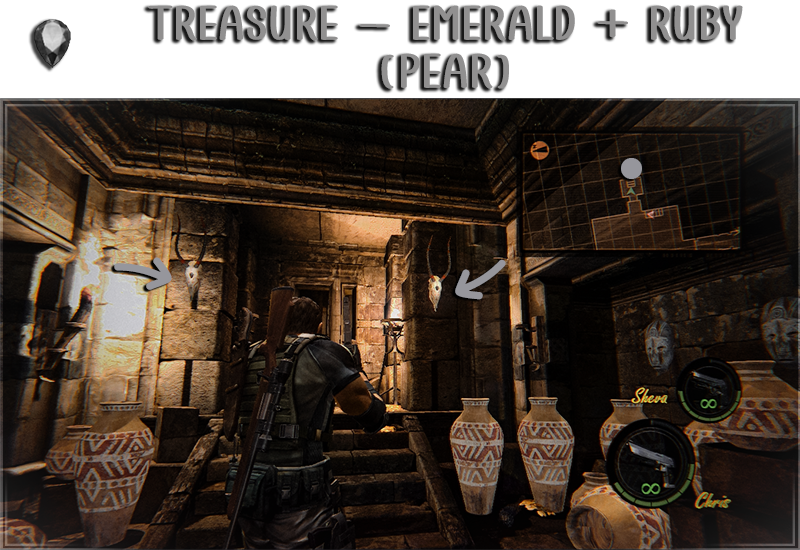
⇢ Emerald (Pear) + Ruby (Pear)
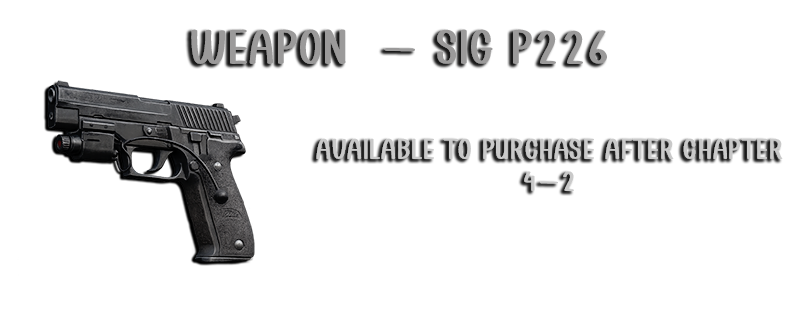
⇢ SIG P226
In this chapter you will find:
→ 8 Treasures
→ 1 BSAA Emblem
→ 1 Weapon
→ 8 Treasures
→ 1 BSAA Emblem
→ 1 Weapon
⇢ Ruby (Square)
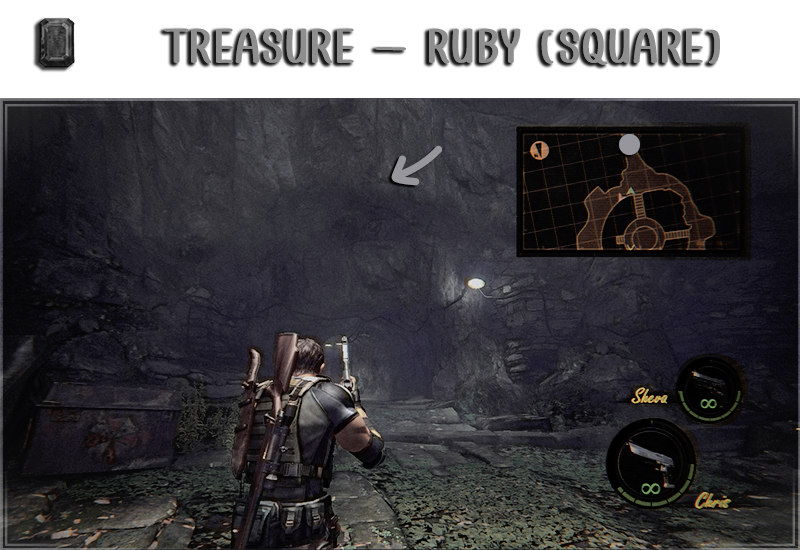
Location: At the start turn around and look up.
⇢ Jewel Beetle
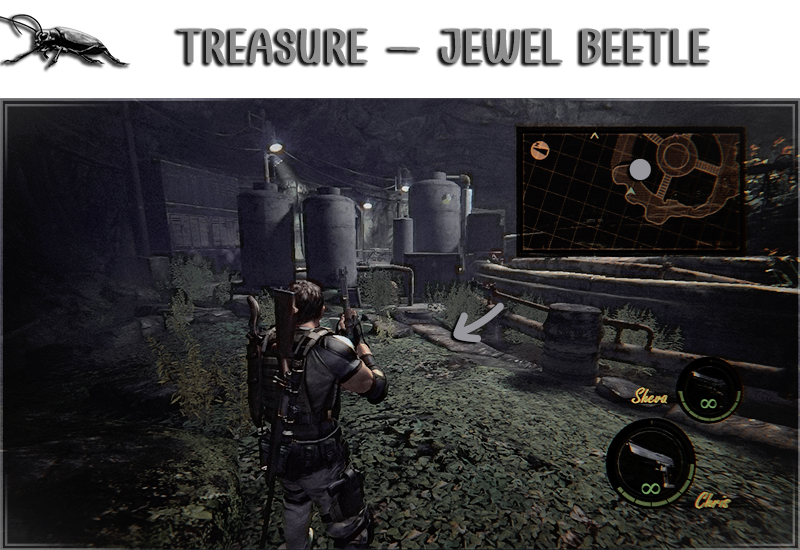
Location: Go all the way to the left to find it on the right side.
⇢ BSAA Emblem 23
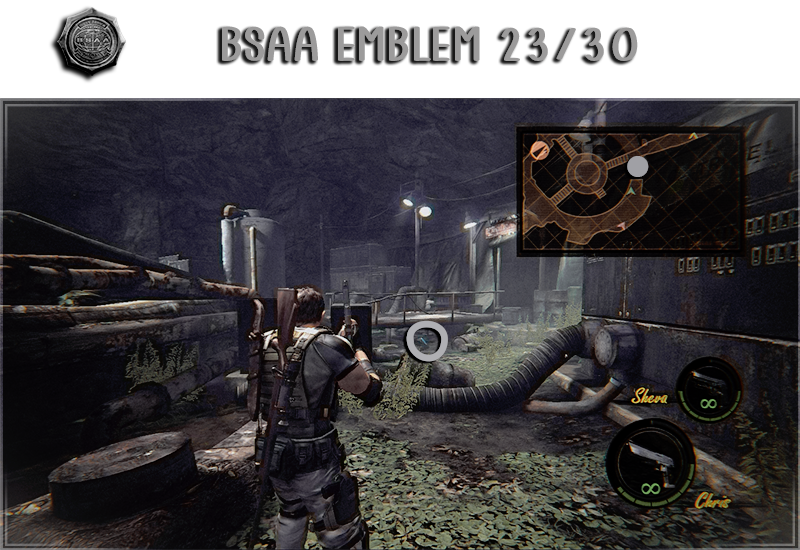
Location: Go all the way to the right to find it under the bridge.
⇢ Emerald (Pear)
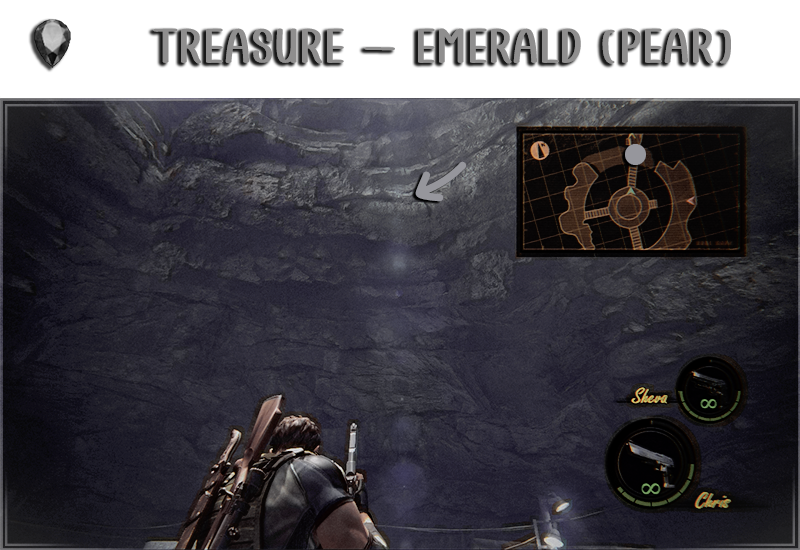
Location: Before leaving the area, look up.
⇢ Lion Heart
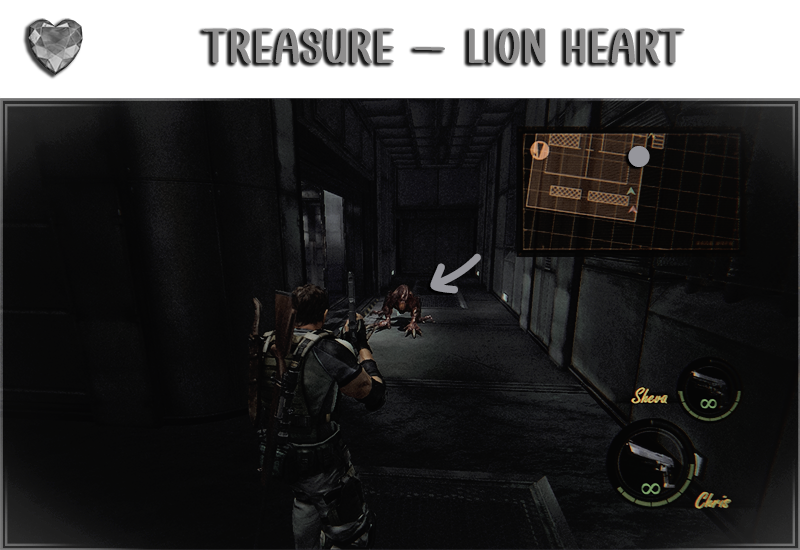
Location: Dropped by the Licker when defeated.
⇢ Ak-74 (MG)
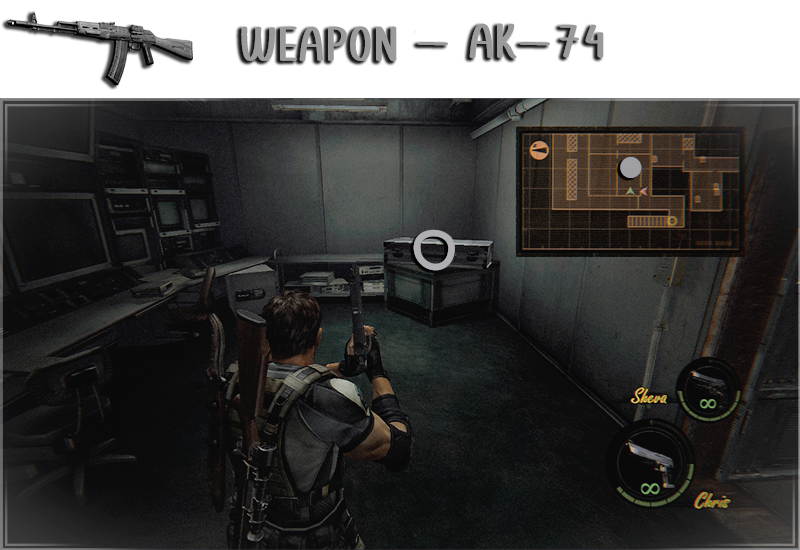
Location: Monitor Room, inside the case.
⇢ Gold Bars
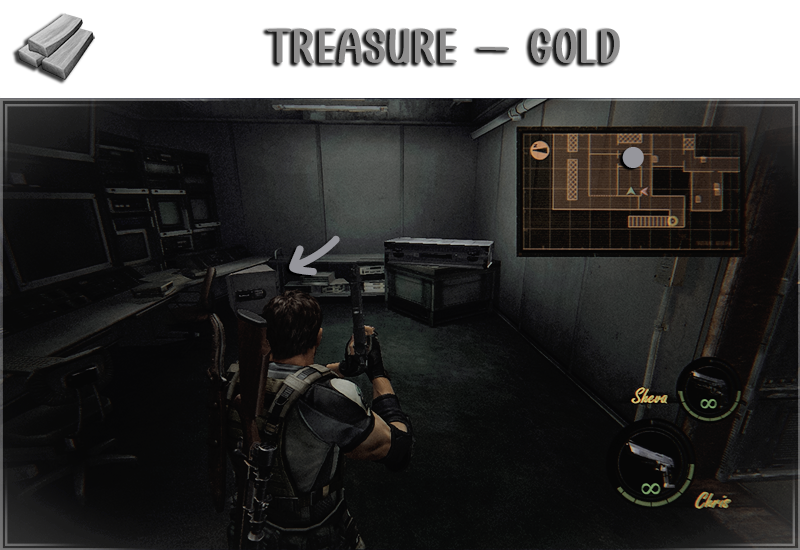
Location: Monitor Room, inside the safe.
⇢ Lion Heart
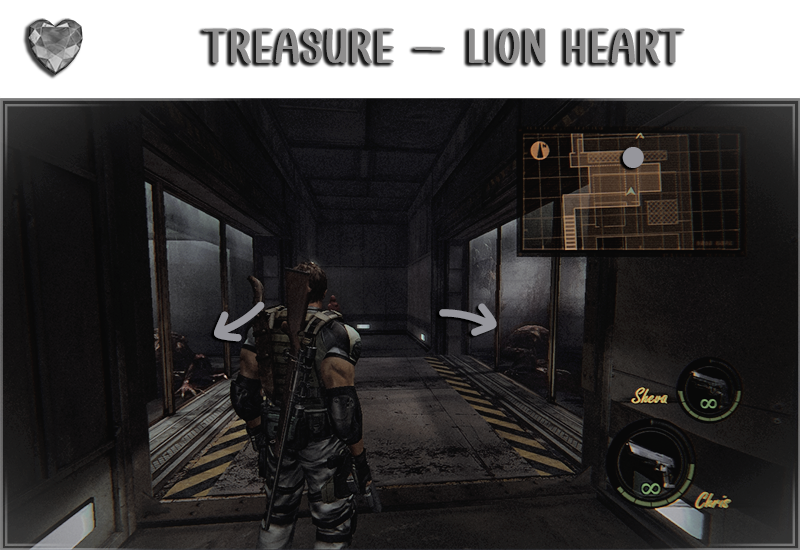
Location: Dropped by the Licker when defeated.
⇢ Lion Heart
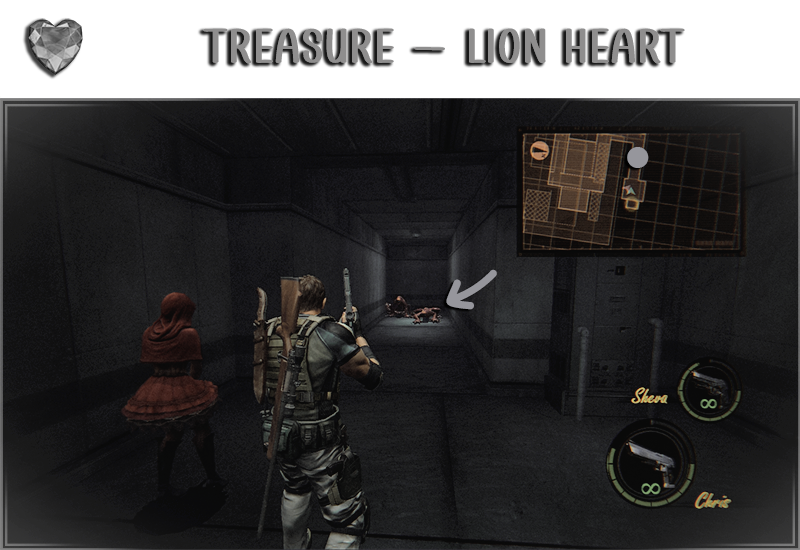
Location: Dropped by the Licker when defeated.
In this chapter you will find:
→ 7 Treasures
→ 1 BSAA Emblem
→ 1 Weapon
In this chapter you will need to bring a Hand Grenade, Rocket Launcher or Grenade Launcher.
→ 7 Treasures
→ 1 BSAA Emblem
→ 1 Weapon
In this chapter you will need to bring a Hand Grenade, Rocket Launcher or Grenade Launcher.
⇢ Lion Heart
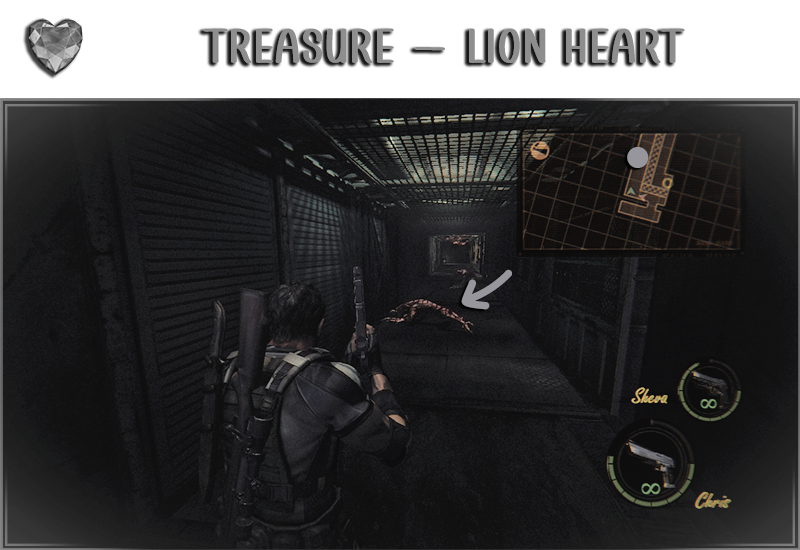
Location: Dropped by the Licker when defeated.
⇢ BSAA Emblem 24
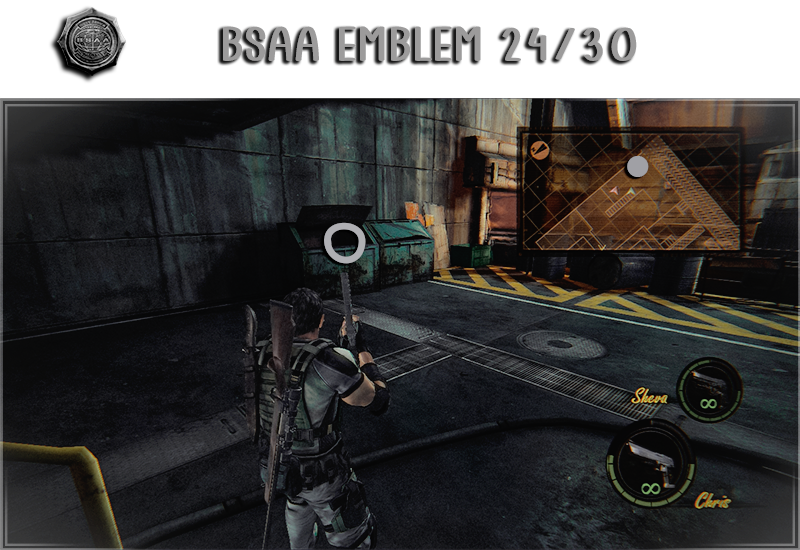
Location: Inside the trash container.
⇢ SIG 556 (MG)
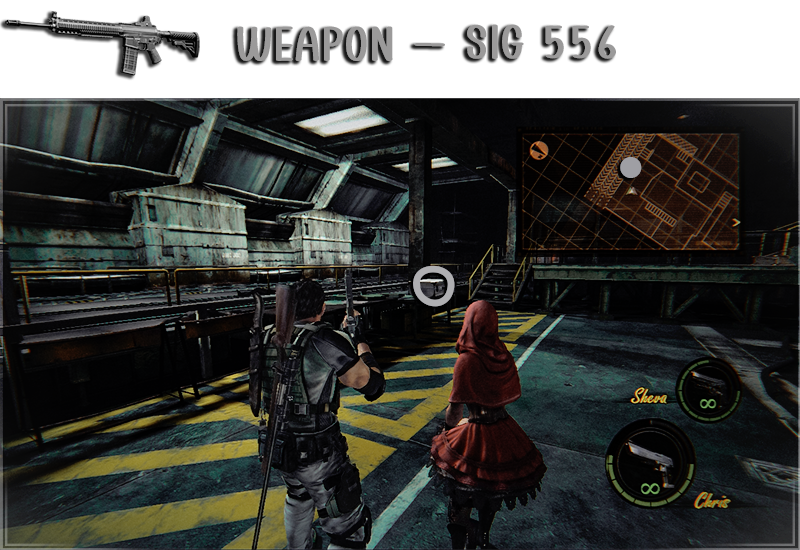
Location: Inside the case next to the conveyor belts.
⇢ Power Stone
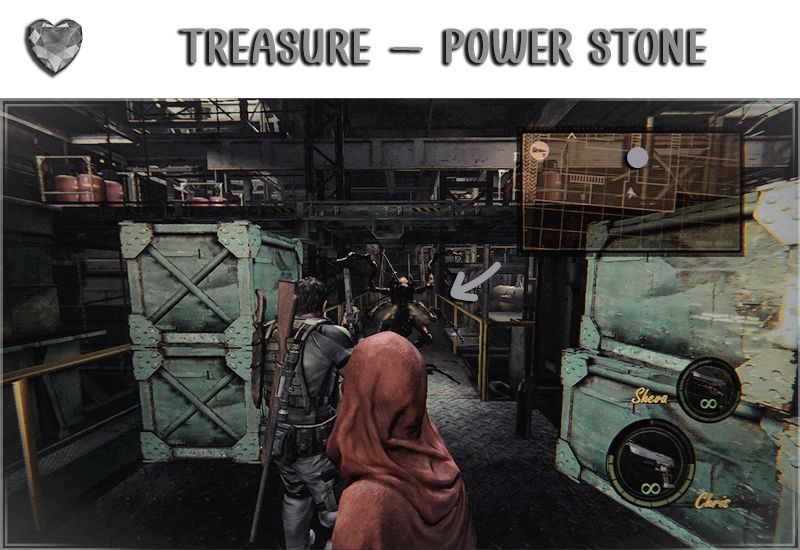
Location: Dropped by the Reaper when defeated.
⇢ Dead Bride's Necklace
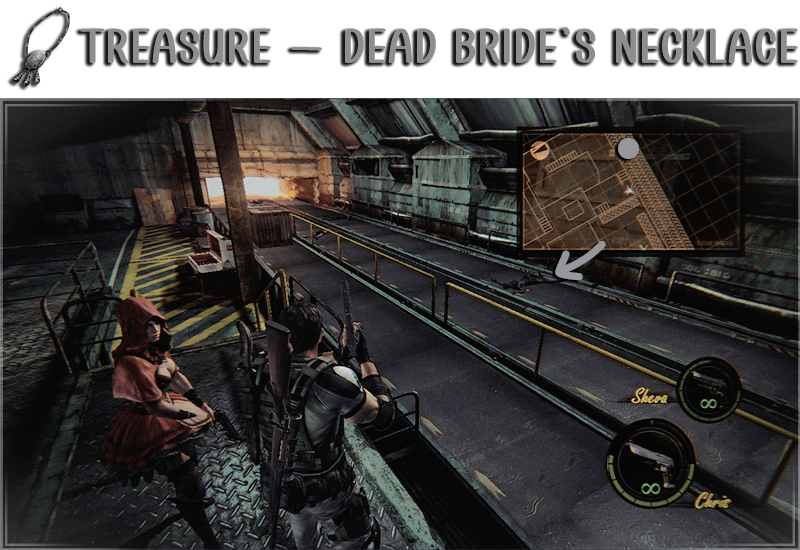
Location: You can get this from the undead laying on the conveyor belts.
In this chapter you will find:
→ 15 Treasures
→ 3 BSAA Emblems
→ 2 Weapons
In this chapter you will need to bring a Sniper Rifle and the most powerful weapons you have to be able to defeat Wesker in less than 7 minutes or you won't be able to get the 'Heart of Africa' treasure.
→ 15 Treasures
→ 3 BSAA Emblems
→ 2 Weapons
In this chapter you will need to bring a Sniper Rifle and the most powerful weapons you have to be able to defeat Wesker in less than 7 minutes or you won't be able to get the 'Heart of Africa' treasure.
⇢ BSAA Emblem 25
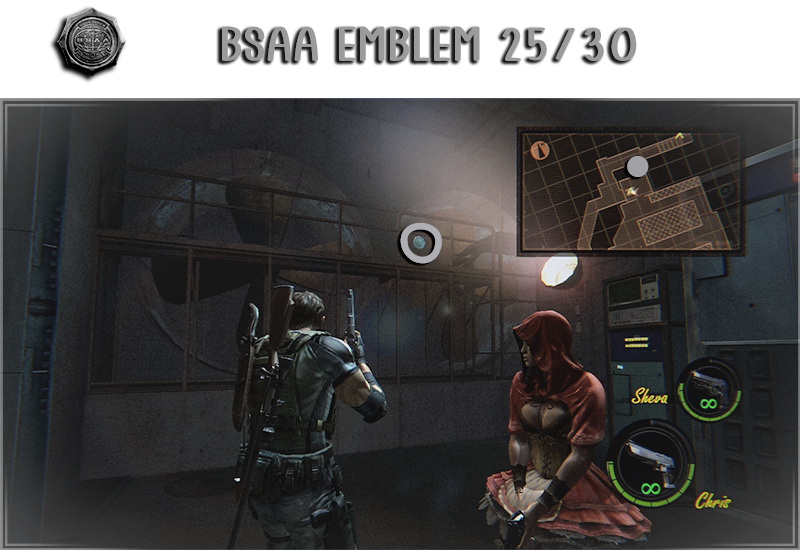
Location: Behind the fan in front of you when you go through the first door.
⇢ Sapphire (Marquise)
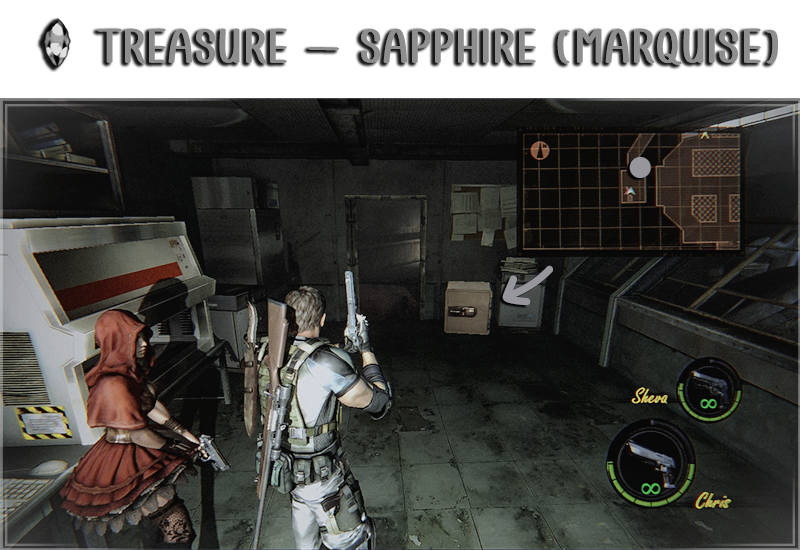
Location: Go up the ladder on your left and go straight to the room at the end.
⇢ Power Stone
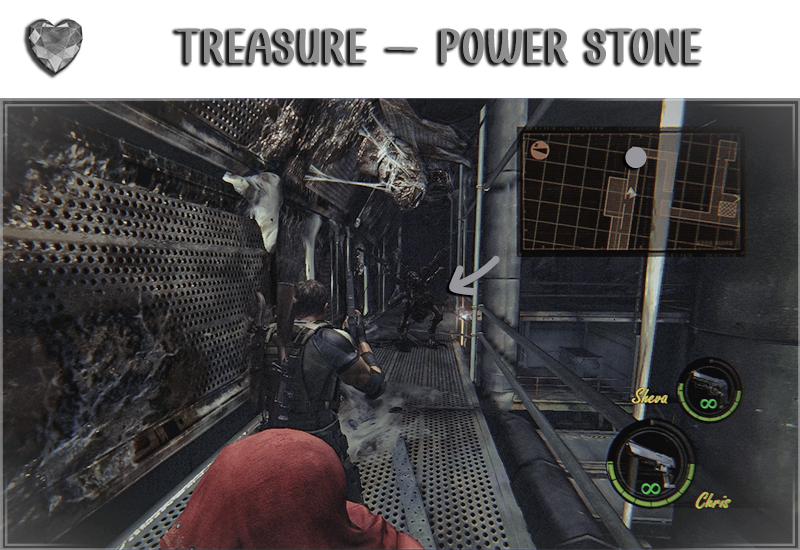
Location: Dropped by the Reaper when defeated.
⇢ Power Stone
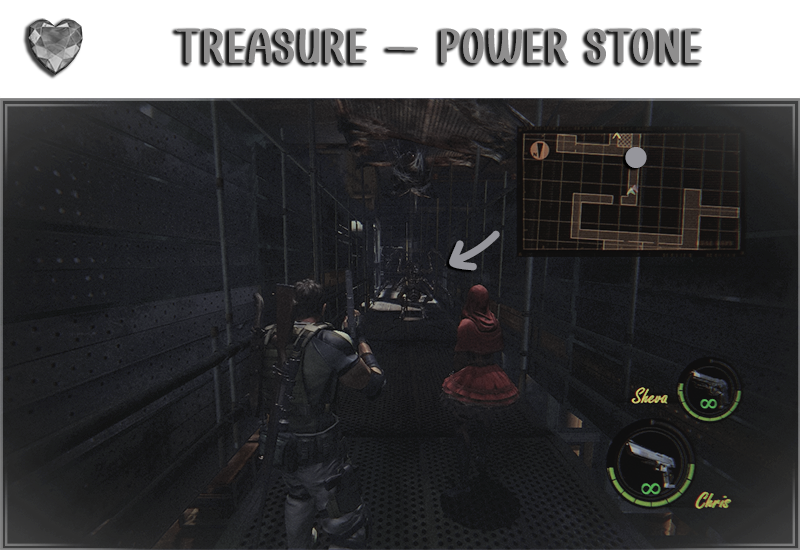
Location: Dropped by the Reaper when defeated.
⇢ H&K PSG-1 (RIF)
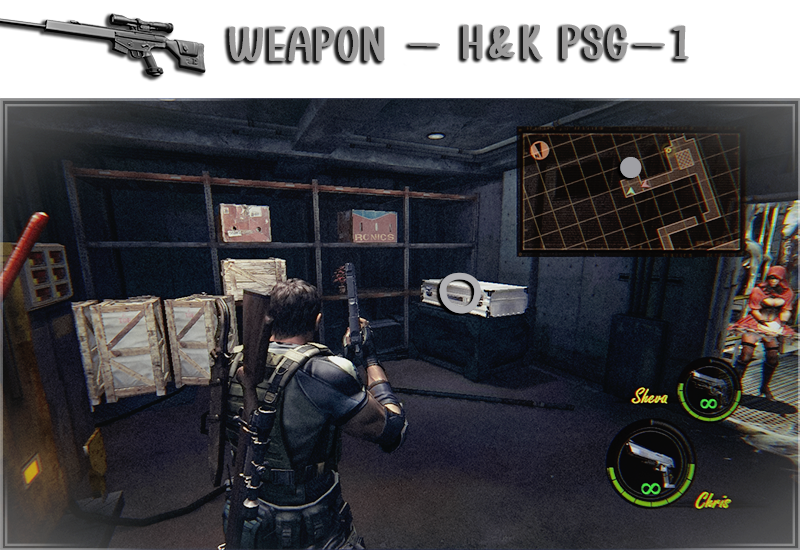
Location: Inside the room where you need to pull the lever.
⇢ Jewel Bangle
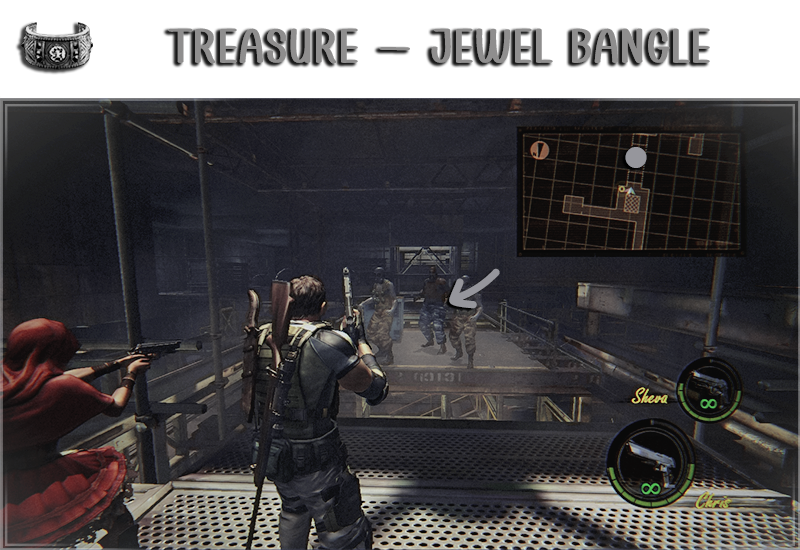
Location: Dropped by the Big Man Majini when defeated.
⇢ Royal Necklace
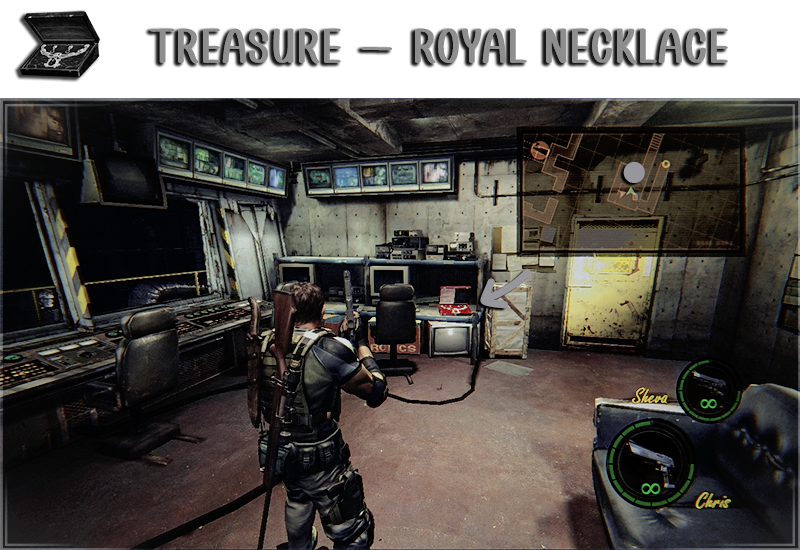
Location: Inside the Control Room.
⇢ BSAA Emblem 26
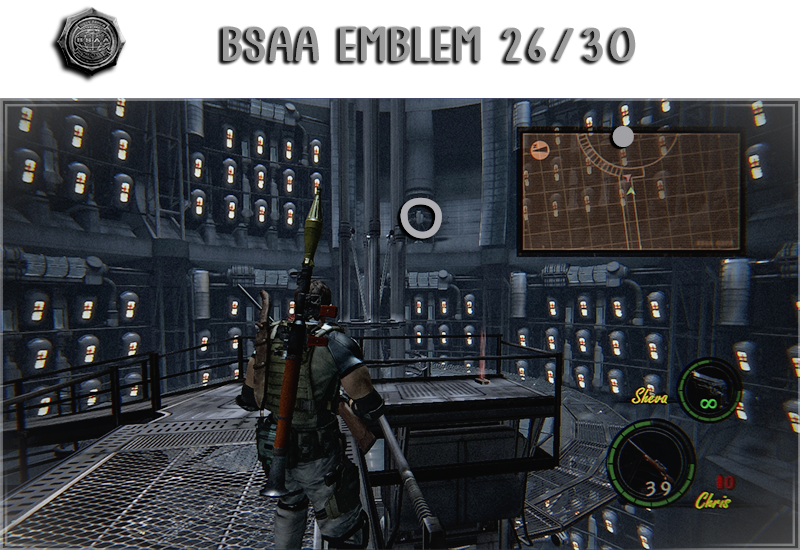
Location: When you enter the room full of capsules, look at the balcony in front of you. The Emblem is on the floor.
⇢ Ruby (Brilliant)
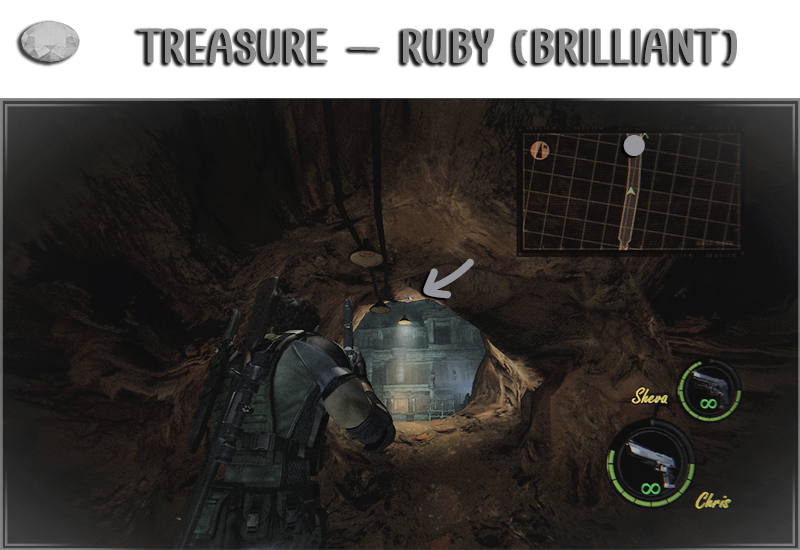
Location: Look up before leaving the area.
⇢ BSAA Emblem 27
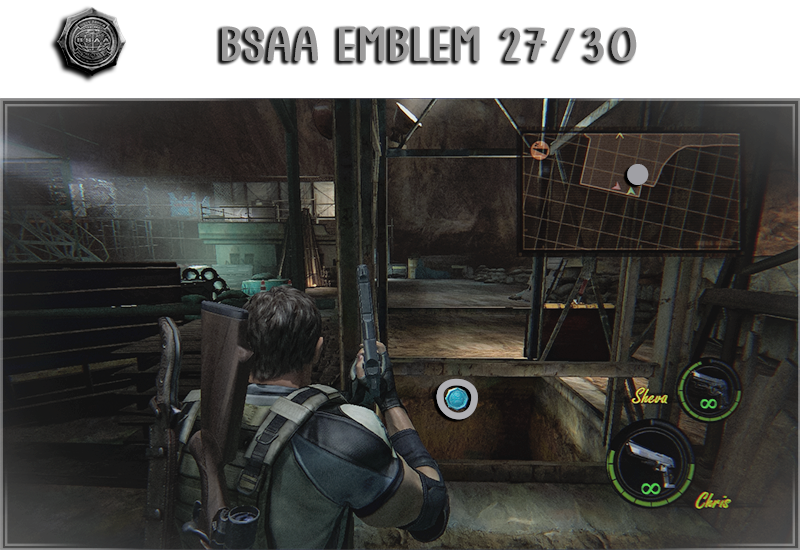
Location: When you enter this new area, go to the left and to the back of the elevator to find the Emblem.
⇢ Lion Heart
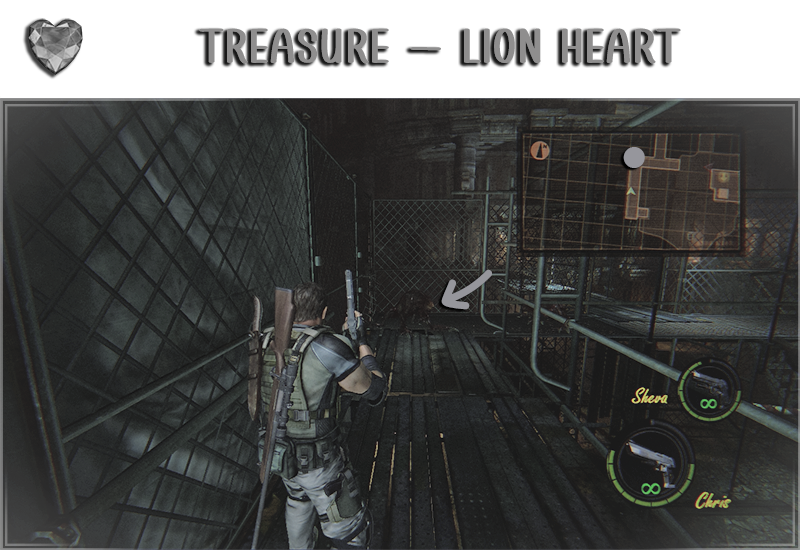
Location: Dropped by the Licker when defeated.
⇢ Chalice (Gold)
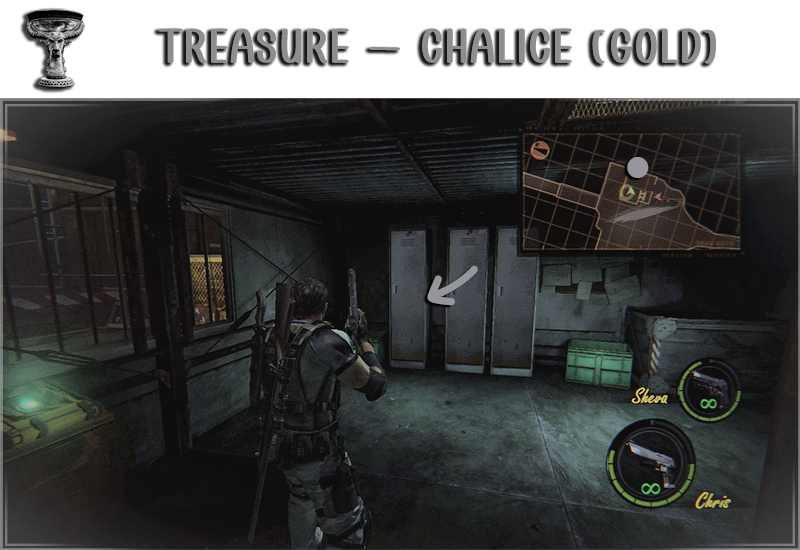
Location: Inside the room where you lower the bridge.
⇢ Topaz (Brilliant)
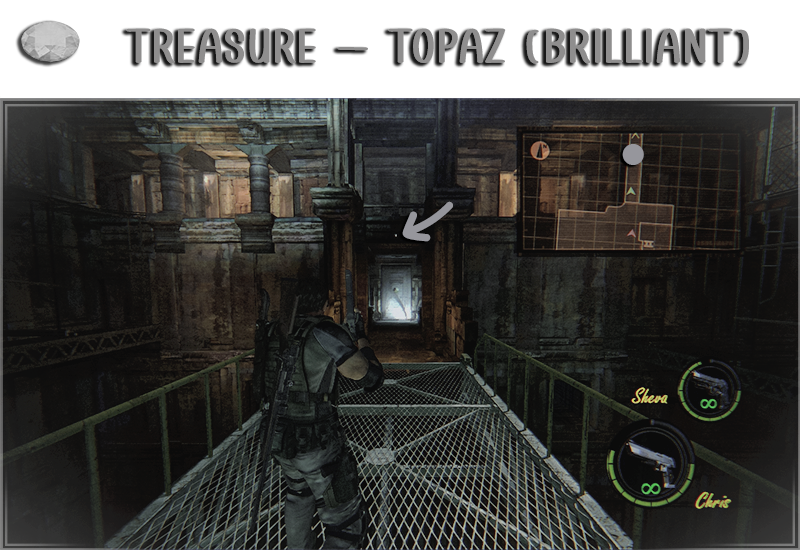
Location: At the end of the bridge look up.
⇢ Emerald (Brilliant)
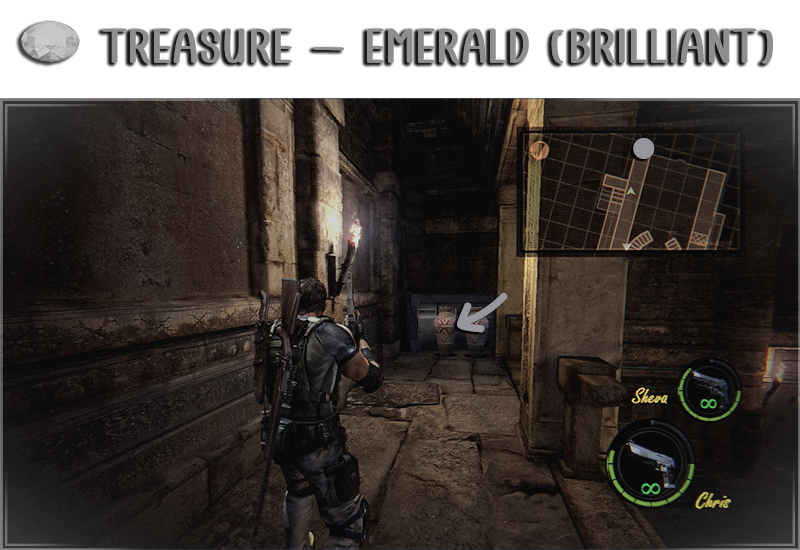
Location: At the start of the Wesker/Jill fight, go up the stairs on the right and go to the back to find the treasure inside the left pot.
⇢ Sapphire (Oval)
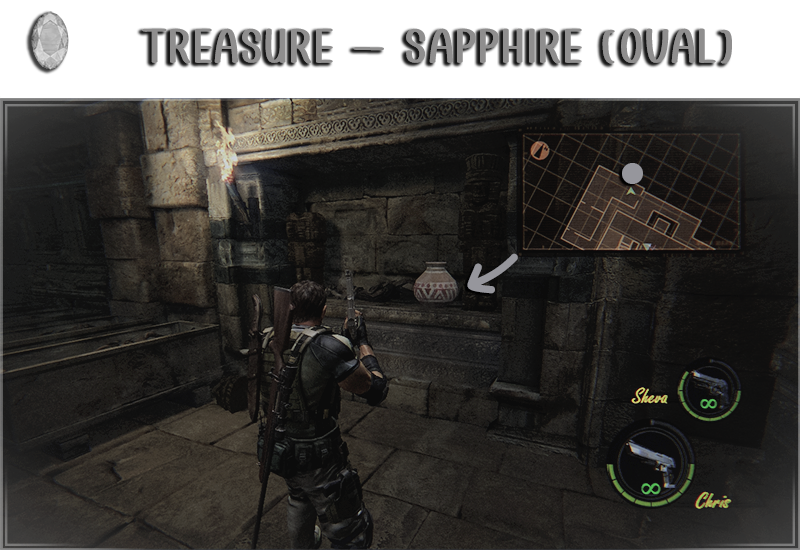
Location: If you get closer to the door on the right, Wesker will kick you inside. Go upstairs and keep running straight and enter the first open room. The treasure is inside the pot to the right of the entrance.
⇢ Sapphire (Brilliant) + Emerald (Oval)
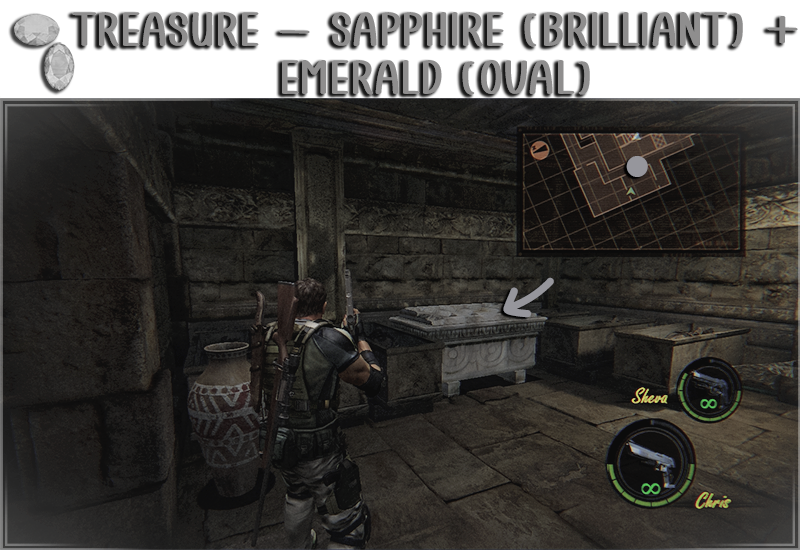
Location: Inside the room next to the last one. You will need Sheva to help you open it.
⇢ L. Hawk
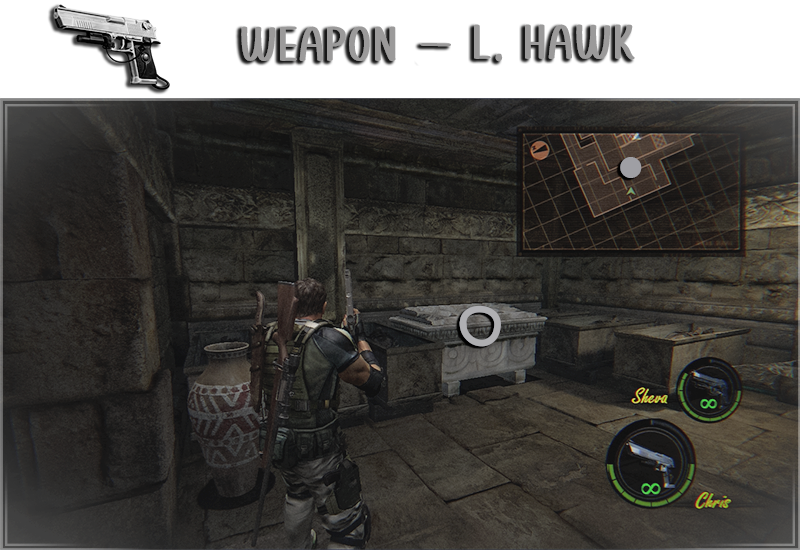
Location: Same as before.
⇢ Heart of Africa
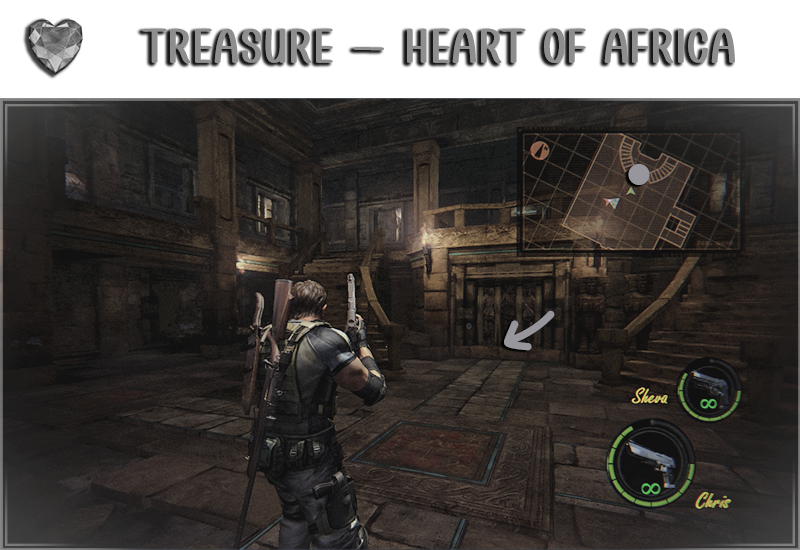
Location: You must defeat Wesker before the 7 minutes expire. After he flees, the treasure will appear between the two stairs.
In this chapter you will find:
→ 11 Treasures
→ 3 BSAA Emblems
→ 1 Weapon
In this chapter you will need to bring a Sniper Rifle and a Hand Grenade, Rocket Launcher or Grenade Launcher.
→ 11 Treasures
→ 3 BSAA Emblems
→ 1 Weapon
In this chapter you will need to bring a Sniper Rifle and a Hand Grenade, Rocket Launcher or Grenade Launcher.
⇢ BSAA Emblem 28
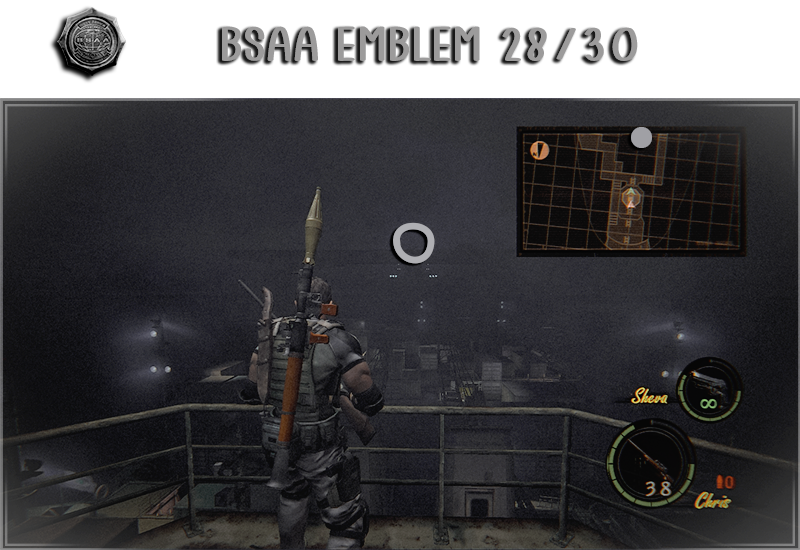
Location: Climb the tower and turn around. The Emblem is in front of you really far away.
⇢ Jewel Bangle
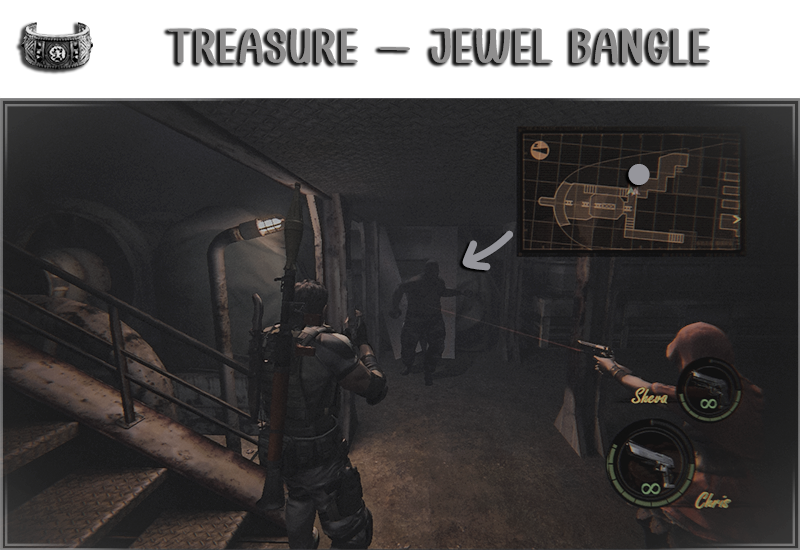
Location: Dropped by the Big Man Majini when defeated.
⇢ BSAA Emblem 29
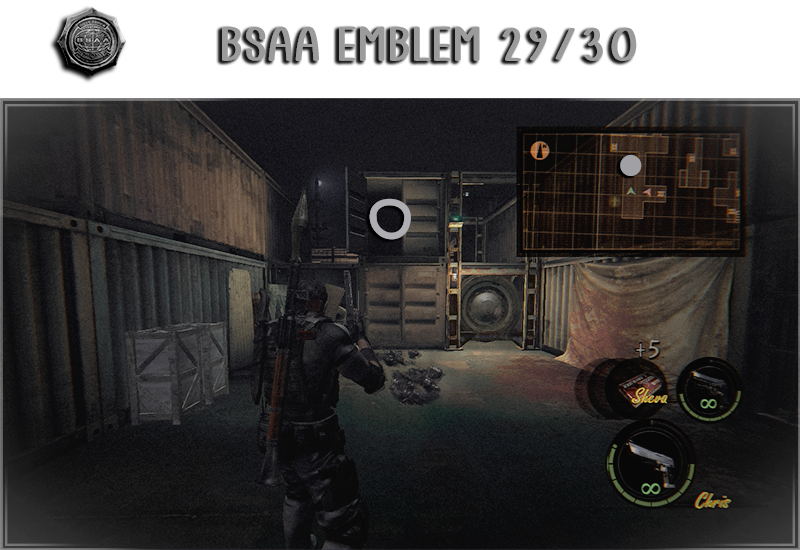
Location: Inside the container. You need to throw a grenade or use the Rocket Launcher.
⇢ Topaz (Oval)
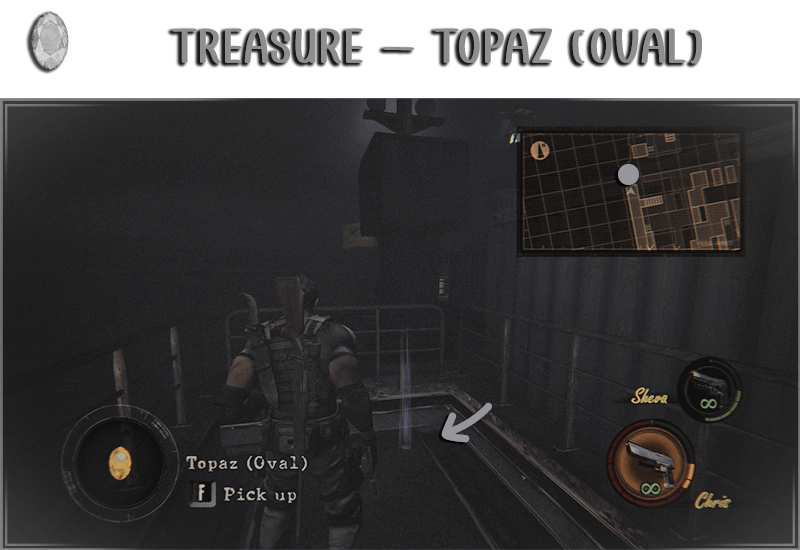
Location: Dropped by the Majini if you killed him earlier with the Sniper.
⇢ Topaz (Oval)
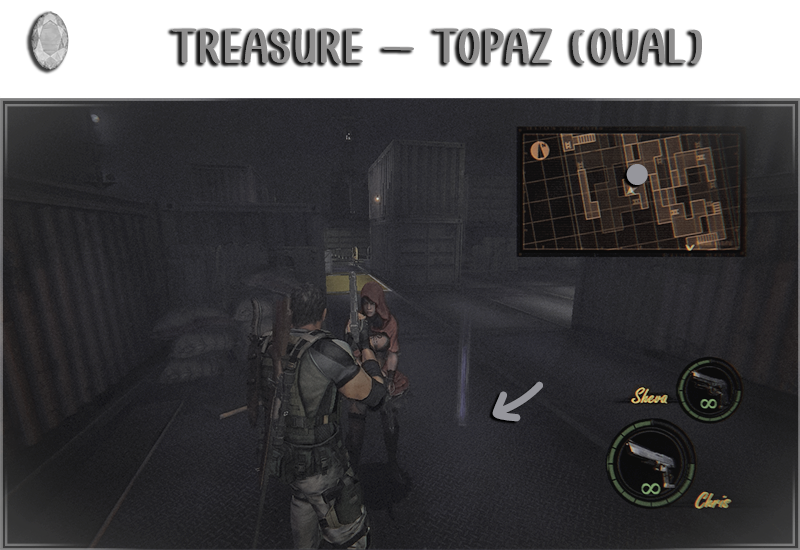
Location: Dropped by the Majini if you killed him earlier with the Sniper.
⇢ Gold Bars
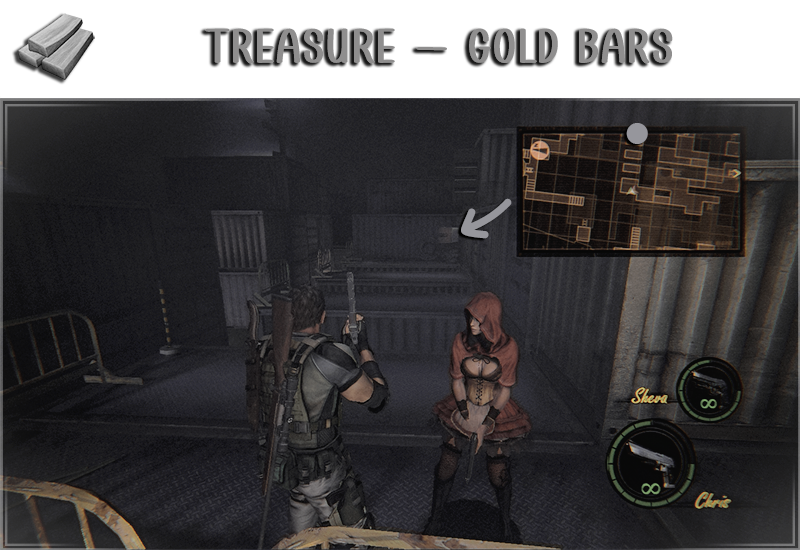
Location: From the last treasure go straight and then right.
⇢ Jewel Bangle
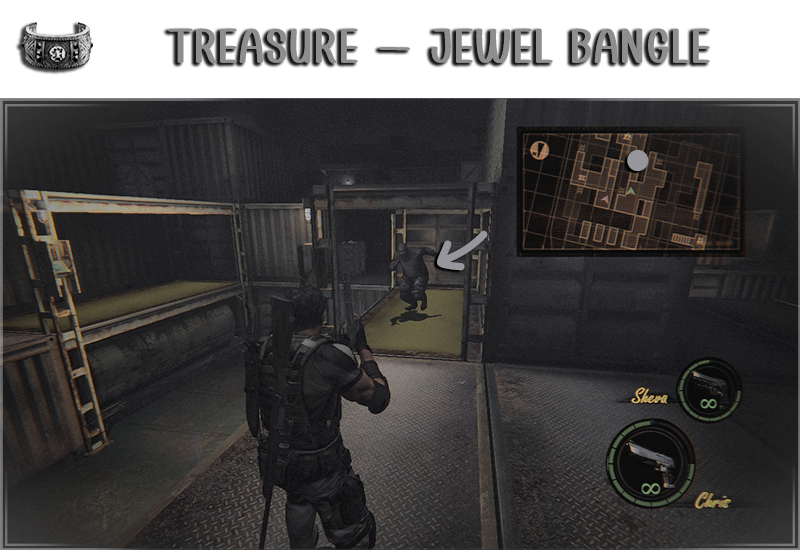
Location: Dropped by the Big Man Majini when defeated.
⇢ Topaz (Oval)
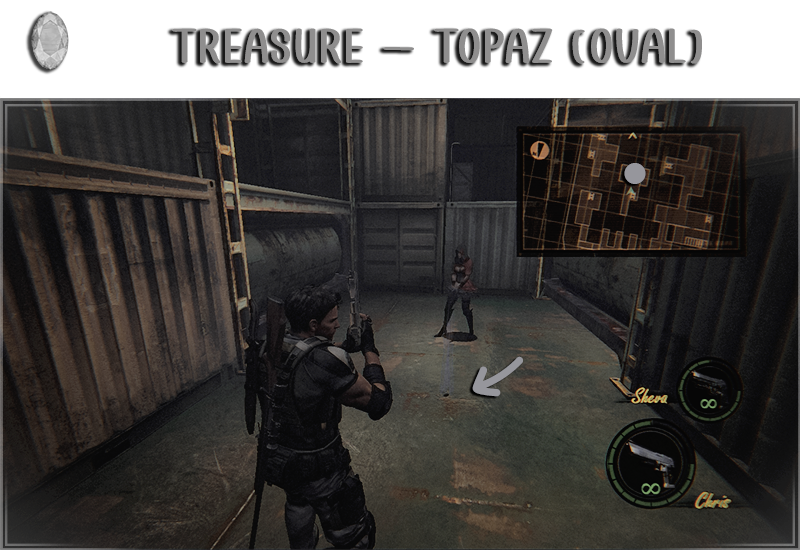
Location: Dropped by the Majini if you killed him earlier with the Sniper.
⇢ Gold Bars
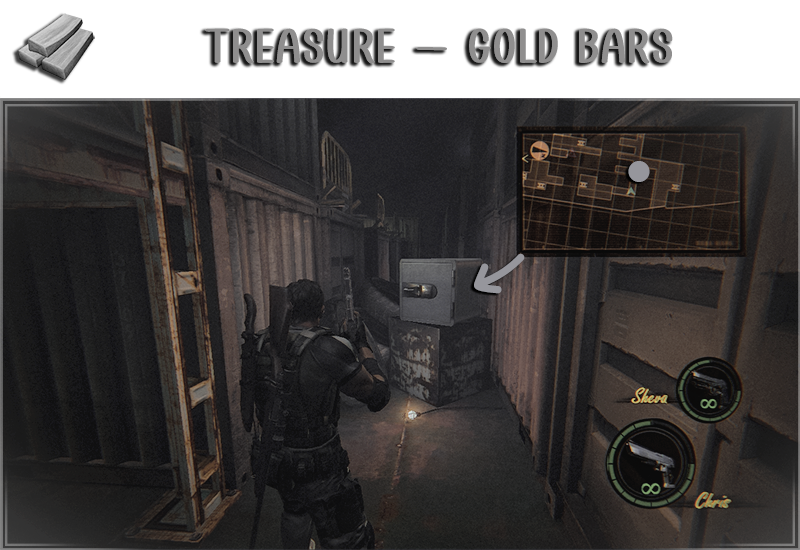
Location: Get on the container on the left. At the top go to the back and jump down, then go all the way left.
⇢ Jail Breaker
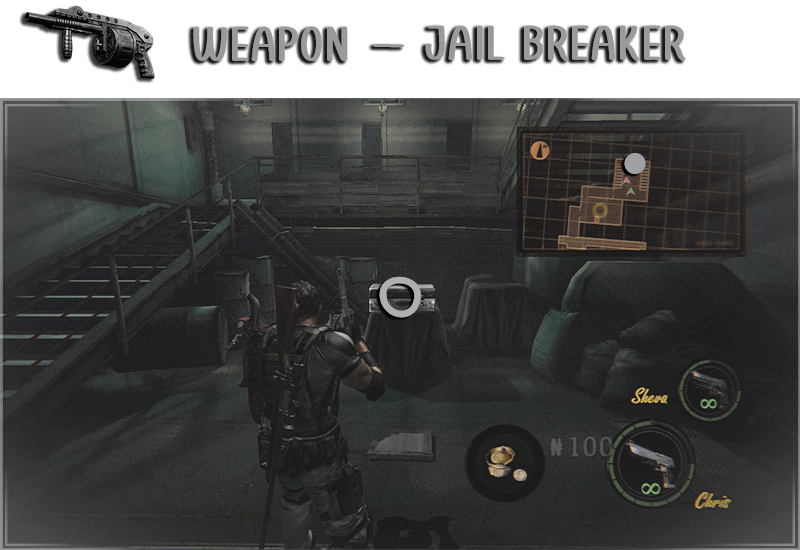
Location: Inside the tanker, all the way downstairs.
⇢ BSAA Emblem 30
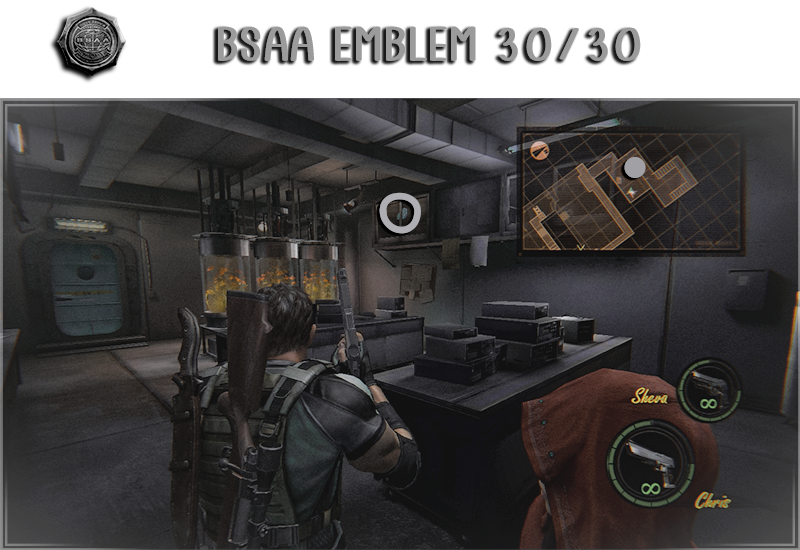
Location: Inside the cupboard.
⇢ Dead Bride's Necklace
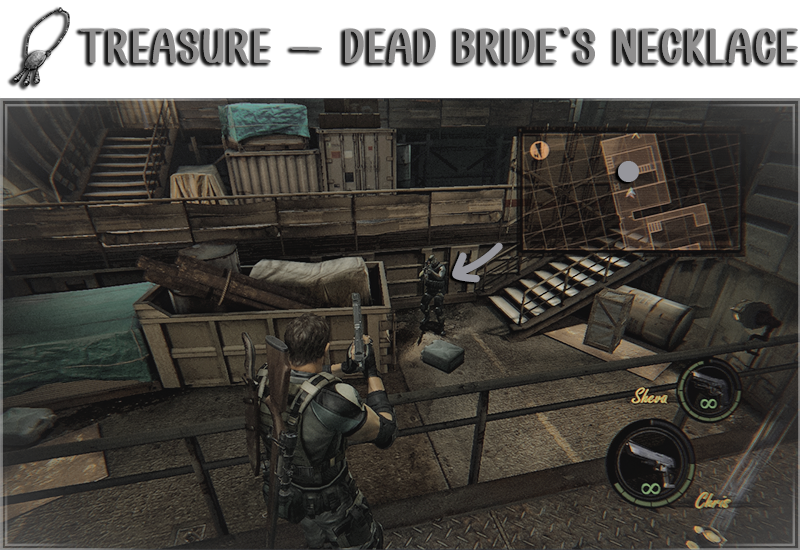
Location: Dropped by the Majini with Rocket Launcher.
In this chapter you will find:
→ 2 Treasures
→ 0 BSAA Emblems
→ 0 Weapon
→ 2 Treasures
→ 0 BSAA Emblems
→ 0 Weapon
⇢ Chalice (Gold)
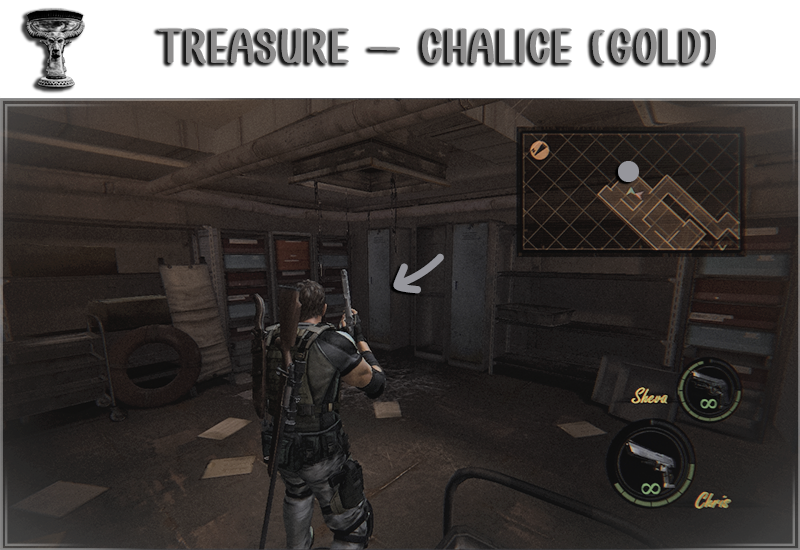
Location: Inside the left locker.
⇢ Chalice (Gold)
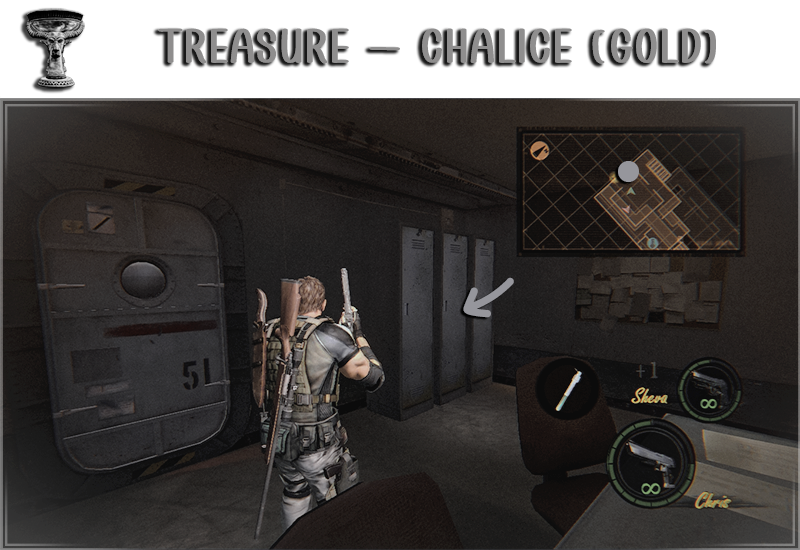
Location: Upstairs inside the middle locker.
In this chapter you will find:
→ 5 Treasures
→ 0 BSAA Emblems
→ 0 Weapon
→ 5 Treasures
→ 0 BSAA Emblems
→ 0 Weapon
⇢ Dead Bride's Necklace
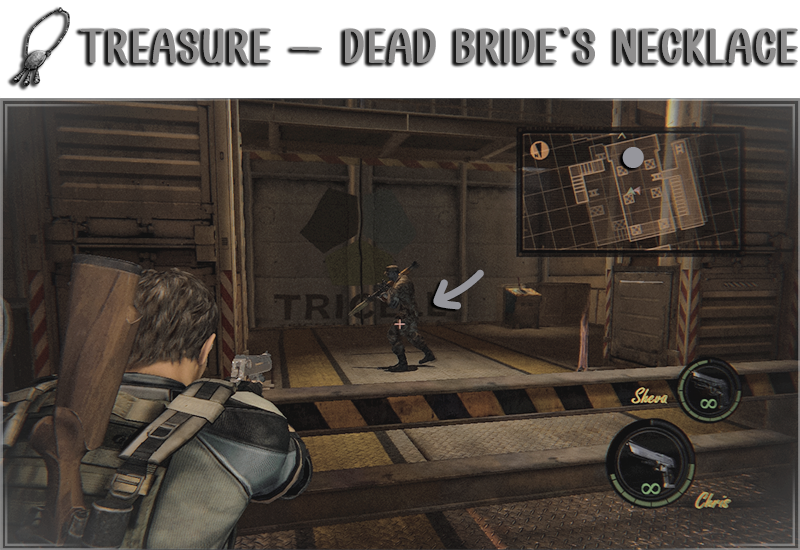
Location: Dropped by the Majini with the Rocket Launcher.
⇢ Power Stone
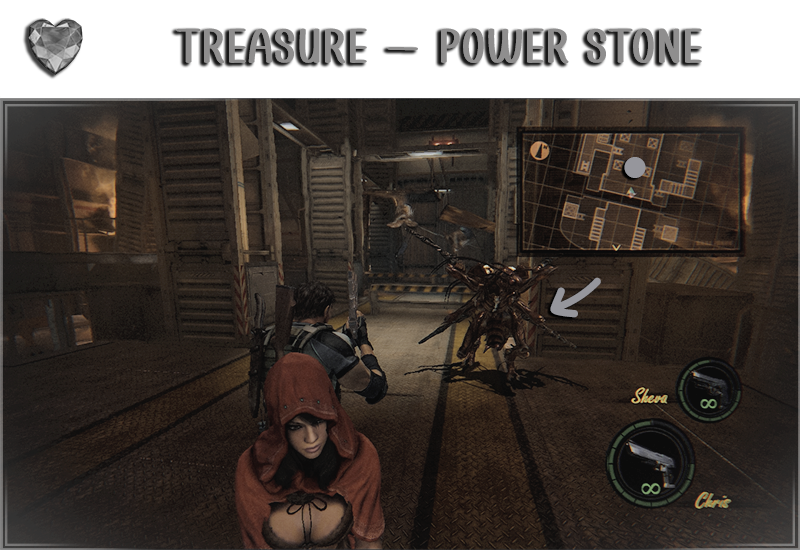
Location: Dropped by the Reaper when defeated.
⇢ Diamond (Marquise)
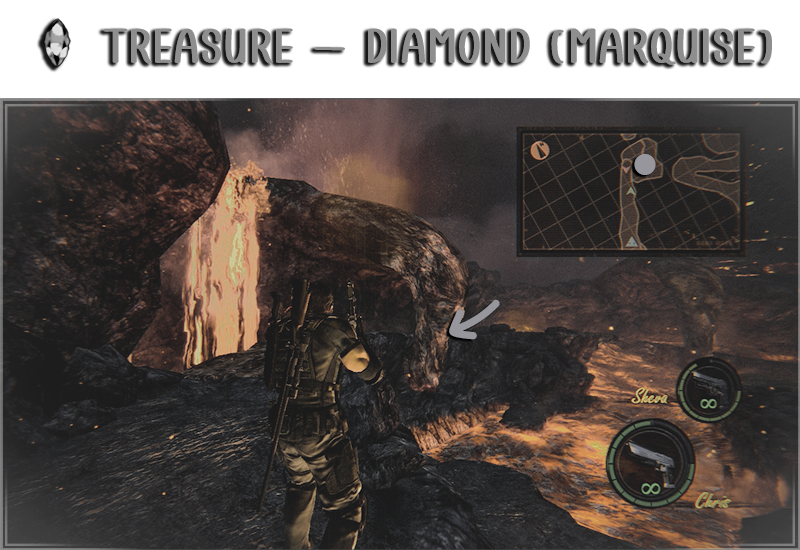
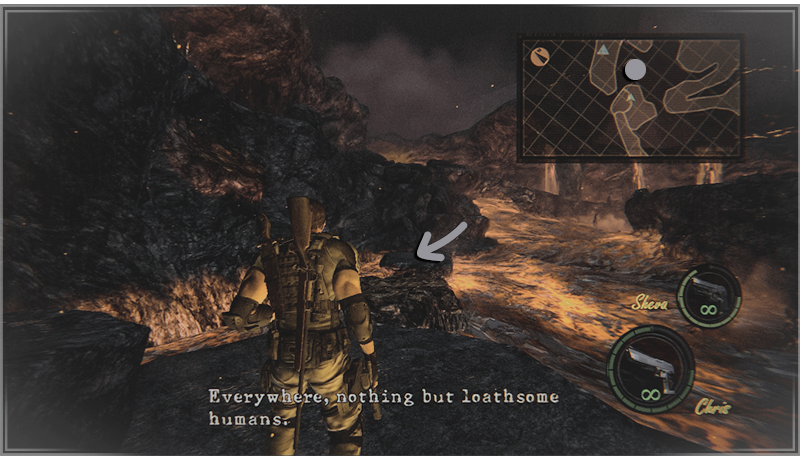
Location: Before following Sheva shoot at this rock. After falling down, turn around and cross to the other side to find the treasure.
 PayPal [paypal.me]
→ https://ko-fi.com/jettorinku/goal ♡
♡ Here are my other RE Guides:
https://steamcommunity.com/sharedfiles/filedetails/?id=3560669767
https://steamcommunity.com/sharedfiles/filedetails/?id=3528036126
https://steamcommunity.com/sharedfiles/filedetails/?id=3687977520
https://steamcommunity.com/sharedfiles/filedetails/?id=3514782156
https://steamcommunity.com/sharedfiles/filedetails/?id=3702383767
https://steamcommunity.com/sharedfiles/filedetails/?id=3549485755
https://steamcommunity.com/sharedfiles/filedetails/?id=3512341258
https://steamcommunity.com/sharedfiles/filedetails/?id=3520685734
https://steamcommunity.com/sharedfiles/filedetails/?id=3541405688
More Resident Evil 5 guides
- Resident Evil 5 - Fixes★ 5 (2k)119k views2.4k ♥9 minUpdated Aug 2, 2025
- Resident Evil 5 Quality of Life Fixes★ 5 (1.5k)78k views2.1k ♥4 minUpdated Mar 9
- Resident Evil 5: Gold Edition 100% Achievement Guide★ 5 (1.3k)42k views2.6k ♥24 min
- getting multiplayer achievements with bots★ 5 (876)33k views1.7k ♥11 minBulgarianUpdated Aug 27, 2023
- Farming Gold (15K), ammo and eggs★ 5 (459)33k views423 ♥1 minBulgarianUpdated Sep 24, 2018
- Полный русификатор (текст+звук) {1C} Gold Edition★ 5 (674)30k views778 ♥1 minRussianUpdated Feb 3, 2024



This guide was created by its original author on the Steam Community. Are you the author and want it removed? Request removal.