Overview
This guide will grow as I progress through the game and discover additional content and nuances to the game play. The scope of this guide is going to be less strategy oriented, although strategy may creep in, and more oriented to understanding the game world. For example, by the end of my second game day I discovered that in order to have my towers actually defend the villagers I needed to build several other supporting structures as well. This is somewhat obvious in the real world but each game has its own variation of the ‘real world,’ and you may not know how Retro-Pixel Castles interprets the real world, I certainly did not. And so I started digging into buildings, what resources you need to construct them, what purpose they serve. That is a major section of this guide and should give you, and me, a better handle on planning your perfect village. What else gets included depends very much on what causes me to pause the game and swear, quietly, to myself. Most likely after all of my villagers have died.I will attempt to keep up with game changes and welcome, kind and helpful, feedback, especially if I am getting something wrong and/or an update completely obsoletes what I have written. On that note, this guide has been updated for Build InDev23c. Please let me know if you notice any changes that have not been included, or need more explanation.
Skirmish
Play a map! Current available maps are:
- Hunted
- Stick
- Bark
- Black Sands
- Survival Island
- Bottleneck
- Sapling
World Map

Note: This world map is going to look a bit different from the one on your screen, more regional maps have been added.
- Regions (points highlighted by moving circles) are areas where you can place your villages. You can expand into more than one region but you should build up more villagers before expanding too far. Suggested starting locations are Applemeadow and Woodhaven.
- Biomes: Currently these are cosmetic with no individual effects. Future development.
- Arid/Savanah – bottom of the map
- Black Sands – top of the map
- Forest/Enchanted – middle left of the map
- Forest – middle right of the map
- Sand/Desert – top of the map
- Food – I find this resource the hardest to spot on the zoomed out world map, food tends to blend in with the crystals and flowers. If you zoom the map all the way in you can just start to make out where food might be on the map. Food comes in the form of cactus (green), potatoes (white with green tops), carrots (orange with green tops), and turnips (pink with green tops)
- Trees – either green (Forests and Black Sand) or brown (Arid and Desert)
- Stone – grey (Forests and Black Sand), brown (Arid), yellow (Desert)
- Crystal – blue, green, or red
While on the world map you will also see two information displays on the right and left side of your game window. Both of these show you the resources you have in Limbo, the left one displays types and number of people, the right displays all other resources. When you first start a world this will only include wood and rock.
Select the game mode you prefer while on the world map.
- Survival – “The way the game was meant to be played.” Lots of monsters.
- Peaceful – Survival mode with a very low monster spawn rate. You can survive the monsters in the early game with a small amount of basic defenses, a tower or two by day 10, adding more defenses as you progress. The mechanics of population management are the same and you still need to get your villagers through the very hot summer, and very cold winter. This mode provides a good introduction to the mechanics of the game, letting you learn the ins and outs of the village without expending as much energy on defense. A better name for this mode though might be “More Peaceful.” When I first tried this mode I did not find it particularly peaceful. 🙂
- Sandbox – You can spawn monsters and resources, and play around with the game mechanics. To have a truly peaceful mode with no monsters there is a spawning tab you can use to drop the monster spawn to zero. For now the settings are not saved and you will need to reset the spawn rate each time. (from Rayvolution)
Placing a Village
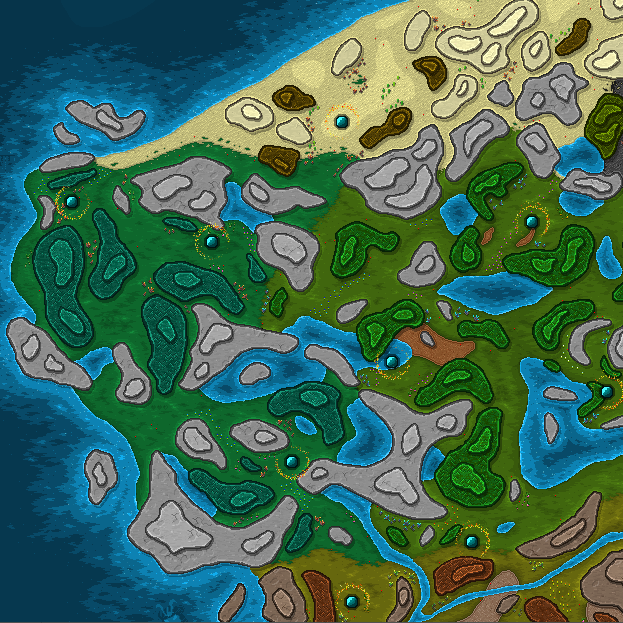
When you are placing a Village Center in a region it is a good idea to bring up the minimap to get a better idea about placement. You will want to have your Village Center in a spot that has close access to all four major resources, food, wood, stone, and crystal. Currently the clock does tick down while you are deciding where to place your village but you can pause (thinking, bathroom breaks) by pressing the space bar. You can not move around the map while paused.
In addition to looking for resources you also want to know what buildings already exist in this region and where your village can grow. Building near existing buildings can save you resources since you will not have to completely build that structure yourself. Press tab to open up the mini-map. On the mini-map existing buildings show up in turquoise. In this map the rock is grey, the trees are swirls of dark green, the crystals are orange, and the foods are pink (turnips) and tan (potatoes). Royal blue are flowers, lighter green swirls are grass, medium blue areas are water, and yellow areas are sand. You can quickly go to anyplace in the region by clicking in that area on the mini-map. On the larger map scrolling over a resource will tell you what that resource is.
- Access to resources: rock, trees, food, crystals*
- Existing buildings
- Space to grow your village – structures cannot be built on ground that has flowers, crystals, trees, food, or stone. You will need to tell your villagers to clear this land before it can be used for structures.
- Defensibility – can you create access chokepoints to place your towers and walls to help keep your villagers and buildings safe?
- Look for existing roads to help your villagers move faster from place to place.
*Note: Crystal, food, and trees grow back over time, although not if the area is built over. They will even spread eventually.
- Ancient Radiance Pool – Heals and gives experience.
- Ancient Cullis Gate – Grab and put anything you want into it, monsters, resources, villagers. It is a useful way to transfer items to another map (region) when starting a new village. The order items come out of the gate is random.
- To place: Use the grab tool to pick up villagers and drop into the Cullis Gate. Put at least 32 villagers in Limbo before starting a new village.
- To take out: Use the grab tool on the Ancient Cullis Gate and then drop the resource where you want it.
Once you place your center you will start out with the following resources:
- 20-30 Wood
- 20-30 Rock
- 32 Villagers – not all of the villagers will be available for assignment to the Center, some of the villagers may be children and need to grow up first.
- More resources, villagers, rock and wood, can be pulled from the Ancient Cullis Gate.
It will be the first day of Spring with the possibility of rain. You will have one full day and night before you have to start worrying about monsters.
- Days 1-4 Spring – Mild temperatures with a chance of rain*.
- Days 5-9 Summer – Farms do not grow unless there is a lot of rain, villagers can die from the heat.
- Days 10-14 Autumn – Milder temperatures with a chance of rain.
- Days 15-19 Winter – Farms do not grow, villagers can die from the cold, there is a chance of snow*.
- Repeat
*Note: Rain/Snow – reduces villager happiness and slows movement speed. Rain inreases crop growth, puts out fires.
**Tip: Spam the motivate power on wild crops the last day of spring and autumn. This will provide more food for your farmers to harvest during the slow/no grow seasons.
Your Powers
Besides the building menu on the right of the game window, which will be covered in another section, there are several other important menus, displays, and buttons included in the game. I have organized them, more or less, by where they show up in the game window.
Small display showing the status of your villagers and buildings.
- Resource Display – View of all of the resources in your village. Useful to keep an eye on your overall inventory and identify bottlenecks.
- Godly Powers – These powers use influence. Influence replenishes over time through Villager happiness.
- Grab – Pick up resources or creatures. The longer you hold the item the more influence is used. You can also harvest resources yourself using this power and place or take items out of Limbo through the Cullis Gate.
- Take from Limbo
- Send to Limbo
- Fire Blast – Lets you throw fireballs at enemies. Be careful, it will also damage buildings and villagers. You also have to hit the target to do real damage.
- Motivate the Land – Causes resources to grow back in the area of the spell. It also encourages the spread of these resources.
- Flame – Ignite an area, and everything in it.
- Dissolve – Dissolves dead bodies and crystals in area, converting them to essence.
- Healing Aura – Heal any villagers in area over time. Does not work on Golems.
- Magic Torch – Light up an area on the map.
- Distract – Distract villagers and sometimes lure them to where the spell was cast.
- Recall – Teleport villagers back to the village.
- Banish – Moves enemies to a random part of the map.
- Spot Light – A light that follows your hand around.
- Resurrect – Use to resurrect a villager who died and became a ghost. You may see ghosts wandering around the village at dusk and night. The spell may not turn out well.
- Game Options
- Main Menu
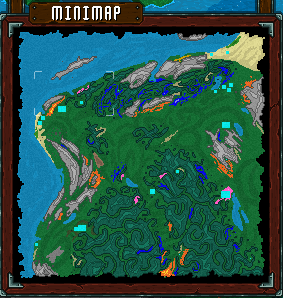
- Mini Map
- Data Views – View your regional map in different ways
- Resource Value
- Movement Costs
- Block Map
- Grid
- Range
- Desirability
- Tower Range
- Hide Topography
- Problem Panel – Gives you information about any issues your village is having, e.g., how many villagers are homeless.
- Building List – Provides status of buildings.
- Population List – Provides status of villagers. Clicking on a villager in the list will take you to that villager.
- Music
Top Right – Game statusShows Season, Year, Time of day, and Temperature. Clicking on it with the mouse will pause the game. You can also use the space key to pause. You cannot open new menus or take any actions while paused. You can look at information on open menu items, and take a bathroom break.
Left Center – Building AssignmentsThis is a hideable menu on the left side of the game window. It provides a list of all building assignments, showing how many villagers are assigned to a work task. You can use this menu to decrease/increase workers assigned to the different types of buildings. You can also see how many unassigned villagers you have.
Right Center – Build MenuSelect and place the structures you want your villagers to build. Details on this menu, and the buildings are covered in the Buildings section of this guide.
Bottom Work ButtonsThere are several Buttons on the bottom of your game window that let you direct your villagers to take particular actions, from collecting resources to clearing the land. The diameter of the brush size used for these actions can be adjusted through the far left button.
Bottom Left – Collecting- Brush Size – click on -/+ to decrease/increase diameter of brush
- Assign work (wood)
- Assign work (rock)
- Assign work (crystal)
- Assign work (food)
Bottom Right – Other Work
- Pause Building – You can adjust the priorities of your new structures but pausing is often a quicker way to reduce the building queue if your villagers are getting overwhelmed. You can also pause work being done by villagers at an existing structure. Pausing will maintain their assignments but give the assigned villagers downtime from their work, which will increase their happiness.
- Dismantle or Cancel Building – When dismantling resources are recovered.
- Create or Upgrade Road
- Dismantle Road
- Destroy Terrain – Useful if you want to expand your village and need to get rid of an inconveniently placed flower bed or tree.
Bottom Center – NewsThis hideable window will give you updates on your buildings’ and villagers’ status. It is not scrollable but you can see around 10 lines of news items, including pregnancies, changes in villager stats (leveling up), and building completion.
Villagers
There are currently three different ways to increase the size of your village: Starting “inventory”, including Limbo; pregnancy, and; Nomads.
You will start out with a certain number of villagers who “appear” once you build your Village Center. You will also have more villagers in Limbo. You can add or remove villagers to Limbo using the (surprise) “Take from Limbo” and “Send to Limbo” buttons on the top right of your Godly menu. As your region increases in population make sure to send some villagers and resources to Limbo before you start another region (map). Some of the villagers in Limbo, and when you start a Village, will be children. Children will not work until they reach adulthood.
When properly fed, housed, healthy, and happy, villagers will pair off and produce children. Children will not work until they reach adulthood.
If you have enough food and housing Nomads will be attracted to your village and settle in, adding new workers to your thriving village. Make sure you have empty housing slots or else the Nomads cannot become villagers.
Buildings
There are many structures you can build in your village. At the beginning of the game you will be focusing on getting your village up and running, which means housing, basic resource collection, storage, and some defenses. Once those are in place you can start focusing on building more advanced structures.
To help you determine how best to grow your village information about buildings is presented in two ways, the first shows building dependencies, and the second shows building order according to the game’s build menu. This second list, in the next section, includes more detailed information about the structures, including building size and resource requirements.
To build structures you need to have resources. Some buildings will need more advanced resources, which means your villagers will need to craft items like boards, bullets, iron ingots, or crylithium out of the raw resources. You can start to see where some of the dependencies are going to come in. You usually do not want to build a structure that requires crylithium before you build the structure villagers use to make crylithium from crystals. And you usually do not want to build the structure that makes crylithium before you build the structures that enable villagers to harvest and store crystals. Some structures specifically need another structure to be built, e.g., Bow Towers need a Bowyer for arrow production. But Bow Towers also need to have a complete lumber and storage system in place before arrows can be made and stocked in the tower. Which means you also need a Lumber Shack, Wood Storage, and Ammo Storage.
The building menu is on the right side of the screen. Click on a category, and then a specific building and you get more detailed information about the structure, including resources needed to build it. If you place a building and your village does not have enough resources the villagers will build as much of it as they can. You can queue up buildings this way and either have them partially completed or pause the construction at any time using the pause construction button on the bottom right of your screen.
You can view all of your buildings from the top menu by selecting the Buildings List (L). In that list you can select and go to any of the bulidings as well as change your build priorities. The default listing of your structures is in the order they have been built. You can change that order if you want to group your structures in a different way. For instance, you might want to move all of your frontier towers to the top of the list to be able to get to them quickly.
This list only includes buildings that need to have other structures in place to function properly. It does not include structures that require advanced resources to build them (that information is included in the dictionary list of buildings below). Or show additional storage requirements since you will need to build additional storage stuctures to hold all of your inventory.
- Armorsmithing – Forge (to turn iron ore into ingots), Mining facility (to find ore)
- Bow Tower – Bowyer (to manufacture arrows), Lumber Shack (to harvest wood), Ammo Storage near the Tower (to maintain your inventory of ammunition)
- Bowyer – Lumber Shack (to harvest wood)
- Bullet Tower – Mining facility (to harvest rock), Ammo Storage near the Tower (to maintain your inventory of ammunition)
- Crystillary – Crystal Harvestry (to harvest crystals)
- Essence Collector – Crystillary (to make crylithium, Crystal Harvestry (to harvest crystals) – Note: You do not have to build these support structures right away to use the collector; you can use the dissolve power to generate energy. However, you will want the full manufacturing line to support continuous energy generation once you start building energy dependent structures, e.g., fire bolt towers.
- Fire Bolt Tower – Essence Collector
- Forge – Mining facility (ore will be found as rock is mined)
- Lumber Mill – Lumber Shack (to harvest wood)
- Rock Tumbler – Mining facility (to harvest rock), Ammo Storage near the Tower (to maintain your inventory of ammunition)
- Sling Tower – Rock Tumbler, Mining facility (to harvest rock), Ammo Storage near the Tower (to maintain your inventory of ammunition)
- Stone Cuttery – Mining facility (to harvest rock)
- Stone Golem Combulator – Essence Collector
- Toolsmithy – Forge (to turn iron ore into ingots), Mining facility (to find ore)
- Way-maker Shack – Lumber Shack (to harvest wood), Lumber Mill (to make boards), Mining facility (to harvest rock), Stone Cuttery (to make stone). You need to have all of these structures to make the highest level stone road. But you can build roads with just wood, and upgrade the roads as you add more capabilities.
- Wood Golem Combulator – Essence Collector
Buildings by Menu
Here are the structures, in all of their gory detail. Information is presented in the following order: Resources needed to build; Number of tiles needed to build (WxH); Storage; Base range; Land Desirability; Number of workers; description; comments.
Resource Codes:
- W=Wood
- B=Board
- R=Rock
- S=Stone
- C=Crystal
- M=Crylithium
- F=Raw Food
- O=Iron ore
- I=Iron ingot
You will need to have advanced resource manufacturing in place to build any structures that require Boards, Stone, or Crylithium. If you find that you do not have enough clear land you can direct villagers to clear the land. This will clear any renewable resources, trees and food, as well as flowers.
Village Center – First building; 32 Villagers; Assigned villagers build, maintain, and dismantle structures. They also collect resources required for building, but will not create stockpiles. Villagers assigned to the specialized structures, e.g., Farms, will stockpile and continue to collect resources; Right click on plus sign to assign all available villagers to the Center. Upgrades to the center will increase the number of building slots and workers allowed, and worker and building speeds.
- Ancillary – 32W/8R; 9×7; 24 General Storage; 16 Base Range; 2 Land Desirability; 4 workers; Adds additional building slots, increases work and building speeds
- Aid – 24W/8R; 6×8; 20 Medkit/Bandage/Silk Storage; 16 Base Range; 3 Land Desirability; 4 workers; provides healing and a safe birthing place
- Kitchen – 24W/16R/4S; 7×4; 20 Food Storage; 16 Base Range; 1 Land Desirability; 4 workers; prepare on-the-go rations for your villagers
- Bow Tower – 12W/8R/2C; 3X3; 4 Arrow Bundles (60 arrows); 8 Base Range; -2 Land Desirability; Shoots arrows; needs Bowyer; advised to build ammo storage near towers
- Bullet Tower – 4W/16R/2C; 3X3; 4 Stone Bundles (400 Stone bullets); 8 Base Range; -2 Land Desirability; Shoots large numbers of inaccurate, low-damage bullets; advised to build ammo storage near towers
- Fire Bolt Tower – 4W/24B/16R/8C/2CM; 3X3; 250 Essence; 8 Base Range; -2 Land Desirability; Uses energy to send fire bolts; needs Essence Collector
- Sling Tower – 24R; 3X3; 4 Stone Bundles (40 Stone balls); 8 Base Range; -2 Land Desirability; needs Rock Tumbler; Heavy tower that shoots stone balls; advised to build ammo storage near towers
- Stone Golem Combulator – 24R/6C; 4X4; 200 Essence; 8 Base Range; -2 Land Desirability; 4 Golems; needs Essence Collector; Consumes nearby rock to create stone golems to protect the city; Uses 100 energy to create each golem; Regenerates health from radiance pools
- Wood Golem Combulator – 24W/6C; 4X4; 200 Essence; 8 Base Range; -2 Land Desirability; 6 Golems; needs Essence Collector; Consumes nearby wood to create wood golems to parotect the city; Uses (x) energy to create each golem; Regenerates health from radiance pools
- Small Farm – 24W; 7X7; 24 Food; 24 Base Range; 1 Land Desirability; 2 workers; Farmers will need to harvest “wild” food before being able to plant. Make sure to assign food for collection.
- Farm – 32W; 9X7; 32 Food; 32 Base Range; 1 Land Desirability; 4 workers; Farmers will need to harvest “wild” food before being able to plant. Make sure to assign food for collection.
These are your main buildings for collecting resources, all upgradable. Upgrades will increase storage, number of workers, and harvesting speeds. Each of these are necessary for the manufacturing of their particular resource.
- Crystal Harvestry – 24W/42R/24S; 10×10; 75 Crystals; 32 Base Range; 1 Land Desirability; 16 workers; Make sure to assign crystals for collection.
- Lumber Shack – 32W/24R; 8×6; 35 Wood; 32 Base Range; 1 Land Desirability; 12 workers; Make sure to assign wood for collection.
- Mining Facility – 42W/42R; 8×9 tiles; 50 rocks; 32 Base Range; 1 Land Desirability; 16 workers; Make sure to assign rock for collection.
- Small Hovel – 42W/32B/24R; 5×4; 32 Base Range; 3 Land Desirability; 24 Villagers
- Small Shack – 32W/16B/16R; 4×4; 32 Base Range; 3 Land Desirability; 12 Villagers
- Tent – 14W; 4×4 16 Base Range; 3 Land Desirability; 6 Villagers
- Fire Pit – 6W; 16 Base Range; 1×1; -1 Land Desirability; use to light up an area and increase your build range
- Large Fire Pit – 12W; 24 Base Range; 1×1; -1 Land Desirability; use to light up an area and increase your build range
- Crystal Motivator – 4R/24S/8C; 2×2; 8 Base Range; 1 Land Desirability; Building near crystals encourages growth
- Cullis Gate – 8R/24S/16C/6M; 7×7; 12 Base Range, 1 Land Desirability; A gateway to Limbo
- Essence Collector – 8R/16S/8C; 3×3; 10 Crylithium storage; 8 Base Range, -1 Land Desirability; Use to gather free essence and convert Crylithium into energy
- Armorsmithing – 24W/32R/4I; 9×7; 30 O/I/armor; 16 Base Range; 1 Land Desirability; 4 workers; turns metal resources into armor; needs Forge
- Bowyer – 24W/16R; 6×7; 20 W/Arrows; 16 Base Range; 1 Land Desirability; 4 workers; Turns wood into arrows, 20 arrows/bundle
- Forge – 16W/24R/16S; 9×8; 50 O/I; 16 Base Range; 1 Land Desirability; 8 workers; Smelt ore into ingot
- Tumbler – 16W/24R; 7×8; 20 R/bullets; 16 Base Range; 1 Land Desirability; 4 workers; Turns rock in to bullets
- Toolsmithy – 24W/32R/4I; 7×9; 30 O/I/Tools/Weapons; 16 Base Range; 1 Land Desirability; 4 workers; Turn ingots into tools to increase productivity and weapons for defense
- Way-maker Shack – 24W/16R; 7×5; 40 W/B/R/S; 16 Base Range; 1 Land Desirability; 12 workers; Used for creating and maintaining roads
- Crystillery – 24W/24R/16S; 8×6; 25 C/M; 32 Base Range; 1 Land Desirability; 4 workers; Converts crystals to Crylithium
- Stone Cuttery – 16W/24R; 8×6; 35 R/S; 32 Base Range; 1 Land Desirability; 4 workers; Converts rock to stone
- Lumber Mill – 64W/72R; 11×7; 32 W/B; 32 Base Range; 1 Land Desirability; 4 workers; Converts wood to boards
Once you can afford it you are better off building the larger storage units: the resource requirements for the structure scale exactly (twice as much building resources for twice as much storage) but the land usage requirements are considerably less, and you will use up fewer building slots. In other words, the larger units are a much more efficient use of land.
- Small Ammo Storage – 16W; 5×5; 30 ammunition; 16 Base Range; 1 Land Desirability
- Small Crystal Storage – 16W; 5×5; 30 C/M; 16 Base Range; 1 Land Desirability
- Small Equipment Storage -16W; 5×5; 30 equipment; 16 Base Range; 1 Land Desirability
- Small Food Storage – 16W; 5×5; 50 F; 16 Base Range; 1 Land Desirability
- Small Mineral Storage – 16W; 5×5; 30 O/I; 16 Base Range; 1 Land Desirability
- Small Rock Storage – 16W; 5×5; 30 R/S; 16 Base Range; 1 Land Desirability
- Small Wood Storage – 16W; 5×5; 30 W/B; 16 Base Range; 1 Land Desirability
- Large Storage – 48W; 7×7; 80 any item; 16 Base Range; 1 Land Desirability
- Ammo Storage – 32W; 6×6; 60 ammunition; 16 Base Range; 1 Land Desirability
- Crystal Storage – 32W; 6×6; 60 crystal products; 16 Base Range; 1 Land Desirability
- Equipment Storage – 32W; 6×6; 60 equipment; 16 Base Range; 1 Land Desirability
- Food Storage – 32W; 6×6; 75 F/Rations; 16 Base Range; 1 Land Desirability
- Mineral Storage – 32W; 6×6; 60 O/I; 16 Base Range; 1 Land Desirability
- Rock Storage – 32W; 6×6; 60 R/S; 16 Base Range; 1 Land Desirability
- Wood Storage – 32W; 6×6; 60 W/B; 16 Base Range; 1 Land Desirability
- Wood Wall – 2W; 1×1; you can shoot over this wall
- Stone Wall – 4S; 1×1; you can shoot over this wall
- Sturdy Wall – 2R; 1×1
Mobs
Under development