Overview
Simple guide for beginners to get along with Rising World and some helpul tips.
Introduction
+++This guide should be up to date of version 0.5.6.8 +++
The game is currently in alpha development phase. This means, that there are constantly exciting changes and improvements done to the game, but also, that this guide could be now up to date anymore. Besides that, of course I am not the developer, therefore it could be, that this guide could contain mistakes anyway. In addition, English is not my Native language. Because of that, please excuse my sometimes false grammar and generally poor writing style. Hence, I highly appreciate if you report misspellings or have general improvement suggestions regarding what words would be better for a sentence etc. 😀
If you click on the images in this guide, you will most of the time find some more tips in the comments. You can also press [Ctrl] + [F] on your keyboard to search for keywords in this guide.
What gamemodes are avaible?
Right now, there is only one playable gamemode: “Survival”. In the moment, the mode “Creative” is the same as “Survival”. “Stranded” and “Adventure” are not even playable, yet.
A list of things that will be implemented into game, can be found here[www.rising-world.net].
Or you take a look at the English threads of the forum[forum.rising-world.net] (Most threads are in German, though).
The first step is always the easiest 😀
To create a new map in singleplayer, you have to click on “Singleplayer” (obviously ^^) and then on the button “New World”.
First, you enter a name for your world. The “seed” can be left unchanged. This code will shortly be used to generate a random world. Moreover, the same code will always generate the same map. So, if you give the code to your friends, they can also play the identical start world or you can use this to restart your world without having to reset your developed world.
Keep the gamemode on “Survival”, since there is no other mode, yet.
If you click on the image under “worldtype”, you can choose between “normal”, “superfla” (no mountains or vegetations) and “surreal” (stone desert and only very little vegetations, if enabled).
A click on the pictures under “caves” and “vegetations” turns these things off/ on.
Note that when you load your map for the first time, it usually takes a bit longer.
Now your world should look something like this:
Now, before you worry about your health bar (left bottom): Right now, there is mainly one danger, the bear. It is recommended to simply run away from it ^^ (see parapraph “Hostile bots”). In addition, you have to eat food from time to time (see next paragraph).
In the unlikely event of a glitch, and you find yourself in the map or something like that, you can press [F2], to activate the flightmode. Then you can fly up by using the common keys, or you use [Space] and [Ctrl] to flight straight up or down.
If you then disable the cheat by presing [F2] again, you should make sure, that you are not too high in the air, because otherwise you will take falldamage. For more cheats see the paragraph “The developers console and helpful commands”.

But now, let’s finally get started.
Other than e.g. in Minecraft, you start with 2 tools:
- The pickaxe, which you use to mine dirt, as well as stone.
- The axe, which you use to cut down trees (but not to remove objects made out of wood, strangely you need the pickaxe for this).
Both tools can be selected with [1] / [2] and the mousewheel. But in my opinion, the mouse scrolling is “reversed” at the moment.
First, I cut down a tree, by selecting the axe, standing near a tree and holding the left mouse button. It can take a while, so be a bit patient. ^^ The root will stay, but you can remove it as well. You can then cut the fallen tree in more, small pieces, by simply hitting it somewhere with the axe again.
Those remaining logs you can now pick up with the [F] – Key (standard), if you are close enough and the hand symbol appears (If you hit the logs again, they break). In Rising World, you have dirt and stone automatically in your invenotry, if you mine them, you need to click on other ressources to pick them up.
The “logs” are now in your inventory, which you standardly open with [ I ]. At the beginning, they are mostly stored in the quickuse bar (presented by the yellow background and the keys 1-5, with which you can use items in that bar).
The humber on the right of the logs shows the quantity of them (max. 64; if you have more in your inventory, a new slot will be used to fill with the rest of the logs).

In this new window, if you now click on the tab “Crafting“, you get to the area where you can craft new items (Currently, there sadly is no other way to reach this window and you can not close it with [ I ]).
This is because we don’t have the needed items to craft this tentative tent. Under “Requires” (in the middle) we can see at the red fond, that we don’t have the 32 sticks needed for the tent. However, since we chopped a tree, we should be able to obtain these sticks somehow. We in fact can do this by clicking on the “General” button above on the left and choosing Ressources“.
But if we now click on “Stick”, there is a red fond again! This is because we admittedly have enough tree logs, but that is something different than the processed good “Lumber”. Luckily, all we have to do is to click on “Lumber” to convert those logs into useable wood.
This is quiet common for Rising World; you often can not craft an item, because you firstly have to craft another one. But often it is just one ressocure which you will need. Standardly, you only craft one item at a time, but with the “Count” switchers, you can set, how many items you would like to craft:

(A system to craft as many items as possible is not avaible at the moment). To set the counter back to 1, you can simply switch e.g. from “Lumber” to “Stick”.
If you have crafted enough lumber and thereof sticks, you should be able to craft the tent. For this, you go back to “General”.
To place it in the world, you have to put it in the quickuse bar (see above) via Drag’N’Drop so you can use it there. You can now plant it everywhere it shines green. If it glows red, probably the slope it too steep. If you have a fitting place, hold mouse 2 until it stands safely. With [F] you can climb into the tent. If it is dark outside, you will wake up after some time and it will be morning (around 9 and a half hours later). Mit [ESC] könnt ihr wieder rausklettern. Furthermore, your tent will be set as your spawnpoint, at least while you don’t have a bed (If you have both, the tent will be used as the spawn, but if your remove it, the bed will be set as the spawn again).
At the moment, you can neither remove the tent nor any other placed object into your inventory. You can only destroy items by hitting it with the pickaxe. If you would like to remove the gras or even the ground, you have to wait a bit, until we will get more tools.

If you want to stay awake in the first night and it’s too dark to see something, you can craft a torch under “Lights” (but to the place it we again need more items first!), craft a fireplace under “General” or you can turn the “developers light” on or off by pressing [L].
Food and drinks
In Rising World, you have to search for nourishment from time to time. You can recognize a shortage, if the hunger and thirst display (both in the botto corner) are not green anymore.
Right now, there are different kinds of meat, to stave off hunger, but in the moment you can only get meat from pigs (bacon and ribs) and cows (beefsteak). But to get the meat, you obviously need to kill these animals first and then open their “inventory” with the use-button.
Moreover, there are watermelons and apples to appease your thirst and hunger.
Watermelons grow in the wilderness and when you fell trees, sometimes apples are dropping as well (this is just a temporary solution, soon there will be real apple trees).
To eat food, you have to press the right mouse button. If you want to eat a watermelon, you have to hold the button for a few seconds in which your character will cut the melon in pieces.
If the hunger and thirst symbols in the right lower corner are completely green and you eat something, your life bar will fill up again. Grilled meat will restore more health than fruits. But beware: Eating burned meat will hurt you (a little bit)!
To cook meat, you can craft a fireplace ( in the crafting section under “General”) and put the meat on a grillage (on the workbench under “Miscellaneous”) or you can craft a grill or “smoker” (on the workbench as well). The meat will take a few seconds until it is done, but you should watch, because otherwise it wil burn sometime.
Hostile bots
At the moment, there are only animals which can attack you: bears, elks and goats. But only the bear attacks you by itself, the other two just handle that way, if you hurt them first. I recommend to run away, if you are under attack, because the bots are rather strong at the moment.
You can’t get items from these animals yet, anyway.
Farming
You can also gain food, if you plant vegetables. Currently, you can only grow tomatoes and carrots, but more plants will follow.
Firstly, you need sapplings if the plants you want. However, you can not simply pick them up, you need a sickle (and only a sickle – the scythe is not suitable for this).
The sapplings however, can only be palced on farmland. To turn the dirt under your feet into farmland, you need a hoe – but don’t confuse this with a rake (with a rake you only make the ground even)! Then you can plant the sapplings by holding the right mouse button.
Introducing the workbench and more items
To get access to all items, we need several “Crafting stations”.
At first we create a “Workbench”, which you can craft in this paragraph in the crafting section. 
You can now use the workbench to craft all the other workbenches, several torches, weapons, tools and ladders.
You might have wondered why you ca not place torches in the world. That’s because you need e.g. a torch holder to set a torch. I will explain in a moment where you can get the needed metal for that holder. If you simply want to place a ‘normal’ torch, you can just use a “garden torch”, since that only requires some sticks. Furthermore, there are four kind of lanterns, which you hang on the ceiling.
Some things, like the knife, you can still get completely “for free” from the workbench. However, if you want the sickle (can be found under “Tools”), you will need the workbench “anvil” first. At the moment, you can still get everything from it without loosing ressources. What is important to note here, is that you can find the “small ironrod” (for the torch holder), however, for tools and weapons you need prefabricated metal “Components“, which you can find under this section on the anvil:


Now to the new tools:
With the sickle, you can cut the grass, on most places, the grass will be initially cut in about half, with a second hit, there will then only be the grass texture left on the ground.
The scythe does basically the same, but on a larger area. If you hold the the right mouse button instead of the left one, both tools will not cut the grass completely and a small rest will stay. Useful, to prevent that you accidently cut all the blades.
Because not that grass does not regrow at the moment! So, before you extensively use the two tools, think about, if you want to remain the grass at some spot. I personally think that just the grass texture at the ground does not look as good as the ‘real’ grass, so I would recommend you to firstly cut the grass in half and see if that is already enough.
The rake adjusts a place on the ground to the altitude of the dirt in the environment. However, I would recommend to use the pickaxe first to destroy bigger hills, because the rake hardly works like you want it to ^^ But if you have reduced the ground too much, you can higher it again with the right mouse button. Note that this function only tends to rise the ground (similiar how the left mouse button lowers it), so it does not work all the time. Therefore, yo have to sometimes manually fill dirt into holes you don’t want or you have to use the pickaxe for dirt and stone hills.
The rake has the disadvantage, that it does not give you dirt. So, if you need ressources, maybe you should rather use the pickaxe anyway. In addition, if you only want to kinda even the ground, I highly recommend you to cut the grass first with the sickle or scythe and decide, if that is alredy enough, since the rake also completely cuts down the grass.
The sledgehammer basically does the same thing as the rake, but with stones. But stones can only be found deeper under the ground. Therefore, you should not need the sledgehammer so much. The stone is not the same as the dirt though, which you can find until a few meters under the surface. But you can also use it to craft stone blocks and stuff. However, note that the hammer has not a ‘rise the ground’ function like the rake.
Under “Miscellaneous” you can get a poster, with which you can upload your own picture from your harddrive. More notes to the posters can be found in the paragraph “Advanced Building”. I will talk about the ladders in “Easy building with the grid”.
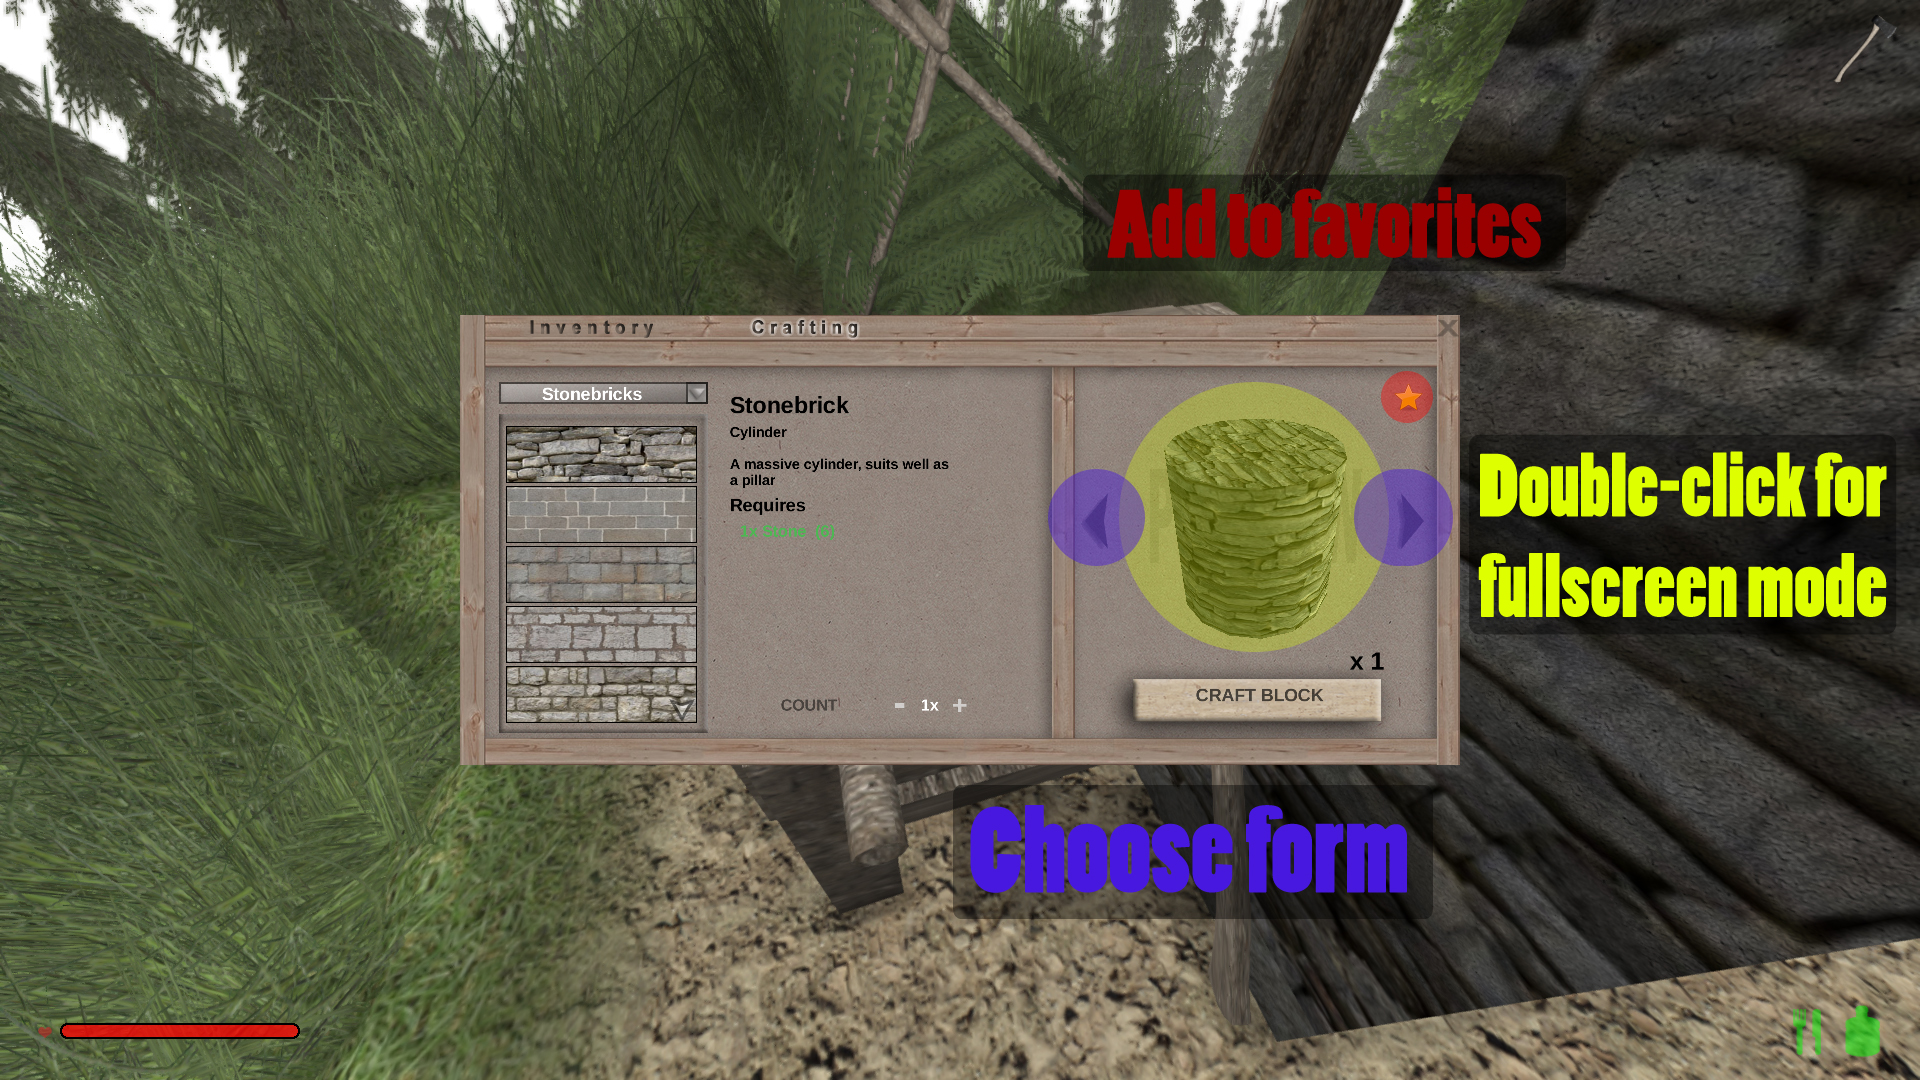
How to craft blocks
In Rising World, square blocks do not appear naturally, you need the “Blockbench” to get them.
For the blocks, you mostly need stone (or dirt which is basically the same regarding crafting at the moment), for the wood blocks you need Logs and not processed wood!
The quantity of blocks you can craft at once, can again be set with some controllers, so that you don’t have to press the craft button a hundred times.
Note that you can scroll down on the left side where you can see the different textures, to see even more of them.
Since textures don’t have names (because of the masses), it can happen that you don’t manage to find them again later. To prevent this to happen, there is the favorite function. You can use this to save a texture a as one of your favorites, by clicking on the star in the right upper corner in the preview window. It will then be saved in the menu under “**Favorites**”. However, you should of course not fill this tab with too many textures.
Is is very important to know, that you can use the arrows in the preview window to choose between different block forms. There are many different shapes; the normal cubes, but also cuboids, stairs, pyramids, half blocks and many more; even in different variations. You can rotate most of them by useing the arrow keys ([←] [↑] [↓] [→]). If you click on the rotating object in the preview window, you can rotate it yourself as you like. If you click on the symbol up left from the object, you can toogle the automatic rotation on/off.
What is very helpful when building with blocks, is that you can place several blocks in a row, if you hold down the left mouse button and draw a line. Use the right mouse button to place the entire row, but be careful that you are not to close to the blocks, because otherwise it sometimes does not work.
Easy building with the grid
If you press [G] on your keyboard, there will appear a grid on blocks for some objects or on the ground. You can use this system to place some objects more precisely, since they use the grid lines to site themselves in the world. However, this also has the disadvantage, that you can not situate items completely free.
The grid can be used to e.g. put the parts of the Extended Construction system into place (see next paragraph), it also works with torch holders, ladders etc (the grid system seems strangely enabled when you place crafting stations, so you can use this system for them as well).
Let’s take the ladders as an example: You can set their height and texture with the arrow key in the preview window like you do with blocks.
Ladders have to be placed on blocks. You can hang them on cave walls, but most likely it should be a bit hard to site them to the uneven stone walls. Furthermore, it then gets tricky to build ladders on top of each other, which can be done by clicking on the edge of an existing ladder with a new one.
For ladders, the accuracy of the grid is basically fine. But other objects might require a bit more accuracy. Therefor you can press the [-] key on the numpad to (while the grid is active) to lower the size of the grid tiles. Use the [+] key to bring the gap back up. However, as you will see, building will get a little bit more unclear with smaller tiles. Optimally, you use the big tiles first and smaller ones for accuracy purposes.

Advanced Building with the freely placeable “Construction” elements (Extended Construction System)
The components “Woodpank”, “Woodbeam”, “Glasspane” and the “Window frame”s A-D are part of the “Extended Constructing System“. This means, that you can absolutely freely situate them in your world which gives you more possibilities than you have with blocks. However, right now, only the items above are available for this system, though more items will be come later. Although the Extended Construction System is a bit harder to use, but as said, it give you more freedom and possibilities and therefore you can create more detailed buildings.
The developers haven proven this, by creating amazing stuff with just some planks:


The mentioned parts can only be crafted with the sawbench. You can find them under “Construction”.
The special thing about this system is, that you can rotate the components around all axis and you can increase or decrease their size to some limit. While you have one of these items equipped, you can press [F1] to take a look at some useful tips on how to use this system, which I will explain now:
When building, you can hold the [shift] key to change the height of the items with the [↑] or [↓] key. While holding [shift], press the [←] or [→] key to change the width of an item. For the woodbeams, this will also change the depth of the beams, so that they will have the height of a block on max. width/ depth.
With the buttons [↑] / [↓], [←] / [→] and [Page ↑] / [Page ↓], you can rotate the components around all axis. If you have made a mistake, you can press the backspace key (←-) to undo all rotations.
If you hold the left mouse button and drag a line with the components (e.g. a fence out of planks), you will notice that, other than with the blocks, there is a small gap between the planks. This gap can be de-/increased with the numpad keys [+] and [-].
But be careful: If you e.g. create a fence by dragging a line of planks at once, you mustn’t make a mistake, because removing one plank of the line will remove the entire fence!
If you don’t want that or simply want to create a line of planks by placing all planks manually, you can activate the so called “Modular Building System” with a click on the enter key (↵).
If you now equip a plank and aim at the excact edge of an existing one, the new one will be placed excactly on the other one (similiar to what automatically happens with ladders). 
But now I am telling you, what I see as the most useful tool of the Extended Construction System: The ability to completely freely place objects! With it, you can situate an object everywhere in the world, even in other objects! That is e.g. useful to build beams a little bit into walls etc.
To activate this method, you need to press the right [Ctrl] button. Now you can freely walk around an object and it will not move. The great thing about this is, that you can now move it centimeter for centimeter on all axis. You do that by using the [↑] and [↓] keys to move it further or closer; use [←] or [→] to stir it to your right or left. With [Page ↑] and [Page ↓] you can change its position in the vertical line.
Press [Ctrl] again to turn the system off again.
You can change the size of posters like you do with planks. But they need to be placed on surfaces. At first, you have to load a picture into the game, by choosing a poster, pressing the left mouse button and then clicking on “Upload image”. Next, you choose a picture from your hard drive and click on “Use image”. With the arrow keys left and right from the preview picture, you can quickly find images you already uploaded in your world. Then, press the right mouse button to place the poster.
You are also able to fully freely situate glass in your world. If you have chosen a glasspane, click in a window frame, this will make it automatically fit into the frame. You can also put multiple glasspanes into a frame which makes the widow less translucent. Furthermore, there are several types of glass in the crafting section (normal, curved etc.).
The developer’s console and helpful commands
You can open the developers console to use cheats, e.g. to get items faster.
To open the console, press the [´], [/], [], [~] , |*| or [^] key on your keyboard.
Use the arrow keys [↑] / [↓] to scroll through previous inputs.
Cheats which influence the world:
- Change game time:
tod *TIME*
(0 – 23) or
settime *TIME*
(0 – 23). E.g.
settime 7 5
changes the current time to 7:30 am.
Note: The sun rises at 7 am, has fully risen at 8 am, sets at 9 pm and at 10 pm it is completely dark in your world. - Make dirt and stone invisible (Useful to find caves):
wireframe
(Type in again to undo)
Get ressources:
Note: There are commands for all items, but it is not recommended to use them. It is better, to cheat the needed ressources and then use the crafting stations to craft the items you want. This way, you can also take a look at each item on the preview window on the crafting stations. For that reason, I will only list the commands for ressources and the most importatn tools etc.
I also recommend, to have the inventory opened in the back, so that you can see, if it is already full (otherwise there could appear some problems and you will simply not get items).
Um sich die wichtigsten Items zu geben, benutzt man den Befehl mit dem Format
item *NAME OF ITEM* *QUANTITY*
I have posted some example commands here, so that you simply have to copy and paste them. You might want to change the quantity though.
- Treelogs:
ID = 101
So you type in:
item 101 64
, to get 64 treelogs.
Food:
- Watermelon (to satisfy your thirst):
item watermelon 1
- Apples (to satisfy your thirst):
item apple 64
- Bacon (raw/ cooked/ burned):
item baconraw | baconcooked | baconburned 16
- Beefsteak (raw/ cooked/ burned):
item beefsteakraw | beefsteakcooked | beefsteakburned 8
- Ribs (raw/ cooked/ burned):
item ribsraw | ribscooked | ribsburned 1
Other items you might need are:
- (Processed) Wood:
item lumber 64
- Sticks:
item stick 64
- To get stone blocks, you can use the command for dirt, since you can also use it to craft stone blocks:
item ore 64
- However, to actually get stone, you have to use this command:
item ore 64 3
– to get 64 stones
Plants:
- Maple tree sapplings (Bright green, sappling has leaves):
item maplesapling 32
- Pine tree sapplings (Dark green, sappling has pine needles):
item pinesapling 32
- Pumpkins (max. 8 pro Slot):
item pumpkin 8
More Items:
- Torches:
item torch 64
- Clock:
item clock 1
- Compass:
item compass 1
Metal components
(Right now, you get them for free from the anvil):
- Ironsheets:
item ironsheet 64
- Small ironrods:
item ironrods 64
- Medium ironrod:
item ironrodm 64
Objects:
The most important objects are the crafting stations which you get with the command object:
- Wokbench:
object workbench
- Sawbench:
object sawmill
- Blockbench:
object blockbench
- Anvil:
object anvil
- “Dungeon door”:
object door2b 2
Spawn animals:
-
spawnnpc [Name]
- To e.g. spawn a goat:
spawnnpc goat
Save spawn and inventory:
- Set spawn to current position (Attention: Did not work for me sometimes!):
setspawn
- Teleport to spawn:
goto #spawn
Note: It might be that the world looks ‘incomplete’ when you teleport yourself. Das liegt daran, dass die Welt dann noch nicht bis zu eurer neuen Position geladen wurde. This is because the world has not fully loaded to your new position yet. If this happens just wait 😛
- Save inventory (you will keep all your items when you respawn after death):
setinventory
Save a position to get teleport to it later:
- Save current position:
mark
- Teleport to marked position:
go to #mark
Attention: Mark will be deleted if you leave the world!
Cheats concerning the player:
- Commit suicide:
kill
Multiplayer commands:
- Make other player admin (admin only):
makeadmin *NAME OF PLAYER*
Note: To give a player admin status permanently, you have to write his name into the data “server.properties”.
- Revoke admin status from player:
revokeadmin username
- Kick player from server, you can put the reason in square brackets at the end (admin only):
kick *NAME OF PLAYER*
- Teleport to an other player:
goto *NAME OF PLAYER*
- Give an item to another player via cheats:
give *NAME OF PLAYER* *NAME OF ITEM* *QUANTITY*
- Show Ip of a player:
getplayerinfo *NAME OF PLAYER* ip
- Show infos about a player like health, number of posters, if he flys, sleeps, or his position):
getplayerinfo *SPIELERNAME* info
- Disallow/ allow fly mode on server (admin only):
settings_flymode_enabled false | true
Keys which are bind to cheats:
- [F2] – Toogle fly mode
[Page ↓] decreases your flying speed, [Page ↑] increases it again, the jump and crouch button will make you fly straight up or down. Während dem Fliegen kann man nicht mit Gegenständen interagieren. - [L] – Toogle ‘developer’s light’. Useful, if it is dark in a cave and you have no torch with you.
How to fix some bugs:
- When you can not destroy an item:
Type infixconstructionrange
and destroy the things you could not before, but then type in the command again (does not work for items which where placed in Version 1.5.5 or earlier).
Multiplayer
I am just briefly going to explain you how to play on public servers, but if you want your own server: Here[forum.rising-world.net] you can find a guide on how to setup a server or play with friends on a not public game (thanks to yahgiggle for this guide!). Sadly I am not experienced with servers, so I won’t really help you with that.
But you can take a look at the server presentations[https//https] in the forums (partly in German).
Often, you can contact the admins of servers to participate in building projects etc. In addition, you should ask the admins to protect your buildings against other player who might destroy them.
Now for the server lists: In the multiplayer menu, you can see a tab called “Serverlist” (all public server will appear here), your favorites and the history shows all the servers you have visited in the past).
On the top right, you can a arrow symbol with which you can update the serverlist.
The green number on the left shows the latency (if you have a bad connection to a server, it will appear orange), which shows the delay between your pc and the server (mostly the connection is bad when you are e.g. in America and the server is in Europe or the other way round). Since Rising World is not a skill based shooter, this should be no issue ^^.
Under the name of each server, you can further see the Ip of this server and the green number on the right indicates, how many players are on the server right now. On the right, it states for some servers, if Lua scripts[https//hthttps] are activated. These scripts e.g. cause that you can not destroy building of other players. On the top left, it you can set, whether the serverlist should be sorted alphabetically or according to the numbers of players in it.
If you want to connect to a nonpublic server, you have to click on “Connect to IP” in the middle and then type in a Ip.
When you play on a server, you open the chat per standard with [T]. If there is a problem with another player, you can use this to ask for help from an admin. Press the (↹) key to see who is on the server, what ping they have, their group and the distance to each player.
Note that many console commans might not work on servers, because you don’t have the permissions of an admin. Moreover, he could have limited the size of posters. On some server it could be, that the fly mode is disabled as well. If you then clip through theground, you can press [F2] two times to teleport back to the surface.
Generally these rules apply to all servers:
- Thread others respectfully (No insults etc.)
- Do not destroy buildings of others
- Do not steal items of other players
- Do not attack them unless it is allowed
- Often you should also tell others that you just want to take a look at their stuff, since some act kinda sensitive in this regard ^^.
Short hints
- [F1] shows help for building on some items.
- [F3] shows several technical details (to turn it off again, you have to press the button again until it is gone)
- At the moment, you can not get placed objects back into your inventory, you can only destroy them.
- You can simply pick up flowers with the use key.
- You can find pumpkins, but you can only use them to craft a halloween lantern.
- On the sawbench, you can get a fully functional piano (under “Miscellaneous”).
- The music [audiojungle.net]of the is not available in game.
- Because of a glitch[forum.rising-world.net] you used to be able to build an “elevator”.
- Die Axt wird auch benutzt, um Büsche zu entfernen. The axe is also used to cut down bushs.
- The world has an altitude of 1152 blocks, but only around 256 blocks are above the surface.
- When crafting or using cheats, you have to be careful, that your inventory is not full, because then the item will be thrown at the ground (or not even appear somewhere when you use cheats).
- To get a picture frame, you can simply place a window frame and then use it as a picture frame, by clicking on the inner edge of the frame with a poster. Then the poster will automatically fit into the size of the frame (you have to choose an image for your poster before).
- Use [Z] to zoom in.
Sources
Here a list of things that helped me creating this guide:
- The most infos are form the developers themselves, but I have not listed all the links here, since that would be a bit too much. But here you can find all changelogs. In addition, I would like to thank these community members:
- Quezax’ guide for new players[forum.rising-world.net]
- Quezax’ Youtube tutorial for the Extended Construction System
- Thanks to andyzee for the commands to get meat[forum.rising-world.net]
Since I am not very creative, I have also used these pictures:
- Images of the Extended Construction System from the developers [forum.rising-world.net]
Last but not least…
If you need inspiration for your own projects, you can take a look at the forum[forum.rising-world.net]or you enjoy a walk through the numerous server with their impressive buildings.
New Crafting Station
*Under Progress – please ignore :P*
You get the clock and the compass from the workbench under “Utilities“, the ironsheet can be obtained from the anvil for free, as well. To use the clock, hold [O] and to use the compass, hold [K]. On the edge of the compass, there is a small red dart, which shows you the direction to your spawn.
Blueprints
*Under Progress – please ignore :P*
Ores
At the moment, you can ‘only’ find iron, copper, silver, gold, aluminium, tungsten, cobalt and mithril ores. These can be found at several underground heights, however the best method is to explore caves, because then you have the highest chance of finding some.
Right now, you can only smelt the ores into ingots, by putting them into the crafting station “smelting furnace”. The furnace can simply be turned on for this, you don’t need to fill it with fuel as for now. The smelting process will take a few minutes, just come back after some time 🙂