
Overview
SAS 4 BIBLE POWERED BY THE MESSENGER OF GODS
The Very Basics for New Players (Level 1-35)
Hello everybody, welcome to the SAS 4 Bible! This Bible will teach you how to be the best player you can be, even at low level!
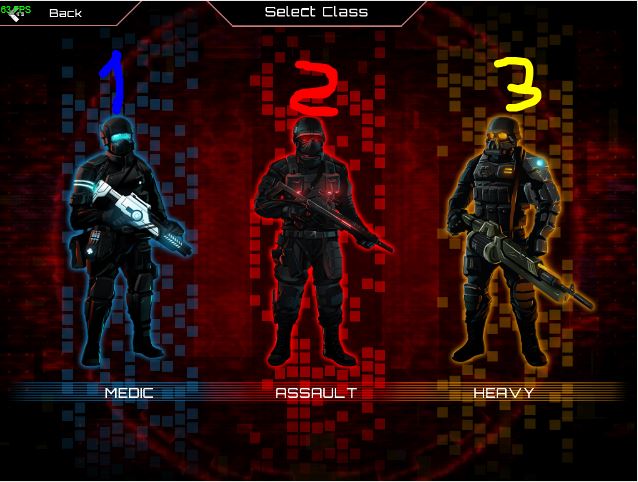
At the start, you have to choose a character. There’s 1 (Medic) 2 (Assault) and 3 (Heavy). My suggestion is 2 & 3. xd
Play the Onslaught map until Zombie Pods is unlocked.
Q: How many onslaught runs do I need to do till I can play on Zombie Pods?
A: Usually takes 3/5 games, depends on your kill counts.
Q: Why Zombie Pods?
A: Zombie Pods is by far the best way to farm free crates. (Or Strongboxes. Whatever.) You can get at least 1 to 3 boxes every run you make, meaning you can find guns and armor very fast for starting gear.
Q: How long for low level pods runs?
A: About 2 minutes.
Q: What guns should I use during Onslaught?
A: Use any of guns you’ve got, just remember to avoid guns/armor that have movement penalties. (Just in case you didn’t get any guns or armor, use HVM 001.)
Q: Why HVM 001?
A: Cause it has low reload/almost the same damage result of your Z-Armtech guns. Only difference is that it’s lighter.
After level 10, up to 35, look for Exp contracts:
Maps that I recommend you to spam are:
1. Uranium Mine
2. Sea Lab (With Shredder Disk Thrower for best results.)
Every other map is wack for Exp grinding.
Skills to pick for low level:
ASSAULT:
1.Adrenaline
2. Reload
3. Speed
4. Killing Spree
5. 1x Stim Shot
HEAVY:
1. Hold the Line
2. Speed
3. Tough Body
4. Reload
5. 1x Die Another Day
MEDIC:
1. Medkit (13 points max.)
2. Bio-Cleanse Bomb
3. Speed
4. Reload
Skills you should avoid at all costs:
HEAVY:
1. Concussion (1 is fine, anything above 1 is useless. Also, if you wanna use Concussion skill on Heavy you’ll need a multi-pellet gun such as a shotgun or a high RPS gun like the Proposition.)
2. Heavy gear (I’m pretty sure you can get all maxed resistances without heavy armor like Hardplate armor so this one is kind of a waste.)
3. Die Another Day (1 is a must no matter what, anything over 1 is a waste.)
4. Aerial Bombardment (No damage at all, just shakes your screen and everyone else’s screens. Literally useless even with only 1 point. Unless you’re going for the achievement never use.)
5. Brute Strength (nope 0dmg)
ASSAULT:
1. Deadly Force (25% of base damage,garbage Use Titan HUD helmet instead for 32% unless you want a full DPS build.)
2. Assault team (Like Bombardment, only good for the achievement.)
3. Close Quarter Combat (CQC) (-1dmg with 25 points on it, seriously don’t recommend.)
4. Gun Mod Expert (GME) ( Reduces gun augmenting price, it’s okay if you’re low on money, but afterwards I’d suggest gathering the money and items that you want maxed out and reset after you finish it, make sure you can afford the 1x reset cost or that you still have a free reset.)
5. Stim Shot (1 Stim Shot is a must, anything above 1 is just a waste like Die Another Day.)
MEDIC:
1. Bad Blood (??? Why don’t you shoot instead of putting points into this useless 0dmg CQC skill?)
2. Revive (You better avoid this one if you’re going to be a meta Medic, unless you changes your mind and wanna be a real Medic.)
3. Antidote (0 points is a must cause even with 25 points in this skill it barely kills a worm in 2 seconds.)
4. Final farewell (Why choose to die and give medkits to stranger when you can survive and give other people your medkits and provide DPS?)
5. Protective Aura (uuuhhh wtf?)
SAS skills you should avoid at all costs:
1. Field Supplies (TRASH, unless using Jupiter/Hotspot/HIKS 3100/Jagfaust. If so, use 3 points max for High Damage Ammo (HDA) farming, but for black versions only. Don’t farm HDA on red guns.)
2. Grenade Damage (Uh… Well at least if you have T-189 MGL it increase the damage by 320% or so but still 0dmg.)
3. Health Regen (Just use Bio instead! OMG such a waste of valuable skill points.)
4. Pay Grade (This only increases the end-game money result. This doesn’t affect in-game money loot. But it’s quite good if you’re just doing singleplayer and running contracts, by the time you reach level 100 you’ll have around 100M credits with 25 paygrade, but even then I don’t recommend this one.)
5. Energy Boost (idk why this exists lol you tell me)
6. Recovery Time (This too, who chooses to be dead?)
7. Energy Regen (It’s good on Medic because if you want to spam Bio-Cleanse Bomb and medkits it’s very good. 16 max points for spam build.)
SAS skills you should use:
Toughness 0-25 (Use only if you are going for a high HP build. Choose 0 or 25, can’t be lower or Medic must be 0 or 25.)
Reload 0-6 (6 with medusa helmet and 9 with other helmet)
Body Armor Expert (BAE) 0-25 (Start building BAE at level 75.)
Critical Shot 0-25 (Use this for certain guns such a Hornet/Proton Arc/Shockfield with Adaptive. Just to remind you guys 25crit vs 1crit is not quite different, 1crit 0sec, 25crit +1sec thats your CRIT DMG BONUS.)
Movement Speed 0-25 (Highly recommended, you must have minimum speed at 70% to outrun Dark Minion enemies.)
Good guns at low level:
Mobbing: Good against hordes and mobs. (Shambler, Runner, Spitter, Bloater, etc.)
Bossing: Good against large boss enemies. (Regurgitator, Wicker, Zombie Mech, etc.)
Regen: Good for regenerating health.
Multi: Pretty much can do anything.
CM 800 Jupiter (Mobbing)
Hotspot (Mobbing/Bossing)
HVM 004 (Multi) bit trash xd
Lone Star (Mobbing)
Luftplatzen (Mobbing/Regen)
Raptor (Bossing)
RIA 20 Striker (Bossing)
RIA Strikeforce (Mobbing/Regen)
RIA T7 (Mobbing)
Shockfield (Multi)
Stripper (Bossing)
Armor:
Avoid all armor/gear with large speed penalties, use any armor you see with 0% penalty. Some good armor includes Hummingbird gear, Rubicon, and Titan MEM Sprint.
Good luck boys! Don’t suck. 🙂
Helmets
Titan IRN Hud:
Many people think this helmet is good because of the % damage increase, but this helmet only gives a 32% base damage bonus. Here’s how base works: 100damage+32%=132

That’s how it is. The helmet only affects base damage, not including Deadly Augmentation which makes the helmet garbage and unusable. For a helmet that has -5% movement penalty it’s really bad.
For resistances, Titan has quite big numbers in base or full auged, but the helmet is meant to be a DPS boost helm, not recommended for putting resistance augmentations on it.
DMG PREVIEW WITH TITAN NON AUGED GUN

DMG PREVIEW WITH TITAN AUGED GUN

UNEQUIPPED TITAN IRN HUD, NON AUGED (BASE)

UNEQUIPPED TITAN IRN HUD, AUGED

This helmet is not recommended for any level, whether it’s early, mid, late, or end game, unless somehow you don’t have any other helm. xd
Dragonfly Helmet:
This helmet is pretty good for any level. Can be one of the end game helmets too. If you get it in Red, you’ll be ok too.
Augment wise, Body Fueling & Hazchem all the way. If you want more resistances then put Fortified instead of Body Fueling.
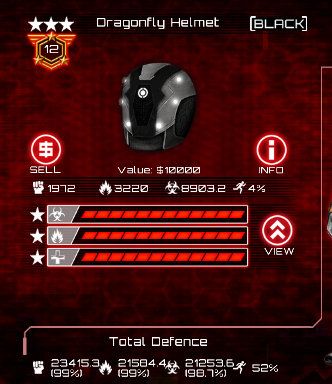
Drop rate for Red ~39-100, for Black ~41-100, best chance to get 10/2 slot is around level 65.
Medusa Helmet

1.) Only need to put 2 Hazchem aug in the end game setup to get 99% in Chemical resistance, which benefits other gear.
2.) +9% reload speed bonus which is equal to 3 skill points in Reload. Means you can spend 3 points on other skills. Can stack even further with Titan IDS Gloves with only 6 points into Reload, can even cap your reload speed entirely. (Max reload on every gun.)
3.) It’s pretty easy to get compared to any other helmet.
Drop rate for Red ~35-100, for Black ~42-100, best chance to get 10/2 slot is around level 70.
Graphene Combat Hood
Well, this helmet is balanced, but not as good as the Medusa Helm.

Augment wise, spec into Body Fueling and Hazchem. If you want more resistances then put Fortified instead of Body Fueling, if you’re low in Thermal resistance put that in instead of Fortified.
Drop rate for Red ~40-100, for Black ~50-100, best chance to get 10/2 is around level 70. Also, this helmet is kinda rare end game, even I’m struggling to get 10/2 at 100, so good luck.
R1 Interceptor
Great helmet, but you’ll need medusa pants to match the ressistance, otherwise it wont work
lowest bae point with R1 Hemlet reaches 13-17bae (MAXED ARMOR) which is gud+++
Augment wise, spec into Heat & Fortified, put Body Fueling if you have enough physical resistance.
Drop rate for Red/Black ~31-72. If you’re looking for this helmet above level 72 then RIP.
Vests/Chest Armor
Rubicon Power Assist (RPA)

Rubicon Power Assist is the best for any level/build, no questions asked. Here’s a few reasons.
1. +18% movement speed bonus, equals to 12 Skill points in Speed.
2. Has average/above average Physical resistances.
3. Easy to get at any level.
Drop level for Red and Black ~36-100. Good luck.
Q: what about any other chest armor?
A: Naaah. They all suck in end game.
Q: what about low/mid level chest armor?
A: Here’s a list of good chest armor for low/mid if you can’t find RPA:
Graphene Body Suit Top
Dragonfly Vest
R4 Guardian Vest
Medusa Vest (Only use this if you have none of the above.)
Armor you should avoid:
Titan Teslashock
Hardplate Chest
Heavy Trooper Vest
Q: Why are these bad?
A: they’re all bad because of large movement penalties. Movement is important.
Q: Aren’t they good with high resistance numbers?
A: Sure, having a high defense amount is great, but if you have less than 70% movement speed it’s just the same as having no speed at all.
Q: How so?
A: If you have under 70% speed, you’re generally very slow and cannot finish missions as quickly. It’s especially hard to evade enemy attacks, especially when they’re Dark Minions, which will easily eat you alive with less than 70% speed.
Q: Is having Heavy Gear in the Heavy skills for heavy armor good?
A: No, definitely not. You can get 99/99/99 resistances without Heavy Gear at all. You can have these and high speed like this:

Gloves
Titan IDS 01
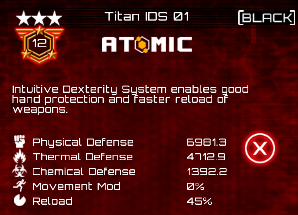
The only gloves that are useful. While they are relatively rare, they work on essentially any level you can find them at.
Augment Wise: Fortified & Nimble. Always.
Drop rate for these ones is ~50-100 for Red and Black. In this case, you might have issues with finding a 10/2 due to the rarity, but good luck.
Q: Why do other gloves suck?
A: No other gloves in the game can reach 45% reload speed with a 12 Nimble augment. This is because IDS Gloves come prepackaged with extra reload speed.
Q: What should I use when I can’t find Titan IDS?
A: Graphene Gloves for resistances, Dragonfly for the reload bonus. Despite how rare they can be, you’ll get the Titans eventually.
Q: What should I use on low level if none of the three above are available?
A: Find any gloves with 10 augment slots and put Nimble on them (The extra reload speed augment.) until you find better gloves.
Pants
Lot of pants for low/mid/high builds and end game builds.
Graphene Body Suit Bottom
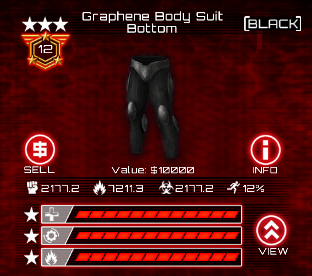
Body Suit Bottom is meta, no words for this one. It’s just overpowered for any level, whether Red or Black.
Drop rate is ~60-100 for Red and Black, you might having issue finding this pants because Body Suits are kinda rare, especially with 10/2.
Medusa Pants

Not much a difference between Graphene/Medusa Helmet, you only need to put 1 Hazchem into the Medusa Pants to get 99% Chemical resistance.
Augment Wise, Machine Assist and Hazchem this bad boy for movement and Chemical resistance.
Drop rate ~47-100 for Red and Black, quite common but need time for 10/2.
Dragonfly Pants

I wouldn’t recommend these pants if you are going for 99/99/99, otherwise you’ll need 25bae. Only use these for the max speed build. Like the Dragonfly Helmet, a Red one is relatively effective if you want speed and nothing else, but you might be a bit squishy.
For augments, Machine Assist & Hazchem. If you have a Medusa Helmet, put Fortified on instead of Hazchem. If you simply want more health put Body Fueling.
Drop rate ~39-100 for both Red and Black. Best chances to get a 10/2 for these is level 50, but it shouldn’t be too hard. Dragonfly Pants are pretty common.
R7 Guardian Pants

Second best pants in the game. Also useable for all levels under end game, but not as good.
Q: Why do R7 stand on 2nd place for best pants?
A: Because you need less BAE than Medusa Pants/Body Suit Bottom which is good.
Q: How many points should go into Body Armor Expert if I’m using R7?
A: 17 when maxed, 21 without cores. For comparison, Body Suit Bottom requires 23 BAE.
Augments for R7 are Heat Resistant & Machine Assisted.
Drop rate ~40-72 for Red and Black, best chance to get 10/2 is around level 60.
Titan MEM Trooper

Behold, the best pants in the game.
Q: Why Titan MEM Trooper?
A: You only need 19 points in BAE to get 99/99/99 resistances and 15 when max base cored to get max resistances, along with an extra 90% movement speed if augmented right.
Q: Can Titan also be used as low/mid level pants?
A: Yes they can, but they’re quite rare at those levels, and also not the best for said levels, but when you get higher they’re easily the best.
Augments are Fortified & Machine Assisted.
Drop rates are ~49-100 for Red and Black, but it’s quite rare to see 10/2, even a Red 10/2. So good luck. Best chance to get 10/2 would be in between 65-70 if you’re wondering.
Pants you should avoid at low levels:
ANYTHING WITH MOVEMENT PENALTY. Dear God, never use anything with negative speed. xd
Boots
Titan MEM Sprint
The best boots. Ever.

Q: Why are they the best?
A: 22% speed bonus, which is unmatched for any other boots. Pretty good resistances too.
Q: What about other boots if I can’t find Titan MEM Sprints?
A: Well, if you don’t have Titan MEM Sprint, do like what you did for gloves, except this time slap Machine Assisted on them and avoid speed penalty boots for low/mid level.
Guns for End Game
Stripper
(Bossing)
(Not good for mobbing if it’s in Red quality, but still very good for bossing.)
223K DPS MAX for maxed out Black 12/4/10/10
1887 Shockfield
(Multi)
(Deadly/Overclocked/Adaptive/Capacity for bossing. Deadly/Overclocked/Capacity/Biosynthesis for regen. Both Shockfield builds good for mobbing too.)
860K DPS MAX for maxed out Black 12/4/10/10
CM 800 Jupiter
(Mobbing/Regen)
(This gun will pretty much do the job on mid/high level, but never for bossing. Regen on Jupiter is weak compared to anything in the Shotgun category. Also, very expensive ammo if you didn’t use Field Supplies. Good for Nightmare Mode, especially if it’s Red, but not for long event runs.)
70K DPS MAX for maxed out Black 12/4/10/10
Hornet
(Bossing)
(This guy only works if you put 25 points into Critical Shot and increase your Sniper Masteries to level 5, but it takes some serious skill point replacement so it generally makes you weaker or slower. Rather use Stripper.)
900K DPS MAX for maxed out Black 12/4/10/10
Hotspot
(Bossing)
(Good if you don’t have Stripper, but use Stripper if you’ve got it instead.)
480K DPS MAX for maxed out Black 12/4/10/10
Mustang
(The only good sidearm, but a bit rare on every level. You’re better off never using a sidearm at all and focusing on other things.)
Guns that are completely trash:
Proposition
(Slow and hard to use. Literally only purpose would be to buff Heavy’s Concussion skill, which isn’t even really good anyway.)
570K DPS MAX for maxed out Black 12/4/10/10
HIKS 3100
(why)
410K DPS MAX for maxed out Black 12/4/10/10
T-102 Jagdfaust
(The most expensive ammo in the game. Enjoy burning your credits.)
220K DPS MAX for maxed out Black 12/4/10/10
HIKS S300 Sniper
(By far the most useless gun in the entire game.)
430K DPS MAX for maxed out Black 12/4/10/10
Best augments for Black/Premium guns:
Stripper
Overclocked/Tenacious/Adaptive/Capacity
For events: Overclocked/Tenacious/Adaptive/Biosynthesis
1887 Shockfield
For bossing: Deadly/Overclocked/Adaptive/Capacity
For mobbing/regen: Deadly/Overclocked/Capacity/Biosynthesis
For 1 gun build: Deadly/Overclocked/Adaptive/Biosynthesis (Not as overpowered as the others but gets the job done. Only do this to flex.)
Hotspot
Bossing: Deadly/Overclocked/Adaptive/Capacity
Mobbing: Deadly/Overclocked/Capacity/Piercing
Proposition (Garbage, but whatever. xd)
Bossing: Deadly/Overclocked/Adaptive/Capacity (Skeletonized is not auged for this bossing spec because it doesn’t work for Proposition bossing. You need to face the boss for full DPS.)
Mobbing: Deadly/Overclocked/Capacity/Skeletonized (Kinda garbage against Shielders but it manages to work well if you’re playing Assault and have points in Killing Spree.)
HIKS S300 (-_-)
For bossing: Deadly/Overclocked/Tenacious/Capacity (NEVER USE THIS TRASH OMG BUT IF U INSSIST HERE U GO)
HIKS 3100 (Again, this gun is garbage, but if you insist.)
For mobbing: Deadly/Overclocked/Capacity/Skeletonized
For bossing: Deadly/Overclocked/Capacity/Adaptive
Tempest
For mobbing/bossing: Deadly/Overclocked/Adaptive/Piercing
For regen: Deadly/Overclocked/Adaptive/Biosynthesis
T-102 Jagfaust (bro pls dont)
For mobbing/bossing: Deadly/Overclocked/Adaptive/Capacity
For regen: Deadly/Overclocked/Capacity/Biosynthesis
CM 800 Jupiter (TRASH at end game but reliable for low/mid level)
For mobbing: Deadly/Overclocked/Adaptive/Capacity
For regen: Deadly/Overclocked/Capacity/Biosynthesis
Proton Arc (NIGHTMARE BOSSING ONLY DONT USE IT IN EVENT)
(Nightmare only. Use for nothing else.)
Deadly/Overclocked/Adaptive/Capacity
Extra Red augmentation specs:
Note: All specs shown here are done with Red weapons and do not includes augmentation cores placed into these weapons, meaning their max slots are 10/3. This is mainly to show how to prioritize your augs.
CM 800 Jupiter
For mobbing: Deadly/Overclock/Adapt
For regen: Deadly/Overclock/Bio
Hotspot
For bossing: Deadly/Overclocked/Adapt
For mobbing: Deadly/Overclocked/Capacity
Shotlite Tempest
For mobbing/regen: Deadly/Overclocked/Biosynthesis (Events and Assault/Heavy only.)
For mobbing: Deadly/Overclock/Piercing (Nightmare mode only. Works with all classes.)
Hardthorn
For mobbing/regen: Deadly/Overclocked/Biosynthesis (Events and Assault/Heavy only.)
For mobbing: Deadly/Overclocked/Piercing (Nightmare mode only. Works with all classes.)
Stripper
For bossing: Tenacious/Overclocked/Adaptive
Alternate augs for bossing: Tenacious/Overclocked/Capacity
1887 Shockfield
For Assault/Heavy mobbing/regen: Deadly/Overclocked/Biosynthesis
Medic augs 1: Deadly/Overclocked/Piercing
Medic augs 2: Deadly/Overclocked/Capacity
CM Gigavolt
For Assault/Heavy: Deadly/Overclocked/Biosynthesis
For Medic: Deadly/Overclocked/Adaptive
Ria Strikeforce
For basically everything: Deadly/Overclocked/Biosynthesis
What’s that? You want aug advice for Hornet and Proposition? aight den xd
Hornet
Sell/Sell/Sell
Proposition
Sell/Sell/Sell
“Rules of Thumb” for best augmentation results:
- Deadly is the best first augmentation due to it simply increasing damage.
- Overclocked is great with Deadly due to massive DPS increase.
- Medics should never use Biosynthesis due to their ability to heal. Biosynthesis is usually best for the other two classes, Assault and Heavy.
Pre-End Game Skill Build (Non-Cored)
HEAVY
Heavy Build 1 (Standard)
25 Hold the Line
23 Body Armour Expert
23 Tough Body
23 Movement Speed
5 Reload
1 Die Another Day
Gear for this skill build:
[link]
Heavy Build 2 (Crit)
25 Hold the Line
25 Critical Shot
23 Body Armour Expert
17 Tough Body
5 Reload
4 Speed
1 Die Another Day
Gear for this skill build:
[link]
Heavy Build 3 (39k HP)
25 Hold the Line
25 Toughness
23 Body Armour Expert
18 Tough Body
4 Reload
4 Speed
1 Die Another Day
Gear for this skill build: [link]
ASSAULT
Assault Build 1 (Standard)
25 Adrenaline
25 Killing Spree
23 Body Armour Expert
20 Speed
6 Reload
1 Stim Shot
Gear for this skill build: [link]
Assault Build 2 (Crit)
25 Adrenaline
25 Killing Spree
23 Body Armour Expert
16 Crit
6 Speed
4 Reload
1 Stim Shot
Gear for this skill build:
[link]
If you want more reload speed, you can use this: [link]
Assault Build 3 (39k HP)
25 Adrenaline
25 Toughness
21 Body armor expert
21 Killing spree
4 Reload
4 Speed
Gear set for this skill build: [link]
MEDIC
Medic Build 1 (Stripper)
25 Medkit
23 Body Armour Expert
23 Biocleanse Bomb
23 Speed
6 Reload
Gear set for this skill build: [link]
Medic Build 2 (Hornet)
25 Critical Shot
25 Biocleanse Bomb
23 Body Armour Expert
13 Medkit
9 Speed
5 Reload
Gear for this skill build: [link]
Medic Build 3 (39k HP + 2 Energy Regen)
25 Biocleanse Bomb
25 Toughness
23 Body Armour Expert
12 Medkit
10 Speed
5 Reload
Gear for this skill build: [link]
Premium Guns Worth a Shot
Note: Most if not all Premium weapons give bonus experience to the player when you use them. They also all cost real money. Prepare your wallet.
Contagion
This weapon is good for any character at every level, but only for Exp contract farming. The Contagion isn’t recommended for Events, Nightmare, or as a standard end game weapon. Good DPS for low/mid level, put Capacity as its augment.
CM 000 Kelvin
Hella good for freezing bosses and Exp contract farming. This one is also coreable if you’re playing Assault. Quite good for mobbing if it’s maxed. 3 pellets per shot, 220 rounds with the Capacity augment.

CM Proton Arc
Amazing bossing weapon, but only usable in Nightmare for low/mid level. It can be an end game bossing gun, but it isn’t recommended for long event runs due to multiple mob and boss spawns, especially during an event such as Virus Samples. While it can only hit one target at a time, it has the highest DPS in the game, (261k DPS when maxed out.) making it one of the greatest bossing guns in the game if you can afford it.

Q: How much damage can Proton Arc deal by using a maxed out DPS Assault?
A: See my video about the Proton Arc below:
Q: how about the Zerfallen?
A: Naaah. The gun has high DPS, but the reload time costs more than the DPS offers so it’s trash, Zerfallen is capped at 2.8 second reload time which means you have to wait 2.8 seconds to continue any sort of DPS with it, while other high-ranking guns sometimes stand with a reload time of less than 1 second. It can make a big impact during battles.
Q: How about the Torment? is it overpowered like on the original Flash version?
A: NOPE. Not even worth a try. Look at this video on the Torment I made:
Event Tips
Along with/after Exp contracts, start with Events for more Exp farming.
Apocalypse
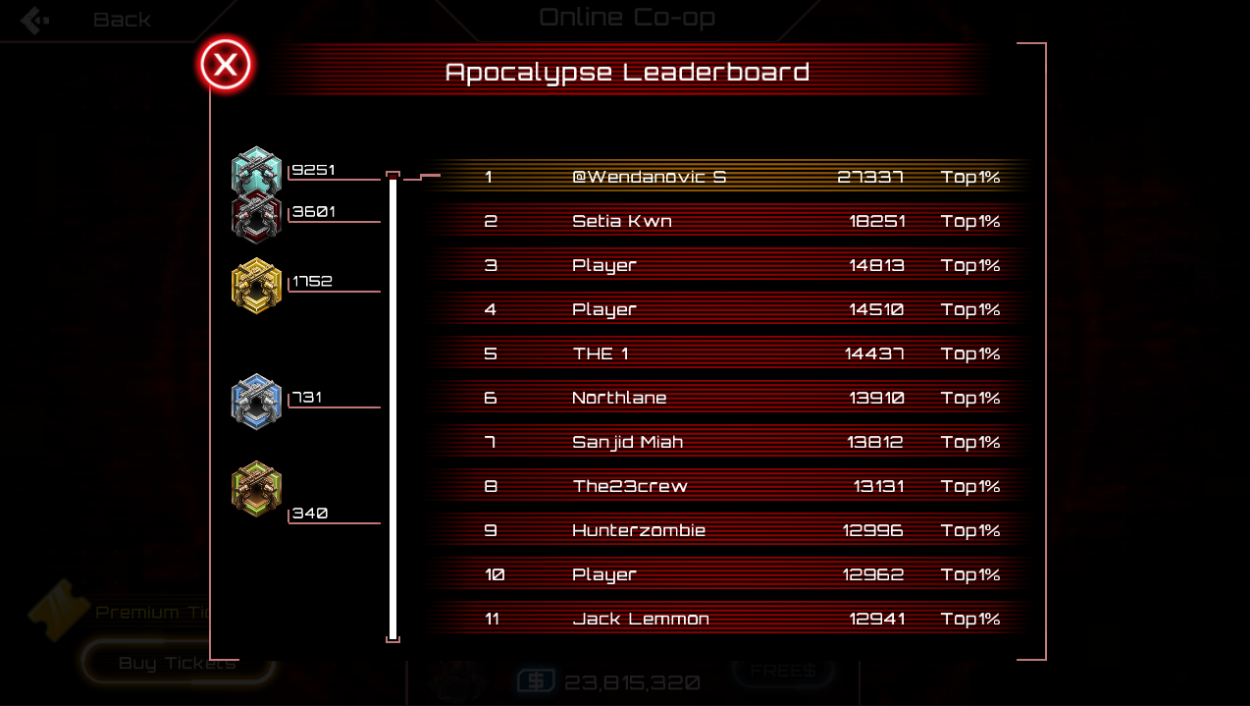
For Apocalypse, stay until Wave 21 for low level or Wave 27 for mid/high level and then disconnect/leave.
Q: Why Wave 21 and 27?
A: At some point, points you earn in Apocalypse begin to deteriorate. The value of waves in points degrades after Wave 27, it becomes around 40-80 points per wave after 27. Because of this, Wave 27 is the maximum wave if you wanted to climb the leaderboard quickly, and Wave 20 is for those who are still weak and don’t have weapons for regeneration or are too slow.
Q: Was it always this way? Did higher waves used to give more event points?
A: Yes, it used to be like that. That was until Ninja Kiwi, the devs, decided to patch it to max out points at Wave 27. It was because “grinding event points at low levels and rising through the event leaderboards was too difficult.”
Q: When did they patch the scoring for Apocalypse?
A: The 1.7.0 Update, released early 2017.
Math ETA for Apocalypse score:
1apoc game, ~21min, ~21wave =501 PTS
21min x 50games=1050minutes=17hours
501 PTS X 50 =25.050
You’ll secure 1st without any concern using this method.
The less your total level is (All players in the lobby combined.) the faster the waves change. In about 15 minutes you can reach Wave 21.
If you want to get to (and keep) Diamond ranking on the leaderboard (Top 1% of participants.) stay above 10,000 points to secure your ranking. This would mean around 25 Apocalypse runs that end at Wave 21 just to get to Diamond.
Virus Samples
Eh… I don’t play this event very often, but here are some tips to get fast points in Virus Samples:
1. Best map to play on is most certainly Power Out with four people. (AKA maxed out lobby.)
2. Have as much movement speed as you possibly can, I’d recommend 90% or more. Never use gear with movement penalties if you can.
3. For best effects, use an Assault character with 25 points in Adrenaline and Killing Spree.
4. Use a Mobbing weapon such as the 1887 Shockfield with a Capacity augment. Along with this, use a Shredder with Capacity augment for Bossing and some extra Mobbing.
5. Have at least 70% on your resistances, especially if you’re using an Assault character.
6. Savage Devastators usually begin to show up when you reach 70k Samples, so just a heads up.
7. For the best effect, try to play with only four people, otherwise you receive less points at the end of the match.
8. It’s best to avoid Virus Samples at a low level. At low levels, try playing Exp contracts, Apocalypse, or Last Man Standing.
Q: Why should I avoid Virus Samples at low level?
A: Virus Samples is very hardcore, since bosses spawn at an alarming rate. At low level without effective gear, you will barely contribute.
Q: How does the Virus Samples scoring system works?
A: The top player at the results screen will get 20% more result points. Second place gets only a 10% increase. 3rd and 4th get a 0% bonus. This is why it is best to play with four people.
Q:How do I survive on Virus Samples as a low level?
A: Don’t play it. 🙂
Last Man Standing
This event can be the most challenging and annoying for those who don’t know how to play it. Here are some tips:
1. If you want to climb the LMS leaderboard for quick rewards, make a character with tons of skill points put into speed and simply run around, waiting for people to die. I’d recommend making a level 25 with 24 points put into the speed skill so you’ll match up with a weak team. Usually, if you’re good enough at it, it can be either as short as 1 minute or a bit longer at 4 minutes per game. You can make a lot of points and climb up very high this fast.
2. If you see someone much stronger than you, bolt. (Unless you think you can take them.) Always look for a game lobby with the lowest levels.
3. Having at least 1 gun with Biosynthesis really helps just in case you get hit, especially if it’s a shotgun like the HVM 004 or the 1887 Shockfield.
4. As always, avoid using stuff with movement penalties at low level.
LMS is by far the best event for Exp grinding, but you’ll need good partners to last long in it. Around 30 minutes in Last Man Standing will yield you 1 million Exp if you’re level 70, while you need to reach Wave 51 for 1 million exp in Apocalypse. One of the best ways to do this is to go lurking for strong random players/friends to help you with LMS. Both players must cover each other. The longer you survive, the more Exp you’ll gain.
DM ME IF YOU WANNA RUN FOR INFINITE HOURS xd
Critical Shot Calculation/DPS Calculator [Extra]
This info is based on an Assault character with 25 points spent into Adrenaline, Killing Spree, Critical Shot, and Deadly Force. All Masteries and Collection damage bonuses are included.
What we will be calculating is the approximate damage a full magazine from the Hornet can do. While calculating DPS in SAS 4 can be tricky, we like to approximate anyway:
Adrenaline 235,011 + Killing Spree 352,516 = 587,527
+ Critical Shot (65%) from 125 Capacity +10% Damage perks = 1,215,045
+ Supercrit (5% chance to do 10x damage.) from 125 capacity = 7x Supercrits guaranteed.
9300 x 10 = 93000 x 7 = 651000
(Watch carefully at the 0:25-0:35 mark on the video for 7x Supercrit.)
Total damage of the Hornet: 2.453.572 MAX per magazine.
DPS the Hornet should have:
Base 9300 x 25.27rps + Adre 235,011 + 16% crit for 25.27 Capacity 299,088 = 534,099 + Killing Spree 352,516 = 979,615 DPS + 1x Supercrit
In the video, the Necrosis died after 313 rounds which is mean its equals to 10,775,765 damage. This means the Necro had at least 10 million HP. It took about 11 seconds to reach 320 rounds because of the chances for crit/supercrit, although the Necro died in 8.5 seconds. (With Adrenaline active.)
Extra: Titan IED Hud with Smart Target and Deadly Force base cored.
Extra 2: 10 cores to increase your damage and rate of fire of the gun by 50%. However, this isn’t a pure 50%. This is the main bug that makes every single gun weak in the Mobile/Steam version of the game. They only increases about 26%. We know this because if it was a pure 50% the damage would be same as the Hornet from the Flash version. The Flash version has about like 14,000 base damage with 12 points in Deadly while boosted with a Titan IED Hud augmented with Deadly Force and Smart Target. On Mobile, it maxes out at 9359 base damage with Medusa Gloves. With Deadly Force, that would be 11,000.
26% only affects damage from things like Deadly, Overclocked/Piercing/Capacity are okay because that’s when they get the full 50% bonus.
Q: Is there any way to calculate DPS?
A: Hell yeah there is!
[link]
Note: Some functions are down, but I’ll fix it and add to it when I care.
Epilogue
“Thanks for reading. pardon my english if you feel its bad heh, Also if you like to see other guide, go to see one of vets of this game named papabear he also have extraordinary guide for new comers, If you wanna have a game with me just Add me and message me i’ll eventually replies within a day 🙂 also if you feel this guide is NOT HELPING or USELESS feel free to land your tought in the commect section” -Yoga_R@ppapa
[link]
“(me, papabear) I’ll be in charge of fixing this guides grammatical errors when I get the time. I will not be changing the contents without the authors permission.” -Blast_R@ppapa
[link]