Overview
How to unlock the secret exits in Love is Dead. You only need to unlock one of these for the achievement, but they are potentially useful for speedrunning the game as they allow you to skip large numbers of levels.
Level 1-2
In the third section of level 1-2, the first secret exit in the game can be found over on the island on the top right.

Secret exits are quite simple to activate – when you are near them, you will see a circle appear on the ground. When you step on them, it will cause the other secret exit location to glow.
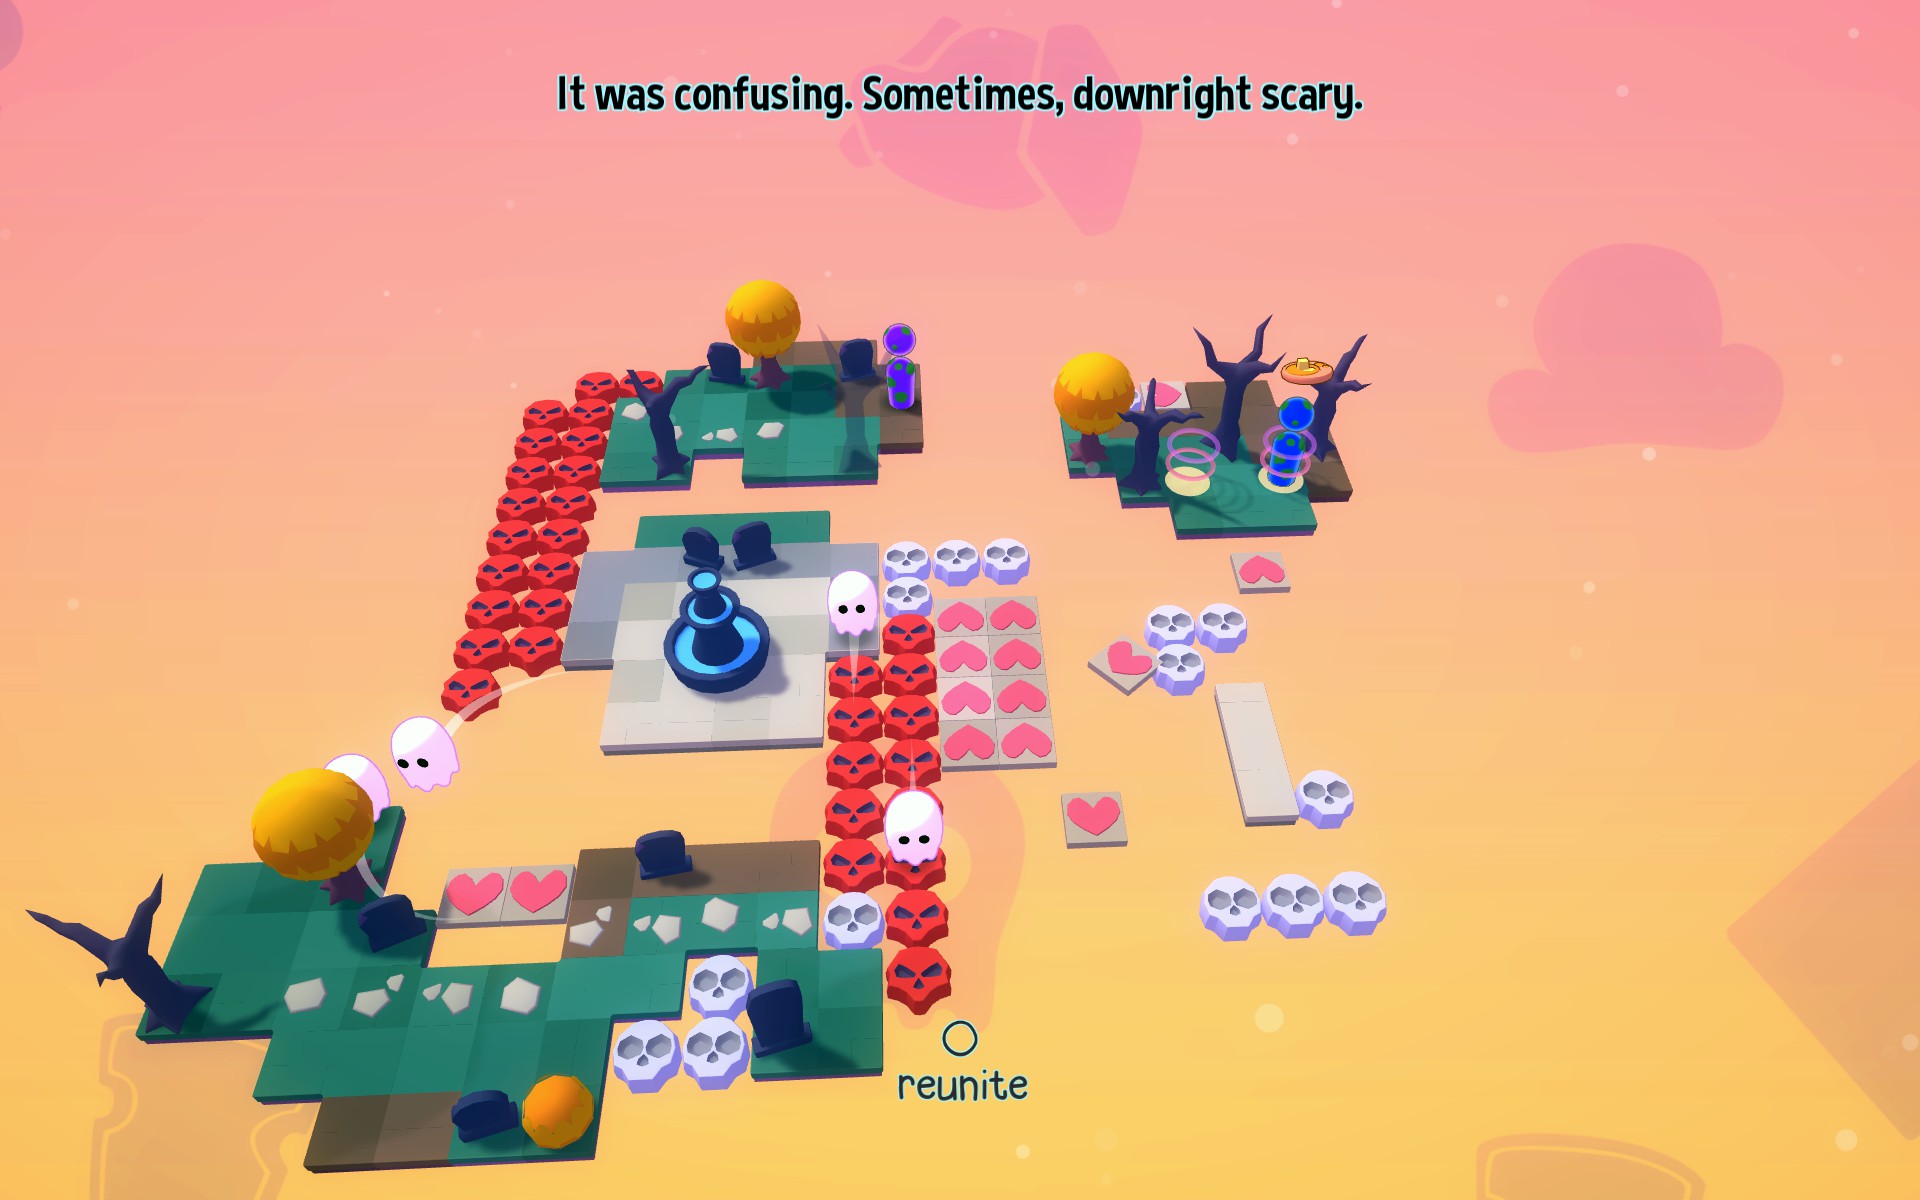
All you have to do to activate a secret location is bring both of the lovers to them, placing one lover on each of the exits, and you will leave the level and activate the secret exit.
In this case, the easiest way to get the lovers there is to take the lover on the bottom-left (in blue in this screenshot) to the right, taking them across the red skulls, then over to the island on the bottom right (retrieving the pancake in the process), before freeing up the heart platform over there to go up to the top-right island.
The easiest way to get the other lover to the island is to simply free up the heart platform just above the top-right island, then allowing it to float over, while unoccupied, to the second lover’s location.
Then simply have the second lover (in purple in this screenshot) hitch a ride back over to the top-right island, and activate the secret exit!

Like all secret exits, this one leads to a later level in the present world. This secret exit leads to level 1-6.
Level 2-2
In the third area of level 2-2, there’s a parking lot full of cars.
The blue car on the far right, just above where the right lover (in blue, in this screenshot) starts, is the car you must preserve at all costs.

Why?
Because your goal here is to clear out every car in-between that blue car on the far right that is facing to the left, and the buildings on the far left.
There are two cars you must pay particular attention to – the yellow car and the light blue car, both facing to the right, in line with the blue car you are trying to clear out. If either of them is allowed to drive off unobstructed, they will strike and destroy the car you are trying to use.
Your best bet is to clear out the red car (immediately to the left of where you start), followed by the problematic yellow car, followed by the problematic blue car. From there, clear out the rest of the cars in-between by driving them to the top/bottom, then, once the path is totally clear, get in the light blue car facing to the left on the far right and let it drive into the buildings on the far left.
The spots you need to stand on are located behind that building; position one of the lovers on each of the two spots to activate the secret exit.
This secret exit leads to level 2-8.

Level 3-2
Located in the third section of level 3-2, these are the sneakiest secret exits so far. Where are they? Behind the walls!

This seems easy enough – all you need to do is lure the baseball bat goons to the walls and have them strike the walls with their bats, destroying them and giving you access.

Easier said than done.
The two secret exit locations are located in the top-left of the map (where the purple lover with the pancake over her head is located) and the middle-right of the map (the glowing spot in the exposed area).
It does not matter what section of wall around the secret areas you have the baseball bat goons destroy, but you need to gain access to both areas, as you must position one of the lovers on each of the spots.
This secret exit leads to level 3-7, skipping most of the area, and (most importantly) the pancake checkpoint.
Level 4-4
Breaking the pattern up to this point, the fourth secret exit is found in level 4-4 (rather than 4-2), and is found in the first section of level 4-4 (rather than the third section). Note that you can reach level 4-4 immediately after completing level 4-2 or 4-3, so this is not too much slower than the previous secret exits.

This exit is pretty straightforward: it is located on the ship on the far left of the screen. One of the exits is on the top-left of the ship, while the other is down on the bottom of the ship. The only hard part is getting over there.
Ultimately, it isn’t terribly difficult to make your way over there; you simply must time the cannonballs and move along the path while you’ve got the chance. Note that only the elevated area (in brown) is walkable; the lower area cannot be walked on.

You can make the way over a little easier for the second lover by blowing up the cannons in the middle by putting the explosive barrels next to them on the way over there; this means that your lover won’t have to dodge the first set of cannons.
This secret exit leads to level 4-7.

Level 5-3
In the third section of level 5-3 (which is accessible immediately after 5-1) is the 5th world’s secret exit.

This secret exit is very easy to get to, it simply requires a bit of doing.
You must take the treasure with the top lover (purple in this screenshot), then immediately go back down over the crumbling floor and bring it over to the altar. This will trigger a boulder to roll down the map, clearing out the center of it. This is necessary for clearing out the way for the bottom lover to get to the secret exit point.
Next you will need to bring the top lover over to the top secret exit point. This is above where the treasure was located. With the crumbling floor gone, this might seem impossible, but there’s a secret way around through the trees on the top left, which itself contains crumbling floor.

Simply move the lover up along this secret passage to the top of the map, and you will reach the secret exit point.
The second secret exit point is on the bottom of the map, which is why you had to trigger the boulder – the bushes block the way to it otherwise, rendering it inaccessible. Move the bottom lover (blue in this screenshot) down to the second secret exit point to activate the secret exit.


This secret exit leads to 5-7. Note that this is before the pancake checkpoint, meaning that if you are speedrunning the game, you must acquire 60 pancakes to pass through to the end of the 5th zone of the game.
Level 6-2
This is one of the simplest of the secret exits to get to.

In level 6-2, in the third section of the level, you will be in an area which contains two lasers which will target your characters.
You want to move your character out in front of the large orange tubes, then dodge out of the way of the laser shots. This will cause these tubes to be destroyed.
Behind the tubes are the entrances to the secret exit, one in the center-top, and one on the right.
Simply bring one lover to each of the secret exits to complete the level.

This secret exit leads to level 6-7, which is after the pancake checkpoint, meaning that you can skip the checkpoint in this section of the game.
Level 7-3
Ironically, the last of the secret exits is also arguably the easiest to get to.

On level 7-3, in the third section of the level, the secret exits are simply located at the very top of the rightmost island, on which the right lover spawns (purple in this screenshot), and at the top of the pirate ship in the middle, behind the rocket.
Nothing special has to be done to clear the path to these; all you need to do is move the right lover to the top of her island and the left lover (blue in this screenshot) to the ship in the middle and move them to the exit at the top.
This secret exit leads to level 7-8, which is past the pancake checkpoint for world 7; this means that from 7-8, it is a straight shot to the end of the game!
