Overview
This guide shows how to access every secret in the second episode of Doom.
E2M1: Deimos Anomaly
This level has 4 secrets.
After crossing a walkway over a blood pool you will find a switch on the wall. Press it and step back and you will see a red button rise out of the floor. Pressing this button will cause a teleporter to appear if you travel back to where you collect the blue key. This teleports you to a secret room containing the Plasma Gun.
On the back side of the button that rose from the floor for secret 1 is a second red button, that when pressed opens up a small compartment nearby (shown opening in the picture below). This compartment contains the red key.

Go into the nearby teleporter from secret area 2. Your way will be blocked by a tall platform with demons on it. To your left are two skull switches in the wall. The switch on the left causes the wall to open up leading to a secret telporter, which takes you to a thin corridor with a number of health and armour bonuses. Note that this only opens up temporarily and can only be opened once, so if you let it close you will need to restart the level to access it.

Now that you have the red key you can open the locked red door. It has a blue armour and automap behind it.

E2M2: Containment Area
This level has 12 secrets.
The yellow key in this map is optional for completion of the map, but necessary to get all of the secrets. To cross the blood pool and collect the key, a path will raise from the blood if you walk under the blue circles in the ceiling.
There is one crate touching the Western outer wall of the crate maze. Walking towards it from the North will cause it to lower, revealing a small secret compartment with shotgun shells.

In the level near the yellow key are three circular machinery things with moving floors. The left-most one has a secret tunnel hidden inside if you ride the moving floor down.

Explore the level until you find some flashing blue strips which hurt when you stand on them. Walk past all three and you will find a small tunnel in the far corner.

Collecting the backpack in secret area 3 will trap you in and you will be ambushed. To leave you need to activate a secret door at the back of the ambush monster closet. This leads to a secret room which has a second secret door in it that leads you to a small corridor that takes you back to the rest of the level.


Inside the short corridor in secret area 4 there is another secret door.

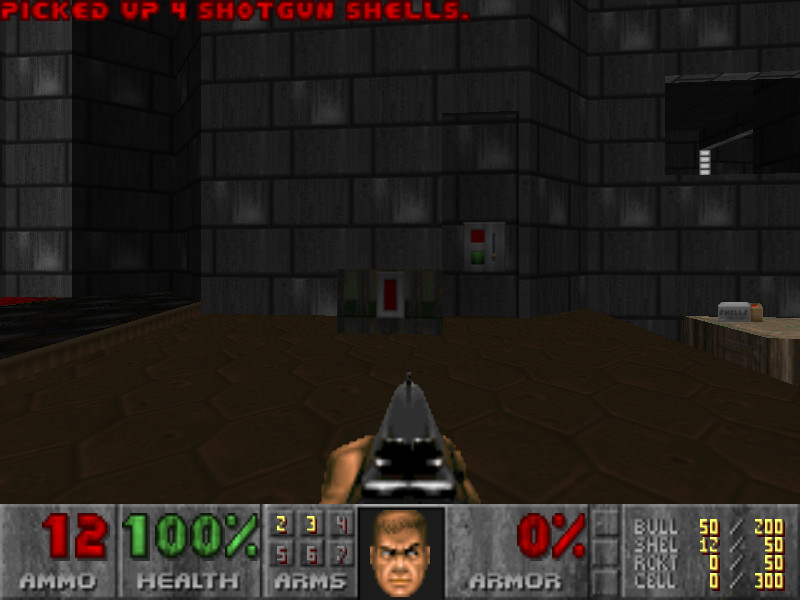
When you can see the exit door on the other side of a slime pit near the red locked door, turn around and you will see a room with a grey hexagonal ceiling and floor. In the middle of this room is a brown pillar with a strip of light flickering on one side. On the opposite side of this pillar to the light is a switch. When pressed, this switch will lower the other pillar in this room giving you a Plasma Gun. Watch out because this column only lowers temporarily and can only be lowered once. If you miss this you will need to restart the level or load a save game and try again.

Near the exit door is a corridor with a number of crushers. In the middle of this corridor under one of the crushers is a tunnel on the left side. This leads to a secret chainsaw.

At the end of the crusher corridor you will find a slime pool with the blue key. On one side of this pool in the corner of the room is a small triangle of light. Stepping into this will lower a soulsphere on the other side of the room. This is only lowered temporarily so you will need to run to the other side of the room to collect it. If you fail to collect it, it can only be lowered once so you will need to restart the level or load a save game.


In the top-centre of the map in the crate maze you’ll find a grey room with a locked yellow door. Inside is a chaingun that counts as a secret.

In the top-right of the map in the crate maze is another yellow locked door. Inside is a large room with a backpack at the end, a number of pillars, and three grey UAC doors. Picking up the backpack raises 3 computers with switches at the back. Each switch opens one of the doors in the room, and the small room behind each door counts as a secret.


E2M3: Refinery
This level has 6 secrets.
In the Southwest of the map is a small area that leads to an outdoor pit of blood. Jump into this pit and you will find a path leading to a Plasma Gun.

Continuing on from secret area 1 you will eventually come across a small room with a hexagonal slime pool in the middle and a blue armor against the wall. In this room you will see two sets of bars on the wall. These each contain a secret door, these are only shortcuts but walking through them counts as a secret. They can only be opened from one side, one will open from this room but the other needs to be opened from the flesh room.


Directly outside the flesh room is a corridor with vines on the walls. In the corner the wall is a slightly darker brown colour and is a secret door.

Beyond the locked blue door is a dark flashing maze, and after that is a big slime pit. If you do a U-turn to the right in this pit you will see a small ledge housing a biohazard suit.


In the same slime pit walk through the tunnel at the side. At the end is a small room with a few health bonuses, but in the corner a soulsphere is hiding behind a wall.


E2M4: Deimos Lab
This level has 10 secrets.
In the start room a light is shining onto a wall on the right. Open this wall for a shotgun and ammo.

Enter the teleporter out of the start room and go straight ahead and up a lift. You will come to a room with a green armour and an automap sitting behind some bars. Walk around the right side of these bars to see a red column with a skull on top. Walk up to this column and the bars will lower.

Continue through the level past a ring of slime and you will come to a junction, with the right path leading into a dark corridor ending with a bright room containing a crusher trap. Instead of going into this room, turn around and shoot the wall on the right side of the corridor, and it will open revelaing a blur sphere and chaingun.


Past the blue key is a corridor with a crusher trap. Beyond this you will come to a thin zig-zag path with a biohazard suit on the other side. If you fall down into the pit, you will find a secret beserk pack on a small platform.

When making your way out of the slime pit the beserk pack in secret 4 is in, you will return to the large ring of slime you crossed over earlier. If you walk around this slime ring clockwise a room will open on the north wall opposite the green armour and blursphere. This contains a large number of demons and spectres, as well as some goodies including a soulsphere.


Immediately behind the yellow key door is a circular stone corridor. Follow this clockwise until you see some stairs leading downwards into a room with 5 doors and a lava pit. In the lava pit is a secret platform with two medikits on it.

Escape the lava pit secret 6 is found in by opening a secret door in the corridor on the other side of the lava pit. Behind this secret door is two paths, one leading back out to the level and other leading to a room full of goodies with a red rock wall on the back. When you try to enter this room the floor will raise and will try to crush you against the ceiling and kill you, so make sure to run into the room to get the secret goodies inside. (To run, hold SHIFT or on most source ports press CAPS LOCK to toggle “Always Run” mode on and off). There is a secret door that allows you to get back out of this room.

Make your way out of the secret corridor and back into the room with 5 doors. Open the rightmost door to find a small room with a slime pit. To the right of this slime pit is a small room holding a blue armour, but it is blocked by barrels. You will need to stand in the slime and shoot the barrels to blow them up without killing yourself.

Go up the stairs and back into the circular stone corridor. Continue going clockwise and you will see a small triangular hole with badly aligned wall textures. Fall into the hole and there is a secret door in the wall that leads to a plasma gun.

Walk up to the exit door and turn around. There is a soulsphere in an alcove on the wall across the blood pit. If you enter the exit room, a path raises up out of the blood to let you reach it.

E2M5: Command Center
This level has 10 secrets, one unmarked secret, and leads to a secret level.
In the start area there are two hidden alcoves both containing shotgun shells and imps on the left and right sides of the room. On one side there is a medikit in front of the secret door, while on the other there is a pool of blood. Both of these count as a seperate secret.


From the start room head up the stairs on either side and continue straight ahead to the outdoor area with deep slime pits on either side. Behind the large square marble block is a small skull door. Go through this then turn left. Behind a large door is a tiny room filled with enemies, and in the corner of the room is a small glowing decoration with skulls. There is a secret door contaiing chainsaw next to this.


In the South-West of the map there is a small area covered with vines, and in the centre is a small room with a switch inside. While this switch is not really hidden, it does enable you to collect a Plasma Gun inside secret 6, and is not marked as a secret. It is advised you press this switch before looking for secrets 4-6.

Towards the South of the level there is a wooden spiral staricase. If you walk up to the top of this staircase and then go back down again, the central pillar will open leading to a secret biohazard suit and cells.

Collect the biohazard suit in secret 4 and go back up the spiral staircase. At the top is a small skull door. Open it and head to the right, you will travel down a long slimy corridor and around the area where the swtich described in the unmarked secret section above resides. Towards the end there is a clip on the floor next to the wall. If you walk over to it a secret door in the wall will open up automatically.

Go into secret 5 and continue past the cage. This will lead to a small room with two doors and a mural on the wall between them. The doors and mural can all be opened and lead to a small room with a deep slime pit. Inside this slime pit is a large cell pack which is marked as a secret, and a teleporter out which places you back at the start of the level. The platform with the Plasma Gun in the centre of the slime pit is accessed by pressing the switch described in the unmarked secret section above.

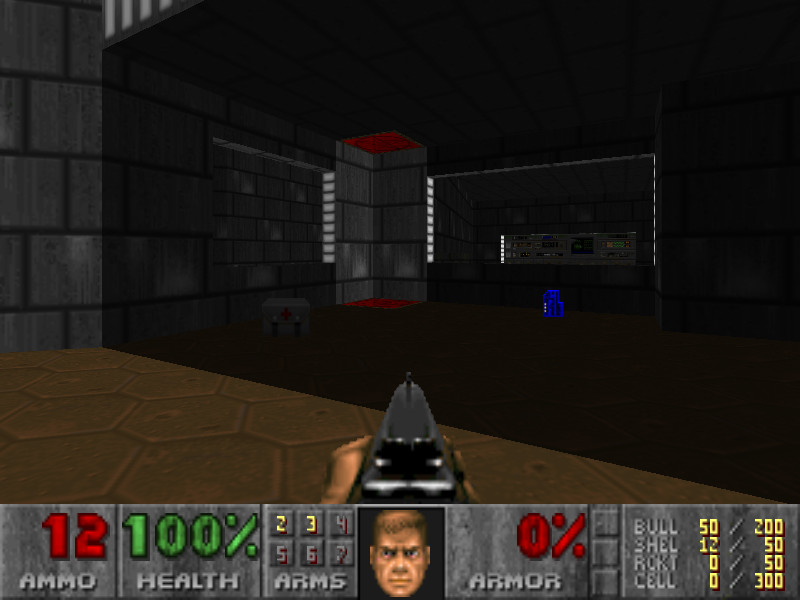
Reaching the secret exit involves travelling through a number of rooms which are all marked as secrets, so while these can all be considered part of the same secret they technically count as 4. In the South-West area of the map you will find a green marble room with ledges in each corner that have a red fire texture on the walls. (See the second screenshot below). In this room there is a door leading to a small wooden room with a switch inside that is tucked into a small alcove in the corner. Pressing this raises stairs in the corner of the green marble room leading up to one of the firey ledges. You can walk through the fire texture and into a secret teleporter. This leads to a tiny room where you will be surrounded by a number of lost souls. Inside this room is a lion face on the wall that acts as a door, leading to a second teleporter that takes you to the secret exit.


E2M9: Fortress of Mystery (Secret Level)
This level has one secret and it’s the exit room which is marked as a secret, so it’s impossible to miss.
FUN FACT: This was done because in the original Doom Engine, getting 0/0 secrets counted as 0% on the end level screen. Putting in a guaranteed secret makes it show 100% so nobody thinks they’ve missed any secrets. The majority of modern source ports show 100% instead of 0%, so modern map authors have no need to use this silly workaround.
E2M6: Halls of the Damned
This level has 3 secrets.
To the North of this level you will travel through a long, thin, dark tunnel until you reach a junction that splits into another 4 paths. Heading South (which has a health bonus in front of the door) will lead you to the yellow key, but the other three directions are all traps. Triggering each of these traps gets you a secret, and these make up the three secrets for the level.
Take the West path. You will see a blood splat on the floor and a chaingun in the distance. Walking to the back of the room will trigger an ambush and get you the secret, but the ceiling towards the entrance door will also come down and crush you if you try to backpedal out of the ambush, so make sure to jump into the thick of the fight.

Take the North path. This is a small room with goodies on a cenrtal platform. Picking up the goodies unleashes an ambush and awards you the secret.

Take the East path. You will see an exit door requiring the yellow key. Open the door and press the switch inside. Surpise! It’s a fake exit. The floor will lower into an ambush. Getting the credit for the secret requires you to go through the corridor that takes you out of this trap and back into the rest of the level. You also get an automap for your troubles.

E2M7: Spawning Vats
This level has 6 secrets.
Go to the South-East of the map where you find the outdoor area with the blue key and the infamous bodies hanging from the sky. You will find a corridor with stairs leading up into the rooms seen through the windows in the first screenshot. These rooms ultimately lead to a third small room down some stairs with a large flashing switch. Pressing this switch opens a small closet in the same room containing a blur sphere and an automap.


From the start room follow the right-hand path and follow the path, ignoring the blue key door. You will come to a room with an invulnerability sphere and silver UAC pillars along the walls. Inbetween two of these pillars is a small corridor leading to a very dark secret area with some green armour and ammo.

Inside Secret area 2 to the north past the green armour you will find a switch on the wall. This is a door leading to a secret chainsaw.

Continue along the main path past the invulnerability sphere and you will come across a small grey room with radiation signs in the entrance. One of the small slime pits around the room has a small corridor leading off from it, which leads to a secret room with a rocket launcher and a teleporter. Going through the teleporter leads to a small room with damaging floors and a door needing the red key, so come back later if you don’t have it yet. Opening the red key door here gets you the fifth secret and another switch to press. This switch helps open the final secret.


To open this secret you need to press two switches. The first is the switch inside secret 5. To find the second, go through the blue key door and go up the stairs on your left. This leads to a small room with the switch lying between two doors. Pressing both of these switches opens up a small closet in the start room with a soulsphere and large cell pack.


E2M8: Tower of Babel
This level doesn’t have any secrets.
FUN FACT: Unlike the secret level, this level does not have a dummy secret which would ensure the level end results screen shows 100% secrets. The reason for this is because the original executable file did not show the end of level screen for boss levels, instead going straight to the episode end text. (This behaviour is changed in many modern source ports).