Overview
Just a guide to setting up a good, sort of beginner friendly, base of operations in Riverside. It starts off as safe and ends up being impenetrable. It’s a great starting point for anyone looking to get their first base set up with little hassle which allows them to explore and survive in comfort. The best part is you can set it up right out the gate.
Before we carry on:
This guide works under the assumption that you understand the core elements of the game. While I’ll try to explain some elements knowing how to craft, how to move objects, how to fight and when to fight is best left up to more extensive guides on those subjects. This guide is meant for one goal: building your first base.
This is a new character friendly base. You can take it within the first week of spawning. In some cases you could even rush right over there and set it up in a day or two.
Everything written in this guide I have done myself with no mods and on core Apocalypse difficulty. If you want to use mods or change the difficultly that is 100% up to you and wont effect this guide much if at all.
This guide is written for the Beta Version B41. As of the time of writing there is no multiplayer so everything shown here will represent the single player experience.
I will be using [link] for a lot of directions in this guide. It’s a great resource that I highly recommend you use.
Added “Additional Tips and Ideas” section that might have some additional information you will find helpful. These are just little tidbits I’ve learned from others or stumbled upon after making this guide. All will help maximize your base!
Added “My Base” section. This section contains a base I have made and can maybe serve as a template for what you can do with yours.
Where the base is located:
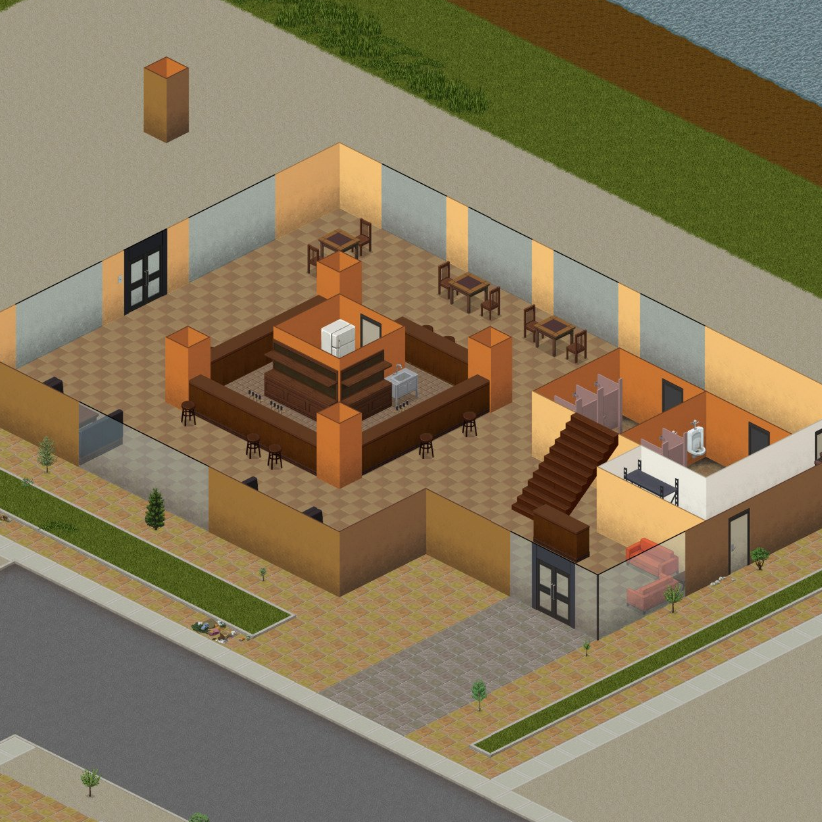
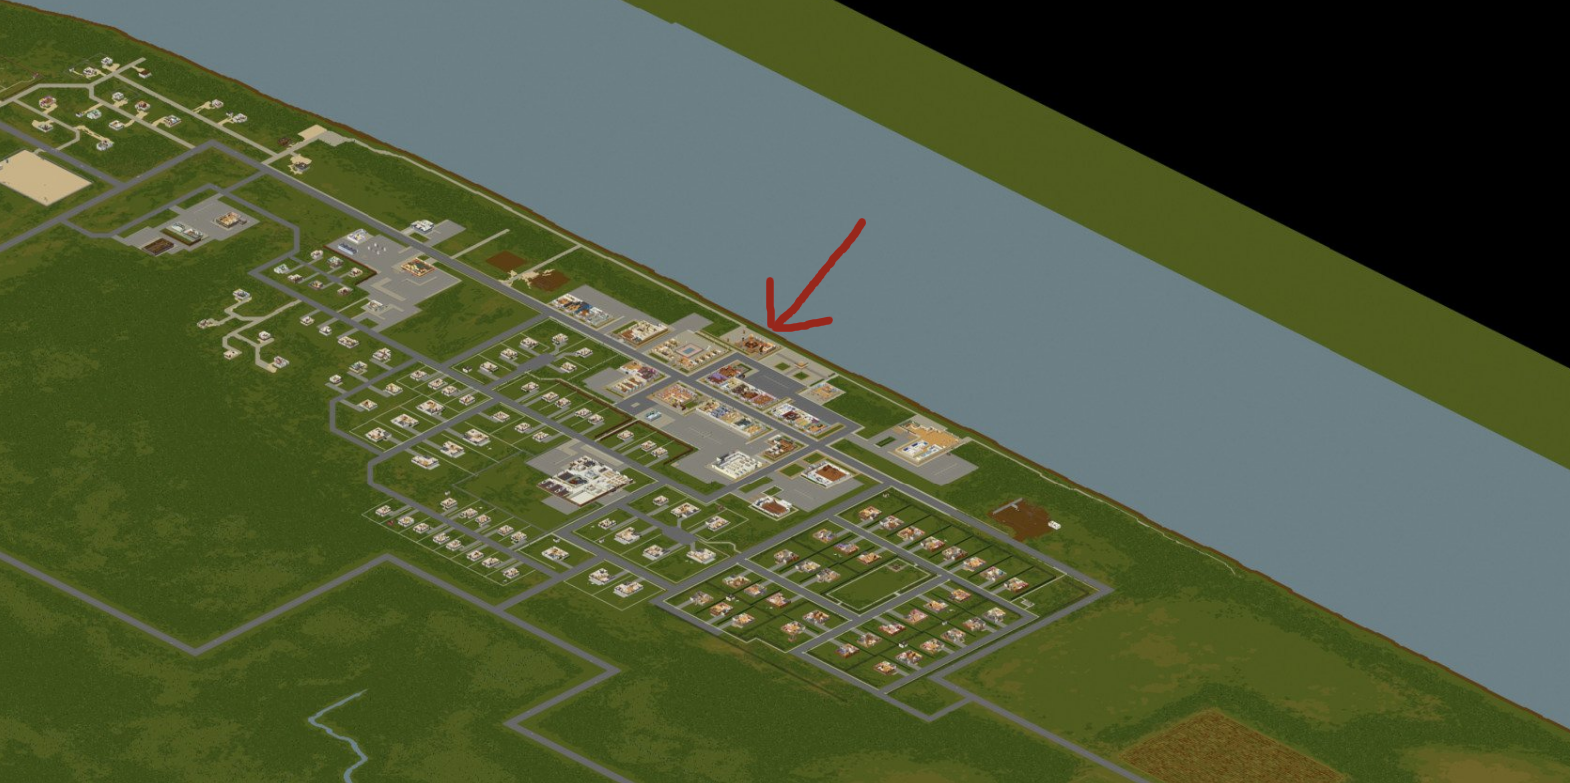
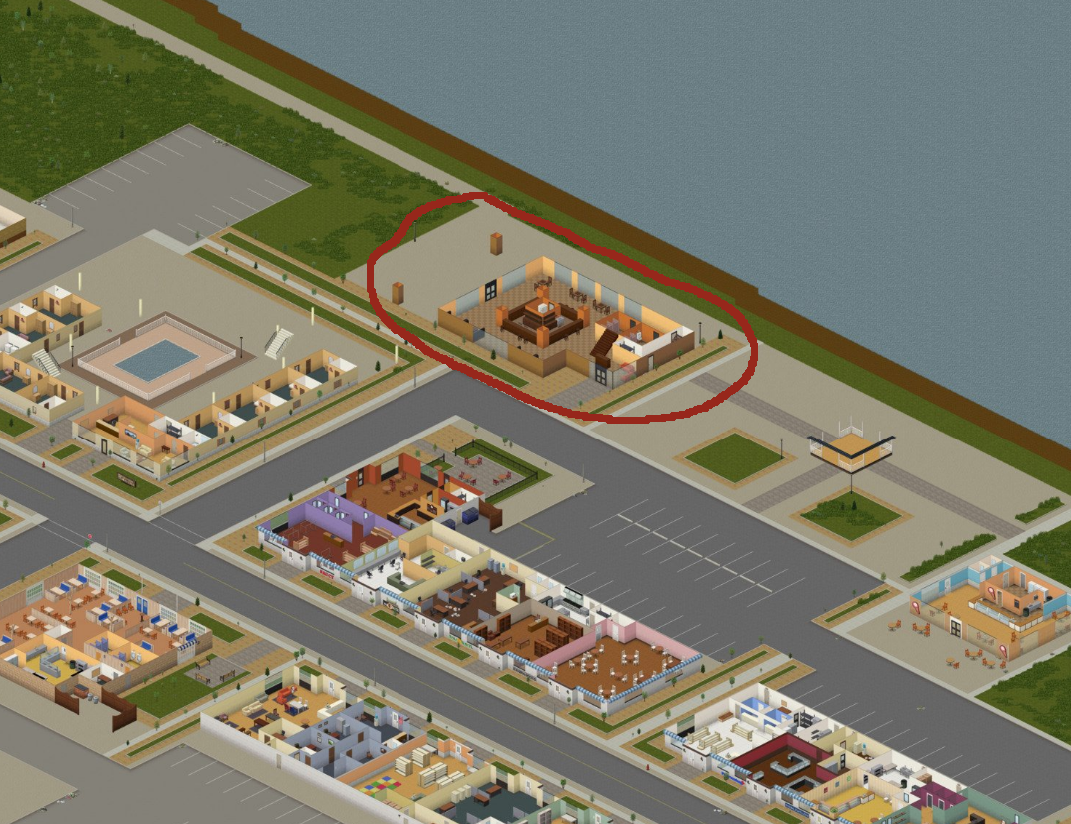
- The base I have chosen is located at the far north of Riverside. It’s a glass windowed restaurant with two floors and two ways up (for now). It’s located right by the river and north of all the shopping centers.
When you arrive:
- Before we get started there are three things you need. Hammer. Nails. Sheet rope. All of which can be acquired on the way here with a tiny bit of luck.
- When you first arrive at your new base chances are it will have some undead inside and outside. Go ahead and clear those fellas out top, bottom, and outside making sure to check the backroom and bathrooms. Once you’re sure the place is secure we can move onto the defenses.
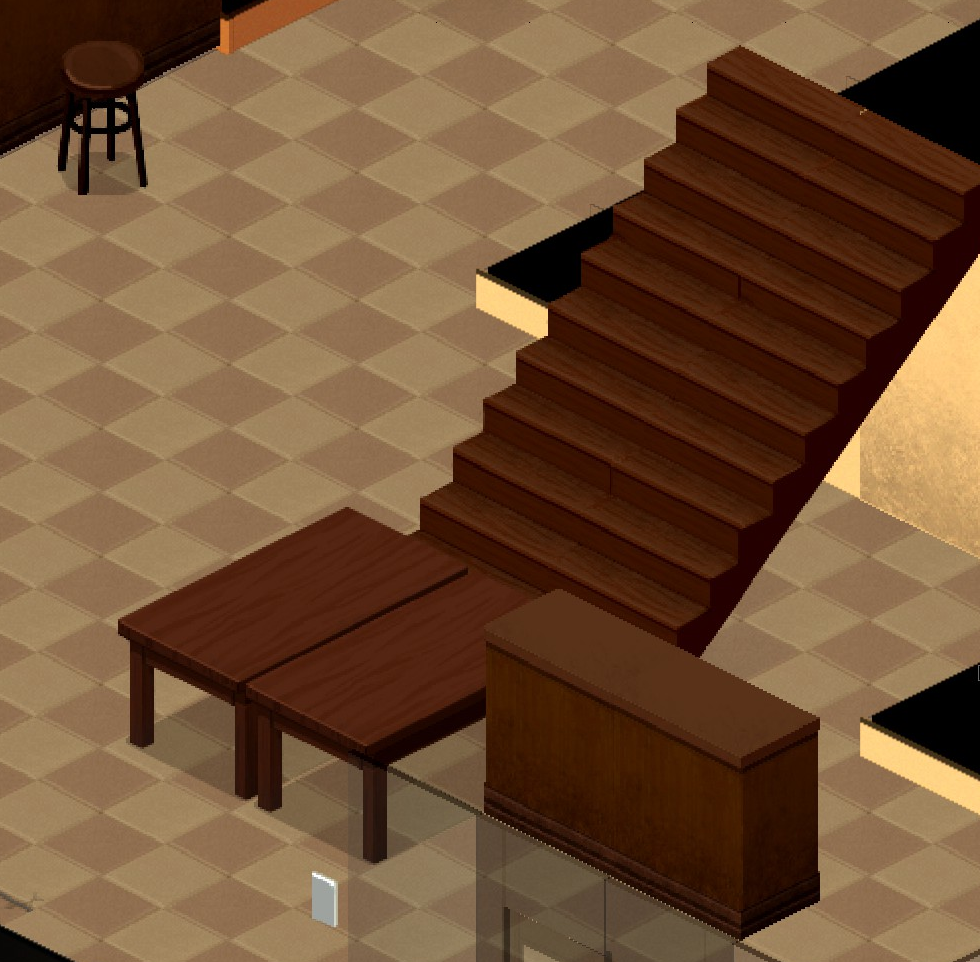
- On the ground floor towards the south end of the building there will be a flight of stairs. This is one of two ways up. For now we want to take the two tables nearby and block them off. Zombies can destroy these tables, but there is more stuff around that you can continue to block them off with.

- Now head towards the other side of the building next to the bathrooms. There is a door that will lead to the back room. Inside here you will find a shelfing unit and a box. You’re going to want to empty both of them out and then move them in front of the doors. This will block the doors.


- Now work your way up top. You’re going to want to break out at least two windows, remove the glass, and attach the sheet rope. It requires the hammer and nails along with the sheet rope. (in a pinch nails can be acquired from disassembling the chairs and tables if you didn’t happen to find any on the way here) Now we have two ways out and two ways in and zombies have none. Kind of. What we need is a sledge hammer to make it fully secure.

After it’s secure:
- After the base is cleared out and set up it would be a good idea to look around. The first floor has a large bar to loot often containing cigarettes and booze. The second floor has a kitchen with four fridges, two sinks, four stoves, and plenty of storage for all your loot. There are two bathrooms up top and two down below. The dining area has plenty of tables and chairs to dissemble to increase your carpentry. The booths count as “average” beds. There is even a balcony.

Where to go now:
- Now you might be wondering where the best places to go are. If you’ve made it to the base within the first day or so then food wont be rotted. I would recommend putting the fresh food from the 2nd story of the base into the fridge then head over to the food market (blue) and loot some food prioritizing the perishables that you can also put in the fridge. Then you could go across to the hotel (pink) and grab a bed and a T.V. Then you could head over to the hardware store (green) and loot some tools. Then you could head over to the book store (yellow) and get some books to read. Really you could do just about anything so long as you keep your head on your shoulders. If anything gets too dicey just hoof it on back to your base.

What to do:
- Since you’re right by the river you have all the fishing potential you could desire. If that isn’t your cup of tea you could make a garden on the balcony; up there no zombie can get you and you have a beautiful view of the river. If you’re down with carpentry you could disassemble everything on the top and bottom floor then head over to the hotel and do the same. If you like metal working there are sinks, toilets, and tubs at the hotel to disassemble. If you like nature you could run it back into the woods and do a little lumberjacking and foraging. If all of that sounds boring you could head into town for some looting and killing. From this base the town is yours.
Getting a Sledgehammer:
- This would be the end game to securing up your base. Sledgehammers are pretty rare in my experience, but are an amazing tool. The best bet to acquire one would be at the warehouses outside of town.
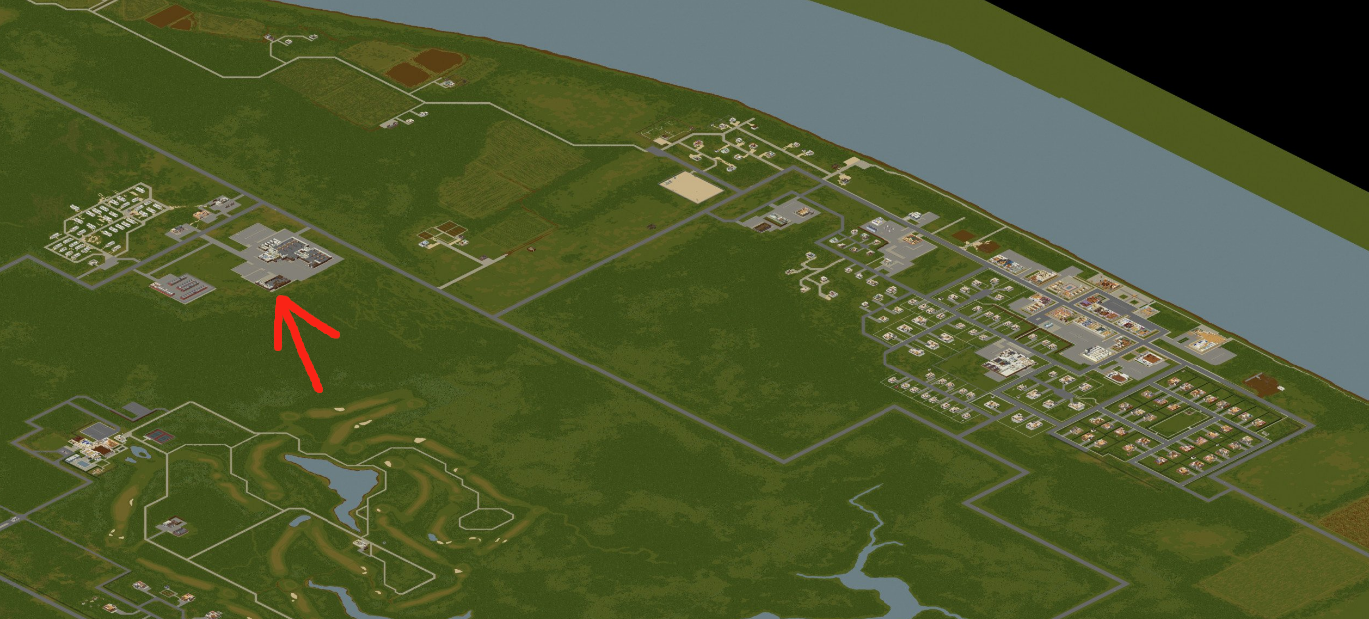
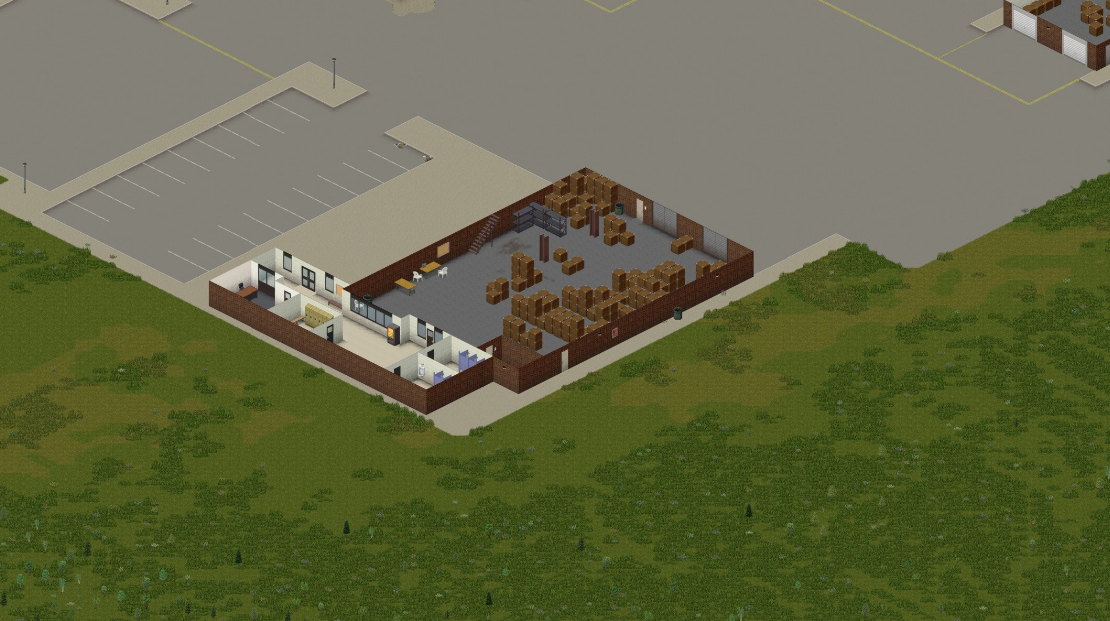
- This will be an extremely sketchy journey that might not even have what you’re looking for. It’s still in my opinion the best bet to get a sledge hammer when you’re on this side of the map. Just check all the creates slowly making sure not to skip one.
- A sledgehammer is not mandatory, but it is essential for your complete safety and full construction of your base. Until you get one you will have to keep replacing the tables with varies objects to block the path of zombies from coming up. This is a mild hassle that can ultimately lead to death and most people don’t want that.
- Once you get the sledge hammer you will want to take out the staircases. Personally I only opted into destroying the main flight of stairs.

- Once it’s destroyed you can add a floor over the opening so you don’t fall down. Learned that the hard way.

- After that’s all done there is no way for zombies to get you so long as you’re on the 2nd floor. Even if you bring a whole hoard back to your base they will just stand around confused not knowing what to do.
Additional Tips and Ideas:
- As user Kilted Weirdo Suggested in the comments another option to the main staircase is to enclose it in walls. While this is far more effected than the tables there is still a chance a pack of zombies could rip through it. It’s a great alternative if you don’t plan on rushing to a sledgehammer.

- There is a number of water coolers around the map each holding 150 units of clean water. These are useful for after the water goes out as a backup. They can be picked up and carried back to your Base. Here is just the location of four, but there is more scattered around the map like in the Hotel or the Rec Center.

- If storage is getting tight there are clothing racks located in a few stores nearby. Time 4 Sports, located in the strip mall to the west, has three 5 pound racks that can store up to 50 pounds of clothing each. While you could just make a crate this is a nice way to keep clothes organized for no material cost and can all be collected in one trip.


My Base:
For those of you who are ready to move past the starter base and venture into something more advanced here are some things I have done to make this base my own. When I started this run I knew where I wanted to go and what I wanted to do. Having a goal in mind helps a lot when it comes to base building. In no real particular order here she is.
I knew I wanted to wall off the whole restaurant and for that I needed a sledgehammer. Once I got one I destroyed three walls on the 2nd floor and added wooden windows so I could drop sheet rope from them. I then used the sledge hammer to destroy all the windows on the first floor. I then replaced those windows with wooden walls.


That wasn’t enough defense for me though. I added sheet rope that led to the roof so I had another way in. I then went to another restaurant down the street and grabbed these nice wooden booths. I used them to create a sort of barrier and extra layer of defense. Again that wasn’t enough for me. So I added wooden walls on the other side of the booths. After that I dug up some hedges and placed them in front of the walls. I think it turned out alright.


I planted a garden on the balcony with some extra plots on the roof. I placed rain collection barrels right next to the crops so I wouldn’t have to go far for water. I then placed a BBQ on the balcony to cook the fish I would catch. I converted a 2nd floor bathroom into a pantry that stores a sizable amount of non perishable food. I keep all my veggies and fish in fridges and freezers on my first floor meat locker located behind the bar.


I converted one of the bathrooms on the 2nd floor into a “water room”. It has 6 rain collection barrels on the roof feeding water into the 6 sinks in the room which purifies it on the way down. I also have two sinks in the kitchen set up the same way.


The kitchen has been converted into a bedroom if you even want to call it that. It consists of an unreasonable amount of metal counters, and a small nook with a bed and a dresser.

The whole 2nd floor dining area has been converted into my hoarders nest. It has stuff I collected. Not much else to say. It’s still a work in progress and I continue to add junk.

The 1st floor has yet to be renovated. It’s mostly used for the storage of items I don’t need immediate access too like chairs and tables I’ve picked up and other decorative items.
The End:
If you made it this far I would like to say thanks and I hope this guide has helped. I know this guide might be rather specific, but after roaming through town after town attempting to set up shop here or there I stumble upon this place. It looked daunting and I almost didn’t take the time to inspect it. I wanted something close to town while being damn secure and this was it. I figured I would just share my journey so maybe another lost survivor can enjoy what I did. So again, thanks and I hope this guide was helpful.