
Overview
A guide that shows you how to setup a single player mod on the Source Engine SDK 2013 branch.
Newer Version + Website
You can find a more up to date version on my site now: [link]
I would also highly recommend checking out Mapbase! It has a lot of great additions to the Source SDK 2013 singleplayer base including Vscript support.
[link]
Video Version of this Tutorial
Don’t feel like reading or need a visual aid? Here’s a video
Looking for Multiplayer?
Check out my other guide if you are wanting to do multiplayer
[link]Things you will need to download
EDIT: It would seem Steam does not like my links to Microsofts site for some reason… So if you see LINK REMOVED let me know in the comments. But all links should be in the description of the video
To start off you’re going to need to download a few things:
- The source code for 2013 off of GitHub. Link to Page[github.com] Direct Link to the Zip file[github.com]
- Notepad++[notepad-plus-plus.org] is great for looking at text files (.cfgs, .txt, etc)
NOTE: Default notepad has some issues when looking at files like gameinfo.txt the formatting is kind of off. It’s still usable but I highly recommended notepad++ so you dont have to deal with it.
- Microsoft Speech SDK 5.1[www.microsoft.com], just choose SpeechSDK51.exe. Update: Microsoft seems to have taken the download down, you can find a fixed version of what you need here on the VDC
- Multibyte MFC library[www.microsoft.com] (install this AFTER visual studio 2013)
- Source SDK base 2013 Singleplayer (Be sure you opt into the beta branch!)
- Visual Studio 2013 Community Edition
This will take a bit of work now that Microsoft has moved on to newer versions but not much. Go here: [link] and scroll down to 2013 and click download then sign in with a Micrsoft Account (it’s free).
VISUAL STUDIO 2015 AND 2017 DO NOT WORK DO NOT USE EITHER UNTIL VALVE UPDATES WHICH WILL PROBABLY NEVER HAPPEN, but if you are experienced you know how to just use the 2013 compiler.
Once you have installed both Source SDK base 2013 singleplayer and visual studio 2013 run both to make sure they launch before continuing.
Setting up the work folder
Choose a location you want for your mod source files to be. This will serve as the location that you will keep all your files both WIP and final. This includes but isn’t limited to maps, models, sounds, textures, scripts, code, etc.
Once you’ve picked out a spot create a new folder and name it your mods name.
Move the source-sdk-2013-master.zip into this folder, right click it and choose to extract it here.
Open up the Source-sdk-2013 folder and delete the MP branch since we do not need it.
NOTE: There can’t be any spaces at all in the file path, I suggest putting it at the top of one of your drives
Example: C:/modname/sp/
Setting up Microsoft Speech SDK (SAPI)
Run the SpeechSDK51.exe file you downloaded. It should unzip contents to a selected folder. One of the contents it unzips is Microsoft SDK 5.1.msi. Running this with the default settings should create a directory in C:Program Files (x86) called Microsoft Speech SDK 5.1. Copy the Microsoft Speech SDK 5.1 directory into the src/utils directory of your mod and rename it sapi51.
Navigate to spsrcutilssapi51Include and open sphelper.h in visual studio.
The following are changes you need to make to the code (hint if your line numbers are off by default read this[msdn.microsoft.com]):
Line 769
Line 1418
Line 2368
Line 2560
Line 2634
Setting up the codebase
Navigate to source-sdk-2013spsrc
Run both createallprojects.bat and creategameprojects.bat
Open games.sln in visual studio 2013. It shouldn’t ask if you want to update files but if it does say yes. Right click on the games solution and go to properties.
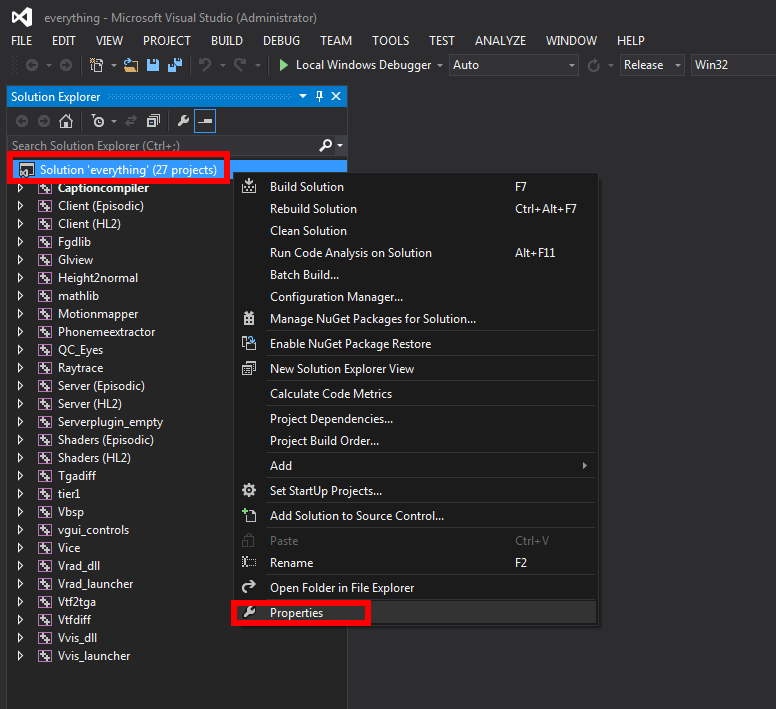
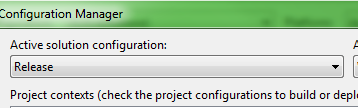
Choose Configuration Properties then click Configuration Manager…
For the Active Solution configuration choose Release
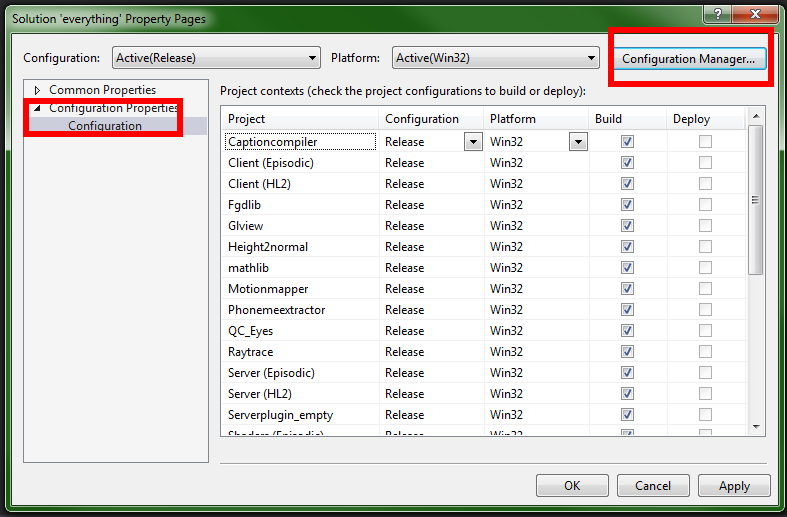
Click Close, then OK.
Right click on the games solution again but this time choose “Rebuild Solution”. Wait for it to compile. If you did everything correctly you should get no errors. If you get an error debug it like you normally would, if you have never really coded before this means google the error and try and figure out why it broke on your own. Yes this might mean spending thirty minutes to an hour to figure out what broke. If you can’t figure it out and you have put a good amount of time into trying to do it on your own post on the forums as well as other places like stack overflow.
Click File -> Open -> Project/Solution and find the everything.sln you created earlier.
Do the same thing as above.
NOTE: If you do not plan on modifying things like vbsp, vrad, vvis, shaders and the like you do not need to bother with everything.sln
Setting up the mod folder
Go to SteamsteamappscommonSource SDK Base 2013 Singleplayer
Copy the hl2 folder.
Paste it into Steamsteamappssourcemods (should be about 2.6 GB)
Rename it to your mods name (if your mods name contains spaces use underscores instead and use no capitals or special characters).
Open the folder up.
Delete the following:
- ALL vpk files
- Both of the vpk.sound.cache files
Make sure the following folders exist:
- bin
- cfg
- maps
- materials
- media
- models
- particles
- resource
- scripts
- sound
The gameinfo.txt file [IMPORTANT]
The [link] is a very important file for your mod. It’s what tells the engine what to call your mod in steam, the title to use on the main menu, what kind of mod it is, and most importantly what files to mount.
First thing you need to do upon opening it up is select everything and delete it. Then copy paste this in:
PasteBin link[pastebin.com]
Of course change/add things to this file as you want.
Now then if you want to mount additional content from a game like Counter-Strike: Source this is the file you do it in. Follow Valves example, in the case of CSS it would look like:
The bin folder
The bin folder is where your client and server .dll files will go from your compiled code
Navigate to ModSourceFoldersource-sdk-2013spsrcgameclientRelease_mod_hl2 and copy the client.dll and paste it into the bin folder located in your steamappssourcmodesmodname
Same thing for server.dll
The cfg folder
The cfg folder is where you will keep all your config files for the game.
Common .cfg files found in this folder include:
- 360controller.cfg (Button mapping for gamepads)
- undo360Controller.cfg (undoes the gamepad settings)
- config_default.cfg (Default button mapping for keyboard and mouse players)
- config.cfg (Game creates this one on it’s own, it stores the users current keybindings and loads them up automatically)
- chapter#.cfg (Typically runs the map command followed by the name of the map that starts the chapter off but can be used to run other commands as well) example:
map d1_trainstation_05
- modsettings.cfg (Loaded by the engine on startup. If this file is not present in the mod’s cfg folder, will not fallback based on search path)
- skill.cfg (Default stats for your weapons, npcs, etc, the game assumes these are the values to be used when played on normal difficulty and adjusts them depending on what difficulty the player picks)
- skill_manifest.cfg (executes the skill.cfg, must have for skill.cfg to work)
- thirdperson.cfg/thirdperson_joy360.cfg/thirdperson_keypad.cfg/thirdperson_mayamode.cfg (thirdperson settings)
Here’s a download[drive.google.com] of all the ones from HL2
The maps folder
Shockingly this is where you put your maps for your mod
The materials folder
This is where you put your materials. Please try and keep some consistency and order when putting materials in here.
For example I suggest having a “models” folder for where materials that models use go. Brick is where brick textures go, etc.
The models folder
Models go here, again like the materials folder try and keep them organized.
Popular organization methods:
- General folders such as junk, boxes, pipes, skybox, etc
- Folders for models that are used only in one level
- Folders for non props such as npc models
The particles folder
This is where you will place your particle files
The resource folder
The resource folder is the folder that is used to contain close caption text, icons, fonts, cursors, UI and just general .res files.
The scripts folder
The folder that is used to hold the script files for things like soundscapes, weapon scripts, chapter titles, propdata, sentences, sound scripts for npcs, soundmixers, hudlayout, game sounds, ui animations, vehicles, effects and a lot more.
Take an hour and go through these so you know what it is you can change via the scripts.
The sound folder
Surprise this is where your sound files go.
You’re done!
Now just restart steam and your mod name should popup in the library ready to be launched!
NOTE: If you are having trouble launching your mod be sure you are in the SDK 2013 singleplayer beta. You can join the beta by right clicking SDK 2013 singleplayer in Steam and going to properties then beta.
NOTE 2: If you load up your mod and you have EP2 mounted you might notice the water looks like it is missing it’s texture (purple and black) for some reason this has to do with the game pulling the map file from the VPK. If you extract the BSP and place it in your maps folder it will load it and the water will look normal.
If you want to compare here’s a finished version that would go in your sourcemods folder[drive.google.com]
If you found this tutorial helpful and have $3 to spare I would love your support!
Support Me on Ko-fi[ko-fi.com]

Additional Resources
Looking for some more resources regarding setting up your mod?
Be sure to check out [link] for basically anything you need to know.
[link] [link]Keep in mind a lot of these haven’t been update in a log time so use common sense when reading.
- [link]
- Adding more console commands and cvars
- How to make icons for your mod
- Soundcaches
- Adding Credits
- Adding a logo to the main menu
- Changing the game UI
- Setting up main menu background
- Changing game menu items
- Adding chapters
- Unlocking chapters
- Bonus Maps
- Creating thumbnails for your maps
- Fixing VGUI Screens
- Adding FMOD
- Adding over the shoulder view
- Adding rain splashes
- VGUI image progress bar
- VGUI Panel List
- Adding a grappling hook
- Non-code mod settings
- [link]
- Adding Fonts
- HUD Elements
- HudLayout
- Adding VGUI to an entity
- Adding a L4D like glow around entities