
Overview
1. Install, Configure, First Use2. Using an External Storage location (in preparation)3. Capture screens and windows4. Capture screen recording 5. Samples
1. Install | Configure | First Use


Step 1.1: Install:: ShareX is installed (as you did) in your favorite Steam folder, whatever you decided. As a sample this could be: C:STEAMsteamappscommonShareX
x———x———x———x———x———x———x
You can start the app in different ways:
go to your library, select Installed (n); search ShareX, right mouse click on the app and select Launch App…
Click in your system tray area on the icon…oeps its working..or
use your desktop shortcut. You can make a shortcut on your desktop using the menu as in The long way above.
Other menu command will be dealt with later.
We keep you up to speed using ShareX
Whatever you want to capture, either pic’s, screens, vid’s…you must know where the captures are gone. For simplicity start ShareX with the desktop shortcut. This is what you get:


Go to Application Settings and select Paths.
Then press the Browse button and select your favorite place on any hard drive.
Note: You must now Close and Exit ShareX and
Re-open ShareX for this personal folder change to take effect.
Just close this screen with the [x] in the right upper corner.
There you go!

This is what you get first:


The RED block indicate: no assignments
Click on the first…Select a hotkey…Done..next…up to 4 keys
When ready you have 4 F-keys that:
- Capture a region (drag with the mouse)
- Capture entire screen(s)
- Capture active window
- Makes a Screen recording
OK… ready for
- Press your first key (Capture region)
- Drag a square
- The moment you release the mouse…done…on your screen
- In the right under corner a preview is shown.
- The pic is stored in the location you defined earlier.
- If you created a folder name, then inside this folder there are 2 sub folders created named:
- >> Logs and Screenshots
- In the sub-sub folder Screenshots a monthly folder is created.


- 1. In the ShareX Menu, go to Application Settings and select Paths.
- 2. Press the Browse button and select Pictures (or fill %MyPictures%)
- 2. Close and Exit ShareX
- 3.Re-open ShareX for this folder change
to take effect. - 4. Done ! This is it…Next Chapter.
+———+———+———+———+———+———+———+———+———+———+———+
5. Samples
2. Capture | Upload | Workflows | Tools |


-
Full screen:
that’s simple. If you have multiple screens, you get a multiple screen capture!
-
Window >>:
if you don’t want Full screen, select WIndow and then the window from the list
-
Monitor >>:
here you can select the monitor full screen that you want to capture.
-
Region
: use your F-key to Capture region and move your mouse (don’t click!) to see the different marked square sections in that region. Left click to save.
-
Region (Light):
is the same as Region ,however without the extra view options. Use this option for drag and capture at any place on your screen.
-
Region (Transparent):
is like previous, only influences readability of text.
-
Polygon:
draws a polygon; click three times on different spot and wysiwyg
-
Freehand:
a little bit shaky? Don’t use it.
-
Last region:
shows you the last pic you captured.
-
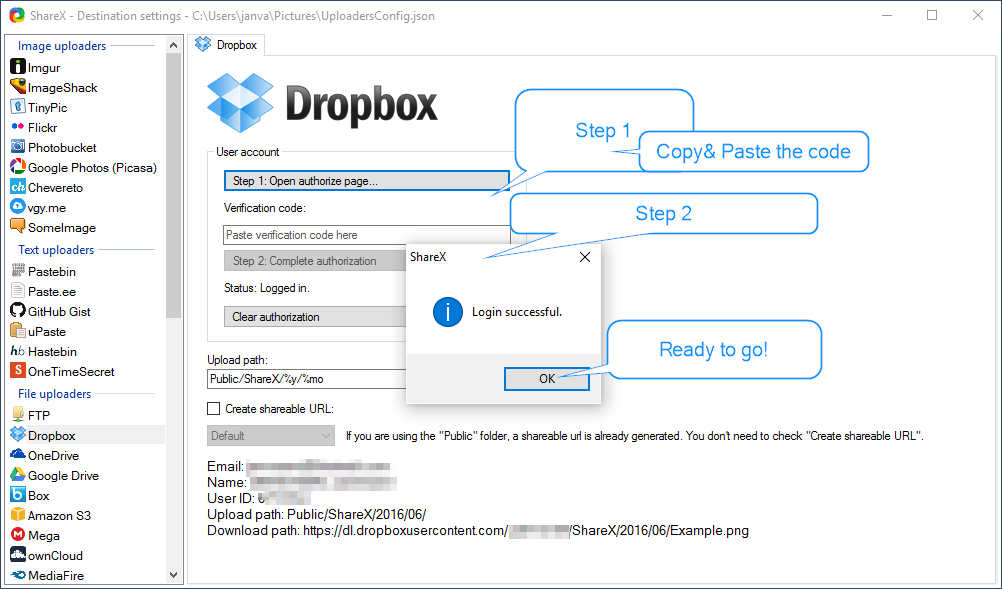
Screen recording:
first thing you need to do is to configure your destination settings. In this sampl ewe use Dropbox. You must have a user account with Dropbox. If so… in themain ShareX menu go to Destinations >> Destination Settigs and select Dropbox.Execute the verification. Close the screen [X]. Then Select from the ShareX main menu >> Capture>> Screen recording. You can manupulate the size of the screen recording; a counter is running below the capture. After STOP…the file (mp4) is saved in your dropbox folder e.g. [link]
- Screen recording (GIF):
- Scrolling capture
-
Webpage capture:
select this function, set this window @ max. and type or paste the URL; Enter. Press Upload button to capture.
- Text capture (OCR)
- Auto capture


- Upload file
- Upload folder
- Upload from clipboard
- Upload from URL
- Drag and drop upload

Workflows has to do with the assigned F-keys as we descibed in Chapter 1. Some of the functions in the Capture menu are already linked to one of your F-keys. The most frequent used functions are taking a capture of a full screen, a window or a region from a window or screen. If you have chosen your F-keys already, review them again and decide if that is what you want.
TIP: if you want to make a capture from a predefined square of a region, first select Region and then move the mouse to the part of the region to capture. You will see this highlighted square by square.

- Color Picker
- Screen color picker
- Image editor
- Image effects
- Hash check
- DNS changer
- QR code
- Ruler
- Automate
- Directory indexer
- Image combiner
- Video thumnailer
- FTP client
- Tweet message
- Monitor test