
Overview
All achievements, in-game maps, objects and locations as well as solutions to puzzles.
Readme & Credits
First of all, thanks for coming in. If you find any errors, please let me know.
Credits @ DemonicRobots
for the fastest way to solve the chinese puzzle box in Episode 2. Also for the hint that searching the piles of clothes for the key is not random!
And here is the Link to his Speedruns Discord Server for this game:
[link]
Credits @ Canary JOY EASY + @Aschendrae
for pointing out the important Info to Episode 5 and the hint for “the shadow out of time” achievement!
Achievements (automatically received)
Episode 1 / The Husher Mansion
Hold the door – Find out how to block the door.

The Impossible Door – Daniel’s trapped at Husher Mansion… or somewhere else.

Somewhere else – You saved Daniel from the Husher Mansion.

Death to light – Learn to resist darkness.

Episode 2 / Eerily quiet
Silence in paradise – You found Isaac Faber and his music box.

A peaceful place – Find out how to survive the darkness.

Episode 3 / A twisted trail
It’s staring back at you – Learn how to escape the abyss.

Yellow brick road – You have discovered the whereabouts of Sebastian P. Husher.
Reflections – Sebastian P. Husher, in the cell, with the mirror.

Episode 4 / The last concert
Deus in Absentia – Learn to defend yourself against the Requiem.
Through the mirror – You found Sebastian P. Husher and survived to tell the tale.
Episode 5 / The Horror and the Song
The Mask of the Red Death – You have completed the first dream of Berenice.

Morella – You have completed the second dream of Berenice.

The pit and the pendulum – You have completed the third dream of Berenice.

To the place and back again – Escape from “There”.

On the shoulders of giants – You figured out what to do with the music box.

Once in a while – You witnessed the end of Daniel’s story.

Achievements (collectibles)
After collecting all Haiku-Folders in EP1:
Paper shadow – Complete Hushers Haiku Collection

After you pick up the tooth from the Zoltan vending machine in EP2:
The tooth fairy – Find Coltar’s tooth of wisdom

After you pick up Maxwells lucky penny from the restroom in EP3:
Until horror do us part – Find Maxwell’s lucky coin
After you’ve swapped all your confessions for tarot cards in EP4:
Thousand faces of horror – Find the Tarot deck

After you pick up all three pictures of Ariadne in EP5:
The oval portrait – Find Ariadne’s lost painting

After you pick up three specific notes in EP5:
The shadow of times past – Find three references to historical times (don’t forget to read the back pages).

After you have found and read all 8 notes in EP5:
Shielded from madness – Discover the truth about Ariadne

After finding and reading three special notes across all 5 episodes:
The Shadow out of Time – Find three references to past times
1. “Photocopy” in Episode 3 – The great library
2. “Violinist´s diary” in Episode 4 – Abbey of St. Cecilia
3. “Letter from an artist” in Episope 5 – Jeremy Hartwood Mental Hospital 2F

Achievements (character specific)
Episode 1 / The Husher Mansion
Shocking Discovery – Alina has entered the Husher mansion and has gone far beyond her duty.

Princess in shining armour – Sophie found Daniel and saved his life.

The undercover boss – Etienne found Daniel and saved his life.

Unexpected Guest – Alexander has returned to the Husher Villa, but has not found the person he expected.

Episode 2 / Eerily Quiet
Welcome home – Erica found her father

Taking care of myself – Finish an episode (in which there is more than one character) by playing exclusively as Daniel.

Downpour – Renè has found Isaac Farber

Episode 3 / A twisted trail
A practical lesson – Grace made it through the Great Library
Honoris Causa – Omar made it through the Great Library.
Episode 4 / The last concert
The survivors’ guilt – Ernest helped Daniel to find Sebastian P.Husher.
Episode 5 / The Horror and the Song
Her loving look – Lidia has discovered what you can do with the music box (M.R. James or higher difficulty level).

All Episodes
Alone in the Dark – Complete the game on Edgar Allan Poe or higher difficulty, choosing Daniel as your character if possible.

Achievements (difficulty level depending)
Episode 1 / The Husher Mansion
The downfall of the Husher House – Find Daniel in the Husher Mansion without losing any of your characters at the Edgar Allan Poe difficulty level.

Episode 2 / Eerily Quiet
With death on the heels – Find Isaac Färber at difficulty level Edgar Allan Poe or higher without losing any of your characters.

Episode 3 / A twisted trail
Summa C.um Laude – Find the whereabouts of Sebastian P. Husher at difficulty level Edgar Allan Poe or higher without losing characters.
Episode 4 / The last concert
One for all, all for one – Find Sebastian P.Husher at the difficulty level Edgar Allan Poe or higher without losing any characters.
Episode 5 / The Horror and the Song
Blind to the horror – Find out what to do with the music box without losing characters – on Edgar Allan Poe or higher difficulty levels.

All Episodes
Deaf to the song – Complete the game on Edgar Allan Poe or a higher difficulty level without losing characters.

All Episodes
The Presence is waiting in your dreams – Complete the game on H.P. Lovecraft difficulty

Achievements (other)
Accept a personal item from a character who has died before.:
Farewell gift – Take a gift from a character you lost before.

WARNING: Observe the manifestation closely. If it is angry, sad etc. it will kill you if you start an interaction.(?)
Ep1: The Husher Mansion
How to survive…
-Stay calm, your character will panic enough.
-Listen to your character.
-Examine everything and look at objects from different angles.
-Eavesdrop at every door. Especially after you’ve been attacked.
There are two types of threats that can kill your current character. The first time, you will get a tutorial and these are placed in fixed locations. After that the attacks will be random and their interval depends on the value of conspicuousness, whether you are running or not as well as on your level of difficulty.
“Hold the Door”
Noticeable trigger: Shadows form at the door. Your figure says something about “blocking” or “door”.
Support: Strength
With one button you gather strength, hit the button as fast as you can. With the other you smash against the door. The more power you gather, the more your character will smash against the door and the easier it will be to close it. However, as you gather power, the door opens and you don’t want it to. Keep an eye on the door, it’s open about 1/3, It’s almost over with you. Sometimes it is necessary to hit the door with less force instead of waiting until your indicator is almost full.
“Hide”
Noticeable trigger: The whole room becomes dark and shadows form everywhere / Lights go out with sparks. Your figure says something about “hiding” or “get out”.
Support: lucky charm, calmness, speed
Press both buttons simultaneously on each heartbeat. Remember where there are hiding places. you don’t want to run around looking for a place to hide while you’re being hunted. You’ll have plenty of time to change rooms and find a place to hide. But don’t run back to a room you came from.
The more relaxed your character is, the easier it will be to calm him down. If your character has a lucky charm, this will have a positive effect.
The second threat is after a paranormal event. For example, if the room becomes extremely cold or fingerprints suddenly appear on a wall and your character gets scared, there is a very high probability that you will die when leaving the room. Therefore, always listen at the door before you leave the room.
Mansion 1F
Notes/Letters/Clues:
C1: Dusty note
C2: Picture from Saul
C3: Note from Julia and Saul
C4: Haiku-Folder 3
C5: Haiku-Folder 2
C6: Note from Masha
Important places:
A: Matches
B: Ring (key part)
C: Oil can
D: Master Key
E: Screwdriver
F: Firewood
G: Box with fuses
H: Jumper cables
I: Orange doll
J: Dissolver
K: Fireplace
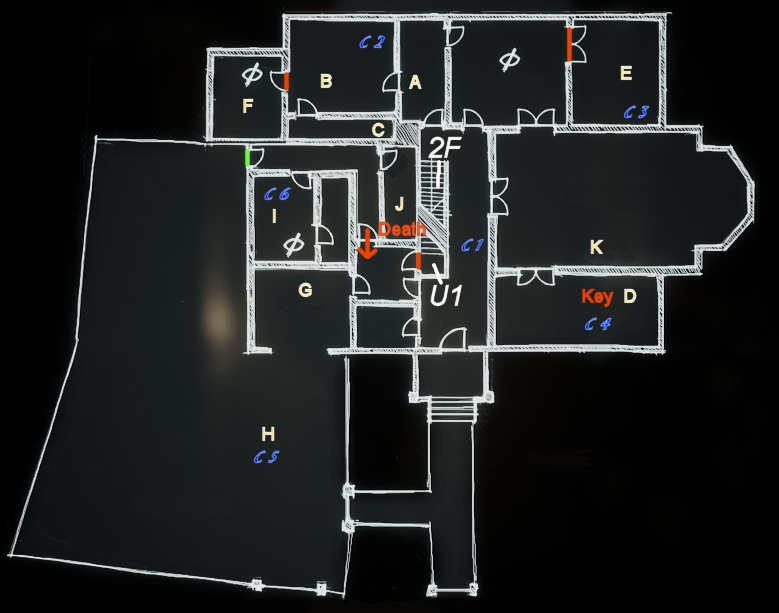
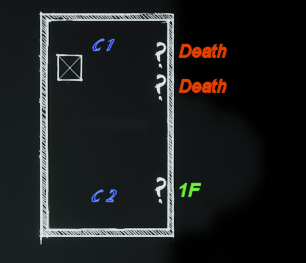
Mansion 2F
Notes/Letters/Clues:
C1: Black and white photo
C2: Second letter from Isaac Faber
C3: Construction plan of the Husher Mansion
C4: Fourth letter from Isaac Faber
C5: Third letter from Isaac Faber
C6: Mashas records
C7: Second picture from Saul
C8: crumpled sheet of paper
Important places:
A: Dishtowel
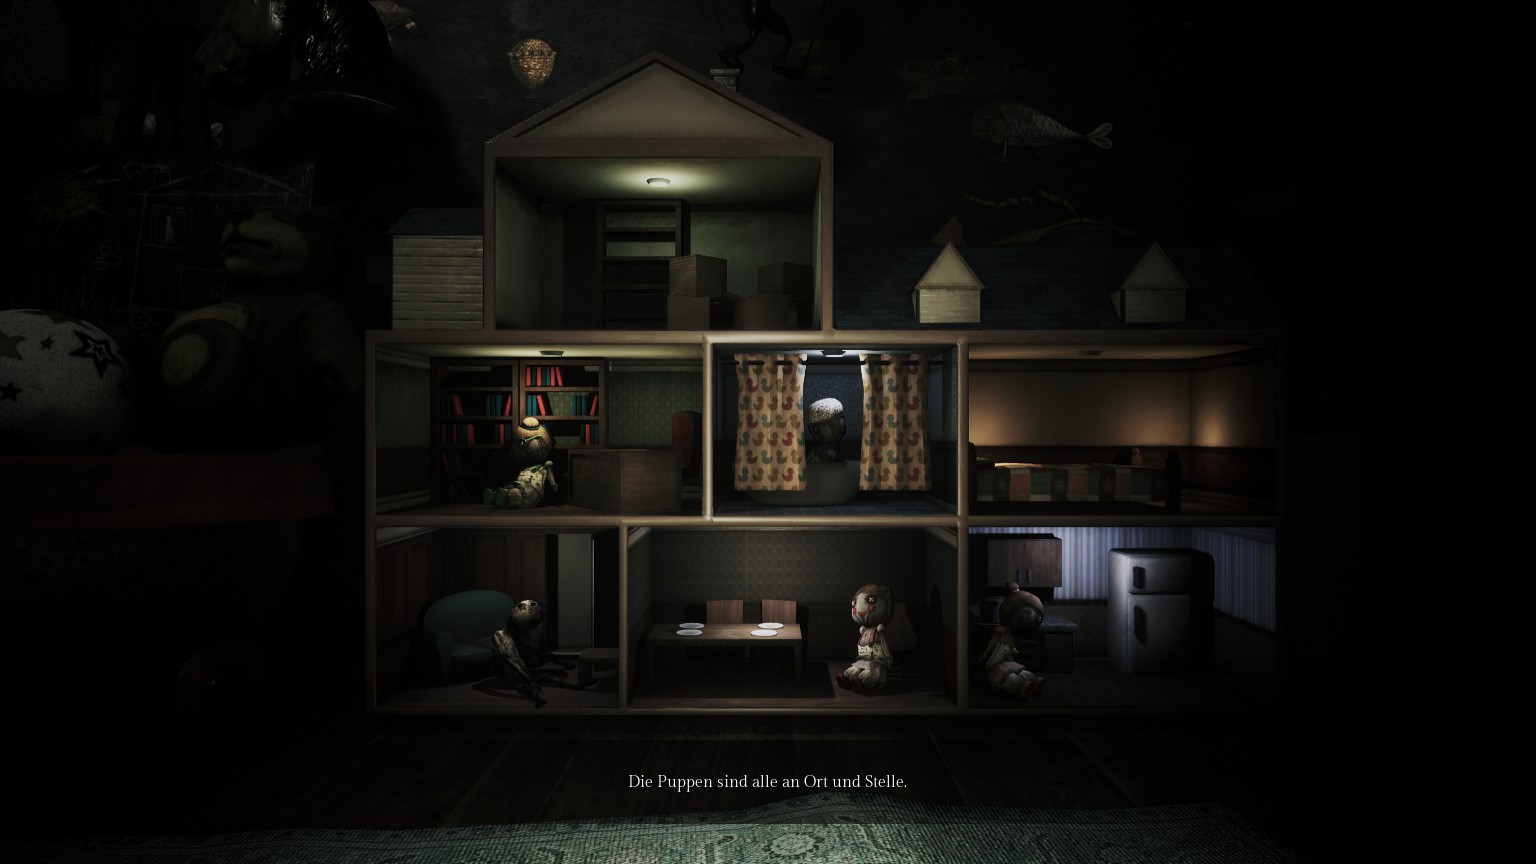
B: Doll’s house puzzle
C: Grill tongs
D: Remote control
E: Superglue
F: Black Doll
G: Metal hook
H: Blue Doll
I: Red Doll
NA1:
The power must be restored or you will die when you enter.
NA2:
Only accessible if you have driven away the shadows with the spotlight on the balcony.
NA3:
Only accessible if you combine the superglue and the metal ring.
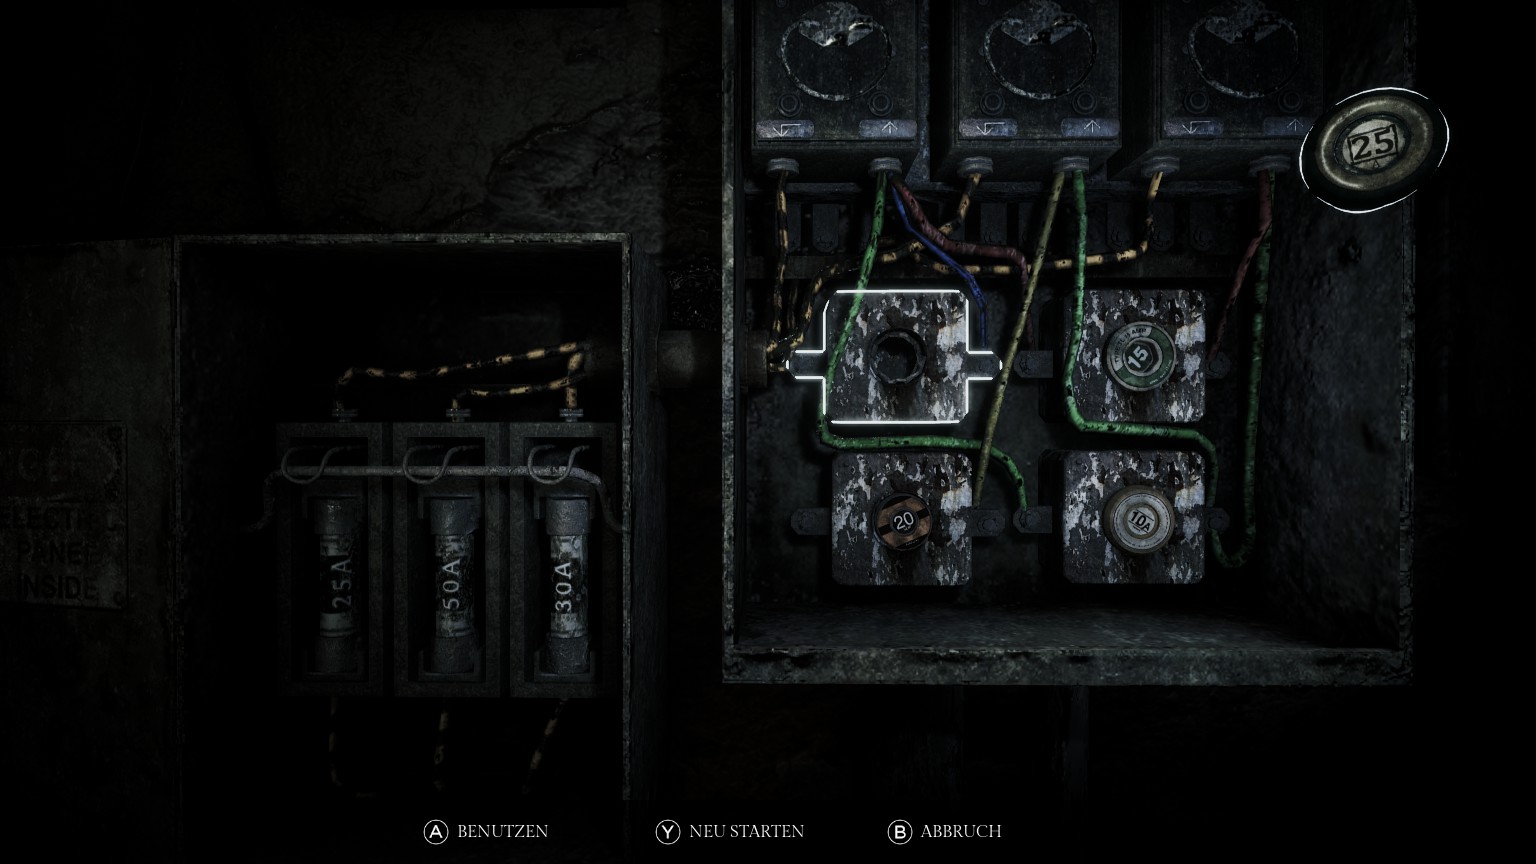
Basement U1

Notes/Letters/Clues:
C1: Safe note
Important places:
A: Safe / Green Doll
Combination: 4798
B: Fuse Box
Solution:
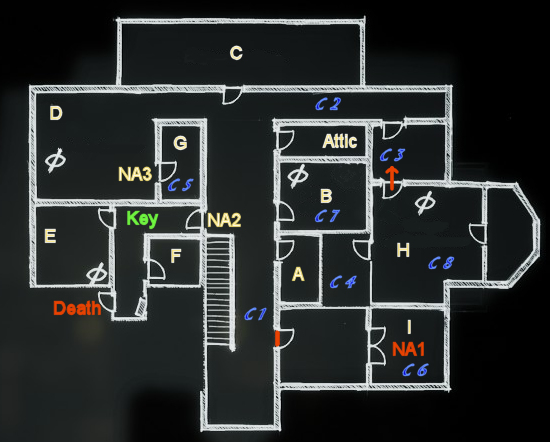
Attic
Notes/Letters/Clues:
C1: Painting
C2: Haiku-Folder 1
Ep2: Eerily Quiet
How to survive…
The new game mechanic is called “The Silence” or “breath control”. When the presence is in the room you have to use both keys to adjust a white dot to the constantly changing white circle. Tip: keep one of the two buttons (no matter which one) pressed and vary the size of your point with the second button. The longer you keep this button pressed the bigger your point will be. You always have to adjust this point to the white circle. If you’ ve been above or below it for too long, your character will make itself noticeable involuntarily… and you don’t want that.

Residential complex 1F
Notes/Letters/Clues:

C1: article list
C2: Letter 1 from Sebastian P. Husher
C3: Letter 2 from Sebastian P. Husher
C4: Night shift report
C5: Day shift report
C6: Recording 1 of Isaac Faber
Important places:
A: Clothes hanger
B: Samurai Armor bronze coin
C: Zoltan vending machine
D: Spray bottle
E: Card turn around and examine for magnet
F: Silver coin
G: Key use clothes hanger with magnet
H: Crank handle
I: Hydrogen peroxide
J: Key use adjustable wrench / don’t forget to take the tool with you again
K:Chinese puzzle box (contains keys)
Hint: hexadecimal
Solution: 85E2B0
The fastest way to open the puzzle box (1 is far left / 6 is far right – u = up / d = down):
6 – d d
2 – d u u
3 – u
5 – d
4 – d d
5 – u
4 – u
5 – d
L: Square flashlight
NA1:
You need the crank handle to open the steel door. Pay attention to the monitor before you enter because listening at the door does not help here.
Residential complex 2F
Notes/Letters/Clues:

C1: Note from Erica Faber
C2: Recording 2 of Isaac Faber
C3: Guide to the keys
Important places:
A: circular disc
B: Black light bulb socket
C: Pet food
D: Darkroom puzzle
To start this puzzle you need Luminol and Hydrogen Peroxide
Solution:
Turn A and B on simultaneously. As soon as A has lost 150ml (375), turn B off.
A = 225 C= 100 D= 200
E: Window Use the adjustable wrench to get to the shack in the yard

Residential complex 3F
Notes/Letters/Clues:

C1:Mixing instructions
C2:Note from Isaac Faber
Important places:
A: Key puzzle
Solution:

B: locked dresser
Hint: You need to search every pile of clothes in this apartment. The key can always be found in the third or fourth pile of clothes, no matter which one you start with.
C: Spider’s terrarium / gold coin move in front of the spider’s terrarium and use the pet food in your inventory or you will die trying to take the coin
Basement U1
Notes/Letters/Clues:

C1: crumpled sheet of paper
Important places:
A: Adjustable wrench
1: position of the fallen card
B: platinum coin
NA1:
It could be a random event when the presence appears in this room. If you want to be on the safe side, enter the room after mixing the lumino.Check the door anyway.
U2:
Once you have solved the darkroom puzzle and go through this door with the Luminol, you will no longer be able to explore the complex. You will then have to go to the end of the episode.
Tip: Solve the key puzzle in Erica’s apartment and then enter this area of the basement without mixing the luminol. So you can have a look around and get an impression of the floor plan. Without the Luminol you won’t be attacked. You can also unlock all the doors that you would otherwise have had to unlock during the chase scenes.
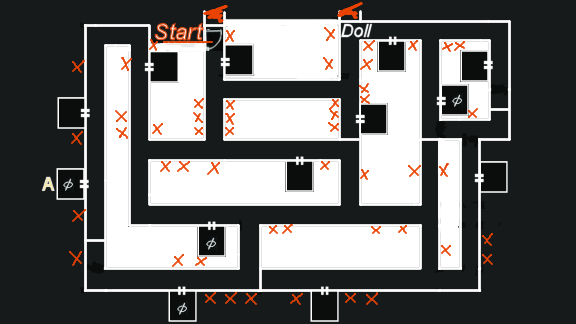
Basement U2
Danger
You don’t have a map in this part of the storerooms and the constantly changing camera perspectives will do the rest. Because here you will be chased randomly by the darkness. The chance that you will die here is very high.
Solution:
ignore everything and go the short way directly to A. As soon as the music changes hide in one of the rooms on the way. Don’t wait until it finds you otherwise you’ll have to search for protection in one of the rooms and complete a quick time event (hold the door).
After you’ve examined the wardrobe and left the room again, run back to the first intersection. There will start up a sequence at the end of which you will have to complete a quick time event..
Ep3: A Twisted Trail
How to survive…
The new game mechanic is called “the Abyss”. Handprints on the ground come towards you and the shadows want to devour you afterwards. This mini-game is not harder than the previous ones. There is one main key and two secondary keys. Press the indicated keys as fast as you can, but keep an eye on your character. As soon as the shadows grab your arms (right or left), you must immediately switch from the main key to the displayed key. The indication that you have to press the main key will not disappear! So don’t be confused. Once the shadows have grabbed your arms, pressing the main key won’t help you anymore.
Archive of the Historical Institute
Notes/Letters/Clues:

C1: Note from Professor Merino
C2: Caricature
C3: Maxwell’s voice recording
C4: Maxwell’s notes
C5: Biography of the LeGrant family
Important places:
A: Slides
B: Power cord
C: Bolt cutter WARNING: If you do not take this with you, you will die later.
D: Handsaw
E: detached arm – You must examine this item before you use it or you will lose the wedding ring. Use the bolt cutter and then examine the ring again.
NA1:
To use the slide projector you need the power cord and the slides.
NA2:
To keep the switch in its position you need the detached arm.
Magnetic card puzzle solution:
Bookshelf O, top shelf – opposite the caricature at C2
Slide projector puzzle:
Here, a certain sequence of the slides as also of the images is required so that an unlocked door appears on the projector wall.
The order from the projector’s perspective:
1: (fifth slide from your perspective) chained door
2: (fourth slide from your perspective) Lamps
3: (third slide from your perspective) Musix box
4: (second slide from your perspective) Switch
5: (first slide from your perspective) Shadow with key
Newspaper archive of the Historical Institute
Don’t forget the bolt cutter and the optional wedding ring in the archives. If you don’t have the bolt cutters with you, you’ll die here.
Notes/Letters/Clues:

C1: Note of a painter
C2: Protocol sheet from the newspaper archive
C3: Note
Important places:
A: Radio Inspect the back
B: paint can
C: Pencil
D: Paint roller
E: Exchange batteries for keys use the pencil with the back of the radio
collectible item: Maxwell’s lucky penny You have to use the ring before the batteries. After the door has opened you will find it in the cabin.
F: Clogged sink use the paint can here
G: Microfilm – needs key from the reception office
1: Microfilm scanner search for 17 March 1913 and then print out the page about crimes.
NA1:
Overpaint the motion detector with paint to unlock the door to the reception office.
The great library
Notes/Letters/Clues:

C1: Photocopy
C2: Sinister events
Important places:
A: Broken camera
NA1:
To navigate safely through the library you need access to the cameras. To get access to them you have to be attacked by the shadows once. Attention: If you are attacked by the shadows you have to free yourself quickly or you will die immediately. Press the action button as fast as you can. But you may only be attacked three times! The fourth time you will die.
You can skip the whole part with the camera(s) and run straight to the end. But you still have to touch the shadows once to unlock the ladder. Keep your distance from the bookshelves and tables.
Abbey of St. Cecilia (Interlude)
You have no map for this area.
Notes/Letters/Clues:

C1: Comments of the Prior
Important places:
A: Hoe Opens the door to switch D)
B: Clogged toilet Switch C & D becomes usable
C & D: Switch (Activates switch E)
E: Switch (Opens secret passage)
To be able to use levers C and D you must first press lever E and then clear the toilet at B. Then use the 3 levers in the order D,C,E.
Ep4: The last concert
How to survive…
The new game mechanic is called “The Requiem”. You can only see the ghosts through your hand mirror, so ignore everything else on the screen. Should you ever lose sight of them, simply make a 360° turn. You must destroy the ghosts with the lamp (focus button) before they reach you, otherwise you will die. Keep an eye on the black clouds of smoke when they move. This way you can defeat them quite easily. You should not take too much time, though. As there are several ghosts appearing one after the other, it can happen that two or three of them attack you at the same time. And you don’t want that!

Abbey of St. Cecilia
Notes/Letters/Clues:
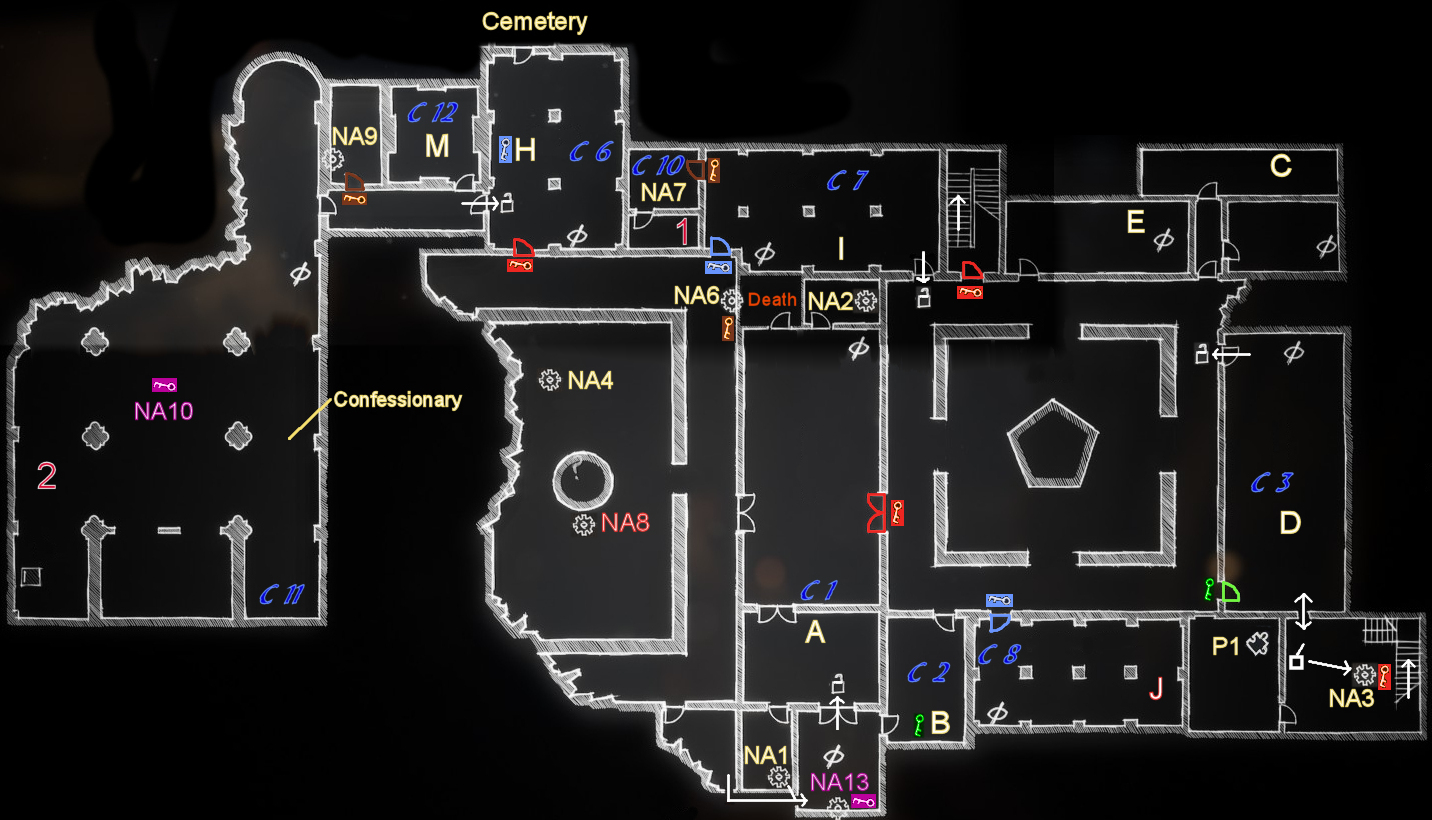
1: The confession of the librarian
2: The confession of the treasury manager
Confessionary: Swap confessions for tarot cards
C1: folded note
C2: Page 2 from the abbot’s diary
C3: lost notebook
C6: Confession of the librarian
C7: The plans of the librarian
C8: Page 1 from the abbot’s diary
C10: Note on plant extracts
C11: Bible of the treasury manager
C12: Diary of the violinist
Important places:
A: empty bottle of brandy
B: Tin key
C: Dirty rag
D: Hedge trimmer
E: Bellows
H: Silver key
I: Lamp Use fuel + inspect back = lit lamp
J: Pioneer spade WARNING: don’t take the grenade!
M: bent metal piece combine with surgical spreader
“Not Available” Location:
NA1: crank use at NA2 first; take it back after use at NA1, used at NA9 too!
NA2: Bucket with oil
NA3: Iron key Use the dirty rag with the pipe and pull the lever.
NA4: Red flowers hedge trimmer required
NA6: Hatch – Bronze key surgical spreader required
NA7: Rusted Door Rust remover required
NA8: Well with bucket – WARNING: if you don’t have used lit lamp + bucket you will die immediately using the well.
NA9: Crank mechanism crank required
NA10: Incense container – Key of the treasury manager use NA9 first
NA13: Furnace – Key of the abbot wax figure and bellows required
Puzzles:
P1: (Fuel for lamp)
If you hold one of the displayed buttons (it doesn’t matter which one you start with) liquid will run into the container. If you hold the button too long, steam will escape. This is the sign you pressed too long. Change back and forth without steam escaping.
Abbey 2F
Notes/Letters/Clues:

C4: Poem of the librarian
C5: Testimony of the Prior
C9: Farewell letter from the Prior
C14: Diary of Argos LeGrant
Important places:
F: loose parts (1/3)
G: loose parts (2/3)
K: loose parts (3/3)
“Not Available” Location:
NA5: Rust remover (Solution required) red flowers + plant mixture
NA14: Key of the Prior surgical spreader required
NA15: All 4 special Keys required
Puzzles:
P2: (Plant mixture)
Hint: Your goal is to mix Diathilocos
Solution:
F + E +
F + B + F + B +
B + D +
A + A + B + B + D + D +
E
P3: (surgical spreader – all 3 parts required)


Endless hall:
You have to go into a room with skeletons on the floor, there’s a mirror and thus the end of the chapter.
Opening one of the doors in the corridor automatically leads to the end of the chapter.
If the doors are randomly arranged, just try one after the other.
You may need to enter the room with the skeletons first before you find the exit door.
Cemetery
3: confession of the abbot
4: confession of the prior / Random Door:
This door opens at random when you are near it. WARNING: if you want to get the confession of the prior, you have to hurry. The doors will close again after a short time. Quickly in and quickly out again.
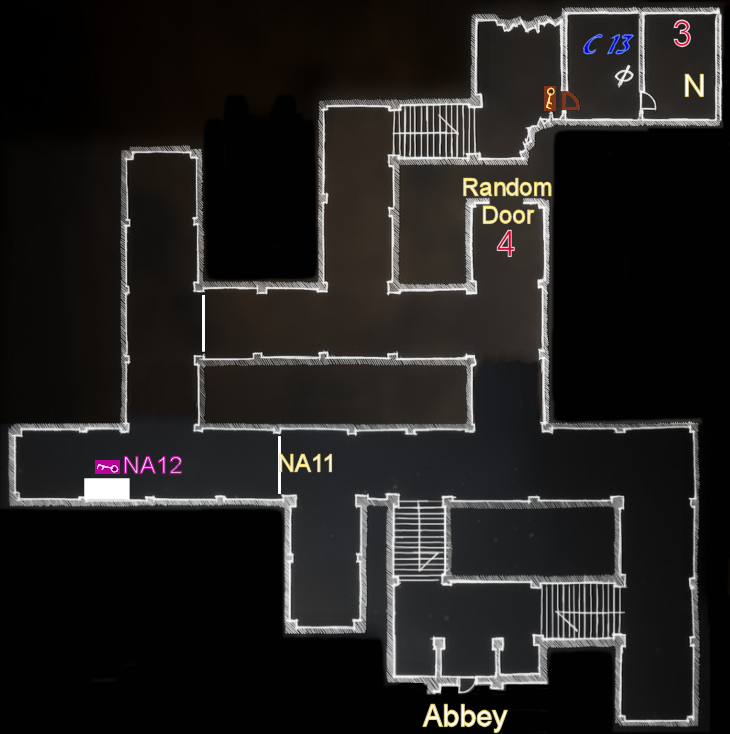
Notes/Letters/Clues:
C13: Diary of the abbot
Important places:
N: wax figure check the back
NA11: rusted gate Rust remover required
NA12: Sarcophagus – Key of the Librarian Pioneer spade required
The Crypt
5: confession of the writer
WARNING You won’t be able to come back here later, so you have to collect it now.

Important places:
L: rusted key
Puzzles
Lever puzzle:
Move the grates so that you can get past the monster to the ladder. The monster will always move one free space further in your direction if there is room. Warning: If there is no grate between you and the monster you will die immediately.
Ep5: The Horror and the Song
Important Info about Episode5!
-If you collect all three drawings, you will only need to solve two instead of three nightmare puzzles in the Finale.
–The position of the room with the syringe at NA2 on 1F is random. It can be either on the right or left side.
Jeremy Hartwood Mental Hospital 1F
WARNING: Location NA2 on the map does not show the room that is safe, it is just an example. See “Not available Location” for more info.
1: Ariadnes lost drawings 1
2: Ariadnes lost drawings 2

Notes/Letters/Clues:
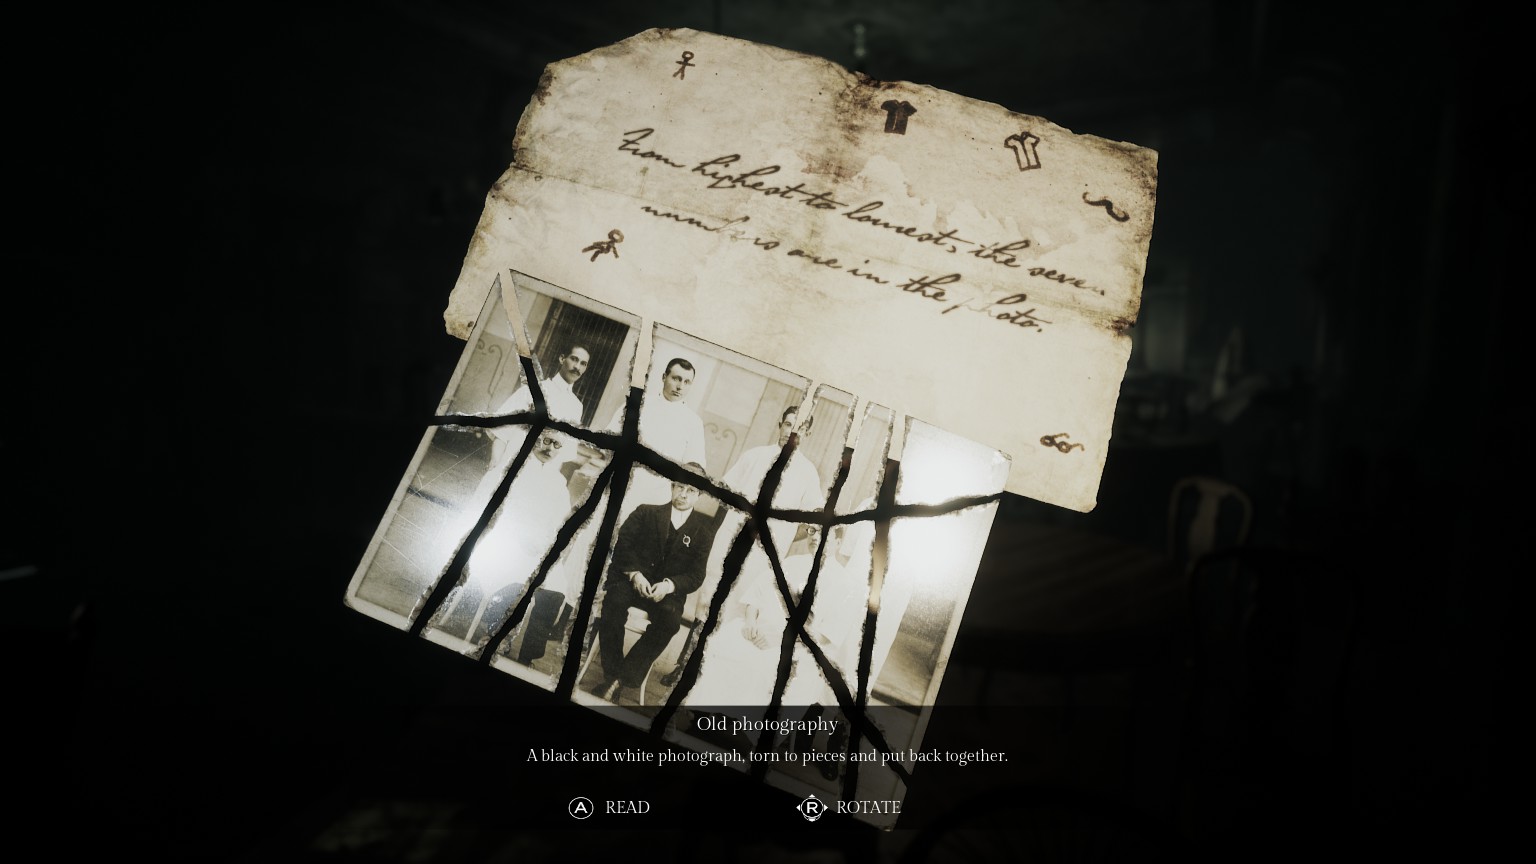
C0: Old photography (doesn’t count for the “shielded from madness” achievement)
C1: dismantling notice
C3: first experiment report
C4: second experiment report
Important places:
A: Broken handle / Generator
B: Cable / If you take this, NA1 will be activated
C: Emergency Power Supply (ESP):
-Generator at A must be repaired
-Can only power one thing
-To avoid unnecessary walking, choose the order “Security” – “Morgue” – “Elevator”
-With “Security” only the keypad is meant, not the door leading to the room itself
E: Film Reel / tiny key required
F: Film projector / Film reel required
G: Scalpel
J: Gloves (bottom left in the shelf)
K: Stapler gloves required
N: Syringe examine the needle to obtain hypodermic needle
“Not Available” Location:
NA1: If you take the cable from B, this area will be blocked until you find the flares (and use them here at the door) WARNING: If the flare dies (out), you die too.
NA2: WARNING Without the stethoscope, you will die on entry. The location of the safe room is random.
NA3: broken belt / the power in the ESP must be set to “Morgue” / use stapler to obtain “stapled belt”
NA5: stapled belt required
Puzzles:
P1:
Once you have folded the pieces in the correct distance from each other, the image will be automatically assembled and added to your notes. The characters at the edges give you a hint what you have to look for to find out the numerical code.
Solution:
7643331
Jeremy Hartwood Mental Hospital 2F

3: Ariadnes lost drawings 3
Notes/Letters/Clues:
C2: Taxidermist instructions
C5: Poem by Berenice
C6: Letter from an artist
C7: Third experiment report
C8: Doctor Alan Cedrac`s note
Important places:
D: Lamp / drawing
H: Emergency cabinet scalpel required
I: Recording 2 of Berenice Prestegard
L: Phonograph
-all 3 records by Berenice Prestegard required
-after you use the third recording, this section of the chapter ends.
– after you use two of the records, the needle will break off. You will need the hypodermic needle to play the third recording
M: Stethoscope
“Not Available” Location:
NA4: This door opens automatically after you take the flares
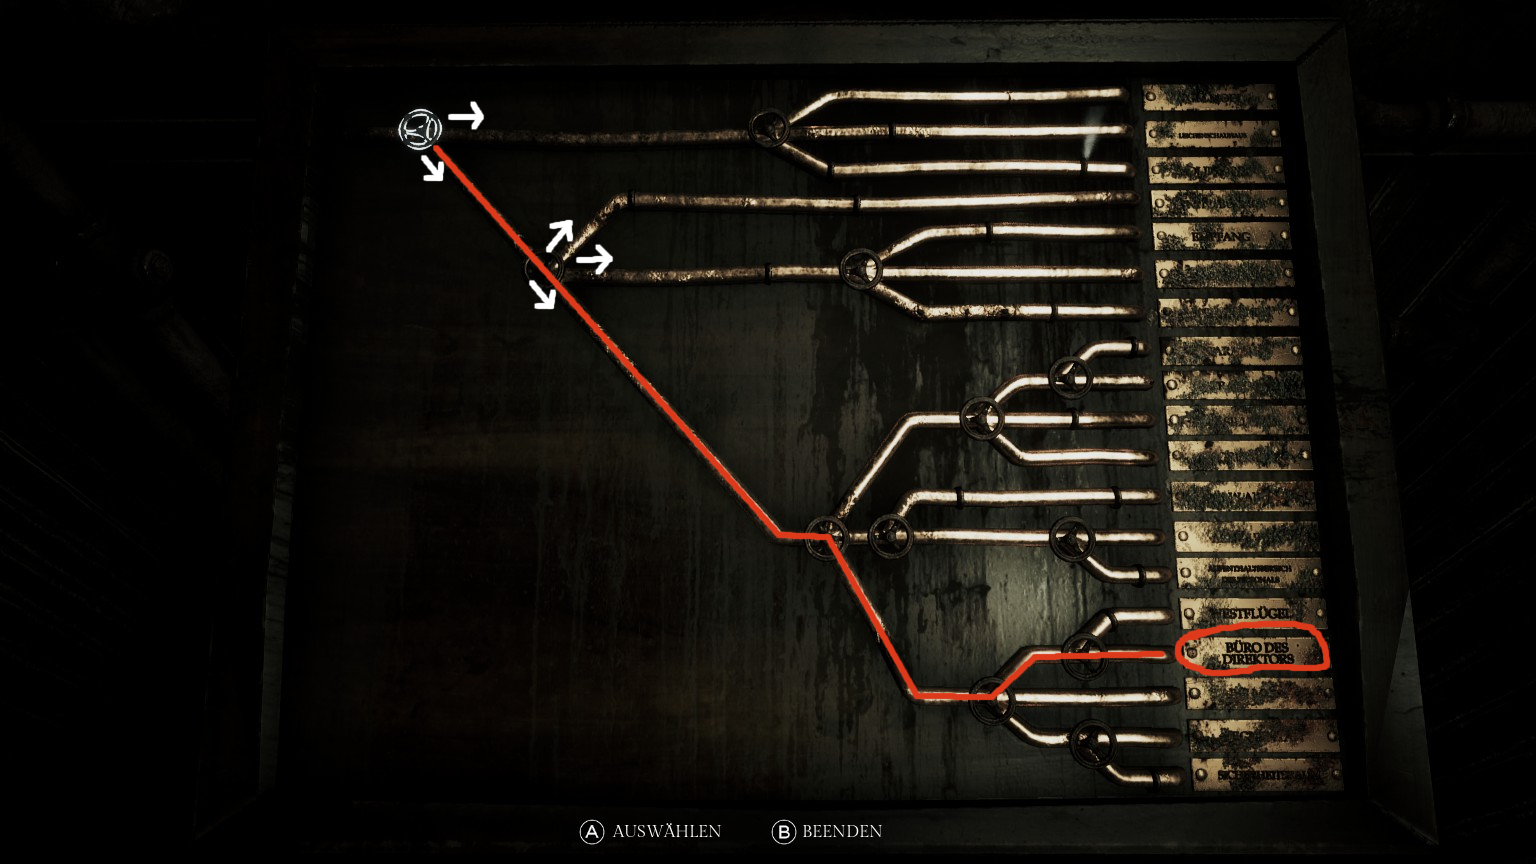
NA6: Recording 3 of Berenice Prestegard / tube puzzle P3 must be solved
NA7: This door will be open at the end of this chapter. Before you play the third record and finish everything else. Including the two drawings of Ariadne
Puzzles:
P2: Music puzzle / piano key (investigate) – tiny key
To get access to this puzzle you have to take the drawing from the wall in the next room and turn on the lamp. Just play the dark notes and the key is yours.
Solution (Increased brightness):
Solution (numbered):


P3: Pipe puzzle:
This riddle is much easier than it looks. You have to use the valves to direct the steam to the director’s office. The first valve has two possible directions, the second three, and so on. You can use the steam output to find out in which direction you have to turn the valves.
P4: Owl puzzle / Deterioraded key
Solution:
Eye / Ear / Wings / Claws / Branch / Beak / Claws / Beak / Wings / Eye
B. Prestegard Dreams / “There” Nightmares / Finale
-In the dream sequences of Berenice you can’ t do anything wrong. Even without a map the sections are completely manageable; you won’t be attacked; you can’t miss anything; just follow the given path and the story.
-The same goes for Daniel if he wants to get the music box back.
-If you collect all three drawings, you will only need to solve two instead of three nightmare puzzles in this Finale. How many puzzles must be correct depends on whether you have collected all three drawings before. Three correct ones are usually required, but once you have all the drawings you will only need to solve two of them. However, if you don’t manage to solve the required number of puzzles, it means game over. In the big room there are four doors, just knock and depending on your character you will get into another nightmare with a different puzzle.
-Two mistakes are allowed per nightmare, the third time you are removed from the nightmare and your attempt fails (Argos LaGrant is an exception). If you have done something wrong you can see that only the light flickers or the lamps break.
Nightmare puzzles – Isaac Faber
In the large room there are three cameras which, if you use them, each show you a different picture. Your task now is to use the right levers based on the camera images.
Solution:
Based on my sketch below, the solution is: 3, 11, 15
Hint:


Nightmare puzzles – Argos LeGrant
This puzzle is completely sound-based, because you are practically walking through a black room without landmarks. Just walk / run towards the baby’s crying three times. Stop now and then because you’re walking through water…
WARNING: If you move too far away from your target or approach the “edge” you will be devoured by the darkness
Nightmare puzzles – Sebastian P. Husher
You will be told a story through a theater play. You have to complete the situation by finishing the sentence. Once you have gotten involved in the situation a little bit and followed the story, it’s a piece of cake. You also have three attempts here.
1: bibel
2: entered
3: Saul
4: hugged
Nightmare puzzles – Berenice Prestegard
This puzzle is about finding the two people who have not yet heard the melody of the music box by asking questions and other clues. Simply press the button of your choice and then press play. If you deal with it it won’t be difficult to quickly exclude 3 out of 6 people. Particularly since Ariadne is already excluded from the beginning right? And she gives you a very good clue…
Also here you have three attempts.
Solution:
1 + 2