
Overview
Most solo walkthroughs and guides for Master Gee take way too long to finish him, and are pretty much the same. Here is something different. No hard to find equipment required.
Introduction
Most walkthroughs I’ve seen on how to take down Master Gee solo follow the same pattern: kill his worms and get him to absorb the acid pool a few times, then just hide behind the rock near the entrance to his arena and wait. Make a cup of tea, do the dishes and take a hot bath, then come back to the game and hope he is dead. If he is not, too bad, wait a bit more. Even then some people may have trouble killing the worms in the first place, because in UVHM the acid spit packs a lot more punch.
Here is something different: in this guide I will suggest a much faster, relatively easy and safe way. It takes a bit finesse though. If this sounds like your kind of thing, read on.
Equipment
First you need the following easy to find equipment.
1. Lobbed or longbow singularity grenade mod with short fuse time. Just look for something cheap in the vending machine. Ideally it should be longbow corrosive with 0 fuse time. Homing or rubberized grenade is no good here.
2. Grenade regeneration. This can be any grenade mod from Tiny Tina DLC, Magic Missile is perfect because it will regenerate grenade AND slag, you can use it on Master Gee without switching weapon. You will be lobbing a lot of grenades, so you need this.

3. The Bee. Great if you can find an Alkaline Bee, but anything else is fine. In most of the fight you won’t get hurt, you may as well buff your DPS.
4. High damage fire weapon with high fire rate and high chance to burn. I use a Good Touch, it is easy to get from Moxxi. Blue or purple Maliwan fire SMG is good enough. The worms are weak to fire.

5. High chance to slag weapon. A slag sniper rifle will do.
6. Relic that increases fire damage. This is entirely optional, just makes the fight a lot easier. For solo you may want to equip Vault Hunter’s Relic instead to get better loot though.
Walkthrough
- You want him to follow you to the entrance, because you will be hiding behind the rock near entrance most of the time for the rest of the battle. If you are too far away, he won’t follow you and just keep firing his rocket launcher. That is no good.
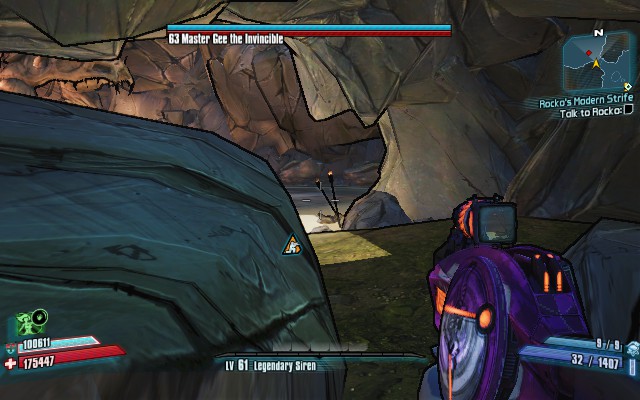
- This is the rock:
- When you are hiding behind the rock, most of the time he can’t hit you. You can only hit him while standing or jumping up.
- This is the worm you are looking for. Don’t worry, after you kill it, another worm will take its place.
- If you are not sure, just look at the mini-map: there should be 2 red spots even after you crouched behind the rock for a while. One is Master Gee, the other one is this worm you are looking for.
- Another sign that says THIS IS THE WORM is that when you stand up, you can shoot it, when you crouch, you can’t:
- Sometimes there may be more than one worm in that position. Just make sure they refuse to burrow even when you are hiding behind the rock crouching. Then they can be killed later. DO NOT shoot other worms.
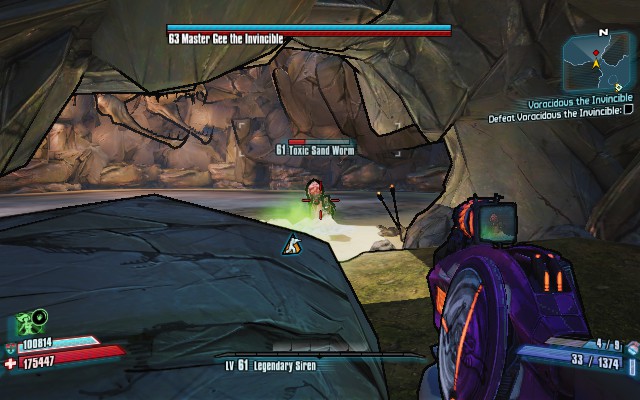
- Screenshot above shows the perfect position you should line up Master Gee. In the mini-map you can’t tell the two dots apart. As long as you got singularity grenade and grenade regeneration, you can take your time putting him there.
- Maya with Converge can use phaselock on the worm to line Master Gee up, but singularity grenade is more accurate. Converge can sometimes “overshoot” and toss Master Gee away from the worm. If you have to Phaslock with Converge, use it just before killing the worm, so as to pin Master Gee near the centre of the pool as long as possible.
- Make sure after you line him up, he still can’t shoot you behind the rock. If Master Gee ended up in the 5 o’clock position (the entrance would be at the 6 o’clock position), then he can hit you behind the rock. Use another singularity grenade to draw him away from there. WHENVER MASTER GEE CAN HIT YOU BEHIND THE ROCK, STOP HIDING AND USE SINGULARITY GRENADE TO MOVE HIM AWAY IMMEDIATELY FROM THAT SPOT. Move him more to your left, so the rock can block all his attacks.
- Sometimes using grenade will cause this worm to burrow. If this happens, repeat Step 3 again, but make sure this time, when you are using the grenade, you have clear view of both the worm and Master Gee by strafing right a bit from the hiding spot. Just a little bit. A grenade with short fuse time makes sure you can line Master Gee up real quick.
- Do not kill any other worm while doing this.
- Ideally Master Gee should be either to the left of the worm facing you, or he is behind the worm. Either way because he can’t see you, he won’t attack.
- If there are other worms blocking your view, hide completely out of sight for a few seconds. After the horde of worms burrow, you can focus on that one worm again.
- In UVHM, slagging is essential, otherwise you will soon run out of ammo. For Maya with Ruin AND Converge, resist the urge to phaselock the worm. If your Maya doesn’t have Converge, then you can use Ruin on the worm. The point is, you don’t want Master Gee to move around too much and risk him not absorbing the acid pool or hitting you even in your hiding spot.
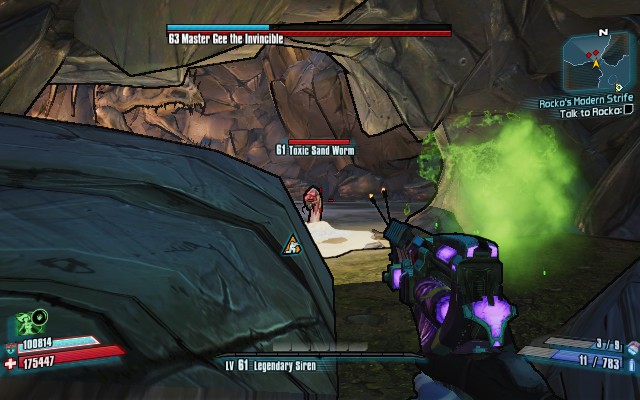
- Because you lined up Master Gee close to this worm, he will absorb the acid shortly after it dies. This is your meal ticket to defeating Master Gee. You will know this is working if you hear the acid absorbing sound.
- If you can’t hear the acid absorb sound, or Master Gee looks to be too far away from the acid, throw one singularity grenade at the exact spot the worm died. The point is to drag Master Gee to that spot and make him absorb the acid. Just remember to be comepletely out of sight afterwards so he won’t move.
- Make sure when you strafe right, you still can’t see Master Gee. If you can see him and he is attacking, then you have moved too far out.
- It may take a few tries to get a worm to appear in the sweet spot, especially in the beginning of the fight.
- If you’ve got everything right, worms will keep showing up in that exact spot and Master Gee doesn’t move much. Then the “rinse and repeat” part will be very easy and safe, almost mechanical. By my count it takes about 10-15 minutes to kill him solo this way. It is the beginning that is difficult. Once you are in the groove he dies very quickly.
- After Master Gee’s shield is down, you can be a bit more proactive by directly attacking him standing and/or jumping up. Just remember the window to attack him risk-free is about 1 second. Take longer than that you risk getting an axe or acid spit in the face.
- A lot of times after you killed him this way, the gate won’t open. Just quit to main menu after picking up anything valuable.
- Sample loot from Master Gee:


