Overview
A Basic guide for solving the puzzles involved with getting deeper into the Lost Colony Mission.
Jumping through the Grand Gate
We’ll assume you’ve done all the legwork in gathering the required Lost Colony Fragments. You need 4 as of writing this guide.
 To activate the gate just pilot your way inside and it will line up itself. You can’t teleport onto the station or communicate with it in any way.
You’ll be interrupted in your warp by a very tough boss fight. This boss has 2 stages. With the first stage introducing you to the mechanics.
 It will have several target-able parts which will reduce some of it’s capacity.
It has a large high damage laser on it’s “face”
It will fire nukes periodically
It will fire a pulse energy weapon that does high shield damage
It will fire barrages of mini black hole looking projectiles that do massive damage to your ship
It will sometimes fire an electric shock in a small AoE which I think is supposed to increase your reactor heat
It can use viruses on your ship
It will sometimes send boarding parties to interrupt your crew
 The second phase of the boss fight “reflects” the position of ships as well as minor details like UI, it also has the boss return to a full health bar with many more hardpoints and capabilities
The arena where you fight this boss is very tight and collision with the outside “wall” will fling both you and the boss back in.
The strategy that worked for me is a highly upgraded engine and thrusters to outmanoeuvre the projectiles and nukes while focusing down the weapon hardpoints.
There is no reward or scrap after you defeat the boss as you’re flung almost immediately to the Lost Colony sector.
A few primers on the Ghosts
 You’re going to encounter these guys on the planet. They are fairly easy to deal with, especially in a crew, as they are basically Weeping Angels. Keep an eye on them and they will freeze and eventually dissipate. Take your eye off them and they move in for the kill. There’s about 3 of them on the map at all times however eventually they stop spawning.
As they get close lights will start to flicker.
They move fast and do HIGH damage if they collide with you.
Navigating your way to the ending sequence.
 You’ll teleport to the insides of a ship, there’s a few tidbits of lore and a Sylvassi Stem here, but nothing out of the way. Explore the local area as you’ll need to get a few cards to access the entire facility.
 There’s 3 in total. With a scanner it’ll be easy to find as there are no other pickups (Aside from 1 research mat) on the planet.
 The first card which grants you access to the facility can be found just to the right after you exit the ship.
 Make your way across the walkway that’s opposite the ship enterance and find your way to this door. This is where you
use that card you just found.
 Keep going straight ahead to the observation room. There’s a few lore tidbits and a primer on the ghosts. Head to the far door on the left to enter the stairwell. There’s also a storage area on the far door but you’ll need a key from deeper in the facility to access it, we’ll cover that later.
 You’ll want to head up 1 level to the Residential Area to get the next keycard before descending. It’ll give you access to the lower levels.
 It’s sitting on the kitchen bench as you enter the residential area. After you’ve got it head back down the stairwell to the lowest level.
 This is where you’ll use the card you just found. Beware as there are many ghosts inside here and many will spawn and make their way down here.
 After you make your way through the door, go immediately right to see a vault like door and a big screen on the left wall. You’ll want to keep an eye on the screen as it will give you some information on what to do next. For this portion just keep your eyes on the doorway behind you so no ghosts sneak in.
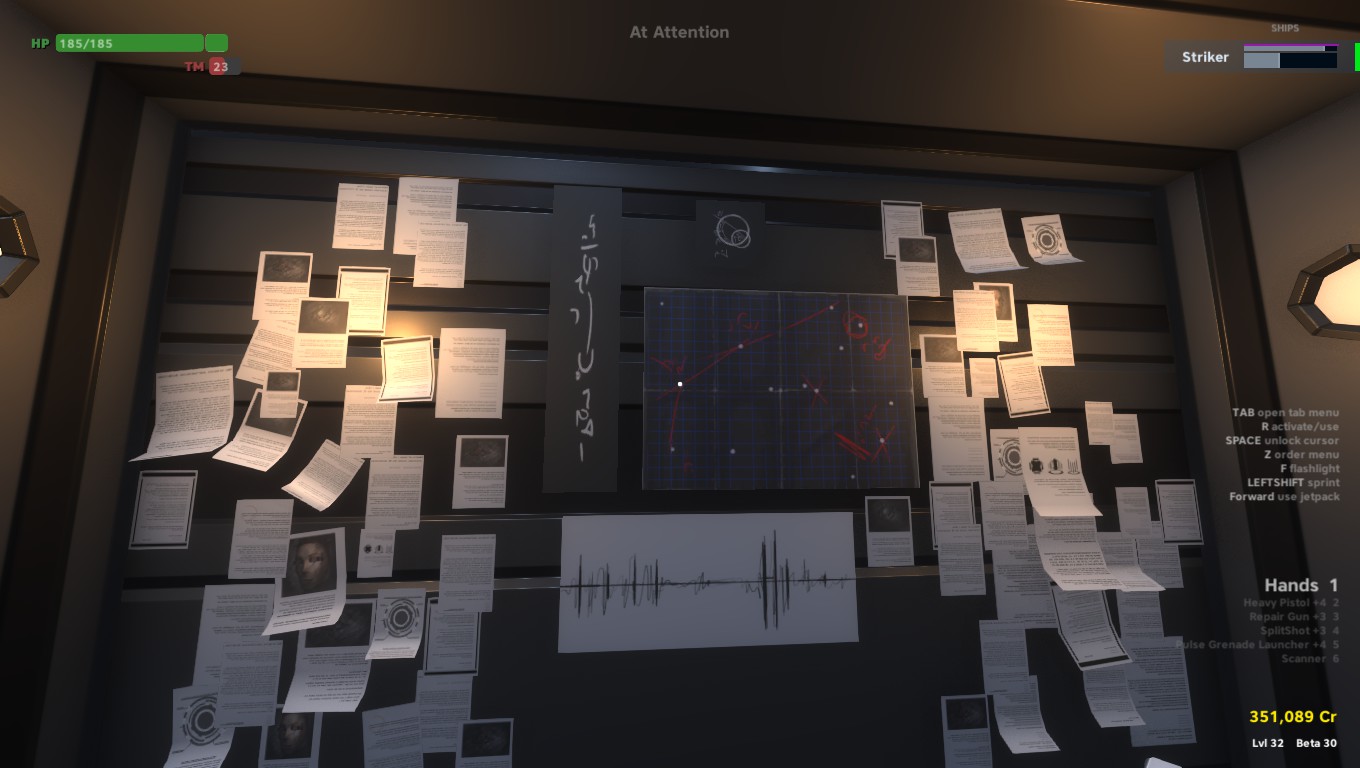
It takes a few minutes to get all the information you need; once it’s all listed make your way around the floor to calibrate the screens it asks you to adjust. You don’t need to be exact as close enough is good enough.
Once you’ve done everything correctly the music will abruptly stop – this is how you know you’ve done it correctly – The screen will also confirm. 
 Before we go ahead however, there is a keycard for an optional ending located near the water control panel by a lore tidbit.
 This will allow you to get the poison canister from the Storage room (Which is near the Observation Room we passed by earlier) which you can put into a hatch at the back of the containment [in the last room]. This opens up 1 additional ending to you.
The hatch is located behind and a bit above the containment, there will be a ladder to mark where it is as shown in this picture.

 The hatch is this blue thing, just move the canister from your inventory to the Hatch before you do the puzzle to have an additional choice in the ending.
 Back on track, after the big screen confirms that you’ve done everything right hold space and mouse over the big green button to the left of the vault door, that will initiate the door opening sequence. You can move onto the next puzzle.
 As you can see in this image you have 3 screens, Ignore the green screens, you just need to hold interact on the red screens(centre screen). The number of errors lets you know how many screens to interact with. Some will need to be repaired with the repair gun before you can interact with them(left most screen). They have a health bar to let you know. Once complete, head through the long tunnel and prepare yourself for the final puzzle.
 !! I recommend saving here !!
This final challenge isn’t as intimidating as it seems. You’re not letting out that big mindslaver in the containment(Behind that to the left is where the blue hatch is for the optional ending). Instead, you’re going to be matching numbers. It’s a fairly simple game of deduction and you have 8 minutes to do this so take your time, if left for about 3 minutes the bar will passively get to 50% full.
You have to match one pair per level and the pair will be reflected between the orange and blue colours, as you progress more numbers will fill the colours.
If you get the match correct it flashes green, if not it flashes red and takes you back a previous stage. The bar will shift either progressing forwards or losing progress depending on your match.

Once you’ve passed this puzzle you can make your choice as to the ending of your run. Congratulations! You’ve just finished Pulsar Lost Colony!