Overview
In this guide I will run you through all Spyro™ Reignited Trilogy achievements by the order they appear in game.
Copying this guide
I give anyone permission to translate this guide to their own language long as we are credited on the guide for the original work. Cheers!
Spyro The Dragon
Spyro The Dragon has a total of 36 achievements and a lot of them are earned by doing miscellaneous stuff in each world. I will post a video reference with all the timestamps on this section of the guide and by scrolling down you can see a more detailed explanation about each achievement.
Artisans World (Video)
1:25 –
2:55 –
7:00 –
9:50 –
10:30 –
13:10 –
14:50 –
18:50 –
22:05 –
24:10 –
27:50 –
31:05 –
32:25 –
1 Artisans

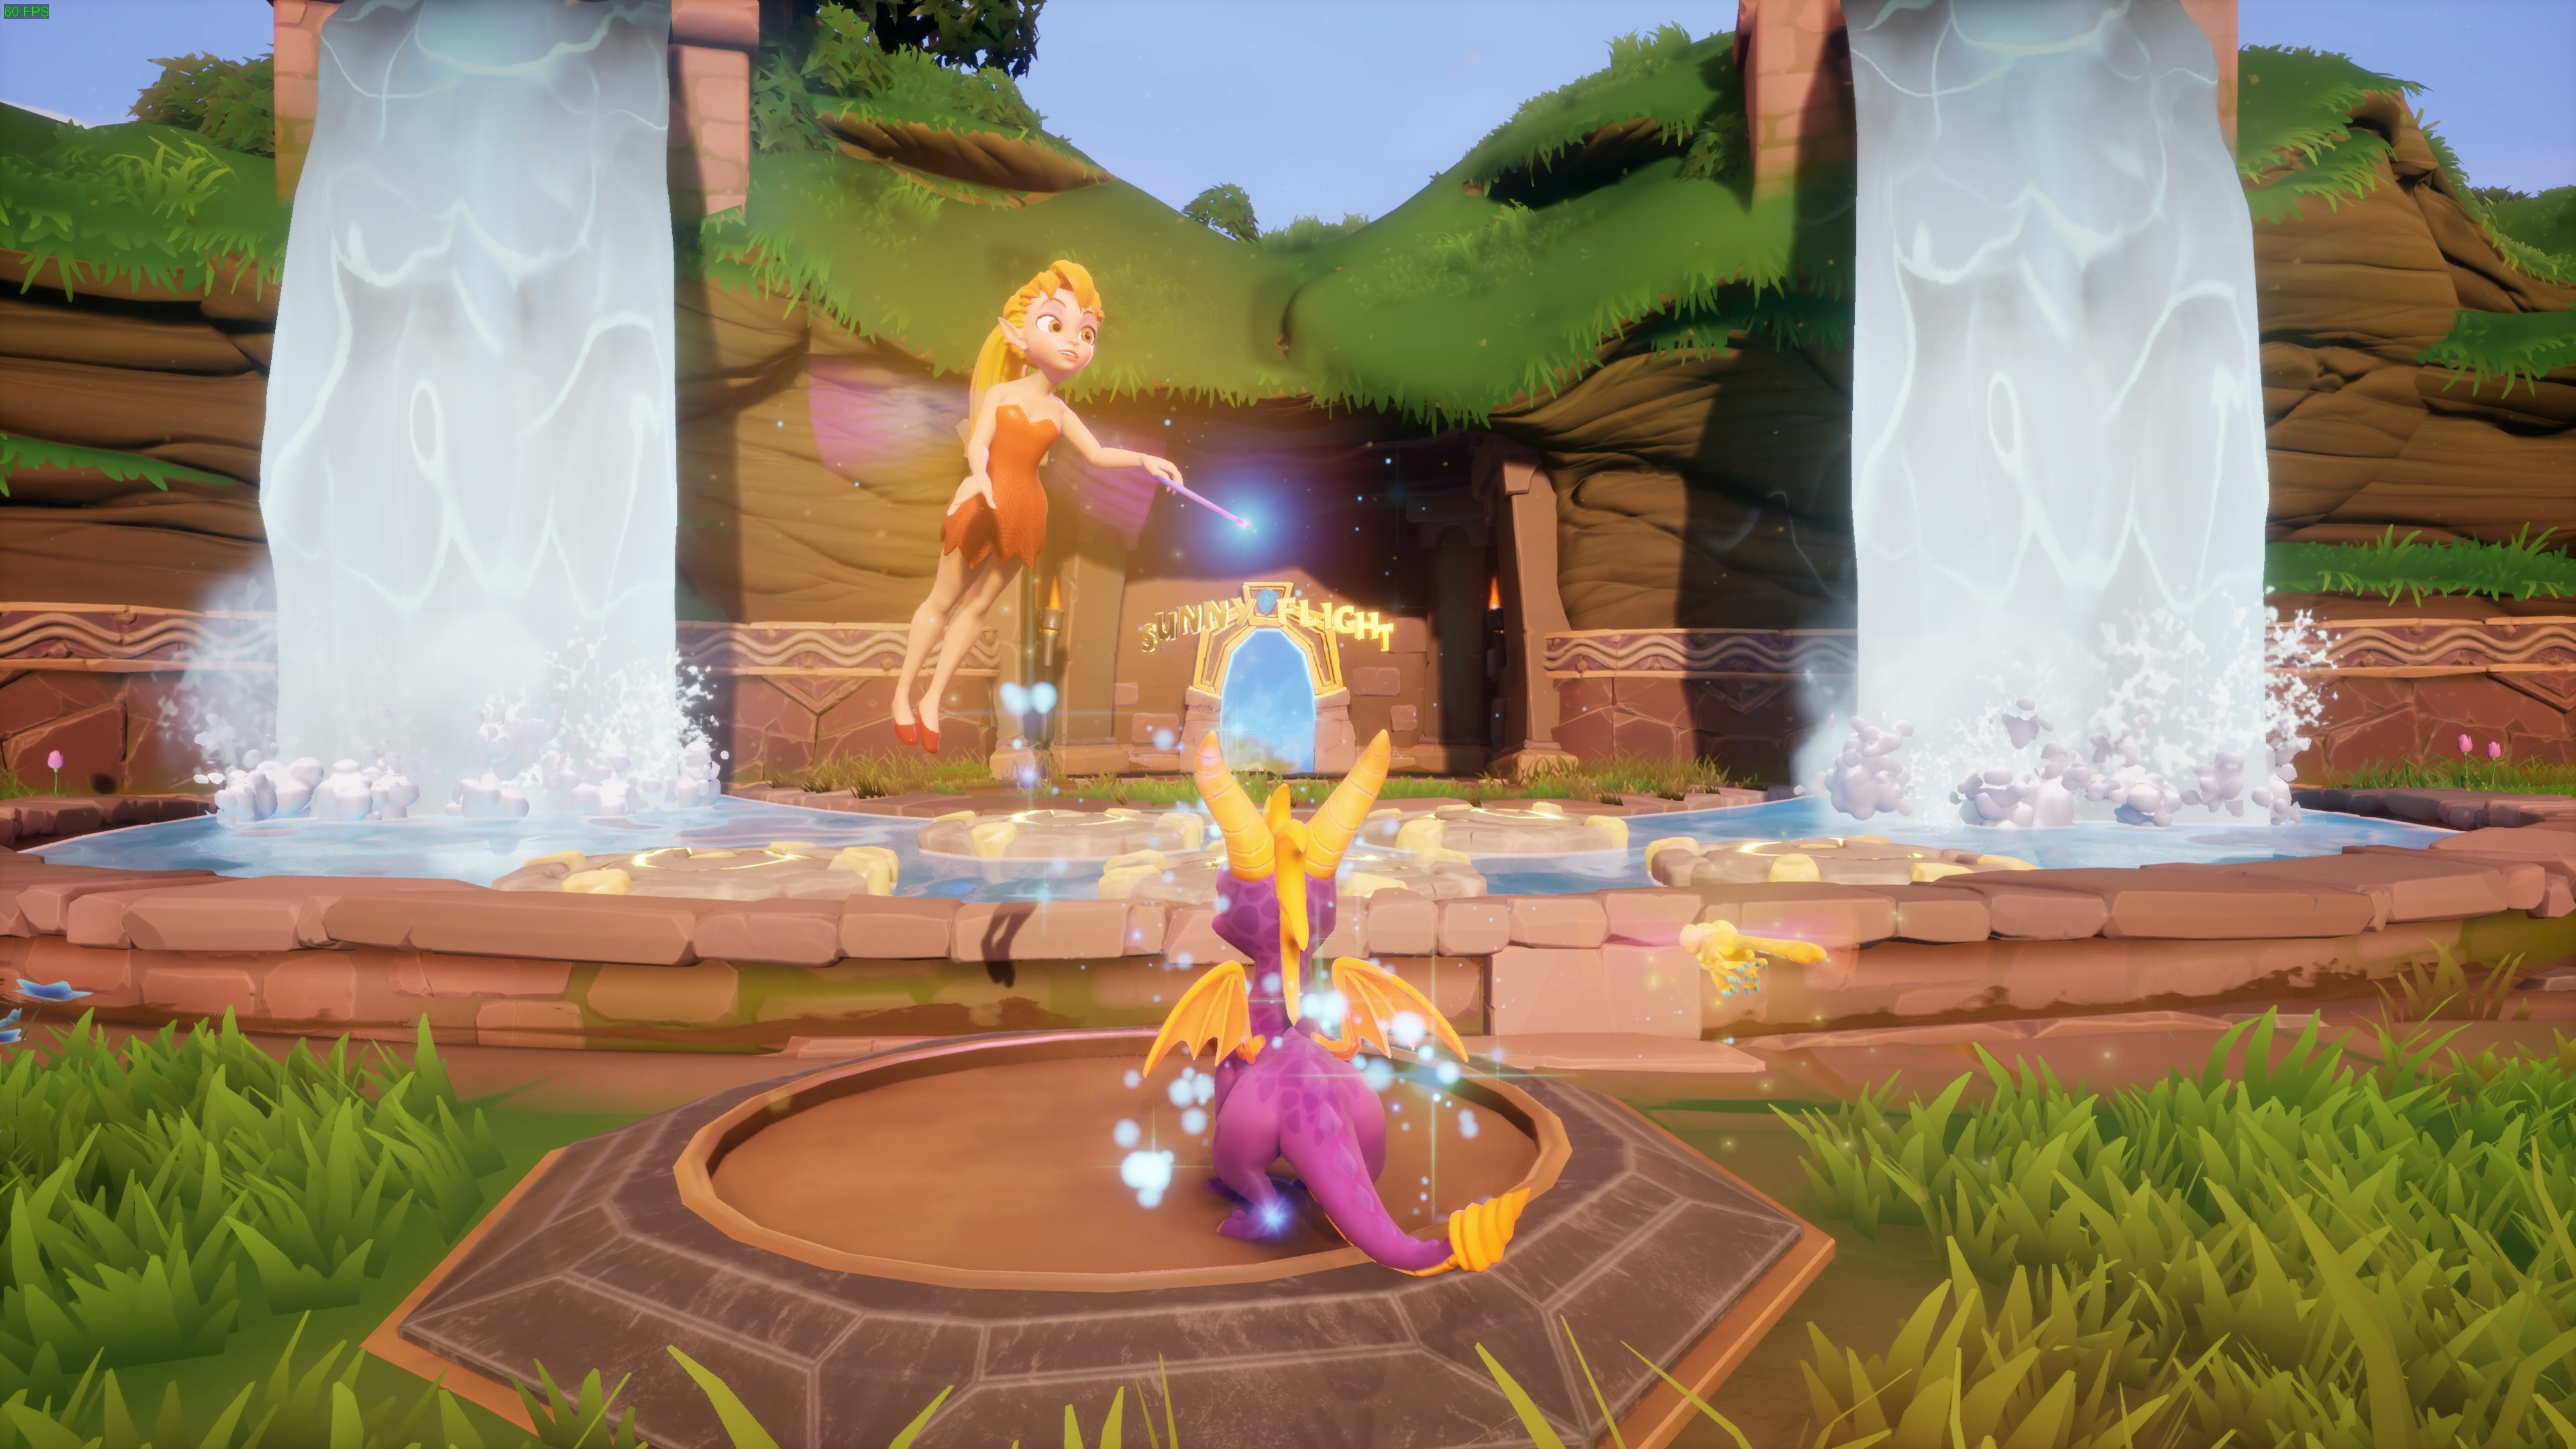
Find the hidden entrance to Sunny Flight
In Artisans World there is a hidden entrance to Sunny Flight. You will unlock this entrance by hopping on all of the stones in the pond by the waterfall.

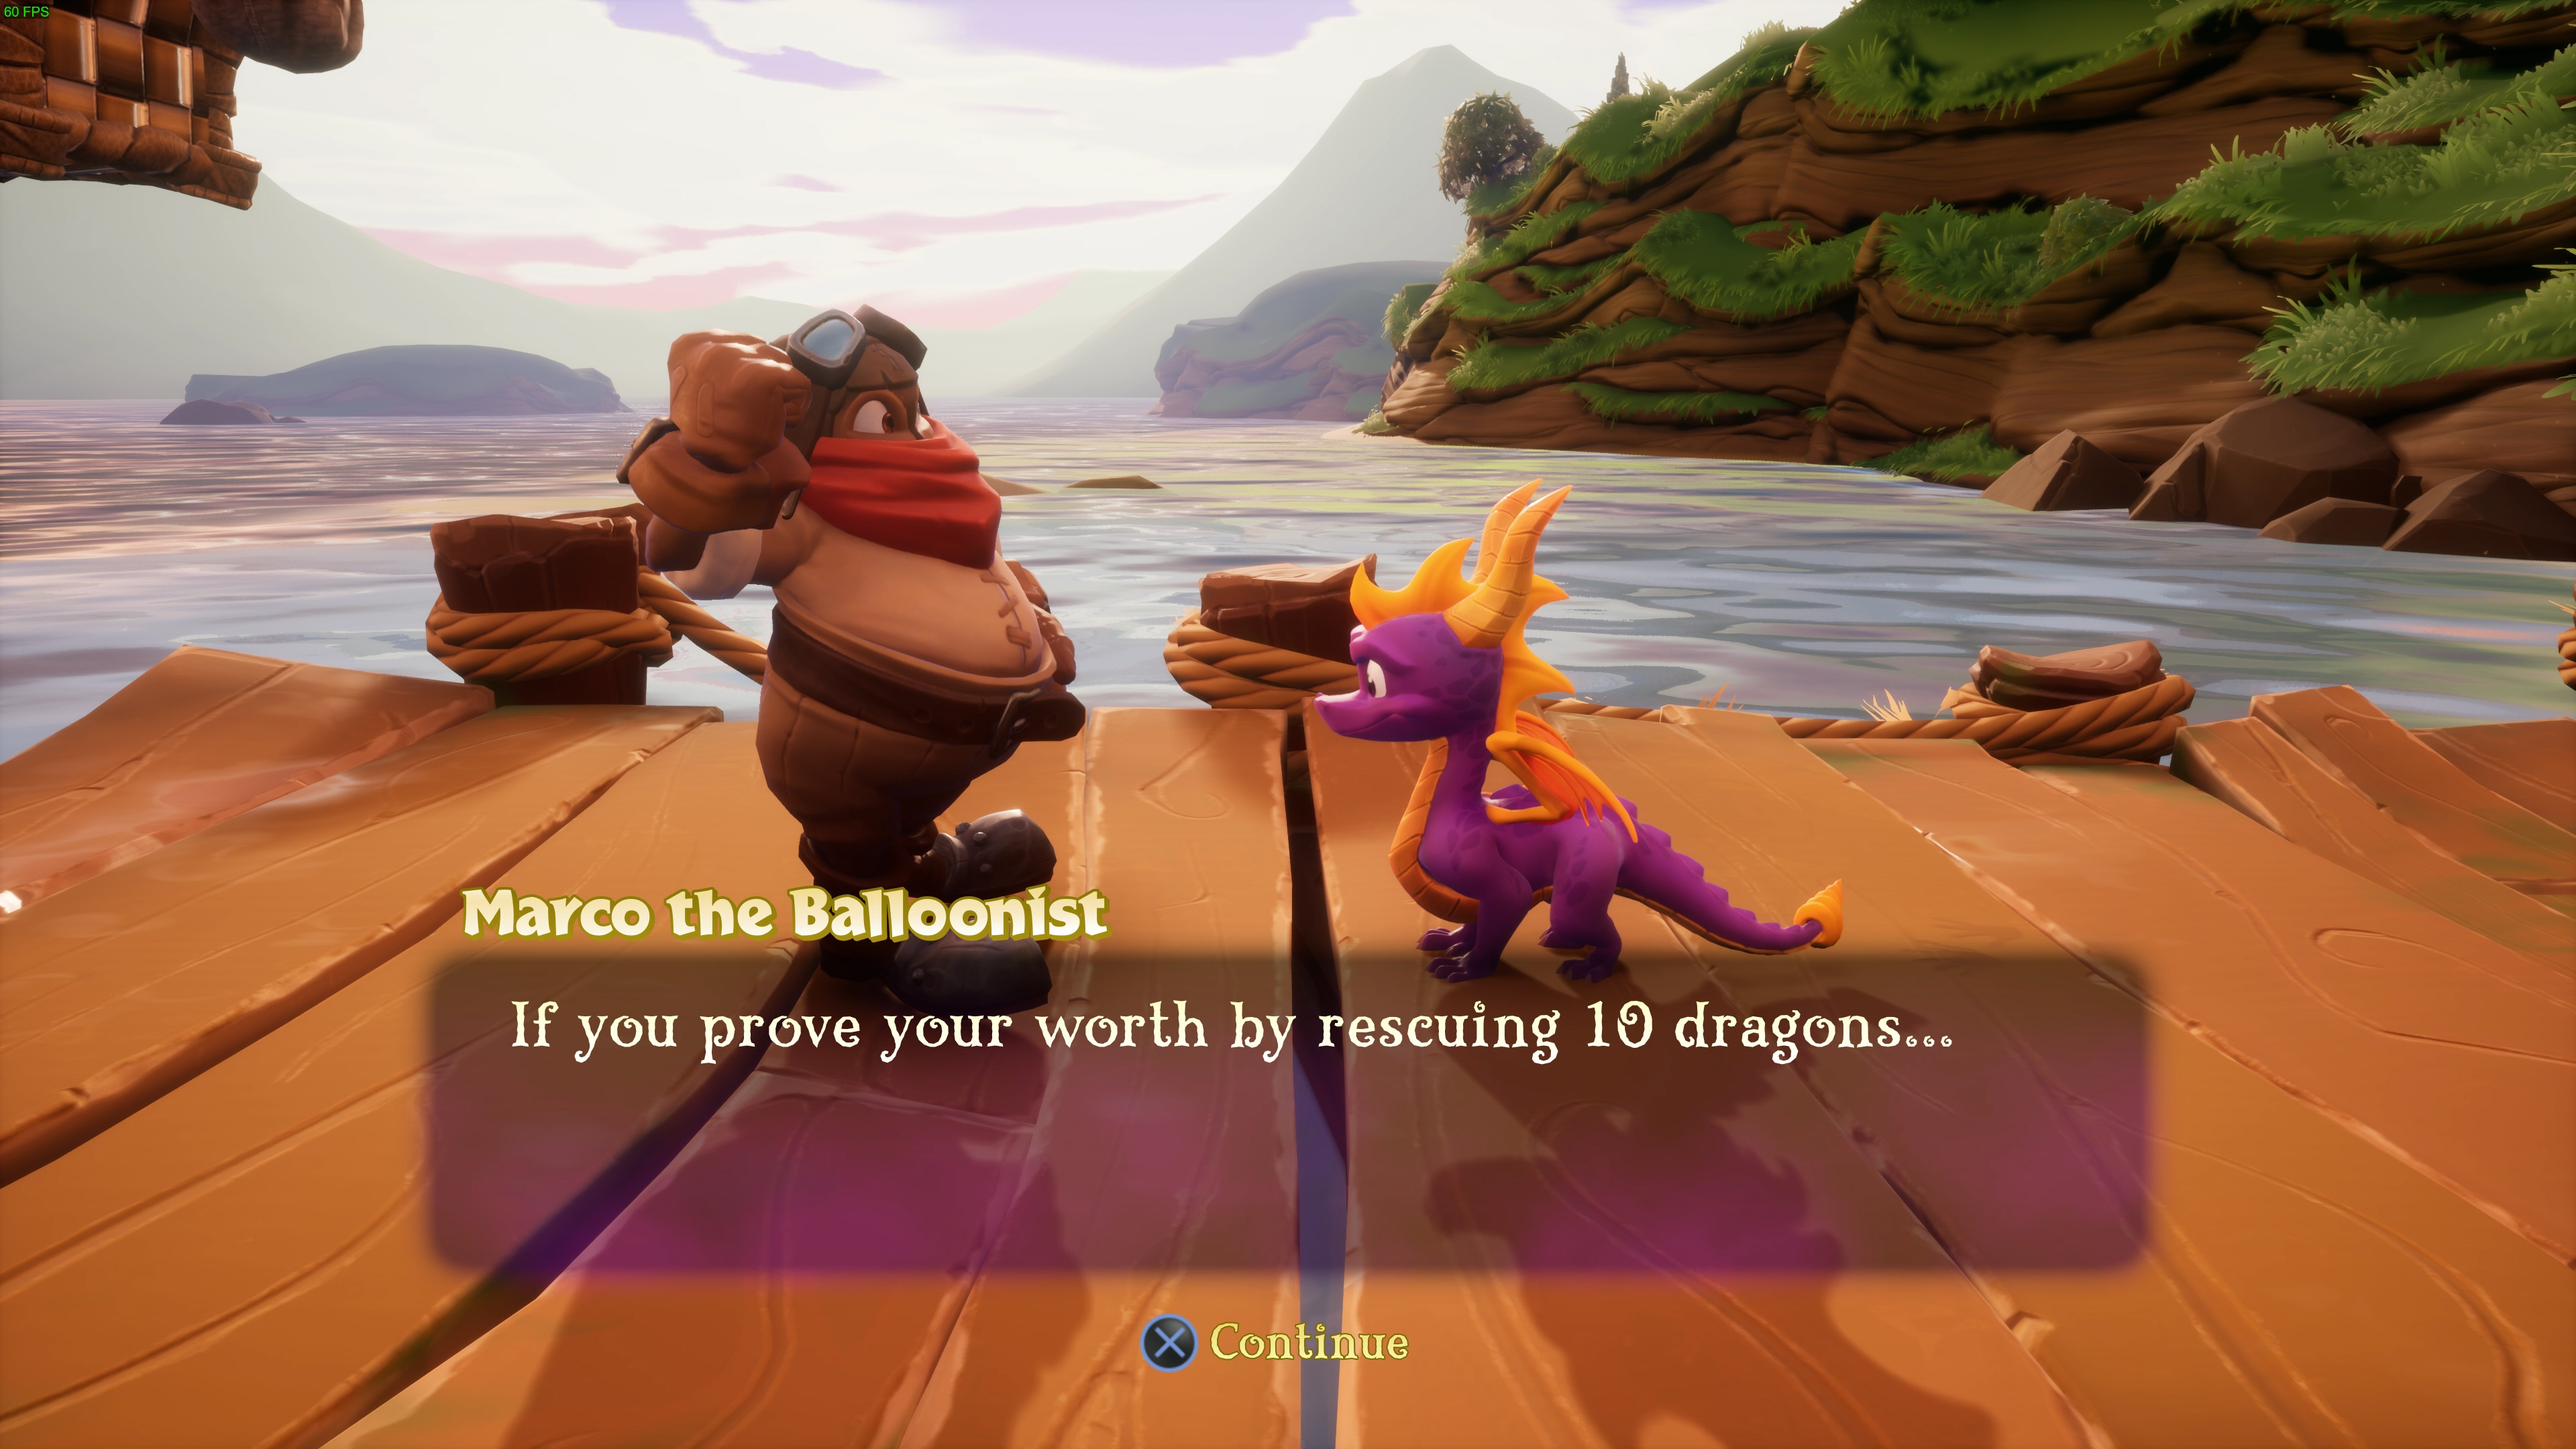
Take a trip with a Balloonist
Unmissable
After rescuing 10 dragons, you unlock this achievement by traveling to the next world after talking to Marco at the docks.
Flame 10 sheep in Stone Hill
Sheep are found around the level. There are quite many of them in the hills, but if you are low you can move to the next area and the sheep will respawn.


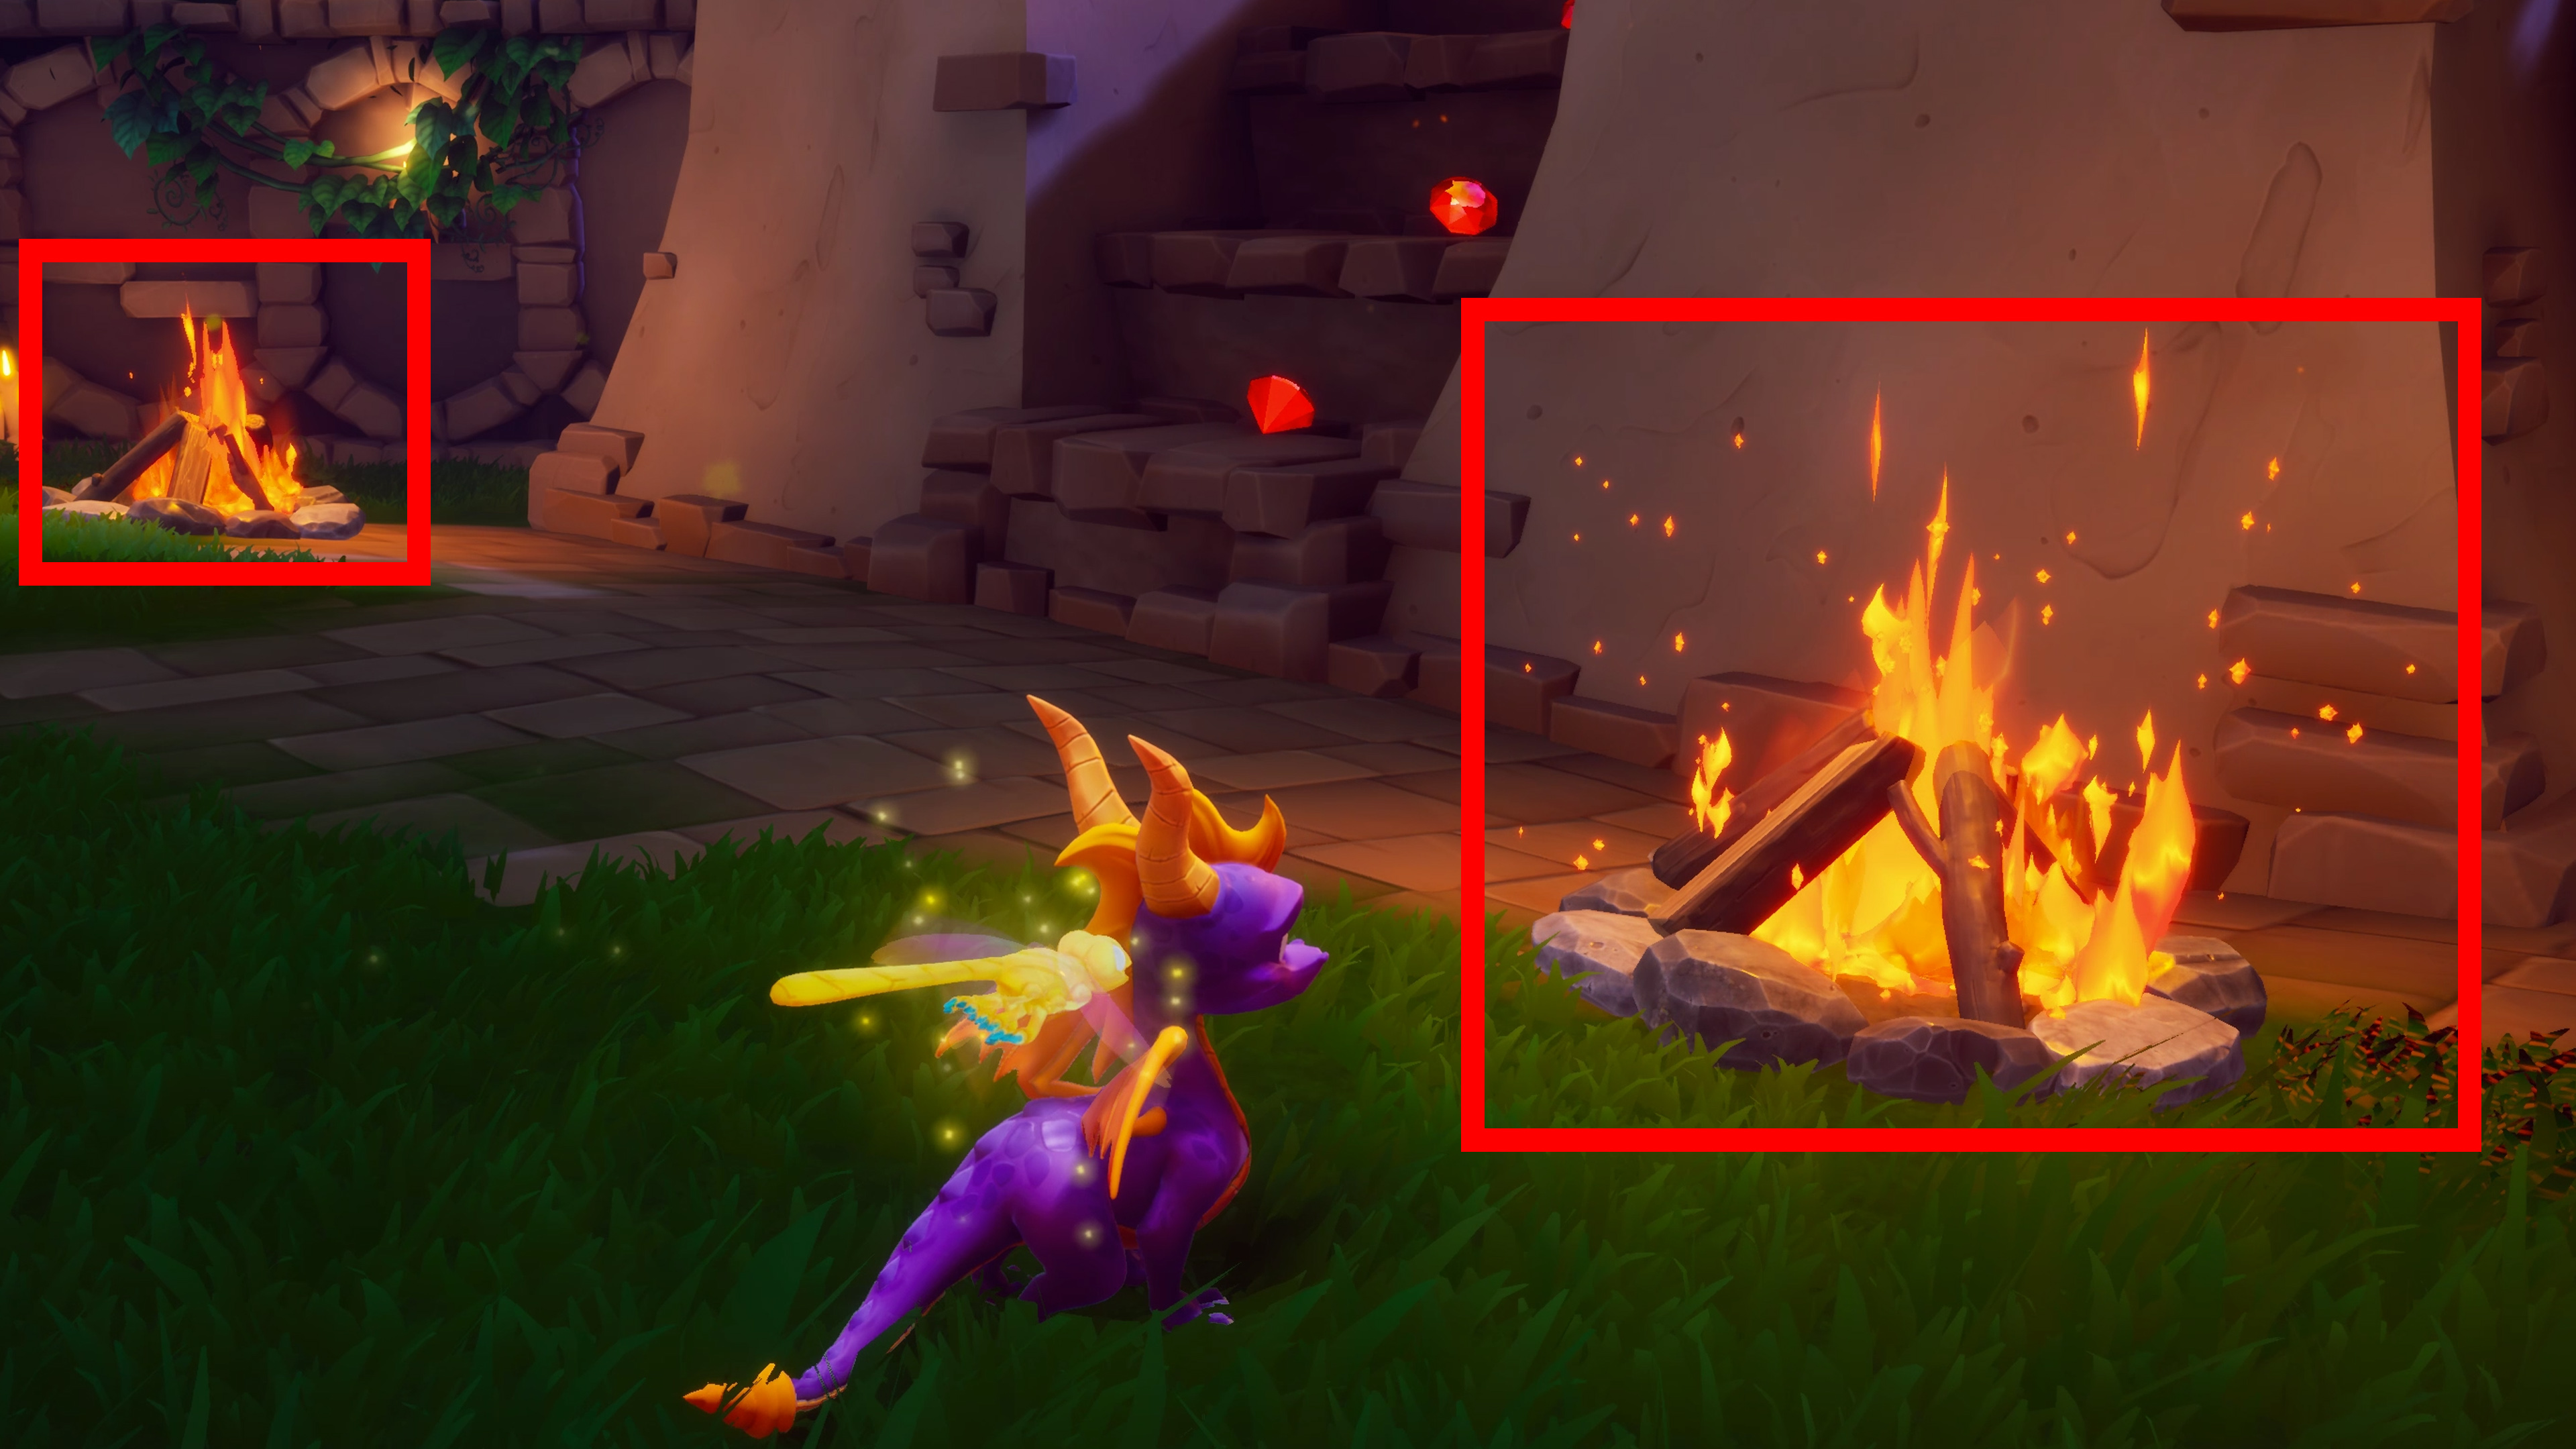
Light the two bonfires in Dark Hollow
While halfway through the level you will notice two bonfires. Light both of them for the achievement.

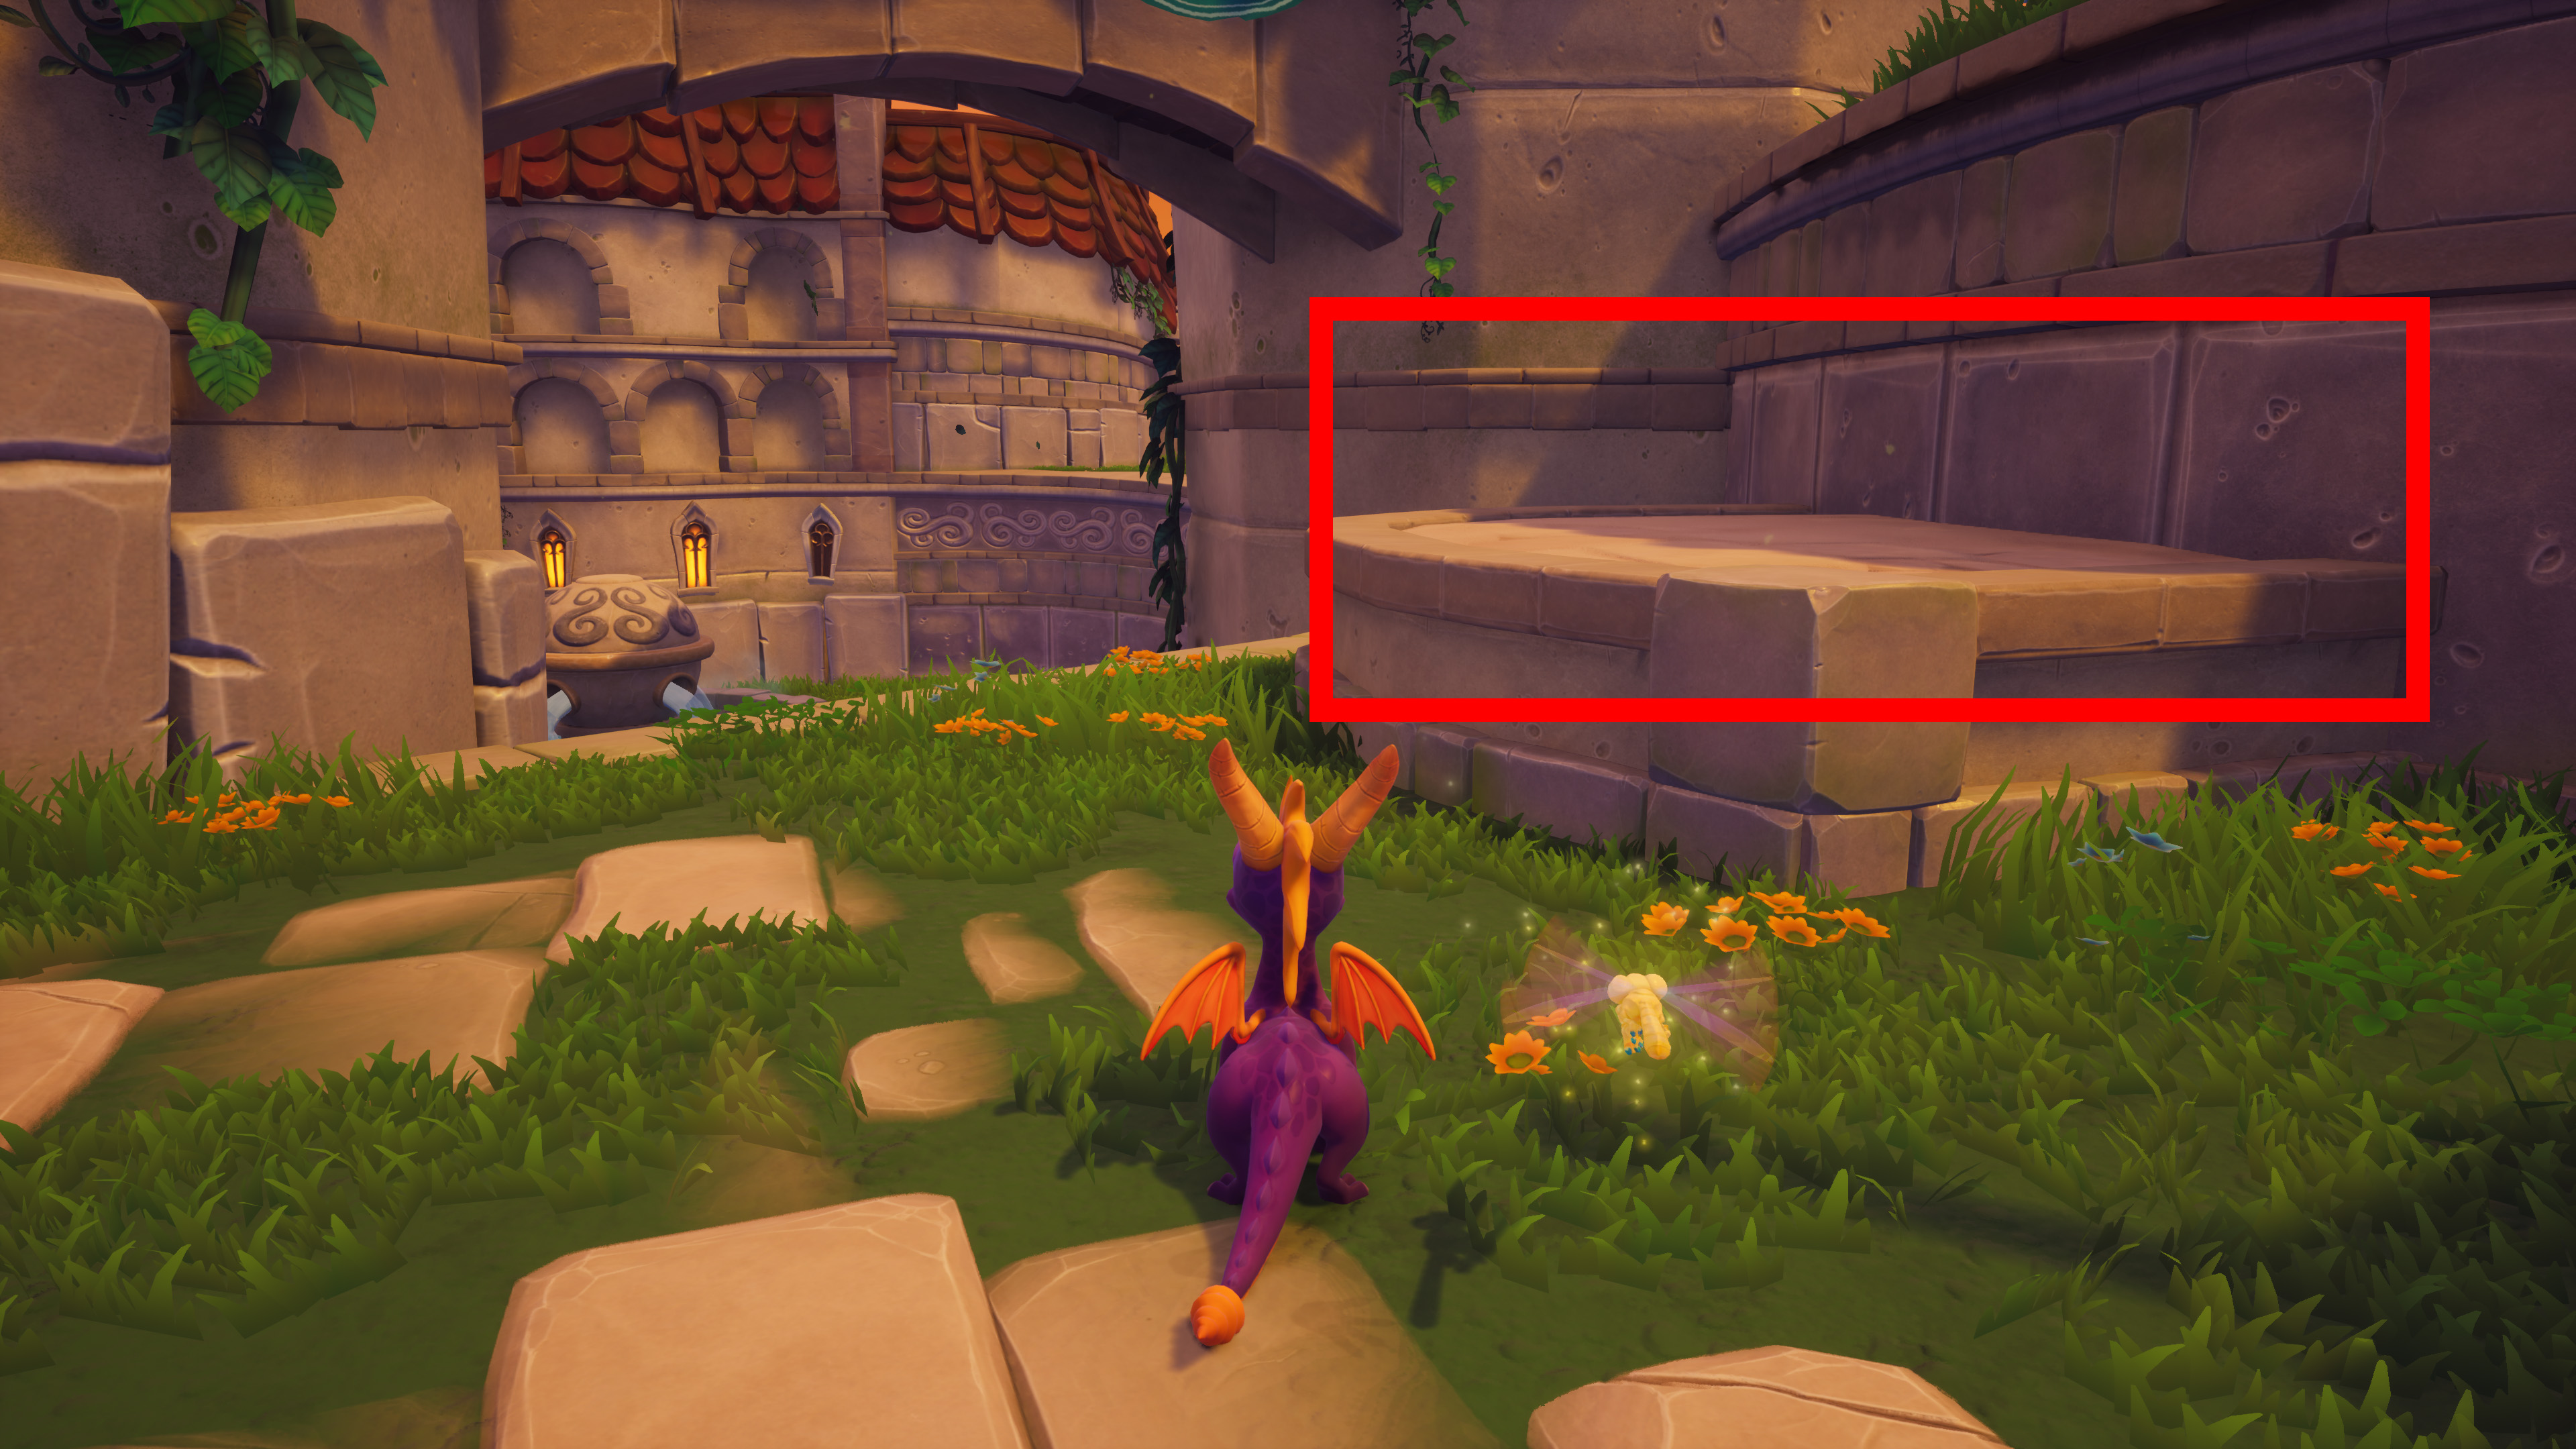
Glide to secret Egg Thief area in Town Square
Halfway through the level you can see a thief taunting you on the ledge in the secret area. You need to get there obviously. Climb the staircase and after that there is another ledge from which you can glide into the area. You don’t actually need to catch the Egg Thief for the achievement but you are going to need it to 100% this game so you better get this out of your way right away!


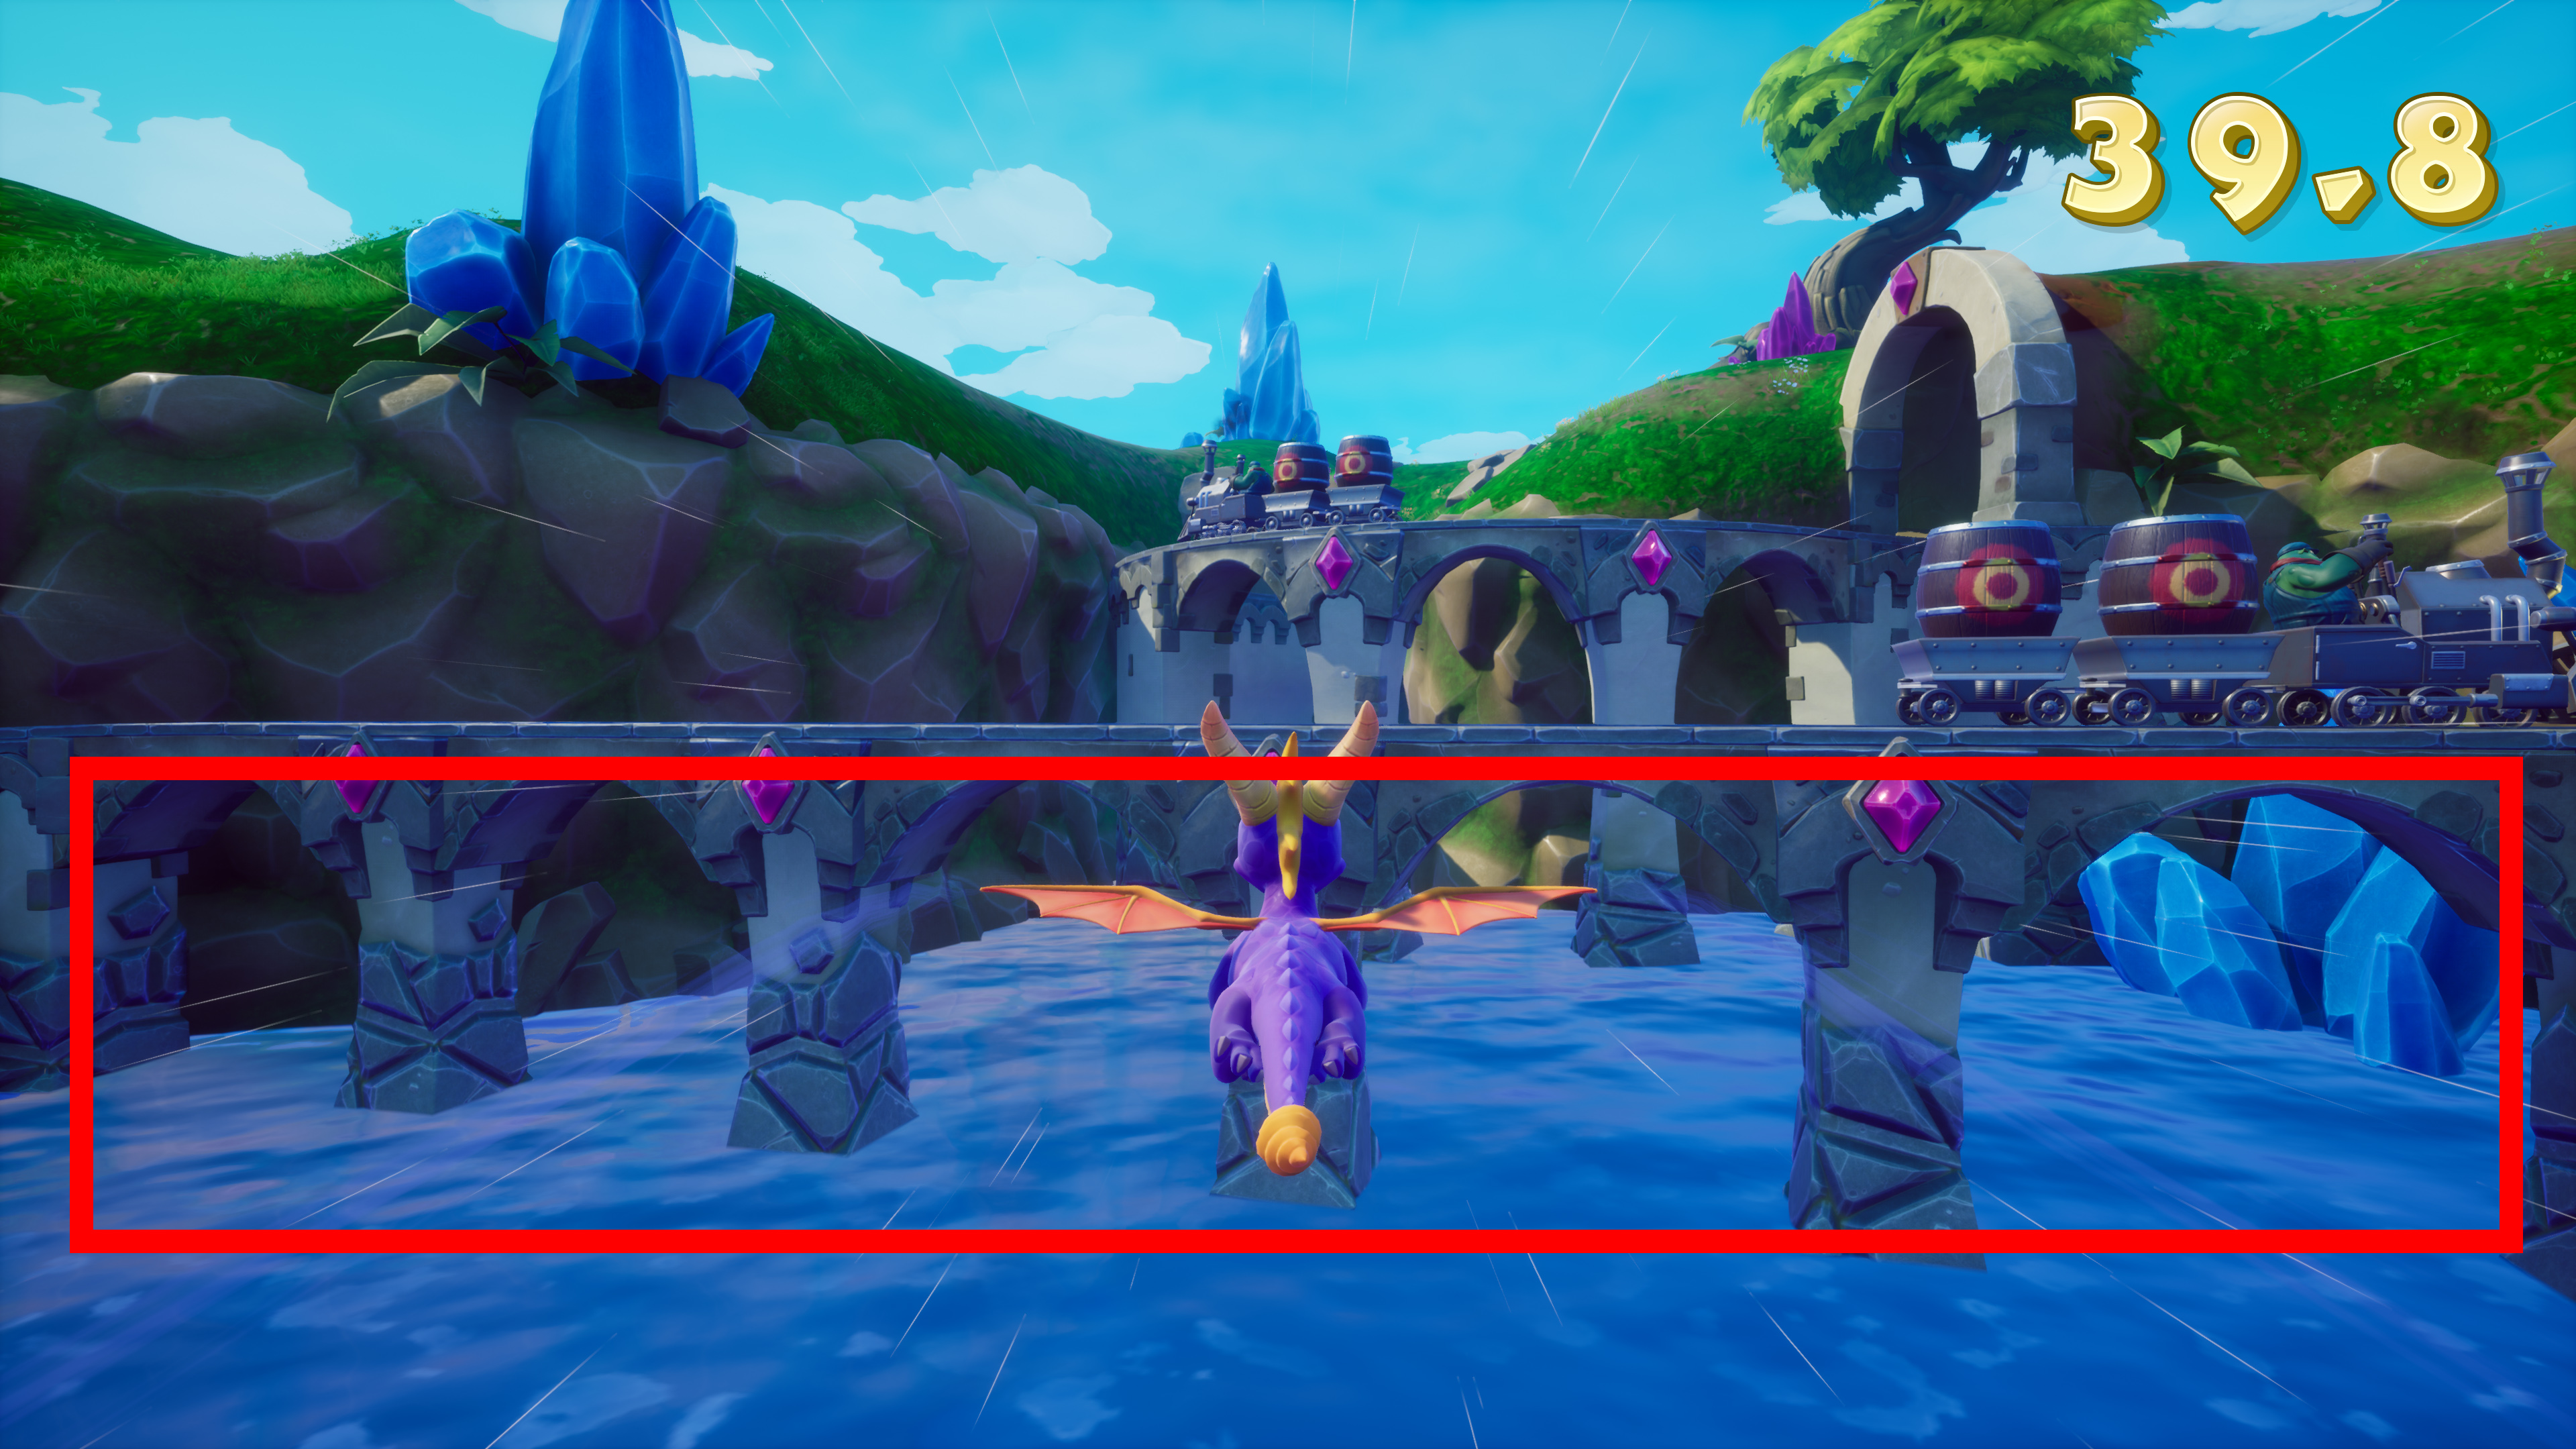
Do a loop around an arch
You can only do this achievement in Sunny Flight. As you enter the level, aim for the train tracks. As you fly under them press either 


Defeat Toasty without getting hit by him
Toasty is the first boss of the game. You can still get hit by the other enemies, as long as Toasty doesn’t hit you directly.
Peace Keepers World (Video)
0:00 –
5:30 –
10:30 –
11:45 –
12:10 –
14:30 –
19:20 –
23:35 –
26:00 –
27:55 –
33:05 –
36:35 –
2 Peace Keepers
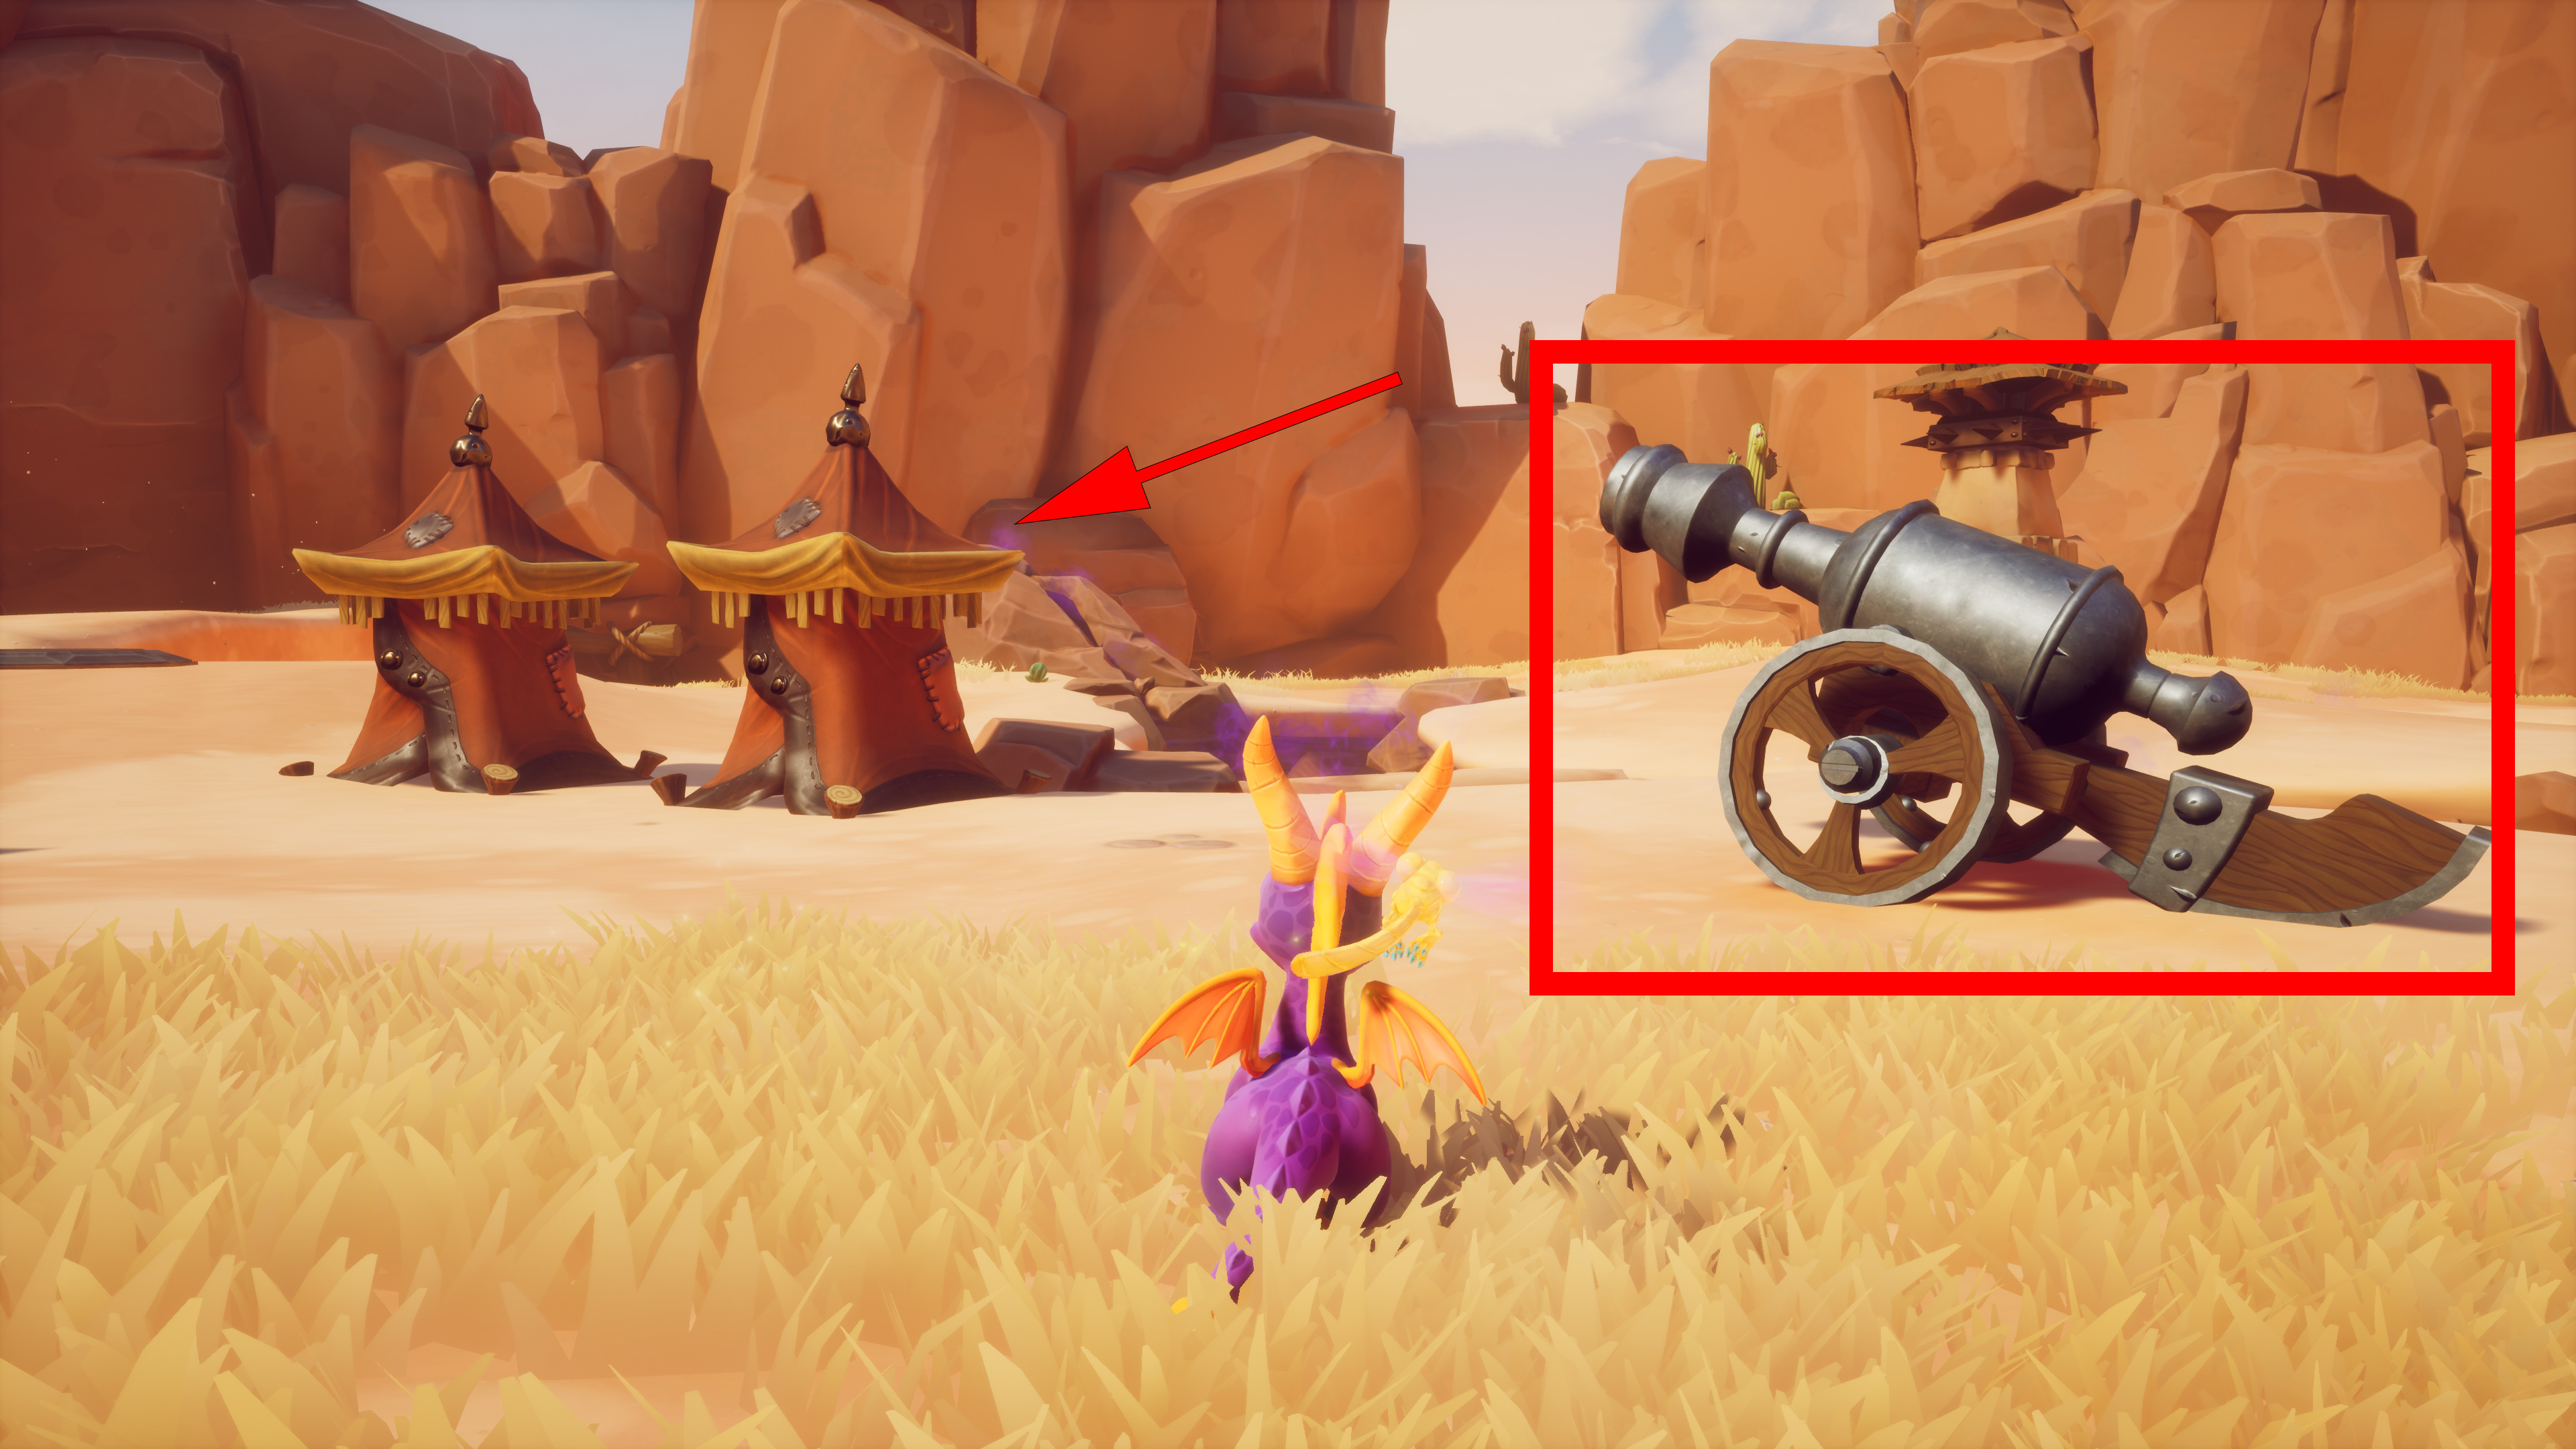
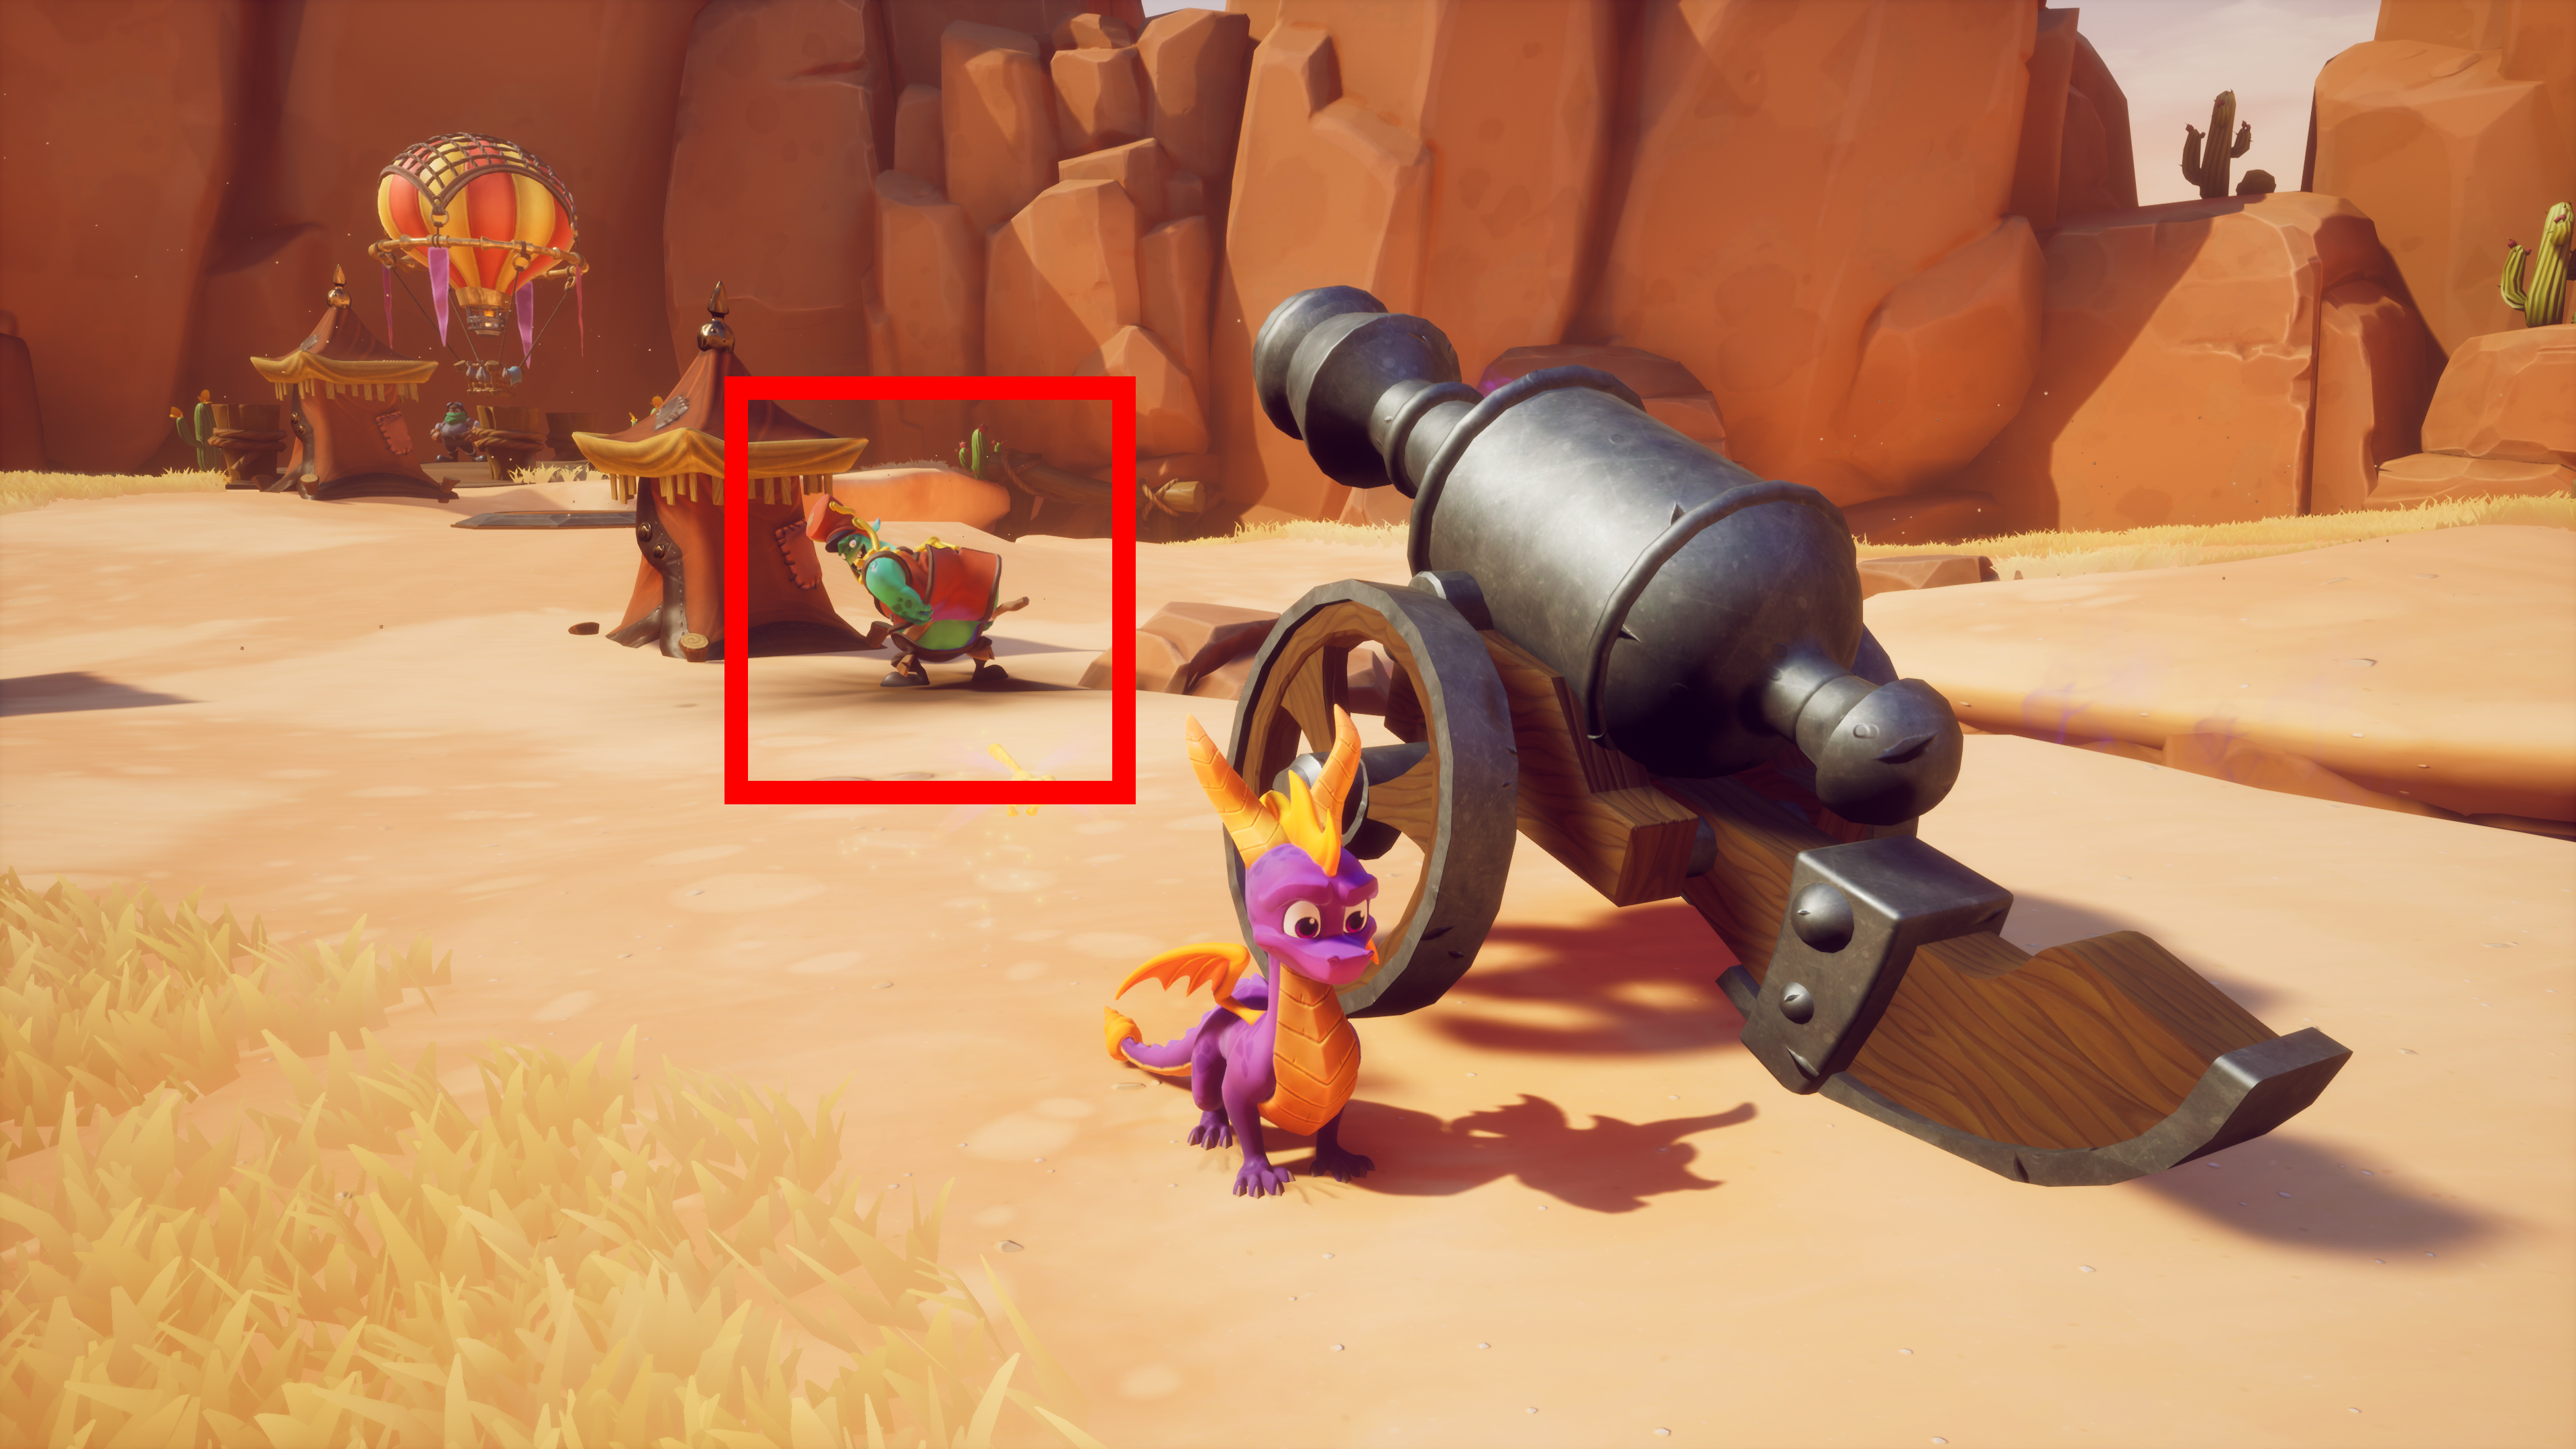
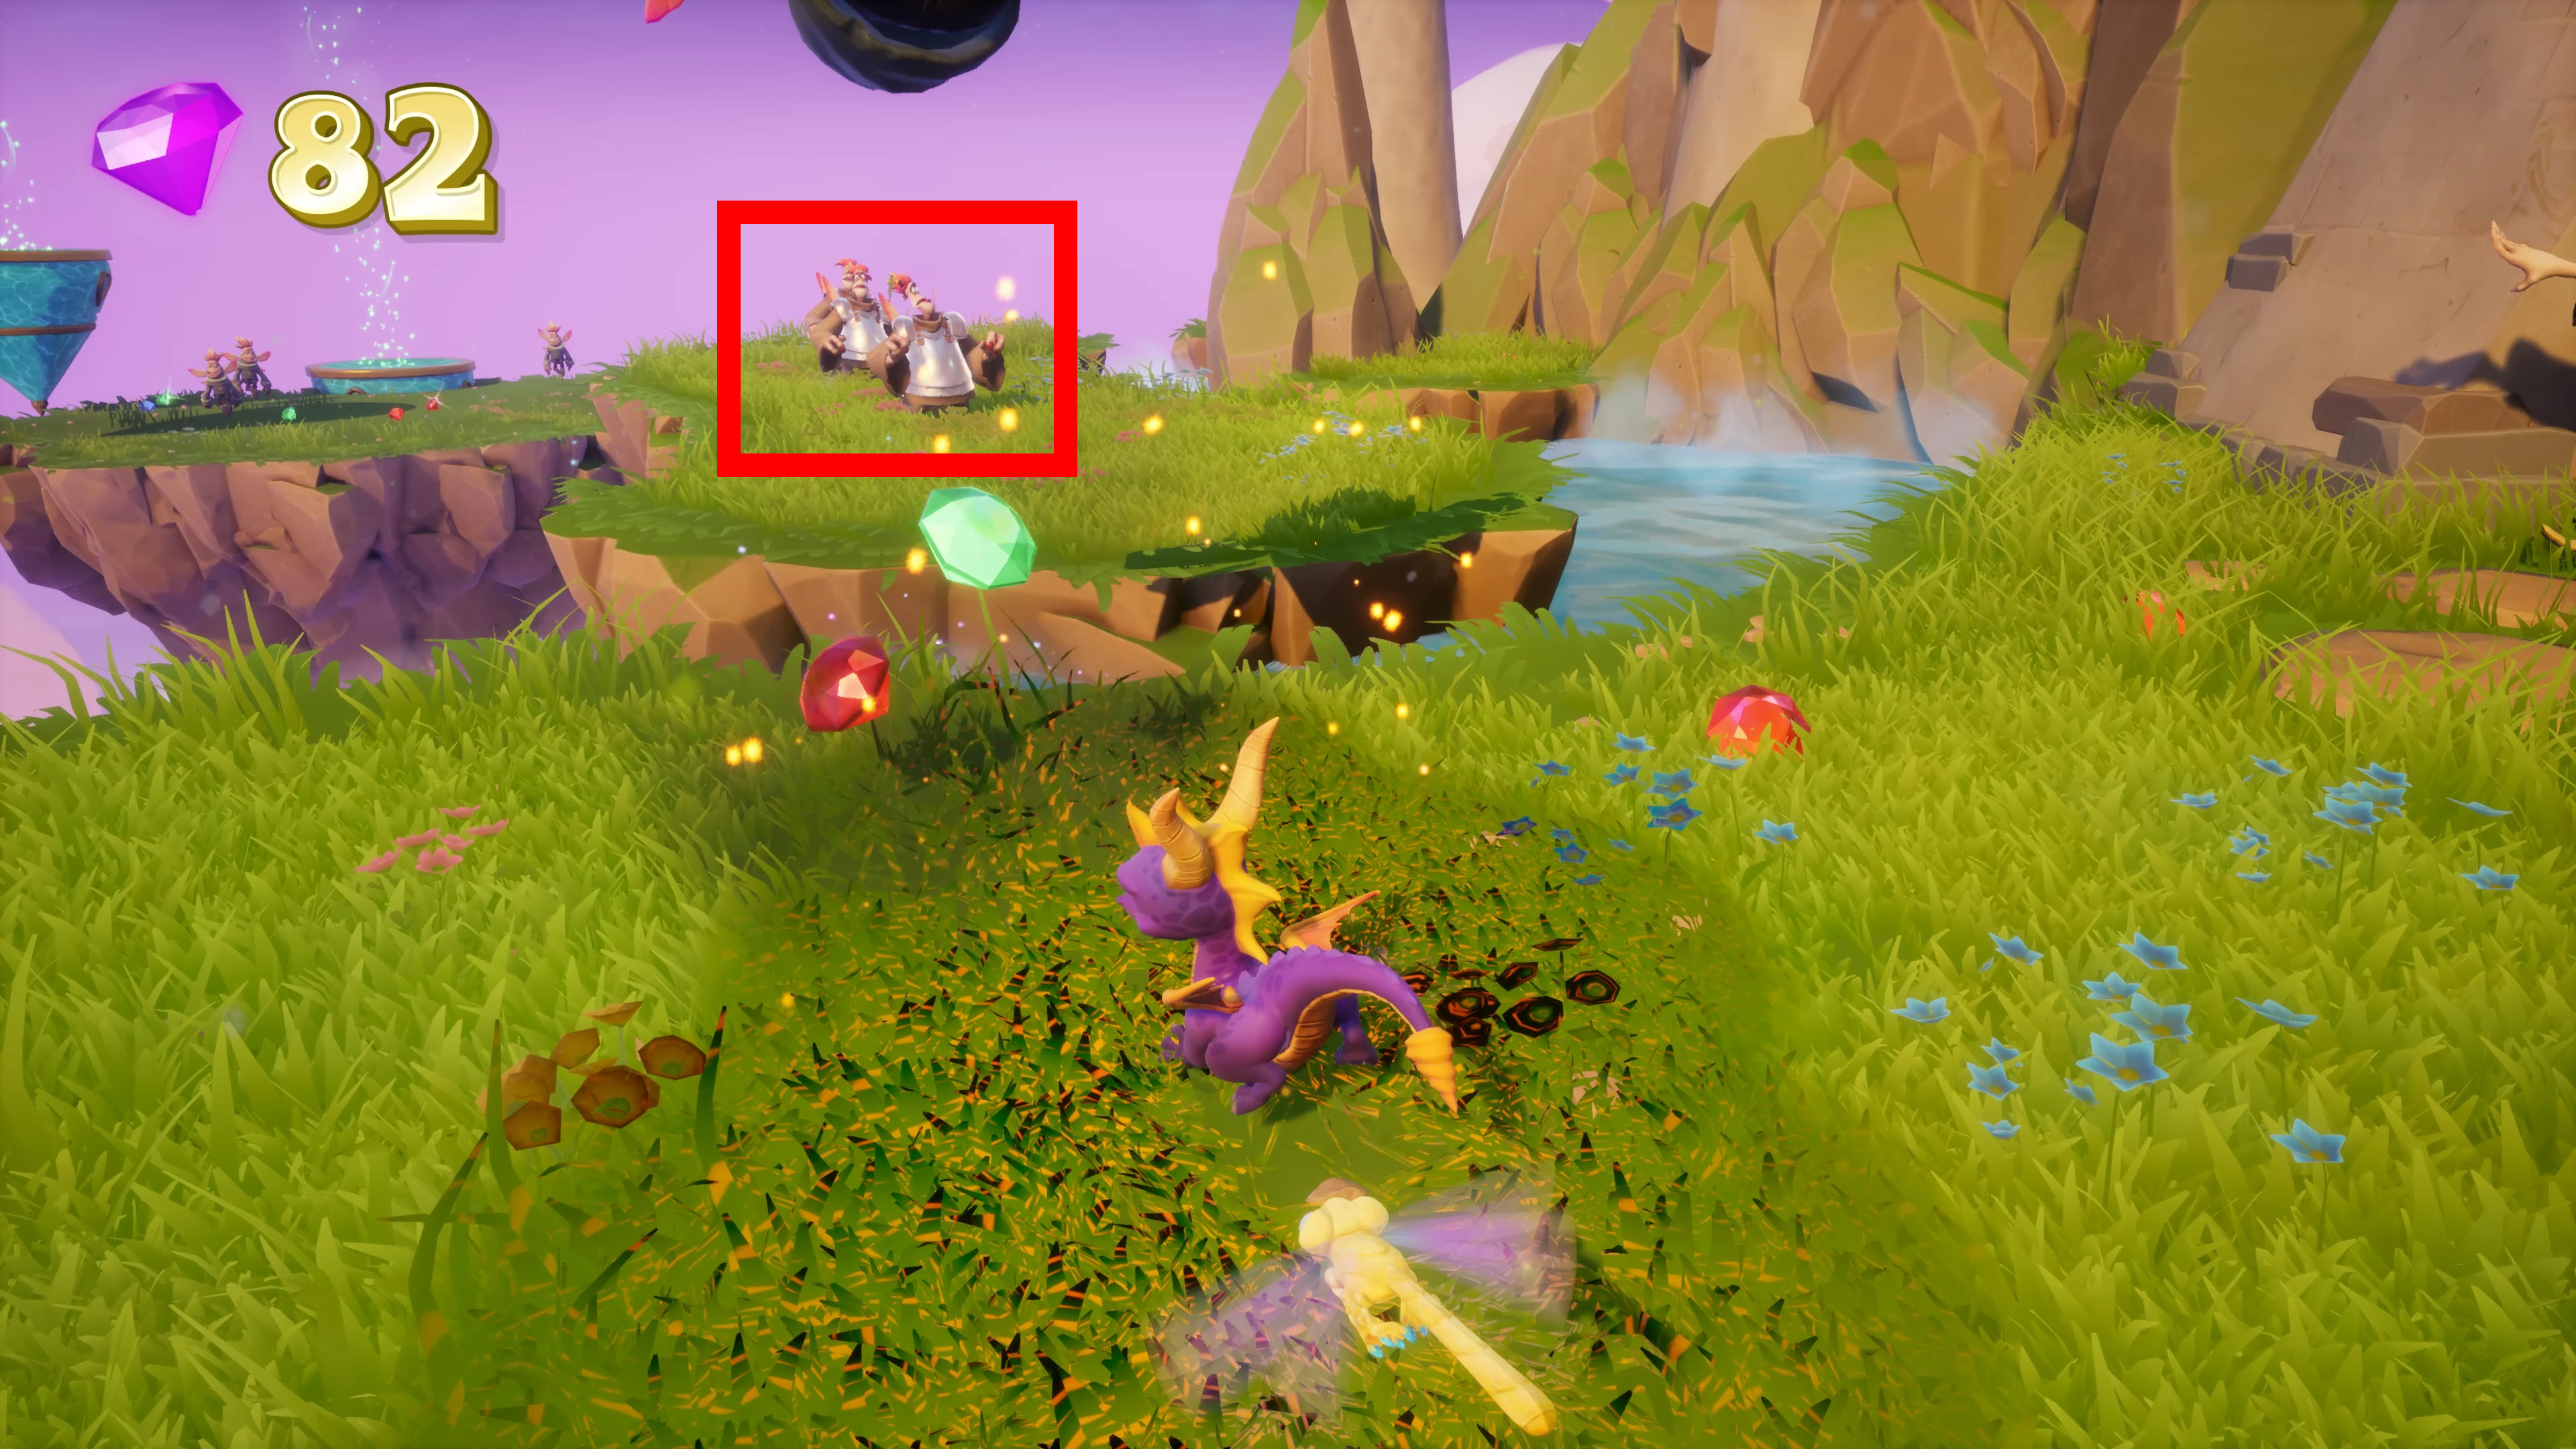
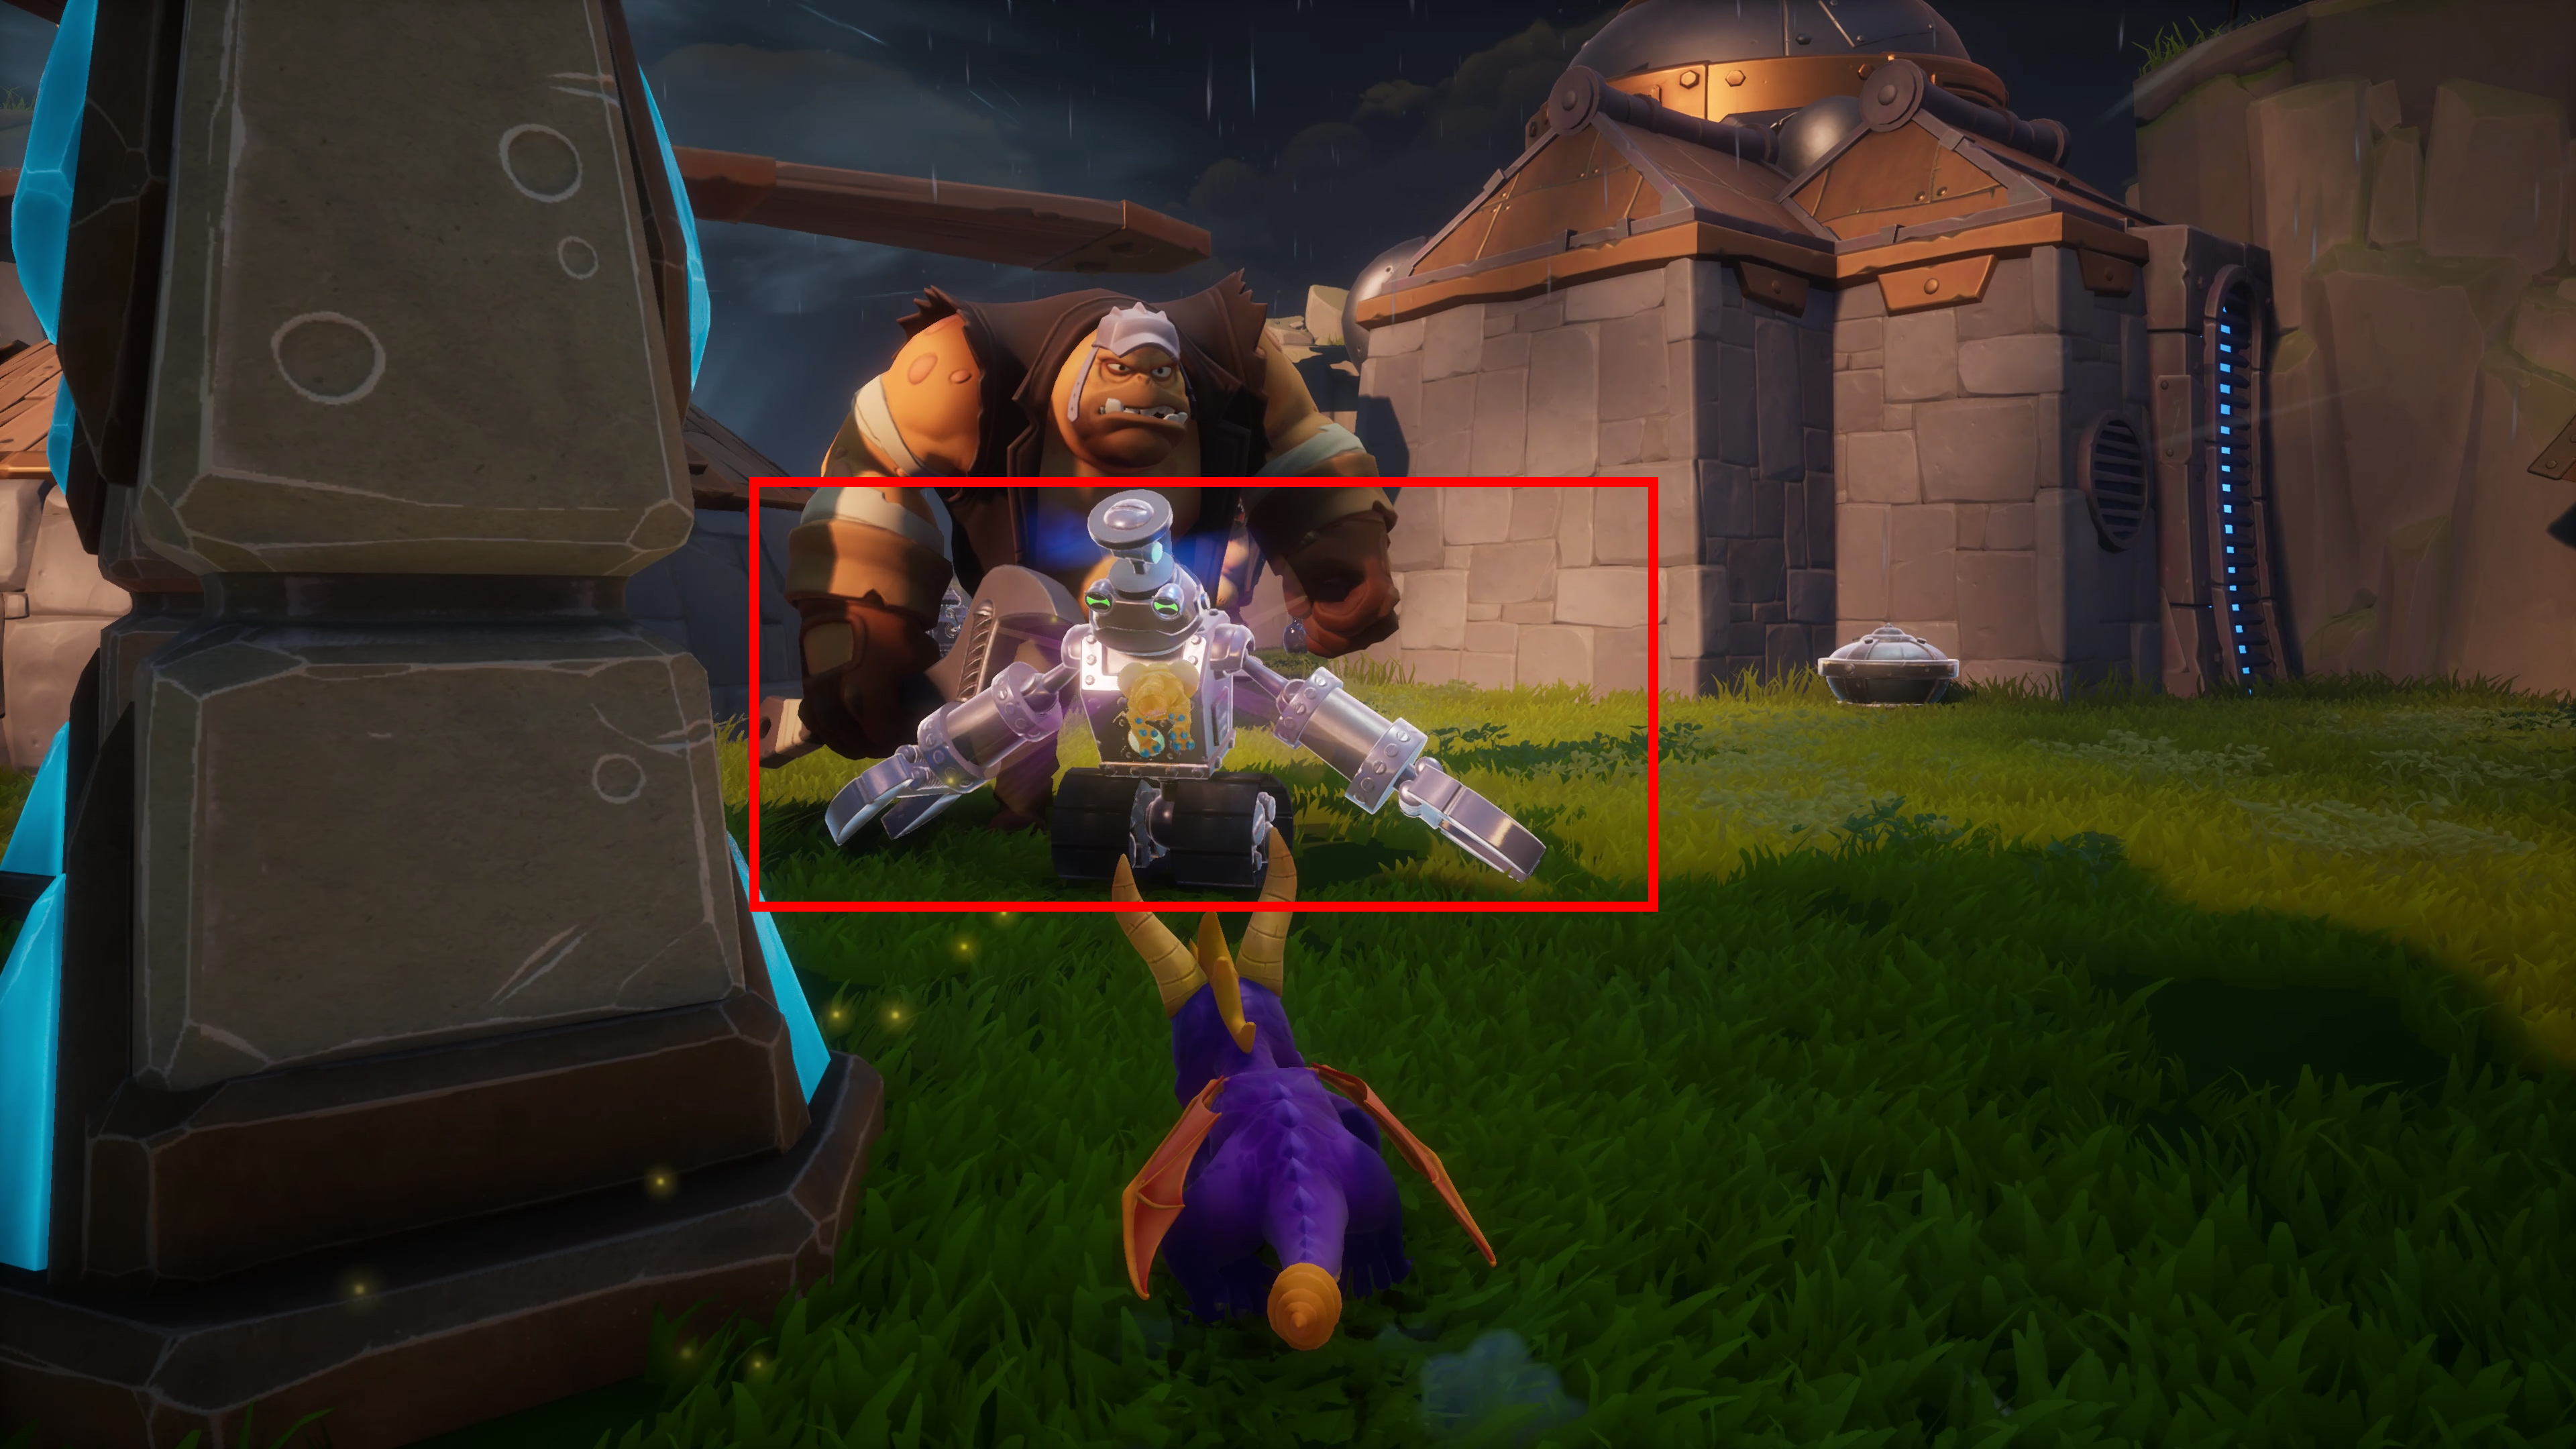
Use a cannon to dispatch a taunting Gnorc
In Peace Keepers there are a couple of cannons. You need to kill the Gnorc operating the cannon. During this time Gnorc soldiers will hide inside tents which you need to either destroy with a cannon or your flames. After this a Gnorc soldier will taunt (picture 2) you which will be the time to shoot them with the cannon for the achievement to pop. You need to flame the cannon for it to ignite.
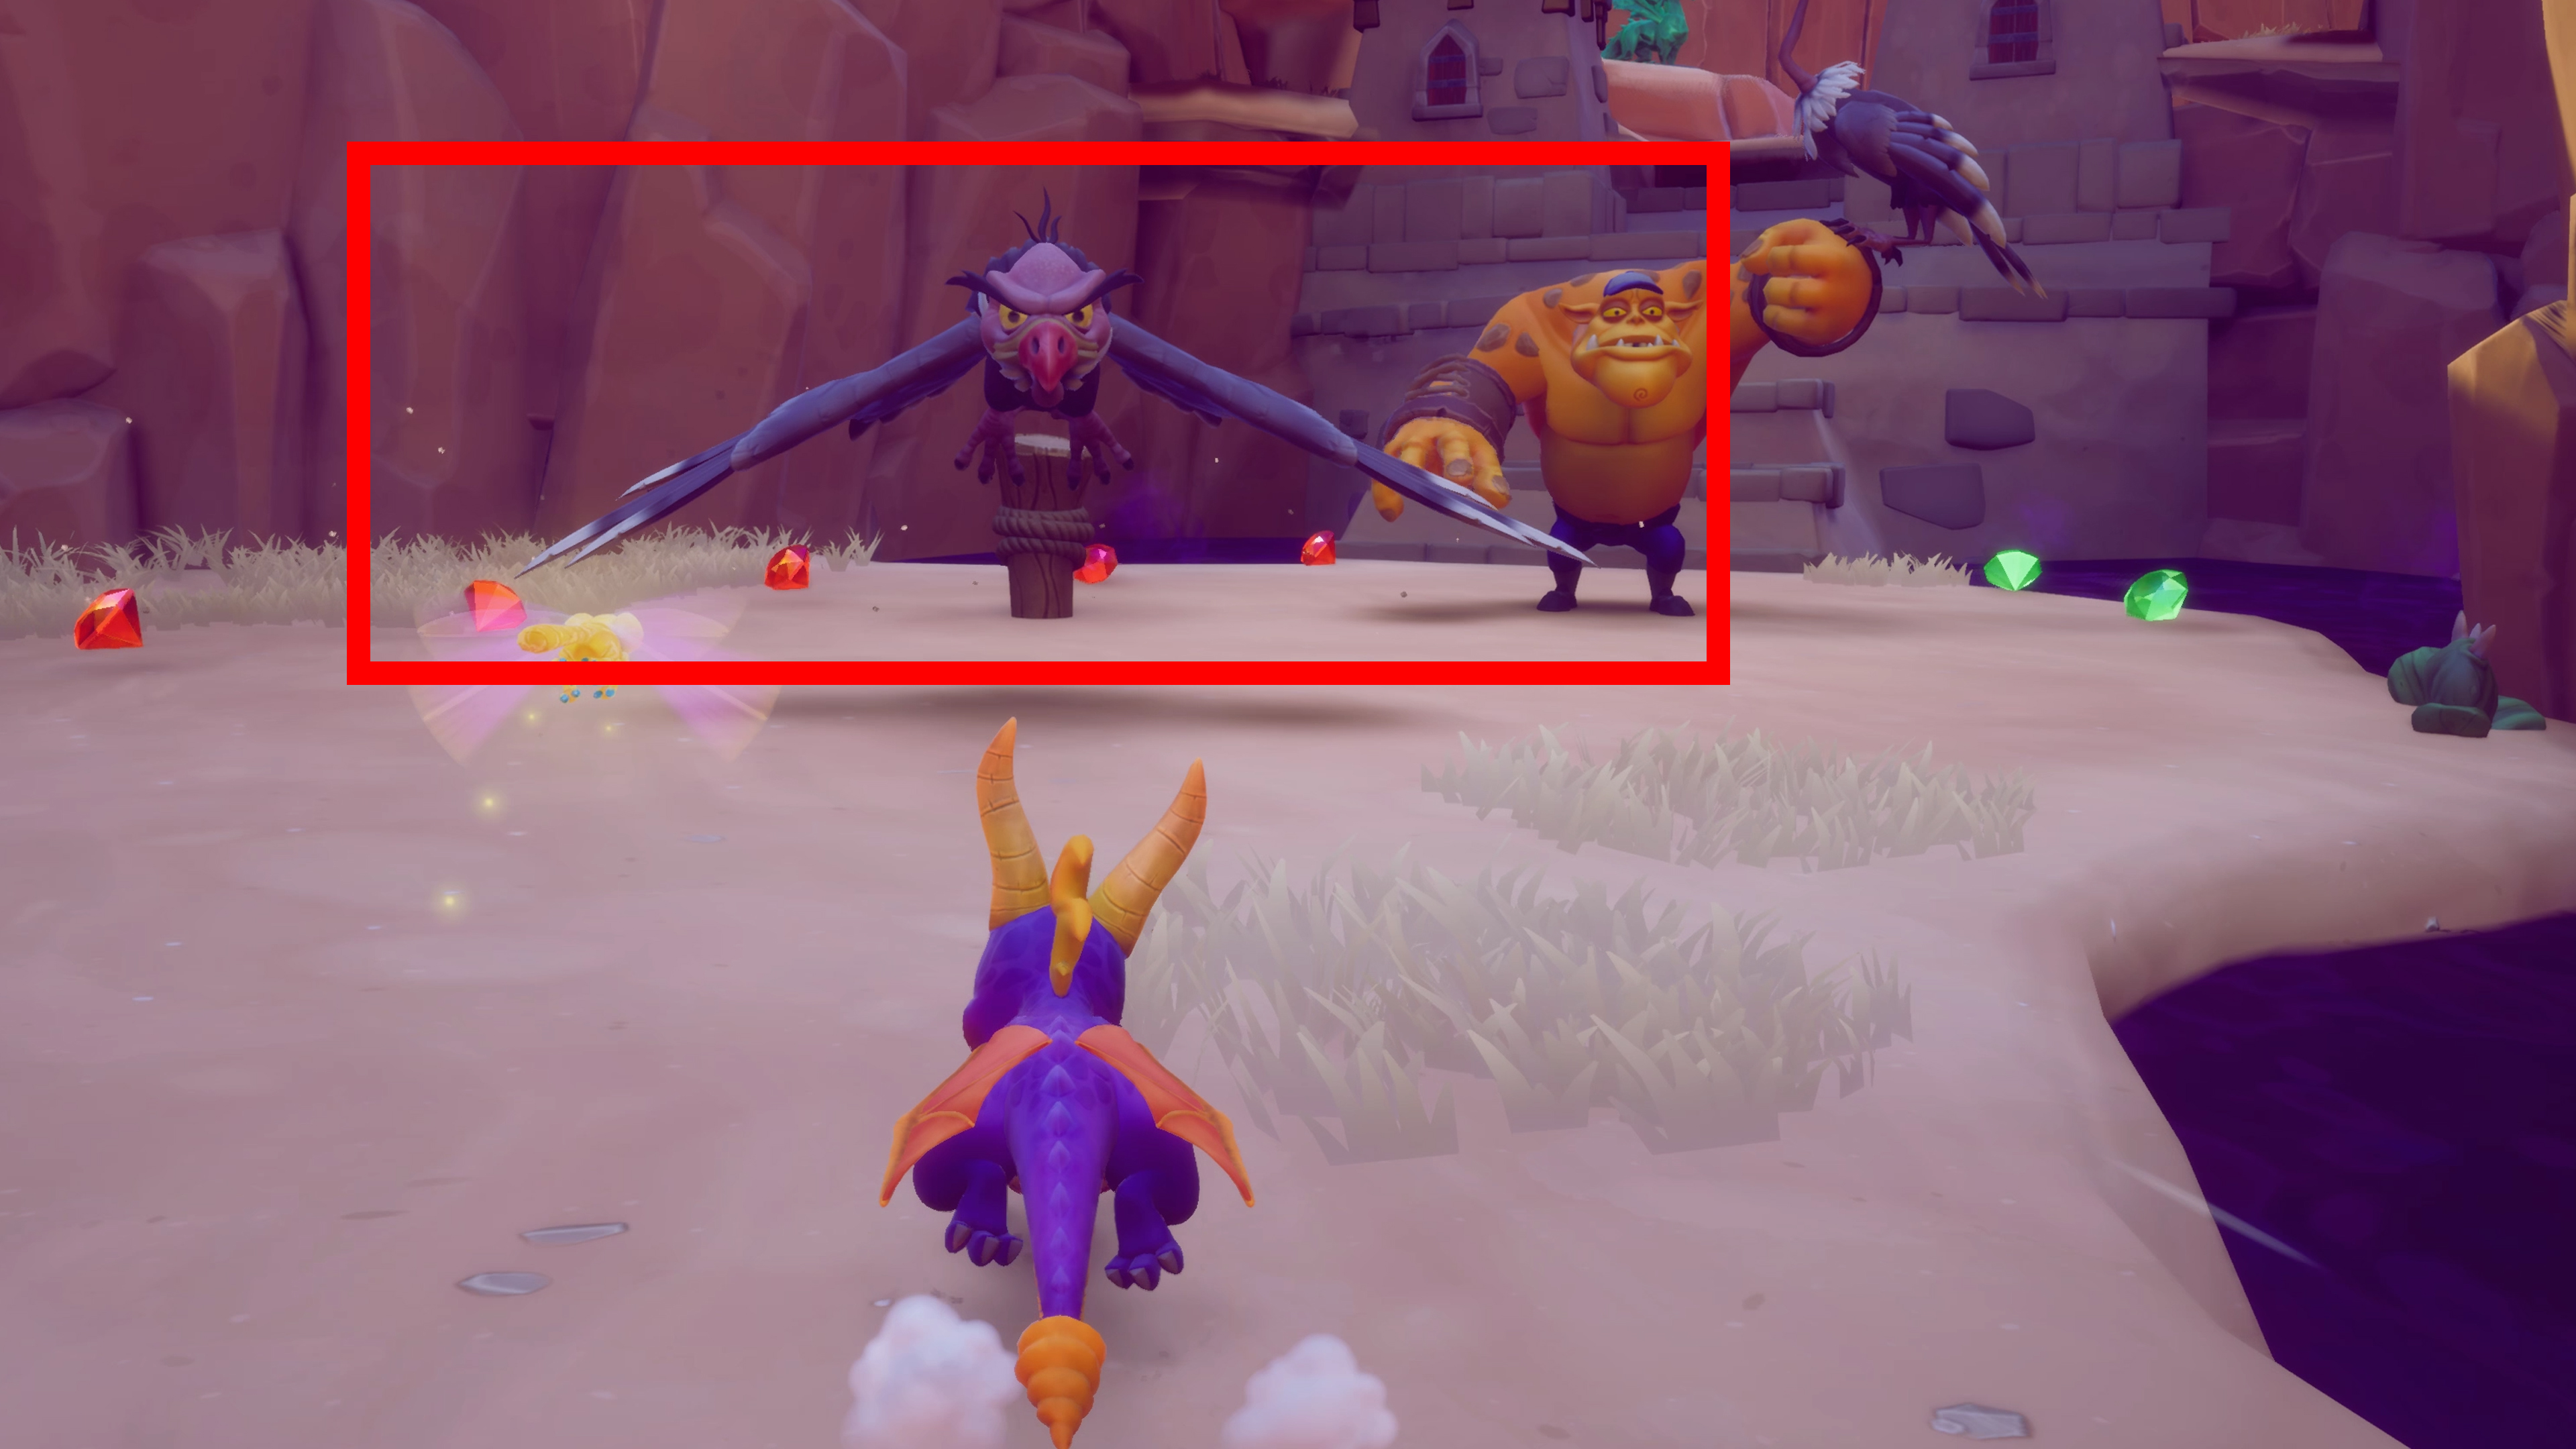
Charge a Vulture
This achievement can only be earned on Dry Canyon even though there are some other levels with Vultures. All you need to do for this achievement is to charge them.
Flame every Vulture in Cliff Town
Just after you rescue Enzo there is a gorge next to you. Glide over it. All of the Vultures are in this area. Remember to flame them, not to charge!

Defeat all three Ski Gnorcs
You will get this achievement naturally as you are finishing this level. These Ski Gnorcs are at the very end of the level. Below is an image of Ski Gnorc for reference.
Flame all Fairies in Night Flight
Night Flight has total of 3 Fairies scattered around the map. I highly suggest doing this after you have finished level once so you have unlimited time to get the Fairies. Locations are as follows:
1. Just right of the cave exit after you have flown through five rings.

Unlock the strong chest in Doctor Shemp
Just before the boss of this level, there is a hidden passage to the right protected by one big nasty Gnorc. Take her out. After that has been dealt with go into the vortex to get on top of the tower. After you are on top of the tower get the purple crystal from the left and from there glide towards your key.
The chest itself is right after you defeat Shemp. From there go close to the exit vortex and jump down to the chest which is on top of the big rock.
1.

Magic Crafters World (Video)
00:00 –
00:50 –
4:35 –
5:00 –
7:55 –
13:30 –
15:30 –
20:55 –
23:00 –
27:20 –
29:55 –
29:55 –
3 Magic Crafters

Charge through 4 Armored Druids near the start of Magic Crafters
After you have rescued Cosmos there should be 4 Druids nicely lined up. Just place yourself in the corner and charge through them.

Detonate 3 explosive chests on the pillars in Alpine Ridge
After you reach the exit of Alpine Ridge next to it is a ledge from which you can glide into a hidden cave which has another dragon to rescue. You can either glide to the entrance or straight to the explosive chests. Just remember that after you flame your first explosive chest, start jumping to the next one as getting caught in the blast will knock you into the water.
1.

2.

Defeat all Metalback Spiders
Metalback Spiders can only be defeated by either a Super Charge Attack or a Super Flame Attack. There are total of five spiders. Two of them must be defeated with the Super Flame attack and three of them with the Super Charge Attack. A Fairy is located in the upper part of caves.

Defeat hidden Egg Thief in Wizard Peak
You will need to use a Super Charge to reach this place. When you get to the first Supercharge ramp in this level, use it and take a turn left. After that keep going onward till you see another Supercharge ramp, which is going the other way. Jump just a bit before you hit a wall and you should be able to charge right to that platform. The Egg Thief is hidden behind the wall on the platform.
1.


Flame all Fairies in Crystal Flight
There are a total of two Fairies in this level. If you did the rings first, the first Fairy will be after first electric fence. The second Fairy will be after the seventh electric fence.
1.

Collect 400 gems in Blowhard
Pretty self explanatory and there are no hidden areas in this level so there should be no issues.
Beast Makers World (Video)
00:00 –
1:40 –
2:35 –
2:55 –
3:40 –
4:35 –
4:40 –
4:40 –
7:30 –
8:00 –
15:25 –
19:20 –
23:40 –
28:30 –
35:20 –
35:20 –
4 Beast Makers

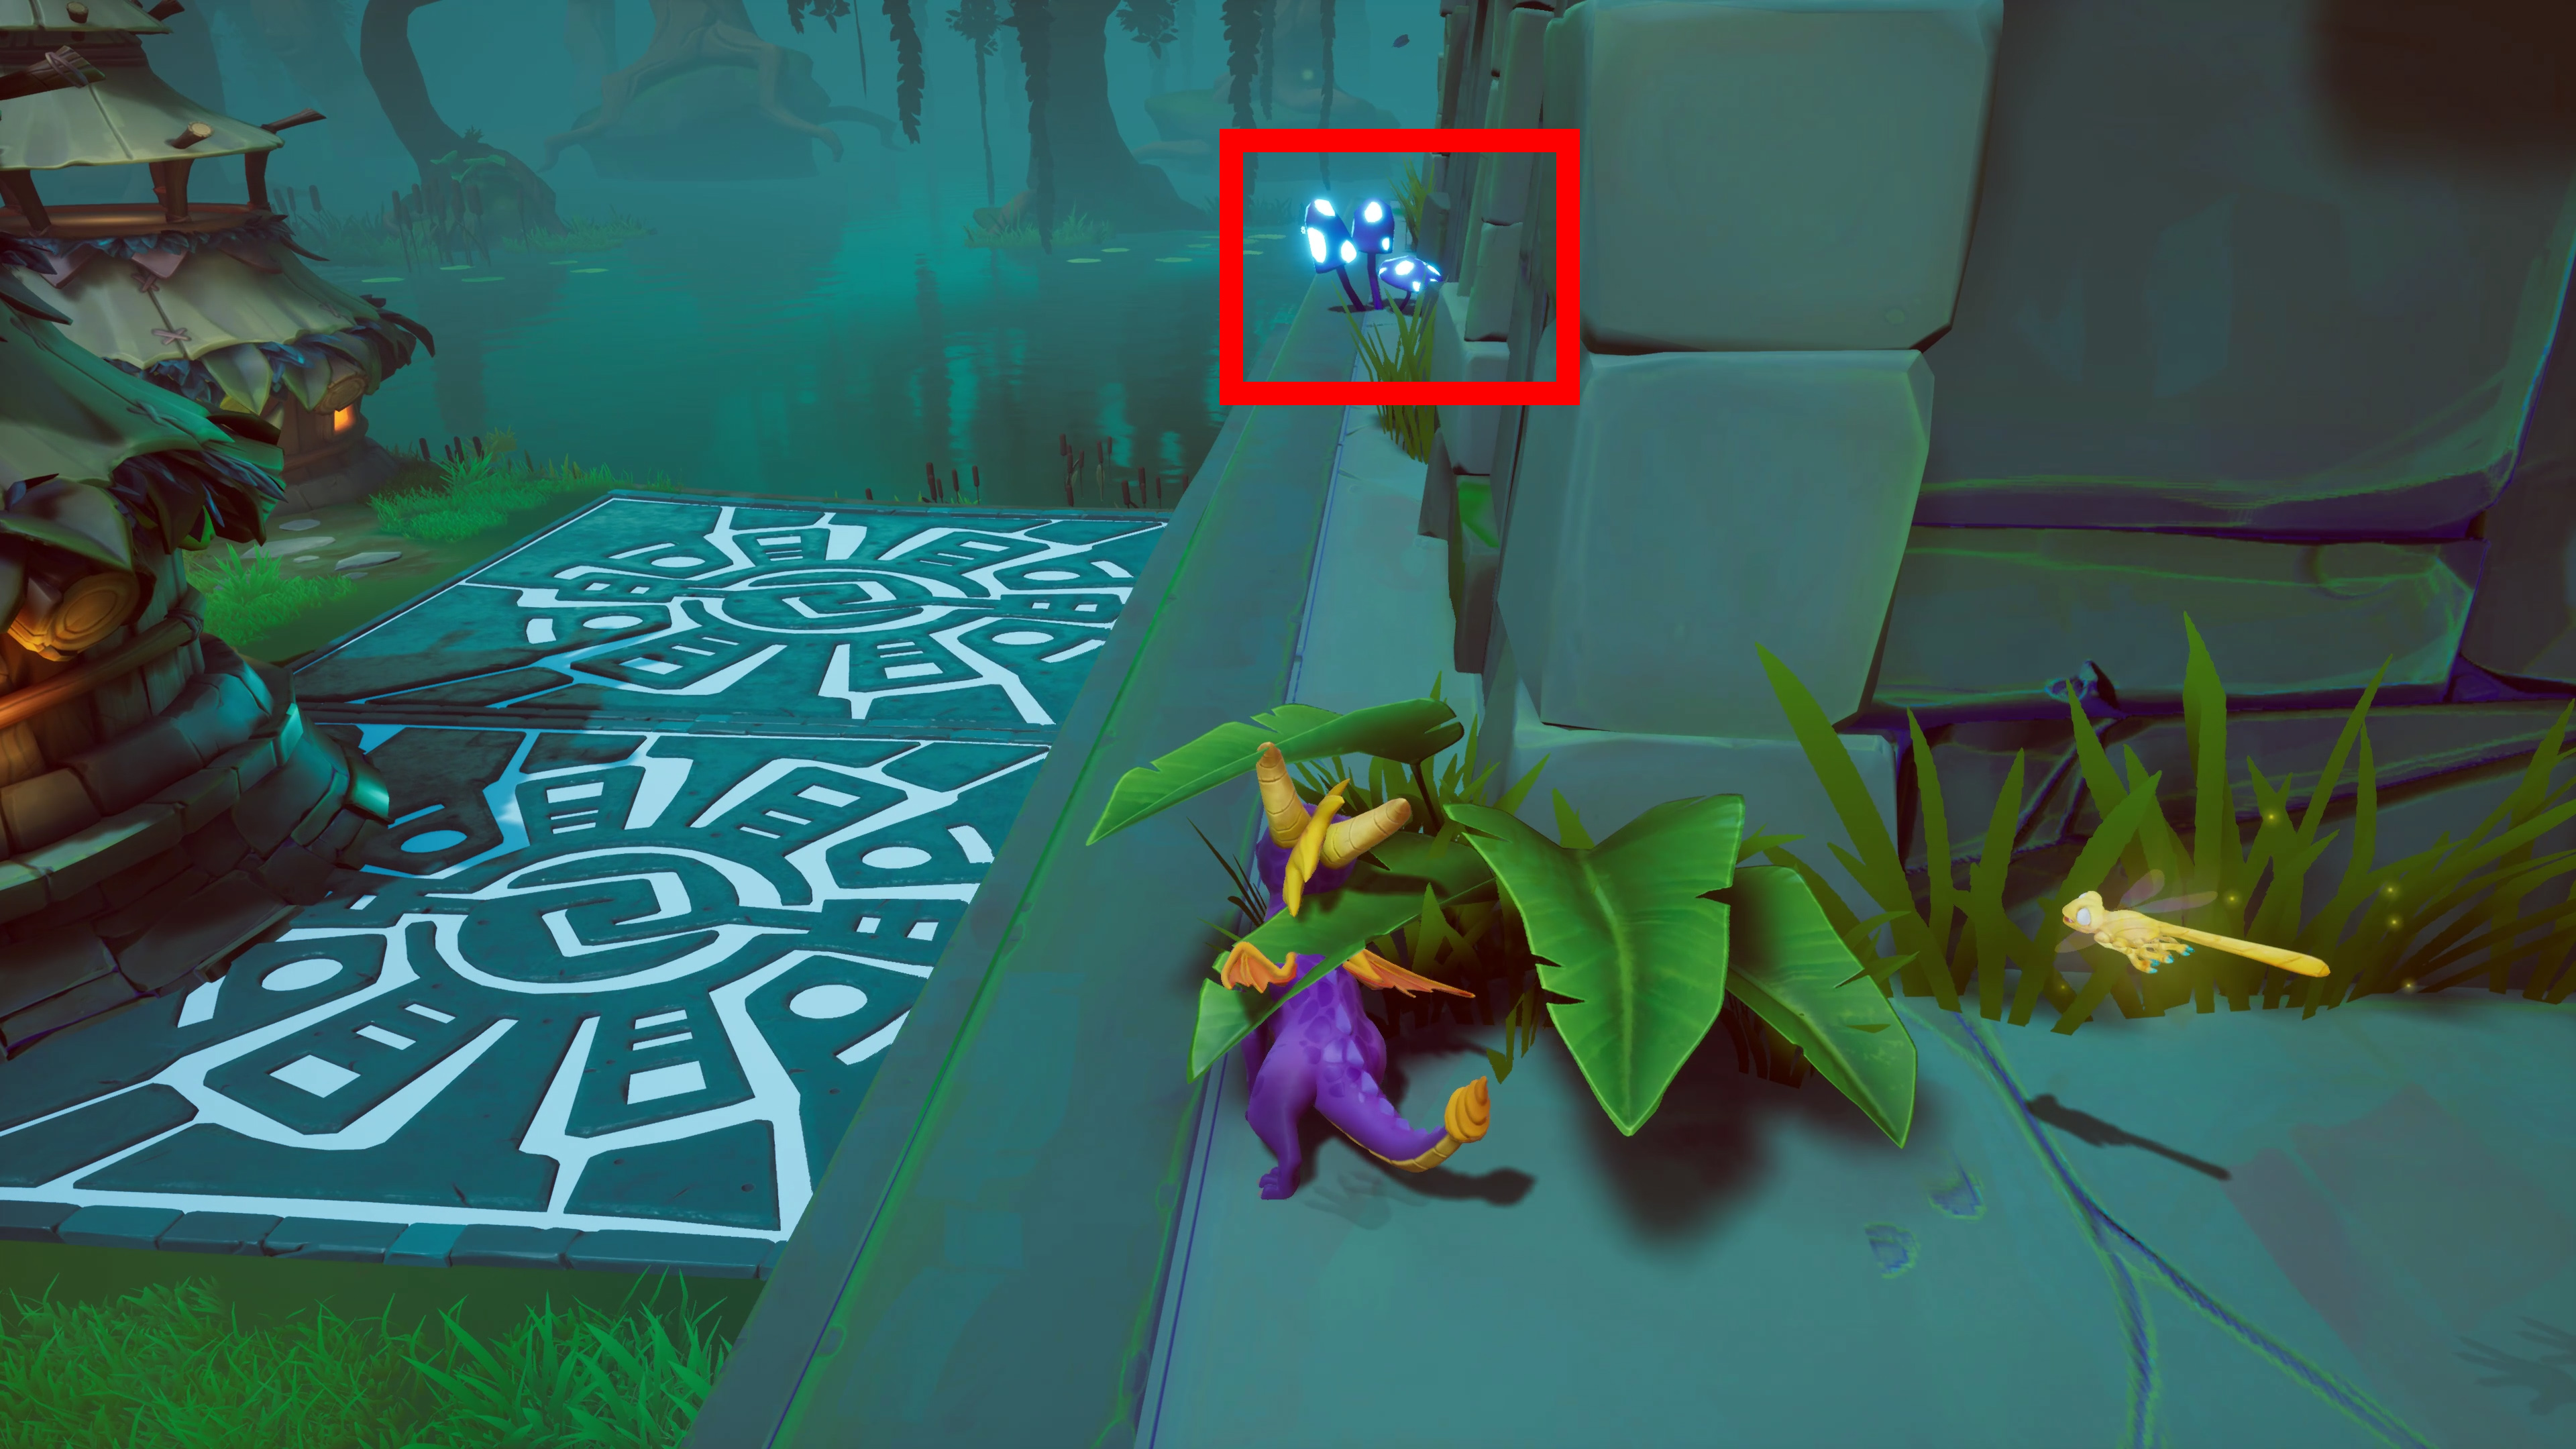
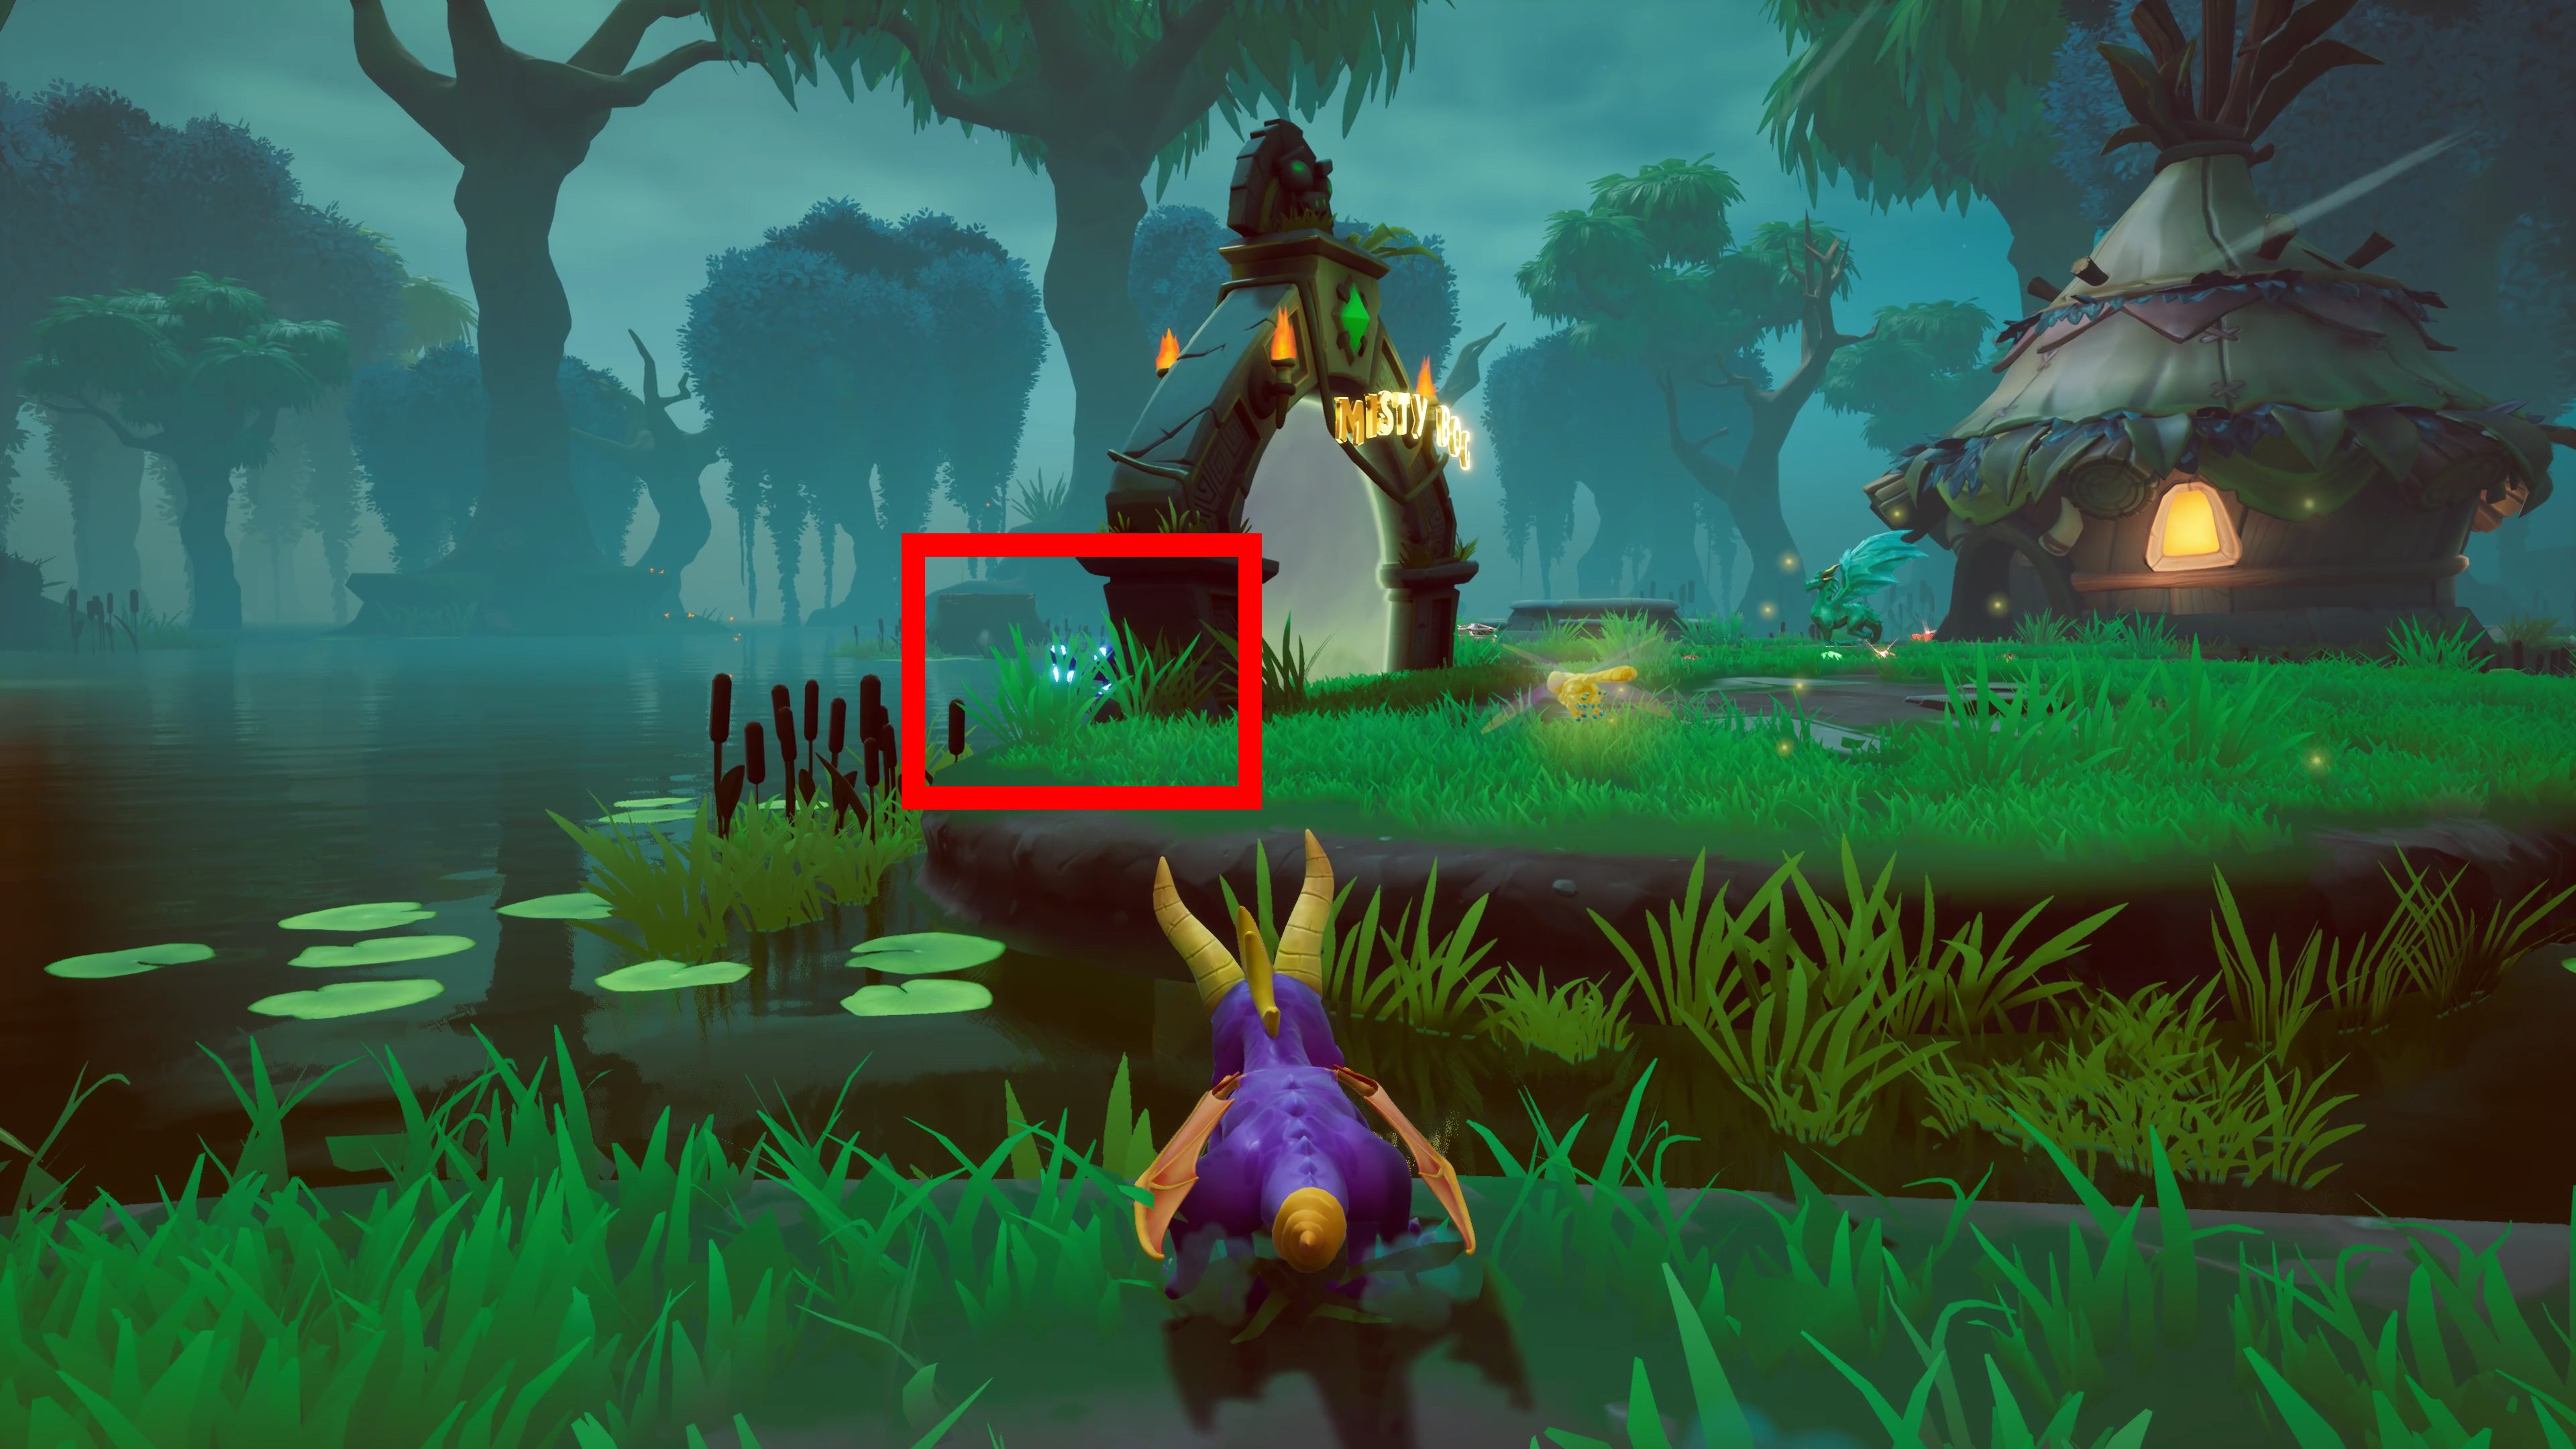
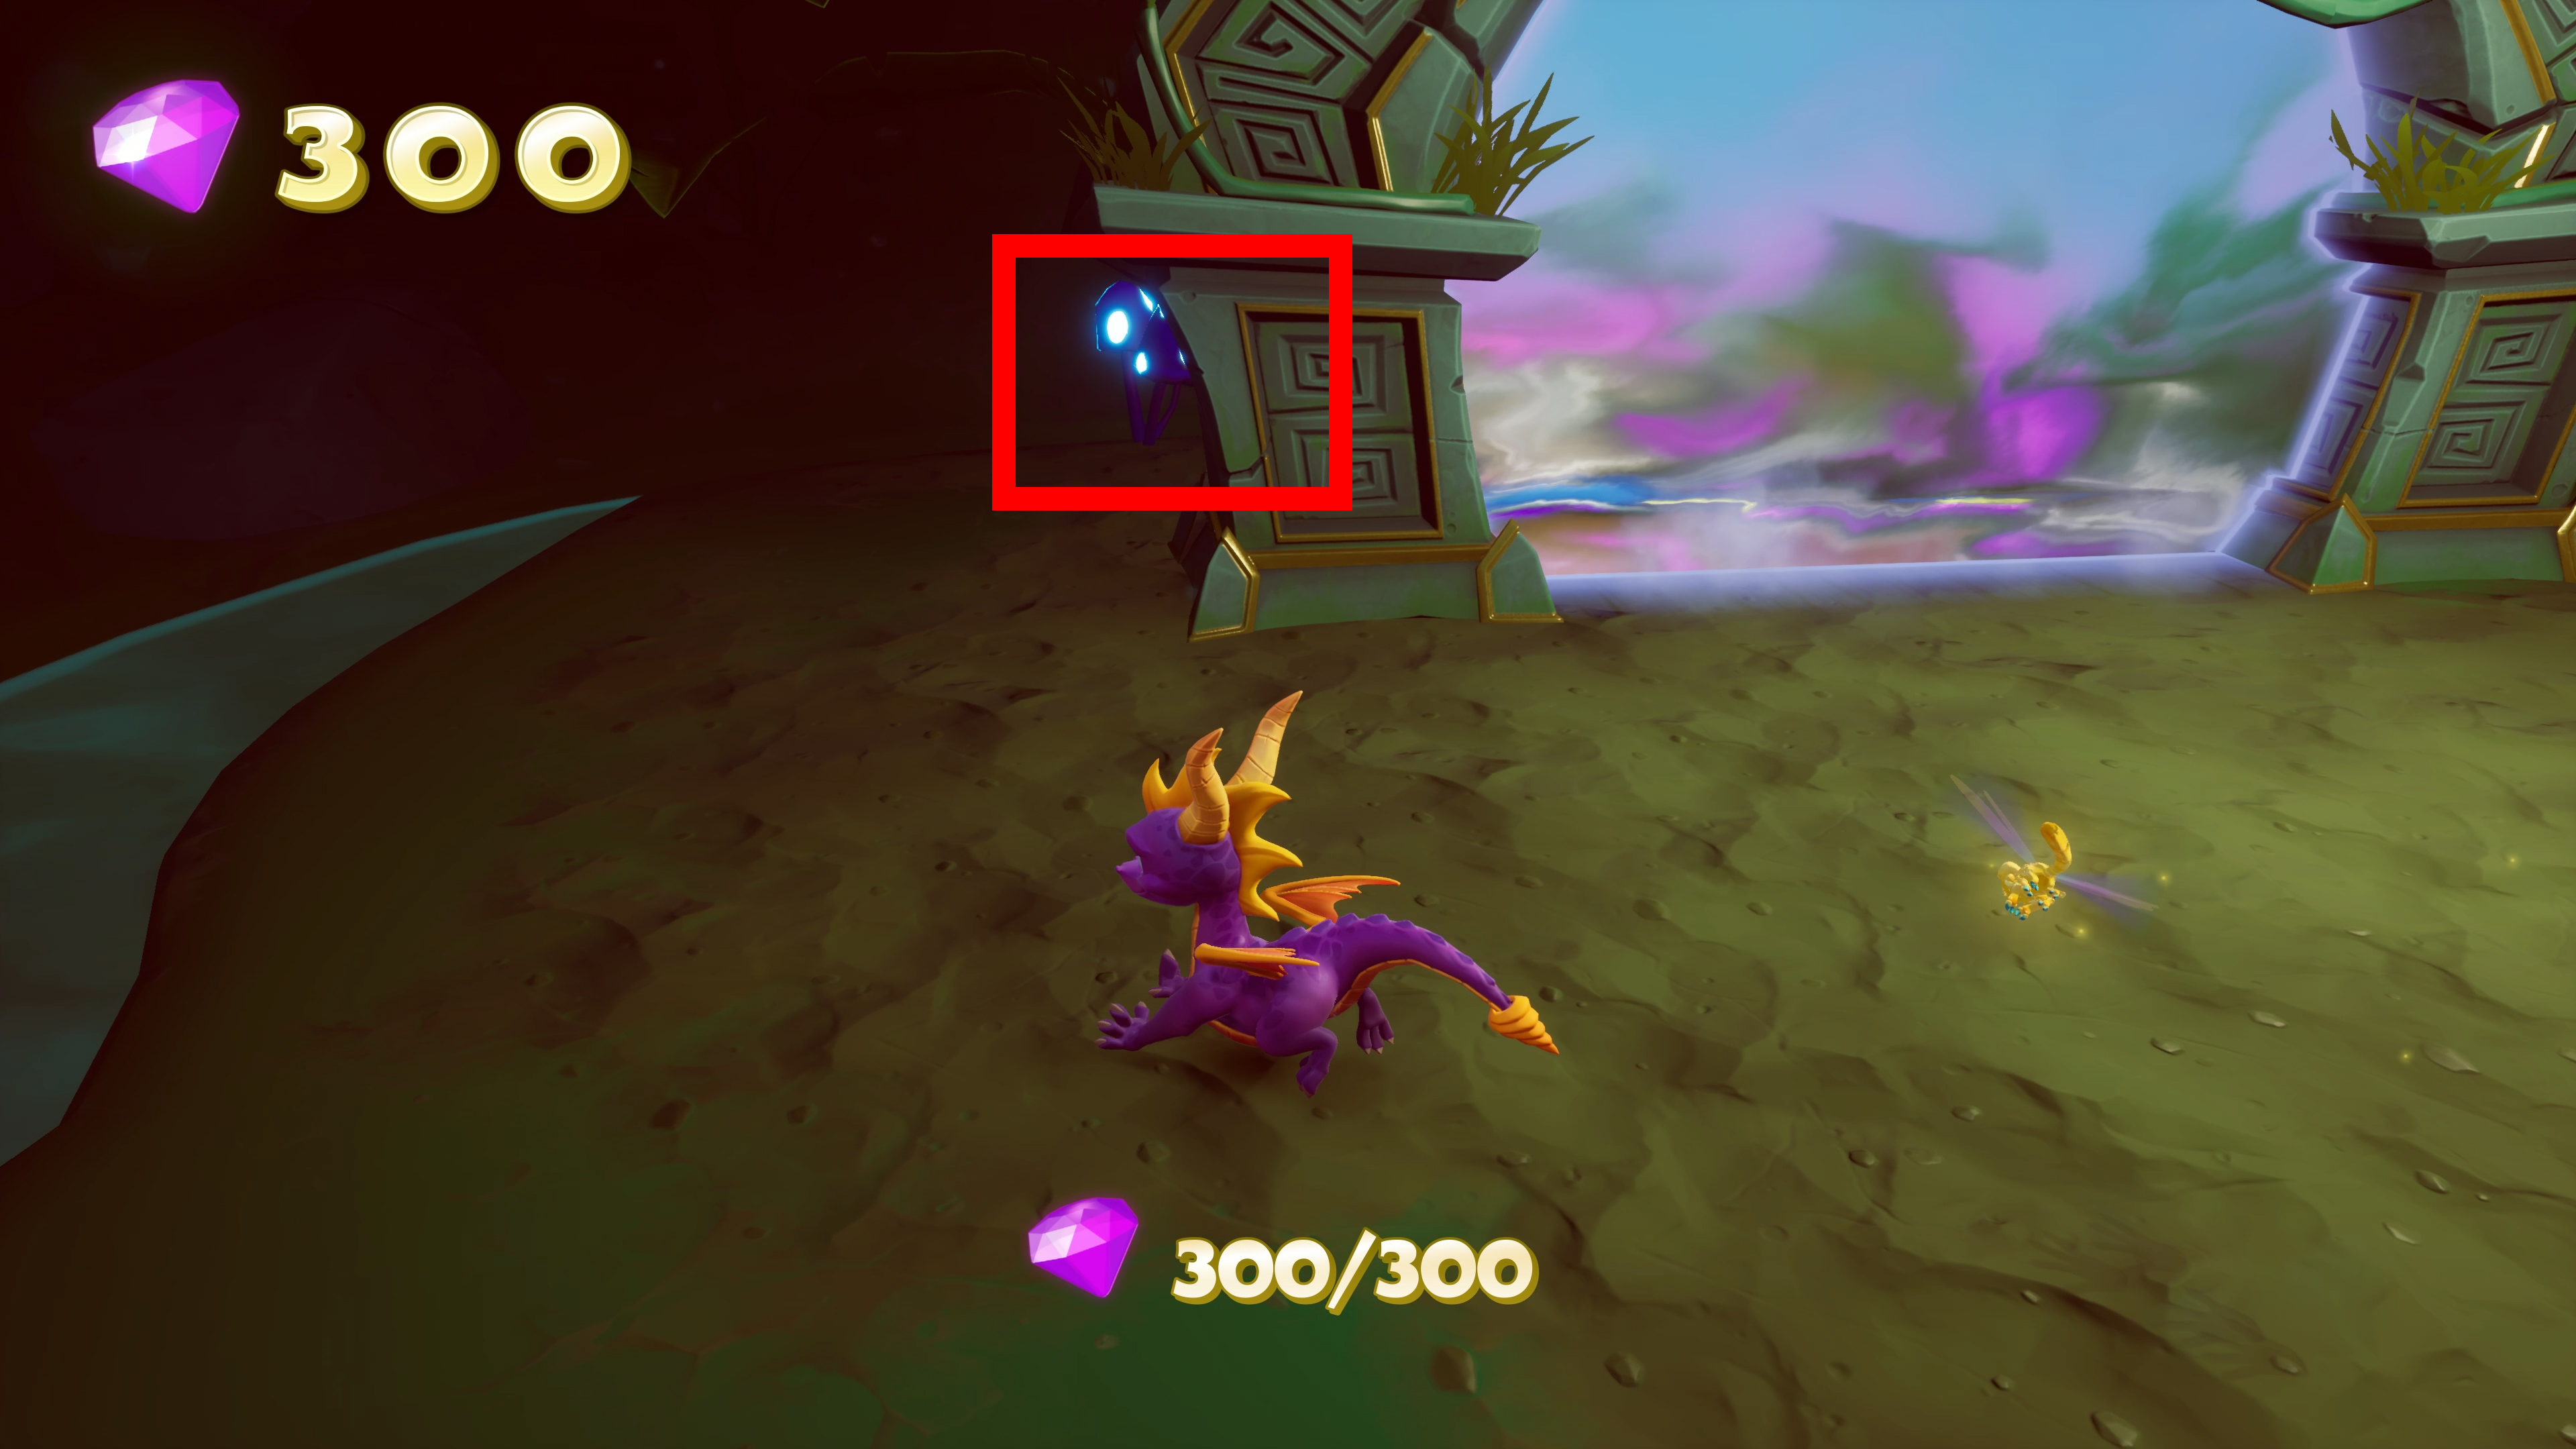
Flame 5 Glowing Mushrooms in Beast Makers
Five mushrooms are scattered around Beast Makers. Some are bit harder to find, but I posted pictures below.
1. One is behind the entrance to Treetops
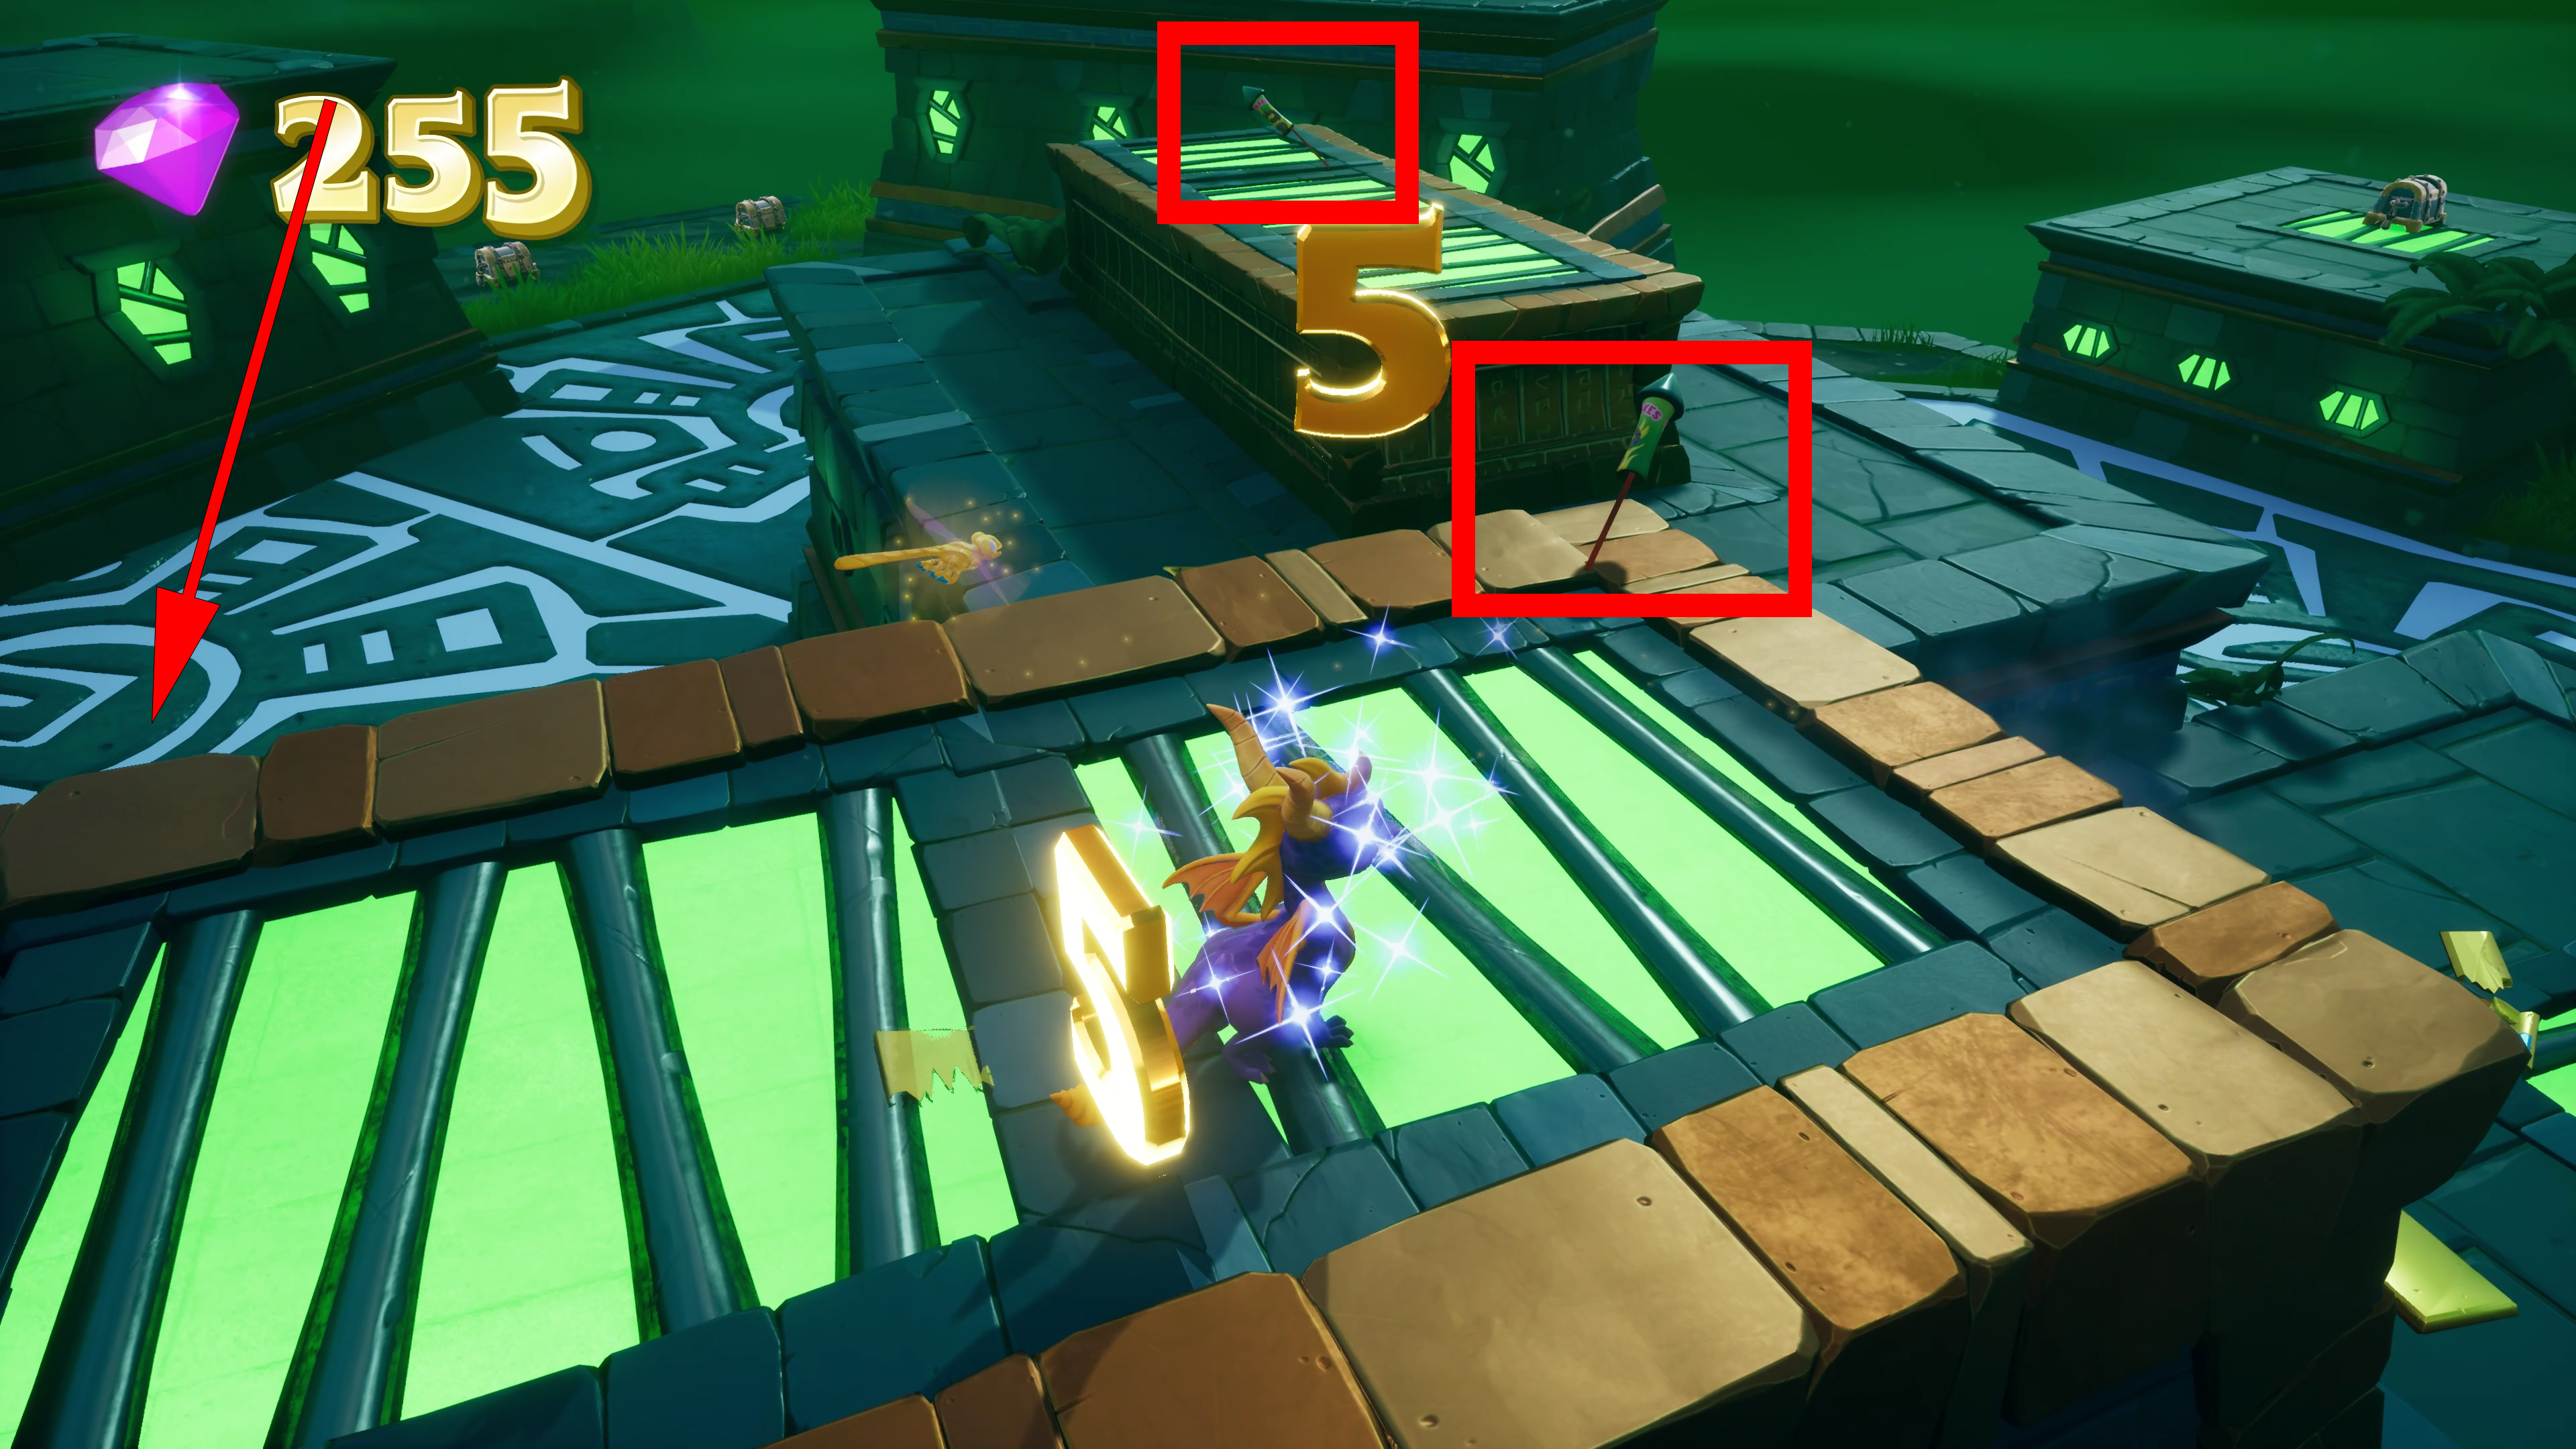
Light 3 fireworks within 15 seconds
As you progress through the level you should come by a rocket after you have freed Claude. This will be the last firework of the three, so do not ignite it yet.
From the exit portal go right of the building and jump up the blocks to the top and glide from there to the obscured roof (picture 2) which was in the way you came from. After you are at the roof keep jumping from roof to roof till you reach the two rockets. Flame them and the one in the bottom.
1.

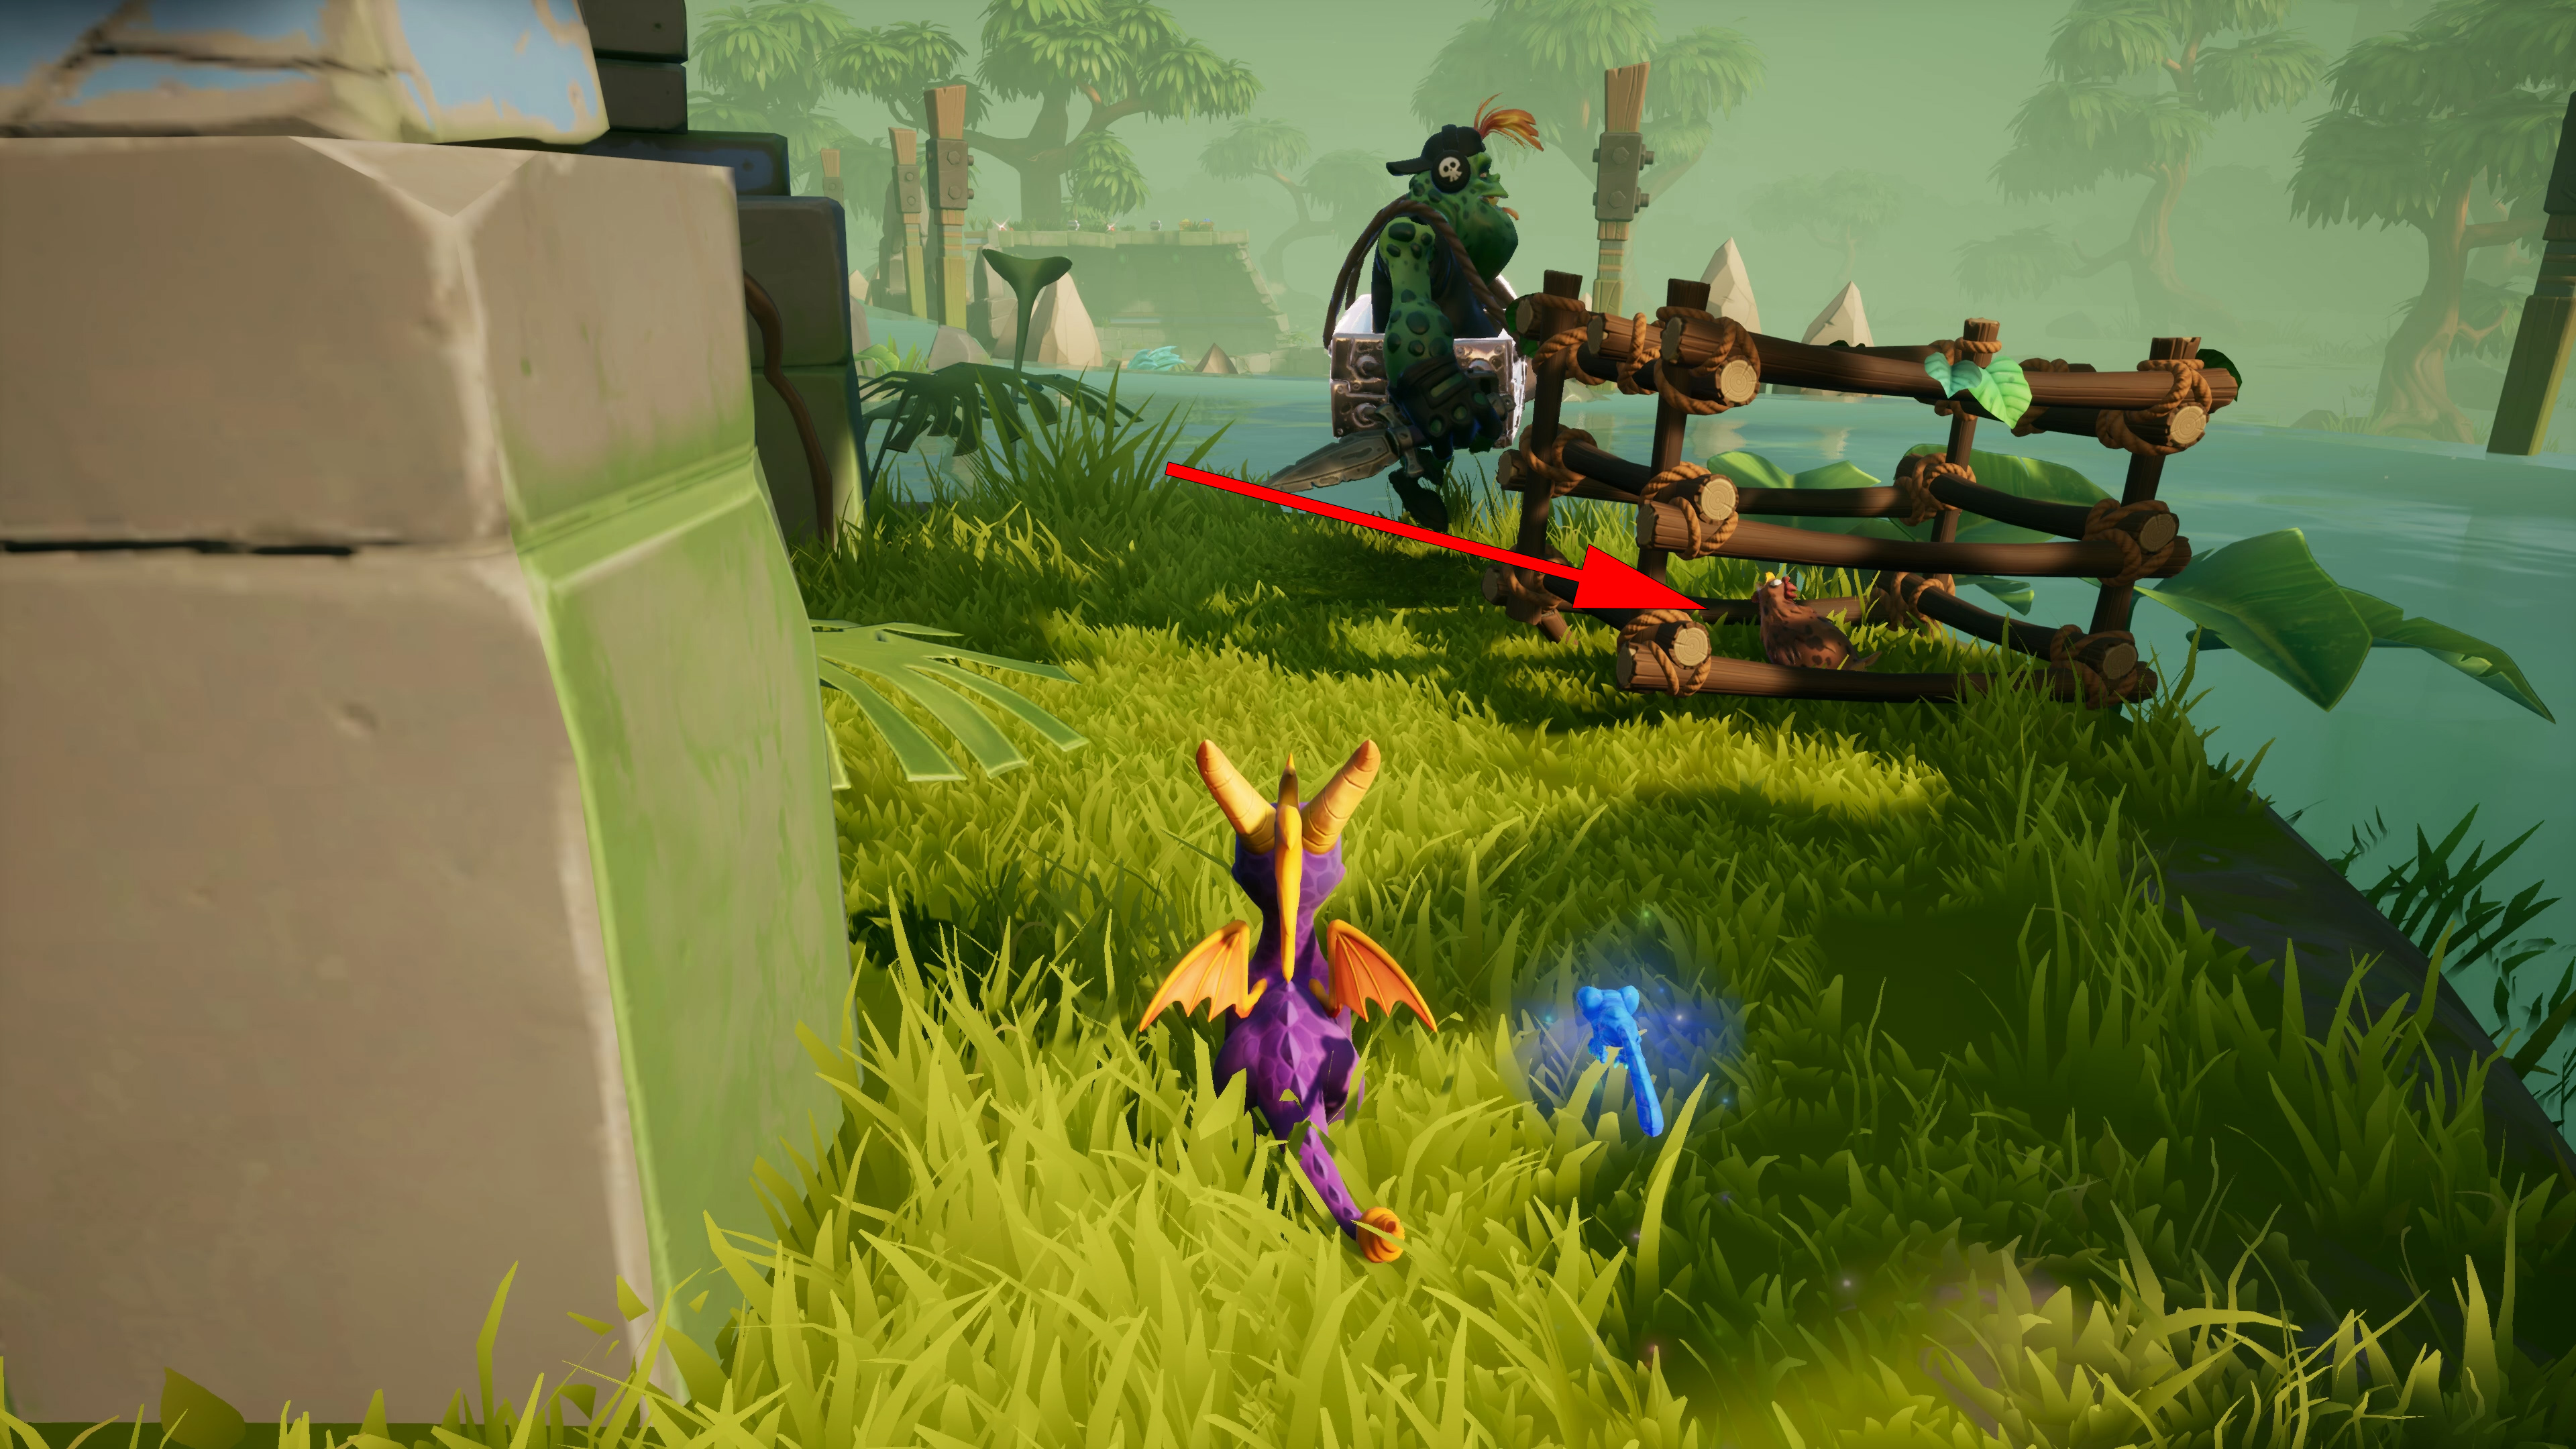
Free a trapped Chicken
At the start of level turn right around and start to chase the Chicken. Don’t charge or flame it until it runs under the trap and trap falls down on it. After that flame the trap to earn the achievement.
Jump off every Supercharge ramp in Tree Tops
There are a total of 4 Supercharge ramps on this level. Pictures are below.
1. After rescuing Lyle the first ramp is just next to him.
Complete Wild Flight without touching the ground
Self explanatory. Hitting walls is okay.

Collect 500 gems in Metalhead
Pretty self explanatory again. There are two hidden areas with gems, pictured below.
1. Just before going to the Metalhead boss room there is a ledge with a river and a gate next to a ledge. Glide there to find one of the hidden areas of this level.
Dream Weavers World (Video)
00:00 –
1:30 –
5:35 –
7:30 –
9:35 –
11:40 –
17:40 –
18:15 –
25:10 –
25:10 –
34:45 –
36:25 –
5 Dream Weavers

Charge through 3 Armored Fools in a row
As you progress through this world you will come across 2 Armored Fools which do not get hit by the beam, which enlarges and shrinks the enemies. Just left of them should be a line of 3 Armored Fools which you can charge. You can only charge through these enemies if they are shrunk so just wait for the right moment or get to the turret yourself and kill the enemy shrinking and enlarging other enemies with the turret.
Defeat 3 Demon Dogs in large form
There are more than enough Demon Dogs in this level. Just flame them while they are in their large form.

Charge through 4 Puffer Birds in a row
This achievement is quite easy. Just watch out as you charge through the Puffer Birds that the Demon Archer won’t go and kill one of the Puffers as that might happen sometimes.
If you fail charging through the four Puffers at once you can die to get reloaded to the closest checkpoint. Baruti is just to the right of the Puffers.
Defeat all Tin Soldiers
Tin Soldiers are immune to your charge and flame so you need to get Super Flame. I suggest skipping all of the Tin Soldiers which do not directly block your path, as later on there is a Fairy who gives you infinite Super Flames for the whole level.
Instructions for getting to the Fairy:
1. As you get to the only Supercharge ramp on this level. Use it and go through doors until you get into the large room. Take the second doorway to the right.

Complete Icy Flight without touching the ground
This will be the last Flight level in Spyro with a timer. As always if you touch the ground you can just land in the water to restart the level.

Defeat 4 Nightmare Beasts in one glide
You need to reach the secret area of this level to reach the 4 Nightmare Beasts.
To get into the secret area, there’s a one Clock Fool to the left and one on the right which need to be flamed within several seconds of eachother. Go left, using the raised platform to jump to the lowered platform. After the platform rises up again, glide to the other side and you should see a dragon statue and a vortex to the left of it.
Jump into the vortex and glide through the 4 Nightmare Beasts while flaming them. Do not stop on any of the platforms.
1.
Gnasty’s World (Video)
00:00 –
1:15 –
1:15 –
8:40 –
14:15 –
14:20 –
14:45 –
15:10 –
15:15 –
15:45 –
16:15 –
19:35 –
22:55 –
24:00 –
24:30 –
24:30 –
30:15 –
6 Gnorc Gnexus
Unlock Gnasty’s Loot
You will unlock Gnasty’s Loot when you have collected every treasure, dragon & egg = 100% the game
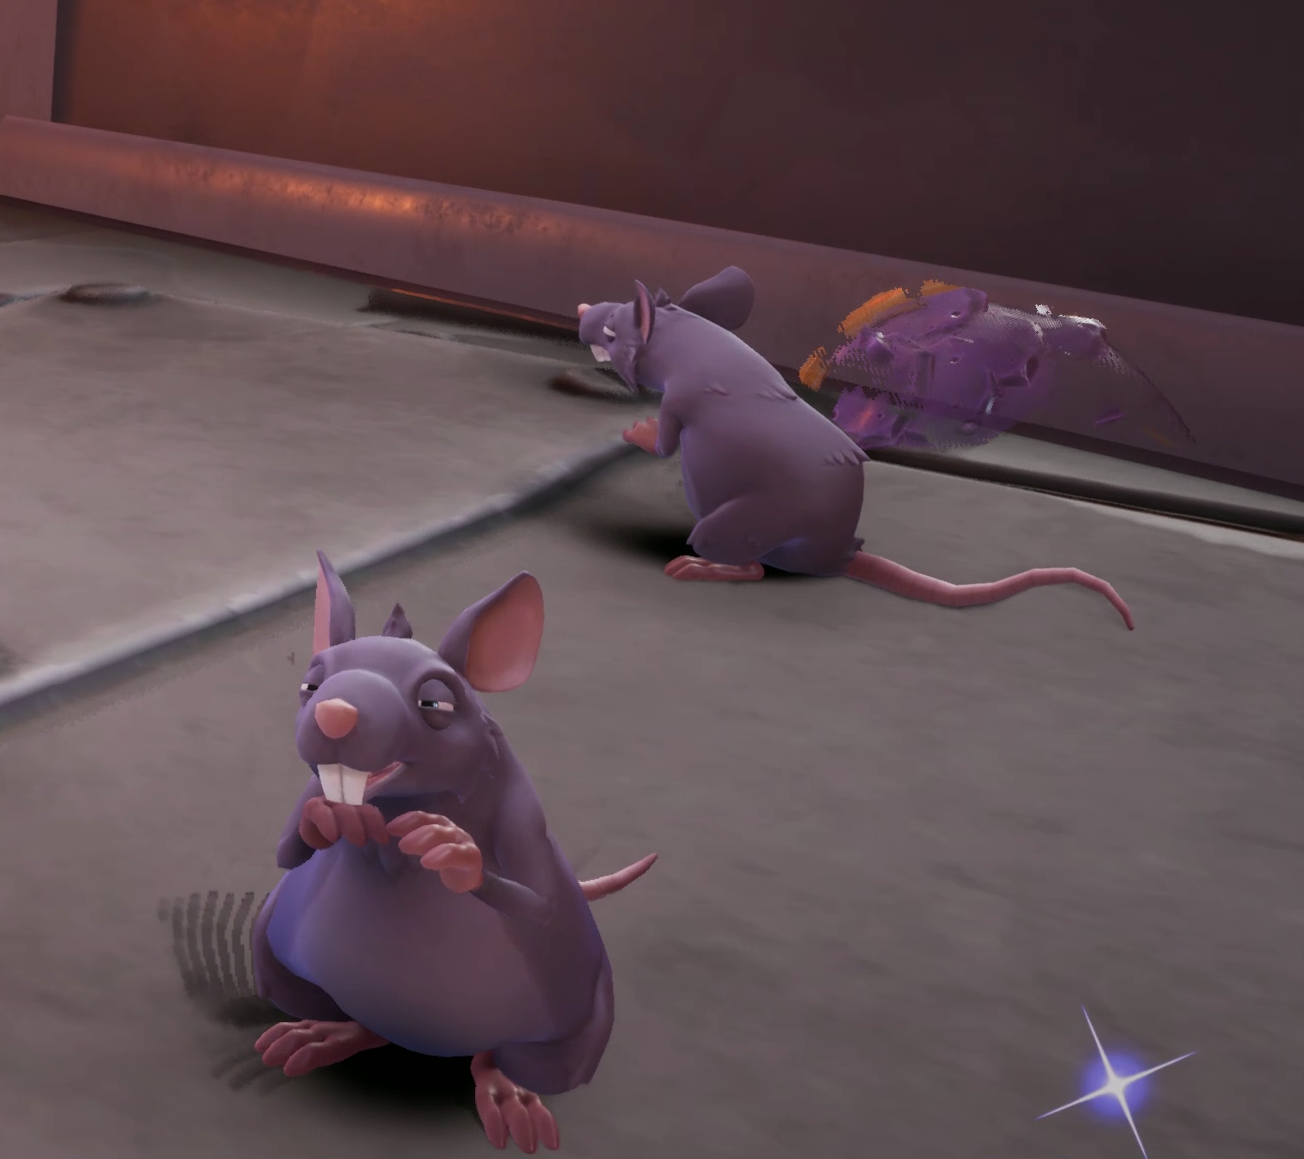
Complete Gnorc Cove without killing any Rats
Another self explanatory achievement. Just watch out when you charge or flame Gnorcs and you will be fine. Rats are these ugly things if you haven’t seen them before in your life.
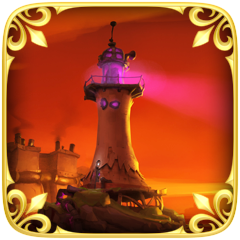
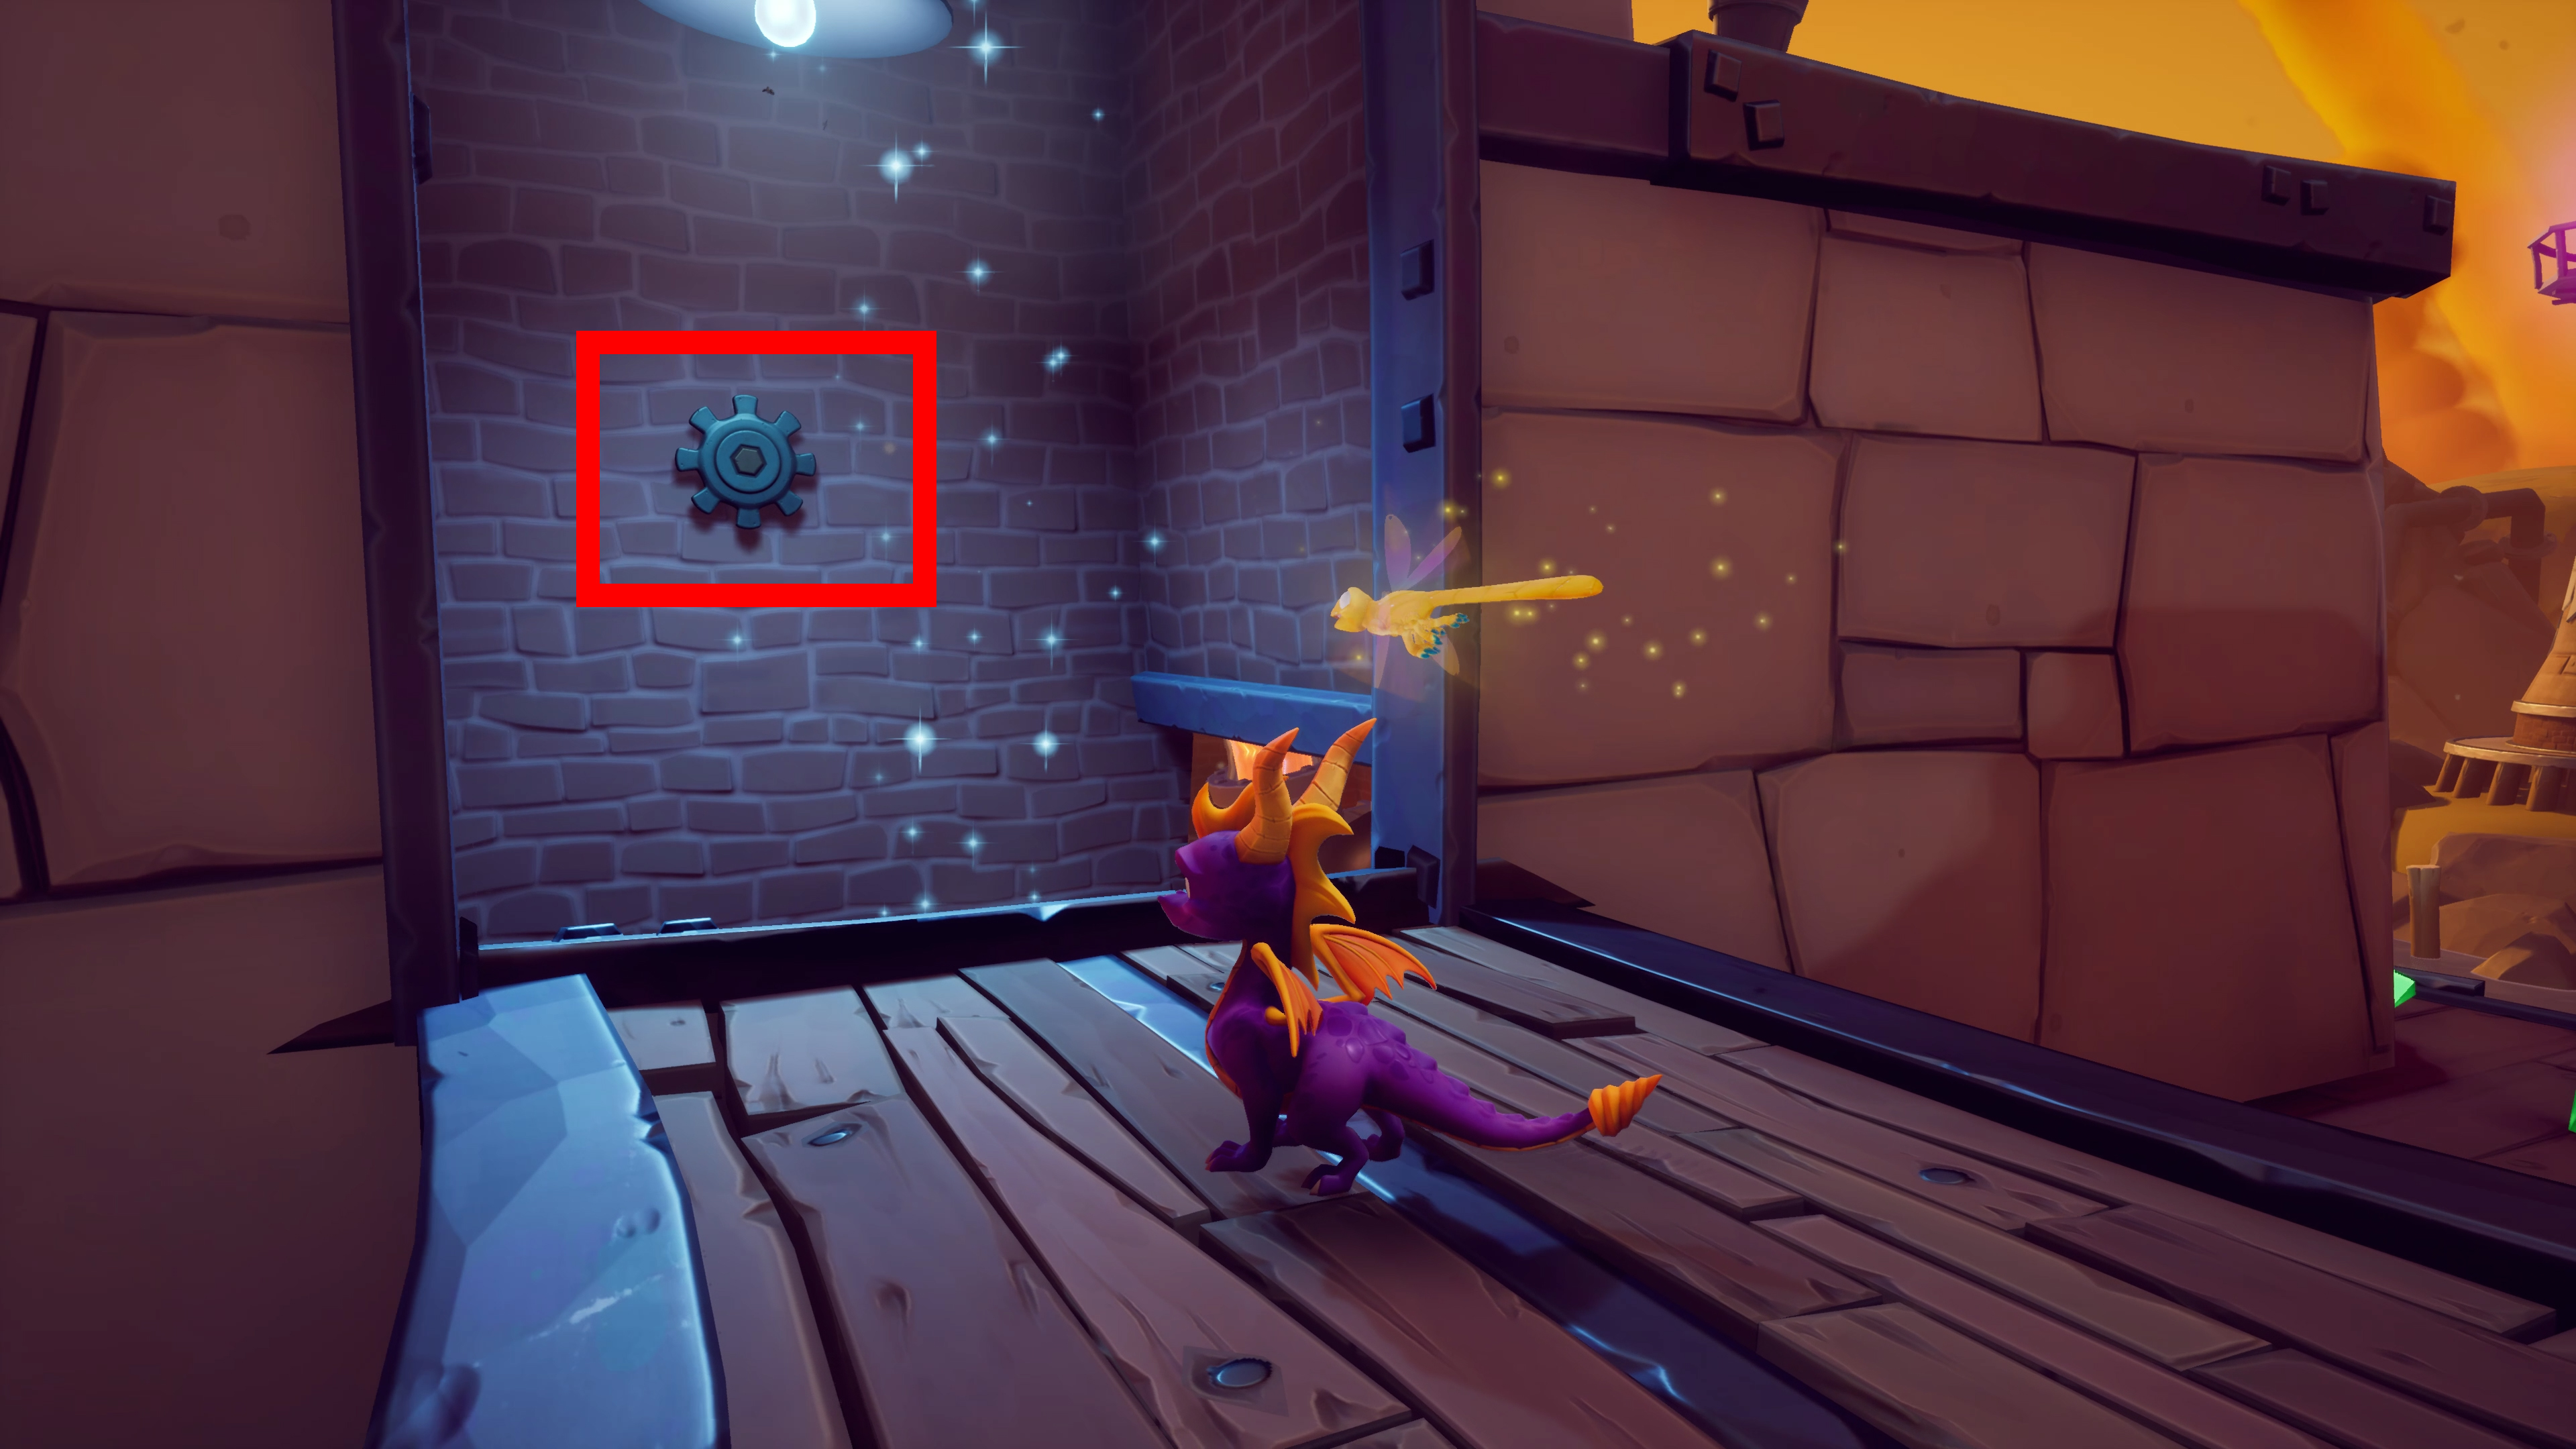
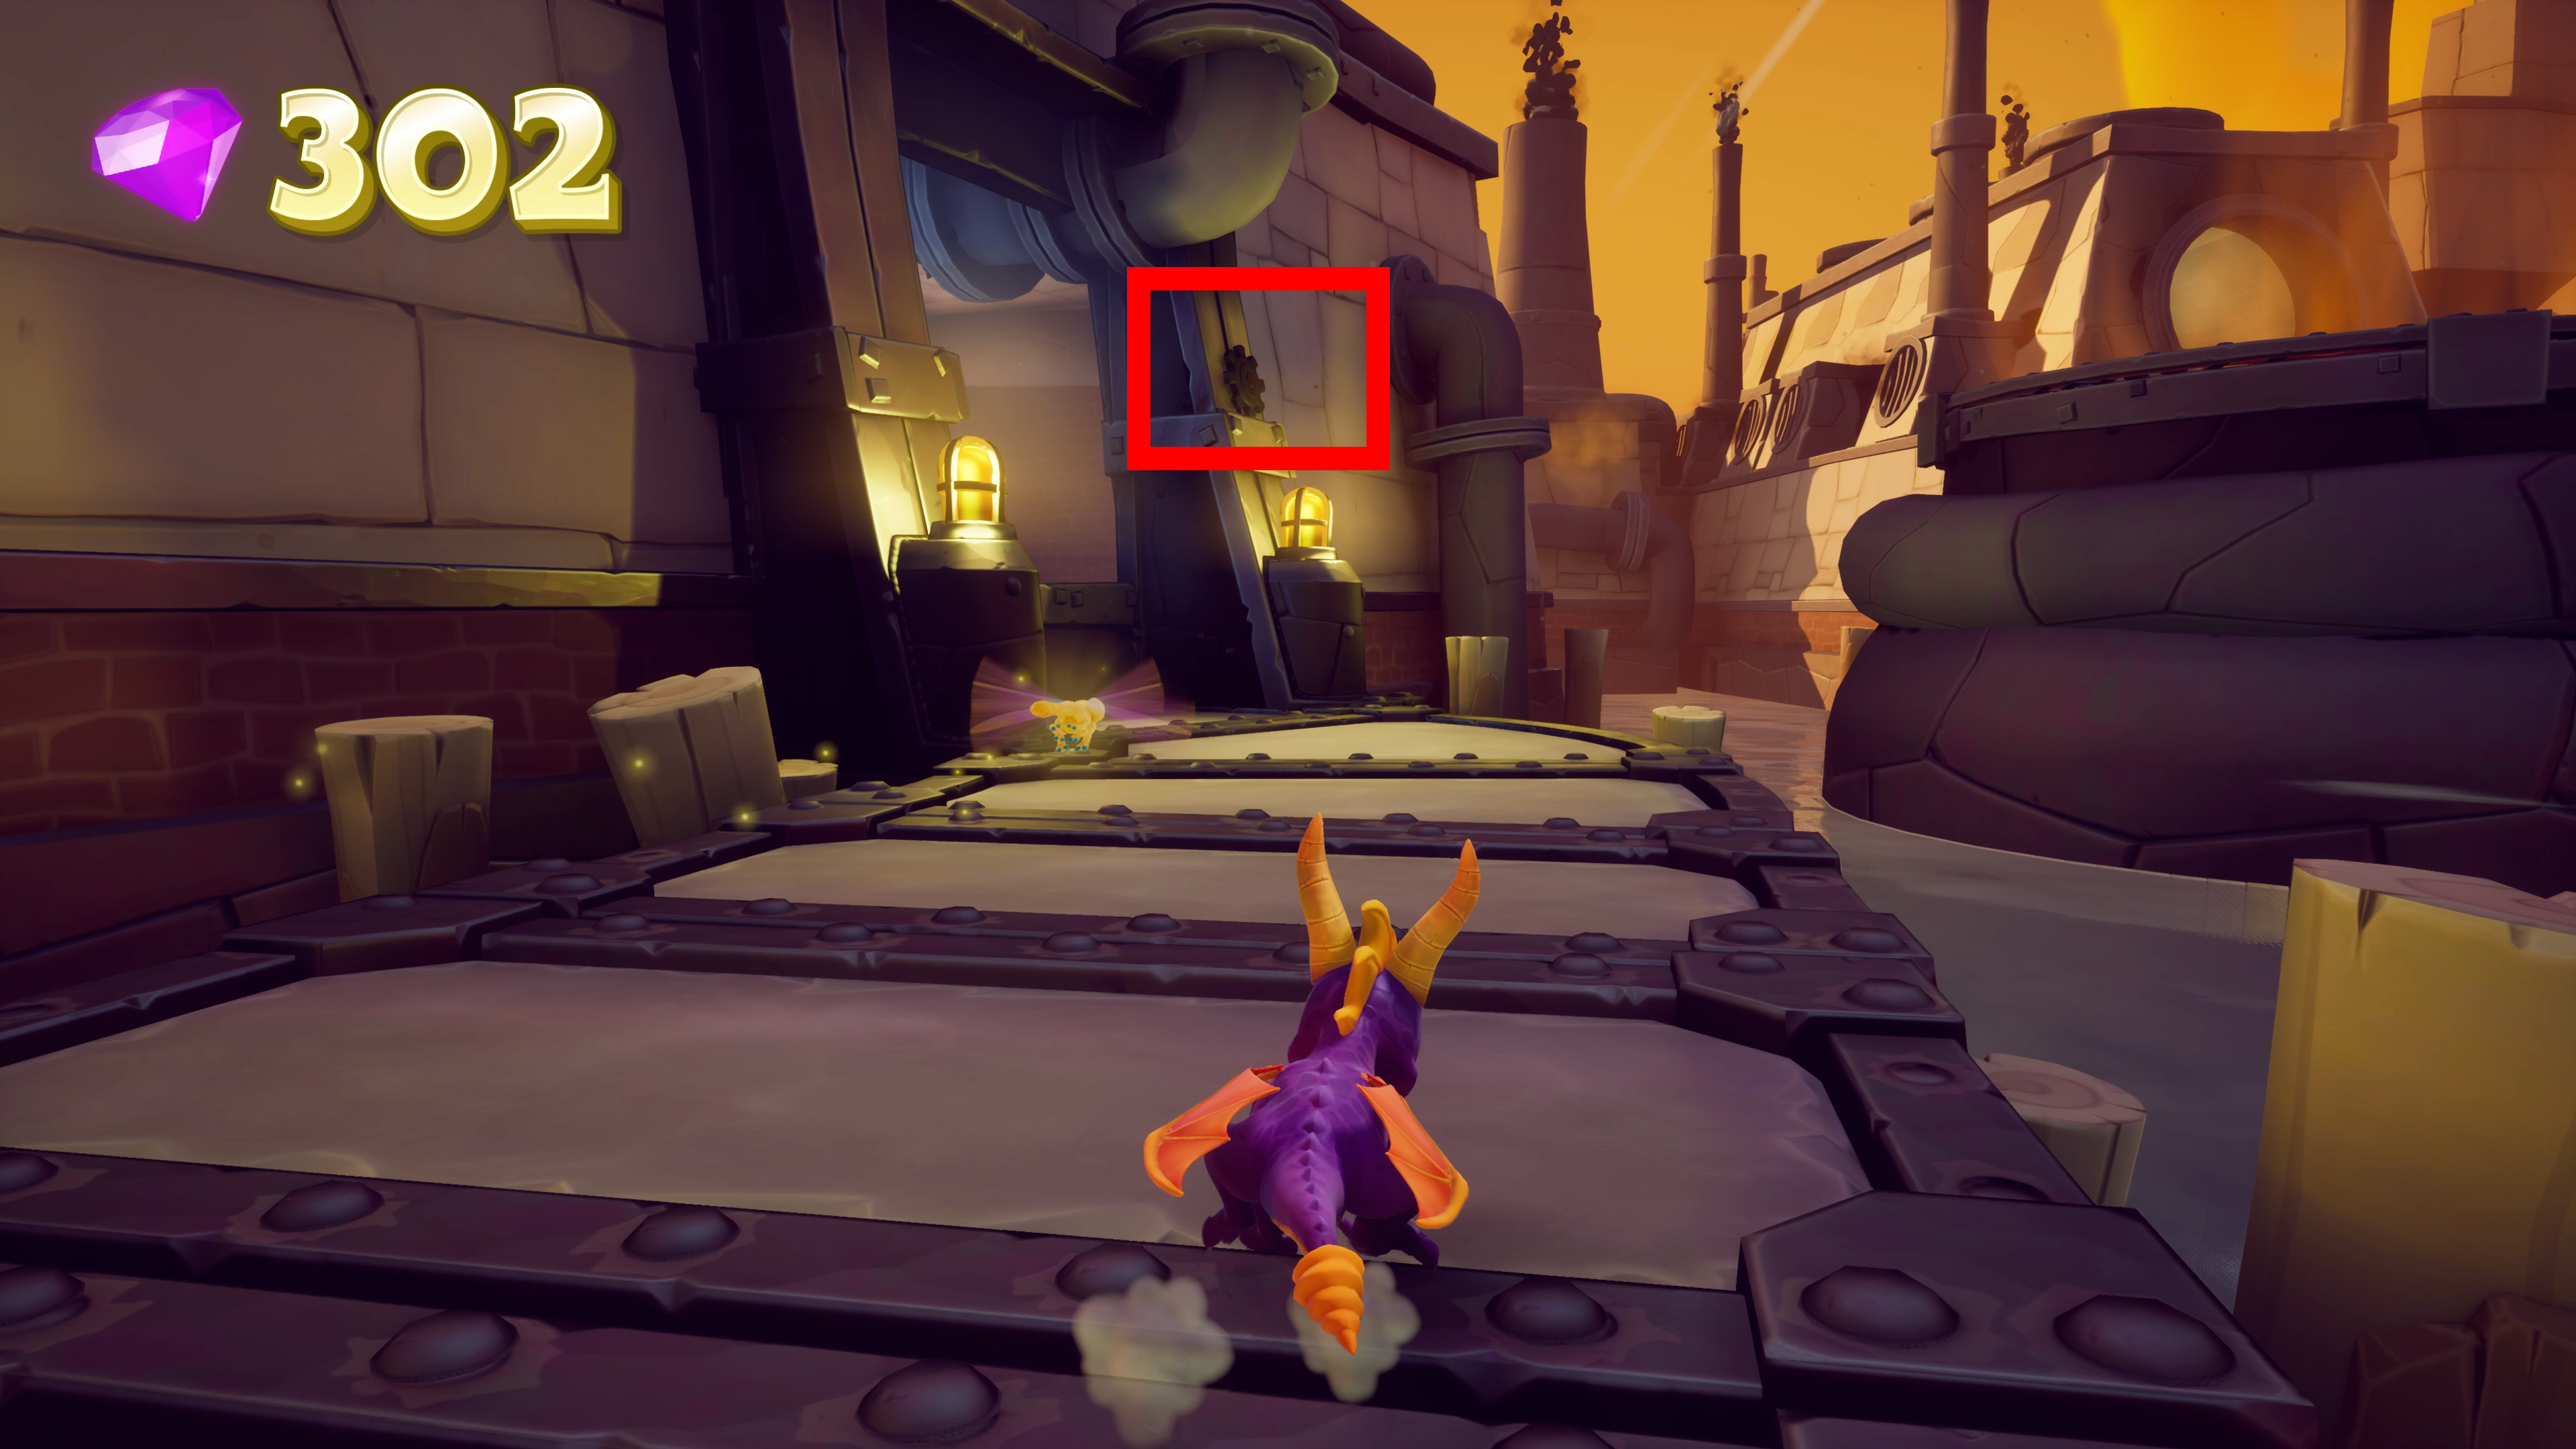
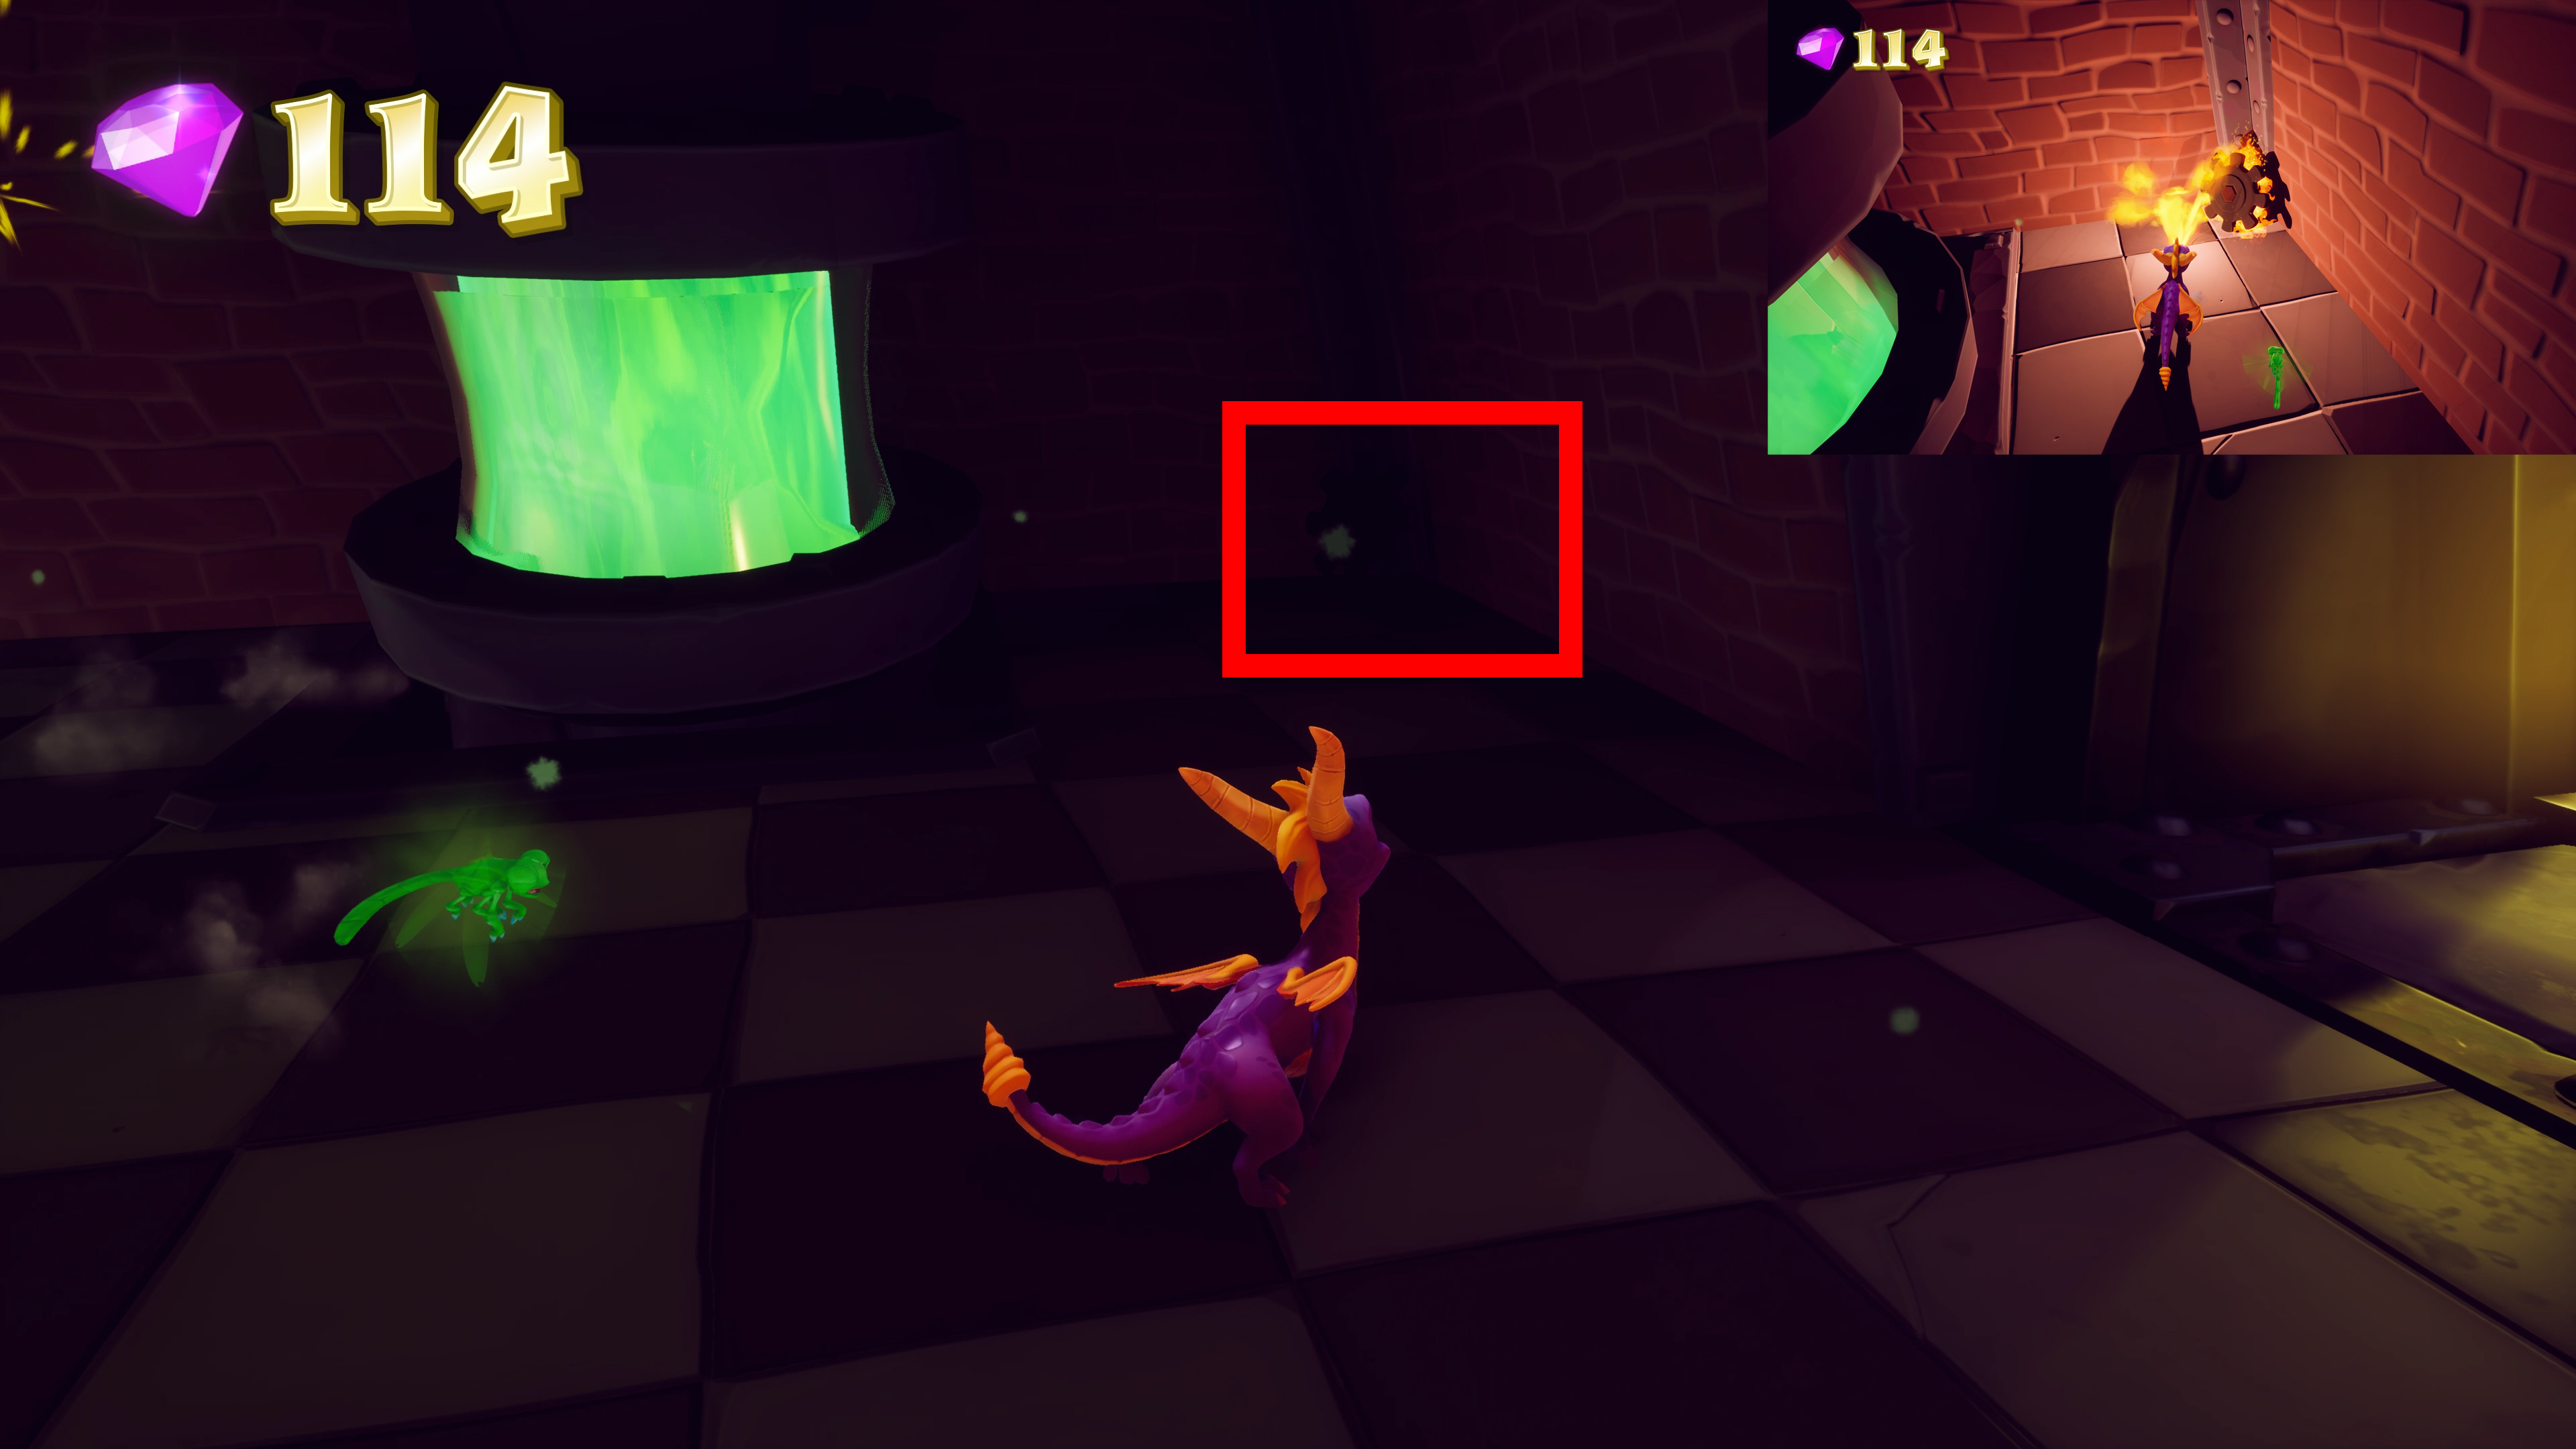
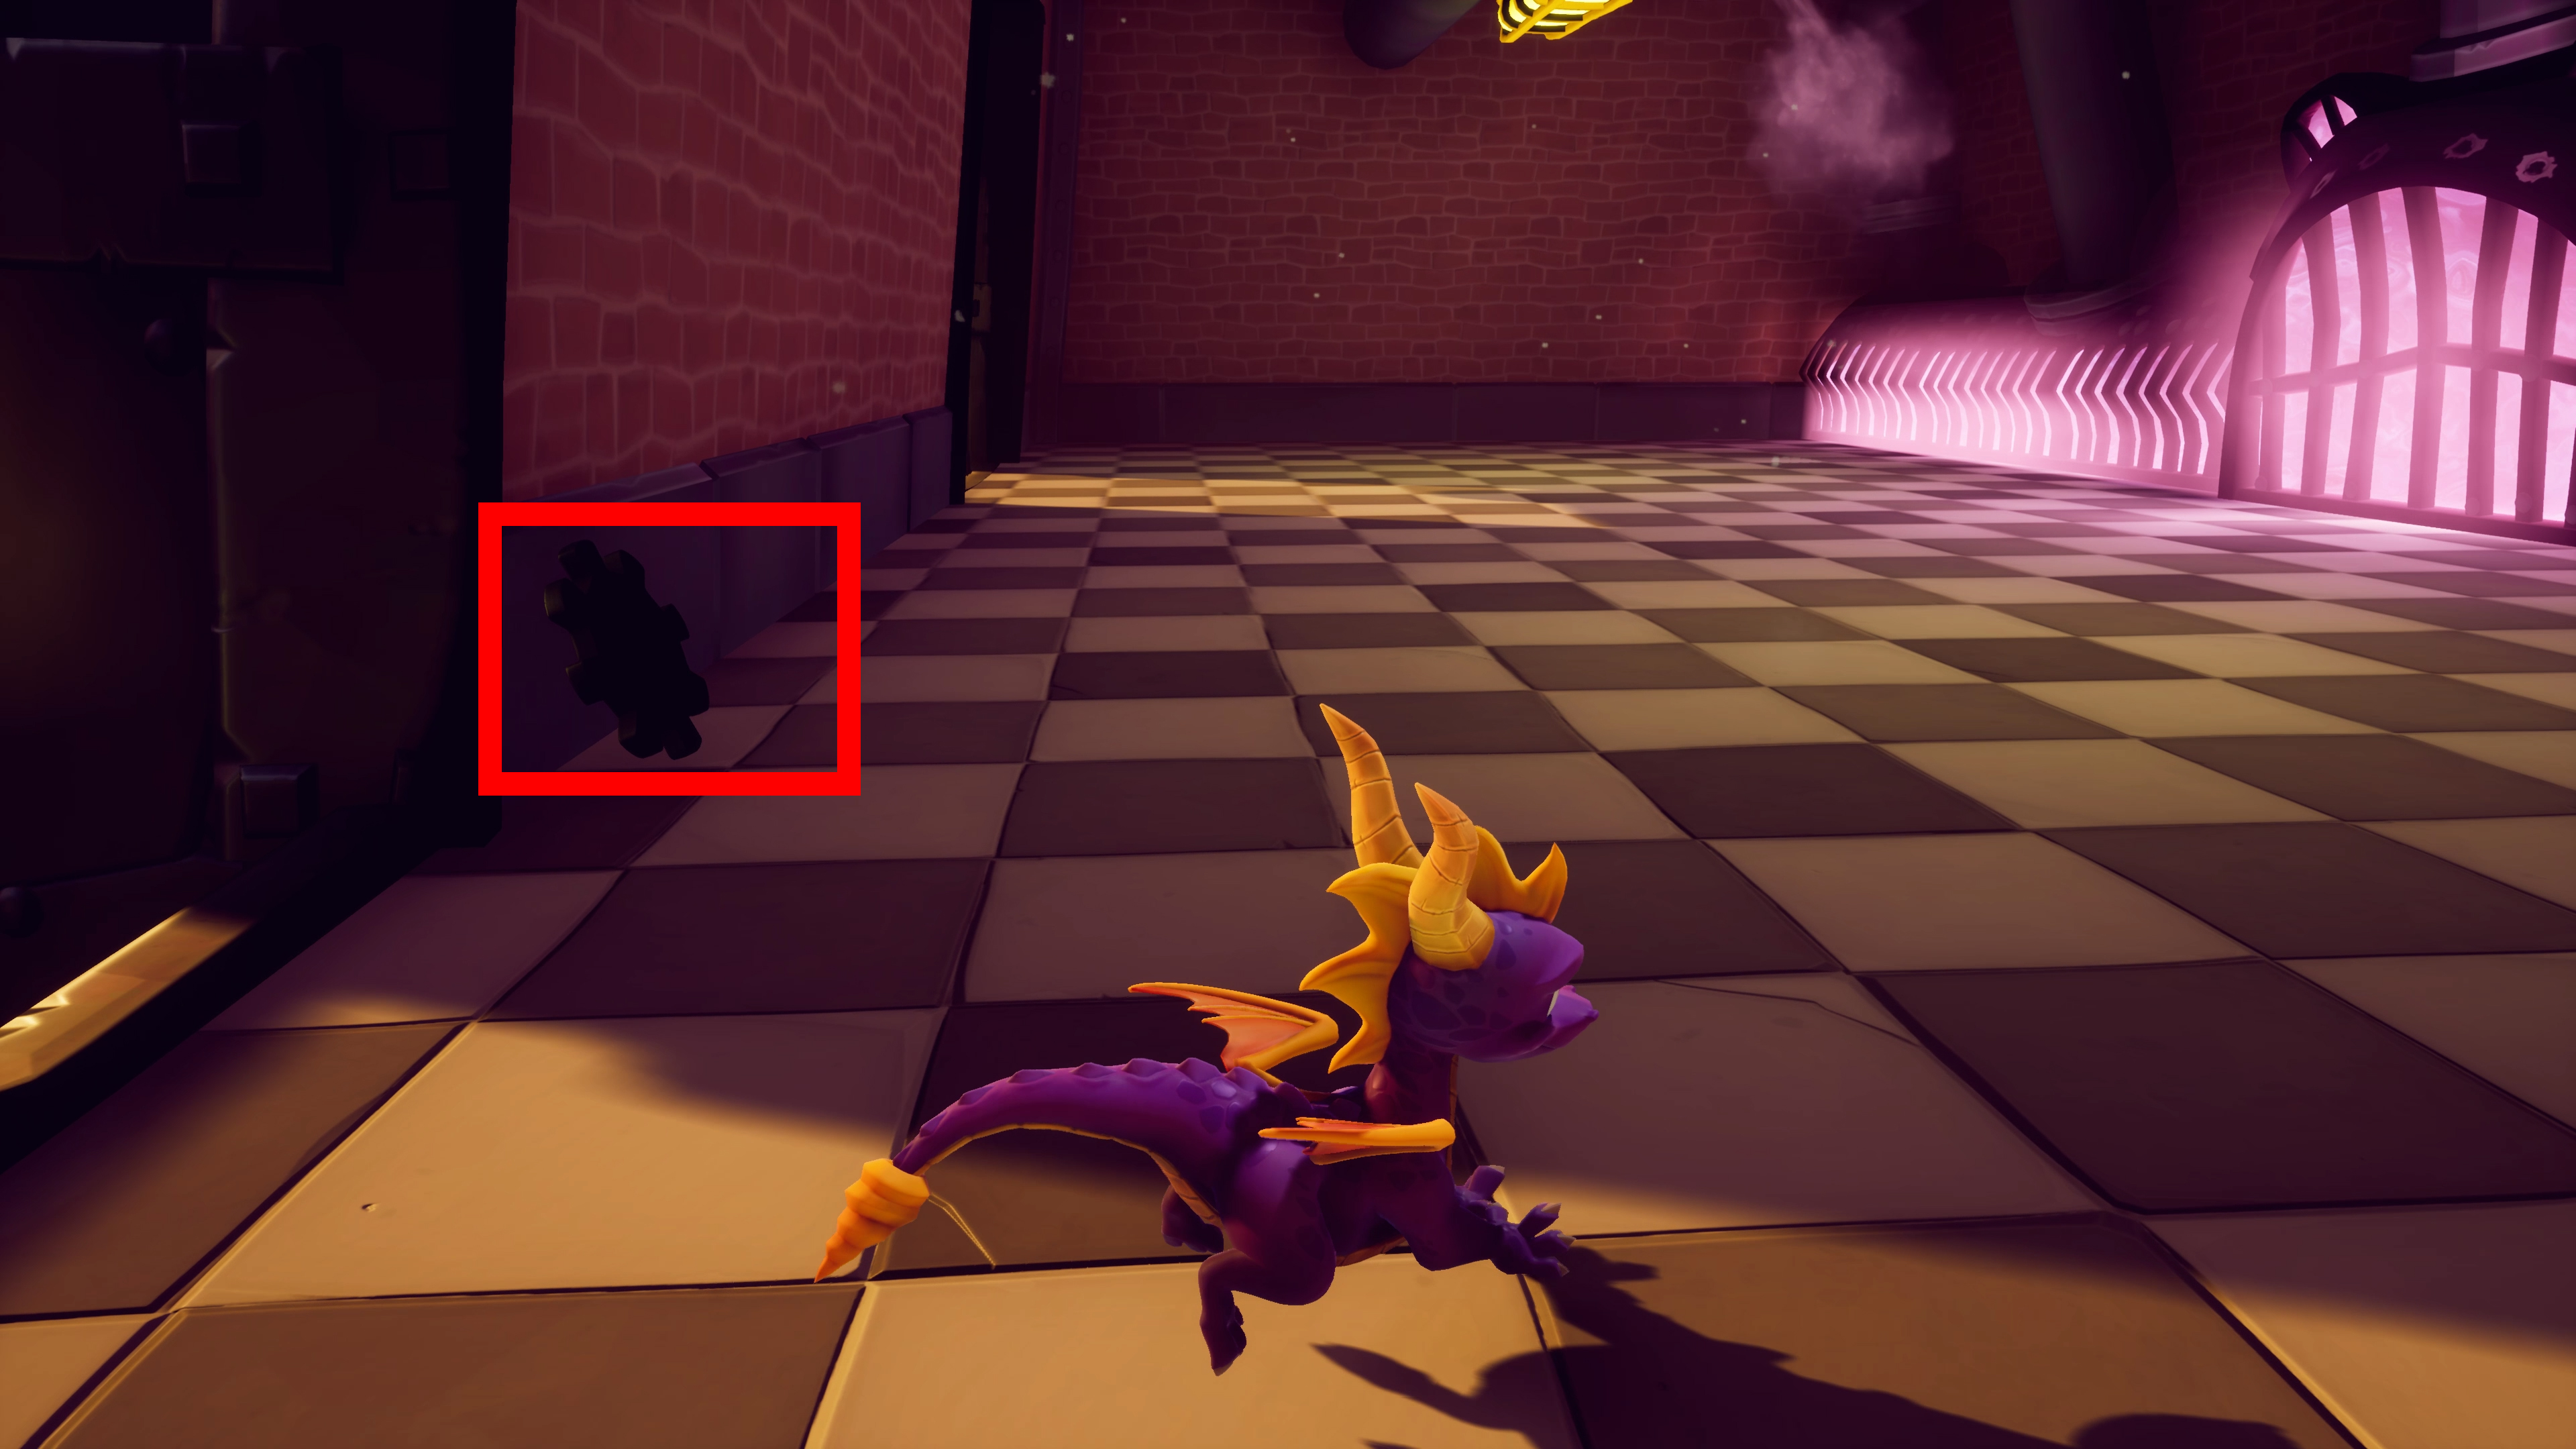
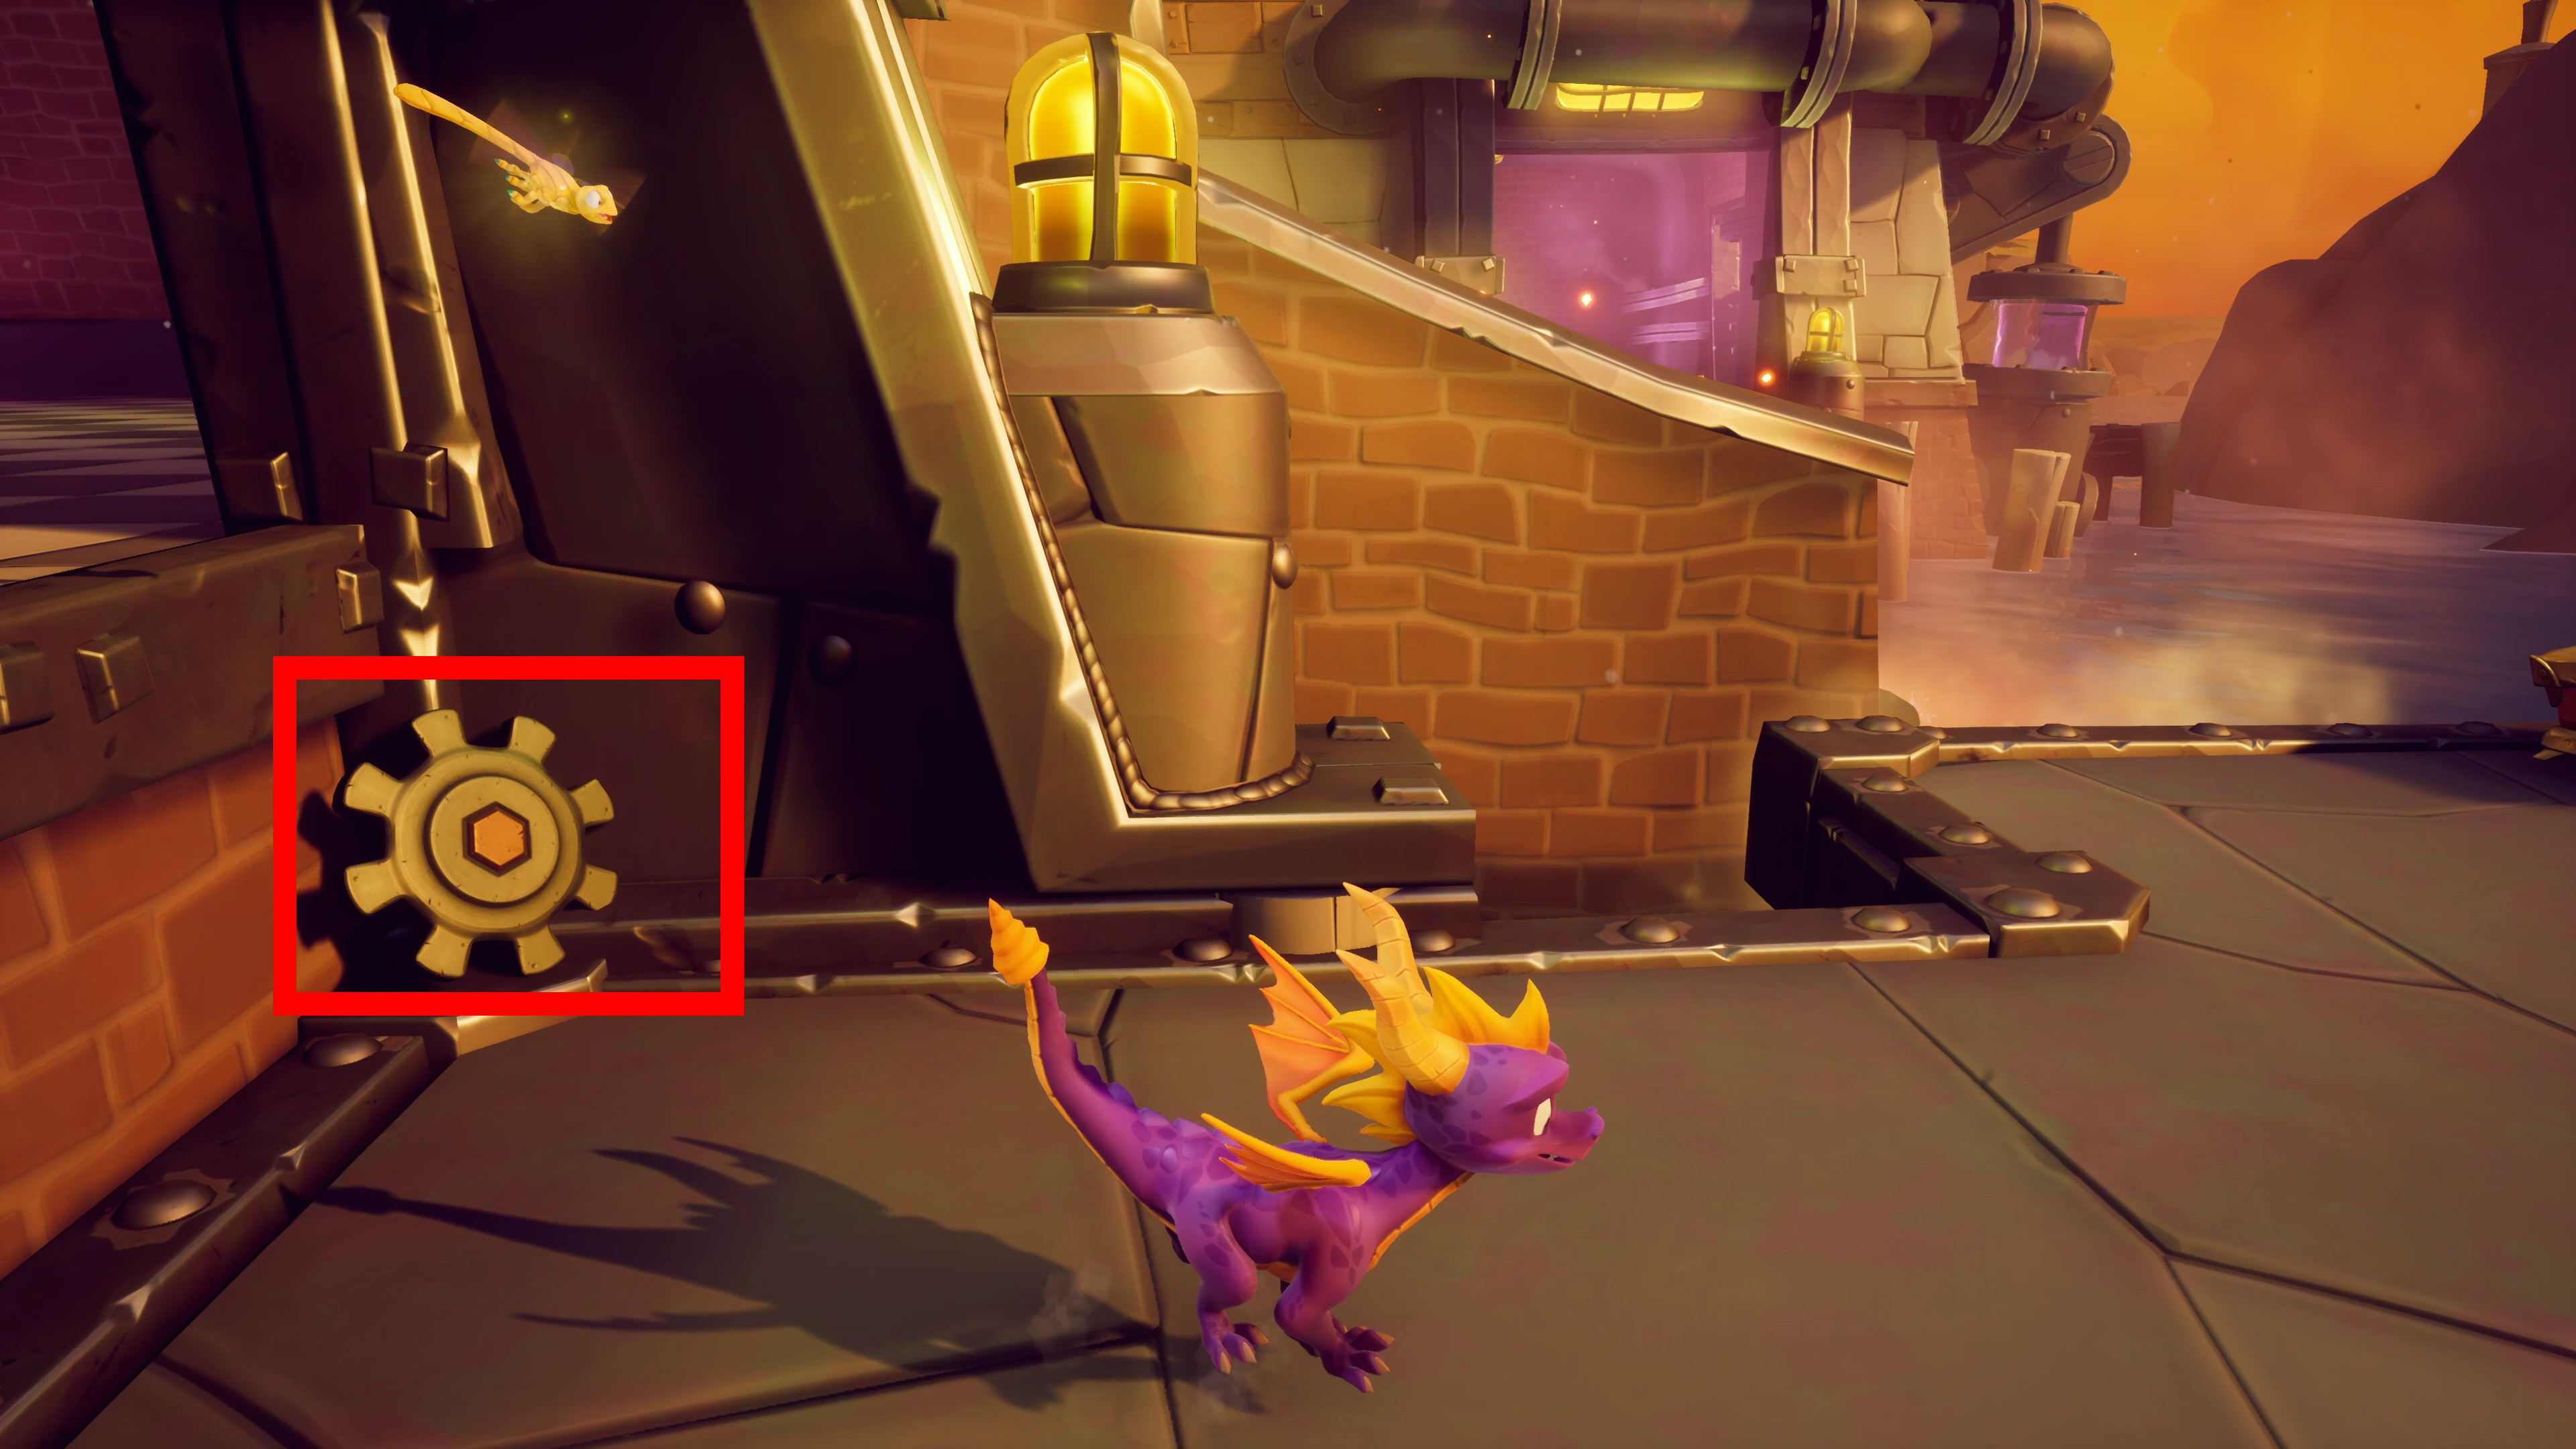
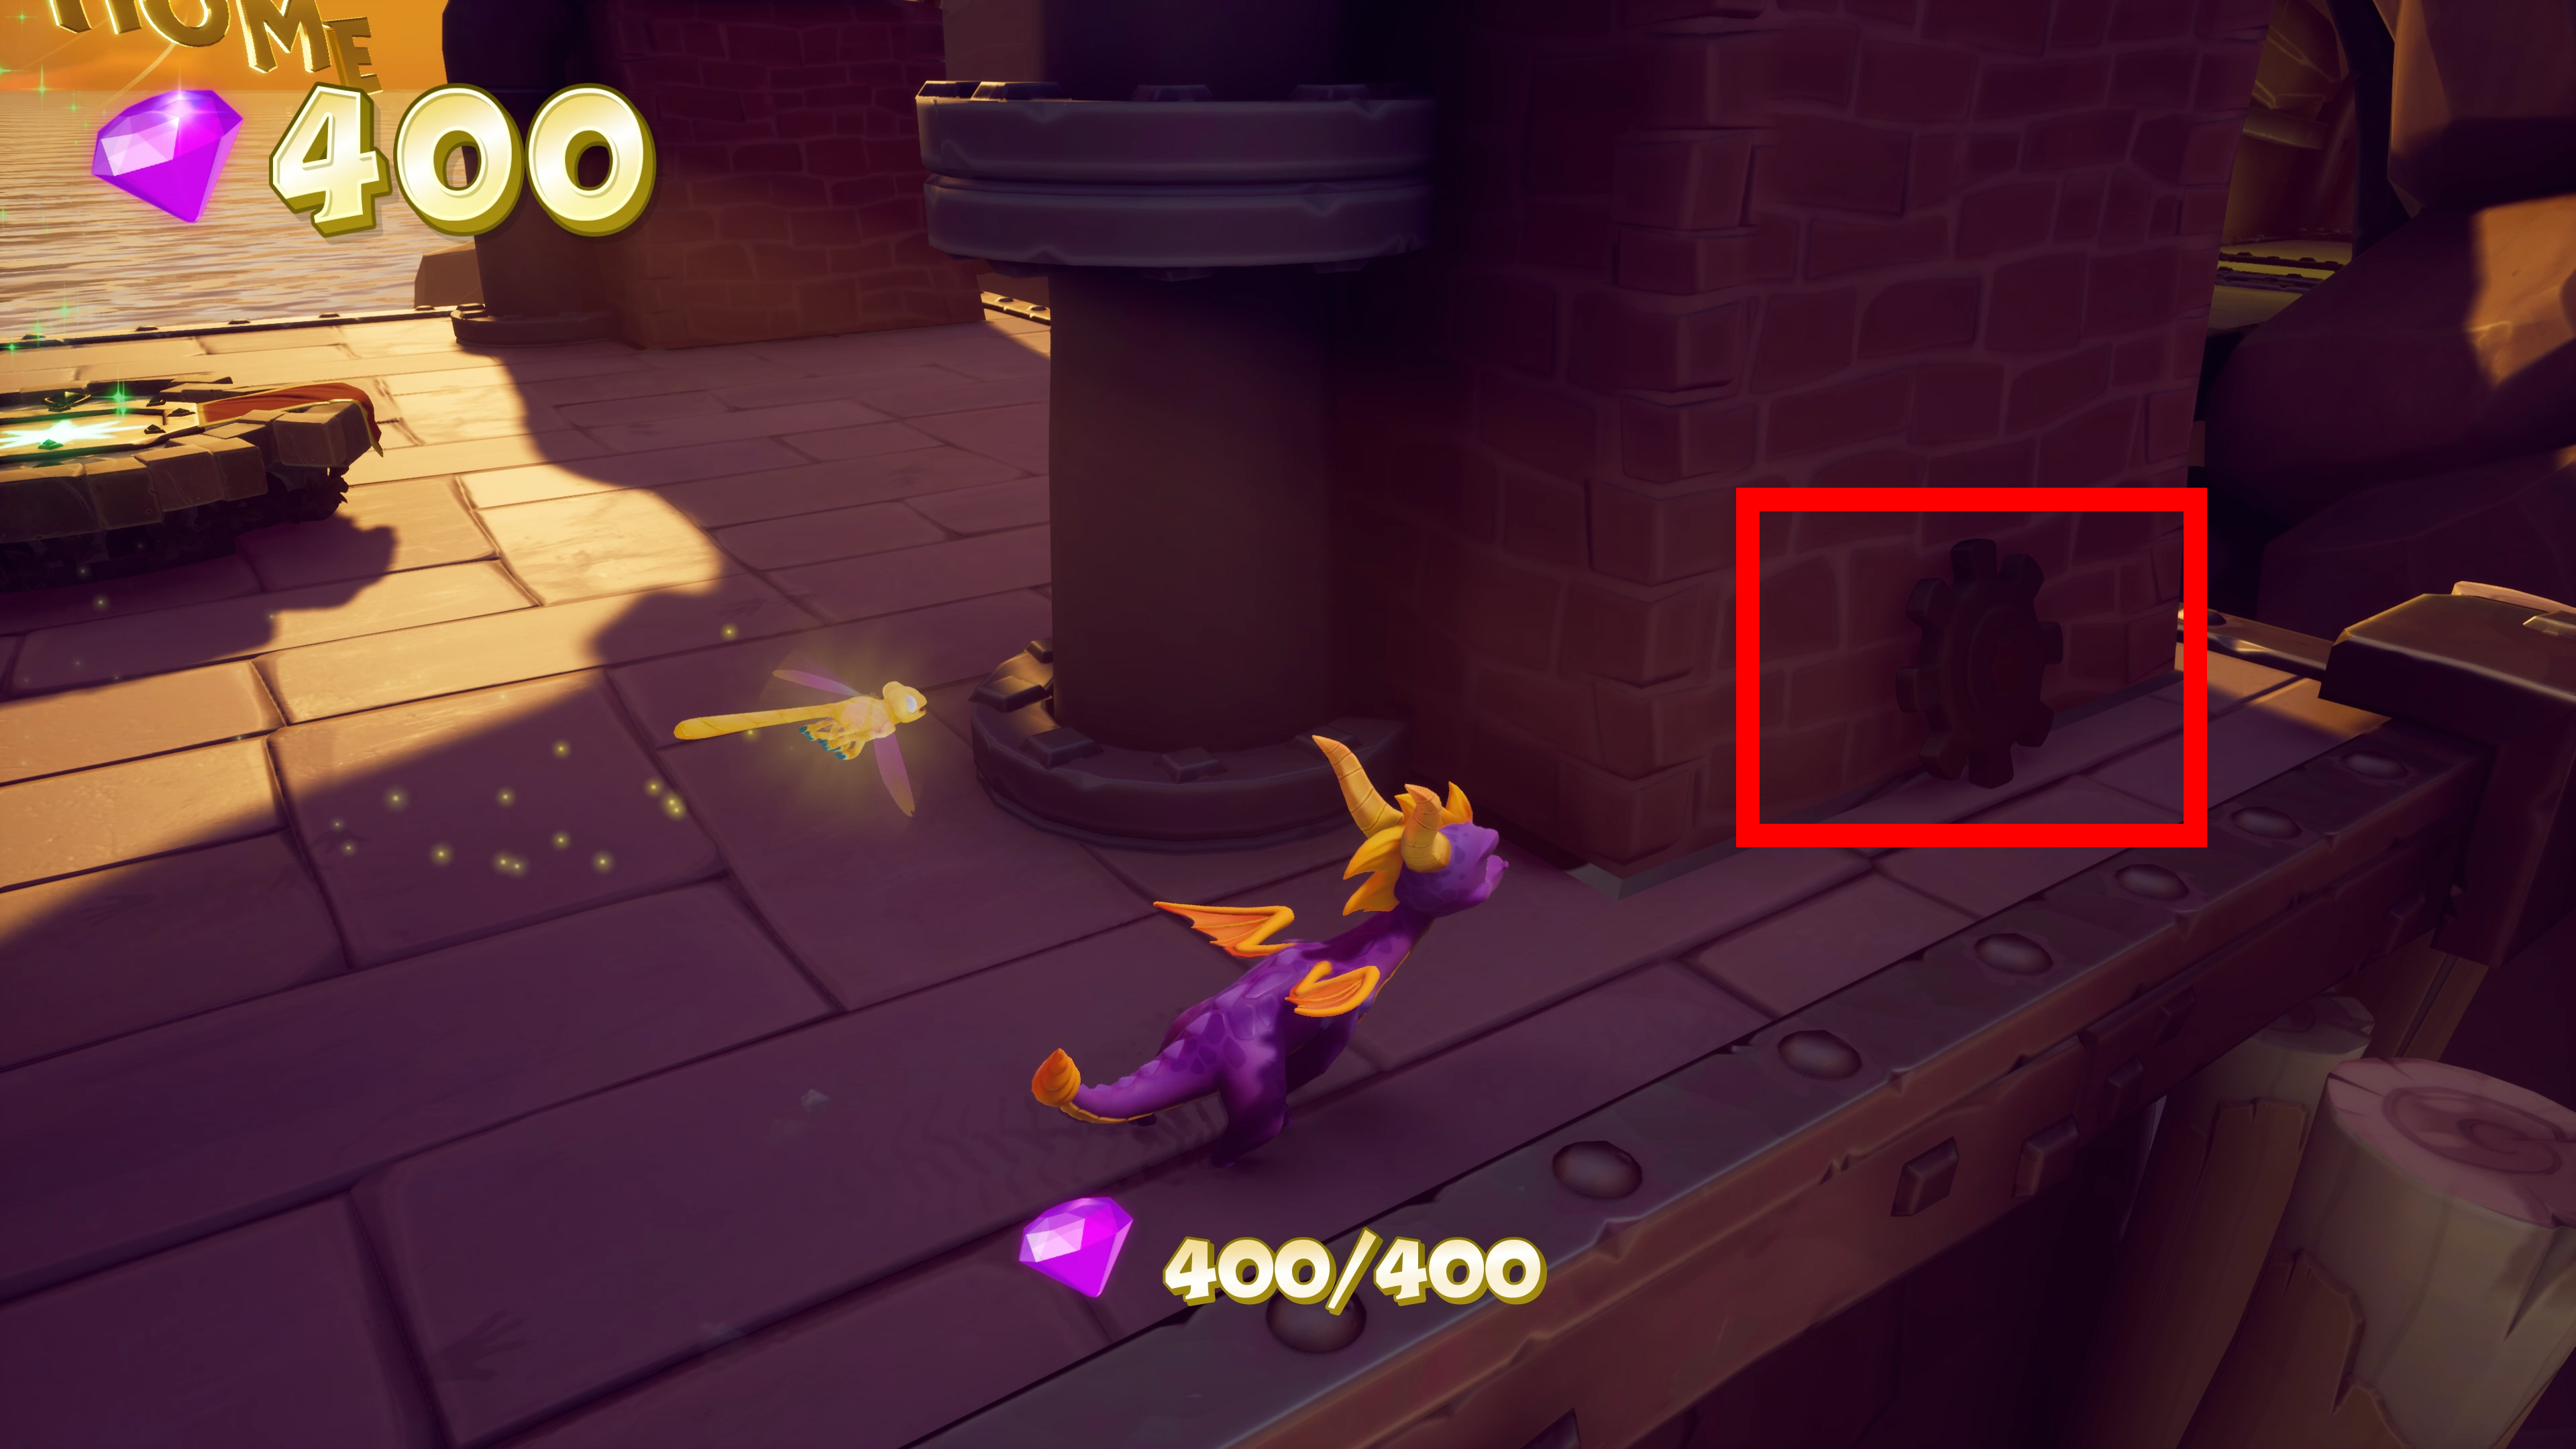
Destroy 6 gears in Twilight Harbor
There are a total of six gears in Twilight Harbor and you need to destroy them all in one go. If you die while you do this you will have to destroy all of the gears all over again, so if you feel unsure I highly suggest clearing the whole level before destroying the gears.
1. Turn around after first the vortex.

Get Gnasty Gnorc to complete 5 laps
When you get to the final boss you should reach the point where you can finally confront Gnasty Gnorc. A chase sequence will start, in which you will chase Gnorc around and he will always take a breather at the end of a lap. Instead of flaming him right away let him do 5 laps around the area to get him some exercise and get you your achievement!

Collect all gems in Gnasty’s Loot
Gnasty’s Loot is unlocked after you have achieved 100% completion. This is a bonus level but it is still required to 120% the game. After collecting all of the gems you have finished Spyro 1 and can continue into Spyro 2: Ripto’s Rage!
Congrulations for finishing the first Spyro in the Trilogy!!!
Spyro 2: Ripto’s Rage!
Spyro 2: Ripto’s Rage! has a total of 29 achievements and a lot of them are earned by doing miscellaneous stuff in each world. I will post a video reference with all the timestamps on this section of the guide and by scrolling down you can see a more detailed explanation about each achievement.
Summer Forest Worlds (Video)
3:18 –
8:15 –
13:20 –
13:20 –
17:00 –
20:50 –
20:50 –
23:05 –
32:04 –
35:20 –
36:35 –
37:40 –
42:35 –
46:55 –
55:45 –
57:30 –
57:30 –
1:00:55 –
1:09:10 –
1:14:15 –
1:17:30 –
1:25:00 –
1:26:55 –
1:30:10 –
1:31:00 –
1:37:30 –
1:41:25 –
1:44:00 –
1:51:55 –
1:51:55 –
1 Glimmer

Light 6 Gem Lamps in 15 seconds
Glimmer will be the first level you arrive into. After going past the exit portal there is a challenge giver next to a Superfly powerup. After accepting the challenge use the Superfly powerup. If you did not flame them in time you need to either die or re-enter the level. If you are struggling with this you could just come here in the postgame with Superflame (Infinite) powerup.
1.


Complete Hunter’s challenge
After finishing Glimmer, Hunter can be found to the right of the Idol Springs portal. He will give you the tutorial challenge for Glide and Hover. After finishing the tutorial, he will give you an Orb, and you will get the achievement.


Do not feed the Hungry Idol any red fish
Before going for this achievement you must have purchased the Swimming ability from Moneybags for 500 gems in the Summer Forest. He is to the left of the Idol Springs portal.
Once you can swim, dive into the pond at the start of the level. Swim up the well that you should find underwater. After you jump out of the water, there should be Foreman Bud offering you a challenge.
You need to finish his first puzzle to move onto the next one. The puzzle is quite easy so you shouldn’t have too much difficulty with it. Use picture 1 as reference. After you finish the first puzzle head back to the start of the level, where Foreman Bud relocated next to the Idol in the Water. Foreman asks you to feed 10 fishes to the Idol and for the achievement you need to make sure you don’t feed red ones to the Idol. If you fail, simply retry this part.
1.


Charge a Goat in Colossus
After starting Colossus there should be some goats right away in front of you. Charge one of them for the achievement.


Defeat every robot in Hurricos
Hurricos level has a total of 8 robots. Only charge works on them as they are immune to the flame. You should have no issues finding these as they are usually close to Gear Grinder enemies. You will need to destroy most of the enemies while doing 100% for this level anyways so you will most likely get this achievement without too much trouble.

Headbutt every turtle in Turtle Soup challenges
In order to do this achievement you need to learn Climb first in the Autumn Plains from Moneybags for 400 gems.
After you have learned Climb, enter Sunny Beach again and get to the end of the level to start the challenge. For this achievement you must charge attack the turtles to the pond and not flame them!
You need to complete both Orb challenges to obtain the achievement.
1.


Destroy every Roboshark
Robosharks can only be defeated by the Superflame powerup. There is one at the start of the level. These sharks instakill you if you get too close, so you need to kill them from a distance.


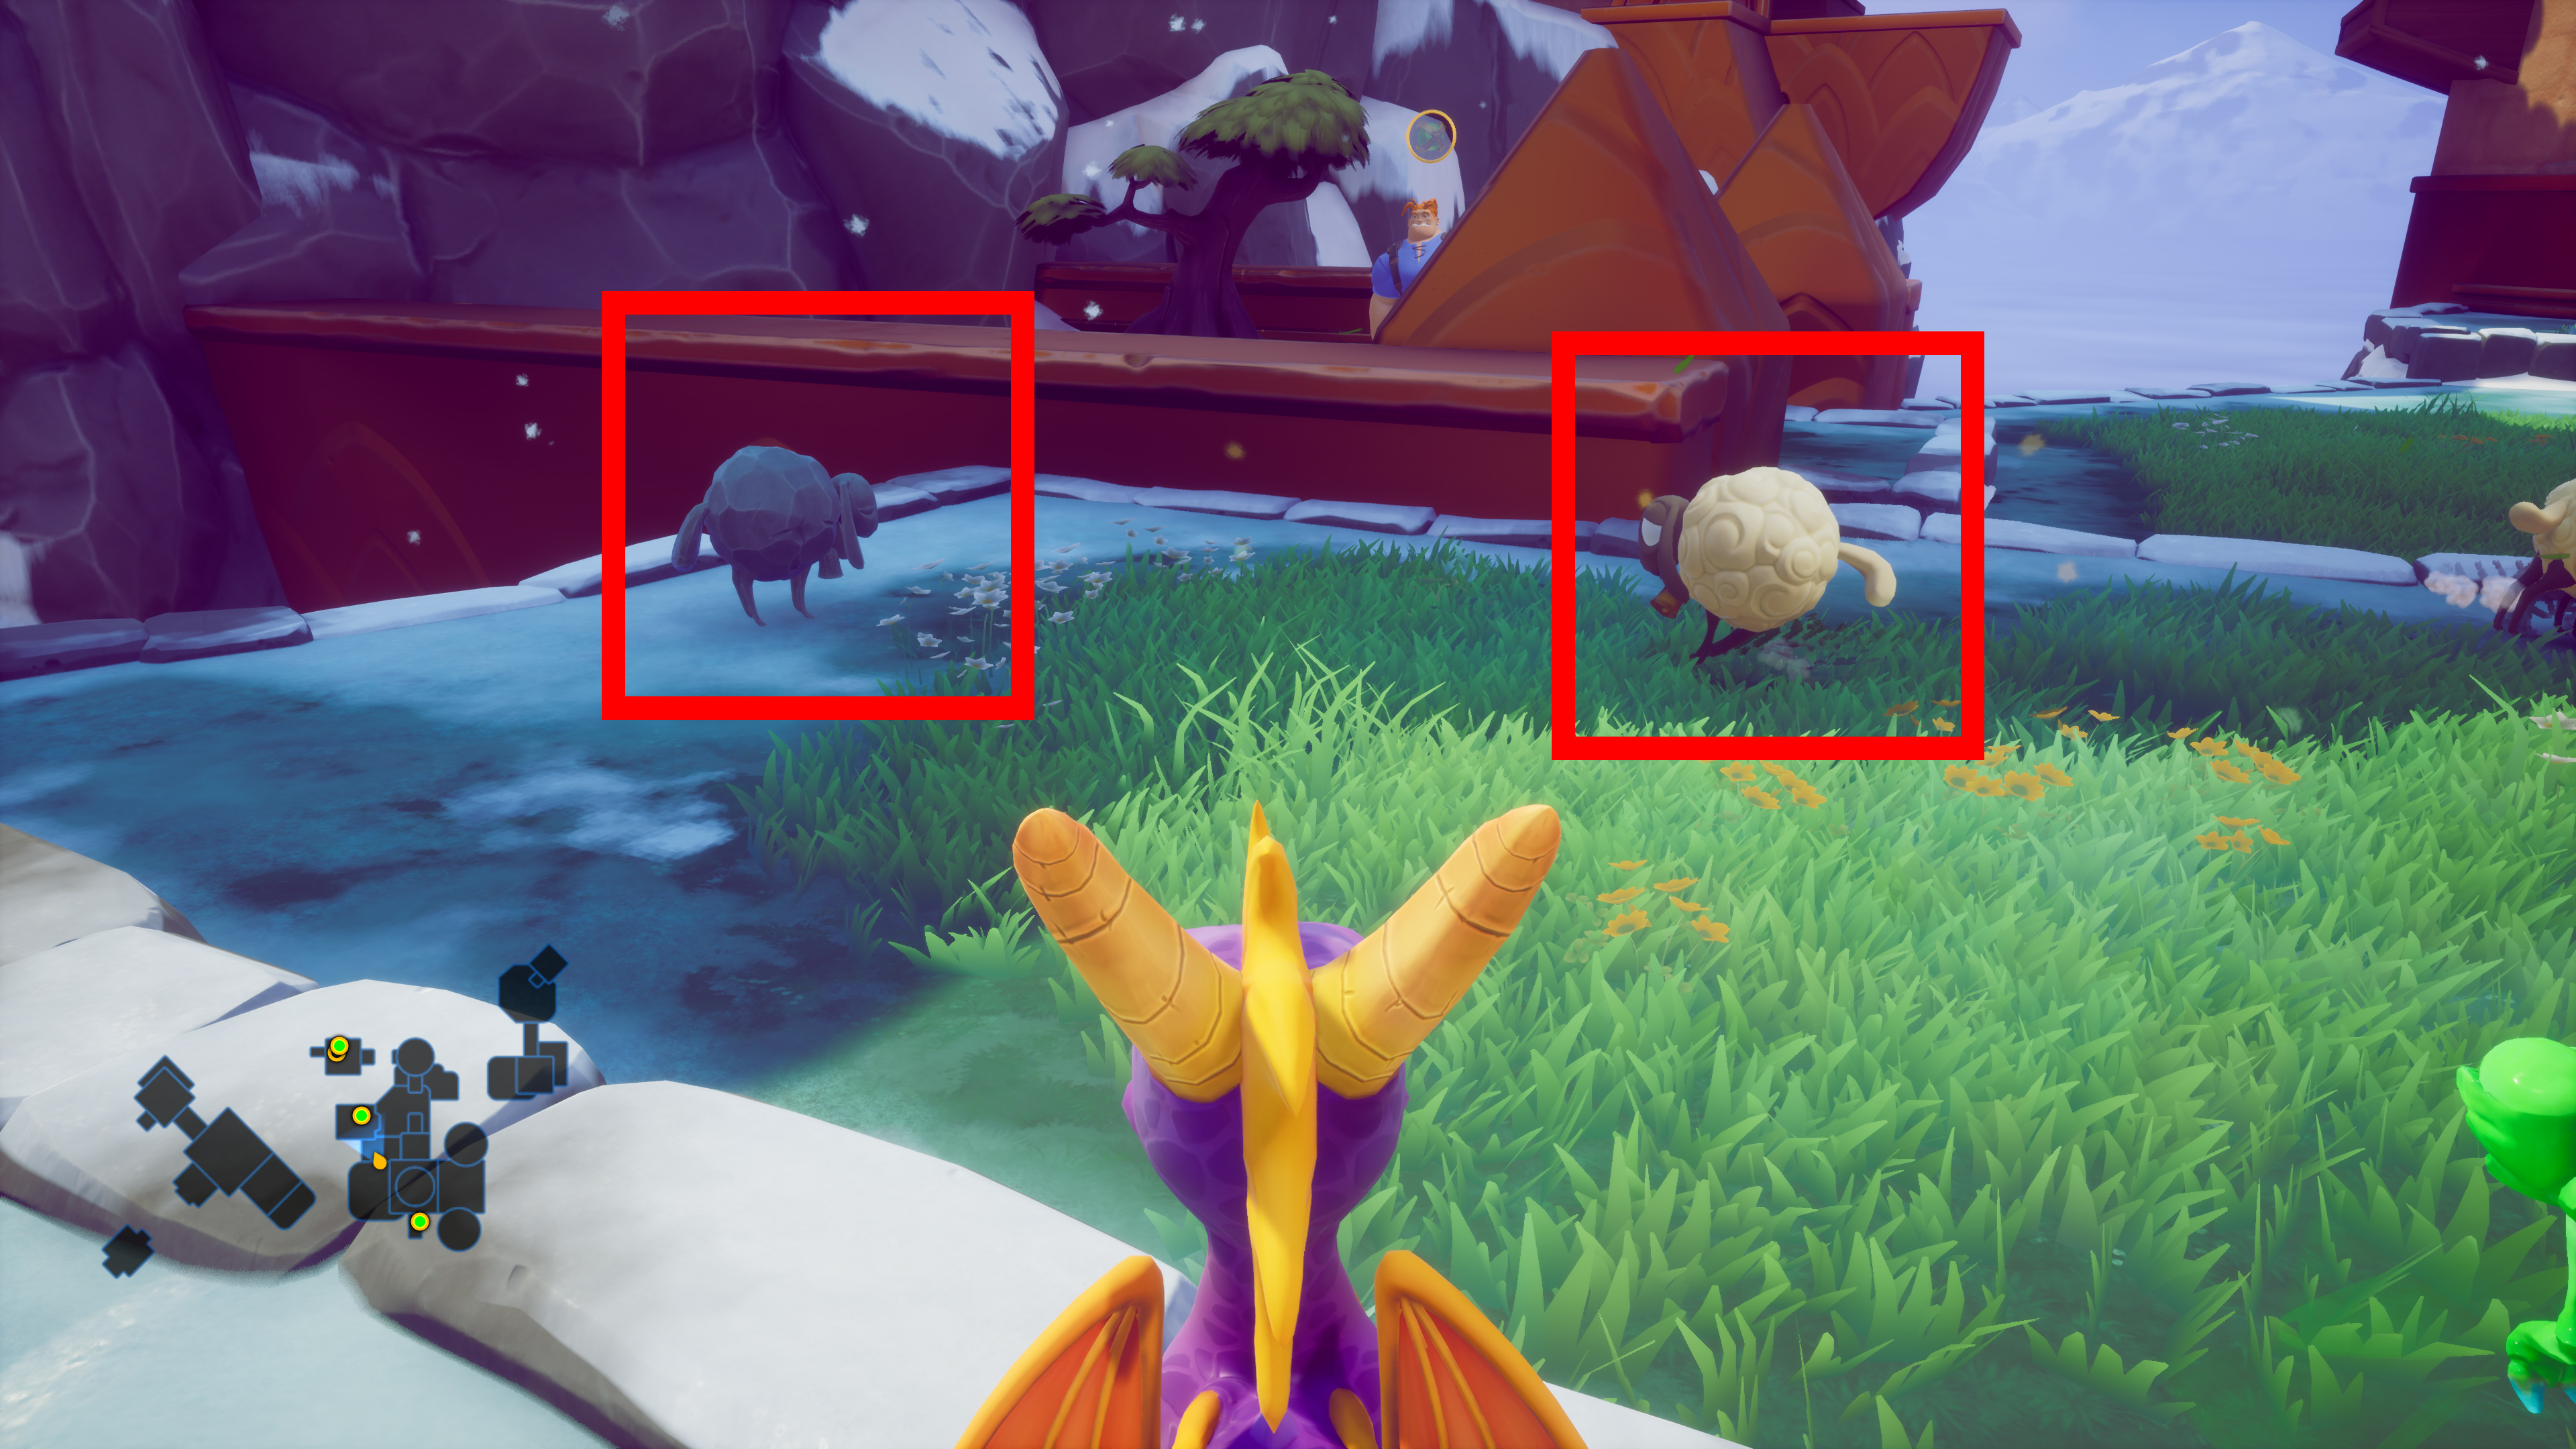
Complete Crush’s Dungeon without hitting any fodder
For this achievement you need to defeat Crush without killing any of the sheep that spawn during the fight. If you stay on full health for the entire boss fight, Crush wont spawn any fodder, which makes the achievement way easier.
As for the fight with Crush he is quite an easy one. As he runs from portal to portal just flame him from behind to do some damage. Blue portals will make Crush shoot waves at you which can be jumped over and the red portals will make him shoot fireballs at you which can be dodged by moving either left or right. After you have taken down Crush, the achievement should pop.

Heat up the audience
Can be done at any point in the level. Just land into the audience and flame everyone except Queen Finny for the achievement to pop.

Autumn Plains Worlds (Video)
00:00 –
6:50 –
6:50 –
8:50 –
9:25 –
9:25 –
21:40 –
25:22 –
31:30 –
34:25 –
34:25 –
37:10 –
43:00 –
45:30 –
54:40 –
1:01:35 –
1:01:35 –
1:05:55 –
1:08:15 –
1:10:00 –
1:17:30 –
1:17:30 –
1:21:08 –
1:24:05 –
1:29:10 –
1:29:10 –
1:35:28 –
1:46:20 –
1:51:12 –
1:53:35 –
2:00:50 –
2:04:45 –
2:06:42 –
2:09:45 –
2:09:45 –
2:17:10 –
2:21:22 –
2:22:31 –
2 Autumn Plains

Complete the long glide to Orb in Autumn Plains
For this achievement you need to glide into the secret area at Autumn Plains (picture 3). I will explain how to get there in pictures below.
1. Just before the portal to the Gulp there is a cracked wall which you can charge through.


Defeat all Dracklets in one Superflight
For this achievement you must complete the Orb challenge of this level. If you touch the ground or walls it seems to count as a failure so you need to exit the world and re-enter. After that give it another go.


Don’t touch the lava in Skelos Badlands
You might obtain this on your first trip to Skelos but if that was not the case just run straight to the exit on your second trip and make sure you do not touch the lava.


Use a cannon to defeat a TNT thrower
TNT throwers are larger blue birds and there is only one you can actually shoot for this achievement. As you progress through this level you will come by a fairy and a turret. There is a doorway which you need to blast to progress. Blast it and shoot around the same area (shown in picture 1) to hit that pesky TNT thrower for an achievement.


Clean run in the trolley
Trouble with the trolley, eh? This used to be the most annoying Orb challenge in the original game, but it feels like they made this a bit easier in the Reignited Trilogy.
You need to collect 50 gears in the trolley area. See Autumn Plains world video for guide or check out the link I posted for it below.
()

Don’t get hit by Bob
At the very end of the Scorch level you can find Handel next to a Superflame powerup which you will need during this, offering you an Orb challenge. Start it. After you take the Superflame powerup, backtrack to a flagpole and you should see Bob floating on top of it. Shoot him down and the challenge will start. His bombs are pretty easy to avoid so you should not have too much difficulty with this achievement.
Check out the video at the top of Autumn Plain sections if you want to see visual presentation of it.()


Defeat every Earthshaper in Fracture Hills
You can’t do this achievement before you have learned Headbash from Moneybags for 1000 gems in Winter Tundra.
Only Hunter area giants need to be Headbashed while others can be defeated by charging them into lava.


Steal a Popcorn Crystal from Hunter
You can obtain this achievement from the Hunter challenge in Magma Cone. For the location of the Hunter challenge in this level see picture 1. Once there, you need to grab one of the Crystals just before Hunter is about to grab it. You don’t need to finish the challenge to get this achievement.
1.


Don’t touch the hazardous water in Shady Oasis
This achievement is done the same way you did Unburnt in Skelos Badlands. But this time it is water and looks kinda toxic to me. You are likely to get this on your first trip as this is way easier to avoid than the lava was in Skelos Badlands.


Complete Gulp’s Overlook without harming fodder
First things first. You can cheese this fight later on by using your infinite Super Flame rewarded for 100% completion and have no problems whatsoever to get this achievement. If you want to do this right away, prepare to spend some time here.
This is the worst achievement in Spyro history. It is the same as Conservationist 1, but with way more things to watch out for and a boss that’s a bit more unpredictable than the Crush was. Let’s go over his abilities.
1. Gulp starts to chase you from time to time so he can jump on you and smash you. To avoid this one, charge either to left or right of him while he jumps.
2. The thing that makes this boss annoying is his lasers. He will only shoot a few at the start but as the fight progresses he will shoot more and more until it becomes a nuisance. Best way to avoid this ability is to switch direction from left to right when he fires so you can make his shots more predictable as Gulp always shoots ahead of you.
If you get these 2 parts right rest of the fight should be pretty easy.

Defeat the Snowmobiles before defeating a Hang Glider
Kinda simple compared to the last one as you only need to defeat Snowmobiles before defeating Gliders. Picture below if you need confirmation of the target you need to aim for.


Flame the Pigeons first in Metro Speedway
As with the earlier one just flame up the pigeons before anything else. Picture below.

Winter Tundra Worlds (Video)
00:00 –
00:55 –
2:20 –
5:15 –
6:25 –
6:55 –
6:55 –
8:45 –
12:00 –
12:00 –
12:00 –
18:50 –
25:15 –
32:00 –
32:00 –
32:00 –
37:45 –
40:15 –
45:00 –
45:00 –
49:25 –
56:40 –
59:45 –
1:03:30 –
1:03:30 –
1:05:50 –
1:05:50 –
1:10:10 –
3 Winter Tundra

Headbash every rock in Winter Tundra
As you enter the level you should have more than enough gems to buy Headbash from Moneybags for 1000 gems.
If you do not, backtrack a bit to earlier levels and come back here after you have enough gems to buy the next ability. All of the rocks you need to Headbash are in the outer area of the Winter Tundra. None of them are inside the castle grounds.


Charge through every Monkey in Mystic Marsh
This needs to be done without changing the world in between. Wait until they stop attacking and charge after that. They are hanging by the trees. Look at picture below for reference.


Don’t hit any Sheep in Cloud Temples
As you progress through the level you will come by some Sheep encased in stone. It is okay to get close to the sheep. This is pretty much the same as the Ratastic achievement from Spyro 1.

Defeat the Ox without taking a hit
Midway through the level you should see ladders to your left. Climb them and you should be at the Logistic Droid who will give you a challenge to defeat the Ox.
You can cheese this fight by obtaining the permanent Superflame and shooting the Ox with that. You can also do the fight normally by flaming the bombs towards the Ox.


Defeat every Robo Bee by spitting
Robo Bees are the enemies that fly in this area. You will get this achievement by spitting Yellow honeycombs (picture below) at them which can be found all around the area.


Use all 3 types of power-ups in Ripto’s Arena
This is a pretty simple and fast achievement compared to the earlier boss achievements.
To get powerups in Ripto’s Arena you need to pick up orbs which Hunter drops down for you. Ripto can pick these up as well so watch out! You need a total of 3 orbs to activate a powerup. Only the color of the third Orb matters as that is the deciding factor for which powerup you.
Orbs and powerups are shown in the picture below as follows from left to right:
Red Orbs (Superflame)
Green Orb (Green Bombs)
Blue Orbs (Supercharge)


Defeat 5 Buggies while charging
This will be the last Speedway for Ripto Rage.
You don’t need to do all of this in one charge, so you can stop and move to the other section of the road by gliding and continue charging from there.


Unlock the permanent Super Flame
This is probably the last achievement you will get in the game unless you followed my suggestions and skipped Conservationist 1/2 or Olly Olly Oxen Free to use this ability to cheese them.
This is the reward for 100% the game and is obtained from Dragon Shores. If you are still missing some Orbs or Gems you can always check the Guidebook for the area.

4 Cleanup Section for 100%
This video is for the people who want guidance for the areas that were inaccessible earlier in the game.
00:00 –
1:25 –
2:00 –
3:05 –
4:40 –
4:40 –
4:40 –
11:20 –
13:50 –
13:50 –
18:50 –
18:50 –
20:05 –
20:05 –
25:35 –
26:48 –
30:20 –
32:10 –
32:10 –
38:40 –
40:30 –
SUDDEN REALIZATION THAT I MISSED ONE LEVEL
45:00 –
45:00 –
48:50 –
51:50 –
53:00 –
53:05 –
Spyro 3: Year of the Dragon
Spyro 3 has a total of 40 achievements and a lot of them are earned by doing miscellaneous stuff in each world. I will post a video reference with all the timestamps on this section of the guide and by scrolling down you can see a more detailed explanation about each achievement.
A lot of the achievements in Spyro 3 are obtained just through Story progression. I will mark these as unmissable and go into less detail about them.
Unlike previous entries, Spyro 3 does not have an achievement for 100% completion.
This means that you will only need to collect 100 out of the 150 eggs in the game, so you can be quite carefree while playing. You don’t need to collect all of the gems either. You just need enough to pay Moneybags to progress through the several points of the game.
Sunrise Spring Worlds (Video)
2:46 –
12:15 –
14:10 –
14:10 –
22:05 –
22:05 –
41:10 –
50:05 –
56:25 –
59:25 –
1:05:00 –
1:22:50 –
1:26:05 –
1:28:00 –
1:36:50 –
1:36:50 –
1:36:50 –
1:43:35 –
1:43:35 –
1 Sunrise Spring

Sunrise Spring: Free Sheila the Kangaroo
Unmissable
You can’t progress into the next world unless you free Sheila and finish her level. You need a total of 300 gems to free her, which can be collected from Sunrise Spring.

Sunrise Spring: Launch the Transporter Balloon
Unmissable
You will unlock this achievement upon using the Transporter Balloon after completing all of the levels available in Sunrise Spring excluding Mushroom Speedway and Crawdad Farm.

Sunny Villa: Defeat all Coward Rhynocs
During Sunny Villa you’ll encounter smaller Rhynocs who fear you and are about the same size as Spyro.
Pictured below.


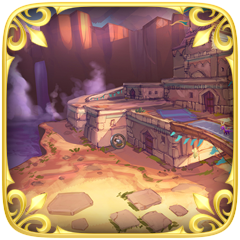
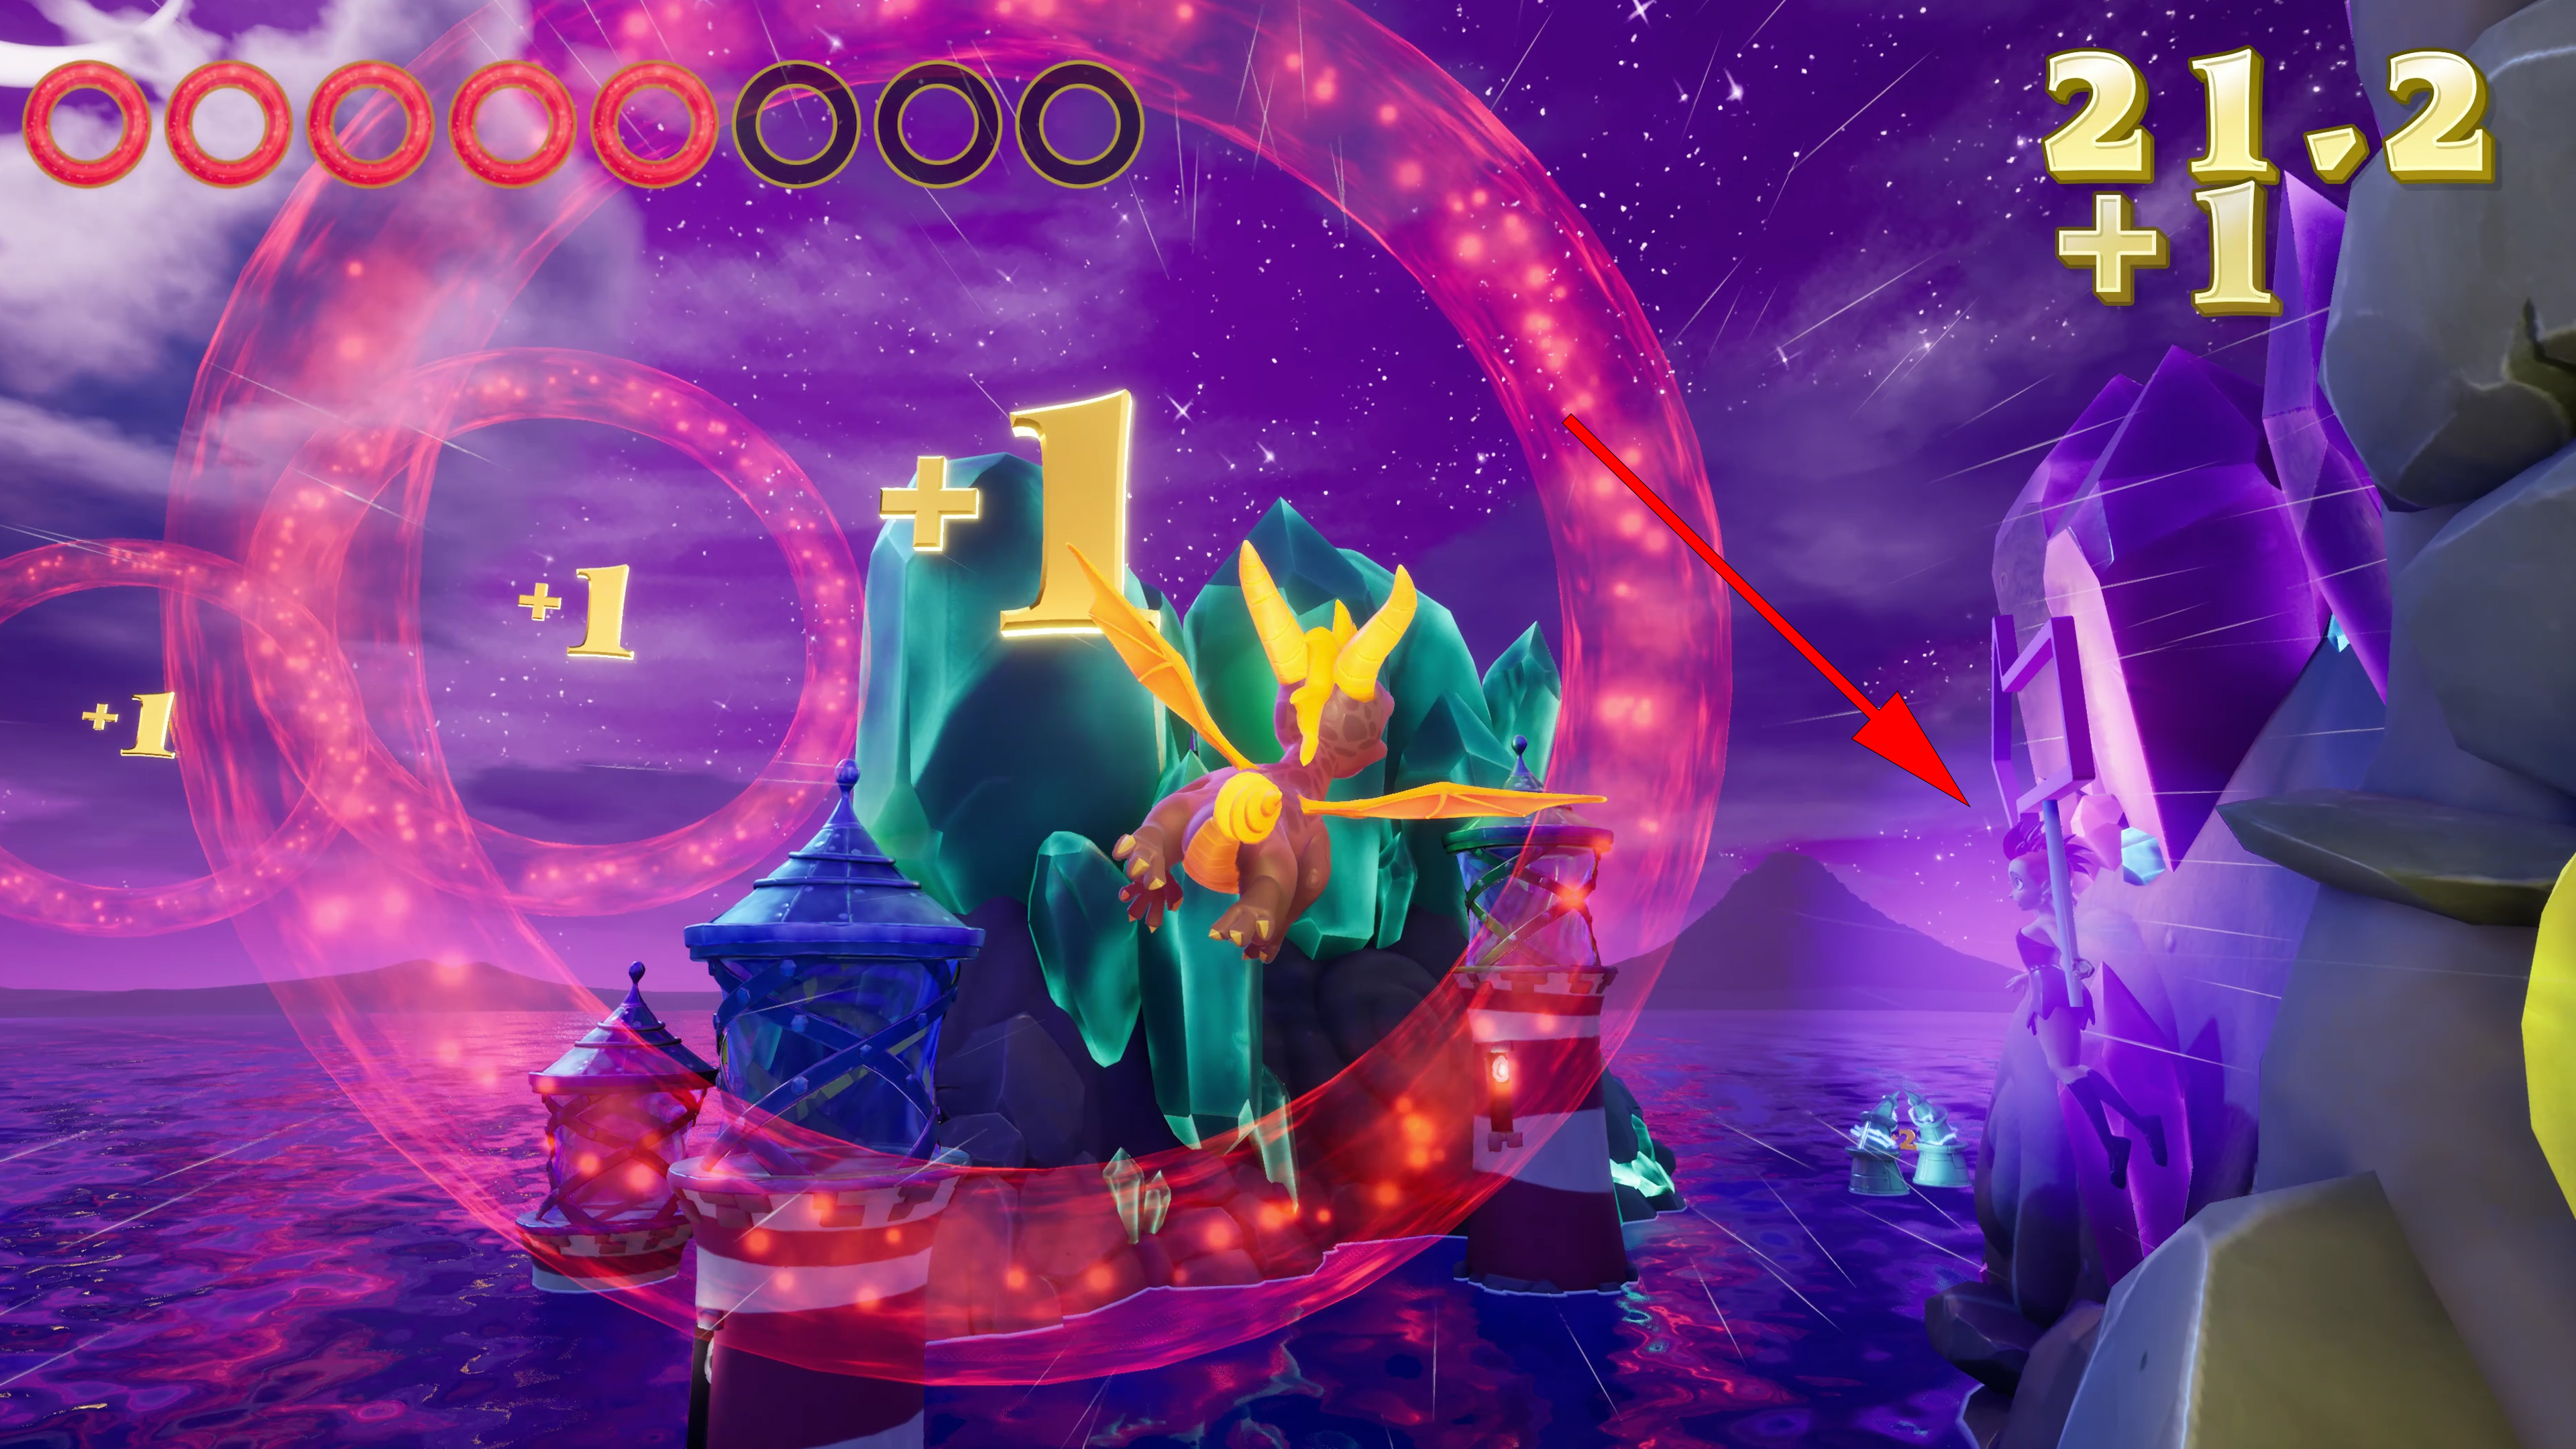
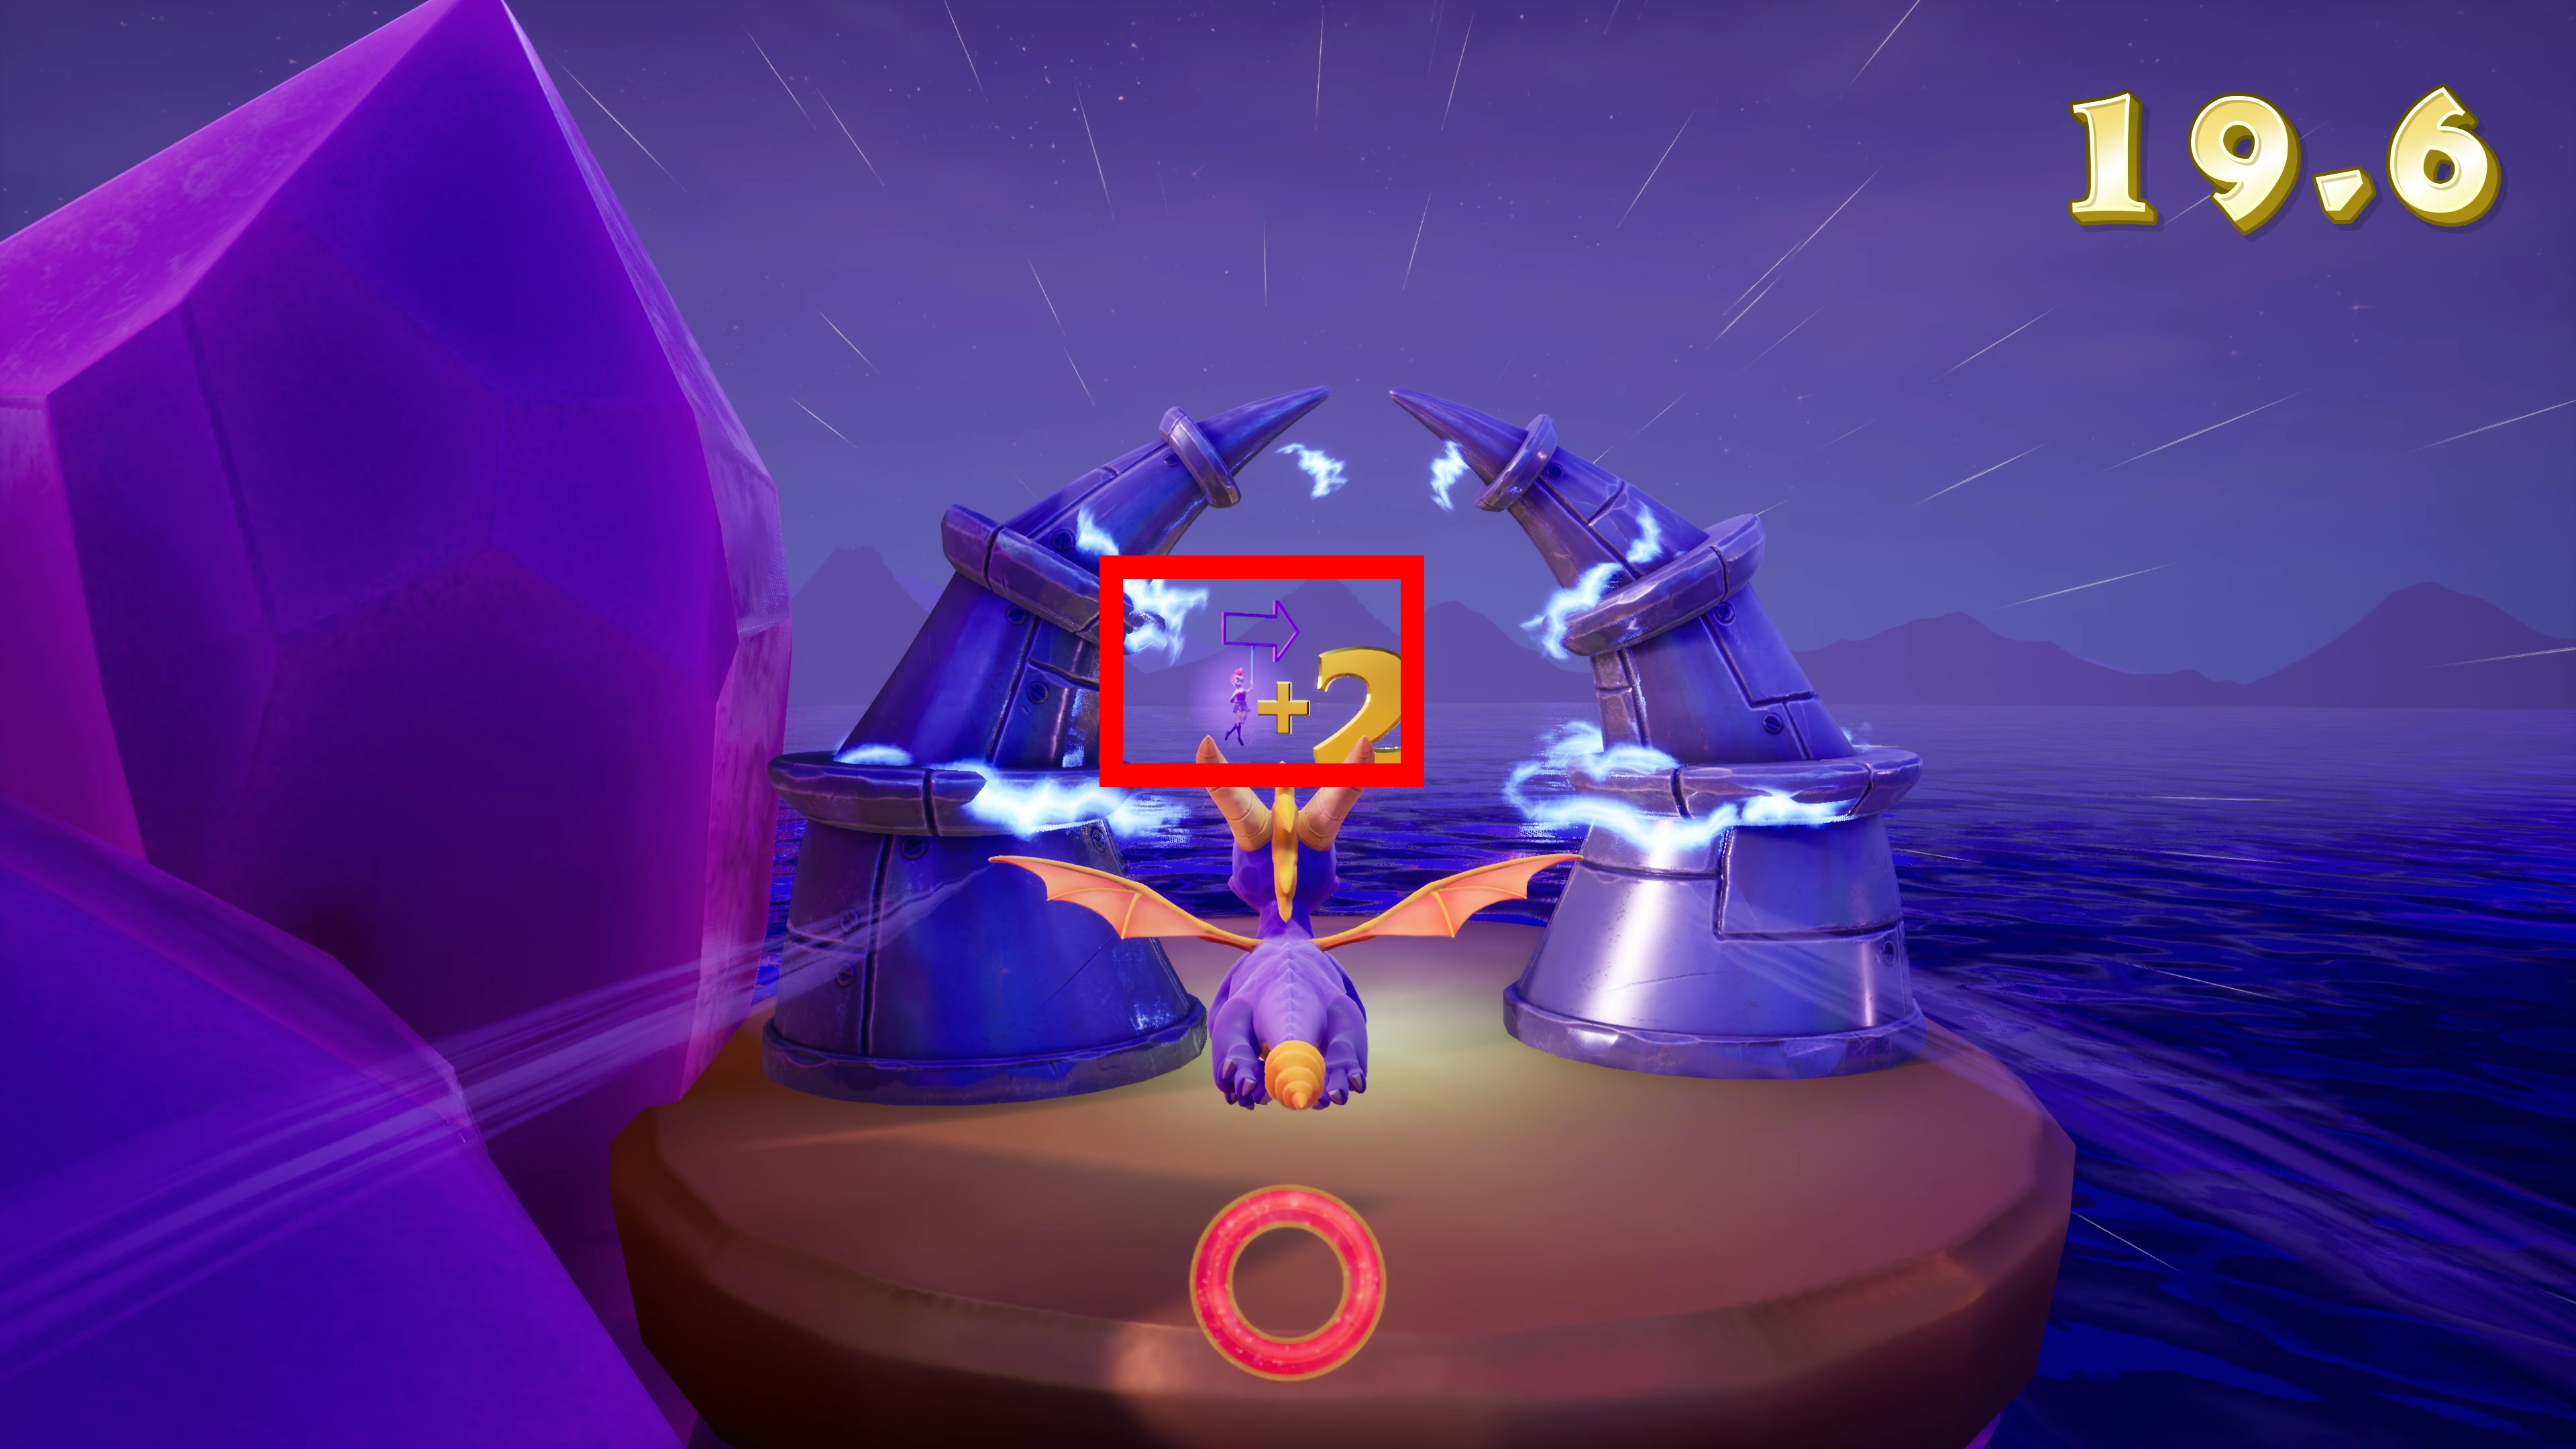
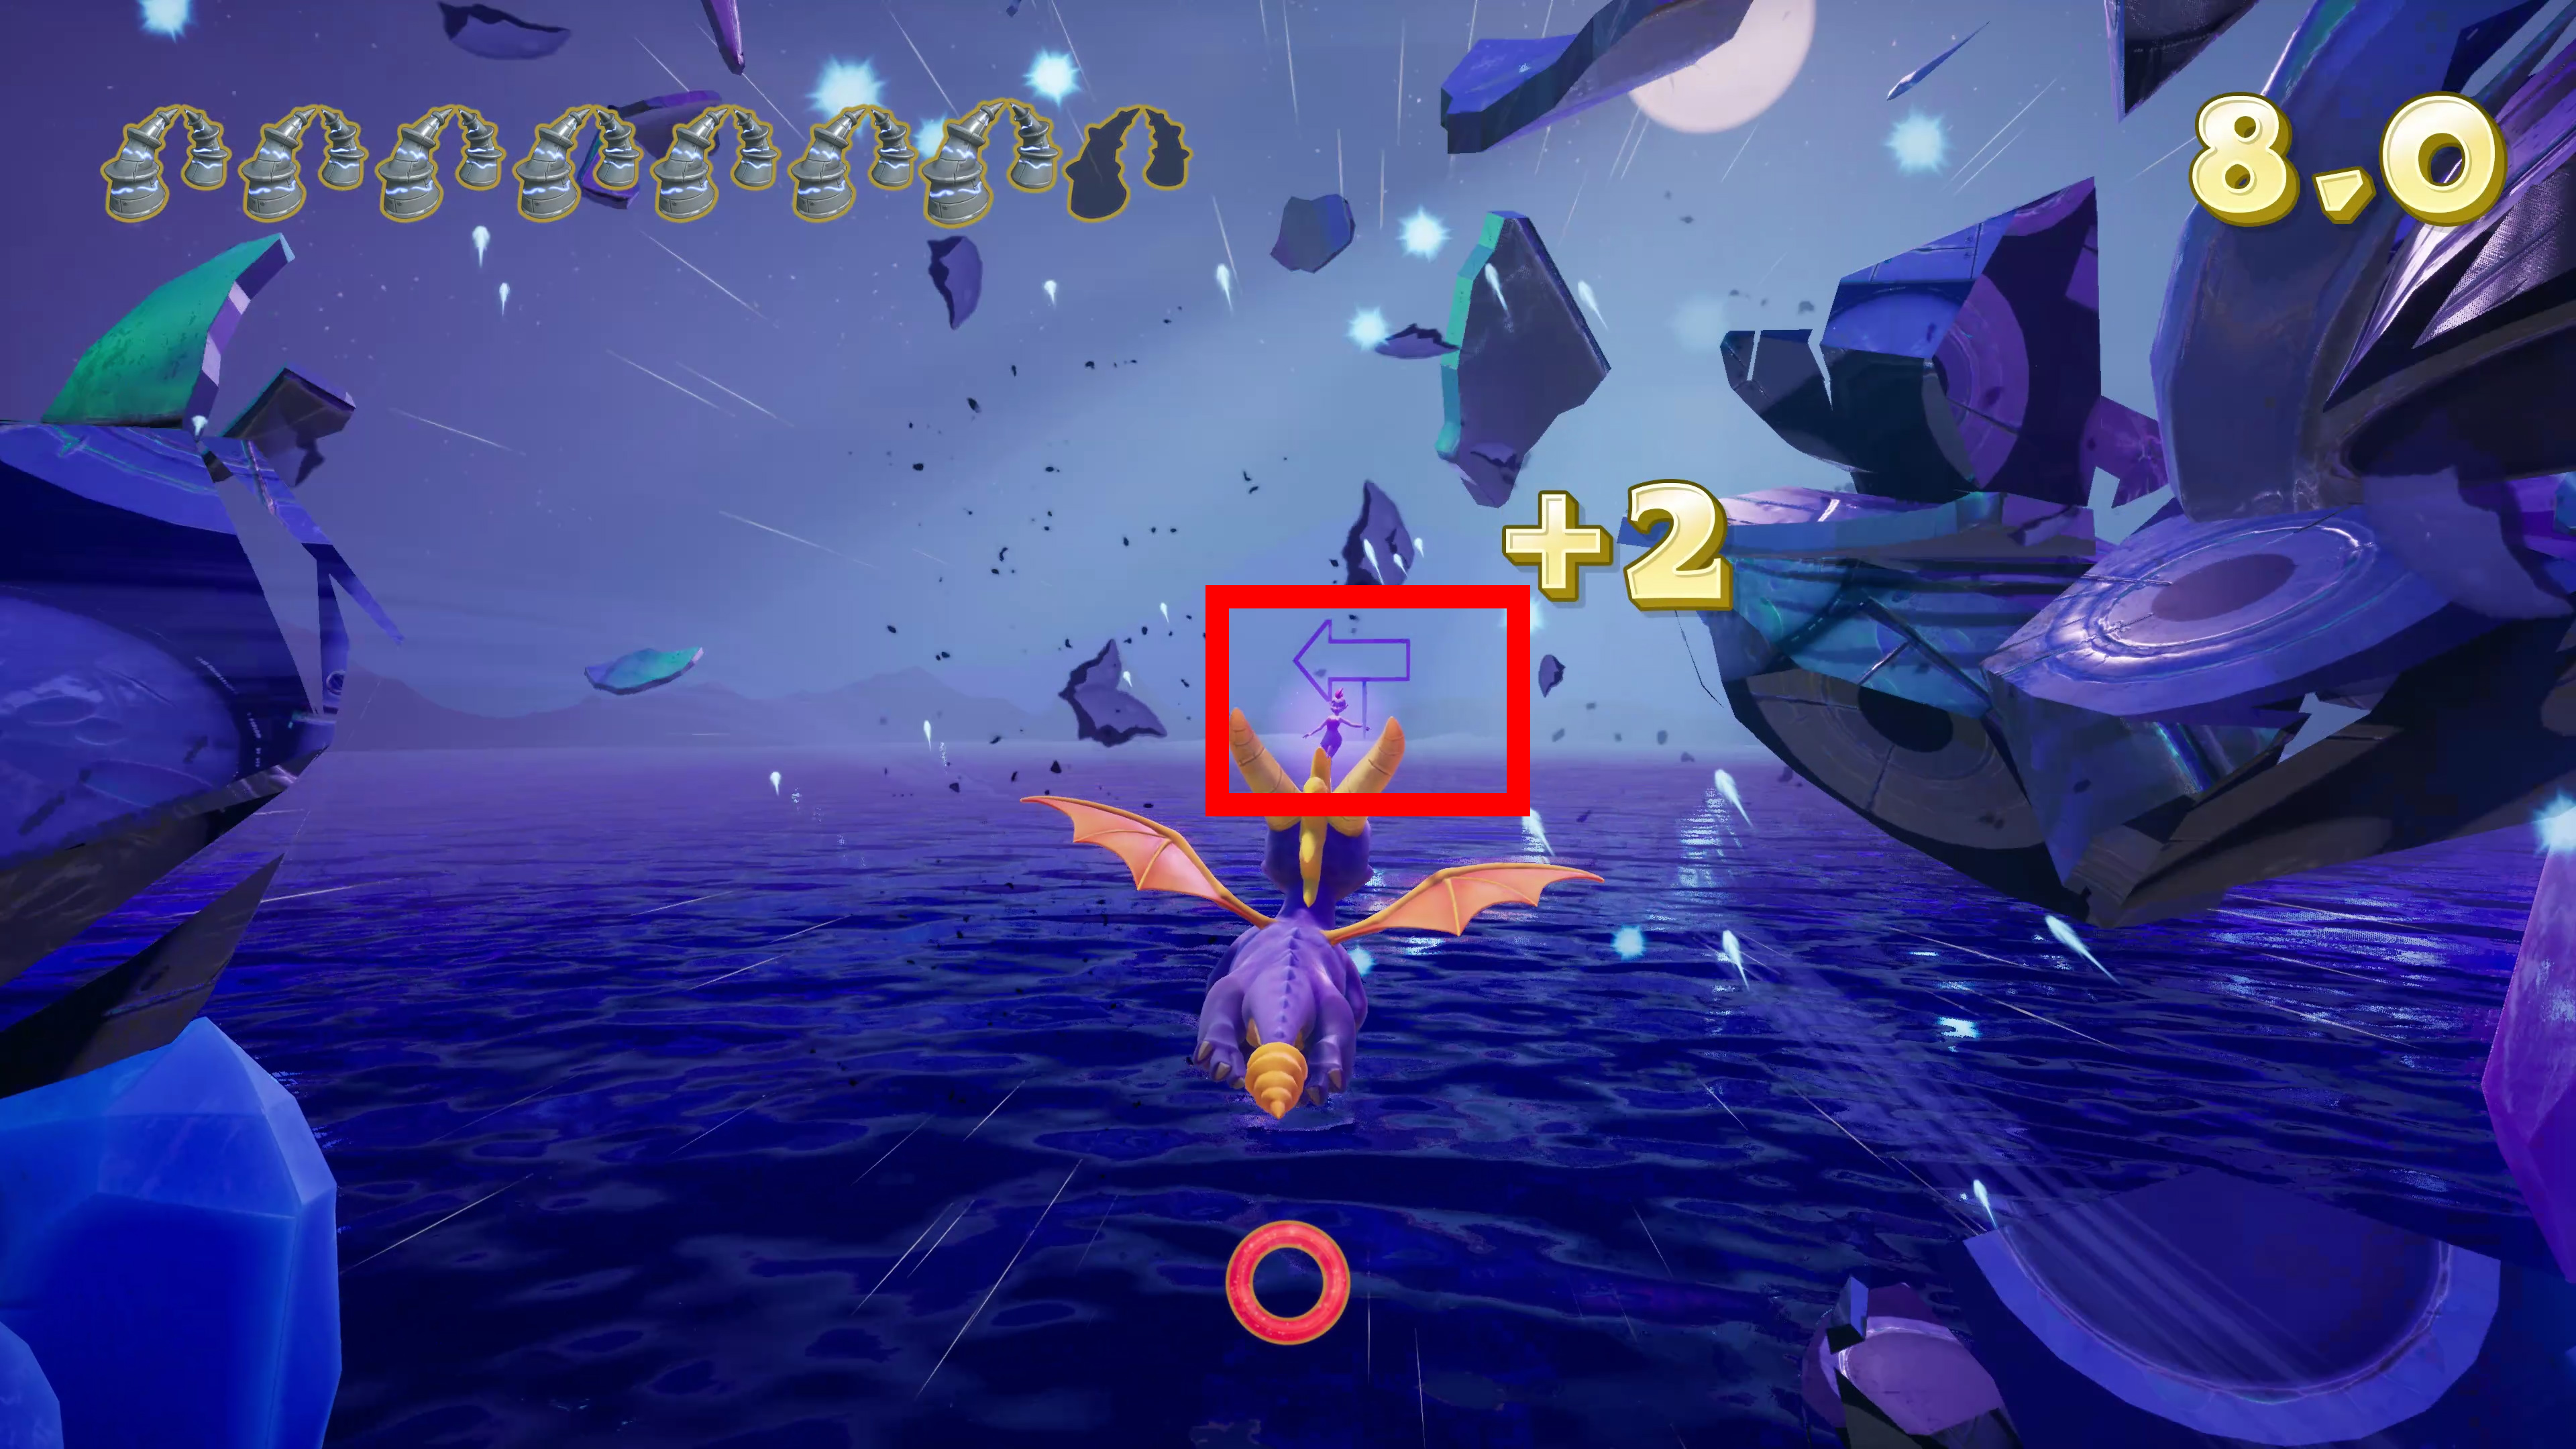
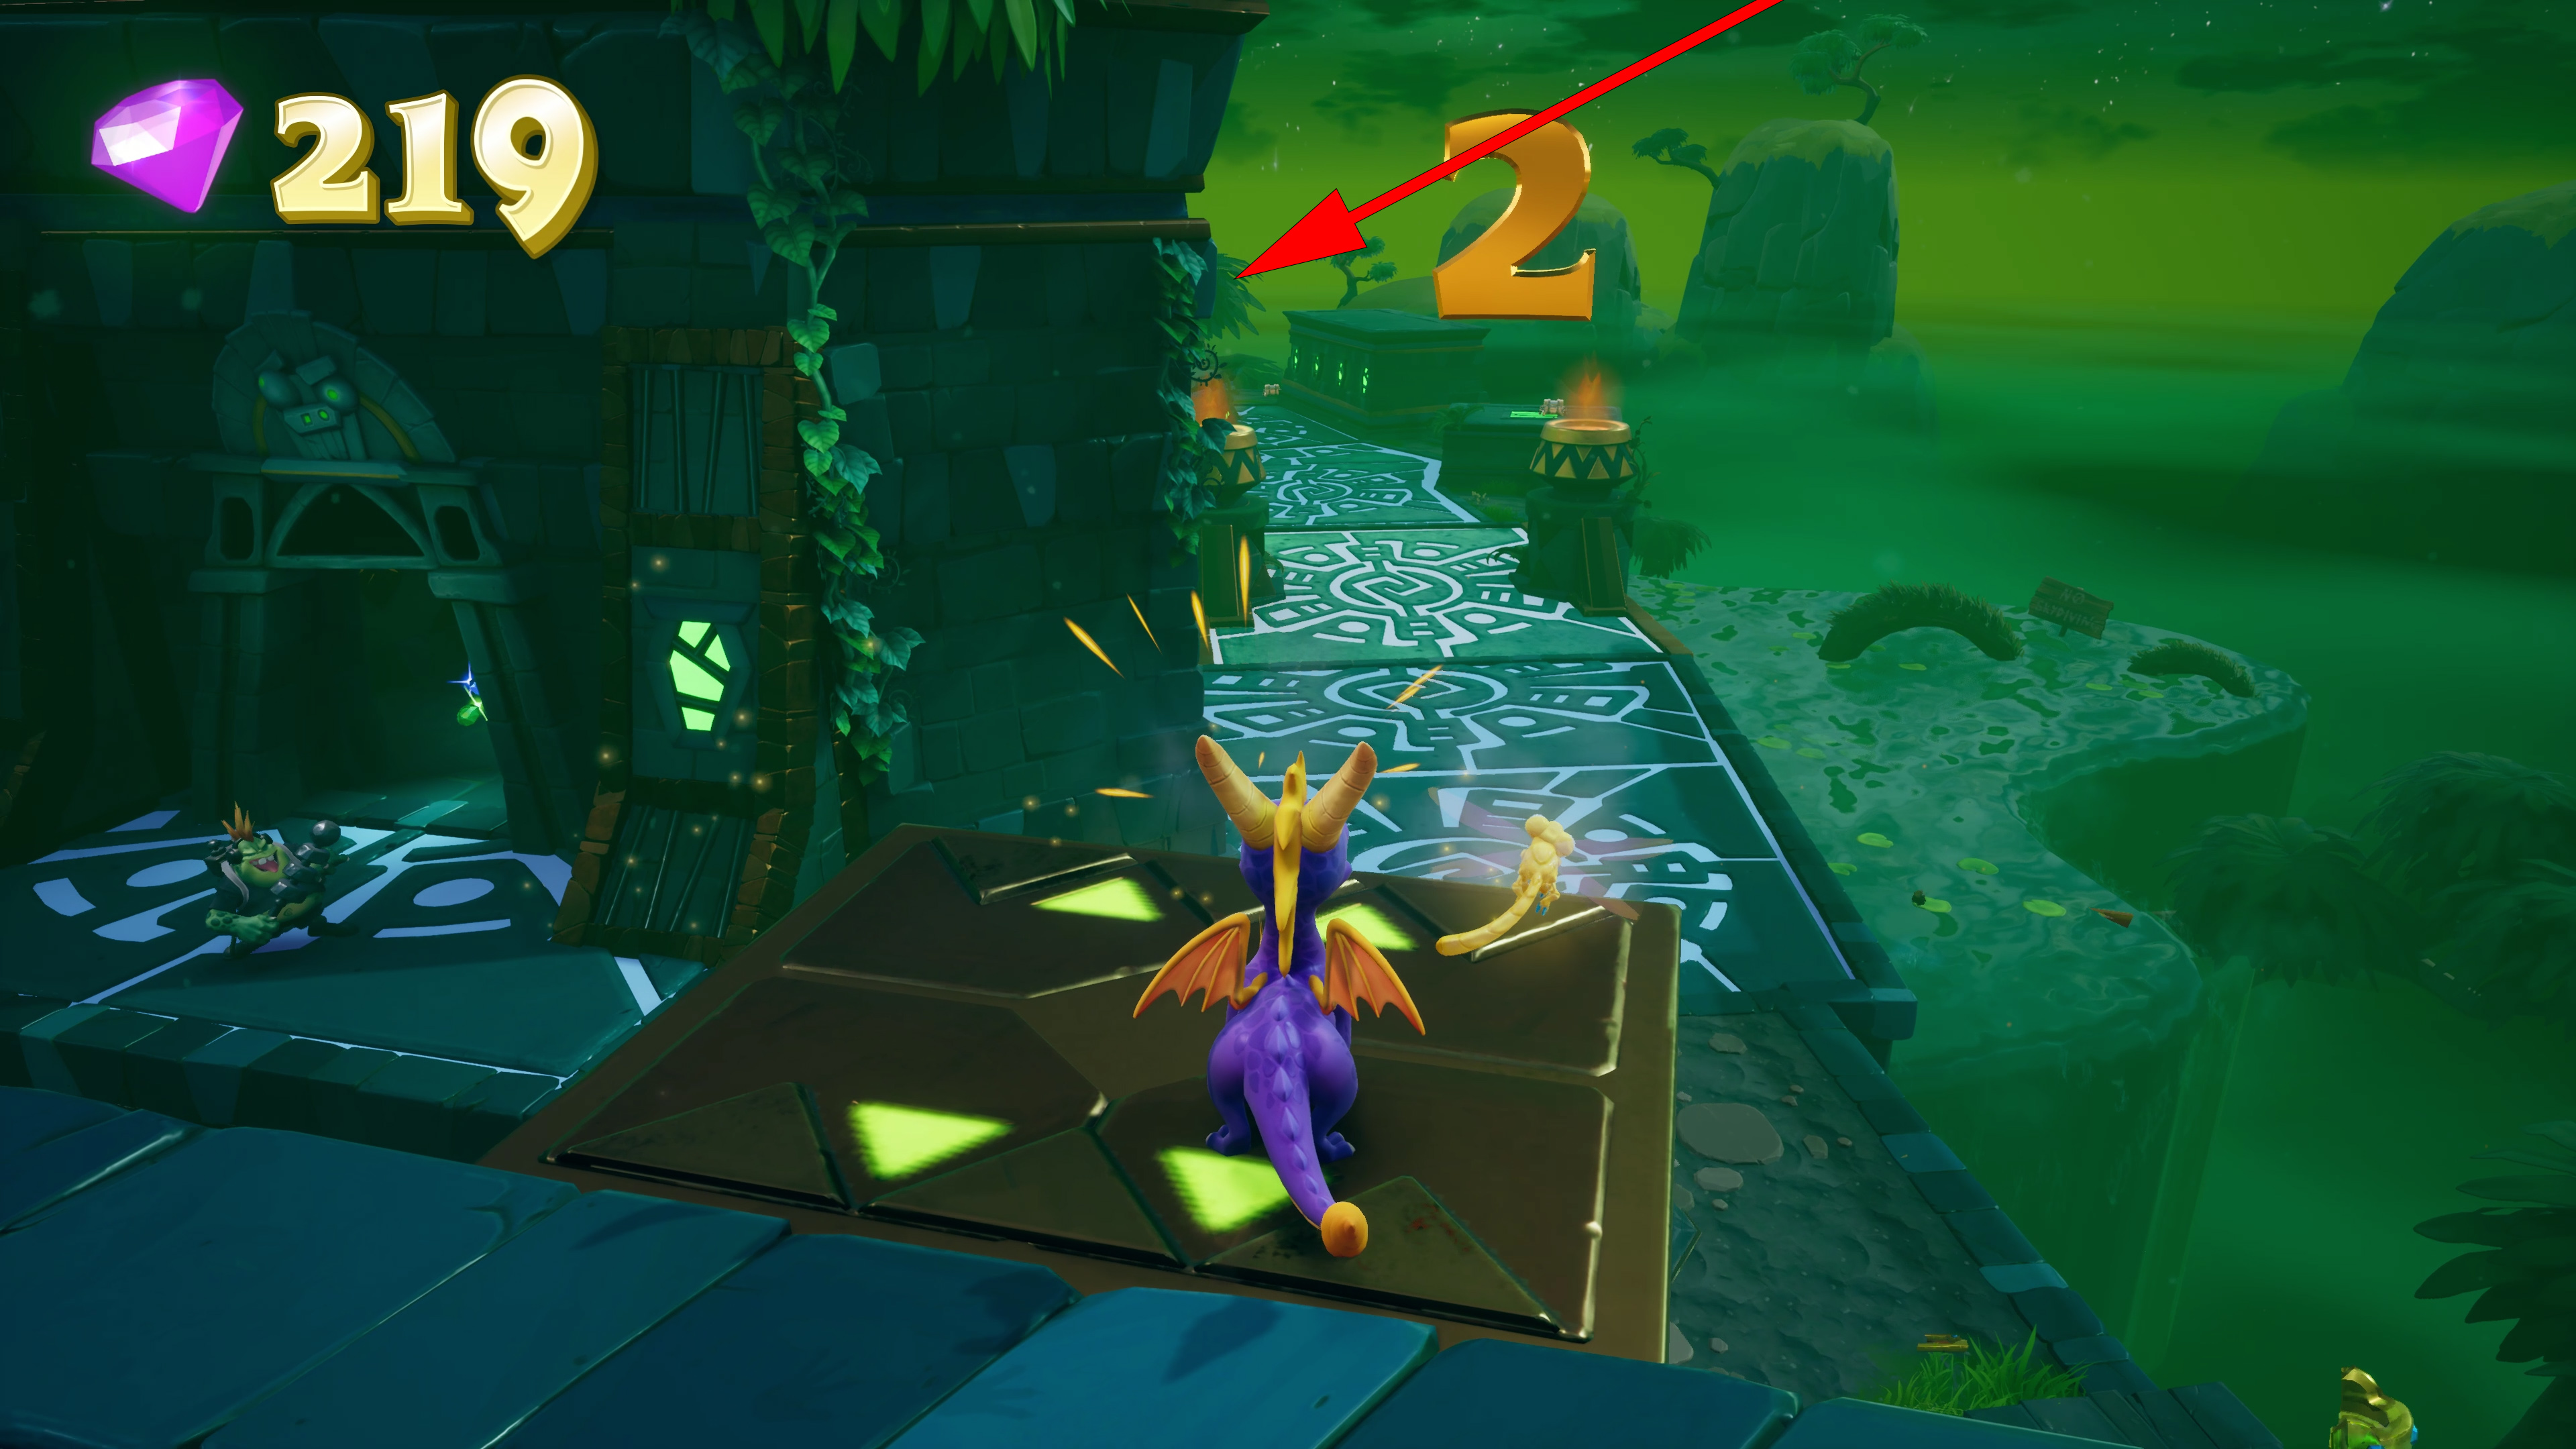
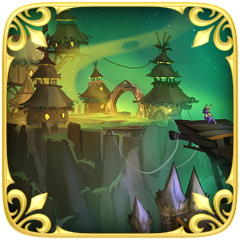
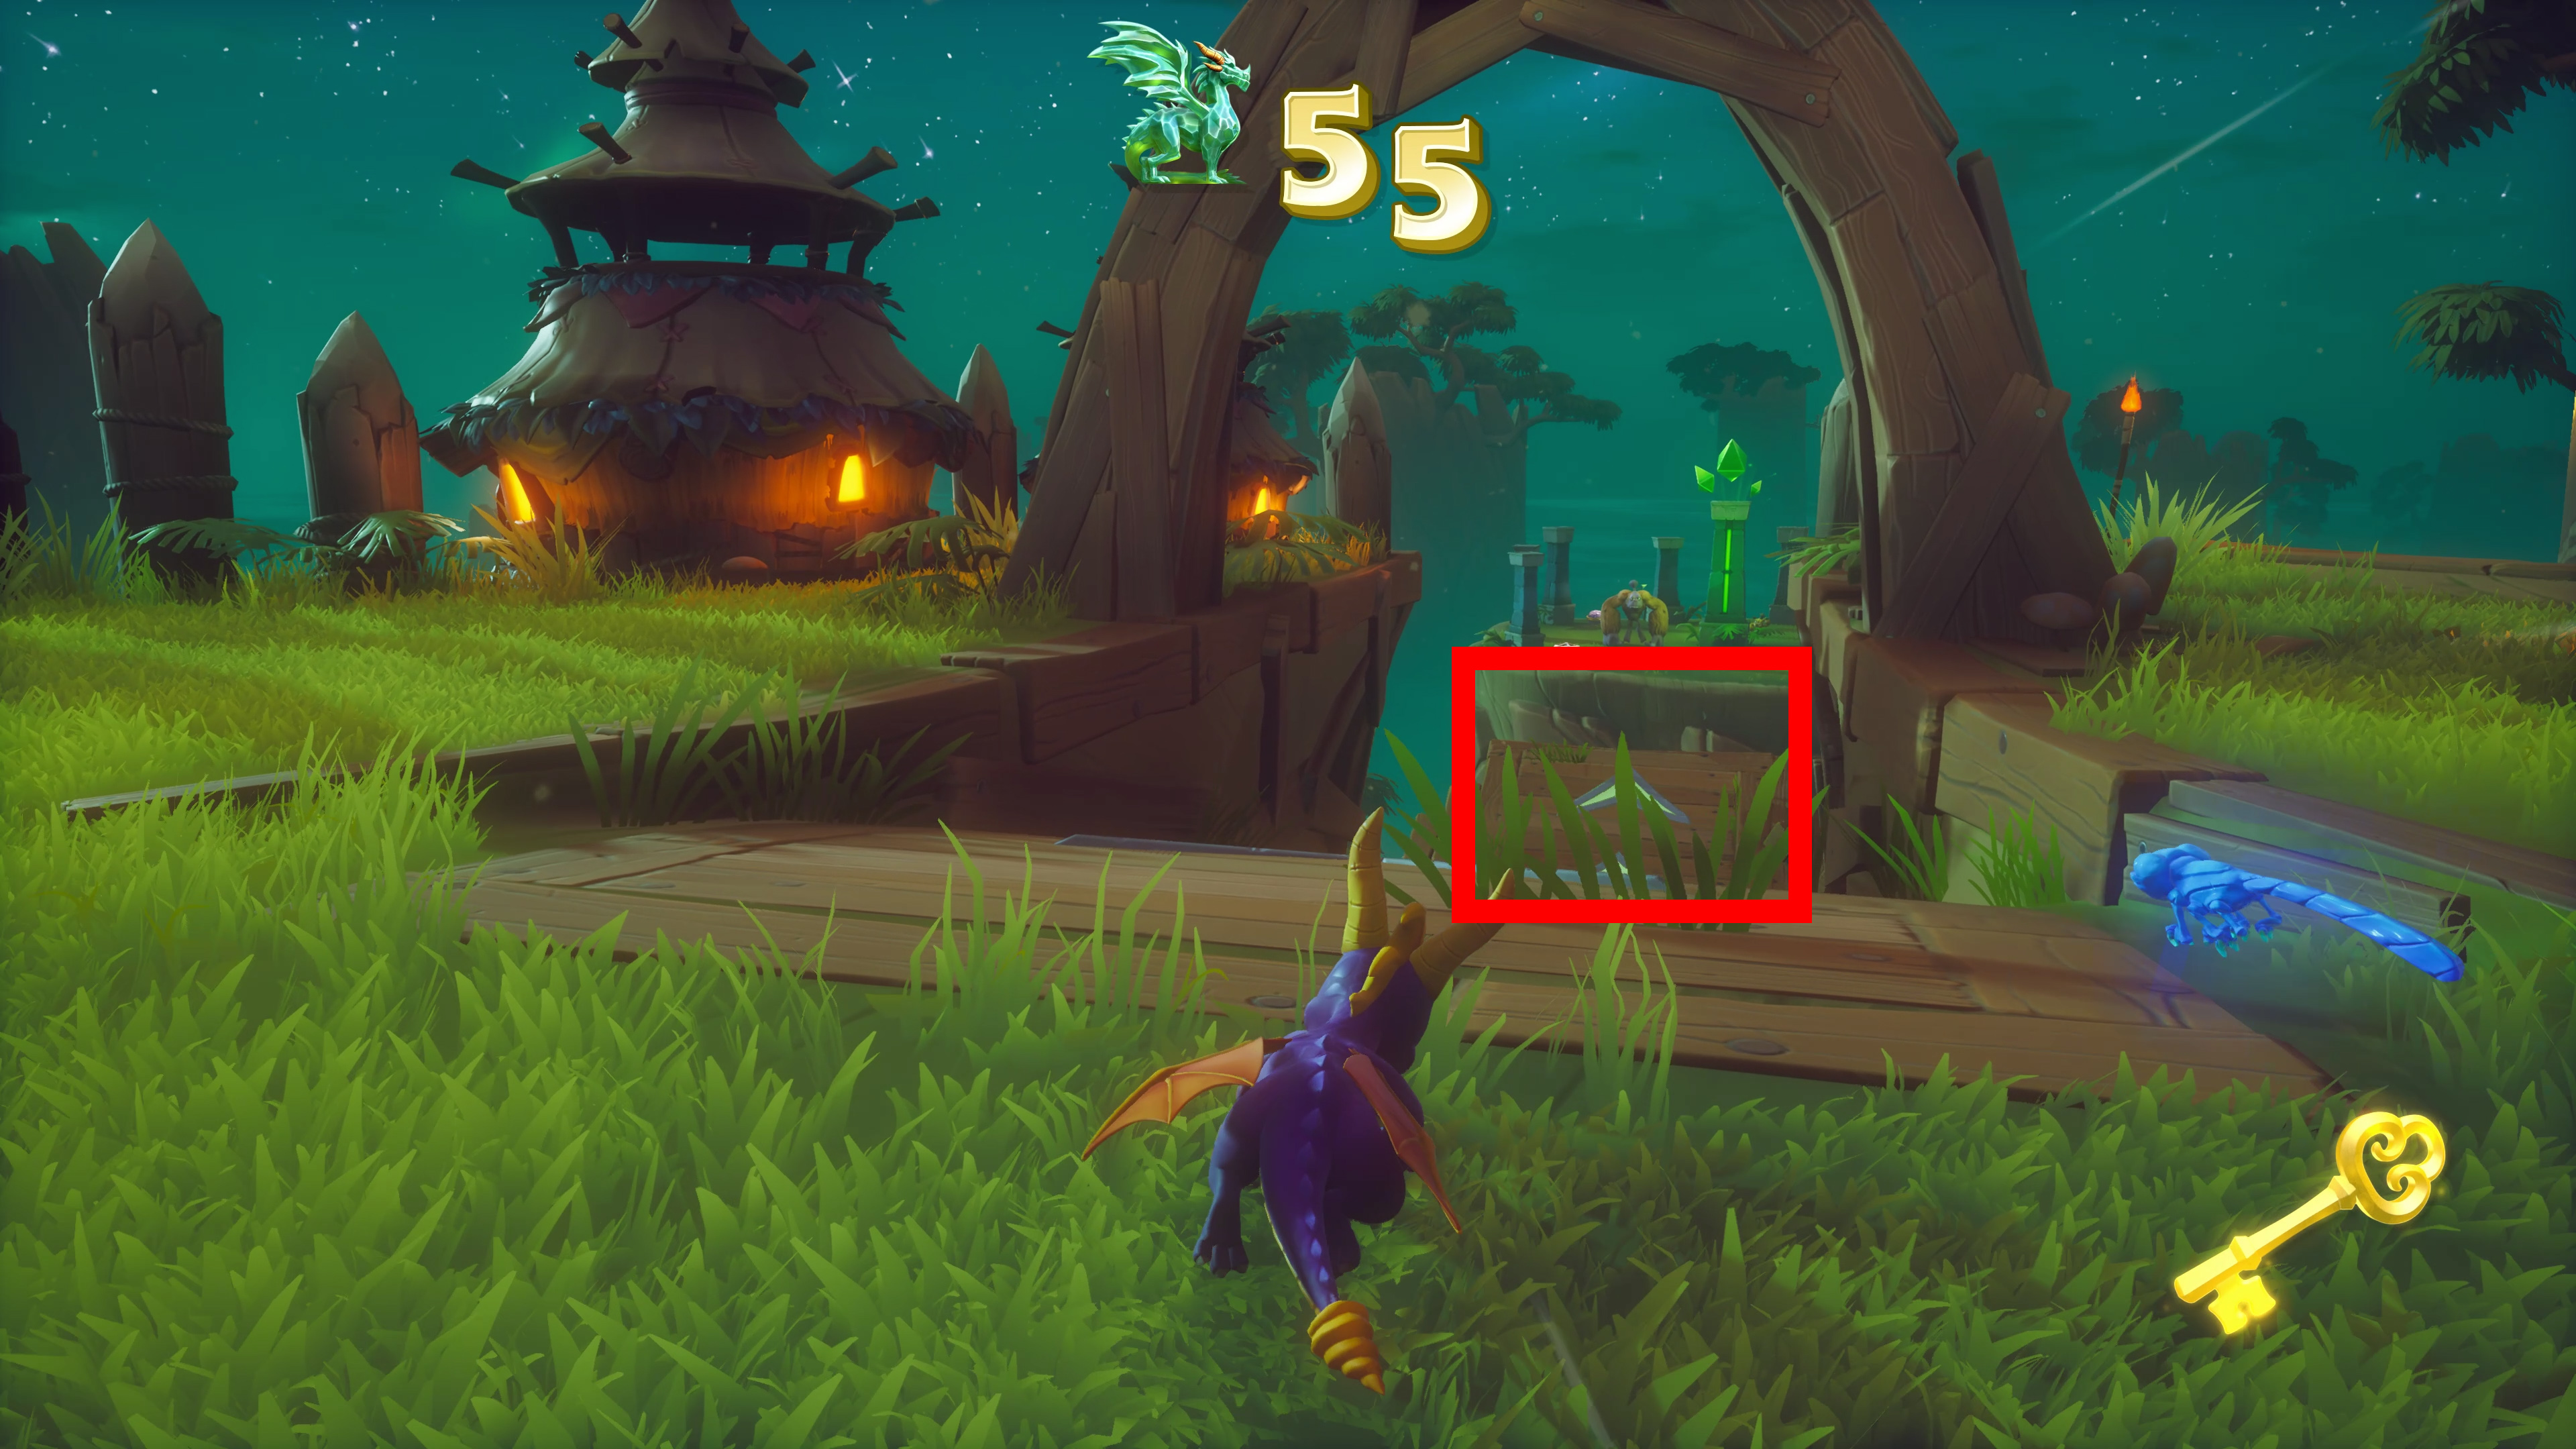
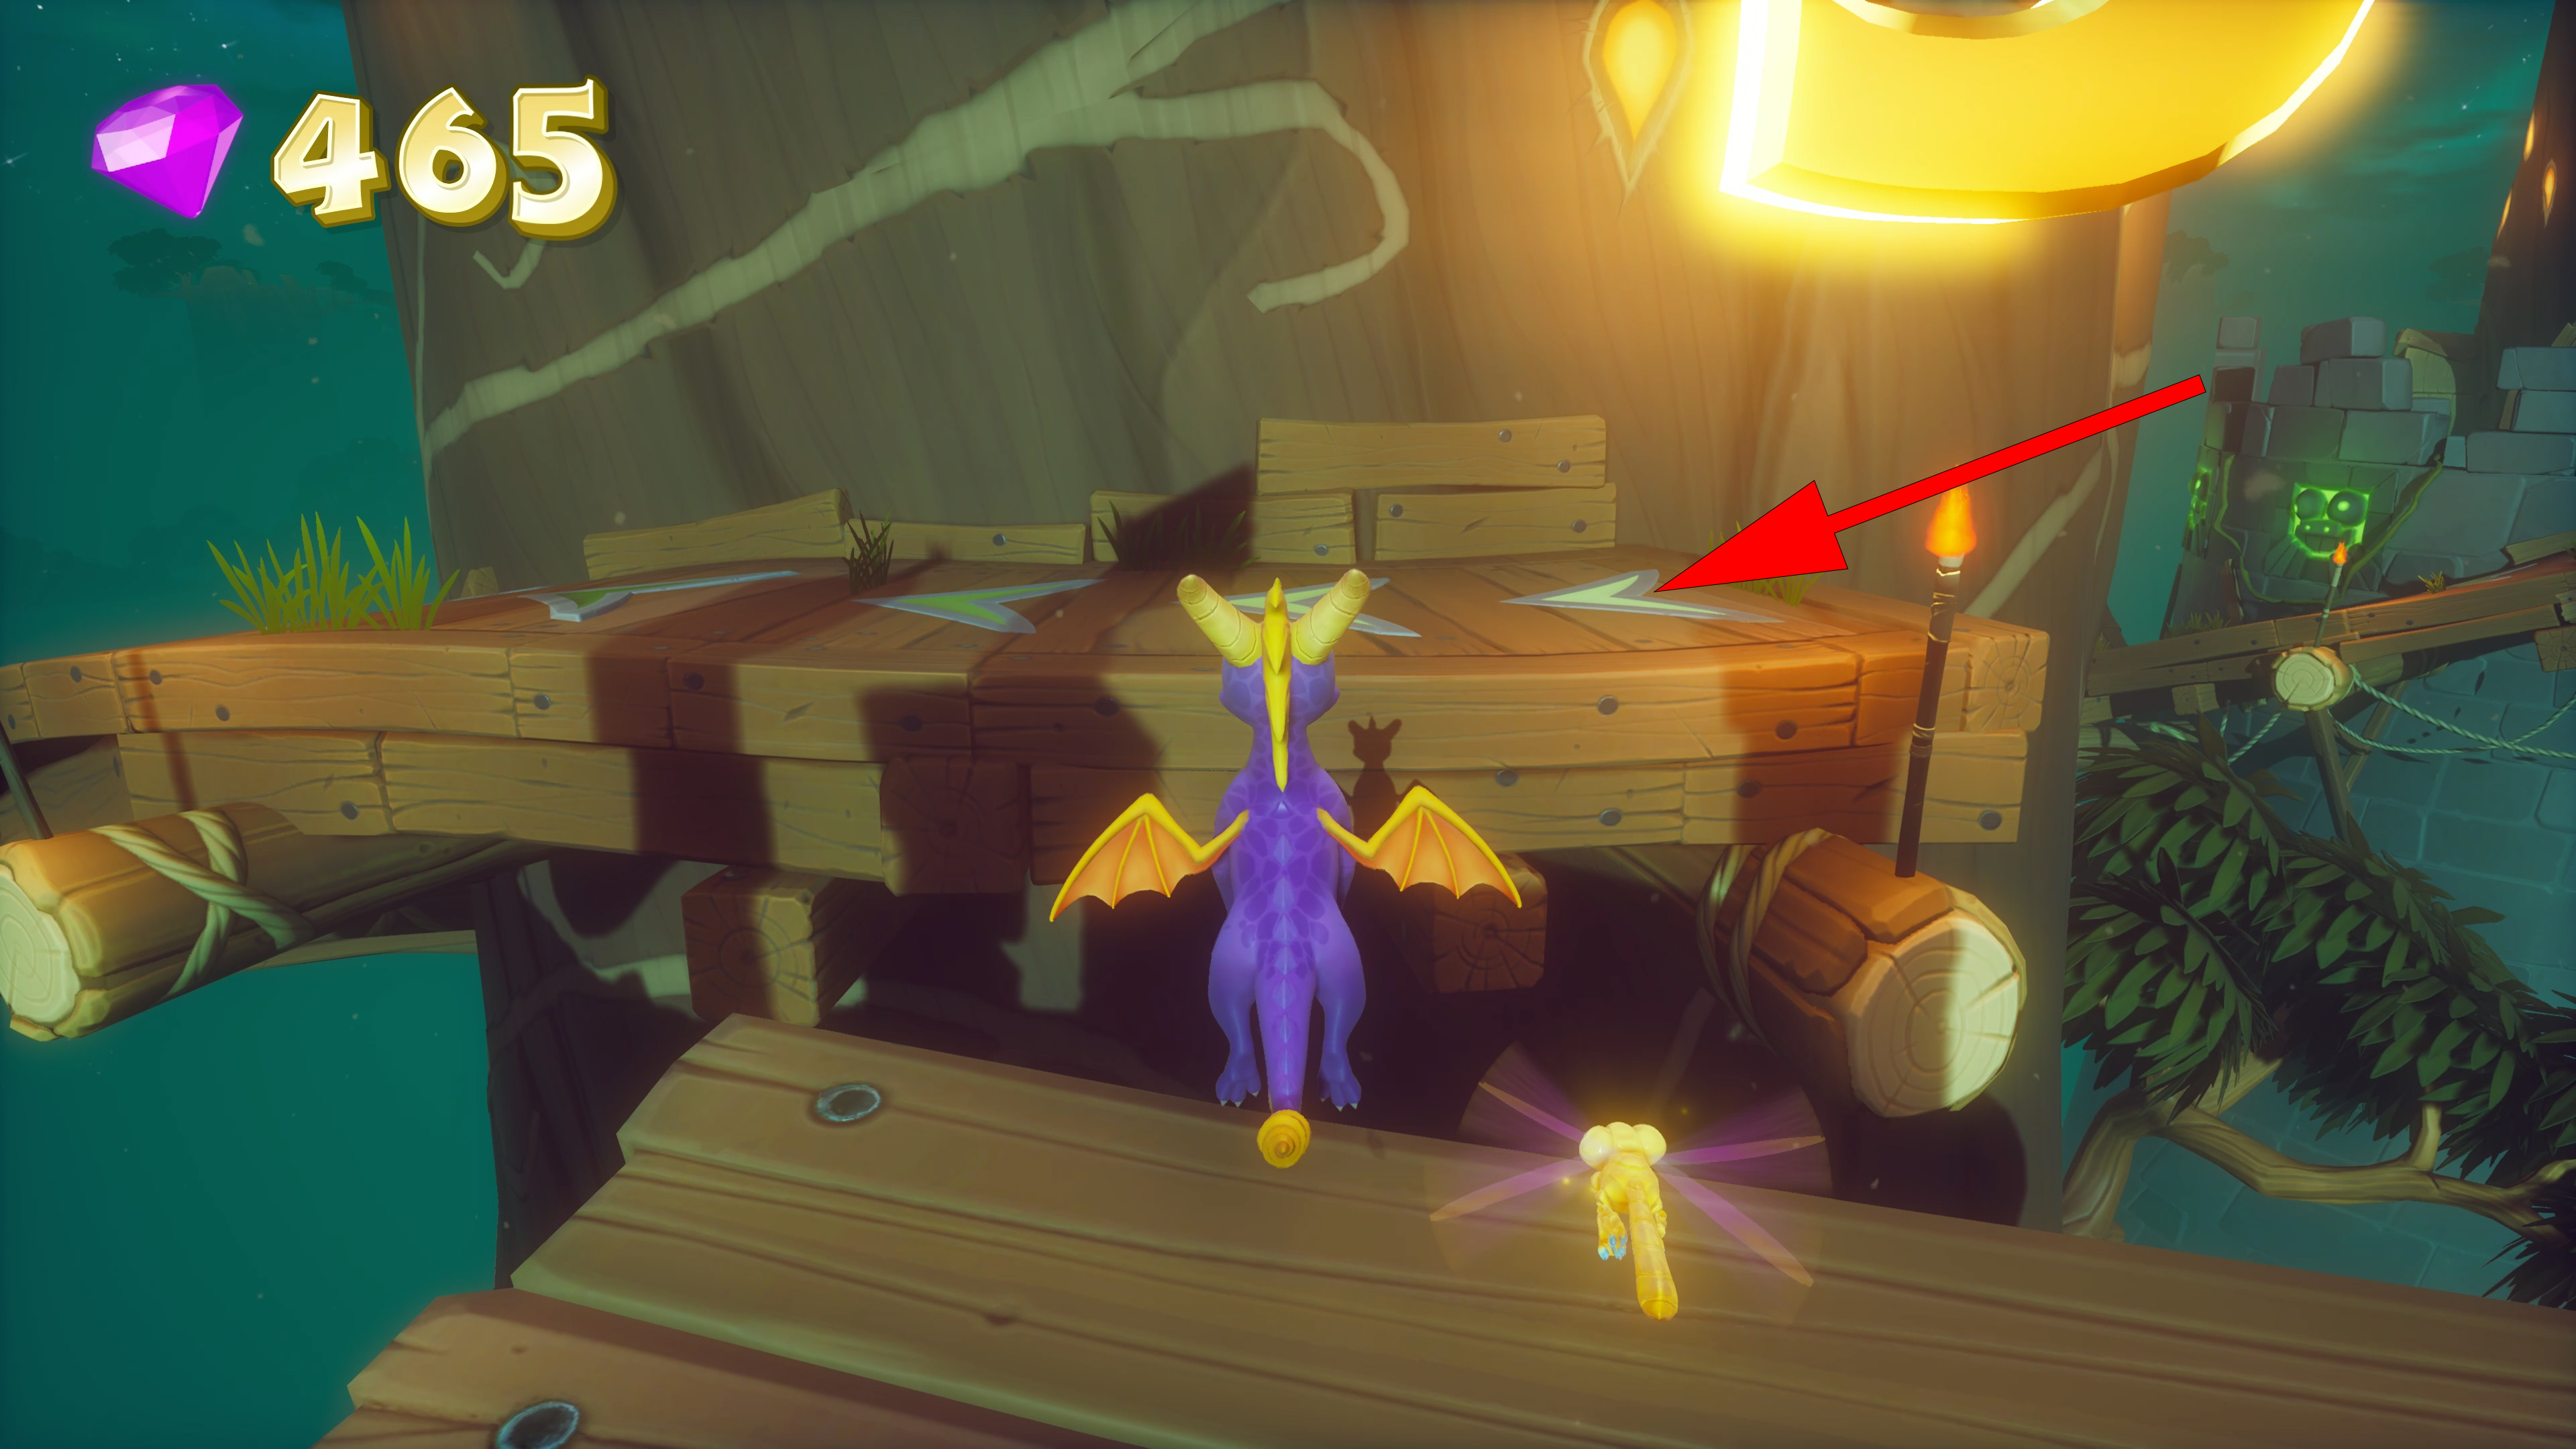
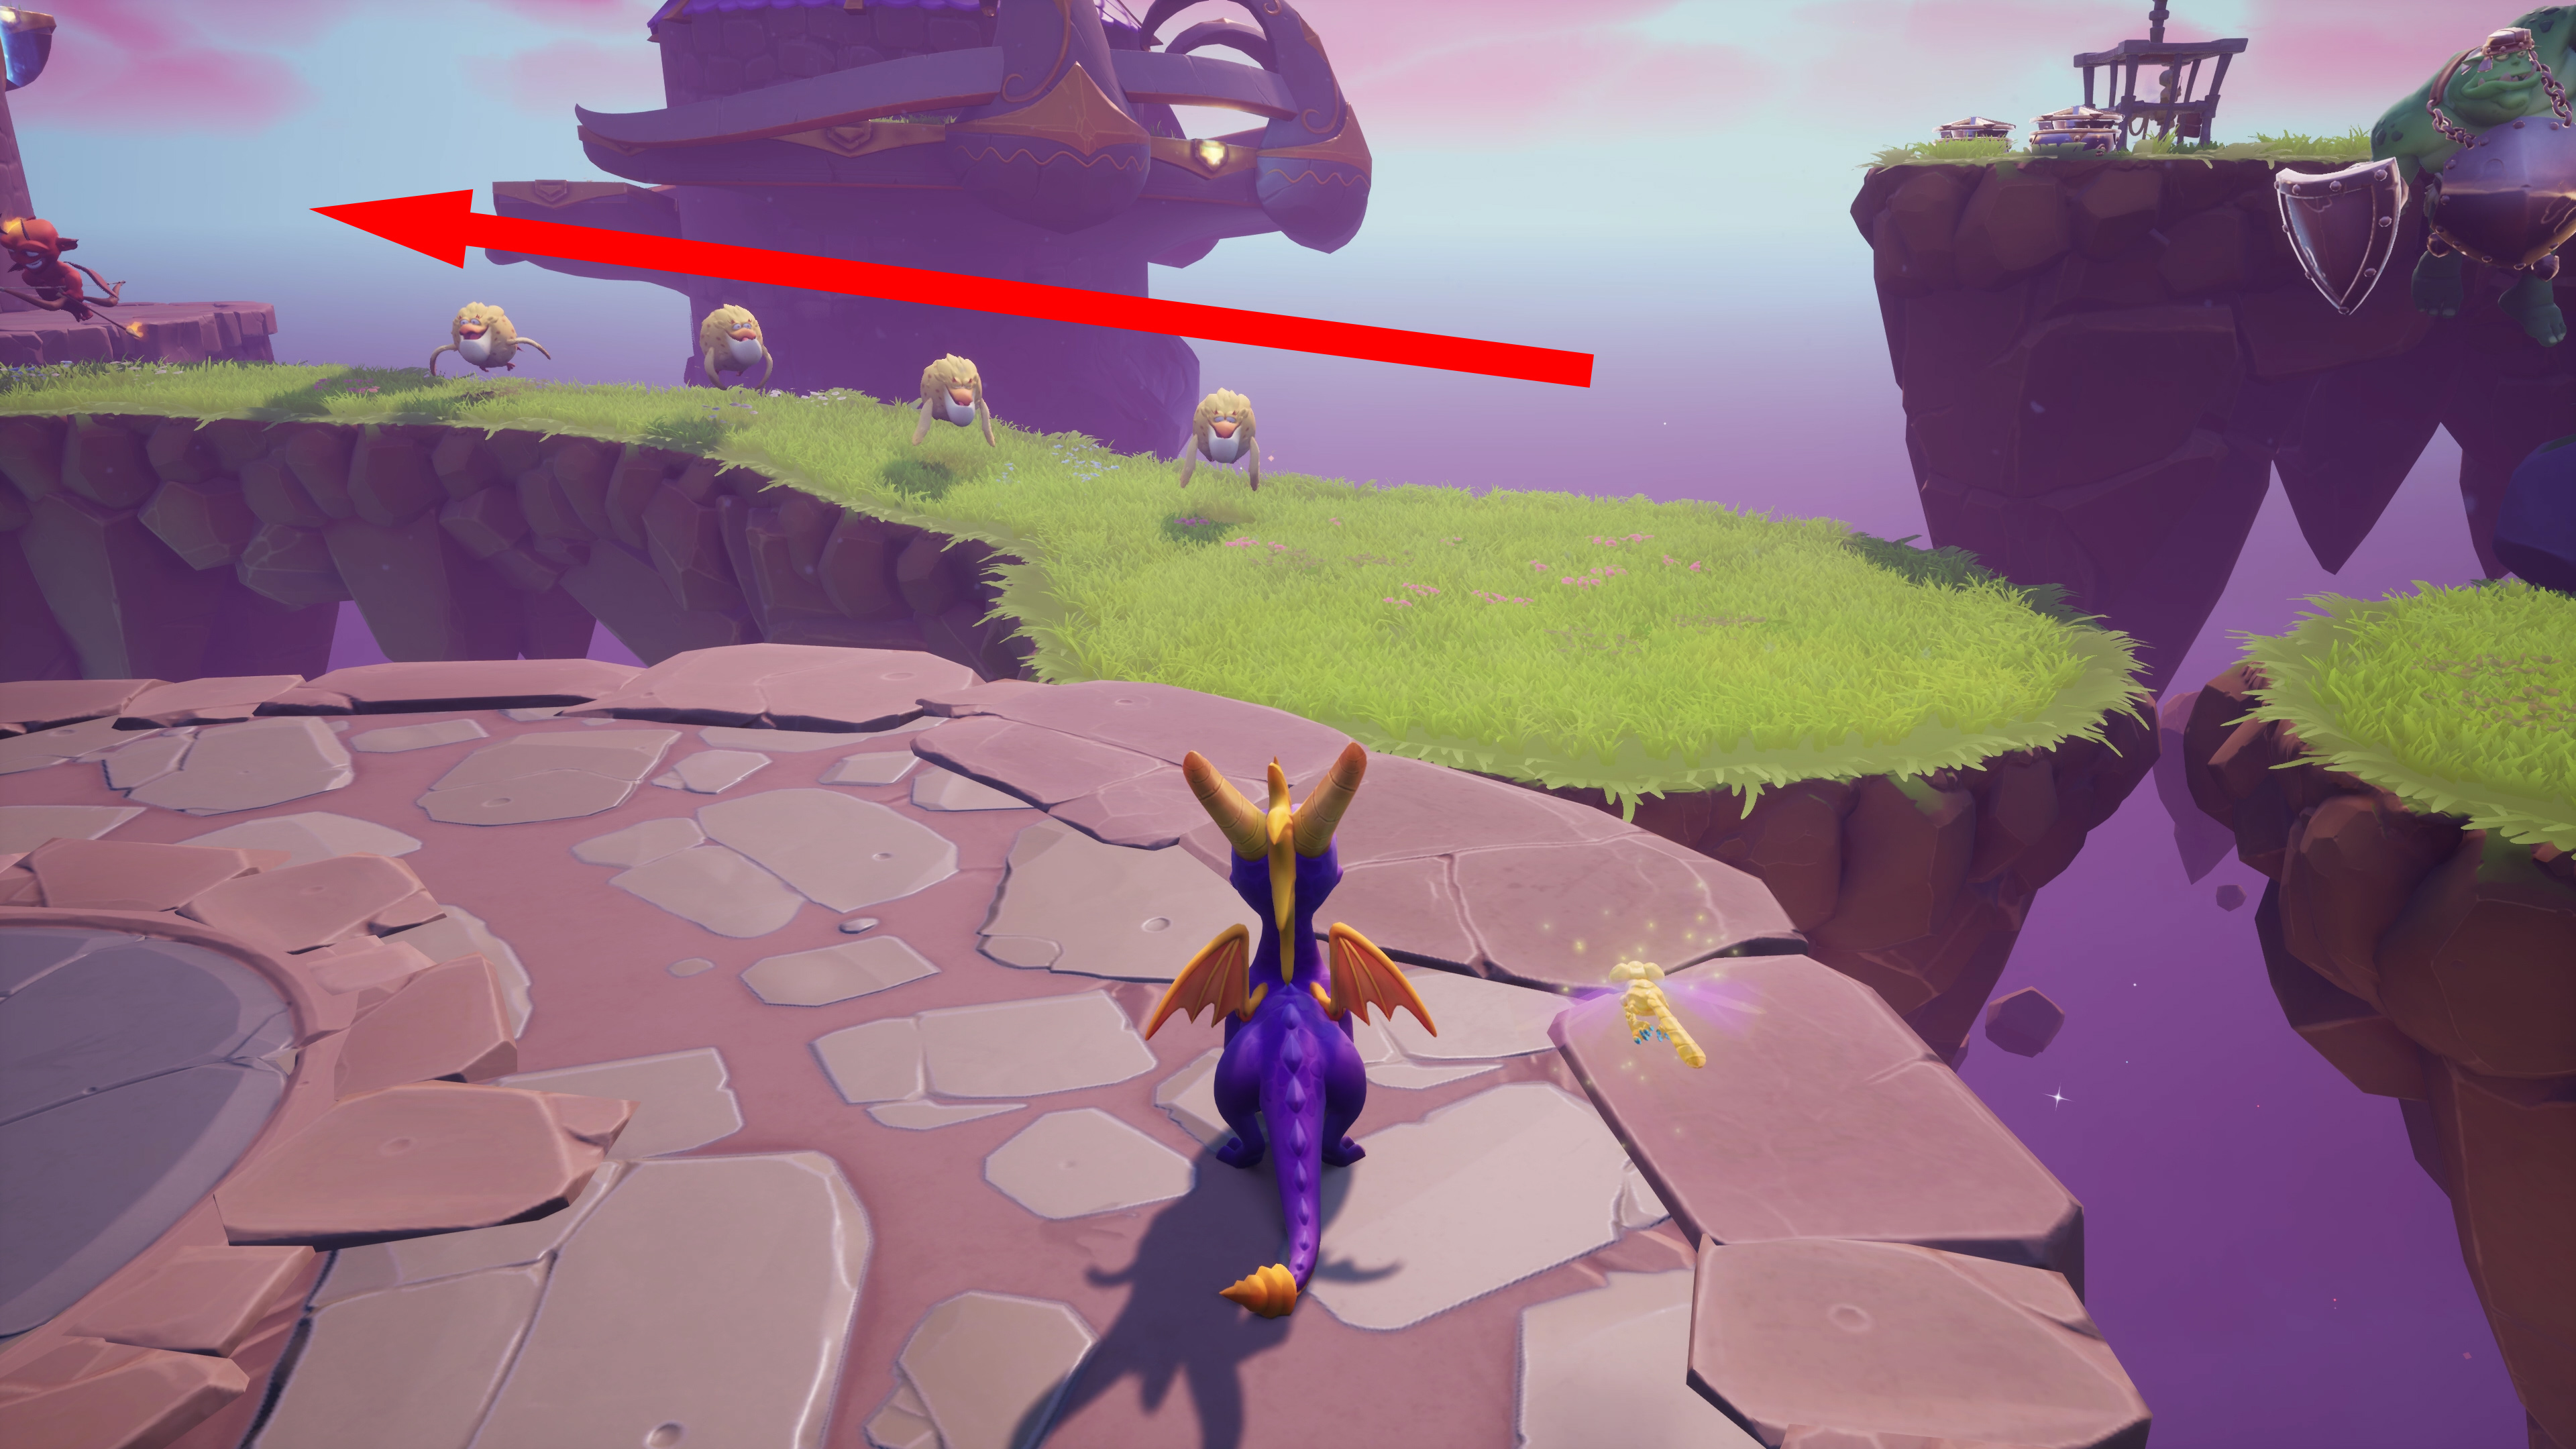
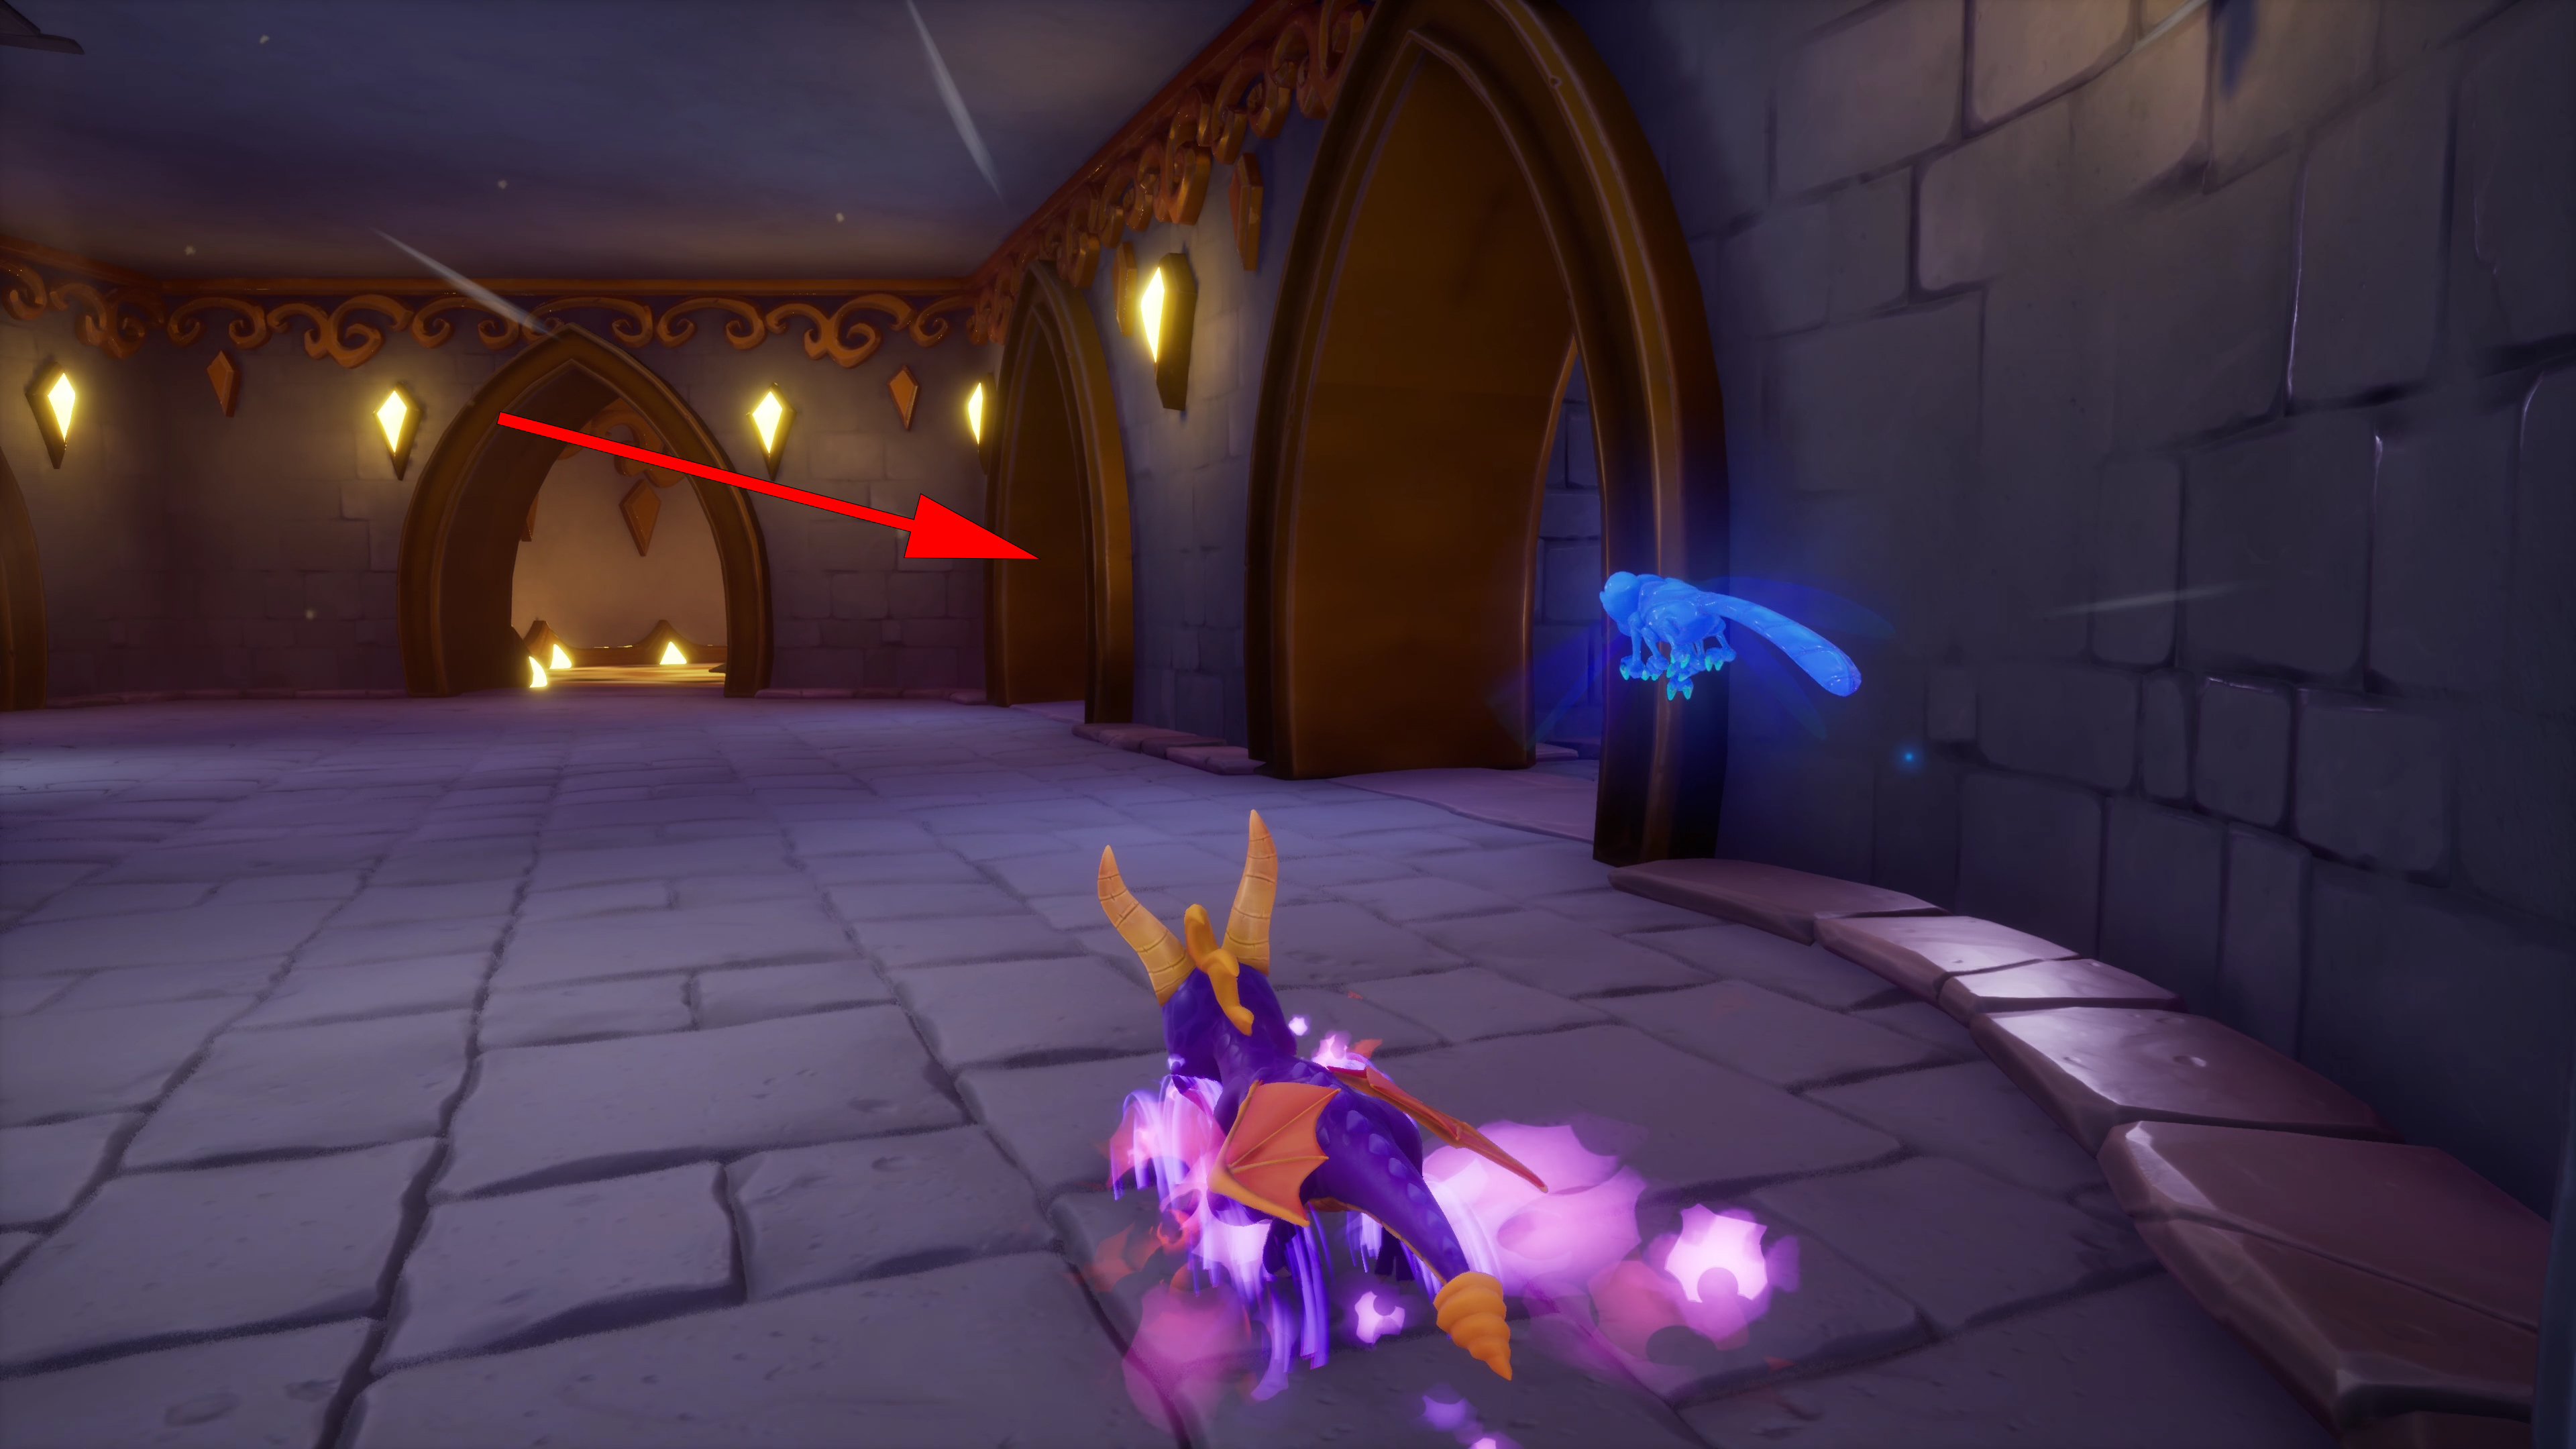
Cloud Spires: Glide for 5+ seconds (and land safely!)
You can get to this area after you have finished the level. From this spot glide towards the arrow, then turn right and after that keep gliding towards the entrance you entered the level from. Just before you are about to land, use hover.
You can also cheese this achievement by going into one of the Cloud Spire sublevels which has Superflight in it. Instead of doing the challenge, fly as high as you can and wait for Superflight to expire. From there glide until you are close to the ground and use hover to get that 5 second airtime.


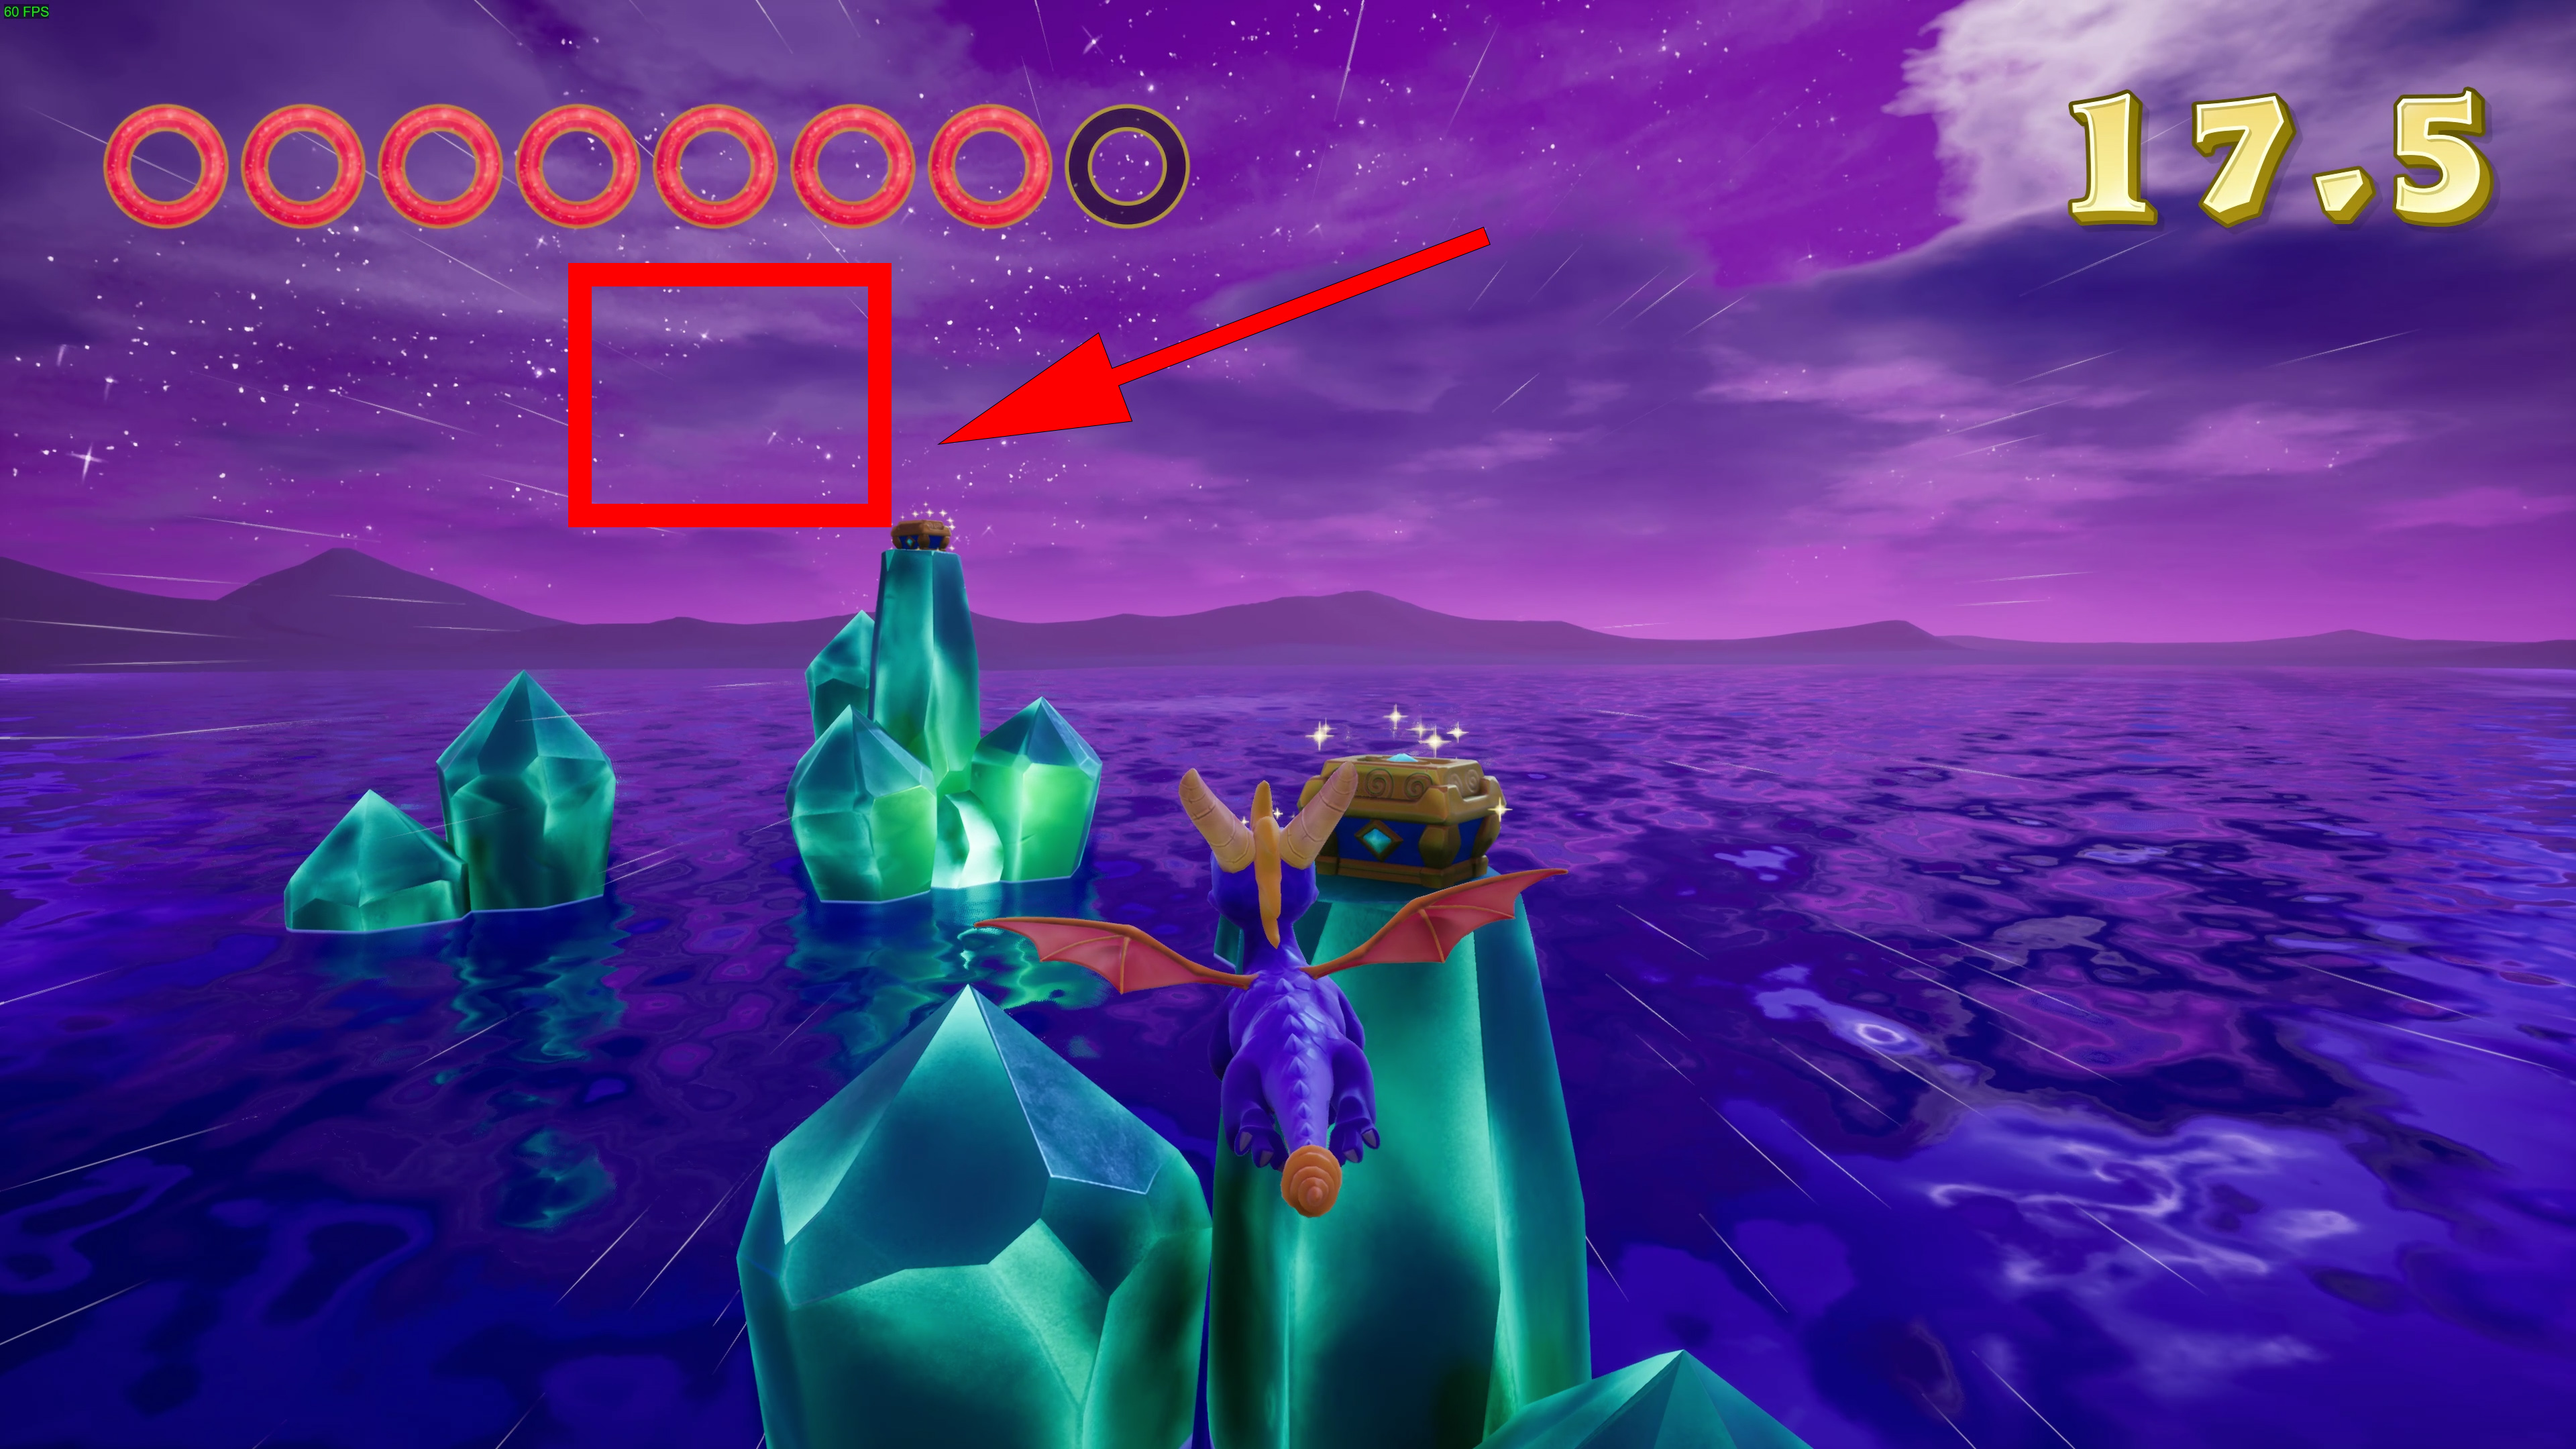
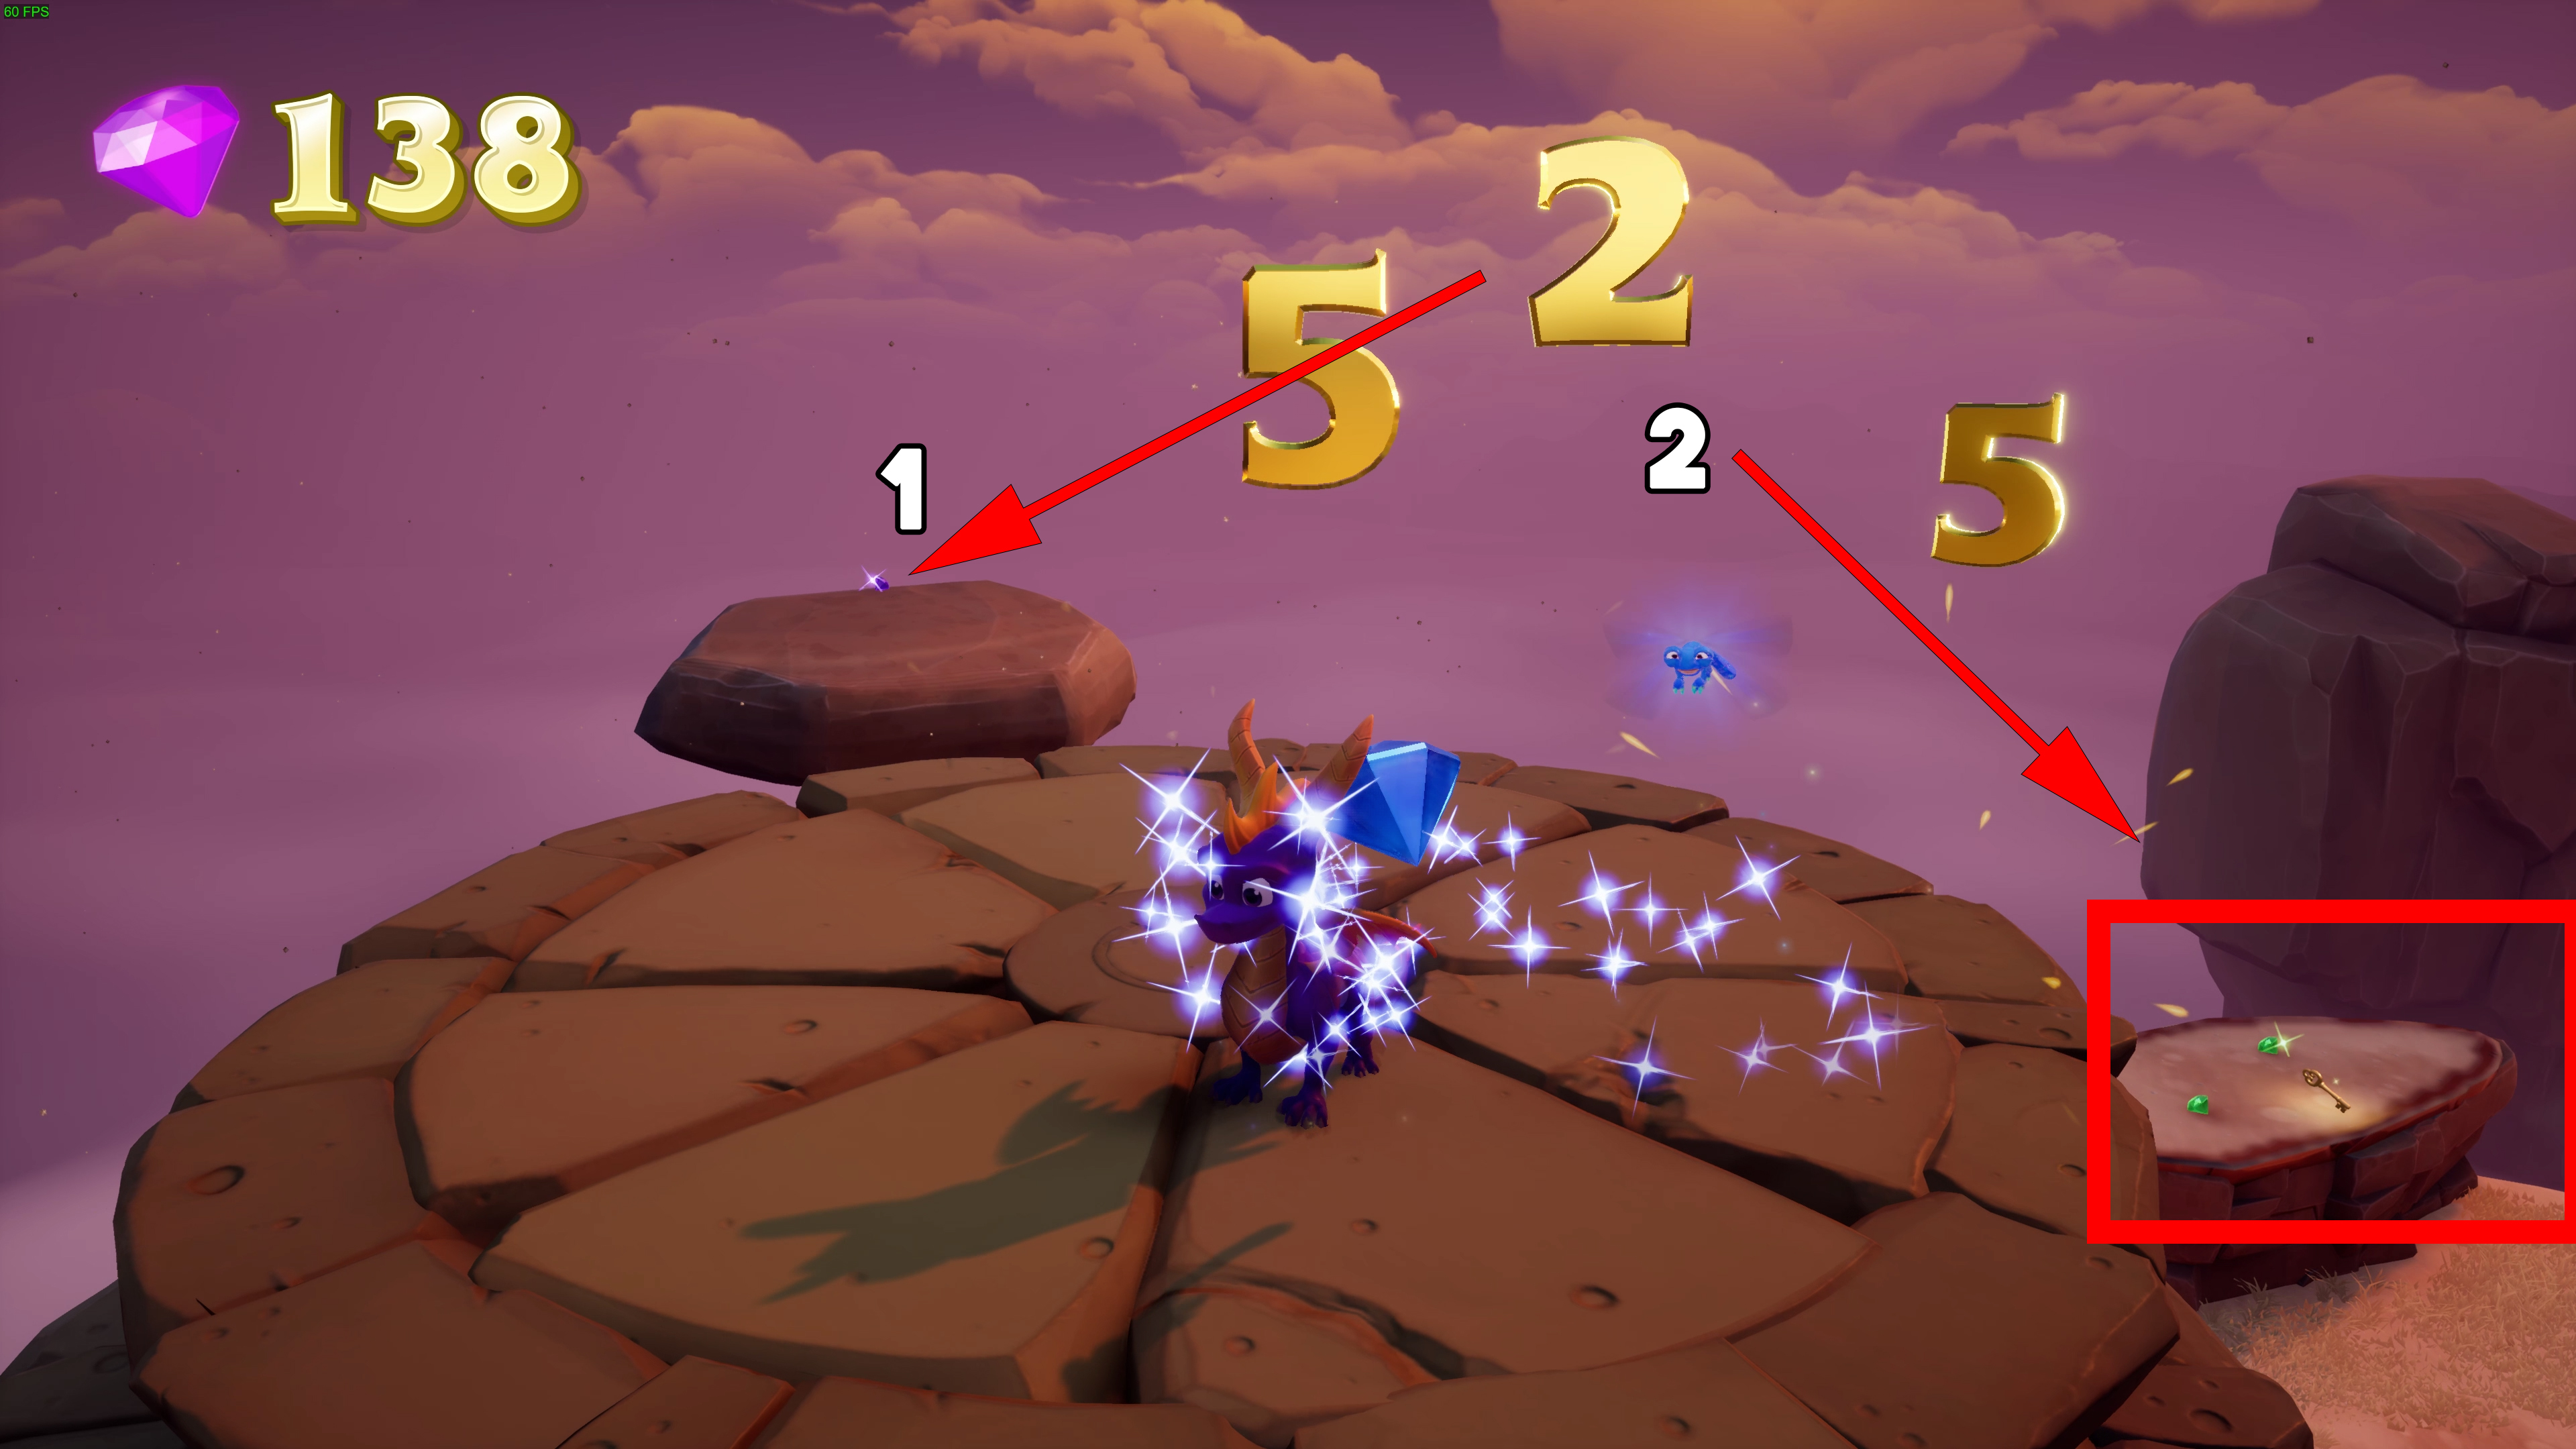
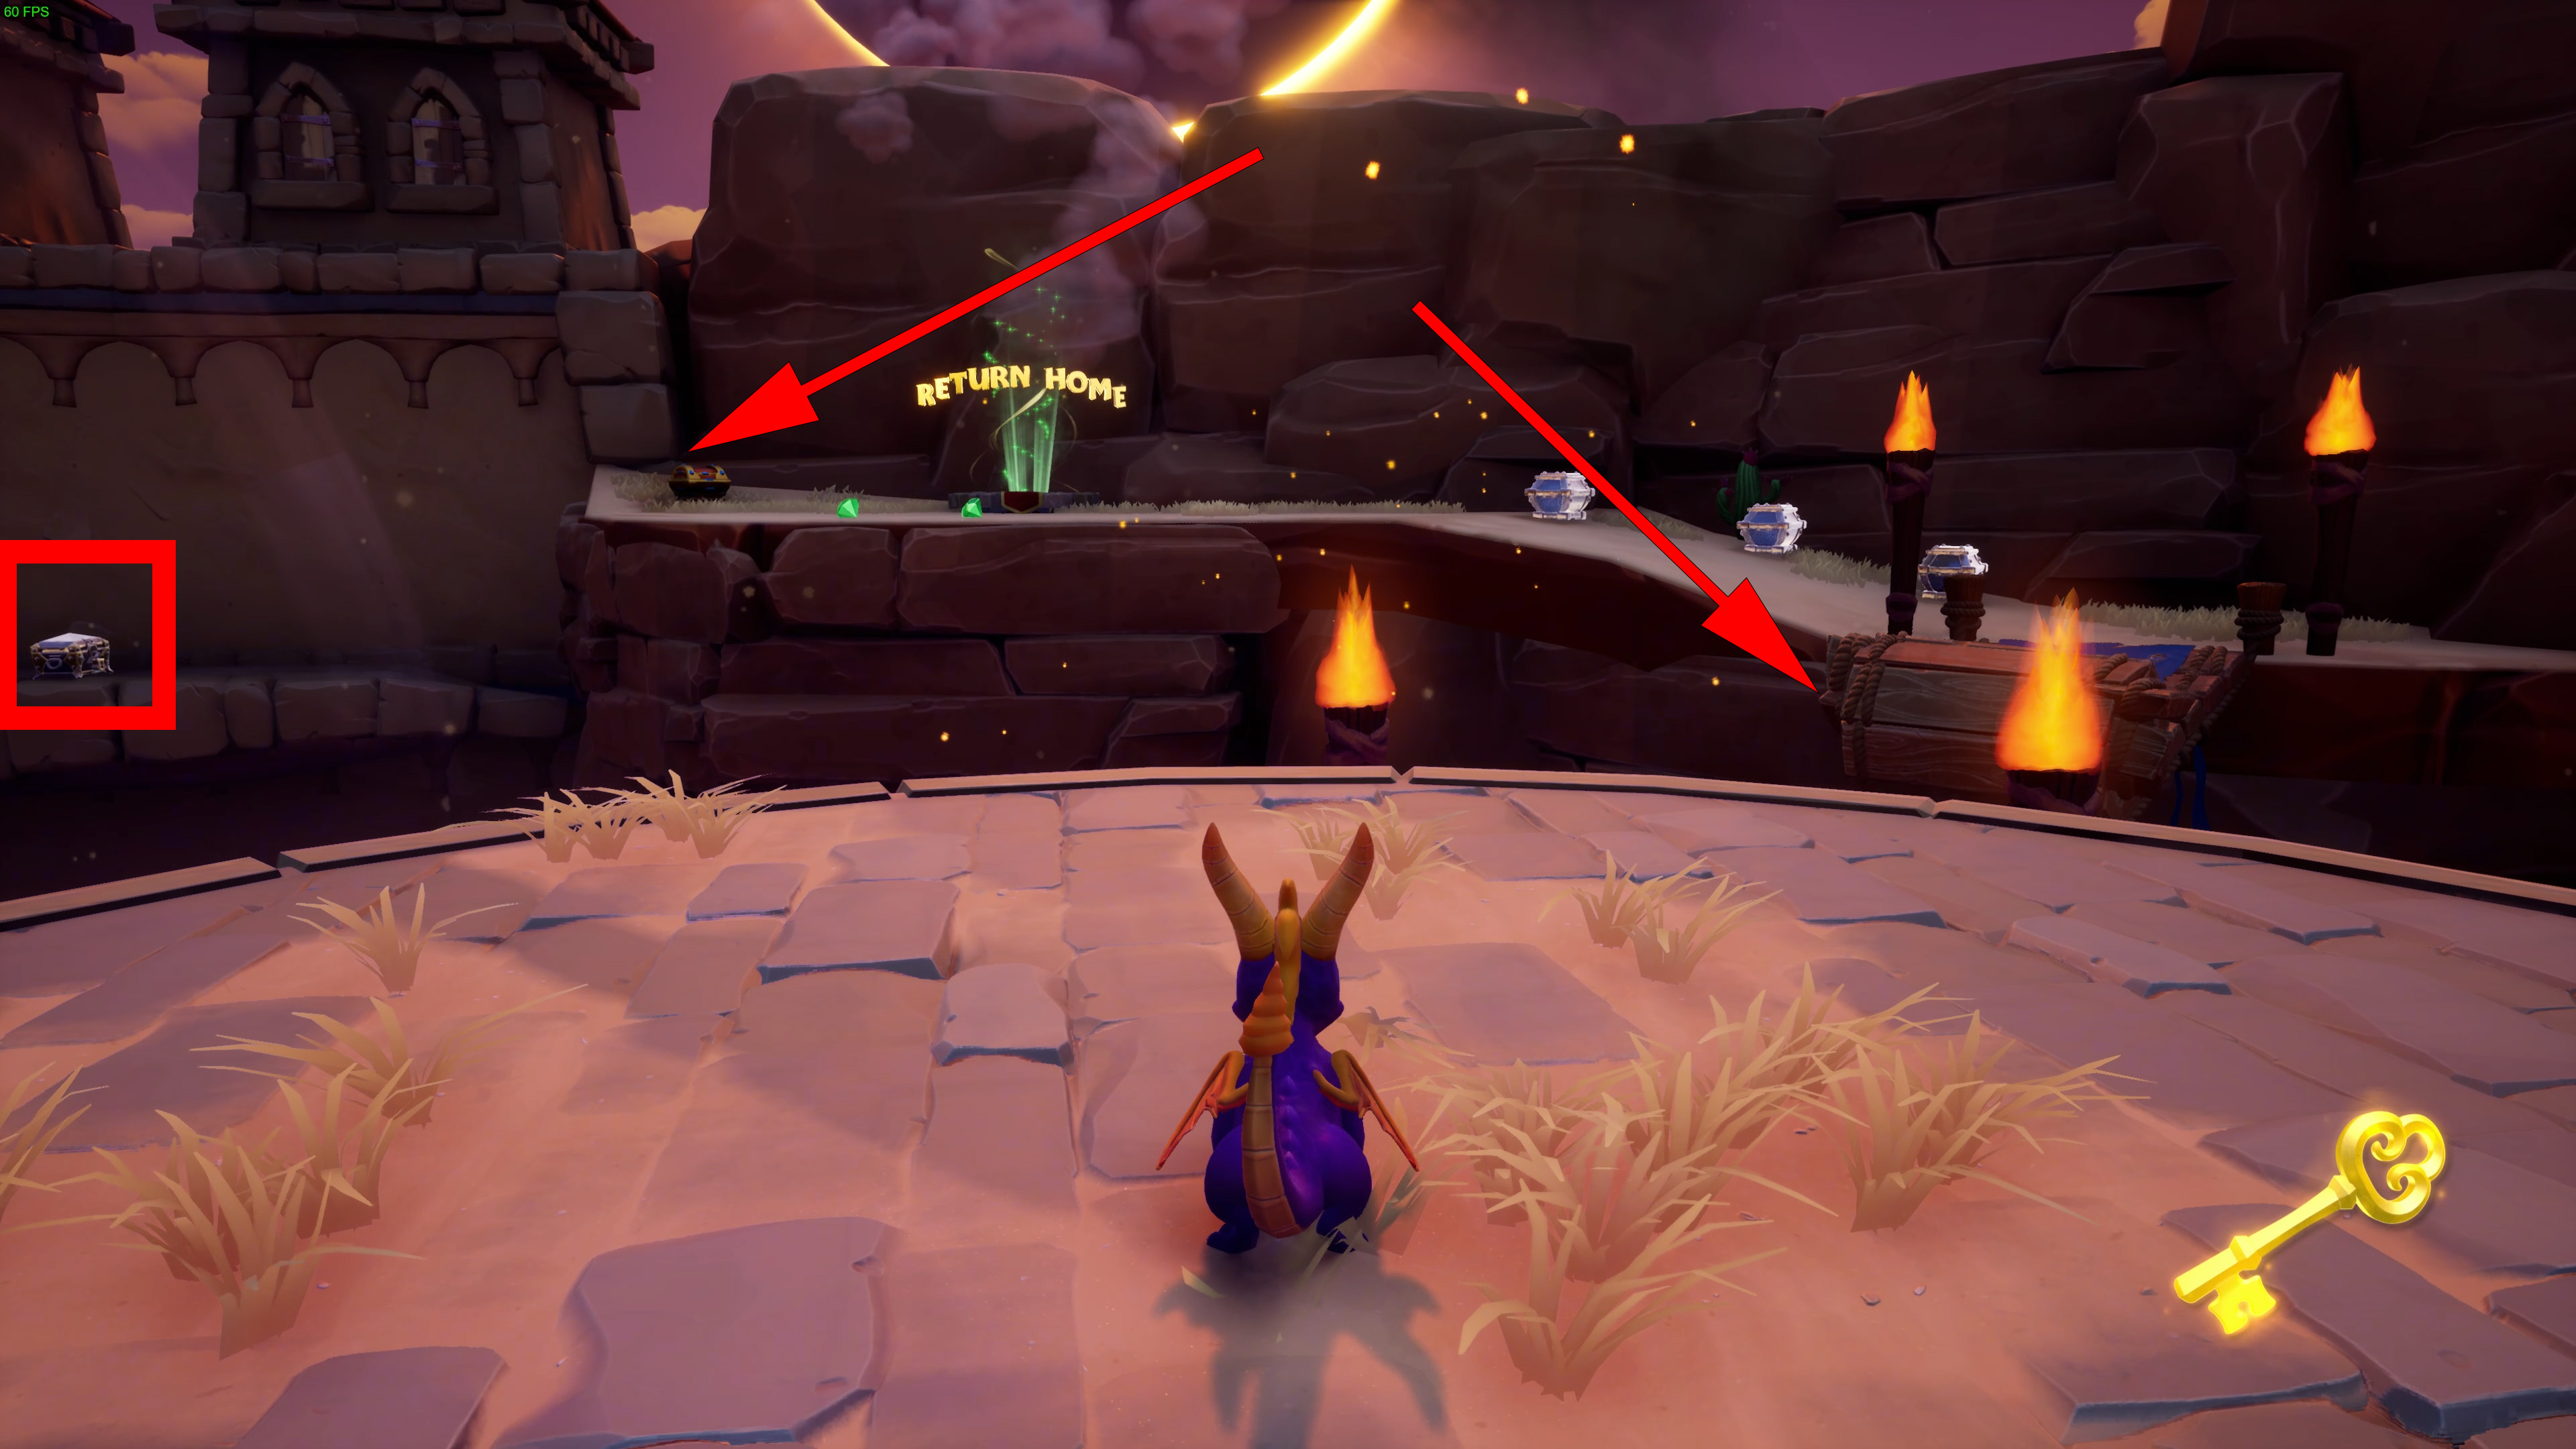
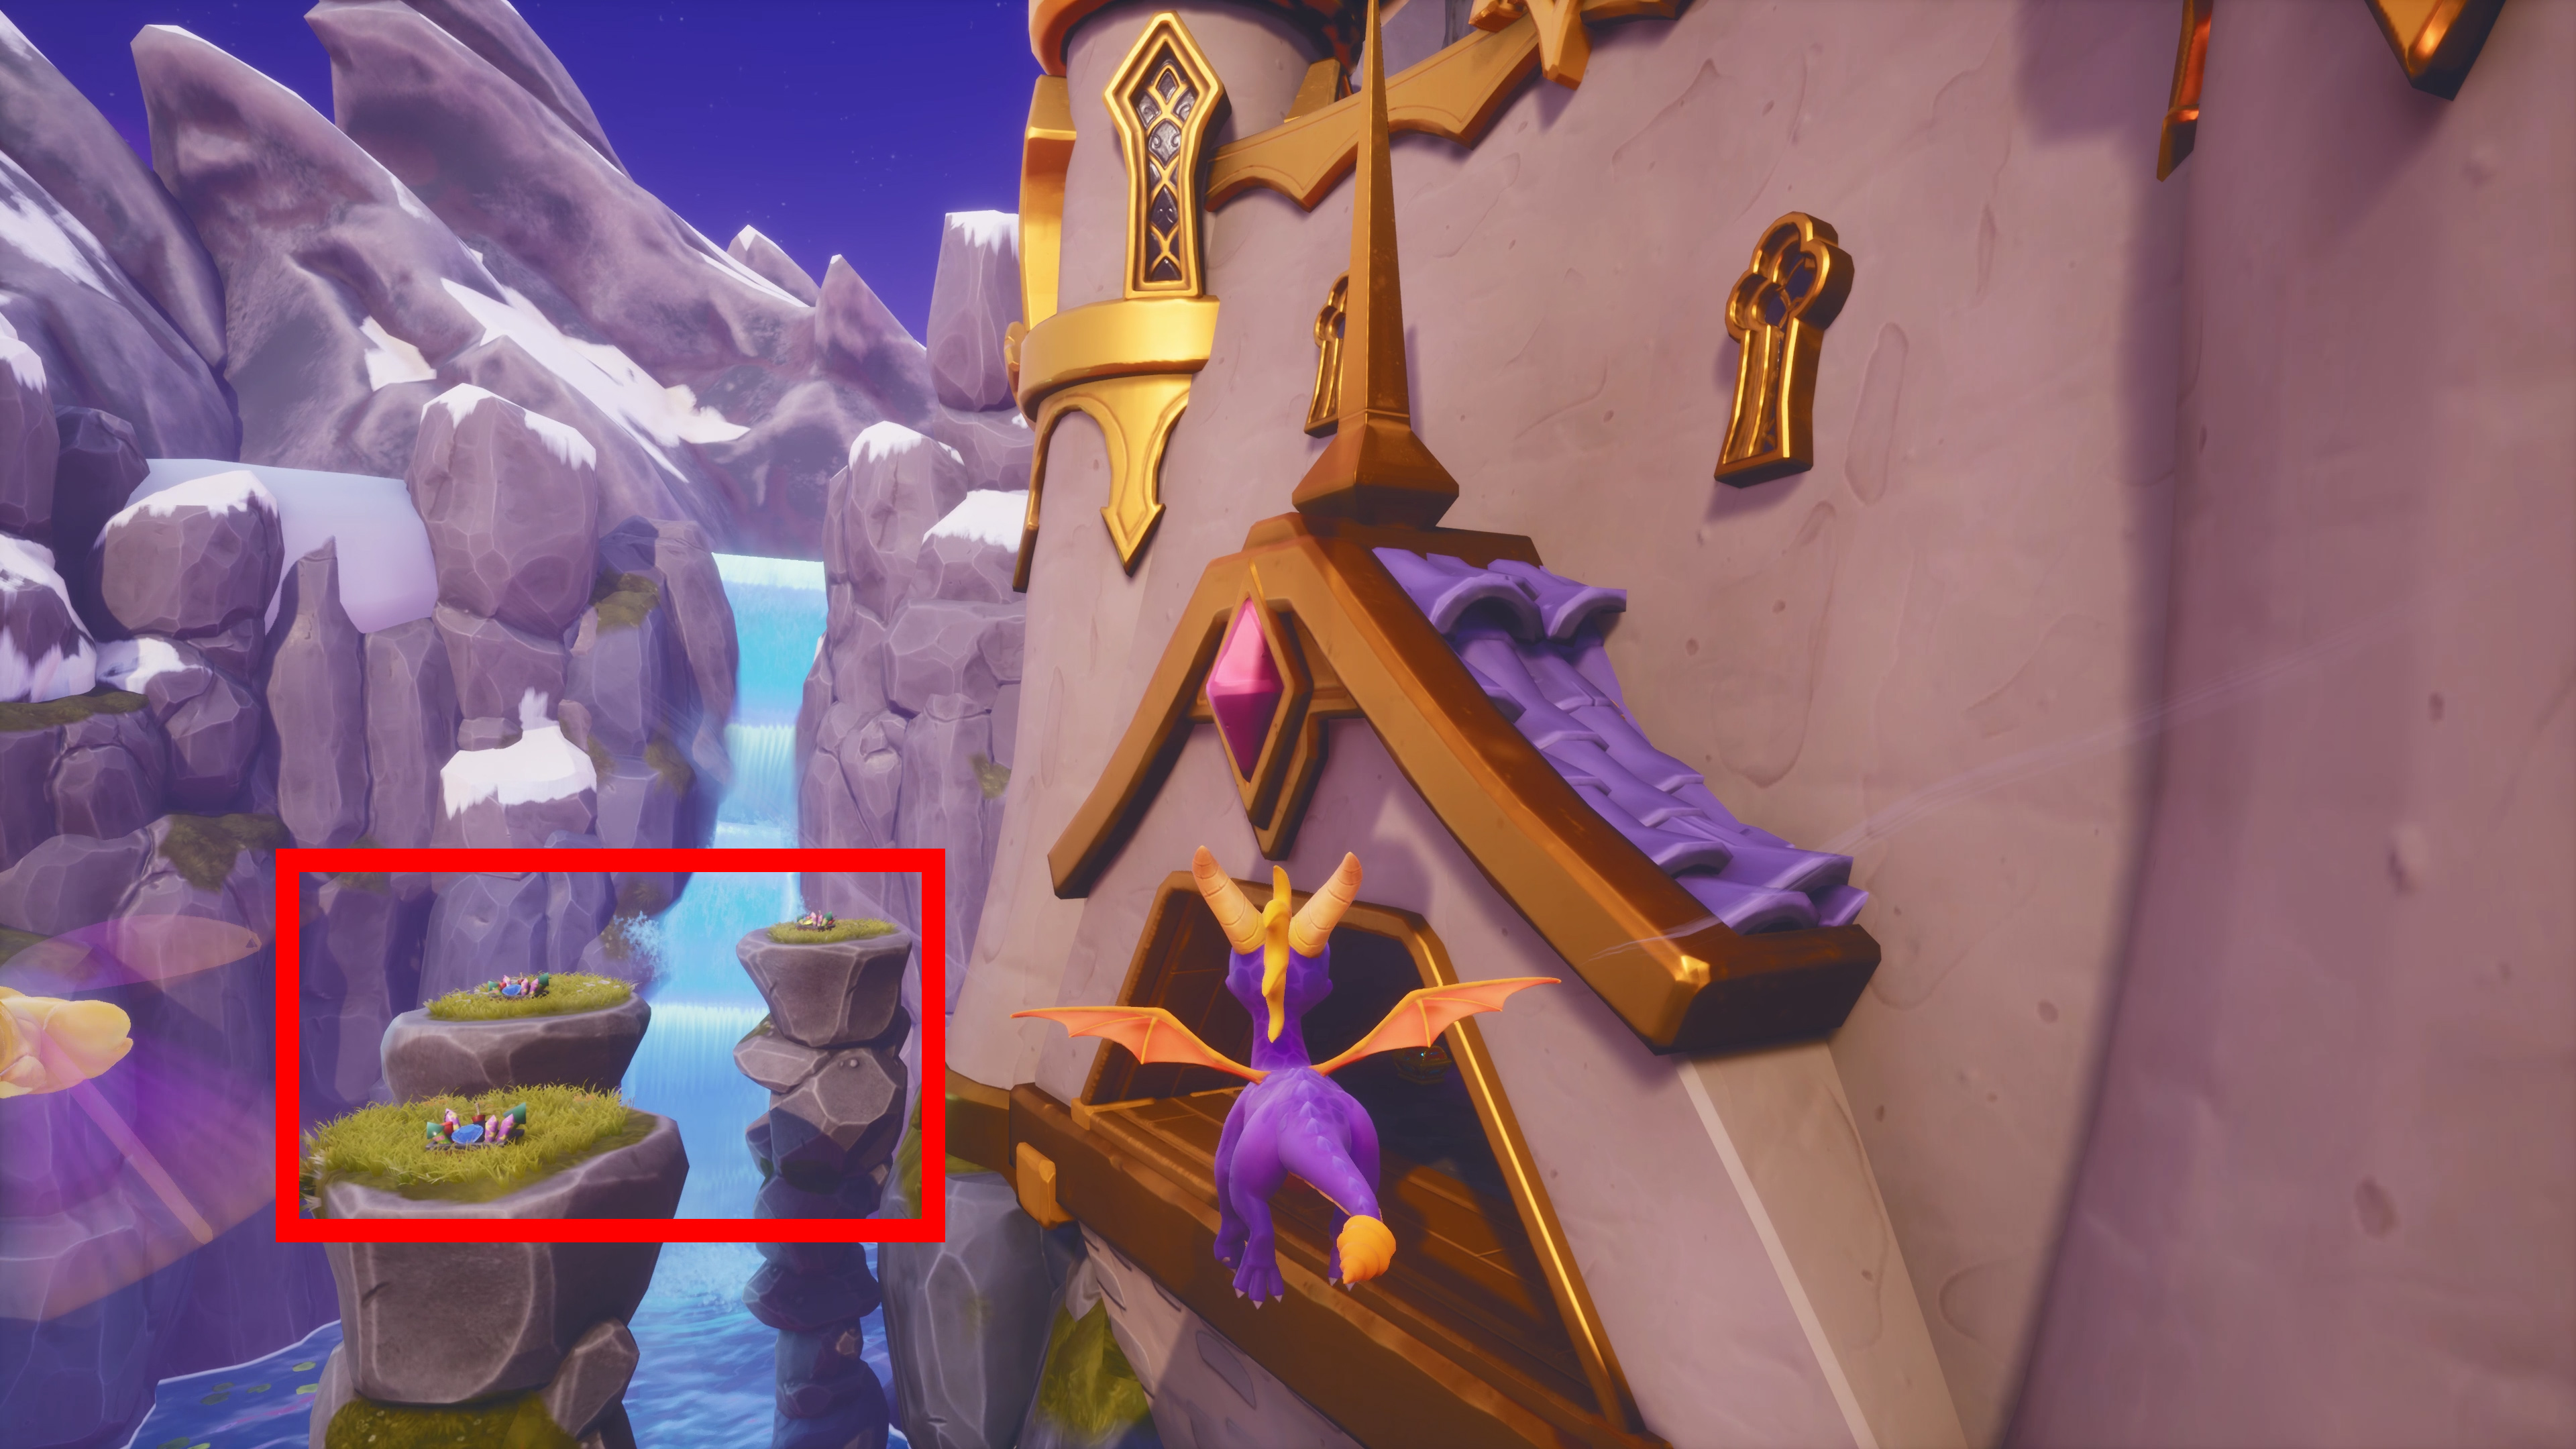
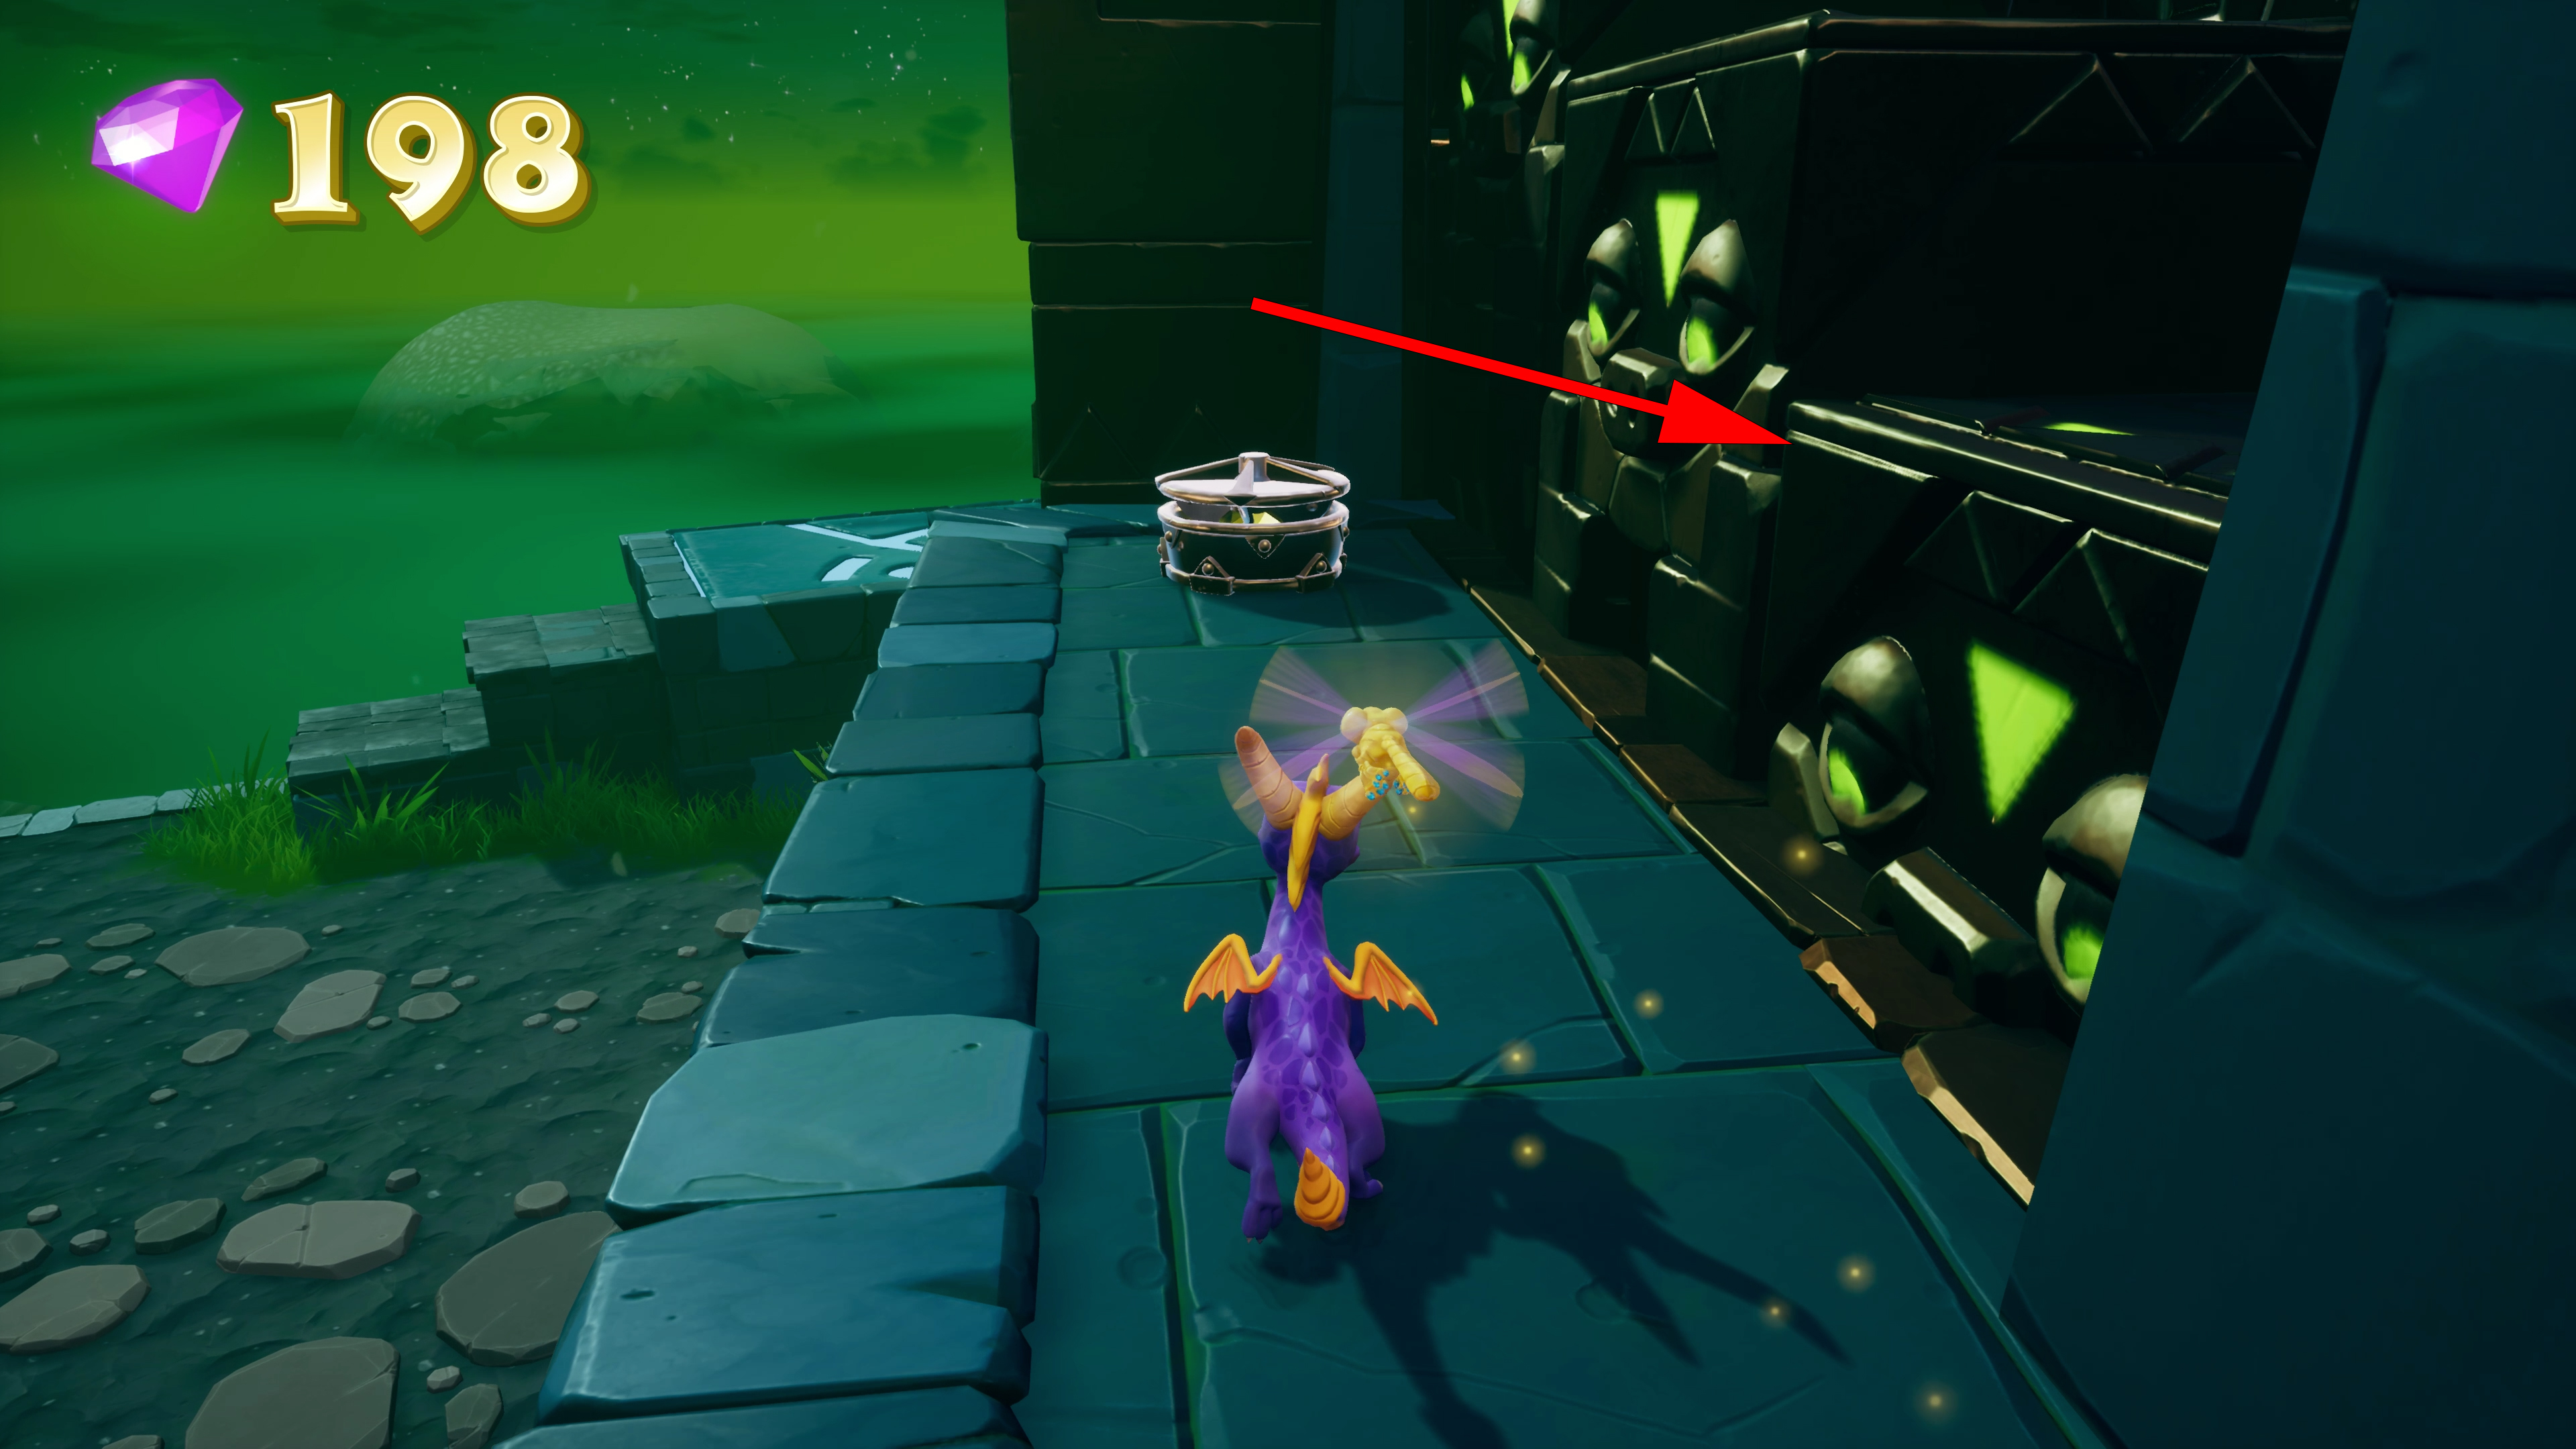
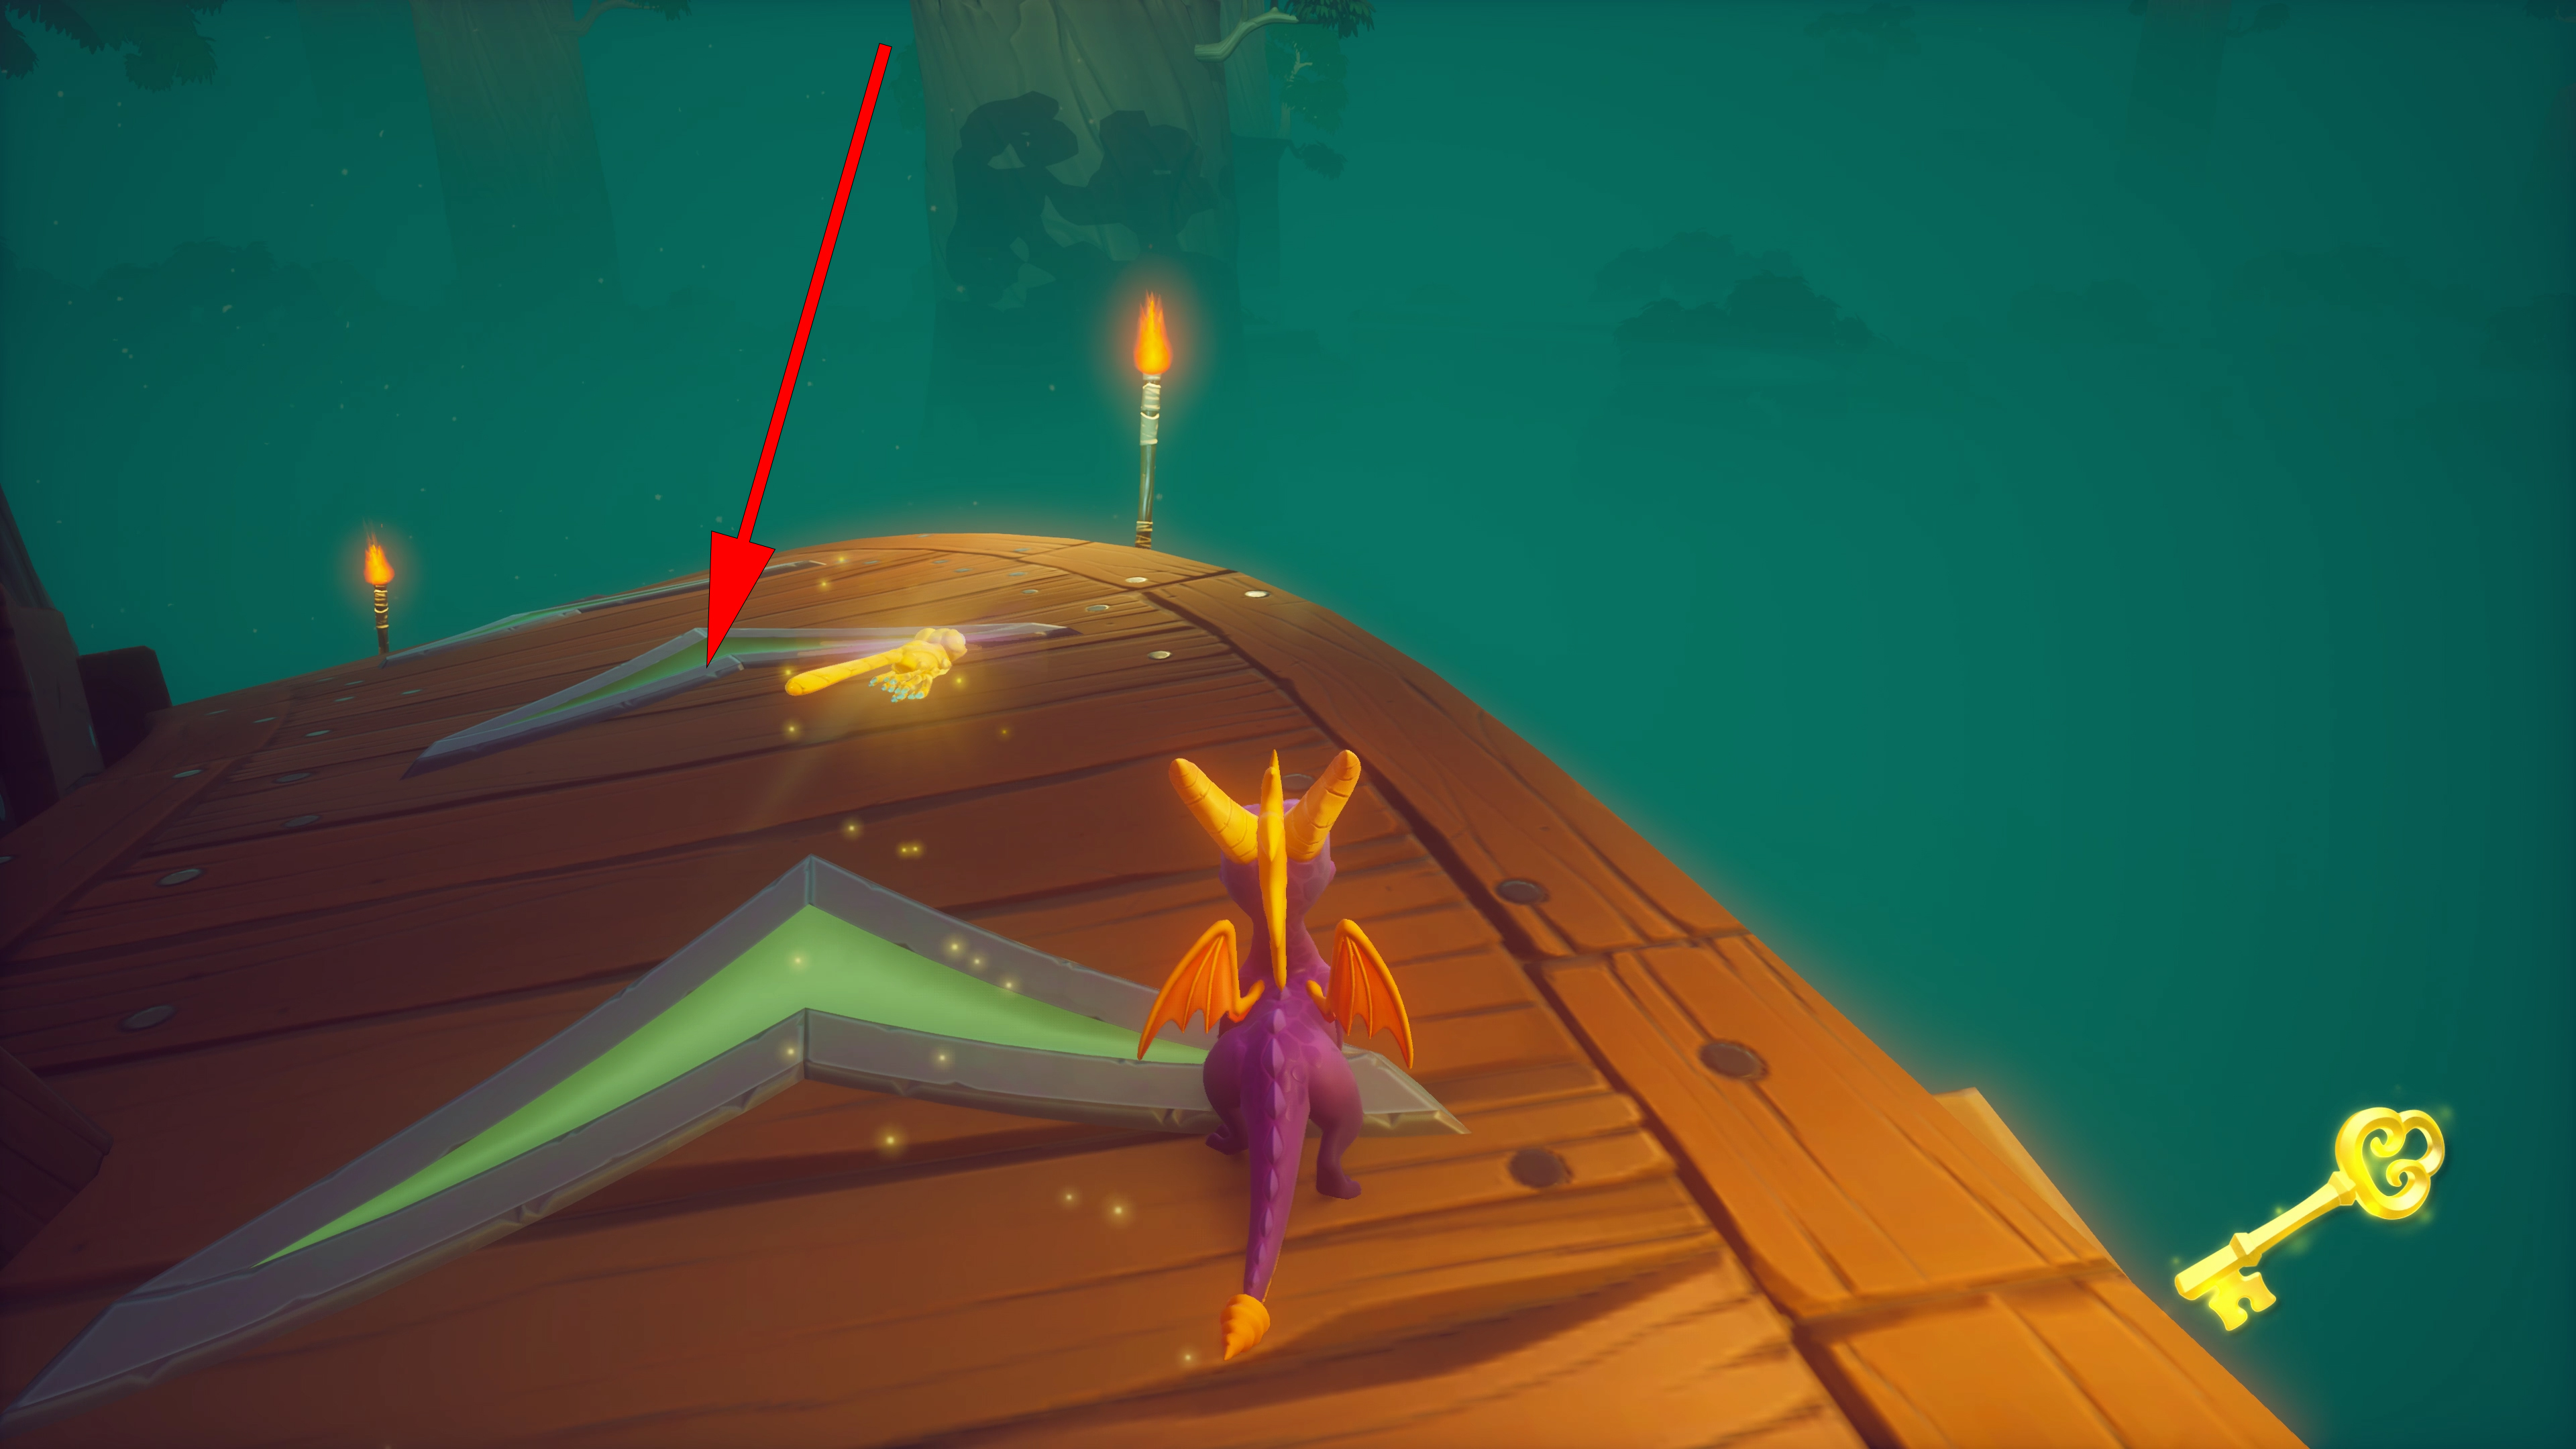
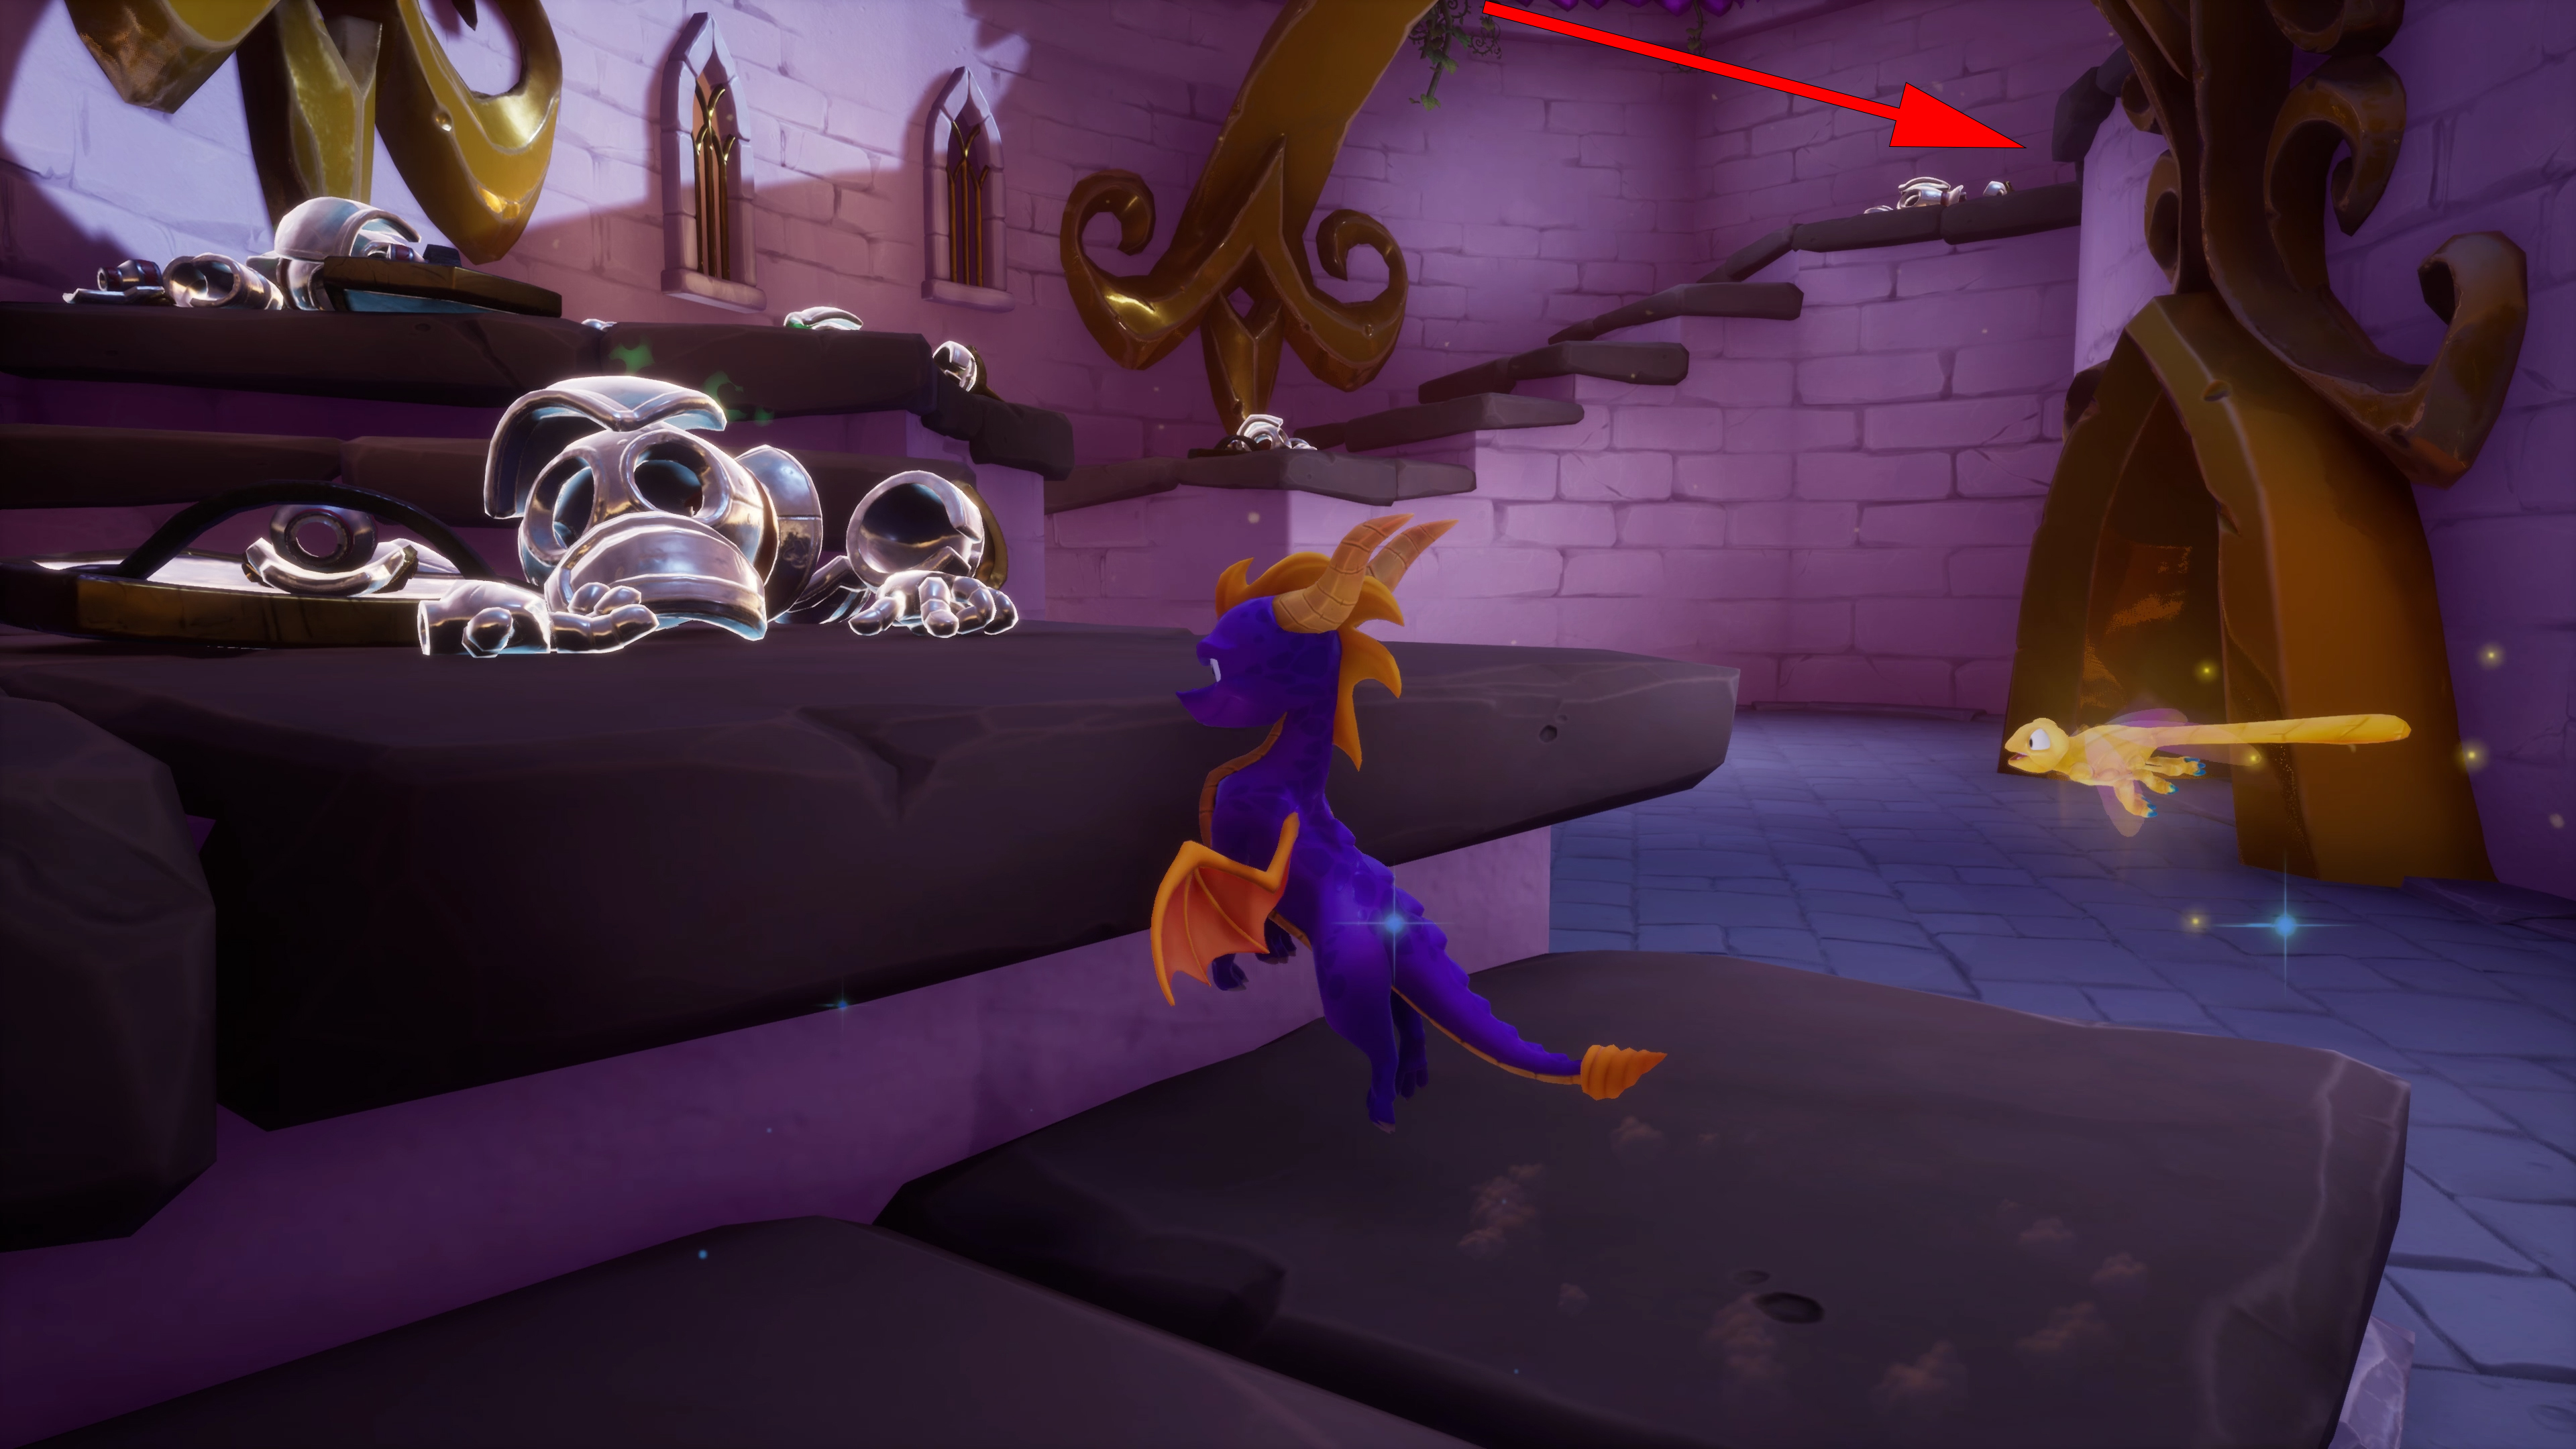
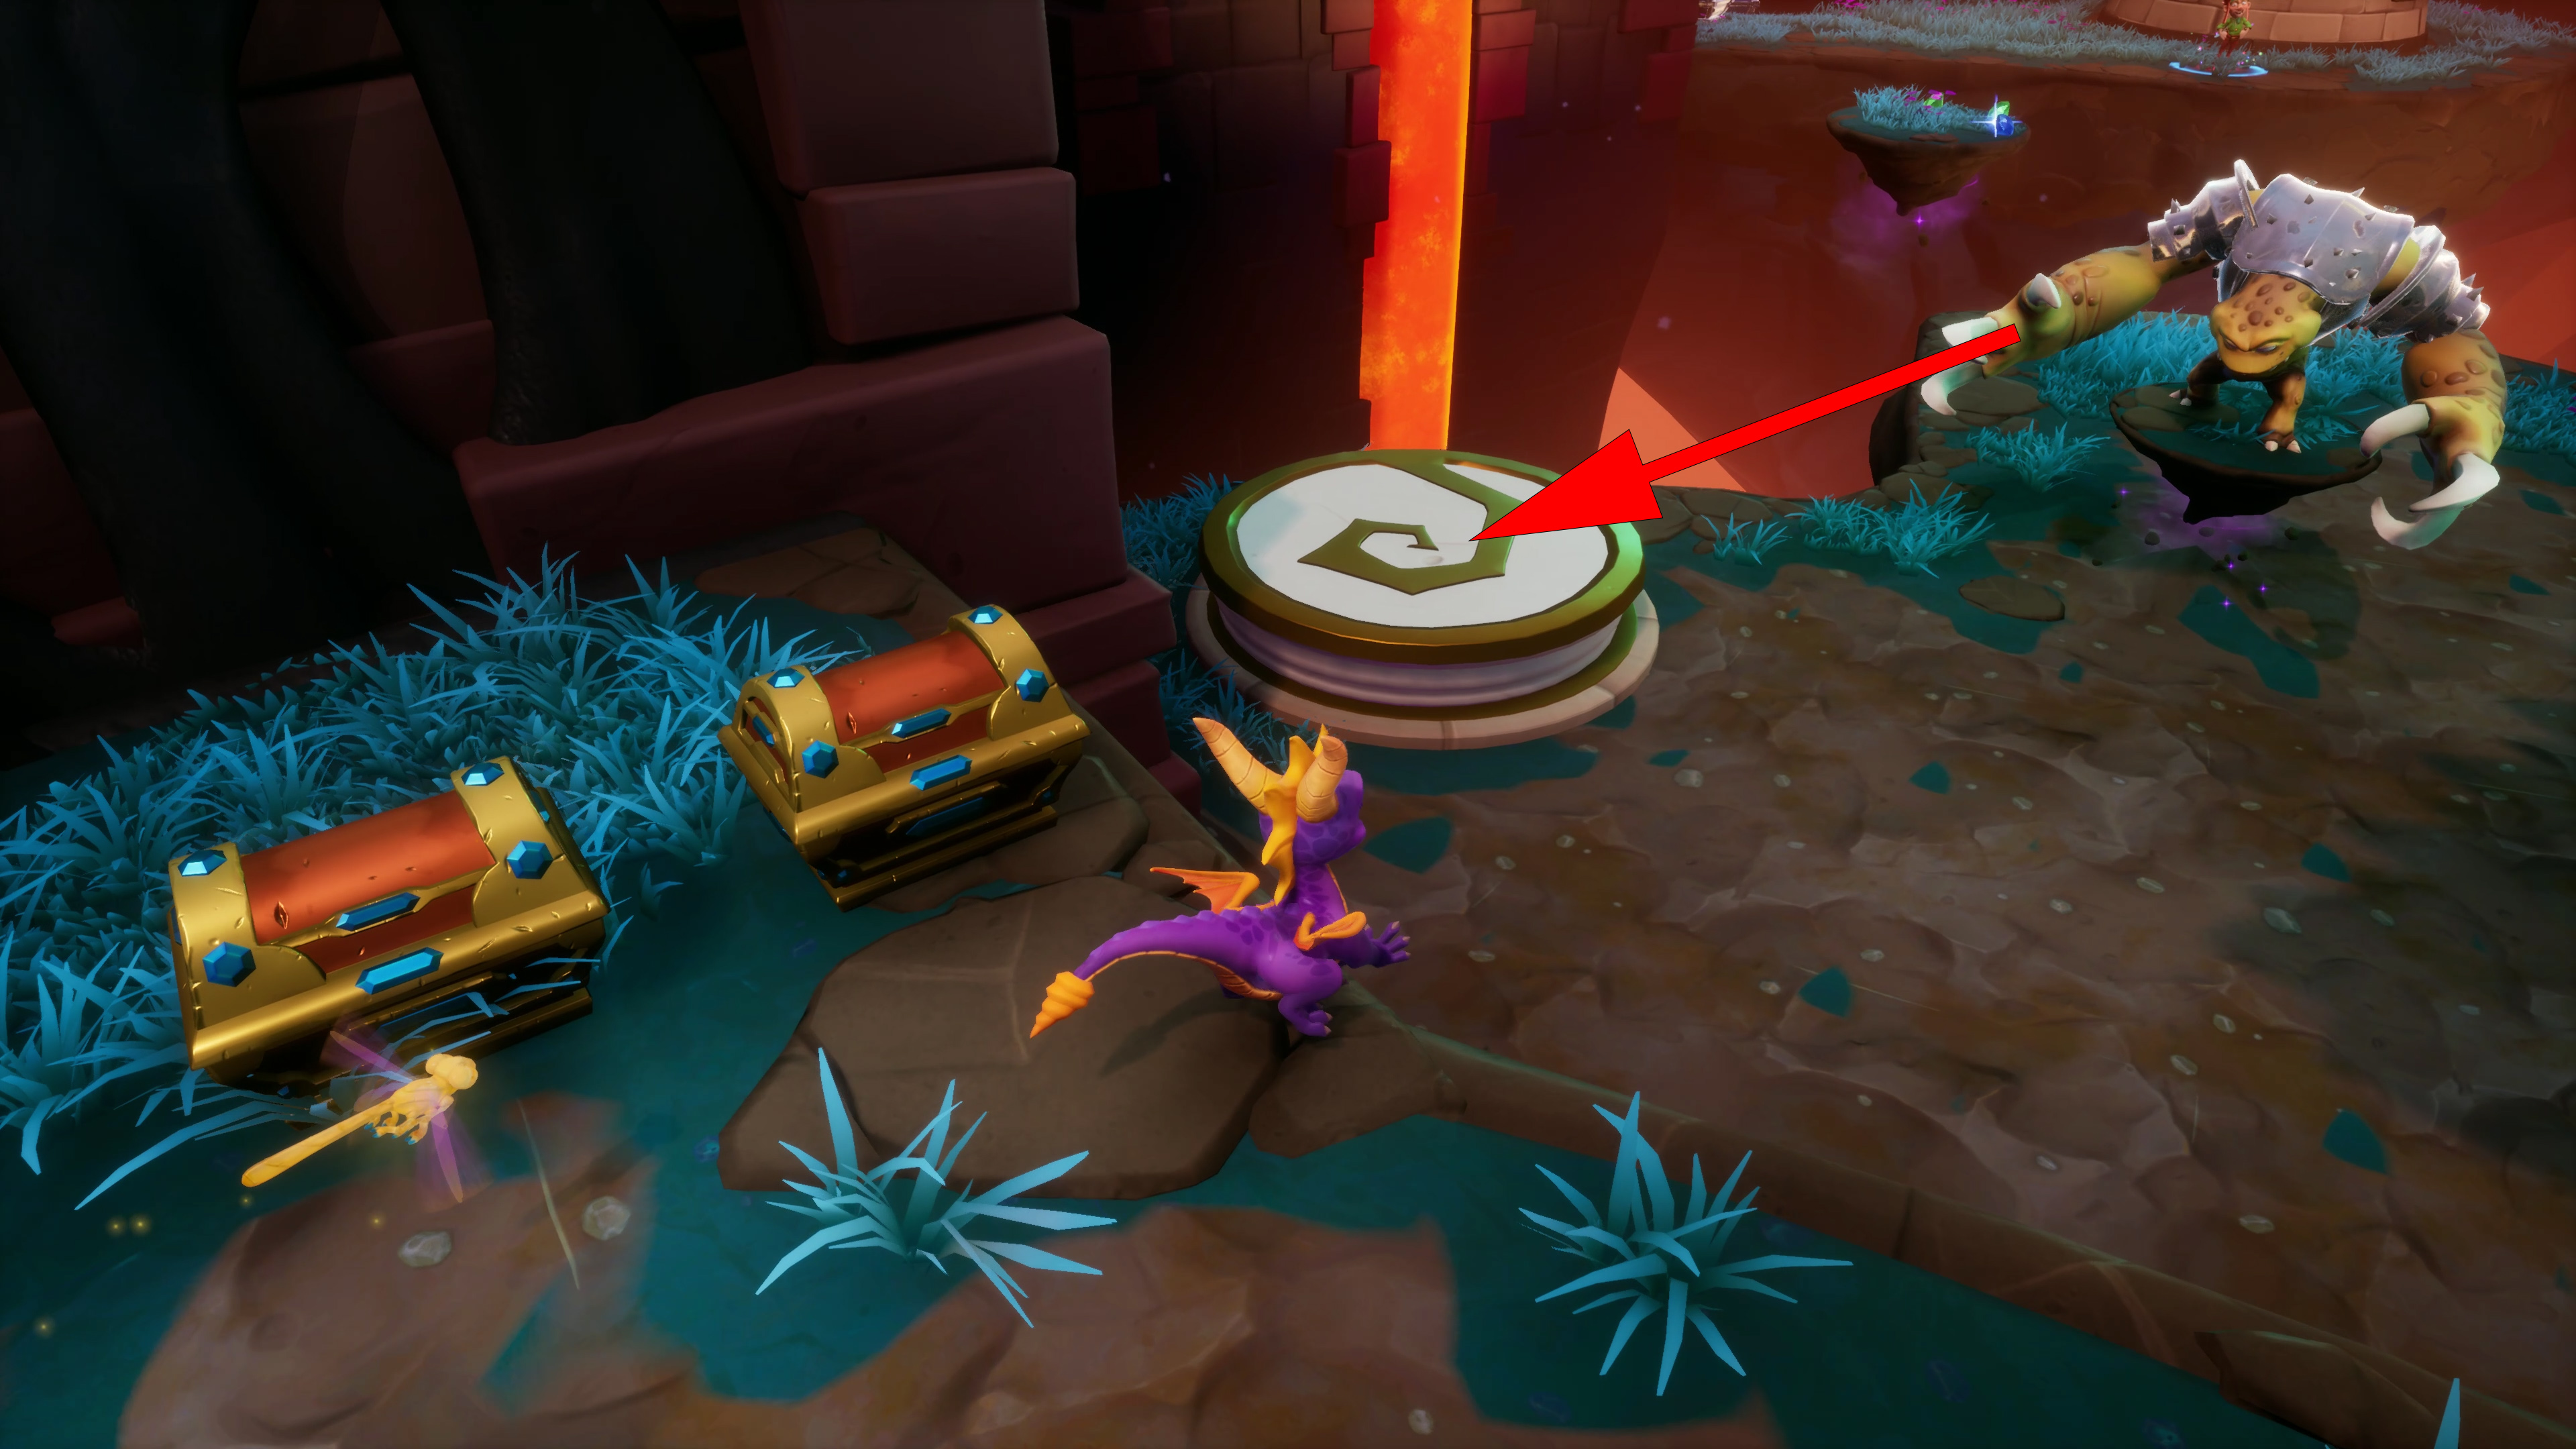
Molten Crater: Unlock the locked treasure chest
The locked treasure chest is at the start of the level (Picture 1). The key you need to open the treasure chest on one of the islands to the right of the exit portal (Picture 2)
1.


Seashell Shore: Defeat Bluto’s nuclear shark submarine
Only thing hard about this achievement is finding the actual location for it. Picture below.


Sheila’s Alp: As Sheila, destroy all headbash treasure chests
Sheila’s Alp has a couple of hidden areas with headbash treasure chests. If you have the map enabled you should not have too much difficulty finding them. You need to destroy all of these for the achievement. Picture below for the reference.


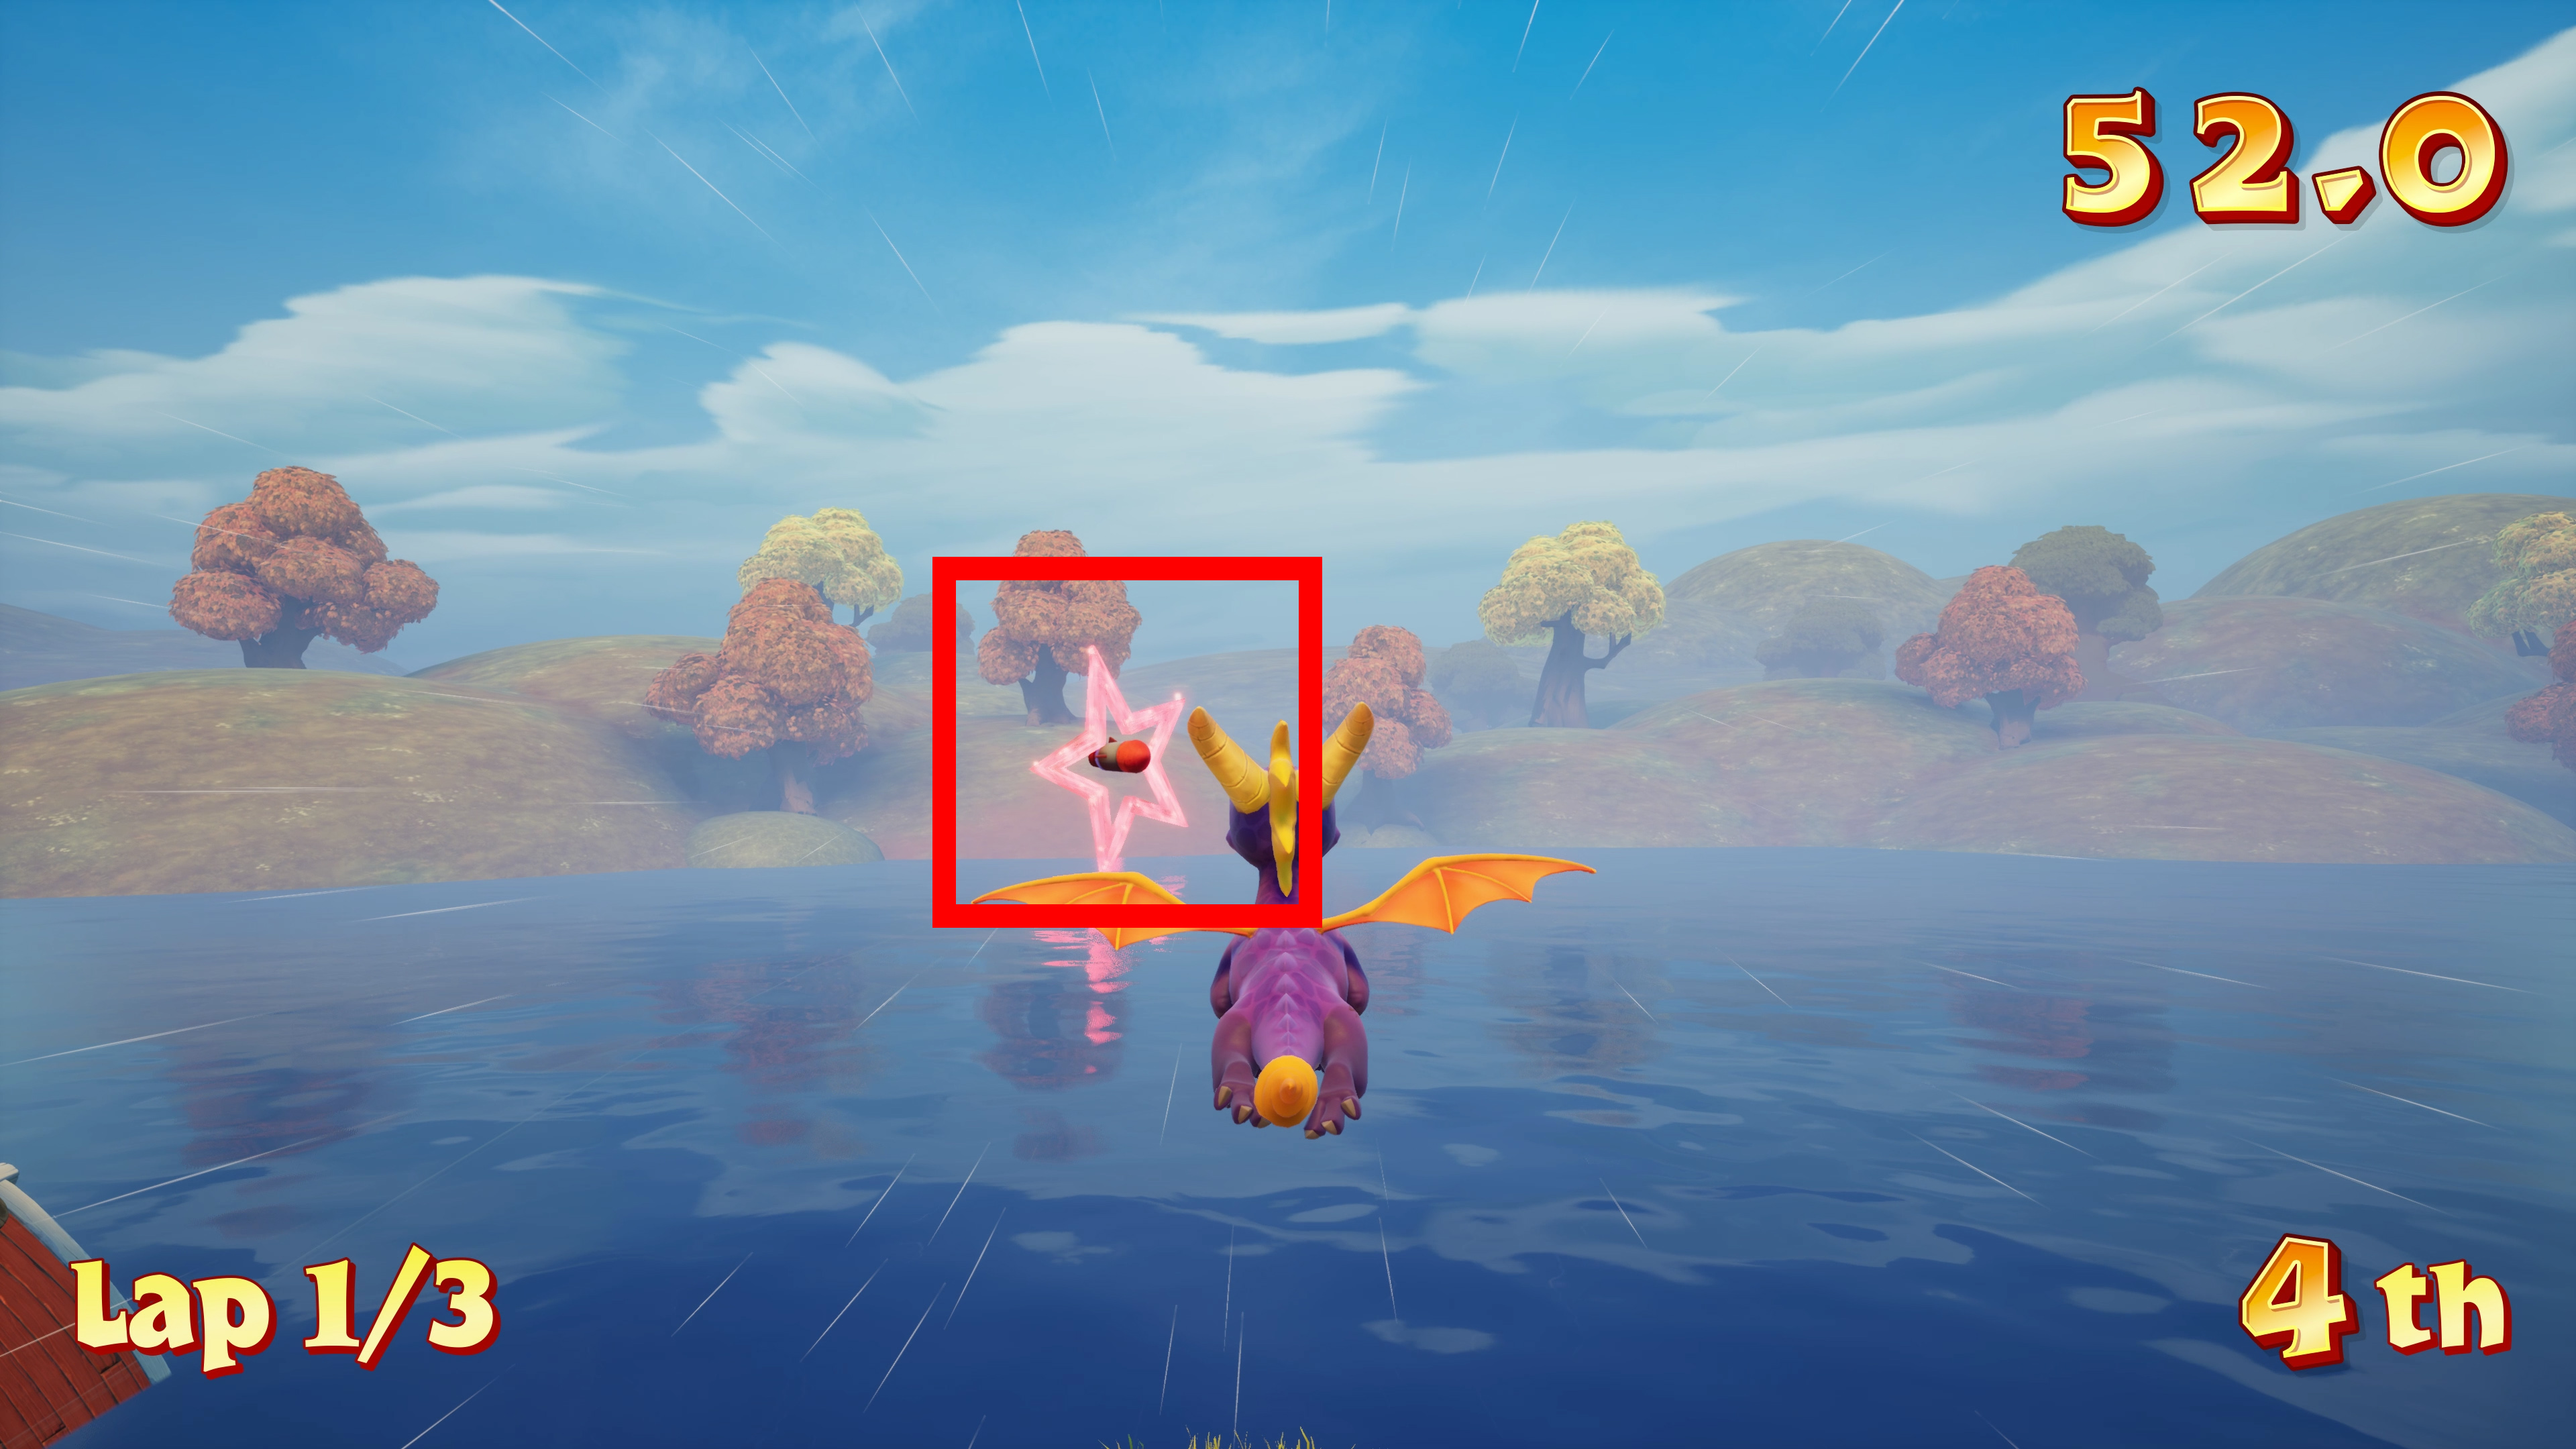
Mushroom Speedway: Fly Through 4 Star Speed Boosts In One Lap
Enter Mushroom Speedway and choose race when you enter. During the race aim for the blue stars which are Speed Boosts. As you only need to do 1 lap for this achievement, you can just quit the race after obtaining the achievement. Picture below for reference so you know what to aim for.


Buzz’s Dungeon: Defeat Buzz
Unmissable
You have to defeat Buzz to enter the next world. The fight is quite simple. Just charge into him and push him into the lava so Sheila can headstomp him and cause damage. After a while he learns a new ability which makes a ring of fire around him which you need to wait for it to disappear and after that, you can charge him again.

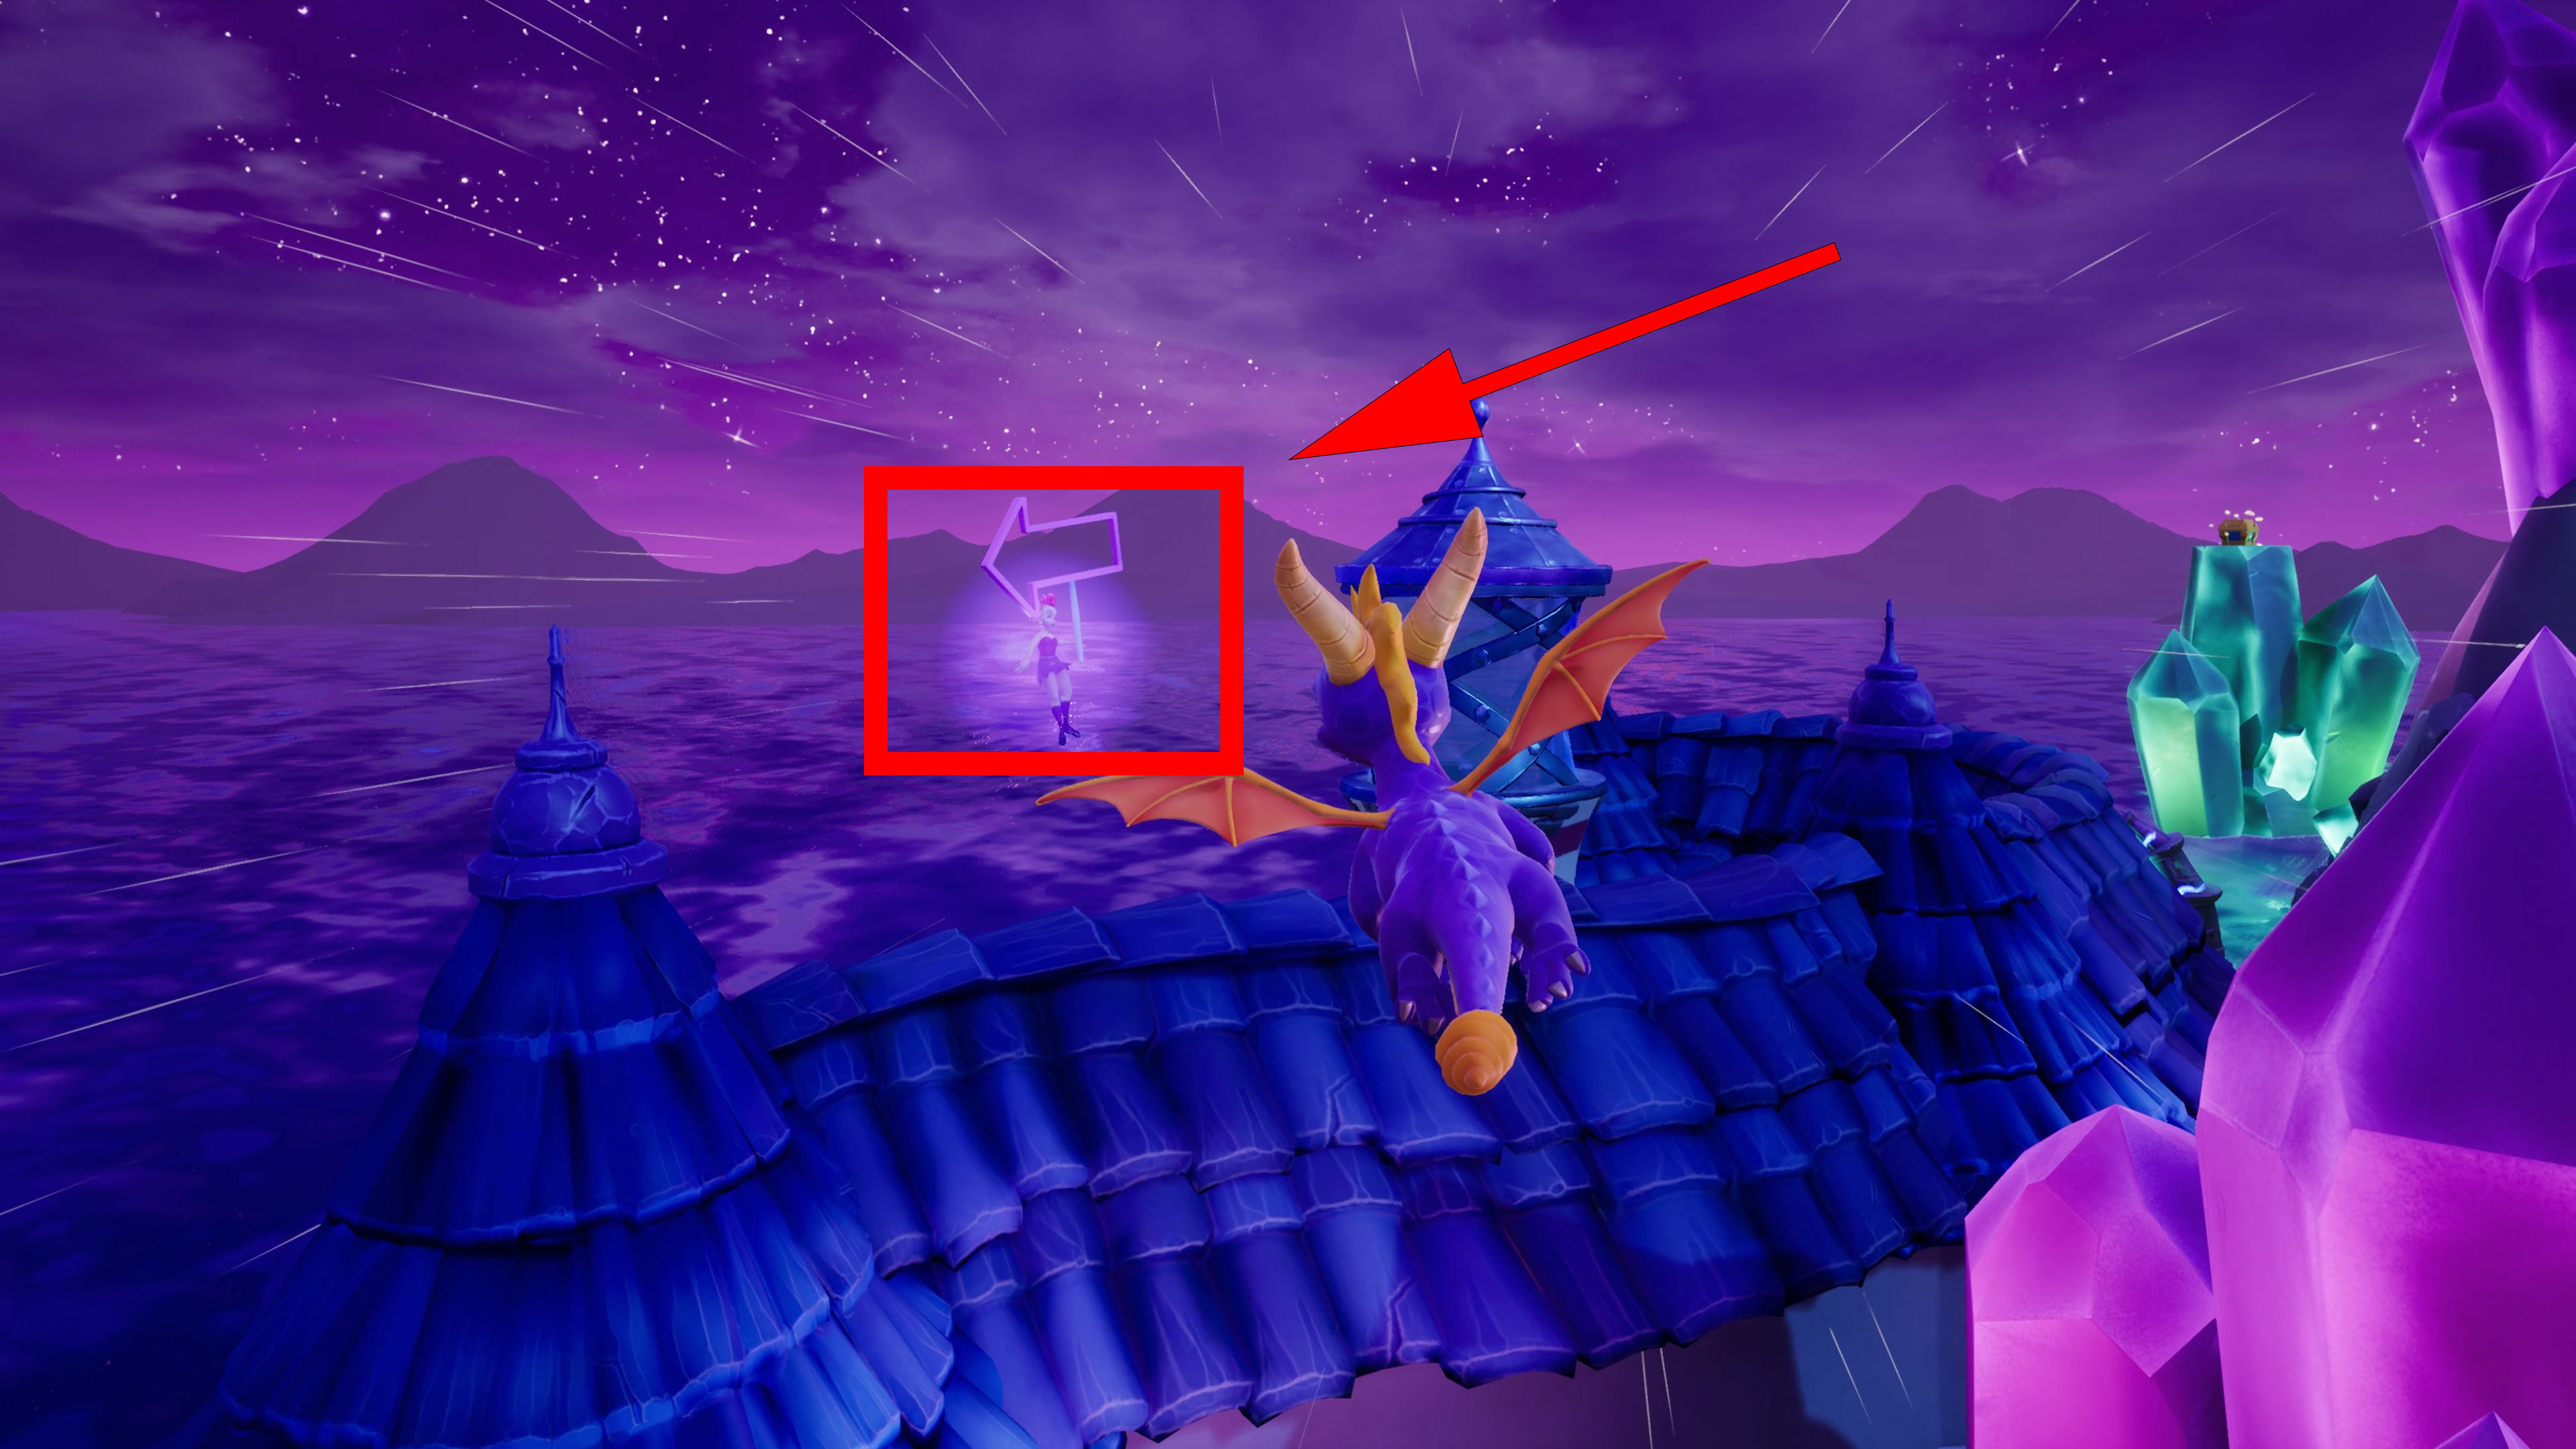
Crawdad Farm: Defeat the Crawdad King
To access the first Sparx level you need to defeat Buzz and come back into the first world to a sign which has Sparx portrayed on it. The Sparx level is pretty simple and the game makes sure you learn anything mandatory for it.

Midday Gardens Worlds (Video)
0:00 –
7:55 –
9:30 –
9:30 –
23:30 –
23:30 –
44:30 –
50:10 – 51:10
1:09:35 –
1:16:20 –
1:35:05 –
1:37:25 –
1:42:00 –
1:49:50 –
1:54:05 –
2:05:25 –
2:07:01 –
2:07:01
2:11:45 –
2:11:45 –
2 Midday Gardens

Midday Gardens: Free Sgt. James Byrd
Unmissable
This is the same as freeing Sheila, except this time you need 600 gems to free Byrd. You should free him before Enchanted Towers as otherwise you can’t do the Balloon buster achievement.

Midday Gardens: Launch the Transporter Whirligig
Unmissable
This achievement is obtained upon using Transporter Whirligig to enter the next world.

Icy Peak: Destroy 6 icy things using the cannons
There are more than enough icy things to get this achievement done. Just make sure that you use the cannon to destroy the icy walls and crystals to get the achievement. Picture for reference on what you need to shoot.
1. Icy Walls


Enchanted Towers: Destroy all the balloons
As mentioned earlier in this guide, to be able to finish this achievement you need to have unlocked Sgt. James Byrd as a playable character. There is a portal at the end of the level (pictured below) which allows you to change into him.
You need to destroy all of the balloons in the hidden skate park which is located under the statue you destroyed while progressing through this level. There are a total of 2 balloons in the skate park.
1.


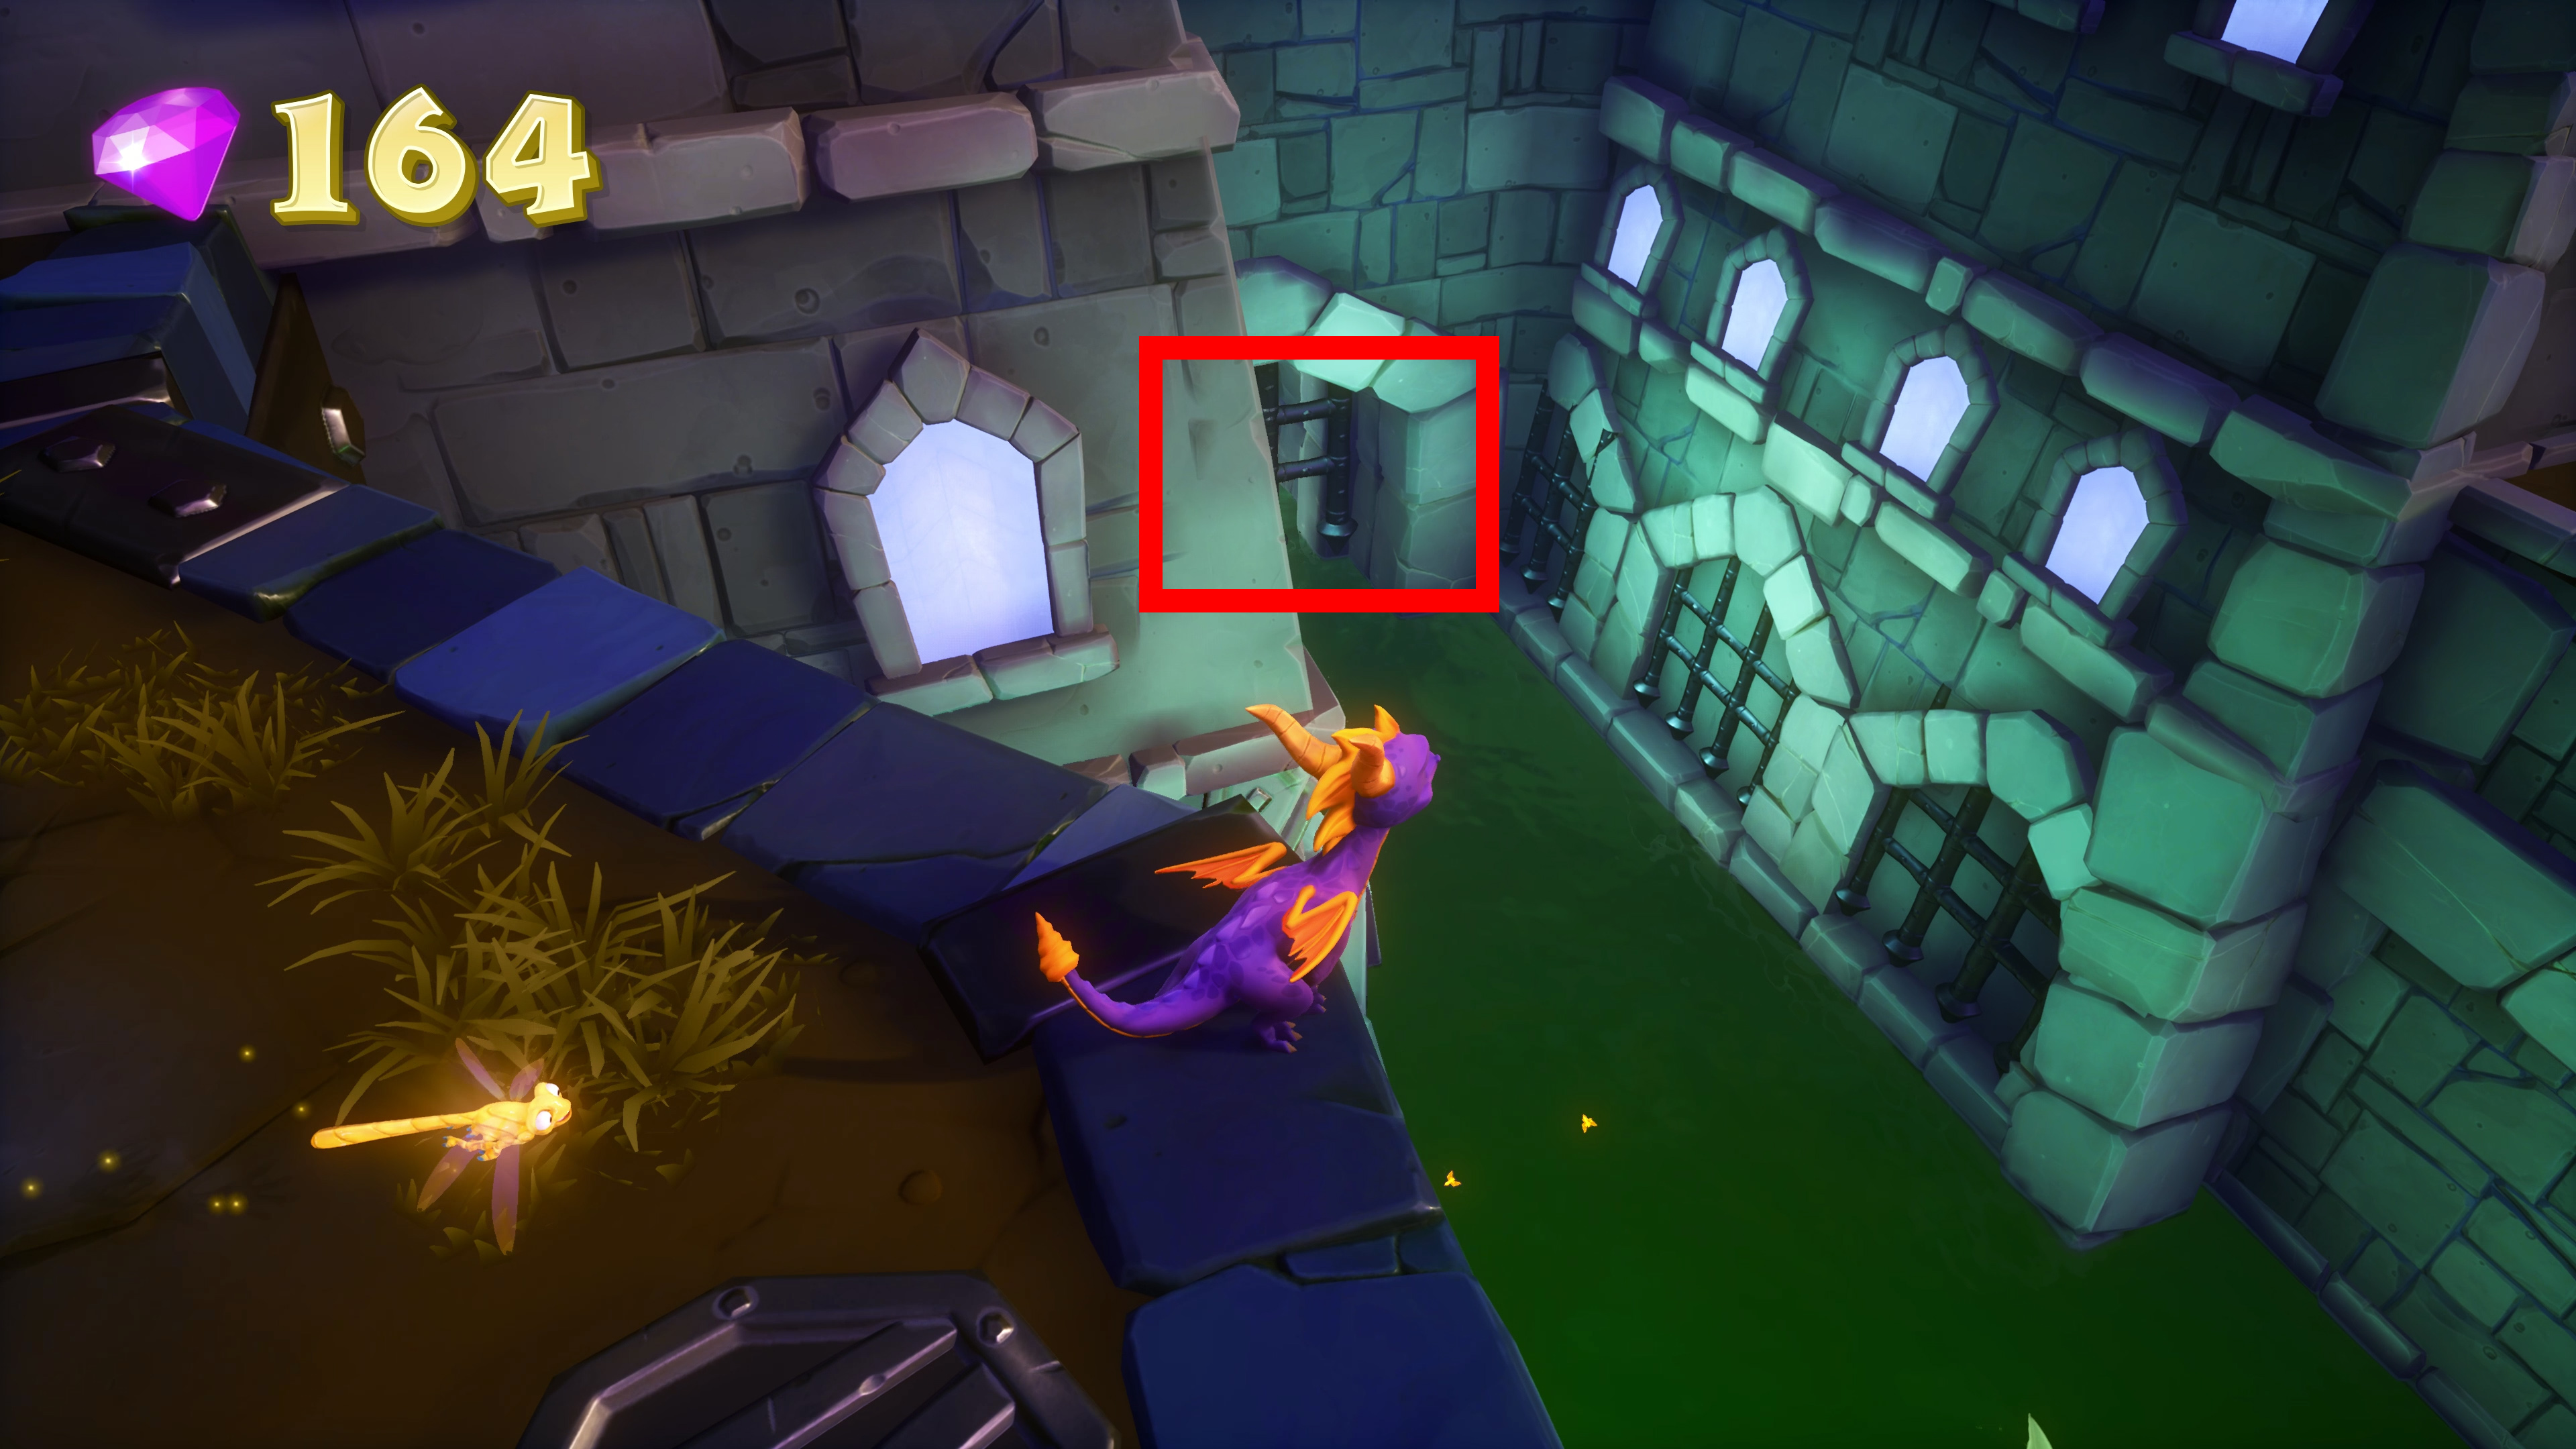
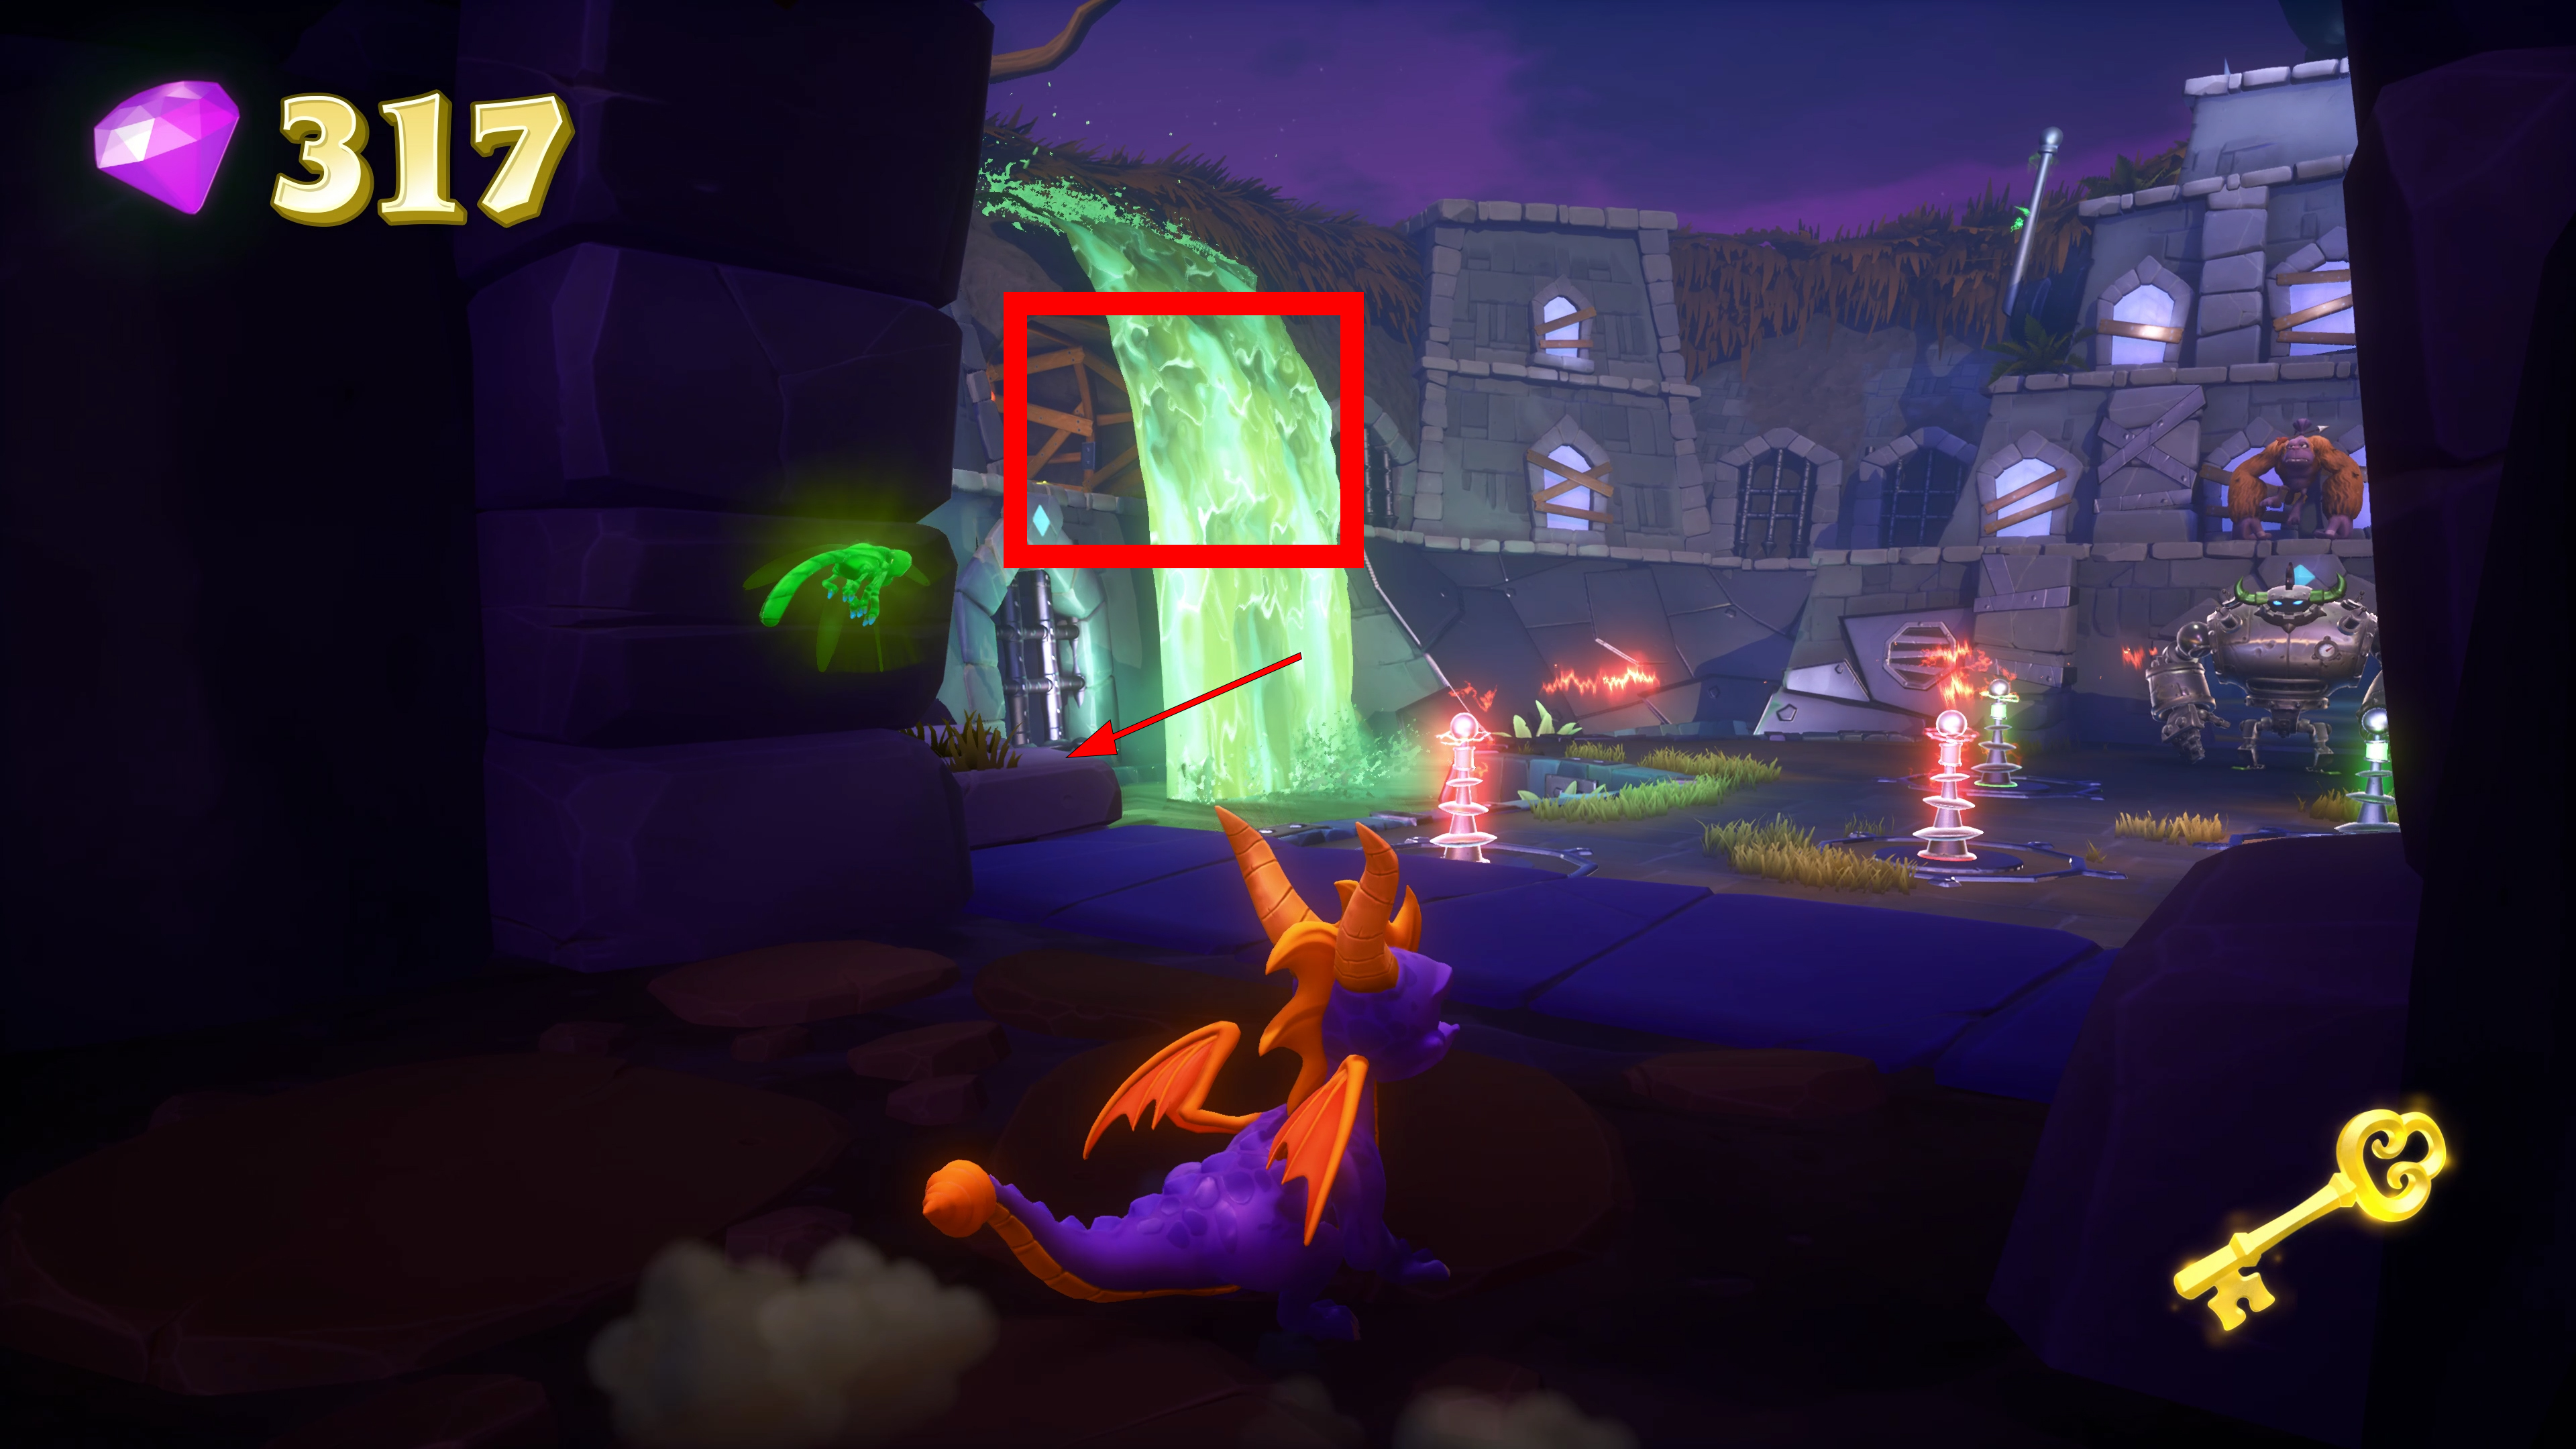
Spooky Swamp: Defeat Sleepyhead
Around Spooky Swamp there are a total of 4 lamp lights. You need to light up all 4 of these for a cutscene to occur and for a new area to open. In this area there is a miniboss called Sleepyhead.
The boss fight is pretty simple. Sleepyhead will throw bombs at you. You need to wait for it to stop bouncing and then charge it back at him. After each bomb explodes, a few gator enemies will spawn which you can either charge or flame. Just keep repeating this until you have defeated Sleepyhead.


Bamboo Terrace: Follow the question mark bottles to the end
At the end of the level you should be able to find a yellow bottle with question mark on it. Hit it and it will teleport to another location in the level. It is quite easy to spot and it backtracks the level all the way to the beginning. Eventually it will teleport to the start and when you destroy it there, the achievement will pop.


Sgt. Byrd’s Base: As Sgt. Byrd, bomb all treasure chests
These are scattered around the level. You can only destroy these with the bombs from the ground. Picture below.


Country Speedway: Fire 5 missiles in one race
There are a total of 4 missile pickups per lap. If you pick up every missile during the race you will only need to continue a bit further on the second lap for this achievement.
You don’t actually need to hit anything for the achievement to pop. Just make sure you use them. Picture below for reference so you know what to look out for.

Spike’s Arena: Defeat Spike
Unmissable
Spike is the second boss of Spyro 3. Nothing too special about him. Charge the magma balls towards him to do some damage to him. After losing enough health Byrd will start dropping red spiky orbs which will give Spyro superflame power up. Once you obtain superflame, chip some health from the boss with it. At the end of the fight Byrd starts to drop purple spiky orbs which work like missiles. After you take him out the achievement will pop.

Spider Town: As Sparx, defeat the Spider King
You will unlock Spider Town after defeating Spike. This is another Sparx level and one will always unlock, after you have defeated the boss of the world.
Evening Lake Worlds (Video)
0:00 –
7:35 –
9:05 –
9:05 –
16:35 –
58:10 –
59:55 –
59:55 –
2:05 –
9:10 –
22:30 –
23:30 –
54:00 –
57:52 –
1:04:30 –
1:06:36 –
1:06:36
1:14:00 –
1:14:00
3 Evening Lake

Evening Lake: Free Bentley the Yeti
Unmissable
Freeing up Bentley will cost you total a of 1,000 gems. Bentley is mainly needed for the Bentley’s Outpost achievement so I suggest buying it soon as you can.

Evening Lake: Launch the Transporter Rocket
Unmissable
After using the Transporter Rocket in Evening Lake you will get this achievement.

Lost Fleet: Use cannons to shoot down all vultures
WARNING! This achievement tends to be buggy and for some reason it does not grant you the achievement from time to time. If that happens just re-enter the world.
After you have used the cannons to shoot down the vultures the achievement should pop. I highly suggest finishing the level atleast once so you can just get back to the ship right away and try this over again by re-entering the world. Picture below for reference on which cannon to use and what Vultures look like.


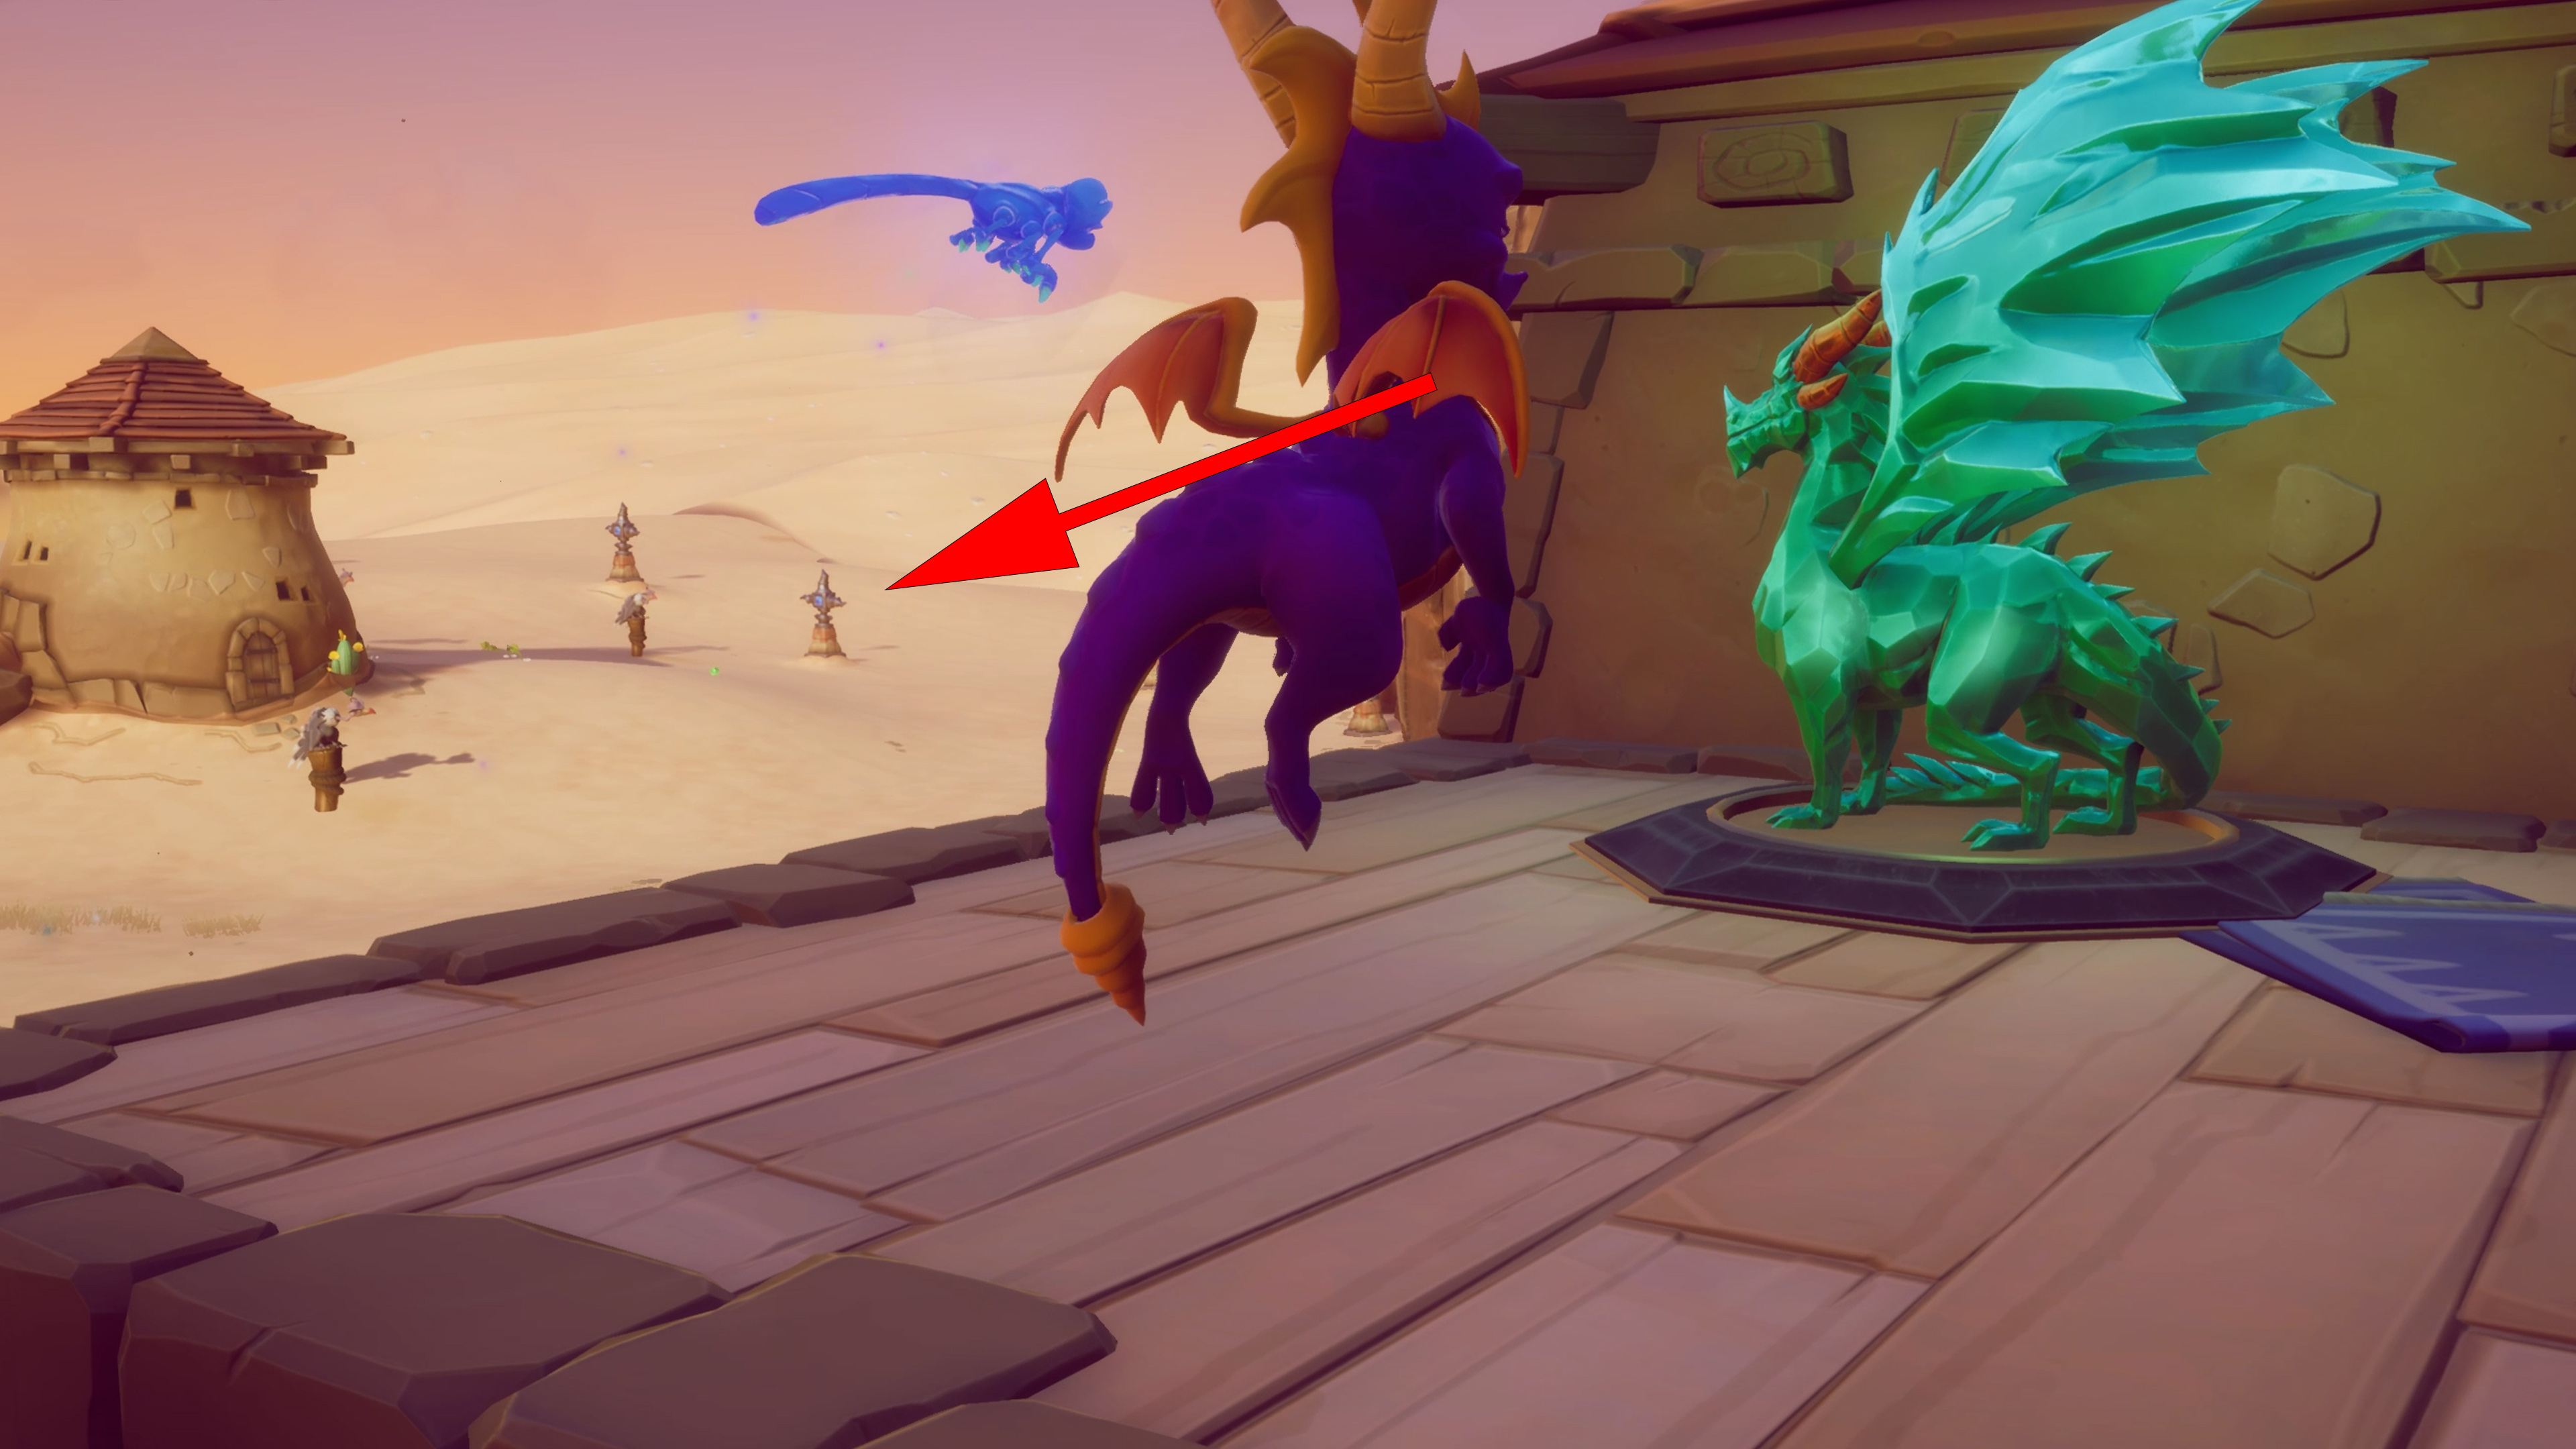
Frozen Altars: Use ice breath to freeze 12 enemies
As you enter the Frozen Altars a fairy will zap you and give you the power to breath ice instead of your usual fire. Ice the enemies before charging them for the achievement to pop. There are more than enough enemies in this level to finish this.

Fireworks Factory: Defeat Twin Dragons (Boss)
At the end of Fireworks Factory you can glide across some towers to a sub-level in this level. In this area there are two dragons and a superflight / superflame powerup. You need to use this to defeat the dragons in this area.
Things to keep in mind while doing this.
- After a certain amount of time a dragon will start to heal itself.
- If you try to attack from the front they will start shooting you which can drop you out of the sky.
- Dragons get faster as they lose health.
- You can pre-emptively shoot at the tunnel exits the dragons use to move around.

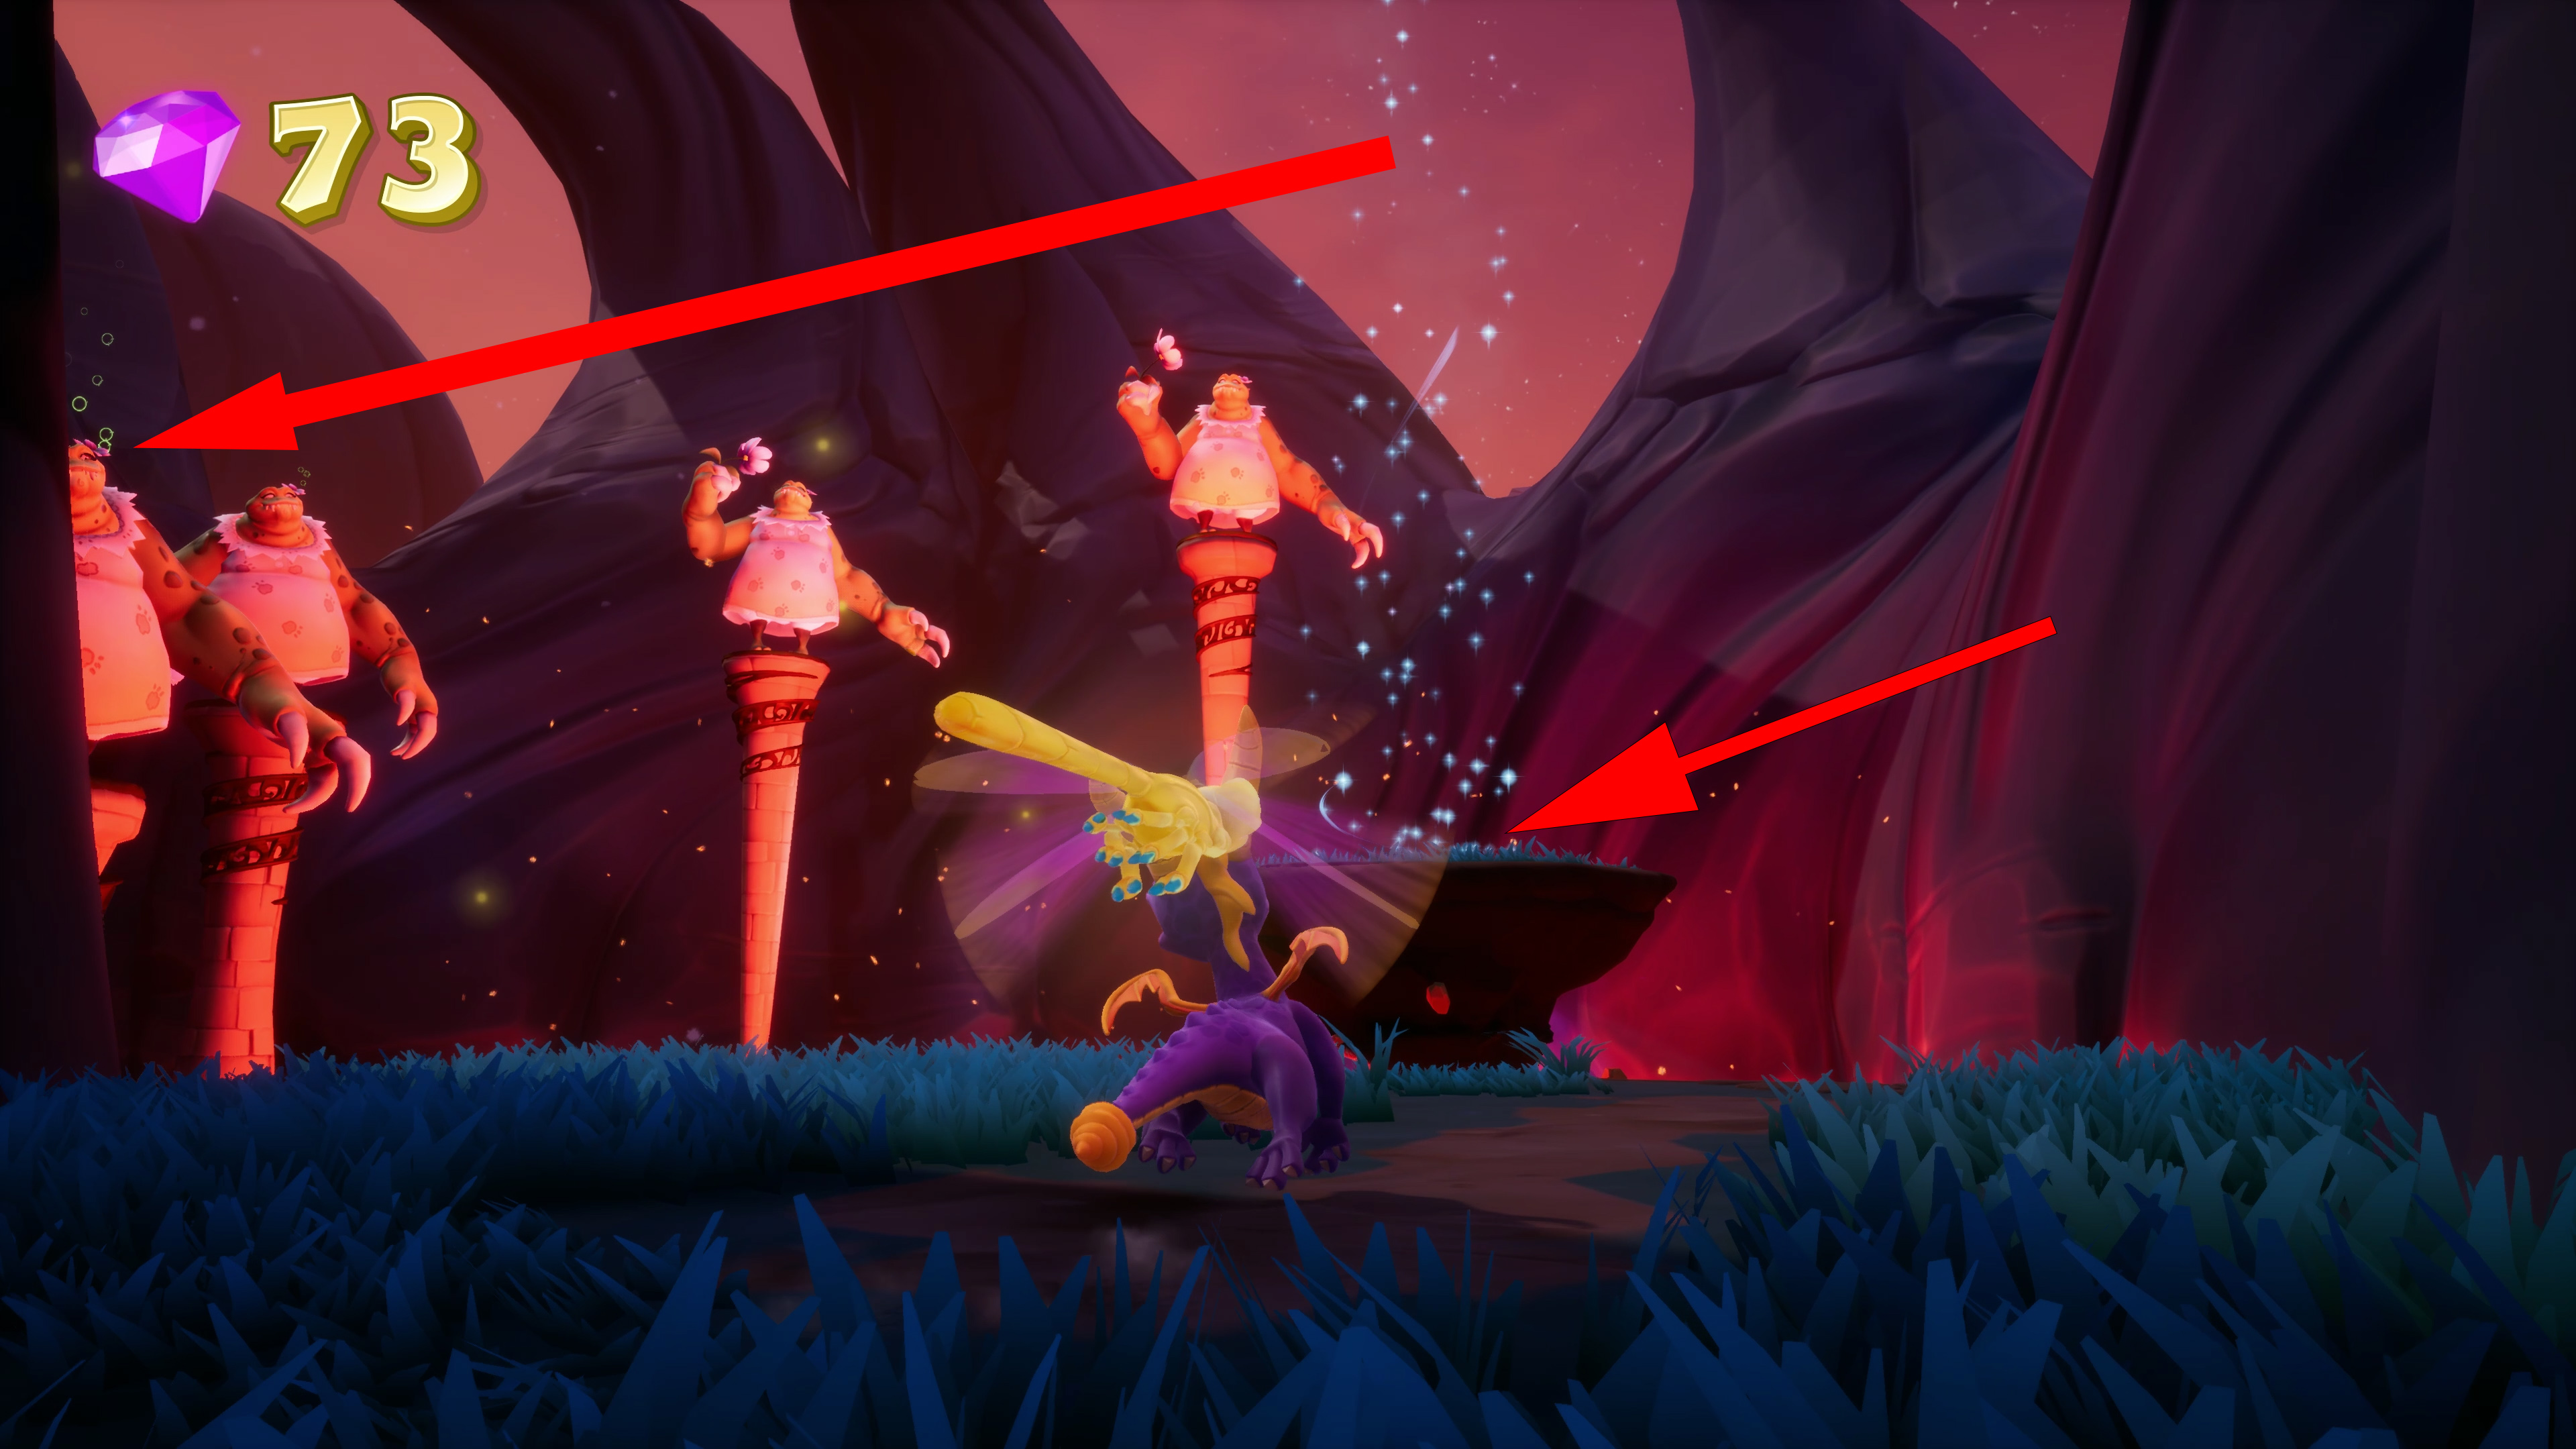
Charmed Ridge: Defeat a giant
While doing Charmed Ridge there are Wizards which will increase the size of Rhynocs you come by. Just flame any of the chargers after they have been turned to a giant to get this achievement.
Picture below.


Bentley’s Outpost: As Bentley, destroy all the totem poles
There are several totem poles placed around Bentley’s Outpost which you can destroy. Whack them until you can destroy the chests at top the of them. All of them are pretty easy to spot but if you still miss some after you are at the end of the level use Sparx to detect gems to locate the last poles. Picture as reference so you know what to look for.


Honey Speedway: Fly through 12 star speed boosts in one race
There are a total of 7 speed boosts per lap so you will need to do almost 2 whole laps for the achievement. Picture reference below.


Scorch’s Pit: Defeat Scorch
Unmissable
You need to defeat Scorch to advance into the next level. He is not too special. Bentley will drop you missiles from time to time. Use them while the boss’s shield is down.
The boss itself has two abilities, one of which is shooting barrages of fire into the ground which are easy to avoid. The other one is dropping a few eggs from time to time which will spawn some crab enemies for you to take out. After the boss is down the achievement will pop.

Starfish Reef: As Sparx, defeat the Manta Ray
After you defeat Scorch you will unlock this Sparx level.
Midnight Mountains Worlds (Video)
0:00 –
7:00 –
8:05 –
8:05 –
20:45 –
20:45 –
38:10 –
40:55 –
54:20 –
54:20 –
1:16:55 –
1:24:35 –
1:31:20 –
1:40:40 –
1:45:05 –
1:45:05 –
1:52:55 –
1:52:55 –
4 Midnight Mountain

Midnight Mountain: Free Agent 9
Freeing Agent 9 costs you 1300 Gems and is the last person you need to free. You have to free him as you need him for his homeworld achievement Someone Set Us Up the Bomb and for the Nice Shootin’ Tex achievement in Dino Mines.

Midnight Mountain: Get revenge on Moneybags
If you have been following the guide so far this will be last achievement you will earn in the game. You can do this achievement after beating the sorceress.
He will be on one of the bridges in Midnight Mountains bragging about the egg he has found. This leads to Spyro finally being able to give some hard earned trashing to Moneybags.
During this chase sequence Spyro will be able to either flame or charge him to take back all of the gems you have given to him during Spyro 3. Once he runs out of gems he will give you the egg as well which he was planning to sell in Avalar from Spyro 2.
After you have kicked Moneybags butt in this event all the paywalls you have not paid for yet will be automatically opened.

Crystal Islands: Defeat all the Crystal Bears
Crystal Bears are the enemies you will encounter while doing the Crystal Islands. You should get all of the Crystal Bears while progressing through the level normally. Picture below.


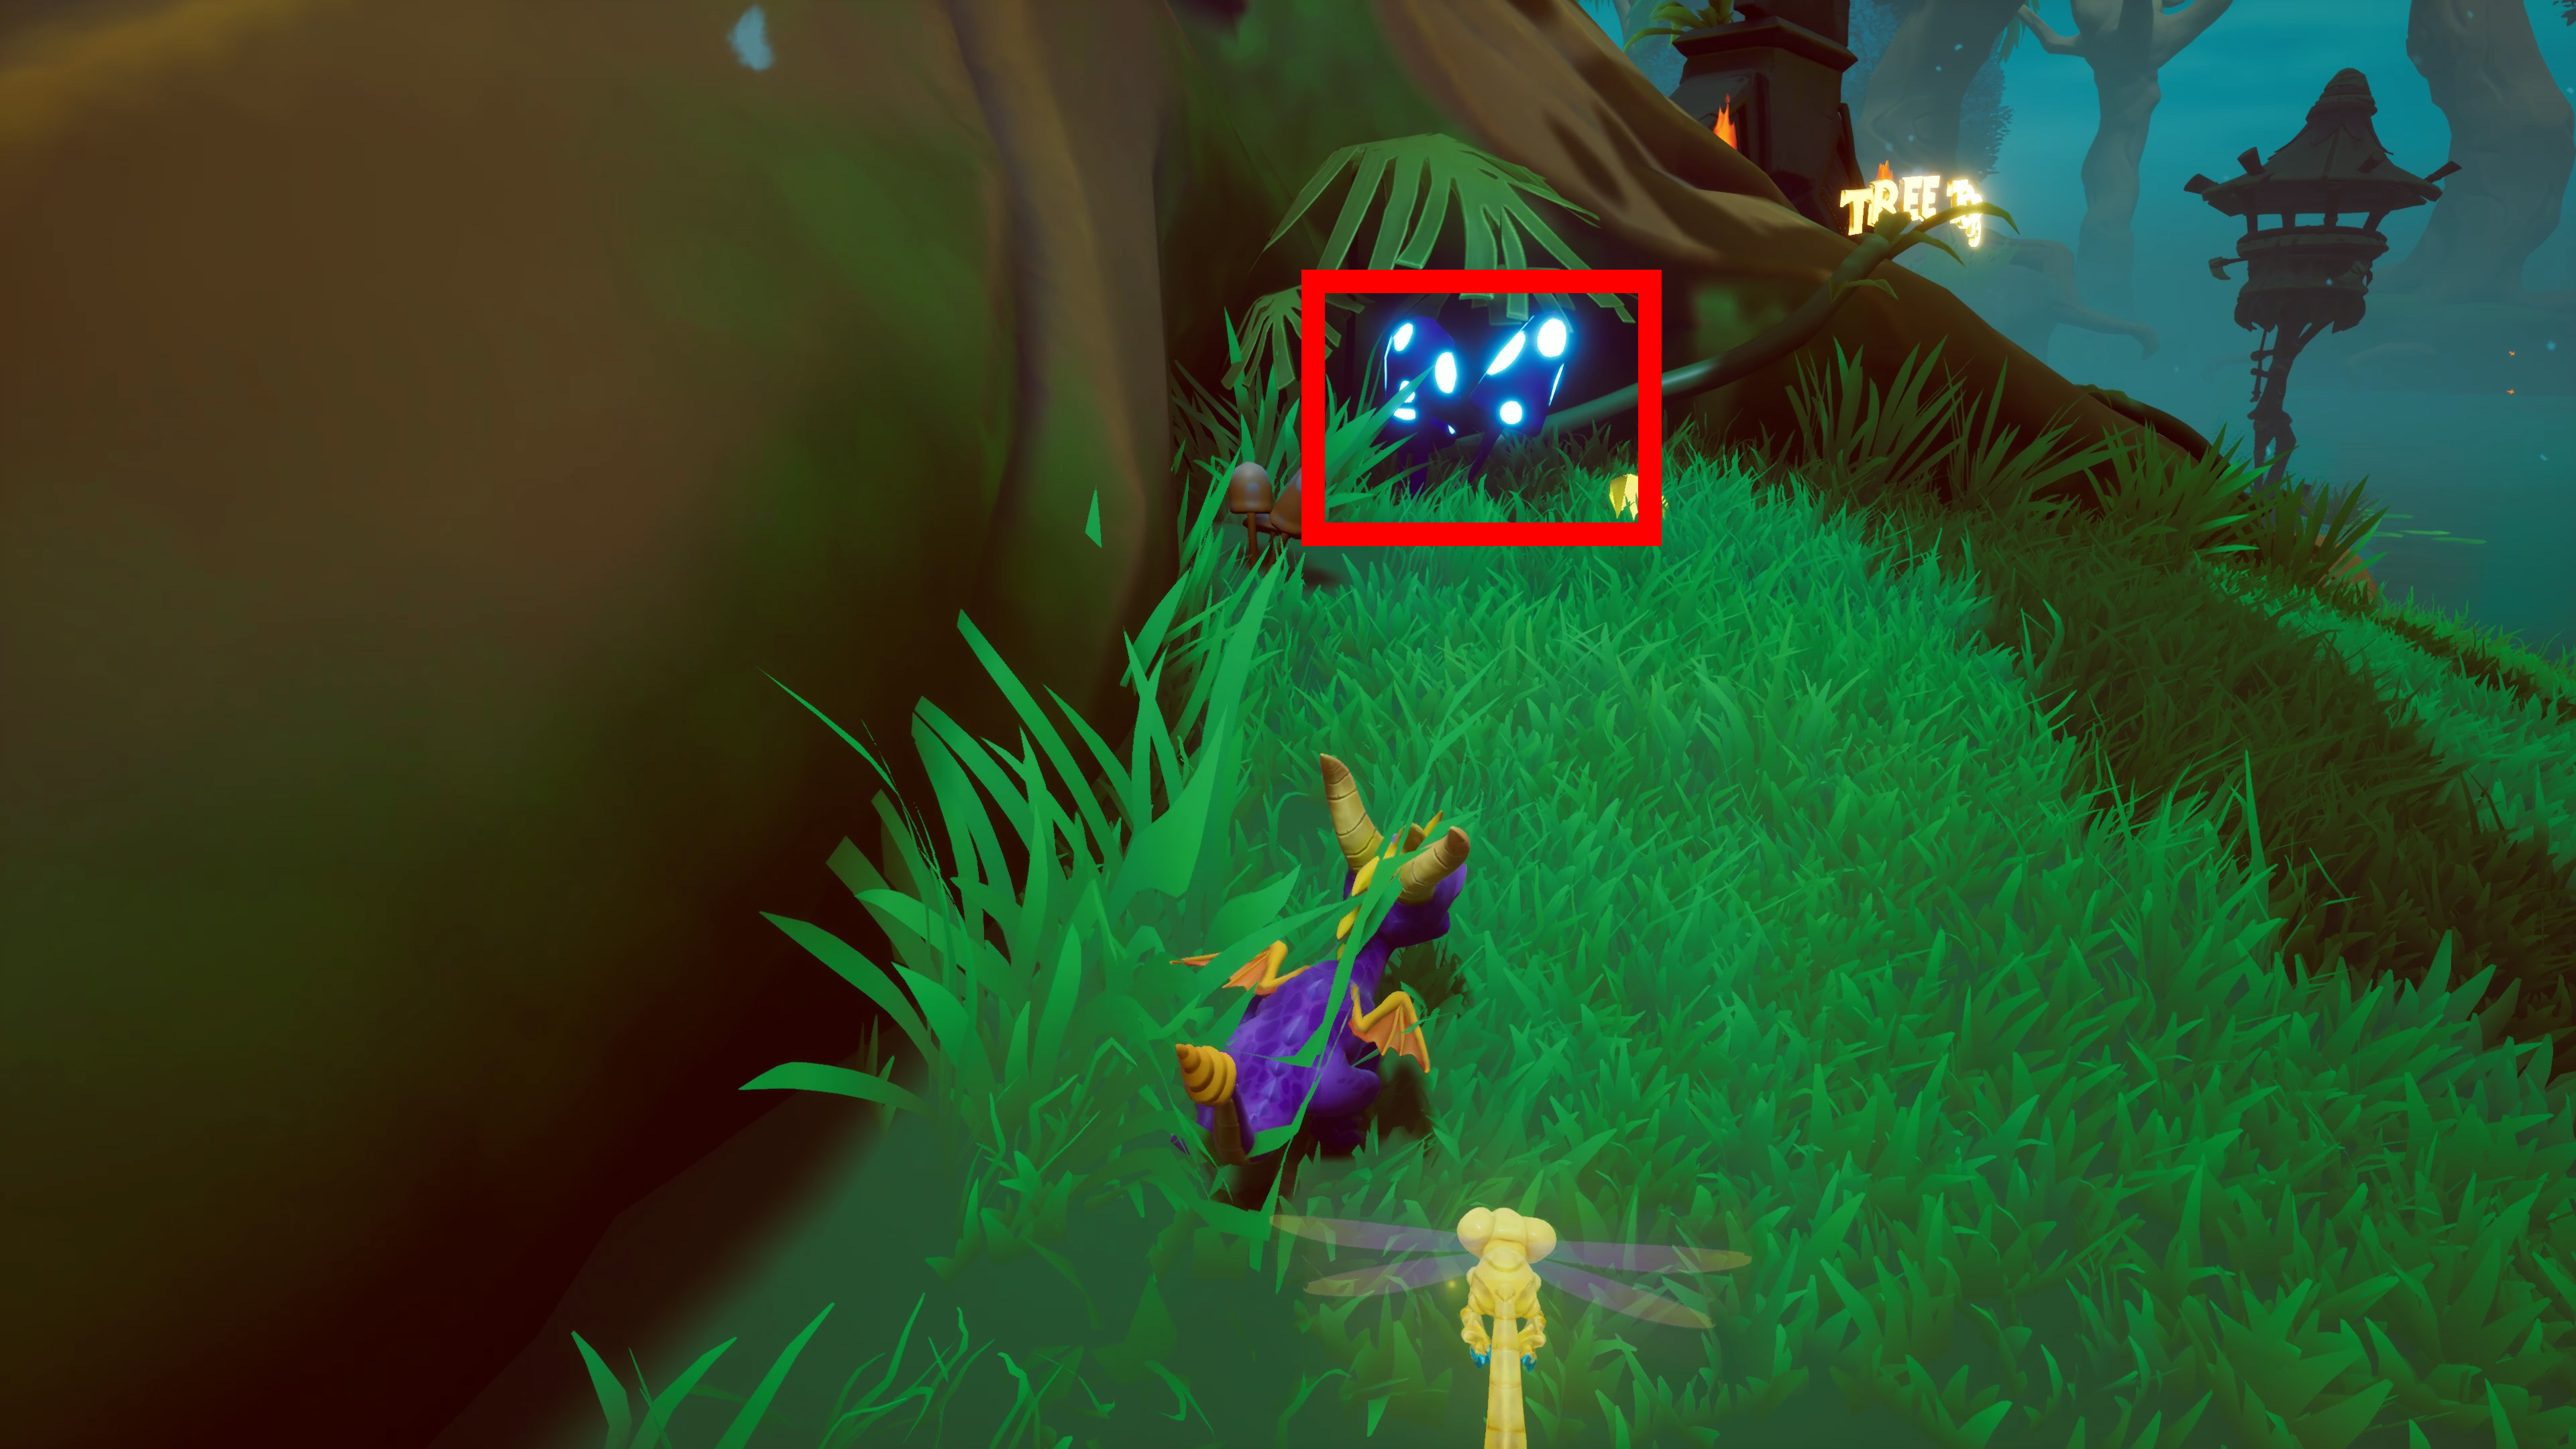
Desert Ruins: Find both butterfly jars
During Desert Ruins there will be two butterfly jars which are placed around the level. We will go and see where they are located.
The first one is fairly close to the start when you are about to enter the temple. Instead of entering, turn to the left of the temple and charge / flame through the bronze scorpion to see ladders to your right. Climb them. From the ladders turn right and you should see a Rock Hand in front of you. Take it out and behind it is the first jar (Picture 1).
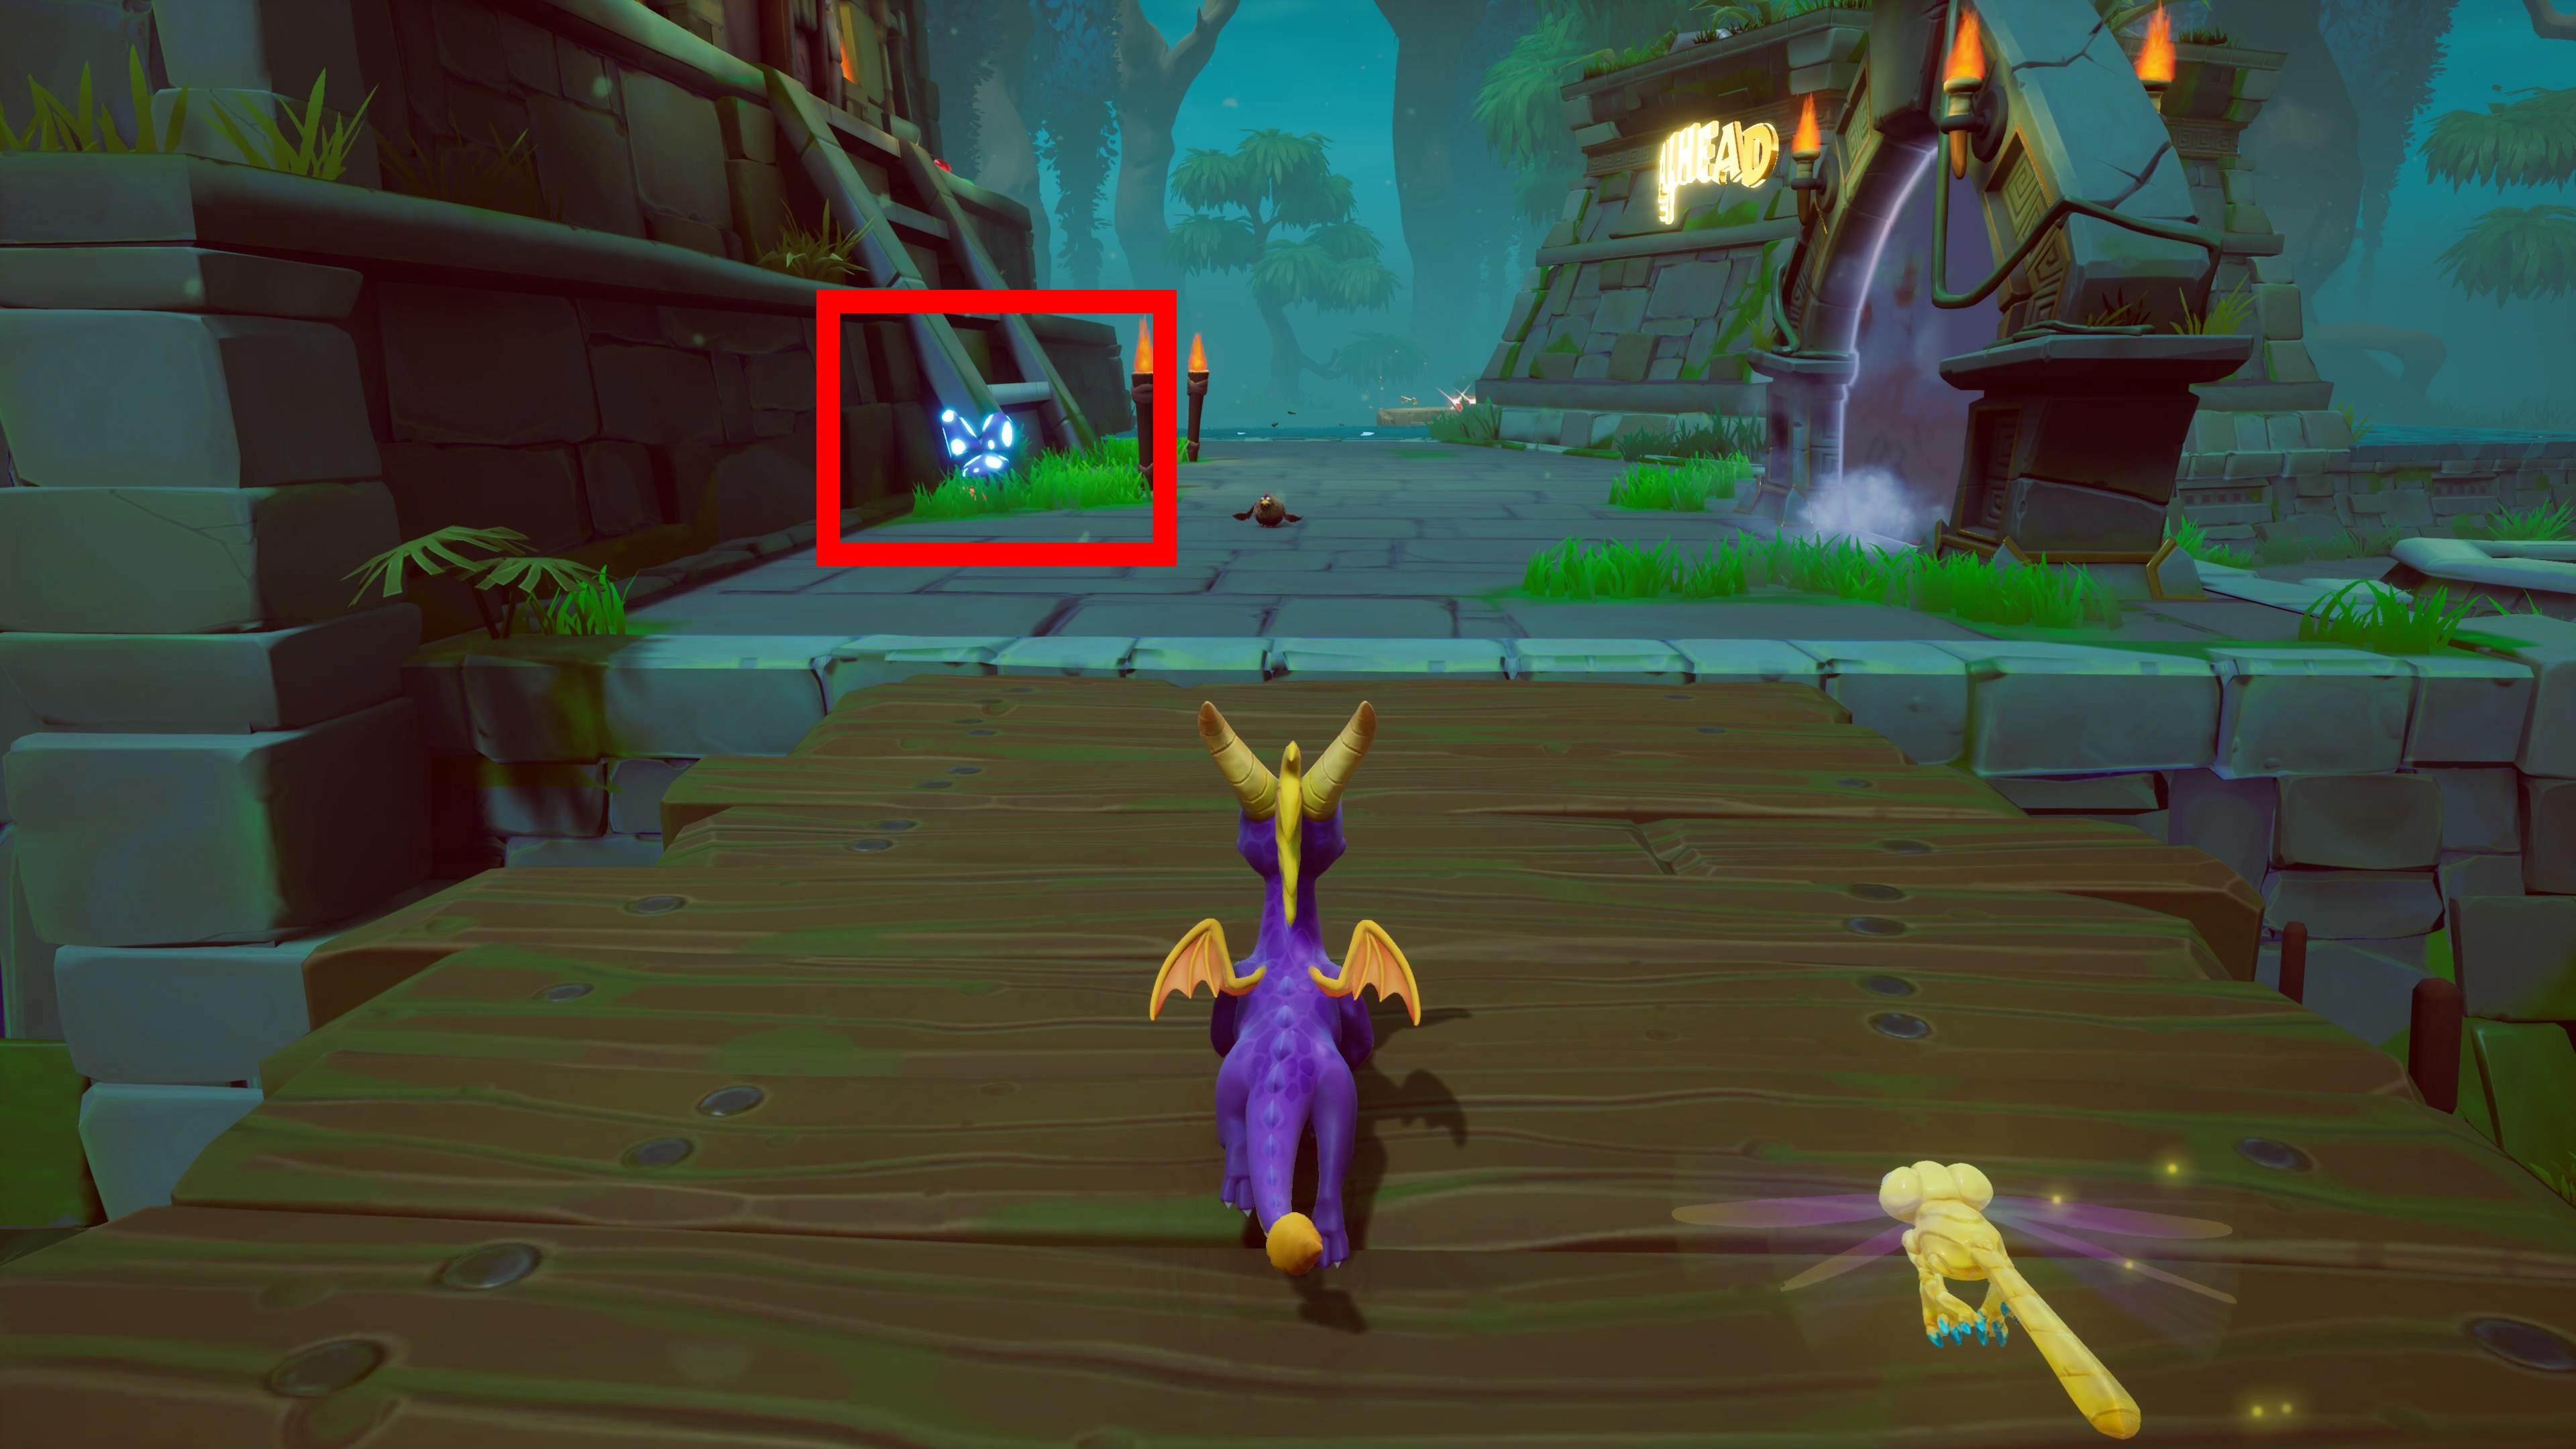
To get the second jar, instead of turning left from the temple, enter it. As you progress through the temple you should see the jar right away on the ledge in front of you. Progress inside the temple till you see ladders next to you. From there climb them and take out the Rock Hand and one of the Scorpions. After you have defeated both of those, turn around and keep going on until you see a platform to your left with a jar on it. From the platform you are standing on right now, glide to the platform with the butterfly jar for the achievement (Picture 2).
1.


Haunted Tomb: Destroy All Sarcophagi
As you progress through this level you should come by some Sarcophagi which seem to be indestructible. In the same area you should see big mummies throwing some lava rocks at you. You can use these to destroy the Sarcophagi so you should not take all of the big mummies out before you have taken every Sarcophagi. Picture below for reference so you know what both of them look like.


Dino Mines: As Agent 9, defeat an enemy with a ricochet shot
There is a shooter activity sub-level in the Dino Mines just for Agent 9. As you progress through this area with Agent 9 you need to defeat one of the enemies with a ricochet shot. Just keep shooting the walls behind the enemies until this achievement pops. There are more than enough opportunities to get this achievement during this challenge so don’t worry if you don’t get it on your first go. Just retry the area if that happens.

Agent 9’s Lab: As Agent 9, shoot down all the balloons
During Agent 9’s Lab there are several vases up in the air which you need to shoot as Agent 9.
One of them is floating under the ceiling in the first room you enter. This is where you have to shoot the rhynos behind cover from the elevated pedestal in the center of the room.
Rest of the vases are in the outside areas so you need to look out for them during that time.


Harbor Speedway: Find Hunter
Easiest Speedway out there. Hunter thinks he is well hidden inside of his lighthouse but he probably needs to rethink his strategy. After talking to Hunter inside the lighthouse you will earn this achievement. You don’t actually need to finish his challenge unless you want to get one of the eggs out of it.


Sorceress’s Lair: Defeat The Sorceress
Unmissable
As mentioned at the start of the guide you only need 100 Eggs to 100% the game and it is only because you need them to unlock The Sorceress boss fight. The boss fight is your typical three phase affair so check the video if you need help. [VIDEO LINK HERE]

Bugbot Factory: As Sparx, defeat the Metapede
You will unlock the last Sparx level after you have defeated The Sorceress. The achievement will unlock after you have finished this level.
Cleanup (Video) Not needed for any achievement
This video is for the people who want guidance for the areas that were inaccessible earlier in the game. None of the achievements will need this so you can skip this video if you just wanted to 100% the achievements.
0:00 –
4:00 –
8:15 –
16:20 –
37:30 –
Rantsi: Do you love achievements?
Well, you are not alone! There is a great community with lots of support, guides and shoulders to cry on, if those pesky achievements won’t unlock. Join 100pals[discord.com] discord and find more people like you 🙂
Credits
Rantsi: Text, videos, screenshots, layout.
Goblin: Proofreading, icon