
Overview
***Squad Beginner Guide***This guide is meant to give new players a basic idea of how the game works and to avoid common mistakes, problems and miscommunication which can affect the gameplay for others, in a compact and picture assisted format.
1. Introduction
If you are new, first of all, welcome to the Squad community and i hope you grow to enjoy the game.
The next sections in this guide will contain basic principles and info which will make your first steps in the game less brutal.
You can also comment on the guide and i will try to answer as soon as possible if you have any questions.
2. Servers
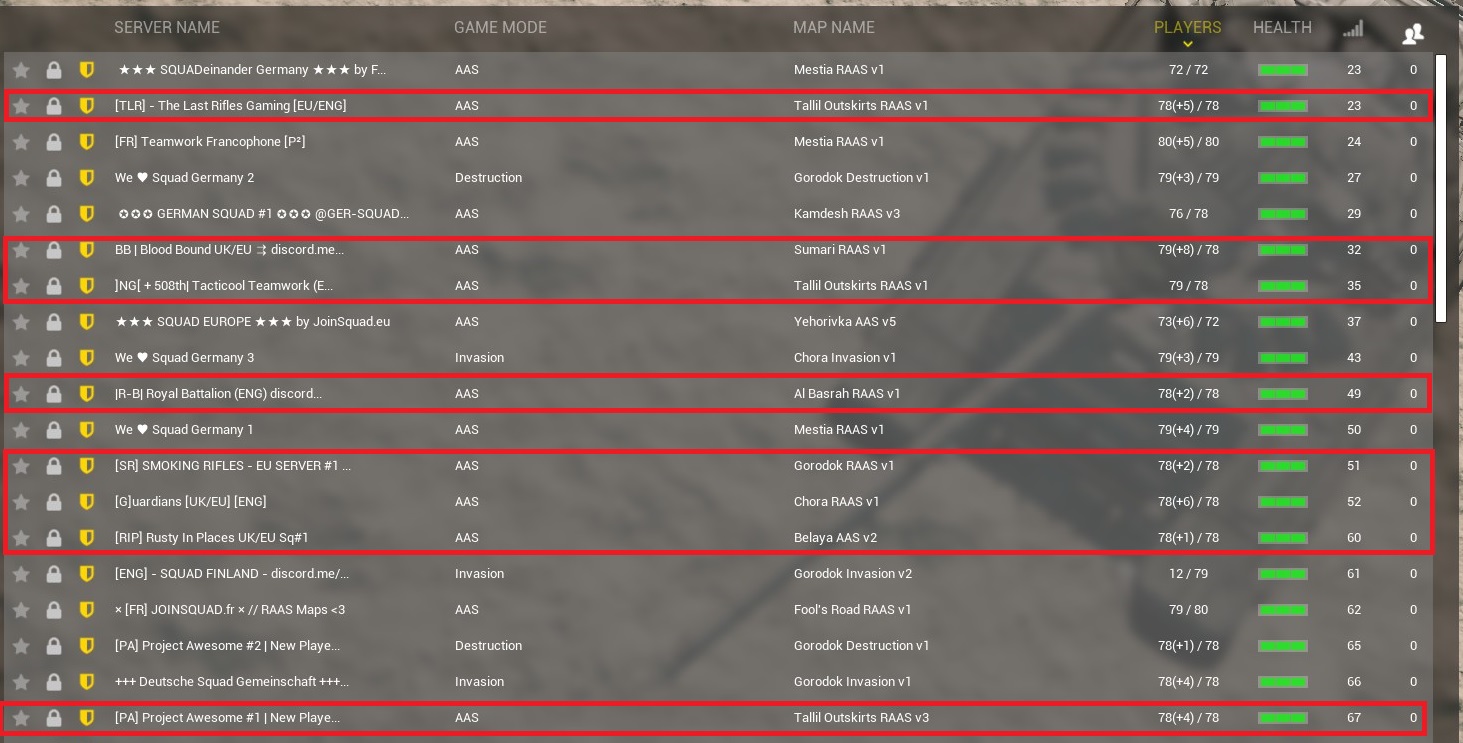
Choosing the right server can make or break your experience in squad.
Points to keep in mind for server choice are:
- Ping
- Language
- Current game mode
- Players
An example, i am from Belgium and i only speak dutch/english and a small amount of french.
Based on that, my best choices would be the highlighted servers since they have low ping, english as the main language, a simple game mode (AAS/PAAS/RAAS) and a high amount of players.
3. Game modes
There are a total of 7 game modes in squad, of which 3 are featured on most servers.
I will only discuss the popular modes, additional info can be found here:
[link]
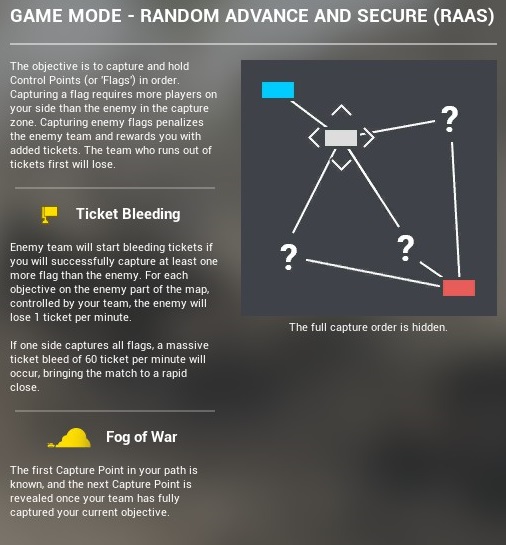
- Advance and Secure (AAS/RAAS)
- Insurgency
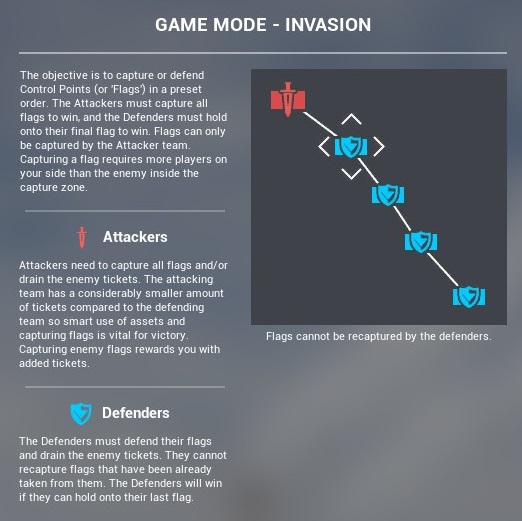
- Invasion
- Skirmish
- Territory Control
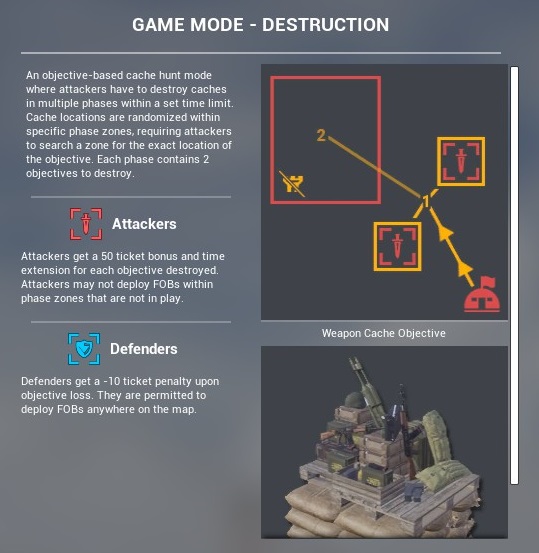
- Destruction
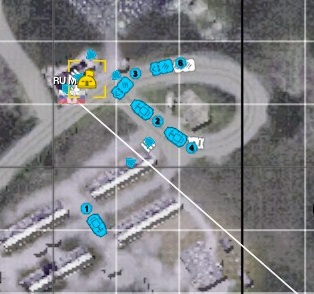
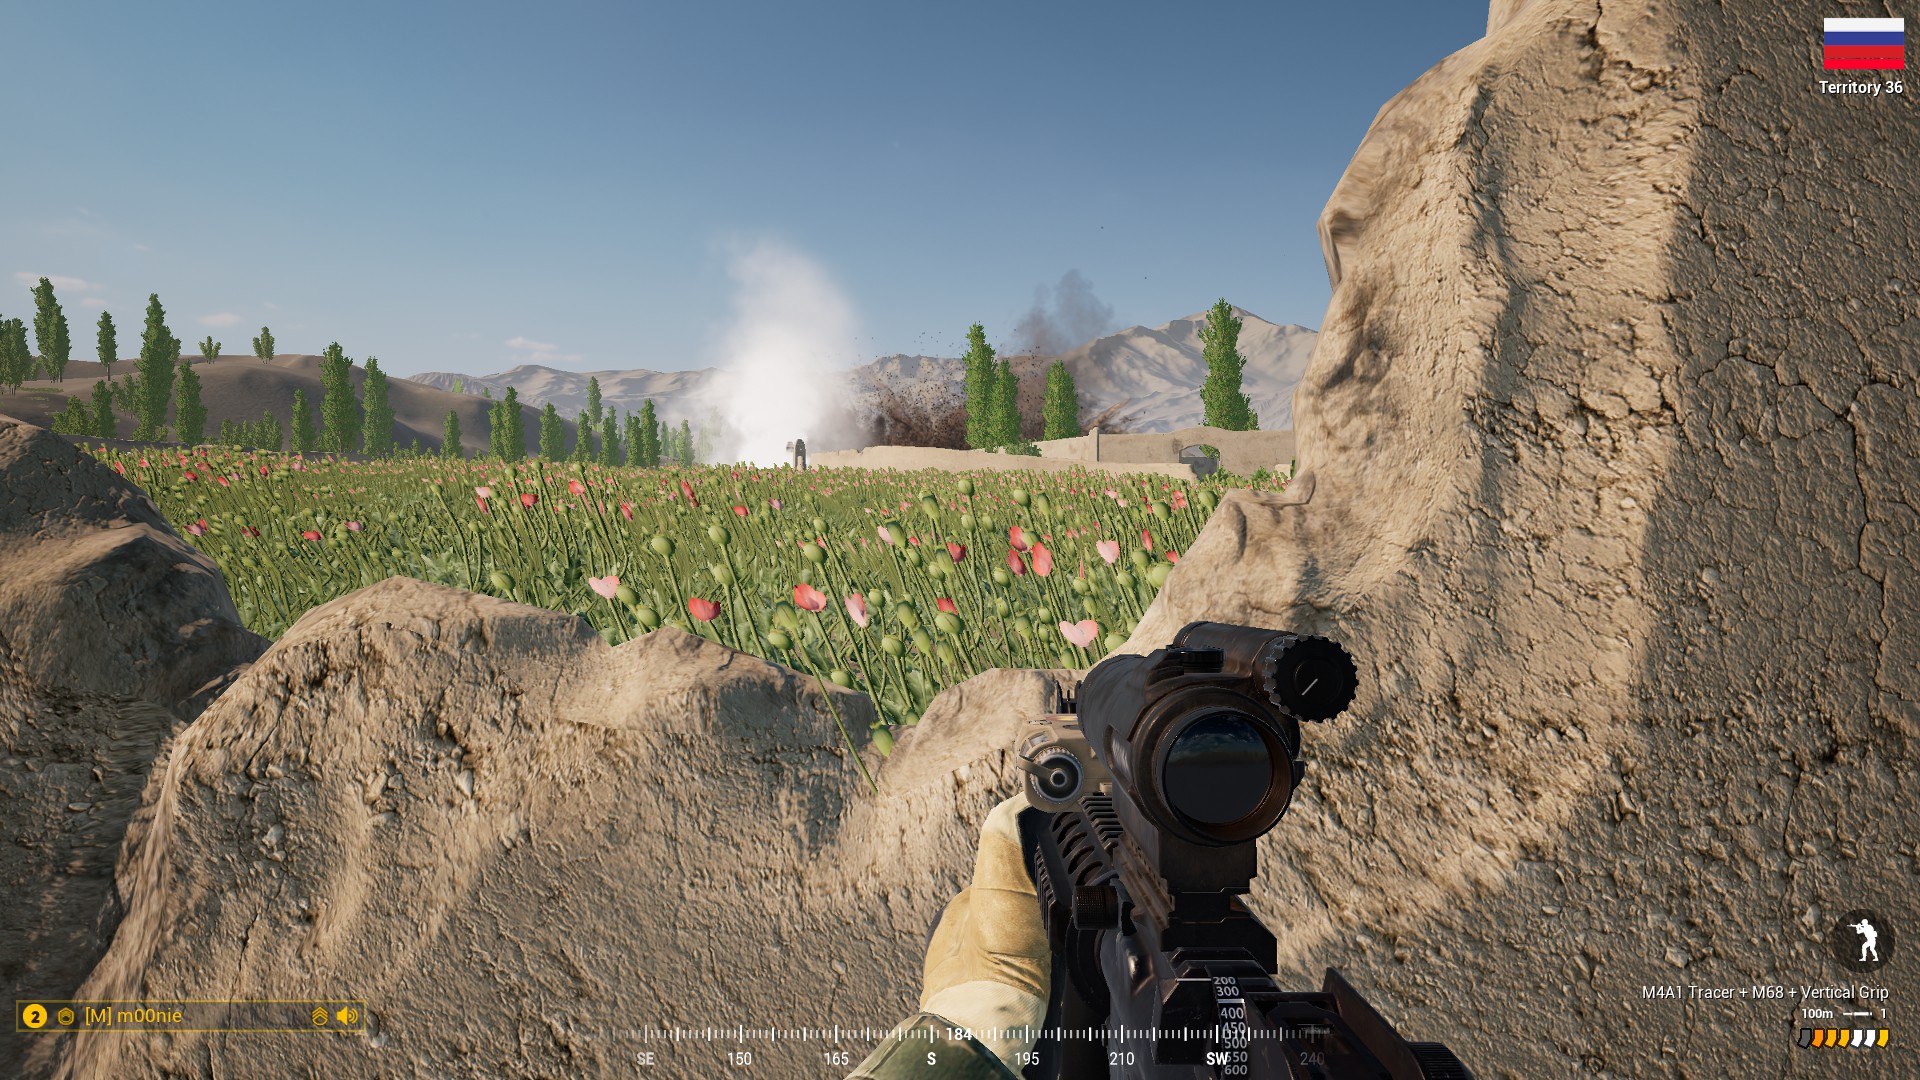
One thing to remember on all maps is that Squad will always indicate on the map which points need to be defended and attacked, act accordingly.
Flags that can be attacked will be marked on the map.

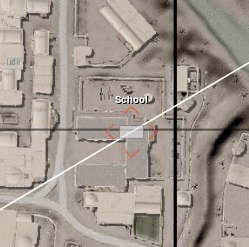
As of V15, Squad will now inform you onscreen of objectives that have changed status.


Another important note is to never leave the defence flag unguarded.
Defence is always more important than offense, should you lose your defense flag, it can spiral the game into a rapid defeat.
Some game modes like Invasion will also feature temporary spawns which disappear after a set amount of time.


4. Tickets
Tickets determine which team wins the match and can be found at the top when you check the scoreboard. In squad, you can only see your own team’s tickets.

You can gain tickets by:
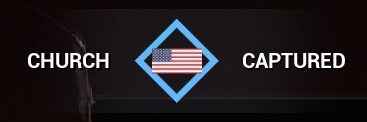
- Capturing a flag
- Reviving a player who has been downed
You can lose tickets by:
- Friendly flag gets captured
- Friendly player gives up after being downed / gets killed
- Suicide of a player
- Friendly vehicle gets destroyed
- Losing of a friendly FOB
- Ticket bleed (if you have less flags then the opposing team)
For more info about the amount of tickets, you can check the top right of the map screen.
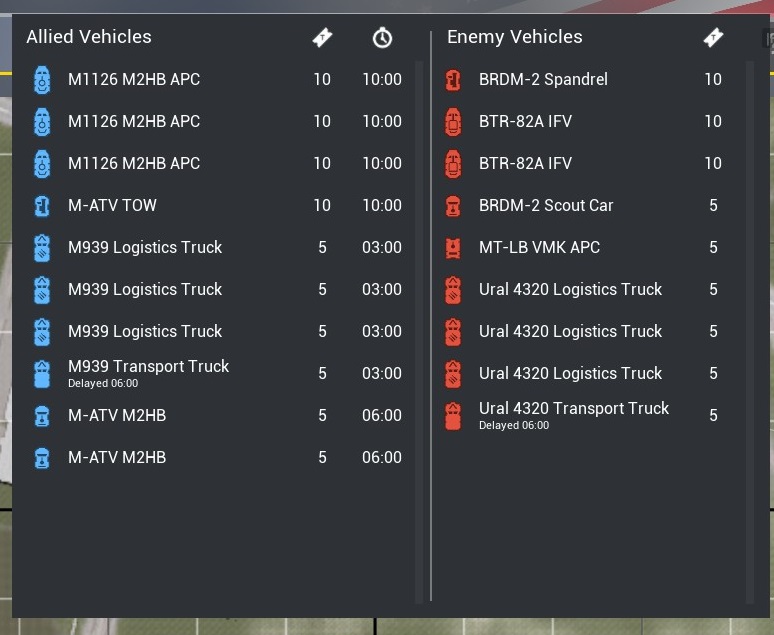
As of V15, friendly and enemy vehicles are shown for the current map with respawn and ticket values. (Some have a delayed spawn timer)
*As of V2, the flag capture/loss ticket balance has been changed to +60/-10.

5. Staging Phase
After map load, there is a pre-match 3 minute (180 seconds) staging phase which allows squads to be formed, tactics to be discussed by squad leaders and vehicles to be mounted.
During this phase, play close attention to what your squad leader has to say.
Some points regarding this period:
- Do not spawn in untill you are told to do so.
- Do not spam squad chat, your squad leader is talking to other squad leaders and needs to be able to hear.
- Do not take any vehicles unless your squad leaders orders you to do so.
- Make sure your squad has atleast 1 medic and anti-tank, fill when needed.
- Do not spawn in at the last moment and force your squads vehicle to wait for you. You will risk being left behind.
The timer will appear in the middle of the screen.

During this period, you cannot fire your weapon, start an engine (V16) nor leave the main base.
6. VOIP
If you are new to squad, please invest in a microphone, you will be at a severe disadvantage without one and might even be kicked out of a squad for the lack of.
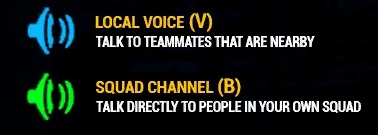
As a new player, you’ll be using Local and Squad chat the most.
Local only works in close proximity. Use this for talking to people next to you, for serious or non-serious chatter.
Squad works only for your squad members, regardless of distance, including your squad leader.
Try to keep these comms as clear possible, only providing important info which is useful to either the squad leader or a squad member.
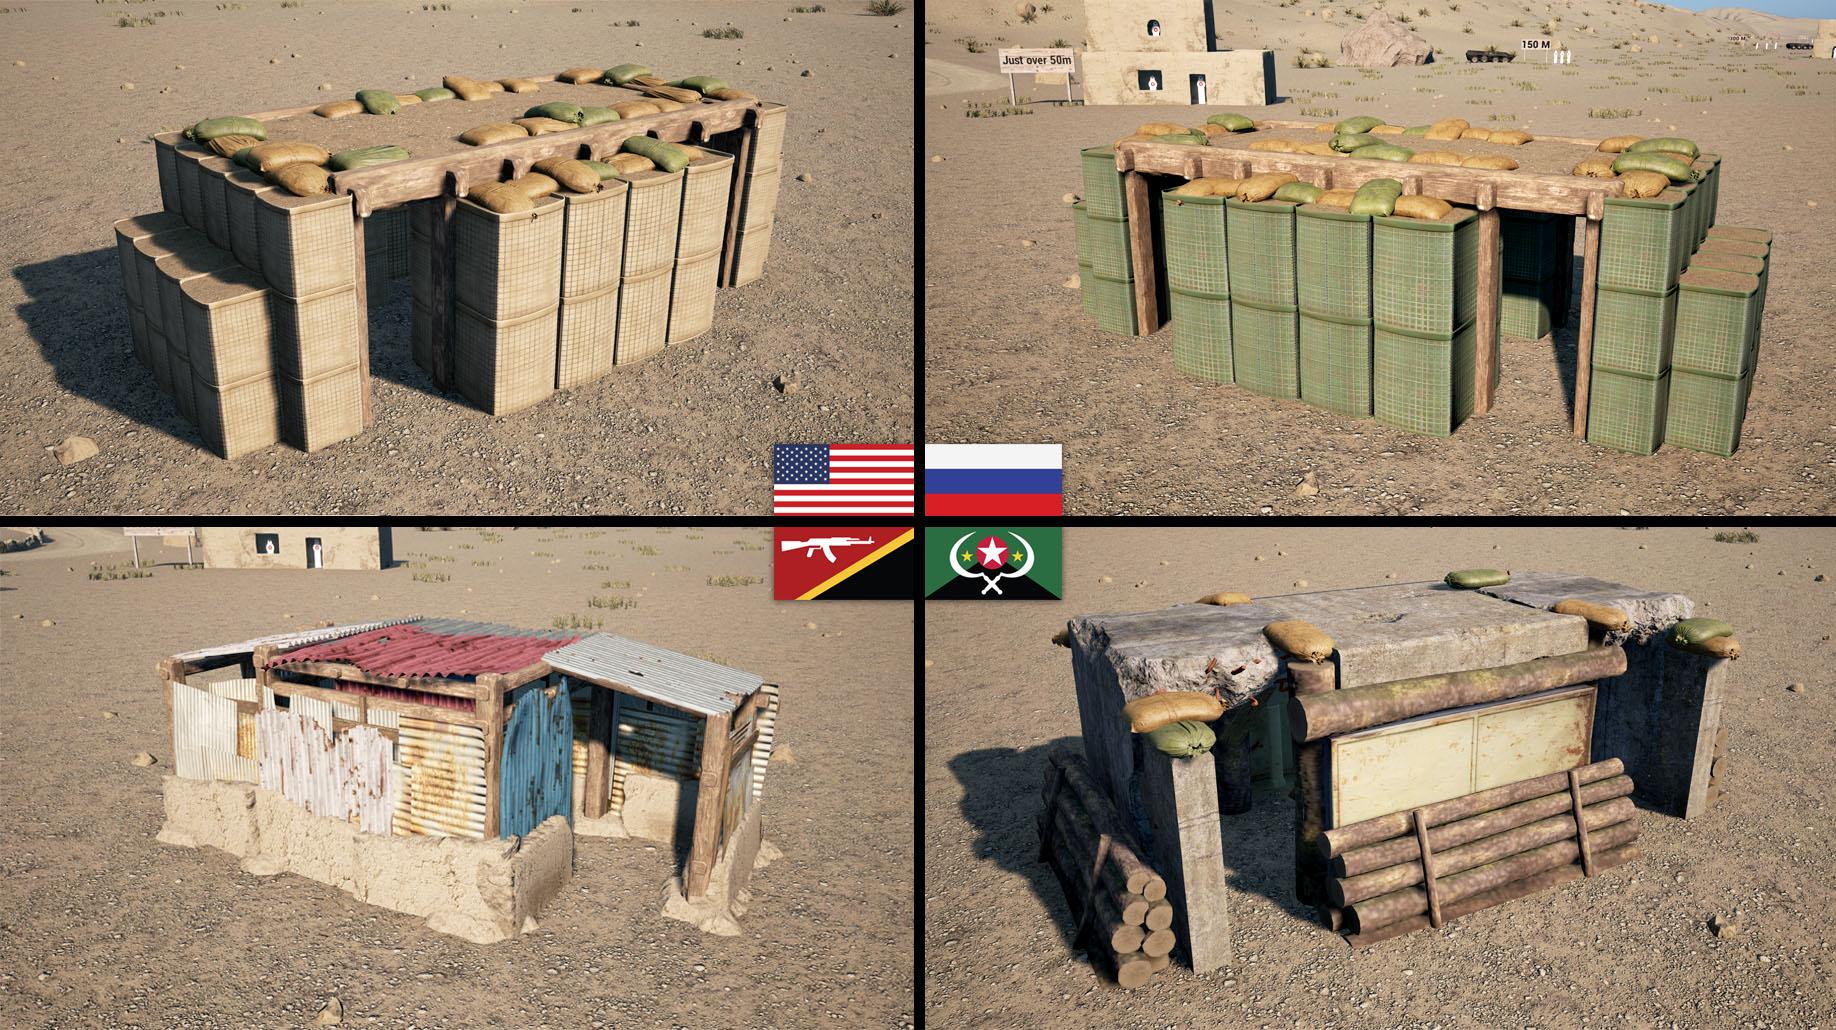
7. Teams and vehicles
Each team has a different look, weapons and access to faction specific vehicles.
It is important to have knowledge of these subjects to avoid friendly fire and have good battlefield awareness.
Factions are divided into 2 groups.
- Conventional armies
- US army
- Russian ground forces
- British army
- Canadian armed forces
- Middle eastern alliance
- Rebel factions
- Insurgents
- Irregular militia
This topic of the gamepedia covers all the information about this subject.
[link]
[link]
Be sure to learn the visual appearance of the infantry and which vehicles each faction uses.
Some factions like the Russian ground forces and militia/insurgents share vehicles due to similar background or history.
One other important point is the sound of gunfire / sound of vehicles, being able to determine if it is enemy or friendly is often a matter of life or death.
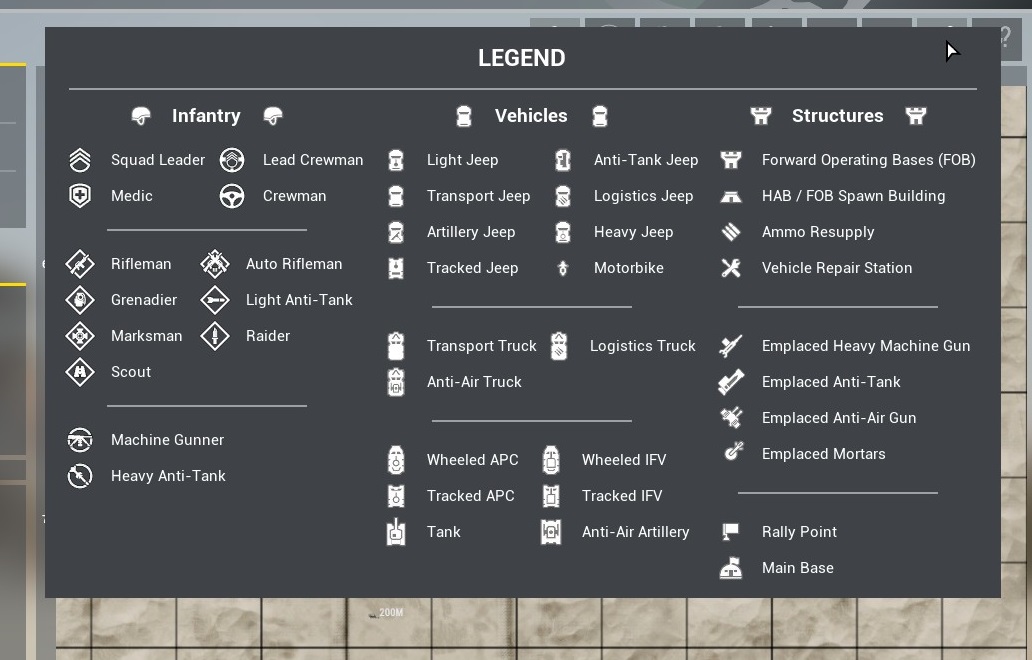
The map also comes with a legend on the top right of the screen.
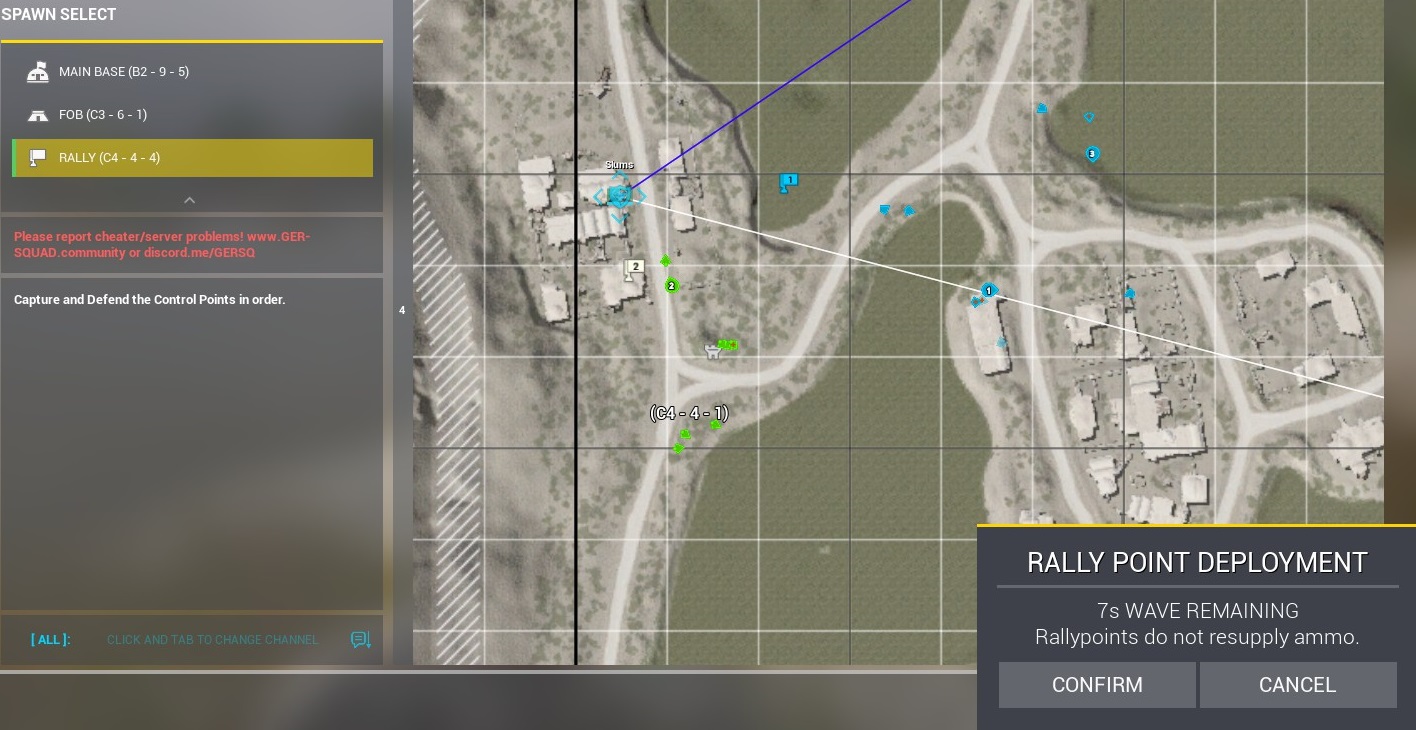
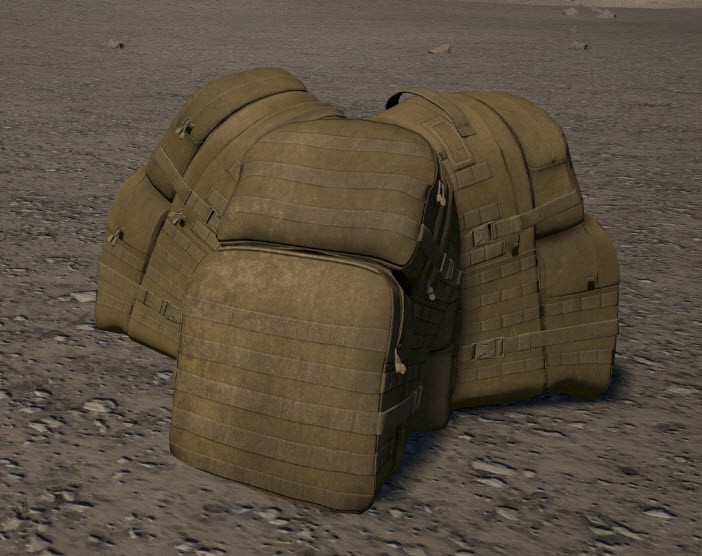
8. Spawn options and FOB’s
On each map, you will always have different choices of spawn points.
There are 3 sorts of spawnpoints.
- Main base
- HAB (HESCO Accommodation Bunkers)
- Rally point
DONT FORGET TO CONFIRM YOU SPAWN CHOICE

1) Main base
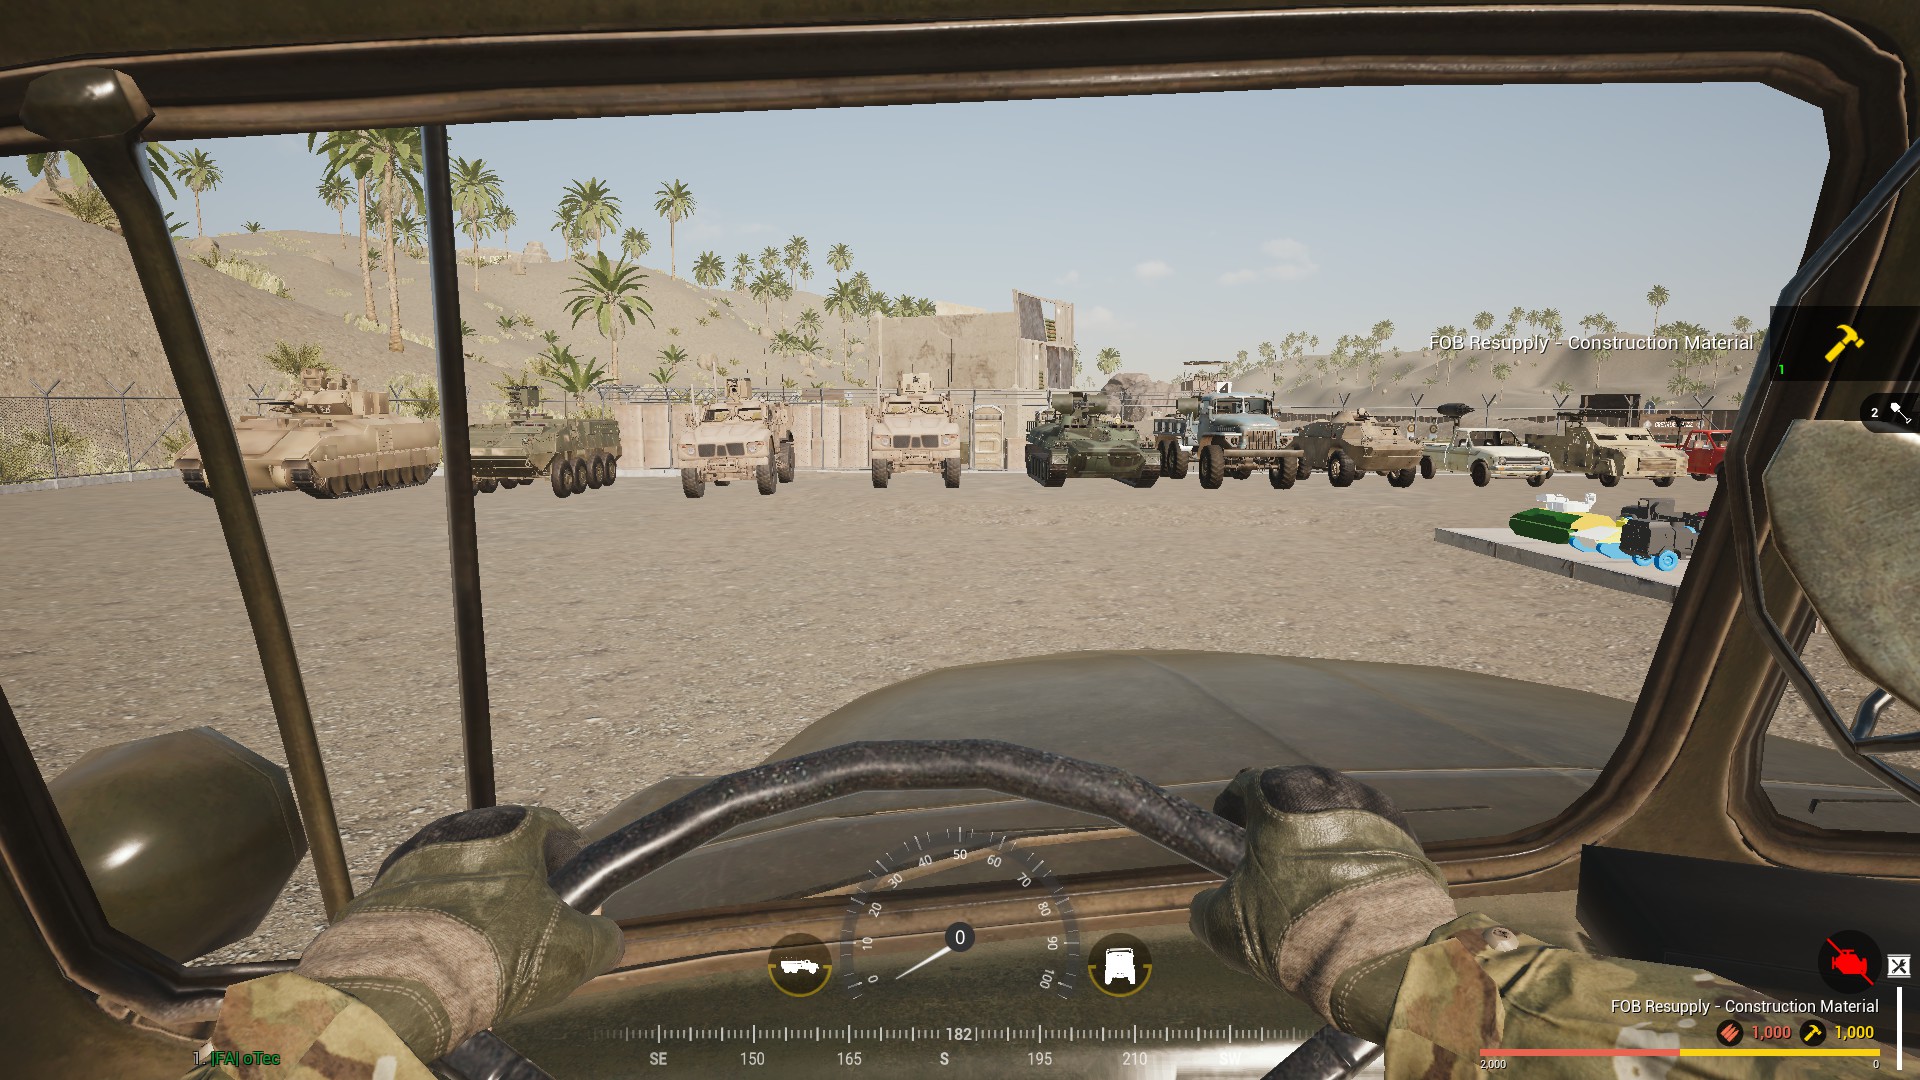
The main base spawn is always available to you and your team and has the shortest respawn time.
It is a protected spawn zone which also harbours your vehicles at the start of the match and where they will respawn after getting destroyed. It also houses repair stations and ammo boxes, and is the resupply zone for logistics trucks and supply helicopters.
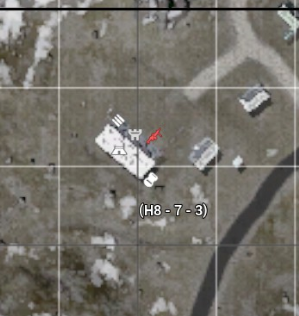
2) HAB
The HAB is a spawn bunker which requires a FOB (radio) to be build first.
It is usable by the whole team and has a shorter respawn than the rally point.
The radio is marked with a blue crown symbol (if the HAB is active) or a grey crown symbol (if the HAB is not build/being destroyed or if the radio is getting destroyed).
The HAB is disabled when 2 enemies are within 30m of it, when it is being dug down and when the radio is being dug down.
Active HAB;
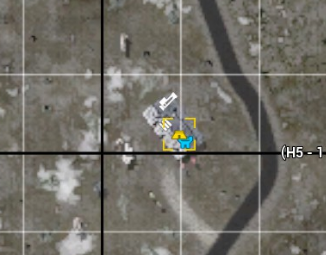
Enemies within 30m (or FOB health below 75%) marks with a red cross over the HAB;

HAB has been dug down to half build;

- Having a FOB (radio) within 100m
- Having enough construction points
Your squad leader will need 1 team member (of any squad) + a logi or supply helicopter within 30m to put a radio down.
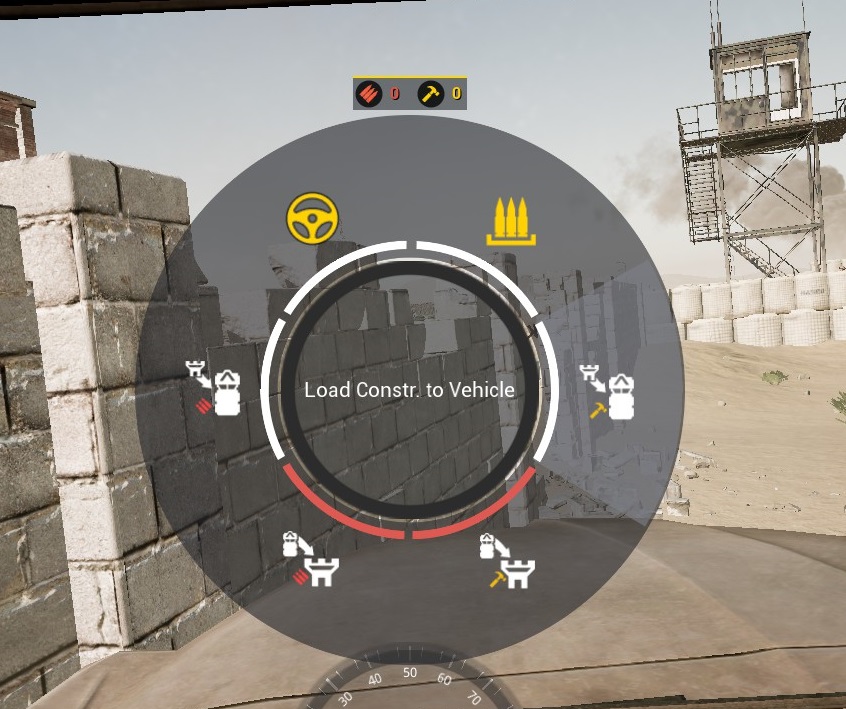
After this he can place a hab or other deployables which need to be build using the shovel.
Left click builds, right click destroys. BE CAREFUL TO NOT DESTROY DEPLOYABLES
To know that you are in range of a radio, you can check the top left corner of your screen.
It will display the health of the radio, the supplies on the FOB (radio) and if the HAB is active.
*As of V1, a FOB can now bleedout. To check a friendly FOB status, keep an eye on the healthbar while in range of the FOB.
FOB health level bar. Blue – operational, Yellow – disabled due to health level, Red – Bleeding.

Construction points and ammo points can be picked up at your main base and dropped off at your FOB (radio) using a logistics truck (truck marked with ammo symbol) or a supply helicopter.
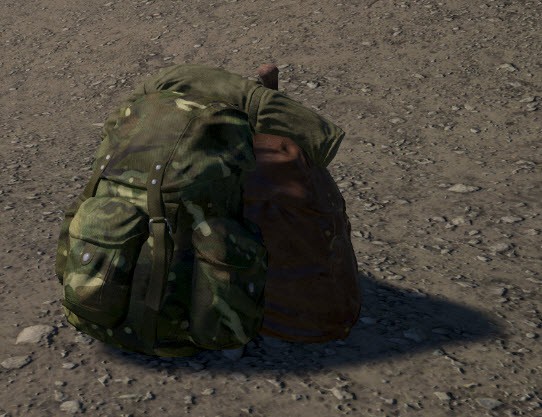
3) Rally points
Rally points can only be placed by your squad leader if he has one squad member within 8m of him and no enemies with 50m. (Since V13 and the “Buddy Rally system”, a SL can place a rally ontop of a friendly rally when dead – As of V18, only insurgents can use this feature.)
After being placed, they have a 60 second timer.
If an enemy gets within 10m of the rally point, it gets destroyed.
Should the enemy be within 50m when placing the rally point, it will fail and have a cooldown.
Each rally point holds unlimited spawns for your squad in a spawn wave format and have a higher cooldown then a HAB, so watch the counter so you don’t miss the spawn wave and let your squad leader know if it gets wiped. CALL OUT THE WAVE TIMER TO OTHER SQUAD MEMBERS
*As of V17, the death cooldown has been increased. Keep this in mind, and do not expect to be able to spawn on a spawnwave instantly after getting downed.
*As of V21, the rallypoint is now a consumable which has to be rearmed after use.
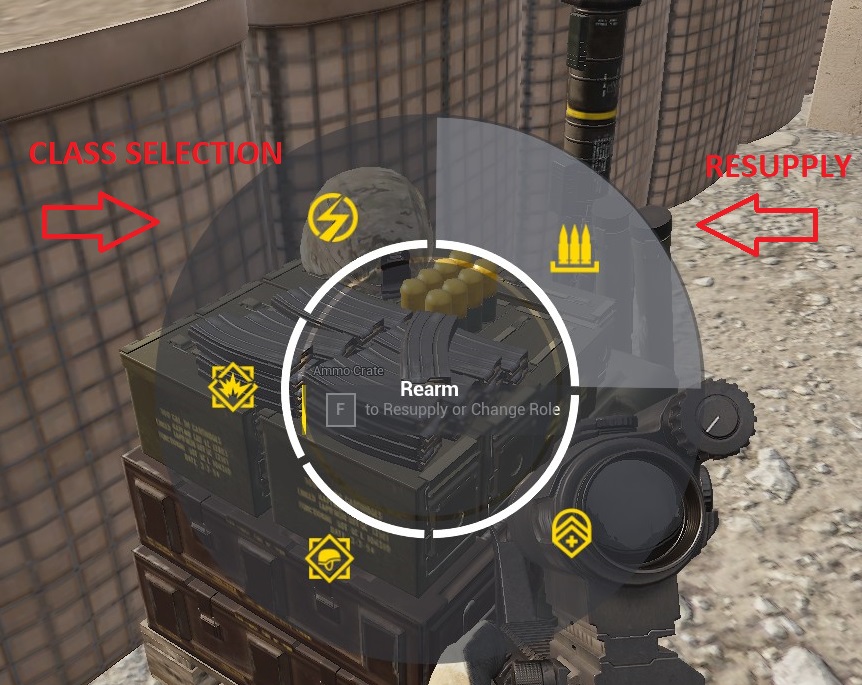
9. Role selection
A good squad relies on a good role selection.
When you open the map screen and join a squad, you will be presented with all the possible roles.

If you enabled the UI options, mousing over a class will display info about its role and the loadout of each class.
If you open the role loadout, even more info will be displayed.
You can also select different primary weapons and for Anti-Tank, different launchers depending on the squad size and available class.

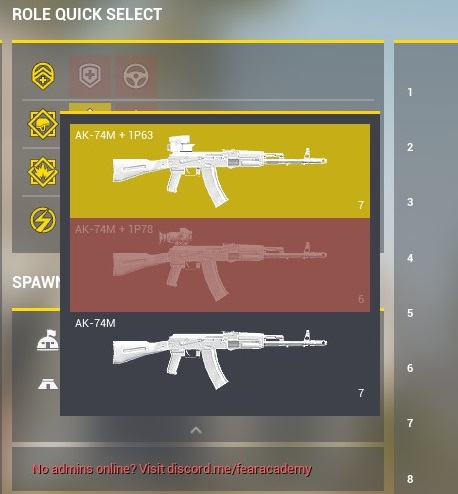
New players are often best served using the rifleman role until they have enough experience to field another, more specialized role.
The rifleman class comes with a standard rifle, a possibility of an optic, 2 grenades and a deployable ammo bag which makes it a valuable addition to evry squad.
NEVER GO SQUAD LEADER IF YOU ARE NEW
More info can be found on [link]
10. First aid and death
Another important aspect of squad is first aid. Should you be wounded and live to tell the tale, you will need to take steps to ensure your survival.
Each class comes equipped with 2 bandages (medic has more) which stop bleeding.
To apply a bandage to yourself, select it and just hold right mouse click. You can also bandage other people, but if you are not a medic this is not advised unless in critical situations.
To check if you are bleeding, watch the right bottom icon. It will flash orange and you will also get visual clues on screen.


After bandaging yourself, it is often wise to find a medic to heal you back to full health due to possible stamina penalty the injury will cause, hampering your aim and sprint.
In a downed state, any teammate is still able to revive you and your team does not lose a ticket until you bleed out or give up. A general rule of thumb is to only give up if there are no friendlies near or when you are down in a risky place.
*As of B19, reviving takes longer as non-medic (17 second revive for non-medic unit).
*As of B19, you can drag incapacitated players by crouching and pressing the designated use button (default F).
11. Logistics and resources
Logistics are an important part of Squad and will help your team reach victory.
After your squad leader has planted a FOB (radio) down, he will need supplies to start building within the 100m radius of the radio. For this, he will need a logistics truck (logi) or supply helicopter to drop these.
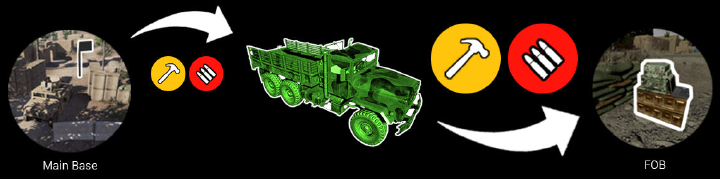


There are 2 sorts of supplies:
- Construction
- Ammo
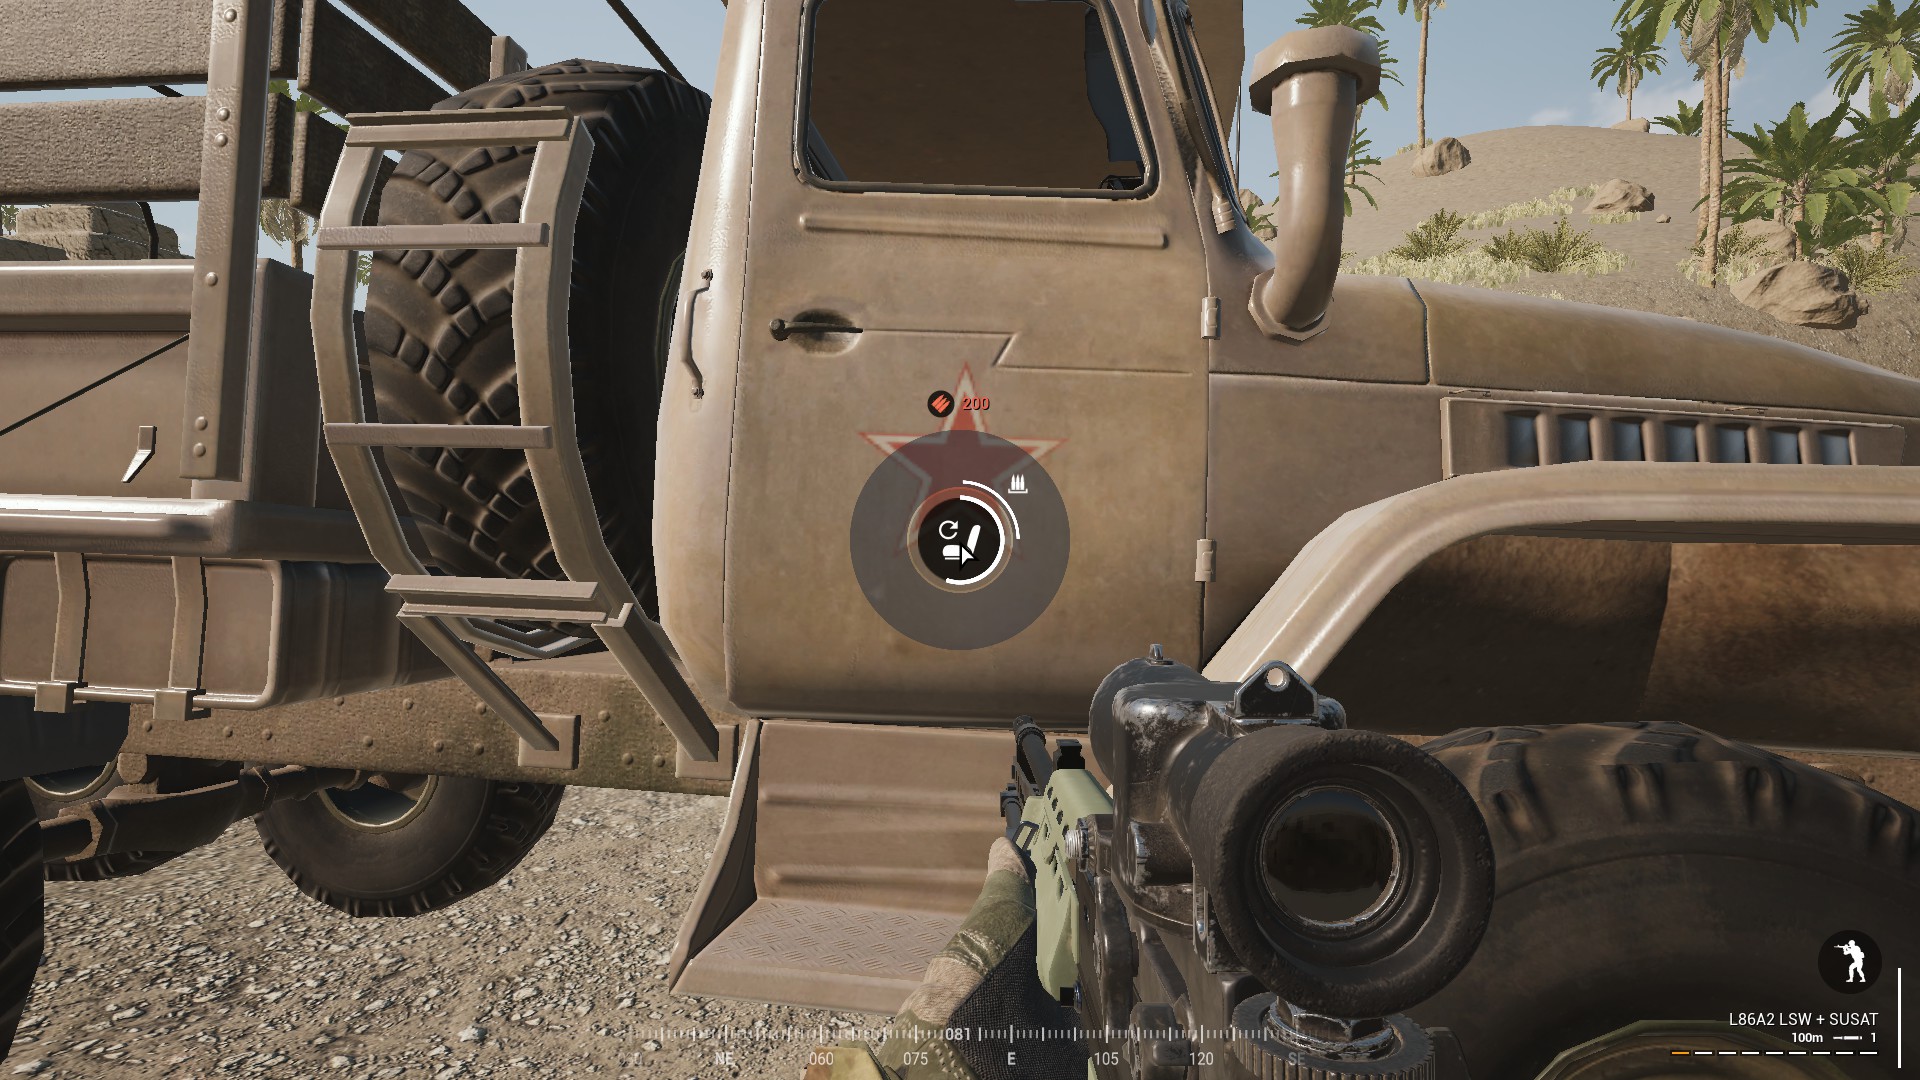
Construction is needed for building HAB’s, ammo boxes, repair stations etc. It is also needed to repair vehicles at a repair station.
Ammo is needed to rearm at ammo boxes, supply ammo for emplacements like mortars and machine guns etc and to rearm vehicles at repair station.
Doing logistics runs is simple. Pick up a truck at the main base or one that has been left on the map. When you are at your main base and near the vehicle repair station, select the resource you want using the radial menu.
Then drive to your fob within the 100m range and drop the supplies, again using the radial menu.
As of V15, this cannot be done while moving anymore.
As of V16, supply helicopters have been added.
The counter for your resources is shown on the right bottom corner.
Before doing a logi run, always consult your squad leader if he needs one and what he needs.
Half-half is a term often used for equal amounts of construction and ammo but he might state specific numbers. Keep this in mind with evry logi run.
NEVER LEAVE A LOGI NEAR A FOB OR HAB TO AVOID DETECTION BY THE ENEMY
12. Crippling the enemy
The key to winning a prolonged firefight is often the denying of enemy spawnpoints.
- Rally’s
Taking down rally’s is simple, just walk near an enemy rally and it will dissapear.
Keep an eye out since people are spawning on them in waves, so don’t blindly sprint right at them.
Difference between US rally and Militia/Insurgent.
- HAB
Taking down an enemy HAB is more complex, you’ll need 2 people to get within the 30m range to disable the ability to spawn and then dig it down to atleast half build. Keep an eye out for enemies who have been alerted on their map of your actions.
ALWAYS FIND THE FOB RADIO AFTER
Should the FOB (radio) be found, digging it down is simple. Just to be sure to keep someone on guard, since anyone within the FOB (radio) range will see the health of it go down. Digging the FOB down beyond a certain point will also disable the HAB.
*As of V21.1, FOB’s cannot be destroyed immediately. After digging it down to last stage it will enter a bleedout state after which it will disappear in 60 seconds unless the enemy digs it back up.
*As of V1, the FOB UI warning has been added to clarify the bleedout state. The FOB will also no longer be able to be dug down with your shovel while in this state.
LEFT CLICK ON SHOVEL BUILDS, RIGHT CLICK DESTROYS
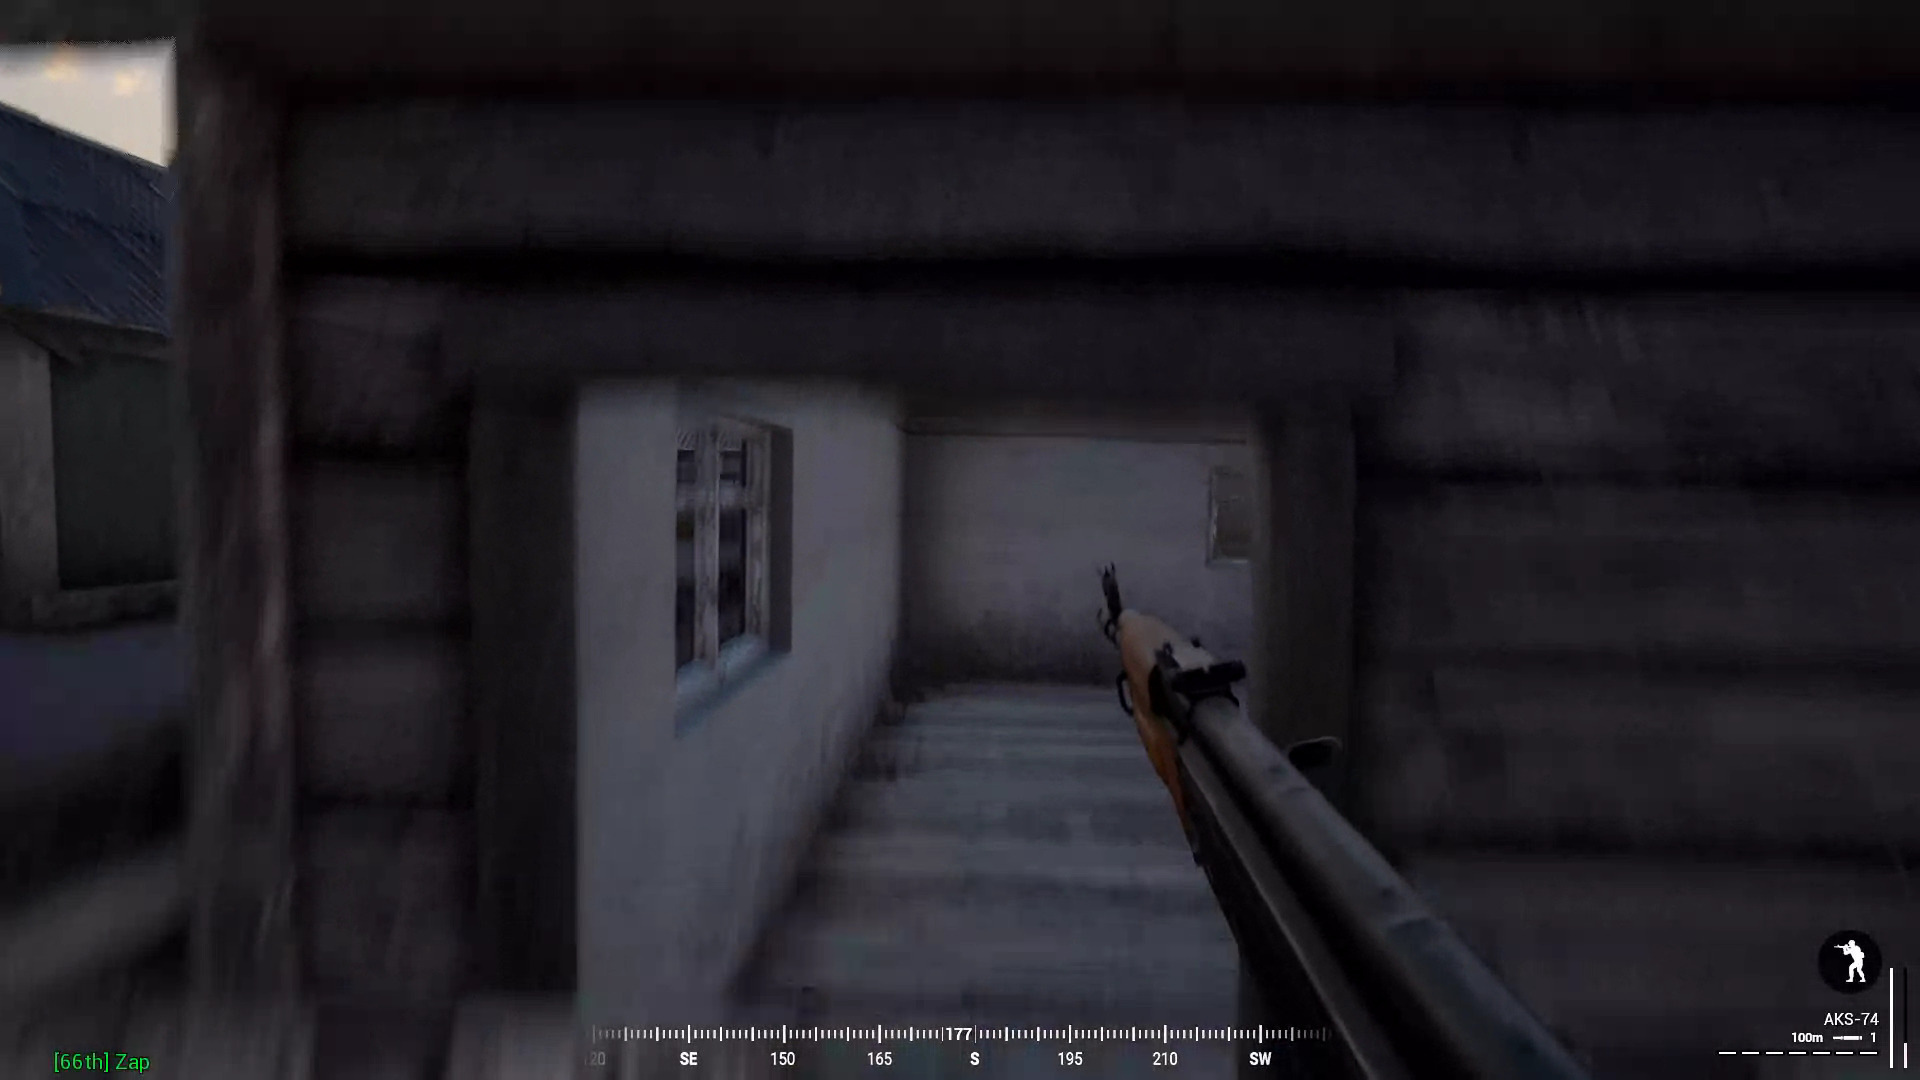
13. Important mechanics
- Ranging your weapon and fire mode
Scopes can often not be ranged in but have a visual representation inside the scope for the ranges.
This weapon is ranged at 100m and is on 3 round burst.
- Bipod

Keep in mind that it will restrict the movement of the weapon and you will need to remain stationary.
- Movement
- Armor

As of V11, directional armor has been added to Squad. Before you fire at a vehicle, consult the firing range and take note of the armor values. They will mean the difference between life and death.
Always engage armor straight and never under an angle, this will cause ricochet shots.
As of V12, damage components have been implemented. Vehicles can now have their engines ,turrets damaged/disabled and ammo reserves exploded.
As of V13, wheels can also be destroyed.
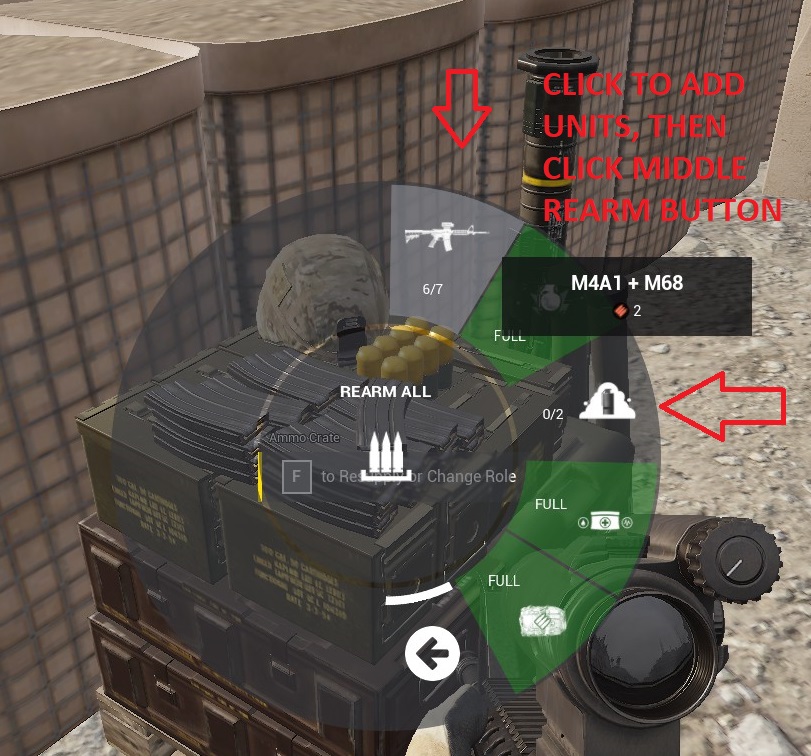
- Resupply & switching kits
**
If you run out of ammo, you can resupply on ammo crates or vehicles if they have ammo points.
As of V13, rearming is modular which allows you to choose what tools you want to rearm yourself.
Repairing / rearming vehicles must be done at a repair station on a FOB (radio) with sufficient resources. You can drop the ammo of vehicles onto a fob even when the vehicle is not a logistics truck.
As of V13, you can also switch kits at vehicles, on condition they have ammo. Light vehicles allow switching to crewman kits, APC and IFV to all roles.
You can also still switch kits at an ammo crate, on condition that the FOB has ammo.
- Flag Capture
Keep in mind that it takes at least 3 players to start neutralizing an enemy flag.
If you have more people on the flag than the opponent then you will capture unless you do not own the previous flag.
This can often lead to “double neutrals” which means both teams have neutralized their opponents flag at the same time.

- Compass and Bearing

There are 2 ways of calling out targets, either by direction or by bearing.
General rule of thumb is to always use direction, it might not be as accurate as a bearing but it works for everyone in the same way. Saying “Enemies north-west” will also be accurate for your squad member 30m down the line, while bearing will be different for said person.
Bearings are only accurate for people close to you. Often used when you are spotting in/for a vehicle or a fellow machinegunner/sniper which is in your close vicinity. “Enemies 328°” will provide an accurate point for them to focus on.
You can also make a combination of these and add additional info.
“Enemies south-west 223, moving down the hill” will provide maximum information to your fellow squad members, both far and close.
- Commander abilities
As of V17, the commander has been implemented.
The only advice that i can convey here is, when a point has been captured or lost, to stay away from the main cap. This will often be the first place that will bit hit by off map artillery or air support.
More info can be found here :
[link]
- Vehicle velocity
As of V17, jumping out of moving vehicles will now inflict damage or death.
Be sure to wait for the vehicle to fully stop or move at a walking pace, else expect to take damage.
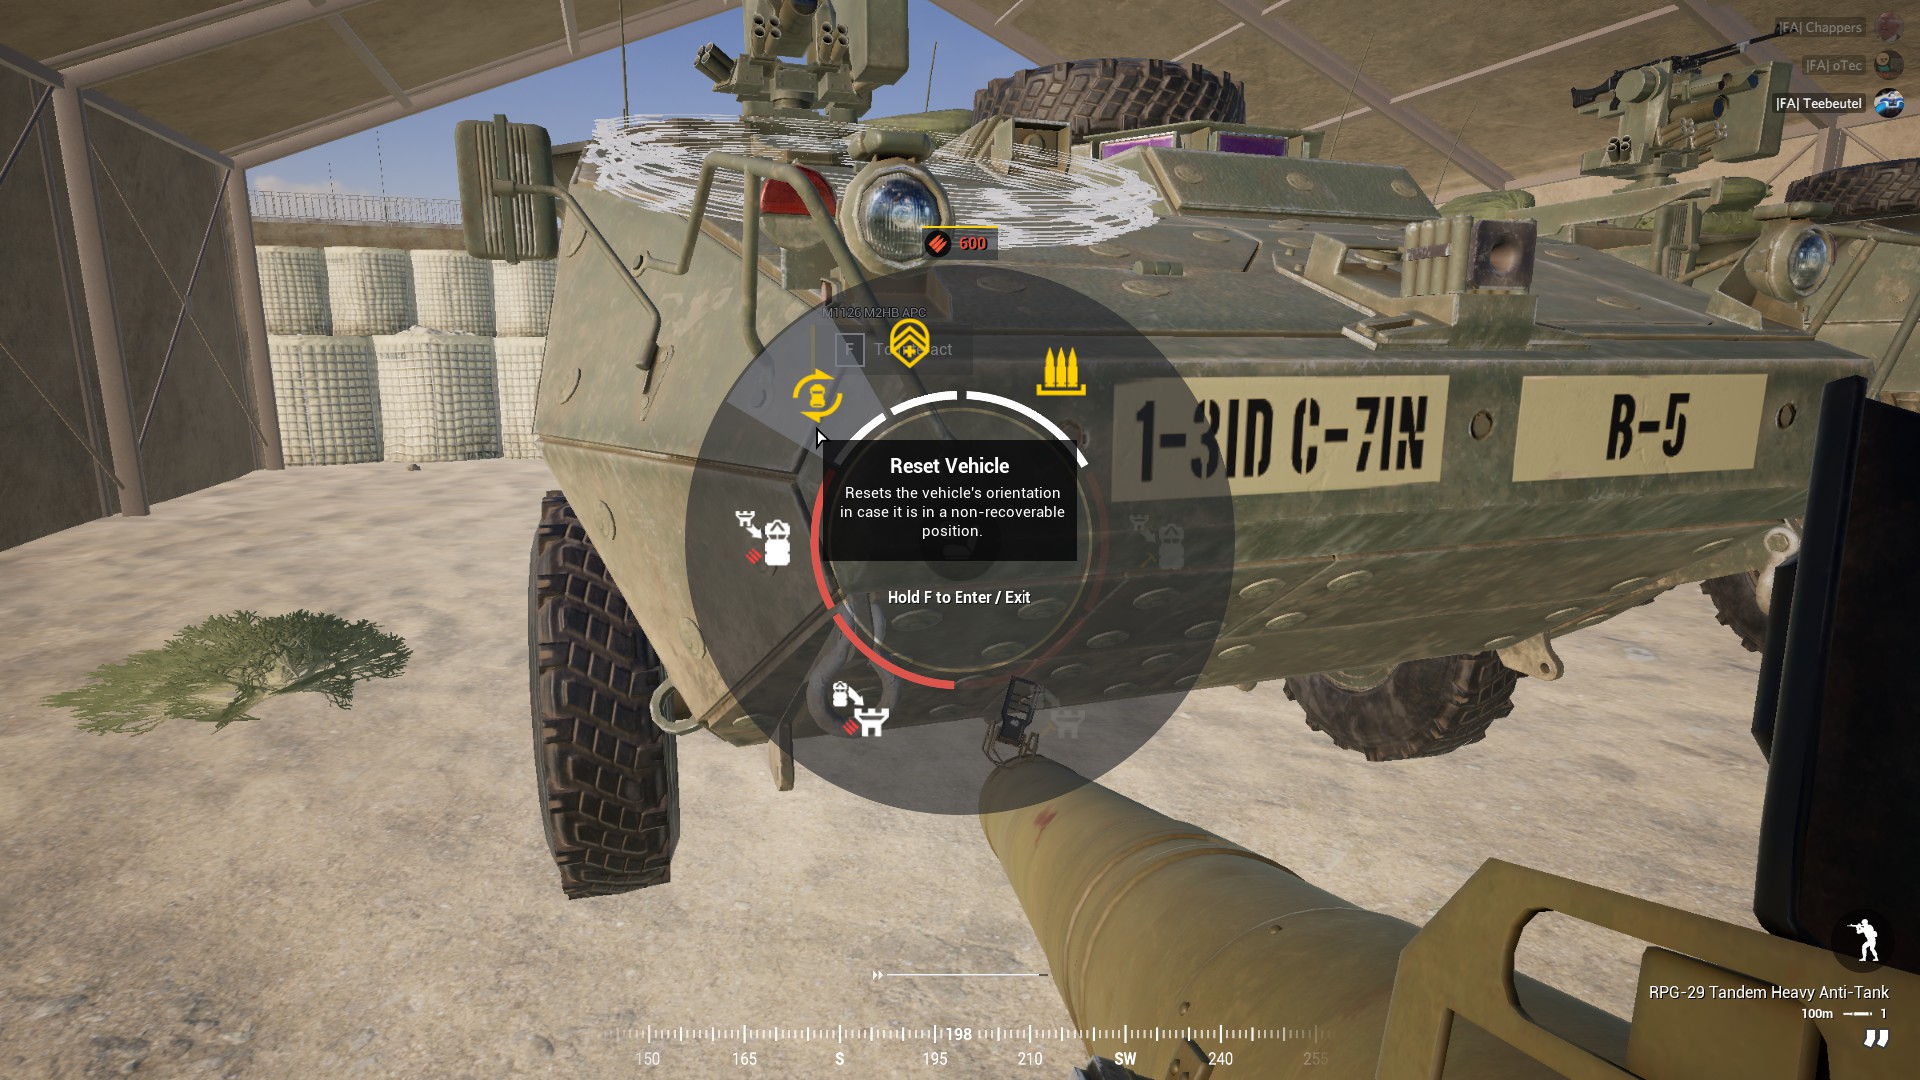
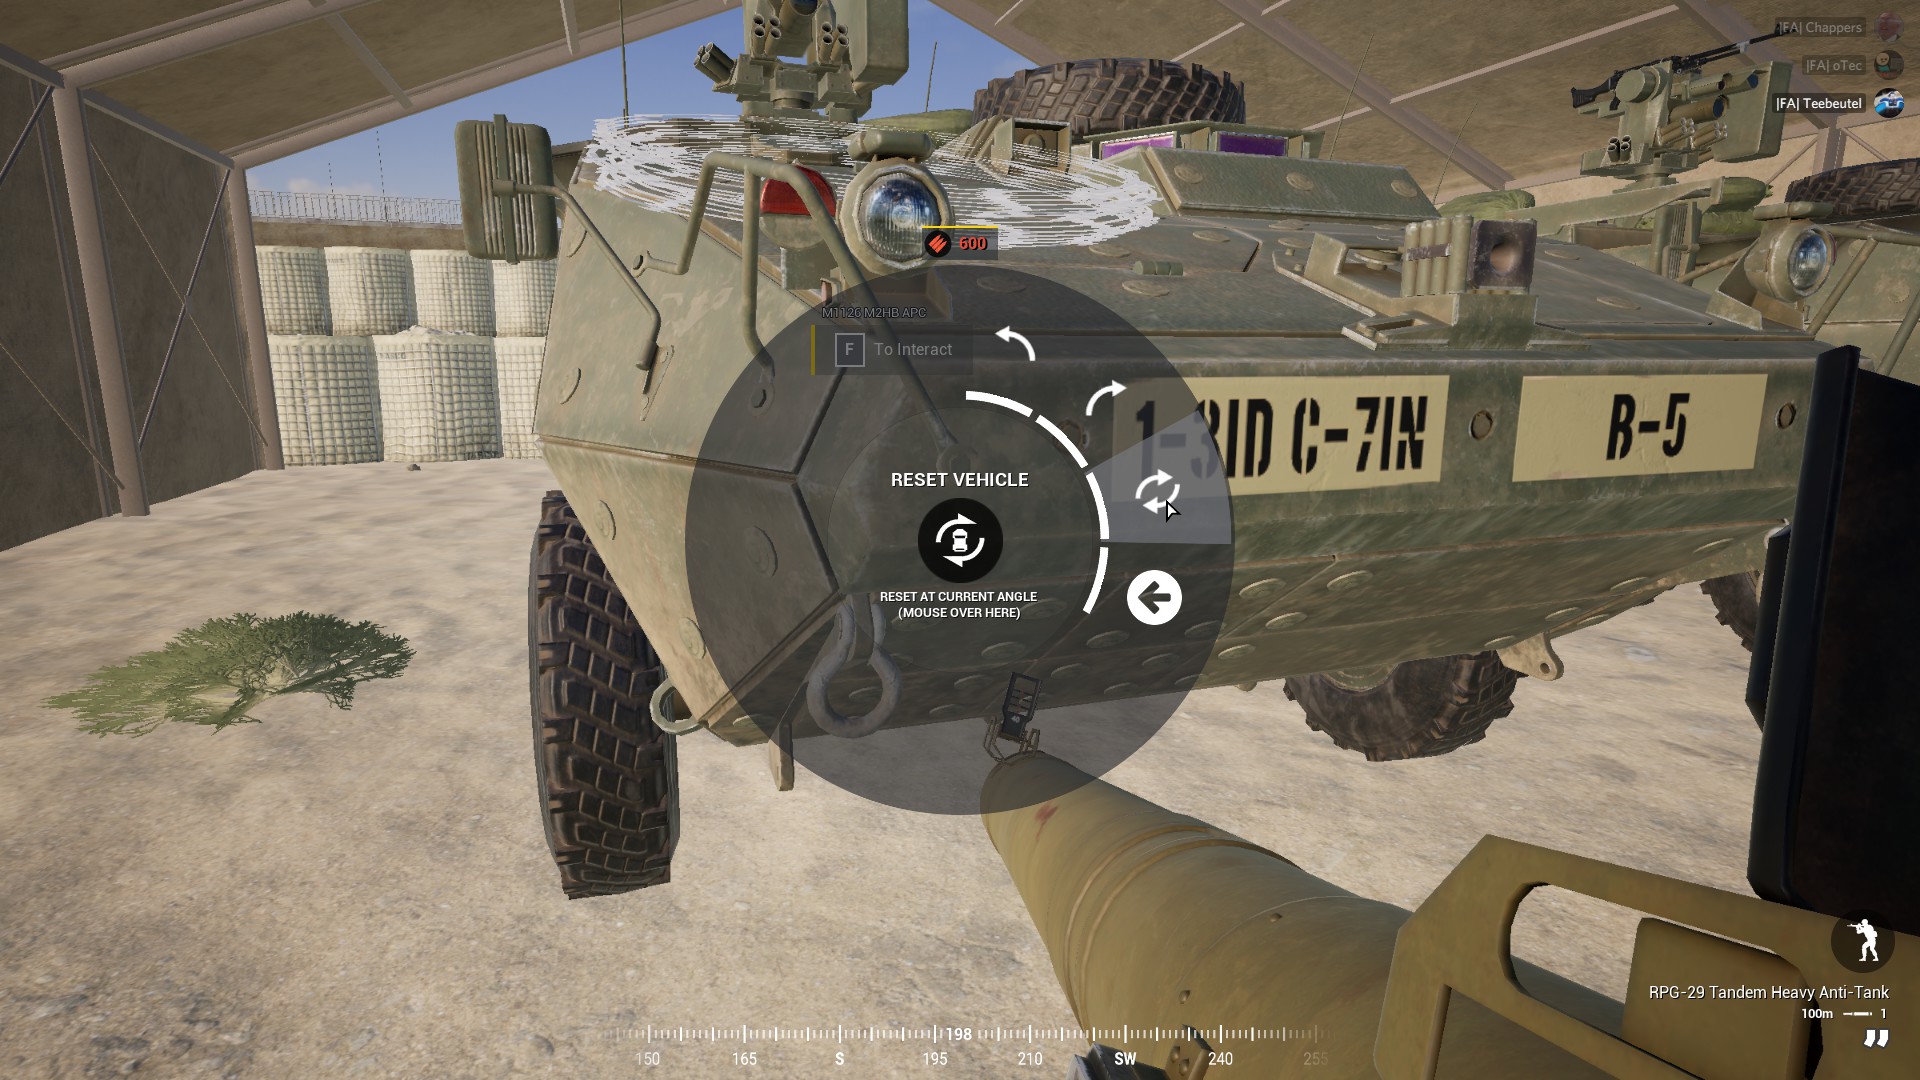
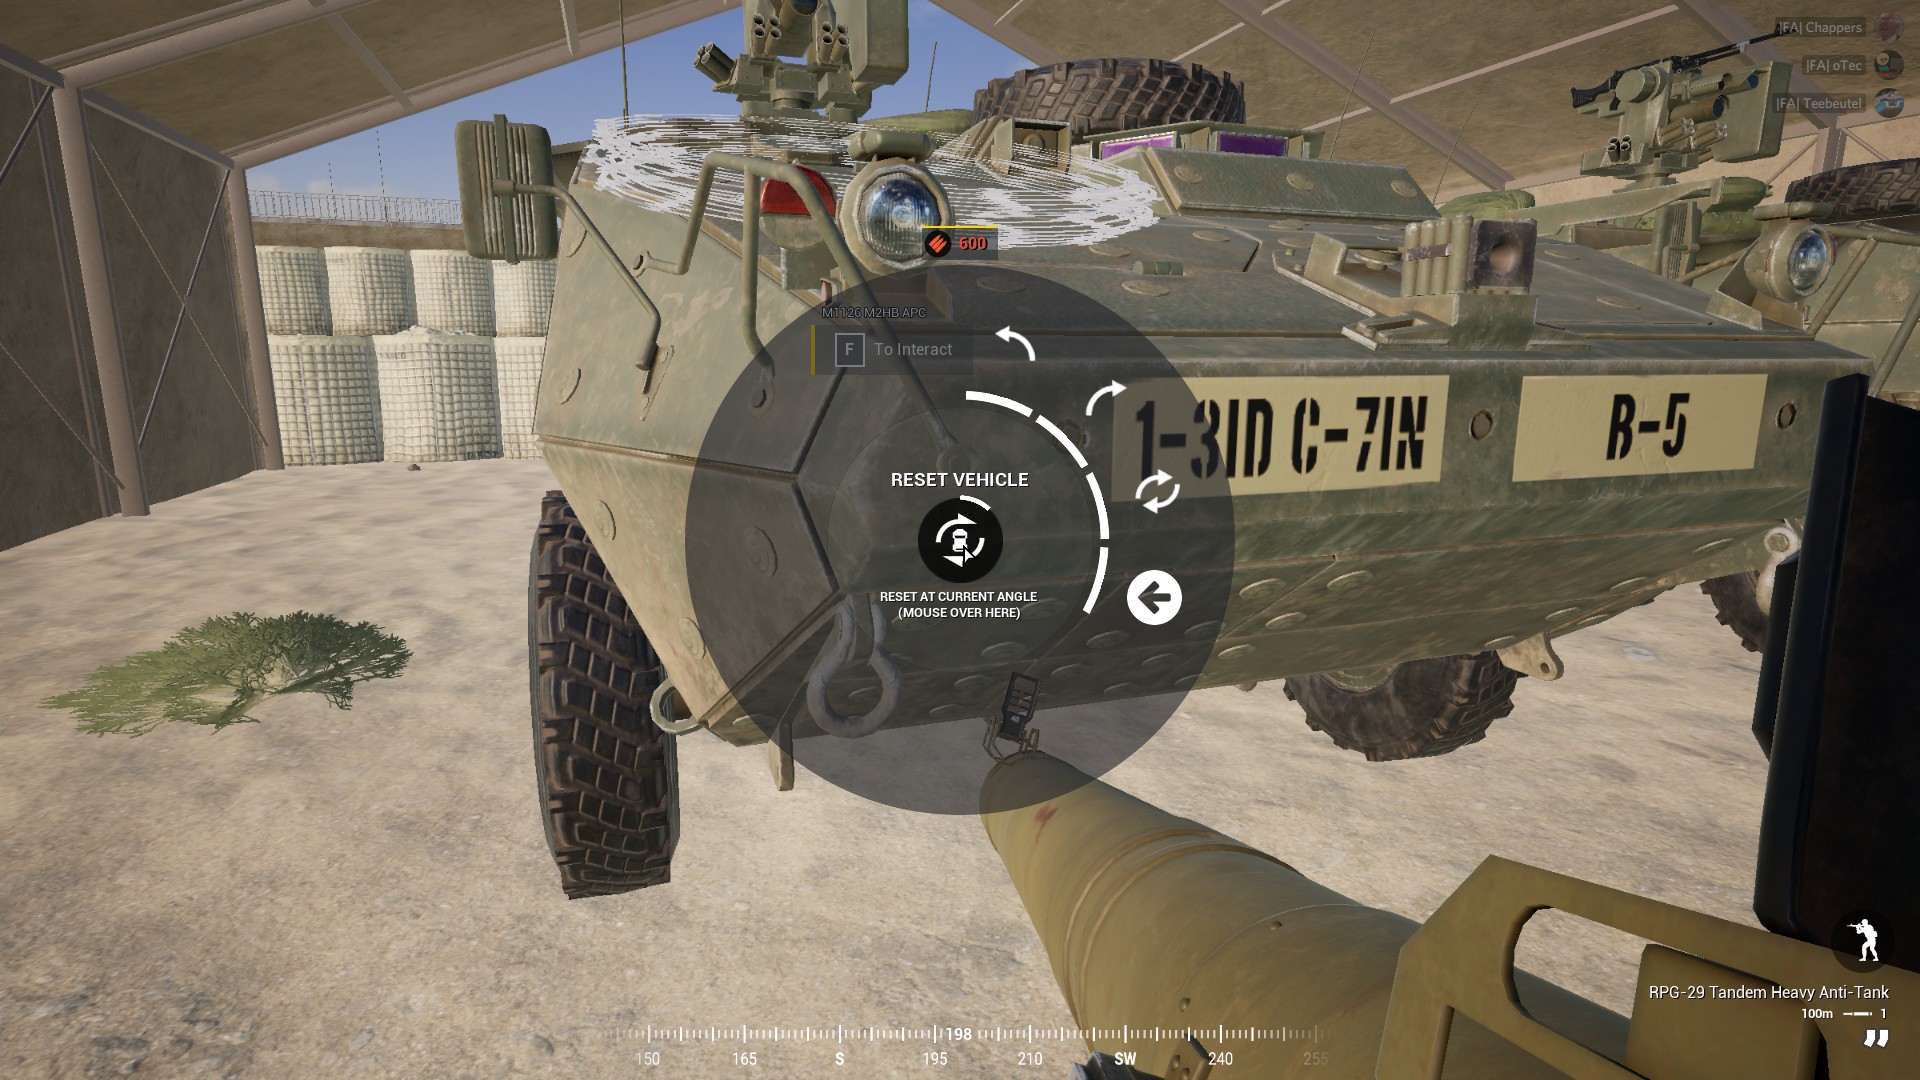
- Vehicle Reset
As of V17, flipped vehicles can now be reset.
You can select the angle and the action will take 40 seconds to complete.
14. Cache clearing
When Squad recieves an update, it is best to clear the user cache to prevent any crashes/freezes or bugs. Do this evrytime Squad updates to prevent this. Squad will clear all your options and bindings and restart.
You can also do it manually to prevent having to reboot squad by deleting the folder saved in Appdata/Local/Squad.
Official link below:
[link]