
Overview
A quick reference guide for optimizing your graphics settings in Borderlands 3 to get those sweet sweet frames per second as high as possible without compromising graphical fidelity.
Intro
First off, much of the information contained in this guide is sourced from this amazing video by Hardware Unboxed (HUB):
They’ve done all the work of testing each setting individually and measuring the impact it has on performance, so credit goes to them. I wanted to have all the information in the video in an easy to access form (instead of jumping from timestamp to timestamp), and where I didn’t have to Alt+Tab to view it but rather be able to view it from the Steam overlay. Hence this guide.
Please, go take a look at the video, since they delve into great detail on how the settings differ from each other. Feel free to show them some support!
Additionally, although this guide is meant to be a quick reference, I will put down some personal experience tips and explanations, but remember that there is a wide variety in hardware and software specs, so YMMV.
All the tweaks in this guide are done in-game. There are plenty of guides out there that explain additional tweaks that can be done to your operating system as well as the use of third-party software to enhance the performance of this game (or any game). These more advanced and less documented changes are outside the scope of this guide.
Quick Reference
Overall Quality Settings
Note: Values indicate gain/loss of performance, measured in percentage increase/decrease of average frames per second compared to the reference setting of Ultra. Large performance gains are seen with the Medium setting.
HUB Optimized Settings
The HUB Optimized Settings are as presented on the video mentioned in the Intro. All credit for these settings go to Hardware Unboxed.
General Performance Settings
Here I’ll discuss general graphics settings found in the Options -> Visuals -> Basic Settings menu.
Fullscreen
It is always a good idea to run your game in Fullscreen mode (not windowed or borderless). While borderless has its utility to be able to Alt+Tab easily, you may lose certain benefits (framerate may get locked to desktop settings).
Resolution
Lowering the resolution will always result in an increase in performance, since the game needs to render less pixels every frame. Not only that, but the result is exponential. For example, going from 1920×1080 to 1600×900 represents a decrease of ~31% of pixels per frame, while going up to 2560×1440 would mean an increase of ~78% of pixels needing to be rendered. Every frame.
Obviously, the best option would be to play at your monitor’s native resolution, but if that proves too taxing, don’t be afraid to decrease the resolution a notch for significant gains. The main downside is pixelation of the output image.
Resolution Scaling
This setting enables the game to render at a set fraction of the selected resolution, but to output at whatever resolution was selected above. This means you can render at a higher resolution (with a scaled down output) effectively increasing the quality of the image (much like super-sampling), or render at a lower resolution (with a scaled up output).
An advantage to using this is that you can keep your monitor’s native resolution as output (thus eliminating resizing of the screen every time you launch the game or Alt+Tab), but reduce the load on your system by decreasing the rendering resolution, thus increasing framerate.
The disadvantage is that the resolution scaling slider is set to specific ratios (like 50% and 75% of the resolution), so if you want to select a resolution that falls between them you’re better served with the Resolution option.
Individual Settings
Now I will go over each individual setting found under Options -> Visuals -> Advanced Settings (two gears), and describe a little more what their impact is on the game’s performance.
Note that the gain/loss in performance with each setting are measured in percentage increase/decrease of average frames per second when compared to the highest (usually) option for that particular setting. I will specify what the reference value is for each component.
Keep in mind that since we’re talking about percentage changes in performance, the actual change in frames per second will depend on what your baseline fps is. For example, a combination of settings that would give us 50% increased performance would mean an additional 15 fps if the baseline is 30 fps (or 30 –> 45 fps), or an additional 30 fps if the baseline is 60 fps (or 60 –> 90 fps).
To DX12, or not to DX12, that is the question.
If there was ever anything that was arbitrarily divisive and misunderstood, it’s whether to use the DirectX 12 API setting. Due to the varied nature of the hardware that every gamer has, each person’s experience with using this setting will vary.
Most people with nVidia graphics cards report a mild drop in framerate… while others say it runs smoother than ever, with a 30+ fps increase! AMD users also have varied results, but usually favoring DX12… slightly.
This is one of those settings for which the game engine has not been optimized, and realistically, only players with very high end graphics cards will make use of (although ray-tracing isn’t even implemented).
My personal experience with it is that I lose around 2-3 fps by using DX12 instead of DX11. On the other hand, CPU frametime is lower, which means that it’s less likely the CPU will bottleneck the performance. One of the bigger downsides I’ve seen myself (and mentioned by others) is the increased variability in framerate, leading to stuttering. Another big disadvantage comes in the form of increased game launching time. The very first time you turn this feature on will result in a close to 5 minute game startup time (the game optimizes the shaders for DX12). You would think this is a one-time thing (and for some players it is), but my experience has been that every subsequent startup of the game leads to a 30 seconds to 1 minute startup time due to the game optimizing the shaders. Load times within the game are largely unaffected.
All in all, I would recommend you stick with DX11. Using DX12 has no appreciable graphical impact, and your fps may or may not improve.
Once again, the number of players that would benefit from this setting seems to be low. There are bigger gains to be had from the individual graphics settings, and that’s what we will tackle primarily.
Anti-Aliasing
Anti-aliasing has a low impact on performance. This can be left off if you don’t mind the jaggies, but neither option hogs resources. Ultimately, it’s up to you and your personal preference. Some people find FXAA to make everything blurry. I usually run without AA since I enjoy the added sharpness.
Anti-Aliasing
Note: Values indicate gain/loss of performance, measured in percentage increase/decrease of average frames per second compared to the reference setting of Temporal AA.
FidelityFX Sharpening
FidelityFX Sharpening has a trivial impact on performance. I personally don’t use it, though it hasn’t caused me any problems. Some players described artifacts / glitchy performance during cutscenes, on ultra-widescreen setups.
FidelityFX
Note: Values indicate gain/loss of performance, measured in percentage increase/decrease of average frames per second compared to the reference setting of On.
Motion Blur
Motion Blur exists as two settings, but behave as one. You can select one of three combinations: both off, both on, or just object blur on. Turning on camera blur forces object blur to be turned on. The impact of this setting is low. Usage is personal preference, but you can eek out some more fps by turning both off.
Motion Blur
Note: Values indicate gain/loss of performance, measured in percentage increase/decrease of average frames per second compared to the reference setting of Camera+Object Motion Blur both On.
Texture Streaming
Texture Streaming has an apparently trivial impact. The effects are most noticeable on Medium and Low (significant decrease in texture quality). Unfortunately, it doesn’t significantly increase performance by choosing those settings, so it’s a net negative (decreased quality with no appreciable gain in fps). Lower end graphics cards with limited VRAM might benefit.
Texture Streaming
Note: Values indicate gain/loss of performance, measured in percentage increase/decrease of average frames per second compared to the reference setting of Ultra.
Anisotropic Filtering
Anisotropic Filtering has a low impact on performance, considering what it does: increases texture clarity on oblique surfaces. Turning it down decreases the distance at which the sharpening of the texture occurs. Preferably left at max setting (16x), with only very low-end systems requiring a decrease in this setting.
Anisotropic Filtering
Note: Values indicate gain/loss of performance, measured in percentage increase/decrease of average frames per second compared to the reference setting of 16x.
Material Complexity
Material Complexity has a high impact on performance. There is little difference in the perceived quality between Ultra and Medium, with significant gains to be had by using Medium setting. Low setting has a much bigger impact on the image quality with little gain in performance over Medium.
Material Complexity
Note: Values indicate gain/loss of performance, measured in percentage increase/decrease of average frames per second compared to the reference setting of Ultra.
Shadows
Surprisingly, the Shadows setting has a low impact on performance. Gains can be had by lowering it to Medium, with visible decrease in the quality of the shadows and the distance at which they’re rendered.
Shadows
Note: Values indicate gain/loss of performance, measured in percentage increase/decrease of average frames per second compared to the reference setting of Ultra.
Draw Distance
The Draw Distance setting has a high impact on performance. Lowering the setting to High has an appreciable impact on fps, further augmented by lowering it to Medium. The downside is that objects will get rendered when closer to the camera. This can be jarring immersion-wise, but the performance gain adds up.
Draw Distance
Note: Values indicate gain/loss of performance, measured in percentage increase/decrease of average frames per second compared to the reference setting of Ultra.
Environment Detail
Environment Detail has trivial impact on performance down to the Medium setting. High performance gains are seen with the Low setting, with a small impact to the image quality. This one is personal preference. If you don’t mind/notice the lower quality it can significantly increase the performance, but only at the Low setting.
Environment Detail
Note: Values indicate gain/loss of performance, measured in percentage increase/decrease of average frames per second compared to the reference setting of Ultra.
Terrain Detail
This setting has a trivial impact on both performance and graphics quality. Since there can be an appreciable decrease in textures (if looking closely), the performance gains are not worth lowering this setting.
Terrain Detail
Note: Values indicate gain/loss of performance, measured in percentage increase/decrease of average frames per second compared to the reference setting of Ultra.
Foliage
Decreasing the Foliage setting can have a high impact on performance with little loss in the quality of the image.
Foliage
Note: Values indicate gain/loss of performance, measured in percentage increase/decrease of average frames per second compared to the reference setting of Ultra.
Character Detail
The Character Detail setting is another one with a trivial impact on performance. As you can see on the table, there is some variability in the gains (with medium being higher gain than low, surprisingly). I attribute this to margin of error in testing. Nonetheless, lowering this setting has a trivial impact on both performance and quality, so best to leave it on Ultra.
Character Detail
Note: Values indicate gain/loss of performance, measured in percentage increase/decrease of average frames per second compared to the reference setting of Ultra.
Ambient Occlusion
I thought Ambient Occlusion would have had a much bigger impact on performance, yet it is mostly trivial. It’s only when you turn it off completely that you have a significant impact on performance, at the expense of the lighting looking a bit… odd (dated, rather). Down to personal preference, but if you need the extra frames, turn it off.
Ambient Occlusion
Note: Values indicate gain/loss of performance, measured in percentage increase/decrease of average frames per second compared to the reference setting of Ultra.
Volumetric Fog
This is it. The big one. This is the GPU crusher. I’ve never seen any setting have such a big impact on performance. Turning it down to Medium sees a whopping 22% increase in performance (that’s almost half the gains to be had), without any significant loss in quality. You can also turn it all the way off for an additional 5% increased performance (27% total), but you will see a big impact in the quality of the image.
The Volumentric Fog setting also comes down to personal preference. While it can give a sense of realism to certain areas (particularly the swamp), and it has some nice interactions with God Rays and Shadows, it can also give everything a washed out appearance. Comparing screenshots of this setting turned On (medium) and Off, makes the Off option appear much darker.
Volumetric Fog
Note: Values indicate gain/loss of performance, measured in percentage increase/decrease of average frames per second compared to the reference setting of High.
Screen Space Reflections
Finally, the last setting, Screen Space Reflections can have a significant impact on fps, with gains to be had at Medium setting and minimal (nearly inappreciable) impact to image quality.
Screen Space Reflections
Note: Values indicate gain/loss of performance, measured in percentage increase/decrease of average frames per second compared to the reference setting of Ultra.
Performance Impact At-A-Glance
Performance Impact
Material Complexity
Draw Distance
Foliage
Screen Space Reflections
Environment Detail
Ambient Occlusion
Shadows
Anti-Aliasing
Anisotropic Filtering
Texture Streaming
Terrain Detail
Character Detail
Further Reducing Stuttering (Launch Options)
There is another option to consider to further reduce stuttering, which is the use of the following Launch Option:
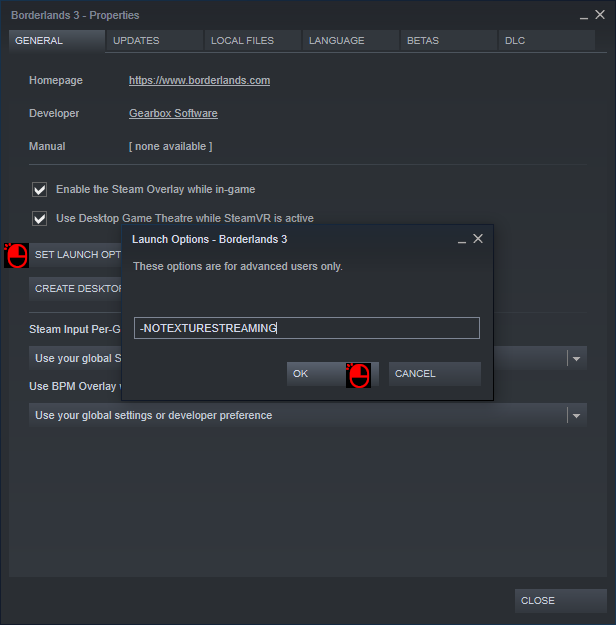
-NOTEXTURESTREAMING
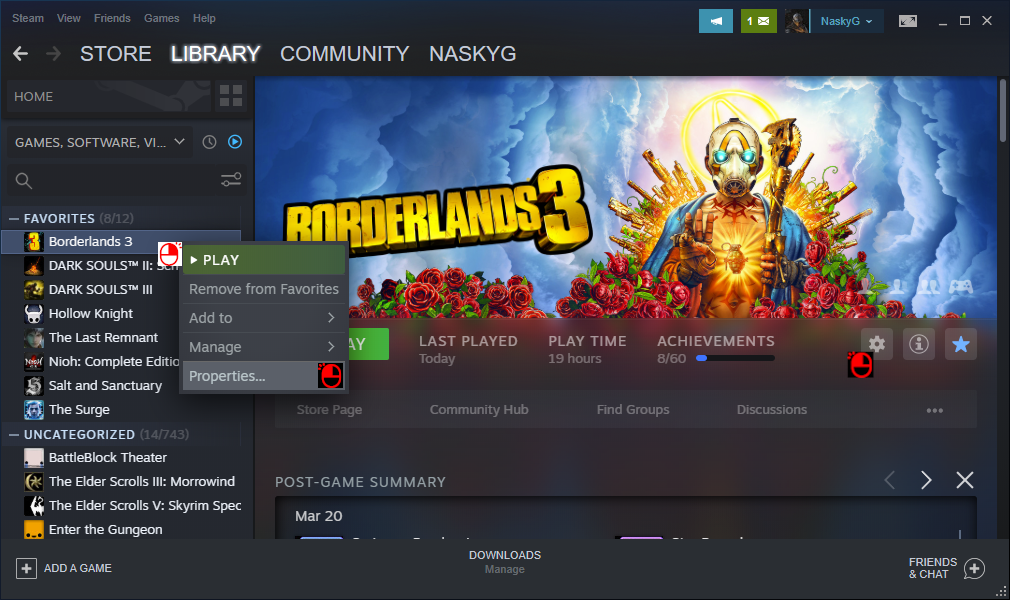
You can set this launch option by right clicking on the game in your Steam Library list (alternatively, left click on the gear icon on the right side). Select “Properties”, and then click on “Set Launch Options…” In the menu that comes up, type in the command as shown above (with the initial hyphen included).
This essentially disables the texture streaming function, reducing stuttering when loading new assets, but prolonging load times (since all the assets need to be loaded in upfront), and it requires more RAM.
Normally, the game will load in textures as needed. Say you start up the game, continue where you left off. When you swap weapons, the game needs to load the weapon’s textures to display it correctly. This will cause a small drop in fps. The game tries to mitigate this by loading low resolution versions of the textures, and then loading in the higher resolution versions as needed (instead of all at once). You can also notice the impact this has when opening the skills tree menu (I experience a brief but noticeable delay in displaying the mech when playing Moze).
The advanced visual option for texture streaming only controls how fast the high resolution textures are pulled in. Setting it to low does not seem to turn off texture streaming, but it does affect the overall quality of the textures.
By setting -NOTEXTURESTREAMING in the launch options, you will force the game to load all necessary assets when the savefile/map is loaded. This will prolong your load times and will be dependent on your HDD/SSD speed (not recommended if you’re rocking an HDD) and RAM. Graphics card VRAM may play a factor, since it may limit how many assets can be held in the video memory.
In my testing, I noticed a drop of about 5 fps (100 down to 95) by using this launch option. But that was a rock solid 95 fps. Without this option, my framerate tanked down to 45 fps until all the assets finished loading, causing significant stuttering. Afterwards, it held around 100 fps, but swapping weapons or loading skill tree menu (or any menu), caused a noticeable drop in fps with stuttering. My load times were increased, but not by much. My testing was done with DX11.
Shoutout to FrozenStar for making me aware of this option.
Conclusion
I’d like to give thanks to the people at Hardware Unboxed for their extensive testing of the graphics settings, and for sharing that knowledge. Much of the information in this guide is thanks to their work.
I hope this guide has helped you tweak the performance of your Borderlands 3 experience on PC! This game has been around for a year now, but with this new release on Steam, there’s a lot of new players coming to the Borderlands. I’m one of those. I wanted to tweak my graphics settings to improve the game’s performance, but there are no guides on Steam right now for this. Thus, I put myself to the task (first guide, BTW).
Feel free to comment below on how I can improve this guide. Also, please share what kind of fps improvements you’re getting after tweaking the settings.
Good luck, Vault Hunters!