![Starbound Style (Outfits and Armor) [Vanilla] for Starbound](https://steamsolo.com/wp-content/uploads/2021/07/starbound-style-outfits-and-armor-vanilla-starbound.jpg)
Overview
Custom Outfits! Sounds Awesome? Sure it does!Recoloring wasn’t enough for you or me, so I bring to you more Custom Stuff Volume 2. You always wanted an outfit or armor for exactly your taste and with this Guide you might be able to do it yourself too (No guarantees and no money back). This is not faked in any way, all parts of the clothes are animated and it even got sleeves (or not, depends on you). Modding Geniuses and the Starbound Potential and Simplicity have fused to make this happen: Full Customization of Wearables.(This Guide revolves around Vanilla Modding. Before you click away: This doesn’t mean that you need a mod at all. All you need are some tools and you’re good to go. The result of these created Items do NOT require a mod and work on Single- AND Multiplayer)
Prerequisites
Welcome, again,
Didn’t see that coming? Another Guide by the same person who already screwed one guide up? Guess excuses should be brought up, but enough about that, let’s get to it.
(But first a little warning since that’s important for my future sanity: I do not take responsibility if you or your PC breaking in the process of this guide. It’s written almost fool-proof and if you don’t trust my links, google it yourself. Don’t click on any other links that do not imply content of my Guide. Use the Internet responsibly, (and don’t cause me OR yourself too much trouble please). Where you actually looking for Recoloring? How convenient that I made a guide about that too: [link]
Now that that’s out of the way, here is a list of what you’re gonna need:
Paint.net
Link: [link]
The free alternative of Photoshop that you should always have on Hand when modifying Starbound. If you got Photoshop and know how to handle it correctly, go for it, I won’t judge.
Silverfeelin’s PantsGenerator
Link: [link]
Don’t let the name fool you, this is one hell of a tool. Newest Version, click on download and download.
An Archive Program (WinZip, WinRar, 7-Zip)
Take your time, I’ll wait here until you’re done. (This is normally a must-have on every PC, like the Editor or Paint.)
What, that’s it? That’s it! Nothing more, which just shows that this is gonna be easy.
(Not really, it’s gonna be fiddly as hell)
Anyway, Onwards to the next part!
The Realization
Oh, This couldn’t possibly go wrong
I’m still asking myself why I’m doing this. Whatever I guess, Let’s get to it.
Better get some Structure into this, because holy hell, it’s gonna kill you if you don’t. Create a folder somewhere you like and drag the pantsGenerator in it. We’re gonna need this folder in the future and I’ll call it the “Main” folder Repeadetly. Whenever I mention the “Main”-Folder, you know where to go now. Open up the downloaded PantsGenerator with whatever Archive Program you downloaded and Drag all of the contents into the “Main”-Folder.
(There seems to be a License, Oh well. I hope Silverfeelin doesn’t mind. I’ll credit her in the end anyway……)

Right click on the unxie_template and “Open with….” Paint.net.
(Don’t mind the Language difference, that’s German. In case you didn’t know: Windows is extremely smart and turns every Program Language into the OS-language. Recommended for Guides, Thanks Windows.)

There is really not much to do from here. You can start drawing now. If you’re an artist, then go for it. If you’re not, keep reading.
Since I’m not that big of an artist too, I’m just gonna take something from the NingenRace Mod. (Credits in the Credits Section, DON’T JUDGE ME)
This is the Original:

I’ll make a Step-by-Step walktrough on how to get already finished Assets (from a modpack for example) into the template. The first thing you wanna do is create a new layer in the bottom right.

You need to locate the outfits of the modpack, it should always be at /[ModName]/items/armors/…..
The folder structure should be like this:
Alternatively you can also search for “pants” in the Mod folder.

Start by Right-clicking the Pants.png and “Open with….” Paint.net, just like the Template. They should both be open now as seen in the top (Blue in the picture).

Start off by Selecting the “Climbing” Parts and the every text Part, look at the picture if you don’t know what I mean (The steps are given as numbers):
1 – Click on Rectengular Selection
2 – Select an Area with Text (Choose what you prefer, everything has to go anyway)
3 – Click on Edit in the Top Row
4 – Click on “Delete Section” (Press [Delete] or [Entf] Alternatively)

Repeat this process with the climbing Area
5 – Rectengular Selection
6 – Area of the Climbing Sprites (Should be roughly the area shown in the picture)
7 – Edit
8 – And, you got it, Delete
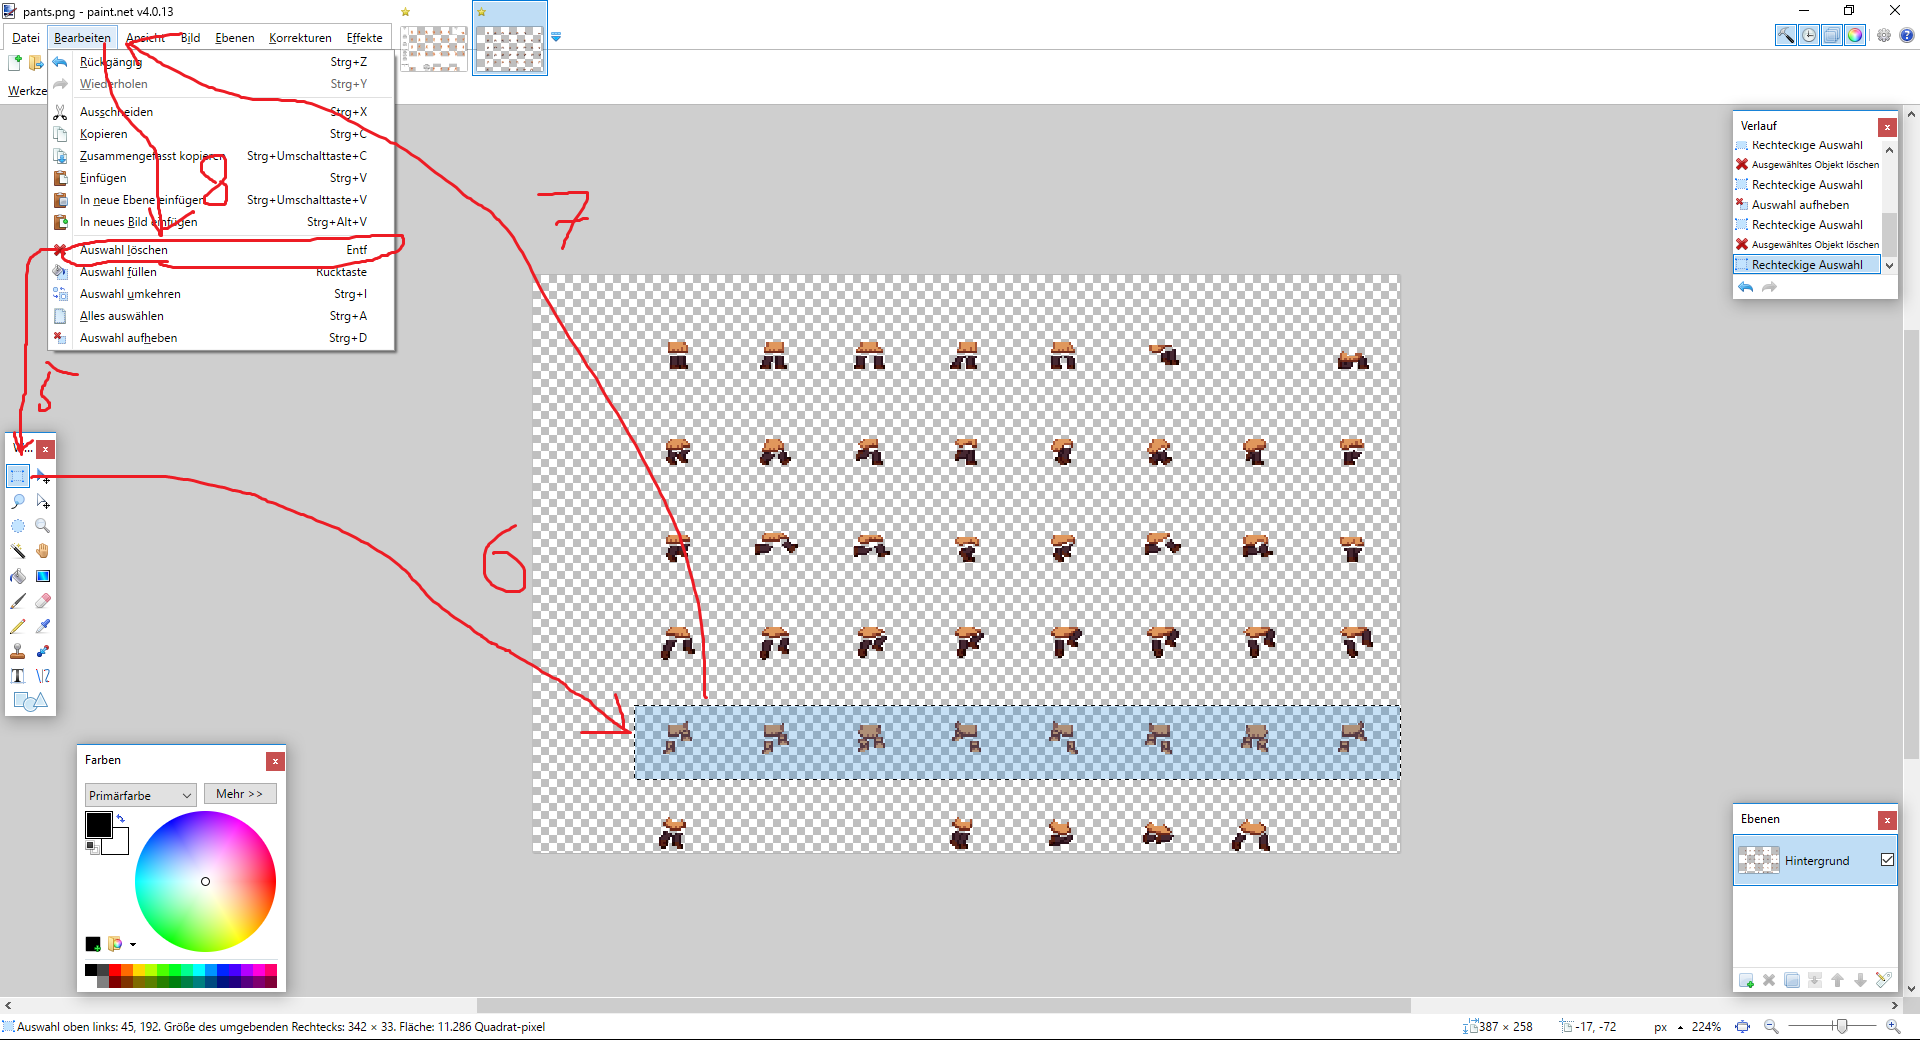
The Reason why we throw out the Climbing Sprites is because Climbing isn’t implemented.
Now, follow my Lead:
1 – Selection
2 – Select EVERYTHING
3 – Edit and –> 4 – Copy (Alternative: [CTRL] + [C])
5 – Select the unxie_template in the top left
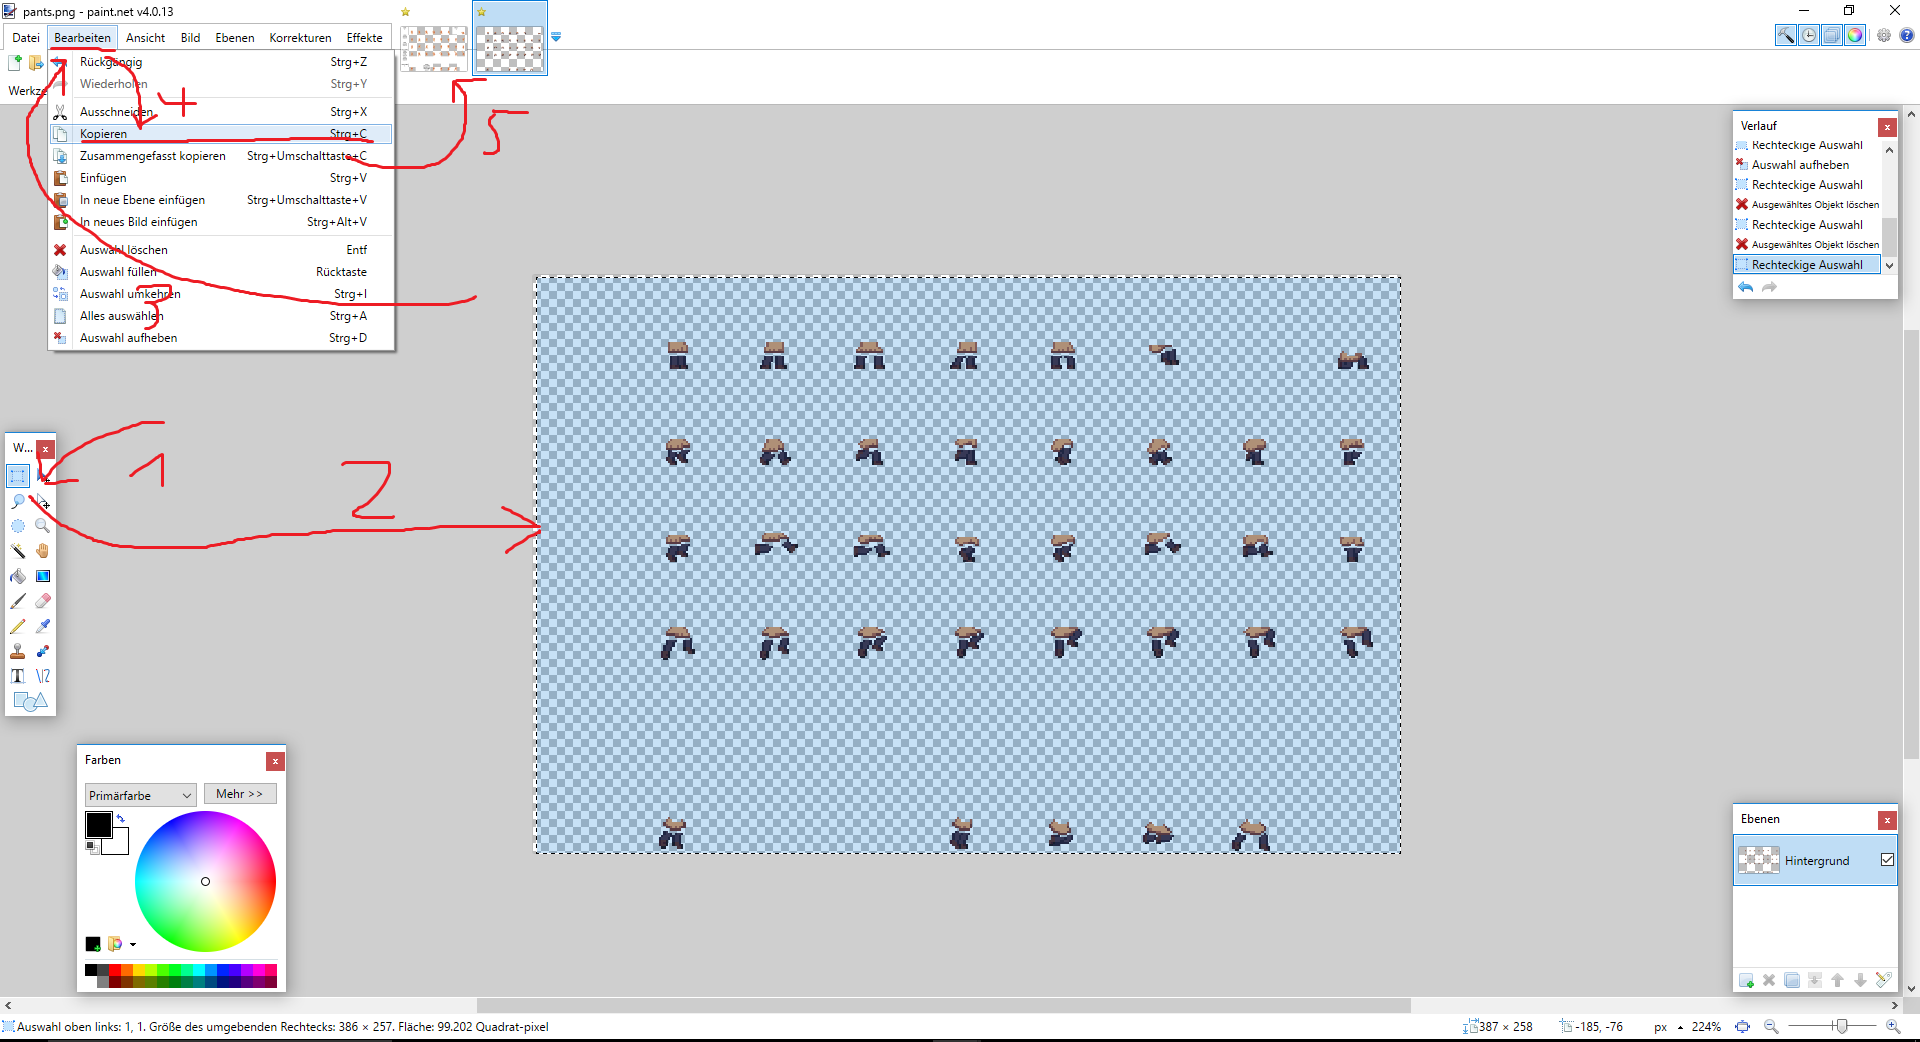
6 – Edit –> Paste (and for the smart people: [CTRL] + [V])
7 – Allign the Pants, It’s obvious when it fits. It should be alligned as soon as pasted but as you can see in the image (in green), I’ll have to Allign mine too.
Be ABSOLUTELY SURE that you pasted into the new Layer and not into the template. See the Blue markings in the bottom right. Any fault in Alligment will pay off, once ingame. Trust me, you don’t wanna see this mess.

Before I strip Valve’s Server Capacity I’ll make a new Section. Next up are the Sleeves and the Top Section.
The Whole Rest
That took too long for such a simple thing…..
Up until this Point we got Custom Pants, If you like you can go out in the world and show them your new custom bottom section (Sounds wrong….).
All we need now are Sleeves and the Top Section (except for the people who drew themselves, jump down). Keep going like I do and we get to the goal. It’s fiddly, but you’ll get the drill eventually.
Right click on the chestF or chestM (for Female and Male respectively) and “Open With….” Paint.net, obviously.
Looks VERY different, right? This is where it gets difficult. I had to do some experimentation myself to get what has to go where. It took some time, thank me later.

RED – These are all the possible Stances ingame (Custom Ones not included)
GREEN – These are the Markings for the Tops that fit to the Stances (can easily be seen in the image or ingame.
BLUE – This text is actually copied from the NingenRace Mod. The Original Starbound assets don’t have these descriptive texts. The text simply confirms what was already mentioned in Red and Green.
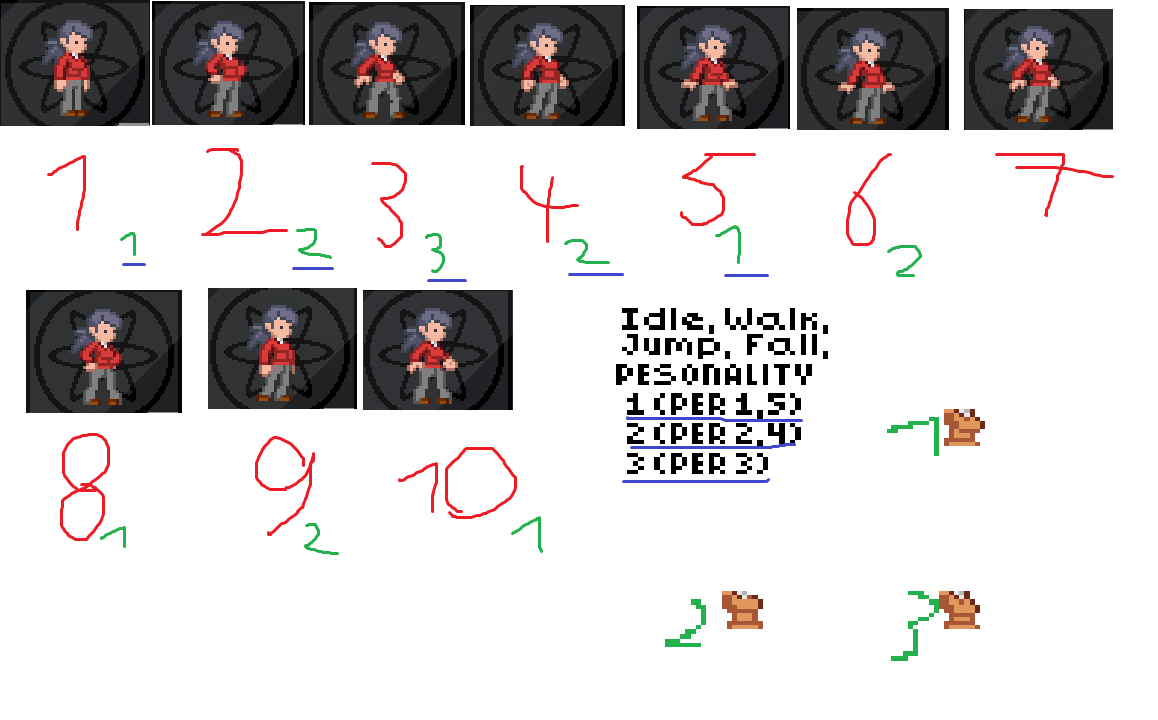
THAT MEANS, that we need to allign everything manually. Make Sure you have the new-made Layer selected again (Last section of previous part the blue part). Now follow my Lead again:
This looks big and complicated, right? Don’t worry, I’ll guide you through it.
We’ll start simple:
RED – Swimming occupies the bottom row, don’t mind if you paste over the Sleeves, just make sure it alligns pixel for pixel or it’s gonna look nasty when it’s done. The right part top might have to clip into the bottom part too. It’s not a problem if the Top and the Bottom clip together as long as the alligment works, you’ll see in the result.
BLACK – The crossed out Black Sections are not of any importances whatsoever. When Climbing should ever get released, maybe then again.
GREEN – The Duck Sprite has only one corresponding other sprite, making the copy and paste quite easy ;D
DARK BLUE – Run goes to Run, obviously. One Run Top occupies all the Run Bottom. The reason why is explained at the bottom.
PURPLE The First 5 Idle Sprites are based off the different Personalities/Stances in Starbound. That’s why we need different top sections for each. 1 Goes to 1, 2 to 2 and 3 to 3.
Unbelievably complicated, but if the Devs make it that way, we’ll have to accept it.
LIGHT BLUE – The normal Idle Stance also occupies Jumping and Walking, as well as sitting. Whenever the Character ingame walks, jumps or sits there is a shift in the Stance which lets us simply use the normal Idle Sprite. Grand Idea by the Devs, really clever.
Running, Walking and Jumping go through different Sprites and Loop when performing these actions. This Loop goes only for the Bottom and the Sleeves, which is the reason why we can use the same Top on multiple Sprites at the same time.

I almost forgot, you wanna know how to copy easily? Just watch this magic happening:
1 – Select the Magic Wand (Literally Magic Happening)
2 – Check the Tolerance in the top which pops up after selection.
3 – Fiddle around with it, 70-80 should be fine. Why? Check 4.
4 – Click on one of the Tops, if the Tolerance is too High, you’ll select everything. Is it too low you’ll miss out pixels. Fiddle around with it until your find the optimal Percentage. (The usual Rule is: More colors, more tolerance)
5 – Copy that Stuff, you should know how by now.
I’ll leave pasting and allinging up to you, all it needs is a kind of good eye and you’re good.
Just make sure you’re on the created layer (See Last Part of the Guide Bottom Section).
(If you have trouble with the alignment because the arms are blocking the way, zoom in very closely and draw a line with the rectangular Selection from left to right with the top cutting the lower side. If there are any top sections going over the Line realign them. Example:)


The finished Result should look like this (in my example, I hope that it looks good for you too):

Now all we need are sleeves and we’re done and done…. OH right, yeah. Check the next part to keep going. ;D
Sleeves and Finishing Generation
Still waiting for something?
You got trough the hardest Part already. You could go with a Sleeveless Dress or Armor from here on if you like, that is. If not, keep going. ;D
I hate to brake it to all of you, but Sleeves will only be 2 colors, one outer (which is usually darker) and one inner (which is lighter). Sleeves are added in the process of Generation, so you basically only need a Top and Bottom Piece. That means for you, Design your Clothing, add accessories, make it special and then save it as a .png file in the “Main Folder” (Delete the Template Layer beforehand. (Don’t try to add Sleeves, they won’t appear ingame). Drag the .png of your finished product onto the PantsGenerator.exe for Sleeveless Outfits or onto the PantsAndSleevesGenerator.exe for Sleeves.
The Green Path on the image is for sleeves and the Outfit, while Red is simply for the Outfit.
When generating Sleeves you’ll be asked for an Outer and inner color. You’ll need Hexadecimal Color Values for this. Go to one of these sites:
[link] OR [link]
and make yourself a Color or search for your own Site if you don’t trust my links.
When that’s done, enter it exactly like in the image (Example: AF23ED)

As soon as the Program is done, you can Press any Key to Exit and 2 files should be appearing in the Folder where you just executed the programs. Start up Starbound in the Meantime. Open these .txt files and have a look. That’s a bunch of numbers on the Outfit and almost nothing on the Sleeves, right? Starbound should be started by now, go into Singleplayer and type “/admin” into chat (without “”). After that [CTRL] + [C] or Copy the Stuff from the Files and paste it into the Starbound chat and press [ENTER]. Keep your Mousecoursor close to you, because it’s gonna drop there. Put the Outfit in the Legs Slot and the Sleeves in the Chest Slot and you’re good to go. ;D
This is my Result, hope yours worked well too:

Whenever you modify anything, you’ll need to change the .png file, generate a new command and spawn a new one in Singleplayer or changes won’t apply. If you want to treat your clothes with some new colors you are free to do so, go see my Recoloring Guide for that: [link]
Check out them Credits and Q&A if you still have Problems, Questions or want to see the awesome People who made this possible. ;D
Credits and Q&A
You did it, enjoy your Outfits
Did you like my Guide? If so tell me, If not, also tell me. If you like you can show me your Creations, I’d love to see them. (And say if there are any Spelling/Writing Mistakes, I’m not an English God)
But wait, what about the people who made this possible?
A Huge Thanks to:
Nettle Boy – As Inventor or this system he’s the one to thank the most.
Silverfeelin – The person who created the Executables that allowed for the use of the system
Unxie – The Maker of the Sleeves Template and the person who made sleeves even possible
(Also Big thanks from my side for being a great friend and awesome teacher :D)
The Starbound Dev Team – Thanks to them, it was even possible to make this happen.
The Creators of Paint.net – A helpful and free tool, compared to Photoshop
The ILoveBacons Community – For showing me Vanilla Modding, without them my Guides would
never be existant
and finally
YOU – For reading this Guide, Rating and (hopefully) Sharing it.
Now if you still got Questions, put them in the Comments below and I will add them to the Question & Answers Section for you and others.
Questions & Answers
What about Mac and Linux?
I don’t know actually. You’ll sadly have to figure it out yourself and if you do so then tell me so that I can add it.