Overview
This guide will help new players starting up on game version 9+. It is action after action oriented, not lists of info. The actions form up small tasks and all tasks form up a starting plan, in parallel with game’s tutorial missions. The plan ensures maximum possible survivability up to the point that you are autonomous and safe. You have also learn most game’s ‘how to’, hints and tips, HUD and interfaces, gradually when needed and not all at start. After the plan you will have a base with all primary essentials plus an automated turret for defense when you are out and a small hovercraft to move to the planet. Then you are good to proceed with your own plans and involve from a survivor to universe superpower!
Fall within the pod
Starting the game, you are inside a safe pod that falls on the planet of default scenario or anything you choose when starting a new game. This guide focus on default scenario with custom planets that has a fixed start on breathable planet. Custom scenarios can be anything. This guide takes a breathable planet as example, and can be used for any non breathable planet as long as at those custom scenarios provide some O2 small battles and means to produce O2. If you had choose the default scenario there is no problem, this guide is perfect. The differences from a non breathable planet are that you can skip the oxygen project for later since the planet is breathable and you do not need O2. All other instructions are the same. Supposing been a new player, i highly recommend the default scenario before any custom, to learn the game.
Starting up, wait for the pod to land.
You may use Look Around key (default Left Alt) to look around while inside the pod. This allows mouse view without changing direction, especially usefull when driving a vessel later on and want to look around without changing vessel direction. You can also use WASD to steer the pod while falling.
Wait for the pod to fall to the ground.
Then you find yourself just outside the pod
And get a pop up message with usefull info
This message also starts the tutorial/story mission which is extremly useful. Choose Let’s Go! to start the missions.
If you miss the dialog or click skip and you want to activate the missions, press F1(default) to open your PDA and choose Story tab, Robinson Protocol then click Activate Story
Then you get the dialog open again, click Let’s Go!
Your first task/mission is to check pod’s inventory, and you can always see your current task at the right side of your screen bellow the radar.
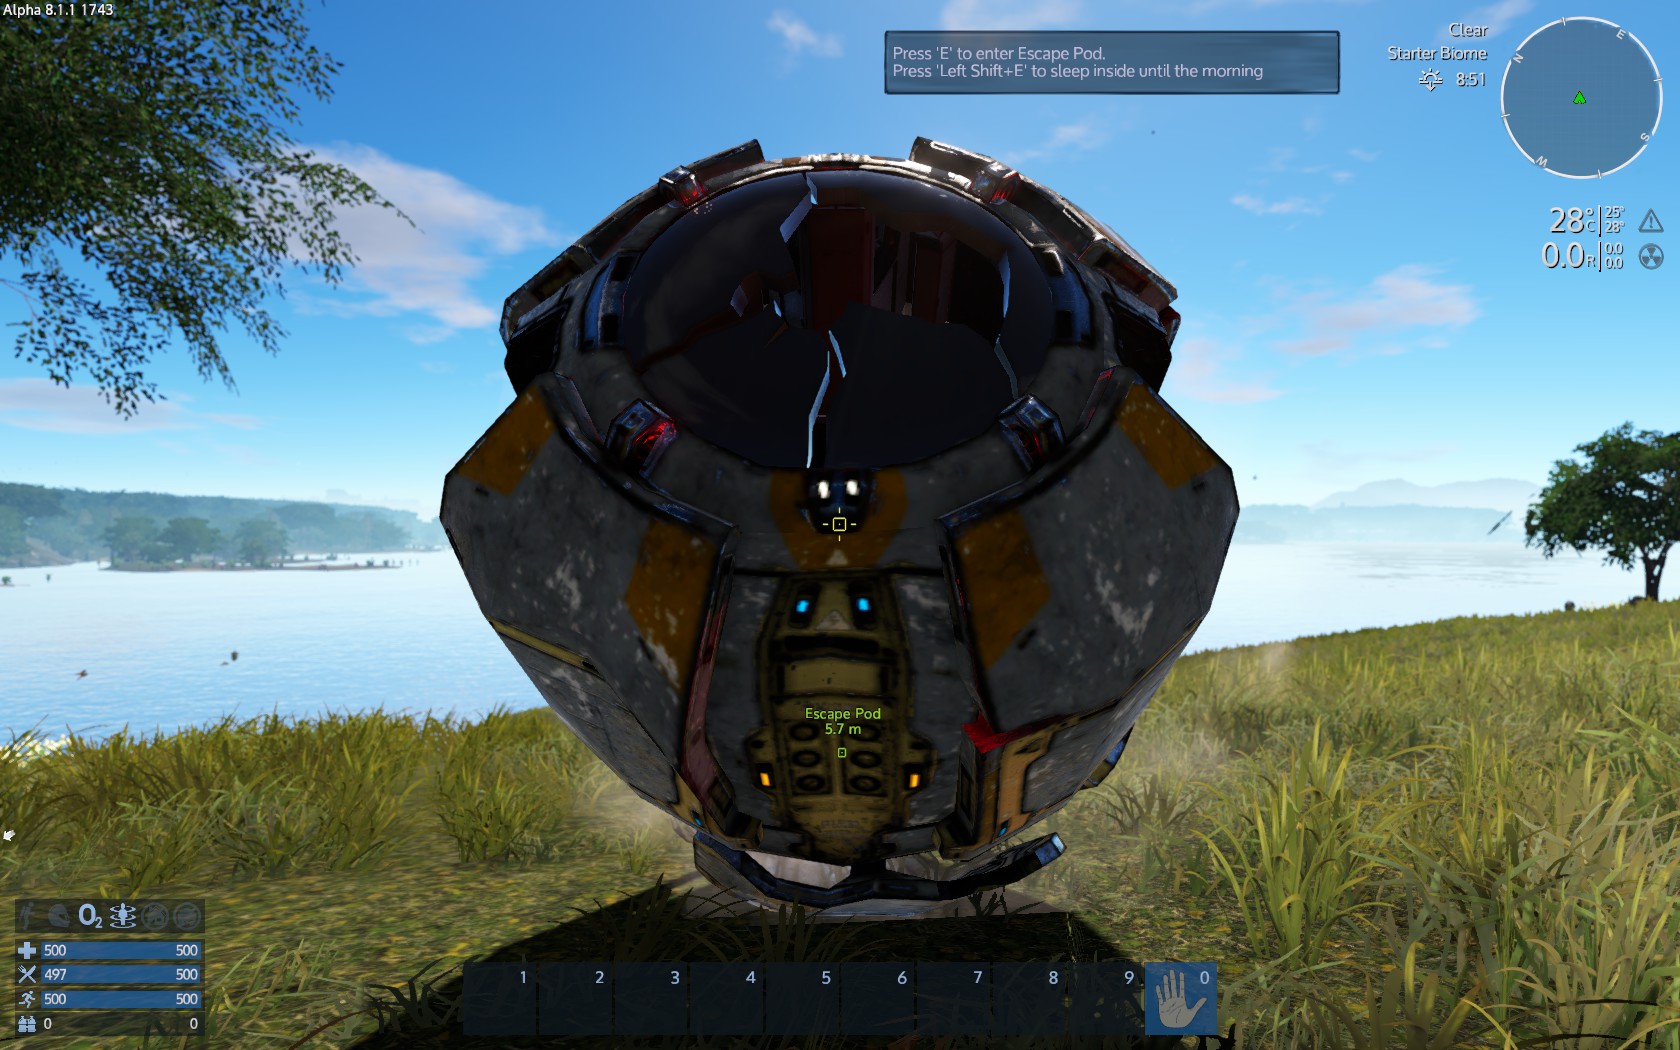
Looking at the pod, press Open/Use key (default F) to access the pods inventory.
There is a popup said Press F to enter the pod (means to access pod’s inventory)and Shift+F to sleep at night. At night temparature usually drops and you can spent the night within the pod to save yourself from freezing. You can also use your tent for sleeping if you are away from the pod, and you will be soon, however this action is available.
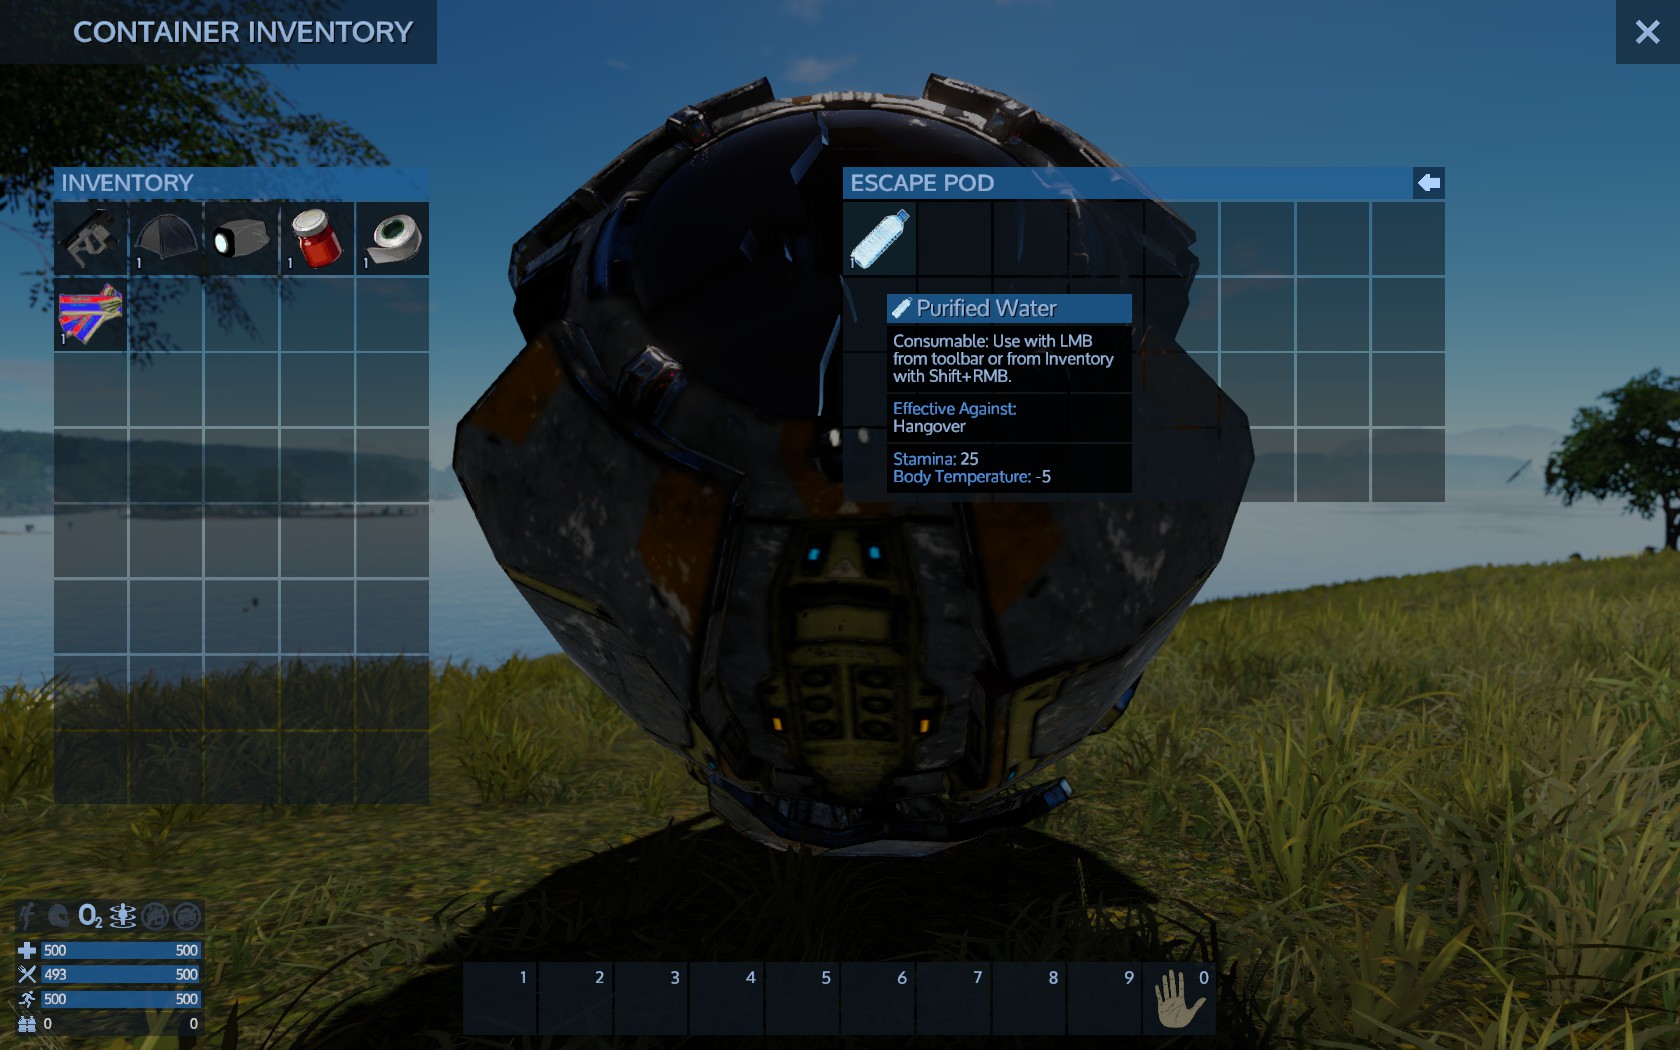
Pressing F will open the pods inventory. Not much here just a bottle of purified water. Your inventory is left, pod’s inventory is right (and that is how it will be when looting storages). On top right area of the window, somewhat lower and left than the ‘X’ that closes the window there is a button with a left arrow like <–. Left click (LC / LMB) to take all pod’s inventory items to your inventory. Then LC (left click) ‘X’ button at the top right or press Esc to close the window. Drag and drop (L click, drag, L click) water into your inventory or click the right arrow at the top right corner of pod’s inventory to take all.
Before you do anything else, you need to know your HUD and put some items to the quick items list usage.


At the lower right of the screen there is a set of bars and some indicators on top of the bars. The bars are from top to buttom health, food, stamina and oxygen.
Above there are indicators which are, from left to right, Jetpack, Helmet, breathable O2 atmoshpere, Gravity, nearby base and nearby resource(for building purposes).
At the center buttom is your toolbar slots, 1-9.
At the top right you can find the radar. Left to radar you can find the weather, the biome and the time until night/dawn. Below the radar is the temprature, radiation and your current mission.
Press the Jump/Up key (default Space) and try to climb on the pod for a better first view of the surrounding area and some height safety from wildlife, if there is any close to you (it won’t be on that level any aggressive wildlife at default scenario). Take a look around for agressive wildlife, you will know becuse the creature will go towards you. If not, other creatures are neutral and never bother you. However note that they become agreesive if you attack them.
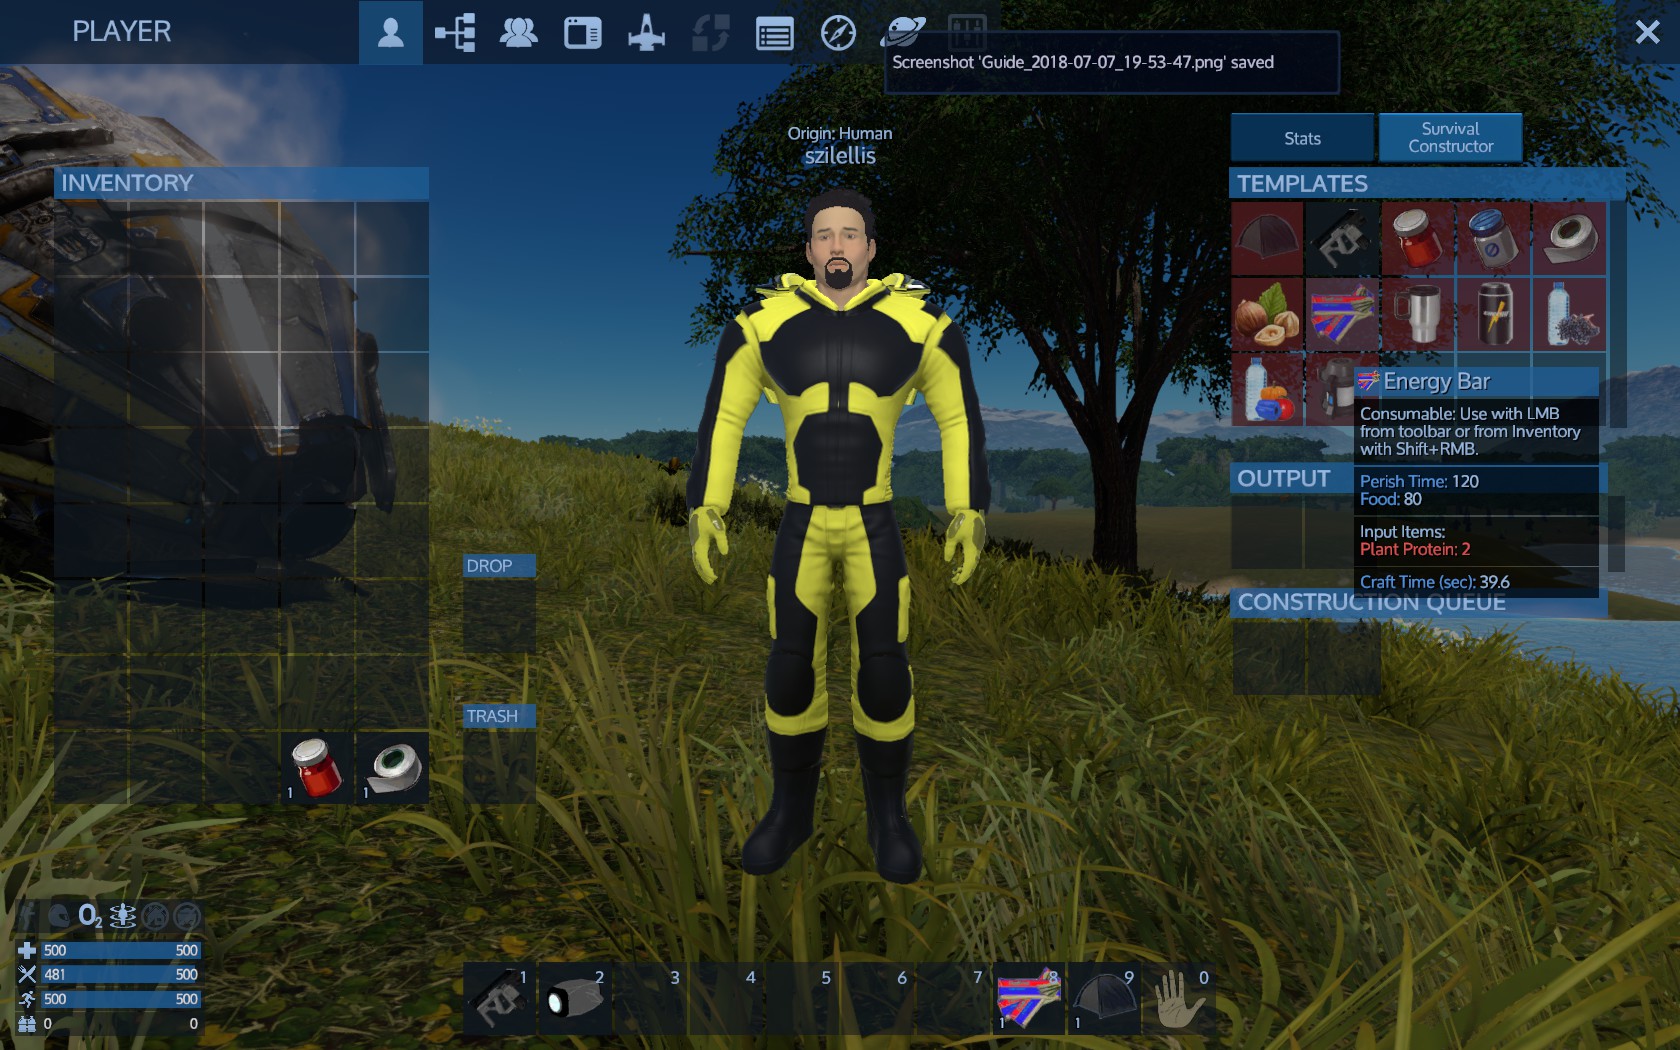
Open you inventory by using Inventory key (default I). Pick the survival tool from your inventory by LC and place it in your quick access horizontal bar at the left of your screen (also hotkeys 1-0 by default and selectable through mouse wheel cycling as well). Place the flashlight next. You will also need few more items to put to quick bar slots. That is Energy Bar and Survival Tent. If you use non breathable planet, Small O2 bottles as well, if you have. To avoid accidental item usage you better put items that doesn’t matter to use (flashlight, survival tool, weapons later on) on the top slots (left slots 1,2,3,4) and items that are few and precious (meds, O2 and food) on lowest slots(right slots 6,7,8,9). The free middle slots will be needed for tons of temporary shortcuts from now on anyway.
Here is how you look before and after managing inventory and slots:
Your next mission will be to find the signal source and we do, but all our way there we need to do more things.


Starting at a non breathable planet
When starting at a non breathable planet, O2 is an extra need you have and actually more urgent than anything. This section will explain what you need to do to survive.
To understand the problem, O2 is consumed much faster than food and you have 5 small O2 bottles that restore your bar fully. So you have a total of 2 bars, your initial one and one refill from the small O2 bottles. This will only give you some time to craft additional O2 small bottles. If you do not focus on this as your first priority you most likely end up dead out of oxygen. This is especially true at hard difficulty. With Oxygen Consuption set to ‘Fast’ (hard difficulty setting) you have about 12 hours max before all your O2 runs out and die. This section deals with hard difficulty – play Medium or Easy will buy more time for you. So if you can do it at Hard setting, you can do it at any setting.
What is all about surviving in those conditions and difficulty is to understand that once you crash land you have extremly limited time until producing your own O2 bottles. And you have to produce more O2 bottles than O2 you consume.
First, let’s see what you need to do/craft:
1. Reach level 3 to unlock Portable Cunstractor
2. Craft 2 Emergency Generators, preferably 3
3. Craft 1 Portable Constructor
4. Craft Biofuel for your Emergency Generators.
5. With 2 Emergency Generators (EG) time works for you and not against you but surviving from O2 is behind you, you have some time to craft another Emergency Generator and then search for wood (for Biofuel) and food.
6. With additional EGs you increase Small O2 production thus increase your exploration range. Later you may craft a water generator and O2 station e.g. on a hover vessel for mobile autonomy.
The difficult part is until step 5. Let’s see how it is done:
First thing to do while falling with the pod is to check your map. It is dead important to land near water. Temperature is very high on the desert type planets and water can cool you down. High temperature will first drain your stamina and you will not be able to drill ore rocks or chop woods fast. Keep staying under that sun and you will eventually die before O2 runs out.
When you crash land loot the Purified Water from the pod. This may give you some extra O2 and save your life while you wait for the first small O2 Bottle to pop out later on.


Now one important thing: While you move, LOOT EVERYTHING IN YOUR PATH even if you will not use it yet or do not know what it is. Looting is the only way to reach level 3 to unlock Portable constructor. Drilling ore rocks does not yeild XP, chopping wood is slow XP and will drain your valuable O2 faster and exploration is also slow XP plus you cannot go far from coast line.
Also very important: DO NOT RUN. Use your jetpack to go faster. Tap 2-3 times, land, tap again. This saves O2 – the one thing you do not have enough of.
Now if you are not close to the coast line, go there. If you are, go around the coast line. Do not go far from the coast line.
While moving you always loot everything in your path or near your path and search for ore rocks:


When you have 1 iron ore and 3 copper ores, use your survival constructor and begin crating your first Emergency Generator. It takes some time, so it is better been crafted while you search.
If you spot a tree, chop it with the survival tool at Defence mode. you need about 3-4 wood logs.
Do not forget, while you search for ore rocks and trees, loot everything.
If you get too hot or heat stroke afflictions jump into the sea. You will soon cool down and be able to go out again.
When having the next 3 copper and 1 iron, craft your second Emergency Generator.
Finally when you reach level 3 unlock the Portable Constructor and craft it. You need 3 iron, 2 silicon and 1 copper.
Do not loose time to drill lots of a single ore type e.g. iron or copper. Same for wood. 3 wood logs are enough as well as 5 iron, 7 copper and 2 silicon. You shall need 1-2 trees and 1 of each deposit for the ores.
When the Portable Constructor is ready put it on the ground, supply the wood logs (and the fibers if you have to save time) and craft at least 2 biofuel (or shift click for 10). Install the Emergency Generators just next. If you have few O2 left (50-100) you better stay there and do not even walk to consume as less O2 as possible. When crafted, place the first Biofuel at 1st EG and the 2nd at the other. It is important for the EGs to work in parallel. Share the next Biofuels the same way.
Stay nearby until your O2 bar is full and also have 1 Small O2 bottle to get with you. Craft the 3rd Emergency Generator as soon as possible. The EG crafts 1 Small O2 Bottle and then 1 Purified Water, so you get 1 bottle every 2 timer countdowns.
Sometimes you may be unable to find 1 type of ore. All you can do is try to combine different terrains whenever possible. Check the pics above – i found iron at plain desert and copper at somewhat fertile desert. However this is not 100% sure for ore rocks.
Sometimes you may land at a spot where there is no water visible not even at the map. Sometimes may be impossible to survive at all because of heat – portable heater-cooler also requires level 3 to unlock. There is no guarantee on a random generated planescape. This tactic however gives a fair chance you make it securing O2 availability at start.
Few important stuff you need to know
Lets take a quick look at our HUD and items at this moment for some info it is good to know. This may save your life.
Until now, we land with the pod, loot the pod and put some items into quick action shortcuts.
We also now our HUD display but not how to make use of it to survive.
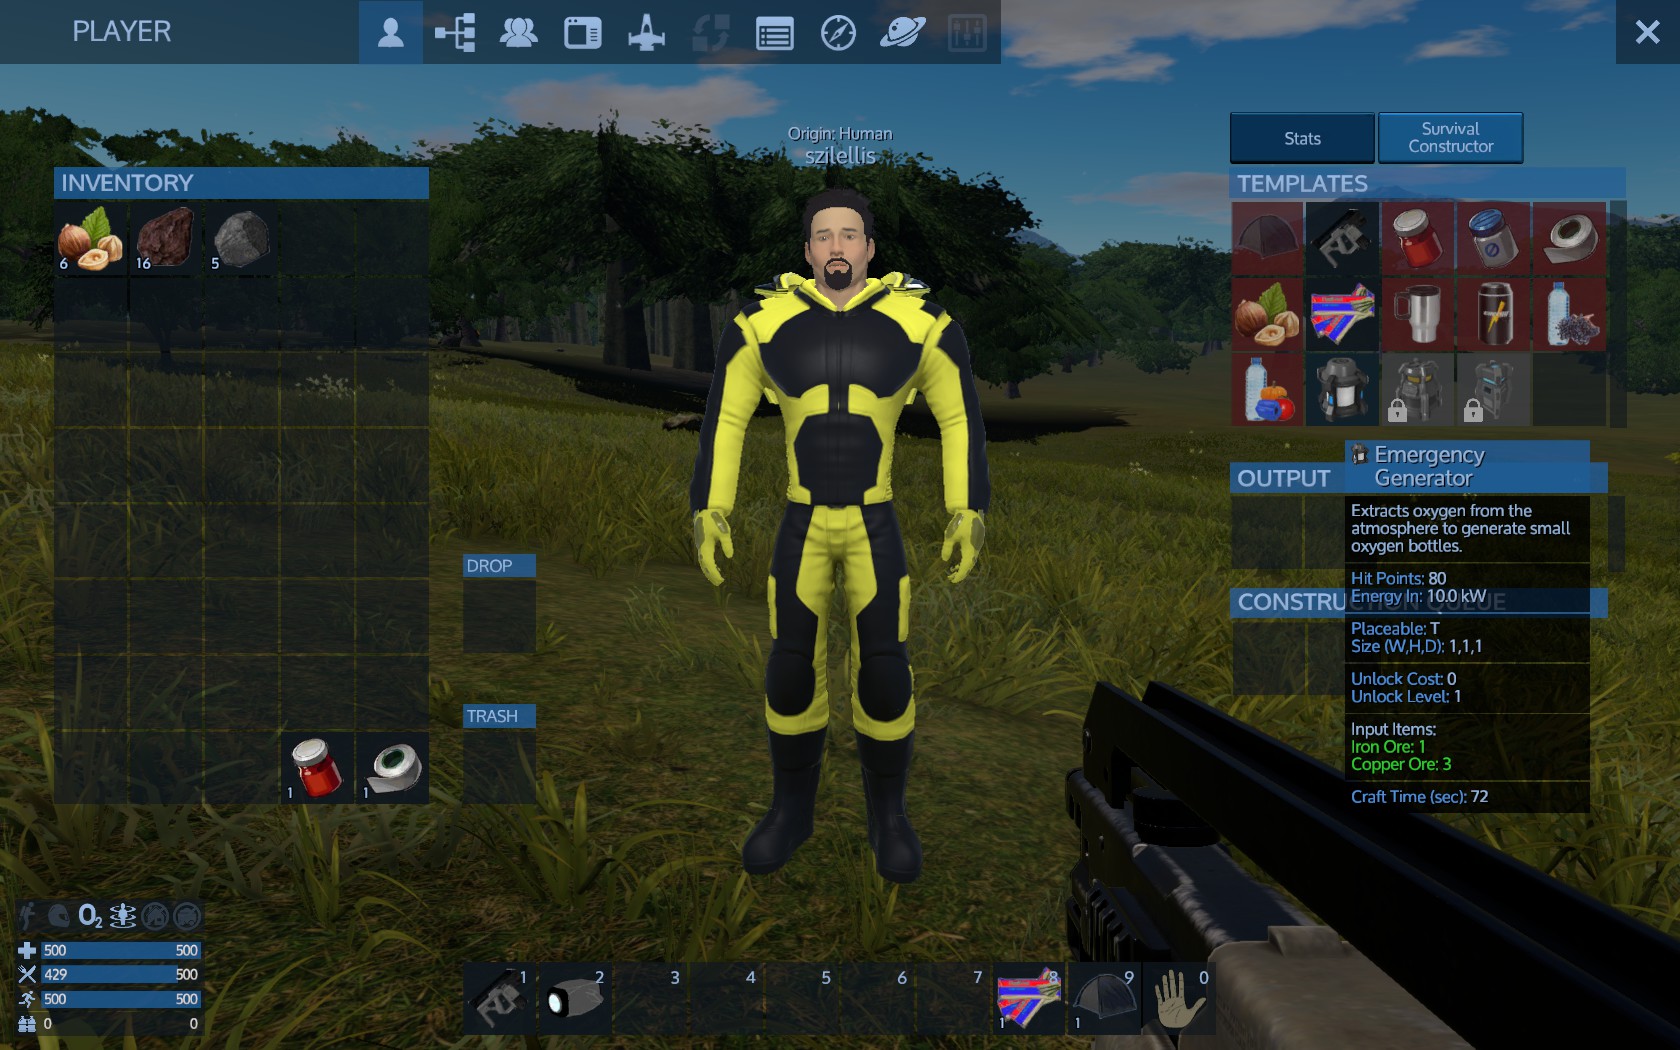
Open your inventory. At the right side, next to stats click Survival constructor.
Browsing the items, find the Berry Juice. The popup say perish time 50, health 90, input 2 berries. This means that when you loot 2 berries you will be able to craft a berry juice to restore 90 health. perish indicates that, unless inside a fridge (you do not have one now) the item will turn to spoiled food (which is also needed) after X ingame hours.
Same for energy Bar, requires 2 plant protein and restores 80 food.
So you now know how to restore food and health bars. When you have the required items in your inventory the item in the constructor will no longer have red background and it will be available like the Survival Tool which requires nothing to build. Click the survival tool into the constructor to craft one to see how it works. When finished it will be placed at output slots. You do not need to wait, close inventory to move on, the survival tool will be crafted meanwhile.

Now on the HUD:
You total have 500 health and 500 food, food bar should be somewhat lesser now. Food bar always depletes.
Stamina is used for running and replenishes over time. Better use running when you really need to.
Oxugen is 0 because you have no suit and you do not need it yet because you are on a breathable planet. Leter on you produce O2 from water with certain devices and you will have O2 either from base/vessel ventilators or your suit O2 and use O2 stations or carry O2 bottles to replenish.
The indicators above are, from left to right, Jetpack, Helmet, breathable O2 atmoshpere and gravity. The O2 and gravity should be on because of the planet. Later on those are either non existent and you get O2 from your armor suit and move from your armor suit thrusters or exist from a base or spaceship having ventilators and gravity generator devices. The two left indicate a base or resource nearby that block you from build close, not needed for now.
Bellow are extra info, you do not need to read right now if you do not like, but feel free to do if you want. You can go on and without and come back later here.
More info on tooltips:
Description: General info helpful to know where to use it
Different item types have different stats. While most devices have energy In for example a generator has Energy out. A consumable plant may have Health – 100, Stamina 500, meanning it damages health by 100 and restores 500 stamina. Weapons have stats like damage, range, ammo and the like. Devices have stats like HP, Placeable, energy In or Out, Mass, Size.
More info for health:
Your health should be full at this point. Injuries will deplete health and you can restore your health using varius items. Health can be damaged from combat, falling a lot of height or as a last resort when starving, freezing, cannot breathe, getting very hot or got radiated (environmental conditions). Can be restored with medicine, food, or medic devices at bases and ships. For now you have no enemies at this level, no special environmental conditions and no hazardous environment disasters, so just make sure you will not fall from too high. Also make sure you protect yourself from freezing at night by sleeping. You can check temperature below your radar. When starting getting cold you will also got notified as ‘Too Cold’ at down right of the screen and see the afliction at your stats (inventory, stats tab next to survival constructor tab).
More info for food:
Food is a constant need. Water is not. If you run or drill stones for example you need more food. Check your bar level and your food resources at regular times. Eating food restores the bar. The food bar indicates how hungry you are. Fulls means not hungry, empty means starving – dying from hunger. If the bar empties you don’t die instantly but you loose health gradually. However it is pointless to ‘heal’, when you food bar depletes you need to eat. That is what energy bars do at your quickslots, make sure if you get starving you have a workaround at your pocket. If you don’t place into quickslot at least make sure you always have some food in your inventory. Later you run here and there and do multiple tasks you might find yourself starving because you miss to check the food bar. It is relatively easy to obtain food so you probably won’t have to starve unless you forget to check the bar and forget to collect food or your food had perished. Later on you craft emergency rations that do not have perish time. For food there is one rule, you better have and do not need it yet, than need it and do not have it. Carefull with perish time, when you stack items perish time goes average. Place 1 energy bar with 50 perish time on top of 10 other having 1 perish time your fresh bar will join the others and now 11 bars will have 2 perish time!
THIS IS VALID ONLY IF YOU HAVE AMROR FROM THE SCENARIO: Press the Jetpack key (default J) to toggle your jetpack on. The jetpack state and energy is at your HUD, lower left of your screen. The energy recharges very fast. The jetpack indicator will now work as vertical bar. Press U to toggle helmet on and off. When off, you cannot use suit’s O2 and night vision.
More info on O2:
The oxygen is your suit oxygen supply, when wearing a armor suit. Like food, if it depletes then you gradually loose health until you die. If it is depleted healing will not help you, you need to refill it with oxygen. You can refill your suit oxygen using small O2 bottles. Later on you will use a device on your bases called O2 Station. When away of O2 station you only have small O2 bottles. Your oxygen supplies are deadly more limited than food. A single small O2 bottle fills only a very small portion of your suit oxygen supply. All 5 bottles will fill half your meter. So instead of take care you hunger 4 times with 4 emergency rations, with 5 small O2 bottles you only fill your meter 50%.
More info on stamina:
Stamina is used when you run. You run by pressing Run key (default Left Shift). It regenerates slowly when you walk and much more faster if you stand still. You do not have any consumables to restore stamina now but there are some items you may harvest and others you will craft that restore stamina. However when your stamina is depleted you cannot run but you don’t die of this.
More info on Jetpack, Gravity and Helmet:
Jetpack is the On/Off indicator for your jetpack. The bar represents the jetpack’s energy that replenishes very fast. Please remember that when the jetpack is on you cannot run so it is good to turn it off while on the planet and opened it when you need a high jump, then turn it off again. The jetpack is mostly used (On) when been in space where there is no gravity, so you can move around.
The gravity indicator is of no much use at the moment.
The helmet indicator is important. It is On/Off toggle and shows if you wear your helmet or not. The key Helmet (default H) toggles the helmet. If you take of your helmet however you cannot breathe unless been on a breathable atmosphere or inside a vessel cokpit. Without helmet you cannot also use night vision googles.
The way to the signal
The mission to go to the signal open a yellow waypoint visible into the game and on the radar. It is named ‘Wreckage’. We certainly need to get there. It says 1.09 km which means it is 1090 meters away. We need to walk 1km to get there.
On our way we may also visit small wreckages unless close to our way:
This small wreckage worth visiting because it is close to our path.

Keep in mind that if you night gets you, use your tent to sleep:


During our travel we will search our surroundings for collectibles, mostly important food and ores.
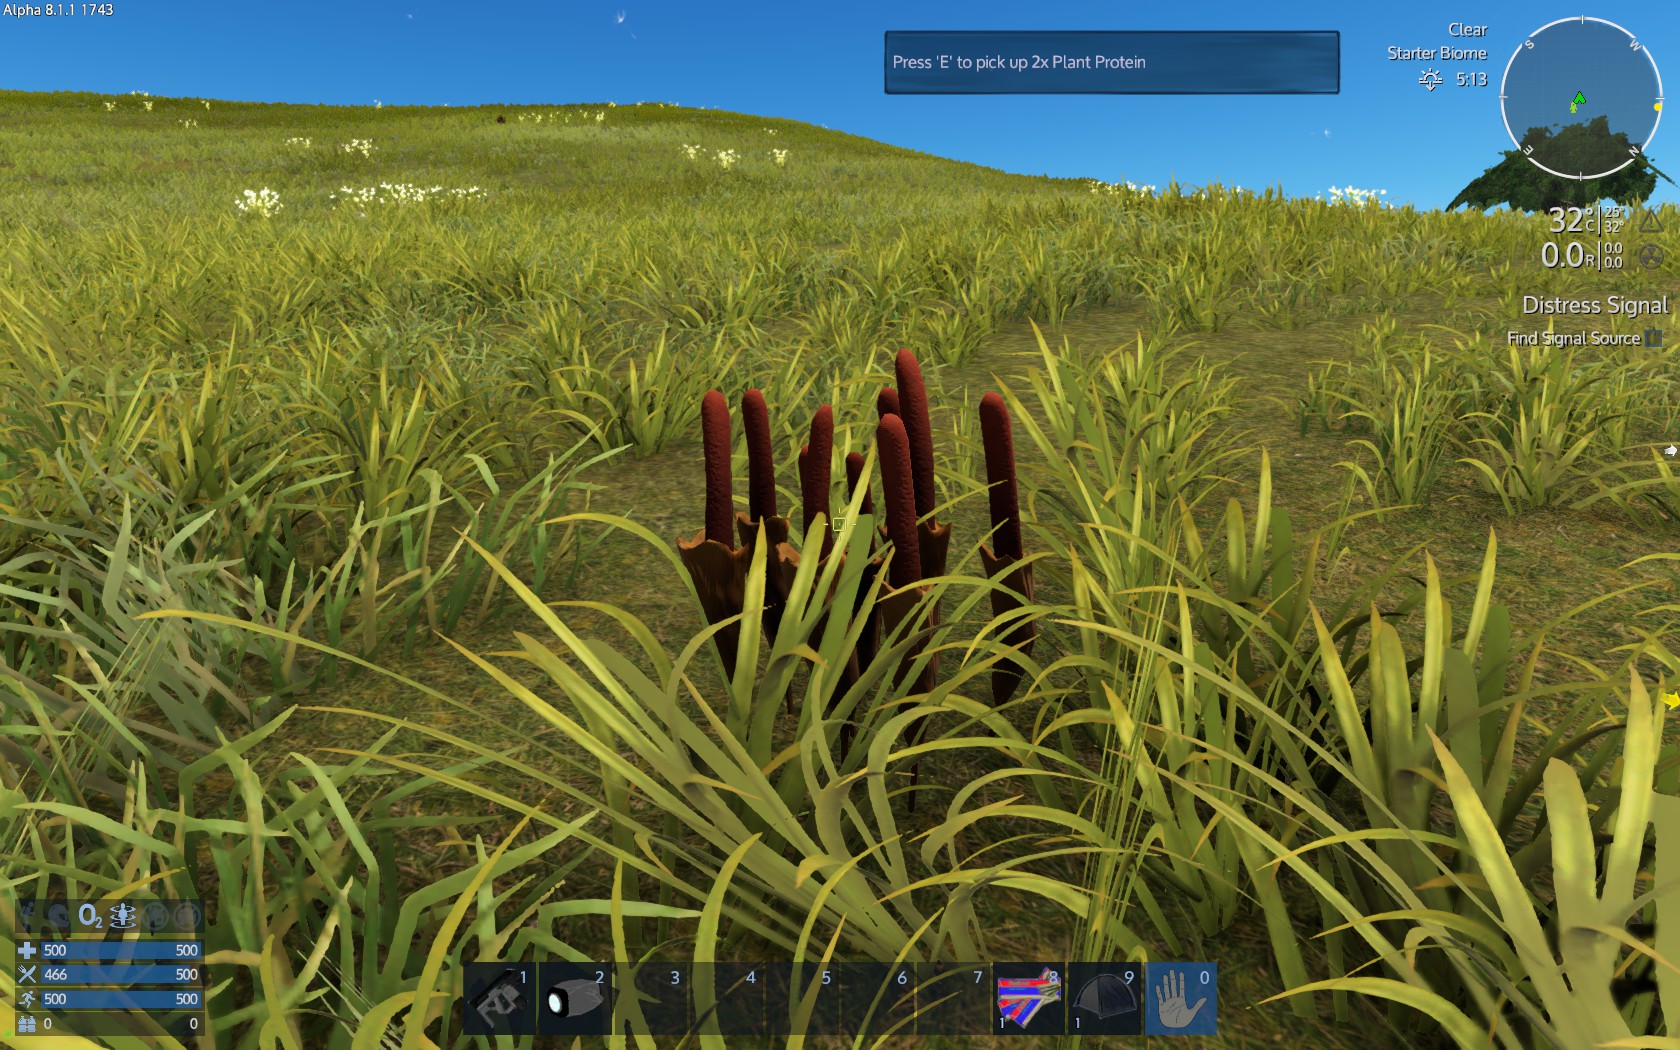
Here is a plant fiber collectable. Pressing F will get it to our inventory.
Here is another collectable, Plant Protein.
Plant fiber are not that crucial to collect since they can be crafted from wood at large quantities. Plant protein however is needed to create food items and specifically Energy Bars, from our Survival Constructor. We do that a little later.
Now select your survival tool at slot 1 by pressing 1 or roll the mouse wheel there.
Once selected, click RMB. You have 3 options with this tool:
Defence Mode, used as a (really weak) weapon and to chop wood.
Rock Drill, used to drill rocks and ore rocks.
Salvage, used on constructions and vessels to recycle them back to materials, piece by piece.


Ores are the most valuable resources of the game, as they are used to craft nearly anything except food and medicine. Right now and without a hand-held drill we can only drill ore rocks.
So be aware to spot them:
Get close the survival tool at Rock Drill mode and hold L mouse to drill:
At the lower right part of screen there are info about what the rock is (stone, iron,copper,silicon) and how much HP has for drilling.
After completing the drill, be carefull to collect the ore:
Different ore stones have different colors. Copper are red, iron are blue, silicon are white-to-silver:


Moving on, we found the wreckage. This one is burried. Small wreckages do have one cargo container to loot but this one is bellow ground so we have to abandon the loot. Loot is random at those. Ifyou like use the survival tool (Salvage) to salvage a block (like drilling a stone) to see how it is and what you get.

Time to craft. Open inventory and survival constructor tab.
The survival tool we had click for crafting before should be ready by now at output items. Take it. IIt is a free item anyway – throw it at trash slot at your inventory.
The energy bars should now be available if you collect at least 1 plant protein. Check how many plant proteins you have and click – 2 gives 1 bar. So if you have e.g. 6 click 3 times to get 3 energy bars. your crafting order will stack – 3 bars will be craftet one after another.
There are also some items with a locker. Those are Portable Heater/Cooler and Portable Constructor. Those are items that need you to know the tech to craft them. Get out of inventory and go to tech tree(default F3). There you will find all techs you can unlock and craft.
You need to go to ‘Misc’ tab and locate those techs. Right now at my screenshots i am level 2 and have 10 unlock points. Those require 5 points each and level 3, so i need 1 more level to unlock and craft them.
There is also Emergency Generator available, which is not needed here (needed on non breathable planet starts):


Anything you do in Empyrion you gain XP and levels. Exploring, looting, crafting, building, fighting.
That is important to balance your progress – do not spent very much time drilling ores far away and looting plants for food forever – you will gain levels and be unable to deal with new threats. You need to move on and progress.
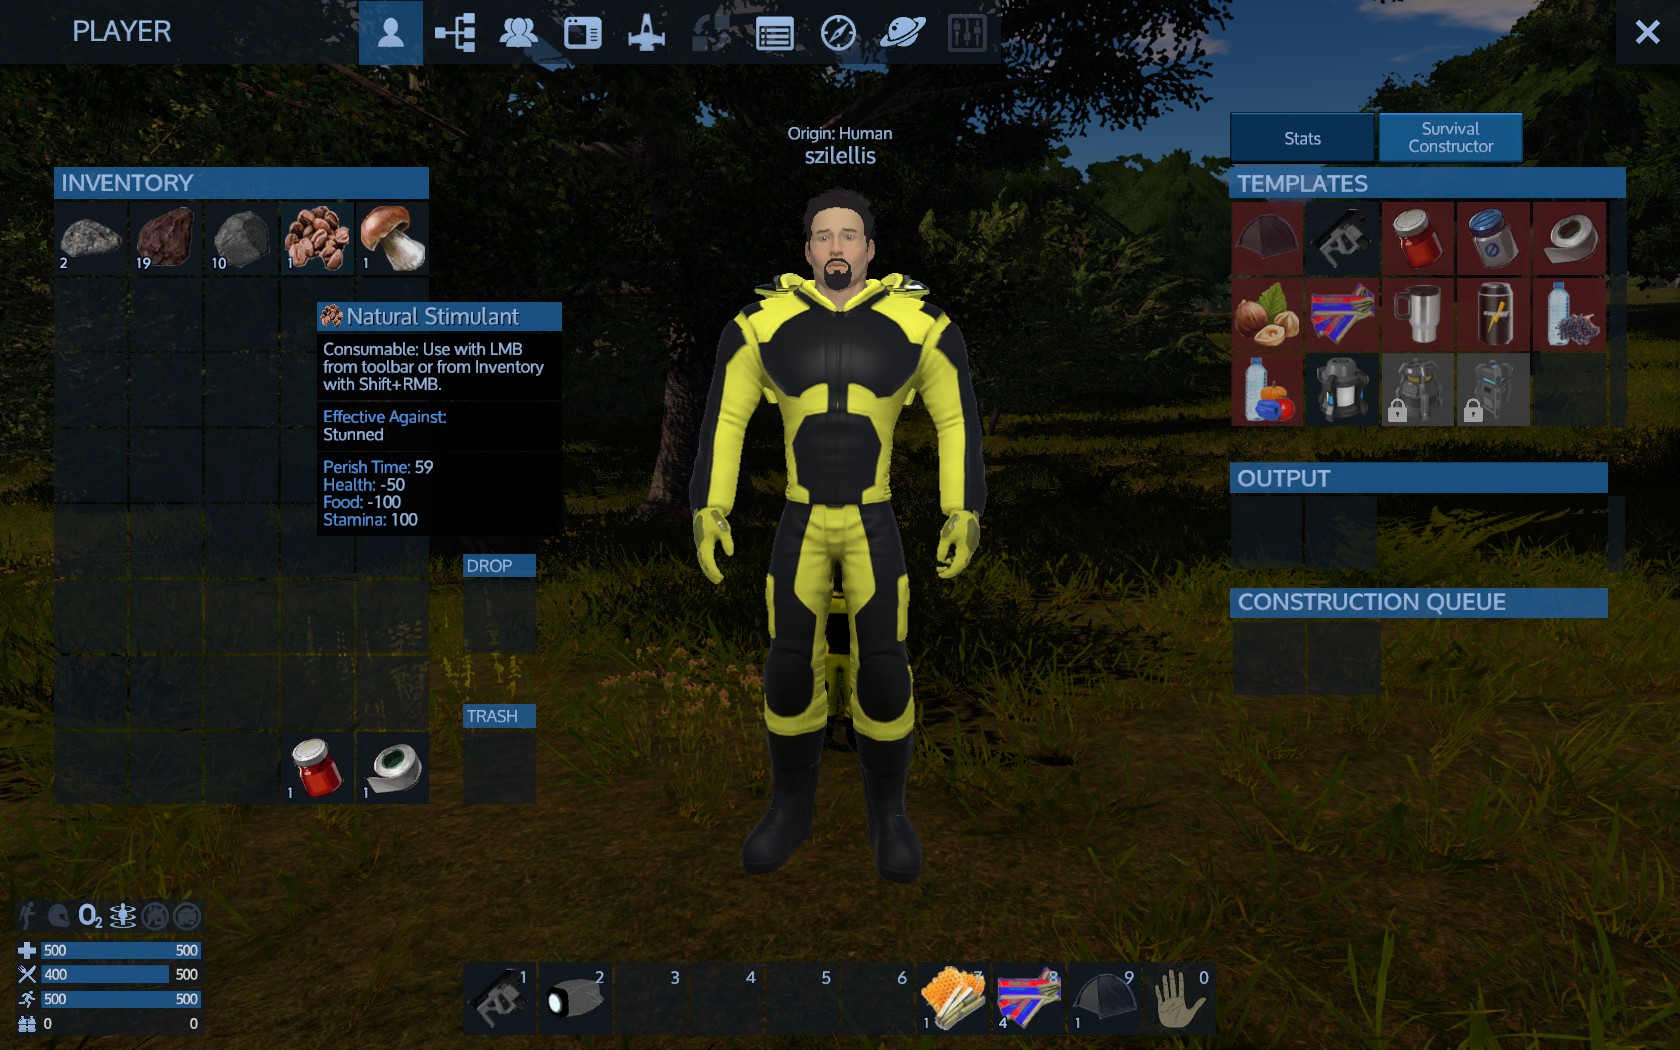
Get close to whatever looks like collectable to you. Check the tooltips. This one for example collects something
Checking the inventory, we can see what the items offers:
This item, the Natural Sweetener for example, is a very usefull curative item ready as is – it is not like berries where you need to craft them to use them. Additionally, the Effective Against properties of the item means that if you get one of those illnesses this item can cure you.
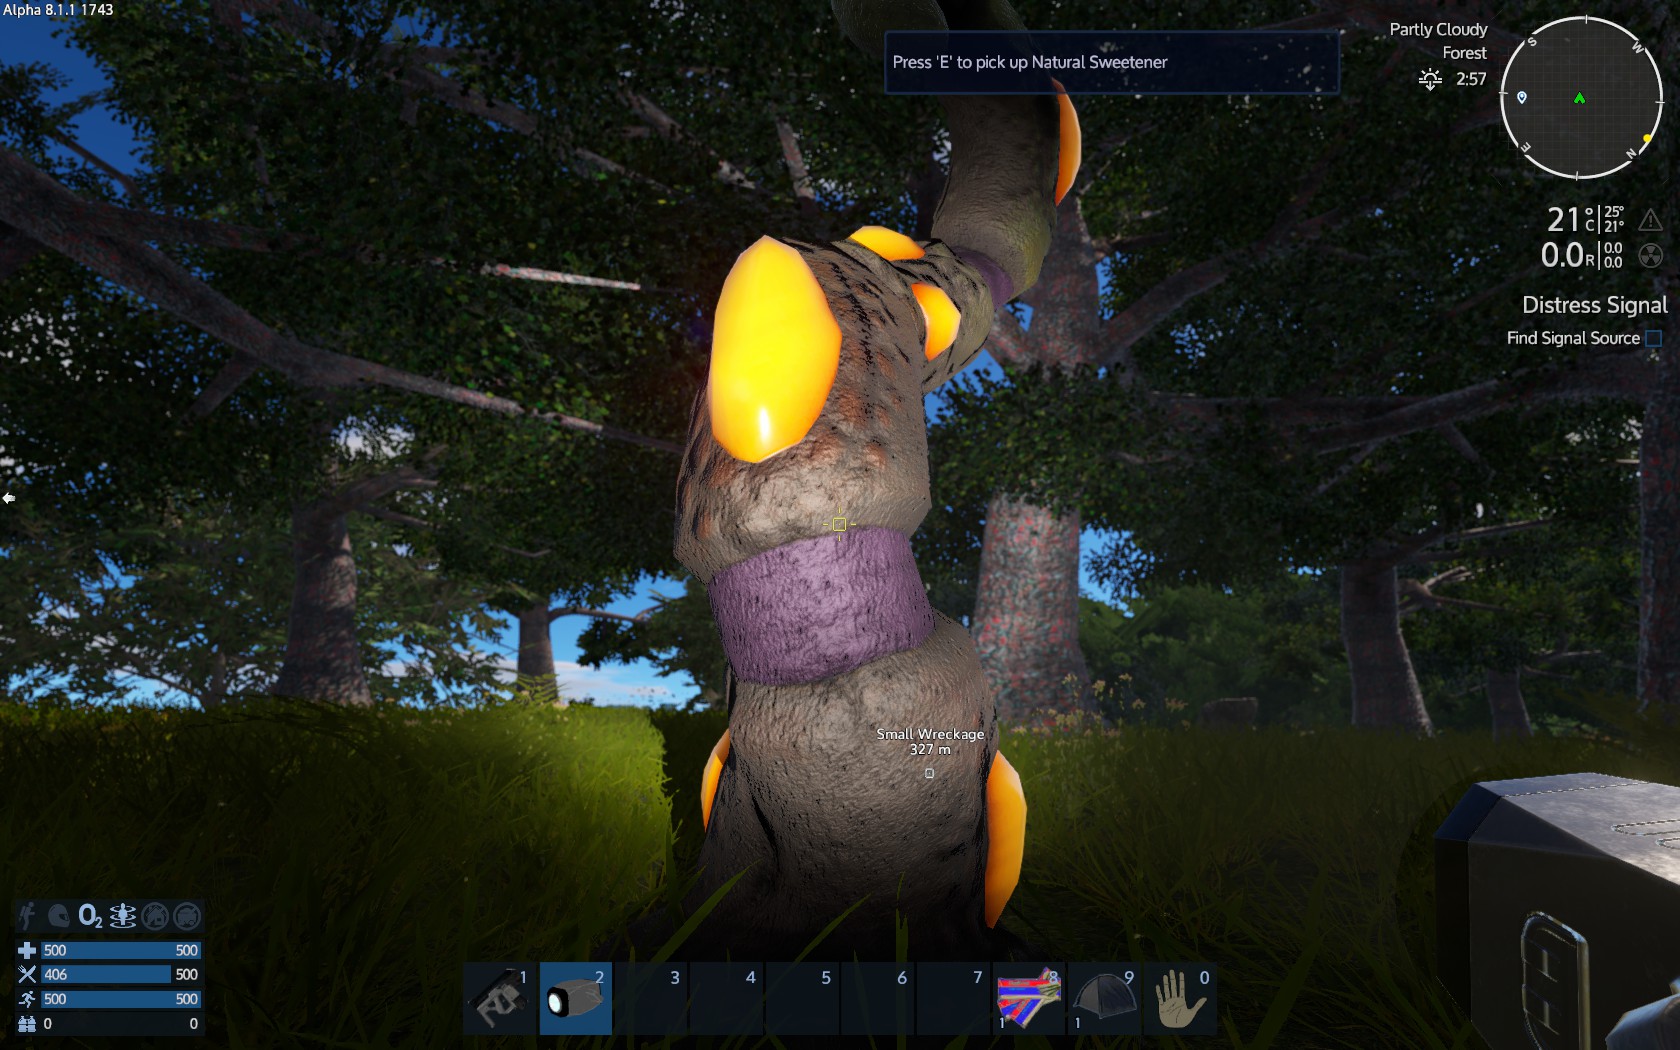

It is important to check all items you loot, items you may craft, all recipes available and generally all tooltips to know what each item does. One of those items heals poison bite and the other got stunned. Note that negative values cause negative effect -100 food means getting more hungry!

Keep walking and exploring you will discover other useful locations, like this iron deposit:
Deposits have large quantities of ore. You need however a drill there, as survival tool only drill surface rocks. For some ores like promethium you also need a scanner.

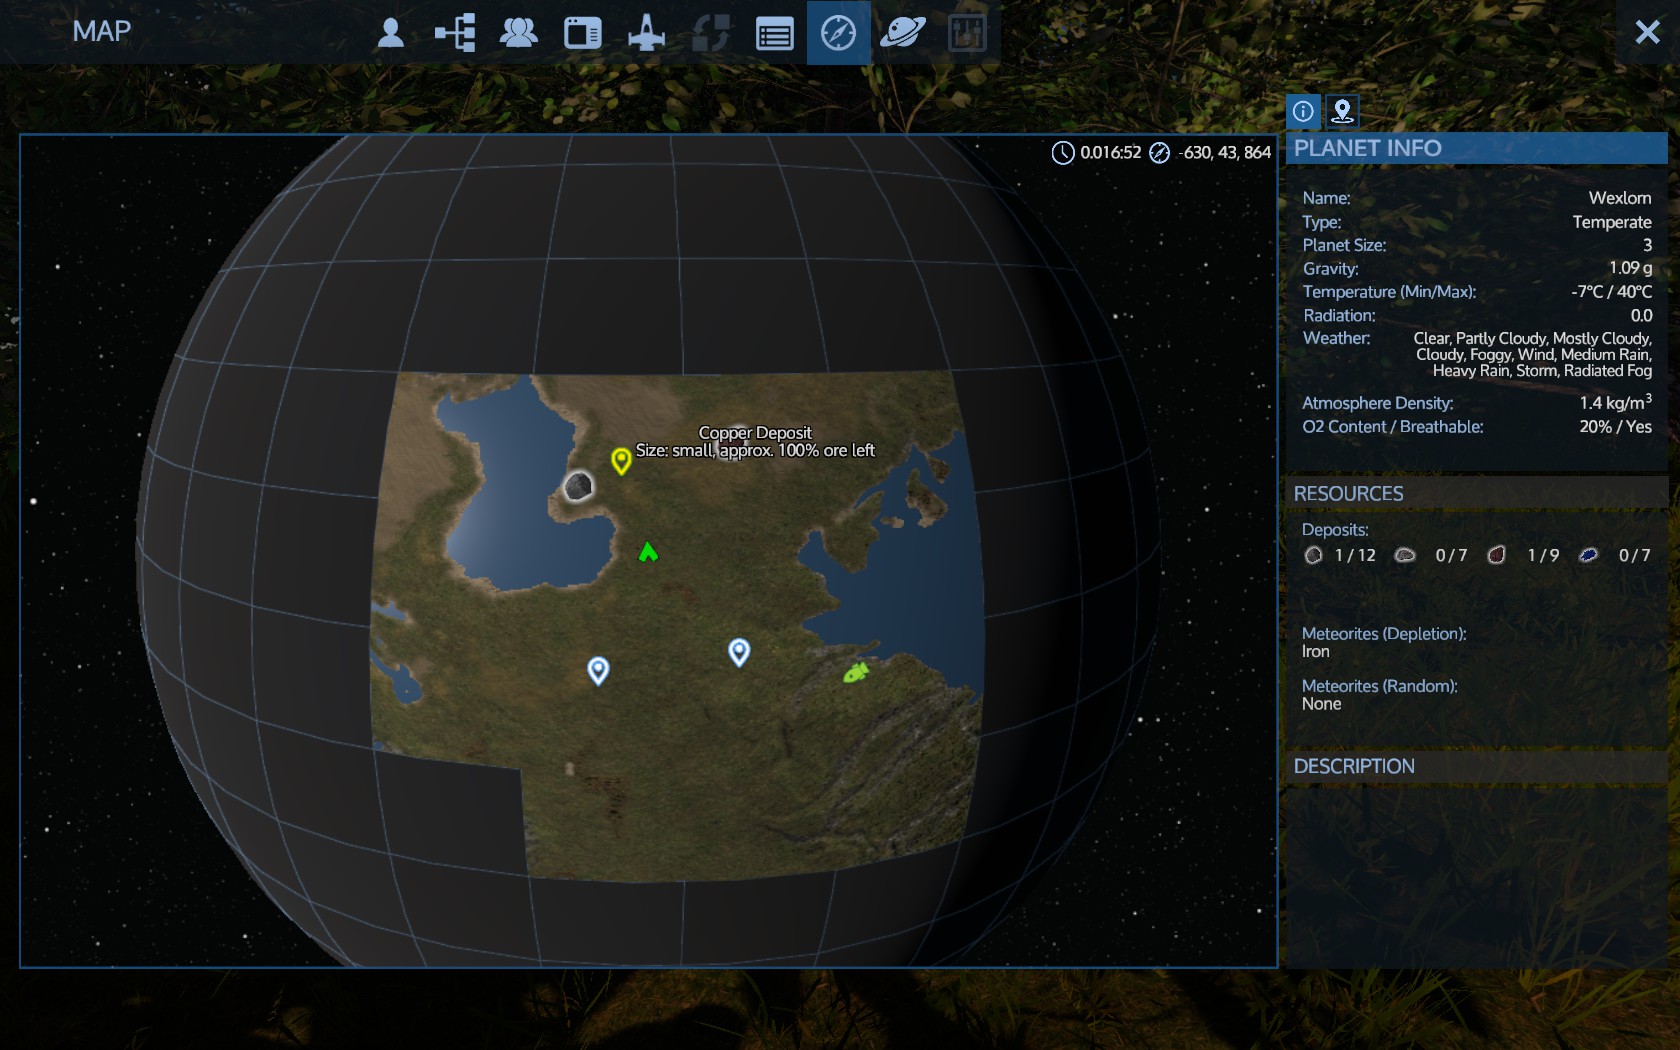
Press M for map. There you can see whatever you had discover so far:
Except existing markers, you can right click anywhere on the map to set your own custom markers.
Eventually you will reach your target, a larger wreckage. There you will find a locker.
Loot it like your pod at start. You will also get mission update messages.
More or less the game here will tell you to craft more advance items by checking the portable constructor recipes.
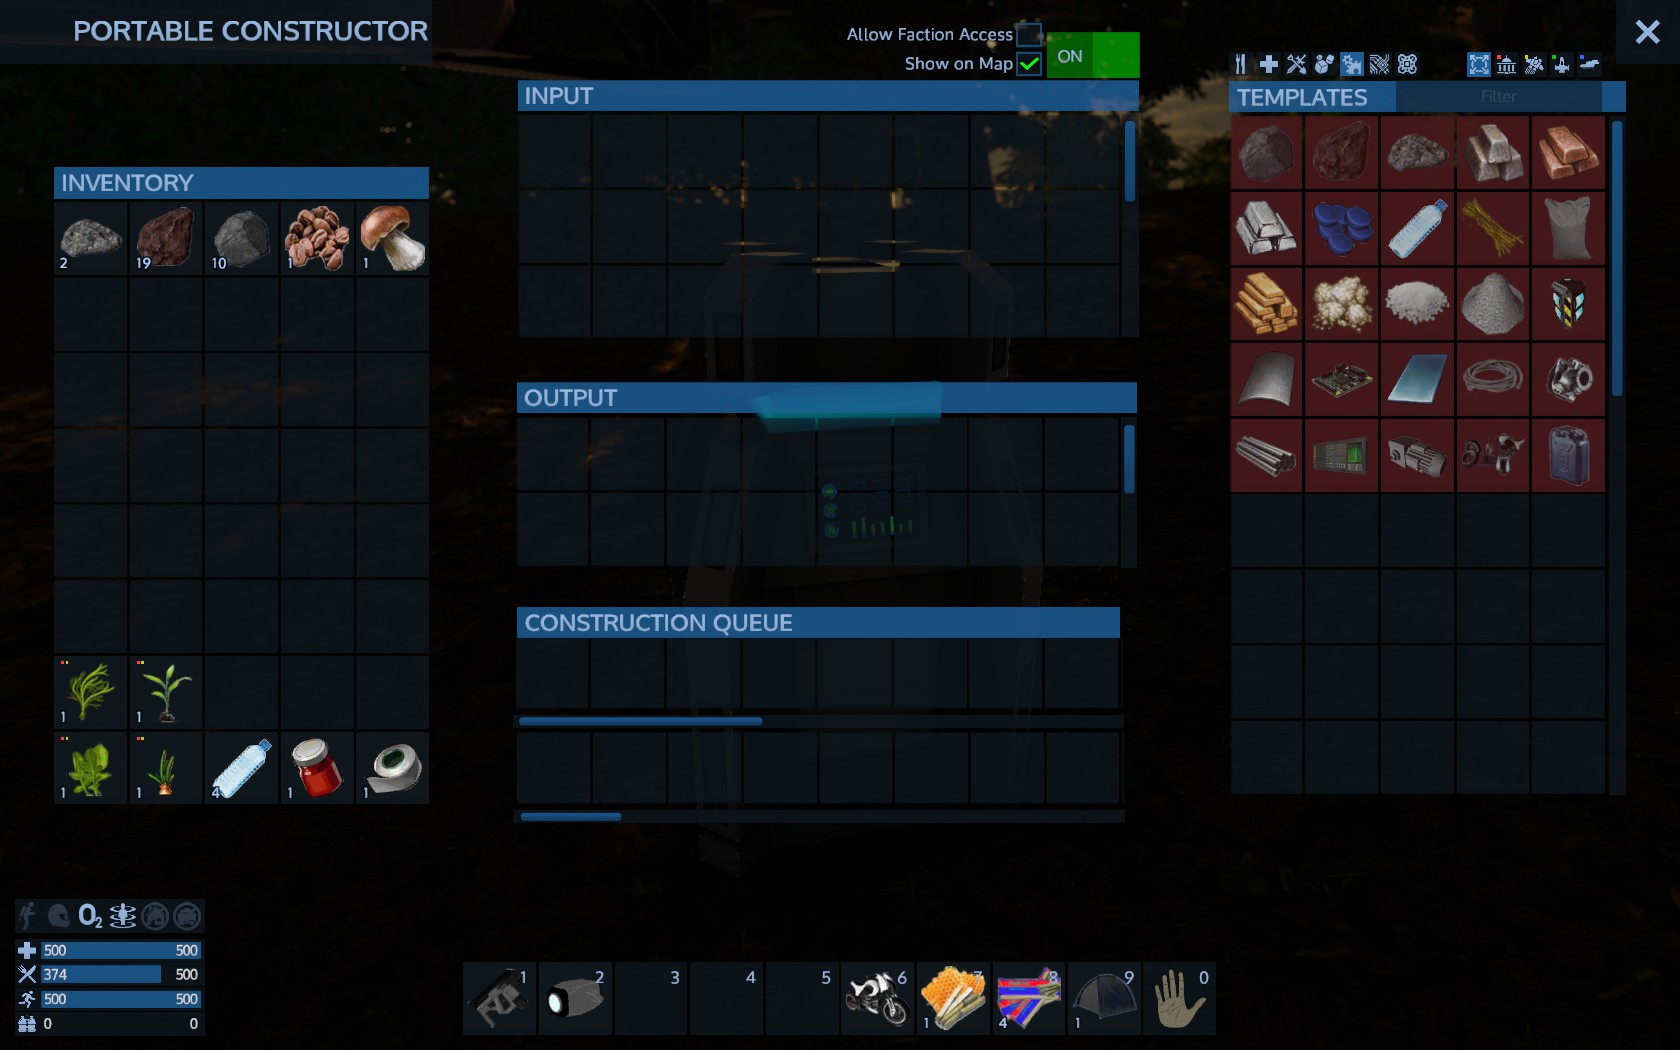
Place the portable cunstructor and the motorbike at your belt. Select the portable constructor and point at ground. Left click to deploy – you can pick up at any time(Shift+F), so deploy anywhere.
All constructors work the same way. They have recipes, get materials, have construction queues and place the products at output upon completion. The difference is at recipes and craft speed. More advanced constructors have more advanced recipes available and craft faster.
Looking at the constructor we have the templates at the left, input, output and construction queue at the middle and your inventory at the right.


Prepare to drill with a hand-held driller
We now have travel some distance, have a portable constructor, have food but what is next?
This wreckage you are now will be your temporary ‘base’.
Next we need to craft some weapons, a base and a hovercraft. To do all those however, we need resources, much more than we collect so far from surface stones.
Actually we need to drill 4 deposits, one of each iron, copper, silicon and promethium ores.
This will take some time so we need to make sure we replenish our food supplies at least between each deposit. I use to leave the portable constructor at the wreckage and use it as storage as well as craft items that take a long time while i go drilling.
You aslo need a weapon, even a pistol will do. Open the constructor, go to Weapons and Tools filter and find the pistol recipe.
Looks fine to build, but we also need to check the ammo. Ammo for any weapon can be found a tweapon tooltip.
Pistol bullets look like they need something called nitrocellulose which we do not have.
Next to the templates label there is a text filter. Click there and type ‘nitro’ will display the missing item:
This is an intermediate item needed to craft other items. A final item may have several intermediate items needed as layers. Anyway this items require plant fibers, obviously another intermediate item. This one may you have find but can also be found as recipe. Using the filter and seaching you find out that plant fibers need wood logs.


Get to the nearest tree and use your survival tool at defence mode to chop the tree. It may take some time. Choping trees will put wood logs into your inventory when finished (no need to collect like drilling stone ores).
Now get back and place the wood logs into the constructor input. The bullets will now be available (unless you miss something else also). If you do, find what else you miss.
IMPORTANT TIP:
An item can be gained by at least one of the following ways:
Can be crafted on Constructors or Food Processors (Hull Block, Pizza)
Can be produced on a special device (Small O2 Bottle, Water Jug)
Can be looted from dead creatures and Alien enemies (Raw Meat, Alien Parts)
Can be harvested from planet ground plants (Plant Protein, Berries)
Can be harvested from artificial ground plants you have build and grow (Corn, Tomato)
Can be drilled from a rock on the ground (Iron Ore, Crushed Stone)
Can be drilled from a deposit or the ground (Iron Ore, Crushed Stone)
Can be recycled into your inventory if you use your Survival Tool or Multi Tool on something that is crafted from that item (all components are retrieved e.g. recycle a Hull block will give 2 metal plates)
Can be looted from containers, Alien or neutral. (Heavy Armor, Survival Constructor)
The fact that bullets become available after you place the wood logs into constructors input means the constructor will automatically craft all intermediate items needed (plant fibers and then nitrocellulose) needed to craft the final product, the bullets. Since items have a minimum crafted quantity that is not always 1, all spare intermediate items after product completion will be deposited into your constructor input storage.
If you do not trust the pistol, try the shotgun. You need to unlock it however:
Unlocking the weapon will also unlock the weapon’s ammo
Make sure however that you have unlock Portable Heater/Cooler and Portable Constructor first. If you do not have the level or the points go drill ore rocks until you have.

In order to move you can now use the motorbike. Select it and left click on the ground:
Once placed, used it as usual to ride:
And you are good to go.


Now for the drill. Checking into the constructor same way as the pistol bullets, you may miss silicon to craft the drill.
So you need to go search some silicon. Before that however you may check drill’s ammo. You will need a lot of drill ammo to drill deposits so it would be wise to craft while searching for resources. Actually it is always a good practice to have crafting ongoing if you need it while you do something else. If not, you find yourself need more time to do things.
So craft some biofuel before go out look for silicon.
If you check your portable constructor at components filter (if you haven’t already), you will find out that you can craft silicon ore out of crashed stone:
The deal here is that you need a LOT of crushed stone for a single silicon ore. It is definatetly faster to drill a silicon rock. However if you can’t find one or you just miss a single ore, get it from crashed stone is an ideal alternative.


Remember, checking constructor recipes and items you loot and reading the tooltips is mandatory to know what items do, what resources you need each time and what you can craft.
So before you go drill, you need to craft:
A weapon and ammo for at least 5 reloads. This will be needed because by exploring and drilling you gain levels and wildlife predators (e.g. spiders) will hunt you.
A portable heater/cooler and a portable constructor to carry with you. The heater/cooler will protect you from tempratures outside your comfort zone (depends on your suit and can be chaecked from inventory->stats->armor stats). The portable constructor will help you craft something on the way that the survival constructor cannot plus gives you a second crafting line while on your ‘base’ (e.g your 1st constructor crafts lots of biofuel, use your second to craft the drill).
A drill and drill ammo called biofuel to actually drill the deposit. Tools need their ammo like weapons. The survival tool needs no ammo because it is a startup basic item.
Since i play and write this guide at the same time i collect the stuff and put them in a queue:
I also use the survival constructor for another queue:
By exception, some items are only crafted at the survival constructor like the portable heater/cooler and constructor. At least at this version.


Remember to do things in a way that you order crafting while do something else, so you do not have to wait later. Think what you need before go away for collect/drill or even before sleep at night. Your portable constructor(s) will be very happy to craft e.g. 20 biofuel while you sleep or collect food or drill.
When eating, consume food with lesser time to perish first. Grilled stick for example perishes much faster than energy bars:
And do not worry now for spoiled food. Whatever got spoiled got spoiled. Treat it as resource – you will need it later. At this stage you are without a fridge spoiled food is a natural outcome.

My items are ready, i pick them up from constructors output and i am ready to go drilling.
The constructor output is a temporary storage – once you get items from there you cannot put them back.
The constructor input however can be used as storage.
If you see you need, you can craft additional portable constructors. They can be used for crafting multiple things plus used as storage.

Ready to Drill
We are now ready to drill. The deposit is in front of us.
Markers dissapear from HUD when far away so i will mark my temporary base to be sure i get back.
Right click on the wreckage and click ok on the dialog. Change the icon if you like – i choose the home icon.
This way your base will be visible to the HUD from anywhere on the planet.
Deploy the bike and go close to the deposit.
Your HUD gives info about ore type, size, ore left and distance. Deposits are always bellow ground.


If you miss a deposit type, you need to explore. Go on with your bike and explore until you find a deposit. To make sure the deposit exists and how many they are, check your map:
At the rifgt side, bwloq planet info lists the resources. There are plenty and you need to find 1 of each. Just avoid getting closer than 500 meters from any enemy base. Crafting a detector and carry it with you will help you further detect ore deposits and avoid alien bases.

Be carefull as predators (agressive wildlife) may be there and attack you. Make sure you clean the area of predators before drill.
If you get injured check your health and restore it. If you get an affliction (i got dermal burn at the screenshot shown bottom right) enter inventory-stats and mouse over the affliction there – it says what medicine item you need to deal with it.
Sometimes natural ingentients heal afflictions. It is important to read the tooltips.
If you do not have whatt it takes to heal the affliction, check the recipe at your constructor and find the ingedients to craft it. Try to craft few not just one. This way you build your medicine set so you can deal with afflictions.
Do not let afflictions go over time. Treat them as soon as you get them. Some may go, other may get worse and you die.
If you have some medicine but get a new affliction that needs new medicine, craft the new medicine.

Over time you will always have a complete set of medicine with you or close to you.
For now, be careful because you are on foot, armorless and with just a weapon with some ammo.
Just try to clear the location near the deposits and that is all.
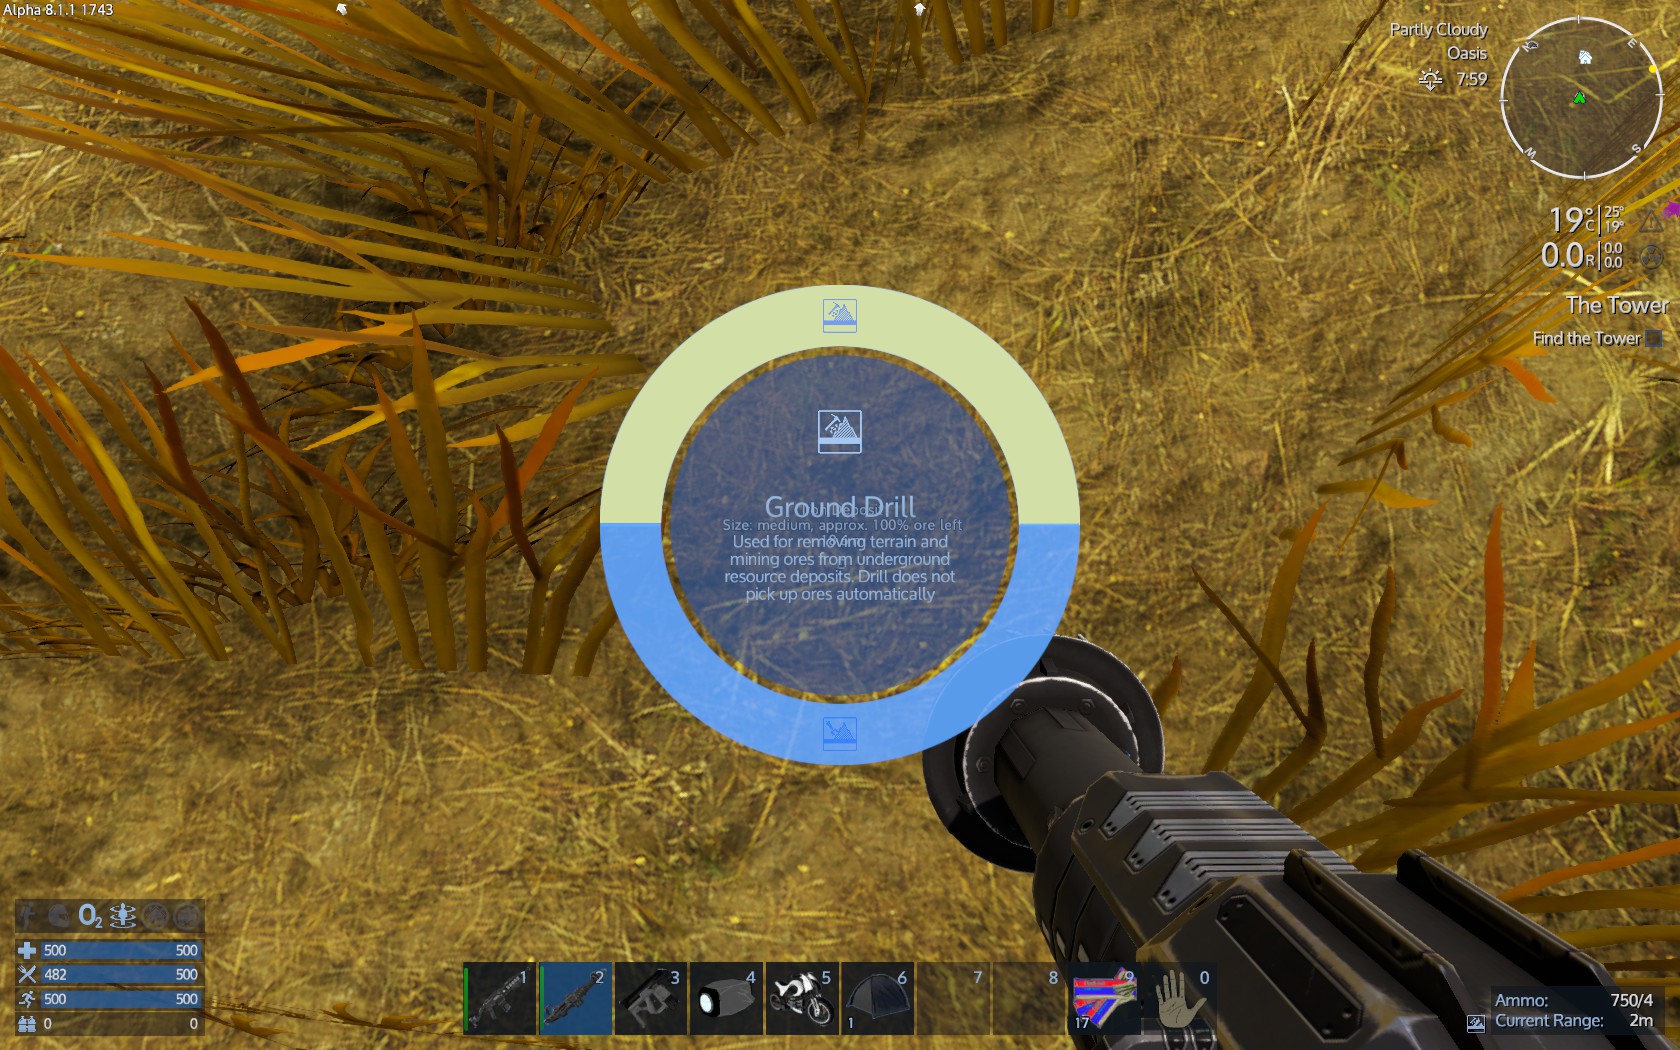
After ok with predators, go just over the deposit, deploy the drill and reload it(default R).

Just like survuval tool, the drill has modes, ground drill and rock drill. Right click will display:
Choose ground drill and you are ready. Start drilling holding left mouse and pointing down-front. After some drill check what you did:
There is no easy way to explain how you drill – each just a do and learn procedure. All you need to be careful is to have a way to jump out when finished, so a hole right down is not a good idea.
Getting close to the ore you will see it by color which always differs from stone:
Also, make sure your way back is passable:


Once you find the first spot of ore, you can drill it all. Ore deposit is like a gigantic egg below the ground. However keep in mind that you need a way to go up at all times!
While drilling, ore will be deposit to your inventory automatically. You do not need to collect it, just keep drilling. Together with ore, you will also get crashed stone – it is a valuable resource as well. Keep it. Most bases need it for concrete, it is their basic resource.
The first drill project.
You now have a base and a small hover vessel. You are good to go drilling and get some resources. Before you go, make sure that:
Your base has the fuel tank full and the power is on. Open the control panel and check the autonomy. Make sure you do that while the large constructor does not craft something at the moment. The constructor uses a fair amount of fuel for crafting an item so if you craft few stuff you get wrong indication. Wait for the constructor to finish and then check base power autonomy. Make sure you will return before fuel runs out. Later on you will build large fuel tanks and get much greater autonomy. If you dfinatetly need more autonomy now, craft a second fuel tank, install it and fill it with fuel. This will double autonomy.
Your base ammo box has ammunition for the cannon turret. Remember, the cannon turret uses different ammunition than your pistol and your assult rifle. If you don’t remember check the recipe or enter the turret to find out. If you haven’t already, now is the time to craft ammo for the cannon turret and place it into the ammo box.
Check the O2 generator, add some fuel if needed and collect O2 bottles.
Make sure your hover has fuel into fuel tank, O2 bottles into O2 tank and extra at cargo box and food into the fridge. Add anything else you see fit. A second weapon with some ammo, few meds, 5 small O2 bottles and an emergency ration would be smart because if you die on foot and respawn near your hover you can equip and reclaim your inventory from your death location. When you respawn from death you have nothing at all at inventory and slots and all bars are at 50%.
Also make sure you have ammo for the hover turret. However place that ammo at the simple cargo box. It will be a waste to shoot dozens of aggresive creatures on the way that you never loot, don’t get epxerience (you don’t get epxerience from turret kills or damage) and use lots of precious ammo.
Unlock and craft the Remove and Repair tool with a relative charge. This tool has 2 great functions. First it repairs any building block or device that is not entirely destroyed, with RMB, charge free. Secondy, it recycles. If you press LMB close to a building block or device, yours or ALIEN(!), after some shoots (depends on the target) the target is destroyed but you get ALL crafting required for crafting at your inventory! So basically, if you missplace something you recycle it, place the components back to the constructor,craft it again and install it properly. Later on you may want to recycle certain important components from alien bases you will conquer. For now you mostly need it to repair your hover.
Finally make sure you have enough charges for your drill tool. One charge per different ore is great as it provides about more than 200 ores, which means 400+ ingots. The working light tool will also help you, you have one. Without it and without the flashlight either it would be difficult to drill at night.
Open you map and select your first deposit to drill. Go there. If you get attacked by drones stop the hover, get out and kill drones on foot. Loot the drones, back to hover and continue.
When you get at the deposit, power off the hover, get out and check around for aggresive creatures. Kill all you find. Then fill the ammo box with the turret ammo from the cargo box. Enter the hover, turn power on and get out. The turret will reload – if not enter the turret and reload it yourself then get out. If the turret targets and starts firing, there must be an aggresive creature into vicinity. Enter the turret to understant where it targets. Then enter the hover and turn power off. Get out and run towards the turret target area. Find the aggresive creature and kill it. Go back and turn power off. If the turret targets and fires again, repeat.
When you are done with aggresive creatures, drill as close to the deposit as possible. Avoid to drill vertically, drill as much horizontally as you can. Drill in a way that the ground gradually goes deep so you can always use the jetpak to jump out of the hole – you will eventually create a hole. The longer the drill the wider and deeper the hole. Also make sure you drill to the horizontal sides first to broaden the hole as much as possible before make it deper. Drill with LMB is better i think but you may experiment. Don’t forget to loot the ores when you drill. Best practice is to drill for few seconds, collect ores, repeat. Ores if left on the ground they dissapear after few minutes.
Make sure your hover is as close as possible:

Finally when you hear your hover’s turret firing, get out and check. Do not let your hover deal on its own. Deal with the threat and repair your hover. Device damage can be easily spotted from the control panel. There you see for example Cockpit 75%, meanning your cockpit is 75% damaged. For building blocks you have to check visually around the vessel. You can RMB to repair – repair does not use any charges so when your pointer goes over a damaged building block you hear the repair sound. Stay to that block until the sound is off. Your starting hover, the hoverscout as i call it is very light. If a single madatory component is destroyed (core, cockpit, generator, fuel tank, RCS) you will be unable to drive it back to your base. If however you get into that situation and the cockpit is destroyed for example, possible due to cockpit size, the best practice is to use the remove and repair tool to recycle the core, get your stuff off the hover and head back to base. There you need to craft a new core with the materials you have and then craft a new copkit to replace the destroyed one. While you do this the remains of your hover are perfeclty safe since Aliens find and target bases, hovers and all vessels in overall by their core. No core means nothing exists.
Bases and vessels crafting
After drilling 4 deposits, iron, copper, silicon and promethium you have all you need to build a base and a hover vessel (hovercraft). Later on you get access to small vessels and later to capital vessels.
I will highly reccomend to craft a hover vessel first, move around a bit with it and then build your base. This will help you locate a good place for your base, away from enemy bases and at the open so bases cannon turret(S) will be able to short work out enemy drones.
As soon as your base is build enemy drones will attack soon after. If you have an HV however you have some decent defence until you at least craft some cannon ammo and load the base cannon. That is because only base large constructor can craft 30mm bullets the base cannon turret needs.
There are 2 ways to craft a base/vessel:
1. Use the blueprint factory:
Use the blueprint factory (default F6) to select a blueprint
Click to factory to get the blueprint to factory and supply the resources needed from your inventory to the box buttom centre. The resources you put there you cannot get back, they stay in there until used.
Supply the resources and click start production.
Start production will be available when all resources are placed and you have the proper level the blueprint requires.
When ready, you can spawn it into your game instantly. Open blueprint factory.
Select it, ready items are on top left of the list and click spawn down right.
And here you are:


2. Craft it into your game:
This is very difficult and complicated. Please see sections ‘Craft ingame’ down on this guide.
Where do i find blueprints?
1. The game has some ingame blueprints you can use.
3. You can craft your own blueprint starting a new game of type ‘Creative’. This game type gives you all resources, you cannot die and be able to build anything you like, thus the mode name creative. When finish your creation save it as blueprint (you do not need to publish it) and it will be accesible into your blueprint library, together with the ingame blueprints.
2. The game’s workshop has thousands of blueprints you can use, created by other users and shared for free. Browse them and subsribe to those you want. When subscribe, they will become available to your blueprint library together with ingame and your blueprints.
Steam workshop:
[link]
You can also ckeck my blueprints if you like:
[link]
I also have a special collection for starter blueprints here:
[link]
Few things you need to know:
Bases (BA) do not move. They may have solar panels thus been energy sufficient. They have the strongest weapon turrets available. They can be build on ground and on space. When build on ground they are subject to structural integrity. Structural integrity can be checked using build menu (default T), debug, check structural integrity. Bases may have the best utilities available to install on. Bases only compared to capital vessels, but they are build faster (lesser level) and they can repair capital vessels (capital vessels cannot repair themselves) as well as hovercrafts and small vessels. Bases only have turret weapons. Turret weapons automatically fire enemies and player may also control them directly if choose to.
Hovercrafts (HV) move only on planets hovering above ground. They have many roles according to their design, from combat tanks to utility or scavenging or multiple roles. You can move around inside them, attack wildlife or aliens (aliens according to HV strenght and role) and may have a variety of usefull devices like constructors, fridges, storage boxes, O2 stations, interior protected O2 ventilated space, armor lockers, health and spawn stations and more. A proper hovercraft will allow you to move on as a nomad at this phase, explore the planet and collect resources. Hovercrafts have both turret and fixed weapons. Fixed weapons fire manually at ship’s croshair.
Small vessels (SV) are flying planet and space ships. They have most of a HV utilities you can install on them except towers. SVs only have fixed weapons. SV can fly to the moon of a planet. If equipied with SV warpdrive can also travel to a nearby planet as soon as is lesser than 15AU. SV only get up to hardened steel armor.
Capital vessels (CV) are large spaceships. They have all a base may have except solar panels. Capital vessels are capable of carry any SV and HV on them, as long as the HV/SV have docking pads. They can also repair SV/HV on them. Capital vessels may go on planets but certain weapons do not function there.
Starting with a scavenging hovercraft
As i reccomend, you better craft a HV before your first base.
The hover vessel is a vessel type construction. While bases are fixed on a planet, vessels move around. The Hover Vessel (HV) hovers up to 3 meters above the ground. It travels up to 40 meters per second. It is safer than motorbike because wild creatures cannot attack you as the hover will avoid rocks and similar obstacles. On it you can install cargo boxes, a fridge(s) and an O2 station (!!!), making it a small mobile base, short of. That is, you fuel your hover, turn power on, add some food into the fridge, add O2 bottles to its O2 tank, some more into the cargo box with any other supplies you see fit and you are good to go. If you run out of oxygen, you return to your hover and use the O2 station. In cockpit you use hover’s O2 anyway. If you are hungry you open the fridge and suit yourself. As simply as that, while moving around. On top of that, the hover may get a medic station and a cannon turret exactly like your base does! Except a large constructor (hover’s mobile constructor has certain recipe limitations), the hover has all essentials your starting base has!
But most importantly:
The HV will not attract enemy drones and will help you learn how you manage vessels and bases.
There are thousands of HVs you can find. For learning purposes i will continue with a vessel i design and use which is simple, cheap, easy to use and effective at scavenging around.
Get the ship from here:
[link]
Subscribe and you are ready to craft it into your game using the blueprint factory.
After crafting it, it is time to use it. Aproach the ship and press P for control panel.
Lots of info here.
There are 4 tabs, Main, Devices, Signal Logic, Statistics.
Stay or go to the main tab.
Down right says Fuel. All bases/vessels need fuel. that is why you drill promethium. To craft Fuel Packs (Promethium). If you have not, craft some now. Use those to fill the vesell fuel. Use manage to fuel with drag and drop or fill all to automatically fill all. From manage you can also withdraw fuel. Type the value and click the << button. Fuel has value, 30 is the minimum Fuel Packs (Promethium) have. Filling and widrawing comes to measures of 30 and no less. So if the fuel tank of the vessel has e.g. 25 fuel empty cannot be fill or of it has 25 fuel left cannot be taken.

Up left next to info there is general. those are switches:
Power, general power switch, default key Y. Closes all power.
Oxygen, for ventilators of O2 covered areas.
Lights, for all lights (default L)
Signals, for all signals
Turrets, for all turrets
Thrusters, for all thrusters.
Sometimes you need a vessel to be powered on partially. Going around with this ship you need fridges to be always on to save your food items from perishing and also the turret to protect you from predators and drones. So using the general power is not an option. Instead i close thrusters, hover and lights instead to save fuel.
Go to devices tab. Find the turret.
There you can define what the turret shoot at by checking the appropriate checkboxes. If you uncheck for example wrap drive, generator and thruster the minigun will focus on turrets and mounted (fixed) weapons.
Now find the hover engine group. If there are no groups, use auto group button on top. Make sure that hover engine group do has shortcut = ‘hover’ selected at the left side after you click it. This allows the custom ‘Hover’ switch at the main tab to power on/off all devices of that category. This way you can create your own switches. Type ‘Fridges’ for example bellow ‘Hover’, then go to devices, find Fridge category and select the shortcut you just typed. Now you have a switch exclusively for fridges.

At devices, using the buttons up and down you can expand or collapse all groups. If a device is damaged, there would be the damage percentage left of the list. If damaged at all, you can check at Main tab down and right looking at 100% HP.
Custom and Signals are custom switches the base/vessel may have. Those are custom so you need to find out how they work. A common signal switch is eco-thrusters especially on large capital ships. This disables some thrusters to save fuel. Signals are more complicated than custom.
Before go on, craft some 15 ammunition for the minugun.
Let’s take a look at the vessel devices:

Also at the back of the vessel there are 2 more cargo plus the armor locker:


At the front you can use the harvester module while piloting to chop trees. Wood will go to harvest box.
When reach level 7 you can craft and add a Medic Station for your HV. You need to do that using a large constructor from a base.
To repair your vessel, you need to craft a multi tool. If you have not craft already, craft one now. When available, choose repair mode to repair damaged parts of your HV.
Totally destroyed parts cannot be repaired. this will be available later with BA/CV repair bay T2.
If your vessels got heavilly damaged you need to build a new one.
Remember, this is a scavenger ship, it cannot attack alien enemy bases!
When you are happy scavenging around, build a small base. Your Hv will protect you until power up, craft and deploy 30mm ammo. Just make sure the blueprint has at least 1 cannon turret.
A better look on Constructors
Constructors
All constructors work in a very similar way.
Turn on the constructor (if off) by LC the switch on right top of the window.
The players inventory at the left, input, output and queues at the middle and recipes at the right side.
The players inventory is there to transfer items to input and get items from output.
The input is where the constructor gets the items needed to craft.
The output is where the constructor puts ready items.
The queues are 2, the upper is your queue (if you craft different items one after another) and the lower is auto queue the constructor uses for various intermediate items.
The recipes are the available items to craft, displaying information about what is needed, time to craft and so on.
You can use the filters to filter recipes.
You can also use text filter if you know the name of what you need to craft.
When use text filter make sure you also check all objects and search all categories because text filter works together with categories filters.
If you cannot find a recipe, the constructor is unable to craft.
If the recipe has a lock, you need to unlock before craft from the Tech menu.
If a recipe is red you miss something to craft it. If it is normally colored you can craft at least 1 item.
The template filters are category filters right (food, medicine, weapons…) and object filters left (all, bases,hovercrafts…). The object filters have a color dot. Recipes have at least one dot and may have up to four. This indicates where the crafted item can be installed – one dot means one type e.g. Base only while all 4 dots means the device can be installed anywhere, bases and all vessel types. No dots means no installation, that recipe should either be a usable or consumable item like weapon and ammo or component to craft installable items.
It is a good practice to place resource materials into the constructor to identify craftable recipes, easily craft various items and free your own inventory from occupied slots. To quickly move items from your inventory to the constructor without drag and drop, shift+LC to items you want to transfer.
Constructor input can be used as storage until actual storage becomes available.
A constructor will use an intermediate item if available instead of crafting it from lower intermediates or row materials.
Survival Constructor is always with you and needs no energy. With a good amount of iron, copper and silicon ore in your inventory you have a fair chance to survive without anything else.
The Portable Constructor is very cheap, can be crafted by the Survival Constructor, can be placed on terrain and also needs no energy to work.
Mobile constructors of hover and small vessels have a lot of recipes but not as many as large constructor.
Large constructor has most recipes available.
Finally, the advanced constructor has all recipes available.
You are on your own now
At this point you have a small base that can protect itself while you are absent, a small hover that allows you to move fast to the planet surface to drill, kill creatures or harvest plans and assuming that you drill one charge per different ore deposit you have lot of resources for doing more things.
The difficult part of surviving is behind you. You are now relatively safe, autonomous and with a fair amount of resources. But the difference between the moment you get out of the pod and now is obvious, i think. If you have not done what you did so far, maybe you would be dead by now. You are still stranded on a planet with alien inhabitans however.
What will you do now is and should be up to you. You already know so far all you need to know to explore the game further.
I will only list some final hints and tips here that is good to know. I will not give detailed explanations because i will need a page for each hint, but if you follow the hints you will realise the why behind the hint.
When you are attacking aliens either on a vessel or on foot make sure your inventory is as empty as possible. If you die and not been able to recover your inventory, your items maybe be lost. A couple of favourite weapons, their ammo at reasonable quantities and few consumables to get you going is the perfect loadout.
When you design a vessel to attack aliens at POIs you are not sure of their defensive capabilities you better design a small light vessel than a large heavy one. In case you lost the vessel you had saved yourself crafting and building hours as well as resource gathering hours. You will become better and learn from your mistakes and defeats at a lower time cost. This also applies when exploring uknown areas for first time.
Also make sure your attacking vessel does not carry tons of important stuff. Make sure you carry only the essentials for your mission. If your vessel cargo box(es) are destroyed, your stuff will be likely lost. You can deal with loosing few O2 bottles, some food and meds and few miscellaneous supplies but loosing 1000 ore will cost you.
If a container is destroyed, its inventory is tranferred at a temporary box nearby and disappear after a certain time. This is valid for all containers from cargo boxes to your inventory drop container after death. Believe me, try to collect all your stuff from a destroyed vessel under enemy fire and within your limited inventory is not the best plan. To recover something however do not use area damaging weapons nearby because you may destroy your stuff yourself.
Avoid storing important resources and stuff in one place like ‘this is my iron storage with 50000 iron inside’ or ‘all resources and components are in my advanced constructor’. Spread to at least 2 storage locations. Make whatever disaster recovery plan you like as long as you think in advance that even when something goes wrong your losses will be as few as possible.
When you design a vessel do not stay on visuals. Design it with a purpose, a role. Define what the ship will do and what properties it will have to accomplish its role. Base and vessel design is one of the most amazing parts of the game, and the limitations of what you can do are really few. You will be surpised of what you can build if you think out of the box. Do not limit yourself to ‘standards’. You won’t get any ISO 🙂 A base may have a ‘secret’ area, a vessel may have doubled its primary devices etc.
Organize to reduce micromanagement and time wasting. Using lots of tanks for example will allow you to refuel at longer intervals. Installing your devices properly will save you from unnecessary walks. Having all your tanks in one place will allow you to organize your REST space effectively as check and refill them can be done from control panel. It is easier to harvest 100 plants installed in one straight area than 25 installed at 5 different areas. On the other hand, certain devices help if spreaded. A central cargo box area is not as practical as spreaded cargo boxes exactly where you need them. A cargo box near your tanks will allow you to pick fuel from your reserves to refuel instantly. Food Proccesor and Frdges near your plants are another example.
Make sure your bases and vessels are secure when you are not present. If you need to leave for a very long time and you do not need the base or vessel to be powered, recycle the core and put a new one when you return.
Space is safer than planets. A base in space somewhere far from anything is the best place to store your most valuables, later on.
NPC Factions and reputation
Newly added, the game includes 3 NPC factions and therefore 3 reputation standings for you, one for each faction. Those Factions are Zirax, Talon and Polaris. The standings are from worst to best: Hostile, Unfriendly, Neutral, Friendly and Honored. By default you start with unfriendly with Zirax and neutral with Talon and Polaris. You can see all realated information at Functions tab (the 4th tab) or by pressing the default key F4.
In Functions tab you see NPC, Human and Neutral sub tabs. The NPC subtab has the info for NPC Factions. There you can see the 3 Factions and you reputation standing at the right pane. Hovering your mouse over any of them the left pane will display a list of info about how you gain or lose reputation.
While not clearly understood from the beginning, your reputation greatly affects your game as defines enemies and friends. It also limits your actions into any territory marked as faction territory based on your standing. Finally allows trading services and even discounts. For example, unfriendly or worst reputation will cause factions to shoot at you or on the other hand friendly reputation will allow you to mine ore into the faction territory and honored will even allow you to spawn vessels and bases into their territory without loosing any reputation!
So a key factor is to maintain a neutral or better reputation at least with the factions you do not want to attack (yet). Better than neutral is needed for action you need to do. If for example you need to mine promethium into Talon territory, you need to get friendly reputation. If not you will lose reputation gradually and Neutral may change to unfriendly. If this happens, the Talon will attack you.
When starting a game you need to be very careful about what you do within a faction territory. Whenever you enter such a territory, a HUD information pops up with the faction you enter and your current standing. Also when you perform action the change reputation up or down other pop ups spawn where the XP and item gathering info also pops up. It is very easy to lose standing – travel or stay within the territory with any vessel is enough for Zirax and Talon to lose reputation from when been Neutral or below. For Polaris this is not valid – Polaris tolerate traveling for Neutral. In general there are some things in common but other are different among the functions for when you gain or lose reputation. All those can be found at the left pane of Factions tab as mentioned above.
When you start your worst standing is with Zirax. This however can be change. Think about it because Zirax has the strongest military presence and their drones guard POIs even outside their territory. They will shoot you on sight unless you gain Neutral reputation standing. Once you get Neutral you actually have a ceasefire with Zirax and all their drones, vessels and bases become irrelevant to you. To gain reputation with Zirax is easier than Talon and Polaris assuming that you do not attack Zirax which gives the fastest boost for Talon and Polaris reputation. If you read the texts at the left pane you see that killing predators or prey or chopping wood into their territory adds reputation. All you have to do is go close to one of their borders, enter their territory on foot and start killing prey and predators. While you remain unfriendly you need to be careful for Zirax foot patrols. Avoid them at all costs. Keep killing predators and prey until you get neutral standing. When neutral you no longer need to look out for foot patrols as they will not fire at you. You can freely travel on foot and keep killing to get even further at friendly and honored standings.
Polaris on the other hand only gives positive standing reputation for killing predators, killing prey is useless. Talon is even more strict, they give positive reputation for predators but negative for prey, so killing prey into Talon territory will slow progress down.
Be aware, for using a vessel into Zirax and Talon you need friendly or better standing. Also make sure you shoot when 200% sure you hit what you think you will hit. Never use explosive weapons, shoot rapidly and/or when Faction troops are nearby and NEVER-EVER use automatic turrets even if you have disable NPC factions as targets. If you accidentally hit a faction member you drop to neutral (even when been honored) and if you kill a member you drop to unfriendly standing. An automatic tower may shoot a patrol soldier if it happens to go between your turret and the prey/predator the turret currently shoots. I had injured a Zirax troop this way dropping from friendly(almost honored)to neutral and had to start over.
Getting and keeping a neutral standing with all factions will ensure that no faction will shoot you on sight. Getting and keeping higher than neutral standings will allow you to perform actions within faction territory without worsen your standing, and get services like trading even with discounts.
In general it is recommended to get at least neutral standing even for some time at start. However for game immersion reasons you may not wish to get neutral or better with e.g. the Zirax. In any case always make sure you do not lose (or gain?!) reputation without intent to with the factions according to your play style.
Mass and volume setting
A relative late addition, mass and volume setting activates two properties for nearly all items in game, mass and volume. This setting can be found at difficulties tab when starting or loading a game.
Before this setting or having it off, the only restriction was the number of inventory slots and the number of max same items able to stack in one slot. Pretty much quite a usual and standard inventory system to many games. That give some ‘volume limit’ faint idea. Still it was possible to loot most of an entire base, including the concrete blocks into your backpack. This cannot be done when use mass and volume setting on.
When activated, this setting primarily affects 2 things:
Firstly, in order to put any item into any inventory there must be enough inventory volume available (free) to accommodate the item’s volume.
Secondly and for any vessel, the summary of any cargo mass (including docked vessels total mass and player inventory total mass) is added on top of the vessel mass creating that vessel total mass. An unloaded (cargo-free) vessel mass (the net mass) can be seen at statistics. When loaded statistics display the total mass that is now the sum of net mass plus any cargo mass. This total mass is counted for vessel movement. This is very important because the same vessel that could operate normally at mass and volume setting off may not be able to move at all at mass and volume setting on.
Certain types of containers like the portable constructor and certain game features like the blueprint factory are not bound to mass and volume settings (up to 9.7.1). There can be lot of debate here about balance between immersion and simplicity of a game however all this goes to each player immersion theme and i believe is totally subjective.
The Emergency (O2) Generator and Water Generator
The importance of this section depends if the starting planet is breathable or not. This section is especially useful at NON BREATHABLE starting planets.
This section is to make sure you have oxygen supply. You will learn how we will build the Emergency (O2) Generator and the Water Generator and see how it works.
First open your survival constructor and build the emergency Generator:
When finished put the device into your belt and install it on the ground:
As usual, you can take it off with Shift+F
Access as usual ans see 3 sections, energy items, output items and status. Energy items are where you put energy packs, output is where the produced items are placed to get them and status has info saying Off(no energy source), source quality 20% and producing Small O2 Bottle. Quality affects how fast O2 will be produced but it is the same at all planet surface. Small O2 Bottle is the item produced.
Shift left click Fuel Packs from your inventory to start the generator.
After give fuel status has important info. Operational time is how much time it will work in real hours before energy runs out. Next Product is when the next Small O2 Bottle will be ready at output to get.


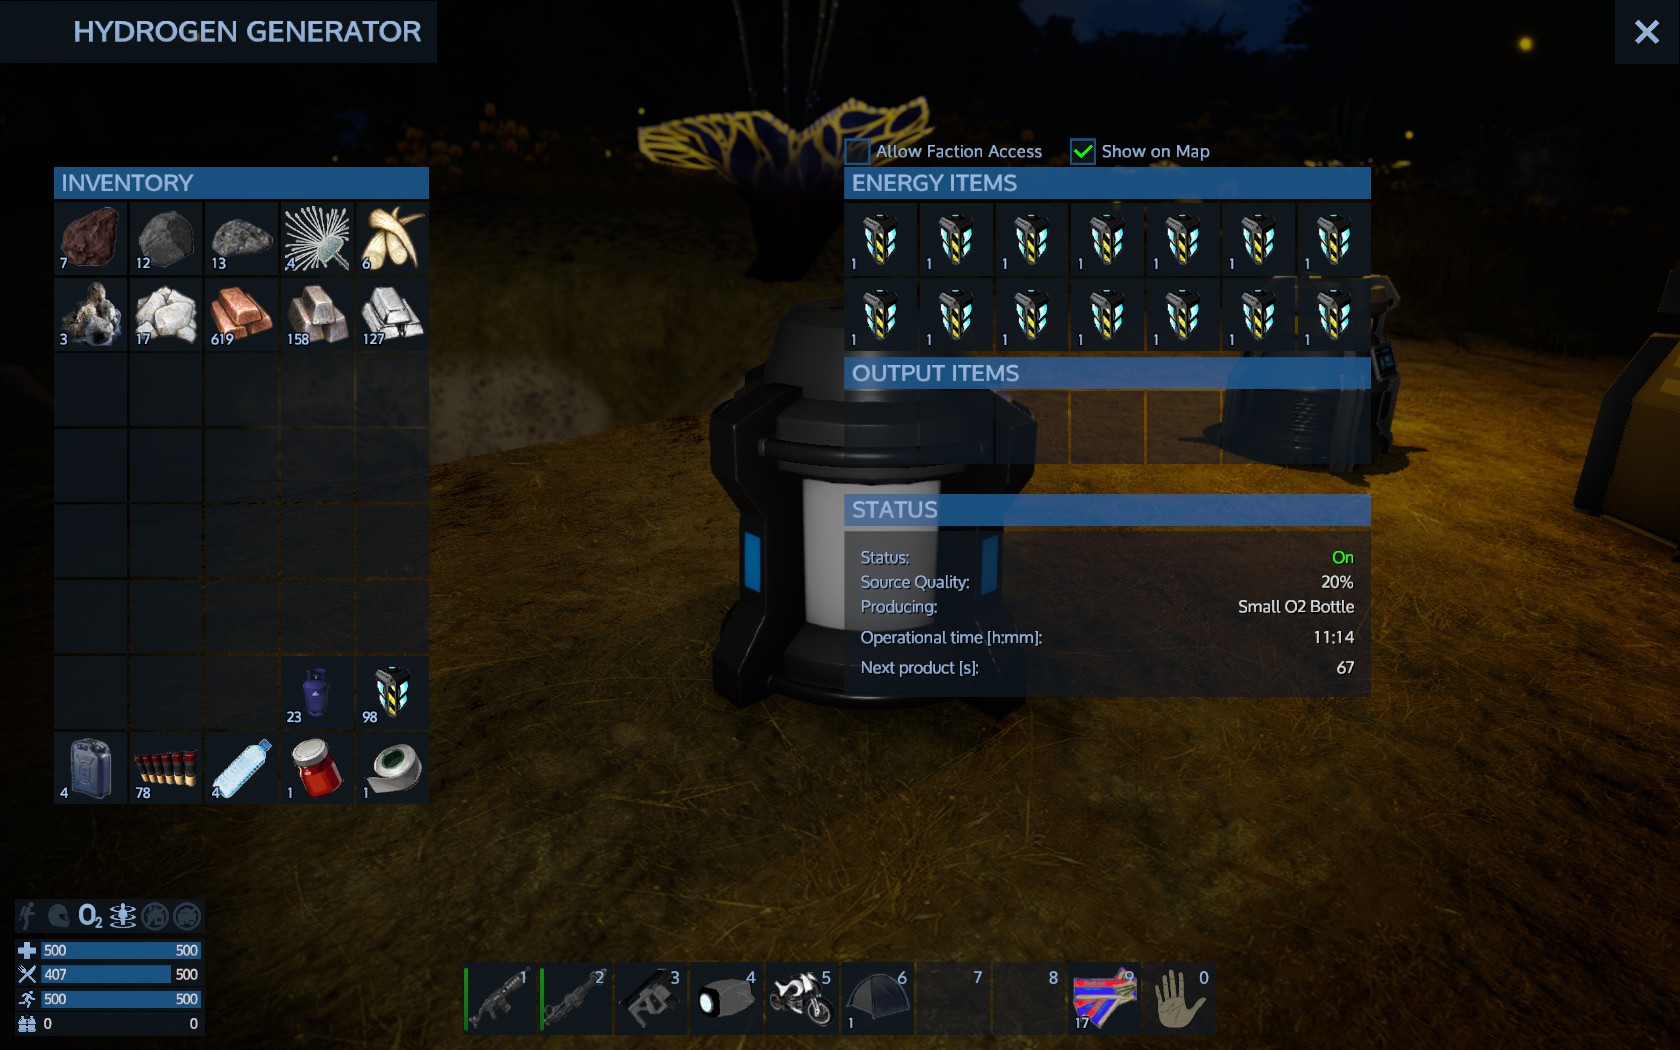
This way you have Small O2 Bottles that can be placed at your belt and refill the O2 bar of your armor. If the quality is not good enough you need to craft additional Emergeny Generators so you produce more Small O2 Bottles within the same time. You will undestand this if you consume O2 bottles faster than you produce them.
The device will also produce 1 Purified Water Item after 2 Small O2 Bottles.
Finally, you need promethium ore to craft Fuel Packs, without those the generator is useless and you are out of O2.
Note: If you put a single Fuel Pack into energy items it will dissapear almost instantly. Don’t worry, you did not loose it. The generator used it to start work. If you place a second one it will stay there until the first one is 100% used. That is the reason for so many slots, place a lot so the generator may work for a long time without micromanagement from you.
However there is a more efficient way to get O2 to refill. You nee a Water Generator and an O2 station from a base or hovercraft.
You can craft your water generator from your portable constructor.
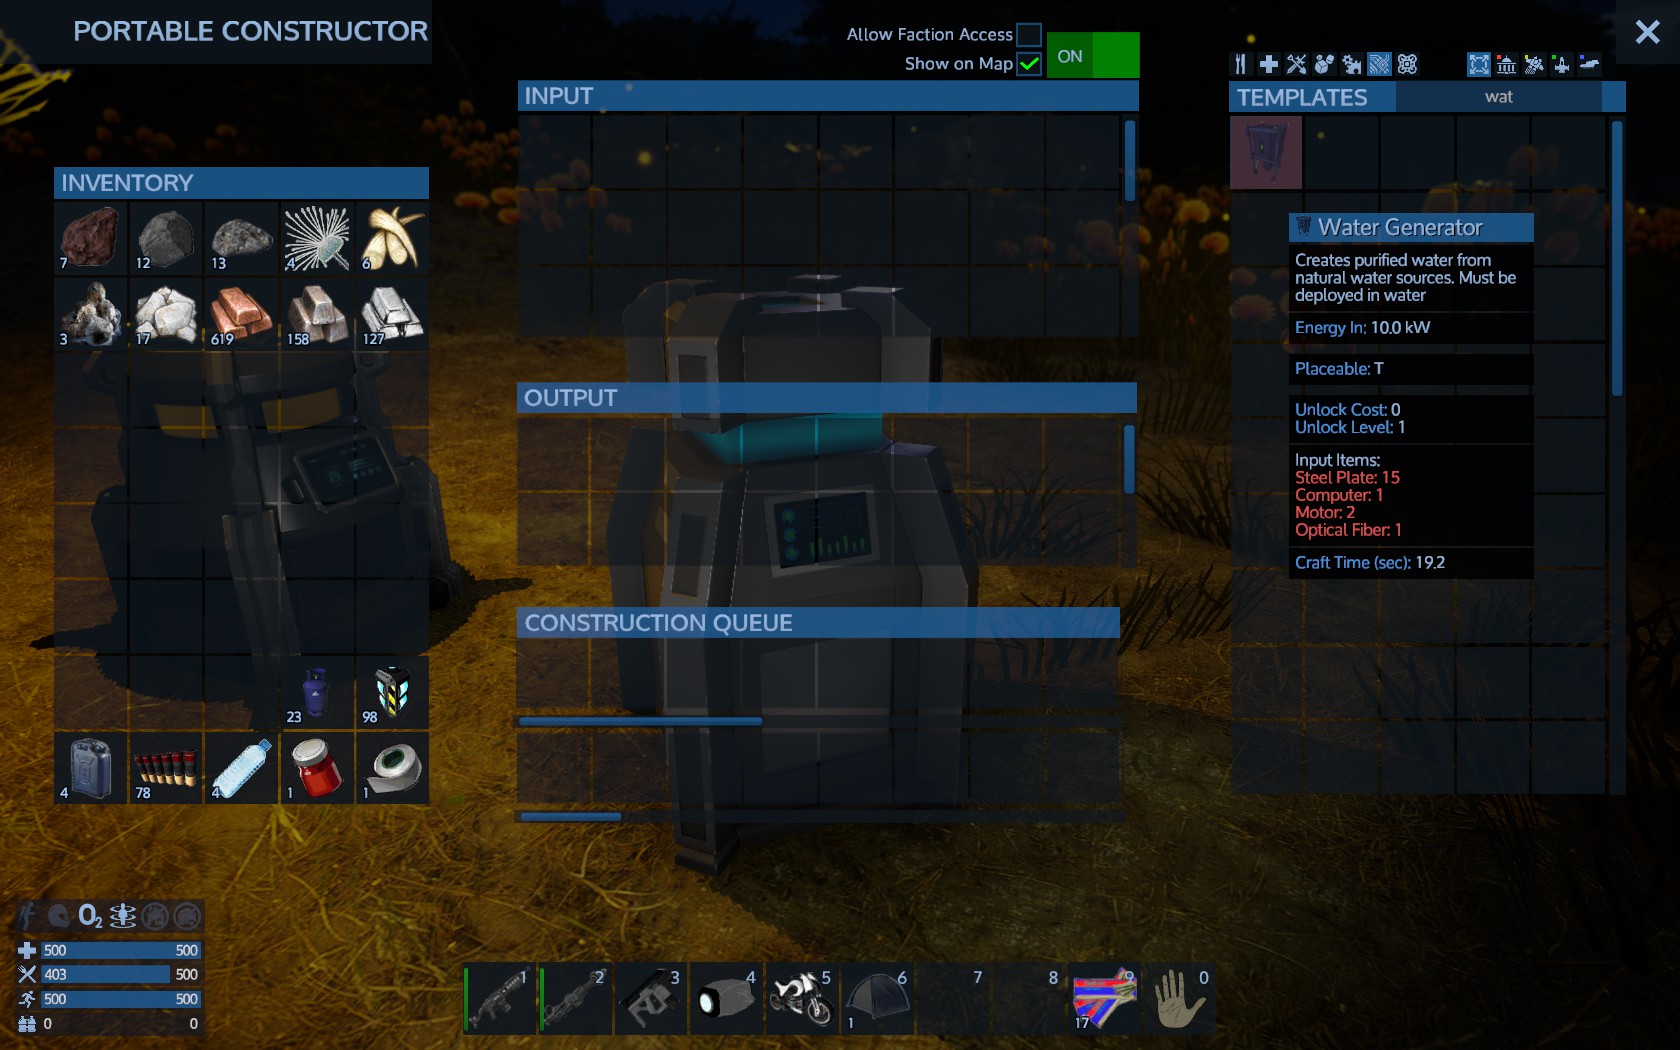
Looking the Placeable stat it is T, means Terrain. Simply, you place it in the ground. The Water Generator in particular needs to be placed into water to function. You cannot place it on ground terrain, the place marker will be red.
On water, it turns blue so you can place it


Access the Water Generator, all is much like the Emergency Generator. The difference is that it produces Water Jug item. This item can be used to produce O2 Bottles which have x4 the O2 of small bottles. However note that crafting O2 Bottles needs iron plates which can be crafted from iron ore.
Again, like Emergency Generator, you can use multiple Water Generators to produce Water Jugs faster.
With O2 Bottles you can fill your base/hovercraft O2 tanks and by using an O2 station you can refill all your armor O2 bar.
From time to time you need to check your Emergency Generator(s) and/or your Water Generator(s) to get their output items and refill with energy packs.
If you need to get them off ground, get their remainning energy packs, their output and pick them up. If you do not want to waste present use fuel pack, let them finish.
Building a hovercraft in game!
The easiest way to build a base or vessel is through blueprint factory. There are in-game blueprints, thousands made and shared by user can be found at the workshop and you can create your own within a creative game mode.
If you want however to build your bases and vessels in game (for immersion i guess) here is a short guide to start. We build a small hover vessel.
To build a hover vessel you need a Hover Starting Block (bases need the Base Starter Block, small vessels a Small Vessel Starting block, Capital vessels a Capital Vessel Starting block). Go, check what you miss, craft requirements and craft the Hover Starting Block.
Also you need a certain amount of Steel Blocks. How many, dpeends the size. 20 are super enough for a small one.
IMPORTANT: Make sure all item you craft (probably from within your base large constructor) are SUITABLE FOR HOVER VESSEL!
To build a basic hover you will need the following devices (A = needs to be reachable for use, B = needs to ‘look’ at specific direction, C = 1 of type is good to be reachable for use):
1 cokpit (A)
1 generator
1 fuel tank (C)
1 RCS
1 main thruster (B)
1 directional thrusters (backwards) (B)
Optional:
2 directional thrusters (left and right) for easier navigation (B)
1 O2 station to refill your oxygen (A)
1 O2 tank to feed O2 station (C)
1 cargo box to store supplies inside (A)
1 fridge to preserve your food (A)
1 minigun turret (A) for extra firepower against drones that you WILL encounter, and to get alerted your hover spot an enemy while you drill
1 small ammo box (A) for your turret weapon
At least 1 spotlight (B) to use up front, to light at night, also lights your drilling site if you park and drill properly!
You can skip the optionals, but i highly recomment not to do so.
If you cannot find a recipe, check your tech tree, hover tab. You probably need to unlock it.
Yoy will also need a multitool in order to salvage a misplaced item.
Devices will be linked to eachother as needed. The fuel tank will feed the generator, the O2 tank will feed the O2 station and so on. However you need to be careful at two things:
First, make sure devices that would need you to use them, like the fuel tank to add fuel, must be placed in such a way that would be relatively easily reachable with your pointer to use them. I mark those as (A) on the list above.
Secondly, certain devices need to ‘look’ at a specific direction to function properly. The main thruster for example need to ‘look’ back, to actually move tha vessel foward. Those devices are marked (B) on the above list.
Here is how a small ‘econimical’ hover may look like:


Appendix A by brianmi
By brianmi [link]
1. carry and chug water continuously to be able to run without stamina depletion. Also, learn to run, then bounce at low elevation in the air as far as you can on the jetpack with running OFF to maximize your travel distance before stamina runs out. You’ll use this RUN / BOUNCE / RUN / BOUNCE also to “float” over all the deep crevices also.
2. whenever caught out on the open by a drone, drill straight down to get below the surface where it can’t get you, then fire at it when it flies overhead.
3. You CAN play “HARD” pod contents in single player to where you don’t even have any minerals to build anything, and on the airless OMICRON: a, on the way down in your pod, immediately bring up the MAP for a quick peek and then steer towards the largest group of minerals below you. Spot a large body of water also for seaweed to recharge your drill. Keep in mind that IRON, MAGNESIUM, and then PROMETHIUM are all you care about at first. Why? Promethium will let you start the air processor EVERY time you dig, as you won’t worry about wasting the run time when you pick it up, even if you just get a single bottle. IRON / MAGNESIUM obviously for ammo.
With air and ammo, you can definitely get the rest over time. Use about a half of a drill charge on each mineral, although more on Iron and Magnesium and less on Promethium as a little goes a long way early in the game and you want to save daylight. Creatures don’t spawn the first day, so you want to get as many different mineral types before the first sunset while you’re free to roam, other than staying out of range of drones. After you land, if any of the “big 3” minerals needed above are to the EAST of you, make sure to head there soon to get them. The trick is after you get what is nearby, you want to be heading WEST the entire rest of Day One. That way you stretch the daylight, and cover the maximum amount of ground before nightfall.
Try to avoid drones, but for sure if your last mineral you need to complete the set of 5, -OR- it’s nearing nightfall and the last of the “big 3” is protected by a drone, then you want to go for it and worst case charge in and drill down right where the final needed mineral is even if you can’t take out the drones. You alternatively need seaweed also if you are having bad luck with the mix of minerals you’ve run across as you head WEST during the day. With it, you can drill down and horizontal enough so that wandering night creatures likely won’t find you to survive a night out in the open, or, their AI doesn’t take them to the entrance to your cave to be able to get you, so you can make a run for it in the AM.
4. Building your base underground gives you essentially a base you never have to defend, I like to start it ideally at the boundary of something like an Iron, Magnesium or Promethium deposit. Just make it big enough to drop the base starter and get a constructor powered up, then you can add some lighting and expand out the base to get all the rest in place. I then start harvesting water, and with all the stone from digging your cave, you can make plenty of cement to build a hangar above ground poking an elevator shaft through straight up to take you to it.
5. When you build your first SV make it flat enough on top so that you can exit while hovering somewhere and fire away. This works great on alien bases, after you take out the defences just blow a hole in the side at the appropriate story in the building and you can hover just outside and stand on your ship to finish off what’s there. Then hop inside the building, grab the loot from storage containers and jump back in your hovering ship. Also fun to hunt the new packs of animals this way since they can’t get to you in the air. Great fun.
6. Speaking of taking alien buildings, crack them open with an explosive charge, then pistol away the appropriate metal to let you stand and always fight from one level above the aliens and fire at them from above. Just keep an eye on the scanner for a drone if your ship is hovering outside!
7. If you aren’t lucky enough to find a rock giant to kill to get the Neodymium you need for the level 2 drill, as soon as you have a ship just fly to the moon (Omicron) and nab some and fly back. It’s pretty easy to avoid the drones until you find some and a little goes a long way so just get in and get out.