
Overview
This guide is to show you how to obtain all 30 Trophies WITHOUT using any cheats (In-Game Cheats or Cheat Engine).
IMPORTANT INFO
This guide was created on the 27/07/2018
Before continuing with the guide, make sure to read the ‘IMPORTANT STUFF’ section.
All Trophies (Except ‘Speed Run’ and ‘Fast Cash’) can be obtained at any time you like, so take your time and really explore the game. is a link to my YouTube Playlist for all the videos you see, in case the Steam Browser doesn’t work or you just don’t like using it
Now that that’s out of the way, let’s get into it!
IMPORTANT STUFF
RESETTING YOUR GAME
After defeating Professor Ansel, you are given 3 endings. The left portal will throw you into the first game, the middle portal ends the game and the right portal starts ‘New Game Plus’ (NGP). NGP removes all your items, cash, weapons, resets your professions, days and sets your Karma to 0 BUT you keep your Strength, Intelligence and Charm along with any trophies you’ve gotten previously. I recommend you do ‘Speed Run’ and ‘Fast Cash’ first and then work on the other trophies, as you’ll have to start NGP and don’t want to grind everything twice for that 100% Completion.
STARTING
When starting a new game, choose the ‘Wall Street Wizard’ Perk. As you put money into your account, you’ll gain more overtime. And when you begin grinding professions the money will start to build up, making the ‘Monopoly’ and other property related Trophies much faster to get. Choose Positive Karma and max out The Government job to get the most cash you can get from any profession.
*You can be positive or neutral for beating the game, but I recommend Positive
TROPHIES: QUEST
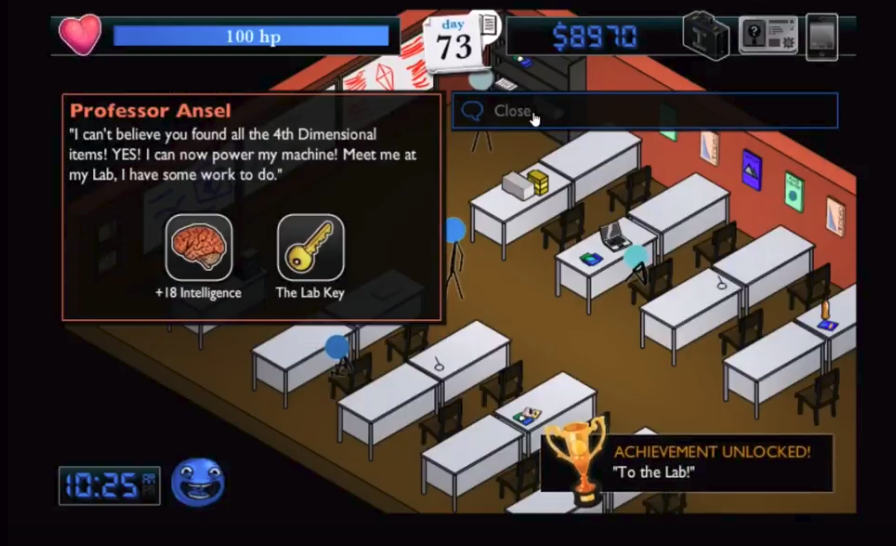
“To the Lab!” and ‘Speed Run’
“To the Lab!” and ‘Speed Run’
Speed Run
Get the Lab Key within the first 15 Days
I put these two together because they are essentially the same trophy. For Speed Run, you need to obtain The Lab Key in 15 days or less. This can be done on a first playthrough (Check ‘Fast Cash’ for more info) but if you’re me, you’ll want to do this on NGP. Before you beat the game and start NGP, make sure to max out all Stats (Check the STATS section for more info). This is important because it will save you a lot of days instead of having to waste time. Once you have all Stats maxed out, then you can beat the game and begin NGP.
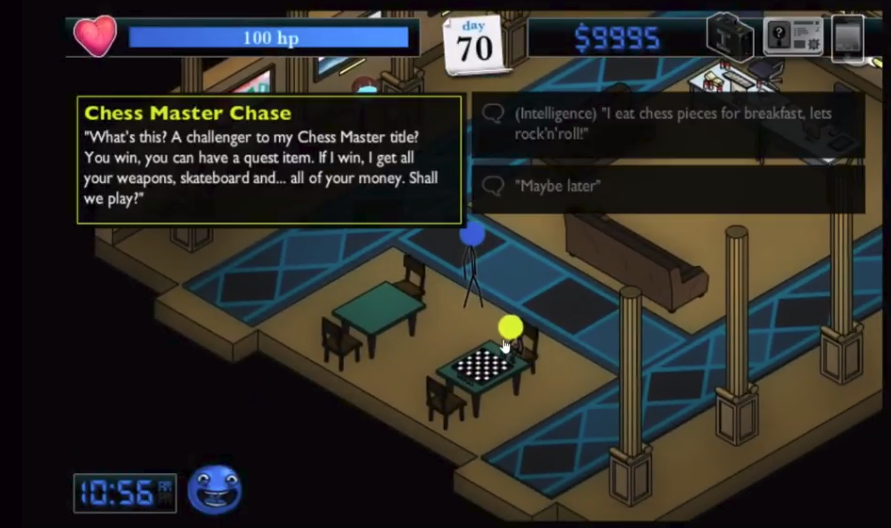
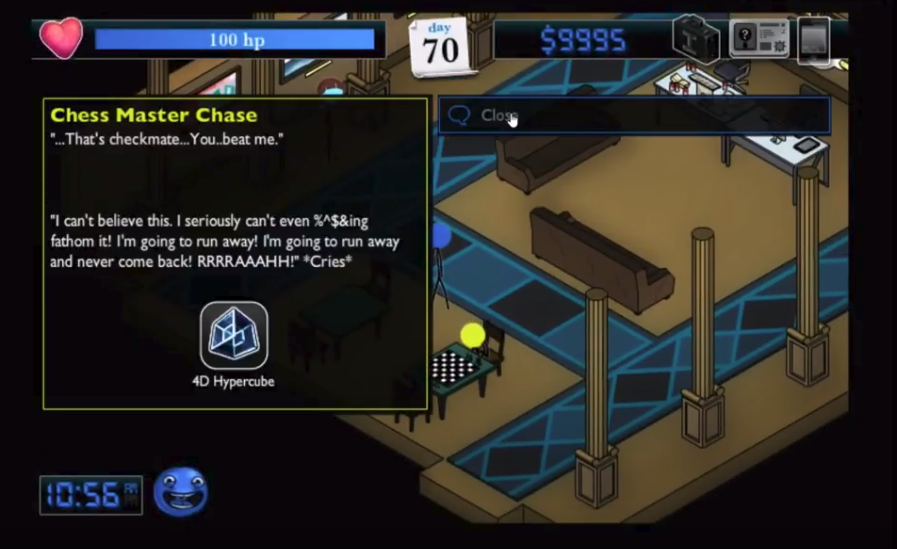
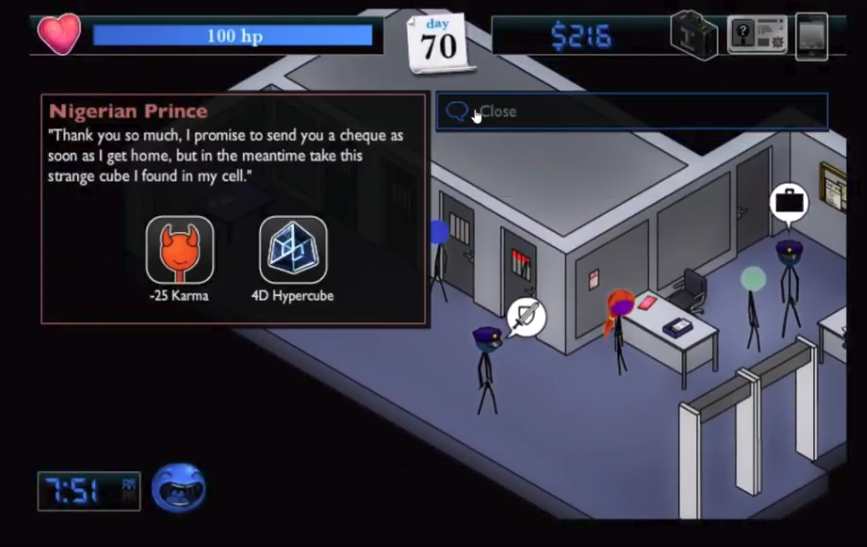
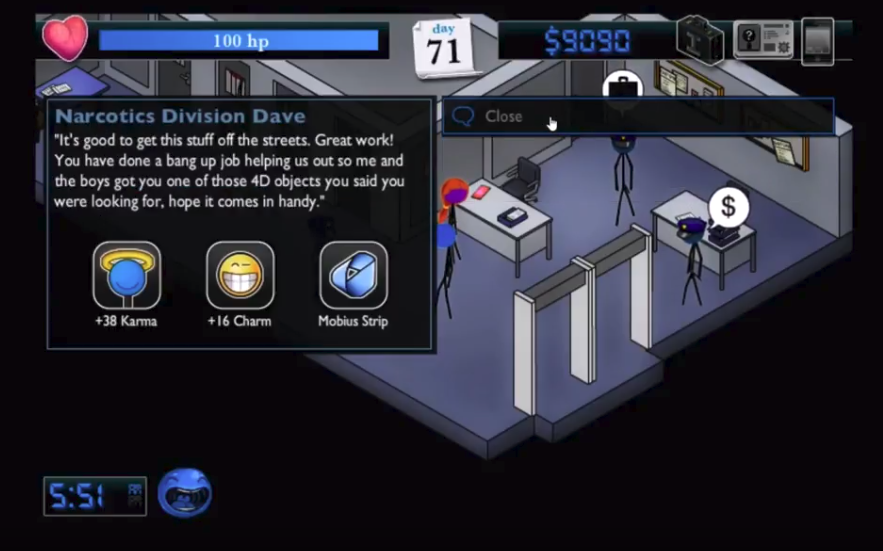
There are 3 4D Objects you need. They are 4D-Hypercube, Klein Bottle and Mobius Strip. Each one can be obtained with Positive or Negative Karma.
4D Hypercube
Positive – Beat Chess Master Chase (Yellow Head) at a game of chess. He can be found at The University of Stick. You’ll need at least 500+ Intelligence for this.
Negative – Bail out the Nigerian Prince at the Police Station. This will cost you $10,000.
Klein Bottle
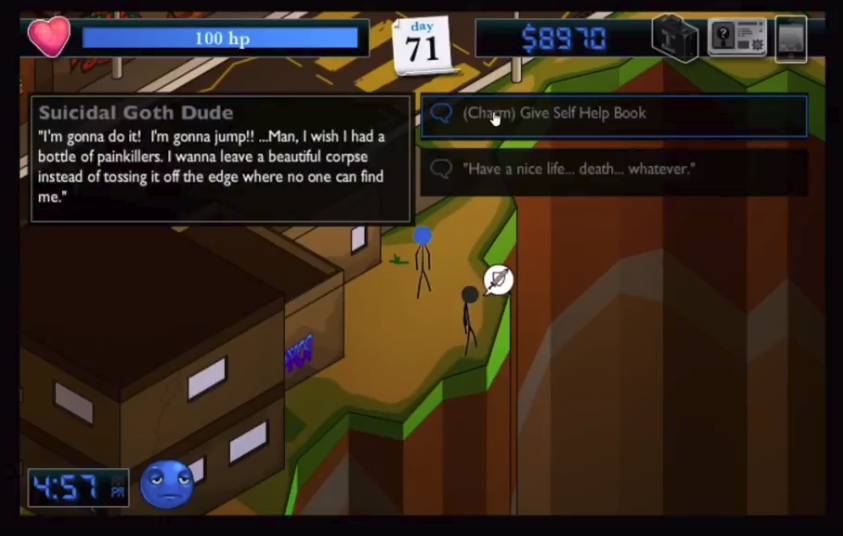
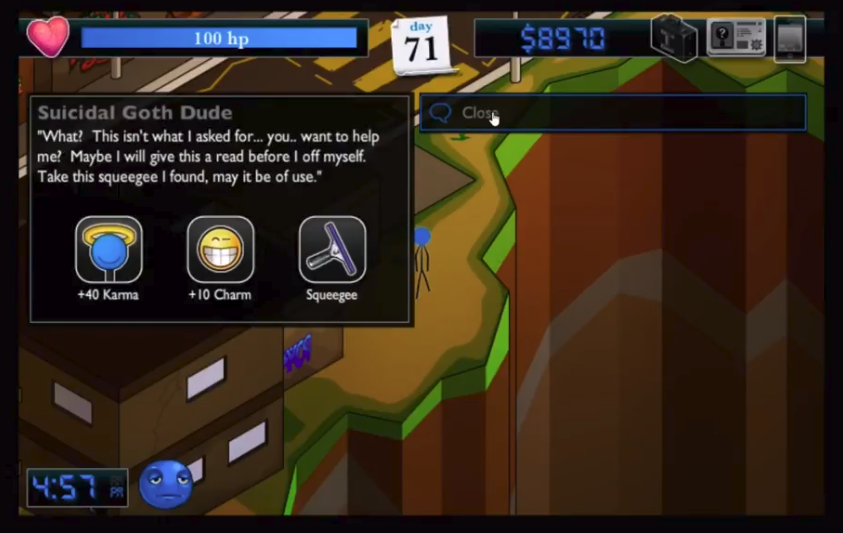
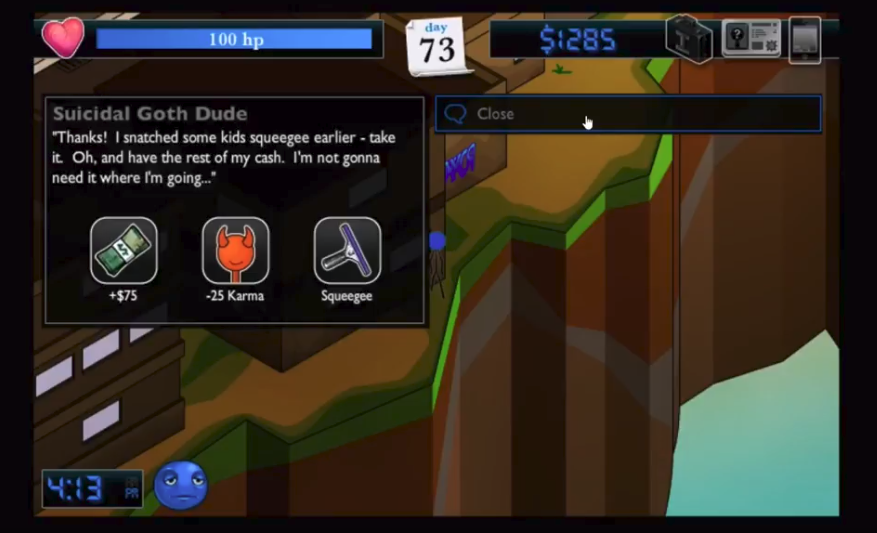
On the first world, during the Afternoon there is an NPC called Suicidal Goth Dude standing near the edge.

Positive – Purchase ‘Self-Help Book’ at Wallymart and give it to him.
Negative – Purchase ‘Pain Killers’ at Wallymart and give it to him.
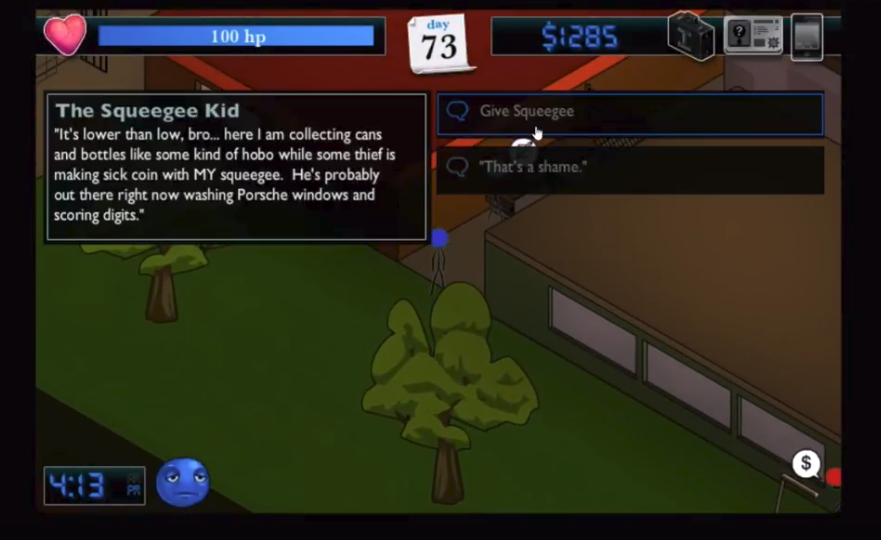
Either option, he’ll give you a Squeegee. Head behind The Club on Island 3 during the Afternoon and give them to The Squeegee Kid. He’ll give you the Klein Bottle in return.
SECRET – If you head to The Club at night with 500+ Strength, you can challenge Broski to an Arm Wrestling competition and he’ll give you one.


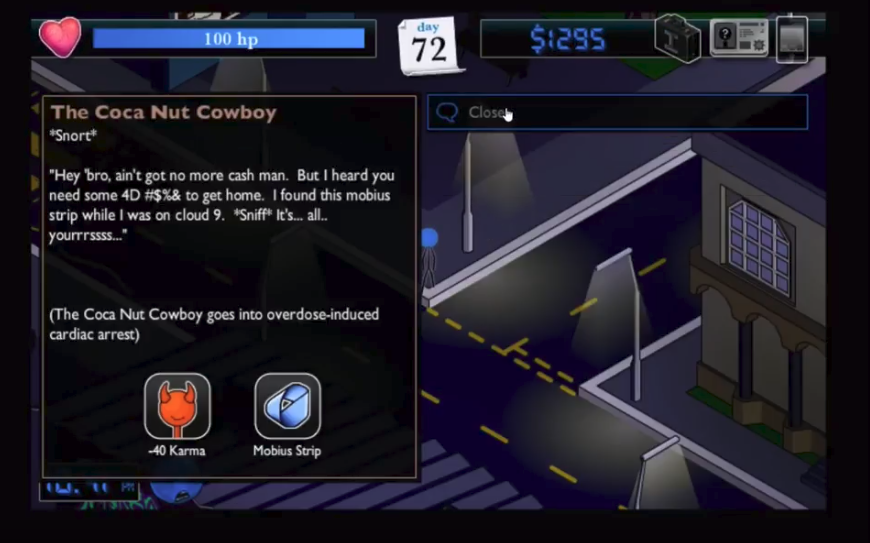
MOBIUS STRIP
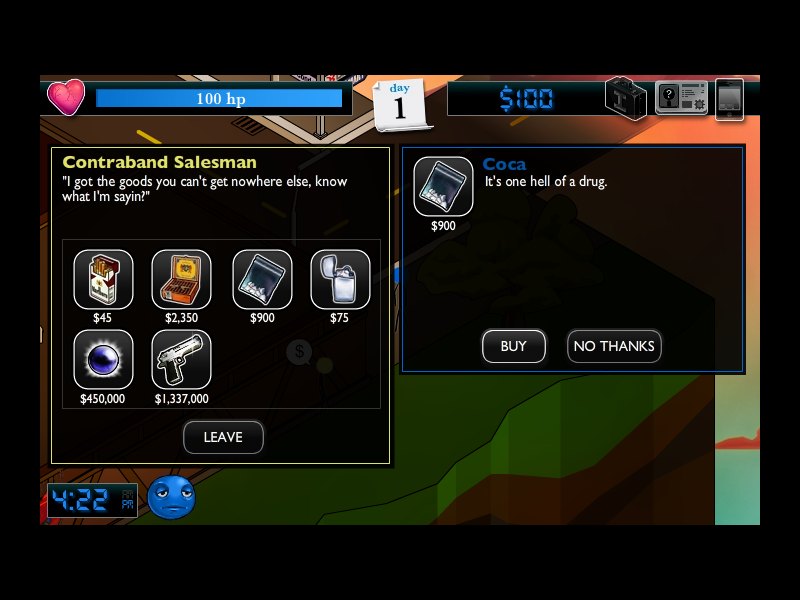
To do this, first you’ll need 3 Bags of Cocaine. You can buy all 3 from The Contraband Salesman behind Skye’s Bar at Night OR complete 2 separate side quests and buy the third bag.
SIDE QUEST #01: Head to The Club at Night and go to the Women’s Bathroom. If you have enough Charm, you can talk to the Lady at the mirror and she’ll hand over her bag.
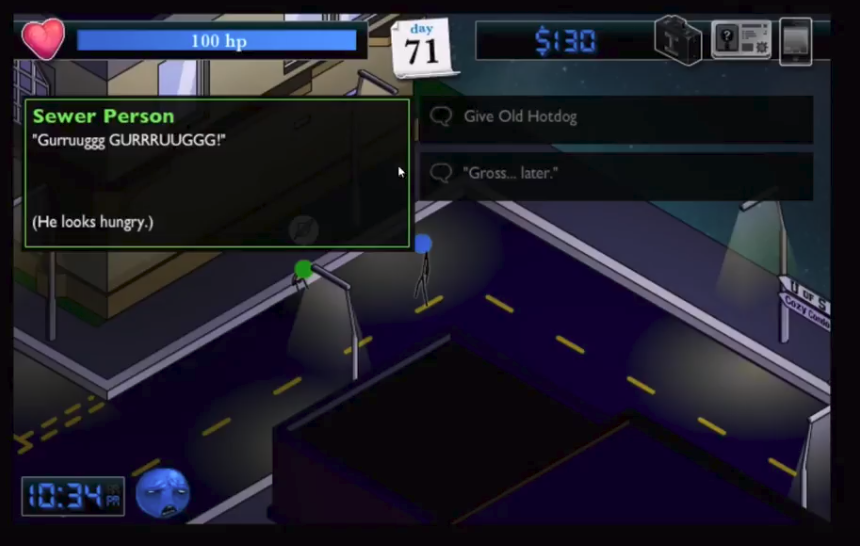
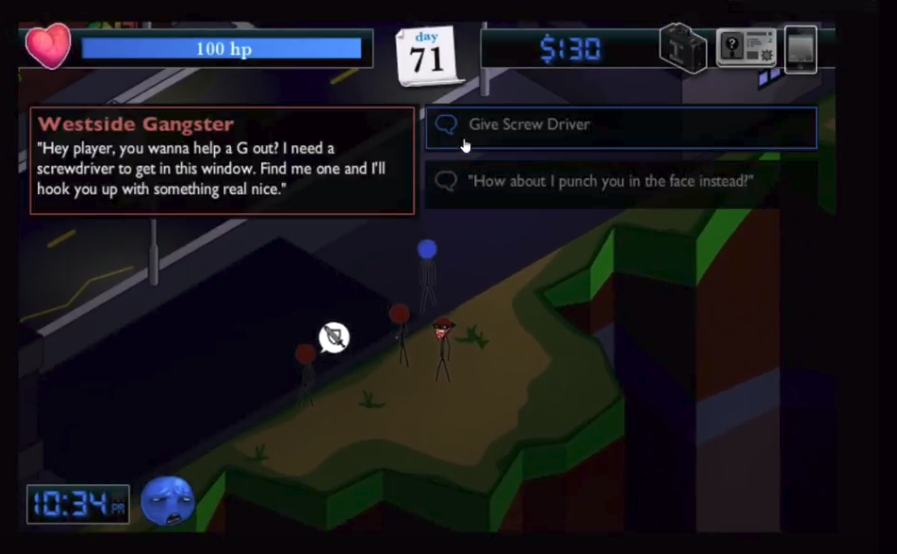
SIDE QUEST #02: Purchase a Screwdriver at Hardware or give an Old Hot Dog to a Sewer Person, then head to Island 1 and go to New Lines Inc at Night. There are a group of thugs trying to break in. Hand them the screwdriver and they’ll give you a bag.
Once you have all 3 bags, you can:
Positive – Hand them to the Cop at the Police Station.
Negative – Hand them to The Cocaine Cowboy in front of Cozy Condos at Night.
Either option will reward you with The Mobius Strip.
Hand them all to Professor Ansel and the Trophy is yours.

‘Fast Cash’
Fast Cash
Gain $100,000 in the first 10 days
This trophy requires a bit of luck, but not too much. When you first start, immediately begin working and get $1000. Once you have the cash, make a Save (This will be handy later). Head to The Casino and begin betting at The Race Horses
MY TIPS AND STRATERGIES
There are 2 horses with the highest Success Odds. ‘One-Horned-Wonder’ and ‘Unicornelius’. I recommend you pick and stick to Unicornelius. Make your starting Bid at $100 and keep increasing it each time you win. Sometimes you might get lucky, other times not so much. If you notice a losing streak (5+), quit the table and re-enter it. If you lose all your money, quit the game without saving and reload your save, then try again. You should be able to get this trophy relatively quickly. You’ll also get the ‘Hustler’ trophy in the process (Read that section for more info). Because time doesn’t pass when gambling, you can do this as long as you want to.
HOW TO GET ‘SPEED RUN’ WITH THIS
On Island 1, near the bottom of the island is an NPC called ‘The Dimensional Drifter’ who sells all 4D Objects, each for $100,000. If you have enough patience and time, you can keep gambling until you hit $300,000+ and then buy all the items.
‘Great Scott!’
Great Scott!
Get the Hoverboard
To obtain the Hoverboard, you’ll need to collect 4 Trophemon’s (Rare Birds) by completing 4 separate side quests. Once done, you can hand them in for either Positive or Negative Karma.
SIDE QUEST #01: Purchase a ‘Grand Slam Burger’ at McSticks and go to Island 2. There is a construction worker. Give him the Burger and he’ll give you a Ladder. Right across is an Old Lady near a tree. Give her the Ladder and she’ll reward you with a Trophemon.
SIDE QUEST #02: On Island 3, during the Afternoon is a street peddler. Tip him 11 times and he’ll give you a Trophemon.
SIDE QUEST #03: At Vinnie’s Bar is a Bodyguard. First buy a Pack of Smokes at 11-7 and give them to him. Then buy some Cuban Cigars from The Contraband Salesman or by Charming Sad Keanu and give them to him. Finally buy a Lighter at Steel Hawk and give it to him. He’ll reward you with a Trophemon.
SIDE QUEST #04: Buy a Pizza and a Milkshake and enter The Club during the Afternoon. The DJ will ask you for some food. Give him the Pizza and Milkshake and he’ll reward you with a Trophemon.
Once you have all 4, you can:
Positive: Head to Island 1, near Ted’s Basement during the Afternoon and give them to The Activists
Negative: Head to Island 2, behind Cozy Condos at Night and give it to The Evil Billionaire.
Either option will reward you with the Hoverboard.
IMPORTANT, MAKE SURE TO ONLY GIVE ALL 4 TO ONE SIDE. IF YOU DON’T, YOU WON’T BE ABLE TO GET THE TROPHY.
‘E.T. Go Home’
ET go home
Help the alien get home
On Island 4, near The Castle is an Alien. To help him get home, you need to obtain a Hyperdrive and Nanobots.
Hyperdrive: First go to The Dangling Pianist at Night and talk to a guy there. (You need 500+ Strength) He’ll ask you if you can clear out his New Abandoned Warehouse and to bring back a Hyperdrive as proof. Clear the Warehouse and go back to him. He’ll be happy and reward you with cash and will let you keep the Hyperdrive.
Nanobots: Purchase a ‘Benjamin’s Club Membership’ from a Seller at Dangling Pianist and enter The Benjamin’s Club. Buy the Nanobots from a seller there.
Once you have both items, head back to the Alien and give them. He’ll reward you Solar Power and your Trophy.
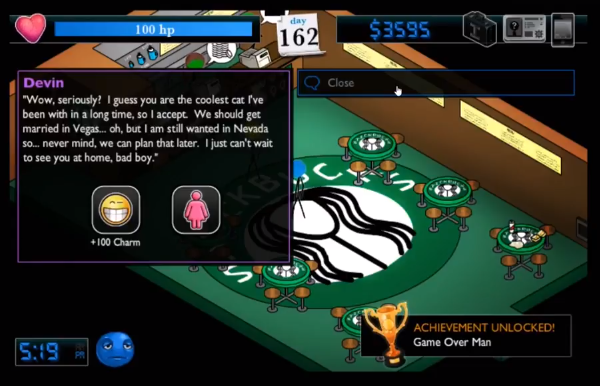
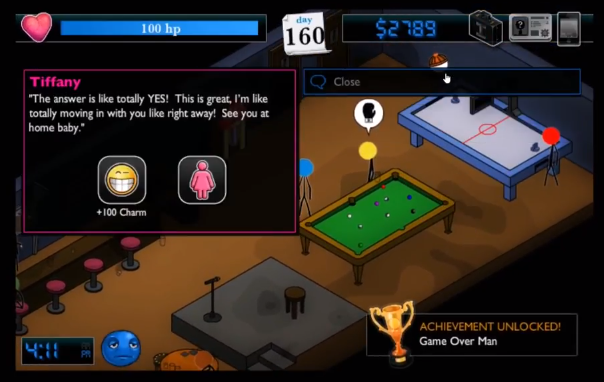
‘Game Over Man’
Game Over Man
Get married
This might be one of the harder trophies to get, only because after the first 3 quests, you’ll have to scour the city to find them to continue. Below are Timestamps for each Side Quest, along with a description.
IMPORTANT NOTES
1. Once you begin a Side Quest with any of them, the others won’t be available
2. All wives give you 1+ Charm, so it doesn’t matter which one you marry
If you’re watching the video, use the timestamps bellow to skip to a section you need help with. Otherwise you can read the instructions and just ignore the timestamps.
——————————————-
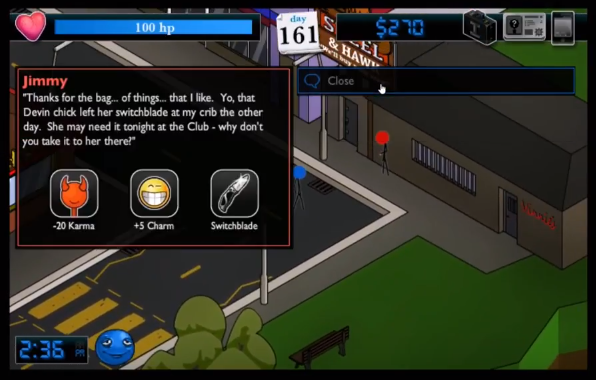
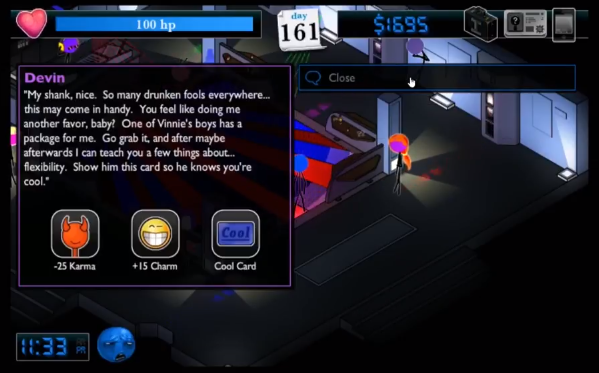
DEVIN
——————————————-
00:12 START
Hit -1000 Karma and go to ‘HOT HOT HO’ in the afternoon and talk to Devin. She’ll ask you to deliver a bag to Jimmy in front of Steel Hawk’s Pawnshop.
00:47 SIDE QUEST #01
Jimmy will give you a Switchblade in return and ask you to give it back to Devin. Go to The Club at Night and return it to Devin.
01:11 SIDE QUEST #02
Devin will ask you to pick up a package at Vinnie’s for her and gives you a Cool Card. Head to Vinnie’s.
01:26 SIDE QUEST #03
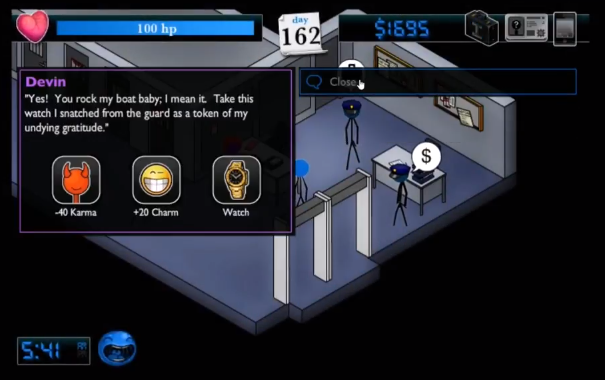
Go to Vinnie’s and talk to Vinnie’s Muscle. Hell give you Devin’s Package. Head over to the Police Station in the morning and give Devin her package.
02:07 SIDE QUEST #04
Devin will then give you a Watch as a token of her gratitude. Head over to The Casino and trade it to the Jewelry Flipper for a Ring.
02:32 SIDE QUEST #05
Head to Stickbucks in the evening and propose to Devin.
——————————————-
TIFFANY
——————————————-

03:08 START
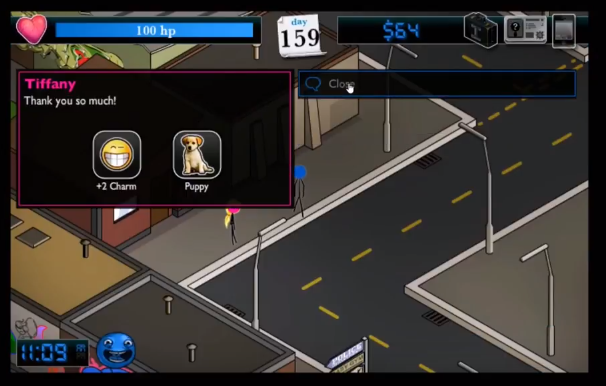
Hit 1000+ Strength and go to Island 2 in the morning and talk to Tiffany. She’ll ask you to return her sister’s Puppy in front of The Penthouse.
03:27 SIDE QUEST #01
Cathy will thank you and ask you to return Tiffany’s keys back to her.
03:41 SIDE QUEST #02
Tiffany will thank you and give you a Scarf, to remember this random series of events. She’ll ask you to drop by The Club later tonight.
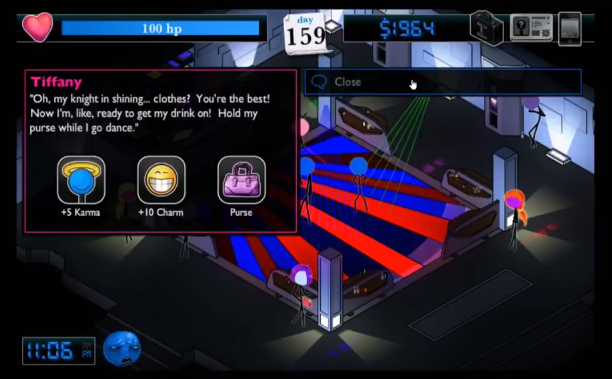
04:11 SIDE QUEST #03
Head to The Club at Night and give Tiffany her Scarf back. She’ll ask you to hold her purse while she dances.
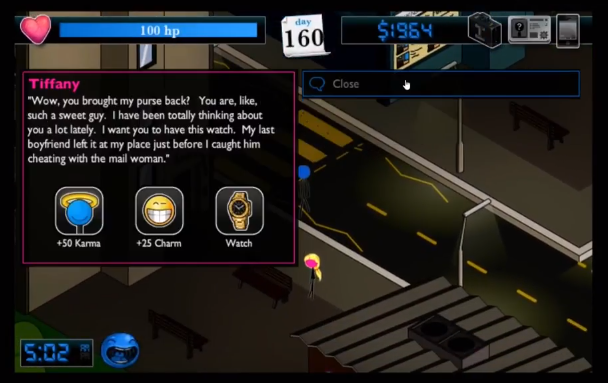
04:41 SIDE QUEST #04
Head to Mobster Towers in the morning and give Tiffany her purse back. She’ll reward you a Watch her boyfriend left at her place. Head over to The Casino and trade it to the Jewelry Flipper for a Ring.
05:05 SIDE QUEST #05
Head to Skye’s Bar in the afternoon and propose to Tiffany.
——————————————-
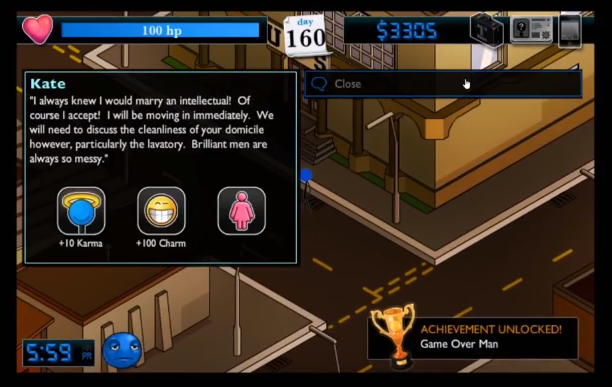
KATE
——————————————-

05:50 START
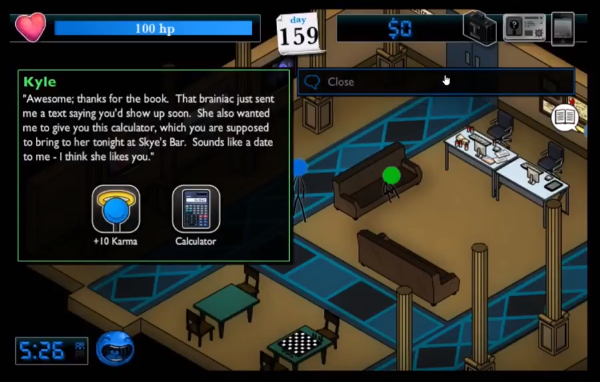
Hit 1000+ Intelligence and go to Stickbucks in the morning. Talk to Kate and shell ask you to return a Text Book to Kyle at the University.
06:14 SIDE QUEST #01
Kyle will ask you to return Kate’s Calculator to her at Skye’s Bar later tonight.
06:49 SIDE QUEST #02
Kate will thank you and give you her Mechanical Pencil, as a symbol of your relationship.
07:25 SIDE QUEST #03
Return to the University in the afternoon and give Kate her Mechanical Pencil back. She’ll give you a Watch she won in a Tournament as a gesture of love. Head over to The Casino and trade it to the Jewelry Flipper for a Ring.
08:04 SIDE QUEST #04
Go to the front of the University in the evening and propose to Kate.
——————————————-
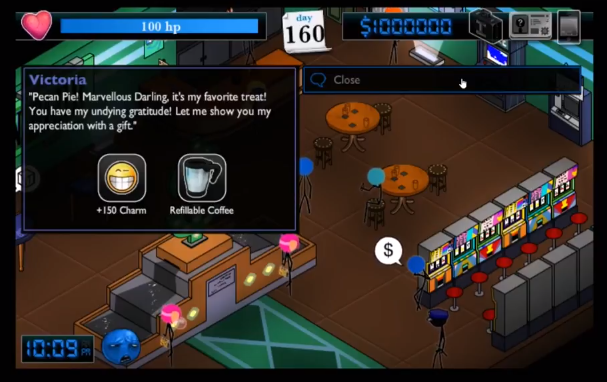
VICTORIA
——————————————-


08:08 START
Have $1,000,000 on hand and head to The Benjamin’s Club at night Talk to Victoria and she’ll ask you to deliver a Bag to the Pie Guardian in front of Giovanni’s in exchange for Pecan Pie.
08:34 SIDE QUEST #01
Give the Pie Guardian the Bag and he’ll give you a Pecan Pie. Return to Victoria and give her the Pecan Pie.
08:50 SIDE QUEST #02
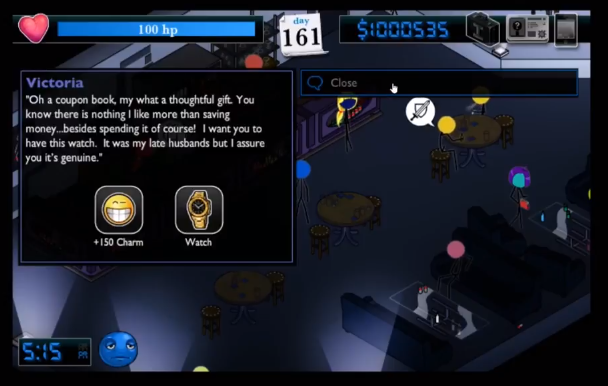
Victoria will show her appreciation for you by giving you a Refillable Coffee. Head over to Stickbucks and talk to Sean. Sean will give you a Coupon Book in exchange. Head over to The Dangling Pianist in the evening and give Victoria the Coupon Book.
10:30 SIDE QUEST #03
Victoria will give you her late husband’s Watch as a gift. Head over to The Casino and trade it to the Jewelry Flipper for a Ring.
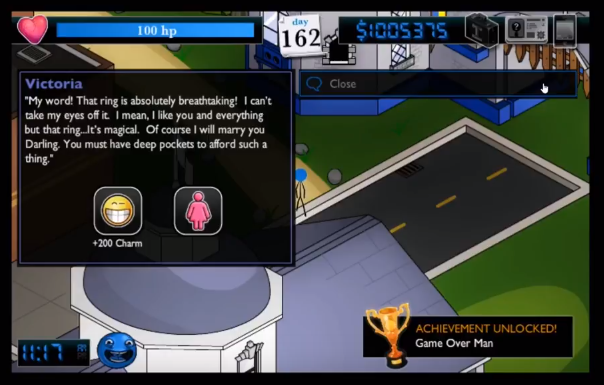
10:48 SIDE QUEST #04
Go to sleep and head to the front of The Castle in the afternoon and propose to Victoria.
*SPEEDRUN NOTE If you max out the ‘New Lines Inc’ job and get a Plastic Watch, you can trade that in for a Ring and propose to Victoria immediately (As long as you have $1,000,000 on you). You can still choose to complete the Side Quests however you won’t be able to propose to anyone else.


TROPHIES: Stats
‘Rhodes Scholar’
Rhodes Scholar
Max out intelligence
You can study at University of Stick with a class or Ted, or at Stick Institution in a class to grind this. You can also get (very small) Intelligence points from Random Events.
‘Used Car Salesman’
Used Car Salesman
Max out Charm
You can get Drunk at Skye’s Bar, Vinnie’s Bar or The Dangling Pianist and be rewarded charm each time. You can also get (very small) Charm points from Random Events. If you are married, each day you can get 1+ Charm from your wife.
‘Gym Rat’
Gym Rat
Max out Strength
You can work out at the University of Stick’s gym, Easy Gym, Jim’s Gym. You can also get Strength by participating in Street Fights, Boxing Matches, Cage Matches, Chainsaw Club Matches or Combat Zones. You can also get (very small) Strength points from Random Events.
‘Power Overhwelming’ and ‘Maximus Prime’
Power Overhwelming
Max all stats
Maximus Prime
Every stat to 2000
The 3 Stats you need to get to 2000 are Strength, Charm and Intelligence. You can either do individual tasks to get these OR head to Island 4 and go to the Bakery. At the Bakery, they sell Pecan Pie for $10,000. Each Pie consumed gives you 30+ Strength, Charm and Intelligence. I recommend you do this because 1) You’ll definitely get 30+ Points for all stats and 2) Won’t ever lose any Points. It is expensive but the fastest.
‘Satan Incarnate’ and ‘Mother Teresa’
Satan Incarnate
-999 Karma
Mother Teresa
+999 Karma
For both these Trophies, you need to get your Karma to either -999 or +999. For time-saving, hit -999 or +999 first, max profession all Positive or Negative Jobs (Check ‘Workaholic’ for more info) then switch, otherwise you’ll be changing Karma all the time. The fastest way to do this is to head to the Island 4 Bakery, buy either Angel’s Fruitcake (Positive) or Devil’s Fruitcake (Negative). You will need 200 or so Cakes that give 50+/- (Each $1050) until you hit the limit.
The longer method will be to set your Karma at the start, then keep doing jobs until you hit the limit, then go to the bakery, put your Karma into +/- then do the jobs until you hit the limit.
If you don’t mind clogging up your inventory, you can spam buy I.D. from The Police Station (Positive) or fake I.D. from the guy outside of 11-7 (Negative)
TROPHIES: Property
‘Monopoly’
Monopoly
Own every purchasable business
There are a total of 6 Assets you can buy. Below is all of them + the price they cost
Ice Cream 32 $17,500
Skate or Cry $29,700
Stickbucks – $186,000
McSticks $475,000)
Casino $1,790,000
Wallymart $3,800,000
TOTAL: $40,498,200
You can purchase Assets from The ATM at Dimension Banks. This is the most time consuming Trophy to get, so here are my tips for getting some cash:
1) Before you begin a game, choose the ‘Wall Street Wizard’ perk. This way you’ll earn more money overtime as you Deposit Money
2) Work on maxing out all Professions. You’ll be going for this anyway, so work specifically on doing just that and ignore the other trophies (Check ‘Workaholic’ for more info)
3) Bank regularly. You will develop interest each time you deposit. The more you have, the more interest you get. This takes a while but eventually you’ll have WAY more than you can possibly spend.
‘Hef’ and ‘Penthouse Living’
Hef
Own the Mansion key
Penthouse Living
Own the Penthouse Key
You can buy both Houses from the ATM at Dimension Bank. Buying each house gives you a Trophy. Below are the costs:
Penthouse – $275,000
Mansion – $1,000,000
The tips for ‘Monopoly’ apply here. I do recommend you buy Houses first, that way the time it takes to sleep and go back to work is shorter.
‘Castle Crasher’
Castle Crasher
Get the castle key
At the Benjamin’s Club is a Minigame called ‘Castle Quest’. In it, you have to obtain a Red Sword, kill a Ghost and use the Key to unlock a special vault. Upon completing the game, you’ll get a Castle, along with the Trophy. Every time you play, it costs $1000.
TIPS
1) There are 2 enemies. Bunnies and Angry Faces. Bunnies move randomly and Angry Faces chase you
2) Memorize the Exit, Sword and Ghost. The Castle is a Labyrinth and you can get lost easily.
3) OPTIONAL keep resetting your game until you get the Exit at Spawn. By doing this, you’ll immediately know where to go once you get the Key
4) The Ghost can’t be killed until you get the Red Sword. So get that first
5) Once you have obtained the Red Sword, all enemies die in 1 hit and you can kill the Ghost
6) Upon killing the Ghost, all enemies will spawn more and move faster. Make sure to haul it when you pick up the key
7) Room Hack. Quickly exit/enter rooms to change the enemy spawns to your favor.
‘Armed to the Teeth’
Armed to the Teeth
Own all weapons
There are a total of 37 Weapons that can be obtained. Some can be bought from Arms Dealer Larry on Island 2 or in the men’s bathroom at The Dangling Pianist, some from The Contraband Salesman, some from Steel Hawk. Others can be given when you max a profession (Check ‘Workaholic’ for Profession rewards). Others can be obtained from cleaning out Combat Zones, and finally some can be created. *I don’t know which weapons you MUST own, because I got the Trophy without obtaining The Zappy Hat or Auto-Railer, so to be safe just collect all weapons and you’ll get it. Below is a list of all weapons and how to get them.
STEEL HAWK (Purchase)
Old Baseball Bat
Ornamental
Pistol
HARDWARE (Purchase)
45cc Chainsaw
55cc Chainsaw
ARMS DEALER LARRY (Purchase)
(Island 2)
Single Barrel Shotgun
Major League Bat
Carbon Steel Katana
Glock
Machine Gun
(The Dangling Pianist)
Glowy Sword
Minigun
Electro Helmet
Prototype Railgun
CONTRABAND SALESMAN (Purchase)
Doomsday Glock (Can also be bought at The Premium Weapons Dealer)
PREMIUM WEAPONS DEALER
The Auto Railer 9000
Chaingun
Doomsday Glock (Can also be bought at The Contraband Salesman)
PROFESSIONS
The Masamune (Video Game Developer)
70cc Chainsaw (Lumberjack)
Tesla Helmet (S.I.T)
The King (City Hall)
Combat Shotgun (Police Officer)
Light Laser Sword (City Hall)
Hall of Fame Bat (Drug Dealer)
Secret Weapon (Hitman) can also be obtained from playing Slots
Dark laser Sword (Sithlord)
COMBAT ZONE
AK-47 (Mobster Tower)
Double Barrel (Gangster HQ)
QUEST
Homemade, Modified and Nova Flamethrower (Outside of The New Old Abandoned Warehouse, Pyro Perry)
Weathered, Heavy and Super Sledge (24 Hour Laundromat)
Blast Cannon (Hardware Store Murder)
The Zappy Hat (Random Fight, Night Time outside The Dangling Pianist)
TROPHIES: Combat
‘Golden Glove Champ’
Golden Glove Champ
Win 5 boxing matches
This only applies to ‘Easy Gym’. During a boxing match, you must kill the opponent using nothing but your fists. Some tips I recommend
1) Max out Strength. The amount of Strength you have also applies to your weapons. If you have low strength, you might be dealing out blows for a while
2) Purchase food. Time doesn’t pass when fighting, so buy plenty of burgers and prepare to brawl
3) Bank it. Make sure to bank all cash before beginning, in case you lose
HOW TO FIGHT
(Dirty)
Force your opponent into a corner and go on top of him. Now he can’t hit you rapidly, but you can. Keep punching and you’ll be fine
(Clean)
Don’t rapid click, do small bursts to maintain hits and to have a flow because if you do a 1-2 combo, you take a brief brake and that’s enough time for the opponent to inflict damage. Move around and go in, punch and back out before they have a chance to swing at you.
‘Caged Animal’
Caged Animal
Win 10 cage fights
This only applies to Jim’s Gym. Much like Golden Glove Champ, the same tips and tricks applies. *The Chainsaw Club Fights doesn’t apply to the total
‘Pwnerer’s Clearing House’
Pwnerer’s Clearing House
Clear out every combat zone 5 times
There are a total of 5 Combat Zones you need to fight in (The Lab doesn’t count). To gain access, you need to defeat their Top Leader. The 5 Combat Zones are:
Gangster HQ (Island 1)
Old Abandoned Warehouse (Skye’s Bar)
The New Abandoned Warehouse (The Dangling Pianist)
Mobster Towers (Island 3)
Sewers (Island 4)
Each time you clean out a Combat Zone, you’ll have to wait 7 days for it to be available again. When you go again, the amount of enemies and their weapons change, gradually get more difficult. I recommend you have Max Strength + The Doomsday Glock or Blast Cannon. Both are 1-Shot kills and can deal with Special enemies.
‘Vigilante Justice’
Vigilante Justice
Kill 100 Enemies
This does not apply to Boxing Matches, Cage Matches or Chainsaw Club fights. Throughout Paper Thin, on each Island are Gangsters, Mobsters or Sewer People. Each one can be fought and will reward an item or stat improvements. Once killed, Enemies no longer appear. If you have cleaned the Island, you can always replay Combat Zones, as they are infinite.
TROPHIES: Money
‘Hustler’
Hustler
Win $50,000 Gambling
You need to rack up $50,000 in total. Any and all games apply. Blackjack, Roulette, Racing Horses, Slots. You can gamble at The Old Casino or The New Casino.
‘Five Million Dollar Man’ and ’10 million dollar man’
Five Million Dollar Man
Get $5,000,000
10 million dollar man
Have $10,000,000 on hand
If you have the Wallstreet Wizard perk, and actively save money you should have no problem with this. You need to have that amount of money on you at once. This might be a long grind if you haven’t been saving up, so here are some tips
1) Max out professions. Maxing out professions will make the process less tedious because you are also going for the ‘Workaholic’ Trophy
2) Max out The Governator job. You get paid $2,5000 per shift and this quickly adds up
3) If you have patience, you can always gamble
TROPHIES: Jobs
Hail to the king baby
Hail to the king baby
Become a king
To get this trophy, you need to max out the ‘Governator’ job. This is found on Island 4 at the bottom right. You need Intelligence, Charm and Positive Karma to be able to apply and get promotions.
‘Maxed Baby!’ and ‘Workaholic’
Maxed Baby!
Max out a profession
Workaholic
Max 15 professions
Here’s a video on what Promoting and hitting Max looks like
This video by ‘TheStickRPG2Helper’ shows ALL professions and max rewards
There are a total of 25 jobs you can do. 14 are neutral (You can have Positive or Negative Karma) 4 are Positive and 7 are Negative. I recommend you max out all your stats before you begin grinding these out, so that you only have to work to get promotions. Each Job has a different number of Shifts you need to work to be able to ask for a Promotion. Each Job has a different number of Promotions needed to be able to max them out and each rewards a different item (See below for the items).
Below is a list of all of professions:
————————————————————————–
NEUTRAL JOBS
————————————————————————–
Burger Flipper (McSticks)
Free Food Card (Not useable)
Stickbucks Employee (Stickbucks)
Fancy Coffee (Health)
Milkman (11-7)
Cow Bell (Not useable)
Pizza Delivery (Joe’s Pizza Palace)
Pizza (Health)
Corporate Zombie (New Lines Inc)
Cheap Watch (Flamethrower + Wedding Ring)
Graffiti Artist (Island 1, across from The Old Abandoned Warehouse)
Empty Paint Can (Not useable)
Pro Skater (Skate or Cry)
Pr Skateboard (Transporation)
Video Game Developer (XGen Studios)
The Masamune (Weapon)
Rock Star (Wallymart)
Platinum Record (Not useable)
Lumberjack (Island 4)
70cc Chainsaw (Weapon)
Pianist (Dangling Pianist)
Grand Piano (Not useable)
Personal Trainer (Jim’s Gym)
Bow Flecks (Not useable)
Professor (Stick Institue of Technology)
Tesla Helmet (Weapon)
Government Official (City Hall)
The King (Weapon)
————————————————————————–
POSITIVE JOBS
————————————————————————–
Ice Cream Tester (32 Ice Cream)
No reward
Police Officer (Police Station)
Combat Shotgun (Weapon)
Doctor (Clinic)
Stethoscope (Not useable)
Light Knight (City Hall)
Light Laser Sword (Weapon)
————————————————————————–
NEGATIVE JOBS
————————————————————————–
Kitten Exterminator (Island 1, Courtyard)
Nothing
Hacker (Stickbucks)
The Internet (Not useable)
Pimp (Island 1)
Pimp Hat (Not useable)
Drug Dealer (Island 1)
Hall of Fame Bat (Weapon)
Hitman (Vinnie’s Bar)
Secret Weapon (Weapon)
Escort (Outside Jim’s Gym)
Crab (Not useable)
Dark Lord (Benjamin Club)
Dark laser Sword (Weapon)
Here are some tips I have
1) Depending on how you want to play, do the Karma you don’t want first and max out all professions in that area, then switch over to your preferred Karma and clean up there. This way, you aren’t hopping back and forth
2) Get your Strength, Charm and Intelligence to 2000, so that you can work and promote without taking breaks in between
3) Plan out your route. Take notes of what times Jobs are open and when they close. By doing this, you can actively work on multiple jobs at once. (For example. I work at New Lines Inc from morning till close, then Nights at The Police Station till I have to sleep) This will save a lot of time in the future
4) Make sure to get promotions. Working doesn’t stack, meaning you can’t work 200 times and then spam Promotion. Each time you get promoted, the counter resets. Take note of how much you need to work to become promoted to maximize time.
Career Criminal
Career Criminal
Go to jail 5 Times
Only 3 jobs can cause you to get arrested. Drug Dealer, Pimp and Hitman. By having Max Negative Karma, your odds are increased.
Conclusion
And that’s about it. If you still need help or clarification, then by all means leave a comment and I will answer them. The game hasn’t been updated since launch, so any bugs won’t be fixed.
Big thanks to TheStickRPG2Helper and the Stick RPG 2 community for helping me with any and all questions I had.
-FingerRocks