
Overview
Basic Things about Street Fighter IV, hopefully you’ll learn some basics of SFIV, have fun, and join the intense yet almost very underground gaming community called the FGC (Fighting Game Community)Eventually with enough gametime, you won’t be so intimidated by the execution and practice required to play this game at “a high level”This game is hard to master but easy to join with enough dedication.
Intro: Welcome to Street Fighter, You Suck. (Hi Purge)
Welcome to my guide that will hopefully teach you how to play Ultra Street Fighter IV. Street Fighter, along with almost all fighting games, usually makes people stray away from picking it up because “it’s too hard” or “too time consuming to play,” or they’re simply too intimidated by the fact that it is a one versus one match and the pressure to win can be frustrating and overbearing. It is true that, in order to like this game you must hate it first. Versing people and losing consistently is infuriating. But with proper practice and dedication to improve. Learning this game becomes rather easy and really FUN.
The saying that “in order to have fun in this game requires an immense amount of hours of gameplay” is all but just a myth, you just need to know the concepts and have some lab time with combo practice. Street Fighter can be convincingly won without the use of combos. While this statement is true it is still IMPORTANT to learn them (They’ll make winning alot easier). Hopefully in this guide, you’ll understand the basic concepts and the more advanced ones in a more simplified view. I’ll try to go over everything that you might want to know.
UPDATES
This section is for the returning readers who might be interested in seeing the new knowledge I try to pick up, as I have said above that this is still a Work In Progress as I try to get better in this game as well.
7/23/2015
-Fixed the name of the place where I met zRekkoha
7/31/2015
-Changed that Ultra Move damage scales with the amount the gauge is filled with (Thank You SneakyToucan2003!)
-Added topics “Punishing Predictable BlockStrings” and “Using Auto-Correct Reversals” in the Intermediate section
-I have realized that my explanation of the math portion (as well as the diagram) of Meaty Hits in “Intermediate Strategy and Concepts Part 2” is COMPLETELY incorrect and I apologize. Working on getting a better grasp of the math to update that section.
-Added an UPDATES section at the top of the guide as well
-Added a Resources that are just general resources that a player can tap into and use to help them grow in skill (Communities and Videos mostly).
System Basics.
THE SYSTEM BASICS:
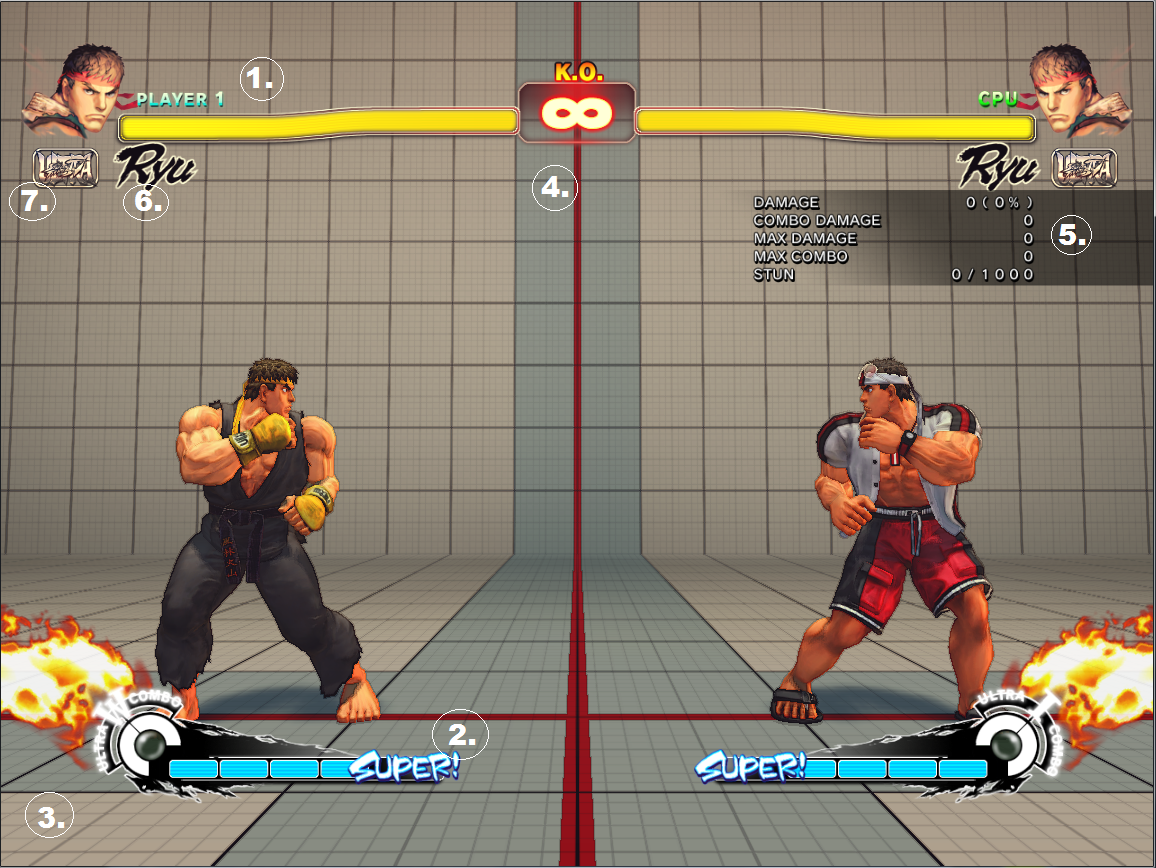
Hit Point Bar (Long Yellow Bar). Pretty basic. If it get’s down to nothing you will lose the round. It’s interesting to note that different characters have different maximum Hit Points.
2. Bottom in the Middle:
EX Bar (Segmented Blue Bar). The EX bar indicates whether or not you can use a bar to upgrade a character’s special move into an upgraded version that gives it better or special properties that a special move normally doesn’t have. The EX bar is segmented into 4 parts, therefore at a maxed out special bar you can upgrade your special moves 4 times before the bar is exhausted completely. Alternatively, you can exhaust the whole bar all in one go to use a character’s Super Move which requires a special input to activate. More about EX Moves and their uses later in this guide.
3. Bottom Left
Ultra Bar or Revenge Meter (The Half Circle going around the EX Bar). The Ultra bar indicates if you can use one of your character’s Ultra move. This meter will only build up if you get hit and receive damage or absorb damage through the use of armor(More on armor later).
4. Middle Top
Round Timer (Infinite is only for Training Mode). A normal match is set on 99 seconds of game time. When the timer reaches 0 the round is forced to end, the winner of the round is dictated by whoever ended the round with more current HP.
5. Right Side
Damage Info (Only available in Training Mode). General information of how much a move or a combo deals damage and builds stun on the opponent.
6. Top Left
Character Name (That’s Pretty Much It).
7. Top Left
Character Edition (Only Available in Ultra Street Figter IV). In Ultra Street Fighter IV, Capcom released an edition select that makes previous versions of characters available for play. Selecting other editions are mostly just played for fun and are not serious in their gameplay (Omega Mode for example).
Very Basic Part One.
Blocking
Blocking in traditional fighting games is performed by holding back or the opposite direction of the way your character is facing. Standing up and blocking will guard against high and overhead attacks while blocking while crouching will guard against low attacks and high attacks. In general you want to block while crouching until they jump or do a standing overhead attack.
Although blocking will protect your life from normal moves, blocking a special move will reduce it’s damage significantly but will not completely negate its damage. This minimal damage you take from blocking a special move is called “Chip Damage.” Winning a round through defeating the opponent with Chip Damage is a legitimate strategy and should not be regarded as “Cheap.”
It’s also important to note that as you block an opponent’s hit’s they will be pushed away from you by each hit (This also happens when you get hit as well). Distance is an important factor for comboing (which we’ll get into later).
Normals
Normal moves are the very basic moves a character can do. They only require the push of the button and your character will perform them. In Street Fighter every character has 6 normal moves that they can perform.
Light Punch(Blue), Medium Punch(Yellow), Heavy Punch(Red)

Light Kick(Blue), Medium Kick(Yellow), Heavy Kick(Red)
In SFIV, every character can Neutral Jump, Diagonally Jump AND Crouch which gives them 3 more sets of normals that they can perform. Knowing the properties of a character’s normal moves is essential to learning a character. The things to know: Damage, Range, Cancelability, Number of Hits, Where it hits (High/Low/Overhead), Startup, and Recovery. (Startup and Recovery Explained later)
Damage:
The heavier attack the more damage it does. Heavy Attacks deal around 100 damage while Light Attacks deal around 30 damage. Knowing the most damaging moves will help optimize the damage you deal when you gain the oppurtunity to do so.
Range:
Knowing the range of your moves is essential ins Street Fighter as the game highly prioritizes on spacing the opponent from you. Arguably the hardest yet most essential part of playing Street Fighter is the ability to play footsies (explained in detail later) which requires knowing the range of your normal moves. Controlling the space in front of your character is vastly important in Street Fighter. In this .gif Sakura uses her superior ranged normals in order to keep Zangief out of range from grabbing her for a Spinning Pile Driver.
[link]
This concept of abusing the range of your normal will become more and more relevant as your understand the concepts of Street Fighter and this guide.
Cancelability:
A wide arrange of normal moves of a character’s move set can be canceled into special moves. It is important to note which ones are and are not able to be canceled into special moves. In general the close variations of normals can be canceled into special moves, while most far range moves cannot be (some are!). Knowing the farthest ranged normal of a character that can be canceled into a special move is important to know in the neutral game.
Number of Hits:
Some normals may not only do one hit, but multiple hits in succession. Yun’s close Heavy Punch is an example of a normal that does multiple hits. Multiple hitting moves prove to be useful when breaking focus attacks(also explained later).
Block Level:
Every move in SFIV hits at a certain level of a character. A move can hit high/mid, low, or overhead. A High/Mid hit must be blocked either standing or crouching in order not to get hit. A Low hit must be blocked while crouching, if attempted to block a low move while standing you will get hit. An overhead hit must be blocked high, if attempted to block while crouching you will get hit.
Crouching Heavy Kick, also called a Sweep, is an example of a low hit that must be blocked low. A normal move that is done after jumping is an overhead attack and must be blocked high. Knowing which moves hit at what level will help you mix up, or confuse, your opponent making him more susceptible to getting hit by your moves.
Command Normals
Command Normals, also known officially in SFIV as Unique Attacks, are added normal moves that a character can perform. These are performed by pressing a direction and the corresponding button, hence the name Command Normals as these normals require an additional command to perform. Many command normals opens up new offensive options for that character.

This .gif shows C.Viper’s Overhead Command Normal.
[link]
With proper timing, C.Viper is granted the ability to leap over fireballs without taking chip damage and still attack with an overhead attack
This .gif shows Ken using his signature Step Kick which greatly enhances his ability to get closer to his opponent using his command normal to attack AND move within an advntageous range of his opponent and start an offensive.
[link]
The many different command normals that are unique to each character continues to diversify this game and it’s variance in gameplay.
Special Moves:
Special Moves are attacks that are also unique to each character. They require an input or motion along with a button, or sometimes multiple buttons in order to perform. Special Moves will also, unlike normal moves, hit the opponent at a reduced damaged when blocked. This is also known as Chip Damage. Special moves are a character’s signature moves that only that character may perform. Ryu can perform a Shoryuken uppercut, while Chun-Li cannot. Akuma can perform a Shoryuken uppercut as well but has different properties than Ryu’s.
It is these moves in combination with normals that mostly determine the playstyle of each character.
Sagat and Guile both have extremely good fireballs (Sagat has a high and low altitude fireball, Guile has an exremely fast recovering fireball that can be slow and fast) along with far reaching normals, this makes players tend to play these characters with more of a zoning oriented playstyle in which they try to chip them out with fireballs and keep opponents away with their normals and fireballs.
Zangief and T. Hawk have very short ranged specials and high hp. With the lack of a fireball special move, they use their high hp as a resource to get closer to their opponents as they attempt to land their moves.
cont. Part 2
Very Basic Part Two.
There are two types of inputs required to do a special move that split the cast in two.
1. Directional Characters
2. Charge Characters
1. Directional Characters:
Directional Characters are the most common and easiest to learn in how to do special moves. These character’s special moves require a set of directions to be inputted along with a button.
The most common directional inputs are shown here.
(These assume you are on the left facing the opponent that is on the right side of the screen.)

1. Quarter Circle Forward – Press down and roll the stick from 6 o’ clock to 3 o’ clock
2. Quarter Circle Back – Press down and roll the stick from 6 o’ clock to 9 o’ clock
3. Dragon Punch Motion – Press the stick Forward, then Down, then Downforward
4. Reverse DP – Press the stick Back, then Down, then Downback
5. Half Cirlce Forward – Start from 9 o’ clock then roll the stick down passing 6 o’ clock until you hit 3 o’ clock.
6. Half Circle Back – Start from 3 o’ clock then roll the stick back passing 6 o’ clock until you hit 9 o ‘ clock
7. Full Circle/360 Motion – Start at 12 o’ clock then roll it all the way around, making a circle, until 12 o’ clock again. It must pass 3 o’ clock first.
Shortcuts:
DP Motion – Press Downforward, then press Down, then back to down+F. This will allow for a DP while crouching.
Full Circle/360 – Press Forward then roll the stick to up back (3 o’clock to 10:30). Up Back is still counted as an Up input
2. Charge Characters:
Charge Special Moves, or Charge Moves, require a certain direction to be held for 2 Seconds, then released with a movement of another direction(s) along with a button to perform. Alot of characters have mostly directional inputs and 1 or 2 charge moves (ex: Chun-Li), but there are some that are completely armed with only charge moves (ex: Guile). A lot of these special moves require holding back which makes the character move backwards. Due to the motion required for these charge moves, it’s unsurprising to see a charge character be stationary.
It should also be noted that you can start to charge at any time (Even before the round starts!).
Variations:
For Both types of Special Moves, each button press (Light, Medium, Heavy) will make the special move have different properties. For example, Ryu’s Light Shoryuken does the least amount of damage, but has the quickest recovery time (Time that makes the person vulnerable from blocking or attacking), while his Heavy Shoryuken does the most damage but makes him fly the highest which makes him vulnerable to attacks longer (or recover longer).
Not only will different variations of special moves make the special move vary in damage but also their properties.
[link]
For Example: The different variations of Ryu’s Hadoken makes the projectile itself move at varying speeds. The Fierce/Heavy version of the Hadoken makes it travel the fastest, while the Light version makes it travel the slowest.
With the use of an EX Bar, a Fourth version of a special move becomes available, the EX Version.
With the use of a bar the special move becomes greatly upgraded and gains unique properties. Not all EX Versions grant more damage necessarily but are used for their utility.
Ex: Ryu’s EX Hadoken gains two hits and if both hits connect they grant a juggle property which allows Ryu to do some follow up damage.
[link]
Ryu’s EX Shoryuken offers less damage, but grants more invincibility.
[link]
As you can see in this .gif, Ryu was able to shoryuken the opposing Ryu out of his ultra. Ex Shoryuken boasts the most amount of frames(time) that Ryu becomes invincible and is unable to get hit by anything. However Ex Shoryuken comes at a price at having an even greater recovery time than the fierce/heavy version of the Shoryuken.
Knowing what each version of Special Moves does for each character greatly helps mastering the character. It’s important to know what an EX move will do in comparison to it’s normal variants.
Grabs
Grabs or also known as Throws are unblockable and must be “teched” out of in order to avoid getting grabbed. To perform a grab or tech one, you must press the light punch and light kick button at the same time while near the opponent, or just use the button macro’d to grab. In order to tech a grab you must press grab at the same time (or near the same time, you can tech a grab late) the other opponent is grabbing you. A grab CAN be whiffed(Missed Completely) which will result in a recovery animation.
Grabs are a ESSENTIAL to not only Street Fighter, but to a fighting game. What is a character to do if his opponent were to block the whole game? Chipping him with special moves would be too time consuming and not worth playing at all. Grabs are a VERY KEY part of one’s offense. More on its uses on a later part of this guide.
It is also worth noting in this section that there are special moves that ARE grabs themselves. These special moves are called Command Grabs and require an input along with a button to perform. Command Grabs CANNOT be teched, if you are getting grabbed YOU ARE GETTING GRABBED. They can be jumped out of preemptively which causes them to whiff. Command Grabs usually have a very long recovery time for whiffing. Just like any other special move they have 3 strengths of moves along with an EX version that change their startup, range, and damage.
In this .gif Zangief whiffs a normal grab to demonstrate that he is outside a normal throw range. However using the Light version of Spinning Pile Driver he grabs Ryu with it’s extended range even though it is outside normal grab range (The heavier versions of SPD lessens the range of the grab for more damage, This does not go for all command grabs in the game).
[link]
Super
A Super Move is a special move that expends the entire super bar that is unique for each character. Although Super Moves have very good damage and properties, the offer of having 4 special moves to be enhanced proves to be more valuable for some characters.
Ex: Chun-Li has a 1 Frame Super (A Super Move that starts in 1/60th of a second) that has great damage and speed, but using the bars for EX Lightning Legs or EX Spinning Bird Kick are more valued for her.
Ultra
An Ultra Move is a character’s most damaging special move that can only be used when one’s Revenge Meter is filled at least halfway. Revenge Meter is only built when the character gets hit by their opponent. The motions to perform an Ultra are usually complex and require all three punches or all three kicks to be pressed (Ex: Double Quarter Circle Forward + All Three Punches). The damage level of an Ultra move is determined by how much of the Revenge Meter is filled. Level one is active when the Revenge Meter is filled halfway, Level two damage is available when the entire gauge is filled, usually when you are low on life. Ultra’s also feature a short cinematic upon their activation. During this cinematic the character itself is invincible, this invincibility is noted as Ultra Invincibility. Depending on the character and Ultra, the move may have more invincibility.
[link]
Every Character in Ultra Street Fighter IV has the option of picking 3 Ultras. Ultra I, Ultra II, or Double Ultra, which allows you to perform both ultras in a match at the cost of restricting it’s maximum damage.
Some characters stick to using one ultra that is good in every match up, while others change their ultra choice depending on the matchp, while few have the ability to pick Ultra Combo Double since their ultra itself does low damage these characters opt for the utility of it instead.
Very Basic Part Three.
Technical
This message will show up on the sides of the screen to inform the players that one player has done a technical action, which include Quick Getup, Delayed Wakeup, or a Grab Tech
-Quick Get Up (Can only be done after being hit by a move without hard knockdown,explained later)
Performed by pressing Buttons or a Direction as you hit the ground after getting hit.
[link]
-Delayed WakeUp (Delays your recovery after a hard knockdown)
Performed by hitting buttons as you are on the ground after a hard knockdown.
[link]
-Grab Tech (Desisting a Grab Attempt)
Performed by pressing Grab when someone attempts to grab you.
[link]
Reversal
A Reversal is the action of doing a special move the very instant you recover from a period of forced inactivity (Leaving a blockstun, hitstun, recovering from a knockdown, or as soon as you land from an air recovery). To do a reversal, you must input the special move as soon as or a little before you recover from forced inactivity. If done correctly a Reversal message will show on the sides of the screen. Doing a reversal with a special move is your “Get off me” tactic when you need room to breathe.
Juggle State
Juggle states are a state that a character may be in after being launched in the air by the use of certain moves. Depending on what Juggle state a character is put in, only certain moves may hit it.
There are Two Levels of Juggles
Full Juggle Potential = Any move may be done to hit a character in this state
Limited Juggle State = Only some moves may hit a character in this state, Most normals cannot and very specific special moves only.
Some Normals and Specials can initiate a juggle state, while some other normals and specials can do the same if they were counter hits(explained later)
Ryu’s Jumping Medium Punch has two hits, the 2nd putting into a limited juggle state
[link]
While the first puts a character into a full juggle state (notice how many hits)
[link]
Here Oni uses the air version of his super to hit Sagat who is in a limited juggle state.
[link]
Focus Attack
Every character in Street Fighter IV can perform a Focus Attack.To perform a Focus Attack you must press both the Medium Punch and Medium Kick buttons. A focus attack can be charged (by holding down the buttons) and released to perform the attack. While Focus Attacking a character gains 1 hit of armor (explained below). Depending on how long you charged a focus attack before releasing a Focus Attack will rise in levels the longer it is charged.
Pressing Medium Punch and Kick:
-Level 1 Focus Attack = Does Minimal Damage, Crumples on Counterhit(Explained Later)
Holding Down Medium Punch and Kick and releasing any time after the first flash of white on your character:
-Level 2 Focus Attack = Does Moderate Damage, Crumples on Hit
Holding Down Medium Punch and Kick all the way
-Level 3 Focus Attack = Heavy Damage, Crumples on Hit, Unblockable
You can cancel charging or hitting a focus attack(Blocked or Not) by dashing forwards or backwards. (Demonstrations Below in Crumple and Armor)
Crumple
Crumple state is a state that forces your character to be vulnerable to attacks as they fall to the ground.
[link]
If you hit the opponent in a crumple state too LATE they will be air resetted and recover in the air as if they were hit in the air by a non juggle move. At the same time some characters hit their opponents late into the crumple in order to do combos possible as if they were in the air.
[link]
[link]
Armor
The term Armor in fighting games regards to the amount of hits a character can take before it goes into hit stun. Certain special moves have armor that allow the character to take in one hit before actually flinching. In Street Fighter IV charging a focus attack grants one hit of armor (Only can take in one hit before getting hit normally). The damage absorbed by armor turns the damage absorbed into “gray hp.” Gray HP slowly recovers back to regular hp as long as you don’t suffer any damage while having it. If you take a clean hit with gray hp, you will lose ALL your gray hp and take damage to your remaining yellow hp normally. To break someone’s armor one must continue to hit the opponent until he runs out of armor hits to resist your attacks or use an armor breaking move.
In this .gif Ibuki charges Focus Attacks and cancels them with dashes after absorbing Ryu’s attacks with the armor, but then loses her gray hp to multi-hitting moves and an armor breaking special move as she attempts to absorb the hits again.
[link]
FADC
An acronym for Focus Attack Dash Cancel. With the use of 2 Bars of EX Meter, a character may cancel certain variants, and certain special moves entirely, into a focus attack. Focus Attack Dash Cancelling has many uses, It can lengthen combos, or get you out of the recovery of an unsafe move. Performing an FADC requires you to do a special move that can be Focus Attack cancelled, then hold the two Medium inputs for half a second then input a dash to continue the combo.
Here Guile uses FADC to crumple and extend his combo
[link]
In this .gif Akumas uses FADC to exit the recovery of his fireball to extend his combo
[link]
The combo potential paired with juggle potential allows for some high damaging combos.
[link]
In this .gif Decapre FADC’s her daggers in order to not be punished by Juri and maintain a safe distance.
[link]
Red Focus
A mechanic new to Ultra Street Fighter IV, Red Focus requires 2 bars to use and acts in the same fashion a normal Focus Attack does, however it has UNLIMITED Armor, Uses Bar, and does MASSIVE damage if charged all the way. Unlike a normal FADC, FADCing a red focus and letting the red focus hit the opponent will ALWAYS crumple the opponent. Red Focus Cancelling a special move will cost THREE bars of EX Meter. This crumple however is very useful as many character’s can easily use their ultra to get the damage off reliably.
Here Ryu demonstrates the unlimited armor and damage of Red Focus
[link]
Here Yun uses red focus to carry C.Viper to a corner
[link]
Stun
Getting hits off on an opponent not only deals damage, but generates stun. Different characters have different levels of Stun tolerance while different moves inflict different amounts of stun. Once the threshold is reached, the victim being stunned is put into a stunned state and is helpless to the opponent’s next attack or series of attack. Any hit after being stunned will put the opponent out of stun state and have a higher stun threshold than normal for that round.
Stun however does deteriorate over time if the victim is not getting hit continously. After a state of neutral activity, the stun meter will reset and will need to build again in order to get stunned. However when a character who has built up stun blocks hits, the stun meter will not build, but neither will it deteriorate, keeping the stun meter at a constant level until it resets again.
In this .gif the opposing Ryu has a very high amount of stun built up, as soon as he gets hit by the next hit, he is put into the stunned state.
[link]
Picking A Character
What character is right for me?
Well I don’t know, It’s up to you to decide. (ALWAYS CHOOSE YOUR WAIFU, ahem). I will however tell you what are some easier characters to understand and play.
Before I suggest some characters let’s go over the type of characters that you may find in Street Fighter.
Zoners:
These characters love to keep their opponents at a controlled distance (Preferably farther away from them) and use their moves (Projectiles, Long Range Normals, Power of Yoga, etc.) to keep an opponent’s movement under their control.
Examples: Sagat, Dhalsim, Chun-Li, Guile(Pick Up Guile as a Beginner’s Zoner)
Grapplers:
These characters are up close and personal specialists that will try to stick to their opponents and grab them with their Command Grabs. They usually feature a higher amount of HP in order to patiently bide their time in order to wait for the right moment to get in and start Command Grabbing their opponents repeatedly. All of these characters’ do not have a projectile themselves and usually have a hard time against Zoning characters.
Examples: Zangief, Abel, T.Hawk, Hugo, Hakan (Grapplers require a good understanding and experience of Street Fighter’s Neutral Game. Zangief is the best choice as a Beginner’s Grappler)
Turtles:
These characters’ feature several moves that are used in a defensive play style. These character’s will usually not attempt many offensive strategies, but will instead try to counter their opponent’s offensive strategies. Some may consider these type’s of character’s synonymous to Zoning characters (Which some are!), but they are different in the aspect that a zoning character will try to control an opponent’s movement, while a turtle character will try to control the space nearby where their own characters occupy. (Example: Guile is happy sitting full screen shooting fireballs, while a Dhalsim likes to stay somewhat near his opponent where his long limbs will prevent his opponent from advancing, jumping, or retreating).
Examples: Guile, E. Honda, Balrog. (Guile is the best Beginner’s Turtle character).
Dive-Kickers:
These characters like to take to the air and start their offensive by forcing their offensive in by dive-kicking into their opponent’s space. These characters will rapidly make multiple offensives in order to try and “rush down” their opponents before they can recover and start a counter offensive.
Examples: Yun, Rufus, Cammy. (These characters will require the knowledge of knowing when you can take the risk of starting each offensive moreso than other characters, coincidentally Dive Kick characters usually have low hp or stun and can easily be defeated with only a few mistakes). Yun is the “easier” Dive Kick character to pick and learn with.
Footsie Based Characters:
These characters have the tools to make them dominant against their opponents in a close to mid range. They have adequate amount of pokes in the mid range while still have a solid close range offensive. These characters have the means to either wear down their opponent at a mid range or completely rush their opponents down with their excellent normals.
Examples: Ryu, Ken, Dudley, Cody, Vega (Ryu and Ken are the easier characters to learn with Ken being the more offensive based play style).
Vortex Based Characters:
These characters have a common strategy: Knock their opponents down on their back and the use one of a multitude of set-ups that will cause damage and another knockdown in which they can then choose another set-up to mix-up their opponent into more damage and another knockdown. Later in this guide I explain what a Vortex is, but I suggest that these characters should be avoided until you have a stronger knowledge of how to set-up and perform a vortex.
Examples: Akuma, C.Viper, Gen, Ibuki, El Fuerte
Rock-Paper-Scissors:
Some character types counter other character types. Certain character’s have the exact tools needed to successfully counter the strategy of other characters. A Sagat (Zoner) has excellent long range tools to keep from Zangief (Grappler) getting close to grapple him. While Zangief has an easier time against Yun players as they want to dive kick themselves into the range where a grappler can grab them.
Be aware that playing a character will have it’s share of bad match-ups. In order to avoid this, one can either learn to play the difficult match-up and attain a win OR learn another character that have a different set of tools that your main character may not have.
Of course there are some players that tend to play their characters’ differently (A Turtle character played with a rush down offensive), but having an idea of character match-ups can show what your character can do against the cast.
Tier Lists:
Tier Lists are a compilation of the cast ordered in such of how good the character overall in comparison to the other characters of the cast. Tier lists are subjective and should never be taken into deep consideration, play who you want to play. Although opinionated, some are highly agreeable (Tier Lists made by pro players). Dee Jay may not be considered the best character in most people’s tier lists, but he is certainly able to get wins and have favorable match ups against some characters. Players that compile these tier lists rate each character based on how effective the tools of the character is when versing everyone else in the cast. For Example: Evil Ryu is currently considered the Highest in the tier list as he can deal massive amounts of damage off most hit opportunities, has good tools in the neutral game and offense, and has a solid set of special moves and normals to round off his character. The major con of playing him is his low maximum Hit Points but with the proper handling his hp is negligible.
Be aware that there is a tier list, but don’t be afraid to try out different characters that aren’t considered “the Best.”
Disclaimer:
-Some Characters are easy to pick-up but can be just as complex as the other characters in mastering them. There are no “scrub-tier” characters that players choose because they “auto-win” certain matchups.
-Not all players play certain characters to their suggested style of play (Ex: NuckleDu uses Guile’s Defensive tools offensively instead of a Tutrtling play style)
https://www.youtube.com/watch?v=A37fyEn-_cw
-Try out different characters and see what you like!
If you don’t know have any idea what you want to play, or just want the easiest character to get started in this game, pick Ryu.
Ryu has all the tools you need to play this game at a fundamental level (Fireball, Great Normals, Directional Inputs, Uppercut, etc.). I’d like to say learning with Ryu is a bonus because it’s easy to understand his tools so when you play a match you don’t have to concentrate so much on getting complex combos down or having great execution that other characters may require.
Ken is another candidate to play at an easier level if you like Ryu’s special moves but want play more offensively
If you know you favor a more defensive style, pick Guile. Although his special moves are charge moves, he literally only has 2 Special Moves (Sonic Boom and Flash Kick). Playing Guile will teach you how effective anti-airs can be and how to watch/punish your opponent’s behavior.
If you know you want to try a charge character and want to play more offensively, you can try out M.Bison. M.Bison can teach you how to rush down and pressure your opponent.
As a personal recommendation to the newest of players that are not yet familiar with executing special moves on your controller, I will highly suggest NOT to play C. Viper or Gen until you have much better dexterity and control. Practicing Special Moves and Inputs isn’t a joke when playing these two characters.
Introduction to Important Math (Really, it is Important.) Part One
Combos
For now I will use a dumbed down definition of what a combo is.
Combos are a series of hits that are done in succession and make them unblockable to the victim after the first hit connects.
Buffering:
Before we get into combos, let’s talk about a concept that makes cancels easier/possible. Buffering is the act of inputting directions or buttons for one move during the action of another move. Most cancellable moves have a Buffer Window in which a player can input the moves to cancel in order to cancel said move into another move. The size of the buffer window depends on how quick or slow the move is, or how much hitstun is generated from the move.
Combos are created by using multiple hitting moves, cancels, or links(we’ll talk about it later).
Multiple Hitting Moves:
Some moves in this game straight up just do a Gorillian amount of hits. Sakura’s Shouoken (Sakura’s special Shoryuken) has multiple hits built into the special move and once the one of the hits connects, the rest of the move will also connect and deal damage.
Cancels:
Extremely Important Concept and Number 1 way to do a combo.
Chaining:
Chaining is canceling the recovery frames of a NORMAL move into another NORMAL move. Spamming a bunch of Crouching Light Punches into a combo is an example of chaining.
-Target Combos:
In the next part I will explain why Target Combos are rulebreakers for combos in this game, BUT many characters have unique chain normals or multiple normals and CANCEL the recovery frames of the preceding normal with another normal. (ex: Guile’s only target combo, Crouching Medium Kick canceled into Forward+Medium Punch).
Some characters have no real use for their target combos as there are bigger ways to deal damage off the same oppurtunity when a Target Combo is able to be used. Most target combos find their uses as getting tricky damage (Like Guile’s where the Cr.MK hits low while his F+MP hits overhead, which requires the opponent to immediately switch their guard or they will get hit by either move) or as quick methods to break a Focus Attack’s armor.
Special Cancels
Certain normal moves and special moves can be canceled into other special or super moves. To perform a special cancel you need to put in the input of the special move as the normal move is hitting your opponent. It’s important to note that Whiffed moves cannot be special canceled, they must be hitting something. What exactly is being canceled? The recovery frames of a move is being canceled into the start up of a new move. For Example Ryu’s cr.MK is special cancelable and can be canceled into any special move he has.
Here in this .gif shows a crouching Medium Kick and a crouching Medium Kick canceled into a fireball.
[link]
Without the fireball Ryu needs the animation to retract his foot, while canceled Ryu suddenly goes into the Hadoken animation without retracting his foot.
Special Moves can also be canceled into Super moves. In this .gif ChunLi cancels her Fireball into a SuperMove. Note the beginning animation as she shoots the fireball, the recovery is canceled into the start up of her Super Move.
[link]
Important Note: You CANNOT special cancel CHAINED Normals, instead you will have to Link those normals in order to be canceled, OR link the special move itself which is not possible sometimes. (Linking explained Later)
Things to Test Out:
Annotations: “Cr.” = Crouching, “St.” Standing, “Cl.” = Close(standing), “QCF” = Quarter Circle Forward, “DP” = Dragon Punch, “LP,MP,HP,LK,MK,HK” = LightPunch, MediumPunch, HeavyPunch, LightKick, MediumKick, HeavyKick.
Ryu: Cr.MK xx QCF Punch
Sakura: Cl.HP xx DP Punch
Dudley: St.LK xx st.MK xx st.MP xx st.HP (Press the buttons fast)
Ibuki: Cl.HP xx QCB HK (If you notice, Ibuki’s HP is 2 hits and is only special cancellable on the 1st hit, Some characters have a multihitting move that can be cancelled in any of the hits in the move)
Balrog: Hold Down Back(2 Seconds), Cr.MP xx Forward+LP (Release the Charge for his Special Move)
Chun Li: Hold Down Back(2 Seconds), Kikoken(Fireball) xx Super
(Both of these moves are back charge moves and can be done with the same charge. Chun Li’s Kikoken requires a Back to Forward Motion+Punch, while her Super requires a Back,Forward,Back,Forward Motion+Kick. You can Super Cancel the Fireball by “doing” the fireball motion normally with a charge, which accomplishes the first half of ChunLi’s Super, then complete the rest of the Super Motion. So: 1.Hold Back for Two Seconds, 2.Forward+Punch, 3. Back, 4.Forward+Kick. Do these steps quickly should result in a Fireball Super Cancel.)
Ken: DP HP xx Super(SHORYUREPPA)
(In this cancel you can also abuse the part in which the game will read the DP motion as a QCF, Unless you do the most PERFECT DP Motion, then which you will just need to do another QCF and a button to Super Cancel. If you want all of the super to hit you have to Super Cancel off Ken’s first hit of the Heavy DP.)
Block Level of Special Moves
Some combos in this game have some specific criteria that must be met in order for the string of attacks to connect for a combo. Sometimes this is due to the block level of the Special Move, or due to the varying body sizes of the characters.
Example1: Tatsumaki
Most Shotokan’s (Class of fighters with Fireball/Tatsu/Shoryuken, ex: Ryu, Ken, Sakura) Tatasumaki will only hit an opponent when standing. To get this combo to his a crouching opponent one must use a normal that forces an opponent to stand. In this example Ryu uses Cr.HP in order to force his opponent to stand and get hit by his Tatsu.
[link]
Example2: Tsumuji
Ibuki’s Medium and Heavy verstion of Tsumuji has the option of hitting low on the third kick. This third kick hits low and must be crouch blocked in order not to get hit by it.
[link]
Example3: Axe Kick
Evil Ryu’s Axe Kick is a special move that can be blocked standing or crouching, however when used with an EX bar it becomes an overhead. This is an example of EX bars changing the properties of special moves. Some special moves are overhead normally (ChunLi’s Hazanshu)
[link]
Introduction to Important Math (Really, it is Important.) Part Two
Breaking Down a Move:
Every Move can be broken down into data. Knowing this data will help you understand how good a character’s special move or normal move really is. This is a continuation of my talk back in knowing what’s good for Normal Moves.
Frame Data
This is the part where people say Street Fighter is a numbers game. Before I get into Startup and Recovery, I must explain what Frame Data is. Street Fighter runs on a 60fps timeline. When 60 frames pass, that means one second (of real time, not game time) has passed. With this time line, the lab monsters of Street Fighter use it to measure how long it takes for any action to happen in game (Normals, Special Moves, Super, Ultra, Jumping, Crouching, etc.). Knowing the EXACT numbers is not necessary, but knowing what it means is VERY beneficial.
Start Up
How long it takes for a move to reach it’s Active Frames(When the move actually hits)
This time is measured in frames. Some moves have a long start up while some have extremely short start ups. The speed of Ryu’s Crouching Light Kick has a 3 frame start up. Essentially meaning after pressing the button for Crouching Light Kick, it will take 1/20th of a second before it will actually hit an opponent.
Active Frames
The Active Frames of a move is the moments of a move when it is allowed to hit a character. Some moves have short active frames (ex: Crouching Light Punch) while some have very long active frames (Ex: Makoto’s Standing Medium Punch), meaning the move sticks out there for a very long time.
Recovery
How long it takes to return to a neutral state (Ability to block or do moves) after doing a move. Moves with long recovery leave you vulnerable for an extended amount of time, while those with little recovery allow you to block afterward, also known as “safe.”
Hit Stun
Hitting an opponent with a move will stun them for a certain amount of frames depending on the move (very few frames). This stun disables their function to block or retaliate and continued hits during hit stuns or newly generated hit stuns from followed up attacks are called combos.
Block Stun
Hitting a blocking opponent will generate block stun. After blocking a hit, for some amount of time they are forced to block (or stuck in the block animation) even after the hit is blocked.
[link]
Here is an example of Ryu blocking Ryu’s Ultra 2 which generates an incredible amount of block stun. Notice that even after the block stun the opposing Ryu is still very vulnerable as he is unable to block since he is stuck on the recovery frames of Ultra 2, taking advantage of this vulnerability is called a Punish (More on that later in the guide).
Now Let’s actually try to visualize what we learned and break down a move.
Oni’s Forward + Heavy Punch makes Oni perform a large palm thrust that has excellent range and power but still has some weaknesses.
A .gif of Oni performing 2 Forward+Heavy Punches
[link]
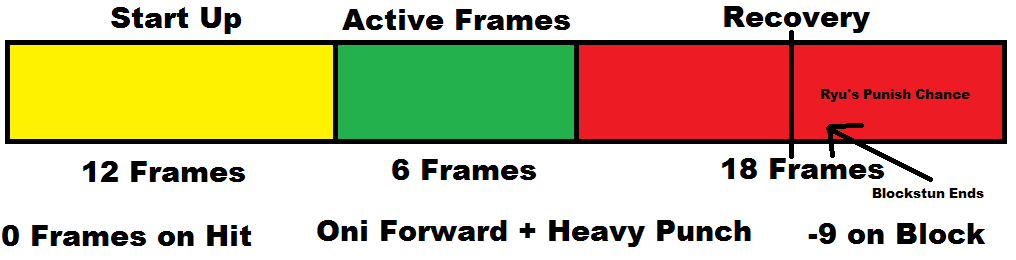
Hopefully this picture will help you visualize a timeline of how a move goes through it’s animation.
We’ll start all over again to break down this move.
-As you can see, although Oni STARTS the animation of this move by taking a step forward, however Ryu doesn’t actually get hit until Oni actually extends his palm outward. The time it takes for Oni to actually hit Ryu after pressing Forward+Heavy Punch is 12 frames.
-After thrusting his palm out, you can also see that his hand sticks out there for little while. Those are the active frames of the F+HP. If Ryu wasn’t getting hit and stuck a limb into the time Oni’s palm was out, Ryu would get hit by Oni.
-After Oni thrust out his palm and leaves it there for a little while, there is an animation in which he retracts his arm in order to return to a neutral state. This is the recovery state of the move. In the .gif, as soon as Oni recovered completely from his move, he is allowed to do a move again in which he throws another F+HP. After having his move blocked, during the time Oni is retracting his palm in that move he is vulnerable and is available to be punished.
-After getting hit by the Heavy Punch Ryu flinches from the hit. This is the animation of getting hitstun. Oni throws out another F+HP but with the combined time of recovering from the move AND starting up the 2nd F+HP, Ryu successfully recovers from the hit stun and is able to block the 2nd hit. This is because Oni only stuns Ryu long enough only for him to recover from his move. This is also noted to be +0 on hit, therefore Oni has no frames in order to start another move to continue hitting Ryu for a combo.
-Ryu blocks the 2nd F+HP that Oni attempts and is shown to be stuck in the blocking animation for some frames, which shows Oni’s F+HP Blockstun that is generated. You should also notice that Ryu is DONE recovering from the blockstun FASTER than Oni is recovering from the move itself. On the picture above, Oni is -9 frames on Block from this move, meaning that Ryu has 9 frames available to him in order to hit Oni during the recovery of his F+HP.
Punishing
Punishing is the action of dealing damage to an opponent’s mistake of leaving himself vulnerable to attacks. Punishing Moves can be vary from very obvious mistakes down to the tiniest mistakes. Taking advantage and punishing as much as you can and as optimally as you can is important part of fighting games. Knowing the frame data of a move allows you to know what move can punish what.
In this .gif Ryu punishes a glaringly obvious oppurtunity to hit Ryu
[link]
Here Ryu punishes a rather obvious oppurtunity to punish Gouken’s tatsu
[link]
Sakura punishes Ryu’s Light Shoryuken
[link]
Punishing can even be as subtle as a normal hit.
Here we will take a look at Ryu’s Sweep or Crouching Heavy Kick.

Here’s also a .gif of Ken punishing Ryu’s sweep with his own horrible sweep.
[link]
Taking a look at the frame data, we can see that blocking Ryu’s Sweep is IMMENSELY horrible for Ryu. Ryu must take almost half a second just to play the game again just for pressing a button. Even after the blockstun ends, Ken has so much time to punish Ryu. Ken needs to find a move that starts up less that 14 frames and has to be close enough to Ryu to actually hit it.
Distance is a very key part of knowing what you can punish or not. Yun’s Shoulder or officially called “Tetsuzanko,” is -3 on block. A shoryuken has a start up time of 3 frames and since it’s a special move it can be buffered as a Reversal without worrying about timing the shoryuken input exactly. However the distance that is created by blocking Yun’s shoulder is too big for a Shoryuken to come out and connect to Yun.
[link]
Therefore learning the properties of Yun’s shoulder comes in handy. Yun’s shoulder is not an armor breaking move, therefore Ryu can FADC through it and get closer to punish Yun.
[link]
Introduction to Important Math (Really, it is Important.) Part Three
Combos PART TWO
Now that we know a bit about the math part of how moves work now I can explain how most characters do their most optimal combos.
Links:
Links is NOT canceling a move into another move. A Link is connecting one hit to another BY DOING A MOVE WITH SPECIFIC TIMING. Sounds kind of stupid but with a bit of math that you just learned you’ll understand what a link is.
Let’s break down a link combo:
Ryu can link a Crouching Medium Punch to his Crouching Heavy Punch provided he is close enough to the opponent.
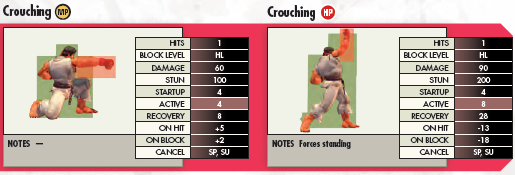
This is a picture of the frame data of both these moves taken from Brady Game’s Ultra Street Fighter IV: Official Bible.
If we add the “On Hit” frames with the “Recovery” frames of the move, we can learn what the Hit Stun of a move is. Ryu’s cr.MP generates 13 frames of hit stun. 8 of the 13 frames are used to recover from doing cr.MP itself. We are left with 5 Frames that Ryu has recovered from performing cr.MP WHILE his opponent is still in hit stun. This time, although small, in which Ryu can do anything while his opponent is still in hit stun is called “Advantage on Hit.” In these frames, if Ryu can do a move with LESS START UP TIME that 5 frames, it will connect and a link combo is performed.
IT SHOULD BE NOTED THAT to perform this link, or ANY link, you must press the button of the next move within a VERY SMALL TIME FRAME. MASHING the next move WILL NOT result in a consistent way to hit a link combo.
Let’s measure how much time a player has in order to time this link right. Within the 5 frames that Ryu is at an advantage, Ryu can fit in a Cr.HP which has a start up of 4 frames. If we get the difference of the Advantage on Hit and the Startup of the 2nd move (5-4) and add 1, we get 2 Frames. This means that the player has 2 Frames or 2/60ths of a second to press this cr.HP in order for it to connect with Ryu’s cr.MP. This is the reason why mashing will not work consistently, because in most cases a player that is mashing will miss that window of time between his button presses. It is instead better and easier if you practice enough to get the general timing of a link. Because you have 2 frames to put in the 2nd move, players call this combo a “2-Frame Link”
Here’s an example of me mashing the buttons to attempt the link vs precise timing (notice the inputs on the left).
[link]
Doing Link combos consistently are usually what you’ll find yourself practicing in Street Fighter. Combos with harder links are usually the combos with more value, although there are some that are not worth learning depending on how hard they are to perform and what they offer to the player (more about what they offer to the player later).
Now let’s see some examples in which the ability to perform link combos is much better than only being able to do cancels.
Here Chun-Li has a very simple combo that features a one link (Between the last 2 Hits)
[link]
In this .gif you can see a comparison of damage when doing a simple cancel off HP into a special versus doing an entire link combo
[link]
Now let’s add FADCs
[link]
As you can see, Combo oppurtunities are vastly expanded and your options are vastly improved. Later I will explain how links into smaller damaging combos that are very VERY useful. For now, just know doing combos via links is possible and more highly variable than combos that rely solely on cancelling.
Plink, P-Link
Plinking, P-linking, or Priority Linking is a technique that will make linking easier… by one frame (1/60th of a second). Sounds useless, but you won’t notice how much easier it is to do links unless you have tried plinking yourself.
Plinking is performed by pressing the desired normal move and pressing a lesser prioritized normal right immediately after it. This is not to be confused by pressing one input right after the other at different intervals, both inputs are pressed nearly at the same time just one slightly before the other.
Street Fighter IV priotizes normals in this order:
HK > HP > MK > MP > LK > LP
Here’s my girlfriend (my hand) attempting to demonstrate plinking a Medium Punch into a Light Punch
[link]
(Sorry the gif is really tall, so scroll down)
I’m doing this using an Arcade Stick, however it is not impossible to do it on a pad. Then again this technique is not necessary to do link combos.
If done correctly the game should read that you pressed 3 inputs although you only pressed two.
Looks like this:

Here I plink the first Medium Punch which is unnecessary, you only need to plink the following hits.
When done correctly the input bar displays the desired normal to be inputted once along with a combined input of the plinked normal and desired normal. Remember that you can plink any normal that’s a lesser priority than the desired normal, Instead of Heavy Kick plinked with a Medium Kick I could have done Heavy Kick Plinked to a Light Kick or alternatively a Light Kick plinked with a Light Punch. There is only one button that Light Punch can be plinked with… and that is the Select button which is highly unviable to do.
I recommend learning this technique as it is necessary for other techniques done in this game. (This is one technique that is performed easier on stick rather than pad).
Learning how to Link is mandatory, Learning how to plink is not. Take your time and practice!
Counter Hit
A Counter Hit is a hit done upon a character that was in the start up of doing a move, but was hit out of it. If you get a counter hit, a message will appear on the side of the screen. Any move can counter hit another move with the right timing. A Counter Hit will grant that hit more damage, more stun (not to be confused with hit stun, the gauge that will induce stun state), and more hit stun. Because a counterhit will grant more hitstun, getting a counterhit allows for new combos possible only on counterhit. These are called Counterhit Specific combos.
Here’s Deputy Ken doing one off his stepkick
[link]
Also remember that a Level 1 Focus Attack will cause a crumple on counterhit!
[link]
Later I’ll explain how to attempt to induce a counterhit from an opponent.
Some Links to try:
Ryu: j.HK ~ cl.HP (Yes that’s a link! If the jump in doesn’t have enough block/hit stun it is possible for your opponent to retaliate if your jump-in didn’t hit hard enough)
Ryu: cr.LK xx cr.LP ~ cr.HP (This combo features a chain ending with a 2 Frame Link)
Ryu: cr.MP ~ cr.MP ~ cr.HK (This combo has 2 Links, 2 Frame between MP’s and 1 Frame for the HK, 1 Frame links are tough to do consistently, take your time)
Sakura: cr. LK xx cr.LP xx cr.LP ~ cr.MK (Easy hit confirm combo (explained later) using a chain and a 2 Frame link between the LP and MK)
Let’s do some links after special moves (Plinking can still be used)
Sakura: cl.HP xx Light Tatsu (or Shunpukyaku), cr.HP xx EX Tatsu (cr.HP is a tough 1 Frame link after the light tatsu)
Link Troubleshooting:
-Remember that linked moves are performed AFTER the first move has entirely recovered, Are you pressing the button after the move has recovered or before?
-“I think I’m doing it at the correct time, How do I narrow it down for it to be precise?”
If the move you want to link is not coming out = You’re pressing the button too early
If the move comes out, but is blocked/didn’t combo = You’re pressing it too late
Let’s Start Playing Street Fighter, Point me in the Right Way
Now let’s talk about methods on how you can apply your Normals, Special Moves, and Combos in order to control the match and win.
Neutral Game
The Neutral game is the part of the match where both players have no advantage of the other. The Neutral game and it’s significance in Street Fighter is paramount. We could honestly talk about every aspect of how complicated it is in Street Fighter, but it’ll take too long to explain. We’ll get more into the advanced tactics used in the Neutral Game later, but for now we should learn some basics.
Concepts:
Watching their Behavior
This is probably the number one concept that is the hardest to execute. Every player you verse will play in a different style that the last opponent. Sometimes one player will do alot of unsafe moves, while others will play extremely patiently and wait for you to make the mistakes. Reading what an opponent does and getting a handle on their behavior (what Combos they prefer, what their wake up tendencies are, when they like to fireball, in what scenarios do they like to jump) is possible to do within 2 rounds. Even Pro Players like Daigo Umehara or Tokido will not know another person’s actions exactly, yet they can make the correct guesses almost every single time. They don’t own the Millenium Eye like Pegasus does. How do they do it? Both players are VERY aware of what options their opponent has in every scenario they are put in. By learning a bit about each character’s abilities you too can narrow down what options your opponent has and have a better chance in predicting what your opponent will do. Character Bias is not a bad thing to have, it does help try to formulate what kind of player you will be playing against.
Ex:
“Hmm… Guile has good fireballs and good anti-airs I bet he likes to sit full screen shooting fireballs and wait for me to jump.”
“Ken has good normals that push him into my face, I bet he’ll try to be in my face as much as possible these rounds.”
“Oh no, I’m against a Shotokan, I better not jump too much, or else I’ll get Shoryukened.”
“Yun has really good dive kicks, I bet he’s going to jump alot. Let’s punch him out of the air.”
“Chun-Li has great ranged normals but weak anti-air options, I better see how this player will react to my jump-in attempts and my attempt to stick to a close range against her.”
Playing patiently will grant you the time to see and understand what your opponent does. Playing patiently is NOT to be confused with playing defensively. Playing patiently will help you react to what your opponent does, you can think about what they do while you are jumping in with an attack (You can multi-task, I believe in you). You want to start thinking about putting your options and executing them as pre-meditated thoughts. That way you can spend less time thinking about the basic combos you want to execute while still being conscious of how they will retaliate afterwards. BUT AT THE SAME TIME you want to be extremely aware that you yourself are not falling into a predictable pattern that can be read easily.
Understanding the concepts of the Neutral Game can never be learned from a guide such as this, but only really understood with experience. Getting the feeling that you need to randomly shoryuken the air in order to hit a limb that you think your opponent is going to throw out can only come by understanding their behavior.
Hitbox/Hurtbox
Now Let’s get less philosophical and get more technical. Every fighting game uses some variance of a Hitbox or Hurtbox in order to detect that a character is getting hit by another character. The rule is pretty simple. If a Hitbox intersects with a Hurtbox, the owner of the hurtbox is taking damage (goes into hitstun, getting comboed, hit, etc.). A Hitbox is made when a move reaches it’s active frames. Projectiles have their own separate hitbox and lack a hurtbox (You hurt a fireball). It is also important to know that when you do a move, in the space that your move will occupy, your HURTBOX will be extended FIRST and BEFORE the HITBOX of the move will. This is why you can whiff punish (Explained Later). If you want to hit someone, make sure that your move’s active frames are present in the opponent’s hurtbox.
Tools:
Pokes
Pokes are moves stuck out at a range in order to “hit-check” the opponent and control the space where your pokes will hit. Kinda like the .gif that I posted earlier demonstrating knowing the ranges of your normals (Sakura beating up Zangief). Poking your opponent with the knowledge of how far your normals will reach along with the cancelability of the normal you can securely zone and control where your opponent can or cannot be. Paired with anti-airs (huge section after this) you can corner an opponent.
A good normal to poke with are usually ones that have low start up and recovery, the trade off for moves that have these are usually that they lack in dealing damage. However with enough pokes the overall damage that you have dealt adds up and becomes very apparent on how much damage they’ve accumulated.
By poking the opponent with your long range normals you can “fish for counter hits.” If a normal move hits an opponent doing his move on start up, you’ll get a counterhit which adds more damage to your poke and may possibly lead into a counterhit combo. In this manner you can “Hit Check” your opponent to make sure he’s not doing a move and essentially controlling his behaviors.”
Here’s an example of a poke hit checking a dummy and then some more pokes to keep him blocking
[link]
And here’s Deputy Ken again to show the potential of a hard read (Sure prediction) of a poke into a combo.
[link]
There exists characters in Street Fighter that mainly get their damage off from pokes. These characters thrive in the neutral game and have a plethora of tools that make them good at Footises (explained later). They trade off the ability to do great combos into getting really good at getting singular hits off the opponent. Chun-Li, Vega, Rose, and Dhalsim are great examples of such characters.
Projectiles
Projectiles are both a tool to combo with and to assist in the neutral game. Projectiles are basically very long range pokes that are a threat independent from the character making the projectile itself.
Projectiles have durability in the form of how many hits they can produce. Normal Fireballs usually will have cause one hit and have a durability of 1. Most characters with fireballs can spend an EX bar making them two hits. Most of the “Evil” Shotokans have another special move that shoots a projectile that can be 1 hit or as many as 3 hits without using an EX bar.
If you decide to play a character with a fireball as a special move and are against another character that can also shoot projectiles you will find yourself shooting projectiles at each other, and knowing the durability of your fireballs will become an important factor whether or not if you can win in the Fireball War.
Heres a .gif showing a Fireball War with the use of EX meter and Shakunetsu
[link]
In combination of your pokes and projectiles you can effectively make zones on screen where you can apply pressure on. Playing Ryu you can section the screen on how you can apply pressure in different areas the opponent may occupy.
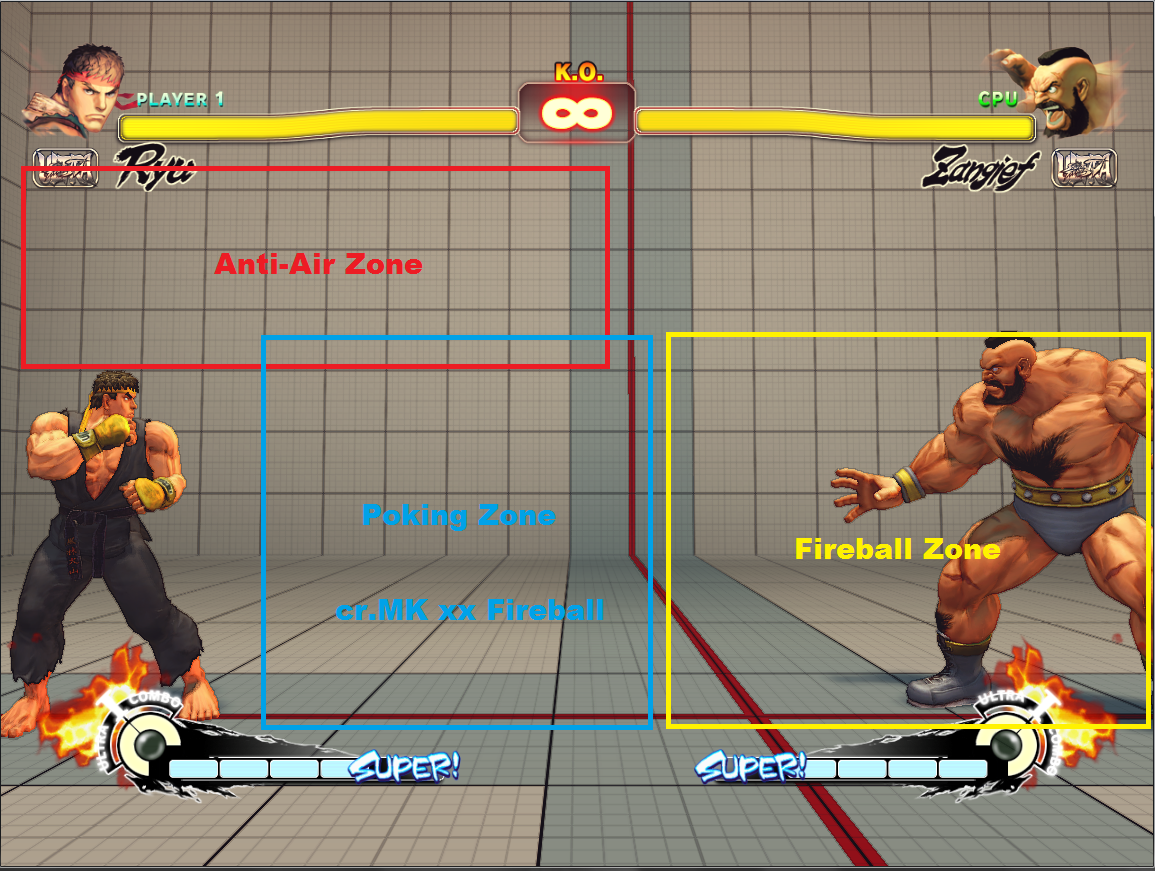
If your opponent is in the zone where they are close enough to be swept, you will want to throw fireballs less predictably as they are now in the range to punish a fireball by jumping in at you. Be aware that there are some characters that can nullify or pass through projectiles without using a projectile of their own.
[link]
Later in this guide we’ll talk about how to use Fireballs Offensively.
Anti-Airs
Anti-Air <—NUMBER ONE FREE DAMAGE SOURCE OF THIS ENTIRE GAME LEARN IT
This Lesson is so important that I wanted to give it a separate section, after you are done reading this you should go back to reading the rest about Neutral Game.
With the little introduction to Hitboxes and Hurtboxes I can show you how anti-airs work properly. When you see an opponent jump, sometimes you’re not ready for it and don’t have the time to put in a DP motion. In this case you want to punish their jump with a Anti-Air normal. It’s pretty important to note that doing this anti-air is something you do on reaction, you had no prior guess that your opponent would jump. Any normal can technically be used as an anti-air, however there are some moves that have the right angle, amount of active frames, or positioning to be used effectively as an anti air.
Let’s look at a moves that can be used as a really neat anti-air
Ryu’s cr.HP and st.HK

If you notice, both of these moves have their hitboxes pointed upwards and have their hitboxes protruding away from Ryu’s hurtbox(body) making these have the perfect angle for different jump in attacks. Cr.HP if they jump right on top of you and st.HK if they want to jump right in front of you. Both moves do great damage so that’s a plus. To successfully perform these moves as anti airs, you must make sure that the move you use to anti-air MUST REACH IT’S ACTIVE FRAMES by the time your opponent occupies that space in the air. You want to put a hitbox in a location they are going to occupy. Both of these moves have a rather SLOW/LONG startup, so it is necessary to press the buttons for these moves early.
Here’s a .gif of both moves being used as anti-airs:
[link]
-Notice that the opponent will reset in the air (Recover in the air) since these normals do not put the opponent in a juggle state. This puts the opponent back into the same situation as he started before the jump making him start all over again on how they will try to get in on you.
-In this .gif notice the timing when Ryu did his cr.HP. Ryu already put his fist out, but Oni ran into his fist and got hit. This is a perfect representation of a good anti-air having a good amount of active frames. You can hit the button a little too early and still defend the space above your head for a longer period of time.
Let’s now look at Sakura’s anti-air which also happens to be cr.HP

Sakura’s Anti-Air cr.HP is another great example of an anti-air as she makes her hurtbox VERY low to the ground and has a rather large hitbox that is pointed straight up and placed outwards, away from the rest of her body. This is an example of a great anti-air that has puts the user in a good position to protect herself from a jump-in
Here’s a .gif example:
[link]
Now let’s look at one more example of a rather weird anti-air normal…
[link]
Although the move itself doesn’t really look like it has the right angle or body position to protect herself, The hitbox of this move is incredibly good… for almost anything Makoto needs. It is her one button wonder. Let’s actually see the hitbox:

It’s got a crapton of Active Frames, Starts Up relatively fast, has no Hurtbox where her Hitbox is. When someone asks you “If you could do a move in Street Fighter in real life, what would it be?” you better friggin’ say “I wish I could do Makoto’s Standing Medium Punch.” BECAUSE IT’S REALLY THAT GOOD. IT DOES DAMAGE, CAN COMBO INTO ITSELF, ANTI-AIR, MAKE FRAME TRAPS, HITS STANDING/CROUCHING/JUMPING/UPSIDE DOWN/PARALLEL UNIVERSE IT CAN DO EVERYTHING.
Anyway, this example is to show you that even though it doesn’t look like a good anti-air, sometime’s checking the actual hitbox of the move itself/testing it out will help you make a good decision whether or not it can be used.
Reading a Jump:
Invincible Anti-Airs
If you do predict a jump in and you’re ready for it, doing a special move as an anti-air is a better option as it usually grants more damage AND builds meter. The special moves you want to anti-air with are usually the ones with the most invincibility. Most Shotokans’ Medium Shoryuken grants the most invincibility and are recommended to be used as an anti-air.
Here’s a .gif of it:
[link]
As you can see, the opposing Ryu’s foot is literally already in Ryu, but thanks to the Medium Punch DP’s invincibility, Player one’s upper body cannot be harmed while scoring higher damage.
On top of special moves, there are ultra moves that are dedicated to be anti-airs.
Ryu’s Ultra 2:
[link]
Decapre’s Ultra 2, Anti-Air motion:
[link]
Air-to-Air:
I want you to note that there is a starting up, active, and recovery time for jumping attacks just like any other normal in the game. In order to hit a grounded target with a jumping attack you need to press the button LATE into the jump (around the end of a jump arc). If you press the button too early, the jumping attack will recover in the air and you will not hit the grounded opponent as your move’s active frames are already over.
Here’s a .gif of what I’m talking about
[link]
If you predict that an opponent will jump with an attack, to punish him you can jump and do your jumping move early to hit him out of the air. You will NOT have to worry about his jumping move hitting you out of the air as he will want to do his move late into the jump in order to hit you who should be on the ground.
[link]
Some characters have an air grab and can score even more damage.
[link]
Juggle Moves
Certain characters have moves that induce a juggle state when connected. These moves are usually slow to start and can’t be used as a reactionary anti-air. Normally these moves when connected to a grounded opponent will not cause the juggle state, but in the air it allows for follow ups.
Here’s Sagat’s F+HK command normal
[link]
Ryu’s Light DP induces a limited juggle state, which can be followed by 1 hit of his Medium DP
[link]
ChunLi’s target combo that is performed in the air induces a juggle state that can be followed up by her “tippy tap toes”
[link]
Prevention:
Another way to “Anti-Air” is to prevent the opponent from jumping entirely. Normals that aims for the head are good normals to use to prevent someone from leaving the ground. (Ex: ChunLi st.HK, Sagat st.HK, Ryu far st.HK). Another good way to prevent someone from jumping is by implanting the fear of getting hit while in the air. Repeatedly connecting successful anti-airs will teach an opponent not to jump as well as having a specific anti-air special in your arsenal prevents people from jumping (Ex: Rose Soul Throw, Hugo BackBreaker, Zangief Ultra2).
Anti-Airs Part 2
Theres a word limit to these sections so I apologize for the multiple parts/sections
Low Profiling
A very uncommon but viable tactic to anti-air (more of a Jump-In punish) is to whiff a specific normal to position your character very low to the ground, to a point where a jump-in attempt will whiff. For characters that lack strong anti-air normals and specials this is a very viable and is the preferred option to anti-air with.
Vega is one such character that lacks an invincible uppercut (Scarlet Terror lacks invincibility in all versions) and has no normals that aim above his head (cr.HP is the best he can do).
[link]
Trip Guard
Trip Guard is the ability to block after jumping. Every jump has a recovery time when they land (4 Frames). However the last two frames can be canceled into moves, BUT the first two frames are what Trip Guard is relevant to. If you commit to an attack or any action in the air after you jump you will lose the ability to block on the first two frames of the landing recovery. If you do an empty jump (A jump with no actions following in the air, If you just jumped and did nothing) you will still have the ability to block on those first frames. If you see a jump in, the option to anti-air by hitting them as they recover from the jump is possible. This tactic is once again more used on the characters that lack a reliable anti-air in their arsenal.
Guy’s most reliable anti-air is to do his cr.MK which both low profiles jump in attacks and can expose a trip guard.
[link]
Anti-Airs are a HUGE HUGE HUGE source of free damage please please please don’t let someone get away with jumping in a neutral situation. A Jump in is such a risky thing to commit to, don’t let anyone get away with it for free. Just learning how to anti-air consistently will get you by as a beginner into the more intermediate ideas of this game.
Let’s Start Playing Street Fighter Part Two
The Defense
In general, learning how to block and when to block does wonders for your life bar. Some characters have the tools to be played defensively, while some do not and have a hard time pushing away an opponent’s offense. A Good Defense is a Good Offense.
Here are some Defensive Options that everyone can do, some characters do it better than others:
Punishing
Very Easy way to do damage. If you know the actions of your opponent is unsafe, hit them for it! Make them learn that they are not allowed to do that for free. Not in your house. I already touched on this subject earlier when talking about frame data, but it is up to you, the player, to train yourself to react to it and doing the optimal punish that you may do against that move (Think about those examples comparing damages from link combos to cancelling combos). Sometimes you can perform an ultra combo, taking half their life, while other times you might just have to settle with a normal cancelled into a special move, WHICH IS OKAY as long as you are showing that you will not let your opponent get away with unsafe moves.
Knowing that you can punish a move and practicing punishing the move in training mode will not prepare you enough in a real match. In a real match ACTIVELY THINKING about that very punish oppurtunity will truly prepare you for that oppurtunity. It’s hard to do at first but eventually it will be subconscious.
Anti-Air
The Damage is SO FREE! Use those Active frames/Invincibility!
BackDashing
Every character’s Back Dash (done by double tapping back) have some frames of invincibility, these frames vary depending on the character (everyone has different animations). Not only can you use this period of invincibility to get out of moves, it will also get you out of range of their normals.
Invuln Example:
[link]
Distance Example:
[link]
The con of backdashing on wake up or out of pressure is that you will give up space on the screen. Too many backdashes will put you in a corner in which you will be trapped in. Or If you are too predictable with it they can chase you down for it. (Option Selects will go into this a bit)
[link]
Wake Up Reversal
Another option that is risky to do is perform a reversal with a special move. If successful you’ll score some damage and get your opponent off you, however if the opponent guesses that you will perform one, all he needs to do is block it and get a free punish. Reserve this wake up option for opponents who have a very predictable behavior.
Here’s an example using Decapre’s Psycho Sting:
[link]
Watch for the Reversal Sign if you did it properly. IF THE REVERSAL MESSAGE DOES NOT COME OUT EVEN AFTER YOU ATTEMPTED TO PERFORM THE REVERSAL IT MEANS YOU DID NOT PERFORM IT CORRECTLY AS YOU THOUGHT YOU DID. However if the message does come out and you still get hit out of it means that the move you woke up with did not have enough invincibility or had too slow of a startup time to beat their move.
Let’s Start Playing Street Fighter Part Three
The Offense
Finally now let’s talk about Offense and the general strategies on how to open people up so you can actually apply pressure and force a situation from your opponent.
Offensive Movements
First let’s talk about some simple actions that literally screams out that you are going to attempt to attack your opponent IN THE NEUTRAL GAME.
Jumping:
This is probably the most obvious one, especially if they’re jumping far away from you. Jumping is a very big risk and a very comitted action that a person takes. Once you jump you cannot block. You are literally betting with your hp just for a CHANCE that the thing you do after hits your opponent. In general this is a VERY risky option to do in the neutral game, BUT WHEN YOU GAIN MOMENTUM jumping becomes part of a mix up and can be very safe and a very viable option to attack (We’ll get into this concept later).
Forward Dashing
Doing a forward dash is pretty obvious action as well, In general most characters want to move at a semi-close range to their opponent so they are at the right distance to start an offensive or poke them. Forward dashing also gives up your ability to block and puts you at risk of getting hit. In the neutral game it can be seen as an offensive action.
Forward Walking
Forward walking is probably the most easily confused hint in what a player is thinking. Forward walking for a long time is definitely obvious, but in order to play footsies backward walking and forward walking is essential in order to stay in and out of range (we’ll talk about it later). For now just note that forward walking for pretty long distances can mean that someone is scheming something.
Walking with Fireball
This method is also the most obvious, if a character is walking WITH a projectile they mean to use the projectile as a double threat. Don’t block and get hit by the fireball followed by their hits, jump over the fireball and get anti-aired, or just block and guess their mix up correctly. Here’s an example of Ryu using his fireball as a double threat, characters with naturally slow fireball and low recovery don’t need to spend meter (Guile, ChunLi).
[link]
Hit-Confirms -BIG CONCEPT/IDEA ALERT-
Hit-Confirms are small combos that lead into okay damage, an advantageous situation when hit, and most importantly the ability to CHECK/CONFIRM if you are actually hitting the person. Hit confirm combos are a godsend in fighting games. With these combos you can prevent yourself from doing an unsafe move AND potentially mix-up your opponent for a better offensive option (we’ll get into this in a bit). Most of the time these combos start with light attacks and confirm off links into special moves that can keep your character safe or deal damage.
Let’s look at two hit confirm combos from Sakura and Ryu.
[link]
In this .gif you can see a small link combo that achieves good damage for Sakura, on her 2nd attempt to start the combo, she has enough hits and time in the combo to realize that the opponent is blocking her moves. Using this time she decides that using a Shouoken would result in her getting punished and stops completing the combo which results in putting her back at a safe distance and back into the neutral game again at a health advantage.
[link]
Here Ryu attempts a very small hit confirm combo with less confirming hits than Sakura’s. Ryu connects his combo which grants him carrying his opponent to a corner limiting Cammy’s movement options. Ryu’s 2nd attempt is blocked by Cammy, Off the first two hits Ryu realizes that his hits are being blocked in which he switches his combo into a link of cr.MP and cr.MK canceled into a fireball. Resulting in a little chip damage and Ryu being put in a safe controlled distance from a Cammy in the corner. With enough practice in hit-confirming you can train yourself to react faster whether or not the hit confirm combo connects or not.
Practicing the links in these hit confirm combos along with the ability to react to getting a hit or not is almost essential to learn. In order to practice this effectively, Go into Training Mode and set the dummy to have a random guard and practice confirming your combo into sizeable damage or cancelling it into a safe special move that puts you in a favorable position.
Well wait a minute, what about all those huge combos off links and what not 2 or 3 sections ago?
Those high damaging combos are not as quick (Remember HP is pretty slow) and are not as hit confirmable or don’t lead to as favorable positions if they are blocked. Try to reserve those combos to punishing an unsafe action. Punishing an unsafe option is okay with a Hit Confirm combo, especially if you’re not entirely sure if you can punish it in your current situation (“He whiffed a Shoryuken pretty far away from me, Am I going to reach him in time to punish him?”), but doing the maximum damage is the goal to aim for when punishing.
Block-String
A block string is a set of attacks that keep a defender blocking. You will usually perform this when you realize that your opponent is blocking your hit confirm combo. A player should try to have a couple variations of their blockstrings as getting too predictable in behavior is never a good thing that will get you punished. Be very aware whether or not your blockstring is a true block string or not. A true block string are a set of moves that will keep an opponent in block stun between each move, just like how a combo will keep an opponent in hit stun between each move.
Just because it combos doesn’t mean it’ll keep them in the same blockstun!
[link]
Mix-Ups
Mix-Up is a strategy that a player employs in order to score damage on their opponent by exploiting holes in their defenses by using unpredictable/ambiguous attacks that will keep their opponents guessing on how they should block your offense.
High or Low:
One of the most basic mixups in the game. Do you block high? or Do you block Low? Seeing a jump-in attack and blocking high for it is easy, but against characters that have standing overheads the game of guessing becomes trickier.
Here’s Sakura being predictable when suddenly a change in her blockstring scores her a hit.
[link]
Here’s Ken being extra tricky with his fake out command normal
[link]
Throwing in high low mix ups into your blockstrings will increase the variety of your offense.
Tick Throws:
Tick throws are a strategy employed commonly in order to throw the opponent after a short block string. Most common tick throws involve 2 or 1 light attacks, if they are blocked attempt to throw, if not continue to your hit confirm combo. Tick throws can catch you off guard pretty easily but there is a counter strategy to this setup in order to tech these surprise throws. They are still a good offensive way to get damage.
In this .gif I throw in a tick throw in order to mix up my offense
In a real match the defender would want to throw out some pokes between the gaps of the offense in order to defend himself so don’t try to attempt a walk up too many times in succession (remember this is just an example/demonstration of a tick throw).
[link]
An important thing to note: You cannot grab someone who is still in block stun OR hit stun. This is the reason light attacks are preferable as they generate low amounts of hit stun or block stun making the throw able to connect faster.
Let’s Start Playing Street Fighter Part Four.
The Offense cont.
Cross Ups
Remember that in order to block you must hold back, away from where your character is facing. Cross up attacks are attacks that attempt to exploit this blocking mechanic by switching sides of the defender in order to make the defender block incorrectly (hold the direction the wrong way) and make the defender vulnerable to attacks.
-Jump Cross Ups
Probably the easiest way to perform a cross up. Many characters have a jumping move that have their hitbox extended a little lower than the other jumping moves, making them the best jumping moves to cross-up with. Some characters have multiple jumping moves that can cross-up, but can only cross-up with a VERY specific distance (All cross-ups ,even the easy ones, requires a minimum distance away from the victim in order to cross-up, but in some cases the hitbox of the move is so small that they need a specific distance in order to cross-up).
Here’s an example of a general cross up performed multiple times in order to show that there is a range where you can jump and cross up with an attack.
[link]
Here’s an example of a character with multiple cross up moves, but showing that some require very specific distances.
[link]
-Ambiguous Cross Ups
Sometimes detecting if the jump-in will cross up or not can be very tricky, especially when the distance makes it even harder for them to see. An Ambiguous Cross Up is basically just a normal cross-up, but with the certain positioning or situation that makes that cross-up LOOK like it’s going to hit the front of a character, but it actually crosses up and switches sides.
Here’s Akuma’s famous Ambiguous jump-ins in the corner:
[link]
The start of the jump looks the same while the divekick hits at different locations, leaving it up to a complete guess on how to block.
Another thing to note, in order to get a grounded combo to connect with your cross up attack you must make sure that your cross up attack has enough hit stun that it may lead into a combo. Unfortunately for some characters, their cross up attacks are light attacks and most of the time don’t have enough hit stun for them to go into a combo
Here’s an example of such a character
[link]
Huh? how did that 2nd one connect? (Short Answer: Ryu was crouching) We’ll answer that question in the next section.
-Dive kicks
Dive kicks are a command normal that only a couple characters have as part of their offensive. The most dangerous part about a dive kick is that they alter the trajectory of your jump making the character bait a mistimed anti-air and still hit them. The other bonus of a divekick is that most are so fast they are almost too hard to ant-air on reaction. Divekicks are NOT overhead attacks and can be blocked crouching.
[link]
[link]
Another thing to note is that divekicks have the trade off of having good utility, but low hit stun.
Because of this low hit stun Yun was able to grab almost immediately after his divekick.
But at the same time it makes it harder to combo into, which brings us back to the question in the .gif above with Poison’s jump in.
[link]
Let’s look at a picture I made in order to explain this.

Basically, In order for a Divekick to have + Frames in hit stun OR block stun the Divekick needs to be aimed at their knees (Break their shins in!) so that the victim will still be in hitstun by the time you land and recover from your Divekick. The Lower the better. On tall characters like Sagat, if you aim it too high you can even be punished on block for Divekicking too high.
Back at Poison’s Cross up .gif, since Ryu was crouching in the 2nd combo, Poison was low enough in the air in order to land and connect a HP from the small hit stun from her j.LK.
-Empty Jump Low
Empty Jump is referred to the action of jumping and not performing any action in the air. Most people empty jump to fake an overhead attack from the jump and instead immediately going for a low attack upon landing. Sounds pretty easy to block on paper, but in the heat of the match it’s hard to see coming, especially if they’ve been jump happy. Although theres not much to explain about this mix-up it’s definitely a viable one that should not be forgotten.
Here’s a basic example comparing a Cross Up and an Empty jump Low:
[link]
-Command Movement
Some characters have special moves that are related to a special movement that a character can do. Super Jump is one such move that allows the character (Only Ibuki and C.Viper) to jump higher than normal. These moves are called Command Movement, movement that requires a command input. With Mix-Ups Super Jumps along with other special movements can help you confuse your opponents. There are better uses for Super Jump that I will talk about later.
You won’t find yourself using this that much, but Super Jump allows you to cross up at further distances.
[link]
Abel and Ibuki are characters that have special moves that allow them to move through the opponent making their block cross up. Here’s Ibuki’s in action:
[link]
This .gif shows an example of a reset. A reset is a combo dropped on purpose for the intent of hitting another combo or throw. Not that many characters in Street Fighter feature consistent resets, but in many other Fighting Games (mostly Anime Fighters/Air Dash Fighters) mostly orient the gameplay upon resetting your opponent until death.
-Corpse Hopping
A Corpse Hop is a side switch you a character “hops” moves over their fallen opponent. Very uncommon mix-up, but more than often not used as a mix-up but more of a side switch in order to make an opponent get closer to a corner.
Here’s a useful one for Makoto done with her fake Forward Heavy Kick (You hold the HK in order to fake it)
[link]
Hard Knockdown
If we want to limit an opponent’s options to make him easier to predict, getting a Hard Knockdown puts your opponent in a situation with the least amount of options. Hard Knockdown, unlike a soft knockdown (which are caused by special moves, or anything that can induce a juggle state), are moves that puts the opponent’s character on their back without the option of doing a quick getup. What makes an opponent getting up from a hard knockdown predictable is the fact that they will always wake up at 2 set amount of times (2 As of Ultra with the introduction of Delayed Wakeup). They can either get up normally or delay their wake up by hitting buttons as their character is on their backs.
On a NORMAL Wake Up, the defender can either do 3 things.
-Get Up and Block.
-Reversal Special Move
-Wake Up Grab
Doing a Wake Up Reversal is risky as all special moves are punishable if the aggressor puts himself at a close distance.
Wake Up Grab can be avoided with the use of special tech (We’ll cover later) and also (although very small) have a start up time which can be beaten out (but not counterhitted).
Leaving the opponent at the most safest option of just plain blocking.
On a DELAYED Wake Up, the defender can only block as they get up. The use of a delayed wake-up is a means in order to mess up the aggressor’s setup/timing of their offense (which we’ll get into later).
With what we just learned about mix-ups an opponent just blocking on their wake-up allows the aggressor the chance of putting the defender in a guessing game on which side they should block.
Let’s Start Playing Street Fighter Part 5. Jesus Christ Part 5?
Punishing Defensive Habits
Wake Up Reversals, Blocking Too Much, Shooting too many fireballs
Sometimes you get you opponent on a knockdown via Sweep, Grab, or Special Move, but they won’t keep still and keep Wake Up Shoryukening me out of my own offense. What do I do?
This is a case that many people run into, especially at the lower skill levels of the game. If you see this behavior on your opponent, IT IS UP TO YOU to teach them that their RISKY tactics will not work on you. An excellent way to teach this is by PUNISHING their wake up reversals. Remember that the tactic of Wake Up Reversal is INCREDIBLY RISKY. In order to let them know that you have a read on them, walking up to your opponent while he’s on his back and just SIMPLY Blocking on his wake-up and Punishing his Reversal is a viable strategy. After a while of doing this he’ll have to stop hitting buttons on his wake up and is forced to take your mix-ups.
[link]
Okay Now he’s blocking too much and defending against my mix-ups successfully, what do I do now? This is what I was talking about earlier about Grabs being essential to fighting games. This is now the time to grab your opponent at unsuspecting moments. If your opponent is getting grabbed too many times he’ll be forced to do a risky option in order to stop you, and if you see it coming you can block that as well and continue your offense.
[link]
Okay well actually I can’t even get in close because my opponent is playing Ryu and is shooting alot of plasma in my face what do I do now?
If you’re a projectile character you can fight back with your own projectiles, If you play a character that doesn’t have a projectile move, you’re going to have to inch your way into the distance where you can punish fireballs upon prediction.
[link]
WHAT IT BOILS DOWN TO:
On the Neutral Game:
-You are looking Ways to Start an Offensive into Mix-Ups
-You are Poking and Controlling Spaces with your normals and Special moves
-Anti-Airing Jump-Ins
-Forcing an Opponent on a Offensive against your strong Zoning Defense
-Punishing Unsafe Moves
On the Offense:
-Mix Up your Opponent
-Grabbing Your Opponent
-Setting Up an Offensive (Vortex/Oki explained later)
-Punishing Unsafe Moves
On the Defense:
-Looking for places to retaliate
-Crouch Teching Grabs
-Playing Patiently and waiting your turn to attack after their block strings
-Punishing Unsafe Moves
Finally we come to a conclusion from the Very Basics of Street Fighter and the Street Fighter basic mentality, In the next section I’ll cover some more intermediate concepts and strategies. If theres anything that you HAVE as a beginner, I suggest right now that you go over and learn only what I have to say about Crouch Teching, other than that you should just leave it alone until you think you’re ready to learn some more.
Intermediate Strategy and Concepts.
Most of what I’m going to talk about in these following sections don’t really flow into each other or connect with each other in ideas (some of them are relatable between ideas), but they are concepts that you should be aware of. Let’s start with an easy idea.
Importance of the Corner:
Earlier in this guide I have just mentioned that putting your opponents in the corner = good, but now I’ll try to explain why specifically it is good.
1. It Limit’s your opponent’s movement.
Straight up the if your back is against the wall, you can only jump (forward/neutral) or walk/dash forward. With the opponent having limited movement, they become more susceptible to your pokes and offensives potentially baiting out more unsafe options to punish.
2. Easier to get more ambiguous mix-ups.
Using Ibuki’s pass through becomes alot harder to see, as well as telling if a jump-in will cross up or not becomes less obvious. Empty Jump Low attacks also become less obvious. In the corner, your chances of getting a hit become greater.
3. Corner Specific Combos
You can unlock more damage in your combos if the corner prevents them from moving too far
[link]
For these reasons, a lot of Hit-Confirm combos are Corner Carry combos, Combos that hit the opponent towards the corner.
[link]
Crouch Teching
Crouch teching is an Option Select method used to tech an opponent’s grab attempt. This method exploits the leniancy of how Street Fighter reads a player’s inputs. Teching a Grab/Grabbing is done by pressing light kick and light punch while standing. However if done crouching, input priority will kick in since you cannot grab while crouching which will result in your character doing a cr.LK. If anyone attempts to grab you while doing this, the light kick will not come out and you will tech their grab attempt instead.
With this technique you may start a hit confirm combo on an opponent’s wakeup without worrying about getting grabbed (Ex: Ryu: Crouch Tech, cr.LP ~ cr.HP xx H Tatsu)
You can also defend yourself from tick throws by holding down back (Crouch and Block) and pressing Crouch Tech as you expect the next part of the combo as the blockstun will disallow your cr.LK to come out, keeping your character in a blocking stance against their next moves, until they attempt to grab you which then the Crouch Tech will tech out of.
Notice the Inputs being put in relative to when Ryu gets hit.
[link]
Option Select
Option Select is a method meant to be a “Failsafe” for whatever option your opponent chooses to do on their wakeup. These methods usually abuse how lenient/the behavior of how Street Fighter reads a player’s inputs. Crouch Teching is an example of an option select where the player can opt to attack or tech a grab. Many option selects are still being developed today but I’ll explain two more OS’s
BackDash OS
This OS technique is mean to be used on their wake up and to hit opponents who try to backdash on their wakeup. This technique is once again done by exploiting how Street Fighter reads inputs and prioritizes some normals over others. In this tech the player will either hit confirm two crouching light kicks on their wake up, or get swept by a crouching heavy kick. This is done by making your first two lightkicks different buttons. The first cr.LK is a crouch tech just in case they wake up grab, while the 2nd will be a combined input of cr.LK and cr.HK. To perform this tech you must press both combinations in quick succession. If the first cr.LK connects (block or hit), the game will not read the HK part as it cannot chain into the first cr.LK giving you another cr.LK to hit confirm. If the opponent backdashes, then the first cr.LK will whiff. Using the quick recovery of the light move, the 2nd combination of buttons will prioritize the HK part of the input and a sweep will come out, hitting the backdashing opponent.
Whiff OS
In this OS the technique exploits the fact that a player cannot special cancel a whiffed normal. By inputting the command of a special move right after pressing the button for your poke. Assuming that your poke is a cancellable normal you can connect the attack and connect it to a special move for a combo IF the move has hit something. This tech is most useful during footsie and neutral game, doing this too close to your opponent to the point that he can block your poke will result in you doing an unsafe move with the opponent blocking it. This tech is almost purely used for whiff punishing (explained in this section).
If you notice the inputs in this .gif you can see Yun pressing Medium Punches and QCF LP as if he was trying to cancel it. Because the MP hits nothing, a special move doesn’t come out. But as soon as Yun correctly times a hit off Sakura’s st.HK the MP is cancelled into his lunge punch.
[link]
There are many other OS’s that can even perform an Ultra on someone’s backdashes, researching and using them are up to you to find out.
Kara Cancel
Kara-Canceling is a technique that cancel’s the very first frame of one move, into another move. The Literal translation of the technique means Empty-Cancelling. Most Kara-Cancels are related in moving the character a certain distance and performing a new action at the new location. Most characters have the ability to Kara-Cancel, but are not worth doing because of how hard the execution is vs. the payoff of doing it. Some notable Kara-Cancels that are used often are on Ken, Vega, and Sagat.
Ken and Vega both have Kara-Grabs that give their grabs a VERY long range. Since I don’t know Vega’s that well I will explain Ken’s Kara Grab/Throw.
Ken cancels the first frame of his Command Normal the StepKick (Forward+MK) into a grab. The Step Kick itself moves Ken forward a set distance, and with the new distance he can grab at a much further range from his original position. Doing a Kara Throw will make it look like Ken is teleporting (Literally). To perform Ken’s Kara Throw you must plink his step kick with a throw input
Here’s a .gif of Ken Teleporting across the screen.
[link]
Sagat uses a Kara-cancel from his F+LK into a Tiger Knee to traverse the screen.
[link]
He can also anti-air from far distances when the opponent attempts to jump over his fireball zoning game.
[link]
Intermediate Strategy and Concepts Part Two.
Footsies/Whiff Punishing
Footsies is the name of the game you play when you play Street Fighter in the Neutral Game. This is such an important concept that I will leave it to the better players to explain who can explain it a million times better than I can (I’m still learning this game too yaknow).
Here’s Juicebox explaining what Footsies is exactly (it’s a 48min video)
I’ll try to boil down what Juicebox says in his video:
Footsies is the neutral game where each player attempts to gain an advantageous position in one of three ways.
Whiff Punishing [link]
The action of hitting your opponent’s poke (their extended limb) AFTER their move has come out. Remember that .gif above with Yun doing a whiff tech? That is whiff punishment. Whiff Punishment is a PREDICTION that your opponent will throw out a poke and that you are guessing a correctly timed normal that you throw out in order to whatever limb the opponent has extended to poke you with. This action happens too fast for it to be a reaction (Try reacting to a Chun-Li’s st.MP, you cant.) therefore you must guess that this will happen. In order to whiff punish you must stand outside the range of an opponent’s poke in order to make it whiff and for you to hit it. This is why during footsies you why you will see pro players constantly dance into the range of where their normals will poke the opponent, and out of the range of their opponent’s poke in order to whiff punish it (which is also why you see alot of random light punches being thrown out). Realize that in order to whiff punish you must be standing at a very precise distance in order to whiff punish.
Fishing for a Counterhit [link]
Also a PREDICTION that a player will poke you, but instead of hitting the limb after it comes out, you can hit the player himself with a move BEFORE it comes out. If you’re certain that your opponent will throw at x normal move at y time, you can press a button early and hit him before he hits you
Again, watching the video will do a much better job of explaining footsies that I can ever do. If you want to learn it, I suggest you watch it.
Safe Jump
A Safe Jump is a timed jump used on an opponent’s wake up that is timed so precisely that a jump-in attempt will attack on the last active frame of the jump-in and on the first frame of the opponent’s wake up. If timed correctly, you will be able to attempt an offensive with the jump-in yet, be in time to land on the ground an be able to block a wake up reversal attempt.
To be able to perform this on any given knockdown one would need GODLIKE timing, so instead most players perform a safe jump off of a set movement that involves a knock down (Like using the grab animation, a whiffed normal, dashes to time it).
Here’s an example of a 3-Frame Safe Jump Set Up, Basically this set up will protect you against reversals that have a start-up of 3 frames (ex: Shoryuken).
Make Sure you watch all of the .gif!
[link]
Meaty Hits
A Meaty Hit is an attack or hit that is timed to hit an opponent at the move’s last active frames in order to result in a longer hit stun, which can result in one recovering EARLIER from the same amount of hitstun. Let’s look at a little diagram (Start from the Bottom Left)

[link]
Notice that Ryu’s cr.MP has beat the start up of the cr.LK which grants him a Counter Hit enabling him to do his link easier. The Use of meaty hits is a tech that can be purposed to beat out Crouch Teching.
Staggered Block String
A Staggered Block String is a blockstring that are done at broken intervals in order to set up a Frame Trap (explained next), or fish for a counter hit when the defender thinks he can throw out a move in order to retaliate from defending.
[link]
Frame Traps
Frame Trap is a method used to bait out a defender’s counter attack when he sees a break in your block string, but get’s hit on the start up of his move. The math behind a frame trap involves that a blocked attack will cause an x amount of blockstun, after recovering from the move there will be a brief window in which the attacker invites the defender to retaliate, until he is hit on the start up of the attacker’s 2nd strike. By causing this brief window of time in frames available, in which a defender can get caught on start up, allows the attacker a setup that can reliably produce a counterhit. Move’s used to setup a frame trap are usually one’s that are Frame Advantageous on block, and followed up by moves that have a quick startup.
Here’s an example of a Chun-Li Frame Trap (Watch the whole thing!)
[link]
Most Link’s can be used as excellent frame traps, however the more subtle Frame Traps give the defender a larger amount of time to act before he his counterhit.
Vortex/Okizeme
Okizeme or “Oki” for short is a Japanese word that roughly translates to wake-up game. The word refers to the player’s mix-up strategy used upon their opponent’s wake up.
The Vortex is one Okizeme Strategy that revolves on a variable setup ending with a knockdown and back into the same setup making the defender guess what attack pattern the opponent will use in order to mix up his defense. Vortex Characters rely on a specific set-up on a hard knockdown in order to keep their defender guessing which side/how they are going to strike.
Here’s an example of (Arguably) the strongest Vortex character using his Command Jump to start his Vortex on a hard knockdown.
[link]
Although not shown in this video, Vortex setups are usually safe jumps as well, making reversal specials not exactly a good idea.
There are many other Vortex characters in this game that do not always relate to jumping in the air for a Dive Kick
But as of Ultra Street Fighter IV’s addition of Delayed Wake Up, Defenders are presented a new option of delaying their wake up in order to mess up the timing of the Vortex Strategy. However as Vortex Characters, there are still many methods in order to counter a defender’s delayed wakeup attempts, basically it’s just another guess they’ll have to make in order to continue their Vortex.
Intermediate Strategy and Concepts Part Three.
Pianoing
A technique used by players in order to consistently produce a mashing special move, also called hands or legs. Characters that possess these special moves are, Chun-Li Lightning Legs(Hyakuretsukyaku), E.Honda 100 Hand Slap, Decapre Rapid Dagger, Gen Hyakurenko. In order to execute a mashing special move, Street Fighter requires 5 inputs of Punches (for hands) or 5 inputs of Kicks (for legs). Any 5 punches or kicks can be used, but the strength of the 5th input is used to determine the strength of the special move itself. The different strengths of the special move also determine the damage and pushback caused. In most cases, a character would want to perform the the heaviest version of the special move in order to cause the most damage. However the problem of executing the move arises in the inconsistency of mashing the one button in order for it to come out, there fore the pianoing technique is used. There are MULTIPLE different ways for a character to do this consistently, but the goal of the technique is to specifically cancel a certain normal into a specific version of the special move
Let’s look at Chun-Li’s and E.Honda’s techniques
In this example Chun-Li will use two different techniques for the executing Lightning legs for two different purposes
1. Comboing
[link]
[link]
2. Building Meter
[link]
E.Honda wants to cancel his cr.LP into Heavy 100 Hands Slap
[link]
Fuzzy Guard/Instant Overhead
The Fuzzy Guard refers to the exploiting the the switch between the shape of a character’s hurtbox going from STANDING to CROUCHING. When your character crouches, there is ONE FRAME in when a character RETAINS a STANDING hurtbox before it actually switches to a crouching hurtbox. An instant overhead is a quick jumping attack that has it’s hitbox low enough to hit a STANDING opponent on the rise of the jump. You can exploit the Fuzzy Guard and hit an opponent’s standing hurtbox with an Instant overhead (You can hit someone who is crouch blocking with an overhead attack), if you can time it right. Timing this is extremely hard so instead, this Video shows Smug Pie (Dudley) finishing off Poongko(Seth) in the final round with an instant overhead hitting Poongko’s Fuzzy Guard (The very last hit of the 2nd Round).
[link]
Run/Stop
A style of play that Guy and El Fuerte uses based off their special moves. Both characters have a special move which makes them run, and from which they can press a button in this running state which will perform a special move.
Here’s Guy’s Moveset from his Run
[link]
Guy is meant to be played as a rushdown pressure, with his mixups being whether or not he will go high, low, or or stopping for a grab. Marq Teddy is an excellent Guy player and in this highlight video you can see the pressure made from Run/Stop.
https://www.youtube.com/watch?v=hu9WBCUfR2I&feature=youtu.be&t=4m27s
On the other hand, El Fuerte uses his Run/Stop as a vortex that mixes up between Cross Up Tostada Presses or a Run Command Grab. Here’s Pepeday with his El Fuerte Vortex
[link]
Super Jump Cancel
A Super Jump Cancel is the technique used to cancel a Move INTO a Super Jump (It’s considered a special move!). Players use this technique in order to cancel certain moves into combos they normally cannot do. To perform a Super Jump Cancel, you must use a move that can be SJC’d (Super Jump Cancelled) and simply press Down Up to Super Jump. However, Players can cancel the PRE-JUMP FRAMES of the Super Jump into a move of their choice, IF they can precisely and quickly input the command of said move.
Here’s C.Viper using the fact that her Seismic Hammer can be SJC and showing, A Normal Seismo, a Super Jump Cancel, and a Combo demonstration.
[link]
Here’s C.Viper Cancelling her Seismo into a Super Jump, which is then cancelled into another Seismo
[link]
Both Ibuki and C.Viper use their Super Jump to cancel a multiple amount of moves (Including Ultra!).
Punishing Predictable Blockstrings
How do I take advantage off reading an opponent doing the same blockstring again and again?
If you have an invincible reversal you can punish their untrue blockstrings. Once again as a reminder, a blockstring is considered true when the player blocking is kept in blockstun throughout the entire duration of the attack string. Almost all link combos are untrue when blocked, giving a window that allows for a punish opportunity. Depending on the move that’s blocked, there are some moves that leave the attacker with a positive frame advantage which will usually grant a counterhit to the attacker if the defender tried to press a button. However with the hard read that the opponent WILL press a button to continue his untrue blockstring, an invincible reversal will make your character’s hurtbox ignore the active hitbox of your opponent’s move and allow you to hit them instead.
I should note that punishing a blockstring in this manner is very hard to do on a reactionary basis (it must be a read on the opponent’s behavior!) and definitely takes a bit of practice in order to reversal properly in their blockstrings.
Using Auto-Correct Reversals
How do I deal with players that constantly cross me up on my wakeup, I can’t reversal properly since the sides switch up my controls.
Once again by taking advantage of how SFIV takes in and stores inputs you can punish this behavior as well. After getting knocked down and your opponent jumps over in an attempt to cross you up you will want to do a couple things in order to get an auto correct reversal.
1. Confirm that your opponent is jumping to cross you up
2. JUST BEFORE your opponent switches sides, input the directions for your reversal
3. AFTER waiting the opponent to fall a bit lower, press the normal in order to complete your reversal
This technique DEFINITELY needs some practice in order to use comfortably. But mastering this technique and showing that you can do it will shut down a strong offensive option that your opponent has.
Watch this gyfcat repeatedly and notice a couple things that are happening here.
1. The inputs on the left clearly show that I have done the inputs facing the original direction before the crossup occurs
2. The timing of when I put in the directional inputs (I do it when he is above Ryu’s head)
3. There is a gap of time between the directional inputs and the button press that completes the special move (I do not press the MP immediately or on the same frame when I press the last Forward/DownForward input)
[link]
Yes this technique can be done with charge moves(Down Up only) but the timing between the button press after putting in the up direction is stricter)
Resources
This section of the guide are simply just links of some videos or groups that I try to give some more exposure that might help a player improve in Street Fighter.
Gootecks is actually a great teacher
-Excellent Adventures is a comedic series that shows Gootecks, Mike Ross, and every now and then a special guest and the matches that they play online on XBL or PSN. These specific episodes they attempt to train a WWE Wrestler that has no experience in Street Fighter into an adequate player. These are SFV I know, but the fundamentals are still the same.
-Gootecks demonstrates a proper method (one of many) to use/hold a fightstick
Online Communities
-Reddit r/StreetFighter subreddit have a Daily Questions thread and a helpful community that will try to help you along the way to get better in this game (I answer questions there a lot!). Mondays feature a small online tournament while Thursdays feature a coaching night in which you can get coached personally by another experienced player while playing against people of similar skill.
-Reddit SF4 Newbie Fight Club, get in touch with some players that are learning just as you are in this game and play some endless matches without worrying about points.
-SRK Forums are still alive even with the dying age of Forum websites, they can still answer a bunch of your questions along with local meetups, stick modding, etc. SRK has been around for a long time so use what you have available while you can.
Closing Notes.
Thanks for Reading all the way, I know it was a big read, unless you scrolled down here you cheater. Hopefully I’ll get to see you online and willing to play and learn Street Fighter just like I am. I still consider this guide a work in progress as I myself am learning new stuff everyday (Like in the middle of writing this I finally realized how to do Seismic Hammer Cancels). In my local FGC I can beat most of my competitors (we kinda suck), but some weeks ago I went to a Round One and got schooled by zRekkoha (shoutouts to you bro). He made me realize that I still had so much more left to learn about this game which lead me to write this guide in more of a gigantic review of what I know about this game. If you happened upon this guide (or was told to read it by me) I hope you will play Street Fighter with the rest of the community.
UPDATES:
7/23/2015
-Fixed the name of the place where I met zRekkoha
7/31/2015
-Changed that Ultra Move damage scales with the amount the gauge is filled with (Thank You SneakyToucan2003!)
-Added topics “Punishing Predictable BlockStrings” and “Using Auto-Correct Reversals” in the Intermediate section
-I have realized that my explanation of the math portion (as well as the diagram) of Meaty Hits in “Intermediate Strategy and Concepts Part 2” is COMPLETELY incorrect and I apologize. Working on getting a better grasp of the math to update that section.
-Added an UPDATES section at the top of the guide as well
-Added a Resources that are just general resources that a player can tap into and use to help them grow in skill (Communities and Videos mostly).
Creating a Situation
If you’re reading this in one go, I have now probably armed you with way too much knowledge for your own good. There’s a lot going on in a match in Street Fighter and it’s easy to see what the core situations that are happening. So now armed with all the little details I told you, let’s create a game plan.
Let’s start with Ryu. Ryu’s Cr.MK xx Fireball is a classic, tried-and-true poke that gives okay damage on hit, a little bit of chip on block, is safe/unpunishable on block, pushes the opponent towards the corner on hit and block, and has reach. There’s very little cons about Ryu’s Cr.MK xx Fireball for Ryu other than it being slightly negative on block if you’re very close to an opponent.
It’s a simple poke, but in the act of doing this string, you’re already creating a situation for your opponent. Hypothetically, if you keep up this string the whole match they’re going to lose because of the hp they lose by getting hit by it and by the chip damage that is caused by blocking it. So Cr.MK xx Fireball on hit or block is already presenting a win condition, since the string itself is unpunishable on block, they must act to do something else to deal with this other than blocking.
This is exactly the behavior that you WANT your opponent to do. Most commonly, people will try to start jumping on top of Ryu and avoid the grounded Cr.MK entirely and land damage in a combo at the same time. Which… will work if you’re a psychic and know exactly when the Ryu presses Cr.MK. But in most cases a Ryu isn’t spamming the MK button in every moment he can and more often than not the Ryu will be able to react to the jump and get free damage from anti airing the opponent.