![SuperPower 2 Modding Guide [BASIC] for SuperPower 2 Steam Edition](https://steamsolo.com/wp-content/uploads/2021/07/superpower-2-modding-guide-basic-superpower-2-steam-edition.jpg)
Overview
A simple guide to making mods with pictures. [Not coding]
Finding Common Ground
Okay, so you want to mod, I know that much. However, I don’t know what your operating system is or if you pour your milk then your cereal, I just don’t know. Therefore, we need to lay out some common ground.
What’s understood
1.You know your way around your computer, and know some computer buzzwords (i.e. I say “dir”, which is short for “directory”).
2.You have PATIENCE – making mods takes some time, and you can’t get anything of quaity done in a day (unless you stay up for LITERALLY a day without stopping).
3.You’re running some form of Windows.
4.You have a mouse.
5.You have a keyboard.
6.You’re not braindead.
7.You know how to install stuff.
Great, now that we have a basis for this guide we can really get into the pre-mod setting.
I advise you read most of the guide.
What you’ll need
In order to make this a sound modding environment, we need a couple things.
.NET Framework
The GLEditor requires you have the Microsoft .NET Framework 1.1 installed. You can get it here[www.microsoft.com].
Getting the needed files and making sure the editor works
Now that you have everything you need to run the editor, you need to actually acquire the editor.
It is in the “Extras” folder, but in case you don’t have it:
This[www.superpower2.co.uk] is the download link. After you have downloaded or located the editor, change it to compatibility mode for Windows XP Service Pack 3, if you’re not already running Windows XP.
Also, you’re going to need a list of region IDs, parties, and cities. Here[www.superpower2.co.uk] is the link to these.
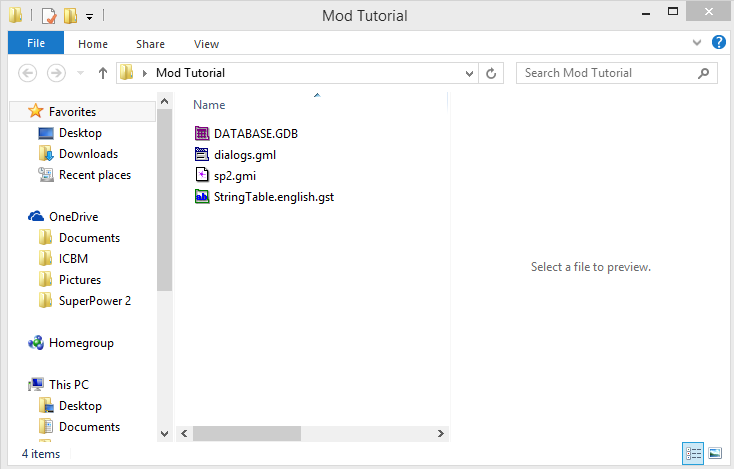
Next, go to “C:Program Files (x86)SteamsteamappscommonSuperpower 2MODSSP2”. Once you get there, copy DATABASE, DIALOGS, and Stringtable.[yourlanguage]. Paste them into a folder on your desktop. Then, go back to the “Superpower 2” folder, and goto “Extras > Sample” and copy sp2.gmi to the folder with the other files.
Basics & Strings
What things are
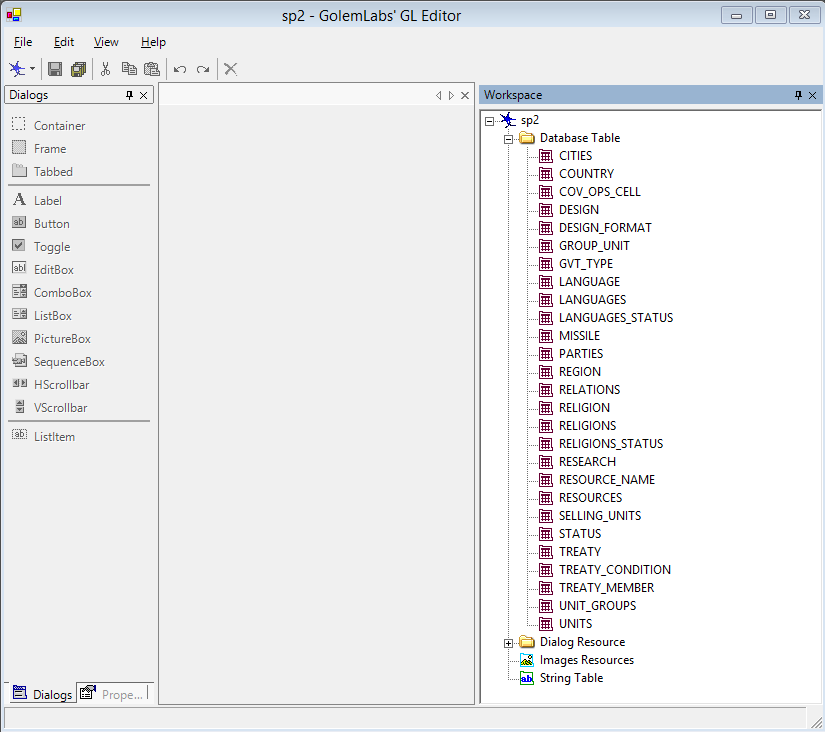
Double click “sp2.gmi” in your mod folder to start. Once you do this, you will see a branch diagram on the right, and a “Dialogs” thing to the left. Click the “+” next to Database Table. Here’s a brief explanation of what things are:
CITIES – City statistics, such as name and location.
COUNTRY – Basic country statistics, such as name, capital, form of government etc etc.
COV_OPS_CELL – Covert ops cell names, country ID, and training.
DESIGN – Unit design information.
DESIGN_FORMAT – Not entirely sure, but we won’t be messing with this anyway.
GROUP_UNIT – Describes how many of which units are in what spot on the globe.
GVT_TYPE – List of possible government types
LANGUAGE – What languages there are.
LANGUAGES – How many people speak what language in each region.
LANGUAGE_STATUS – Language legality statuses.
MISSILE – Nuclear missile locations on the globe and who owns them.
PARTIES – Political parties and who owns them, percents, ideology etc.
REGION – Every region of the game and its stats are stored here.
RELATIONS – Diplomatic Relations.
RELIGION – All religions.
RELIGIONS – Which religions are followed in every territory.
RELIGIONS_STATUS – Legality of religions in certain countries.
RESEARCH – Research levels of countries.
RESOURCE_NAME – Names of all resources.
RESOURCES – Which resources and how much are produced in every region.
SELLING_UNITS – Unit market deals.
STATUS – The names of unit statuses (ready, parked, fortified).
TREATY – Every treaty name and type.
TREATY_CONDITION – Treaty conditions.
TREATY_MEMBER – Which nations belong to which treaties.
UNIT_GROUPS – Where unit groups are located on the globe.
UNITS – Amounts of units, what group they’re in, what design, what country.
Image Resources -The GLEditor automatically makes an “Images” folder, any pictures you put here will be loaded under this section next load.
String Table – Where all text is stored, every unit name, country name, city name, region name, and party name is stored here, along with UI text.
All about strings
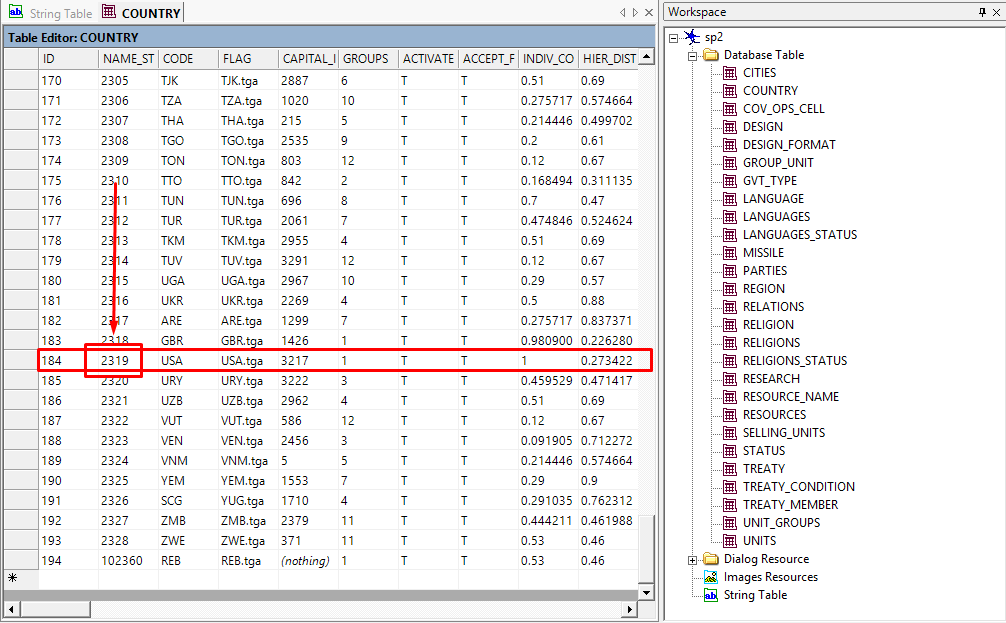
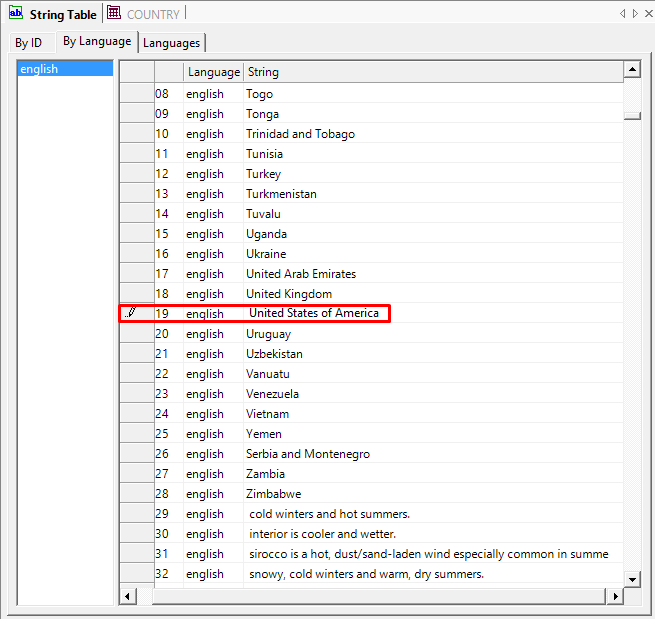
Now that you’ve got the basics, double click the string table. A single row should open up with Australia-New Zealand-United States Security Treaty (ANZUS) in it. At the top, click on the tab with “By Language” on it.
We’re going to change the name of the United States, to the United States of America. What we need to do, is to open up (by double-clicking) the “COUNTRIES” folder on the right, so we can find what string name the US is.
Scroll down and we find the US has a string number of 2319. Now, we can go back to the String Table, by clicking the tab, and scrolling to find #2319.
Be sure to save often, by clicking either the floppy disk icon, or “File… > Save MOD”
You have, while a minor one, made a mod! This works for any text in the game, from countries to
UI.

Also, to add a string, simply go to the bottom of the String Table and type in the text/information you want.
Adding Parties
Adding the party
Time to add new parties to “The United States of America”. Assuming you still have both “COUNTRIES” and “String Table” open, open up “PARTIES” alongside them. Go to the bottom of the list, and type in the next ID “2144” and your country ID (I’ll be using 184 for the USA).

Now, go to String Table, and add a string. Type in any party name you want.

Next, copy the string ID. Go back to PARTIES and paste it in the NAME_STID column.
Then, set STATUS to “1” [legal]. Set percentage to whatever you want between 1 and 0, but you’ll have to adjust the other percentages of the other parties (I’ll do this later). Now, set the ideology of the party, closer to 1 is right-wing, closer to 0 is left-wing.

For the GVT_TYPE, you’ll need a list of the government IDs.
1 = Anarchy
2 = Not implemented
3 = Not implemented
4 = Theocracy
5 = Military Dictatorship
6 = Monarchy
7 = Communist State
8 = Single-Party Democracy (Not for parties, but for country info – I’ll get to it later.)
9 = Multi-Party Democracy (any party you want for a SPD, set as MPD)
I’m going to set the party as “9” or a MPD party, put “T” for “True, this party is in power.”
Adjusting the percentages
You’ve added your party, but now the overrall percentages for your country’s parties are off. While in PARTIES, click on the “COUNTRY_ID” column header and it will organize the list by country. Find your country, and find your party. Once you’ve done that, change the percentages as required.

Make sure you set the other party to that is in power to “F”, if you set your new party to “T”.
Adding A New Country (Takes a while)
Pre-Section Note
Adding a country takes a little bit of patience, and took me several tries to do, considering I had no one to teach me, even as I write this, I don’t remember exactly how to do it, but when this is posted I’ll make sure what I do works :D.
For this, you’re going to need that region list, and you might want to have Superpower 2 running in the background for reference.
Welcome to Hell
First, go back to the COUNTRIES tab, and add a new line. The new country ID should be 195.
Go to the String Table, add a new string, and name it whatever you want.

Then, you want to put in a country code, a 3-letter code for your country (ie USA).

Here’s where it gets complicated-ish
Now we need to give our nation a capital, but the thing is, the cities list in that download, is INCOMPLETE. So we’re going to have to find a way around using it. What I do, is look up the coordinates of the city I want as my capital, and then go to the CITIES tab, and find the city ID with those coordinates. Clever, right? But, alas, it isn’t perfect. Superpower 2 coordinates are slightly off and don’t line up with real-world ones, so a lot of the time, it’s a guessing game if you have a lot of very close cities with similar coordinates. It works, though.
I want New York City as my capital, so I’ll look up the coordinates.

Now, I can check the CITIES list for these coordinates, and I’ll find New York City (click the longitude column header and it’ll organize so it’s easier to find your coordinates).

It took me 20 minutes writing this guide to find New York. You can make sure it is the right city by cross-referrencing with the string table.
Filling in other country data
What I do for this, is fill in the same data from a similar country into this new country. I don’t want to come off as lazy, but the thing is, most of these statistics, I either don’t know what they do or they just aren’t in the game. I do advise you to experiment, and I’m going to use the United States’s data simply for the sake of time and my own sanity.
Fill in the country data now, then move on to the next header.
Values you should input yourself:
1. Government Type
2. Laws
3. Budget Sliders
4. Taxes
Wow, there’s more
Now that you’ve got the basic country data in, we need to assign your country political parties, regions, relations, and units.
You already know how to make political parties, so I’ll skip that, but when you do make sure to make a political party for every government type (except SPD).
Assigning Regions
This is where that region list comes in handy. Figure out what regions you want your country to
have, and look them up in the document.

When you find the region you want, change “COUNTRY_ID” and “MILITARY_ID” To the country ID you want the region to belong to. Do this for all of the regions you want in your nation.
Relations
This part, I’m sorry to say, is mind-numbingly boring and time consuming. Go over to the RELATIONS tab, and open it.

Once it’s open, up at the top click “Table > Edit Table Schema…”. Go to the bottom of the list, and press “Add”. Set ColumnName to COUNTRY_195 and set the type to Floating-Point.
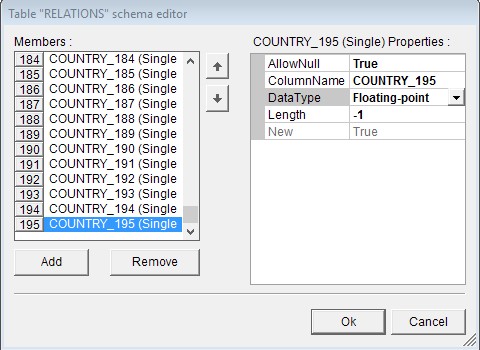
Now, go to the bottom of the table, and add a new line with an ID if 195. Then, all the way across add 0s in every single “(nothing)” value going across until you reach the end of the table. Then, do the same thing, but upwards on the very end of the table.
Assigning Units
All the units in Superpower 2 start in a city, so we can use the same “find the city” trick for units that are stationed there. Find the coordinates of the city that has the unit group, and look up the coordinates in the UNIT_GROUPS tab rather than the CITIES tab.
Once you find the unit group, just change the country ID to your new country’s ID.

Desiging unit’s require
Stuff you can just copy
There is a lot of other information you can copy from a similar country for use in your new country. Most country information is calculated at the beginning of the game anyway, so what you put there doesn’t really matter, as long as you put something there. You can copy both Resources and Research. Simply create a new row for your country in each of them, and copy information from a similar nation. Again, you CAN do this manually if you want.
Flags and Finalizing
Finalized MOD layout
Create a new folder named whatever you want as long it doesn’t have spaces. Within that folder make 2 more folders name “data” and “save”. Copy and paste DATABASE and Stringtable into data (and dialogs if you screwed with it a little). Now, within the first folder, create a new text document named “ModInfo”. Change the extension to .xml. Open the XML and type the following:


The signature can be anything as long as it is unique.
Now, within data, make a folder named “textures”, then, within that, make a folder named “Flags”, then, WITHIN THAT, make a folder named “small”.
Flags
Here, you need to either make a flag, or get one off the Internet, and convert it to a TGA file, there are TGA converters on the Internet. Once it is a TGA, put it in the Flags folder. Then, get a smaller version of it with the dimensions of 23×13, and put it in “small”.

The name of the flag file must be the same as the FLAG you put in the country data while modding.
(When I put UOP.tga and said I’d explain later, well, this is later.)
It’s finally over, but one more thing
Create a shortcut to joshua.exe, but at the end of the target, put -mod “Mod Folder Name Here” (with quotes).
Finally, put the mod file in MODS, and the shortcut on your desktop.
You’re done, I didn’t even think you’d get this far considering how much patience this takes.
This is goodbye, for now
First of all, thank you
I’d like to thank you for taking the time to read this, considering this guide (surprisingly) took me a long time to make. If you don’t like the guide, or don’t think it’s helpful, I apologize.
If you have problems
If you have an issue, I first advise you to, not to sound like a jerk, figure it out yourself. I only say this because that’s what I had to do, I experimented over months to figure out how the damn editor works. If you’ve tried everything, contact me via Steam, and I would be more than happy to help.
Final thoughts
If you got through the whole guide and read every word down to here, congratulations! Oh, and by the way, I did leave some things out, sometimes because I wanted you to improvise and learn yourself, other times because this is a small guide and would take me forever to write every single aspect of the editor and how to use it, and I’m no trying to write a book.
Thank you, and happy modding!
[Extra Info] Countries Table Properties
Full list of probably most important-central table.
Id: Country’s id
Name Stid: Country’s name string id
Code: Three-letter abbreviation of that country
Flag: The flag filename. If you want to modify that country’s flag, this is
the filename you must use
Captial Id: The City’s id of the capital of the country
Groups: Geopolitical groups of the country. SP2 uses 12 different groups. (Defines similarity)
Activated: T if the country is still alive. F if the country has been annexed.
Accept Foreign Order: T if the country accepts foreign unit production order. F otherwise
Indiv Collec: Number closer to 1 means the country’s population is individualist.
Number closer to 0 means the country’s population is collectivist.
Hier Distance: Number closer to 1 means there is a huge distance between the
leader of the country and the population. Number closer to 0 means
the populations feels very close to the politicians.
Male Female: Using psychological terms, we ranked how Male or Female the
population of a country is. An example of a “female” population is
Sweden (has 0), a “male” population would be Japan (has 0.87).
Climate: Country’s climate’s description string id
Natural Hazards: Country’s natural hazards’ description string id
Terrain: Country’s terrain’s description string id
Pop 15 65 Unemployed: % of unemployed population at the beginning of the game
Pop In Poverty: % of population in poverty at the beginning of the game
Pop Economic Model: Describes how far left or right the population of that country is
economically. 1 is Free Market, while 0 is communism.
Pop Political Ideology: Describes how far left or right the population of that country is
politically. 1 if Extreme Right, while 0 is extreme left.
Birth Rate: The current birth rate, in %, of the country
Death Rate: The current death rate, in %, of the country
Birth Rate Expected: The birth rate expected for that country. The current birth rate will
move towards that value. It’ll change once the game begins though.
Death Rate Expected: The death rate expected for that country. The current death rate will
move towards that value. It’ll change once the game begins though.
Human Development: The human development level of the country at the beginning of the
game.
Suffrage: Not used anymore
Global Tax Mod: Global tax mod mod of that country
Personal Income Tax: Personal Income Tax for that country
Available Money: Available Money of that country at the beginning of the game.
Negative amount mean having debts.
Economic Activity: Negative amount means the country is importing. Positive amount
means the country is exporting. This value will change at the
beginning of every game, so changing it has almost no effects.
Economic Health: Economic Health of that country at the beginning of the game.
Budget Expense *: The initial value of all expenses. It’ll be recalculated at the
beginning.
Budget Expense Ratio *: The location of each of the 10 budget sliders. 1 means the slider is to
the right, 0 to the left, and 0.5 in the middle.
Budget Revenue *: The initial value of all revenues. It’ll be recalculated at the beginning
of the game.
Propaganda Level: Not used anymore
Mili Manpower Avai: Number of manpower available at the beginning of the game.
Inflation Level Expected: The expected value of the inflation.
Inflation Level: The current value of the inflation.
Interest Level: The interest level for that country
Minimum Wage: Not used anymore
GDP Growth: Not used anymore
Political Party: Political party id in power at the beginning of the game. It must be a
political party with the same country id.
National Holiday: Not used anymore (but it is a string table id)
Gvt Type: The government type id, referred from the GVT TYPE table. 9 is
multi-party democracy, 8 is single party-democracy, etc…
Gvt Stability: The current government stability for that country
Gvt Stability Ex: The expected government stability for that country
Gvt Approval: The current government approval for that country
Gvt Approval Ex: The expected government approval for that country
Emigration Level: The current emigration level for that country
Emigration Level Ex: The expected emigration level for that country
Emigration Closed: F if the emigration borders are opened, T otherwise
Immigration Level: The current immigration level for that country
Immigration Level Ex: The expected immigration level for that country
Immigration Closed: F if the immigration borders are opened, T otherwise
Next Election: The date of the next election for that country
Corruption Level: The current corruption level for that country
Corruption Level Ex: The expected corruption level for that country
Martial Law: T if the Martial Law is declared, F otherwise
Telecom Level Ex: The expected telecom level of that country
Infrastructure Level Ex: The expected infrastructure level of that country
Law *: The status of every law. T means it’s legal. In the case of the number
of children by family, T means unlimited, while F means limited
number of children.
Nat Security Level: The security level offered by the covert actions cells at the beginning
of the game.
AMDS Level: The status of the AMDS construction. 0 means it has not started yet.
If the number is 1, it is completed.
Nuclear Ready: The status of the nuclear research. -1 means a country hasn’t started
its nuclear research. Once it has, the value move from 0 to 1, 1
meaning the research is completed.
Last iteration: Must always be 0.