Overview
This guide is shows exactly what every Graphics Setting in the game does (with screenshot comparisons) and shows how impactful each one is on performance. In addition, it contains tweaks to your system to improve performance, some Windows 10 bug-fixes, and some Quality of Life Improvements you can make to make the experience more enjoyable.
Introduction

System Requirements

Potato Requirements (720@30+fps on the Very Low Preset)
OS: 64-bit Windows 7 / 64-Bit Windows 10
CPU: Intel Core i3-6100 @ 3.7 GHz or better, or AMD FX 8350 @ 4.0 GHz or better
RAM: 4GB RAM (6GB if using Windows 10)
GPU: Intel UHD Graphics 630 or better
Storage: 50GB available space
Minimum Requirements (720p60fps on the Low Preset)
OS: 64-bit Windows 7 / 64-Bit Windows 10
CPU: Intel Core i3-6100 @ 3.7 GHz or better, or AMD FX 8350 @ 4.0 GHz or better
RAM: 4GB RAM (6GB if using Windows 10)
GPU: NVIDIA GeForce GTX 750 (1GB), GT 920MX (2GB), or AMD Radeon R7 250 (1GB), R7 250X (2GB) or better
Storage: 50GB available space
Recommended Requirements (1080p60fps on the High Preset)
OS: 64-bit Windows 7 / 64-Bit Windows 10
CPU: Intel Core i5-3570 @ 3.4 GHz or better, or AMD Ryzen 3 1200 @ 3.1 GHz or better
RAM: 8GB RAM
GPU: NVIDIA GeForce GTX 960 (2GB/4GB), GTX 1650 (4GB), or AMD Radeon R9 280 (3GB), RX 470 (4GB)
Storage: 50GB available space
Maximum Requirements (1080p60fps on the Ultra Preset)
OS: 64-bit Windows 7 / 64-Bit Windows 10
CPU: Intel Core i7-4770K @ 3.5 GHz or better, or AMD Ryzen 5 1600X @ 3.6 GHz or better
RAM: 16GB System RAM
GPU: NVIDIA GeForce GTX 1060 (6GB), GTX 1660 Ti (6GB), or AMD Radeon RX 580 (4GB/8GB), AMD RX 5600-XT (6GB)
Storage: 50GB hard drive space
Graphics Options

My testing involved cranking everything to the highest possible setting, and then lowering the setting I wanted to test to the lowest. At that point I would measure the framerate and then record it. Then, I would take the setting to the next step to do the same until I reached the highest step for that setting. I’m also obligated to disclose that I took the screenshots in places that best showcased what the graphics setting did. However, I didn’t benchmark in those same spots. I benchmarked the framerate in places that used that particular effect (e.g. shadows) the most. That way, I could really show how impactful it was on performance. Anyway, without further ado, here are the screenshots and numbers!
Test Bench
OS: Windows 10 Version 1909
CPU: Intel Core i3-8100 @ 3.6GHz
RAM: 16GB of DDR4-2400 RAM running in dual-channel mode (2 8GB sticks)
GPU: NVIDIA GeForce GTX 1060 6GB
Storage: Samsung EVO 850 SATA SSD
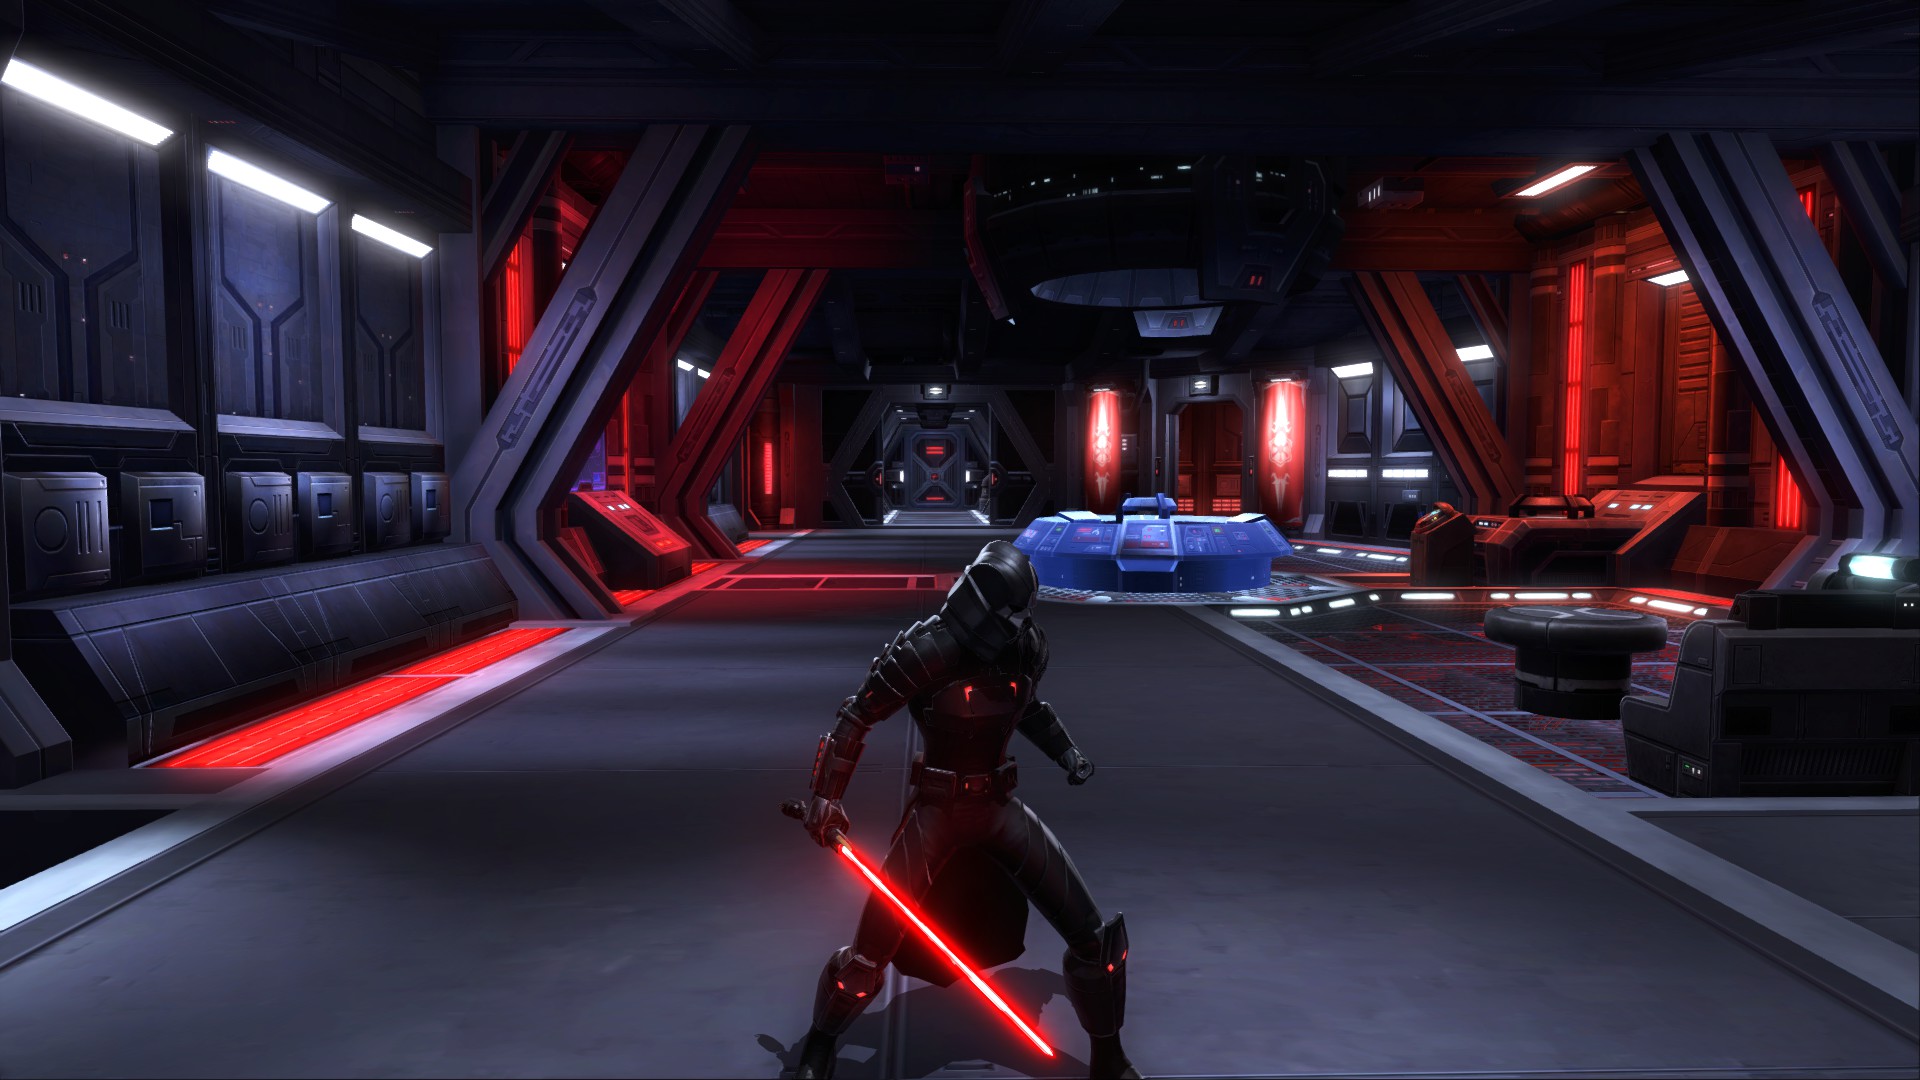
Texture Quality is pretty important as far as graphics go. It completely changes the how every single rock, lightsaber, blaster, and spaceship looks. Unless you’re on an integrated card, there is no reason to put this on low since it doesn’t affect performance.
Low:
High:

FPS Table:
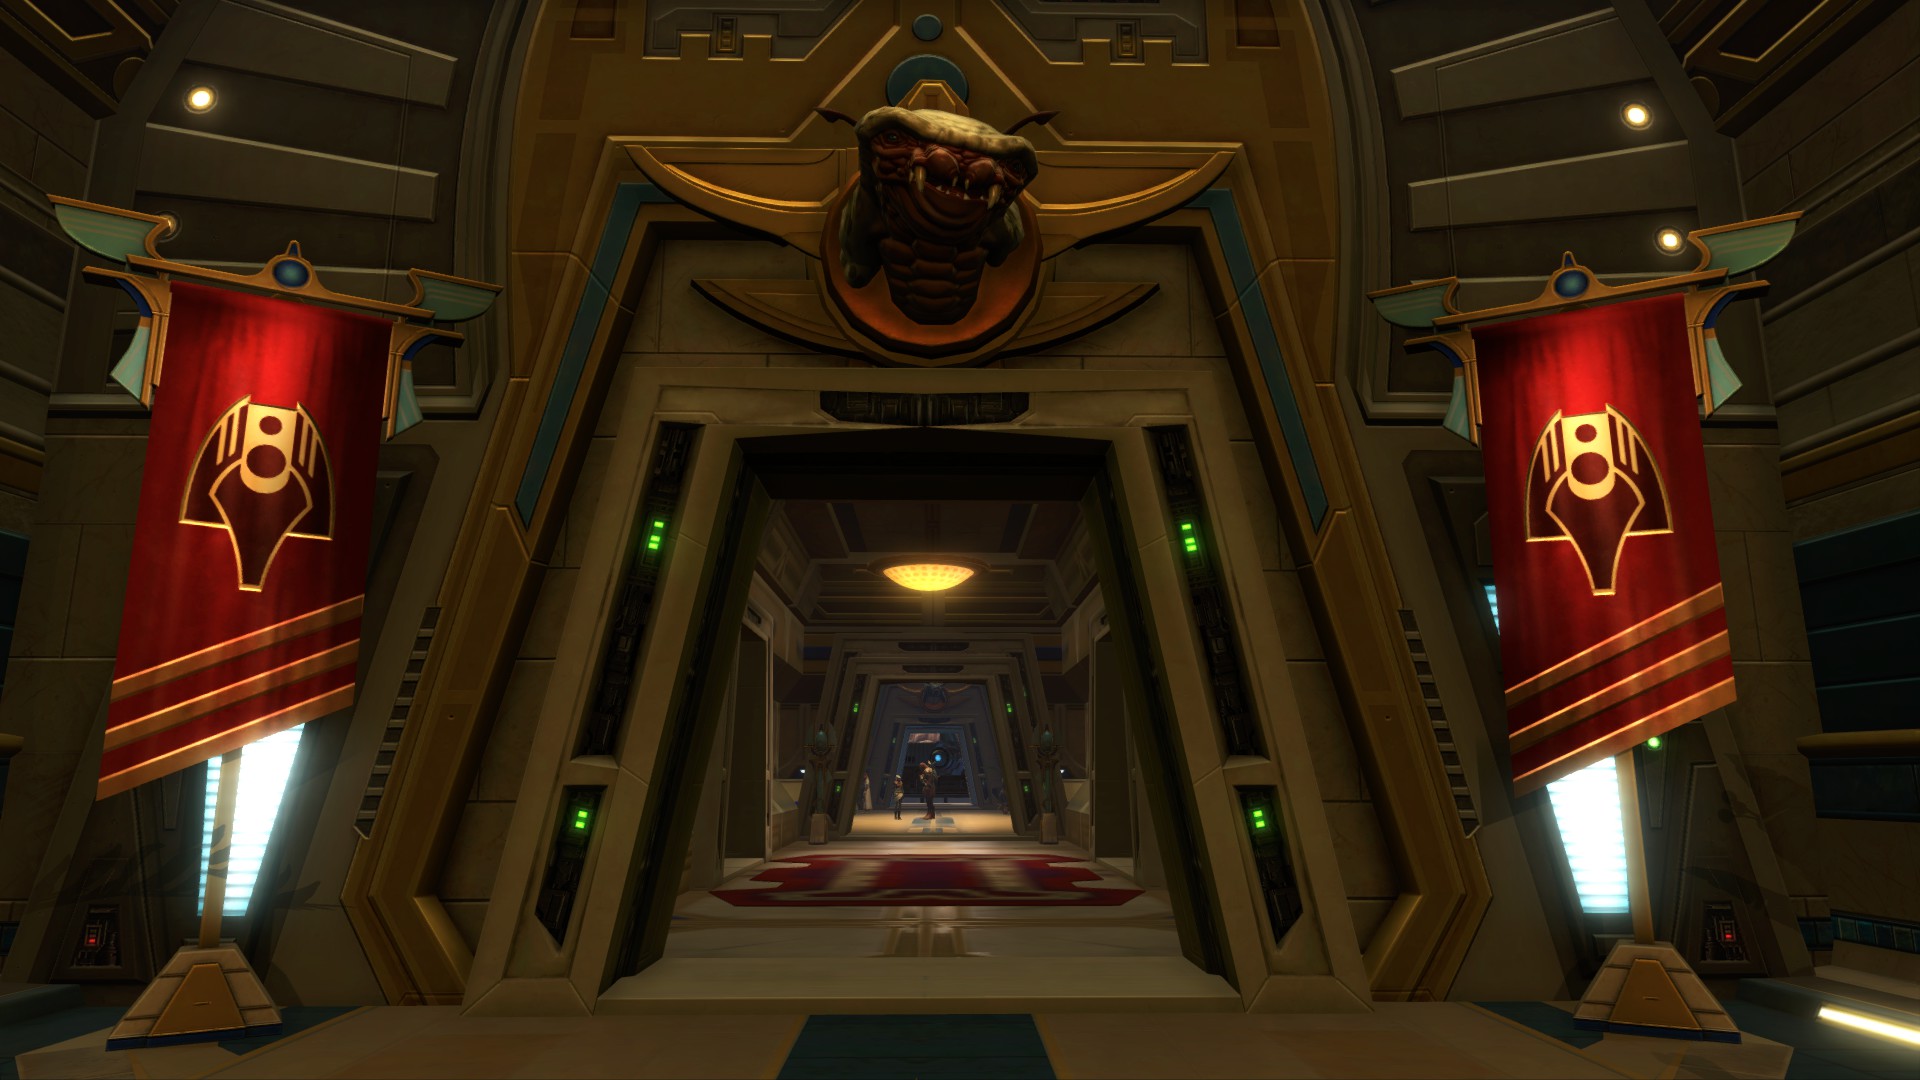
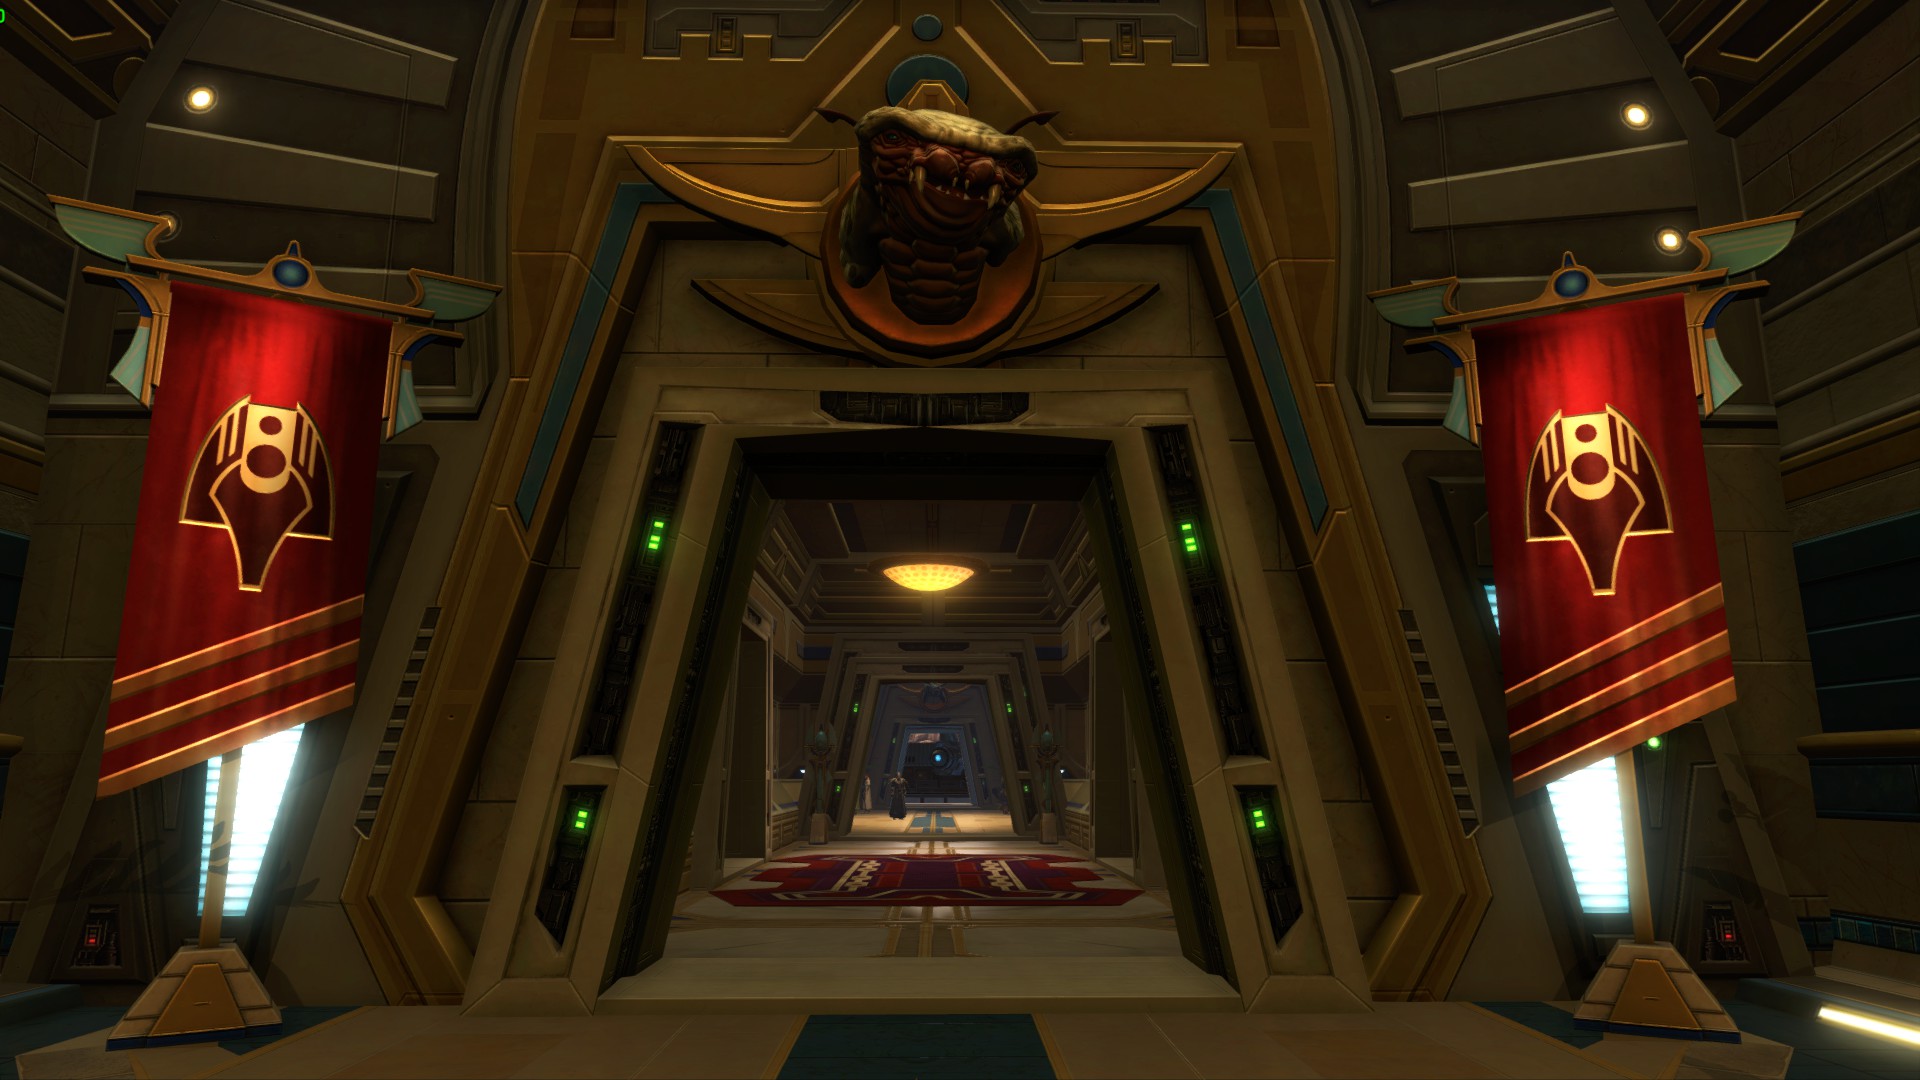
This option controls the lighting and shading effects on everything. As such, it has the most visual impact to the game by a long margin. I like to that think it’s a good idea to push this option as far as your machine can take it before tinkering with other options. It’s not a free option by any means, with a linear increase in performance cost with each setting, but I assure you its worth it taking it to at least low. Also note that you lose other effects with each step below High. Low removes Bloom, Enhanced Shadows, and Shadows. Taking it lower to Very Low also removes Conversation Depth of Field.
Very Low:

Low:
High:

FPS Table:
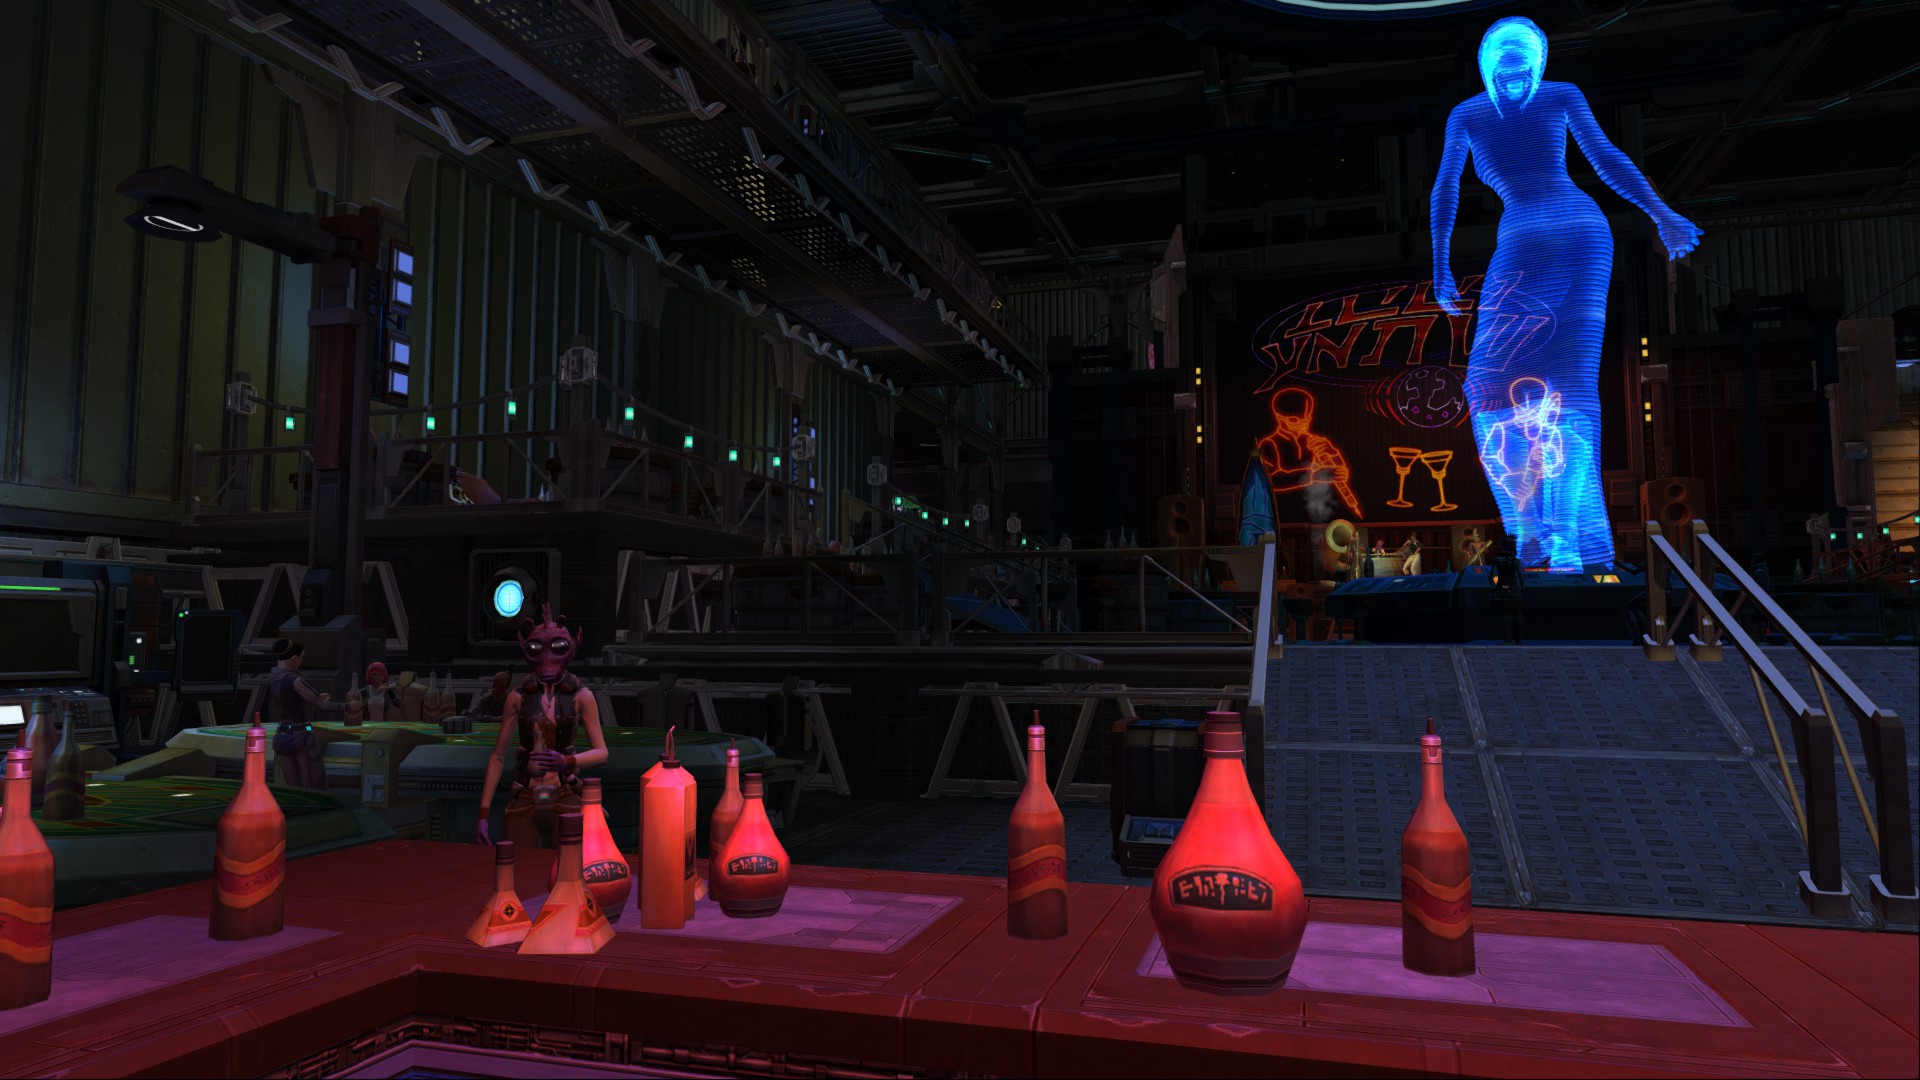
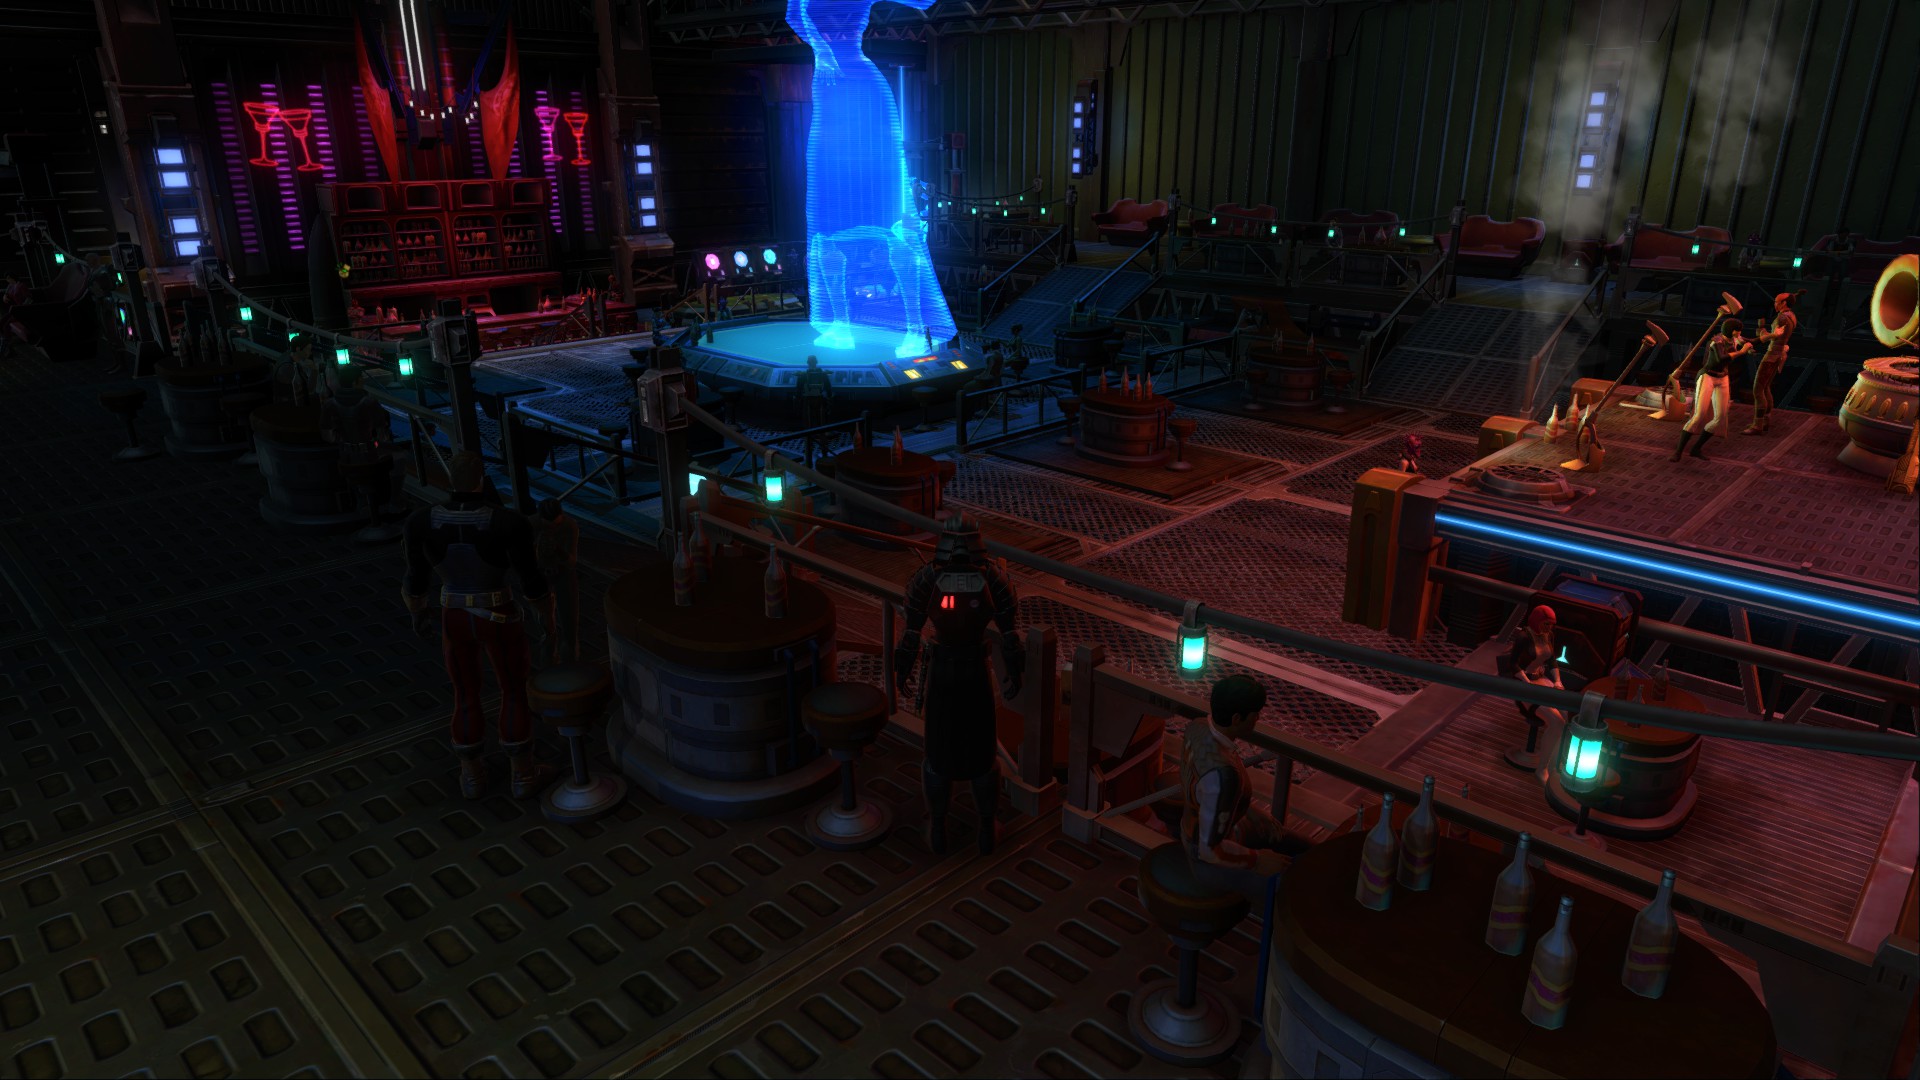
Bloom is a post-processing effect that makes bright objects like blaster bolts, lightsaber beams, and lights “glow.” It does this by bleeding their colour into the surroundings. It’s a pretty essential effect, andiIt doesn’t have a huge impact on performance so I say go for it!
Off:
On:
FPS Table:
Anti-Aliasing makes jagged, pixelated edges on objects (called aliasing) smoother. Different people tend to be either more annoyed or less annoyed by aliasing, so this option is actually dependant on your preferences. For example, on higher resolutions like 4K some people turn it off since it doesn’t make too much of a difference. If you choose to use Anti-Aliasing however, keep in mind that it does not come free. Not the higher settings at least. In SWTOR, the Medium setting is FXAA; the High setting is 2xMSAA; and the Very High setting is 2xMSAA+FXAA.
Off:

Medium (FXAA):

High (2xMSAA):

Very High (2xMSAA+FXAA):

FPS Table:
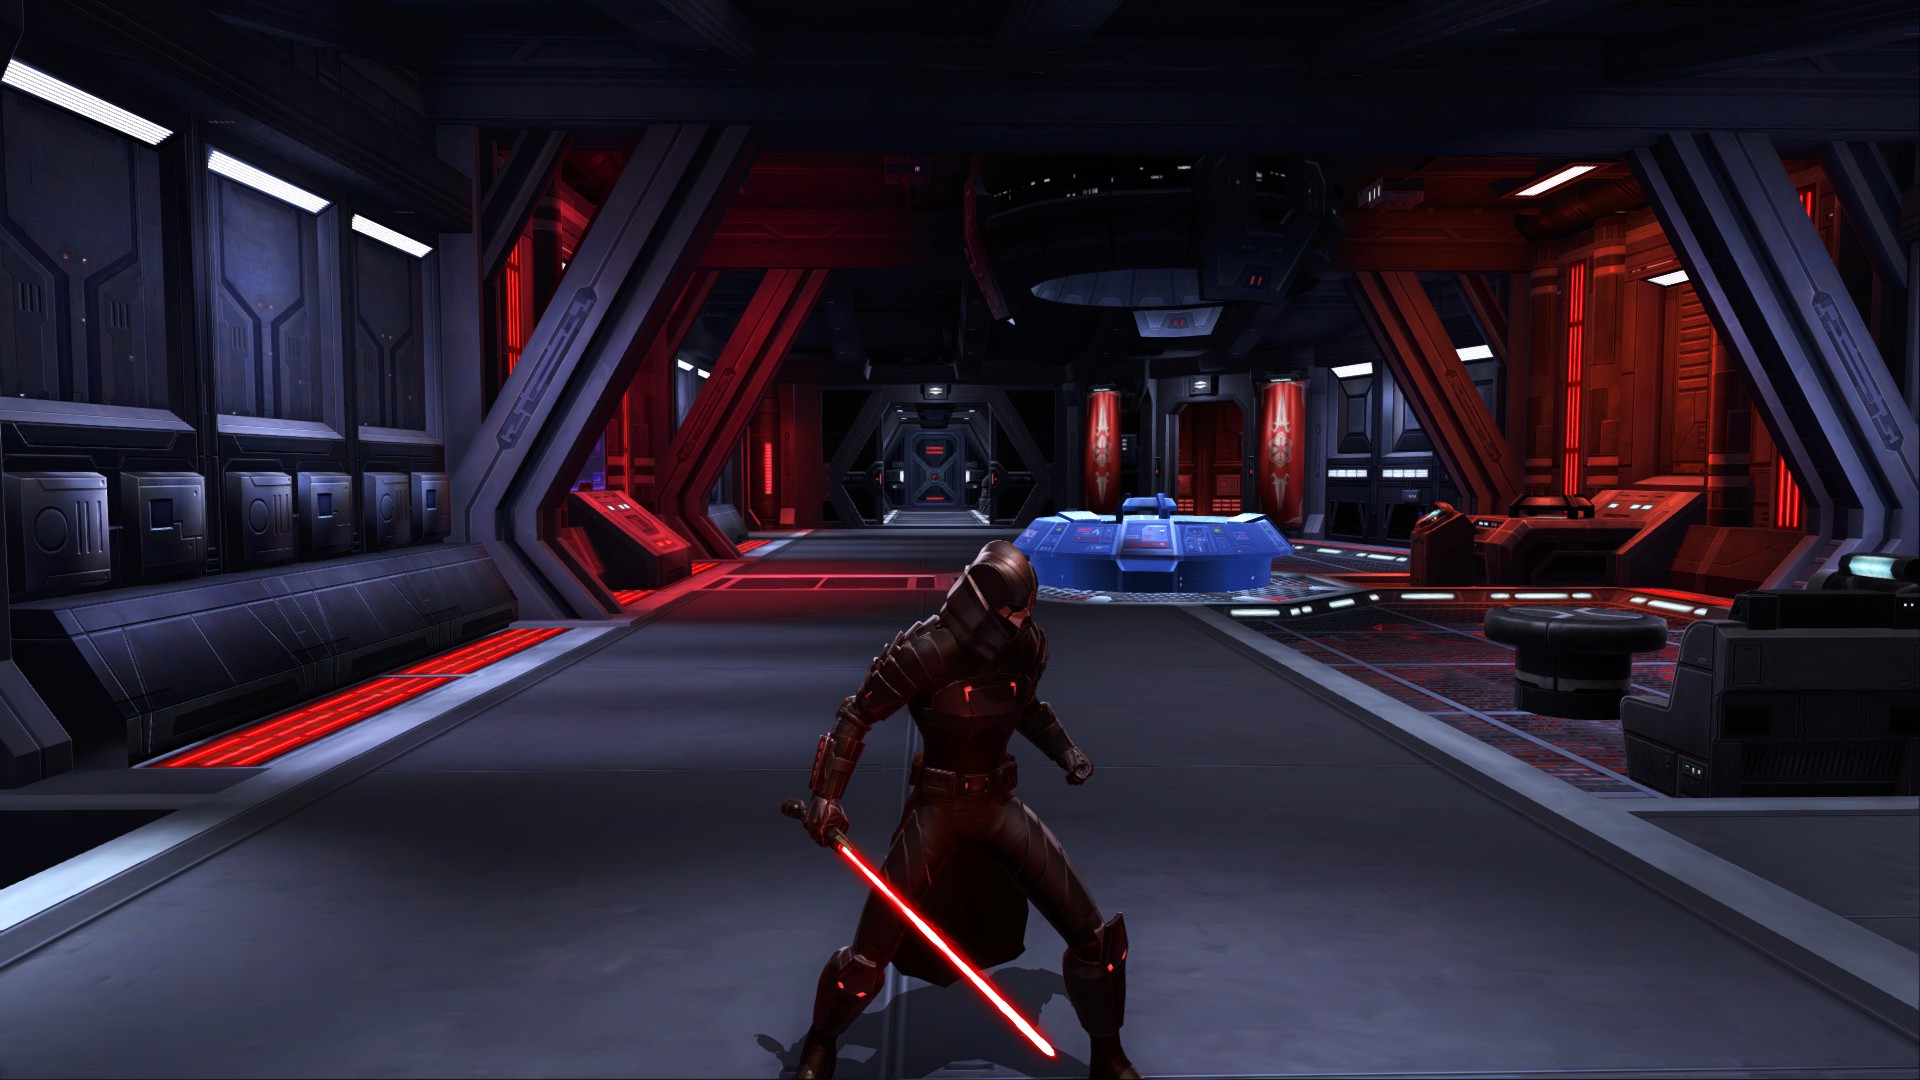
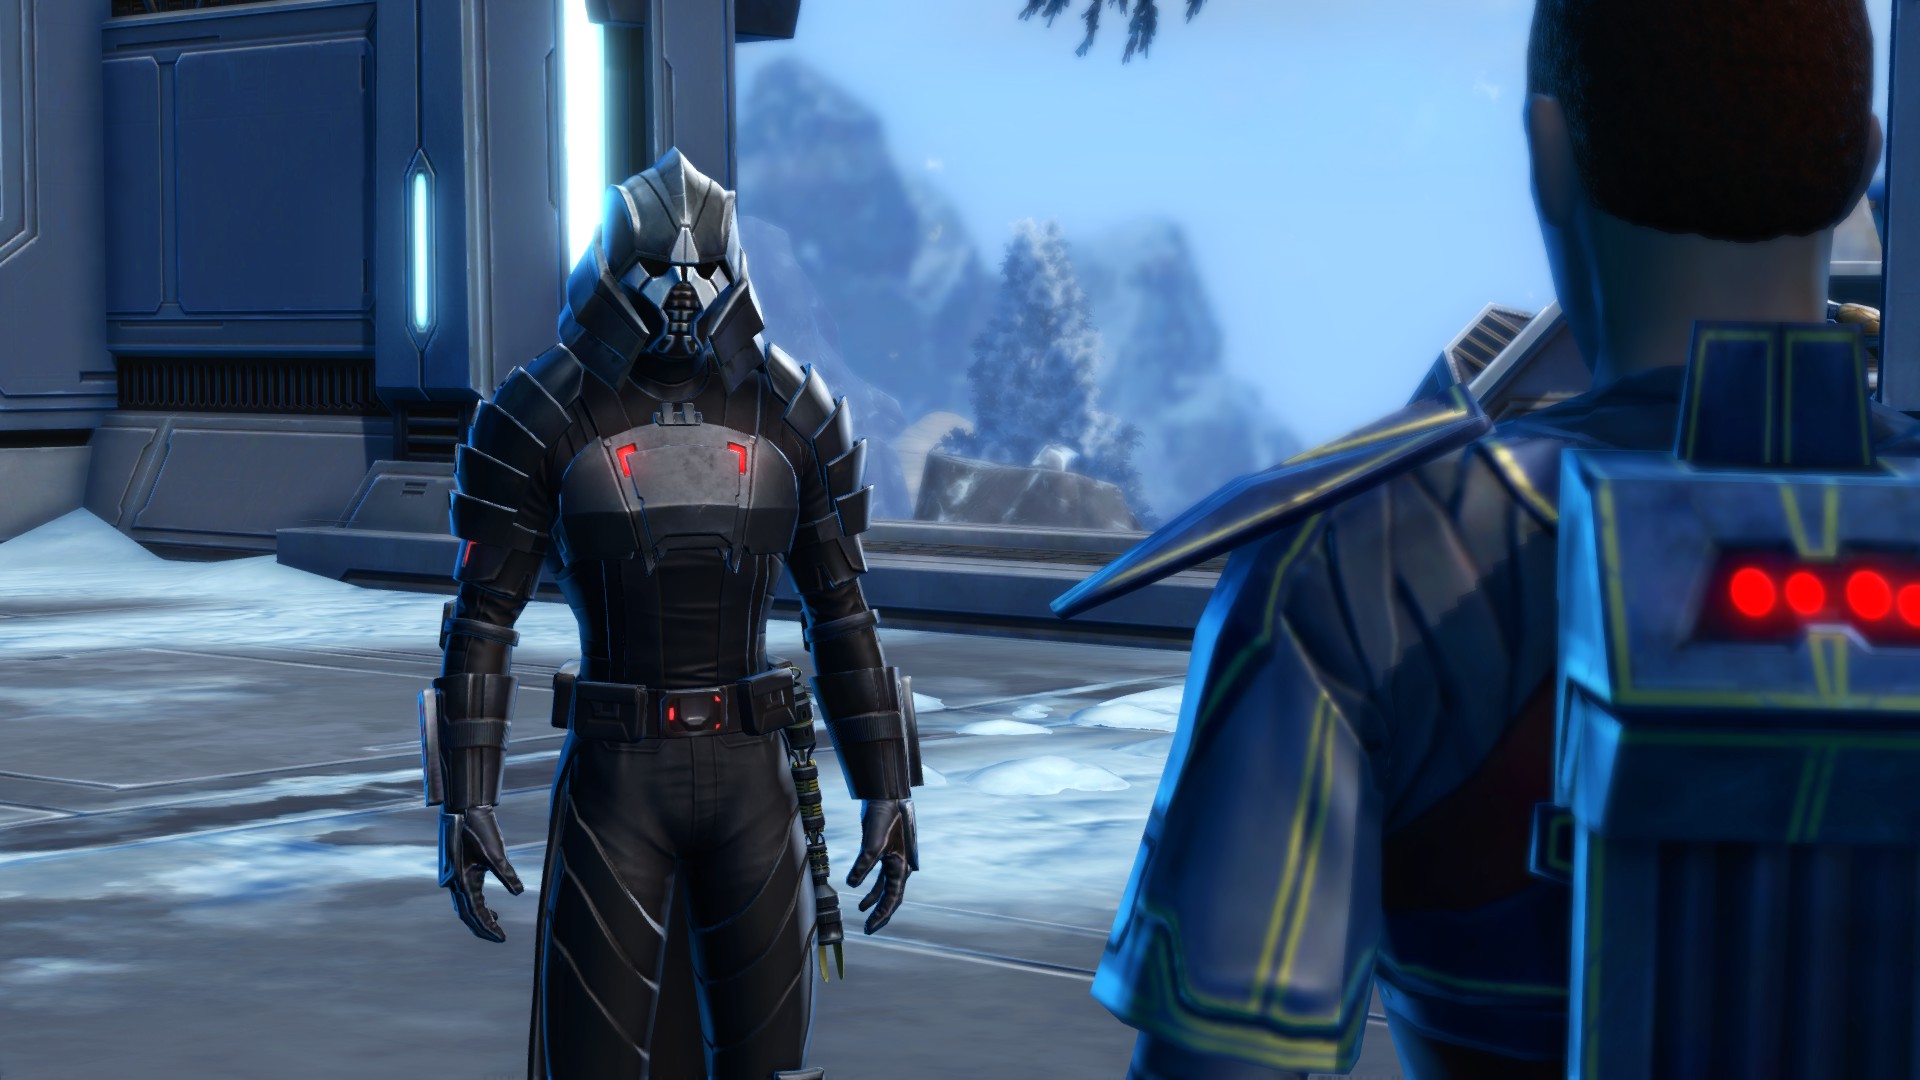
Character LOD controls how detailed character models are. This includes detail of their facial expressions, the realism of how light interacts with them, and other things. It’s pretty noticeable in cutscenes, but less so in normal gameplay. Activities like World Bosses, Warzones, and Operations tend to have many players. In those, this’ll affect performance a lot. If you’re trying to get those running better this isn’t a bad option to turn down.
Low:

High:

FPS Table:
Anisotropic FIltering is a technique that combats the blurring of textures when they’re viewed at an angle. This option is pretty important because High Quality textures still look pretty bad without AF. This setting doesn’t hurt performance at all as long as you’re not on an integrated GPU. Unfortunately, those cards are so weak even a minimal effect like this bogs them down. In SWTOR, Low is 4xAF, Medium is 8xAF, and High is 16xAF. If you turn it on it’s not worth putting it on anything other than High.
Off:
Low:

Medium:

High:
FPS Table:
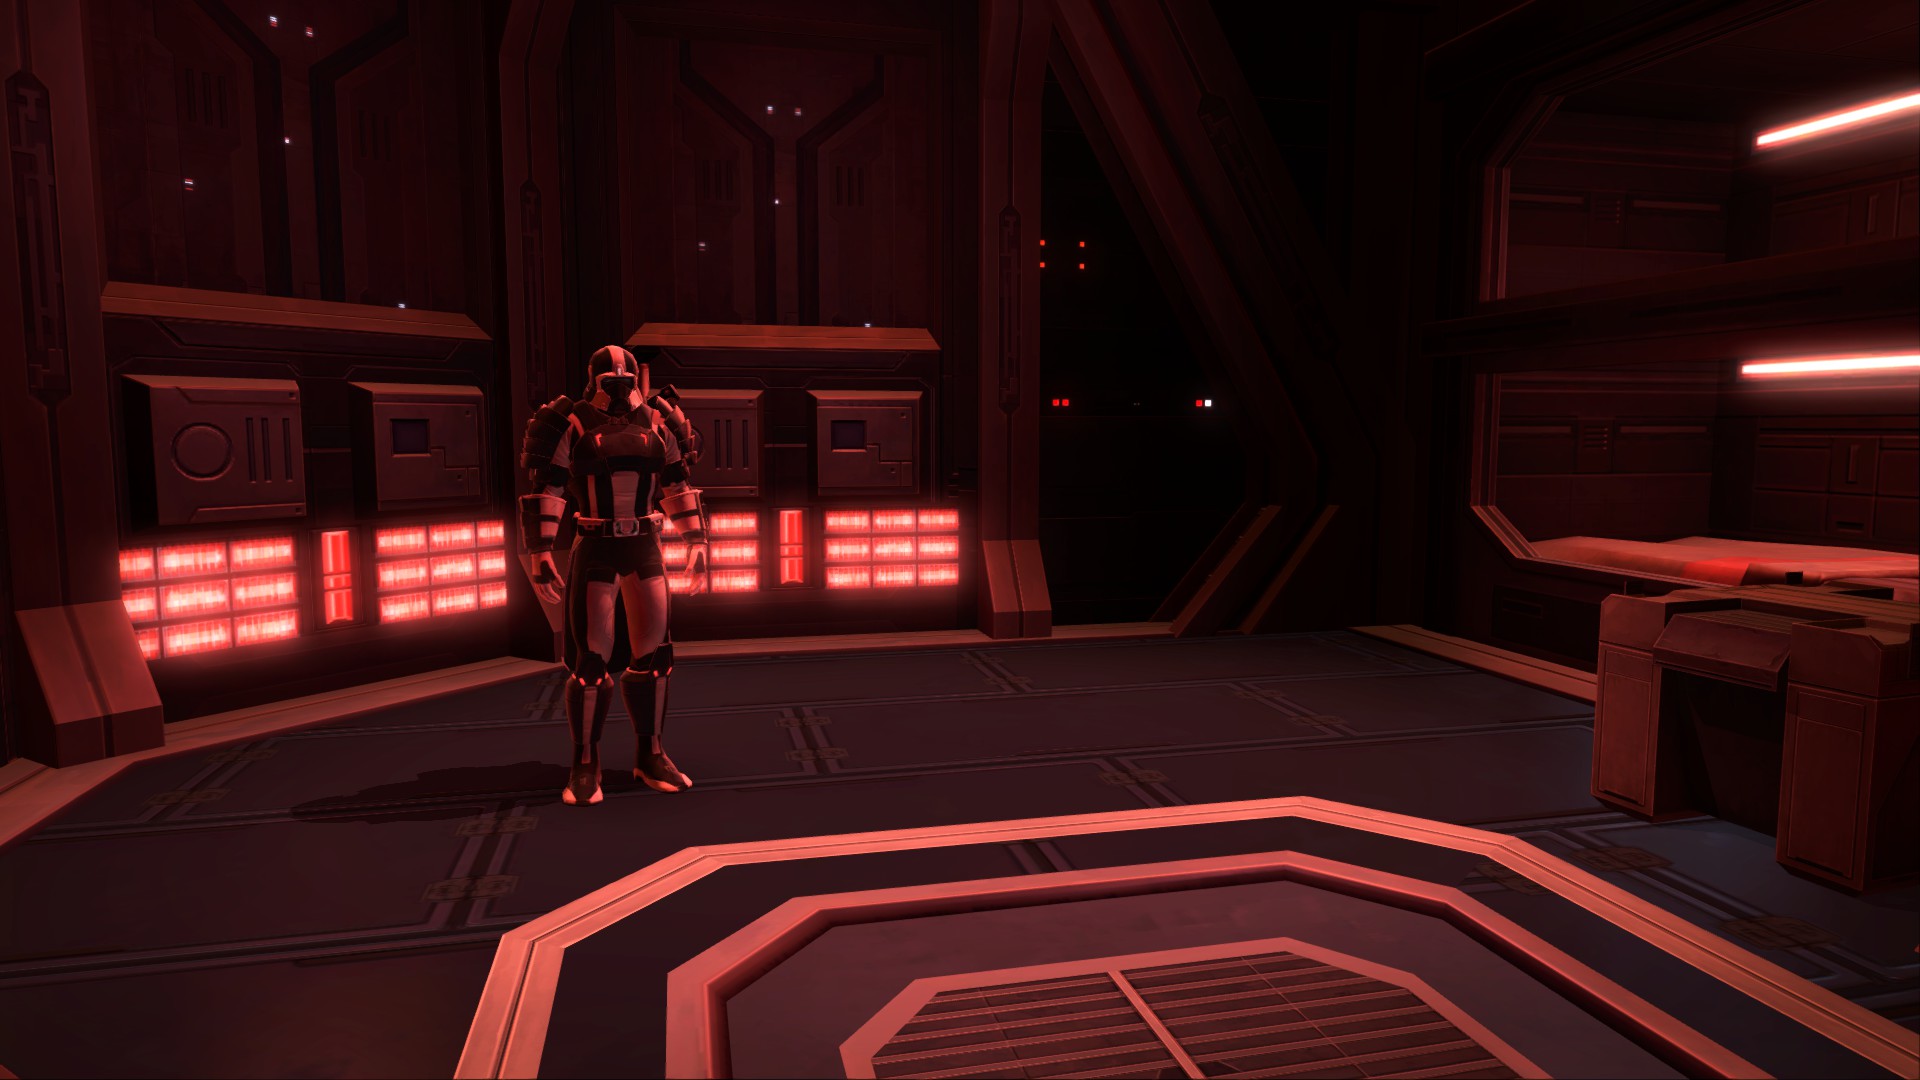
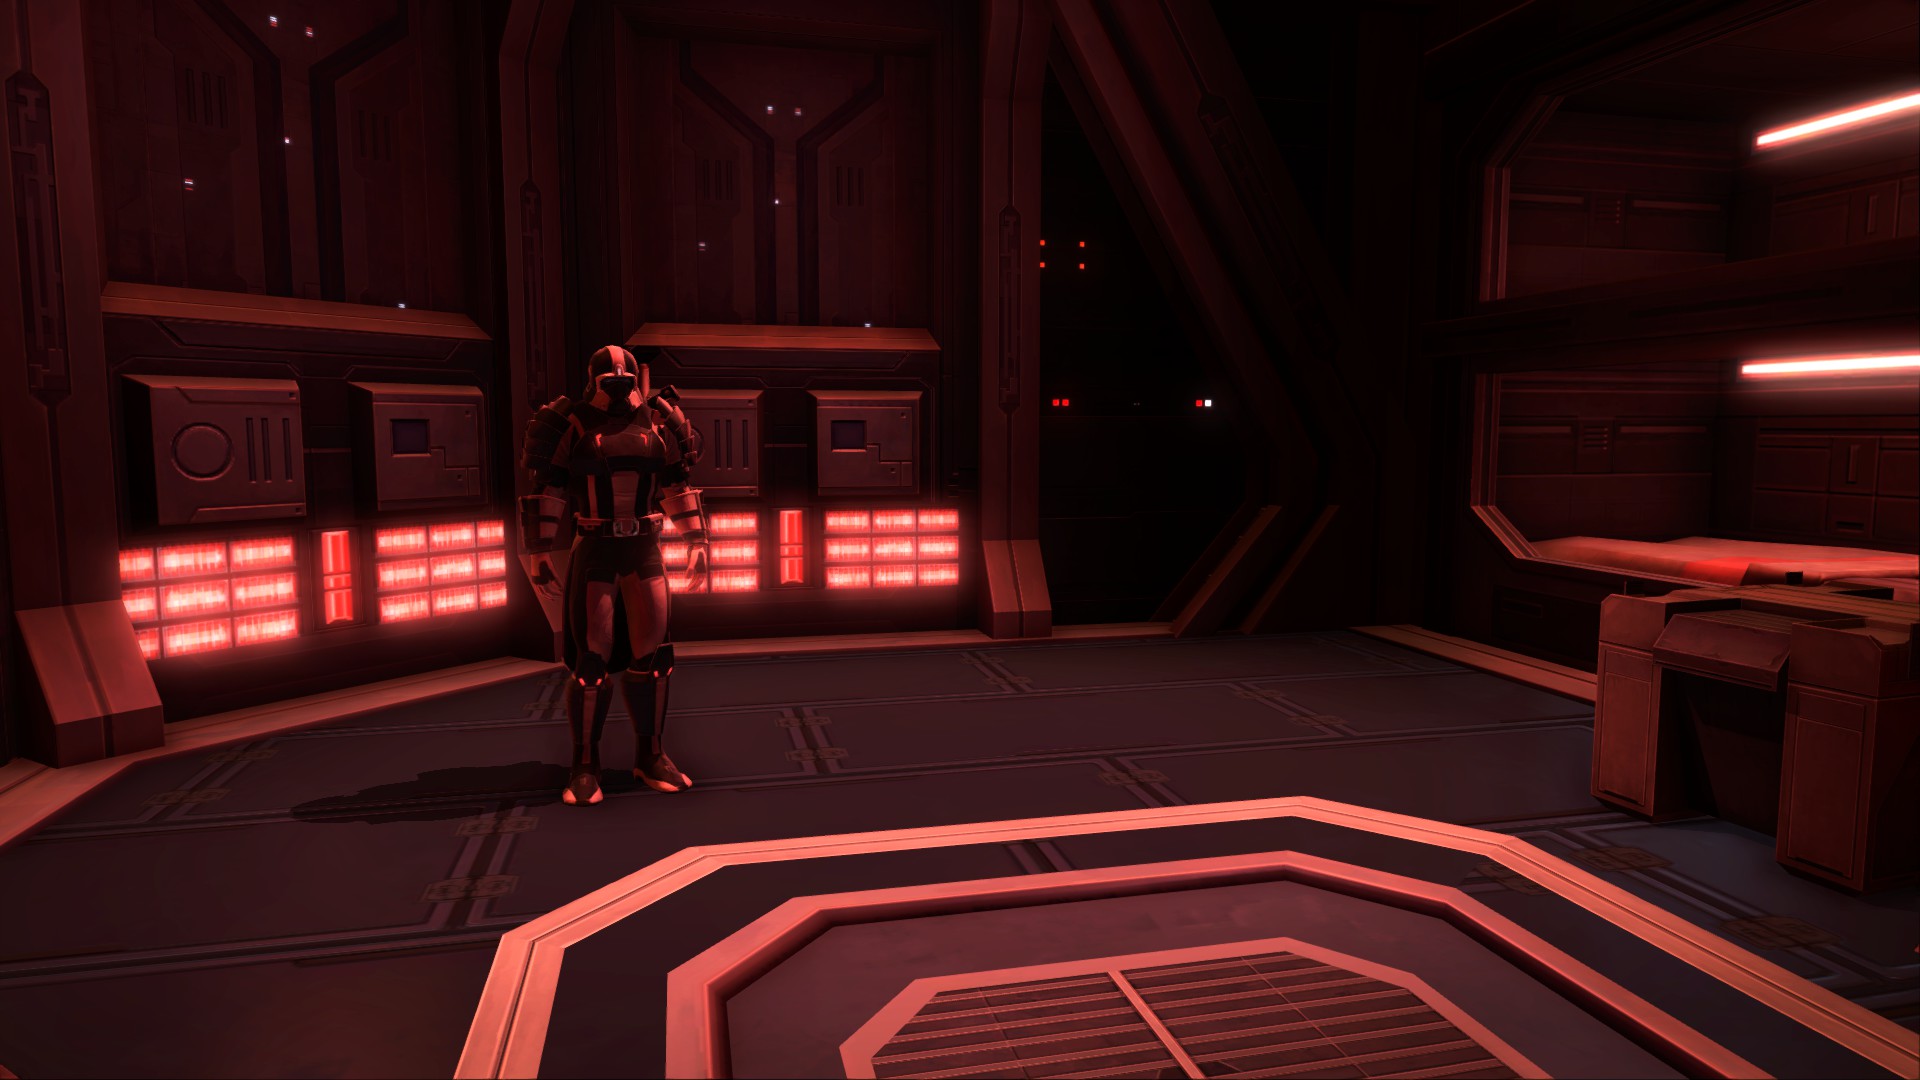
This setting adjusts the degree of Texture Atlasing. This is a technique where many small textures are atlased together to make one big, detailed texture) on the character models in game. It’s basically a Texture Quality setting for your Sith or Jedi’s model. It’s pretty noticeable so I’d keep it on High if you can help it. Lowering it can improve performance in situations like World Bosses, Warzones, and Operations.
Low:

High:

FPS Table:
Graphics Options (Continued)

This adjusts the amount of NPCs that can be rendered around you at once. It also controls how far away from your character the game will render NPCs before stopping. Player characters have a constant draw distance so that people with better computers don’t have an unfair advantage in Ranked PVP. So this option only effects NPCs. I’d suggest keeping it on High for a balance between performance and visuals, since there’s not much of a difference between High and Very High.
Low:
Medium:

High:

Very High:

FPS Table:
Shadow Quality controls the type of shadows rendered by the game. Off has no shadows, the Low setting has blob shadows under players and NPCs, and the High setting has full, detailed environmental shadows. This is a very impactful graphical effect. Shadows are the most demanding thing to render in the game. Unless you meet the Recommended Requirements I’d recommend turning this setting to either Low or Off. Otherwise, the performance impact varies from planet to planet. Grassy planets like Alderaan need much more juice than Coruscant or Korriban. Shadows are also effected by two more options, both of which come next.
Off:

Low:

High:

FPS Table:
*Please note that Shadow Map Resolution and Shadow Map Cascades were on their maximum setting when measuring High quality shadows. The performance cost of these shadows may be reduced if those settings are turned down.
Shadow Map Cascades controls the draw distance of higher-resolution shadows. Higher settings allow for detailed shadow rendering for a longer distance. After the distance drop-off point shadows render at half-resolution. After one more drop-off point, shadows stop rendering. This setting is quite brutal, so it’s best to find a balance between this and Shadow Map Resolution.
Medium:

High:

Very High:

FPS Table:
Please note that Shadow Map Resolution was set to the maximum (2048) for this benchmark.
This power-hungry option adjusts the resolution of shadows in increments of 256. It’s best to find a balance between this and Shadow Map Cascades.
1024:

1280:

1536:

1792:

2048:

FPS Table:
Please note that Shadow Map Cascades were set to the maximum for this benchmark.
SSAO approximates Ambient Occlusion in real-time as an image post-processing effect. It darkens creases, holes, and surfaces that are close to each other. In real life, such areas tend to block out or occlude ambient light, appearing darker. Contrary to its in-game name, it doesn’t have anything to do with environment shadows. SSAO is one of the nicest effects in the game, making a subtle but huge change that makes everything more realistic. It doesn’t come cheap, but it’s worth it if your computer can take it.
Off:
On:
FPS Table:
Graphics Options (Continued)
This setting mimics the eye effect of blurring objects that aren’t in focus, but only during cutscenes. It looks pretty good and gives story cutscenes a more stylized, cinematic feel. Since it only applies to cutscenes, I’d disregard the performance cost and leave it on. Unless you’re on a potato, that is.
Off:

On:
FPS Table:
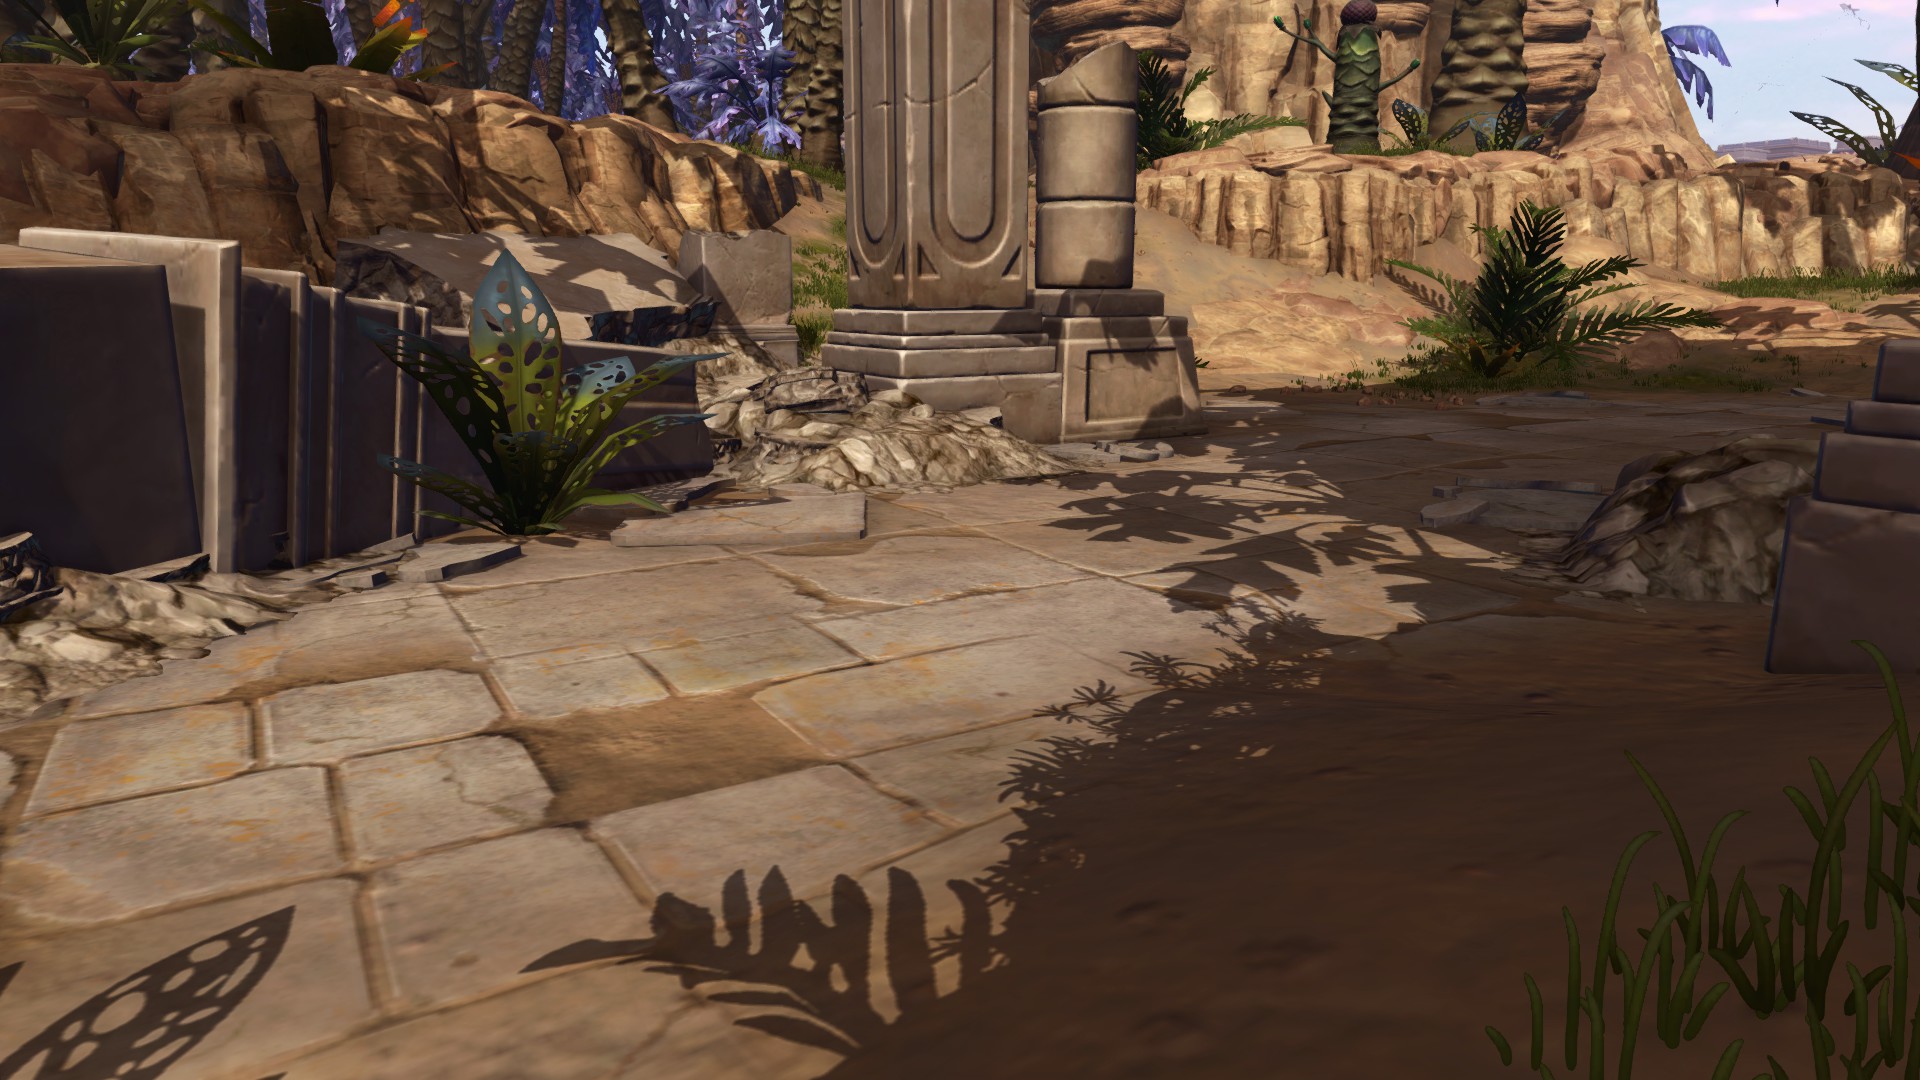
This slider changes the visual quality of trees and the distance at which you can see them before they’re swapped to lower-quality models. In my testing, it seems to have almost no effect on framerate.
0:

25:

50:

75:

100:

FPS Table:
This slider adjusts the density of grass by increasing the number of grass objects rendered per unit area. Looks best maxed out and has very little impact on performance above 0. That said, setting it to 0 gives a drastic performance boost so it’s something to consider on low-end hardware.
0:

25:

50:

75:

100:

FPS Table:
Please note that Grass Render Distance was set to Very High for this benchmark, which is what the Ultra preset sets it to.
This setting adjusts the distance around the player in which the game will render grass. Its effects are more noticeable on grassy planets like Alderaan and Belsavis. There’s a very steady and linear decline in framerate as you turn the setting up. That makes it a good option to turn down if you’re having choppy gameplay on Alderaan. However, I found that it’s a bad idea to put it below High. This is because the performance difference between High and Medium is almost non-existent, but the visual difference is noticeable.
Medium:

High:

Very High:

Ultra:

FPS Table:
Windows Tweaks

Step 1: Go to the game’s files by right-clicking it in your Steam Library, clicking Manage, and then Browse local files.
Step 2: Right-click the file called launcher.exe (or just “launcher” since file extensions may not be visible based on your system settings) and click properties.
Step 3: Go to the compatibility tab and check the boxes that say “Disable fullscreen optimizations”
and “Run this program as an administrator.” After that click OK.
Step 4: In the game folder, go into the folder called swtor, then the one called retailclient.
Step 5: Right-click the file called swtor.exe and click properties.
Step 6: Go to the compatibility tab and check the boxes that say “Disable fullscreen optimizations”
and “Run this program as an administrator.” After that click OK.
Why do this? Because running the game as administrator guarantees that the game has full access to anything it needs on the computer. In fact, some games like SWTOR often won’t run at all on non-administrator accounts. I recommend disabling “Fullscreen Optimizations” since what Microsoft is referring to forces games to run in a borderless window. A borderless window is not a true fullscreen experience. While it looks the same as true fullscreen, it causes a performance reduction.
Tweak 2: Turn off Game Mode
Step 1: Open Start Menu and search “Settings.”
Step 2: Open Settings.
Step 3: In the search bar at the top, search for “Game Mode” and click the result called “Game Mode settings.”
Step 4: Make sure Game Mode is turned off.
Step 5 (OPTIONAL): Turn off Xbox Game Bar stuff while you’re at it.
Why do this? Because Game Mode has been a controversial feature ever since it was introduced. Most of the time it won’t make any difference at all, sometimes it’ll give you a 0.5fps improvement that can just be chalked up to a 1% deviation and no real-world performance boost, and the rest of the time it’ll likely tank your framerate a bit.
Tweak 3: Make sure Hardware Accelerated GPU-Scheduling is off
Step 1: Open Start Menu and search “Settings.”
Step 2: Open Settings.
Step 3: In the search bar at the top, search for “Graphics settings” and click the result called “Graphics settings.”
Step 4: Make sure the “Hardware Accellerated GPU-Scheduling” setting is off.
Step 5: Don’t leave the menu if you want to do Tweak 4.
Why do this? Because HAGS is an experimental feature, and as such can play havoc with your games. In SWTOR, it introduced a micro-stuttering issue that was never there before for me and in Dark Souls III and Sekiro it introduced periodic freezing. As such, I can never recommend you leave this on.
Tweak 4 (NVIDIA OPTIMUS SYSTEMS ONLY): Make sure the game is using your dedicated GPU
Step 1: Click Browse under “Graphics performance preference” and go to the game folder.
Step 2: Go to the swtor folder, and then the retailclient folder, then select swtor.exe.
Step 3: Check the “High Performance” option.
Why do this? Because if your laptop’s integrated graphics card isn’t made for games. It can’t handle them. Period. Use the discrete Nvidia GPU that it has instead.
Tweak 5: Make sure not to use the Balanced or Power Saver power plan
Step 1: Open Start Menu and search “Power Plan” and click the result that says “Choose power plan.”
Step 2: You’ll be presented with a bunch of options (generally 3-4). Pick Ultimate Performance. If it isn’t available, pick High Performance.
This tweak is a major case of “your mileage may vary.” For people with lower end hardware and laptops, it can make a huge difference. Meanwhile, for higher end hardware it isn’t likely to do a lot if it does anything at all.
Tweak 6: Install DirectX9c
Step 1: Go to this page[www.microsoft.com] and download the file.
Step 2: Make a folder called DirectX9c or something like that on your desktop or another location of your choice.
Step 3: Open directx_Jun2010_redist.exe, click “Run” when prompted, and accept the license agreements when asked.
Step 4: Have it extract the files to that folder when prompted by clicking “Browse” and selecting the folder.
Step 5: Go to that folder.
Step 6: Open DXSETUP.exe.
Step 7: Accept the license agreement, click “Next” when prompted to start installing, and wait for it to finish.
Step 8: Click “Finish” when it completes the installation and then restart your computer.
Why do this? Because not everything from DirectX 9 was carried forward into later versions. Normally, this doesn’t affect games too much, but there are some old games like SWTOR that were built for DirectX 9 and may encounter issues under later DirectX versions, as a result. This won’t override any newer DirectX 10 and beyond files, but simply add DirectX 9 files that you might be missing. You don’t need to install it if you aren’t having problems, but it won’t hurt to install.
Tweak 7 (LAPTOPS ONLY): Plug your laptop in
Step 1: Plug your charger in so your computer has enough juice to run games properly. Seriously, don’t play games on a laptop without plugging in the charger.
Step 2: ????
Step 3: Profit.
Why do this? Refer to Step 1.
NVIDIA Driver Tweaks

Before you get started, go to either the NVIDIA site or use GeForce Experience to download and install the latest drivers for your GPU. This is always a good thing to do. Next, you have two pieces of software that you can use to tweak how the drivers handle the game. You can either use NVIDIA Control Panel, which comes with the driver, or NVIDIA Inspector, which you can download from Guru3D. Nvidia Inspector is the same as NVIDIA Control Panel, but allows you to tweak hidden settings that Control Panel wouldn’t even show you. I’d recommend NVIDIA Control Panel if you’re not very good with computers, and NVIDIA Inspector if you’re feeling tech savvy.
Option 1: NVIDIA Control Panel
Step 1: Right-click on your desktop and click NVIDIA Control Panel.
Step 2: Click “Manage 3D Settings” in the panel on the left.
Step 3: Click “Add” and go to the game folder, then the swtor folder, then the retailclient folder and add swtor.exe
Step 4: Set “Low Latency Mode” to “On.” This’ll make warzones a tiny bit more consistent and improve input lag. This is because the CPU will spend less resources pre-rendering frames (On will reduce the number of those frames to just 1) and thus free up CPU power for CPU-intensive situations like warzones.
Step 5: Set “Power management mode” to “Prefer maximum performance.” This keeps your GPU running at full-speed in 3D games. SWTOR in particular benefits from this since it does exhibit odd behaviour where it will down-clock your graphics card speed randomly as if it’s not running a 3D application.
Step 6: Set “Shader Cache” to “On.”
Step 7: Set “Threaded optimization” to “Off.” Threaded optimization seperates the V-Sync thread from the main render thread and improves framerate in triple-buffered rendering scenarios. Most older games, SWTOR included, use double-buffering, and in these older games, Threaded optimization will cause a performance reduction.
Step 8 (OPTIONAL): Set “Vertical sync” to “On.” Do this if you prefer to use V-Sync in games (like I do) because SWTOR’s implementation of V-Sync is pretty lame. Driver-forced V-Sync is way better, and runs better too.
Option 2: NVIDIA Inspector
Step 1: Extract the files you downloaded.
Step 2: Open nvidiaProfileInspector.exe.
Step 3: In “Profiles,” search “Star Wars: The Old Republic” and click the result. You need to use proper punctuation here.
Step 4: Under 2 – Sync and Refresh set “Maximum pre-rendered frames” to “1.” This’ll make warzones a tiny bit more consistent and improve input lag. This is because the CPU will spend less resources pre-rendering frames (On will reduce the number of those frames to just 1) and thus free up CPU power for CPU-intensive situations like warzones.
Step 5 (OPTIONAL): Under 2 – Sync and Refresh set “Vertical Sync” to “Force on.” Do this if you prefer to use V-Sync in games (like I do) because SWTOR’s implementation of V-Sync is pretty lame. Driver-forced V-Sync is way better, and runs better too. If you do this follow Steps 6 and 7 as well.
Step 6 (OPTIONAL): Under 2 – Sync and Refresh set “Vertical Sync Smooth AFR behavior” to “Off.”
Step 7 (OPTIONAL): Under 2 – Sync and Refresh set “Vertical Sync Tear Control” to “Standard.”
Step 8: Under 5 – Common set “Power management mode” to “Prefer maximum performance.” This keeps your GPU running at full-speed in 3D games. SWTOR in particular benefits from this since it does exhibit odd behaviour where it will down-clock your graphics card speed randomly as if it’s not running a 3D application.
Step 9: Under 5 – Common set “Shadercache” to “On.”
Step 10: Under 5 – Common Set “Threaded optimization” to “Off.” Threaded optimization seperates the V-Sync thread from the main render thread and improves framerate in triple-buffered rendering scenarios. Most older games, SWTOR included, use double-buffering, and in these older games, Threaded optimization will cause a performance reduction.
AMD Driver Tweaks

This section is currently under construction while I look for someone with AMD hardware to test this stuff for me. I’m really sorry to any AMD users but I don’t have an AMD graphics card. If you run on an AMD graphics card and have some tweaks of your own, feel free to leave them in the comments and I’ll add them to the guide!
Bug Fixes

A lot of these happen on Windows 10 a lot since old software often doesn’t play nice with the OS. Because of that, these should be particularly useful for most users.
Bug Fix 1: Black screen on startup or invisible/small game window
Step 1: Press Windows Key + R at the same time to open the Run window.
Step 2: Type/copy and paste the following:
Step 3: Open the client_settings.ini file and change the following lines:
Step 4: Start the game.
Bug Fix 2: Missing textures and assets
Step 1: Go to your Steam Library.
Step 2: Right-click SWTOR, and click “Properties.”
Step 3: Click the “Local Files” tab on the left.
Step 4: Click “Verify Integrity of Game Files.”
Step 5: Let Steam scan your game and redownload any corrupted or missing files.
Bug Fix 3: Only a single instance of this application can run
Step 1: Press Ctrl + Shift + Esc to open Task Manager.
Step 2: If the window is tiny with very little information, click the “More details” button.
Step 3: Click the “Details” tab at the top and look for any processes called swtor.exe.
Step 4: When you find them, click each one and click the “End Task” button.
Quality of Life Tweaks

Most of these tweaks are subjective, and just stuff that made the game more enjoyable for me. Feel free to suggest more in the comments!
Tweak 1: Turn off General Chat to avoid toxic morons and credit sellers
Step 1: Right click the chat tab and click Chat Settings.
Step 2: De-select “General.”
Step 3: ????
Step 4: Profit.
Tweak 2: Turn off FlyText for cleaner, less cluttered visuals
Step 1: In-game, hit the Esc key on your keyboard.
Step 2: Click “Preferences.”
Step 3: Click “FlyText.”
Step 4: Disable FlyText.
Step 5: No more numbers when you hit people!
Tweak 3: Turn off friendly nameplates to slightly improve Warzone and Operations performance
Step 1: In-game, hit the Esc key on your keyboard.
Step 2: Click “Preferences.”
Step 3: Click “Namepllates.”
Step 5: Disable nameplates for friendly players. You can also turn off nameplate scaling with distance to get some more fps but it does look really bad so I wouldn’t recommend it.
Tweak 4: Change the interface
Step 1: In-game, hit the Esc key on your keyboard.
Step 2: Click “Interface Editor.”
Step 3: Pick from one of the presets in the game like Advanced or Retro, or make your own! You can also download interfaces made by other people and install those.