Overview
Tutorial for how to go about modding tanks into the game and what softwares to use.
Intro
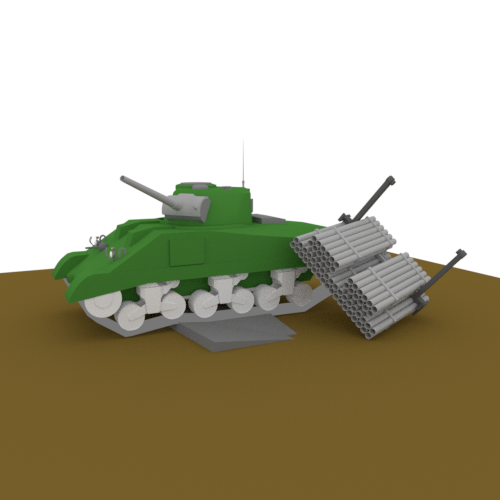
This guide covers most things when modding tanks, including required softwares, modelling tips, and how to go about setting it up in Unity along with a basic suspension how-to. This will take a while to go through and skipping steps may lead to some major problems. The main example vehicle will be my M4 Sherman Calliope tank, since it includes almost all things that I will cover in this tutorial.
Required Softwares/Tools
Both vehicle and weapon modding require the same softwares, so you don’t need to download these again or download new ones if you’ve used JTP’s Weapon Modding 101 guide [link]
You will need Unity 5.6.3p1 (f1 seems to work too) to set your mod up and to export it to RF: [link]
Cost: $0
Most 3D modelling softwares can be used for making the models, the one most people use being Blender (Required for suspension setups), although may be very confusing at times: Found on Steam or [link]
Cost: $0
Lastly, you need the Ravenfield Toolspack to actual have the assets needed: Found on the Official RF server (description of modding channel) or [link]
Cost: $0
Optional:
Audacity, an audio editing software used to port custom sounds into Unity: [link]
Cost: $0
Modelling
The first and most simple yet time consuming task, the modelling. You will need know the way modelling softwares work; what certain things do and how to use them effectively. Blender Guru mainly helped me through this:
https://www.youtube.com/watch?v=JYj6e-72RDs
I recommend watching most of the parts to get familier with Blender, or you can just attempt to figure it out yourself.
When modelling tanks, make sure to create separate objcets for the Hull, Tracks, Wheels (needed for suspension), Turret(s), Cannon Base (an object between the cannon and turret, so they don’t overlap), Cannon(s), and other items you may want to be able to pop off when shot. Do not rotate objects in “Object Mode”, instead, rotate them in “Edit Mode” to avoid any issues that may occur while working in Unity. I recommend starting with a somewhat blocky tank and finding a blueprint of the tank and look at reference pics for certain spots if you are new to modelling.
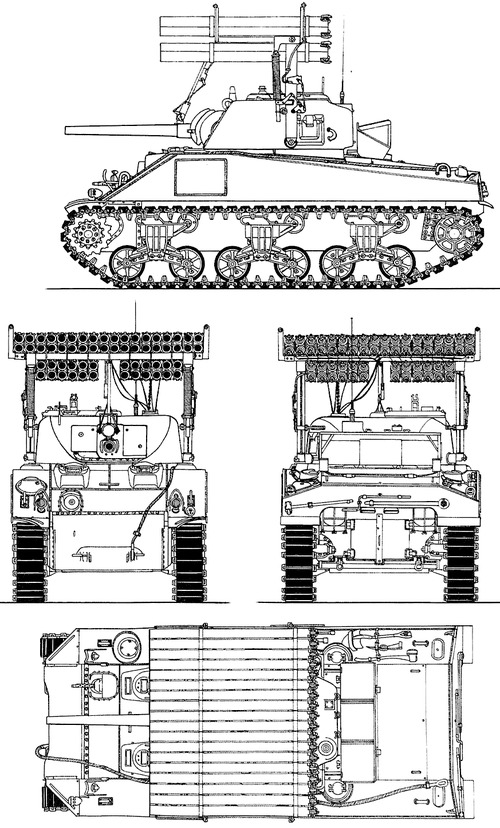
War Thunder, World of Tanks, or any other tank games can help you get a grasp with how the tank is supposed to look like.
Next, the same process of setting up weapon modelling applies to vehicle modelling, but may require a bit more steps when setting up the reference pics:
1. Set the background image(s) as the reference pic (blueprint). I tend to set one for each angle, lining them all up after I got the right side view measured (optional): ‘N’ -> “Background Image” (Checked) -> “Add Image” -> “Open” -> Blueprint (Search for it, recommend putting the pic on the desktop for easy access)

2. You can set the scale of the tank by taking the default soldier model found in the Ravenfield Toolspack and pasting it in the tank model Blend to adjust the blueprint scale to about right:

3. When modelling, the origin point for the Hull, Tracks (Do only one track if making suspension), and extra accesories doesn’t matter where it is, but the Turret and Cannon origin points can be set in the correct pivot points to make your life in Unity easier (otherwise you’ll need to add parents and etc.):
4. Blips are done the exact same way as weapons, you can take a side view shot of the turret for a cannon UI pic, but I personally prefer to make a separate Blend of the shells and make UI images out of those. For a blip of the tank all you need to do is set the camera directly above the tank.

Modelling: Basic Suspension
This part can be skipped over, my setup may lead to frame drops as seen on my tank mods with it.
1. Make sure that the road wheels, idler wheels (optional), and sprocket wheels (optional) are separate from each other, including the tracks:

2. Add bones to the track, the last one placed should be the main track bone:

3. For each part associated with the suspension (Tracks + Road Wheels), add a “Armature” Modifier, setting it as the Armature that you just placed: “Modifiers” -> “Add Modifier” -> “Armature” -> “Object:” = “Armature” (Bind to: Vertex Groups)

4. Before setting the vertex groups, I recommend naming the bones to their corresponding wheel/track (i.e. Wheel.001, Wheel.002, Wheel.003, etc., Track.001):

5. Set up the vertex groups: “Data” -> “Vertex Groups” -> +/- -> double click to rename group (has to be exact same as the corresponding bone) -> select verts (edit mode) -> “Assign”/”Remove”

NOTE:
-The part of the track that isn’t assigned to any other bone must be assigned to the extra bone you made.
-If you want your wheels to rotate, do not do anything to the individual Wheel Objects, technically you only need to set the track up.
Test the suspension by going into object mode, select the bone structure, select “Pose Mode”, and move the bones up and down.
6. If you only did one track, you can copy the whole thing (including bone object) and paste it, then mirror the mesh and move the objects to the other side. Otherwise you can just repeat the process for the other side.
Configuration in Unity Part 1: Setup (Tank Hull)
Now that you have your model, you can set up it in Unity, which unlike weapon modding, may be the most tedious part of vehicle modding.
Before you start, I recommend looking at the default tank “Arcade Car” (“Configurable Joint”, “Hinge Joint”, and “Tank Turret” can help for making cannon recoil) script.
1. Find the Blend file in Unity (may need to drag it into the Unity files if not saved on it yet: Blend file -> “File” -> “Save As…” or dragging it from where you saved it in the files, and drag it into the “Models” file in the Unity RF Toolspack) and drap it from the project tab into the heirarchy (located on the left) or anywhere on the scene:
[link]2. Set the desired materials for your tank:

3a. Add the “Mesh Collider” script for all parts of the tank that have a “Mesh Filter” and “Mesh Renderer” script, you can also manually set it using box colliders and capsule colliders (refer to vanila plane/bomber/helicopter). Then, change the “Material” of the collider to “Tank Hull”:

3b. Alternatively, depending on the shape of the object you may want to divide the mesh up or create the collision meshes in separate pieces. This process is just a tiny bit more work but pays off especially if you decide to use the Vehicle Destructible Hitbox script to adjust the damage multiplier of certain areas:
Original Model

Modelled Collision Meshes
Most of the Collision Meshes Used (Some basic shapes were created in Unity)


4. Feel free to copy and paste the following parts from the default tank over to your tank (you can adjust settings for particles if you so please), and move them to their correct places:
Cannon:
-Camera
-Muzzle
-Cannon Reverb
-Driver Third Person Camera
Turret:
-owner_indicator
-Reload Audio
Main Parent:
-Impact Effect
-Block Sensor
-Explosion Particle System
-Damage Particle System
-Driver Seat
-Gunner Seat (optional)
-Driver HUD
-Gunner HUD (optional)
-Fire Particle System
-Heavy Damage Audio
-Interior Sound
-Water Ripple Particles
-Wheel Colliders (do not use with visual suspension)

Configuration in Unity Part 2: Parameters (Tank Hull)
This section will quickly go over what scripts and parameters you should set for the tank (main parent)
1. Add the following 3 scripts to the main tank parent: “Rigidbody”, “Arcade Car”, and “Audio Source” (audio source comes with the arcade car)

2. Set the parameters however you like for all three, this is how they generally should look like but you can mess with the properties:
-Rigidbody

-Mass self-explanatory (note that if the number exceeds 15000 the vehicle will begin to affect the physics of player characters in-game, I’ve found this to be the cause of characters being launched away on contact
-Drag air resistence
-Angular Drag air resistence when falling
-Use Gravity self-explanatory
-Is Kinematic honestly don’t know what this does
-Interpolate no clue
-Collision Detection how collisions are detected, discrete being right away and only that one time contact, continuous meaning the collision goes on, and continuous dynamic meaning it goes on for a bit unless interupted (I think)
-Contraints locking any of these means the object will not move in that axis
-Audio Source

-Arcade Car: The main script you can modify the properties for as much as you want, but this is the Calliope example.


All properties are self-explanatory
Configuration in Unity Part 3: Setup (Turrets)
Multiple kinds of turrets can be made, but I categorize them into three groups, Turreted (anything that has a bearing point that rotates in a full 360), Non-Turreted (anything that has a limited bearing range), and Other Ammunition (for extra shell types and coax MGs/Cannons)
Turreted:
You can use a “Mounted Turret” (refer to the default machine gun/autocannon/AAG) script or a “Tank Turret” setup (refer to default tank turret).
-Mounted Turret: “Mounted Turret” (audio source too) applied to the main turret parent

-Tank Turret: “Configurable Joint” and “Rigidbody” scripts are applied to the main turret (refer to default tank). The “Tank Turret” (audio source too), “Rigidbody”, and “Hinge Joint” scripts are applied to the Cannon (refer to the default tank)

Non-Turreted
You can use a “Tank Turret” setup, but it isn’t recommended because it’s very buggy ATM, so use the “Mounted Turret” script instead and set it up the same way you did for Turreted turrets.
-Mounted Turret: “Mounted Turret” (audio source too) applied to the main turret parent
Other Ammunition
You can use another Mounted Turret script or a “Mounted Weapon” for these kinds of turrets.
-Mounted Turret: “Mounted Turret” (audio source too) applied to an empty object. Only use if main turret uses a Mounted Turret script too

-Mounted Weapon: “Mounted Weapon” (audio source too) applied to an empty object. Only use if main turret uses a Tank Turret setup
Configuration in Unity Part 4: Parameters (Turret)
Now that you have your turrets set up, you can start to change the properties of them. The mounted turret, mounted weapon, and tank turret scripts are very similar to those used for guns, with some things added to them.
The Configurable and Hinge Joints only have some parts that you can mess around with:

This is how configurable joint should generally look like, the only real thing you can mess around with either than properties at the top is the “Slerp Drive” parameters, which control how springy the turret’s rotation is while turning and firing. The following can also be changed:
-Connected Body Should be the main parent of the tank (has to have a rigidbody)
-Anchor Main pivot point anchor, doesn’t need to be changed most of the time
-Axis Main pivot point axis
-Auto Configure Connected Anchor Auto config connected anchor
-Connected Anchor Pivot point connected to the tank (untick Auto Config box to modify this if the turret doesn’t rotate horizontally properly)
-Secondary Axis Secondary pivot point axis

General look of the hinge joint. Following can be changed:
-Connected Body Should be the main parent of the Configurable Joint
-Spring How springy/bouncy the cannon is while turning/firing
-Limits Min/Max How far the cannon can go up(-)/down(+)

Auto: self explanatory, makes weapon full auto when on
Ammo: amount of ammo per mag (autoloaders)
Spare ammo: extra ammo carried
Resupply number: not sure if this even works
Reload time: how long the weapon is unusable while reloading
Cooldown: amount of time (in seconds) between shots, equal to 60/rate of fire.
Unholster time: time it takes for the weapon to be fireable after it is drawn
Aim FoV: how much you see while ADS.
Can be aimed while reloading: toggles exactly what is says
Force auto reload: weapon automatically reloads when empty
Loud: self explanatory, generally leave this on, except for stealth weapons.
Forces world audio output: don’t know, but on default weapons have it on, so I leave it off.
The next configurations set up how your rounds will act once fired. All values are up to personal preference the the kind of weapon you are making. Note that these settings only work for the “Tank Turret” setup.
Kickback: the raw recoil of your gun, the higher, the more recoil per shot
Random kick: amount of random direction your recoil will have, higher values mean the weapon will spray more wildly.
Spread: raw spread of the weapon as it fires, the higher the number, the greater the spread
Followup spread gain: how much the spread increases per shot
Followup max spread hip: limit to spread while hip firing
Followup max spread aim: limit to spread while aiming
Followup spread stay time: how long it takes for the effect of firing on spread to go away after you stop shooting
Followup spread dissipate time: it think this is very similar to the previous configurtion
Snap magnitude: effects visible recoil effect, larger value increases recoil
Snap duration: effects length of time it takes recoil snap to occur
Snap frequency: larger values increase number of snap starts per second
AI allowed aim spread: how much the AI spreads when firing
Eff [category]: tells AI when to use the weapon. Infantry is a single soldier, infantry group is for multiple soldiers close to each other, unarmored is jeeps and turrets, armored is tanks and attack boats, air is helicopter, air fast mover is planes and bomber.
Effective range: tells AI the maximum range shoot at. Does not effect player.
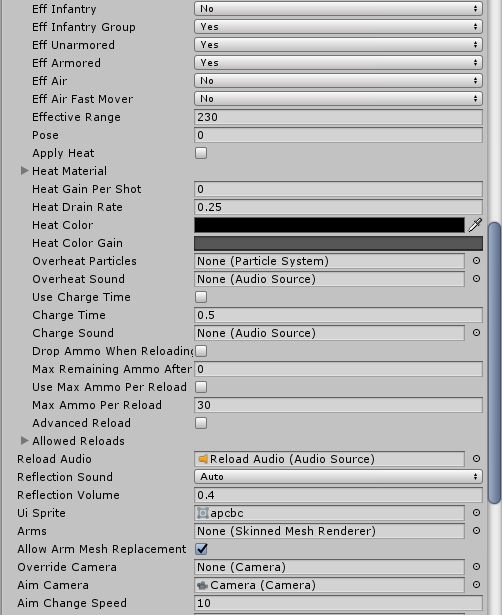
Apply heat: when on, allows weapon to overheat, generally only for machine guns or energy weapons
Heat material:
-target renderer: choose your weapon, specifically the component with the part that will visibly overheat
-material slot: what material in that mesh will visibly overheat
Heat gain per shot: value out of 1 that determines how fast the weapon overheats. So at .25, the weapon will overheat in 4 shots, and at .01 it will overheat in 100, etc
Heat drain rate: how fast the weapon cools down, the higher the number, the faster the cooling.
Heat color: what color the visibly heating part will turn as it heats
Heat color gain: how that color changes as more rounds are fired. Adjust the dots to change
Overheat particles: the particle system seen when overheated. In general duplicate from machine gun
Overheat sound: sound the weapon makes when it overheats
Advanced reloads: allows for different reloads depending on number of rounds left in the gun
-size: dictates how many different reloads there are. At this point I do not know how to properly configure this category.
Scope aim object:prefab to use for the scope of a high magnification optic.
Other things:
Reload Audio self-explanatory
Reflection Sound no clue
Reflection Volume no clue
UI Sprite self-explanatory
Arms arms object if you have one
Allow Arm Mesh Replacement self-explanatory
Overide Camera select a camera that can overide the default one (like the bomber camera)
Aim Camera self-explanatory
Aim Change Speed self-explanatory
Extra Mounted Turret Parameters:

-Bearing Transform horizontal axis object
-Pitch Transform vertical axis object
-Clamp X horizontal axis limits, left(-)/right(+)
-Clamp Y vertical axis limits, up(-)/down(+)
-Sensitivity X self-explanatory
-Sensitivity Y self-explanatory
Extra Tank Turret Parameters:

-Tower Joint horizontal axis object (configurable joint)
-Cannon Joint vertical axis object (hinge joint)
-Cannon Renderer cannon object (same as vertical axis object)
-Sensitivity X self-explanatory
-Sensitivity Y self-explanatory
Configuration in Unity Part 5: Basic Track Suspension Setups
For the suspension, you can either create one similar to the default tank setup, or make it work visually.
Default Setup
Check the default tank’s “wheel colliders” for reference.
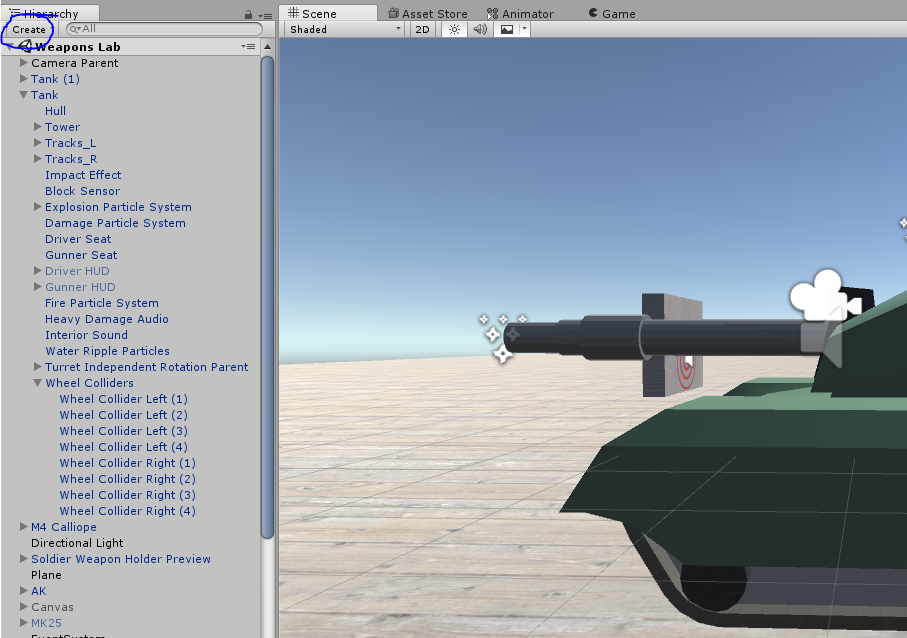
1. In order to create the default setup, you need to add a “Car Wheel” script. Do this by creating a new object, placing it under the main tank parent (can be put anywhere as a child of only the main tank, unless you create a parent dedicated to the suspension), then adding the “Car Wheel” script to it. “Create” -> “Create Empty” (or Create Empty Child) -> “Inspector” -> “Add Component” -> “Car Wheel” (script)


Suspension Height the height of the suspension, although Unity seems to generally not care about this property (even set to 0 it will go up and down). Set this however you like.
Wheel Radius the size of the collider. Set however you like.
Suspension Acceleration how much force makes the suspension go back to its original spot (higher numbers means it returns-to-origin quickly, lower numbers makes it move slower when returning)
Suspension Drag mainly the stiffness of the suspension (higher numbers = more stiff, lower numbers = less stiff)
Wheel Model the model of the wheel used (the model will go up and down with the car wheel script). Generally set to “None” for the default setup.
Rotate the wheel will only be affected visually by this, keep this on if you want, although it only affects the way its model rotates.
Turn Angle if you turned on “Tank Turning” in the “Arcade Car” script (main parent), it’s recommended to keep this at 0.
2. In the scene, you can move and rotate the collider to the place you want it to be in, copy/pasting the object speeds up the process of setting up the suspension. I recommend placing the colliders for one track first, then copying all wheel colliders, pasting, and moving them to the other track.


Visual Setup
1. Check out this video I made on this topic, make sure to watch it in its entirety before starting to do it. P.S. Look at the rotations for each object in the video and make sure they are corrected for your model.
Geometric Tank Tracks
(Text version soon)
Notes:
-At the moment I can’t seem to find a solid way of making it so that Unity doesn’t add any unnecessary vertices but haven’t had much luck, but here’s a list of things to try to create a working version;
-Apply Edge Split and Smoothshade before applying the Curve/Array modifiers
-Apply Edge Split and Smoothshade after applying the Curve/Array modifiers (may need to
manually find and fix any edges that weren’t split properly
-Not apply Edge Split or Smoothshade, based on SteelRaven’s advice but doesn’t really work for
complex shapes
-Apply smoothshade by itself, this is the only “solid” way but produces a really smooth track which
may or may not look good
-Do not make the track mesh a child of the Armature Object
Export, Testing, and Upload
Once you have your tank completed, you must export it to the game and test it so you can tweak it. After, you can upload it to the workshop.
Exporting
1. Go to the “Content” folder, it should look like this:

2. Create a new “Example Content Vehicle Mod”. Ctrl + Click/hold and drag to an empty space in the folder. You can rename the ECVM to whatever name you want (M4 Calliope in my case):

3. Once done, look at the inspector section and select which vehicles your mod will replace in-game.


4. After that, make sure you have the ECVM selected and go to the top bar, where it says “Ravenfield Tools”, click it and hover over “Content”. Next, select “Sanity Check Content Mod”, and if there are no errors, select “Export Content Mod”:


Testing
1. Test the vehicle in-game, I recommend doing things players would usually do in it to see if any bugs occur, or if there are any things you need to change to satisfy yourself.
2. Once done, repeat the Exporting process’s step 4
Upload
1a. Before you upload, I recommend going to the Mods folder in the game files (Right click Ravenfield in Steam -> Properties -> Local Files -> Browse Local Files -> ravenfield_data -> Mods), create a new folder (naming it whatever you like), go into the Ravenfield Tools Export folder and cut and paste your mod from it into the new folder.


1b. Now, go into Unity and click on “Ravenfield Tools” again, this time click on “Publish to Steam Workshop” which brings up a page that looks like this:

2. Click “Create New Item”, which brings up more options:
Change Image the thumbnail of the mod, can only be changed in Unity
New Title add a title, can be changed on Steam aswell
New Description add a description, I recommend doing this part on Steam
Content to Publish self-explanatory, look for your mod left of this option
Refresh & Update Content self-explanatory, although I generally use “Publish!” to update my mods
Changelog changelog description for the latest update of your mod
Make Public self-explanatory, can be changed on Steam aswell
Publish! publish. Can be used to update your mod

3. After you click “Publish!”, it will redirect you to your new mod on Steam, where you can change the title, description, add images, add links, contributers, change who can see your mod and so on.
Special Thanks/Additional Resources
Thanks goes to Shiny Spiteful Mk. XIVe on Discord (for suspension), a lot of help from other people on Discord to help me find out what certain things do in the scripts, and JTP’s Weapon Modding 101 which I used as a guide to make this guide.
If anything is unclear, or if you have a specific issue, please leave a comment and I’ll do my best to reply quickly. Also, if you feel the issue is more complex, feel free to add me on steam and message me, or message me via discord.
Other Contact Info:
Discord Slippynote#7038 (Currently Sloppybells) (in Ravenfield, ATDF, Special Ops, and other RF relate and non-related discords)
Youtube Channel: https://www.youtube.com/channel/UCEysk3u6hq4fDWpkZIr8XSg?view_as=subscriber