![Thargoid Interceptor Combat Guide [Builds, Mechanics, Values] for Elite Dangerous](https://steamsolo.com/wp-content/uploads/2021/07/thargoid-interceptor-combat-guide-builds-mechanics-values-elite-dangerous.jpg)
Overview
Hello Commanders!This guide gives a general overview about AX(Anti-Xeno) builds and combat mechanics for both beginners and experienced players for the endgame PvE content: Thargoid Interceptors!Note:This Guide is mainly about fighting Interceptors Solo.This Guide has the following sections:-General Thargoid Interceptor knowledge and stats-AX Builds for Beginners and Professionals-General Combat Strategies of every Thargoid Interceptor-General Combat Mechanics-Advanced Combat Mechanics and Tricks
Interceptors

- Hearts: 4
- Swarm Size: 32
- Speed: 450 m/s
- Enrage Time: 6:00
- Total Hull: 800
- Shield Decay Time: 1:35
- Reward: 2.000.000 Cr
The easiest of all the Interceptors, made for beginners.
Its main weapon is very weak, however can still partially breach Shields.

- Hearts: 5
- Swarm Size: 64
- Speed: 530 m/s
- Enrage Time: 7:00
- Total Hull: 1800
- Shield Decay Time: 3:00
- Reward: 6.000.000 Cr
High difficulty spike from Cyclops, its high speed can quickly outrun you if you don’t have engineered Thrusters.
Its main weapon does more than triple the damage compared to Cyclops, it can quickly drain your Hull through Shields if unengineered.

- Hearts: 6
- Swarm Size: 96
- Speed: 450 m/s
- Enrage Time: 7:00
- Total Hull: 2500
- Shield Decay Time: 4:00
- Reward: 10.000.000 Cr
Medium difficulty spike from Basilisk.
Its main weapon more than doubles the damage compared to Basilisk. Combined with the large Swarm it can quickly blow you into space.

- Hearts: 8
- Swarm Size: 128
- Speed: 450 m/s
- Enrage Time: 8:00
- Total Hull: 3200
- Shield Decay Time: 5:20
- Reward: 15.000.000 Cr
The hardest of all the Interceptors with a very high difficulty spike from Medusa.
The main weapon damage is only slightly higher compared to Medusa, however due to the large health pool exerting a heart becomes very difficult without premium ammo.

- Hearts: 5
- UNKNOWN: HULL STRESS FACTOR UNCERTAIN
Rumors say this ship has been created by Palin and Aegis using reverse-engineered Thargoid technology. Flees immediately when approached. It cannot be fought at this time.
AX Builds
Against a Cyclops basically any AX/Guardian weapon will work well.
Before we go into hitscan meta with Gauss cannons you may want to try multiple AX/Guardian weapons against the Cyclops first. If you want to make it very easy, you can already start using Gauss against it.
What should you bring to the fight?
First of all you should be engineering your hull. Heavy duty + Deep plating all the way, as raw hull strength matters the most. All optional slots that you can spare should get a Hull reinforcement package.
Just like with hull, raw shield strength matters the most, fill up most of your utility mounts with A-rated Shield boosters, engineered for maximum shield health.
Engineer your Thrusters for maximum speed: Dirty drag drives.
Note: Defense utilities such as: Chaff, ECM, Point Defence etc. are useless!
Weapons
Top Tier: Guardian Gauss cannon (because hitscan meta rules)
Okay weapons: Guardian Plasma Charger, Shard cannon, AX multi-cannon
Not so good: AX missile rack, Advanced multi-cannon(requires synthesis to use AX ammo)
Of course, in my opinion.
If you did not grind for Guardian weapons/modules yet or want to avoid it, don’t waste time and only get the following stuff:
-Guardian Gauss cannon class 2
-Guardian Module reinforcement package
Example Build
[link]
The Krait Mark II is a great medium ship to fight any Interceptor, this build example is meant for beginners, decontamination limpets to get rid of Caustic damage if hit by a missile and for a little bit of sustain. It does not require any form of Guardian technology. You may swap out the AX-multis and the Module reinforcement package for Guardian technology. You can put anything you feel like into the remaining empty slots. Full G5 engineering is not a requirement.
Yep, no xeno scanner, the shield boosters and the heat sink are important tools. And without the xeno scanner you will quickly learn how to spot Interceptor status, like heart status just by visuals.
If you really feel safer with a xeno scanner you may swap out a shield booster.
To counter a shutdown field (EMP) simply boost away and enter FA-OFF and the Interceptor nor the swarm will be able to catch up to you.
Here is a version of the build with Guardian Tech: [link]
The Krait from above with Guardian tech can also be used against the Basilisk and higher very well, as it is fast enough to outrun it. Just make sure your version boosts faster than 530 m/s.
But to also cover big ships, we will look at a tanky Corvette build first to learn how we deal with an Interceptor if we can’t outrun it. Later we will also have a look at “the safest” build in my opinion to fight Medusas and Hydras.
What matters against Basilisks and higher?
First, you should have your ship fully G5 engineered by now as this will make the whole thing much easier.
Second, the hitscan meta begins you should always use Gauss cannons and at least 1 Flak as your weapons now, unless you feel masochistic.
[link]
This Corvette build is tanky, however due to a low boost speed it cannot kite any Interceptor. Pick any Fighters you want, it doesn’t matter. Their only purpose is to draw aggro and give you a little bit of time. Use the long range thermal vent beam lasers to drain an Interceptor’s shield faster or decrease your heat below 15% to make the Interceptor lose their weapon lock on you. Details about heat mechanics can be found in the Combat mechanics section.
[link]
This Cutter was made for maximum failsafe potential and sustain. You may swap out the Repair Limpet with a Decontamination one if you feel unsafe about Caustic missiles still, to reliably evade any Caustic missile, have a look into the Combat mechanics section.
This build is the easiest way to solo a Medusa and a Hydra. For the Hydra you may need to load some Premium ammo for the Gauss cannons.
You should now have the knowledge to make a good AX build for any ship you like!
Krait MK II with gauss against a Medusa:
Corvette against a Basilisk:
Cutter against a Medusa along with some tips:
Faster Medusa with the Cutter:
And finally some Hydra footage with the safest build too:
Interceptor Combat Strategies
After each destroyed Heart, the Interceptors use one or two of the following 3 special attacks:
-Lightning


Causes random module reboot, additionally limits your speed, disables boost and scrambles your HUD. It has a range of 800m.
-Caustic Missile

Caustic damage slowly eats away your hull if not removed, if you are in an emergency, heat your ship up to over 180% to burn it off. They travel with a speed of 350 m/s.
-Shutdown Field (EMP)

Shuts down all systems in your ship for 30 seconds, you should enable FA-OFF before you get hit and boost, to drift away and avoid further damage. Your shield is still active during this effect.
- First Heart Destroyed: Lightning
- Second Heart Destroyed: Caustic Missiles
- Third Heart Destroyed: EMP + Caustic Missiles
- Fourth Heart Destroyed: Caustic Missiles
Exerted Heart visual indicator

- First Heart Destroyed: Lightning
- Second Heart Destroyed: Caustic Missiles
- Third Heart Destroyed: Caustic Missiles
- Fourth Heart Destroyed: EMP + Caustic Missiles
- Fifth Heart Destroyed: Caustic Missiles
Exerted Heart visual indicator

- First Heart Destroyed: Lightning
- Second Heart Destroyed: Caustic Missiles
- Third Heart Destroyed: Caustic Missiles
- Fourth Heart Destroyed: Caustic Missiles
- Fifth Heart Destroyed: EMP + Caustic Missiles
- Sixth Heart Destroyed: Caustic Missiles
Exerted Heart visual indicator

- First Heart Destroyed: Lightning
- Second Heart Destroyed: Caustic Missiles
- Third Heart Destroyed: Caustic Missiles
- Fourth Heart Destroyed: Caustic Missiles
- Fifth Heart Destroyed: Caustic Missiles
- Sixth Heart Destroyed: Caustic Missiles
- Seventh Heart Destroyed: EMP + Caustic Missiles
- Eigth Heart Destroyed: Caustic Missiles
Exerted Heart visual indicator(green “hatches” and orange smoke)

/// Combat Data Classified ///
General Combat Mechanics
Thargoid Interceptors do not attack unless they are provoked, for example by being closer than 500m.
They may also attack when you carry Thargoid/Guardian cargo, or when you attempt to steal the cargo they were about to collect.
But we are here for the combat mechanics, so let’s get started!
You have two strategies available to chose from about how you want to start the fight:
First: You straight up engage on the Interceptor and damage the Hull as much as possible before it starts deploying its swarm and main weapon. When the Heart is exerted, destroy it. Then boost away, over 3km from both Interceptor and Swarm. Lock in FA-OFF and make a 180 degrees turn so you face the swarm. This is also called reverski. You can now blast the swarm with your Flak while still kiting it out.
Second: You provoke the Interceptor then boost away and when you are over 3km away you pull off the reverski maneuver said above with FA-OFF. The difference from the first strategy is that you now destroy the first swarm before exerting the first heart. Via this strat you don’t have to fight another swarm after 1st Heart phase. The Interceptor “buffers” swarms whenever a Heart is destroyed.
For each subsequent heart destroyed the Thargoid will buffer another swarm in the background if the previous swarm has not been wiped out.
This means if you choose strategy 1 above, you will have to wipe out 2 swarms before Heart 2.
(Personally, I choose strategy 1, it allows faster kills. Plus, the Cold Reboot advanced mechanic cannot be used after Heart 1 [when it uses the Lightning]).
Every Interceptor can get enraged when a heart hasn’t been destroyed for a specific amount of time, stated in the “Interceptors” section.
When one gets enraged, the damage of its main weapon will be buffed significantly, additionally it will always deploy a new swarm. You want to avoid enraging it at all cost.
When you destroy a heart, the enrage timer gets reset. Tip: Look at the time on your HUD whenever you destroy a heart, then you will know around what time it will get enraged.
The swarm follows a specific pattern that can be predicted.
When you target a swarm, do not aim for the circle unless you are close.
The red cricle in the picuture is where you more or less should aim for.

Simple explaination:
When they fly towards 12 o’clock and turn, aim towards 6 o’clock.
When they fly towards 2 o’clock and turn, aim towards 8 o’clock.
Basically the opposite direction.
Predicting their movement is all about muscle memory, you will get used to it.
The swarm might also form a big circle in order to dodge your flaks, when they do that, aim even more outside and you will hit them. When their size has been decimated by a lot, they will not attempt the “big circle” dodge anymore. I recommend watching some of the footage above in the Builds section and paying attention to the swarm maneuvers.
Gauss cannons start to have falloff damage at 1.50km, at 2.90km range their damage will be very low. So try to stay close!
With the Flak in reverski mode you can still hit a swarm when it’s around 7km away. The Flak has no damage falloff.
When you are about to exert a Heart with Gauss cannons, set your pips to 2-0-4. Remember that depending on ship you may need to use Heat sinks, the lower the energy in the WEP capacitator, the more heat will be generated when firing.
To destroy a Heart, it’s often sufficient to only shoot 2 or 3 of the Gauss cannons, you can set your pips to 4-0-2 then. Don’t forget to set pips back to 2-4-0 or 4-2-0(if ENG recharges fast enough) when boosting away!
4 pips in SYS makes your shield stronger by around 2.6x
4 pips in ENG increases your maneuverability significantly
Power management in the modules panel of your ship is also very important.
With the Cutter build linked above, for example you want to have the 2 smaller SCBs disabled and set to low priority, its not uncommon that ships with 4x Gauss cannons and a Guardian Module reinforcement package exceed the power limit of your Power Plant.
Also you want to have the most important modules, required to escape a fight set to priority 1, so that priority 1 modules do not exceed 40% usage of the Power Plant. In case your Power Plant gets damaged critically, its output will be reduced.
Priority 1 modules should be: Thrusters and FSD (other stuff that helps can also be set to 1 if it doesn’t exceed 40% usage)
Thargoids use thermal signatures, just like the humans, for their targeting technology.
This means if you get your heat low enough, the thargoids will lose their weapon lock on you and miss.
The breakpoint is 15%.
This is why you should always bring heat sinks to a Thargoid battle.
There are more advanced mechanics regarding this. They will be discussed in the Advanced Combat mechanics section.
If a Thargoid shield gets destroyed within 10 seconds after deploying its shield, it will immediately deploy a new one. This is important for an advanced mechanic called Cold Reboot & Ramming, which will also be discussed in the Advanced Combat mechanics section.
Their shields decay over time, the specific time is stated in the Interceptors section.
When a Thargoid launches a Caustic Missile, simply boost away in around the opposite direction. They only travel with a speed of around 350 m/s, so they are very easy to kite.
Once you got used to this you don’t need a Decontamination limpet controller anymore. Repair limpets allow for better sustain due to higher hull repair capacity.
Reminder: You can burn off caustic damage by heating up over 180%.
Getting shot while a Decontamination/Repair limpet is active, will cancel it.
Putting the Gauss cannons on the closest, equally lined up hardpoints on your ship is important, this makes destroying Hearts much easier, as multiple Gauss cannons can hit the center of the Heart.
Not all 4 Gauss cannons have to be close, you only need to shoot 2 or 3 Gauss to destroy a Heart.
HUD indicator of 3 Gauss cannons lined up(bottom) and the 4th on the top.

So you put 3 of the Gauss cannons on close, equally lined up hardpoints and the 4th a bit further away. Good, then let’s set the firegroups now.
For this example of firegroups, we will be using the Cutter build from above:
Firegroup A: Primary: all 4 Gauss cannons | Secondary: Flaks (This Firegroup is to damage hull and to fight swarms).
Firegroup B: Primary: 3 lined up Gauss cannons | Secondary: The remaining Gauss (This Firegroup is to destroy Hearts).
Firegroup C: Primary: Repair/Decontamination limpet controller | Secondary: Xeno-scanner (This Firegroup is to repair hull/remove caustic substance. And, obviously, for scanning.)
Put Heat Sinks and Shield Cell Banks on hotkeys in the controls options. (Example: I set my Heat Sinks on V and my SCBs on B).
Advanced Combat Mechanics
Alright, stuff will get serious in this section. Some of these mechanics require some practice and may cause you to lose a battle, if you fail.
The reward for mastering these mechanics is high, they will make you a far better pilot and allow for much faster Interceptor kills.
In the General Combat mechanics section we learnt that Thargoids lose your thermal signature and miss with their main weapon if you keep your heat below 15%.
Additionally, you can cancel their Special Attack after destroying Hearts. Does not work on the Lightning after Heart 1, but for each subsequent one! [Heart 2,3,4 etc.]
Before we cover said tricks regarding advanced heat mechanics, we should first learn: advanced pip management and synthesis!
In the General Combat mechanics section we learnt the basics about Pip management.
Now it’s time to learn how to quickly change pip presets.
Fast and smooth Pip management is an important aspect of every fight.
Pip Macros can do this for us:
-Download AutoHotkey[autohotkey.com] and download the following script[cdn.discordapp.com] that binds the most important pip presets to the functions buttons on the keyboard. Your pip controls in the game should be set to default arrow keys
-If you own a gaming keyboard there is a high chance your keyboard has Macro keys.
You should add the following 5 pip configs to your Macro keys:
– |Power| — |Pips| – |Arrow key events in order by macro|
>ENG/SYS | 2-4-0 | DOWN, LEFT, LEFT , UP, UP, UP
>SYS/ENG | 4-2-0 | DOWN, UP, UP, LEFT, LEFT, LEFT
>ENG/WEP | 0-4-2 | DOWN, RIGHT, RIGHT, UP, UP, UP
>SYS/WEP | 4-0-2 | DOWN, RIGHT, RIGHT, LEFT, LEFT, LEFT
>WEP/SYS | 2-0-4 | DOWN, LEFT, LEFT , RIGHT, RIGHT, RIGHT
Synthesis is important when taking on Interceptors above the Basilisk, as you will need more Heat sinks, and Flak ammo than you can fit.
You should always have plenty of Synthesis materials available for the following stuff:
- Heat Sinks
- Flak
- Gauss
Note: Taking damage will cancel an in-progress Synthesis. Synthesize your stuff while you are waiting for shield decay. You may also use a Repair limpet if needed.
Ok! Let’s continue with advanced Heat mechanics, the first mechanic I want to cover is the:
Cold Reboot
This mechanic abuses a 30 seconds long “sleep” phase of the Interceptor and special attack cancelling after each destroyed Heart.
Remember, above we learnt that it does not work after Heart 1 when it uses the Lightning!
To initiate the 30 seconds long “sleep” phase of any Interceptor, we need to get our Heat below 15% immediately after destroying a Heart. This can be done via Heat sinks or via a Thermal vent beam.
At the same time we get our Heat below 15%, we set full reverse thrust and FA-OFF while facing the Interceptor and initiate the Diagnostic repair sequence of our ship.
Important: Your speed has to be below 50 m/s in order to get a successful shield restart(50% health) and you have to be more than 800m away from the Thargoid! You can switch to FA-ON during this effect and set throttle to 0 to reduce your speed, later we will look at another Reboot mechanic called “180 Reboot” where the speed factor with Flight Assist will become even more important!
After your ship is back online, wait at least 10 seconds after the Thargoid has deployed its shield, we learnt above that if its shield gets destroyed within 10 seconds after deployment, it will immediately recharge! A general visual indicator is when the Thargoid deploys its swarm, then boost with pips set to 4-2-0 and ram it. This should depending on the mass of your ship, drop the Interceptor’s shield instantly.
Important: Use another Heat sink after your ship is back online, the rebooting of your ship’s systems will keep it cool, however after rebooting you will still have to keep your ship below 15% heat until you can ram it, or cancel the Special Attack!
(Ramming is optional, you can just use this mechanic to recharge your shield between phases.
And to cancel their Special Attacks (EMP, Caustic Missiles) of course.
I recommend practicing it against a Cyclops, failing this mechanic against anything harder will lead to critical damage and maybe a rebuy screen!
Video of performing a Cold Reboot & Ramming against a Medusa:
As the name of this mechanic might hint, this is about doing a successful Reboot & Repair of your ship (successful shield restart) while making a 180 turn.
This mechanic is extremely useful when your shield dropped and it would take over 10 minutes to recharge.
First you will have to get some distance to the Thargoid Interceptor, around 10km should be safe. Don’t go above 14/15km as the Interceptor will high wake out of the fight then.
When you’re around 10km away, make sure you have 4 pips in ENG and set FA-OFF, then open the functions panel of your ship on the right hand side. Press the Reboot & Repair button and while you wait for the 3 seconds timer, make a 180 turn vertically. Press Reboot & Repair now and set FA-ON. Your speed will quickly decrease, as the main thrusters of your ship with FA-ON and throttle set to 0, will have enough power, (even during rebooting) to lower the speed of your ship below the 50 m/s breakpoint fast enough. When you are below 50 m/s you can set FA-OFF again for that little bit of extra kiting, your ship should have finished its Diagnostic repair sequence any second now.
If all went well, your shields will be back up at 50%.

This mechanic is pretty safe and can be used against the Hydra if you feel that a Cold Reboot would be too risky. The Interceptor should still be around 4-5km away after the 180 Reboot, giving you enough time to turn again and continue kiting, or boost past it to destroy the swarm. The requirement is that your ship should be faster than the Interceptor you are fighting, brave pilots can do this with a Corvette too, if the Interceptor is aggroing a Fighter long enough.
You dont have to be in battle to practice this, you can try in open space first to get used to it.
Video of performing a 180 Reboot:
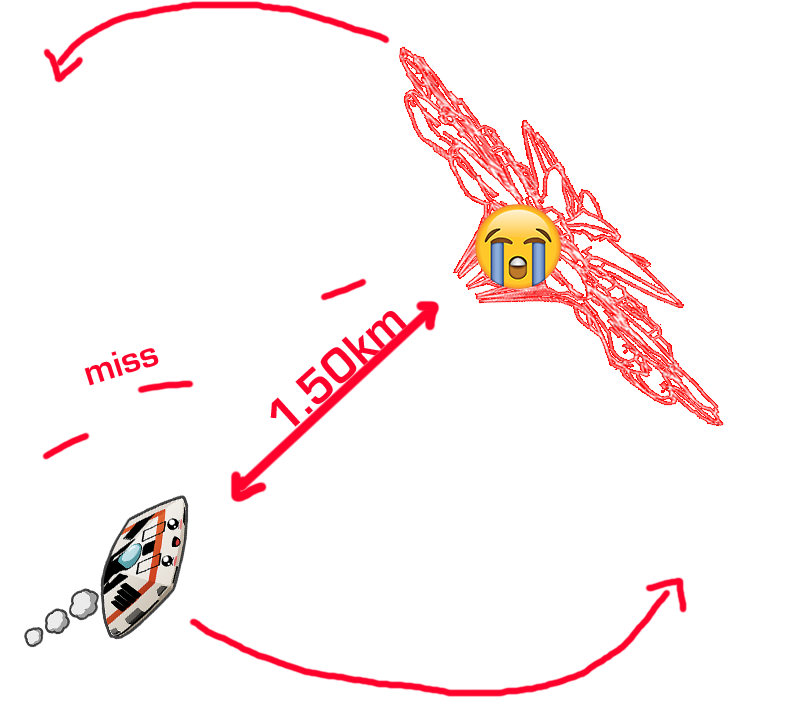
Cold Orbiting should mainly be used with small or medium ships.
We learnt that a Thargoid cannot target us if we keep our heat low.
We have 2 options to abuse this:
-Heat sinks
-Thermal vent beam lasers
To avoid taking damage from the main weapon, use FA-off and orbit the Interceptor in a radius of around 1.50km.
This mechanic is perfect for runs where you want to take as little damage as possible or to drain its shield without taking damage.
When you fire your Gauss cannons, always use heat sinks.
You also need to destroy the swarm before.
Advanced Combat Mechanics Part 2
Cold boost past can be used to boost past the Thargoid Interceptor, while taking as little damage as possible.
For example, you just destroyed the first swarm after Heart 1, but now the Interceptor deploys its buffered swarm, which flies far behind it, so you cannot hit it.
In this situation you will have to boost past the Interceptor, so make a 180 degree turn, then boost, when you are at around 4km range, active a Heat sink, when you are in firing range of the Interceptor (3km) your heat should be below 15%, and it will miss most of its shots.
You may also target the swarm with the Flak at the same time while boosting past it.
Boosting past the Interceptor can be done without heatsinks too, of course. But at the cost of some damage.
Boosting past can also be used to “drain” the Interceptor’s Lightning attack. You just have to be careful to get out of the 800m range quickly.
If you don’t want to wait for shield decay after the first Heart, you can ram the Interceptor at the same time when performing a Cold Boost Past.
Important: You will first have to “drain” the Lightning attack as stated in Cold Boost past above or else you will get hit by it.
Ramming an Interceptor while boosting past it, requires some practice in regards of predicting their flight maneuvers.
This mechanic can be performed against Basilisks, Medusas and Hydras.
When destroying the last Heart, those Interceptors can be killed without having to go through the last phase.
Once the last Heart is exerted, damage it, but don’t destroying it. Wait until the Interceptors queues its Lightning attack. Destroy the Heart once you see the petals glow yellow, the Interceptor will still hit you with the Lightning attack, during that time window (duration of the attack) you can destroy the Thargoid by attacking its hull because it will not deploy a shield nor a swarm.
Important: This is a very risky maneuver and you might lose the fight if your ship is not in good condition during this phase. However it allows to skip the last phase entirely thus allowing to get faster kills.
Other Useful Resources
Thank you for reading my Guide. I hope it was helpful!
If you are a beginner I hope it was easy to understand and you learnt something about the game you had never heard of before!
If you are a veteran I hope you may have discovered one or two new mechanics that help you in your fights.
Useful Resources:
Anti Xeno Knowledge Base[axi.atlassian.net]
Good luck on your hunts!