
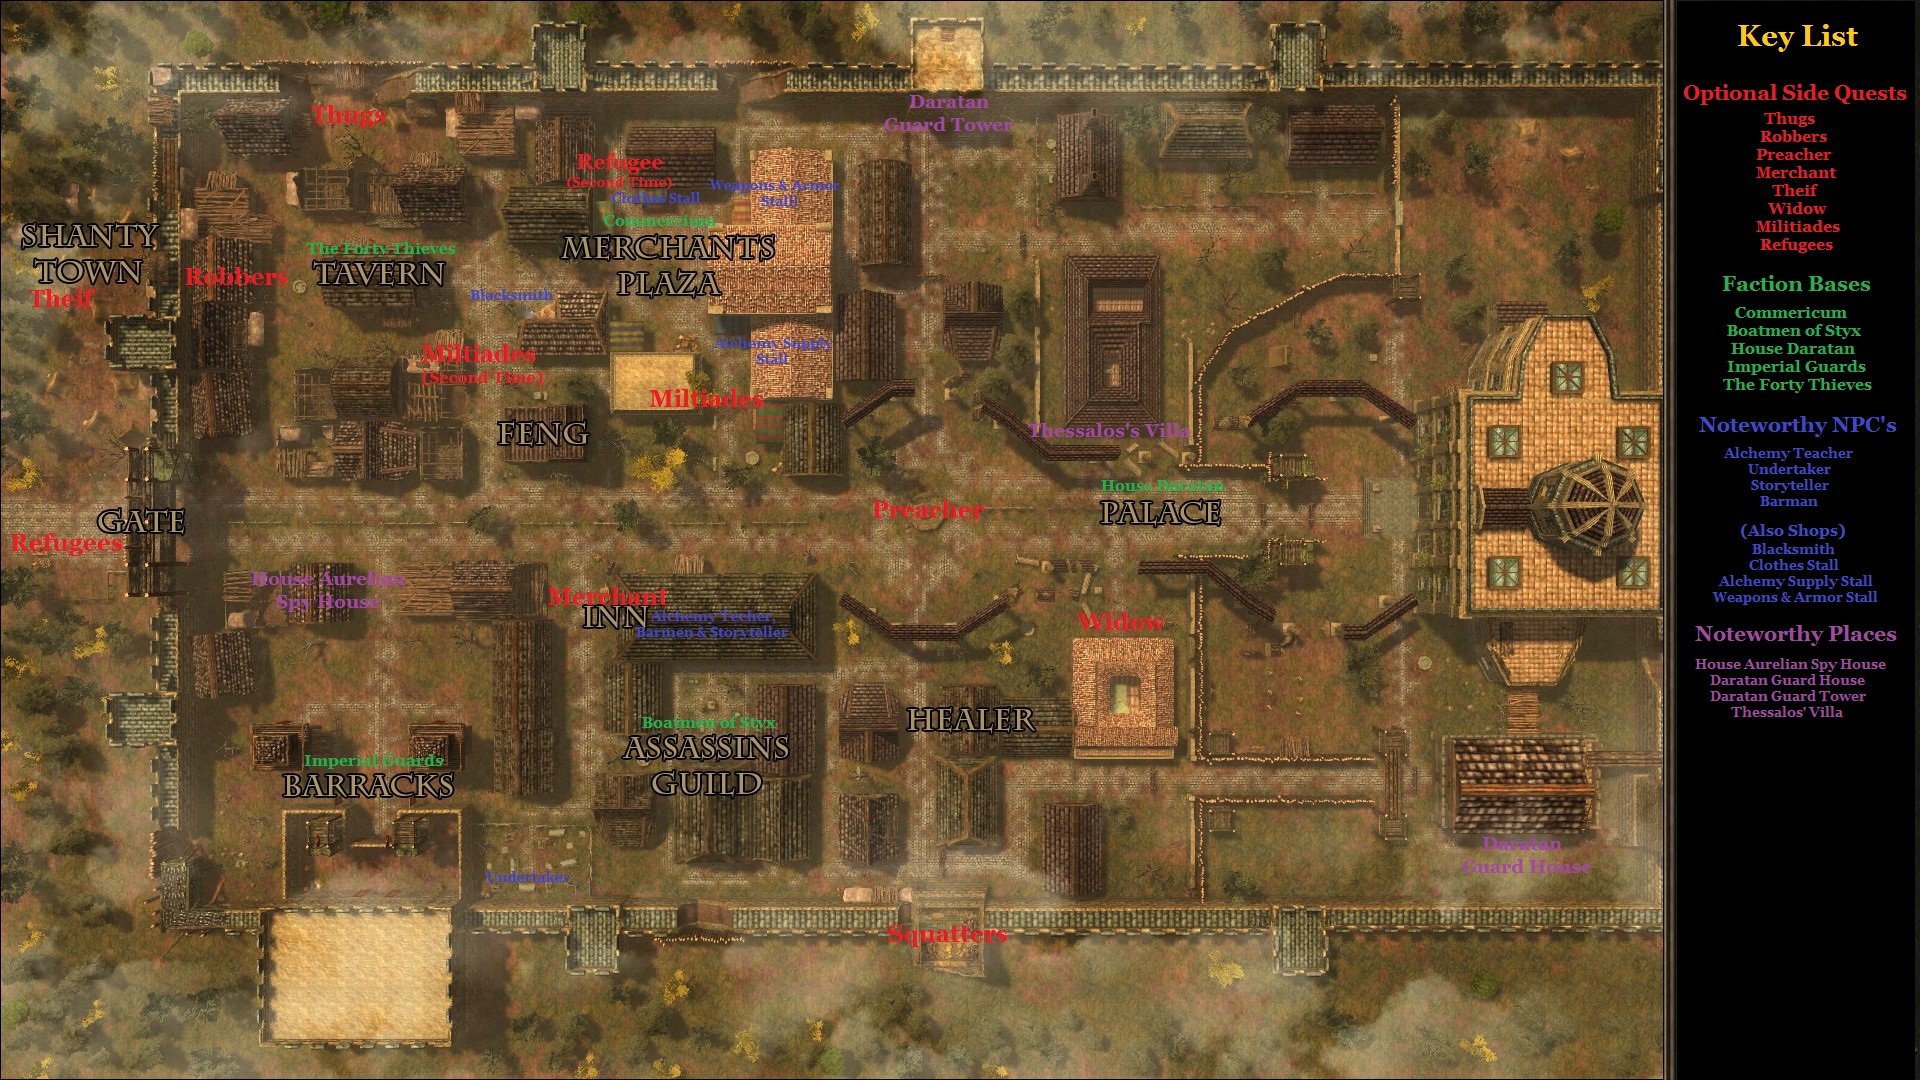
Overview
This Guide covers the optional unmarked Side Quests scattered throughout Teron, along with a list of skills needed to unlock them or give you a tactical edge in a fight.This Guide also provides a map that notes all the points of interest in Teron.NOTE: Class specific Side Quests are not mentioned here, though there may be mention of them in the Comments section.
Chapter 1 – Introduction
Hello there, I’m Farsight and this is another one of my Guides.
I decided to make this Guide after a few playthroughs, when I realized that Teron has a fair amount of unmarked Encounters that a lot of new players wouldn’t know about, let alone which skills would be needed for the job.
Then I decided to take a Screenshot of the Teron Local Map and highlight those encounters, along with all the Shops and other noteworthy information new players might find interesting.
Fast forward seven hours or so and the guide is finished, I hope you all enjoy it and new players find it helpful.
Chapter 2 – Mitilades
This Encounter is in fact a long series of Encounters, though depending on your actions, it can be cut short.
You don’t need to pass the Skill Check ([Streetwise]) to know that Mitilades is a con artist (though your character does) from his avatar to his general wording, this man practically breathes scam. However, if you want to progress you’ll have to go along with it.
Go to the house and *Ambush* you never seen it coming. You can pass a Skill Check ([Dexterity]) to run away and end further encounters with Mitilades, or you can stay and kill them all. After that you simply wait for Mitilades to arrive (after you’ve clicked the exit and specified that you’ll wait for him) at which point he will plea for his life. Cutting his lying throat might seem tempting, but it will (as you imagine) end all further encounters with him. You can let him go, or you can accept his deal.
Accepting his deal and waiting for the customer quickly reveals that Mitilades has screwed you both over. You can achnowledge this fact and attack the noble along with his guards, or you can pass a Skill Check ([Persuasion] or [Body Count]) to resolve the situation without bloodshed.
Track down Mitilades near the Tavern and finally cut his filthy lying throat, or spare him and recieve 472 Imperials and the promise of more to come. He then leaves for Maadoran.
Working for Mitilades you’ll quickly discover that you’re going to leave a rather long and bloody trail of corpes behind you, though it will be very profitable.
Chapter 3 – Refugees
There are five Refugees outside the Gate trying to get into Teron and being told that there is a levy set at 30 Imperials a head in order for the to move into Teron.
Paying the 150 Imperials to let the Refugees into Teron will have the Old Man (Aemolas) promise to repay your kindness.
You can later visit Aemolas behind the Clothes Stall where he will show his gratitude by bestowing the armour of his people upon you. From then onward he will become a bronze armour, and weapons merchant.
Chapter 4 – Thief
Approaching the Kebab Seller’s Stall in the Shanty Town for the first time will automatically start the conversation with him. While buying a Kebab, a man standing nearby snatches your purse (20 Imperials) and runs away with it.
You can decide that he needs it more than you and let him off, or you can chase after him which requires a Skill Check ([Dexterity]) to catch up to him. You’re gaining ground on the Thief until he runs into a Guard, when the Guard asks what’s going on, the Thief promptly accuses you of pulling a knife and trying to rob him.
You are prompted with two generic options, attack them which, assuming you survive, will result a visit from a battallion of Guards, or you can simply give up.
Chapter 5 – Squatters
Located in a crumbling Guard Tower, the Squatters here live in absolute squalor, sleeping on the floors and breeding rats by feeding them human corpses. Chances are good that if you’ve killed anyone by now then their remains are here rotting away, and if not then it’s only a matter of time.
Looking around the Cellar will reveal two options, examining the drain and examining the walls. Examining the drain reveals nothing. While thoroughly examining the walls will prompt a Skill Check ([Crafting]) which activates a pump and clears the drain.
Once you return to the surface you’ll quickly find youself surrounded on all sides by the Squaters, they want the Jellyfish that you found and they want it now.
There are a three generic ways to deal with the squatters. You can pay them 20 Imperials or you can kill them all and just to be ironic, you can feed them to the rats they were breeding.
A third option lets you charm your way out of there by staging a Cursed Artifact stunt and with three ([Streetwise], [Streetwise] & [Trading]) you’ll not only convince them to let you leave, but they’ll pay you to leave and their leader will even throw in his prized gem to sweeten the deal.
Chapter 6 – Robbers
When you approach the Robbers house you will see a drunken Mercenary chasing a young girl (Livia), she hides behind you and the Mercenary says that she owes him eight Imperials.
You can tell him to back off, which he does and after a moment Livia will hug you in gratitude. Also, there are 52 Imperials missing from your Inventory.
You can pay him the eight Imperials, which he counts out and once leaves Livia will hug you in gratitude, and there will be 60 Imperials missing from your Inventory.
After passing a Skill Check ([Streetwise] or [Stealing]) you’ll realize that this is a ruse intended to distract your attention while the girl picks your pocket. Armed with this information you can either push her away or pass a Skill Check ([Dexterity]) to grab her.
Once caught, you can order her to hand over everything she owns, though she proclaims that she has nothing and that everything she does have is at her house, which she swears to take you to. Pass another Skill Check ([Perception]) will give you the feeling that she is a little too willing to lead you to this house. Assuming you agree to walk into what is obviously an ambush, you will be ambushed. You can kill their leader (an Ordu), the Mercenary and Livia looting their bodies for around 200 Imperials.
Pushing her away or letting her go nets you nothing, and the three of them will go underground never to be seen or looted again.
Chapter 7 – Thugs
A local gang of unaffiliated thugs. I’m not going to lie to you, the Developers put these guys in fore the sole of being killed by you. With the effort, or lack thereof needed to bring these guys down they are essentially free Skill Points that should be harvested as soon as possible.
There are three ways to handle them.
Shoot them from a distance. Only really makes sense if you have a ranged weapon.
Get close to them and pass a Skill Check ([Critical Strike]) to instantly take out the Gang Leader.
As with most [Critical Strike] Skill Checks this requires that you have a Dagger in your Inventory, and will equip you with it once the combat begins.
Get close to them and just fight them.
Sadly there is no generic way to resolve this fight peacefully, so if your aiming to keep your Body Count low, then you may wish to avoid this encounter. If you do go through with it, then you can expect to loot around 150 Imperials (Gang leader = 50+ / Gang Member = 30+) from the four of them.
Chapter 8 – Preacher
This man is a preacher sent by House Crassus to spread the Word of God. He can be found in the center of Teron (near a broken fountain) standing atop a pile of rocks spreading the aforementioned Word of God, while surrounded by a small mob of displeased townsfolk.
There are a few ways to handle this situation.
You can “listen to him” up to a point where you can throw a rock at him and have the mob run him out of Teron. This will damage your Reputation with House Crassus.
You can hear him out and pass five Skill Checks ([Intelligence], [Streetwise Success], [Streetwise], [Persuasion] & [Charisma]) to convince him that you’re the next Messiah. This will net you a Prestige boost, improve your Reputation with House Crassus and score you the Chosen One Achievement.
You can hear him out and with two Skill Checks ([Intelligence] & [Persuasion]) convince him to leave peacefully (albeit with some reluctance), citing that his mission of peace is fanning the flames of war. This will get rid of him, but you won’t lose or gain anything.
You can hear him out without passing any checks and walk away the feeling that he has given you quite a bit to think about. This will improve your Reputation with House Crassus.
Chapter 9 – Widow
You get to either rob or con a sweet little old lady out of her jewelry. No, really that’s what you get to do. Clearly someone somewhere has issues, but I’m not going to discuss those here, it take would take far too much time and space.
So, once you’ve knocked on the front door and waited a bit, a kind sweet little old lady answers it.
You now have two options, work your charm on her or come back later tonight and break in.
If you want to charm the rings off her old wrinkled fingers, then you’ll need to pass two Skill Checks ([Streetwise] a [Streetwise][Etiquette]) after which she gives you both of her rings and six Sapphires.
To break in you will need to pass three Skill Checks ([Sneak], [Strength][Dexterity] & [Sneak]) and then look around for goods to steal. Once you’ve stolen the six Sapphires, two Golden Goblets, two Silver Plates and her Dress out of the wardrobe(why not? You’ve stolen everything else, you might as well steal her dignity as well) you’re ready to leave the house.
Chapter 10 – Locations
Noteworthy Comments
ashurakain 11 Feb @ 4:01pm
with the livia encounter u can also have her be recruited into the thieves guild if ur member of cado’s crew, i always do these first b4 i start the main quests in the faction im in.
Searis 17 Mar @ 8:21pm
With the refugees, if you talk to the refugees then tell them “dont worry about it” and pay it, He gives you another quest to go get his gold from his old village wich he will give you 1/3 of, after he gives you the armor. Havent been to the village as of yet though.
Searis 17 Mar @ 8:26pm
you can also go in thru the SE window of the blacksmith, pass a dex, then sneak chest to get +1 crafting off the workbench and a Masterwork 2h axe from the chest. Climbing the vines and picking the lock into Fengs house, passing a dex, lockpick, sneak scores you +1 lore off the scroll on the south wall.
DarthTom1013 27 Mar @ 3:06pm
in regards to Chapter 4 Thief, you can as of patch 3 pass a body count check to get your money back no fight.
gangstergamer510 14 Apr @ 8:34am
chapter 4 thief there is also a bow option when he’s running if you are skilled with a bow and an assassin option when you talk to the guard oh and of course the crit strike if he doesnt believe you
gangstergamer510 14 Apr @ 12:06pm
chapter 7 the thugs there is a peaceful way but you need to know cado
nikcha1313 16 Jun @ 2:34am
(… continue)
You can talk to the leader and find out that Aemolas cheated him, stoled his money and ran away to hide in this village. Then Leader found him killed every one, and put a bolt in Aemolas back. You would need to tell him where the gold is. And then take him to Aemolas. Then you can walk away or side with Aemolas and kill Raiders leader and two raiders. (way easier then killing all gang). Aemolas will be soo shocked that will allow you to take all money and loot the bodies.
nikcha1313 16 Jun @ 2:34am
Comment on Chapter 3.
After, you will recieve an armor Aemolas will give you another quest (check on word of honor 1). He will tell that while running away from raiders he buried 1200 coins and will ask you to retrive it. It will open location Aemolas village. When you will arrive there you will see that there are around 12 raiders.
You can kill all of them.
You can sneak (sneak check) and dig out the treasure.
You can talk to the raiders leader and try to lie him and dig out the money (did not tried this one. check on streetwise)
nikcha1313 16 Jun @ 2:34am
(… continue)
You can talk to the leader and find out that Aemolas cheated him, stoled his money and ran away to hide in this village. Then Leader found him killed every one, and put a bolt in Aemolas back. You would need to tell him where the gold is. And then take him to Aemolas. Then you can walk away or side with Aemolas and kill Raiders leader and two raiders. (way easier then killing all gang). Aemolas will be soo shocked that will allow you to take all money and loot the bodies.
Updates
Update 1 (29/12/2017) – Corrected some minor spelling errors.
Epilogue
For the Greater Good, please Like, Favorite & Follow.
If you found my Guide useful or simply enjoyed reading it, then why not join my Guide Makers Club? It’s a group dedicated to helping would-be Guide makers, but if you liked my Guide and want to see me make a Guide for a specific game, then you can make a request there.
Cheers!