Overview
A comprehensive guide to surviving and thriving in Sunless Sea, tailored for new players. Topics include your past and what it means, the significance of the 5 main stats, the needs of your ship and crew, and an overview of the best ways to start making money.
Introduction
Three decades ago, London was stolen by bats. Now it lies a mile underground in the vast cavern known as the Neath. As if that weren’t enough, it now sits comfortably on the edge of a great, waveless ocean filled to the brim with beasts,
mysteries and other perils, ranging from dastardly to horrific and everything in between.
Welcome to the Unterzee.

____________________________________
Sunless Sea is a game about discovery, horror, loneliness and death. Let’s put some emphasis on that last one; You’re probably going to die. Don’t let it get to you, these things can (and probably will) happen. Survival can be difficult for a captain starting out; living can be even harder. But if you follow this guide, you should be able to get off on the right foot more often than not.
If you want to start from the top, just keep reading. If you understand how the character creation works and what your 5 main stats mean, skip to Fallen London: Acquainting Oneself with Home.
If you understand the menu and want to skip to the basics of zailing, skip to Zailing the Zee.
If you want to know about combat, skip to Encountering Enemies and Engaging in Combat: Perils of the Neath and Not Dying to Them.
If you get all that and just want me to shut up and give you a rundown of how to start living, skip to Making Money: What to Do, Where to Go and Who to Know.
Stats, Your Past and Your Objective: Who are you? Who will you be?
No-one was born a zee-captain.
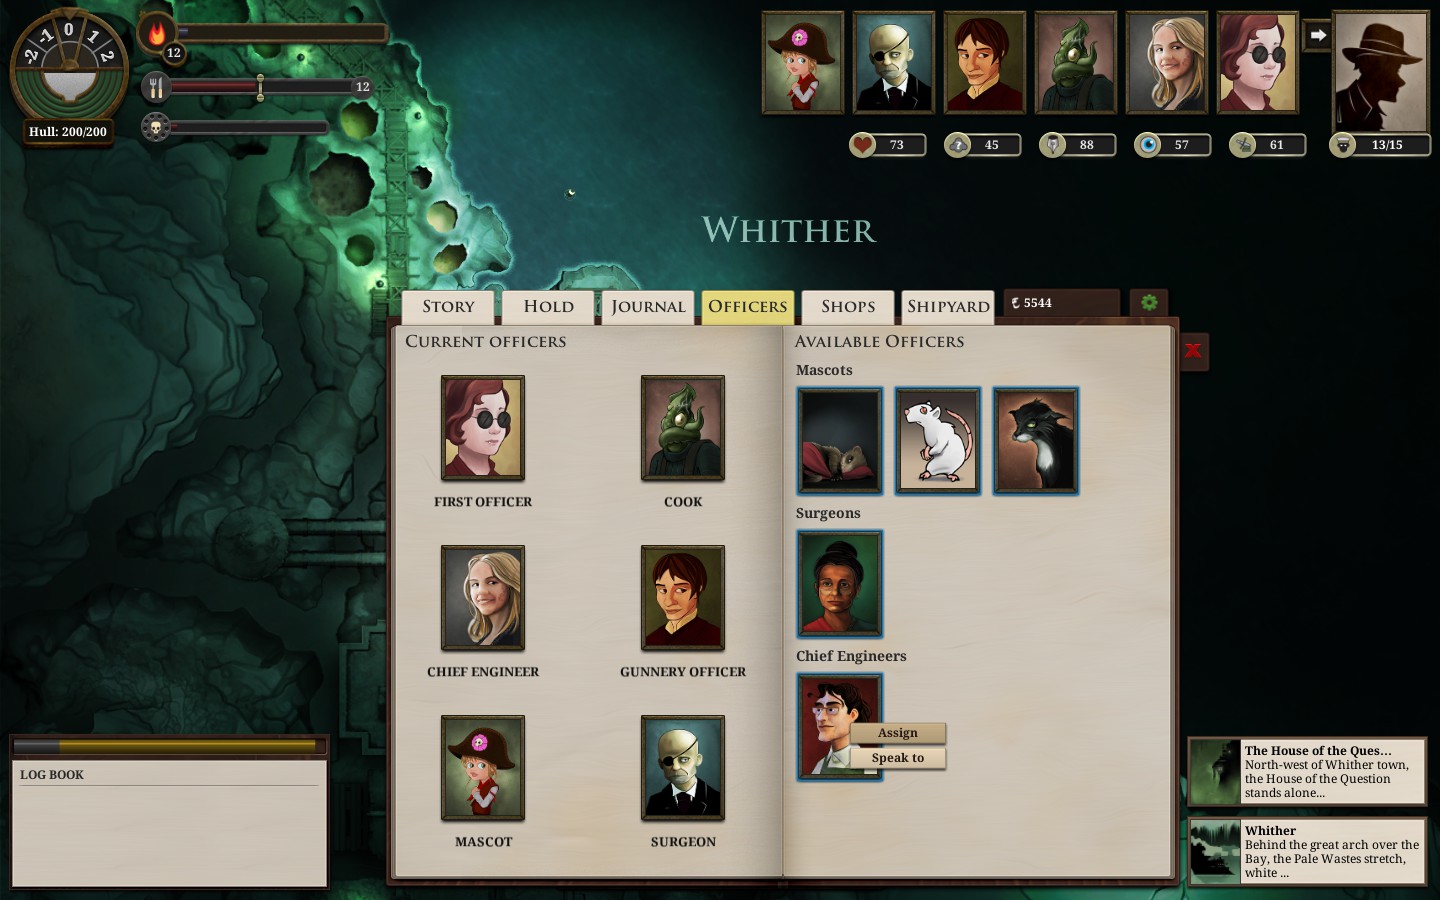
You have 5 pasts to choose from, corresponding to the 5 main stats: Hearts, Veils, Pages, Mirrors and Iron. The first Officer you are given will also correspond to the Past you chose (more on Officers later.)
A street urchin! – 

A poet! – 

Veteran of the Campaign of ’68 – 

An ordained priest – 

A natural philosopher – 

A Past Wreathed In Shadows – 
As a side note, each of the 5 starting officers wants to go somewhere. If you take them there, you will have the option to let them leave, saying goodbye to them forever but giving you some nice goodies in return.

Your Father’s Bones – The closest thing to a “main campaign” you’ll probably find, this ambition will take you all around the exotic locations on the zee, fetching whatever you might need to uncover the next clue as to who might know where your father’s bones lie.
Fulfilment – You want to create a work that will be remembered, a dazzling tale of horror, mystery, melancholy and adventure. Thankfully, the Unterzee has all of those things in excessive quantity. To complete this ambition, you will have to create the Zong of the Zee using a frankly frightening number of stories, secrets and other curiosities. If you’ve written your magnum opus, you can retire happily in London, no questions asked. If.
Wealth – You want money. A lot of money. It doesn’t matter where you get it from, what you’ve done, the things you’ve seen, all you need is the biggest home you can buy and enough cash to bribe the entire Ministry of Public Decency five times over, and you can retire in London without a second thought.
A Private Kingdom – If you started your journey grabbing a boat and said you were going to build an empire to rival London, you’d also probably win a visit to the Royal Bethlehem. Still, should you find some suitable land, perhaps your final goal may change…
The Uttermost East – You want to go East? Why? Well, I won’t judge. There must be some person or faction that shares that desire. Maybe you could talk to them about it… or manipulate your way into getting a suitable vehicle for the journey.
Fallen London: Acquainting Oneself with Home
“FALLEN LONDON! Deep, dark and marvellous. All voyages start here: and this is where successful voyages end.”
Before departing from London, let’s familiarise ourselves with the place. This is where all your voyages will begin. This is home. Safe – or as safe as one can be in the Neath. In London, you can:

Put your ship in Drydock to get repairs: the unreliable but cheap(er) Leadbeater and Stainrod, the quality repairs of Cotterel and Hathersage, or the exceptionally cheap (so long as the Admiralty owes you favours) Admiralty Yards. Or you could take your chances feeding the Rattus Faber, but don’t expect the L.Bs to do a good, or pleasant, job of it.
Go to your Lodgings, where you can read the papers to acquire Recent News (and occasionally a unit of Supplies), rest to exchange money for Terror reduction, or buy better lodgings altogether. Once you’ve moved to a better house, you will also gain a Study where you can craft valuable ship equipment and create items that will help your future characters should this one meet their maker sooner than you’d like.
Carouse in Wolfstack Docks, spending a Free Evening and some money to reduce an unclear amount of Terror, gaining Recent News if you don’t already have some, and potentially meeting a romantic interest.
Once you have acquired a Secret from your travels, you may use one to enter the University, wherein the ambiguously-gendered Alarming Scholar will pay you to bring him(her?) various curiosities, if you’re willing to give them away to her(him?).
Should you be in need of extra crewmen, you can bring on more crew here. If you pass the Hearts challenge, you may be able to rope in 2 or 3 poor sods at the cost of 30 Echoes; failing the challenge will give you 1 man for 15 instead. Recruiting more crew also very slightly reduces Terror.
Perhaps the most important place in London for a captain such as yourself, the Admiralty will be where you make the money to sustain yourself through delivering reports and, eventually, taking commissions to retrieve important information. At least, for a time. Eventually, you might be able to betray them and seek payment from other, less desirable factions find alternate sources of profit.
Lastly, you can browse the shops by clicking on the, well, SHOPS tab of the menu. Bultitude sells lamps that you can fit to your ship to increase your Mirrors, but the stronger ones will also reduce your Veils (except for the most expensive ones). Carrow’s Naval Surplus and Caminus Yards sell weapons and a few other pieces of ship equipment. The Iron and Misery Company sells engines, though the best engine that money can buy is found in Caminus Yards instead. Mrs. Plenty sells fuel and supplies, the two most important resources for any zee-captain, as well as candles which are required for certain riskier endeavours in distant places. Lastly, the Wolfstack Exchange buys and sells various trade goods, though it’s so hard (and frankly boring) to eke out an existence as a mere trader that it’s almost not worth bothering.
Now that you’re suitably acquainted with London, it’s time to leave its luxuries behind. Zet zail!
Zailing the Zee: Your Ship, Your Crew and What Things Do
So! Finally, we’re on the great waveless expanse of the Unterzee. Let’s take a moment to make sure we know what all these things on your interface are.
1 –
2.1 – 

2.2 – 
2.3 – 
3 – 
4 –
5 – 
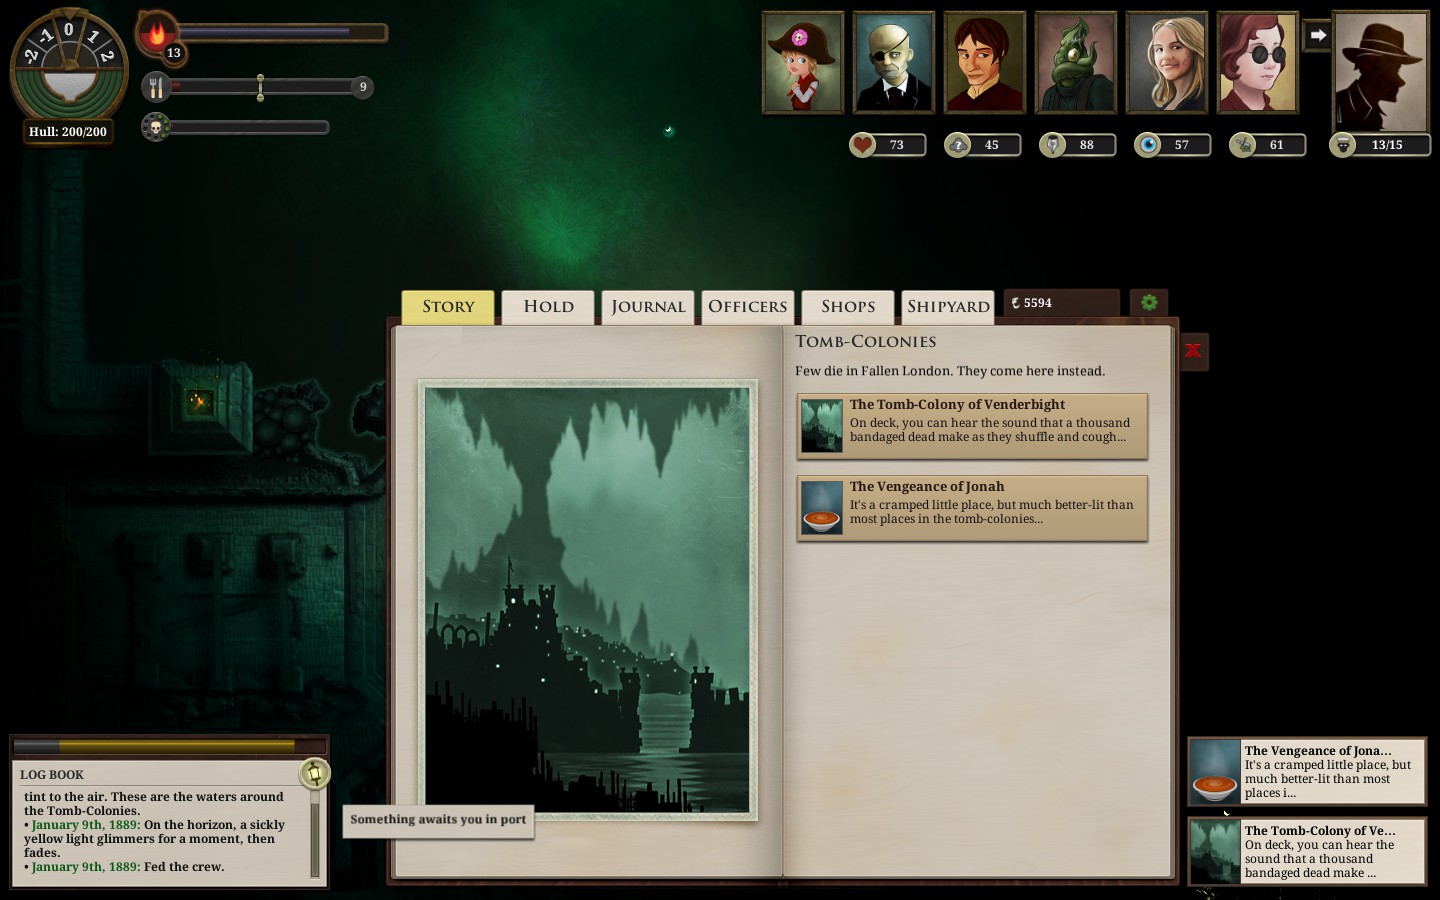
6 – The Log Book records recent events. Here, you can read flavor text describing the regions of the zee you find yourself in, as well as reports of how much damage you’ve taken in combat, areas and enemies you’ve just discovered, and if you have Something Awaits You or not (more on that in a little bit.)
7 – You can press the E key to ready your weapons at any time, or click on another entity in the zee to take aim. From left to right, the other buttons are:
- Dispatch your Zee-bat to search for undiscovered land. A message will pop up above the log book once it returns to your vessel informing you if it found something. Alternatively, press Z.
- Turn on your ship’s light, either to soothe your crew or allow your guns to line up a shot faster on an illuminated enemy. Alternatively, press L.
- Repair your ship in open waters using Supplies, as mentioned previously. Alternatively, press R.
- FULL POWER! Increase the speed at which your ship travels for a while by turning up the heat on your engines. Useful if trying to escape a fearsome enemy or traveling across an expanse of terror-inducing empty zee, but you run the risk of causing a fire, which will deal a wildly random amount of damage to your ship and (should you fail a Hearts check) kill some of your crew as well. Alternatively, press F.
- Pause the game. Not much to say about that, really. Alternatively, press Space.
- Open the Gazetteer, the main interaction menu. The Gazzeteer will be described in further detail a little bit further down. Alternatively, press G.
- Open the Map, where you can see everything you’ve discovered and where you currently are in the grand scheme of things. Alternatively, press M.
- Open the options menu, where you can change volume and graphical settings, be a coward manually save or quit the game. Alternatively, press ESC.
8 – Your ship! Well, my ship. You’ll begin the game with a Ligeia-class Steamer, while pictured here is a Phorcyd-class Corvette. The Steamer has a Hull of 75, a maximum Crew of 10 and a Hold (inventory space, essentially) of 40.
You can press G at any time to open the Gazetteer, as mentioned previously. The main tabs are as follows:
Story – Where the more text-based section of your adventures take place. Possible actions, along with their requirements, are displayed here. To do something, just click its respective button. If the action has a challenge attached to it, such as a Veils check to eavesdrop on something, you will see an icon describing your chances, which you can highlight to see the specific % chance of your success.
Hold – Your ship and its currently fitted equipment are displayed on the left page, along with a summary of your current weapons and their functions. Hull damage is the amount of damage inflicted on enemy ships, Life damage is inflicted on zee-beasts, and Crew damage is the number of crew killed when the weapon deals damage to a ship under half hull. However, it is incredibly difficult to wipe out an enemy crew without destroying the ship, so crew damage is mostly irrelevant right now. Some weapons can also inflict stagger on enemies, setting back the time it takes for them to wind up an attack.

On the right page, you can see your inventory, the things you have to your name beyond your ship. Cargo items are the ones that actually take up space in your Hold, while Curiosities include smaller physical items like trinkets and trophies, and more “conceptual” items, such as stories and secrets. If you urgently need to make space in your hold, the red Cargo button allows you to select cargo to throw overboard.
Journal – On the left page, you can see your Accomplishments. These are mostly cosmetic notes of the things you’ve done and, should you make it that far, awards given for the success of previous captains. On the right page, you can see a comprehensive series of categorised notes keeping track of the progress you’ve made in stories, the current state of affairs in the Neath, objectives you’ve been given etc.

Zailing the Zee Cont. and Something Awaits You
Officers – Here you can see the officers you’ve recruited and reassign them. You can talk to an officer to trade Secrets or pursue their storyline by right clicking on their portrait. Note that reassigning officers while out at zee will increase your Terror by 1.
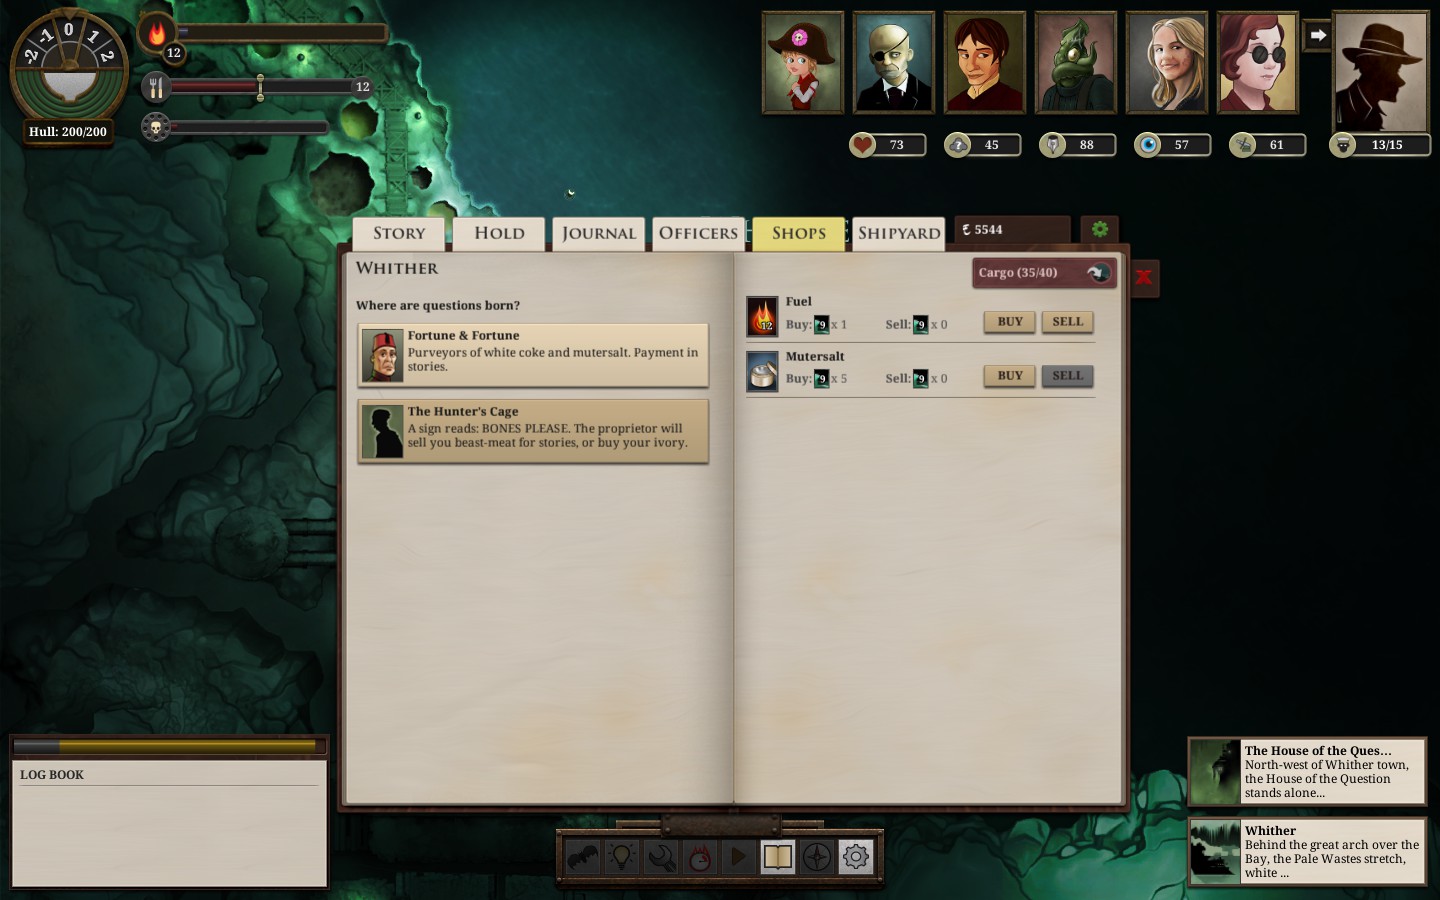
Shops – The shops of the current port you’re docked at. Many shops will sell items only and not accept them back, and vice versa. Note that some shops might not trade merely in Echoes; the northern port of Whither, seen here, only accepts trades in Zee-ztories and Tales of Terror, for instance.
Shipyard – London is the only port where you will be able to buy new ships, with the sole exception of a very special circumstance in Venderbight. There isn’t much to say about this one, since all the information you need will be displayed with each ship.


Returning to London with SAY will “consume” it to:
- Increase “Time, the Healer”, the status that determines how much time has passed in the Neath.
- Allow a new recruit to become available
- Give you a Free Evening, which can be used to Carouse in Wolfstack Docks or spend time with your sweetheart, if you have one.
Encountering Enemies and Engaging in Combat: Perils of the Neath and Not Dying to Them
In the following screenshot, we are fighting a fearsome Lifeberg. Well, I say “fighting”…
As previously mentioned, click on the thing you want to be shooting to enter combat. The combat interface will also automatically come up if an enemy becomes aware of you.
1 – The enemy’s health. When it reaches 0, it dies. Again, simple stuff.
2 – The enemy’s current state of awareness. A blank circle means it is completely oblivious to your presence. A (?) indicates that it is aware of you, but cannot currently see you. A (!) means it can see you and is actively engaged in combat. Three red (!!!) means they have almost finished preparing to attack.
3 – Your weapons. The Resilient here is equipped with a pair of powerful Deck and Forward guns; however, the steamer you begin with will only be able to fit Deck guns. The orange partial highlight means that a firing solution is being developed. The red arc indicates the range and area your gun can fire, and an enemy must be in this area for your gun to take aim. Once the firing solution is complete, you will be able to fire a shot that is guaranteed to hit by clicking the icon or pressing 1, 2 or 3. You can fire once the firing solution is at least half done, but it’s likely you’ll miss and half to start over. You can also turn on your ship’s light to increase the speed at which your guns ready a shot. Note that many zee-beasts can submerge themselves underwater, preventing your guns from aiming or firing at them for a while. Some larger enemies may also be able to stagger your guns, setting back their aiming by a second or two.
4 – Other items that can be used in combat. Strange Catches can be used to force a zee-beast to resurface, Rattus Faber Assistants can instantly repair damage to your hull, etc.

If all goes well, the enemy will disappear into a burst of smoke, leaving remains behind. Steer your ship into the remains and you will receive a storylet wherein you can choose what to do with them. For most zee-beasts, you will either be able to either study them for Fragments (should you pass a Pages challenge) or butcher them for supplies and, for most larger beasts, An Unprepossessing Mass, which essentially serves as a random piece of loot. For enemy ships, on the other hand, you will generally only be able to scuttle the ship and obtain a Cache of Curiosities, serving the same purpose as the Mass, but with different potential treasures.

- The first rule of battle: NEVER FACE THE ENEMY HEAD-ON. The last thing you want is to be caught in a conflict where you did not choose the opening state of the field. Even if you win a fair fight, you’ll take a bunch of unnecessary damage in the process.
- Against enemy ships, try and stay behind them. With the exception of some of the most powerful enemies, the majority of ships have no aft gun, and thus can’t touch you so long as you stay behind them. Colliding with other ships does no damage, so don’t be afraid to hug their back if possible.
- Try and keep the enemy unaware of your presence for as long as possible while you take shots at them. Once it becomes impossible to stay hidden, turn your light on to speed up your firing rate and pray.
- Most zee-beasts have one simple attack: Ramming speed. For some of the slower ones, you may be able to escape some damage by backing up, but once they’re close, you’re not getting them off you unless you fire up the engines and go as fast as you can in the opposite direction.
- Zee-beasts can also get behind you very easily, usually as they slow down from having just charged. Try and turn with them if they’re charging you at close range so they don’t leave the firing arc of your guns.
- The majority of enemies will start killing your crew with each attack if your ship falls below half Hull.Try not to let that happen too much.
- The starting steamer is not suited for combat. It really isn’t. Even following all this advice, all but the weakest enemies will be tough fights for the tramp, so it’s probably smart to wait until you’ve got the cash for a better ship such as the Corvette before you try and pursue combat at all.
- Avoiding enemies is very easy, thankfully. So long as you stay at an arm’s reach from them and they don’t have a light pointed at you, they probably won’t see you. Stay behind land if it’s available, and never pick a fight that you more than likely won’t win.
Pirate Steam-Pinnace
Hull: 30
Crew: 5
Attacks: Single, low damage Deck gun
A measly pirate vessel most commonly seen near Low Barnet. The weakest enemy ship in the game, but still an annoyance for the unprepared captain. Once you have some equipment and fighting experience, this is practically just a floating box of loot. A Crack-Pirate variation exists with 80 Hull.
Auroral Megalops
Health: 20
Attacks: Very fast, low damage charge
Many of these glowing crabs can be found around Mutton Island and near the Cumaean Canal, directly south of London. They are one of the fastest charging enemies you’ll find, but are still extremely weak and easily dispatched. They cannot be used for supplies once killed, but set your Hunger to 0 instead. Dissecting them is almost completely pointless, as it only provides a single Fragment even on a successful Pages check.
Bat Swarm
Health: 20
Attacks: Fast, pitiful damage charge (Destroys Supplies if below half Hull)
Most often seen near Venderbight, these annoying swarms can be somewhat difficult to see against the darkness of the zee. Using them for supplies will increase your Terror by 1, while disposing of the corpses will reduce it by up to 2 instead.
Angler Crab
Health: 150 (Western) / 300 (Eastern) / 600 (Elder)
Attacks: Moderately slow, good damage charge
Can submerge
Angler Crabs are a step up from the Auroral Megalops, and much more of a threat than their young. The Westerns give way to more powerful variations the further out to zee from London you go, but their behaviour changes little. Dissecting these creatures is guaranteed to provide you with a Hunting-Trophy, while butchering them provides Supplies and a Mass instead.
Pirate Frigate
Hull: 75
Crew: 15
Attacks: Light-damage Deck gun
A step up from the Steam-Pinnace, the Frigate is also much more valuable to destroy, as looting it guarantees a unit of Fuel and Supplies as well as the Cache. Crack-Pirate variants exist with 140 Hull.
Jillyfleur
Health: 75
Attacks: Rapid, moderate damage charge
Can submerge
Jillyfleur are annoying little buggers. Their loot is also quite different from other zee-beasts; you have the potential to get a Strange Catch instead of Supplies from butchering them, and watching the body disperse gives you a Zee-ztory. You’ll also receive Fragments, if you’ve been to a certain place…
Lifeberg
Health: 400
Attacks: Slow, very high damage charge
Cannot submerge
Found near the northernmost port of Whither, Lifebergs are not to be messed with unless you have the firepower to take it down from a distance. On one hand, they’re so massive that they are unable to submerge. On the other hand, they’re so massive that they deal catastrophic damage with their charge. Sneak past them until you have a better ship; thankfully, they don’t have very good awareness and are quite slow when not charging.
There are many, many other beasts and ships to be encountered further from London, but let’s not spoil everything, now.
Making Money: What to Do, Where to Go and Who to Know


Conclusion
So, did any of that help? If not, I’m sorry. Tell me if there’s something you wanted to know that I failed to cover, and I’ll see if I can’t fill in the gaps for you. If this has helped you at all, please rate it so that others can hopefully learn from it as well. It’s a wide zee out there, and I hope you now know how to live long enough to take a good look at it. You CAN lose your mind and eat your crew, but it really doesn’t mean you should. Keep your mind, eat good food, and reject the Dawn Machine.

The sun.
The sun.
The sun.
THE SUN.
