
Overview
A “Do it live” kind of guide, that will teach someone who has never modded to learn how to mod Medieval Engineers.===========================================================================================Q) Do you have a Blender model completed with a stable 512×512.png UV ready and accompanying 512×512.png texture ready to convert to .dds format? A)* Yes!? Than this guide is definitely for you if you are trying to figure out the magic of M.E. mod crafting from the Blender platform. I was where you once are now.A)* No?!This guide can still work for you but some knowledge in blender is pretty much required. This guide may get your creative juices flowing though and introduce you to your new favorite toy.PS: (The size of the image isnt that important. We use 512×512 to conserve space while still allowing for pretty textures.)===========================================================================================Whether you have Blender installed or not got to C: drive folder or what ever the root directory of your machine is and make a folder called “BlenderSaves”. Also within this folder create a folder called “Textures” and also a folder called “Models”. This will store your pre-M.E. world developing products so you may get them to the right size and orientation when exporting the models into the M.E. & S.E. data standard “3Dmodel.mwm” file format. Within the texture folder you should keep backups of your .png textures not including UVs. Within the Models folder make more folders by the name of the block you are creating and keep multiple versions of the iterations until a final placeholder is reached then delete outdated and obsolete versions. Examples will be found in the upcoming videos.===========================================================================================Q) Have you created the Mod destination folder in “Appdata/Roaming/Medieval Engineers/Mods” that will contain your mod creation?A)* Yes!?O.K. you are probably just ready for the video that shows you how to make your .blend into a .mwm file. That is coming but I must lay all this out first to be certain all the information is clear.A)* No?!That’s not a problem. Do that now and come right back to this spot. Create a new folder in the Mods folder named (Anything)Content Now use the new content folder and grab the basics from the contents of your M.E. main game directory. ===========================================================================================(Data/_,Models/_,Textures/(Models/_),(GUI/_))Throw these in a named folder and you have the basis of your mod folder. This Folder of folders is the ground work for the storage and coding of your future creative expressions. You can delete all unnecessary files you are not modding unless the game gives you a bug later and you might have to re-add something but keep the files as light as you can in the beginning of your M.E. modding journey.
What Software do I need? (It’s all FREE)
Hello, I am the narrator for this adventure. It will be an exciting trip filled with success, struggle, and new found joy. Mod crafting can be tricky at first but as you practice modeling and explore new things, you begin to find it more easy. Though as you begin your journey though, your pockets may feel empty… if that’s the case don’t worry! Hurry, open the chests to acquire your Mod Building Equipment.
I will be condensing 400+ hours of coding, and 200+ hours of testing, into 1 Complete Guide. It may take a while to finish this guide, due to it covering every single thing in Medieval Engineers.
(1) You need a Modeling software, this guide uses the Blender platform:
[link]Or you may get it through Steam:
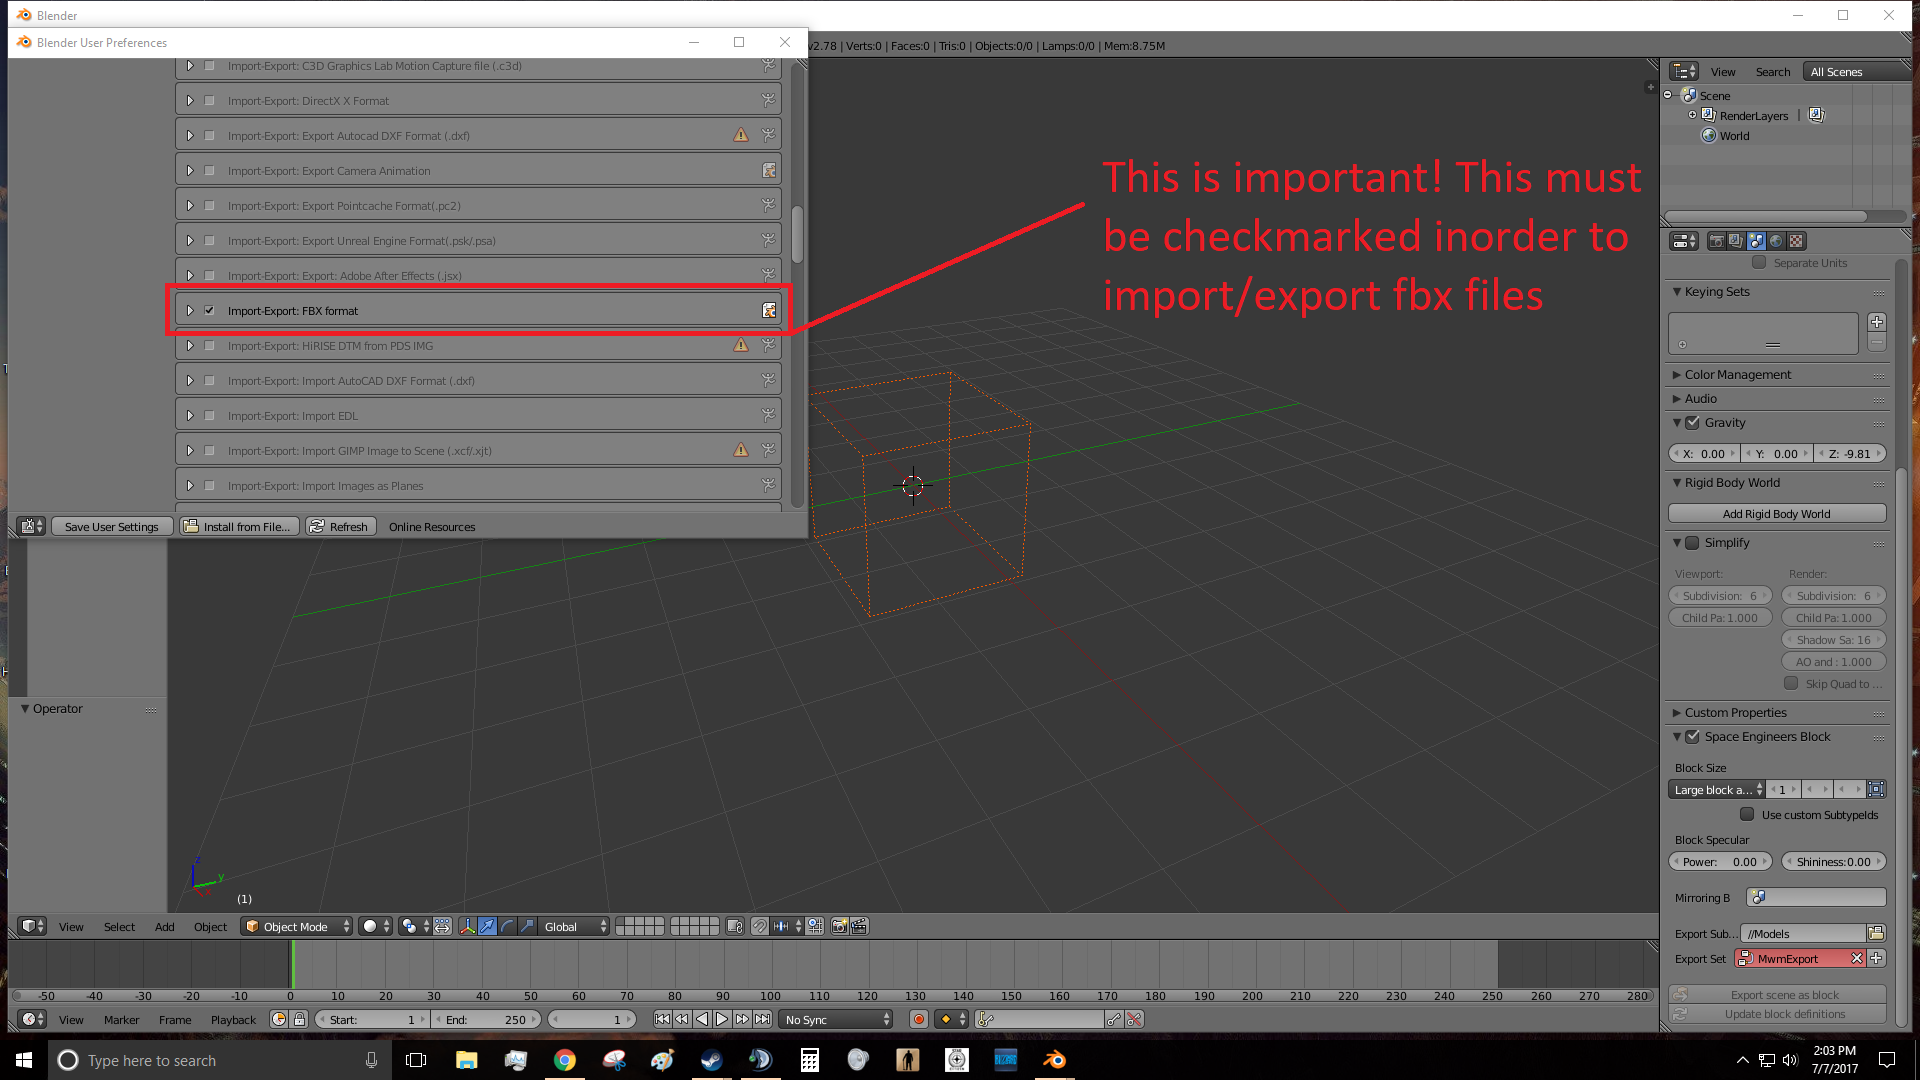
[link](2) This is important for understanding how to use Blender with ME:
[link]This guide was designed for Space Engineers, but it works for Medieval Engineers, so you need to get your Mwm converter working. You’ll find the (working) mwm converter.exe in 32-bit MedeivalEngineersModSDK. If you use the Current MedeivalEngineersModSDK the mwm converter will not work. So Please keep the 32-Bit SDK on while using the Blender Addon, if you need to import an FBX, please use the Current SDK.
(3) You MUST follow this guide above ^^^
(4) Havoc is required for Blender,
(Link to acquire havoc) [link]
(5) You will then need a Scripting software to write script. (I use Notepad).
– [link]
(6) You will need some Painting programs:
– MS Paint
– [link]
(7) You will need a PNG to DDS converter:
– [link]
(8) You will need the current version of the MedievalEngineersModSDK file (next in the sequence but never again unless you need to do a update to the MODKIT) and the Legacy 32-Bit version after.
Found under steam Library –> Tools
(9) You now need to install the current MedievalEngineersModSDK. Take the folder from the instal directory, move it to the desktop, and name it something like “M_E_MODKITCurrent”.
Now you will have access to a repository of the necessary components needed to mod the base models or use the existing models as vehicles for you own creations. When this is done you will need to install the leagcy 32-Bit version to complete all other actions.
(The reason you need the legacy 32-Bit version is because it contains the Mwmbuilder that works for this guide’s blender to mwm converter.)
Equipped with the legendary tools of mod crafting, you begin your quest, you step into the darkness, but you are not alone! The narrator is with you! Let us begin….
If you have any further questions, our mod crafting group is here: [link]
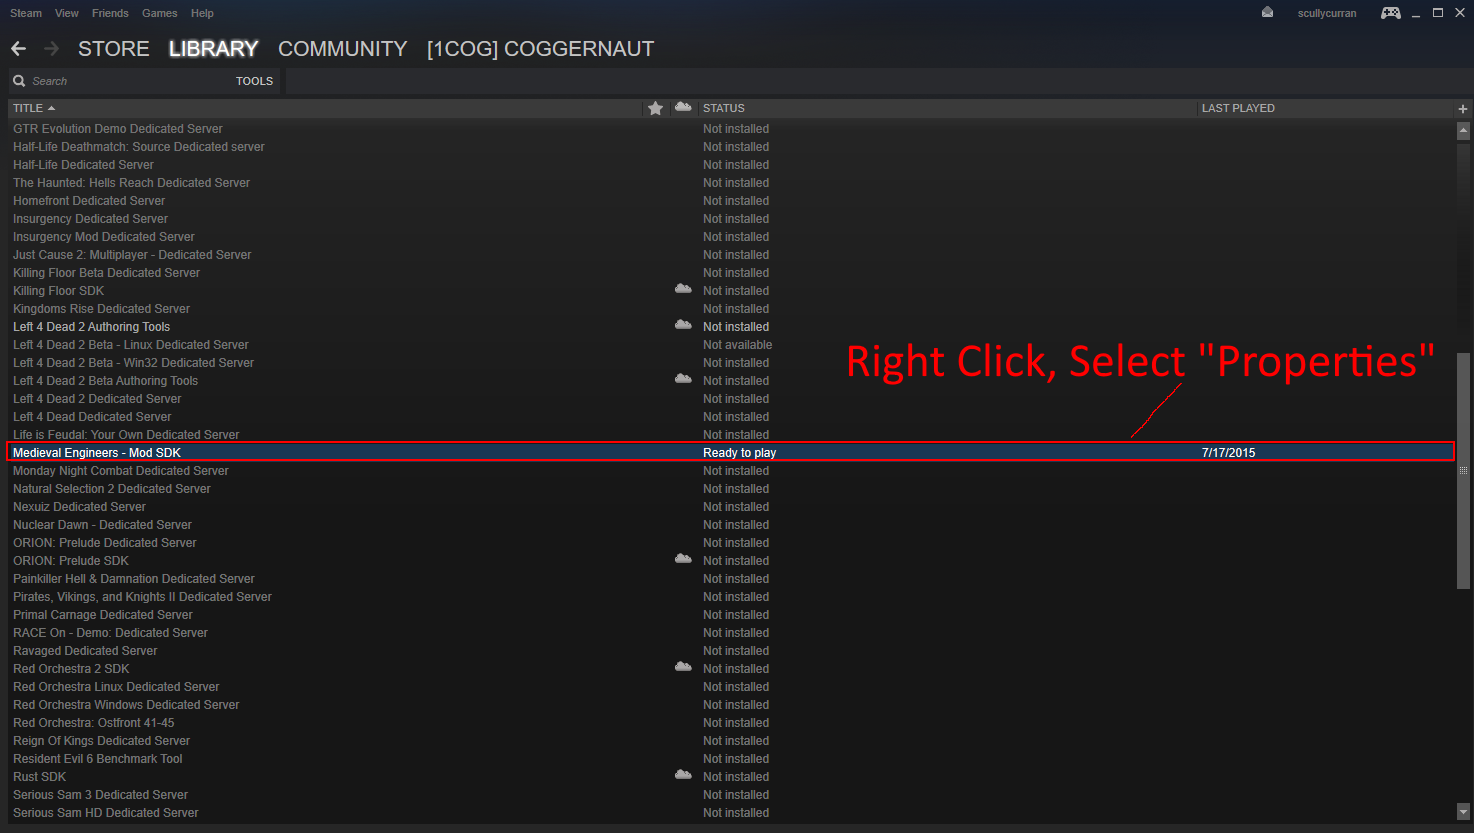
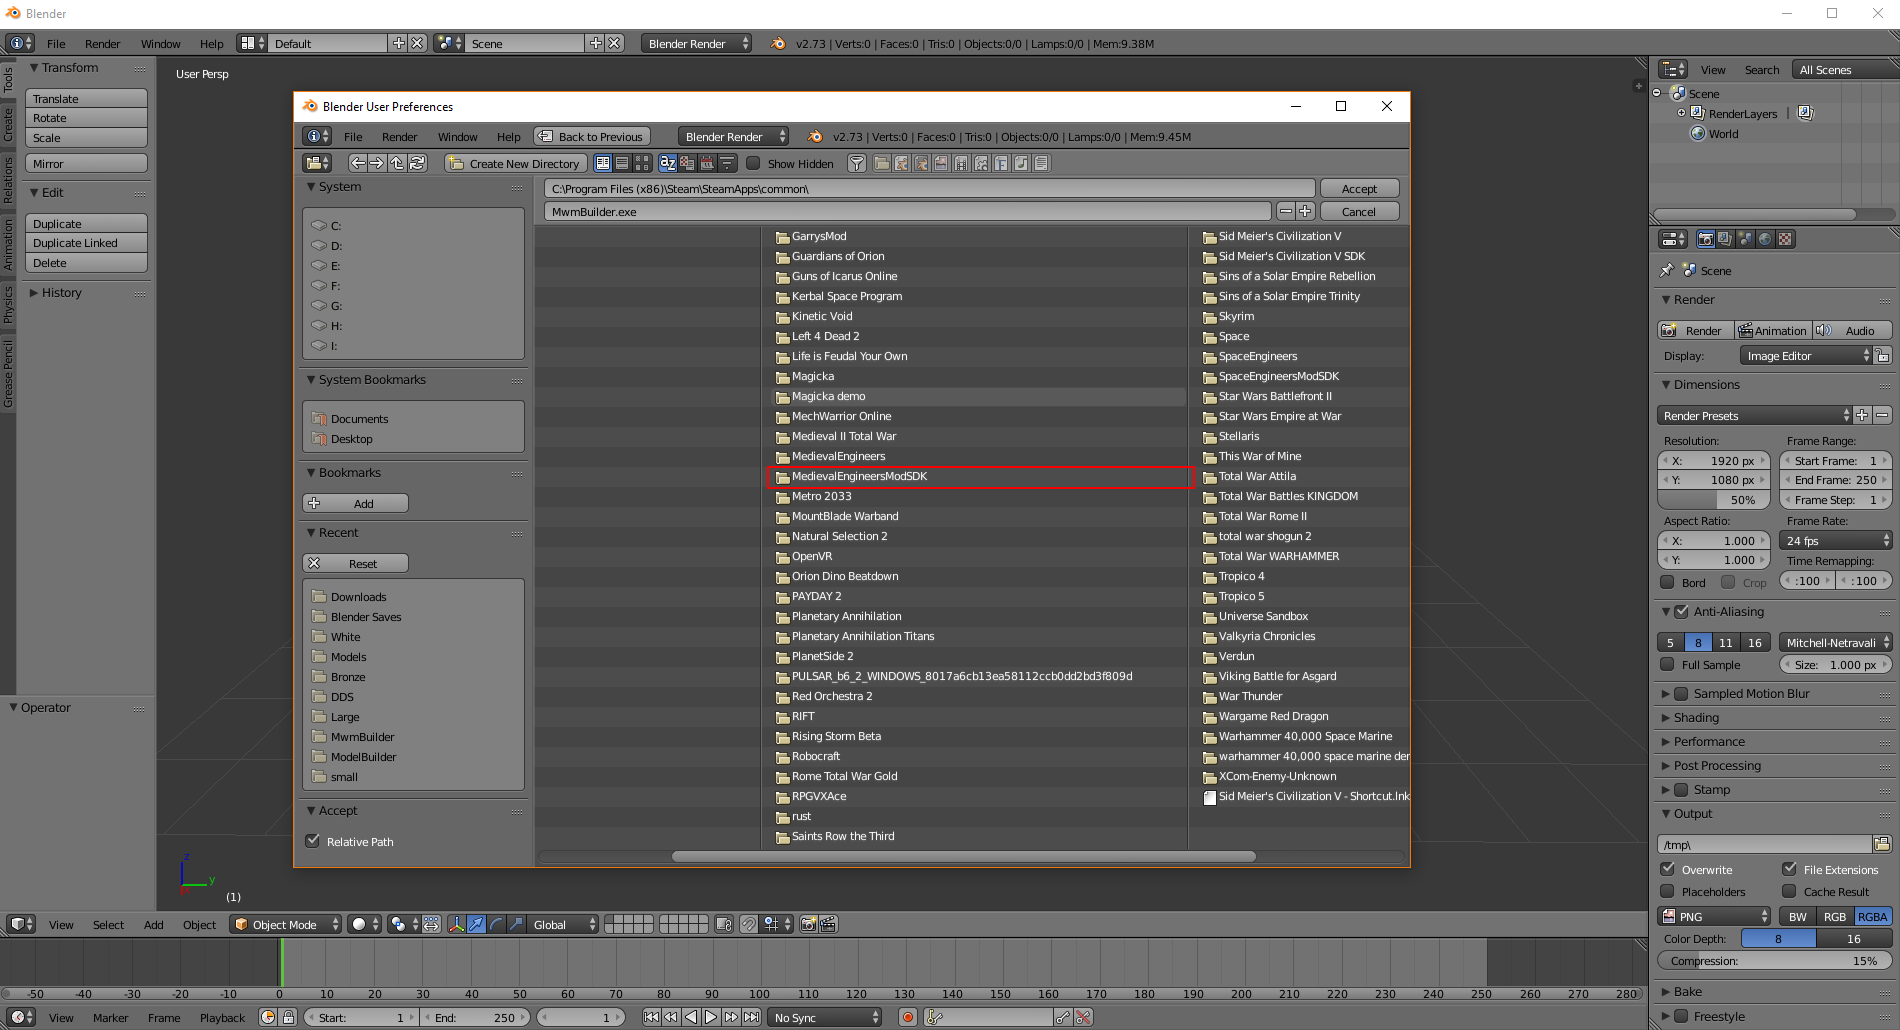
Location of 32-Bit MedievalEngineersModSDK
This is how you find your 32-Bit MedievalEngineersModSDK file:
Step 1:
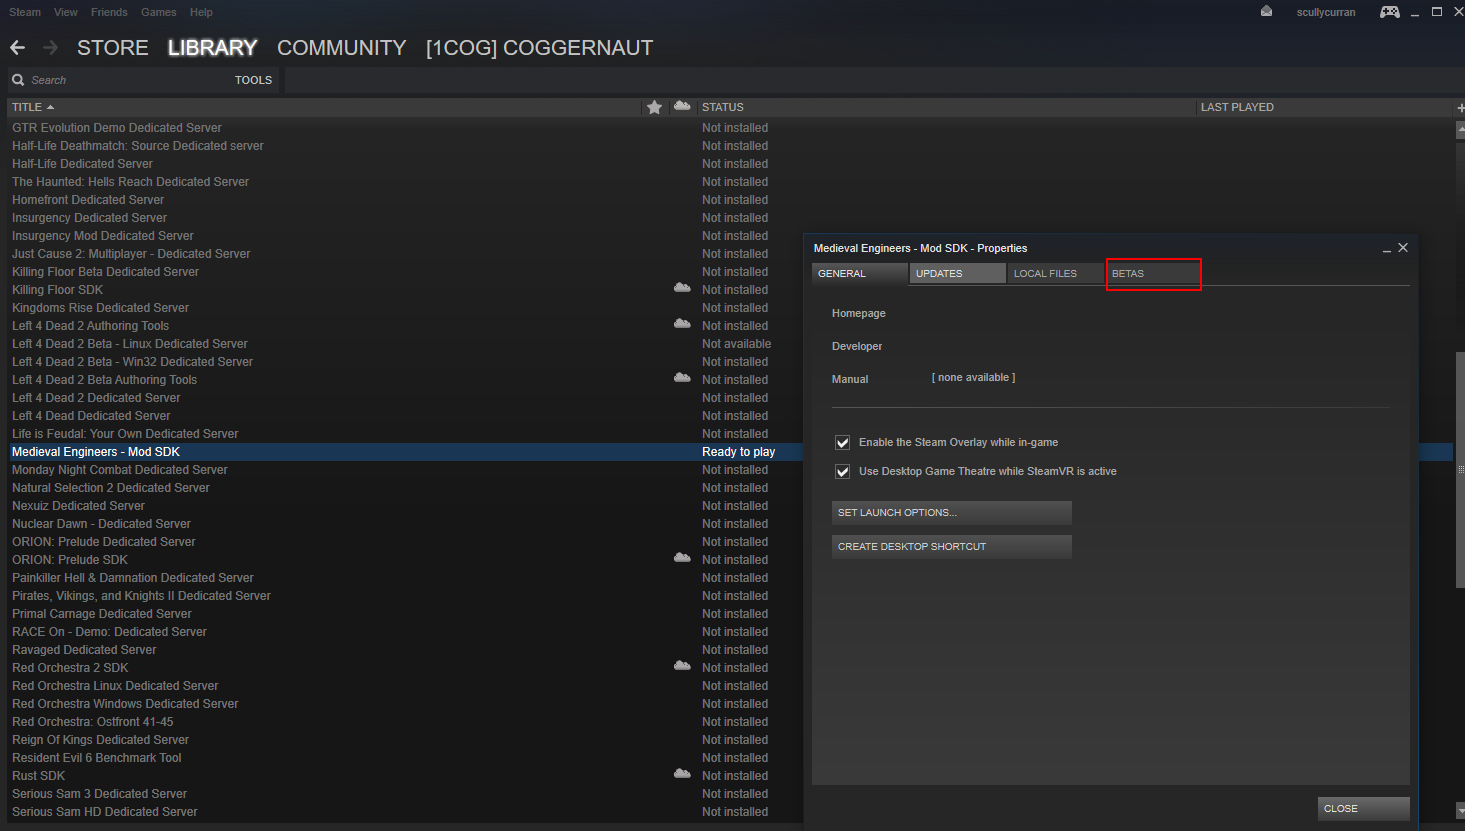
Step 2:
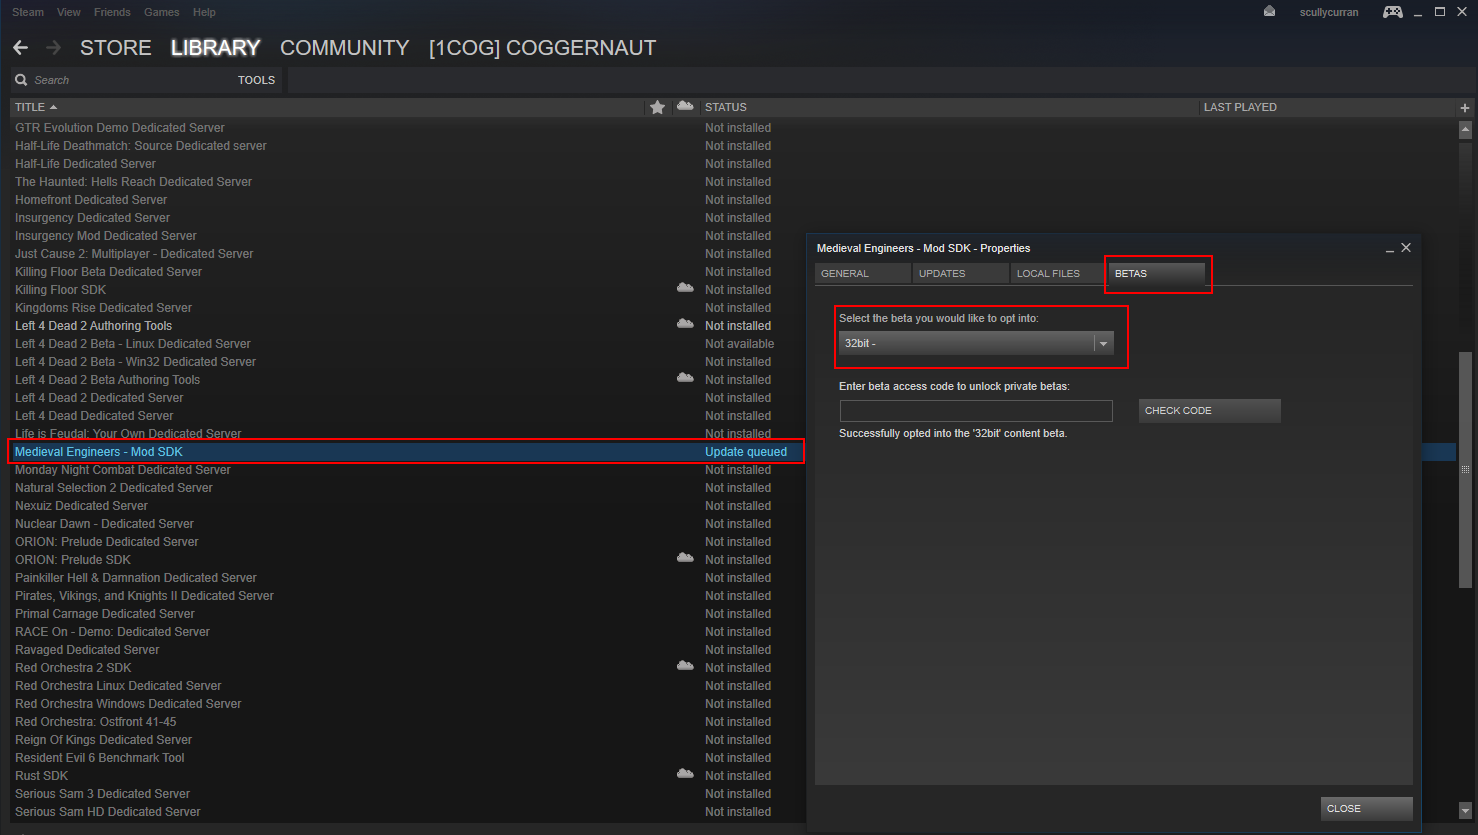
Step 3:

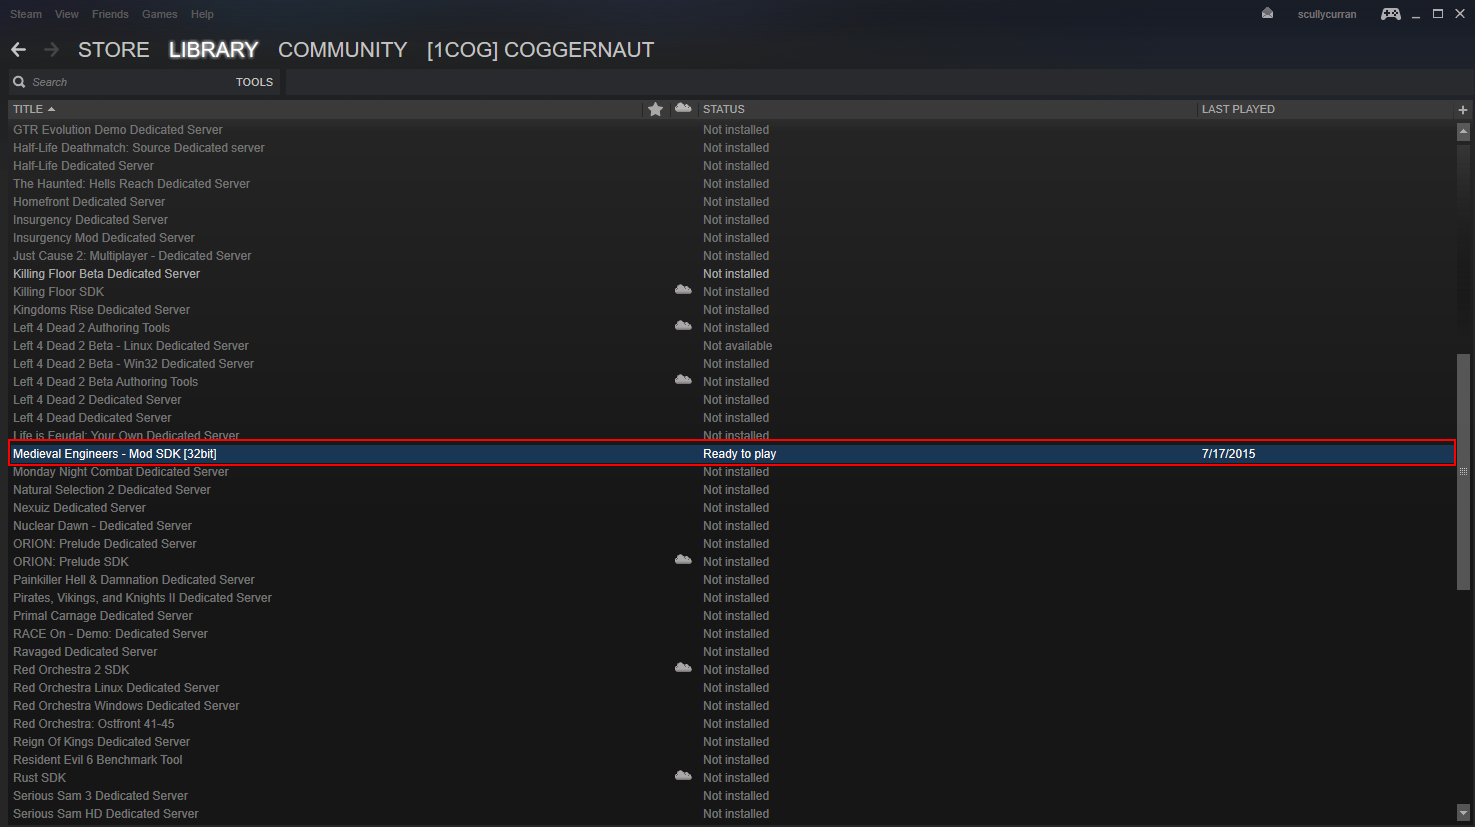
Step 4:
Step 5:
To revert back to MedeivalEngineersModSDK File, simply repeat these steps and select “None” as your beta. For 32-Bit, select “32-Bit” as the beta.
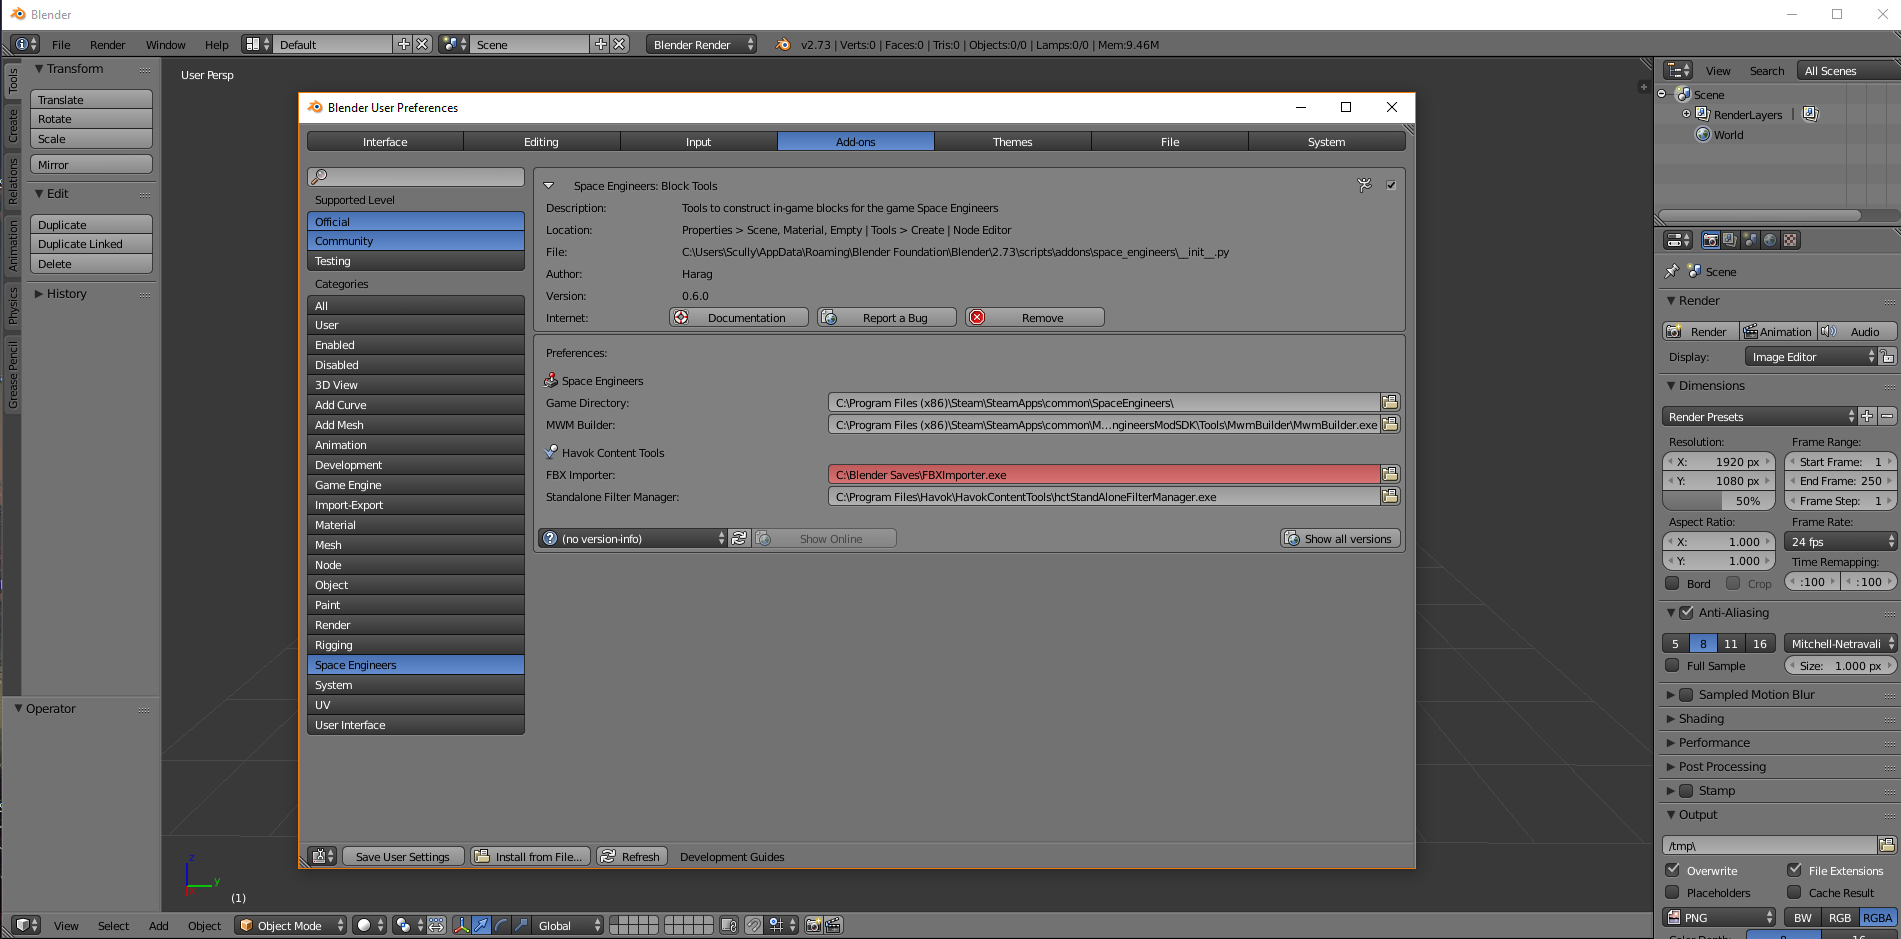
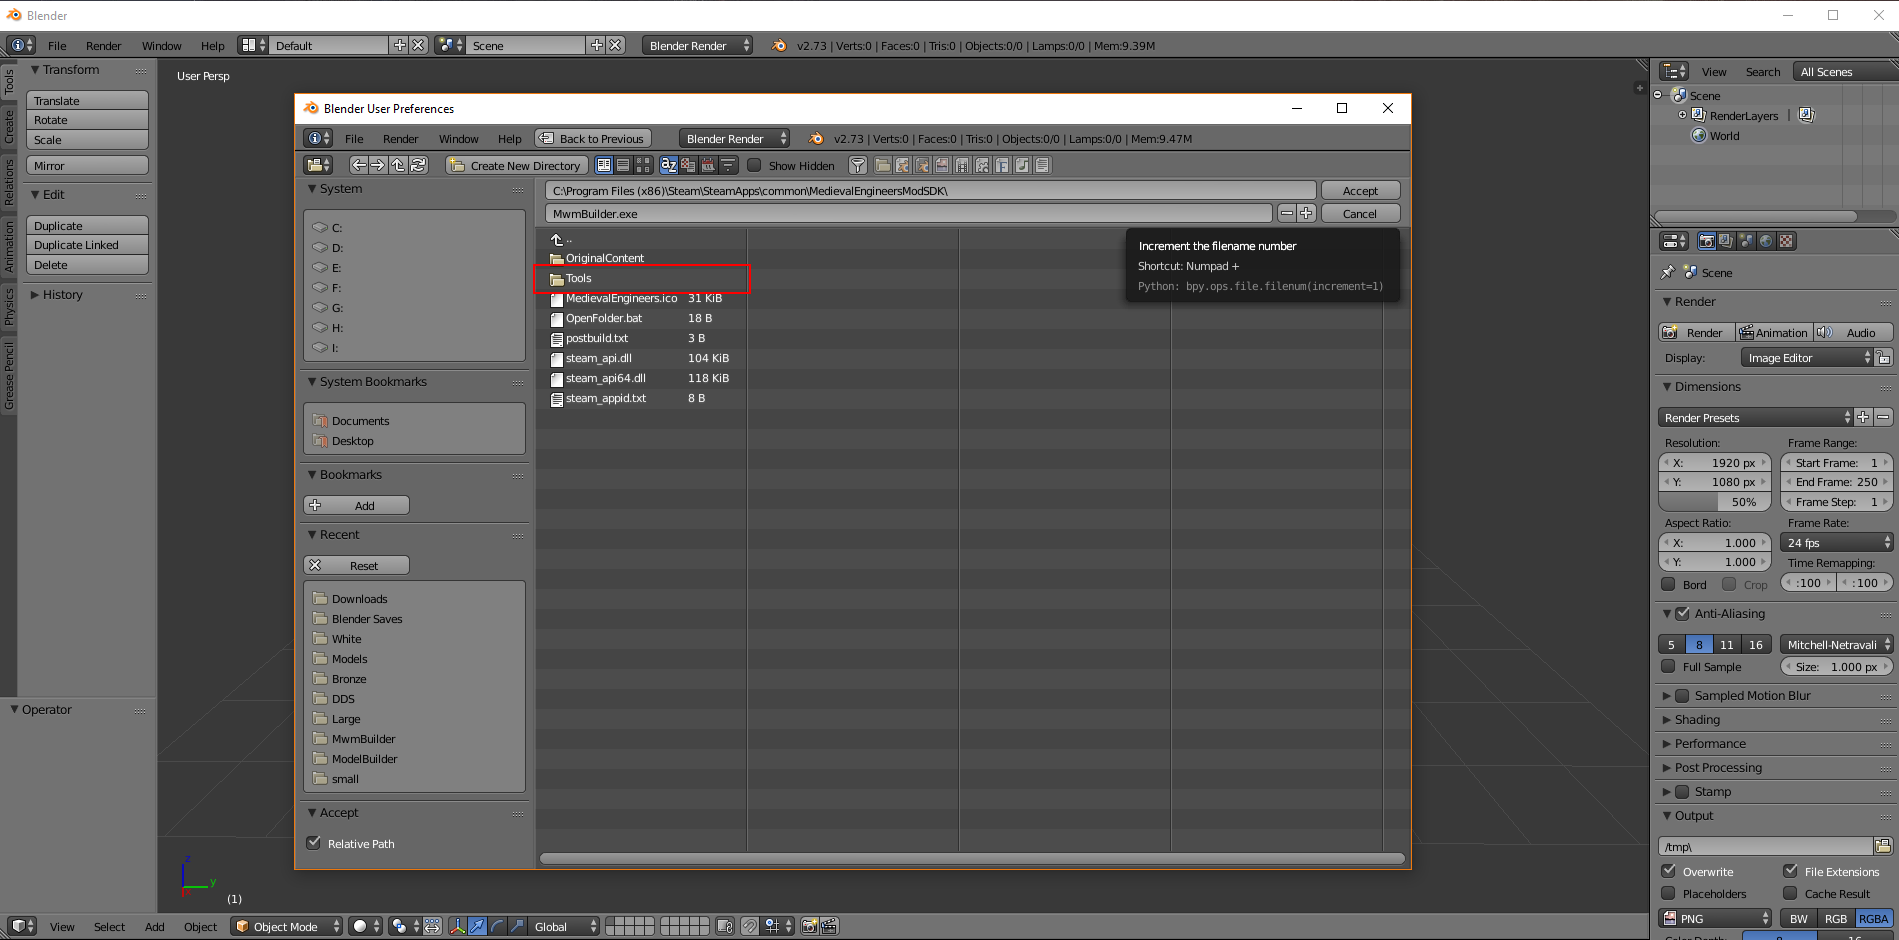
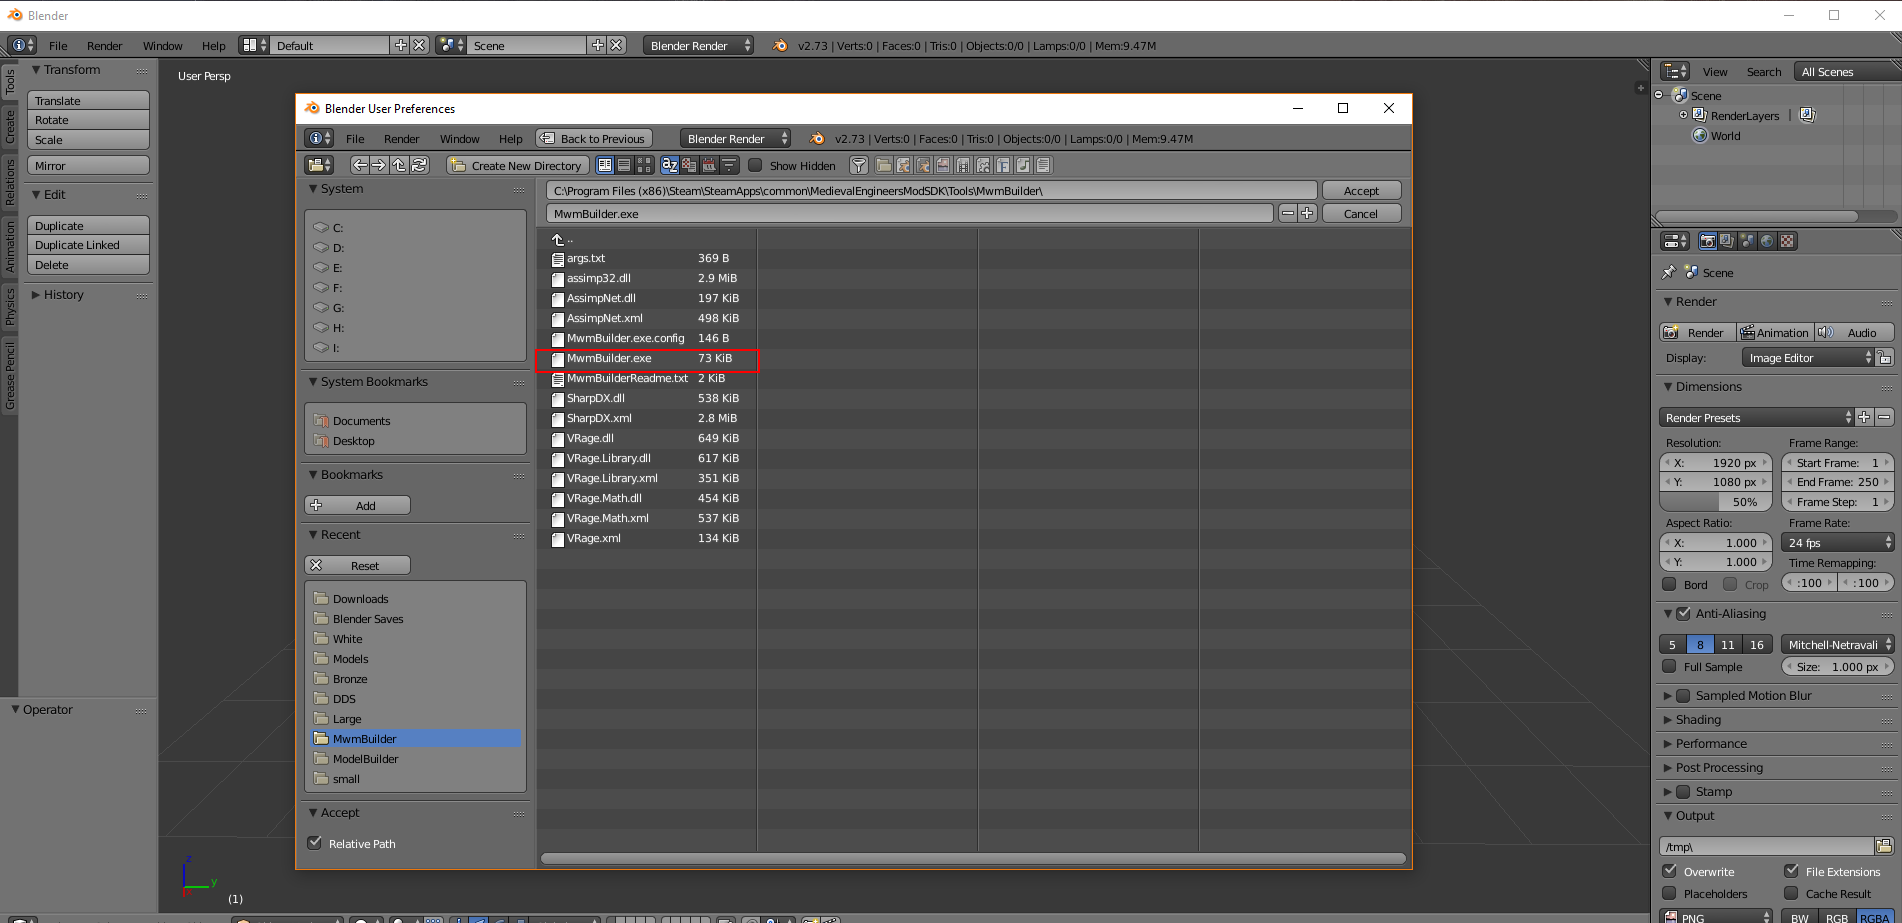
Setting up the Blender Addon
This guide was designed for Space Engineers, but it works for Medieval Engineers, so you need to get your Mwm builder working. You’ll find the (working) MwmBuilder.exe in 32-bit MedeivalEngineersModSDK. If you use the Current MedeivalEngineersModSDK the mwm builder will not work. So Please keep the 32-Bit SDK on while using the Blender Addon, if you need to import an FBX, please use the Current SDK.
For the Blender Addon, download this:
[link]
If you cant find MwmBuilder, take this:
[link]
[link]


How Do I add the ME/SE Addon to Blender?
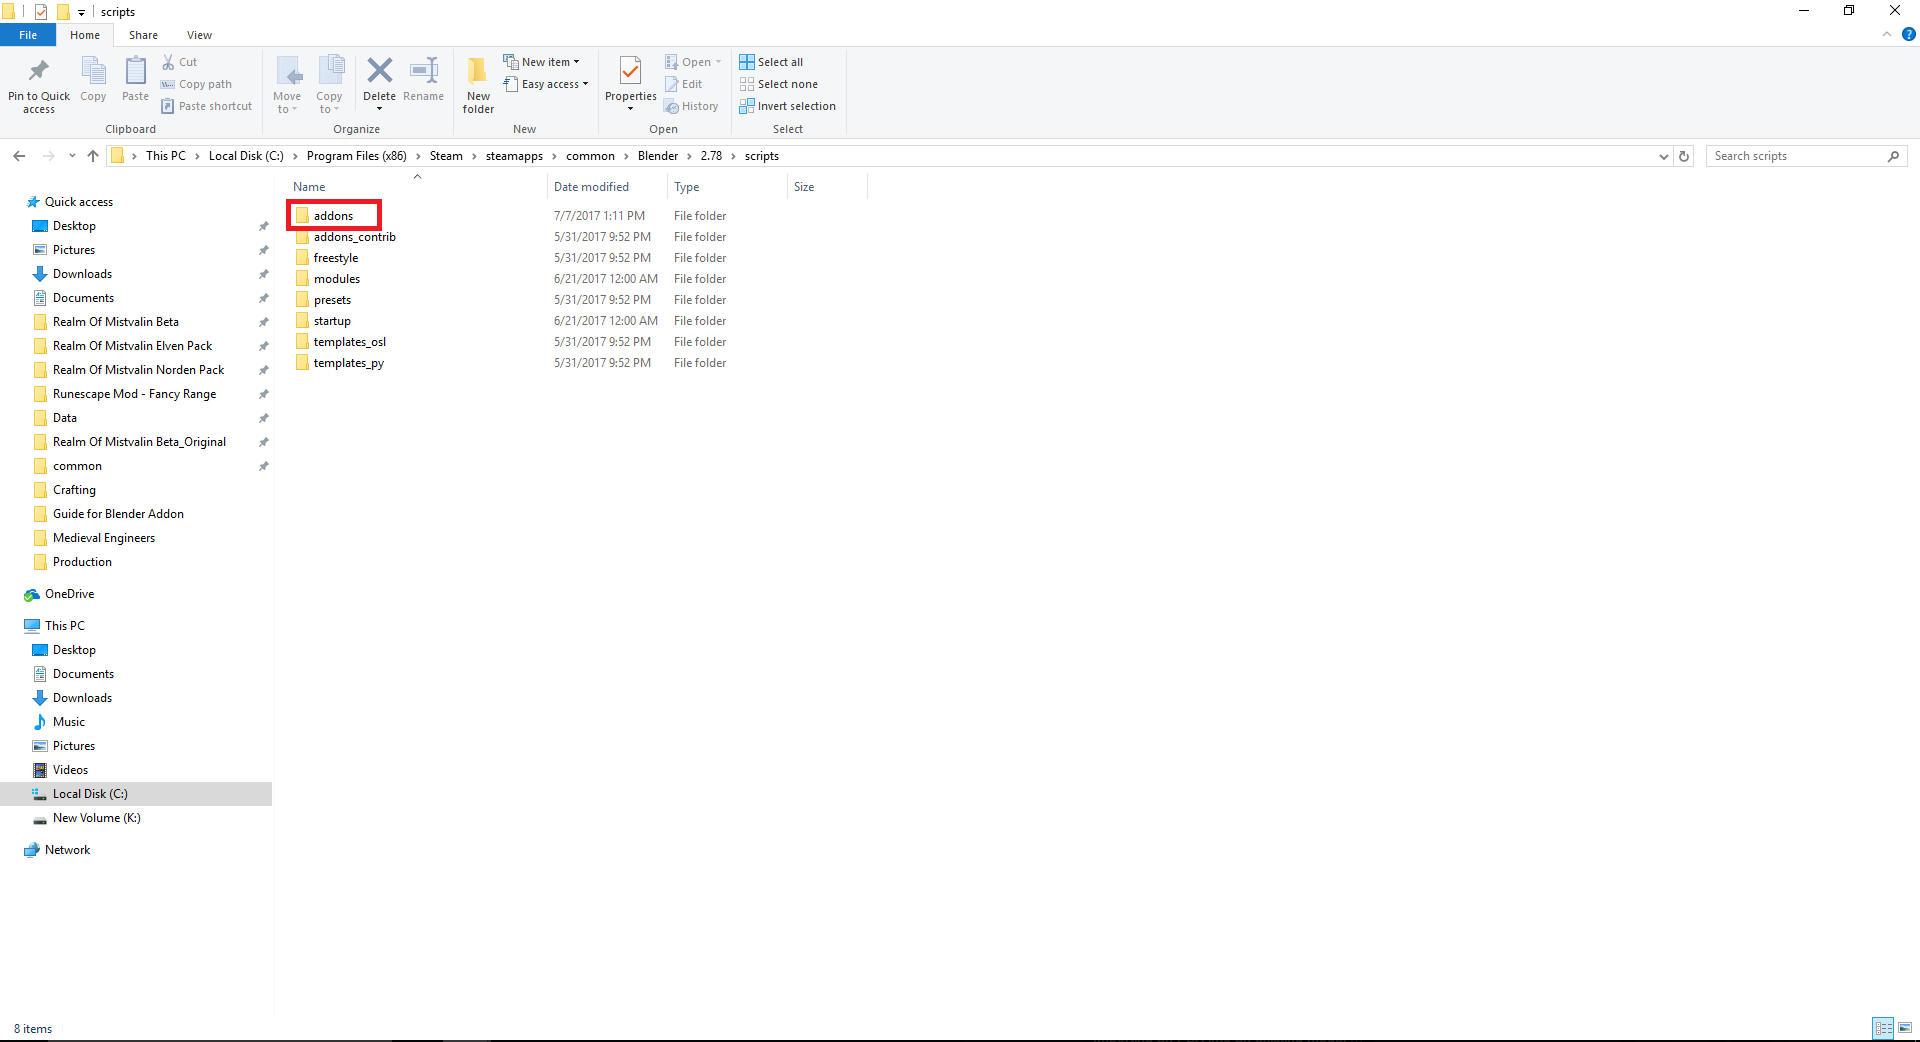
Make sure your blender Addon File Path looks like this:
Remember, you need the 32-Bit Legacy Version of MedievalEngineersModSDK for this “addon”
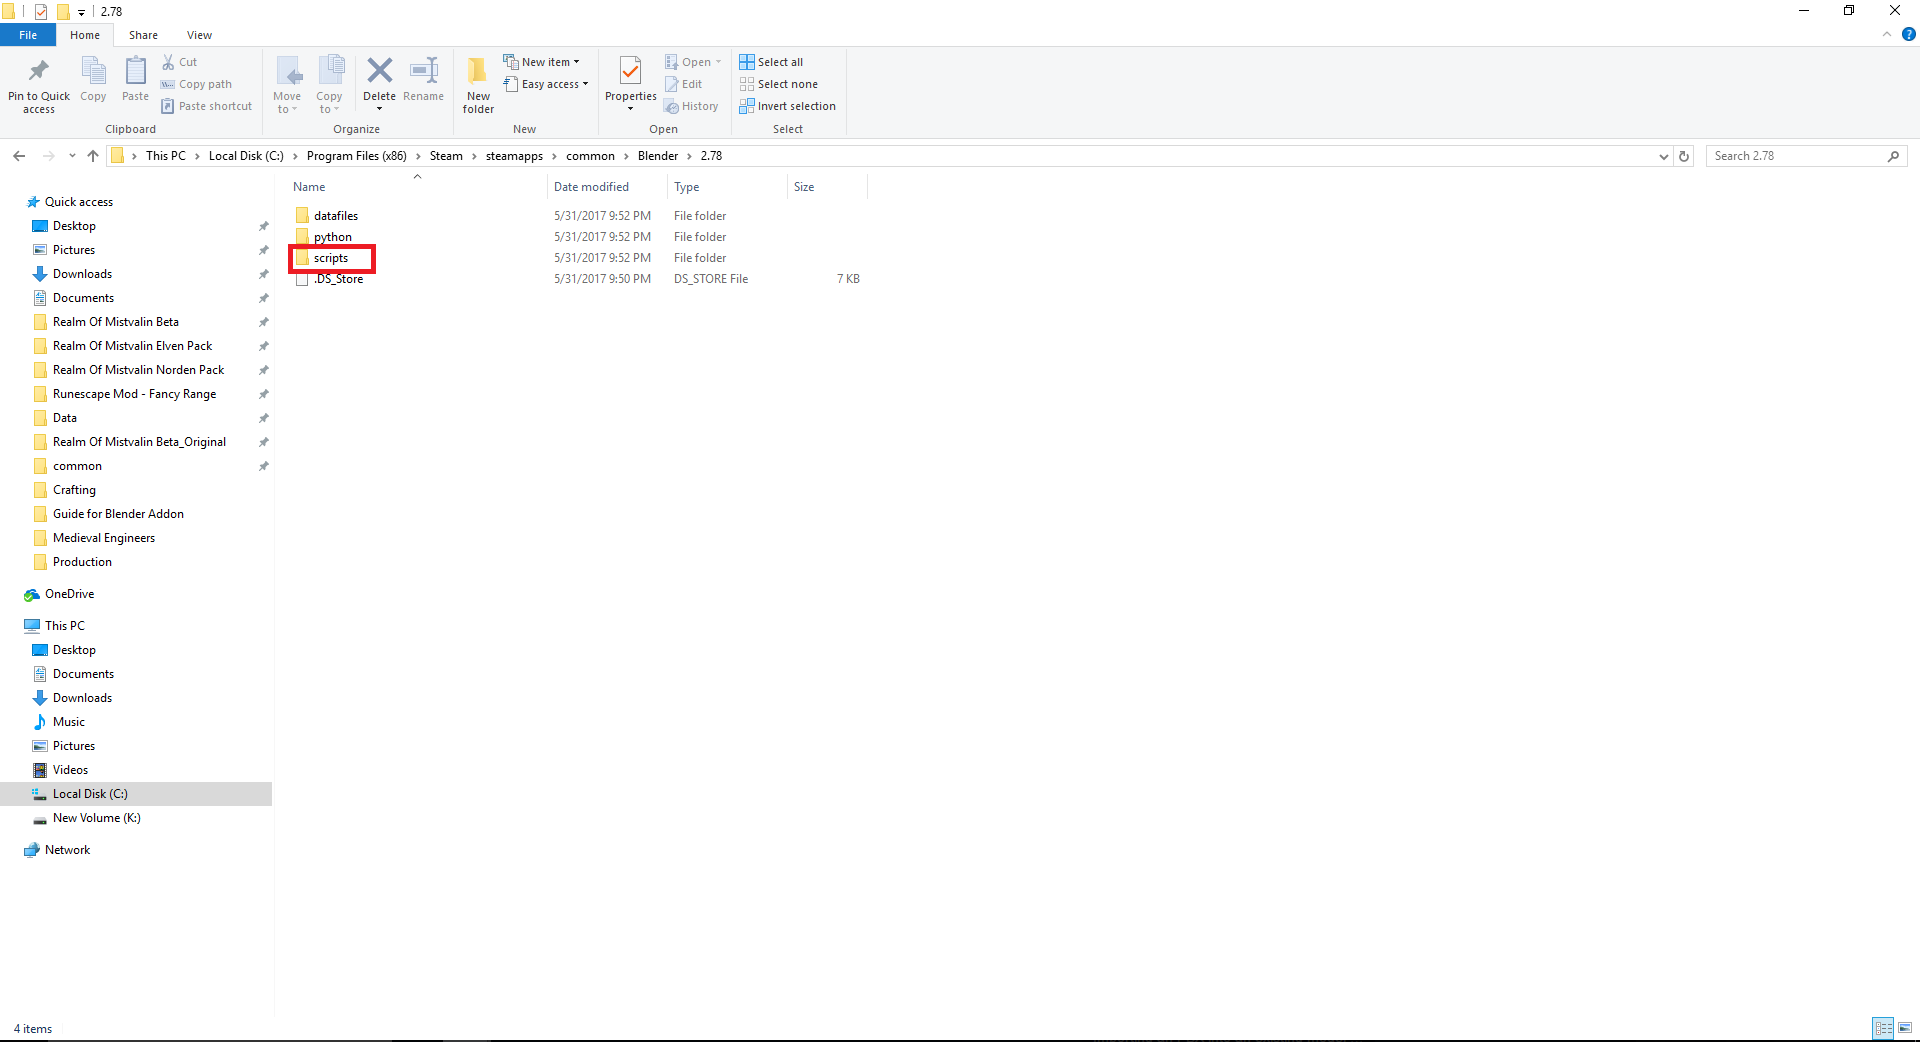
Place the extracted “SE-Blender Addon” file into blender add-on folder.
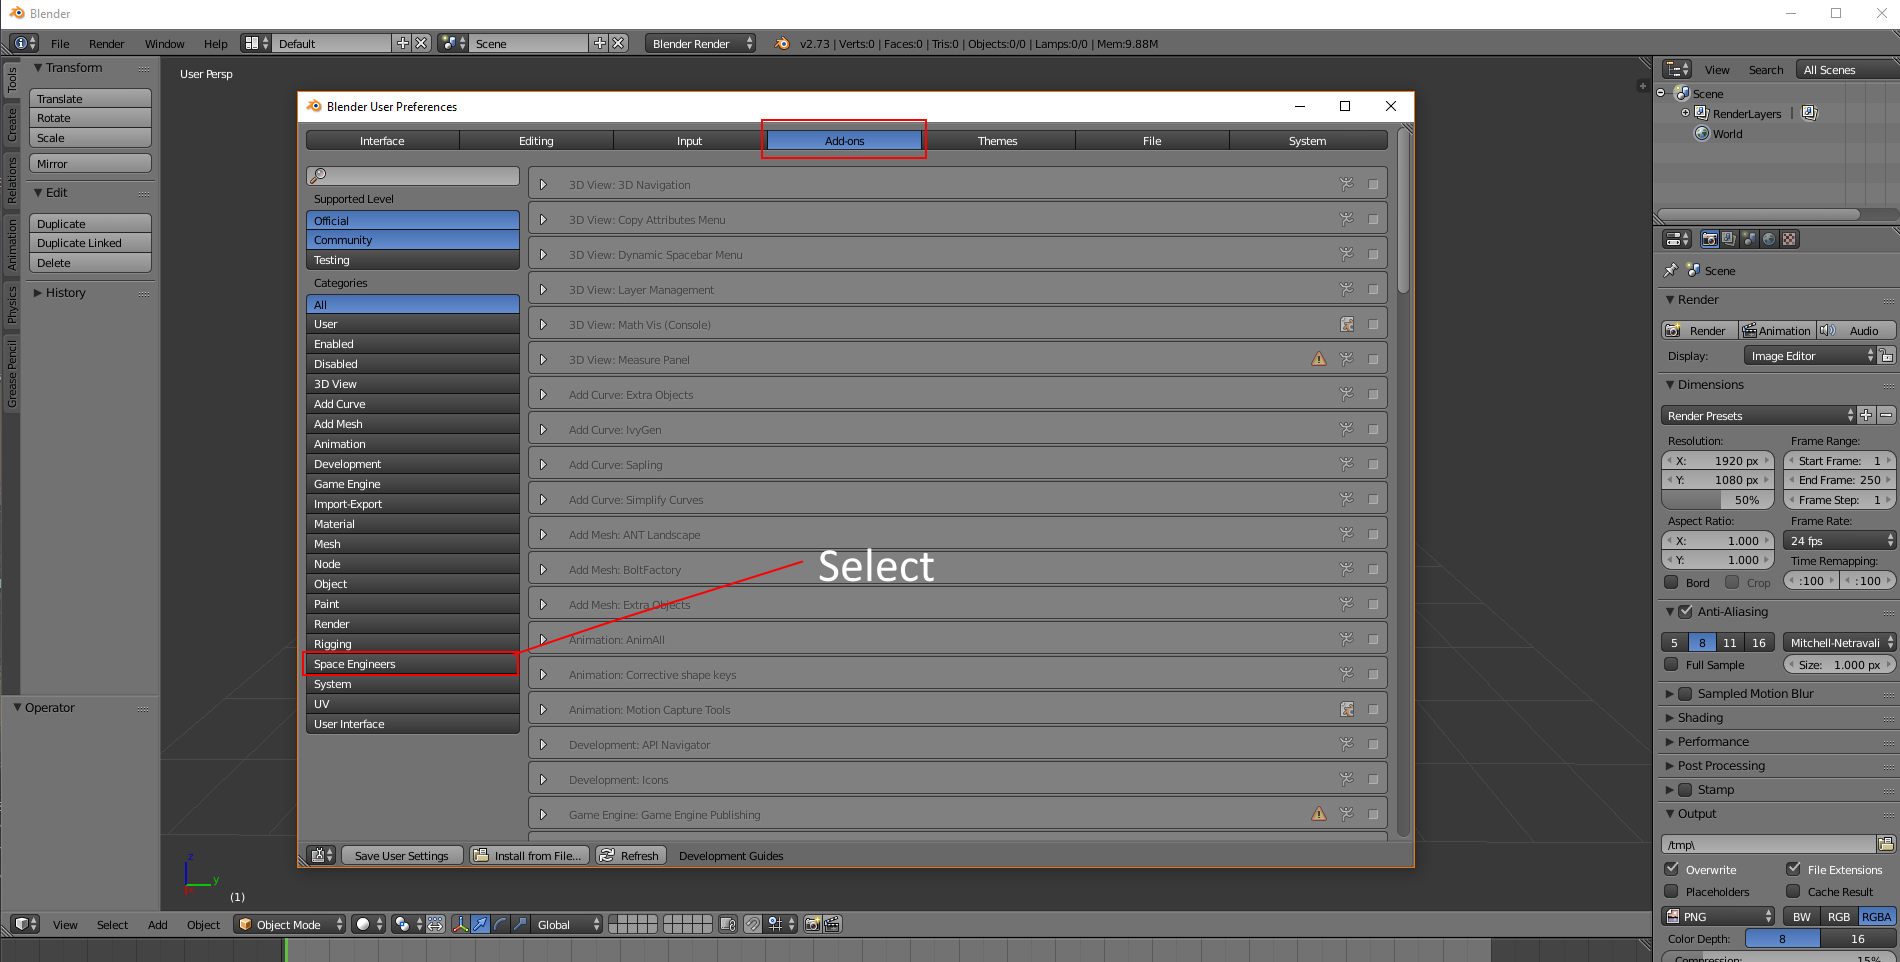
Important!!: Do not uncheckmark any of the default blender addons!!
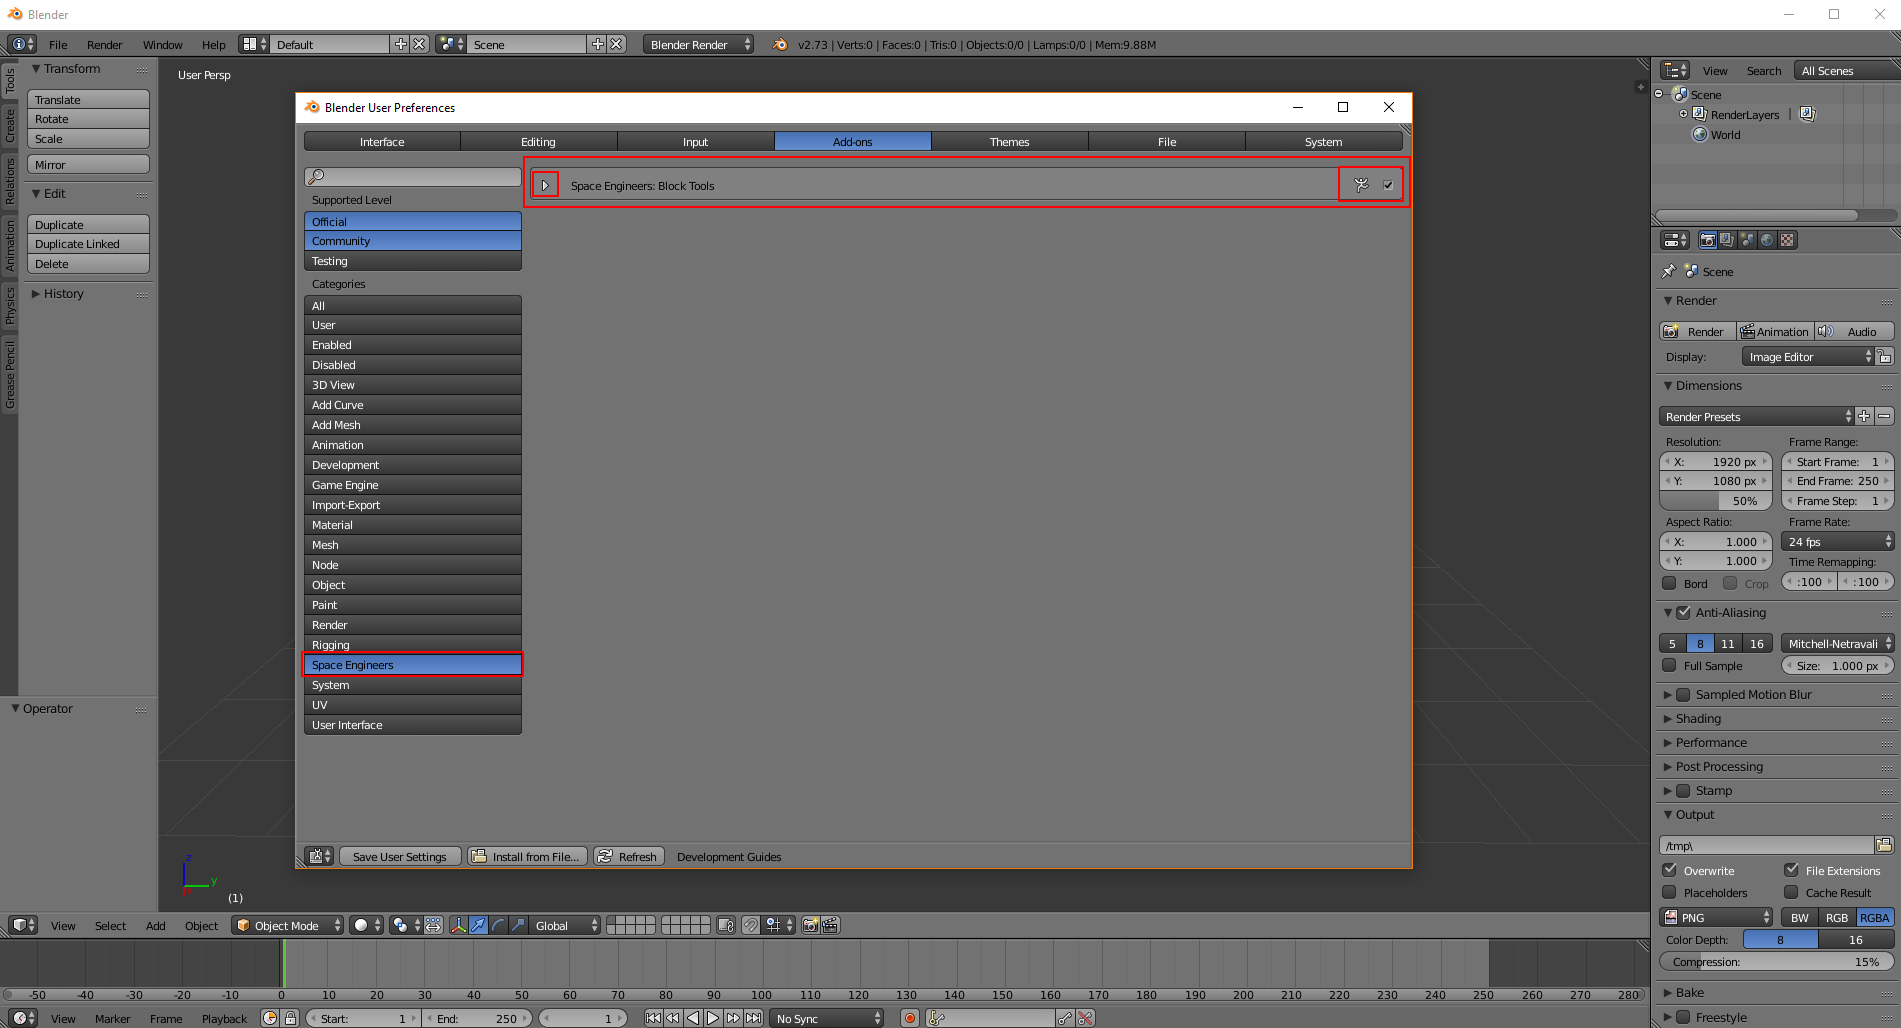

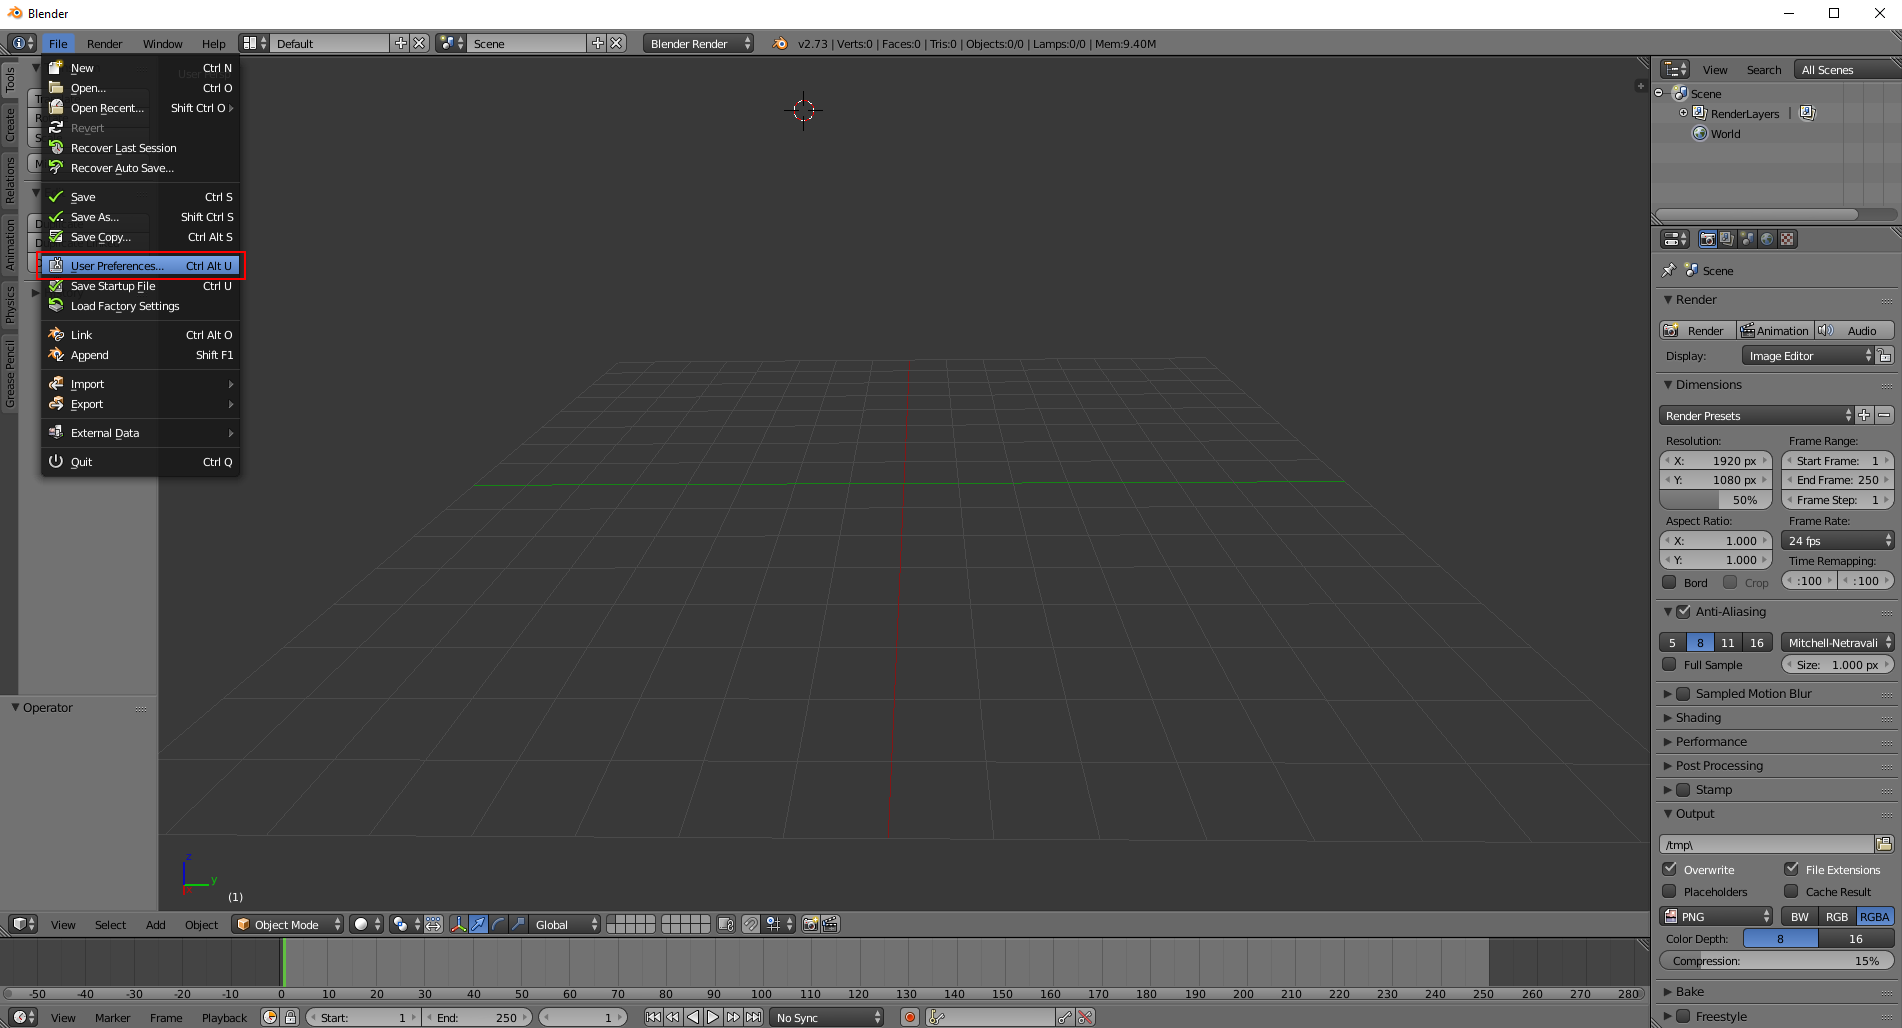
After you feel you have everything in order but before you leave this screen be sure to click the “save user settings” button or the addon you just installed will not necessarily be saved if you exit the Blender platform application.
How do I use Blender, What do I do?
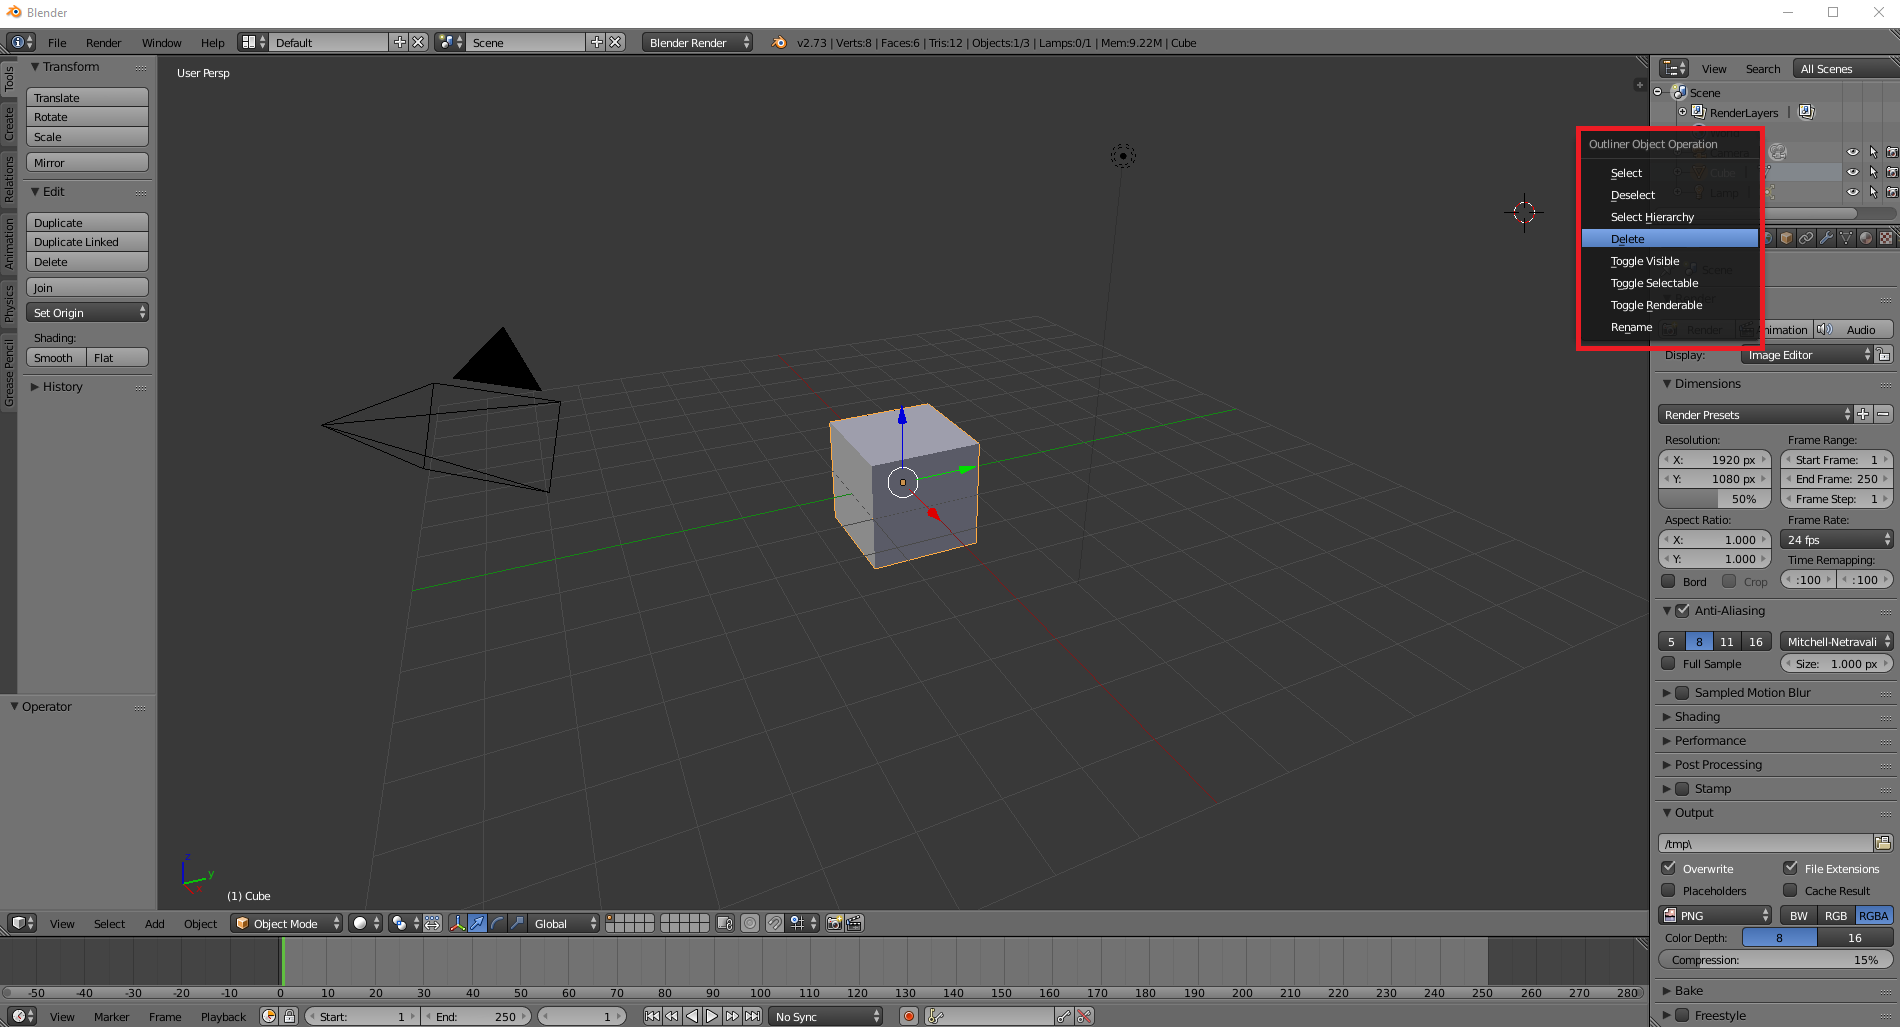
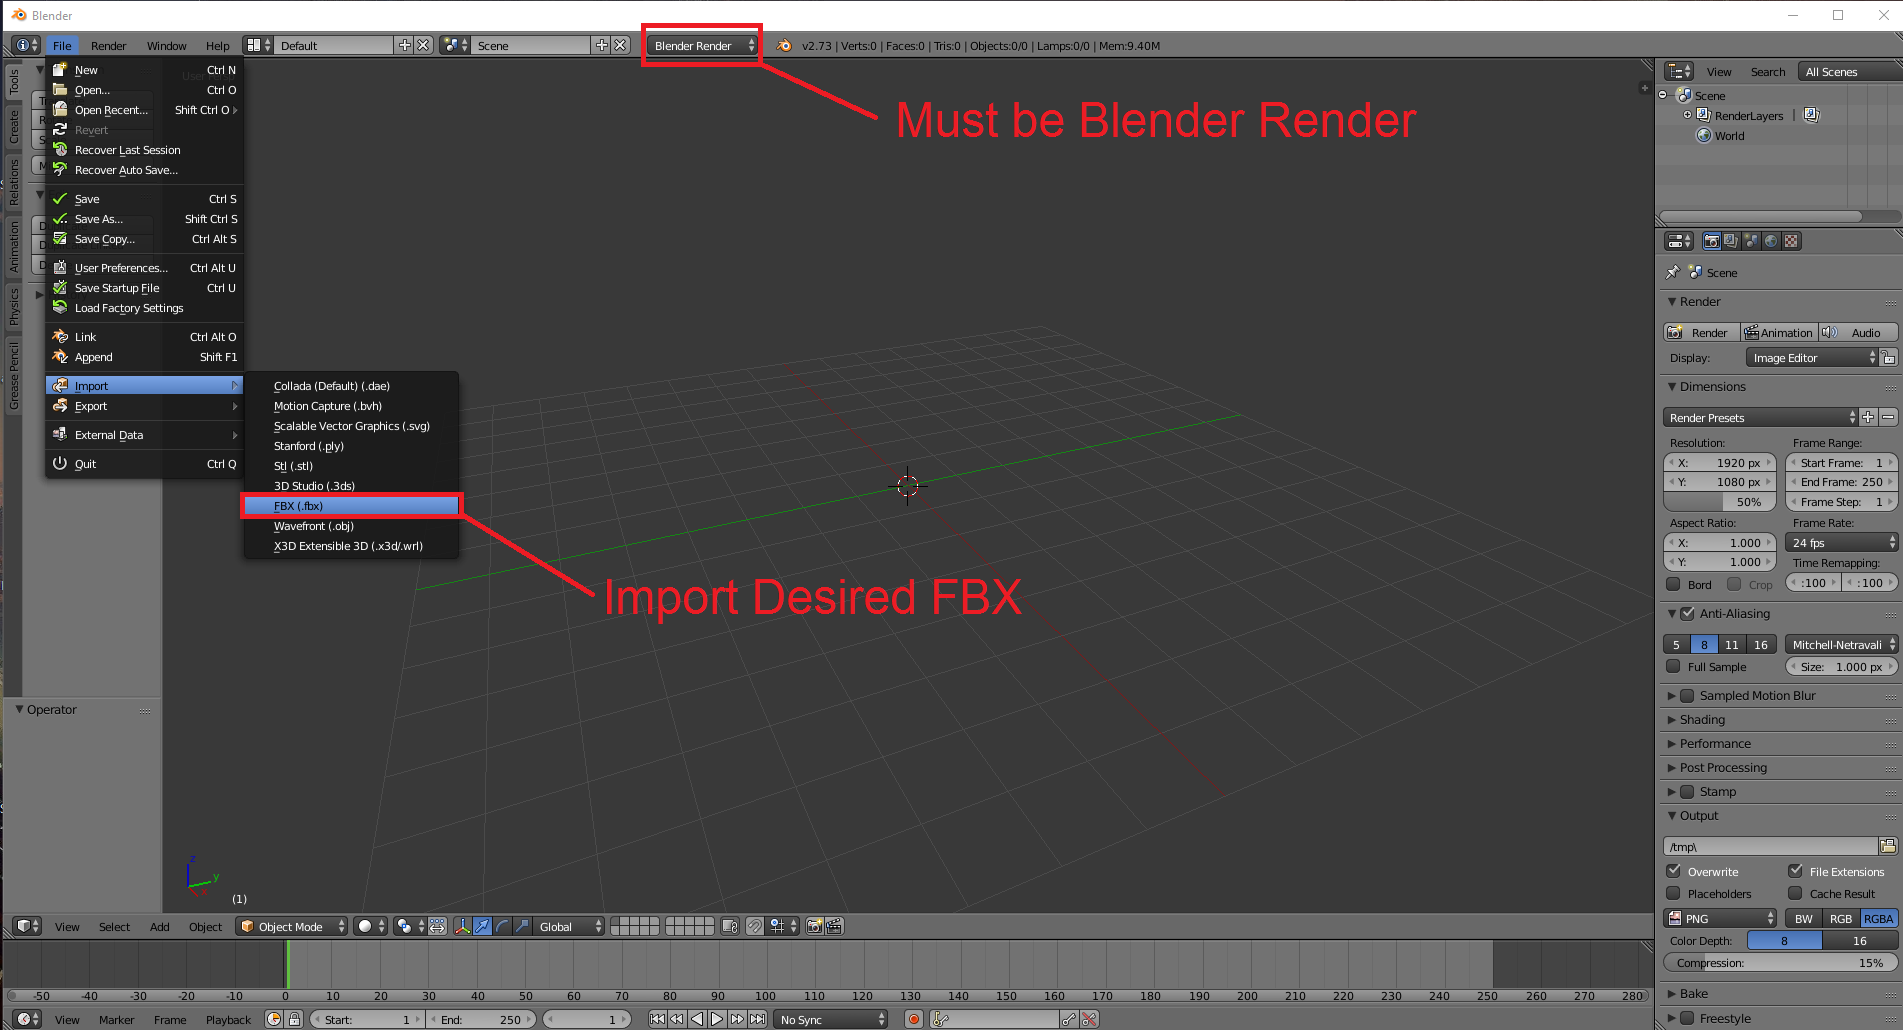
Your first quest is to read that blender to mwm guide! It’s important! But when you start an object, delete every item that’s given to you. You want to import an FBX from Medieval Engineers.
Though it’s important to have the CURRENT (non-legacy) version of MedievalEngineersModSDK
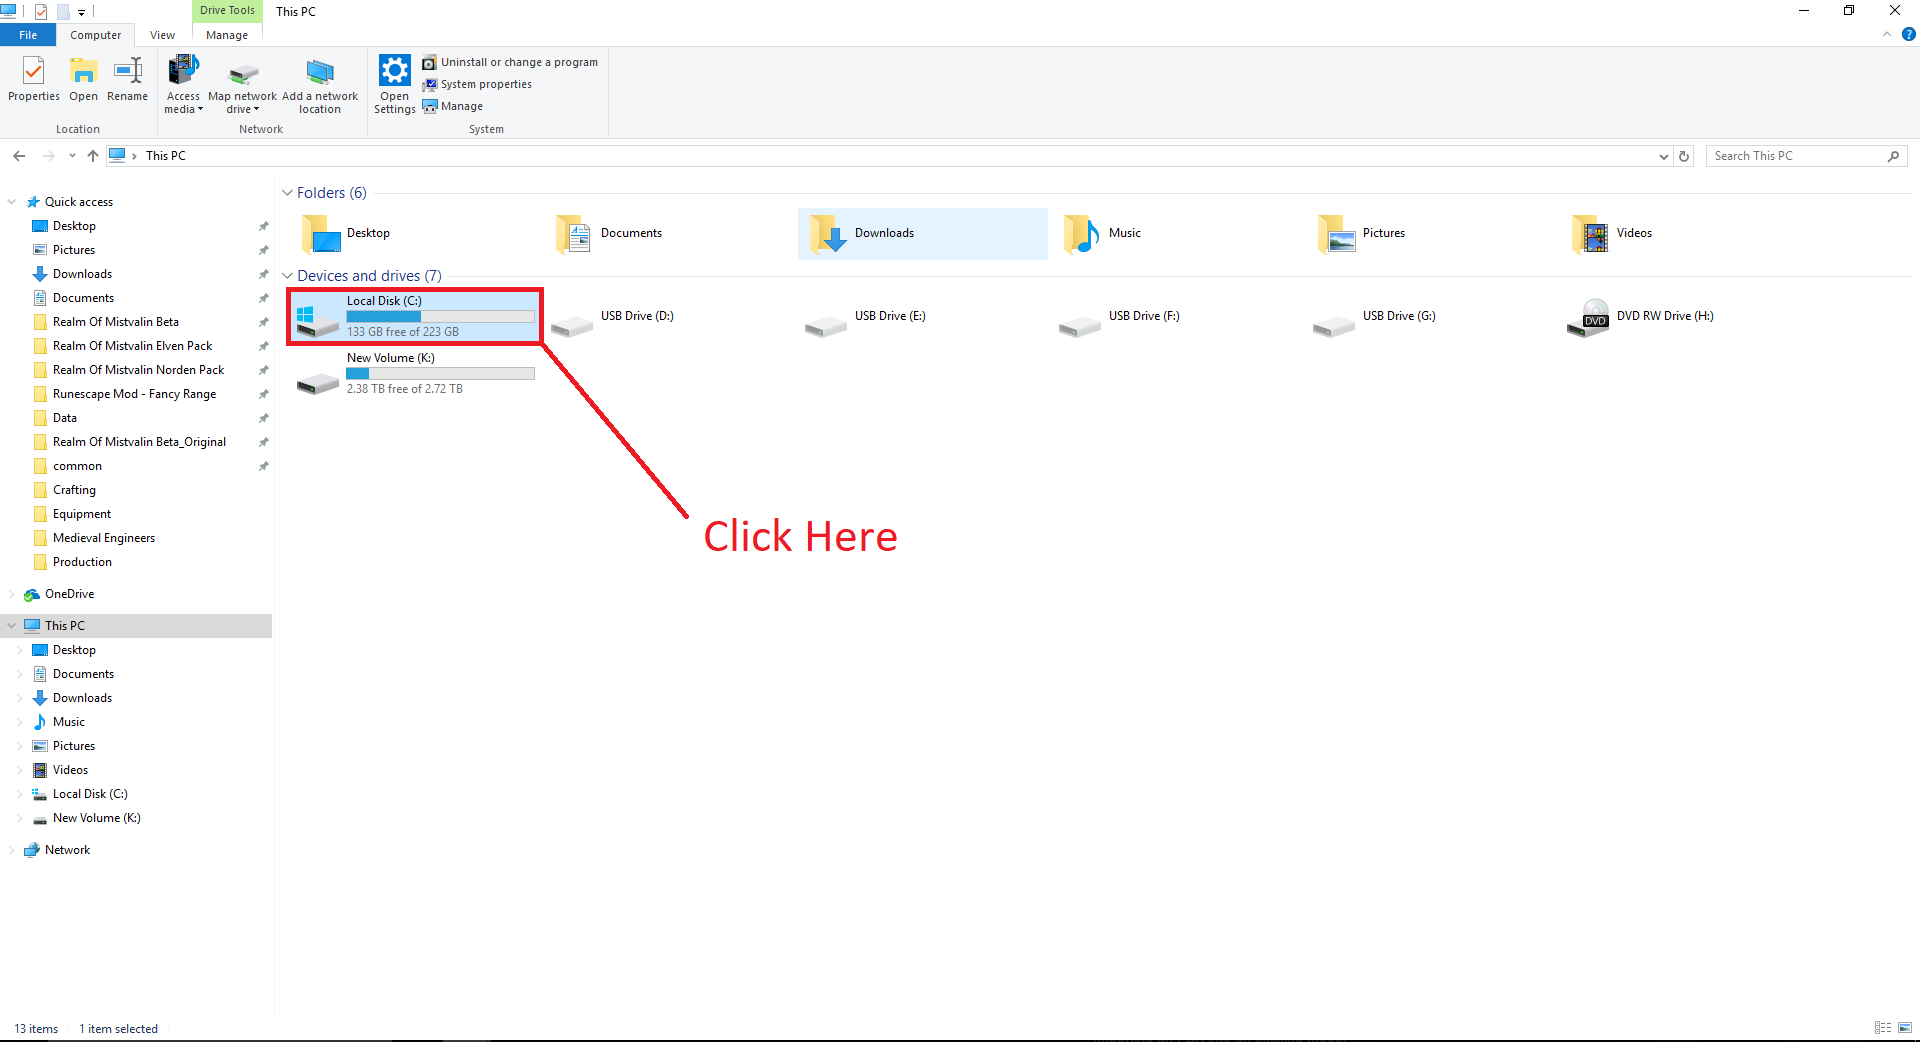
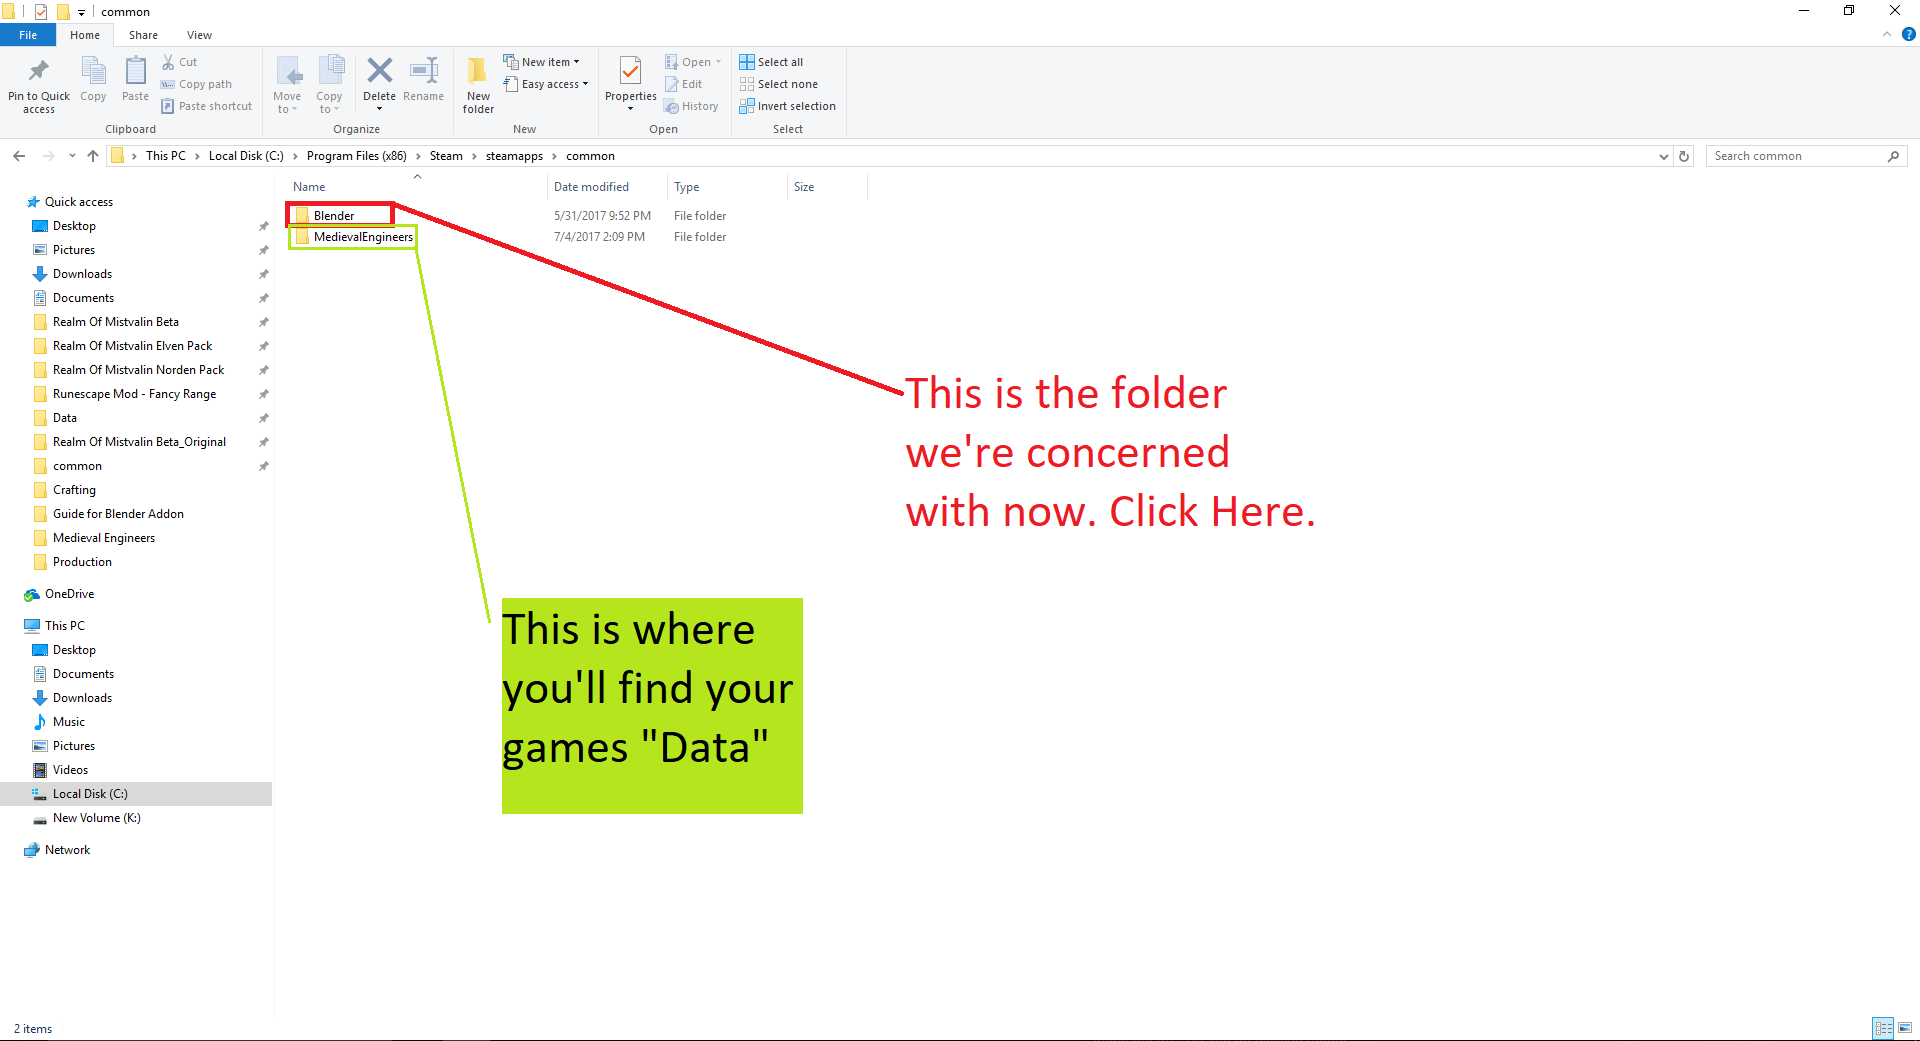
Program Files –> Steam –> SteamApps –> Common –> Medieval Engineers Mod SDK –> Original Content –> Models
Here is an example of what you’re begining Blender file should look like. After you have your blender file looking like this, you can begin importing the desired fbx.

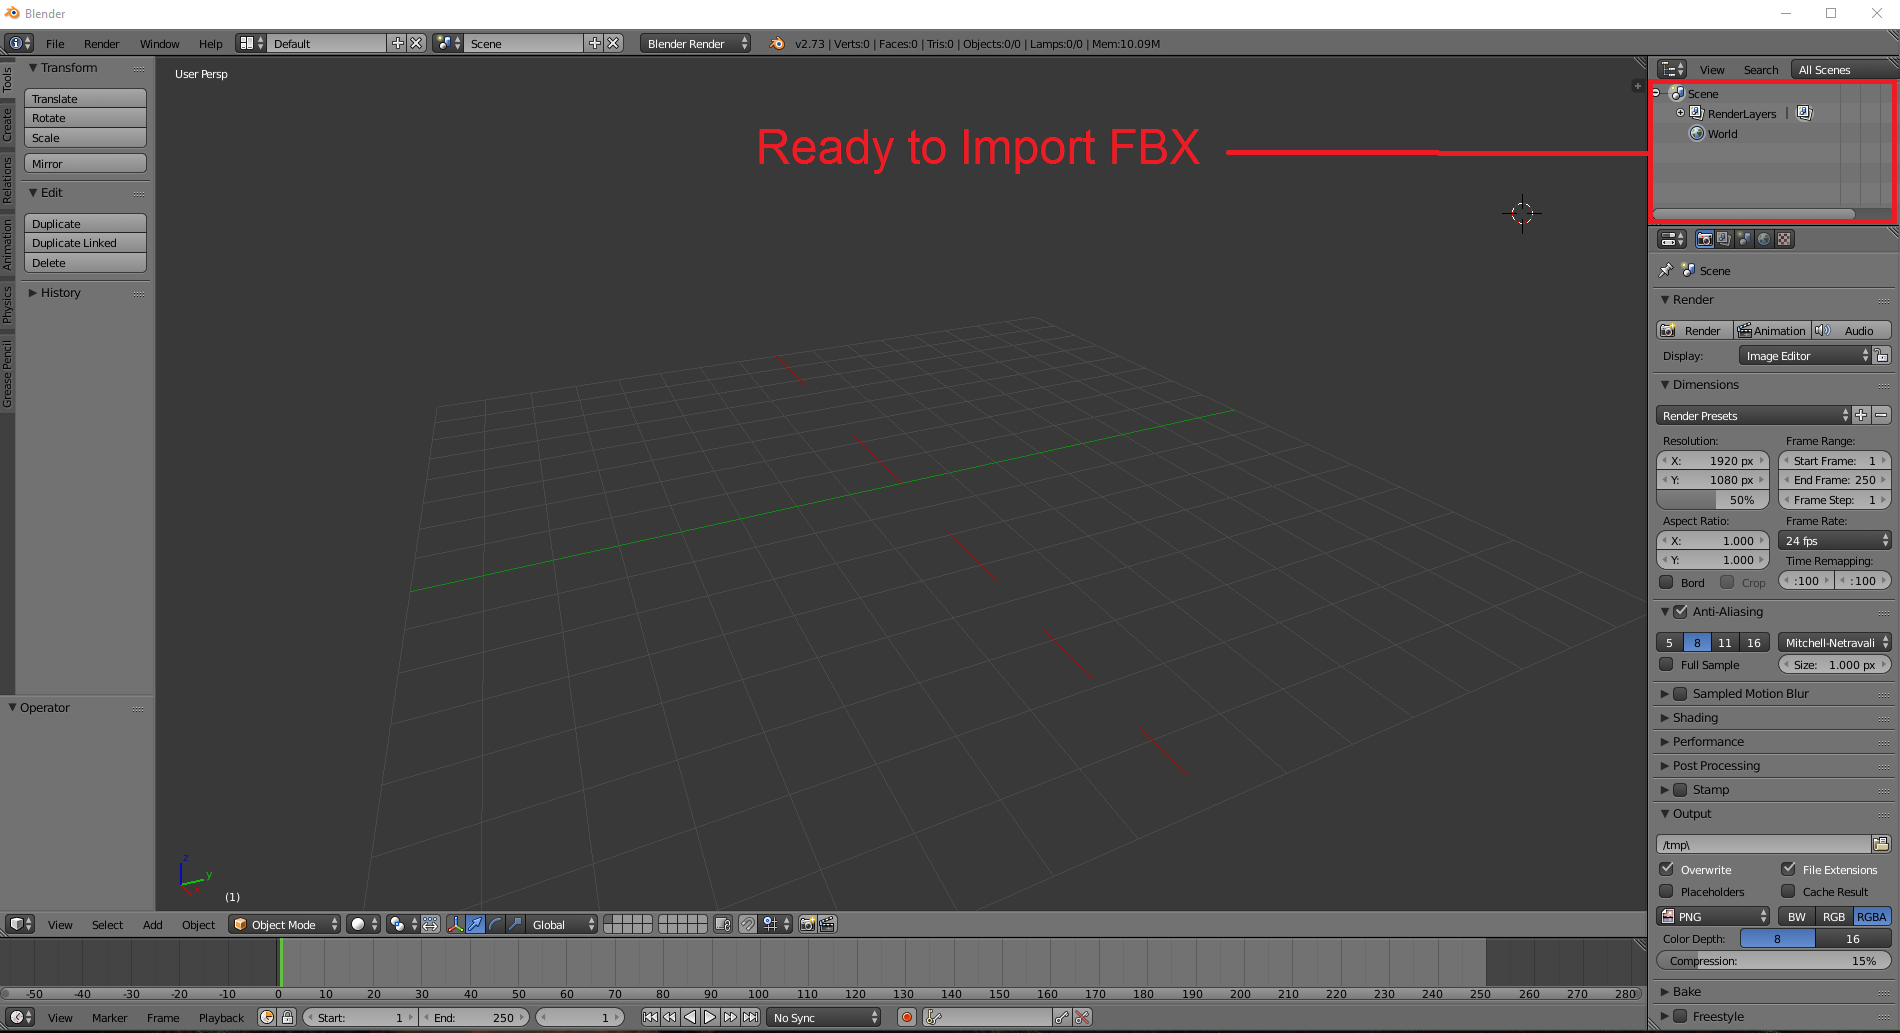
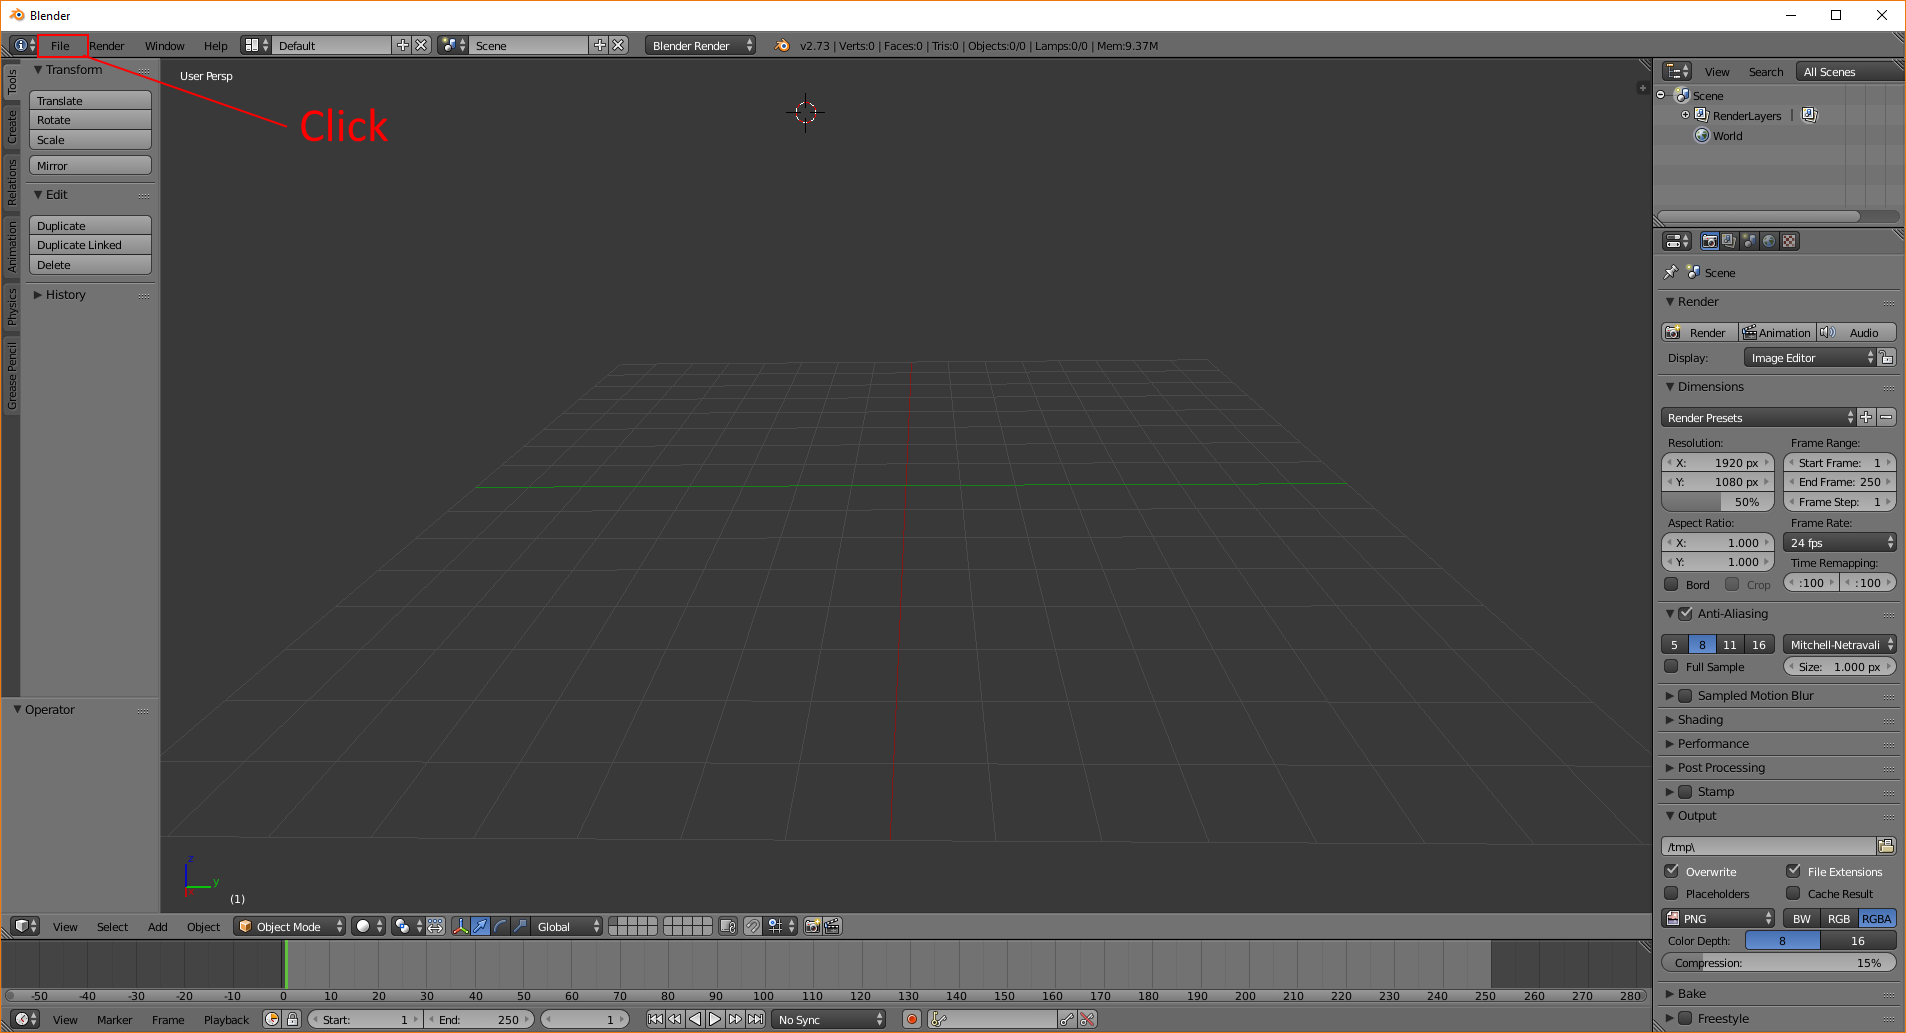
At the top of the 3D view is a header bar. In this header bar is the interface saving features for Blender. Click the plus symbol next to scene. Name the scene copy “CleanSceneSave” and then click (File).
Again like before, navigate your way back to the preferences settings under interface tab at the bottom left again click the “save user settings” button. You have just now created a template to reproduce in the future for M.E. Mod crafting with ease.
——————————————————————————————————————
Though depending on the item you want to mod, you’ll have to import different FBX files.
——————————————————————————————————————
Remember to look at this tutorial if you’re stumped:
I made a beautiful Block, What now?
After you have followed the Blender guide, you should have your Mwm file. If you dont have your mwm file, go back to the blender guide and get one. If you have one, good work! Lets continue!
(1) First, we need some source code. We can find this by looking here:
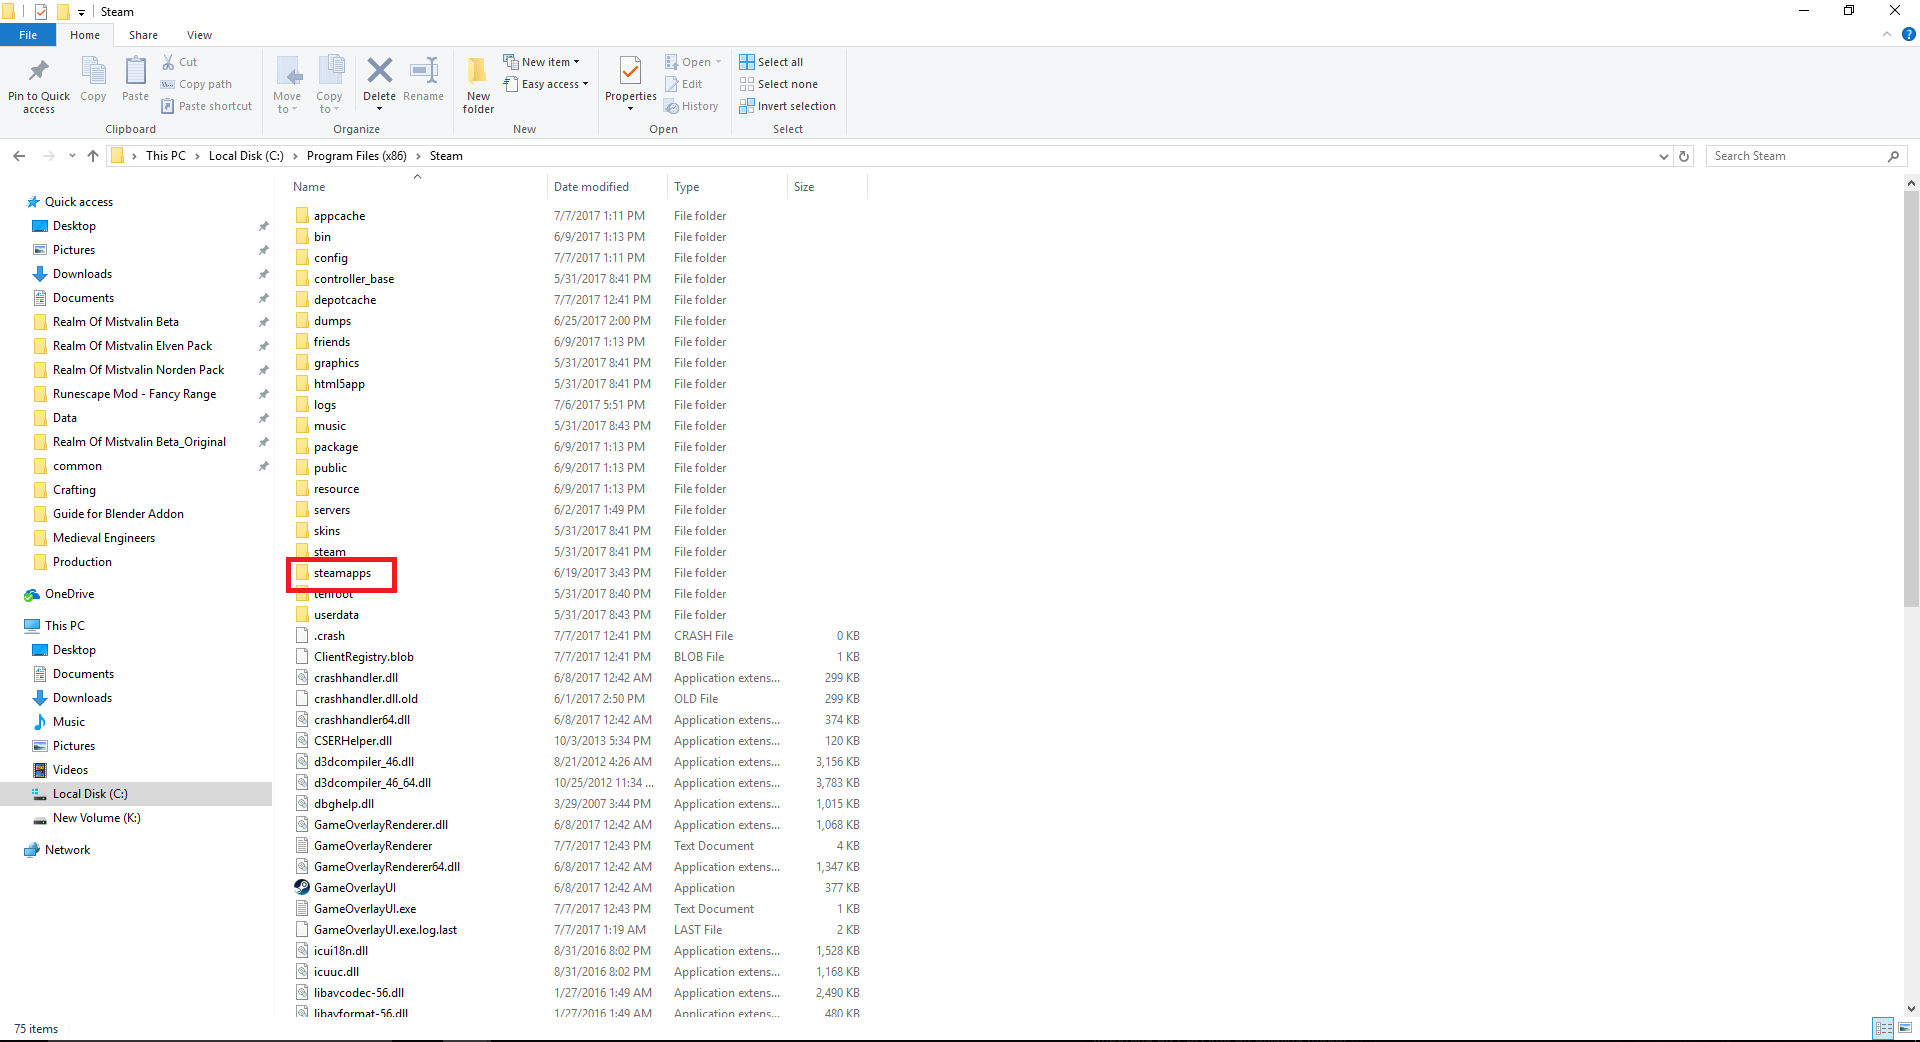
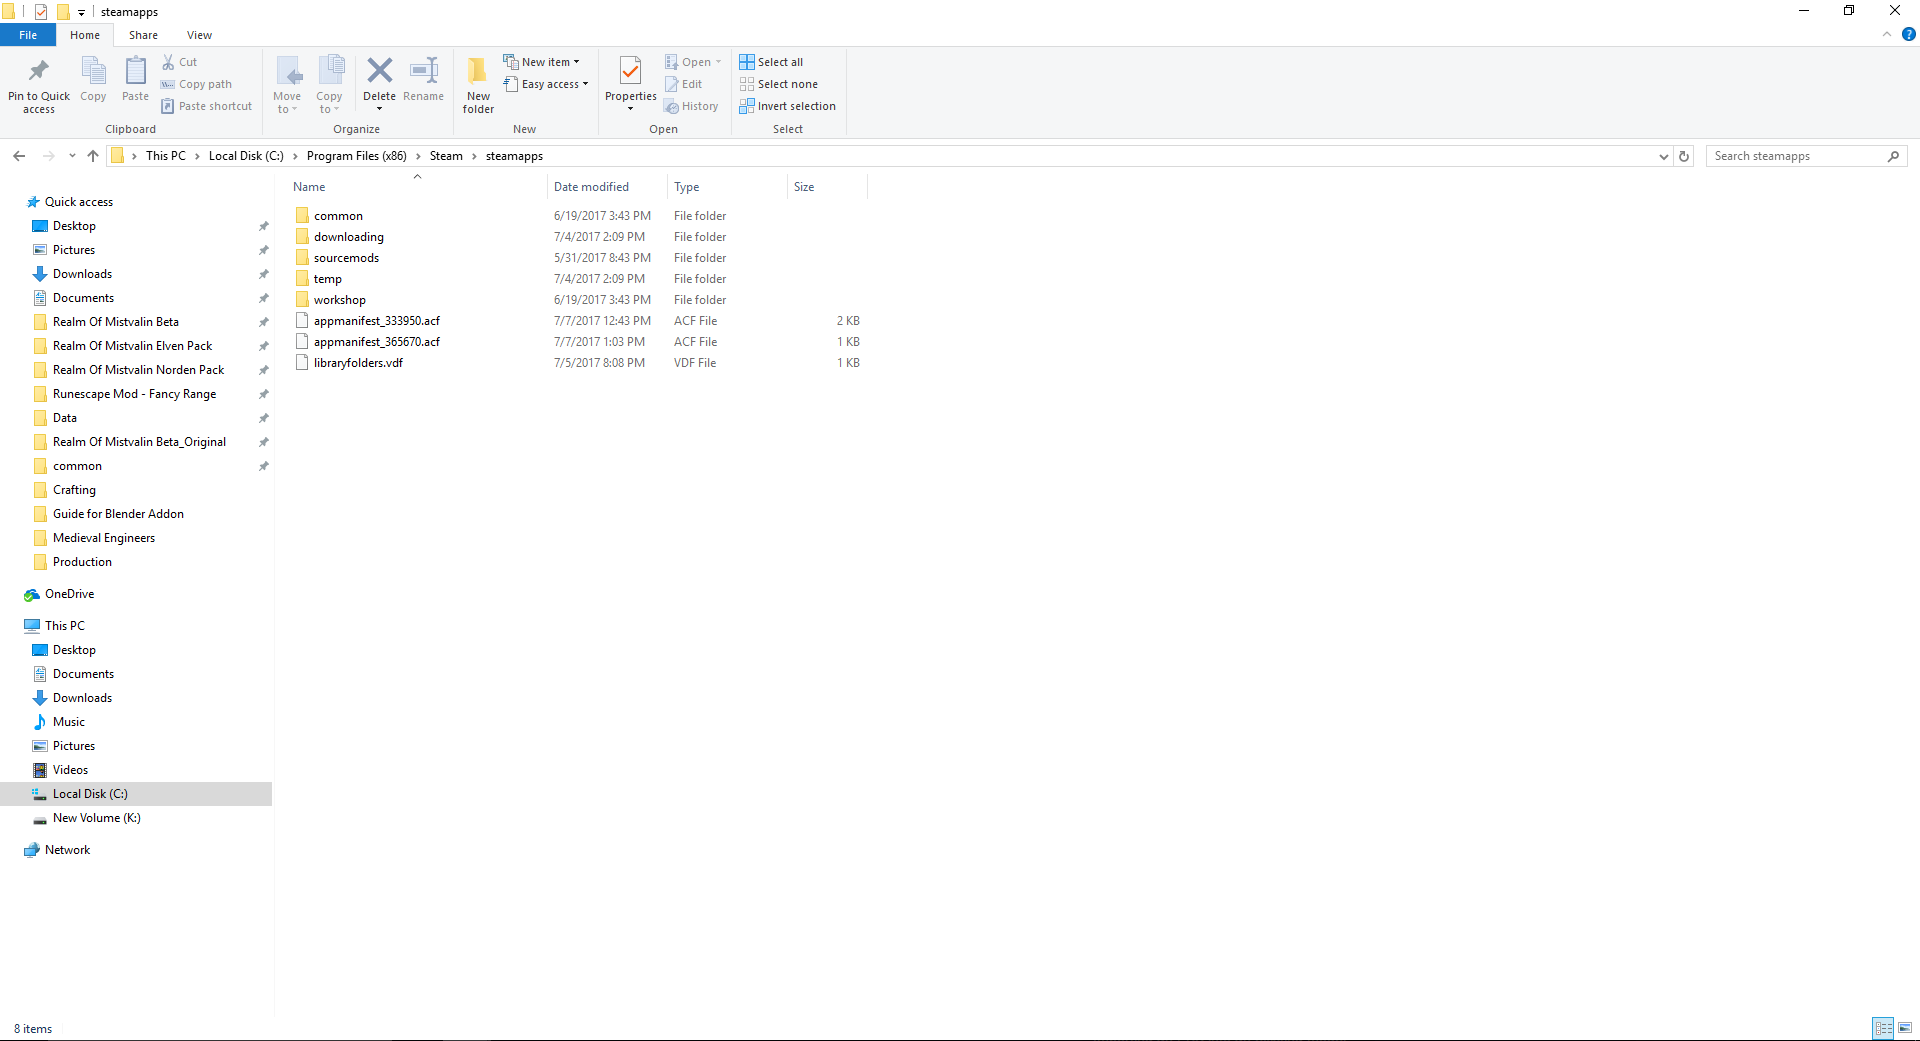
Programs –> Steam –> SteamApps –> Common –> Medieval Engineers –> Content
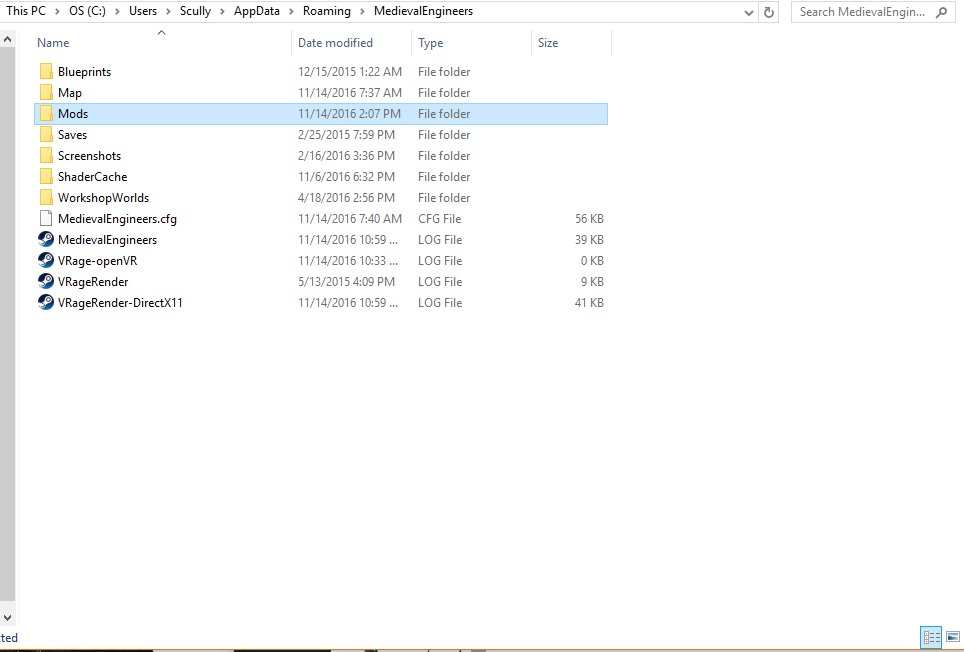
(2) Then you must copy every file, this is very important. Now we need to make the Mod File, you can find it here:
User –> AppData –> Roaming –> Medieval Engineers –> Mods
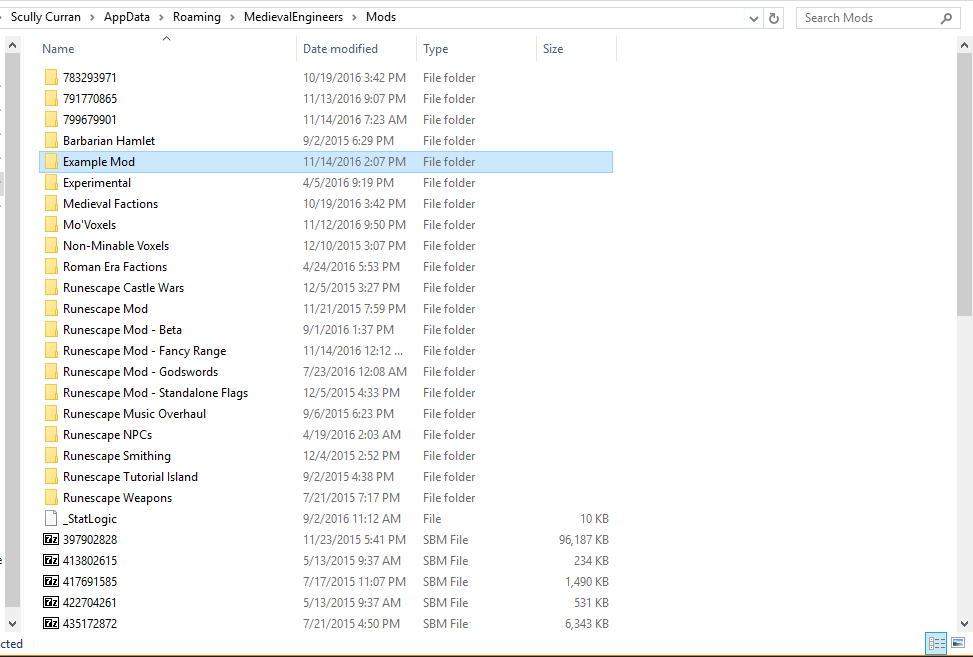
(3) Here we want to create a mod, this file is important, this is your mod. Go ahead and name it whatever you like it doesnt matter since your workshop name can be changed independantly and not change the mod file.
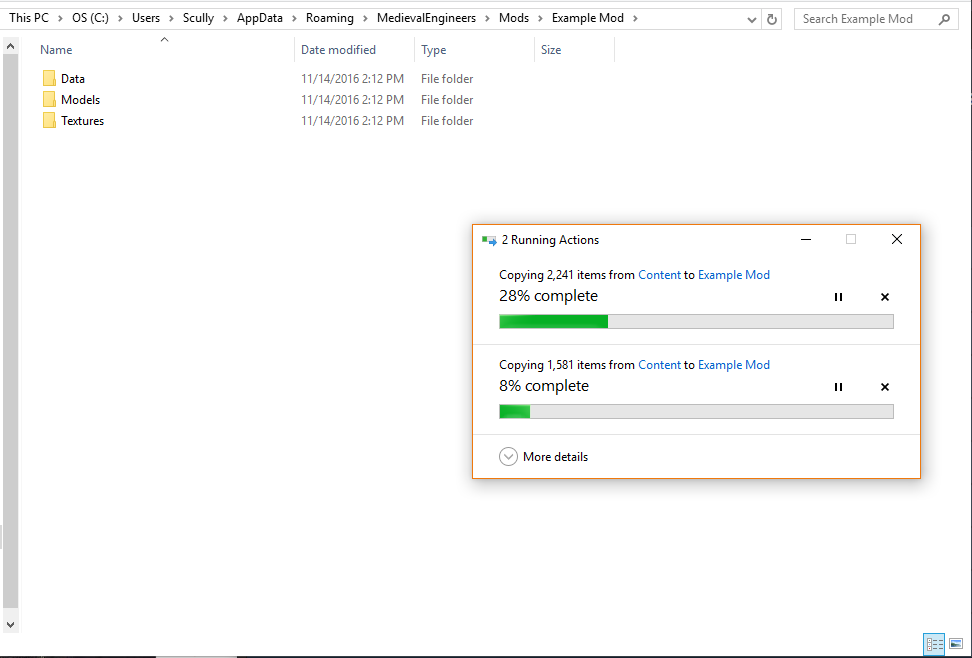
(4) Wounderful you named a mod, open the file, now you see an empty file. Remember those files I told you to copy? Yea, lets paste them. Open the data file… look at all these files, what are they? These are your Data Files, they are very important for modding.

I understand it’s a bit early to learn your first code, but it’s time. The Narrator is going to help. When I started I didnt know what the hell I was doing, so trust me, you dont need coding experience, it’s that easy! Lets continue.
These files from Data, Audio, etc are your data for your game. If you wanted to change a weapon’s sound or the sound of the food you’re eating. Why not make that the glug of a Water Flask, or the drink of a potion. Thats all possible with the Audio file. But we’ll go on about audio later in the guide.
This guide will inform you on how to take your block and use it for many other things. Simply look at the table of contex for the item you want to mod, and you’ll find a guide.
Importing an FBX into an existing model as a “reference item” in blender
If you prefer to make from-scratch models first you may add in a “reference item” to your model in blender after you have a finished product and wish to export it into .mwm format. To do this you must be in object mode in the 3D view.
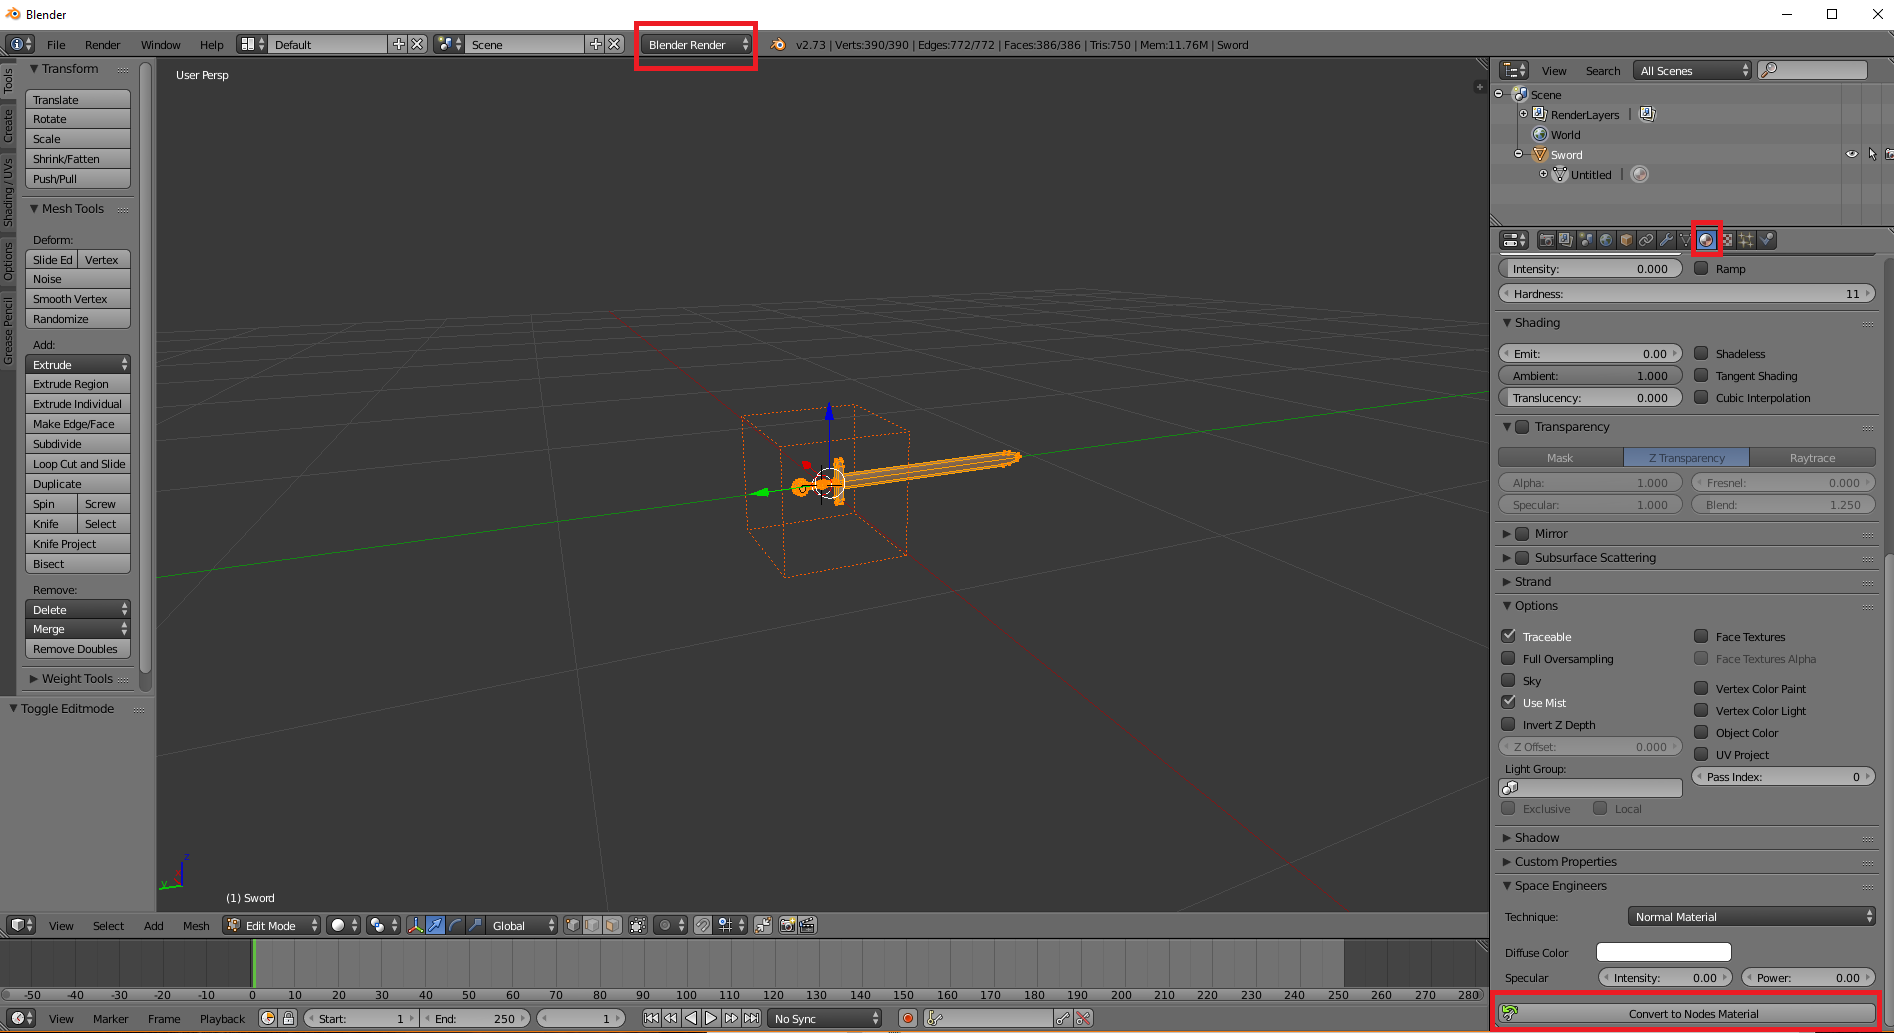
Beneath 3D view switch to the node editor and switch to Cycles Render mode. At the bottom bar click the Add button. Now click Texture and then click Texture Image. Set the path of the image to the mod’s .dds file location. Now switch back to Blender Render mode.
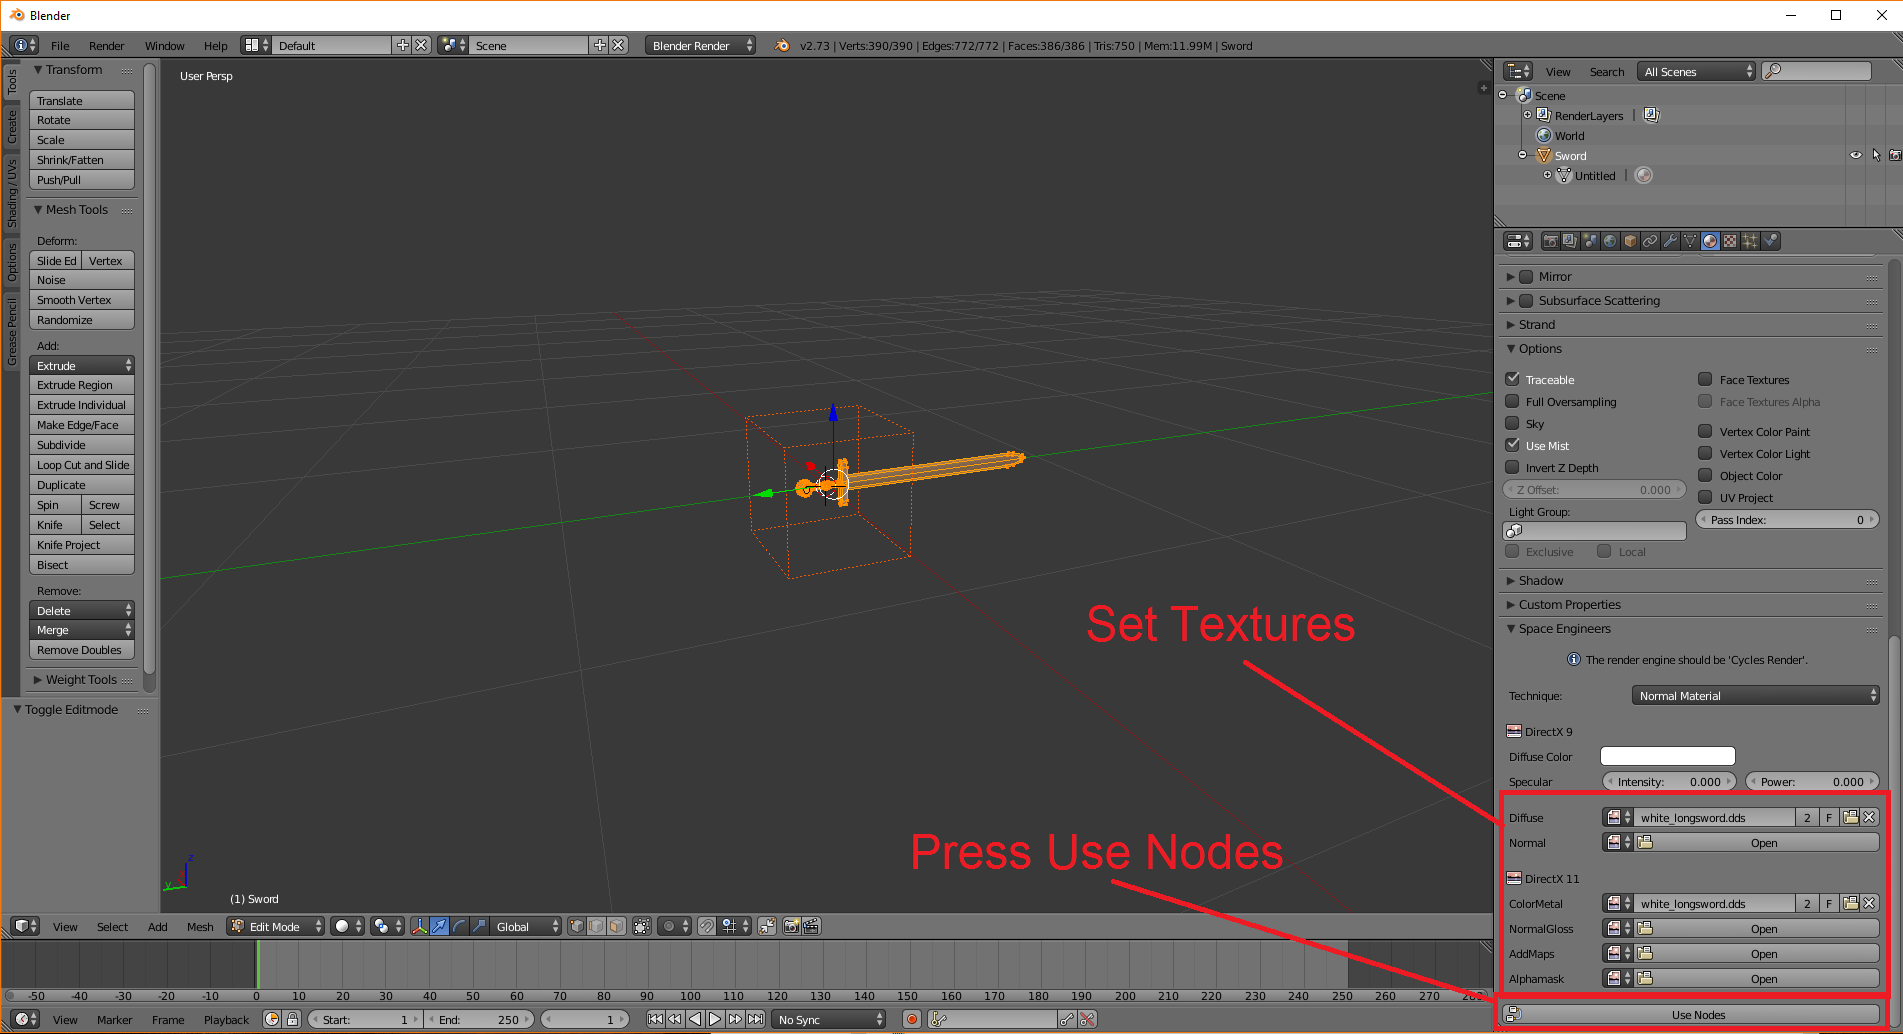
Next look in the side panel at the bottom for Space Engineers Materials panel. Within this panel is a button that will unlock the the texture shaders for the node editor screen and further texture qualities of your model.
After you are finished remove as many verts from the imported FBX as you can and bury it in the model before you must join the objects to be one. I would do this by using the move to world selection if the selection is zero’d out.and the model is centered in the scene.
This last part can be tricky so a video will be applied to show exactly how to do this.
VIDEO COMING SOON
—————————————
Part 1: Modding a Tool
This part of the guide will teach you how to mod tools, we will begin by learning how to mod a sword in Part 1a.
You MUST read and complete Part 1a, then you can move on to the other tools:
Part 1b: Modding a Mace
Part 1c: Modding a Pickaxe
Part 1d: Modding a Axe
Part 1e: Modding a Hammer
—————————————
Part 1a: Modding A Sword
This is the begining of the guide, we’re going to start off with swords. This will teach you how to create a sword in-game.
For Part 1, you will need to have a sword model finished and have the mwm file converted and ready for use.
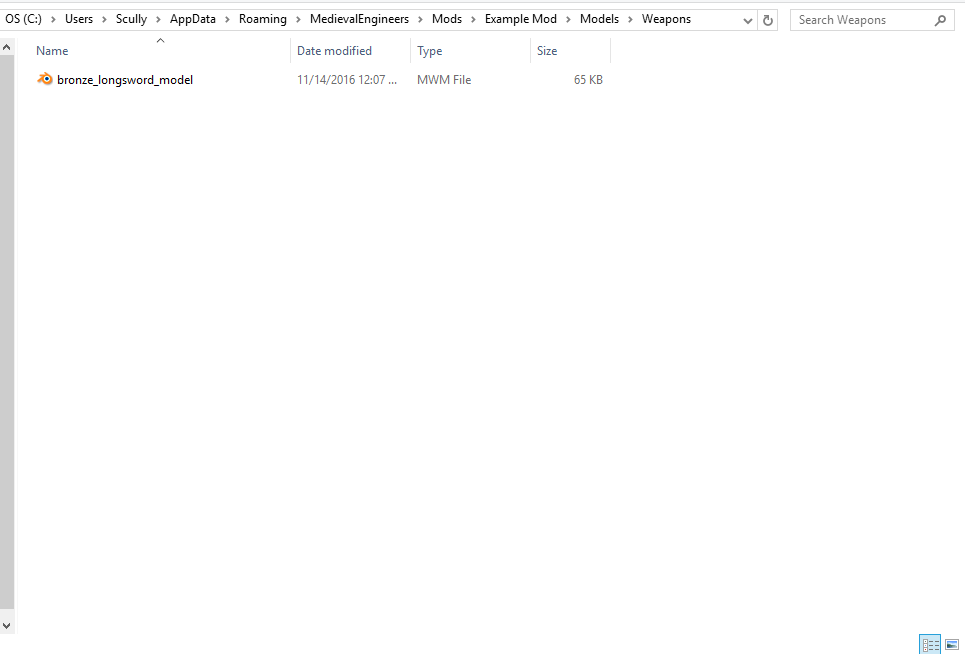
You will want to place your sword model here: ModFolder –> Models –> Weapons
————————————————————————————————————————-
Custom Sword
————————————————————————————————————————-
Want to start making your own sword? Easy stuff! Just download this vanilla sword fbx, import it to blender and modify it to your delight. Be sure you dont delete any dummies/nodes, specially the hilt. The hilt is a good indicator of where the hand is supposed to be and the scale of the sword. If you delete too much of the sword, the animation and dummies will be unattached from the model. To have the easiest modding time, simply import the FBX, and edit it (be placing new shapes, etc) and dont delete anything form the sword. Just make undesired parts smaller (by selecting the part and using the “scale” option). Then once you get a sword ready, we can start learning on how to apply textures to it and how to put it into the game!
Simply grab the vanilla sword here:
Vanilla Sword FBX: [link]
————————————————————————————————————————-
Modded Example
————————————————————————————————————————-
We will be making the “Bronze Longsword” as our example modded sword. The modded example comes from the “Runescape Total Conversion Modpack”:
[link]
If you plan on using the Example Modded Code, use this mwm model file:
[link]
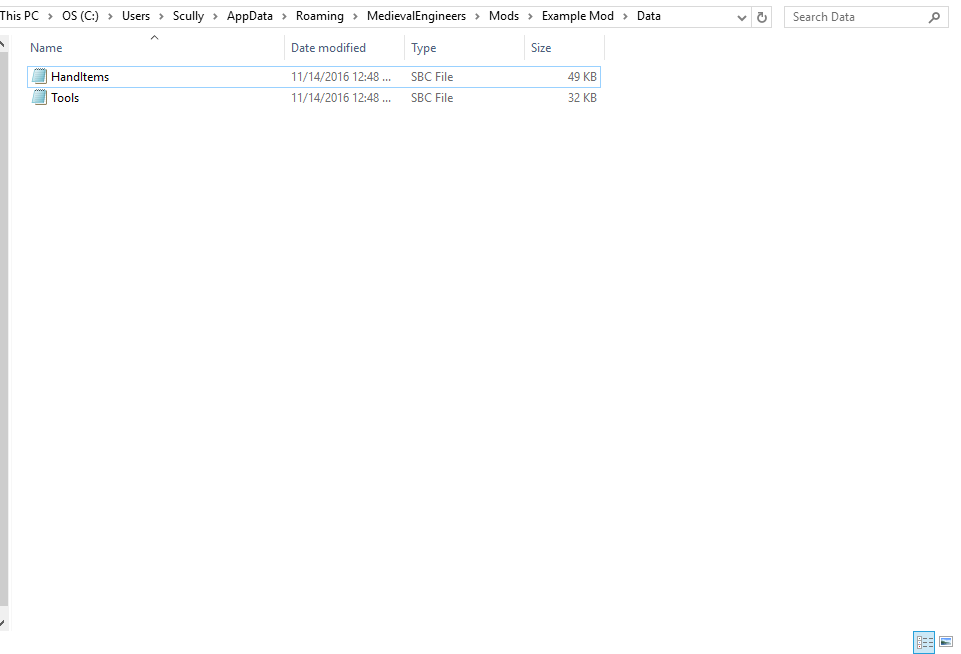
Part 1a: Setting Up Your Mod Folder For Sword Mods
1) Find your Mod Folder:
(This PC –> OS –> Users –> (User) –> AppData –> Roaming –> MedievalEngineers –> Mods)
2) Create A Mod Folder (name it whatever):
3) Copy folders you need from Vanilla Folder (Found in base game, not ModSDK):
(Program Files –> Steam –> SteamApps –> Common –> Medieval Engineers –> Content)

4) Paste files you need (For Part 1) in your mod folder:
5) Delete Files you dont need. Here is what the Modded Example (For Part 1) looks like:
—————————————————————————————————————-
Data Folder
—————————————————————————————————————-
Delete folders and items you’re not using except for what’s below:
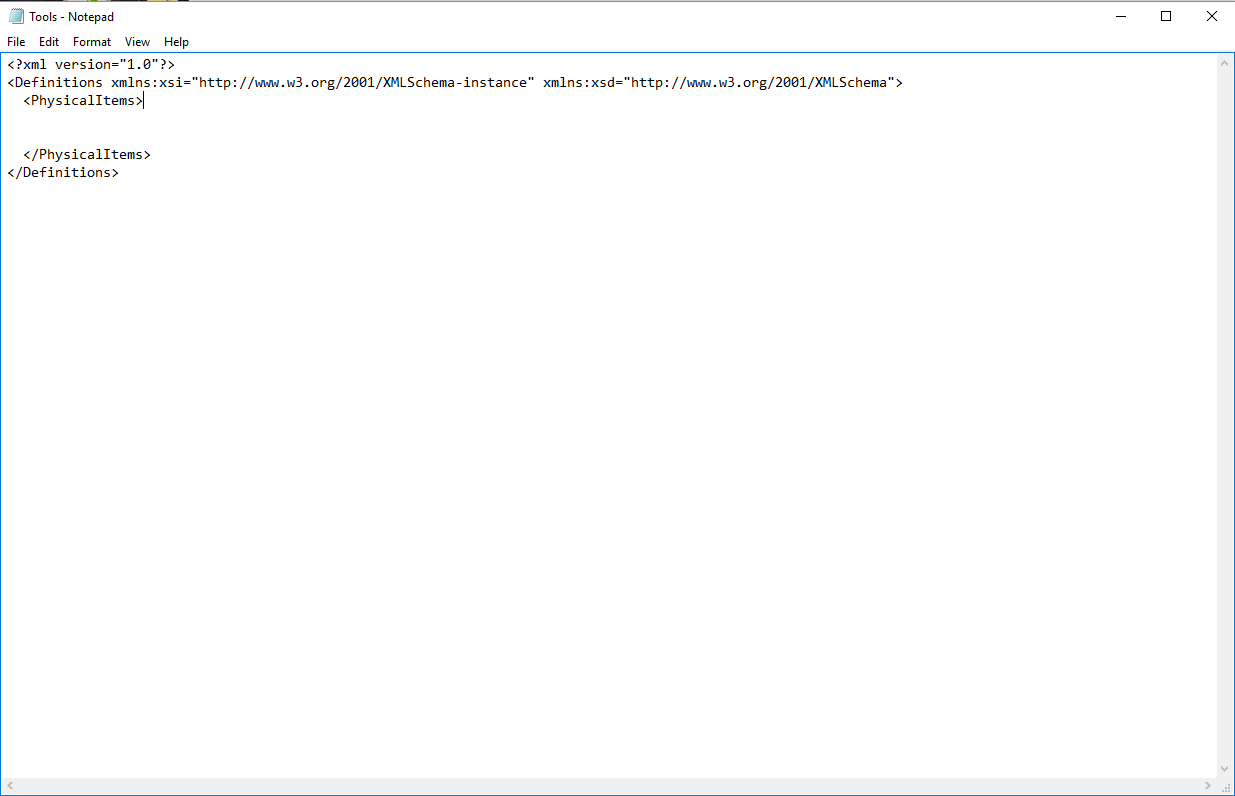
Delete All code In Tool.sbc except for what’s below:
Then paste modded Tool code:
Delete All code In HandItem.sbc except for what’s below:
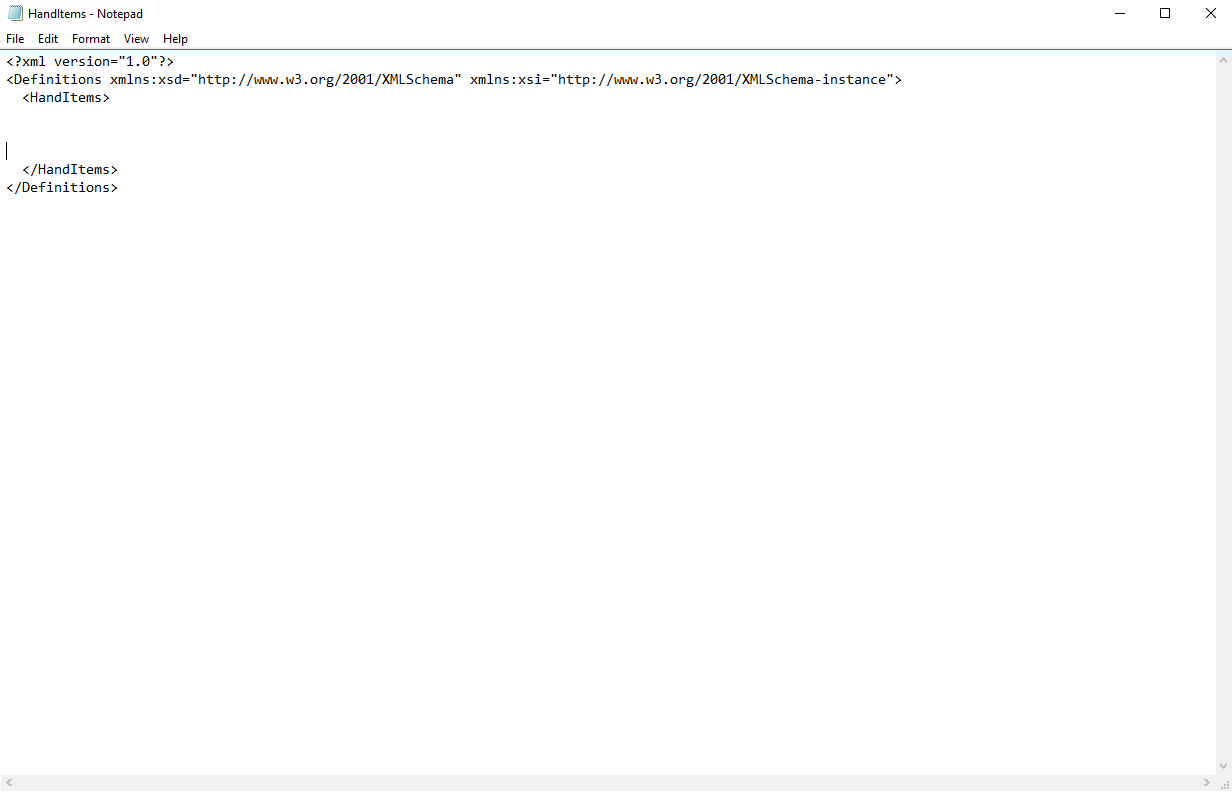
Then paste modded HandItem code:
—————————————————————————————————————-
Model Folder
—————————————————————————————————————-
Delete folders that are uneeded (For Part 1), except for these:
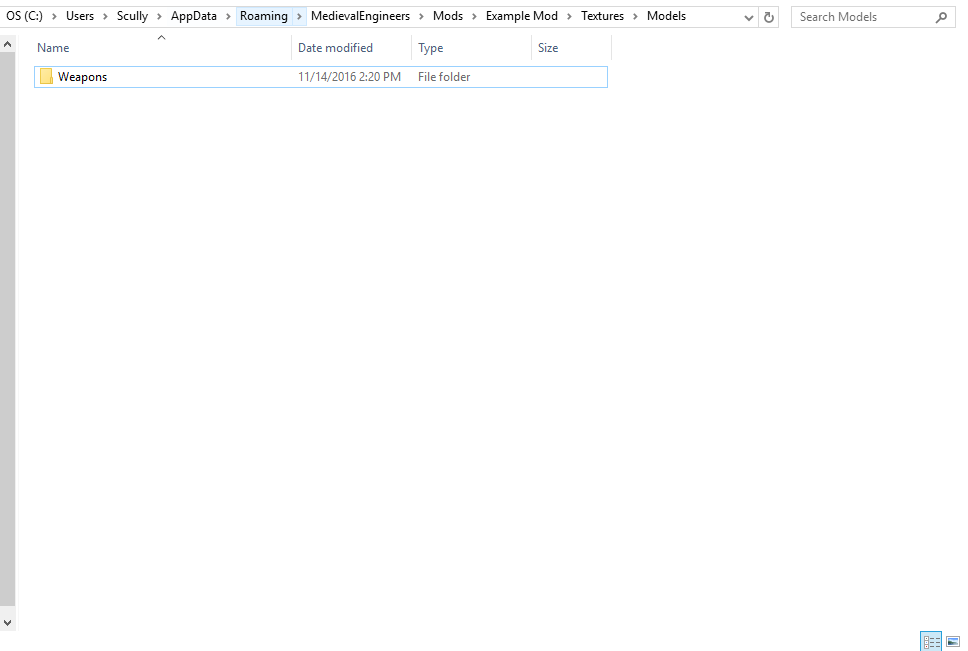
Add in the desired models (For Part 1):
—————————————————————————————————————-
Texture Folder
—————————————————————————————————————-
Delete what you dont need (For Part 1), except for this:

Paste the desired texture files (For Part 1):
Paste the desired icon files (For Part 1):
Part 1a: Vanilla “Tool” Code For Sword
Here is our Vanilla “Tool” Code:
<PhysicalItem xsi:type=”MyObjectBuilder_ToolItemDefinition”>
<Id>
<TypeId>PhysicalGunObject</TypeId>
<SubtypeId>((__1__))</SubtypeId>
</Id>
<Public>true</Public>
<DisplayName>((__2__))</DisplayName>
<Icon>TexturesGUIIcons((__3__)).dds</Icon>
<Size>
<X>1.2</X>
<Y>0.6</Y>
<Z>0.3</Z>
</Size>
<Mass>0.5</Mass>
<Volume>3</Volume>
<Model>ModelsWeapons((__4__)).mwm</Model>
<VoxelMinings>
<Mining>
<MinedOre>Stone</MinedOre>
<HitCount>10</HitCount>
<PhysicalItemId>
<TypeId>Component</TypeId>
<SubtypeId>StoneOreSmall</SubtypeId>
</PhysicalItemId>
<RemovedRadius>0.125</RemovedRadius>
</Mining>
</VoxelMinings>
<PrimaryActions>
<Action>
<Name>Mine</Name>
<StartTime>0.3</StartTime>
<EndTime>0.53</EndTime>
<Efficiency>1</Efficiency>
<SwingSoundStart>0.4</SwingSoundStart>
<SwingSound>Swing</SwingSound>
<HitStart>0.6</HitStart>
<HitDuration>1</HitDuration>
<HitConditions>
<HitCondition>
<EntityType>
<string>Voxel</string>
</EntityType>
<Animation>Mining</Animation>
<StatsAction>GeneralWork</StatsAction>
<Component>Mine</Component>
</HitCondition>
</HitConditions>
</Action>
<Action>
<Name>Cut</Name>
<StartTime>0.3</StartTime>
<EndTime>0.53</EndTime>
<Efficiency>0.2</Efficiency>
<SwingSoundStart>0.4</SwingSoundStart>
<SwingSound>Swing</SwingSound>
<HitStart>0.6</HitStart>
<HitDuration>1</HitDuration>
<HitConditions>
<HitCondition>
<EntityType>
<string>Tree</string>
</EntityType>
<Animation>Cutting</Animation>
<StatsAction>GeneralWork</StatsAction>
<Component>Cut</Component>
</HitCondition>
<HitCondition>
<EntityType>
<string>Lumber</string>
<string>Log</string>
</EntityType>
<Animation>CuttingLog</Animation>
<StatsAction>GeneralWork</StatsAction>
<Component>Cut</Component>
</HitCondition>
</HitConditions>
</Action>
<Action>
<Name>Attack</Name>
<StartTime>0.3</StartTime>
<EndTime>0.53</EndTime>
<Efficiency>0.4</Efficiency>
<StatsEfficiency>WeakAttack</StatsEfficiency>
<SwingSoundStart>0.4</SwingSoundStart>
<SwingSound>Swing</SwingSound>
<HitStart>0.6</HitStart>
<HitDuration>1</HitDuration>
<CustomShapeRadius>0.5</CustomShapeRadius>
<Crosshair>crosshair</Crosshair>
<HitConditions>
<HitCondition>
<Animation>Attack_sword</Animation>
<StatsAction>SwingTool</StatsAction>
<StatsModifier>Attack</StatsModifier>
<Component>Attack</Component>
</HitCondition>
</HitConditions>
</Action>
</PrimaryActions>
<SecondaryActions>
<Action>
<Name>Craft</Name>
<StartTime>0.3</StartTime>
<EndTime>0.53</EndTime>
<Efficiency>0.35</Efficiency>
<HitStart>0.6</HitStart>
<HitDuration>1</HitDuration>
<HitSound>ToolAxeLumbering</HitSound>
<HitConditions>
<HitCondition>
<EntityType>
<string>Lumber</string>
</EntityType>
<Animation>Lumbering</Animation>
<Component>Craft</Component>
<StatsAction>GeneralWork</StatsAction>
</HitCondition>
</HitConditions>
</Action>
<Action>
<Name>Block</Name>
<StartTime>0.3</StartTime>
<EndTime>0.53</EndTime>
<Efficiency>0.4</Efficiency>
<StatsEfficiency>WeakBlock</StatsEfficiency>
<HitStart>0.6</HitStart>
<HitDuration>0</HitDuration>
<HitConditions>
<HitCondition>
<Animation>block_idle</Animation>
<Component>Block</Component>
<StatsActionIfHit>Block</StatsActionIfHit>
<StatsModifierIfHit>Block</StatsModifierIfHit>
</HitCondition>
</HitConditions>
</Action>
</SecondaryActions>
<PhysicalMaterial>Sword</PhysicalMaterial>
<MaxStackAmount>1</MaxStackAmount>
<HitDistance>1.6</HitDistance>
</PhysicalItem>
————————————————————————————————————–
What Does This Code Mean?
————————————————————————————————————–
While their is a lot on this code, we’re not really interested in all of it (For Part 1). Later in the guide I will be going into detail about all of these lines of code. But for now, we’re only focused on the basics:
Simply replace ((__#__)) with the disired values:
1) This is your subtype ID, it must be unique.
Example: Bronze_Longsword
2) This is your item name, name it whatever.
Example: Bronze Longsword
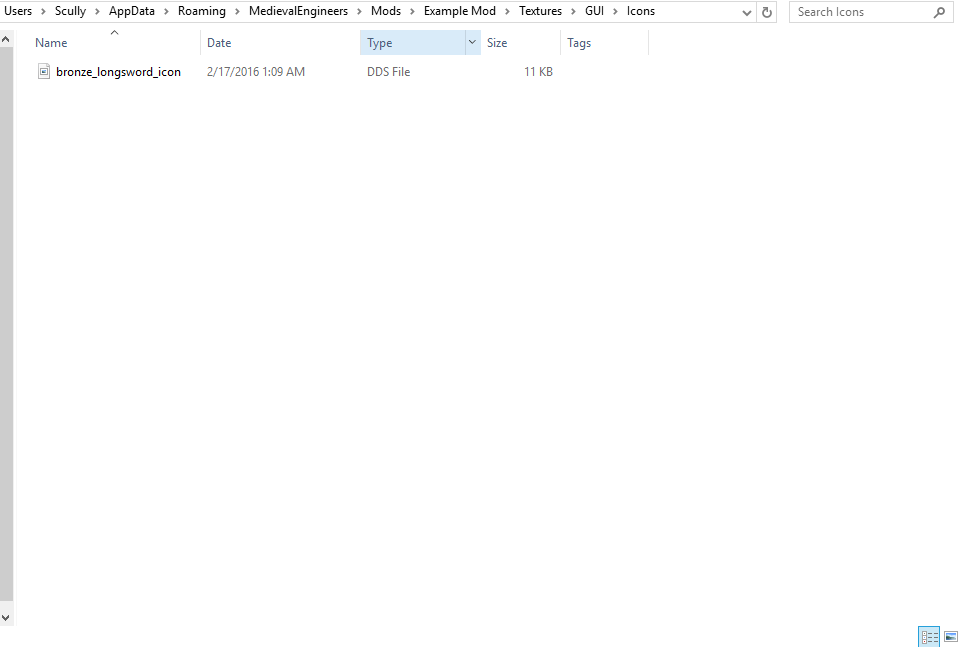
3) This is your item Icon Texture, it must be the file’s name.
Example: bronze_longsword_icon
For the example icon file, follow this link:
[link]
4) This is your item model, it must be the model’s name
Example: bronze_longsword_model
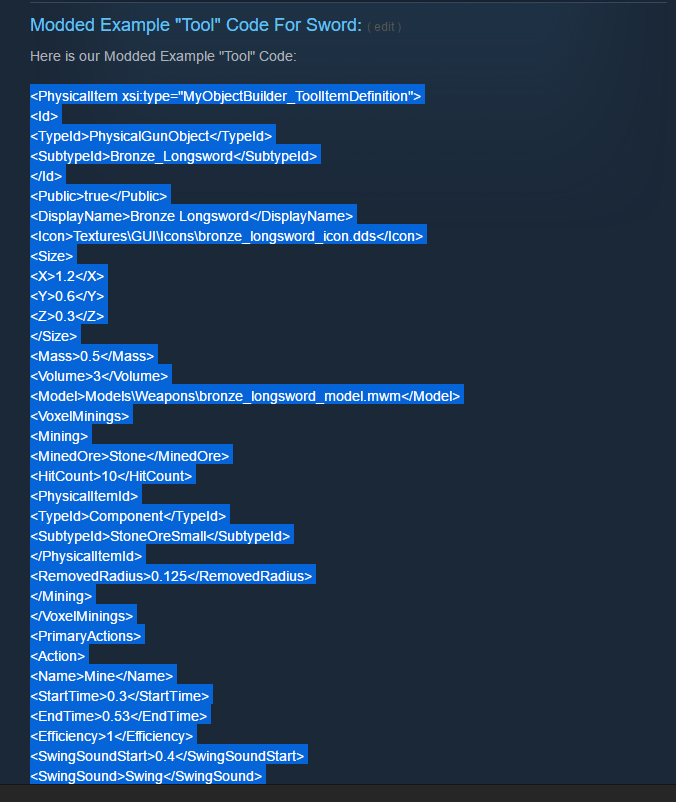
Part 1a: Modded Example “Tool” Code For Sword:
Here is our Modded Example “Tool” Code:
<PhysicalItem xsi:type=”MyObjectBuilder_ToolItemDefinition”>
<Id>
<TypeId>PhysicalGunObject</TypeId>
<SubtypeId>Bronze_Longsword</SubtypeId>
</Id>
<Public>true</Public>
<DisplayName>Bronze Longsword</DisplayName>
<Icon>TexturesGUIIconsbronze_longsword_icon.dds</Icon>
<Size>
<X>1.2</X>
<Y>0.6</Y>
<Z>0.3</Z>
</Size>
<Mass>0.5</Mass>
<Volume>3</Volume>
<Model>ModelsWeaponsbronze_longsword_model.mwm</Model>
<VoxelMinings>
<Mining>
<MinedOre>Stone</MinedOre>
<HitCount>10</HitCount>
<PhysicalItemId>
<TypeId>Component</TypeId>
<SubtypeId>StoneOreSmall</SubtypeId>
</PhysicalItemId>
<RemovedRadius>0.125</RemovedRadius>
</Mining>
</VoxelMinings>
<PrimaryActions>
<Action>
<Name>Mine</Name>
<StartTime>0.3</StartTime>
<EndTime>0.53</EndTime>
<Efficiency>1</Efficiency>
<SwingSoundStart>0.4</SwingSoundStart>
<SwingSound>Swing</SwingSound>
<HitStart>0.6</HitStart>
<HitDuration>1</HitDuration>
<HitConditions>
<HitCondition>
<EntityType>
<string>Voxel</string>
</EntityType>
<Animation>Mining</Animation>
<StatsAction>GeneralWork</StatsAction>
<Component>Mine</Component>
</HitCondition>
</HitConditions>
</Action>
<Action>
<Name>Cut</Name>
<StartTime>0.3</StartTime>
<EndTime>0.53</EndTime>
<Efficiency>0.2</Efficiency>
<SwingSoundStart>0.4</SwingSoundStart>
<SwingSound>Swing</SwingSound>
<HitStart>0.6</HitStart>
<HitDuration>1</HitDuration>
<HitConditions>
<HitCondition>
<EntityType>
<string>Tree</string>
</EntityType>
<Animation>Cutting</Animation>
<StatsAction>GeneralWork</StatsAction>
<Component>Cut</Component>
</HitCondition>
<HitCondition>
<EntityType>
<string>Lumber</string>
<string>Log</string>
</EntityType>
<Animation>CuttingLog</Animation>
<StatsAction>GeneralWork</StatsAction>
<Component>Cut</Component>
</HitCondition>
</HitConditions>
</Action>
<Action>
<Name>Attack</Name>
<StartTime>0.3</StartTime>
<EndTime>0.53</EndTime>
<Efficiency>0.4</Efficiency>
<StatsEfficiency>WeakAttack</StatsEfficiency>
<SwingSoundStart>0.4</SwingSoundStart>
<SwingSound>Swing</SwingSound>
<HitStart>0.6</HitStart>
<HitDuration>1</HitDuration>
<CustomShapeRadius>0.5</CustomShapeRadius>
<Crosshair>crosshair</Crosshair>
<HitConditions>
<HitCondition>
<Animation>Attack_sword</Animation>
<StatsAction>SwingTool</StatsAction>
<StatsModifier>Attack</StatsModifier>
<Component>Attack</Component>
</HitCondition>
</HitConditions>
</Action>
</PrimaryActions>
<SecondaryActions>
<Action>
<Name>Craft</Name>
<StartTime>0.3</StartTime>
<EndTime>0.53</EndTime>
<Efficiency>0.35</Efficiency>
<HitStart>0.6</HitStart>
<HitDuration>1</HitDuration>
<HitSound>ToolAxeLumbering</HitSound>
<HitConditions>
<HitCondition>
<EntityType>
<string>Lumber</string>
</EntityType>
<Animation>Lumbering</Animation>
<Component>Craft</Component>
<StatsAction>GeneralWork</StatsAction>
</HitCondition>
</HitConditions>
</Action>
<Action>
<Name>Block</Name>
<StartTime>0.3</StartTime>
<EndTime>0.53</EndTime>
<Efficiency>0.4</Efficiency>
<StatsEfficiency>WeakBlock</StatsEfficiency>
<HitStart>0.6</HitStart>
<HitDuration>0</HitDuration>
<HitConditions>
<HitCondition>
<Animation>block_idle</Animation>
<Component>Block</Component>
<StatsActionIfHit>Block</StatsActionIfHit>
<StatsModifierIfHit>Block</StatsModifierIfHit>
</HitCondition>
</HitConditions>
</Action>
</SecondaryActions>
<PhysicalMaterial>Sword</PhysicalMaterial>
<MaxStackAmount>1</MaxStackAmount>
<HitDistance>1.6</HitDistance>
</PhysicalItem>
Part 1a: Vanilla “HandItem” Code For Sword
Here is our Vanilla “HandItem” Code:
<HandItem xsi:type=”MyObjectBuilder_HandItemDefinition” Enabled=”true”>
<Id Type=”MyObjectBuilder_HandTool” Subtype=”((__1__))” />
<Public>true</Public>
<AvailableInSurvival>true</AvailableInSurvival>
<LeftHandOrientation>
<X>-3.905605E-07</X>
<Y>0.707108</Y>
<Z>0.7071055</Z>
<W>1.6858742E-07</W>
</LeftHandOrientation>
<LeftHandPosition>
<X>-0.08030445</X>
<Y>-0.114194907</Y>
<Z>-0.06793878</Z>
</LeftHandPosition>
<RightHandOrientation>
<X>0</X>
<Y>0</Y>
<Z>0</Z>
<W>1</W>
</RightHandOrientation>
<RightHandPosition>
<X>0</X>
<Y>0</Y>
<Z>0</Z>
</RightHandPosition>
<ItemOrientation>
<X>0</X>
<Y>0</Y>
<Z>0</Z>
<W>1</W>
</ItemOrientation>
<ItemPosition>
<X>0.1</X>
<Y>-0.18</Y>
<Z>-0.22</Z>
</ItemPosition>
<ItemWalkingOrientation>
<X>0</X>
<Y>0</Y>
<Z>0.119599655</Z>
<W>0.99282223</W>
</ItemWalkingOrientation>
<ItemWalkingPosition>
<X>0</X>
<Y>-0.218271181</Y>
<Z>-0.310783446</Z>
</ItemWalkingPosition>
<ItemShootOrientation>
<X>-0.119511753</X>
<Y>0</Y>
<Z>0</Z>
<W>0.9928328</W>
</ItemShootOrientation>
<ItemShootPosition>
<X>0.1</X>
<Y>-0.233399391</Y>
<Z>-0.338593751</Z>
</ItemShootPosition>
<ItemIronsightOrientation>
<X>0</X>
<Y>0</Y>
<Z>0</Z>
<W>1</W>
</ItemIronsightOrientation>
<ItemIronsightPosition>
<X>0</X>
<Y>0</Y>
<Z>0</Z>
</ItemIronsightPosition>
<ItemOrientation3rd>
<X>0</X>
<Y>0</Y>
<Z>0</Z>
<W>1</W>
</ItemOrientation3rd>
<ItemPosition3rd>
<X>0.1</X>
<Y>-0.18</Y>
<Z>-0.22</Z>
</ItemPosition3rd>
<ItemWalkingOrientation3rd>
<X>0</X>
<Y>0</Y>
<Z>0</Z>
<W>1</W>
</ItemWalkingOrientation3rd>
<ItemWalkingPosition3rd>
<X>0.186470717</X>
<Y>-0.322347462</Y>
<Z>-0.102630876</Z>
</ItemWalkingPosition3rd>
<ItemShootOrientation3rd>
<X>-0.180763185</X>
<Y>0</Y>
<Z>0</Z>
<W>0.983526647</W>
</ItemShootOrientation3rd>
<ItemShootPosition3rd>
<X>0.1</X>
<Y>-0.18</Y>
<Z>-0.318868965</Z>
</ItemShootPosition3rd>
<BlendTime>1</BlendTime>
<ShootBlend>1.28796792</ShootBlend>
<XAmplitudeOffset>0</XAmplitudeOffset>
<YAmplitudeOffset>0</YAmplitudeOffset>
<ZAmplitudeOffset>0</ZAmplitudeOffset>
<XAmplitudeScale>0.450995952</XAmplitudeScale>
<YAmplitudeScale>0.6822766</YAmplitudeScale>
<ZAmplitudeScale>0</ZAmplitudeScale>
<RunMultiplier>2.47470331</RunMultiplier>
<AmplitudeMultiplier3rd>0.5634576</AmplitudeMultiplier3rd>
<SimulateLeftHand>false</SimulateLeftHand>
<SimulateRightHand>false</SimulateRightHand>
<MuzzlePosition>
<X>0</X>
<Y>0.19</Y>
<Z>-0.16</Z>
</MuzzlePosition>
<ShootScatter>
<X>0.136752144</X>
<Y>0.07429304</Y>
<Z>0</Z>
</ShootScatter>
<ScatterSpeed>0.8763971</ScatterSpeed>
<PhysicalItemId Type=”MyObjectBuilder_PhysicalGunObject” Subtype=”((__2__))” />
<LightColor>
<X>0</X>
<Y>0</Y>
<Z>0</Z>
<W>0</W>
</LightColor>
<LightFalloff>0</LightFalloff>
<LightRadius>0</LightRadius>
<LightGlareSize>0</LightGlareSize>
<LightIntensityLower>0</LightIntensityLower>
<LightIntensityUpper>0</LightIntensityUpper>
<ShakeAmountTarget>0</ShakeAmountTarget>
<ShakeAmountNoTarget>0</ShakeAmountNoTarget>
<ToolSounds />
<ItemPositioning>TransformFromAnim</ItemPositioning>
<ItemPositioning3rd>TransformFromAnim</ItemPositioning3rd>
<ItemPositioningWalk>TransformFromAnim</ItemPositioningWalk>
<ItemPositioningWalk3rd>TransformFromAnim</ItemPositioningWalk3rd>
<ItemPositioningShoot>TransformFromAnim</ItemPositioningShoot>
<ItemPositioningShoot3rd>TransformFromAnim</ItemPositioningShoot3rd>
</HandItem>
————————————————————————————————————–
What Does This Code Mean?
————————————————————————————————————–
Simply replace ((__#__)) with the disired values:
1) This is your HandItem’s “MyObjectBuilder_HandTool” subtype ID, Idealy, you’ed use the same name as your Tool’s “PhysicalGunObject” subtype ID.
Example: Bronze_Longsword
2) This is your HandItem’s “MyObjectBuilder_PhysicalGunObject” subtype ID, it must be the same as your Tool’s “PhysicalGunObject” subtype ID.
Example: Bronze_Longsword
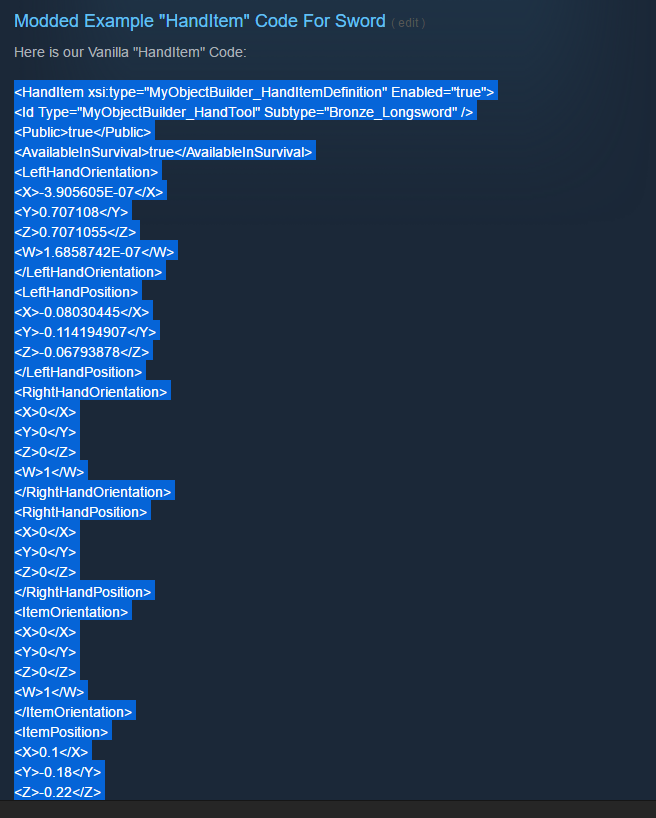
Part 1a: Modded Example “HandItem” Code For Sword
Here is our Vanilla “HandItem” Code:
<HandItem xsi:type=”MyObjectBuilder_HandItemDefinition” Enabled=”true”>
<Id Type=”MyObjectBuilder_HandTool” Subtype=”Bronze_Longsword” />
<Public>true</Public>
<AvailableInSurvival>true</AvailableInSurvival>
<LeftHandOrientation>
<X>-3.905605E-07</X>
<Y>0.707108</Y>
<Z>0.7071055</Z>
<W>1.6858742E-07</W>
</LeftHandOrientation>
<LeftHandPosition>
<X>-0.08030445</X>
<Y>-0.114194907</Y>
<Z>-0.06793878</Z>
</LeftHandPosition>
<RightHandOrientation>
<X>0</X>
<Y>0</Y>
<Z>0</Z>
<W>1</W>
</RightHandOrientation>
<RightHandPosition>
<X>0</X>
<Y>0</Y>
<Z>0</Z>
</RightHandPosition>
<ItemOrientation>
<X>0</X>
<Y>0</Y>
<Z>0</Z>
<W>1</W>
</ItemOrientation>
<ItemPosition>
<X>0.1</X>
<Y>-0.18</Y>
<Z>-0.22</Z>
</ItemPosition>
<ItemWalkingOrientation>
<X>0</X>
<Y>0</Y>
<Z>0.119599655</Z>
<W>0.99282223</W>
</ItemWalkingOrientation>
<ItemWalkingPosition>
<X>0</X>
<Y>-0.218271181</Y>
<Z>-0.310783446</Z>
</ItemWalkingPosition>
<ItemShootOrientation>
<X>-0.119511753</X>
<Y>0</Y>
<Z>0</Z>
<W>0.9928328</W>
</ItemShootOrientation>
<ItemShootPosition>
<X>0.1</X>
<Y>-0.233399391</Y>
<Z>-0.338593751</Z>
</ItemShootPosition>
<ItemIronsightOrientation>
<X>0</X>
<Y>0</Y>
<Z>0</Z>
<W>1</W>
</ItemIronsightOrientation>
<ItemIronsightPosition>
<X>0</X>
<Y>0</Y>
<Z>0</Z>
</ItemIronsightPosition>
<ItemOrientation3rd>
<X>0</X>
<Y>0</Y>
<Z>0</Z>
<W>1</W>
</ItemOrientation3rd>
<ItemPosition3rd>
<X>0.1</X>
<Y>-0.18</Y>
<Z>-0.22</Z>
</ItemPosition3rd>
<ItemWalkingOrientation3rd>
<X>0</X>
<Y>0</Y>
<Z>0</Z>
<W>1</W>
</ItemWalkingOrientation3rd>
<ItemWalkingPosition3rd>
<X>0.186470717</X>
<Y>-0.322347462</Y>
<Z>-0.102630876</Z>
</ItemWalkingPosition3rd>
<ItemShootOrientation3rd>
<X>-0.180763185</X>
<Y>0</Y>
<Z>0</Z>
<W>0.983526647</W>
</ItemShootOrientation3rd>
<ItemShootPosition3rd>
<X>0.1</X>
<Y>-0.18</Y>
<Z>-0.318868965</Z>
</ItemShootPosition3rd>
<BlendTime>1</BlendTime>
<ShootBlend>1.28796792</ShootBlend>
<XAmplitudeOffset>0</XAmplitudeOffset>
<YAmplitudeOffset>0</YAmplitudeOffset>
<ZAmplitudeOffset>0</ZAmplitudeOffset>
<XAmplitudeScale>0.450995952</XAmplitudeScale>
<YAmplitudeScale>0.6822766</YAmplitudeScale>
<ZAmplitudeScale>0</ZAmplitudeScale>
<RunMultiplier>2.47470331</RunMultiplier>
<AmplitudeMultiplier3rd>0.5634576</AmplitudeMultiplier3rd>
<SimulateLeftHand>false</SimulateLeftHand>
<SimulateRightHand>false</SimulateRightHand>
<MuzzlePosition>
<X>0</X>
<Y>0.19</Y>
<Z>-0.16</Z>
</MuzzlePosition>
<ShootScatter>
<X>0.136752144</X>
<Y>0.07429304</Y>
<Z>0</Z>
</ShootScatter>
<ScatterSpeed>0.8763971</ScatterSpeed>
<PhysicalItemId Type=”MyObjectBuilder_PhysicalGunObject” Subtype=”Bronze_Longsword” />
<LightColor>
<X>0</X>
<Y>0</Y>
<Z>0</Z>
<W>0</W>
</LightColor>
<LightFalloff>0</LightFalloff>
<LightRadius>0</LightRadius>
<LightGlareSize>0</LightGlareSize>
<LightIntensityLower>0</LightIntensityLower>
<LightIntensityUpper>0</LightIntensityUpper>
<ShakeAmountTarget>0</ShakeAmountTarget>
<ShakeAmountNoTarget>0</ShakeAmountNoTarget>
<ToolSounds />
<ItemPositioning>TransformFromAnim</ItemPositioning>
<ItemPositioning3rd>TransformFromAnim</ItemPositioning3rd>
<ItemPositioningWalk>TransformFromAnim</ItemPositioningWalk>
<ItemPositioningWalk3rd>TransformFromAnim</ItemPositioningWalk3rd>
<ItemPositioningShoot>TransformFromAnim</ItemPositioningShoot>
<ItemPositioningShoot3rd>TransformFromAnim</ItemPositioningShoot3rd>
</HandItem>
Part 1a: Texturing For A Sword Part I
1) Every model has a unique texture, you’ll need to unwrap your texture to get your texture file.
2) Once you unwrap your texture, paint it to how you want using Paint . net or MS Paint. Blender has a built-in texture painting feature. A youtuber by the name of Darren Lyle can help with this feature.
3) Save texture image as “PNG”. Then use the “PNG to DDS” Converter.
4) Your texture needs to be in DDS format.
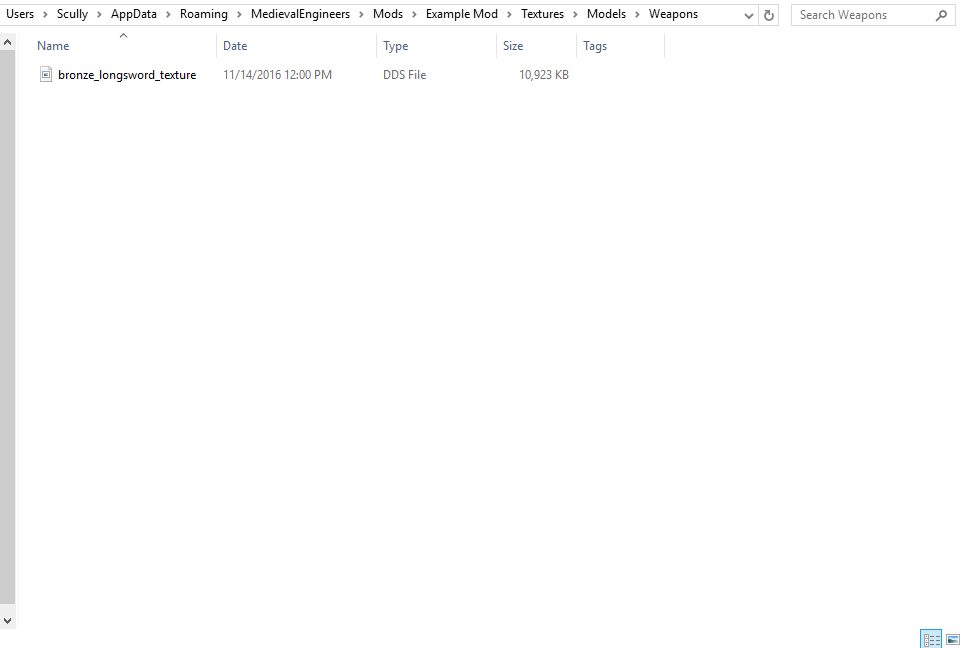
5) Please place the texture in this location
Modder Example:
Mod Folder –> Textures –> Models –> Weapons
———————————————————————————————————————–
Custom Location
———————————————————————————————————————–
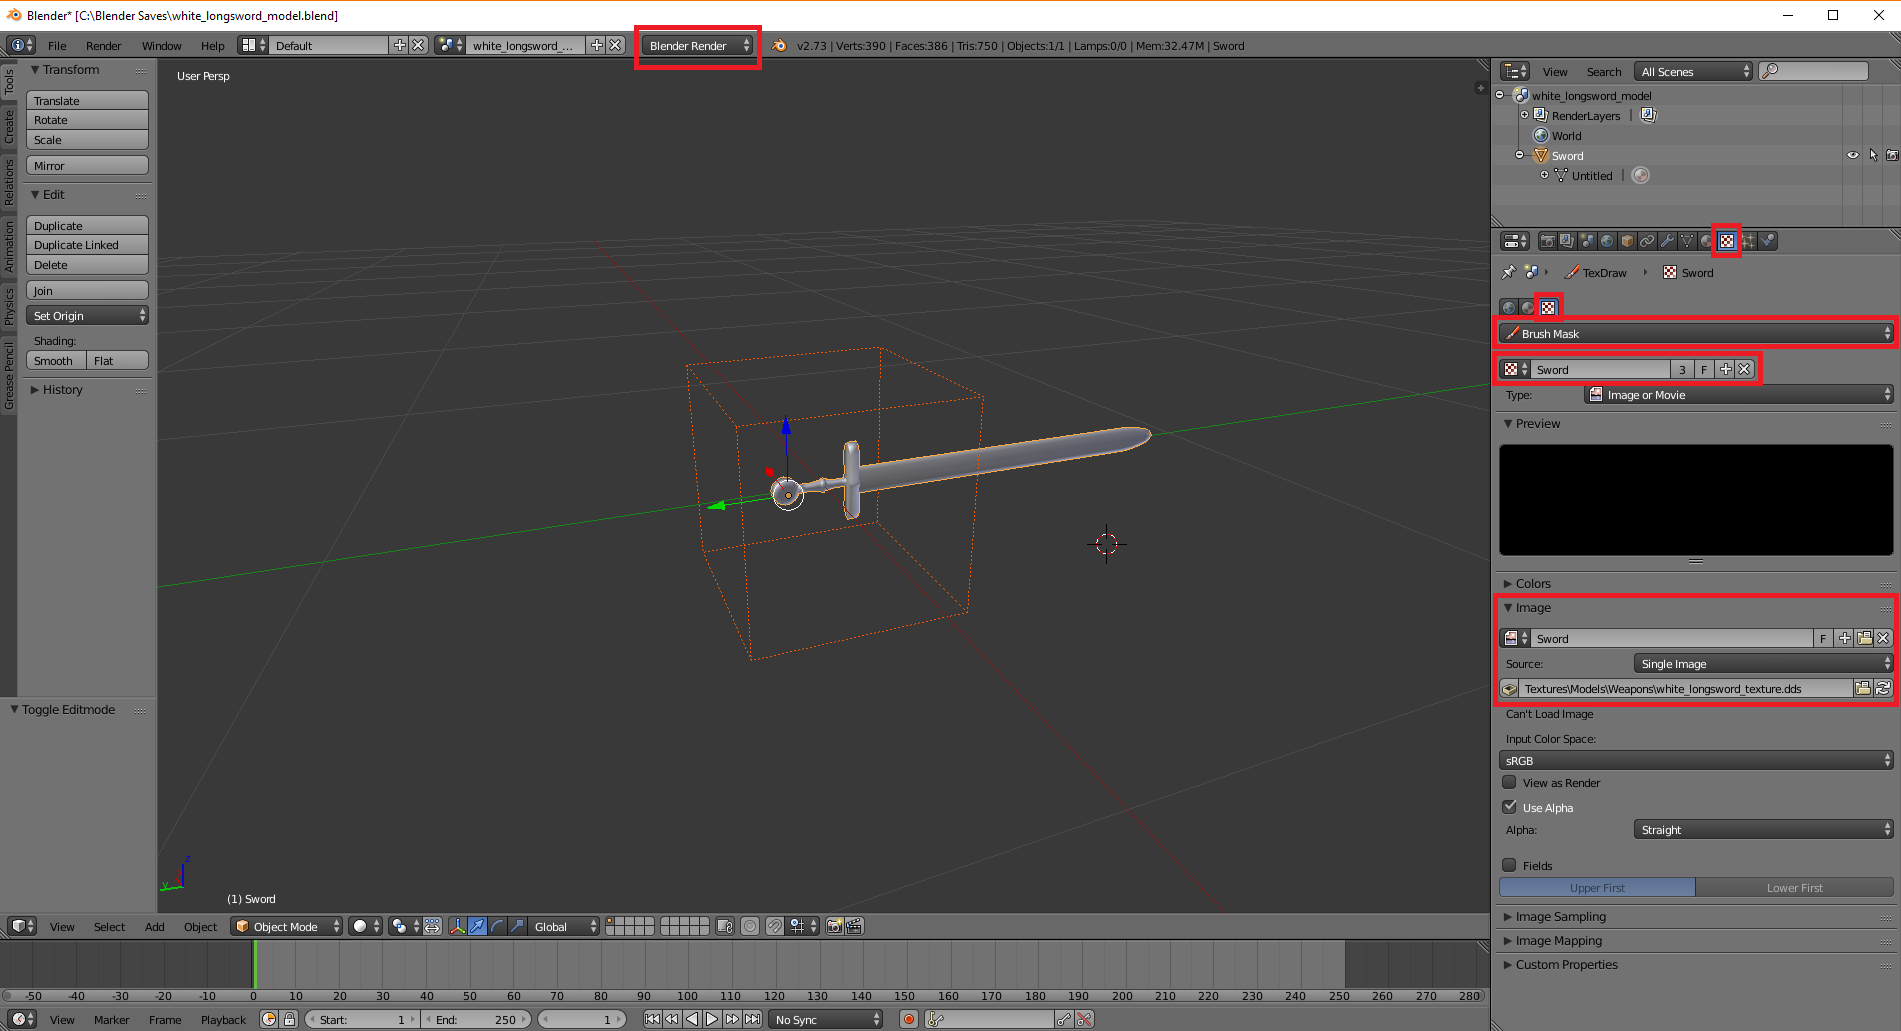
1) Normally, texture location is dependent on the model’s texture’s path. In this image, you can see the Modder Example’s model uses the path:
Modder Example’s texture destination: Textures –> Models –> Weapons


2) You don’t want to have anything before “Textures”. If you do, the game will not be able to load the texture. You must manually edit the correct, by default blender searches for the image on your computer. You want the game to search for the image in the mod’s folder. Not your personal computer’s folder. The Mod file for the texture’s location looks like this:
Wrong: DDS File –> Textures –> Models –> Weapons
3) The game does not start the search for the texture in “Mod Folder”, because that’s where the mod information is held. Thus it must look for the next location possible, which is textures. So the correct chain is:
Correct: Mod Folder –> Textures –> Models –> Weapons –> DDS File
Conclusion: This means the model will only load the texture if you place your texture in the defined location. Though, you can have all your texture files in “Textures” folder and have all your line be set to: “Textures” But I do not recommend this for large projects, since it can get messing or cluttered.
———————————————————————————————————————–
Modder Example
———————————————————————————————————————–
Though if you plan on using this guide’s example sword, this is the texture file looks like and the location it needs to be:
Mod Folder –> Textures –> Models –> Weapons –> DDS File
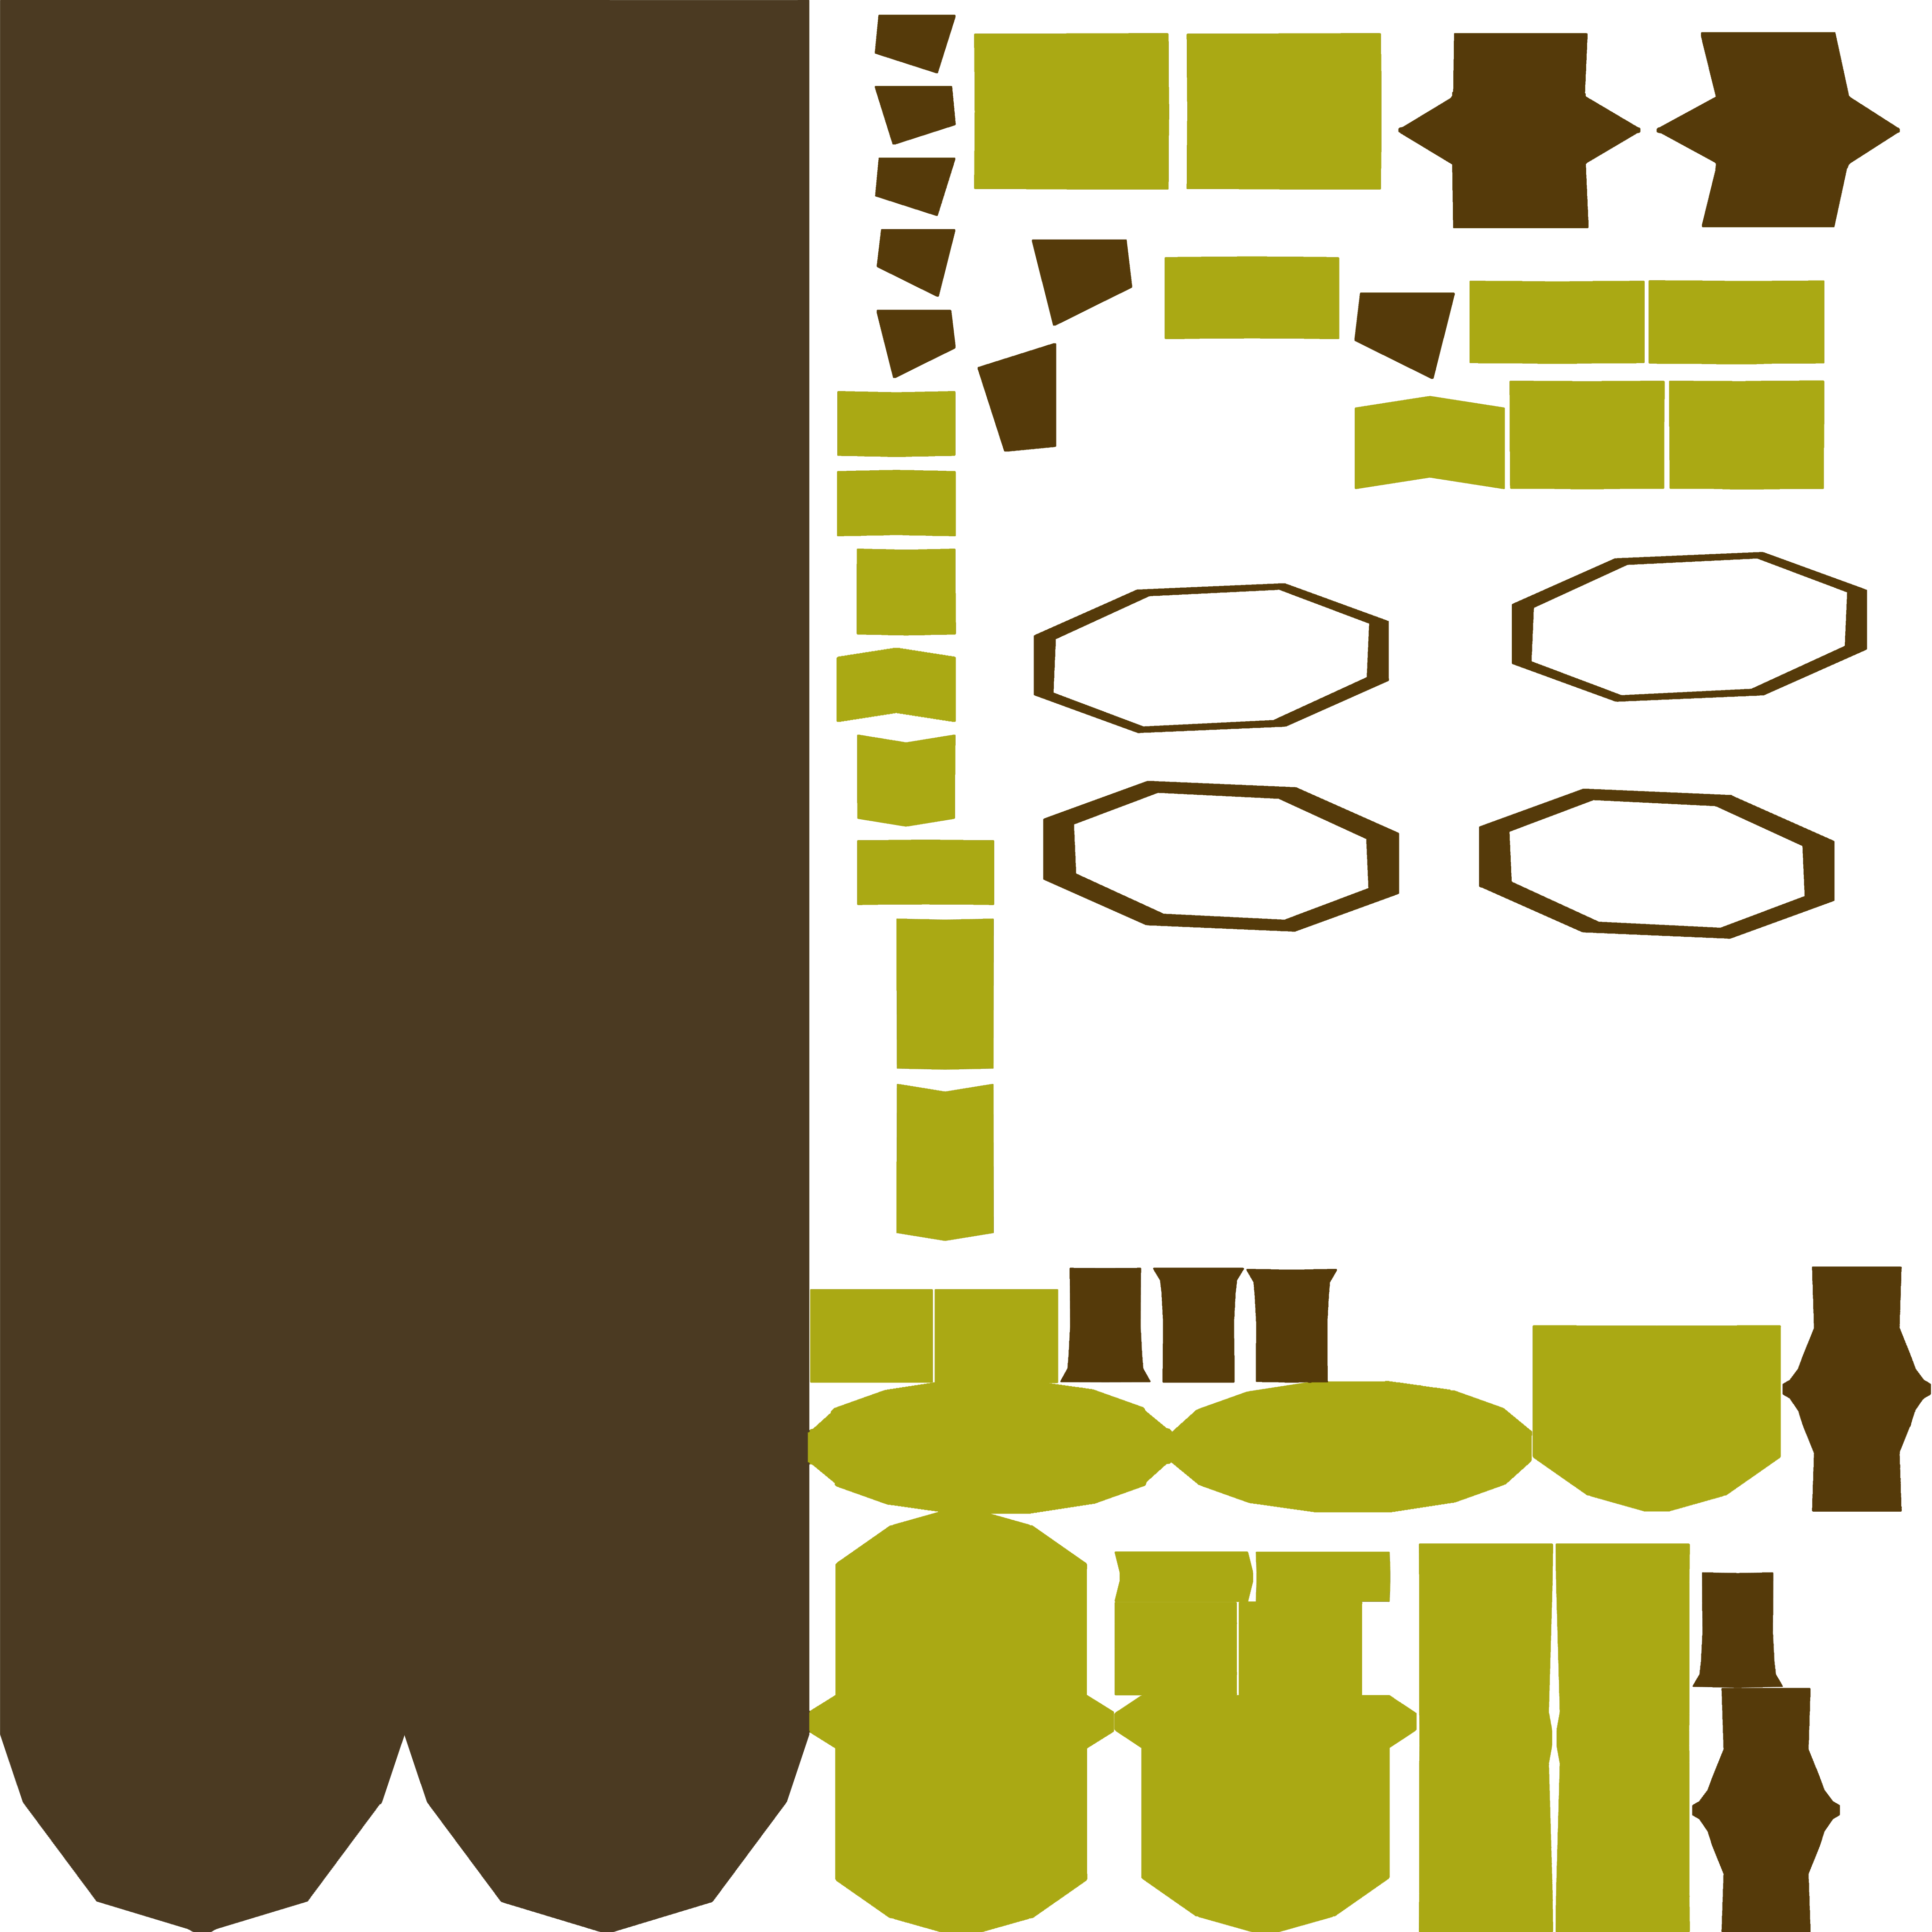
Simply fill in the colors that you want for each “side” of the object. This is how you change the sword’s color.

You can find the bronze_longsword_texture.dds here:
[link]
Part 1a: Texturing For A Sword Part II
————————————————————————————————————————–
Texturing For A Sword Part II – For Custom Models and Textures
————————————————————————————————————————–
Part II’s instructions can actually be used for any model or texture. Simply upload the FBX of Medieval Engineer’s “sword” from the (non-legacy version) Mod SDK. Edit the imported sword without deleting the handle or animations tied to it. Once you have your custom sword, unwrap the texture, edit the texture, add the texture to the mod file and correct the path. Then simply follow the instructions below on how to connect your texture to the model.
Vanilla Sword FBX: [link]
————————————————————————————————————————–
Optional Step – Not Required To Make Modder Example Work
————————————————————————————————————————–
Part II focuses on going more in-depth about textures and how they work.
We’re going to change the texture for the Modder Example, from “Bronze” to “white”. When we’ve copied the (bronze_longsword_texture) and edit it, we’re going to rename the copy to (white_longsword_texture). Once we have our texture, we’re going to follow the steps below and import the {bronze_longsword_model.fbx} into blender. Then we’re going to apply our new (white_longsword_texture) to the model and export it as {white_longsword_model.mwm}.
When we’re done, we’ll have 1 Bronze Long Sword model and 1 White Long Sword model. With this we can easily copy the sword code for (bronze long sword) and rename the copy to have white_longsword files. Once we get that finished, we’ll be able to load the Example Mod with 2 Long Swords!
Step 1:
Acquire Model FBX file (this is your file’s universal form that can be imported to blender)
Step 2:
Acquire texture mapping:
Open the image in MS paint or Paint . Net to change the colors.
Step 3: Fill in colors as desired:
Rename the texture file from (bronze_longsword_texture) to (white_longsword_texture).
Step 4: Convert the texture.png into a texture.dds (PNG to DDS)
Step 5: Import Model FBX into Blender, like this:
Step 6: Adjust Texture Settings:
Step 7: Correct Pathing:

Step 8: Export Model as Mwm file.

Step 9: Paste New Model into model folder, replacing old model.
Success! Model texture has been changed!
Part 1a: Advanced Tool Settings Part I (Optional)
————————————————————————————————————————–
Optional Settings – Not Required To Make Modded Example Work
————————————————————————————————————————–
I will be going into detail about the what the sword can do and it’s settings. You can manipulate the effect of weapons or what they can do. Go ahead and try these if your Modded Example for Part 1 works.
————————————————————————————————————————–
Vanilla Code
————————————————————————————————————————–
=================================((__1__))==================================
<PhysicalItem xsi:type=”MyObjectBuilder_ToolItemDefinition”>
<Id>
<TypeId>PhysicalGunObject</TypeId>
<SubtypeId>((__1-a__))</SubtypeId>
</Id>
<Public>true</Public>
<DisplayName>((__1-b__))</DisplayName>
<Icon>TexturesGUIIcons((__1-c__)).dds</Icon>
<Size>
<X>1.2</X>
<Y>0.6</Y>
<Z>0.3</Z>
</Size>
<Mass>((__1-d__))</Mass>
<Volume>((__1-e__))</Volume>
<Model>ModelsWeapons((__1-f__)).mwm</Model>
==============================V=((__2__))=V================================
<VoxelMinings>
<Mining>
<MinedOre>((__2-a__))</MinedOre>
<HitCount>((__2-b__))</HitCount>
<PhysicalItemId>
<TypeId>Component</TypeId>
<SubtypeId>((__2-c__))</SubtypeId>
</PhysicalItemId>
<RemovedRadius>((__2-d__))</RemovedRadius>
</Mining>
</VoxelMinings>
=============================V=((__3__))=V=================================
<PrimaryActions>
———————————————V–((__3-A__))–V—————————————————-
<Action>
<Name>Mine</Name>
<StartTime>((__3-A-a__))</StartTime>
<EndTime>((__3-A-b__))</EndTime>
<Efficiency>1</Efficiency>
<SwingSoundStart>((__3-A-c__))</SwingSoundStart>
<SwingSound>((__3-A-d__))</SwingSound>
<HitStart>((__3-A-e__))</HitStart>
<HitDuration>((__3-A-f__))</HitDuration>
<HitConditions>
<HitCondition>
<EntityType>
<string>Voxel</string>
</EntityType>
<Animation>((__3-A-g__))</Animation>
<StatsAction>((__3-A-h__))</StatsAction>
<Component>((__3-A-i__))</Component>
</HitCondition>
</HitConditions>
</Action>
———————————————V–((__3B__))–V—————————————————-
<Action>
<Name>Cut</Name>
<StartTime>0.3</StartTime>
<EndTime>0.53</EndTime>
<Efficiency>0.2</Efficiency>
<SwingSoundStart>0.4</SwingSoundStart>
<SwingSound>Swing</SwingSound>
<HitStart>0.6</HitStart>
<HitDuration>1</HitDuration>
<HitConditions>
<HitCondition>
<EntityType>
<string>Tree</string>
</EntityType>
<Animation>Cutting</Animation>
<StatsAction>GeneralWork</StatsAction>
<Component>Cut</Component>
</HitCondition>
<HitCondition>
<EntityType>
<string>Lumber</string>
<string>Log</string>
</EntityType>
<Animation>CuttingLog</Animation>
<StatsAction>GeneralWork</StatsAction>
<Component>Cut</Component>
</HitCondition>
</HitConditions>
</Action>
———————————————V–((__3C__))–V—————————————————-
<Action>
<Name>Attack</Name>
<StartTime>0.3</StartTime>
<EndTime>0.53</EndTime>
<Efficiency>((__3-C-a__))</Efficiency>
<StatsEfficiency>((__3-C-b__))</StatsEfficiency>
<SwingSoundStart>0.4</SwingSoundStart>
<SwingSound>Swing</SwingSound>
<HitStart>0.6</HitStart>
<HitDuration>1</HitDuration>
<CustomShapeRadius>0.5</CustomShapeRadius>
<Crosshair>crosshair</Crosshair>
<HitConditions>
<HitCondition>
<Animation>Attack_sword</Animation>
<StatsAction>SwingTool</StatsAction>
<StatsModifier>Attack</StatsModifier>
<Component>Attack</Component>
</HitCondition>
</HitConditions>
</Action>
———————————————————————————————————————
</PrimaryActions>
=============================V=((__4__))=V=================================
<SecondaryActions>
———————————————V–((__4A__))–V—————————————————
<Action>
<Name>Craft</Name>
<StartTime>0.3</StartTime>
<EndTime>0.53</EndTime>
<Efficiency>0.35</Efficiency>
<HitStart>0.6</HitStart>
<HitDuration>1</HitDuration>
<HitSound>((__4-A-a__))</HitSound>
<HitConditions>
<HitCondition>
<EntityType>
<string>Lumber</string>
</EntityType>
<Animation>Lumbering</Animation>
<Component>Craft</Component>
<StatsAction>GeneralWork</StatsAction>
</HitCondition>
</HitConditions>
</Action>
———————————————V–((__4B__))–V—————————————————-
<Action>
<Name>Block</Name>
<StartTime>0.3</StartTime>
<EndTime>0.53</EndTime>
<Efficiency>0.4</Efficiency>
<StatsEfficiency>((__4B__))</StatsEfficiency>
<HitStart>0.6</HitStart>
<HitDuration>0</HitDuration>
<HitConditions>
<HitCondition>
<Animation>block_idle</Animation>
<Component>Block</Component>
<StatsActionIfHit>Block</StatsActionIfHit>
<StatsModifierIfHit>Block</StatsModifierIfHit>
</HitCondition>
</HitConditions>
</Action>
———————————————————————————————————————
</SecondaryActions>
=============================V=((__5__))=V================================
<PhysicalMaterial>((__5-a__))</PhysicalMaterial>
<MaxStackAmount>((__5-b__))</MaxStackAmount>
<HitDistance>((__5-c__))</HitDistance>
</PhysicalItem>
————————————————————————————————————————–
What Does This Code Mean?
————————————————————————————————————————–
Find out in Part 1a: Advanced Options Part II
Part 1a: Advanced Tool Settings Part II (Optional)
————————————————————————————————————–
Definitions For Advanced Options Part I Terms
————————————————————————————————————–
Simply replace ((__#-#-#__)) with the disired values to find the definition of what that term does:
===========================((__1__))===========================
((__1__)): This is the general information for your sword (Or other tool).
((__1-a__)) This is your subtype ID, it must be unique.
((__1-b__)) This is your item name, name it whatever.
((__1-c__)) This is your item Icon Texture, it must be the file’s name.
((__1-d__)) This is your item model, it must be the model’s name
===========================((__2__))===========================
((__2__)): This is the information for your tool (sword) to mine different types of ore. We’ll go into more detail about this Later in the Guide.
— If you dont want the ability to mine ore, delete the code inbetween these too lines:
<VoxelMinings>
</VoxelMinings>
— Alternatively, you can set multiple mining options, they must have different <MinedOre> names:
<VoxelMinings>
<Mining>
<MinedOre>((__2-a__))</MinedOre>
<HitCount>((__2-b__))</HitCount>
<PhysicalItemId>
<TypeId>Component</TypeId>
<SubtypeId>((__2-c__))</SubtypeId>
</PhysicalItemId>
<RemovedRadius>((__2-d__))</RemovedRadius>
</Mining>
<Mining>
<MinedOre>((__2-a__))</MinedOre>
<HitCount>((__2-b__))</HitCount>
<PhysicalItemId>
<TypeId>Component</TypeId>
<SubtypeId>((__2-c__))</SubtypeId>
</PhysicalItemId>
<RemovedRadius>((__2-d__))</RemovedRadius>
</Mining>
</VoxelMinings>
— If you do want the ability to mine ore, here are what the variables mean:
((__2-a__)) This is the type of voxel you are allowed to mine
((__2-b__)) This is required amount of strikes to mine the voxel
((__2-c__)) This is the type of ore (component) you recieve
((__2-d__)) This is the radius of voxel removal
===========================((__3__))===========================
((__3__)): These are primary actions, they activate an action when the left click butten is used. Depending on the type of object, the weapon will do different actions
— If you dont want to have a primary ability, delete the code inbetween these too lines:
<PrimaryActions>
</PrimaryActions>
— Alternatively, you can set multiple actions or simply one action, they must have different names though. I recommend default names:
<PrimaryActions>
<Action>
((Mine)) Activated upon voxels
</Action>
<Action>
((Cut)) Activated upon trees
</Action>
<Action>
((Attack)) Activated upon objects
</Action>
</PrimaryActions>
— If you do want the modify abilities here is what the terms mean:
————————((__3-A__))————————
((__3-A__)) This is the “Mining” Action, and has code ready for mining/digging.
((__3-A-a__)) This is starting time of action. Do not set Time Start = 0 Setting it at 0.1 means you will begin the attack 0.1 seconds after you right click. Though it can be delayed with Time Value > 0.1
((__3-A-b__)) This is ending time of action. Time Start < Time End.
((__3-A-c__)) This is starting time of action’s sound. Setting it at 0 means when you right click, you will play the sound. Though it can be delayed with Time Value > 0.1. Ultimately, you may want to have the swing sound start before or around Hit Start
((__3-A-d__)) This is sound of the action striking/swinging. Later in the guide, you will be learning how to change this. Time Start < Time Swing < Time End
((__3-A-e__)) This is the start of the physical action. Time Start < Hit Start
((__3-A-f__)) This is how long the physical action lasts, Time Hit Duration < Time End
((__3-A-g__)) This is your action’s animation, We’ll talk about this later in the guide.
((__3-A-h__)) This is your action’s StatAction, We’ll talk about this later in the guide.
((__3-A-i__)) Still exploring this (it’s new).
————————((__3-B__))————————
((__3-B__)): This is the cutting action, much like the mining action, it is simply set up for cutting trees instead of ore.
————————((__3-C__))————————
((__3-C__)): This is the attack action, much like the other two actions, but is set up to do damage against objects, players, NPC’s.
((__3-C-a__)) This is the Efficiency of the action, which can affect the effectiveness of attacking an object. Against Players, this is the damage done. If efficiency is set at .05 the action will do 5% damage to the target’s health. Default health value = 100. Therefor 5 damage will be applied to the target.
((__3-C-b__)) This is the StatEfficiency, which can affect the effectiveness of attacking when stamina is below a certain amount. We’ll learn more about this later in the guide.
===========================((__4__))===========================
((__4__)): These are secondary actions, they utilize the right click butten. You can interchangably use code from primary, in secondary, and visa versa.
————————((__4-A__))————————
((__4-A__)): This is the Crafting action, this is an action that is set up to craft/build blocks or cut trees logs down.
((__4-A-a__)) This is the sound used when the action hits the target object
————————((__4-B__))————————
((__4-B__)): This is the Block action, this is an action that is set up to block damage like a shield.
((__4-B-a__)) This is the StatEfficiency, which can affect the effectiveness of blocking when stamina is below a certain amount. We’ll learn more about this later in the guide.
===========================((__5__))===========================
((__5__)): These are more general information about the object.
((__3-a__)) This is the type of material the object is made out of. We’ll learn about this later in the guide.
((__3-b__)) This is the amount of times this object can stack upon itself before it must take up another tile’s slot.
((__3-c__)) This is distance the weapon must be from the target to hit the hitbox. I recomend 1.5+
==============================================================
Part 1a: Conclusion (Check-List)
Lets check what you need to make your mod work:
1) Mod Folder
– Mod Folder –> Data ( Tools.sbc and HandItems.sbc )
– Mod Folder –> Models –> Weapons ( place mwm file here )
– Mod Folder –> Textures –> Models –> Weapons –> ( place DDS texture file here )
– Mod Folder –> Textures –> GUI –> Icons –> Etc…… ( place DDS icon file here )
– Mod Folder –> Etc….. (The log will tell you what you are missing when you get to testing)
2) Mwm File
– Make sure you have your textures on the model set up right.
– If you’re using the modder example, you dont have to worry about this.
3) Texture File
– Make sure texture is in DDS format
– If you edit the model’s dimensions (not position), you must unwrap the model and redo the texture.
4) Data Files
– Make sure you have the required Data files working correctly with no typos
5) Test!
For testing, all you need to do is launch Medieval Engineers, and go to “mods” you’ll see a mod file (that’s yours) and you will want to load that mod. Though the game must be on multiplayer setting: “Offline” in order to load.
Here is the Modder Example replicated by Wolfgar7474
[link]
————————————————————————————————————————-
I Got A Mod Error / My Game Crashed
————————————————————————————————————————-
This one isn’t too bad, it simply means one or more of your Data files have typos, or have a conflicting subtype ID, or it may have code that does not exist/work with the game engine. Check all folders etc.
Simply correct the mistakes, and reload the mod in-game.
————————————————————————————————————————-
My Models Are Black Boxes
————————————————————————————————————————-
This means your code is working, but your model is not loading. Check Data files for a typos in the model’s name. Files must be in .mwm format. Also be sure the path that the model follows is correct.
————————————————————————————————————————-
My Model’s Textures Are Black
————————————————————————————————————————-
This means your model’s textures are not loading, though model is working properly. Check data files, their may be a typo in the texture name. Also make sure the path that the texture follows is correct.
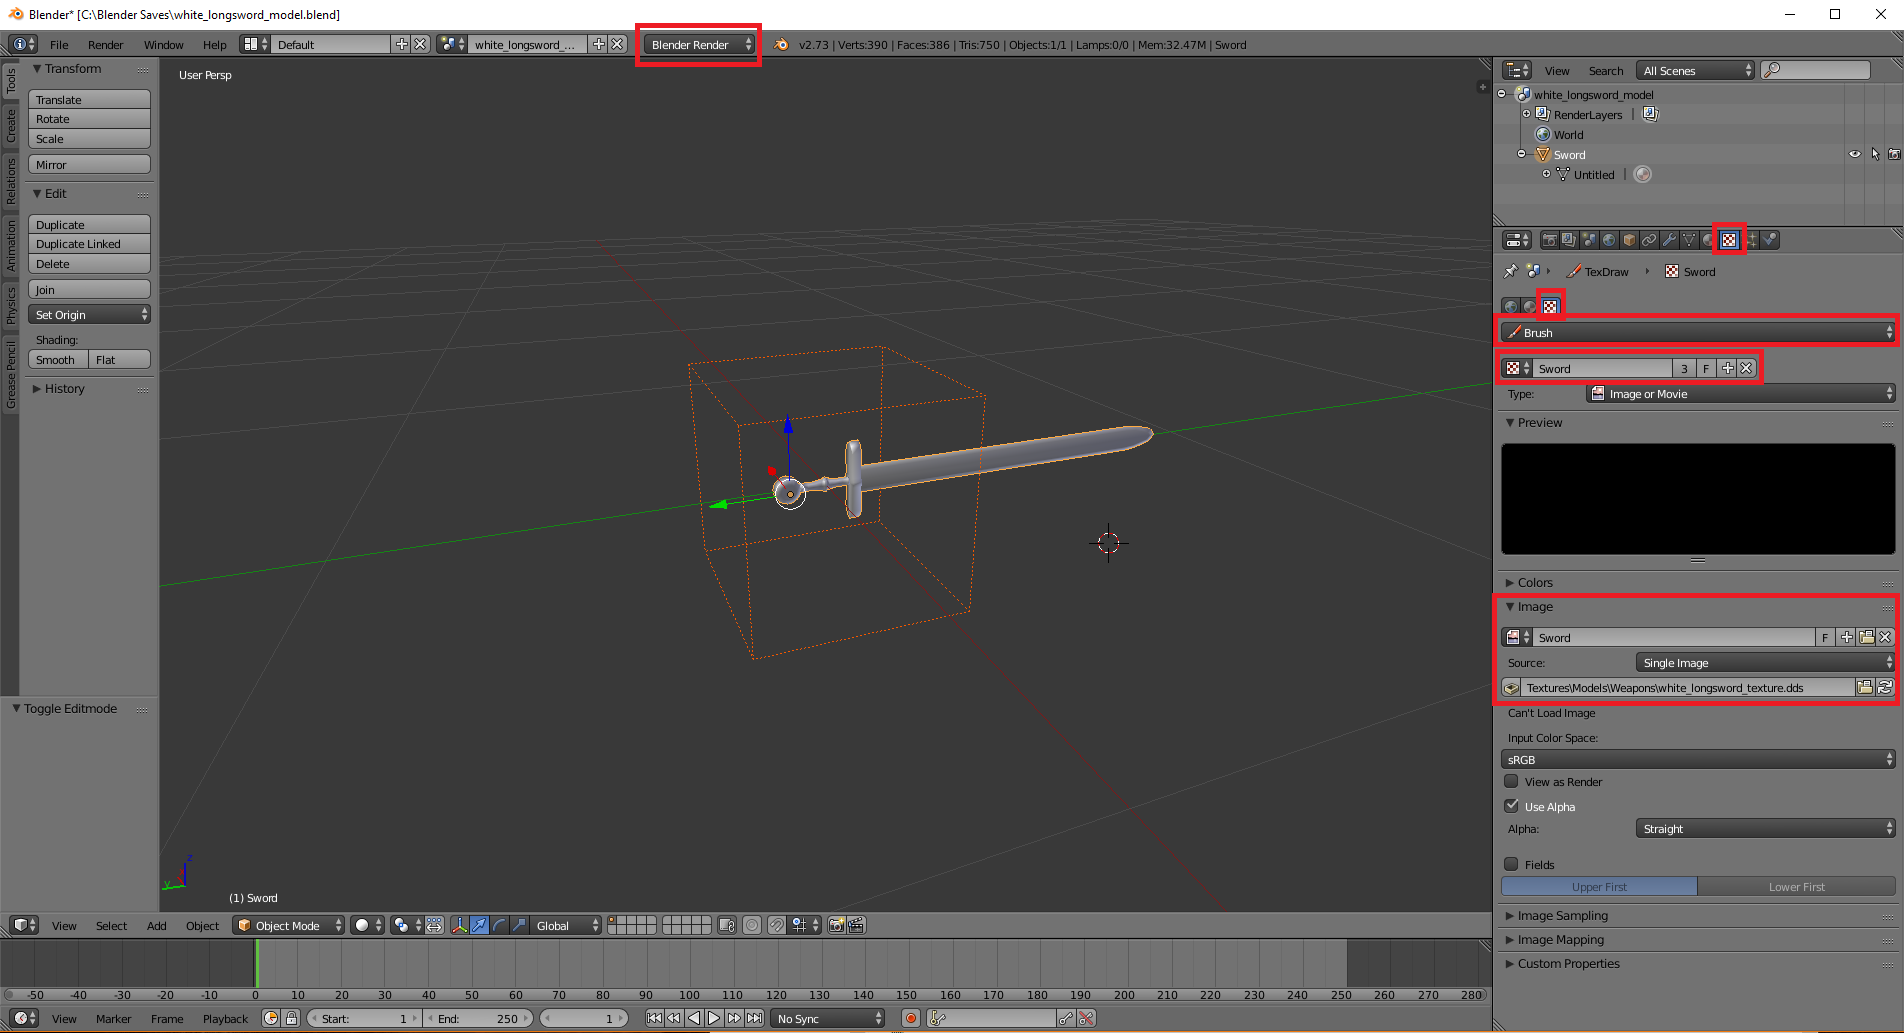
You must be in Blender Render mode in order to see this path selection and naming in the textures side panel. The Source Path is important for the finished product, the name must be named ALWAYS like this;
TexturesModelsETCYourModelTexture.dds
Before converting the model from a .blend to the .mwm format you may point the UV texture to the (TexturesModelsETCYourModelTexture.dds) path and switch from Blender Render to Cycles Render. You are now testing the path and the texture quality may be considered pre-game.
————————————————————————————————————————-
My Model’s Textures Are Pink
————————————————————————————————————————-
This means your model is loading properly, and the texture is loading, but their is an error with your texture’s format. Though the “Pink” color is tell you that the texture is in the incorrect format and can not load properly. This may be due to the fact the texture is not in .dds File format.
—————————————
Part 1b: Modding a Attack Action
Essentially Modding a Mace is no different then modding a Sword, except for the animation. Other then that it’s really no different code-wise.
————————————————————————————————————————-
Custom Mace
————————————————————————————————————————-
Want to start making your own Mace? Easy stuff! Just download this vanilla Mace fbx, import it to blender and modify it to your delight. Be sure you dont delete any dummies/nodes, specially the hilt. The hilt/handle is a good indicator of where the hand is supposed to be and the scale of the Mace. If you delete too much of the mace, the animation and dummies will be unattached from the model. To have the easiest modding time, simply import the FBX, and edit it (be placing new shapes, etc) and dont delete anything form the Mace. Just make undesired parts smaller (by selecting the part and using the “scale” option). Then once you get a Mace model ready, you can use Part 1a to learn how to apply textures, then convert it into a mwm, then write the code for it. and finally place it in the game. Remember, even though it looks different, it’s still a tool. It’s all the same tool code, just modified to “mimic” the desired tool’s characteristics.
Simply grab the vanilla Mace here:
Vanilla Mace FBX:
————————————————————————————————————————-
Modded Example
————————————————————————————————————————-
We will be making the “Bronze Mace” as our example modded mace. The modded example comes from the “Runescape Total Conversion Modpack”:
[link]
If you plan on using the Example Modded Code, use this mwm model file:
————————————————————————————————————————-
Code Specific To Attack
————————————————————————————————————————-
Though, you may be wondering how you have the weapon only attack targets, not mine or cut.
Heres how:
Only have the secondary/primary actions as “Attack”, this will have your weapon/tool only have the ability to attack objects/people
Part 1b: Vanilla Code For Mace
<PhysicalItem xsi:type=”MyObjectBuilder_ToolItemDefinition”>
<Id>
<TypeId>PhysicalGunObject</TypeId>
<SubtypeId>Mace</SubtypeId>
</Id>
<Public>true</Public>
<DisplayName>DisplayName_Mace</DisplayName>
<Icon>TexturesGUIIconsMace.dds</Icon>
<Size>
<X>1.2</X>
<Y>0.6</Y>
<Z>0.3</Z>
</Size>
<Mass>0.5</Mass>
<Volume>3</Volume>
<Model>ModelsWeaponsMace.mwm</Model>
<VoxelMinings>
<Mining>
<MinedOre>Stone</MinedOre>
<HitCount>10</HitCount>
<PhysicalItemId>
<TypeId>Component</TypeId>
<SubtypeId>StoneOreSmall</SubtypeId>
</PhysicalItemId>
<RemovedRadius>0.125</RemovedRadius>
</Mining>
</VoxelMinings>
<PrimaryActions>
<Action>
<Name>Mine</Name>
<StartTime>0.3</StartTime>
<EndTime>0.53</EndTime>
<Efficiency>0.75</Efficiency>
<SwingSoundStart>0.4</SwingSoundStart>
<SwingSound>Swing</SwingSound>
<HitStart>0.6</HitStart>
<HitDuration>1</HitDuration>
<HitConditions>
<HitCondition>
<EntityType>
<string>Voxel</string>
</EntityType>
<Animation>Mining</Animation>
<StatsAction>GeneralWork</StatsAction>
<Component>Mine</Component>
</HitCondition>
</HitConditions>
</Action>
<Action>
<Name>Cut</Name>
<StartTime>0.3</StartTime>
<EndTime>0.53</EndTime>
<Efficiency>0.07</Efficiency>
<SwingSoundStart>0.4</SwingSoundStart>
<SwingSound>Swing</SwingSound>
<HitStart>0.6</HitStart>
<HitDuration>1</HitDuration>
<HitConditions>
<HitCondition>
<EntityType>
<string>Tree</string>
</EntityType>
<Animation>Cutting</Animation>
<StatsAction>GeneralWork</StatsAction>
<Component>Cut</Component>
</HitCondition>
<HitCondition>
<EntityType>
<string>Lumber</string>
<string>Log</string>
</EntityType>
<Animation>CuttingLog</Animation>
<StatsAction>GeneralWork</StatsAction>
<Component>Cut</Component>
</HitCondition>
</HitConditions>
</Action>
<Action>
<Name>Attack</Name>
<StartTime>0.3</StartTime>
<EndTime>0.53</EndTime>
<Efficiency>0.24</Efficiency>
<StatsEfficiency>WeakAttack</StatsEfficiency>
<SwingSoundStart>0.4</SwingSoundStart>
<SwingSound>Swing</SwingSound>
<HitStart>0.5</HitStart>
<HitDuration>1</HitDuration>
<CustomShapeRadius>0.5</CustomShapeRadius>
<Crosshair>crosshair</Crosshair>
<HitConditions>
<HitCondition>
<Animation>Attack</Animation>
<StatsAction>SwingTool</StatsAction>
<StatsModifier>Attack</StatsModifier>
<Component>Attack</Component>
</HitCondition>
</HitConditions>
</Action>
</PrimaryActions>
<SecondaryActions>
<Action>
<Name>Craft</Name>
<StartTime>0.3</StartTime>
<EndTime>0.53</EndTime>
<Efficiency>0.2</Efficiency>
<HitStart>0.6</HitStart>
<HitDuration>1</HitDuration>
<HitSound>ToolAxeLumbering</HitSound>
<HitConditions>
<HitCondition>
<EntityType>
<string>Lumber</string>
</EntityType>
<Animation>Lumbering</Animation>
<Component>Craft</Component>
<StatsAction>GeneralWork</StatsAction>
</HitCondition>
</HitConditions>
</Action>
<Action>
<Name>Block</Name>
<StartTime>0.3</StartTime>
<EndTime>0.53</EndTime>
<Efficiency>0.4</Efficiency>
<StatsEfficiency>WeakBlock</StatsEfficiency>
<HitStart>0.6</HitStart>
<HitDuration>0</HitDuration>
<HitConditions>
<HitCondition>
<Animation>block_idle</Animation>
<Component>Block</Component>
<StatsActionIfHit>Block</StatsActionIfHit>
<StatsModifierIfHit>Block</StatsModifierIfHit>
</HitCondition>
</HitConditions>
</Action>
</SecondaryActions>
<PhysicalMaterial>Mace</PhysicalMaterial>
<MaxStackAmount>1</MaxStackAmount>
<HitDistance>1.5</HitDistance>
</PhysicalItem>
Part 1b: Modified Code For Weapon
—————————————
Part 1c: Modding a Mining Action
Theirs not much to explain, sense much was already explained in Part 1a.
Their are some things we will be explaining how to do in the future, like creating modded voxels, and having the pickaxe mine these modded voxels and give modded ore. We’ll talk about this later in the guide.
————————————————————————————————————————-
Custom Pickaxe
————————————————————————————————————————-
Want to start making your own Pickaxe? Easy stuff! Just download this vanilla Pickaxe fbx, import it to blender and modify it to your delight. Be sure you dont delete any dummies/nodes, specially the hilt. The hilt/handle is a good indicator of where the hand is supposed to be and the scale of the Pickaxe. If you delete too much of the Pickaxe, the animation and dummies will be unattached from the model. To have the easiest modding time, simply import the FBX, and edit it (be placing new shapes, etc) and dont delete anything form the Pickaxe. Just make undesired parts smaller (by selecting the part and using the “scale” option). Then once you get a Pickaxe model ready, you can use Part 1a to learn how to apply textures, then convert it into a mwm, then write the code for it. and finally place it in the game. Remember, even though it looks different, it’s still a tool. It’s all the same tool code, just modified to “mimic” the desired tool’s characteristics.
Simply grab the vanilla Pickaxe here:
Vanilla Pickaxe FBX:
————————————————————————————————————————-
Modded Example
————————————————————————————————————————-
We will be making the “Bronze Pickaxe” as our example modded mace. The modded example comes from the “Runescape Total Conversion Modpack”:
[link]
If you plan on using the Example Modded Code, use this mwm model file:
————————————————————————————————————————-
Code Specific To Mining
————————————————————————————————————————-
Though, you may be wondering how you have the pickaxe mine voxels and not cut trees…
Heres how:
Only have the secondary/primary actions as” Mine” and “Attack”, this will have your weapon/tool only mine voxels and the ability to attack objects/people
Part 1c: Vanilla Code For Pickaxe
<PhysicalItem xsi:type=”MyObjectBuilder_ToolItemDefinition”>
<Id>
<TypeId>PhysicalGunObject</TypeId>
<SubtypeId>PickAxe</SubtypeId>
</Id>
<Public>true</Public>
<DisplayName>DisplayName_PickAxe</DisplayName>
<Icon>TexturesGUIIconsPickAxe.dds</Icon>
<Size>
<X>1.2</X>
<Y>0.6</Y>
<Z>0.3</Z>
</Size>
<Mass>0.5</Mass>
<Volume>3</Volume>
<Model>ModelsWeaponsPickAxe_OneHand.mwm</Model>
<ShowItemHP>true</ShowItemHP>
<VoxelMinings>
<Mining>
<MinedOre>Stone</MinedOre>
<HitCount>10</HitCount>
<PhysicalItemId>
<TypeId>Component</TypeId>
<SubtypeId>LargeStone</SubtypeId>
</PhysicalItemId>
<RemovedRadius>0.25</RemovedRadius>
<OnlyApplyMaterial>false</OnlyApplyMaterial>
</Mining>
</VoxelMinings>
<PrimaryActions>
<Action>
<Name>Mine</Name>
<StartTime>0.3</StartTime>
<EndTime>0.53</EndTime>
<Efficiency>3.4</Efficiency>
<SwingSoundStart>0.4</SwingSoundStart>
<SwingSound>Swing</SwingSound>
<HitStart>0.6</HitStart>
<HitDuration>1</HitDuration>
<HitConditions>
<HitCondition>
<EntityType>
<string>Voxel</string>
</EntityType>
<Animation>Mining</Animation>
<StatsAction>GeneralWork</StatsAction>
<Component>Mine</Component>
</HitCondition>
</HitConditions>
</Action>
<Action>
<Name>Cut</Name>
<StartTime>0.3</StartTime>
<EndTime>0.53</EndTime>
<Efficiency>0.15</Efficiency>
<SwingSoundStart>0.4</SwingSoundStart>
<SwingSound>Swing</SwingSound>
<HitStart>0.6</HitStart>
<HitDuration>1</HitDuration>
<HitConditions>
<HitCondition>
<EntityType>
<string>Tree</string>
</EntityType>
<Animation>Cutting</Animation>
<StatsAction>GeneralWork</StatsAction>
<Component>Cut</Component>
</HitCondition>
<HitCondition>
<EntityType>
<string>Lumber</string>
<string>Log</string>
</EntityType>
<Animation>CuttingLog</Animation>
<StatsAction>GeneralWork</StatsAction>
<Component>Cut</Component>
</HitCondition>
</HitConditions>
</Action>
<Action>
<Name>Attack</Name>
<StartTime>0.3</StartTime>
<EndTime>0.53</EndTime>
<Efficiency>0.12</Efficiency>
<StatsEfficiency>WeakAttack</StatsEfficiency>
<SwingSoundStart>0.4</SwingSoundStart>
<SwingSound>Swing</SwingSound>
<HitStart>0.6</HitStart>
<HitDuration>1</HitDuration>
<CustomShapeRadius>0.5</CustomShapeRadius>
<Crosshair>crosshair</Crosshair>
<HitConditions>
<HitCondition>
<Animation>Attack</Animation>
<StatsAction>SwingTool</StatsAction>
<StatsModifier>Attack</StatsModifier>
<Component>Attack</Component>
</HitCondition>
</HitConditions>
</Action>
</PrimaryActions>
<SecondaryActions>
<Action>
<Name>Craft</Name>
<StartTime>0.3</StartTime>
<EndTime>0.53</EndTime>
<Efficiency>0.2</Efficiency>
<HitStart>0.6</HitStart>
<HitDuration>1</HitDuration>
<HitSound>ToolAxeLumbering</HitSound>
<HitConditions>
<HitCondition>
<EntityType>
<string>Lumber</string>
</EntityType>
<Animation>Lumbering</Animation>
<Component>Craft</Component>
<StatsAction>GeneralWork</StatsAction>
</HitCondition>
</HitConditions>
</Action>
<Action>
<Name>Block</Name>
<StartTime>0.3</StartTime>
<EndTime>0.53</EndTime>
<Efficiency>0.4</Efficiency>
<StatsEfficiency>WeakBlock</StatsEfficiency>
<HitStart>0.6</HitStart>
<HitDuration>0</HitDuration>
<HitConditions>
<HitCondition>
<Animation>block_idle</Animation>
<Component>Block</Component>
<StatsActionIfHit>Block</StatsActionIfHit>
<StatsModifierIfHit>Block</StatsModifierIfHit>
</HitCondition>
</HitConditions>
</Action>
</SecondaryActions>
<PhysicalMaterial>PickAxe</PhysicalMaterial>
<MaxStackAmount>1</MaxStackAmount>
<HitDistance>1.6</HitDistance>
</PhysicalItem>
Part 1c: Modified Code For Pickaxe
—————————————
Part 1d: Modding a Cutting Action
Theirs not much to explain, sense much was already explained in Part 1a.
Their are some things we will be explaining how to do in the future, like creating modded trees, and having the axe cut these modded trees and give modded lumber. We’ll talk about this later in the guide.
————————————————————————————————————————-
Custom Axe
————————————————————————————————————————-
Want to start making your own Axe? Easy stuff! Just download this vanilla Axe fbx, import it to blender and modify it to your delight. Be sure you dont delete any dummies/nodes, specially the hilt. The hilt/handle is a good indicator of where the hand is supposed to be and the scale of the Axe. If you delete too much of the Axe, the animation and dummies will be unattached from the model. To have the easiest modding time, simply import the FBX, and edit it (be placing new shapes, etc) and dont delete anything form the Axe. Just make undesired parts smaller (by selecting the part and using the “scale” option). Then once you get a Axe model ready, you can use Part 1a to learn how to apply textures, then convert it into a mwm, then write the code for it. and finally place it in the game. Remember, even though it looks different, it’s still a tool. It’s all the same tool code, just modified to “mimic” the desired tool’s characteristics.
Simply grab the vanilla Axe here:
Vanilla Axe FBX:
————————————————————————————————————————-
Modded Example
————————————————————————————————————————-
We will be making the “Bronze Axe” as our example modded mace. The modded example comes from the “Runescape Total Conversion Modpack”:
[link]
If you plan on using the Example Modded Code, use this mwm model file:
————————————————————————————————————————-
Code Specific To Cutting
————————————————————————————————————————-
Though, you may be wondering how you have the axe cut trees and not mine voxels…
Heres how:
Only have the secondary/primary actions as” Cut” “Craft” and “Attack”, this will have your weapon/tool only cut trees, cut logs, and the ability to attack objects/people
Part 1d: Vanilla Code For Axe
Here is the code for the Vanilla Axe:
<PhysicalItem xsi:type=”MyObjectBuilder_ToolItemDefinition”>
<Id>
<TypeId>PhysicalGunObject</TypeId>
<SubtypeId>Axe</SubtypeId>
</Id>
<Public>true</Public>
<DisplayName>DisplayName_Axe</DisplayName>
<Icon>TexturesGUIIconsAxe.dds</Icon>
<Size>
<X>1.2</X>
<Y>0.6</Y>
<Z>0.3</Z>
</Size>
<Mass>0.5</Mass>
<Volume>3</Volume>
<Model>ModelsWeaponsAxe_OneHand.mwm</Model>
<VoxelMinings>
<Mining>
<MinedOre>Stone</MinedOre>
<HitCount>10</HitCount>
<PhysicalItemId>
<TypeId>Component</TypeId>
<SubtypeId>StoneOreSmall</SubtypeId>
</PhysicalItemId>
<RemovedRadius>0.125</RemovedRadius>
</Mining>
</VoxelMinings>
<PrimaryActions>
<Action>
<Name>Cut</Name>
<StartTime>0.3</StartTime>
<EndTime>0.53</EndTime>
<Efficiency>0.6</Efficiency>
<SwingSoundStart>0.3</SwingSoundStart>
<SwingSound>Swing</SwingSound>
<HitStart>0.6</HitStart>
<HitDuration>1</HitDuration>
<HitConditions>
<HitCondition>
<EntityType>
<string>Tree</string>
</EntityType>
<Animation>Cutting</Animation>
<StatsAction>GeneralWork</StatsAction>
<Component>Cut</Component>
</HitCondition>
<HitCondition>
<EntityType>
<string>Lumber</string>
<string>Log</string>
</EntityType>
<Animation>CuttingLog</Animation>
<StatsAction>GeneralWork</StatsAction>
<Component>Cut</Component>
</HitCondition>
</HitConditions>
</Action>
<Action>
<Name>Mine</Name>
<StartTime>0.3</StartTime>
<EndTime>0.53</EndTime>
<Efficiency>2.1</Efficiency>
<SwingSoundStart>0.3</SwingSoundStart>
<SwingSound>Swing</SwingSound>
<HitStart>0.6</HitStart>
<HitDuration>1</HitDuration>
<HitConditions>
<HitCondition>
<EntityType>
<string>Voxel</string>
</EntityType>
<Animation>Mining</Animation>
<StatsAction>GeneralWork</StatsAction>
<Component>Mine</Component>
</HitCondition>
</HitConditions>
</Action>
<Action>
<Name>Attack</Name>
<StartTime>0.3</StartTime>
<EndTime>0.53</EndTime>
<Efficiency>0.24</Efficiency>
<StatsEfficiency>WeakAttack</StatsEfficiency>
<SwingSoundStart>0.3</SwingSoundStart>
<SwingSound>Swing</SwingSound>
<HitStart>0.6</HitStart>
<HitDuration>1</HitDuration>
<CustomShapeRadius>0.5</CustomShapeRadius>
<Crosshair>crosshair</Crosshair>
<HitConditions>
<HitCondition>
<Animation>Attack_axe</Animation>
<StatsAction>SwingTool</StatsAction>
<StatsModifier>Attack</StatsModifier>
<Component>Attack</Component>
</HitCondition>
</HitConditions>
</Action>
</PrimaryActions>
<SecondaryActions>
<Action>
<Name>Craft</Name>
<StartTime>0.3</StartTime>
<EndTime>0.53</EndTime>
<Efficiency>0.9</Efficiency>
<HitStart>0.6</HitStart>
<HitDuration>1</HitDuration>
<HitSound>ToolAxeLumbering</HitSound>
<HitConditions>
<HitCondition>
<EntityType>
<string>Lumber</string>
</EntityType>
<Animation>Lumbering</Animation>
<Component>Craft</Component>
<StatsAction>GeneralWork</StatsAction>
</HitCondition>
</HitConditions>
</Action>
<Action>
<Name>Cut</Name>
<StartTime>0.3</StartTime>
<EndTime>0.53</EndTime>
<Efficiency>0.6</Efficiency>
<SwingSoundStart>0.3</SwingSoundStart>
<SwingSound>Swing</SwingSound>
<HitStart>0.6</HitStart>
<HitDuration>1</HitDuration>
<HitConditions>
<HitCondition>
<EntityType>
<string>Log</string>
</EntityType>
<Animation>CuttingLog</Animation>
<StatsAction>GeneralWork</StatsAction>
<Component>Cut</Component>
</HitCondition>
</HitConditions>
</Action>
<Action>
<Name>Block</Name>
<StartTime>0.3</StartTime>
<EndTime>0.53</EndTime>
<Efficiency>0.4</Efficiency>
<StatsEfficiency>WeakBlock</StatsEfficiency>
<HitStart>0.6</HitStart>
<HitDuration>0</HitDuration>
<HitConditions>
<HitCondition>
<Animation>block_idle</Animation>
<Component>Block</Component>
<StatsActionIfHit>Block</StatsActionIfHit>
<StatsModifierIfHit>Block</StatsModifierIfHit>
</HitCondition>
</HitConditions>
</Action>
</SecondaryActions>
<PhysicalMaterial>Axe</PhysicalMaterial>
<MaxStackAmount>1</MaxStackAmount>
<HitDistance>1.5</HitDistance>
</PhysicalItem>
Part 1d: Modified Code For Axe
—————————————
Part 1e: Modding a Building Action
This tool is actually very important, it’s your building tool. Although we wont be able to explain everything right now, we’ll go more in detail in the future.
————————————————————————————————————————-
Custom Hammer
————————————————————————————————————————-
Want to start making your own Hammer? Easy stuff! Just download this vanilla Hammer fbx, import it to blender and modify it to your delight. Be sure you dont delete any dummies/nodes, specially the hilt. The hilt/handle is a good indicator of where the hand is supposed to be and the scale of the Hammer. If you delete too much of the mace, the animation and dummies will be unattached from the model. To have the easiest modding time, simply import the FBX, and edit it (be placing new shapes, etc) and dont delete anything from the Hammer. Just make undesired parts smaller (by selecting the part and using the “scale” option). Then once you get a Hammer model ready, you can use Part 1a to learn how to apply textures, then convert it into a mwm, then write the code for it. and finally place it in the game. Remember, even though it looks different, it’s still a tool. It’s all the same tool code, just modified to “mimic” the desired tool’s characteristics.
Simply grab the vanilla Hammer here:
Vanilla Hammer FBX:
————————————————————————————————————————-
Modded Example
————————————————————————————————————————-
We will be making the “Hammer” as our example modded mace. The modded example comes from the “Runescape Total Conversion Modpack”:
[link]
If you plan on using the Example Modded Code, use this mwm model file:
————————————————————————————————————————-
Code Specific To Building
————————————————————————————————————————-
If you’re wondering on how to make a hammer just build/deconstruct…
Heres how:
Only have the secondary/primary actions as” Build”, this will have your weapon/tool only have the ability to “build” structures.
Part 1e: Vanilla Code For Hammer
<PhysicalItem xsi:type=”MyObjectBuilder_ToolItemDefinition”>
<Id>
<TypeId>PhysicalGunObject</TypeId>
<SubtypeId>Hammer</SubtypeId>
</Id>
<Public>true</Public>
<DisplayName>DisplayName_Hammer</DisplayName>
<MaxStackAmount>1</MaxStackAmount>
<Icon>TexturesGUIIconsHammerOneHand_Construction.dds</Icon>
<Size>
<X>1.2</X>
<Y>0.6</Y>
<Z>0.3</Z>
</Size>
<Mass>0.5</Mass>
<Volume>3</Volume>
<Model>ModelsWeaponsHammer_OneHand.mwm</Model>
<VoxelMinings>
<Mining>
<MinedOre>Stone</MinedOre>
<HitCount>10</HitCount>
<PhysicalItemId>
<TypeId>Component</TypeId>
<SubtypeId>StoneOreSmall</SubtypeId>
</PhysicalItemId>
<RemovedRadius>0.125</RemovedRadius>
</Mining>
</VoxelMinings>
<PrimaryActions>
<Action>
<Name>Build</Name>
<StartTime>0.3</StartTime>
<EndTime>0.53</EndTime>
<Efficiency>1</Efficiency>
<SwingSoundStart>0.4</SwingSoundStart>
<SwingSound>Swing</SwingSound>
<HitStart>0.6</HitStart>
<HitDuration>1.33</HitDuration>
<HitConditions>
<HitCondition>
<EntityType>
<string>Buildable</string>
</EntityType>
<Animation>BuildWall</Animation>
<StatsAction>GeneralWork</StatsAction>
<Component>Build</Component>
</HitCondition>
</HitConditions>
</Action>
<Action>
<Name>Cut</Name>
<StartTime>0.3</StartTime>
<EndTime>0.53</EndTime>
<Efficiency>0.07</Efficiency>
<SwingSoundStart>0.4</SwingSoundStart>
<SwingSound>Swing</SwingSound>
<HitStart>0.6</HitStart>
<HitDuration>1</HitDuration>
<HitConditions>
<HitCondition>
<EntityType>
<string>Tree</string>
</EntityType>
<Animation>Cutting</Animation>
<StatsAction>GeneralWork</StatsAction>
<Component>Cut</Component>
</HitCondition>
<HitCondition>
<EntityType>
<string>Lumber</string>
<string>Log</string>
</EntityType>
<Animation>CuttingLog</Animation>
<StatsAction>GeneralWork</StatsAction>
<Component>Cut</Component>
</HitCondition>
</HitConditions>
</Action>
<Action>
<Name>Mine</Name>
<StartTime>0.3</StartTime>
<EndTime>0.53</EndTime>
<Efficiency>2</Efficiency>
<SwingSoundStart>0.4</SwingSoundStart>
<SwingSound>Swing</SwingSound>
<HitStart>0.6</HitStart>
<HitDuration>1</HitDuration>
<HitConditions>
<HitCondition>
<EntityType>
<string>Voxel</string>
</EntityType>
<Animation>Mining</Animation>
<StatsAction>GeneralWork</StatsAction>
<Component>Mine</Component>
</HitCondition>
</HitConditions>
</Action>
<Action>
<Name>Attack</Name>
<StartTime>0.3</StartTime>
<EndTime>0.53</EndTime>
<Efficiency>0.12</Efficiency>
<StatsEfficiency>WeakAttack</StatsEfficiency>
<SwingSoundStart>0.4</SwingSoundStart>
<SwingSound>Swing</SwingSound>
<HitStart>0.6</HitStart>
<HitDuration>1</HitDuration>
<CustomShapeRadius>0.5</CustomShapeRadius>
<Crosshair>crosshair</Crosshair>
<HitConditions>
<HitCondition>
<EntityType>
<string>Character</string>
</EntityType>
<Animation>Attack</Animation>
<StatsAction>SwingTool</StatsAction>
<StatsModifier>Attack</StatsModifier>
<Component>Attack</Component>
</HitCondition>
</HitConditions>
</Action>
</PrimaryActions>
<SecondaryActions>
<Action>
<Name>Deconstruct</Name>
<StartTime>0.3</StartTime>
<EndTime>0.53</EndTime>
<Efficiency>0.9</Efficiency>
<SwingSoundStart>0.4</SwingSoundStart>
<SwingSound>Swing</SwingSound>
<HitStart>0.6</HitStart>
<HitDuration>1</HitDuration>
<HitConditions>
<HitCondition>
<EntityType>
<string>Deconstructible</string>
</EntityType>
<Animation>Attack</Animation>
<Component>Deconstruct</Component>
<StatsAction>GeneralWork</StatsAction>
</HitCondition>
</HitConditions>
</Action>
<Action>
<Name>Craft</Name>
<StartTime>0.3</StartTime>
<EndTime>0.53</EndTime>
<Efficiency>0.2</Efficiency>
<HitStart>0.6</HitStart>
<HitDuration>1</HitDuration>
<HitSound>ToolAxeLumbering</HitSound>
<HitConditions>
<HitCondition>
<EntityType>
<string>Lumber</string>
</EntityType>
<Animation>Lumbering</Animation>
<Component>Craft</Component>
<StatsAction>GeneralWork</StatsAction>
</HitCondition>
</HitConditions>
</Action>
<Action>
<Name>Block</Name>
<StartTime>0.3</StartTime>
<EndTime>0.53</EndTime>
<Efficiency>0.4</Efficiency>
<StatsEfficiency>WeakBlock</StatsEfficiency>
<HitStart>0.6</HitStart>
<HitDuration>0</HitDuration>
<HitConditions>
<HitCondition>
<Animation>block_idle</Animation>
<Component>Block</Component>
<StatsActionIfHit>Block</StatsActionIfHit>
<StatsModifierIfHit>Block</StatsModifierIfHit>
</HitCondition>
</HitConditions>
</Action>
</SecondaryActions>
<PhysicalMaterial>Hammer</PhysicalMaterial>
<HitDistance>1.5</HitDistance>
</PhysicalItem>
Part 1e: Modified Code For Hammer
—————————————
Part 1f: Modding a Block Action
Shields are… tricky.
You can make a shield, but you’ll have to set your own “Shield_Animation” because the current animation for block wont work with a shield model.
If you know how to make animations, please talk to me.
————————————————————————————————————————-
Custom Shield
————————————————————————————————————————-
Want to start making your own Shield? Easy stuff! Just download this vanilla Pickaxe fbx (Yes, Pickaxe, you need a normal weapon as reference to shere hand placement is. Then you will need to create your own animation for how the shield is moved during a “block action”.) , import it to blender and modify it to your delight. Be sure you dont delete any dummies/nodes, specially the hilt. The hilt/handle is a good indicator of where the hand is supposed to be and the scale of the Pickaxe. If you delete too much of the Pickaxe, the animation and dummies will be unattached from the model. To have the easiest modding time, simply import the FBX, and edit it (be placing new shapes, etc) and dont delete anything form the Pickaxe. Just make undesired parts smaller (by selecting the part and using the “scale” option). Then once you get a model looking like a Shield ready, you can use Part 1a to learn how to apply textures, then convert it into a mwm, then write the code for it. and finally place it in the game. Remember, even though it looks different, it’s still a tool. It’s all the same tool code, just modified to “mimic” the desired tool’s characteristics.
Disclaimer: You must make your own animation for this tool, if you know how to animate, please post in the comments, I will add you personally and work with you to update this guide.
————————————————————————————————————————-
Modded Example
————————————————————————————————————————-
No Modded Example, I do not yet know how to make my own animations. Although it is mod-able and I can write the code for the data files. The issue I’m not experienced in animation. If you know how to animate, please post in the comments, I will add you personally and work with you to update this guide.
————————————————————————————————————————-
Code Specific To Blocking
————————————————————————————————————————-
Though, you may be wondering, how do you make the Shield Block and Base opponents.
Heres how:
Only have the secondary/primary actions as” block” and “Attack”, this will have your weapon/tool only have the ability to attack objects/people and block attacks.
Part 1f: Modified Code For Shield (Experimental)
Again, This is experimental, although the code works, the animations are incorrect. Even though your object spawns correctly, if you dont have the correct animation it will not block correctly (It’ll be held up like a weapon, very ineffective as a shield)
Here is a basic Example Code for a shield that simple blocks and attacks:
Subtype: Example_Shield
Name: Example Shield
Icon: example_shield_icon
Model: example_shield_model
You will need to do a custom animation for ((__Shield_Block__)) and ((__Shield_Bash__))
<PhysicalItem xsi:type=”MyObjectBuilder_ToolItemDefinition”>
<Id>
<TypeId>PhysicalGunObject</TypeId>
<SubtypeId>Example_Shield</SubtypeId>
</Id>
<Public>true</Public>
<DisplayName>Example Shield</DisplayName>
<Icon>TexturesGUIIconsexample_shield_icon.dds</Icon>
<Size>
<X>1.2</X>
<Y>0.6</Y>
<Z>0.3</Z>
</Size>
<Mass>0.5</Mass>
<Volume>3</Volume>
<Model>ModelsWeaponsexample_shield_model.mwm</Model>
<VoxelMinings>
</VoxelMinings>
<PrimaryActions>
<Action>
<Name>Attack</Name>
<StartTime>0.3</StartTime>
<EndTime>0.53</EndTime>
<Efficiency>0.4</Efficiency>
<StatsEfficiency>WeakAttack</StatsEfficiency>
<SwingSoundStart>0.4</SwingSoundStart>
<SwingSound>Swing</SwingSound>
<HitStart>0.6</HitStart>
<HitDuration>1</HitDuration>
<CustomShapeRadius>0.5</CustomShapeRadius>
<Crosshair>crosshair</Crosshair>
<HitConditions>
<HitCondition>
<Animation>((__Shield_Bash__))</Animation>
<StatsAction>SwingTool</StatsAction>
<StatsModifier>Attack</StatsModifier>
<Component>Attack</Component>
</HitCondition>
</HitConditions>
</Action>
</PrimaryActions>
<SecondaryActions>
<Action>
<Name>Block</Name>
<StartTime>0.3</StartTime>
<EndTime>0.53</EndTime>
<Efficiency>0.4</Efficiency>
<StatsEfficiency>WeakBlock</StatsEfficiency>
<HitStart>0.6</HitStart>
<HitDuration>0</HitDuration>
<HitConditions>
<HitCondition>
<Animation>((__Shield_Block__))</Animation>
<Component>Block</Component>
<StatsActionIfHit>Block</StatsActionIfHit>
<StatsModifierIfHit>Block</StatsModifierIfHit>
</HitCondition>
</HitConditions>
</Action>
</SecondaryActions>
<PhysicalMaterial>Sword</PhysicalMaterial>
<MaxStackAmount>1</MaxStackAmount>
<HitDistance>1.6</HitDistance>
</PhysicalItem>