
Overview
This guide will teach you the ins and outs of surviving the wasteland, such as what to build, where to look, what to do, and how to do it.
Foreword
This is a guide that is I think an entire year old at the time of this writing. Lots of it is slightly outdated, but (thankfully? Nah, i’d rather have more updates) Team 17 doesn’t update the game all that often, and when they do it’s usually not a huge change.
Yes, I do edit it still, and I do reply to every comment. Please, do not be shy. If you feel I missed something, I beg you to put it in the comments. I will either add it to the guide, add it to the guide saying ‘some people suggest’, or something similar, or I will tell you in the comments why I dissagree. Or both.
I want the guide to be as complete as possible, and everytime I playthrough the game again, I go back and tweak this guide in some way or another. But I am only one person and I do miss stuff sometimes. The more eyes the better, and I have ears to hear the stuff that you saw, but I may not have. (The bit about the pet fish is one prime example of me adding something because of a comment.)
Who knows, if enough people give me info I might even make a mentions section. So if being mentioned in a guide is your dream, well… Now’s your chance.
Then maybe you can find a better dream cause tbh that one’s kinda lame.
Cheers, lads. -AFoxInAviators
Making your family
This is a very important step in the game, and how you tailor your surviors will dramatically change how well you preform in the game.
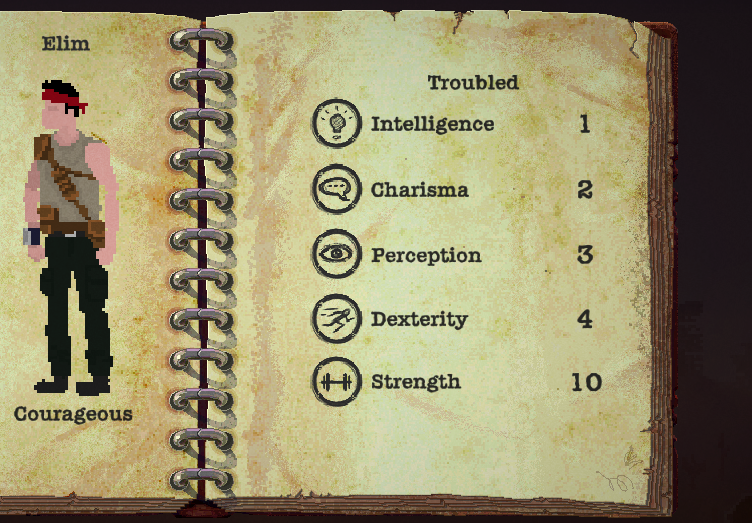
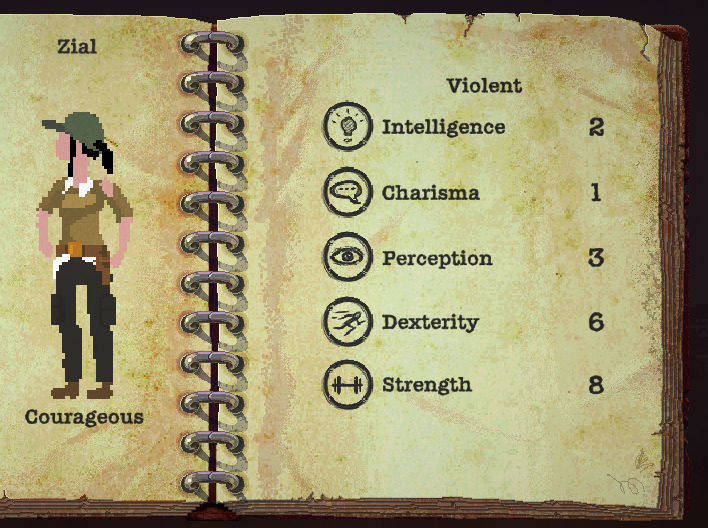
You want both parents to be couragous, as couragous makes 2/3 attacks an automatic hit, and give one Troubled and the other Violent presets, so they won’t get torn to bits by the first random axe murderer they find. Some people would prefer to have both Troubled parents, but I like to balance out the Strength-only Troubled preset with the slightly more all round Violent, which gives one of your parents 6 Dexterity as well. (And leaves them with only two less Str, at 8, which is still pretty dang good.)


You want one child to be Hands-On and the other to be Resourceful. Hands-On means they craft faster, which is just an all around +, and Resourceful will be immensely helpful mid-late game, as you get almost the full amount of supplies back from things you built, like the sleeping bags. One should be a Brain-Box (which will be useful when you need a high intellegence survivor to use the laboratory) and the other should be a Bully, as an escort for your first child. You could really make the second child any other preset you feel like, Bully is just my personal preference, as i’ve had my children turned into mincemeat by crazy people while looting the nearby farms and houses one too many times.
Charisma, while being a great stat, is a dump stat simply by how easy you can grind it up. I’ll elaborate later. Intellegence is also a dump stat, but it’s useful to have one of your children with a high intellegence so you can have him use the laboratory and ammunition press later in the game. Making a toy box and having him play with it will quickly level him up to 10, the minimum required to use the lab or ammo press.
If you don’t feel like following my guide exactly, a good rule of thumb is this. This is the wasteland. The smart do not survive. The clever do not survive. The observant do not survive.
The biggest person with the sharpest axe survives. How do you think we got this shelter in the first place? Nobody would just abandon such a great base. No no, we killed the well-educated smart people who built it. Now it’s ours.
At least in this game, anyways. Here’s hopin’ we’ll be able to use our wits to outfox our opponents one day. Then maybe Perception will actually have a use, and street-smart wont be a useless preset.
By the way, every negative trait can be reversed by doing the following.
Big Eater
Change into Small Eater by receiving the malnourished notification. Fill the Hunger bar past red. (Can take a very long time.)
Cowardice
Change into Courageous by winning a fight. The person with the trait needs to land the killing
blow (I get happy when I see this ‘downside’, as the fix works 100% every time. Once you get a single kill, no matter the health of your opponent, it turns into a great upside. The rest are dodgey at best, and this is the only one i’ve seen work right off the bat, multiple times, every time.)
Light Sleeper
Change to Deep Sleeper by receiving the sleep notification. Fill the Tiredness bar past red and leave it there till it changes.
Lazy
Change to Proactive by exploring
Hands-off
Change into Hands-on by crafting and fixing shelter structures. Don’t get discouraged if it takes a long time to change, cause it can take quite some time.
Pessimistic
Change into Optimistic by returning from an expedition with loot
Wasteful
Change into Resourceful by deconstructing objects (to be fair unless you have too much stuff and just want to build a lot of tiny water butts or pantries or something, just don’t have these guys deconstruct anything and save yourself the resources.)
Unhygienic
Change into Hygienic by receiving Food Poisoning. Easy enough to get, i’m sure you know how.
Pets
Pets can influence your playstyle in a variety of ways. Here I will talk about the different kinds of pets, what they do and how they influence your game.
The Dog
The Dog is a very helpful Pet, aiding you in combat and helping you find more items, which basically means you don’t need to boost your perception. The downside is it eats 1 food every day, although the game can be cheesed into you never having to feed him, as long as you send him on expeditions every day.
The Cat
A pretty useless pet. It relieves a small amount of stress, and catches rats. The dog relieves more stress, and rats can be kept out by simply cleaning your shelter every once and awhile.
The Fish
This pet relieves a lot of stress. It requires food every other day, and needs it’s tank cleaned every so often, which costs 10 water.
Some people say it’s worth it because it gives you the code for the Mysterious Hatch, which gives you 30 bullets and an M16. I find it pointless when you can use the horse to carry a crapton of items back to the base with large rucksacks, or if you want a combat bonus the Dog can be used as a third survivor, as well as finding more loot. Basically, you trade a decent, very late game bonus weapon for just all around boosts to the average amount of loot you can get back on expeditions, or a bonus to both the chance to find loot and making your party practically invinceable.
Why anyone would do that is beyond my comprehension.
The Snake
Just… Don’t use this pet. It’s basically a deadly cat that scares off rats and can bite your survivors.
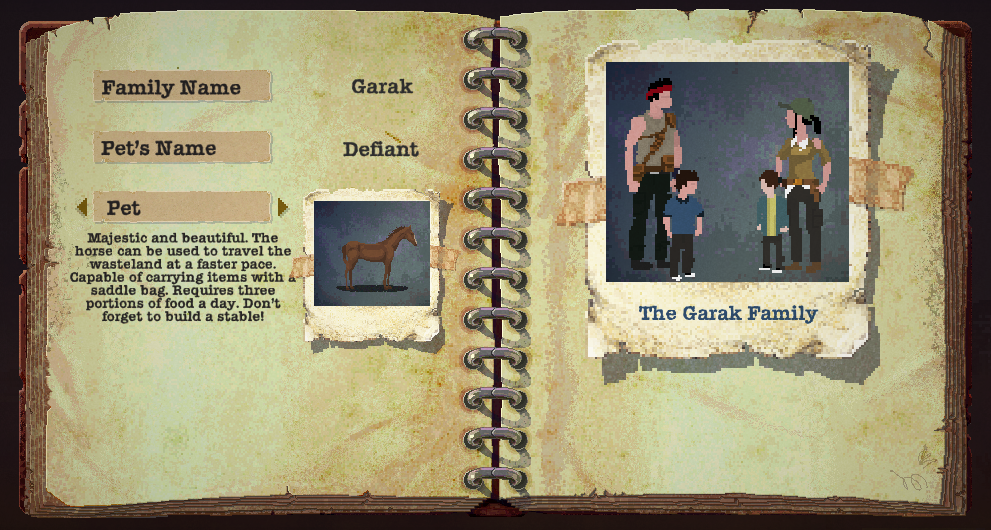
The Horse
My pet of choice. It can be a challenge to use this pet, but the reward vastly outwieghs the challenge.
Combined with 2 rucksacks, your expedition can hold a whopping 48 items, which basically means it gives you the most capacity to hold loot, and can mean you can clear out entire cities of good stuff. It also makes your expedition use less water, as they ride the horse. And everyone knows this horse is a radioactive omnivorous camel-horse cross, so it doesn’t need water or grass.
The downside is it requires a stable (some wood and nails), and 3 food a day. Which isn’t too bad, as long as you send your children out to the houses that spawn near your shelter for food every day or so.
You only need to feed it when it drops to 70 health, as it will heal back up to 100 by the time it is hungry again.
Like the Dog, it can also be cheesed to never need food by sending it out on an expedition every day.
And so, now you’re ready to start!
Getting Started
So plop, you get dropped into a litle bunker to fend for yourself, eh? Well, here’s what you should do on your first day.
Upgrade your workbench to level 2. After you have, make as many water butts as you can and prepare for the first rain. Send your Adult survivors out into the wasteland to loot the buildings that spawn just outside of your shelter. Have them loot everything they can, prioritizing food, fuel, and parts you need to upgrade your workbench again. (Write it down if you have to.) Collect other supplies depending on how much you have already (you can see this by mousing over an item.)
While the adults are gone, set your children to work. Have the hands-on child put a radiation suit on and repair the air and water filter. (also building a stable if you have the horse). Have the other one craft a bucket toilet, a mop, a sleeping bag and a shower. Use the left over supplies and build another room.
Keep the bucket toilet and shower away from your food storage, as keeping them near eachother can cause food poisoning. Put the medical cabinet and food storage above the sleeping bag to save space. Cram your things as tightly into corners as you can, this will be helpful later.
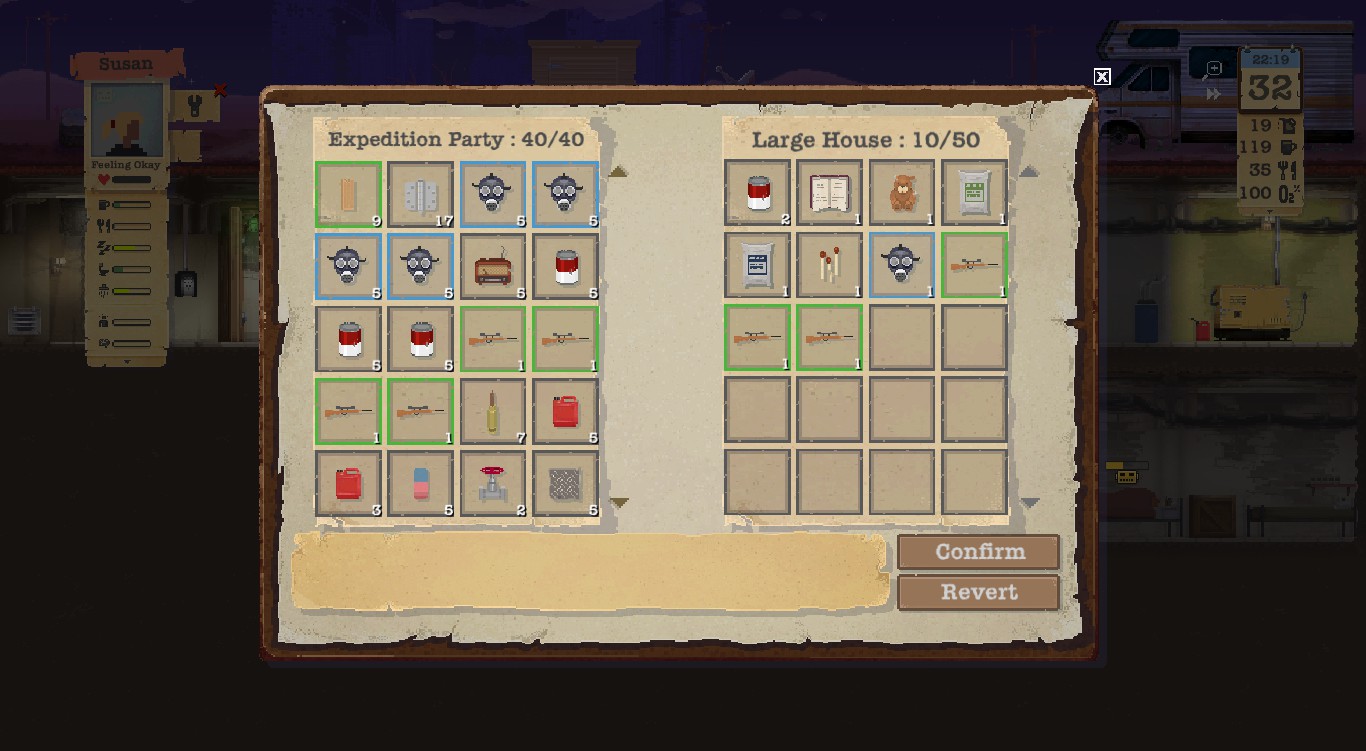
What to Grab
Grabbing things is more complicated than you think.
Always always always save 1-2 slots for food. 3 if you have the horse.
In order of importance, you want to grab
- Food
- Tools (Tools help you craft faster. Don’t grab tools you have, only grab ones you don’t)
- Fuel (5 fuel per run is more than enough to keep you fueled indefinitely)
- Gas Masks
- Materials for upgrading the Workbench
- Car Parts
- Rope
- Rubber
- Nylon
- Leather
- Plastic
- Weapons (Hatchets are best, but if your survivors have under 9 Strength, Knifes work the best)
- Anti-Rads
- Metal
- Wood
- Nails
- Medikits
Everything else, if you have room or don’t find these things. Remember, 1 rope may higher on the list, but it might not be worth 4 Circut boards. Use your own discretion.
If you have an extra space but don’t want anything that’s left, take the most valuable thing in case you run into traders. If you don’t have the tables memorized, i’ll tell you a few here, in order of value.
- Guns (Although guns are the most valuable, they also are worth 350 trade points, far beyond what most pretty much every trader’s stuff will be worth.)
- Car Parts (But if you don’t already have them they’re probably worth more to you on your van than anything else.)
- Books/Teddy Bears (These are worth 25-50 (depending on charisma) and usually come in groups of 1-2. These are also very common, so if you have a spare spot, grab some.)
- Tools (If you already have a tool and you find a duplicate and have space, it can be worth some trade points and can be used to buy something more useful, ie, anti-rads.)
- Medical Supplies (This is strongly discouraged, as they are worth much more to you than they would be to a trader. Lack of medkits can be bad.)
And so, onto…
Weapons
Melee Weapons
As a general rule of thumb, any melee weapon is better than nothing. But i’ll go down the list, from worst to best, just so you can be informed. I half wanted to go from least strength required to most, but that wouldn’t really work as some weapons require insanely low Strength and are really quite good.
- Pipe. A length of metal piping. Has a Strength requirement of 8, and does 8-12 damage. I put this on my Violent parent when the game first starts, but usually after your first big town raid you’ll have something better.
- Wooden Plank. A 2×4. Has a Strength requirement of 10 and does 10-14 damage. Perfect for your 10 strength Troubled parent. Generally the same goes as with the pipe. It also has this wierd ‘-5% Accuracy’ debuff that I have never seen come into play, on any melees.
- Brass Knuckles. Unless i’m mistaken, this is literally just your fists, upgraded. It does 8-12 damage and has a strength requirement of 0. This means little as even a Brain Box child has enough Strength by default to use a Rock (yes, you heard me right, a ROCK) to better effect than this thing. But due to the scaling of weapon damage based upon how much Strength you have over the requirement, it means it’s better than the Pipe and Plank, but not by much.
- Baseball Bat. A dissapointingly bad melee weapon. While it has a strength requirement of only 8, it only does 12-18 damage. That’s less than the Rock, with 4 more strength required to use it. The good thing is you’ll likely find a rock, knife, or even a hatchet before this, as it is an uncommon spawn at scrapyards.
- Crowbar. Now I hear what you’re saying. ‘But Fox, Crowbar does 22-28 damage so it must be good?’ Uh, no. The problem is with a Strength requirement of 11, you’re not gonna be able to use it until your Troubled parent has killed 3 or 4 enemies. And by that time, you’ll most likely have better weapons. I just wish having it equipped gave you more loot, as having a crowbar would be pretty handy. Unfortunately that is not the case.
- Rock. That’s it. It’s just a rock. Don’t be fooled, I gave it to my Brain Box child, and she countered a bear’s attack before taking nearly half it’s health off in one go, with nothing but a rock. Scary stuff right there. Imagine what it could do in the hands of someone with SAS and Navy Seal training, like i’m gonna assume our adult survivors have. It has a Strength requirement of 4 and does 15-20 damage. You can find these at banks.
- Knife. A sharp metal blade affixed to the end of a plastic or wooden grip, generally used for cooking. In our case, it’s a direct upgrade to the Rock, and at only 6 strength to use, it’s quite easy for anyone to use.(7 Strength is what Bully children start out with, so it works great.) The stats say it does 15-20 damage, but I find it quite often does more like 20-25 damage per hit, and seems to have a high bleed chance. You can find these at florists.
- Sledgehammer. I’ve only ever found this once. I believe it did 55-60 damage per hit, but had a -15% accuracy debuff and a 16 Strength requirement. Low on this list because only endgame characters will have 16 strength. Pretty sure it’s an extremely rare spawn at Scrapyards and Factories.
- Rebar. A great melee weapon. With a strength requirement of 14, you will have to wait awhile before you can use this 45-50 damage melee weapon. I’ll explain why it’s not top of the list in a second. You can find these at office buildings.
- The Badass Headsplitter of +1 Cleaving Hatchet. In my humble opinion, the best melee in the game. While it’s damage falls short of the Rebar, at only 30-35, it’s miniscule strength requirement of 9 (that’s less than the Plank) means your strength-focused survivors can use it to brutal efficiency. Thanks to the fact that damage of a weapon increases as your Strength stat goes over the required amount, once you get to about Strength 14 you’ll be killing everything in three hits anyways. Train that up to 16 and it’s a two-hit kill, with Courageous parents that means anything they attack that isn’t wearing plate armor is gonna have to bend over, grab it’s ankles and kiss it’s ass goodbye. To be fair, I might have to put the Rebar in this spot once I actually use it, but I found it unnecessary as the Hatchet is more than enough to kill any threat the wasteland (currently) holds. You can find it at Woodcutting yards.
Take this all with a grain of salt and feel free to experiment, however, as the Strength ‘requirement’ is really more of a guideline. I’ve never personally tried the crowbar on a parent right out the gate, as I would usually hit woodcutting yards as early as possible to get the hatchet. For all I know, it’s decent even on parents with only 10 or even 8 strength. I recently discovered that yeah, the Rebar is badass (against what logic would dictate, but who would think a rock would be superior to a baseball bat either. Devs, your game needs some balancing.) and definitely better than the hatchet, but I still count the hatchet superior as you can use it worry-free with the starting parents. (if you have Troubled or Violent, that is.)
In my opinion, don’t use guns. Until you get your survivors into a cross between the Lone Wanderer and Mad Max, they are too unreliable. People in this universe don’t know how to point a shotgun at someone 5 feet away and not hit the bird in the sky behind them until they’ve punched a punching bag into the next dimension. (Raised their dexterity to a high enough level.)
But you probably want to know anyways. The truth is, I really don’t know the exact stats. They aren’t displayed in the game and, as i’ve made very clear at this point, I don’t use them very often (except to get a badass image for the guide icon.) But i’ll try my best to wing it using my above-average knowledge of firearms in real life. (Not that it’s very hard to shoot a hunting rifle with a scope or a shotgun in real life, but the game seems to be pretty heavy on having high stats for stuff and I remember hearing something about the requirements being high.)
- Pistol. A small handgun, from the way the round and weapon looks, i’d assume it’s a Nine Milimeter Glock. Probably the most reliable of the weapons, i’d have to guess with a dexterity of 8 or more, you will hit your target most of the time. You can shoot continuously as long as you have ammunition in your inventory. Generally it will kill in one or two shots, depending on whether the target is wearing armor. As with all guns, you can use them as a melee weapon. This one has a strength requirement of 6, and does 10-14 damage per hit.
- Shotgun. A shotgun. From the way the shell and weapon looks, i’d assume it’s a Twelve Gauge shotgun shooting either Buckshot or Deer Slugs, it’s never specified. You can only shoot one round at a time with it, if I remember correctly. If you’re lucky, it’ll kill in one hit. Two is probably more likely though. I’d wager it takes 15 Dexterity to use properly. As a melee weapon, it’s pretty bad, with a Strength requirement of 12 and a damage of 15-20 per hit. Really, you should be turning this into a trap, not carrying it around with you, since you don’t know how to point the damn thing.
- Rifle. A long-barreled hunting rifle with a scope. This begs the question why you are using it to fight people standing right in front of you, instead of, say, shooting them from a distance, like scopes are meant for. But whatever. I’d say it’s a .308 caliber hunting rifle, probably Remington. I’ve never actually used these in combat, but i’d say it takes 18 Dexterity to use it properly. You could probably drop an enemy in one well-aimed shot, but I wouldn’t count on hitting anything with a scope on it at such close range. As a melee weapon it is identical to the shotgun.
I’m currently running through a game and i’ll test out the firearms at some point, stand by.
The Subject of Survivors
So you bumped into another fortunate soul? Here’s how to deal with em’.
You Get to Speak
In this case, you have 4 options.
- Trade
- Recruit
- Bully
- Flee
Recruit asks them to join your group. Don’t do this unless you have too, broadcast for survivors instead, they have better stats than ones you meet on expeditions.
Bully fights. I’m not sure why they didn’t just call it that.
Flee, flees,
But what you want to do is trade. For some reason, occasionally fleeing makes the survivor attack you if they catch up, and we don’t want that early game. Instead, trade. They don’t seem to care if you ask them to trade only to change your mind.
Besides being able to maybe get something good, it also grinds up your Charisma, leading to better and better trades. If they don’t have anything you want, trade them something for something. Ie, their 1 fuel for your 1 fuel. This leaves you the same as before, but leveling up your Charisma at the same time.
They Want to Trade
Do as said above.
They Want to Fight
Now, in this case, examine the situation. What you want to look for is
- Do I have a weapon?
- Do they have a weapon?
- Do they have armor?
- How many are there?
- Am I attacking first?
- How much health do my guys have?
If they have a better weapon than you, consider fleeing. But only flee with your Violent parent, as Dexterity determines flee chance. But, if you attack first, and there’s only one, try your luck and attempt to kill them.
If there are more than one, or your guys are low health, try fleeing.
If you are in the better position, and have better weapons, or have more guys, attack them.
This sounds complicated.
It isn’t.
98.7% of the time it’s a 2v1 (assuming you send two man teams, which you should, dummy), 95.3% of the time they are unarmed, and about 97.4% of the time they have some crappy weapon that they are terrible at using. Unless you’re trodding about in faction territory, the best weapon you will see is a knife.
Seriously, the starting parents (assuming violent and troubled, of course) will utterly destroy most survivors in combat. I think it goes down similarly to a fight between a trained American infantryman and a slightly wounded street thug who hasn’t eaten in three days.
Now we shall move on to where you find survivors…
Locations
Let’s talk about the different locations in the game, and what each of them has.
- Houses* (Small, Medium and Large)
- Farms*
- Schools*
- Churches
- Office Buildings
- Police Stations (Small, Medium and Large)
- Pharmacies (Small, Medium and Large)
- Hospitals
- Banks
- Supermarkets
- Scrapyards (Small and Large)
- Botanists
And - Factories
Spawn in the wasteland, grouped together in cities.
- Lumber Yards
- Shacks
- Reservoirs
And - Clearings
Spawn in forests*.
- Caves
- Mountain Passes
And - Abandoned Mines
- Crash Sites
- Convoys
Spawn in mountains.
Houses, farms, churches and schools spawn a various assortment of loot, though farms tend to have Gasoline and Sand/Limestone/Concrete, Churches tend to have Books, and Schools tend to have Rubber, Toys and Books.
Office Buildings spawn various loot, along with rocks and rebar.
Police stations spawn Guns, Ammunition, Grenades, Medkits and Gas Masks.
Pharmacies spawn Medical supplies.
Hospitals spawn Medical Supplies and Gas Masks.
Banks spawn Rebar, Rocks, Shotguns, Pistols and Ammunition.
Supermarkets spawn pretty much everything.
Scrapyards spawn various bits of stuff, mostly industrial, along with car parts and tools.
Botanists spawn a small amount of water, seeds, buckets and oddly enough, large amounts of kitchen knives.
Factories spawn Industrial loot, such as concrete, along with tools and metal.
Lumber yards are a nice place to loot for raw matierials. Besides wood, rope and metal, they also spawn saws and sanders, along with the best weapon in the game: the hatchet.
Shacks spawn weapons, mostly Shotguns, Tires fairly commonly, and other bits of junk.
Reservoirs spawn water, pipes and valves.
Clearings spawn Oak Bark, Beeswax, And other plant based crafting materials using in the Lab.
Caves and Mountain Passes spawn similar stuff to clearings, but different types.
Abandoned Mines spawn rocks, explosive materials, metal ore (a very good source of metal, but only if you have a recycler) and lots of Gas Masks.
Crash Sites and Convoys are new and rare. Only one of either can spawn randomly in mountain ranges. They both spawn high-grade Military loot, but Crash Sites spawn gas masks that work forever, and Convoys spawn Military Rucksacks, that can hold the largest amount of items in the game.
*Shacks Also spawn in mountains, and Farms and Houses can spawn alone, randomly placed throughout the map.
The First Week
The first week will be a busy one. Keep sending your parents out for supplies and keep having your kids build stuff. While we’re on that subject…
What to Build
This depends on what loot you find. This can go two ways. You can either get insanely lucky, or boned immensely. On my first playthrough, I didn’t get Workbench lvl 3 until day 43. Which mean I had to survive a raid with nothing but can traps. On my second playthrough, a trader wandered by on day 2, and gave me all I needed for workbench lvl 3. But i’m getting ahead of myself. What you want before much of anything else is TRAPS.
Traps are insanely important if you want to live through your first month. Use all the stuff you have to make as many traps as possible. As of recent updates, raids don’t come until day 50 (and only have a chance of spawning from then on) so traps are slightly less important, but I still want to stress that you should be prepared.
By the end of the first week, you will want to have…
2 Beds (Recently i’ve discovered beds are more of a luxury than anything else. Do not prioritize them as there is no ‘About to pass out due to lack of sleep’ status effect, and your survivors can be tired with no penalty forever.)
4 Medium water butts
at least 2 storage boxes, 3 recommended
1 Toilet (A real one)
1 Shower (get to 2 ASAP)
And 2 small food storages.
This is the bare minimum. I would prefferably have 5 water butts, 3 storage boxes, 2 showers, and an incinerator.
Upgrades
You probably figured out that you can upgrade your generator, water filter, and oxygen filter. What you upgrade is important though.
Upgrade the filter speed of your Water filter first and formost, then upgrade your generator’s efficiency. These are, quite frankly, the only two you need to worry about. Filter Speed is self-explanitory. Especially as of recent updates, rain lasts for mere seconds, even on the ‘good’ amount of rainfall. You want to get the maximum amount you can in as little time as possible. Efficiency on your genny is also self-explanitory. While fuel is, oddly enough, by no means rare, having a surplus means you can trade the surprisngly valuable stuff for quite a bit. 2 Cans and some water bottles will basically clear out a trader of basic raw materials.
The rest of the upgrades are really for when you have more than enough supplies. Durability is simply a nice thing to have, it influences gameplay in literally no way, other than saving your children some time out on the definitely child-friendly surface of the nuclear desert you now call home. Same goes for tank size on your genny. The filter… er… filter (I forget what it’s called, we’ll just go with ‘cleaner’) Decontaminator is useful, but not a priority. Unless you get several black rainfalls in a row, your contamination levels will never rise above around 20% with the un-upgraded cleaner. As long as you make sure to make your survivors chug a glass as soon as you see the rain start, you’ll be fine, as they can cook, clean, and bathe in the stuff and walk away without a fidget on their Gieger Counter. As soon as the stuff touches their tounge, however, it’s game over.
If you have recruited 2 survivors, you will also need to upgrade your oxygen filter’s pumps, so your guys don’t start suffocating as soon as they are all together.
(Animal) Traps
Snare traps are insanely helpful, not only supplying you with leather, but meat, a substitute for the suspicious vaugely labeled cans of God-knows-what, although requiring a stove to cook.
Get the best snare you can, and place it down (above your shelter). Make a crude stove (better if you can) and a small freezer (or better). If you have a functioning lvl 2 (or higher) snare trap, you will quickly have more leather than you need, and can cross it off your things-I-must-get list.
It also doubles as a friend creator for the horse. My starving omnivorous camel-horse and the radioactive mule deer that for some reason is too lazy to rip the mere twig keeping it tethered to the rope out of the ground often have long conversations.
The Radio (And how you can benefit from it)
The radio is an amazing piece of human engineering. It allows you to communicate remotely with people outside your shelter. There are a veriety of things you can do with it, besides telling your expedition that you don’t need a mannequins head.
Recruitment
You can use it to call other survivors to your shelter. Survivors called this way generally have better stats than ones encountered in the wasteland.
Trading
Trading using the radio is a phenominal way of gaining supplies. If you’ve been following my previously set rules about fuel and meat, you should have a surplus of those supplies to trade away.
Traders encountered this way usually have a huge stockpile of goods to trade. A lucky encounter with one holding 7 rope and 7 hinges can boost you right to workbench lvl 3, besides helping you with other upgrades.
Scanning Frequencies
Now, you probably saw this and went, “What good would that do me?” well, keep reading and you will find out.
Scanning Frequencies can be very helpful. You can get lots of good information from it. Including,
Trade Caravan Locations
Fetch Quest locations (Get me 5 fuel for my super secret project, ect)
Target Quest (This guy has my picture, get it back)
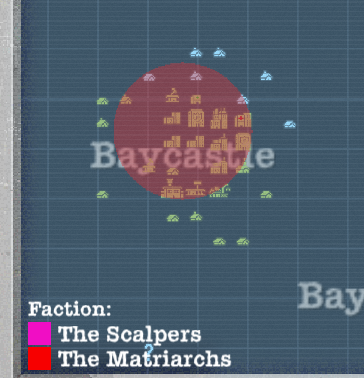
And rarely, the locations of Factions.
Trade Caravans are kind of useless, you can get the same stuff with less effort just by broadcasting for traders.
Fetch quests, while sounding lame and not beneficial, are actually very useful. While it may hurt you in the short-term by losing some stuff, in the end you get much more. Usually in the form of 10 or more of a different kind of supply, Bulletproof Vests of varying qualities, Ammunition, and Grenades, although you can be rewarded with other things away. Generally, it is a good deal, you lose a lot of one item to gain 10 or more of two or more other things, or one expensive item for several mid-range item and stacks of raw materials. Plus you get that warm fuzzy feeling when you give anti-rads to the sick guy.
These can be cheesed with anti-rads by sending somone out to see what they want, bringing them home, giving them anti-rads, and then sending them back with the stuff. Much more efficient than using 2 gas masks.
I have yet to finish a Target Quest. Why? Well, the first one I did (Well this is awkward) I was told “Somone heavily armed is guarding a stashe he stole from me. Go kill him and bring it back so we can split the loot.”, When I got there, the person I met said “wait, did somone tell you to come here ready for troulbe cause blah blah blah?”, when I said yes, it was pretty awkward. However, the dude had good stats, so I invited him to my group. Later, the guy showed back up and said I was no fun, before destroying my oxygen filter by 20%.
The second one I was told to get a photo from somone. Turns out, the guy who had it owned it, it was a photo of his kids, so I just left.
On my most recent playthrough I got the same quest. I decided to actually follow through and finish it, just to complete this guide and tell you if it’s worth it. No. No it isn’t. 10 Hinges (I had 70, I assume this is just 10 of a random supply), 5 Gas Masks (I had 50) and a Satchel (my guys had large rucksacks.)
I knocked a guy out and stole a photo of his kids for basically nothing.
The way the guy acted when I gave the photo to him was wierd as f*** too. Don’t finish the quest for him. In fact, don’t even accept it, just refuse. Now I feel bad. Damn my endless pursuit of information.
If you uncover a faction location, it causes faction members to spawn within a circle. This can be good if you get lucky enough for it to be out of the way
Good.
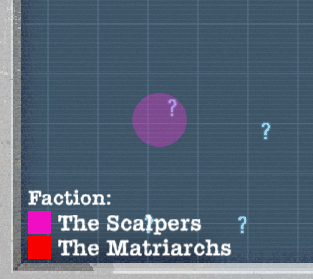
Or awful if it is on top of a big city.
Bad.
The First Raid
EDIT This part is outdated. I will however keep it here for historical purposes, so new people can see how completely stupid raids used to be. Scroll to the bottom if you want up-to-date info, or keep reading for a laugh. Edit Again They tweaked it even more as of April 21st due to the huge outcry of how absolute crap the raids mechanic was. An updated guide can be found below. Yet Another Edit They moved trap workbench requirements around sue to the addition of the sentry, and as such spike traps can be built at workbench 2 and this coupled with the later time raids come makes raid literally no challenge anymore. As such, this section is basically useless, but i’ll leave it here for a laugh and for anyone who wants to be overprepared.
This is probably the hardest part of the entire game.
It usually comes around day 20, or earlier. Most of the time, all you have are paint can traps.
I got lucky, and had them give up before they got in, but this was after 4 retries where they walked right past all the traps and stole A. All my fuel, B. Most of my supplies or C. Killing my children. I lost 3 games this way.
Unfortuantely for us, our badass wasteland survivors with 20 phsycopathic indian cosplayer kills under their belts cower in fear whenever a lady with a picaxe decides to bust down the door, and instead of grabbing the nearest loaded firearm, they decide to trust their lives to hastily armed (with homemade tripwires seconds before the raiders get here) traps.
The only way to deal with this is if ANY get through your traps, press alt+f4. Unfortunately, it saves right before they come on screen, so there’s little prep time. I reccomend putting all surivors on your lowest floor and hope for the best. If you’re super lucky and by some miricle have workbench lvl 3 and spike traps, you’ll probably be fine. But for the rest of us, God be with us.
After you beat this, you have about another month to prepare for the next raid. You will probably get enough spike traps to fend them off, and after awhile, raids wont be an issue.
As of the February 12th update, raids have changed from coming around day 20 to coming around day 50. Which solves the above problems, but makes it a bit too easy, in my opinion. This gives you more than enough time to get spike traps, and perhaps shotgun traps, and by that time raids are not an issue. Just follow the above steps, except instead of paint can traps, use spike traps.
The raids mechanic is insanely broken and unbalanced. Besides not being able to have your survivors do anything and having to rely on traps, it is either insteadeath punishing (1/3 raiders breaking through your traps and stealing ALL your fuel) or rediculously easy (First trap killed only guy). Besides that, traps are also very unbalanced. At first you have paint can traps, which are useless, and then it flies up the sheer cliff of OP-ness, with spike traps that almost always kill, and then bolstered by shotgun traps. There really is no intermediate. End of OOD information.
As of the April 21st update, the raids mechanic has been completely overhauled.
Traps now do damage instead of instakilling raiders.
Shelter survivors can be controlled during raids. Survivors with the Cowardice trait still cannot be controlled.
Raiders can no longer FALCOOOOOOOOON PAUNCH your survivors into oblivion. Survivors are now assinged weapons based on their strength level and the weapon’s damage. Once a raider gets within a certain distance combat is initiated with the survivor.
Sadly, your survivors are too stupid to put up a barricade in front of the door, sit behind it and unload a volley of shotgun slugs at the first raider to come through the door. Although that would kind of break the mechanic, it would make sense..
By the way, shotgun traps place just on the edge of the ladder still shoots raiders who climb down the ladder. Don’t forget to “Harvest” the killed raiders. The “Desperate meat” can be sold for a hefty profit to the next trader. Eventually, your base will look like this.
I call it, “The Meat Grinder”.
Surviving On
After the first raid, and reading this guide, you should have the experience you need to progress on your own. Some things you should focus on however,
Build:
Bunk Beds
Large Storage Cubes
Large water butts (If you are super lucky, auto water butts)
Laboratory
Ammo Bench
Planter (DON’T FORGET TO WATER THE PLANTS)
Large Freezers (3 is a good number)
The Great Stove
Efficient showers and toilets
Efficient snare traps, and
LOTS OF SHOTGUN TRAPS WITH SPIKE TRAPS ABOVE THEM
“Punch Bag”s
Also, focus upgrading
Water filter speed
Generator efficiency
Your survivors strengths (With punching bags or fighting wolves and bears in forests)
Your shetler doors
Tips
Before you go, here’s some tips.
Fight bears and wolves in forests for quick fighting level ups and free meat
You can do two trips for no gas masks if you take anti-rads right after you come back from a trip and right before you go on another. This is also useful to maximize the measly two slots you get for equipment, cause for some reason you can’t put a lockpick in your pocket, wear a bulletproof vest and a gas mask at the same time…
Always take blueprints (No matter freakin’ what, m8. If you get an auto water butt schematic it’s instant GG.)
Use small pantries and place them over low objects (medium crates, medium freezers, and all beds besides the bunk bed work perfectly for this) to maximize space in your shelter.
Turn Fog of War off in every game. I know the game is really easy when you know exactly where every building is, but FoW is bugged as all our phones would be if Hillary won the election. There’s a reason the devs removed it for awhile. Not sure why they didn’t fix it when they re-added it, but whatever.
Get a Recycling Center as fast as you can. To be honest you should skip the makeshift one and go right for the Center. It’s expensive but being able to scrap things means you’ll make your resources back pretty quickly.
The Planter can be handy and is definitely worth it, but there is no indicator of when you should water them (unless you mouse over) and they grow (and die, if not watered) extremely quickly. The returns you can get are immense (4 cans of food and possibly seeds every 2-3 days for about 6 water) if you actually remember, which I can’t seem to. A pop-up (like the ‘needs repaired’ icon) would be nice, but sadly there isn’t one.
Lockpicks are INSANELY useful. Get one and throw it on your expedition ASAFP. I’m not joking, not in the least.
This is the result of putting a lockpick in my expedition and looting a whole city. Small Houses become Handgun mines and Medium houses become Rifle mines. Not to mention Food and Gas Masks become laughably common. And this is on the ‘Thin’ resources setting.
Did I miss anything? Have something you want to add? Say so in the comments! Please!
I wonder if anyone got the reference my family was…