Overview
Just bought the game and want to learn how to build ships quickly? Then look no further, this guide will show you the basics of the build mode.
Getting Started
The first thing you want to do is go into the vehicle designer:
Then you want to press ‘Esc’ and click destroy all vehicles.
Next press ‘B’, which will create a new vehicle.

A Few Things To Note
(This guide assumes keyboard based building mode)
First off, hit Caps Lock. It will hold your vehicle in mid air to allow easy building.
You will then see a green(or red, we’ll get to that later) cube with a long arrow down the middle, and a smaller one on top. This is your selection square.
The long arrow is the direction of your vehicle, build the front facing that way.
The shorter and taller arrow on top of the square indicates what direction the block you place will place.
If the square is green, that means if you click you will place a block.
If it is red, you will destroy the block.
If it is blue, that means the spot the square in is open, but you cannot place the block there. For example, you can’t place a block on thin air(Blue), and you can’t place a beam in a 2 block space(Blue).
You will also see some lines intersecting the wood block, this is the center of mass indicator:
Right now it is covered by the wood block, but if it was out in the open it would look like this:
The color of it depends on the color of the selection square.


Manipulating The Selection Square
On the left hand side of your screen, you should see a list of keys and their function:
The exact functions will be explained below:

E= Inventory(Not much more to this)
TAB= Used to manipulate block rotation, this will be explained much more in depth later down)
G= Switches the orientation of the block(Will be explained more later down)
N=Creates a mirror that mimics your actions on the other side of the mirror. You want to move your selection square so it is in the exact middle of your craft, and then look towards the front of your craft and press ‘N’. You should see a particle effect down the direct middle of your craft. Important: The mirror auto turns off when you exit build mode. Many a player has built a hull to discover mirror mode was off.
F= Activates the fill function. The fill function will fill an enclosed space with the currently selected block, on the plane the camera is facing:
Pressing ‘F’ wil fill the 3×3 empty space with whatever block is selected, on the horizonal plane.
This also works with beams, but you will need to use the ‘G’ and ‘TAB’ functions explained later on.

SHIFT= Holding shift while your cursor is red(Meaning you have your selection square inside a block) and clicking will replace the block with whatever block you have selected, provided it can place.
R= Pressing ‘R’ when your selection square is red will select the current block and its rotation, useful with slopes.
ALT, SPACE, W, A, S, D= Movement keys. Important: By default ‘ALT’ and ‘SPACE’ are relative to the camera, so looking down and pressing ‘SPACE’ will move the camera forwards. It may make a huge difference if you press ‘ESC’, go to the tab called ‘Build mode’, and look under ‘Key controls for key based building’. By default ‘Keys relative to camera’ is selected. It may greatly help you to select ‘Keys relative to camera, up(space) & down(left alt) relative to vehicle’. This will make ‘SPACE’ always move vehicle up, and ‘ALT’ always move vehicle down.
P= Pressing P will shrink all blocks down, allowing you to see important things like the center of mass, or find a block hidden in the middle of a craft easily. Basically it helps to see the craft’s internals without modifing it.
MIDDLE MOUSE= If you selection square is green, clicking your middile mouse button will place a block anywhere the selection square goes, until you toggle it off by clicking middle mouse again. If your selection square is red, it will remove any blocks the selection square touches until toggled off. Important: Laptops do not generally have a middle mouse button.
CAPS LOCK= This will hold your vehicle in midair, and stop all movement of the craft. It will remain enabled until you press ‘CAPS LOCK’ again or exit build mode.
F3=Toggle between mouse based and keyboard based building modes. This entire guide assumes you are using keyboard based building.
= This will show all the forces on a vehicle.
‘TAB’ + ‘G’
Pressing ‘G’ will switch the orientation of the selection square. For example, if you place a slope with the camera facing downwards, the slope will be oriented downwards. However, if you look forwards(Or any direction), and press ‘G’, it will switch the orientation of the selection square to the direction you are looking. To change the orientation of the selection square again, either press ‘G’ again, or hold ‘TAB’ and use ‘WASDQE’ to orient the selection square the way you want. Important: This is dependent on the camera direction. For example, if you lock the selection square facing vehicle forwards, like this:
And then turn the camera to the side of it, like this:
And then hold ‘TAB’, and press ‘S’, the block will rotate towards you one face, like this:
The slope will now place in the orientation shown, sideways.
This works for all blocks, and you could even have hit ‘S’ again in the above example to turn the block upside down.


V=Pressing ‘V’ Opens up a screen that shows useful information about the vehicle, as well as repair options, and the ability to make jets work with a naval AI, and when a vehicle controller is in water mode.
The Inventory
Press ‘E’ while in build mode.
On the left you will see a list of tabs:

Some blocks(Blue):
These are base blocks, clicking on them will select them and close the ‘E’ menu.

Some catagories(Green):
These are catagories which contain multiple blocks, like slopes, beams, and other things.
Selecting the green squares inside these catagories will select the current block and exit the ‘E’ menu. To go back to the full list of blocks, click the ‘Back to full Select’ button on the bottom of your screen.

The currently selected block(Yellow):
This is block currently selected.

Some difficulty locked blocks:
These blocks are locked by the difficulty bar discussed below.

Under certain tabs you will find story mission locked blocks:
These blocks can be unlocked either by completing the story missions found on the main menu(Recommended), or creating a new planet and manually removing the unlocks.

And a difficulty bar with buttons:

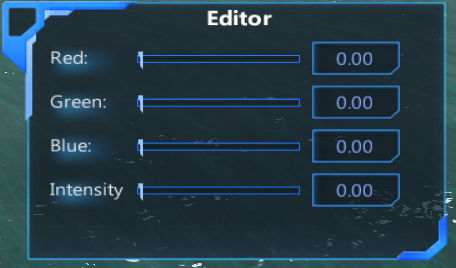
Color Picker and Color Replace Mode:

The color you select will be applied to all new blocks you place.
You can also select ‘Color Replace Mode’, which will let you click on previously placed blocks to apply the selected paint. To return to placing blocks, simply select a block from one of the tabs, or click the ‘Variant Select’ button to return to the list of blocks and such. To return to painting in transparent, select the ‘0’ paint under ‘Color Picker’.
When you hover over a block, you will also see a numbered list:
Clicking one of these numbers will assign that block to the toolbar. To use the toolbar, when in build mode but not in the inventory, press the number that corresponds to the number you assigned to the block. It will also show you what blocks you have assigned to what numbers:


Beams
These are 4 block versions for Wood, Metal, and Light Alloy. They are less laggy than reguar blocks, so use them whever possible.
And with that you’re on your way to being able to build at speeds like this:
Let me know if I missed anything.