Overview
I´m writting this guide to try to help people (specially newcomers) who are having troubles in the game, some tips that worked for me and to try to help as many people as i can to finish this marvelous game. Be aware though that this guide is more oriented towards my experiences in the game so there might be a little bit of subjective information regarding certain aspects of the game, also there might be other ways to play the game so my word is not flawless.If you have any suggestion or doubt about anything feel free to write me.
The beginning
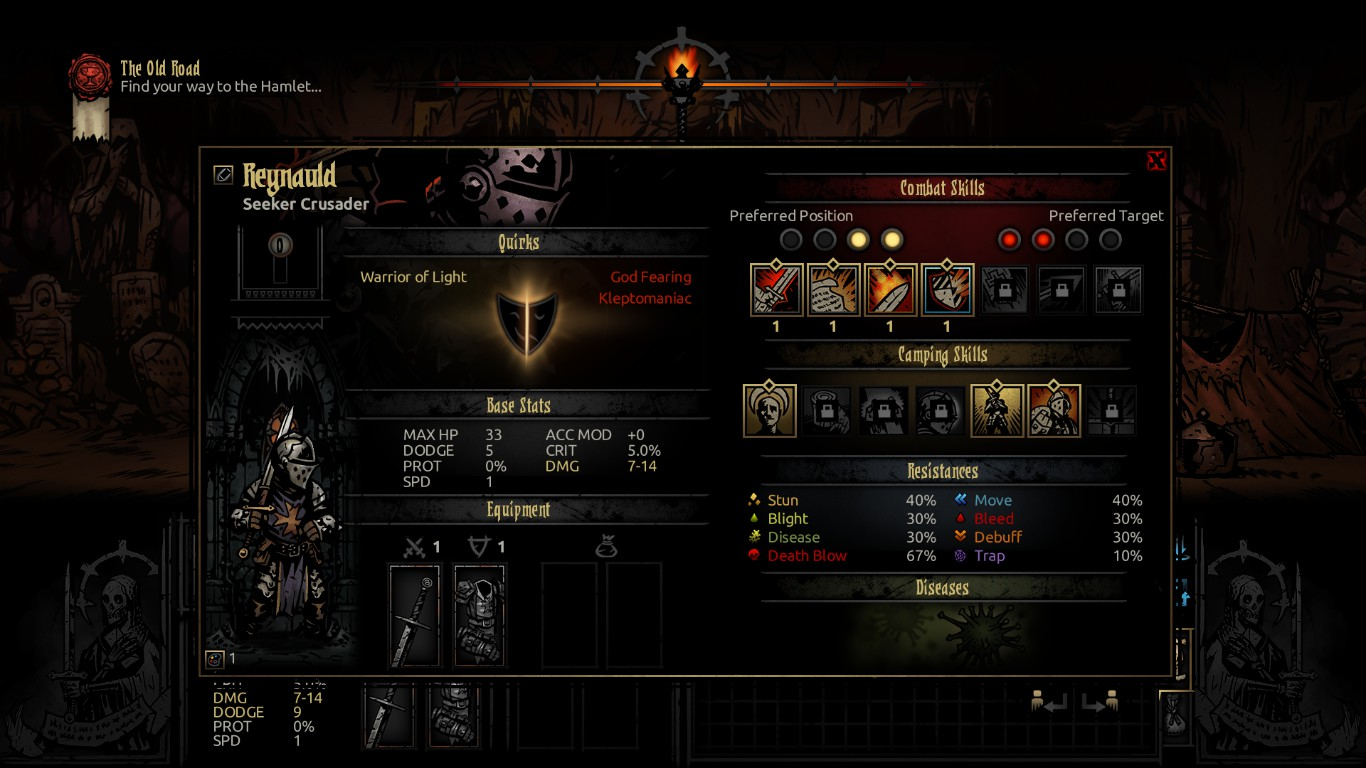
After the cinematic, you will begin your journey with two brave warriors, Dismas and Reynauld. Both are predetermined, so they always begin with the same skills, name and perks. This is important because reynauld will always have kleptomaniac, which he will sometimes take treasures for himself, which can be bad for the early game since you need the resources, and dismas will have known cheat, making him unable to gamble to stress heal.
After you finish the tutorial level you will arrive to the hamlet, which is the estate you will have to help grow in order to help you through all your journey. At first you will only have access to certain buildings of your new home, but they will be unlock in time, giving you chances to interact with them and enabling new possibilities to your party members.

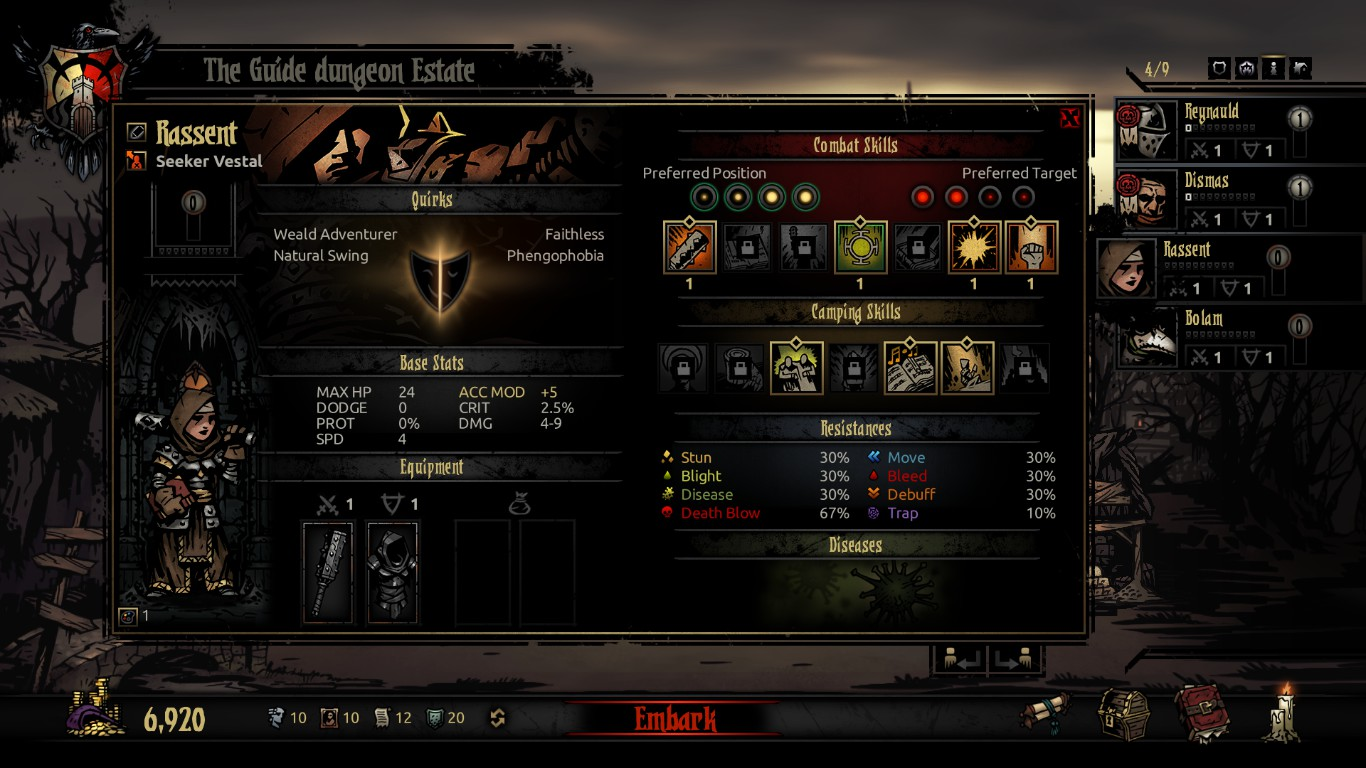
Before embark in your first mission, you need to recruit two more members to your party, which the game will always give you a vestal and a plague doctor. These two will not be predetermined, so they will have different skills and perks every time you start a new game, making things easier or difficult according to their skills (don´t worry though, you can still use them effectively).
When you are ready to embark you will only be able to select one mission in the ruins, but over time the other maps will become avalilable for you to enter, but for the start rely only in the ruins.
Now you will be entering to the first real level of the game, the odds will be against you most of the times, the way will be merciless at the beggining, but trust me, if you manage to arise from the first weeks of the game, your heroes will prevail and your crusade will be one step closer to success.
Mission Supplies
Now, after choosing your four party members and choose the only mission available for you, you will find a window where you will need to buy supplies for your mission, and you might be wondering… what do i buy and how many? I will explain briefly what is important to buy for your adventures.
Food: It is important to ALWAYS have foot at hand. In the game there are some “event checks” where your soldiers will ask for food, and you will lose 4 portions of food if you have. The drawback for not having food is a massive penalty on health and stress (your heroes will lose health and will gain stress). In the case of food don´t be greedy and always buy a lot of foot (12 unit for short missions, 24 units for medium missions and 36 units for long missions). Also food is used for camping, so it is important to have a good supply. Now a lot of people will say that it is a lot of food, but in my case i prefer to lose some money rather than let my soldiers pass hunger.
Shovel: Shovels are important because there are obstacles in the dungeons that will block your way (DUH!). You actually don´t need a shovel to free the way, but doing so without one will stress your heroes a little. For the ammount i´d suggest 3 or 4 shovels (this is according to some dungeons since some curios require a shovel to be used correctly [graves]).
Antivenom: The antivenom cures blight, and can be used in some curios. I suggest to bring 3 or 4 in case you don´t bring a plague doctor or if some of your heroes has little resistance towards blight.
Bandage: The bandage cures bleed, and can be used in some curios. I´d suggest to bring 4 to 5 in case you don´t bring a plague doctor or if some of your heroes has little resistances towards bleeds. The ammount is a little bit increased since bleed is more common than blight.
Medical Herbs: The medical herbs function as a debuff “heal”. If one of your heroes suffer a debuff for either a skill they used or a debufff from an enemy you can use a medical herb to “heal it”. It can also work on curios, most of them will give you food and other supplies. You can bring up to 1 or 2 if you don´t use heroes that debuff themselves regularly.
Skeleton Key: The skeleton key works on most coffers. It can also work in the secret rooms that you can find in the map, and those coffers gives you a nice loot!. For the amount your can always bring up to 3 or 4, according of the lenght of the dungeon (the larger it is, the more coffers you might find) and always save one for the secret room!.
Holy water: The holy water buff your character´s resistances, so it is extremely good on bosses, it can also be used on some curios (and some of then can remove negative perks for free). The amount you want to bring on boss figths are 4 to 5; in normal dungeons they lose a little bit of their use.
Laudanum: The laudanum is an item that removes the “fear status” (it will give you some stress per turn). While is not extremely necessary or good, it might be worth to have at least 1 or 2 on your inventory, in case you face a monster that inflicts fear.
Torch: The torch is an object that will help you to raise your light bar by 25 points. This is either the item you want the most or you can just neglect it, if you want to go to the dungeons without light for the loot. In this guide we encourage you to use torches to make your life less hellish in the game. So for the amount bring up to 10 – 12 torches on short dungeons, 18 to 20 on medium dungeons and 26 to 28 on long dungeons. This is because you want to have the light level at high levels to even the odds, if you feel like embracing darkness, then please bring less torches…
The blood (DLC required): The blood is an item that you need to calm the crimson court. While i am not going to explain everything if you are playing the dlc always bring double rations for each hero (each hero might require up to 2 units of the blood). Also it can be worth to bring more since some mobs from the crimson court might appear on normal dungeons with the risk of infecting you healthy heroes.
Aegis Scale (DLC required): The aegis scale is an item that requires you to have the shieldbreaker dlc. Each time you camp with a shiedbreaker you will unlock an unavoidable event where the shieldbreaker will enter a “nightmare”, in this nightmare the shieldbreaker will have the horror status, stressing herself by a large amount, so you need to beat the mobs of that nightmare super fast or otherwise your shieldbreaker will be afflicted. The item gives you an scale that blocks incoming mob attacks, it is perfect for when one of your heroes is on death´s door and your occultist only wants to heal 0.
Firewood: The firewood is an item that it is given to you immediately whenever you want to embark on a medium or long dungeon. You cannot sell it, and the way to use it is you go to a room without enemies (or defeat the enemies inside), and you click on it as a normal item, then you will be camping. Camping is essential since you can recover from a bad fight or buff your heroes before entering a boss area.
As a final comment on this section some heroes might bring one supply, it is not random but i will not spoil it, so have fun discovering which hero bring what supply.
Mechanics
If you are new to this game then perhaps you are a little overwhelmed by some of the mechanics that the game barely addresses (or do it poorly). In this section I want to write some of the most important mechanics that you want to get familiar with almost instantly to ensure you don´t struggle as much as you might.
Stress
One of the new “mechanics” this game introduces is the stress bar. In this adventure your heroes aren´t godlike humans that can face anything and hardly raise an eyebrow in amusement. In here your heroes are your average Joe; they will suffer stress from many things (I know what a bunch of sissies):
- When the enemy performs certain actions (like dealing a crit),
- Using attacks that deal stress to your heroes.
- Certain curios that you might find and interact with (like books)
- If your hero is afflicted, then this hero will stress the party non-stop.
Once your hero has reached 100 stress then he / she will have a “resolve test”. A resolve test will determine if a hero can overcome the odds and become “virtuous” or if he / she will succumb to his / her fears and become “afflicted”. Both of these status can be reverted; your hero will stop being afflicted if you manage to get him down to 0 stress (good luck with that) or if you take him / her to the abbey or the tavern; and he / she will stop being virtuous once he / she reaches 200 stress. The resolve test is merely luck, you only have some control over it with certain trinkets and perks, but otherwise is just luck and RNG.
Afflicted: There is a 75% chance of your hero becoming afflicted once he reaches 100 stress. When your hero becomes afflicted he will gain several debuffs and he / she will do some random things that will trigger each turn (it doesn´t matter if it’s the hero´s turn or not). While there are several types of affliction your hero will be prone to commit certain actions regardless of them:
- It will harass randomly one of your heroes for any action, dealing stress to that hero.
- It will say something random at his / her turn, dealing stress to your entire party.
- It can move itself randomly, being extremely harmless or ♥♥♥♥♥♥♥ you over.
- It can refuse to be healed, buffed or moved by another hero (yes, this is annoying as hell).
- It can attack another hero (and it can also kill it if they are on death´s door).
- It can use any skill randomly without your consent (and believe me, most of the time they will use the worst skill possible).
- If you are camping, he / she can refuse to eat, use a skill or “accept” a team skill.
- It can stop you from retreating a battle, dooming your heroes if you are on a bad spot.
Virtuous: There is a 25% chance of your hero becoming virtuous. When your hero becomes virtuous he will gain a special buff that can trigger each turn. There are different types of virtuous that can randomly trigger each one with different buffs.
Scouting
Scouting is a “passive” skill that can trigger each time you enter to a new room or certain curious can also activate “scout”. The importance of scouting is that it reveals the path in front of you; if you see the black dots then scouting reveals what they “hold” (a curio, a trap, a battle, nothing). It can reveal up to one to two rooms (with the black dots that takes reaching said rooms).
This is important since what kills you in darkest dungeon is unpreparedness and unawareness, so knowing what is in front of you will help you keeping yourself alive, prepare for incoming battles and having the chance to dismantle traps. Bear in mind though that you have a fixed scouting chance percentage, and it can only increases if you use trinkets, camping skills or quirks (these ones are the most useless of the bunch since they only improve the chances of ONE type of dungeon).
- Trap: A trap is a type of curio (except not really) that, if triggered, will deal damage and can give the affected hero a debuff. To dismantle traps first you need to spot it; and to spot it you NEED to scout or otherwise you won’t be able to see it. Then you need to select one of your heroes to dismantle it. To do this you can check the stats of your heroes to see who has the best “trap” percentage; this means that some heroes have higher chances to dismantle a trap than others. Bear in mind though that you can trigger the trap while dismantling it, so again is merely luck.
- Curio: A curio is a type of interactive item that can trigger an “event”. This event can be a heal, heal stress, loot, a new perk (either positive or negative), scouting, buff, debuff stress, damage, diseases, a secret boss fight or nothing. Some curios can be interacted with an item that can change the outcome of the event: some items grant a positive outcome while others a negative one (don´t try to use a torch on books kids). The key of this is to know which item triggers what event, and the fun of it is to find it yourselves! So, have fun while doing that (but seriously though, don´t use torches on books or altars). Also you lose the item used on the curio regardless if it did trigger the curio.
Camping
When the mission grows longer and your heroes weaker by the minute, you have the option to grant them a respite and let them rest. Bear in mind though that you can only camp on medium and long dungeons, giving you 1 – 2 firewood respectively. It is recommended to camp whenever you are having troubles managing the heroes´ HP /stress bar or when you are about to engage on a boss fight.
When you want to camp you need to use the “firewood” supply. To camp “safely” you need to have some food with you, otherwise if you lack food you will suffer a penalty (your heroes´ HP will diminish and will gain stress). You can also administrate the amount of food you want to give them to feast; with more food more benefits, so if you have a bunch of food to spare or lack it you have to take a decision there. You are granted 12 “respite” points that you can use however you want on the multiple camping skills the heroes have.
The real importance of camping though is that you can access the “camping skills” each hero has.
Each hero has 3 common skills that each one shares and 4 unique ones. Each skill consumes an amount of respite points, making some skills very invaluable regardless of points consumed to completely useless even when they are “cheap”. When you use a buff, this one will last for 4 battles. You need to read carefully because some buffs affect the entire party and some affect only the hero who used it.
A little warning though, when you camp there is a chance that your heroes will be ambushed by the mobs, increasing those odds as the difficulty arises. When your heroes are ambushed then they will be “surprised”, moving themselves to random ranks and your torch level will be at 0. You can prevent this though with certain heroes that have a skill that prevents night ambushes, so you can rest secure.
Secret rooms:
Sometimes when you are exploring a dungeon and scout it, you will find a square with a “star” icon in it. This means that square has a hidden room on it and now you are granted access to it. To enter first you need to go to that square and be there, then push the “up” button (or “w” on the keyboard). Then you will enter a special room with a treasure box in there. USE a key in there because if you do, you are granted at least one of the special heads in the game that the collector gives as a reward to beat him, or if you have them you will receive an special treasure that gives you a lot of gold. If you open the chest without a key you will only receive one item, so always keep a key on hand.
These rooms (as far as i know) only appear on medium and large dungeons, so don´t bother on short missions because they don´t spawn there.
The Hamlet
You made it through your first dungeon, buildings are beginning to unlock to your disposal, your army of warriors are starting to grow, and the most important question remains. Which building should i focus on?.
The hamlet has a stagecoach, a tavern, a sanitarium, an abbey, a guild, a blacksmith, a nomad wagon and a survivalist. From these 8 you need to choose wisely, since resources are scarce and the more you upgrade, the more expensive it becomes.
The requirement increases each time you upgrade a building, and might take you a little while to upgrade every building to its maximun. But there are certain game modes (stygian or bloodmoon) where time is against you, and you are given a “time limit” to finish the game. Then you would perhaps be wondering which building to upgrade first. Well, it all comes from your own personal taste, but prioritizing one building might prove more benefitial rather than trying to upgrade each building at the same time. This is a brief list of which building should be your priority:
- Blacksmith / Guild:These are perhaps the two buildings you need to upgrade ASAP. The blacksmith lets you upgrade your character´s equipment (armor and weapon), giving you a slight edgy over the enemy in the form of better stats, and while it doesn´t sound much it can make a difference. The guild lets you either unlock a new ability (each new hero at resolve level 0 start with only 4 unlocked skills, with the exception of the abomination) or upgradind the skills you want / have. This is important since the new stats will make a difference at the battlefield, and you might notice that you can kill enemies more clean and with less trouble.
- Stage coach:The stagecoach should be your second priority since it allows you to have new recruits, more people on your barracks and a slight chance to get a better recruit. You should focus on increasing the number of heroes that you can have in the hamlet, so that way you can rest your weakened heroes and give them more time to recover.
Also remember, in this game there is no essential hero, everyone and anyone can die and, therefore, can be disposed of if they no longer serves a purpose. Don´t feel bad if you want to dispose of a hero if they are severely stressed or just have tons of bad quirks, you can “fire them” without any penalty. The game even encourages you because the higher the level, the more expensive is to treat those heroes. An useless hero is an ocuppied slot on your stage coach.
- Sanitarium: The sanitarium allows you to treat your heroes´ diseases or remove quirks (or lock positive quirks). This should be yout third priority since some diseases can make a hero useless, or there are certain quirks that will make your life a living hell. Also the price of this building increases according to your hero´s resolve, so the early you let them get treated the less money it will cost.
- Nomad wagon: While i personally don´t care much about rushing the nomad wagon, it can prove beneficial since it can let you have stronger trinkets more early than you should, and at a lower price too. Only upgrade this building when you have a lot fo chests.
- Survivalist: This building lets you buy camping skills for your heroes. Camping skills is a mechanic that can be used when you camp at a dungeon (you need firewood to do this), each skill have a “cost” when used, so is important to manage your camping points since they are limited. What is important about this building is that there are certain skills that you really want / need, and unfortunately your hero might not have learned so you need to buy it, but early on they cost a fortune.
- Abbey / Tabern: These buildings help you when your hero is at high stress or afflicted. It will let a hero use the activity of the building to lose stress. What is important about these buildings is that you should only focus on one activity that they offer since if you bring a jester / houndmaster you shouldn´t have much troubles with stress.
- If you have the crimson court dlc it can be worth spending some resources into the “bank”, the bank will give you 5% of your total gold each week, making it a stable income. After a while you shouldn´t have any problem with money, making it easier to buy whatever you need and to buy the latest upgrades foy your heroes, or if the 5% is already paying the quest then you can focus on bringing heirlooms.
After a while you will see how much your hamlet has grown and believe me, it is worth the time, tears and pain.
Dungeon selection
A little disclaimer here: “difficulty” in this particular section is not related to the game, in the game this is alludes as “apprentice”, “veteran” and “champion”, so what i actually mean is the difficulty of each dungeon for the mobs it has. The “difficulty” i gave to the dungeons is merely subjective. The mobs, the stress, the health, prot, the new gimmicks and the damage is what i took into consideration to put a “rank” on each dungeon.
With that little disclaimer, i want to address that not every dungeon is the same (duh), they can be relatively easier or harder for the mobs the dungeon has. Saying that the difficulty of the dungeons are:
- Ruins: The ruins are the easiest dungeon to do in any difficult, so if you aren´t confident enough to do any other dungeon always do a ruin one. In here most of the enemies are spooky ones (skeletons), so bleeding damage will do you no good since you cannot bleed them; blight on the other hand is effective against them. In here the mobs do more bleed damage than blight, so always bring some bandages with you.
- Weald: The weald is the second difficult map area. In here you can expect mostly human mobs and sometime beast mobs. In here you can expect both bleed and blight damage, so always bring some potions and bandages; also the mobs are weak towards bleeds, so any hero who can cause bleed is good to go.
- Warrens: The warrens is the third difficult map area. In here you can expect mostly beast / human mobs (they are pigs, but somehow some are also human). In here expect both blight and bleed damage, also in here the nasty pieces of ♥♥♥♥ spit on you, causing you to go sick, so don´t be surprised that by the end of the quest you found out that one of your heroes catch a disesase, also bring potions. In this map the pigs are weak towards bleeding, so be a good butcher and cut some throats, they deserve them.
- Cove: The cove is the fourtg difficult map area. In here you can expect eldritch mobs (♥♥♥♥♥♥♥ fishes). In here expect bleed damage, so carry some bandages. In this dungeon expect high damage because somehow the fishes can hit hard af, so don´t venture here unless you want to get bend by some nemo ♥♥♥♥.
- Darkest dungeon: This is the fifth and hardest difficult map area (in vanilla game). In here expect eldritch mobs and a lot of high damage. I will not spoil more but have in mind that these dungeons are the hardest because you cannot escape them unscratched. You have to leave one random hero behind so the other 3 members can make a run for it. These are the final dungeons so just take your most tough heroes and the best compositions you have. Failure is not an option.
- Crimson court dungeon: This is the sixth and largest difficult map area. In here the dungeons are obscenely massive, hell even the game tells you that you can´t complete these dungeons in one run (and you shouldn´t), but they have new trinkets. In here expect a lot (and i mean A LOT) of bleeding and stress, so be aware of that.
The difficult i gave to each dungeon varies according to the real “level” of the dungeon (apprentice, veteran and champion). In the apprentice and veteran the order doensn´t change, but in champion there is a variation:
- Ruins: The ruis is and always will be the easiest dungeon, so not much going on here, the new mobs become truly terrifying though.
- Cove: The cove becomes easier the more you advance through levels since the new mobs don´t do more damage, they do become tankier though (♥♥♥♥♥♥♥ mr crabs, i hope you are feeling it now).
- Warrens: The warrens become a little bit harder since the new mob it has deals a lot of damage to your back line, so be aware of him, but overall is still doable.
- Weald: The weald becomes increasingly harder the more you progress, the new mob in here is a real piece of ♥♥♥♥ who will punish you if you can´t deal with her fast enough, the previous mobs becomes harder to kill since they have a lot of prot and god bless you if you run into certain compositions.
Mission selection
The game presents you a set of different missions, which are:
- Explore 90% of the rooms: This is the one you want to do whenever you are starting a new dungeon difficulty (apprentice, veteran and champion). This is because in this one you can evade any room fight with the mobs, and you can actually test trinkets and compositions without having to worry about not complteting the mission. The downside is that these dungeons are a litte bit larger than the complete 100% of room battles (not having in consideration the size of the dungeon itself), having more squares to explore, thus giving you more chances to run into hunger checks and obstacles.
- Complete 100% of room battles: These missions you want to do them when you want to skip to the next week but there isn´t any good mission to do. Otherwise don´t bother on doing them.
- Gather X thing: Don´t do these, they are mostly ♥♥♥♥♥♥ missions, with the only exception of the wealth, you have to gather medicines and if you complete the mission you gain a town event where they give you free sanitarium activities, making removing and blocking quirks free. The other ones do give you a town event but aren´t as good as the wealth one.
- Activate X thing: You want to make these quests for the bonuses. After fulfilling these ones they give you a town event where they give you extra resolve (XP) and extra damage in the particular dungeon you make the quest, making boss fights easier to do.
- Kill X boss: These aren´t obligatory in order to finish the game, but if regardless of that you still want to complete them you better prepare yourself because some bosses can kill your party if you go unprepared.
So, after that explanation, which missions are the best to do?
Apprentice dungeons
- You want to focus on exploring 90% of the rooms. This is because you don´t have to fight in every mob battle since there are some that do not give any kind of reward (the red ones in the map, the drop is give for the fight, not a curio), and because this way you save your heroes from stress, lowering the odds from them becoming afflicted, and in the early game you don´t want to waste money in buildings that relieve stress.
- After 5 – 10 weeks you will have enough upgrades, heroes and gold to actually do the complete every room battle. These are a little bit difficult as you have to be more careful about both stress and health since you cannot complete the mission by just exploring the dungeon.
- By the time you can afford to level up your heroes´ gear and skills you can take on the bosses of each dungeon. I will write each boss but for the time, just do the necromancer, he is the easiest boss in the whole game. Another aspect you have to be aware of is the trinket that the mission gives you for fulfilling it. This is because boss battles can give you a very useful trinket early on, giving you a solid advantage and an incentive to go and beat a boss.

Veteran dungeons
- After a while you will have heroes with a resolve 3, thus enabling veteran missions. These missions have a new mob per dungeon (one big mob who use two blocks, hit hard or is tanky as hell). They are not difficult but they tend to be a pain in the ass since they have a lot of health, have more damage or stress your whole party.
- In the veteran missions you can go and do whichever you like, just be warned that if you are undergeared or underleveled you might struggle a little, since mobs will crit you more often and deal more damage. Also in these dungeons you cannot afford to have a bad team composition, since the stress and the damage hit a bit stronger and, if not prepared, you will found yourself in a pinch.
Champion dungeons
- These are by far the hardest dungeons that the game has. In these dungeons you need to have fully upgraded both equipment and skills, and a lot of good trinkets to not be raped by the mobs. In this difficulty you cannot afford ♥♥♥♥♥♥ compositions since the mobs hit way harder, crit more often and are more intelligent, they target your backline more often, and they have a new mob per dungeon who believe me, will make your life a nightmare in no time.
- If you really want to try one, try medium and long sizes. This is because if things go horrible you can always camp, but in the short ones you can´t, making it difficult to come back from a bad fight. Also the boss fights suddenly become horribly difficult since most of them make tremendous damage, specially the swine king and the prophet, both of them tend to make fights a living hell if you go umprepared.
Notes and tips:
- About the lenght of the dungeon you should be okay to be doing medium dungeons when you have unlocked the camp. This is because in the medium dungeons there is a new mechanic, camping. While camping, depending on how much food you use, you recover health and stress, and gives you the option to use “camping skills”. These camping skills are most buffs and heals that can turn around things, so use them wisely, most of them waste “time” (points that takes to use a camping skill).
- For the boss battles i would suggest you to do first a “cleanse” missions. These missions consist on “cleansing” an specific curio, you have to cleanse 3 to fulfill it. You get another reward besides the trinket for completing these missions in the form of a town event. In these events, according on which dungeon you complete the mission, they give you bonus resolve exp. and additional damage
- Something important to have in mind for the medium and long dungeons; always carry a hero with a camp skill that prevent night ambush and a percentaje to scout. With the exception of the darkest dungeon, your party can be surprised while camping if you didn´t use any camp skill that prevents it, and the scout chance is sweet since you cannot be surprised by an already scouted mob area.
- Another useful strategy is to “dispose” of the heroes that became afflicted during a mission in the early game, this way you save money, but you will be stuck with heroes with a resolve level of 0. It is also useful to deplete the torchlight in the last battle, so you will have more loot.
Party composition and champions roles
To have a good experience with this game you need to know a lot about it´s mechanics and it´s heroes. To do this we need to understand what makes a good party composition and which are the roles the champions need to fill in the party to truly overcome anything the dungeon has to offer. For this i have divided these roles in three categories (and some subdivisions of those tasks).
Damage dealer: As the name implies, this role is where you beat the ♥♥♥♥ out of the monsters with high sustained damage. We can make two forms of damage.
- Raw damage: This is when your hero go and hit a mob and that´s it, no other thing than that but a clear display of barbaric onslaught.
- Damage over time (DOT): This is when you want to deal damage through giving a mob a blight or a bleed (or both), it is different than the raw damage because it causes damage per turn, it can stack if you manage to affect the same mob, and if you kill a mob wihile bleeding / blighted, it removes the corpse so you don´t have to deal with it.
Support: While the name sounds generic, this role is actually more important than the damage dealers, because there are factors which can make a quest a living hell if you lack the supports to aid the party. The supports can be divided in:
- Healers: Duh!, the healers heal, no much science on it… But what if i tell you that there are two heals? Those are hp heals and stress heals. While healing hp sounds like a priority, you really need to take care of the strees level of your characters, because if you don´t they have a good chance to become afflicted, making an easy dungeon a living hell.
- Buffs / Debuffs: Buffs and debuffs aren´t that important in this game, since you can do other stuff in the turn you wasted using the buff / debuff. But they are useful, and should try to use them when a chance arrives (that is when you surprise the mob party or at the beginning of a boss battle). This subvidision includes marking since the marks are considered a debuff, regardless of the mark actually hit but the debuff is resisted.
- Stuns: The stunner stun, as easy as that. But there are a lot to be said about this one. It is important for a party member to be used as a stunner because if you stun a mob you take away the threat that mob present, and it also helps in the strategy behind the task of the healers, but i will explain that later.
Tanks: While it sound forced to have a “tank” role, it is important to have it, since most of the heroes are squishy pieces of ♥♥♥♥ that cannot take a hit from a stupid glorified giant maggot. They have the task to mitigate as much damage as they can with certain skills. They don´t particulary have subdivisions since most of their skills belong to the role of support, but it is important to know that they are different from then since their task is to be a meatbag for the team, allowing the other party members to focus on their tasks.
- Meatbags: The “meatbags” are the heroes who can target themselves to take aggro from the others and to increase their protection / dodge rate.
- Protect me senpai: These heores can “shield” another hero, taking the damage. they target themselves and increase their protection rate.
Most of the characters doesn´t truly belong on one of the categories, having skills that can make them belong on two or even the three categories. Now for the party composition.
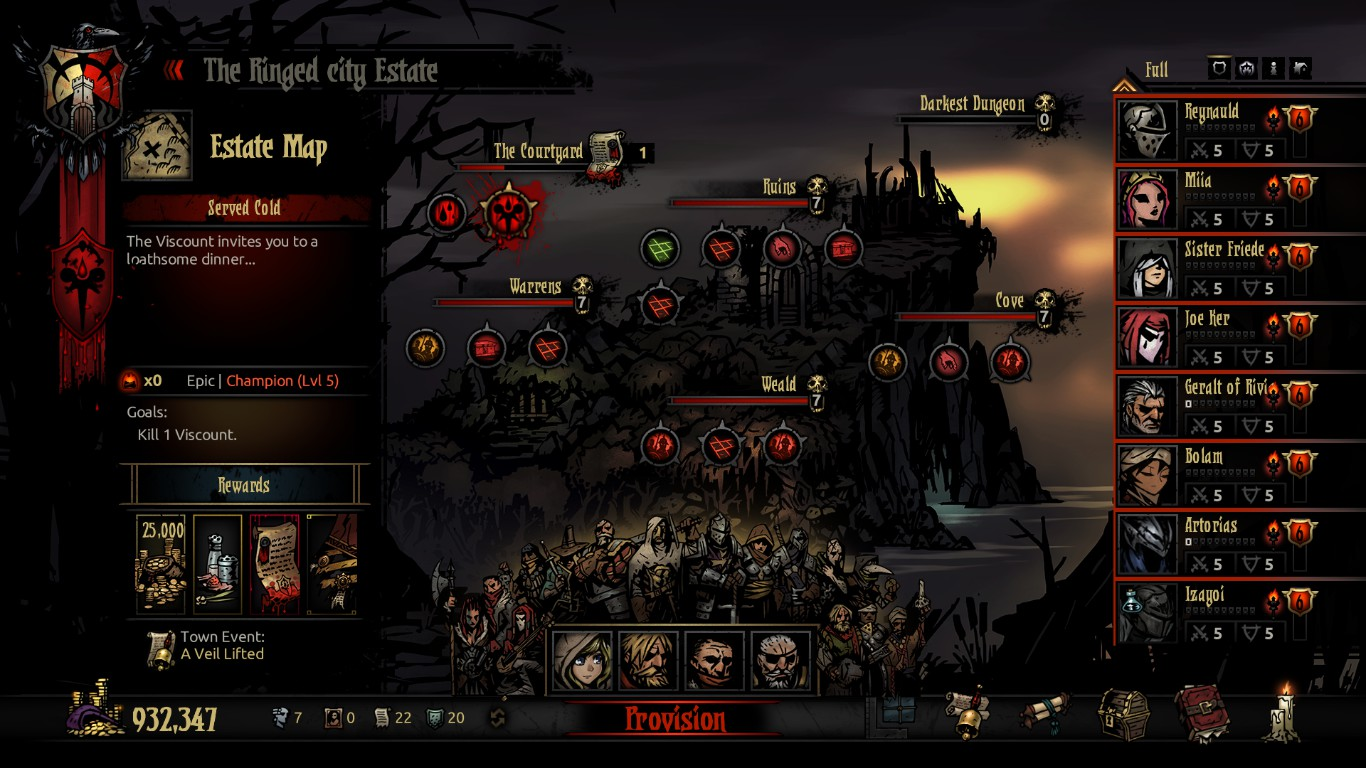
Most of the time you want to have a healer (you need both hp healer and stress healer), a damage dealer and a stunner (usually the stunner is a tank). The other subdivisions of support can easily be forgotten because they are not essential to your overall survival and, while it makes everything easy, you can also go around without a tank. You also need that your damage dealer can reach position 3 and 4, since those two positions have the most dangerous mobs (either by their massive damage output or because they are stress nukers).
In the image you can see a good party compositions since it has a healer (the vestal), a stress healer (the houndmanter who can also deal damage to position 3 and 4 and protect), a damage dealer (a highwayman who can murder position 3 and 4) and a tank – stunner (the man at arms who can also debuff, protect and stun). For a plus this party is not as easily disrupted if surprised, since most of them can act in most positions.
It is important to aknowledge that preparing a party is essential because in this game any battle could be the last one, ♥♥♥♥ can go down too fast and with a bad team comp you will struggle more than you should.
Disclaimer: While i am aware that there are certain skills that can perform certain tasks (like the abomination who can heal both hp and stress) he is not considered (to me) a healer, simply because he cannot aid the other party members. Also all of the heroes have at least one damage ability, but i won´t consider everyone a damage dealer since you don´t want them to fill that task (either because their damage is not high enough or because they fill another role better than damage).
The abomination (Human form)
Main role: Support
Secondary role: Damage dealer
DOT: Yes (Blight)
Crit buff: +20% Damage
Skills: The abomination in human form sacrifices damage for utility, enabling him to stun foes, blight them or giving your healer a break and letting him / her focus on other teammates that cannot heal themselves. Thanks to his transformation ability the abomination start with all of his abilities enable, but at the same time all of his skills need to be max out if one wishes to use him at his best.
- Transform: With this skill the abomination let his curse flow through his body and transform him into an eldritch beast, granting him several bonuses (+ damage, + blight resist, + SPD) but at the price of the sanity of himself and his teammates, stressing all of the heroes in the battlefield. He can only transform once per battle, so be mindful of that.
- Manacles: With this skill the abomination hits in the face one mob, stunning it and dealing some damage.
- Beast´s bile: With this skill the abomination spits on both mobs in position 2 and 3, blighting them for a decent amount of damage per turn, and is stackable when used against the same mobs.
- Absolution: With this skill the abomination heal himself both hp and stress, allowing your healer to focus on the other teammates.
Favorite position: 2 and 3.
Positions that can reach: 1, 2 and 3.
Camping skills: The abomination camping skills focus on his condition by either letting it go wild or suppressing it, for the comfort of himself and his teammates.
- Anger management: With this skill the abomination forgets how useless his teammates are, and also accepts his destiny to be forever (not really after the new patch) bound to the occultist and his bleeds, increasing his stress by 20 but diminishing his teammates´ for 10. Not a good skill to use unless you have some points to spare.
- Psych up: With this skill the abomination grant himself a damage buff (+25% damage) at the cost of stressing his teammates (+10 stress to heroes / 20 stress to religious heroes). This is an excellent skill to use if you are about to face a boss fight.
- The quickening: With this skill the abomination gains a speed buff (+4 SPD) but without any drawback. This skill is good to allow the abomination to always go first in any round.
- Eldritch blood: With this skill the abomination gains a massive resist buff (+ 40% blight, bleed and disease resistance) but also gains some stress by doing so (+ 20 points of stress). This skill is not good at all and shouldn´t be used or learned.
Trinkets: The abomination doesn´t need much trinkets to work efficiently since his core numbers allow him to do his job well. If you want to make him better use anything that boosts his stun and blight chance, increase his health and PROT so he can take more damage.
Trinket set:

Buffs: -15 Stress / +10 DODGE
Debuffs: None
Class: Abomination

Buffs: +20 DMG Range skills / +9% CRIT Ranged skills
Debuffs: None
Class: Abomination
Combo bonus: +20 DMG if in rank 1
In my opinion this combo is bad; while I understand the purpose of the trinket set (being able to help you in both forms) it does this in the worst possible way. What you mostly want on your abomination is trinkets that boost his stun and blight skill chance (and luckily he has one trinket that address your needs) and some PROT so he can tank some damage.
This set doesn´t give you anything useful though; it gives you damage and crits on range skills but he doesn´t have any decent skill to capitalize on the damage (the only skill that does have range damage is his stun, and that doesn´t do much damage…), the dodge is good but I would love more to have stun or blight chances instead of relying on dodge alone (a stunned mob cannot attack you), and the bonus that gives you is for when he is in his transformation, but he needs to be on rank 1 so other heroes that needs to be on that rank (hellion, leper) have to ♥♥♥♥ off that rank, and he already has a skill that buffs his damage, so this bonus is redundant.
Pros:
- Good support overall, allowing you to stun enemies and letting your healer to focus on other allies.
- Decent speed, allowing him to act before mobs and denying them the chance to act.
- He is quite beefy, so he can take some agro from your heroes to let you heal them without having to worry about the abomination.
- He can now be with religious heroes, enabling him to go with the crusader, the vestal, the leper and the flagellant
Cons:
- He doesn´t have much damage in human form, so you need a DPS in order to deal with the mobs.
- He is useless if he is in position one or four, so be careful where you place him.
The abomination (Beast form)

Main role: Damage dealer
Secondary role: None
DOT: No
Crit buff: +20% Damage
Skills: The abomination in his beast mode sacrifices almost any kind of utility for the sake of acquiring skills that do damage, some raw strengths (increased damage, resistances and speed) but at the cost of the sanity of all heroes in the battlefield. Use it only when facing a boss fight, otherwise the drawbacks aren´t worth it for its usage. Think of it as a desperate power for when ♥♥♥♥ is getting out of hand.
- Transform: He can transform again to his human form when using this skill, giving his teammates some stress heal and some hp heal to the abomination, but also he will lose some SPD. Be mindful that the abomination can only transform once per battle, and if he ends up afflicted when in beast mode he will return to his human form, with no chance to transform again.
- Rake: The abomination goes and bitchslap both position 1 and 2. While this skill does have a penalty in damage, it also grants a buff per attack that can also stack when used more than once, allowing the abomination to do even more damage.
- Rage: The abomination rushes towards his enemy, dealing good damage. This is his main damage skill, so use if after you buff your abomination with rake for more damage.
- Slam: The abomination goes full Zidane to an enemy, dealing damage and gives him a chance to move them backwards and debuff them. It also moves the abomination forwards 1 rank, so is good if he is bad positioned and you don´t want to waste a turn in moving him.
Favorite position: 1 and 2
Positions that can reach: 1, 2 and 3
Camping skills: The abomination returns to his human form when you kill every mob in a room / hallway, so the beast mode doesn´t have any skill to use.
Trinkets: The abomination in his beast form is already good enough to work without trinkets since he can buff himself either by using camp skills or rake. Also have in mind that for most of the time you will be stuck with his human form, so is better to not equip him only for one battle (unless is a hard one, then you might think of that).
Pros:
- Increased damage output unlike his human part.
- Being able to buff himself to improve his damage while also attacking.
- Being able to move mobs and himself without wasting any turn.
Cons:
- He can´t stun or heal himself in beast mode.
- He needs to be in the first two ranks to use his skills at its full potential.
- He stresses the party and himself per turn, making it easier for him to get a resolve test.
- He has a rather short range, so he can only reach position 1 and 2.
The antiquarian

Main role: Specialist (She brings more money to the hamlet)
Secondary role: Support (Although she sucks at everything)
DOT: Yes (Blight, but it sucks)
Crit buff: +10 DODGE
Skills: The antiquarian is simply put the worst class in the game when it comes to
combat because she doesn´t bring anything special to the table, for her skills are mediocre at best and have a focus on denying the enemy reaching her by eithers move herself to the back row or using others to protect her. In the bright side though she is the best hero (or rather the only one) in terms of resource gathering, since she allows you to carry more gold and has a chance to find some “antiques” for even more profit. She shines when you play her on mid or long dungeons, but will take an important slot in your party.
- Nervous stab: With this skill the antiquarian will “stab” a mob, that´s it. Is a decent skill to finish of mobs that survived another attack with only 1 hp left or a little more, and the range makes up for it (she can use it in any position and can reach up to position 3).
- Festering vapours: With this skill the antiquarian will let the mobs smell… whatever she is carrying, inflicting a very weak blight and can debuff the enemy´s resistance towards blight. Use this skill only if you want to debuff, otherwise don´t use it, is a bad skill.
- Get down! : With this skill the antiquarian will buff herself (+ blight chance, + dodge, + SPD) while moving herself 2 ranks back.
- Flashpowder: With this skill the antiquarian will launch a small grenade that diminish the ACC of an enemy and removes stealth. Don’t use it, the debuff is laughable if she manages to get it and the skill doesn´t do any damage.
- Fortifying vapours: With this skill the antiquarian… “heals” a party member and improve its bleed and blight resistances. Use it, she already doesn´t have anything else to use and you can buff the heal by 50% with a trinket… if you think that buffing 1 hp by 50% is worth it.
- Invigorating vapours: With this skill the antiquarian surrounds his fellow teammates with some vapours that improve the dodge rate. Is a very ♥♥♥♥♥♥ buff, but worst is nothing, so use this skill.
- Protect me! : With this skill the antiquarian will make a hero her ♥♥♥♥♥, protecting her for any incoming damage and buffing said hero (+ DODGE, + PROT), but at the same time it marks that hero, so expect a lot of crits. Believe it or not this is the best skill the antiquarian has, so use it.
Favorite position: 3 and 4, position 2 and 3 disables her for using her “best” skills (fortifying vapours and invigorating vapours) so you are left with festering vapours and flashpowder.
Positions that can reach: Strangely enough she can reach every position.
Camping skills: Her camping skills focus on gaining supplies, buffing a teammate with the help of her powders or just resting her mind for everything she has saw through the expedition.
- Resupply: With this skill the antiquarian will obtain a random supply item, but don´t ask me where she gets that ♥♥♥♥. Is a decent skill because it has a relatively low cost and can be casted 3 times.
- Trinket scrounge: With this skill the antiquarian will obtain a random trinket, but don´t get excited for it will be a ♥♥♥♥♥♥ one. Is a decent skill for it has a low cost, but use it only if you have points to spare.
- Strange powders: With this skill the antiquarian will give you some powders she found lying around, buffing one hero (+20% bleed, blight, move, disease and debuff resist). Is a good skill if you want to use it, if you have the points to spare.
- Curious incantation: With this skill the antiquarian will show how weird a person she is, giving herself a -50% stress damage. Use it only if the sick ♥♥♥♥ is highly stressed
Trinkets: Unfortunately there is no trinket in the game to save the antiquarian for the ♥♥♥♥♥♥ hero she is (combat wise), but overall you can try to give her some HP and PROT so she doesn´t become a liability, or you can boost the joke of a healing she has so it heals more than 1 – 2 HP per use (maybe 4, and she is taking risks). Improving her dodge rate can do wonders since she already has a skill that helps her to evade the attacks.
Trinket set:

Buffs: +50% Healing skills / +35% Blight skill chance / +35% Debuff skill chance
Debuffs: None
Class: Antiquarian

Buffs: +50% DMG Against blighted / +10% CRIT Against blighted
Debuffs: None
Class: Antiquarian
Combo bonus: +4 SPD / +10 DODGE
In mi humble opinion this trinket set is quite decent for the ♥♥♥♥♥♥♥♥♥ class in the game. While her healing does ♥♥♥♥, +50% healing is quite decent and can help you if you are in a pinch (and you most likely will be if you are using an antiquarian), and +35% blight skill chance sounds good, even though her blights are a little weak. It´s truly a shame that she gets such a decent bonus on damage and crits against blighted since she doesn´t have that much damage, and most of the time you want to spam her dodge buffs all the time.
The combo that the set gives you is also very good, since the antiquarian relies so much on dodge, and the speed helps her on acting first so your buffs are more effective. Overall she has a good (and usable) trinket set, so use it to your heart´s contempt.
Pros:
- You can bring more money in that expedition.
Cons:
- She doesn´t help you at all at anything else (no damage, no support abilities, no heals).
- She takes an important slot if you want to use her at her best of her abilities.
- Her strong trinkets have very good stats but she is just so weak to capitalize on them.
The arbalest

Main role: Damage dealer
Secondary role: Support
DOT: No
Crit buff: +33 Damage vs marked
Skills: The arbalest is all about keeping her distance against most mobs while killing them from afar. Also she can help his fellow teammates from afar by healing them, mark dangerous targets or buffing / debuffing targets, making her an important pilar for your team.
- Sniper shot: This skill is her bread and butter since you will be using it most of the time. With this skill you can attack position 2, 3 or 4 and benefits from marks. Any arbalest will start with this skill.
- Suppressing fire: With this skill you can attack position 3 and 4 with a chance to debuff them (-5 ACC, -5% crit). The drawback is that this skill does minimal damage for it has a damage penalty (-80% DMG), making this skill worthless.
- Sniper´s mark: With this skill the arbalest marks an enemy with a chance to debuff it (- DODGE). This skill should be used in mobs who either has a lot of health so they can be killed faster or when they only have one turn per round, so the mark longs longer, never use this skill for the debuff since most mobs with high dodge might dodge this attack, or even resist the debuff.
- Bola: With this skill the arbalest goes full rengar and will launch a bola with a chance to move position 1 and 2. Most of the time they will resist the knockback unless you equip her with a trinket that improve her success chances, so don´t use this skill at all. Besides the skill has a dmage penalty (-50% DMG).
- Blindfire: With this skill the arbalest will try to quick shot no scope and will shot at a random mob, buffing herself (+ SPD). It has a damage penalty (-10% DMG) and low ACC, but is the only damage skill that can hit position 1 that the arbalest has and it buffs her speed, so is worth having it.
- Battlefield bandage: With this skill the arbalest can become a healer (kinda) if you want a stress healer. It heals for a low amount, but it has a “buff” that improves incoming healings received to said hero, so suddenly the arbalest can heal more as she keeps healing, and she even have a trinket that helps her to heal even more. It is a good skill to use even when you don´t use her as a main healer.
- Rallying flare: With this skill the arbalest uses a flare for diverse purposes; remove stealth, clear stuns, clean marks on teammates, it brings slight torchlight levels and it can heal stress. This is perhaps one of the few skills that can hit anything in the battlefield (heroes or foes), but sadly is not a good skill so don´t use it (pending of testing due to patches).
Favorite position: 3 and 4 (but mostly 4).
Positions that can reach: position 2, 3 and 4.
Camping skills: When camping the arbalest focus on healing her allies from all of those bloody battles, to prepare herself and her bow for incoming battles or to make a plan so they can be as prepared as possible.
- Field dressing: With this skill the arbalest focus on one hero´s injuries and heals them (+35% heal on target / +50% heal on target; both with a chance of 50%). This can be an excellent skill for it can grant both heals or it can grant none, so be mindful about that little detail.
- Marching plan: With this skill the arbalest teaches her fellow teammates that they suck even at walking, so she develops a plan for them in order to walk straight. It grants a buff in speed (+2 SPD) and while the buff seems minimal, an improvement in speed is always welcome so use it if you can.
- Restring crossbow: With this skill the arbalest changes the string of her crossbow, giving her a buff in incoming battles (+10 ACC in ranged skills, +20% DMG in range skills, +8% crit range skills) but it comes with a debuff (-2 SPD). Overall the buff would be godlike if it weren´t for the debuff on speed, but that many stats can only mean that when she focus on something, that something dies, so try to use this skill as often as you can.
- Triage: With this skill the arbalest goes ahead of her time and invent something revolutionary in medicine that not even the plague doctor knows. She will heal all of her teammates for 20%. It used to be better but due to the new patch it lost a lot of edge, but still usable when in a pinch.
Trinkets: The arbalest´s main focus is to kill the enemies´ back line as fast as possible so they won´t be able to move, for this you can equip her trinkets that buff her damage so she can be more prominent at her job, or you can instead focus on her healings so you don´t have to bring a primary healer.
Trinket set:

Buffs: +15 ACC vs marked / +10 CRIT vs marked / +35% Debuff skill chance / +35% Move skill chance
Debuffs: None
Class: Arbalest

Buffs: +30% Healing skills / +20% Healing skills when camping / -15% Stress
Debuffs: None
Class: Arbalest
Combo bonus: +25% PROT
This trinket is quite good on the arbalest, and it helps her in almost everything she wants / needs. The arbalest is a class that doesn´t really need “raw” damage (+ DMG) since she relies more on marks to do some nasty damage, and with this set she gets a lot of accuracy and a decent amount of crits. She also receives some nice buffs to her healing skills, giving you an easier time to keep your heroes healthy. While I don´t use her “supportive” skills (besides marks) now she can use those skills for the purpose they are intended for (now she can move ♥♥♥♥ and apply her debuff).
Overall this trinket set is quite good for a class that needs some assistance to truly shine on the battlefield. Thanks to the combo bonus she also gets a nice PROT bonus, allowing her to survive for longer. The only thing that this set might need is some speed, since the arbalest is a DPS character that NEEDS to go before the enemy, and she is too slow for that. But heym, god gives and takes away.
Pros:
- She has good damage to deal with the enemy´s back row.
- She can aid your healer to make it´s heals more effective.
- She can reliably reach every important position (position 3 and 4).
- She can mark enemies for your allies who benefit from marks.
Cons:
- She is quite useless if she is not in position 3 or 4.
- She cannot heal stress, so you have to decide to take a stress healer or a primary healer (pending of corroboration due to patches).
- She cannot hit reliably position 1 unless he is the only mob left.
- She is quite slow for a DPS character.
The bounty hunter

Main role: Damage dealer
Secondary role: Support
DOT: Yes (Bleed)
Crit buff: +33 Damage vs market
Skills: The bounty hunter´s main job is in focusing one mob at a time while exploting it´s weakness, by either marking and decreasing it´s prot stats and dealing massive damage or stun them. He also has the ability to disrupt the enemy´s formation so he can move enemies around in spots they just don´t perform well or are plain hopeless in your team´s reach.
- Collect bounty: This skill is his bread and butter since it is his primary damage attack. The bounty hunter will hit an enemy with his axe, and the damage done to the enemy can be enhanced by several factors (+90% DMG vs marked, +15 DMG vs human) and can be used in rank 1, 2 and 3 but sadly can only reach position 1 and 2.
- Mark for death: The bounty hunter will mark an enemy with a chance of debuff it (-PROT). Unlike the arbalest mark the debuff granted by this skill is much better, for PROT can be a real pain in the ass since most mobs will gain PROT as the difficulty rises, making this skill way more useful. It also buffs the bounty hunter SPD (pending of corroboration due to patch). If not clear enough use this skill if you need to mark something.
- Come hither: With this skill the bounty hunter will take out his inner scorpion (or road hog, or kunai with chain, whatever floats your boat) and will try to move a mob (the pull moves the mob 2 ranks). It also marks the mob (Pending of corroboration due to patch). Use this skill for it is enjoyable to see the hopelessness on the mob as he is pulled towards his doom.
- Uppercut: Unlike the rising dragon fist (or the true rising dragon fist) the bounty hunter will just hit the mob´s jaw real hard, with a chance of stun and moving them away (knockback of 2 ranks), with no jumps at all. This skill is excellent if you want to move the meaty mobs in front of you or just flat stun them, but not so in doing damage for it has a damage penalty (-67% DMG), still try to have this skill.
- Flashbangs: With this skill the bounty hunter launch some grenades to a mob, stunning it and with a chance of shuffle (the mob will move to a random position). This skill is not good as it can the shuffle might fail, and the bounty hunter has more reliable skills to move around mobs, besides it doesn´t do any damage. On the bright side is a stun that can reach most position (rank 2, 3 and 4).
- Finish him: This skill is the second damage ability the bounty hunter has. While it can reach position 1, 2 and 3 and can be used in position 1, 2 and 3 this skill is slightly less useful than collect bounty as it needs the enemies to be stunned to gain more damage (+25% vs stunned mobs). Not a bad skill at all but can be hard to obtain the bonus damage if you don´t have anyone more than him to stun mobs.
- Caltrops: With this skill the bounty hunter will launch legos at an enemy´s feet, causing it to want to kill itself (bleed, -ACC, -SPD). Sad thing is this skill by itself doesn´t do ♥♥♥♥♥♥♥♥ of damage so good luck with that, not a good skill to use.
Favorite position: 2 and 3 (but feels more comfortable in rank 2). In position 1 he will be more targeted, and the bounty hunter is by no means beefy enough.
Positions that can reach: 1, 2, 3 and 4 (the latter just with certain skills).
Camping skills: For whatever reason the bounty hunter is the batman of the darkest dungeon, since all he does while camping is to have a plan for everything, the sick ♥♥♥♥ needs to prepare for everything and anything, studying the terrain to even the odds, so if you want to improve your chances of survival the bounty hunter is your man.
- This is how we do it: The bounty hunter start to talk to himself about how marvelous his plan is, giving himself some bonus (+10 ACC, +8% CRIT) and the respect of his fellow companions. Use this skill if you want for it has a low cost now and the buffs are good.
- Tracking: The bounty hunter studies his environment, giving him an edge over the enemies and giving him a chance to take them by surprise (+10% chance of surprising an enemy) while expecting them (-15% chance of being surprised)
- Planned takedown: The bounty hunter´s fetishes over big bois start to become apparent, gaining a small buff over them (+25% DMG / +15 ACC against mobs with size 2).
- Scout ahead: with this skill the bounty hunter refuses to sleep with his illiterate companions so he decide to go for a walk, giving him a grasp over the terrain (25% scouting chance).
Trinkets: The bounty hunter is all about damage and disruption, so he benefits from trinkets who can boost his ACC and DMG, so he can go and mark any poor soul and kill it on one hit, or if you want to be a ♥♥♥♥ improve his chances to move mobs around the battlefield so your companions have less trouble reaching them.
Pros:
- Excelent damage when he marks mobs.
- He can provide a nice buff against PROT mobs.
- He can make your life easier when he moves mobs around.
- He can be a good stunner with the right trinkets, and can get a benefit from them.
Cons:
- He relies on marks / stuns to make the most damage.
- His skills can fail at not moving the target or even stun it, making it a wasted turn.
- He is quite fragile for a front row, making him quite vulnerable when targeted.
- He can be hard to get use to since he is not that straight foward.
The crusader

Main role: Tank
Secondary role: Support / damage dealer
DOT: No
Crit buff: 15% PROT
Skills: The crusader is a warrior forged in the battlefield whose main focus is to retake Jerusalem be a hero to your allies, stand strong against all odds and helping them getting enough courage to keep fighting on, while also being able to withstand whatever the enemy has to offer.
- Smite: This is his bread and butter skill because you will be using it a lot if you want to deal some damage to the enemy. Also it deals bonus damage against unholy mobs so it makes him more useful in the ruins.
- Zealous Accusation: This is his second damage skill, but unfortunately is not good since it attacks both position 1 and 2 (the ones you want to keep alive the most), and has a damage penalty. Don´t use it unless you don´t like any other skill.
- Stunning blow: With this skill the crusader will break some noses and stun some mobs, but it has a damage penalty. You might want to bring this skill with you if you need a stunner.
- Bulwark of faith: With this skill the crusader gives himself some PROT for the rest of the battle while also bringing some torchlight, but unfortunately it also mark the crusader so some mobs might become dangerous or crit him more often and can only be casted once per battle. Overall a good skill to have despite the mark.
- Battle heal: With this skill the crusader heals a teammate, it can be casted at any rank. Not the best skill to have if you compare it to its brother “inspiring cry”.
- Holy lance: This is his third and last damage skill. With this skill, if the crusader is in position 3 or 4, he can cast this ability, it will move him forward 1 rank and can be used only against position 3 and 4, while also having a bonus damage against unholy types. It can be a good skill if you find yourself being shuffled / moved a lot or if you´re against a boss that likes to move people around.
- Inspiring cry: With this skill the crusader raises his banner (that only good knows where he stores it) and give a small stress and hp heal, to a party member, so is a really good skill if you are lacking or needing some stress heal. It also raises torchlight level.
Favorite position: 1 and 2.
Positions that can reach: 1 and 2 mostly (though a certain skill let him unreliably reach position 3 and 4).
Camping skills: The crusader focus his time while camping in inspiring his teammates to do their very best in the dungeon while also protecting their sanity a little against the stress and damage.
- Unshakable leader: With this skill the crusader goes full all might and won´t show how ♥♥♥♥♥♥ a situation is, giving him a bonus against stress (+25% stress resist). Thanks to the patch this skill cost fewer points, so it might be worth using now.
- Stand tall: With this skill the crusader will brainwash a teammate by convincing it for not giving a living ♥♥♥♥ about being almost dead. It gives a teammate -15 stress and, if it was in death´s door, it removes the debuff. Overall a bad skill to use since the debuff is not that bad and it cost a lot for what it is.
- Zealous speech: With this skill the crusader tells his team that they need to take Jerusalem man up, giving them (and himself) -15 stress and -15% stress damage. This skill is excellent if you are having troubles with managing the stress and might give you a break, but it cost quite a lot to use so mind that.
- Zealous vigil: With this skill the crusader will guard the camp, preventing any night ambush and some stress heal (-25 stress / -15 stress if afflicted). By far the best skill to use in the crusader since night ambushes can ♥♥♥♥ you up really bad if you try and gamble the event. Use /learn this skill whenever you can.
Trinkets: The crusader is this big meaty boi who likes to take the damage from his comrades, so you can try and give him more HP to help him get beefy, or some PROT so it can stack with bulwark of faith. Another viable strategy is to improve his healing / stress healing so you have less trouble with stress. You can also give him some damage if you´re going to the ruins so the spooky ♥♥♥♥ die faster, or improve his stun chance so he can be more reliable at stunning mobs.
Pros:
- He has high HP, making him a good tank.
- He has a bonus against unholy types, making him perfect for the ruins.
- He can help you at healing stress / HP if you are in a pinch.
- He can go back to position 1 or 2 if moved while also attacking position 3 or 4.
Cons:
- He cannot reach any important position reliably enough (position 3 and 4).
- Has low speed, so he will always go last.
- His stun can be unreliable if you don´t use a trinket to help him.
The grave robber

Main role: Damage dealer
Secondary role: None
DOT: Yes (Blight)
Crit buff: +10 DODGE
Skills: The grave robber focus on killing the enemy effectively regardless of her position by using her trusty pickaxe to destroy some faces or launching her daggers for the farthest ones, while relying on her high dodge to nullify any kind of damage, for this end she can spend time to use her skills to buff this stat. Thanks to the new patch the grave robber has a focus towards blights, dealing more damage against blighted mobs or decreasing their resistances towards it.
- Pick to the face: With this skill the grave robber goes and ruin someone´s face. Sadly it only can reach position 1 and 2 and has a damage penalty, but it can ignore PROT so it is still good against enemies with PROT (which will be a lot)
- Lunge: The grave robber takes fly and straight jumps against an enemy (move forward 2 ranks), has a damage bonus, deals even more damage against blighted mobs and it has a good crit chance added to it. Sad thing is it cannot reach position 4, but still a good skill for massive damage (and going full yolo).
- Flashing daggers: With this skill the grave robber goes and throws two daggers that attack both position 2 and 3, with a chance to debuff the enemies (-bleed resistances). Is a good skill for finishing of dudes or if you have an abomination (both abilities share the same ranks).
- Shadows fade: Thanks to the patch this skill received quite a lot of buffs. For starts any grave robber worth the shovel will have this skill. It moves the grave robber 2 ranks, with makes it perfect for when she uses lunge, it grants her stealt and grants her some nice buffs (+damage and +dodge). On the sad side though it no longer stun or mark, but we can´t have it all huh.
- Throwing dagger: The grave robber throws a dagger and can reach position 2, 3 and 4. It has a damage penalty but it has a nice crit chance attached to it. It also deals more damage towards blighted or mark mobs and buff the grave robber´s accuracy. Is less flashy than the others but is a nice finisher if the mob survive with the slightest of health.
- Poison dart: The least useful or flashy skill of the grave robber. It throws a dart that blights an enemy and debuffs it (-blight resistances). There are better ways to get blights (cough cough plague doctor), so despite the grave robber getting a nice buff against blights, she still lacks the means to inflict it.
- Toxin trickery: With this potion you get into some nice high, granting the grave robber some nice buffs (Cures bleeds / blights, + dodge, + speed) and it last for the entire battle, so now is really good to use… if the other skills didn´t convince you enough.
Favorite position: 2 and 3, but she is not limited to these ones for she can move around in the battlefield.
Positions that can reach: 1, 2, 3 and 4 (the latter with less efficiently)
Camping skills: The grave robber focus on scouting ahead when camping, always on the surveillance of goodies and treasures, and when she decides to stick around her teammates, she can help them with diseases or entertain them with some dank humor.
- Snuff pot: The grave robber will share the joint to one of her teammates, curing both against any disease (that is not the crimson court), just don´t ask what is what you smelled. It is worth using it or learns it because gold wise you can recover the inversion after using it two times.
- Gallows humor: The grave robber will start her ♥♥♥♥♥♥ jokes (just as mine) to try and entertain a bunch of people who will not read the entire guide, will not leave a favorite or a like (yes, I sold my soul for this commercial). Just as any can be entertained by my ♥♥♥♥♥♥ jokes (-20 stress with a chance of 75%) others might be annoyed by them (+10 stress with a chance of 25%). You can use it if you are desperate for some stress heals, but otherwise skippable.
- Night moves: The grave robber goes outside and starts practicing her dank moves, so her teammates will be impressed by some spicy moves. Also she will scout her terrains by accident while doing so (+20% scouting chance). Use this skill fi you have the points to spare; some scouting is always nice to have.
- Pilfer: The kleptomaniac ♥♥♥♥ will tell you that she stole some goodies from our beloved caretaker (the ugly ♥♥♥♥ who laughs at your deceased heroes), giving you a random supply item. Like the antiquarian, use this skill if you have the points to spare.
Trinkets: The main job of the grave robber is to kill anything that moves without letting them lay a finger on her, so you really want to improve her damage and her dodge rate, despite the fact that she already has skill that does this, because you can never have enough dodge (and believe me, the harder the dungeon, the more acc mobs have).
Pros:
- The grave robber´s high speed allows her to act almost always first in every turn, giving you an edge over the enemy.
- The grave robber´s high dodge allows her to be slippery against the enemies.
- Her skills allow her to reach almost any position and act in any rank, so she doesn´t give a ♥♥♥♥ about shuffles.
- She gets some nice buffs for her damage, making her an efficient killing machine.
Cons:
- The grave robber has a joke for HP, so a few hard hits and she will be already at death´s door, she´s a glass cannon type.
- The dodge she relies too much becomes useless as you progress through dungeons since most mobs will have high accuracy, giving a damn about your dodge (unless you wish to stack it).
- She can be a problem with certain heroes that dislike to be moved around, so be careful with who you party her with.
- She can be a little tricky when giving her trinkets, due to her having both melee and range skills and certain trinkets only buffs one.
- She relies too much on blights, but she has only one skill that grants it (is like a ♥♥♥♥♥♥ mark), when there are other heroes who can do that better.
The hellion

Main role: Damage dealer
Secondary role: Stunner
DOT: Yes (Bleed)
Crit buff: +33% Damage vs bleed.
Skills: The hellion is a goddess of war when she is unleashed in the battlefield. Thanks to her enormous glaive she can reach any position and if that fails, she can ♥♥♥♥ her throat to let out a yell that stun the enemies in front of her. If she ever grows tired, she can pump some adrenaline to her blood veins to keep the fight going.
- Wicked hack. With this skill the hellion attack position 1 and 2. It is a very standard attack and is good to deal damage to the front row. Any hellion is granted this skill.
- Iron swan: With this skill the hellion uses the massive range of her glaive to attack position 4. This is an excellent skill if your team is having a hard time reaching this position. Sadly enough this skill can only be used in position 1.
- Barbaric YAWP! : With this skill the hellion gives a ♥♥♥♥ about her throat and yells at the enemy, stunning both position 1 and 2. Sadly this skill doesn´t do damage, it debuffs the hellion (- DMG and – SPD) and is only usable 3 times per battle. Also the debuffs cannot be healed with medicinal herbs anymore.
- If it bleeds: The hellion uses the tip as the good woman she is, making her enemies to bleed. It is a good ability because it helps you reaching position 2 and 3 while also bleeding them. It has a damage penalty.
- Breakthrough: With this skill the hellion rushes to the battlefield if she is moved (move 1 rank forward). It is a decent skill against mobs who likes to move your party around and affects position 1, 2 and 3. But it has a damage penalty and it debuffs the hellion (- DMG, – SPD).
- Adrenaline rush: The hellion remembers everything she learned from shonen mangas, standing her ground and yelling at the top of her lungs granting her some power (+ DMG, + ACC and heals blights and bleeds). Is a decent skill if you are interested in buffing her if you don´t like the debuffs.
- Bleed out: The hellion attack position 1 and bleeds it. It is a bad skill because it can only attack position 1 and, while it has a damage bonus, it also gives her a massive debuff (- DMG, – SPD), so with all of this is up to you to decide to use this skill or not.
Favorite position: 1 and 2 (but she is way better in position 1).
Positions that can reach: any position when in position 1, otherwise position 1, 2 and 3.
Camping skills: While camping the hellion likes to prepare for battle, by doing some ceremonial ♥♥♥♥ or sharpening her glaive, or going full memento mori and ditch all kind of preparation for the sake of party hard or go full heretic.
- Battle trance: With this skill the hellion applies some war painting, granting her some bonus depending on her position (+25% DMG if in position 1, -25% DMG if not in position 1). This is an excellent skill because the hellion is already in position 1 since she is at her full potential in that position, so use this skill whenever you can.
- Revel: With this skill the hellion convinces her fellow comrades to party hard, giving them some debuffs(-5 ACC, -2 SPD) but also granting them some inner peace (-20 stress to all party, -10% stress DMG to all party members). I don´t use this skill that much since sacrificing speed is almost never worth it regardless of the reward, and there are other better choices for stress management.
- Reject the gods: With this skill the hellion becomes the worst enemy to all religious people, due to her cursing and being heretic to the gods. It gives her some inner peace (-30 stress) at the cost of her companions sanity (+7 stress if not religious / + 15 if religious). It is not a good skill unless you really need to lower her stress and the others can suck some.
- Sharpen spear: The hellion sharpen her glaive, giving her +10% crit. It is a decent skill if you have the points to spare, or if you are planning on using her crit bonus.
Trinkets: The hellion is all about damage and probably stuns, so she benefits a lot from trinkets that gives her damage and stun chance. She can also use some health or PROT because she will be sucking some damage since she needs to be in position 1 to work as intended, so that will boost her survivability.
Pros:
- If you don´t get it at first, the hellion can reach ANY position when in rank 1, so any position is in danger when she is around.
- She has a marvelous stun that can affect both position 1 and 2, allowing you to focus only position 3 and 4.
- She can move herself in the battlefield without wasting a turn in doing so (not attacking a mob).
Cons:
- Thanks to the patch her stun is only usable 3 times per battle, so is greatly nerfed (but by any means useless).
- She loses some power if she is not in position 1, making her an enemy of the man at arms or leper.
- Some of her skills debuff her, so using them can considerably reduce her killing potential. This is worse now has the herbs cannot “heal” said debuffs.
- Being in position 1 means that she will suck a lot of damage, and she is not exactly meaty (THICC at best), so be prepared to heal her.
The highwayman

Main role: Damage dealer
Secondary role: None
DOT: Yes (bleed)
Crit buff: +2 Speed
Skills: The highwayman is a crafted killing machine who will, undoubtedly, deal some pain to the enemies. He can easily dispatch enemies in front of him with his sword, or can reach the back row with his handgun.
- Wicked slice: With this skill the highwayman will slice his enemy, pretty straight forward. This skill is good because it has a damage bonus and can be used in position 1, 2 and 3, but sadly it can only reach position 1 and 2.
- Pistol shot: The highwayman will shoot to one mob, not much science behind it. It is a good skill to reach the back row, but sadly it has a damage penalty so it might not do much damage. This skill benefits from marks, so this can be mitigated.
- Point blank shot: With this skill the highwayman will get close and personal with a mob and shoot him in the guts, dealing massive damage. It can only be used in position 1 and can only reach position 1, but it has a damage bonus and will move the highwayman one rank back, so is good to reposition him.
- Grapeshot blast: With this skill the highwayman will shoot 3 bullets and will affect position 1, 2 and 3. This is a good skill to finish off mobs who survived with little HP and can debuff the enemy so they have increased chance to receive crits, but otherwise is better to avoid it since it has a moderate damage penalty, so it deals peanut damage and has a very ♥♥♥♥♥♥ chance to crit.
- Tracking shot: With this skill the highwayman will shoot a mob. What is important about this skill is that is a buff for the highwayman that last the entire battle, giving him some nice stats (+ ACC, + CRIT, + DMG) and can remove stealth to an enemy. Sadly it has an important damage penalty so it doesn´t do any damage.
- Duelist´s advance: As the grave robber, the highwayman charges at the enemy, with the difference that it only moves him one rank, it has a slight damage penalty and a decent crit %, but in exchange of power the highwayman can activate riposte, a passive “skill” that attacks any mob that attack the highwayman, enabling him to attack enemies beyond his turn. It used to be godlike and able to reach position 4, but nowadays it can only reach position 1, 2 and 3. It is a very good skill to have.
- Open vein: With this skill the highwayman cut some throats, bleeding his enemies.
Favorite position: 2 and 3
Positions that can reach: 1, 2, 3 and 4.
Camping skills: While camping, the highwayman will focus his attention on giving maintenance to his trustworthy handgun, honing his skills so they don´t go rusty or to mount alarms so no enemy can surprise them at night. If he has the bad luck to interact with his teammates he can entertain them (or perturb them) with his black humor.
- Gallows humor: With this skill the highwayman will tell some ♥♥♥♥♥♥ jokes, just as the grave robber, but who knows who came with the ♥♥♥♥♥♥ jokes first. This skill gives the highwayman -25 stress and his companions some stress heal (75% -20 stress / 25% +10 stress). Just like the grave robber there are better skills to heal stress, so don´t really use it.
- Unparalleled finesse: With this skill the highwayman will train for a little bit so he can keep his skill at its peak. The highwayman receives some nice bonuses that affects his MELEE damage skills (+10 DODGE, +2 SPD, +20% DMG, +10 ACC). It is an excellent skill if you focus on the melee skills of the highwayman.
- Clean guns: With this skill the highwayman gives maintenance to his guns so they don´t betray them in the fight. The highwayman receives some nice bonuses that affect his RANGE damage skills (+10 ACC, +20% DMG, +6% CRIT). It is a nice skill if you choose to focus on the range skills of the highwayman.
- Bandit´s sense: With this skill the highwayman puts some alarms near the camp, alerting him for intruders. It prevents night ambushes and gives some nice bonuses (+20% chance of surprise enemies / -20% chance of being surprised by enemies). Thanks to this skill the highwayman becomes someone important if your party composition lacks skills that prevent night ambushes, so this skill is a must.
Trinkets: The highwayman is all about damage, dodge and speed, being able to dish out big damage by going first than the enemies while keeping his health up by dodging any enemy attack, so any trinket that boost his damage output, speed, dodge or acc can do wonders for your highwayman (and might prevent dismas to become missmas).
Pros:
- He has a lot of damage and can reach any position whenever he wants.
- He has nice speed to act before enemy mobs, allowing him to make the most of his turn.
- He has riposte, a nice skill that can deceivably kill a lot of mobs.
Cons:
- He lacks any kind of supportive ability, relying only on damage to help his teammates.
- Like the grave robber, he relies on his dodge rate to mitigate damage since his health pool is low, so he can be dead if the mobs start focusing him.
- He relies on trinkets to do damage and, as a grave robber, have both ranged and melee skills, so equip him could be tricky.
- Overall you can consider him a grave robber with a main focus of damage instead of stealth and dodge.
The houndmaster

Main role: Attack damage
Secondary role: Support
DOT: Yes (Bleed)
Crit buff: +20% Bleed chance
Skills: The houndmaster´s abilities relies on giving instructions to his trusty hound, by either go and attack the enemy to go and defend his teammates, no matter the situation for the houndmaster and his hound will have a solution for anything they face.
- Hound´s rush: This is the bread and butter of the houndmaster. With this skill he will order his hound to attack an enemy with a chance of inflicting a bleed. It deals bonus damage against beast types and marked mobs. It is the best damage skill the houndmaster has.
- Hound´s harry: With this skill the houndmaster will order his hound to damage every enemy in the battlefield with a chance of inflicting a bleed. It has a considerable damage penalty so it won´t do any damage (2 or 3 points at best), thankfully if you are using this skill is because you want to bleed all of the mobs, otherwise a horrible skill to use since even the bleeds that inflicts are weak.
- Target whistle: With this skill the houndmaster select a victim and target it so his hound can do massive damage. It has a debuff (-20% PROT) that helps you massively against mobs with high PROT, so it is always good to have.
- Cry havoc: With this skill the hound will bark, healing some stress to all party members. While on paper sounds good, thanks to the patch the stress has a percentage of success and heals ♥♥♥♥ in the first levels (even when maxed out heals very little). This means that the one member you want to heal stress might not get the heal and you wasted a turn, so this skill sucks at the beginning of the game.
- Guard dog: With this skill the houndmaster protect an ally from any incoming damage while buffing the houndmaster´s Dodge rate. This skill is good, but have in mind that it does not grant PROT to the houndmaster, so he will be taking full damage if he gets hit, and also the skill only last for one turn, so you will need to spam it every turn in order to get the guard.
- Lick wounds: With this skill the houndmaster embrace his trusty hound, healing himself. This is an excellent skill if you desperately need a heal but your healer´s attention is on another ally, so is a good skill to have.
- Blackjack: With this skill the houndmaster hits an enemy with his cudgel, stunning it. It has a considerate damage penalty and can only be casted on position 1 or 2, making the houndmaster an easy target for the front row, but it can be good if you want another character on position 3 and 4 but still want to use a houndmaster.
Favorite position: 3 and 4 (but can be used in position 2)
Positions that can reach: 1, 2, 3 and 4.
Camping skills: The houndmaster, as the ex-cop he used to be, likes to gather information. For this end he can send his trusty hound to wander around the area, patrol at night so no one can get near without being noticed or, if the party is struggling, he can make his hound ease their heart and mind.
- Hound´s watch: With this skill the houndmaster becomes the worst enemy at PETA by infracting into some animal cruelty ♥♥♥♥. While everyone sleeps the hound keeps guard, preventing any night ambush and some buffs (-20% chance of being surprised / +20% chance of surprise the enemy). This skill is marvelous if your team lacks any means to prevent night ambushes, so is a must to use and have.
- Therapy dog: With this skill the hound eases everyone’s heart, decreasing their stress (-10 stress / -10% stress). It is a nice skill to use if you have the points to spare.
- Man´s best friend: With this skill the hound heal stress to the houndmaster (-20 stress). It is a nice skill if your houndmaster have high stress and it doesn´t cost as much.
- Release the hound: With this skill the hound goes to wander around the map, so the houndmaster can be prepared for anything (+30% scout chance). It is always nice to have some extra scouting chance so use it if you have the points to spare.
Trinkets: The houndmaster is all about damage and dodge, so improving his damage and accuracy can help you a lot in the long run, or improving his survivability (dodge / health rate) can do wonders since he is most likely to suffer damage if you plan to use him to guard allies.
Pros:
- He is a well-rounded hero, who can perform almost anything you want or need.
- He doesn´t need a healer since he can tend to his own injuries, giving your healer a break.
- He can damage any position with his hound, and it gives you two Scooby snacks to boost even further her (the hound) damage.
Cons:
- Thanks to the patch he is no longer that useful at stress healing, so don´t rely on him to control your stress.
- He can lack damage if you don´t give him trinkets, and can put you in a bad spot if he is the main damage dealer.
- He is quite fragile for someone who can guard a hero, so be careful with his HP.
- While he can stun he needs to be in position 1 or 2, disabling some of his abilities in doing so.
- He relies on dodge a lot, so try to boost his dodge rate so he can survive longer.
The jester

Main role: Support
Secondary role: Damage dealer
DOT: Yes (bleeds)
Crit buff: +40% stress healing bonus
Skills: The jester is unique in his way to deal with the battles. He can go and bleed out his enemies with his sickle, or rush towards them with his dagger. If he needs to he can ease the minds of his allies / inspire them thanks to the sound of his lute. And as the entertainer he is he can end it all with a big blast thanks to finale. Whatever you decide to do, make sure the laugh is not on you.
- Dirk stab: With this skill the jester rushes towards an enemy (like that is original), moving him forward one rank. It can also ignore guard, can reach position 1, 2 and 3, and it boost finale´s damage. It is a good skill to have but is not as flashy as other skills as highwayman or grave robber.
- Harvest: With this skill the jester shows that he approves on communism, by attacking both position 2 and 3, because why not sharing? It has a moderate damage penalty, it can inflict bleed and most importantly, it boosts finale´s damage. It is a good skill to have if the mobs are weak towards bleed.
- Finale: The Magnum opus of the jester. With this skill the jester will impale himself and can target any position he likes. It can only be casted once per battle and when the jester is on position 1 or 2 and it has bonus damage. When he uses this skill he will be moved backwards three ranks and will suffer a massive debuff (- DODGE, – SPD, +100% stress) that will last for the rest of the battle. It is nice skill to use against bosses if you boost the damage, but otherwise can be neglected.
- Solo: With this skill the jester will go ♥♥♥♥ rock star, dashing straight into the public. It buffs the jester (+ DODGE, + SPD, + 75% damage and +10% CRIT to finale) while moving him three ranks forward. It targets him and can be used twice per battle. It is a really nice skill if you are planning on using finale but be careful about the mark, most mobs do extra damage towards marked heroes.
- Slice off: With this skill the jester embraces the capitalism by just attacking one mob. It can reach position 2 or 3; it deals slightly more damage than harvest and inflicts bleed; it also boost finale. It is a good skill to have but you have to decide between socialism or capitalism, you cannot have both.
- Battle ballad: With this skill the jester uses his lute to inspire his allies in the battle. It grants a nice buff to himself (+ DMG and CRIT to finale) and his teammates (+ ACC, + CRIT, + SPD). It is a nice skill to have if you want to buff your teammates.
- Inspiring tune: This is the main reason for why you want / need a jester. He will touch his lute (not sexually) and heal stress to one ally and protect it from incoming stress damage (- stress, -% stress DMG) while boosting the jester´s finale (+ DMG and + CRIT on finale). This is a must on a jester since is perhaps the best stress healing in the game.
Favorite position: 2 and 3.
Positions that can reach: 1, 2 and 3.
Camping skills: When the jester camps he likes to bright the atmosphere he is in, by either using his lute for the enjoyment of his allies, or by making fun of one for the entertainment of everyone. Whatever he does you can ensure a smile on most of them.
- Turn back time: With this skill the jester heals the stress on one ally (-30 stress on ally / – 15 stress if the ally is afflicted). It is a decent skill if one of your heroes is suffering for high stress.
- Every thoth has its thorn: With this skill the jester touch his lute (in a sexual way) to help his allies deal with stress better (-15 stress to party members minus himself / -15% stress DMG minus himself). It is a decent skill to help you keep the stress low and help the jester in keeping it lower.
- Tiger´s eye: With this skill the jester decided that Russia was not good enough in boxing, and succumbing to dirty American propaganda. It buffs an ally (+10 ACC, +8% CRIT), and is a nice buff to use in your main damage dealer.
- Mockery: With this skill the jester makes one of the heroes his personal ♥♥♥♥♥, mocking and degrading that one hero for the entertainment of everyone. It grants some stress healing to three party members (-20 stress on three allies) but perturbing one poor random hero (+20 stress on one ally). It is a bad skill since you don´t have the control over who gets the hit for the team, and can even ♥♥♥♥ you over if it chooses an already stressed hero.
Trinkets: The jester is all about dodge and perhaps some damage. You can go out of your way and buff the jester´s damage (but don´t expect much), or try to take the best of him and boost his bleed chance since he relies a lot in that. But what you really need / want is to buff his health and his dodge rate, since he cannot take many punches before he gets to death´s door, so preventing that can ensure you a happy (and alive) jester.
Pros:
- He is the best at stress healing in vanilla game right now, so he is a must.
- He provides some good buffs to your entire party.
- If buffed he can do some nice damage with finale.
- He is not affected as much by being shuffled due to his high mobility.
Cons:
- He is quite fragile, so a few hits and he might be in death´s door already.
- Aside his finale, his other abilities doesn´t make much damage and relies on bleeds to do the job.
- He relies on dodge rate to mitigate damage, so in harder difficulties he can be in a pinch.
- He takes an important slot as stress healer, so your front row needs to be able to reach position 3 and 4 by other means.
The leper

Main role: Damage dealer.
Secondary role: None.
DOT: No.
Crit buff: +10 ACC
Skills: The leper´s skills are more powerful when you give him a turn to look deep inside him, so he can either find the resolve to withstand whatever comes at him, or to gather the strength so he can wield his massive blade to bring justice against his foes. He is also a self-sufficient class, not needing the aid of his fellow allies nor being able to help them in any way.
- Chop: This is the bread and butter skill of the leper. With this skill the leper attack a foe with his massive blade. It can be used on position 1 and 2, but can only reach position 1 or 2, and it has lower ACC compared to the other skills other classes has, so expect him to miss A LOT; but when he actually hits then also except the mob to die.
- Hew: This is also a bread and butter skill for the leper. With this skill the leper raises his massive ♥♥♥♥ blade and deals damage to both position 1 and 2, but can only be used on position 1 or 2. It has a moderate damage penalty and low ACC, so he will miss A LOT. This skill is good when you want both position 1 and 2 dead.
- Purge: With this skill the leper goes and swings his blade, moving the mob in front of him (knockback 3 ranks) and destroying any corpse in the battlefield. It can only be used on position 1 and can only attack position 1; it has a moderate damage penalty but it grants the leper a little buff on ACC, it is always nice to have it if you are having troubles dealing with corpses.
- Revenge: With this skill the leper will buff himself (+ ACC, + DMG, + CRIT) but also grants him a debuff (-10 DODGE, + damage taken). If you really like the leper this skill is a must, he might waste a turn for using it, but the buff last as long as the battle, and suddenly the leper crits in every attack, killing almost any mob in one swing.
- Withstand: With this skill the leper prepares his anus body so he can take a beating. It grants him PROT and some nice buffs (+% blight, bleed, move and debuff resistances) but it also marks him, making him an easy target for mobs that really are into marked people. It used to be better, but now it last for the entire battle and can only be used once, so he cannot stack prot anymore.
- Solemnity: With this skill the leper goes full space marine, granting himself both HP heals and stress heals. This skill is a must because it gives the leper more survivability and some rest to your healers, can help you controlling his stress rate and can even save you in a pinch.
- Intimidate: With this skill the leper debuffs a mob (- DMG, – SPD) and can remove stealth, but also grants the leper some buffs (+2 SPD) and marks himself. It is not a good skill because there are better skills that can remove stealth, and while the speed is good, the mark is just horrible since mobs will eat the leper alive.
Favorite position: 1 and 2 (but he really loves position 1).
Positions that can reach: 1 and 2.
Camping skills: When the night comes and the other members gather, the leper prefers to be left alone, so he can meditate and prepare himself for the battles to come, or so he is not a liability to his fellow companions for his decaying body. Whatever he does, he does it alone, for all he needs is he.
- Let the mask down: With this skill the leper takes out his mask, his prison; so he can have the soft wind on his face (-25 stress on himself), but in doing so his companions have a chance to stare at the face of a dead man (+5 stress to other party members). It´s cost is so low that it could be a useful skill if your leper is suffering high stress.
- Bloody shroud: With this skill the leper changes his bandages, granting his body a well-deserved rest (+25% bleed, blight, move and debuff resistance). It is only good if you are not planning on using withstand since both skills share the same buffs (with some adjustments)
- Reflection: With this skill the leper gazes upon his massive blade, seeing just how much his body has decayed, but also gaining the strength that his blade is perhaps the only thing that shares his pain (+10 ACC, +8% CRIT / – 20 stress). This is an excellent skill to use on the leper since you help him with his accuracy problem and, with revenge, he becomes in a CRIT killing machine.
- Quarantine: With this skill the leper realizes that he shouldn´t stick around his allies, for they cannot understand his situation and, in fact, are terrified by his presence, so he must be casted aside, for everyone´s sake (+20% self-health damage / -20 stress to remaining party members (50% chance) / -15 stress to remaining party members (50% chance). This skill is meh; there are other stress healing skills that perform way better than this one without putting such strain on its user.
Trinkets: The leper truly benefits on CRITS, ACC, health and PROT. If you are planning on using revenge then any trinket that boosts CRITS or ACC is a must, so he can hit more consistent and crit more often. If you want to use your leper to take the agro from mobs, then you might want to improve his PROT rate and health, so he can suck more damage and mitigate it. Don´t worry about his damage though, he already has the highest damage stat in the game and he likes to crit.
Pros:
- Has the biggest HP and damage stat, making him a beefy tank.
- He is quite good at surviving without the help of other teammates.
- He can dispose of corpses so your party has an easier time reaching enemies.
- Thanks to the new buff his skills aren´t useless anymore, and crits like crazy.
Cons:
- He has a serious problem with ACC, making him an unreliable damage dealer because he will miss A LOT without trinkets or buffs.
- He is slow as ♥♥♥♥, so he will always go last in the fight.
- He can only reach position 1 and 2 to do damage, making him useless against important targets.
- He can´t provide any kind of support to his team, being a greedy bastard.
The man at arms

Main role: Support
Secondary role: Damage dealer
DOT: No
Crit buff: -33% Stress
Skills: The man at arms is a veteran forged and molded in the battlefield; he is an expert tactician who can give orders to his allies to perform better even in the heat of battle, he can use his voice to frighten the enemies and slow them down or he can protect the weak and dying with his life, so they can stand to fight another day.
- Crush: With this skill the man at arms hits a mob straight in the face with his mace, and that´s it. It is a decent skill that can reach position 3, so is better than most for a front liner, and any man at arms worth the eye patch starts with it.
- Rampant: With this skill the man at arms go and hit a mob with his shield, with a chance to stun and move (knockback 1 rank) the enemy. It does have a considerable damage penalty and cannot reach position 3 anymore, but moves the man at arms one rank so this helps him when shuffled or when he is in a team that likes to move around. It is a good skill to have if you have the trinkets to improve the % chances.
- Bellow: The man at arms yells at the enemy team, destroying their eardrums and causing a debuff on them (- SPD, – DODGE, +% CRIT if marked). Despite the fact that this skill doesn´t do any damage, the debuff is more than enough to make up for it; it almost guarantee that you will always go first for three rounds, allowing you to safely kill any mob on the enemy team, making it a marvelous skill if your team is slow.
- Defender: With this skill the man at arms guards an ally from any damage while also buffing the man at arms (+PROT). This is an excellent skill, especially in certain boss fights. Also the buff allows the man at arms to tank more damage and it stacks each time you use it.
- Retribution: With this skill the man at arms hits a mob, marking himself and activating riposte. Unlike the highwayman this skill doesn´t move the man at arms and it has a major damage penalty when used. This skill combined with defender allows you to do even more damage since now you have double chances to use the riposte.
- Command: With this skill the man at arms yells some ♥♥♥♥ to his teammates, providing them some nice buffs (+ ACC, + CRIT, + DMG when guarded) for the duration of the battle, This is a very good buff since right now the game focus mostly on crits, so you know what they say, the more the merrier.
- Bolster: With this skill the man at arms rises his mace, threatening any ally that anyone who dares to take a hit from the enemy team will have to spend the night with the caretaker, motivating them (+ DODGE, -% stress) for the rest of the battle. This skill is quite bad unless you are planning on stacking dodge, but otherwise use command.
Favorite position: 1 and 2 (4 with an item, but is more of a gimmick).
Positions that can reach: 1, 2 and 3.
Camping skills: When camping, the man at arms shares his wisdom to his fellow uncultured swine friends, in the hope they can perform better at the fights. He also shares his plans and strategies to buff his teammates in the incoming battles.
- Maintain equipment: With this skill the man at arms spend some time cleaning and giving maintenance to his equipment, giving himself a nice buff (+15% PRO, +15% DMG). It is a decent skill since the buffs are good, but it cost more than it should, so is up to you if you want to use it.
- Tactics: With this skill the man at arms tells his teammates that they suck so hard they can´t even walk straight, but fortunately for them he is there, so it gives a nice buff (+10 DODGE, 5% CRIT). If your team relies on crits and dodges then this skill is a must.
- Instruction: With this skill the man at arms selects the most stupid ally in your team and tries to, at least, give it a slight hope of surviving, granting a buff (+10 ACC, +3 SPD). Unless your team has a leper or an arbalest then this skill is quite bad, since there are better buffs at almost the same price, so don´t bother at all.
- Weapon practice: The man at arms truly wishes to leave the dungeon alive, and for that he trains the least given warriors he has under his command to use their weapons properly, buffing them (+10% DMG, +8% CRIT on other party members with a 75% chance). It is a good skill, especially if you manage to get the crit bonus.
Trinkets: The man at arms is a beefy boi who likes to protect his teammates, and if he has the time, to disrupt the enemy formation and stun some mobs. For this end giving him trinkets that boost his health, PROT and move / stun chances is the way to go for the man at arms. Also another viable strategy is to improve him debuff chance if you plan on using bellow.
Pros:
- He has a very decent health pool, making him perfect for protecting his fellow teammates without putting himself in danger.
- He has an amazing skill that can both stun and move mobs, making him perfect to disrupt the enemy formation.
- He also is excellent if you want to buff your party´s stats during the fight or while camping, making him a valuable asset.
- He is the only one who can debuff the enemy´s speed, granting you to go first for three turns.
- If you like to be more aggressive he has riposte, so he can deal extra damage.
Cons:
- He is very trinket reliant because some playstyles require him to grant stuns, move and debuffs.
- He can be a little bit slow, so he will most likely act at the end of the round.
- He can be a pain in the ass with a hellion, since he will be moving her from position 1.
The occultist

Main role: Support
Secondary role: Damage dealer
DOT: Yes (bleed)
Crit buff: +25% healing done
Skills: The occultist is a man whose most strong attribute is his power of mind. While his strength alone is not much, thanks to his researches worth a lifetime he learned how to harvest the power of the void. With this newfound power he can summon the eldritch power to do his bidding; attack whoever opposes him, call upon demoniacal powers to curse and weakened monsters, or use this power to try and heal the needed… with varying results.
- Sacrificial stab: With this skill the occultist will go full tsundere and stab a mob. This is a really good skill to have if you plan to have since it does more damage towards eldritch types, has good range and has a really good CRIT mod.
- Abyssal artillery: With this skill the occultist summon his inner hentai fetish to do pervert things attack any poor unsuspected victim. This is another good skill since it attacks both position 3 and 4 and does more damage towards eldritch types, but sadly it has a slight damage penalty.
- Weakening curse: With this skill the occultist will curse a mob, debuffing it (- PROT, – DMG) and marking it. While it does no damage this is the best debuff the occultist has and can make some boss fight trivial and has a good CRIT mod. It used to be better though.
- Wyrd reconstruction: With this skill you will either learn to love or hate the occultist. This skill heals a party member; it has some drastic numbers (it can heal up to 22 to 0 HP) and has a slight chance to inflict bleed to the victim hero. This skill is also what makes the occultist a primary healer, but should be also considered unreliable since you are up to your luck when using this skill, helping you in a pinch or straight up screwing you up. Regardless of that any occultist should have this skill.
- Vulnerability hex: With this skill the occultist debuff a mob (- DODGE) and mark it. Despite the fact that it has a good CRIT mod this skill sucks; unless i´m taking crazy pills this skill used to remove stealth, but nowadays only diminish dodge, so if you want to use a debuff use her sister (weakening curse).
- Hands from the abyss: With this skill the occultist will use his eldritch power to sexually harass an unexpected victim stun a mob. It has a considerate damage penalty, it has a very nice CRIT mod, and can stun up to position 3, but sadly it can only be used if the occultist is in position 1 or 2 and diminish your torchlight per use. This skill is highly situational since is not a bad skill, but it puts the occultist in a really bad spot where almost any mob can reach him, so use it with caution.
- Daemon´s pull: With this skill the occultist will use his powers to kidnap a loli move a defenseless victim. This is also another good skill since it can be used on position 3 or 4, can move a mob (pull 2), has a nice CRIT mod and can clean corpses, but it has a considerable damage penalty.
Favorite position: 3 and 4 (but he can also work in position 2).
Positions that can reach: Mostly position 3 and 4, but he can also reach position 1 and 2.
Camping skills: The occultist is an odd man, who can be found using his spare time to communicate with his captor, the void that surrounds and corrupts his mind, so he can harvest its power to grant strength to himself and his party. But this power doesn´t come free, and it takes a tool on those who step ahead into the dark.
- Abandon hope: With this skill the occultist will understand the meaning of life and how meaningless it to struggle against imminent death, giving himself some relief (-25 stress), but in doing so he stresses his party (50% chance +10 stress / 50% chance + 5 stress). This skill is fairly decent since the cost is very low and can help you if your occultist is having a bad time, and the drawbacks aren’t that bad.
- Dark ritual: With this skill the occultist remembers the good old days where he sacrifices virgins and goats, just for the lols. In doing so he discovers that he can heal people (+50% heal on ally, removes debuff of death´s door) but in doing so the occultist depletes the torchlight (-100 torchlight) and he gain some stress (+15 stress). To be fair I have never used this skill since the heal from the camp is enough.
- Dark strength: With this skill the occultist summon the dark energies in order to grand strength to an ally (+25 DMG), but in doing so he stress himself (+15 stress). This skill is fairly good since the damage can make a huge difference on the damage dealers, and the stress is minimum compared to the reward.
- Unspeakable commune: With this skill the occultist gives all the hentai creates a way to communicate to the void, protecting him from anything that might perturb his dreams (prevents night ambushes), but in doing so his allies thinks that he is a weirdo (+7 stress on party). This is be most useful skill from the occultist since any skill that prevents any night ambush is a fairly good skill.
Trinkets: The occultist is indeed an odd man who can perform a lot of task, but in his diversity comes strength. He is an excellent healer when he wants to so improving his heals can do wonders or can be omitted. If you plan to use him as a damage dealer improving his ACC, CRIT chance or raw DAMAGE will go a long way and will help you a lot, or if you plan to use him as a support class you can improve his DEBUFF chance or STUN chance, so he performs at maximum efficiency.
Pros:
- He can grant certain debuffs to the mobs (specially certain bosses) that can let them useless.
- He is your second choice of healer if you don´t want to use a vestal, with his heals being “stronger” (he can CRIT heal your hero for 60 health or more), making his heals ideal when you face mobs who can dish a lot of damage to one character.
- He can help you moving mobs from position 3 and 4, making your life easier.
- He is a crit machine because most of his abilities have a nice CRIT chance attached to them.
- He has bonus damage against eldritch, so he do wonders on the darkest dungeon or the cove (♥♥♥♥♥♥♥ fishes).
Cons:
- He is quite fragile, so if he is targeted he can get to death´s door in no time.
- His heal, while good, can be quite unreliable because it can heal for 0 points and grant a bleed to your hero.
- Is damage is quite low when he is not facing eldritch types.
- He relies on dodges to keep himself from harm’s way.
The plague doctor

Main role: Support
Secondary role: Damage dealer
DOT: Yes (Blight)
Crit buff: +20% blight chance
Skills: The plague doctor is a scholar who knows nothing of war, so she relies strongly on her researches. She can use her grenades to either inflict blights to her enemies or stun them with a stun grenade. Her researches also allow her to cure her teammates from blights or bleeds, and can even buff their strength with the help of tonics.
- Noxious blast: With this skill the plague doctor launches a blight bomb to an enemy, blighting it. This skill can reach position 1 or 2, gives a debuff (- ACC) and can only affect one mob, so in general you don´t want to have this skill since your frontline can handle the mobs in the first two ranks, and your major priority should be their back line.
- Plague grenade: With this skill the plague doctor launches a blight grenade to two enemies, blighting them. This skill can reach both position 3 and 4 to inflict blight, so this is a must on any plague doctor (besides the fact that any PD worth the mask has this skill), and is useful since it helps in the rush towards killing the enemy´s back row.
- Blinding gas: With this skill the plague doctor launches a stun grenade that affects both position 3 and 4. This is the best stun on the game since it can affect the back row, helping you a lot in dealing damage while disabling them. Also in some boss fights, due to the position of both the boss and his minion, can do wonders against them.
- Incision: With this skill the plague doctor cuts a mob, with a chance to inflict bleed. It is a fairly decent skill, but bear in mind that it can only reach position 1 and 2, so use it only when you need to finish off a mob who endure the fight with very low HP.
- Battlefield medicine: With this skill the plague doctor makes her allies smell a flask with unknown content, healing them and curing both blights and bleeds. This is a nice skill if you are a greedy ♥♥♥♥ who don´t want to waste money on potions or bandages, but don´t rely on the heal itself since it doesn´t heal ♥♥♥♥ (even the antiquarian heals more).
- Emboldening vapours: With this skill the plague doctor once again forces an ally to smell a flask, but this time the effects are that if buffs that hero (+ DMG, + SPD). This is an excellent skill for damage dealers since the buff last all the battle, and can be used twice so your grave robber and highwayman will dance at the damage and speed buff.
- Disorienting blast: With this skill the plague doctor launches a stun grenade to an enemy. This skill can reach position 2, 3 and 4, can clean corpses and shuffle the enemy, so is perfect if your team composition are having troubles reaching the back row.
Favorite position: 3 and 4.
Positions that can reach: 1, 2, 3 and 4.
Camping skills: When camping the plague doctor likes to experiment tend her allies´ injuries, by either using lotions and potions (but unlike the antiquarian these at least have science all over it), or using the old reliable to heal diseases because leeches are known to heal anything.
- Experimental vapours: With this skill the plague doctor saves gold by changing piglets and rats to lepers and abominations, since no one will miss them. It grants +50% HP to the target and buffs incoming healings up to +33%. I have not used this skill… ever, but it sounds good when in a pinch, so use it if you have points to spare
- The cure: With this skill the plague doctor makes herself a public enemy against any other medic since she developed an injection that can cure almost anything. She can only use this skill on herself, it removes a disease and grants a +20% disease resistance. It is a nice skill to use so you can save money if your plague doctor has a disease (cannot cure the crimson curse).
- Leeches: With this skill the plague doctor uses some leeches (god knows why she brings them with her to a dungeon that can be her tomb), so they suck an ally, healing it by 15%, it removes blight and removes almost any disease on an ally (cannot cure crimson court). This is another good skill to have since it can help you save some money if your hero is sick.
- Self-medicate: With this skill we have the first records of humanity giving immunity to diseases by not going to a doctor. This skill can only be used on the plague doctor, it heals her by 20%, it grants her -10 stress, it removes both blights and bleeds and buff the plague doctor (+ ACC). This is a decent skill if your plague doctor is injured and requires the heal, but otherwise it can be omitted,
Trinkets: The plague doctor is all about her blights, stuns and a little survivability. It is in your best interest to get trinkets that can buff her blight and stun % chance so she is more effective in battle, or you can give her some trinkets that buff her health and her dodge rate since she is quite fragile.
Pros:
- She is the best stunner in the game thanks to her grenades, allowing her to stun the back row efficiently.
- She can also deal massive damage thanks to her blights, eating enemies even with high PROT.
- Thanks to her potions she can heal both blights and bleeds, letting you buy another supply.
- Certain champions truly benefit from her damage buffs, allowing them to do massive damage.
- When camping she can heal diseases, saving you some money from the sanitarium.
Cons:
- Despite having a heal, this one does the same healing as an antiquarian, so is pretty low.
- If you decide to take a plague doctor you need to decide between a proper healer or a stress healer, so she takes an important slot.
- She can be easily disrupted if she is moved, making her useless for a turn.
- She has a really low HP pool, making her quite fragile, so if she is focused she most likely will be at death´s door.
The vestal

Main role: Support
Secondary role: Damage dealer
DOT: No
Crit buff: +25% healing done
Skills: The vestal is a nun who has devoted her life to defend and fight in the name of the light. While she is not suited for the rage of war, she can hold her ground with her mace while being able to summon the power of the light to aid her in the heat of battle, but she truly shines in keeping her party alive and healthy, so they live to fight another day.
- Mace bash: With this skill the vestal will hit a mob. It is a pretty standard ability which can only reach position 1 or 2 and can only be used when she is in position 1 or 2, and has bonus damage against unholy types. Unless you plan to use her in the front rank this skill is pretty garbage since the vestal is best suited as a healer.
- Judgement: With this skill the vestal will use the power of the light to call upon the power of the light to judge an enemy. This is a good skill for the vestal since she can use it in position 3 and 4, it can reach any position and it heals her when used making it perfect to finish off mobs while healing her, but sadly it has a damage penalty, so it doesn´t do damage.
- Dazzling light: With this skill the vestal call upon the power of the light so she can stun an enemy and illuminates the way (it gives slight torchlight). This is another good skill to use on the vestal since it can be used on position 3 and 4, but sadly it can only reach up to position 3. It doesn´t do any damage and one of her best trinket lower the chance to stun, so only expect to stun mobs with low stun resistance.
- Divine grace: With this skill the vestal uses the power of light to heal the wounds of an ally. This skill will heal an ally in any position and can only be used when the vestal is in position 3 or 4. While this skill only heals one person, the heal given is also bigger and, unlike wyrd reconstruction, it does have a better heal rate (it is more reliable) but, unlike the same skill, it heal way less. It sacrifices strength for reliability, so if you don´t like to rely on the RNG use this skill.
- Divine comfort: With this skill the vestal will call upon the power of the light so she can use its power to heal her entire party. This skill can be used on position 2, 3 and 4 and will heal every hero on the battlefield. While the heal rate is even lower than divine grace, it can help you at keeping your entire party healthy when facing mobs that can damage all your party, so you don´t need to focus one at a time. It also helps you when the battle is a fight of endurance, so is a must regardless of position.
- Illumination: With this skill the vestal uses the power of the light to weaken an enemy and give it debuffs (- DODGE, removes stealth) and illuminates the way (it gives slight torchlight). This skill is overall meh since it has a moderate damage penalty; it can only reach up to position 3 and can be used on position1, 2 and 3.
- Hands of light: With this skill the vestal harvest the power of the light, so it grants her more power to fight (+ DMG against unholy types, + ACC, + DMG). This skill is pretty good if you are planning to use your vestal as a damage dealer since this skill can only be used on position 1 or 2 and can reach position 1, 2 and 3; but take into consideration that the skill has a moderate damage penalty.
Favorite position: 3 and 4 (but she can also work in position 2).
Positions that can reach: All positions depending of the skill and her position.
Camping skills: When camping the vestal loves to share her wisdom and devotion towards the light in the form of blessings and chants, bringing hope, peace of mind and newfound resolve to the corrupted and tormented souls of her allies.
- Bless: With this skill the vestal uses the power of light to bless an ally, granting it some buffs (+10 ACC, +10 DODGE). This skill is pretty good when used on characters that rely on dodges to keep themselves safe, so use it if you can.
- Chant: With this skill the vestal shares her wisdom to one of her allies so it can grant a small respite (if religious -20% stress damage and -15 stress / if not religious -10% stress damage and -5 stress) from all the madness. It is fairly decent skill to use when used on a religious character.
- Pray: With this skill the vestal convinces her party to pray to the light so they can be blessed by it, granting buffs according to one resolve (if religious -15 stress and +15 PROT / if not religious -5 stress and +5 PROT). It is a decent skill to have if most of your party are religious and can use the buff, otherwise there are better skills at this price.
- Sanctuary: With this skill the vestal pray to the light so it keep an eye on her for any evil that may creep around in the darkness, denying any night ambush (if religious) and helping the allies who had near dead experiences (If any ally has a mortality debuff it heals 50% and reduces stress by 25). This skill is enough just for preventing any night ambush, so is always worth having or learn it.
Trinkets: The vestal is all about heals and survivability, so if you want to make the best of your vestal you need to equip her with trinkets that buff her healings, and if you want to you should also buff her HP and dodge rate, so she can be more secure in more dangerous dungeons. You can also go combat vestal but that is not advised.
Pros:
- She is perfect for when you face enemies who deals poke damage (poor damage but affect all party members), giving you a better endurance overall.
- Her healings are more reliable than the occultist´s one, since they will always have a steady number instead of being all or nothing.
- She can stun foes up to position 3, and gives you some torchlight.
- She can deal additional damage towards unholy types, making herself perfect for the ruins (like the crusader).
Cons:
- She lacks damage since the skills that does damage can only be used in position 1 or 2, and the ones that allow her to be “safe” in position 3 and 4 do little damage.
- She has a below average HP pool, making her quite fragile, and she doesn´t have enough dodge to make up for it.
- Her camping skills are quite bad, so you need to bring someone with good skills to make up for it.
- Despite the fact that she has an stun, she can barely stun anyone in the game, unless is a mob with very low priority (and very low stun resist).
The flagellant
Class: Flagellant (DLC ONLY)
Main role: Support / Tank
Secondary role: Damage dealer
DOT: Yes (bleed)
Crit buff: +20% Bleed skill chance
Skills: The flagellant is a warrior who has learned to work through the pain (he probably saw that batman movie). The flagellant is a very odd man who yearns for pain and stress since he gets stronger the more he is injured or stressed. Thanks to this odd combination you can only make the best of him if you let him go wild on his atrocious ways, but be careful for his power can be his end.
- Punish: With this skill the flagellant will teach his “peaceful” ways by force. He will whip any mob who dares mock his ways, bleeding them. This is his most basic skill but sadly he can no longer target rank 3, so his range is quite short. Still a decent skill to have thanks to his bleed percent chance and damage.
- Rain of sorrow: With this skill the flagellant will make it rain all right. The flagellant will launch an attack that reaches both position 3 and 4, it has a considerable damage penalty but in exchange it has a decent chance to inflict bleed. Not a very skill to have unless you rely on dealing the killing blow using DOTs.
- Exsanguinate: This skill can only be used when the flagellant is below 40% HP. With this skill the flagellant will punch a mob really hard, receiving a 50% HP heal and bleeding the mob in the process. Thanks to the new patch this skill can only be used 3 times per battle, and each time the heal becomes weaker. It is a good skill to have for when the flagellant is in a hard spot.
- Redeem: With this skill the flagellant uses his masochistic powers to heal an ally. This “heal” is quite weak and it last for 3 turns, but in exchange it will cause bleeding on the flagellant. Not a very useful skill when you can use a “dedicated” healer on your team.
- Reclaim: This skill can only be used when the flagellant is below 40% HP. With this skill the flagellant raises him hand, gathering masochistic power to heal himself and an ally. Thanks to the patch this skill can only be used twice per battle and the heal becomes weaker after each use. It is a really good skill to have for when ♥♥♥♥ hits the floor and you need a heal desperately.
- Endure: With this skill the flagellant will use his sexy body power to somehow relief some stress on your heroes, but since the sick ♥♥♥♥ cannot let that slip by he will gain some stress instead and a slight speed boost. This is a decent skill to have if you are willing to trade the stress from one character onto your flagellant.
- Suffer: With this skill the flagellant will “exchange” any DOT (bleed or blight) of any ally to himself, and will remove marks if a hero has been marked. But since the ♥♥♥♥♥♥♥ needs to be hard to use he will mark himself, but at the same time he will receive a -% stress buff and +% deathblow resist. This is an excellent skill to have since DOTs can kill a hero who is in death´s door, giving you extra time to save that hero.
Favorite position: 1 and 2
Positions that can reach: 1 and 2
Camping skills: The flagellant can spend his masochistic nights by beating the ♥♥♥♥ out of him thanks to his lash. Just be careful on what you want to do with him, for his lace can be his savior or his doom. Have in mind that the flagellant has only 4 skills, all unique to him; he loses the other 3 skills every hero share.
- Lash´s anger: With this skill the flagellant receives +40 stress on one go. Use it only if you want to rush and get him rapturous.
- Lash´s solace: With this skill the flagellant receives -50 stress. Use it if your flagellant has been sucking tons of stress and you still don´t want to get him rapturous.
- Lash´s kiss: With this skill the flagellant receives +33% HP, removes any DOT and buff him with +3 SPD. I don´t want to get hit with this thing, it already had his blood and now he French kissed it.
- Lash´s cure: With this skill the flagellant cures a disease he might have (except crimson curse). Just don´t ask how hitting yourself constantly with a lash cures you.
Trinkets: The flagellant is all about survivability and endurance, making trinkets that improve his health and PROT essential to him, for you want to harvest his strength without putting on real danger of getting himself killed. Stacking dodge rates can also help him to live just a little bit longer. Just don´t stack raw damage on him since he doesn´t do any damage besides bleeds.
Rapturous: This is an affliction exclusive to him. While others might find doom when afflicted, this man has learned to get the most of himself whenever he gets afflicted, but be careful for this power doesn´t come free, and might be his doom if you get careless. He receives +25% DMG and +3 SPD, but he loses -20 DODGE and acts as any other afflicted hero, so consider this “power” a double edge sword.
Pros:
- He can be quite hard to kill thanks to his abilities, allowing you to get a “secondary” healer.
- He can reliably inflict bleeds to almost any mob (except spooky things, they can´t bleed).
- He can be a decent support character if you give him the tools to do so.
Cons:
- Despite being classified as a “tank” his HP pool is not as big as one might think, and he can be on death´s door quick if you get careless.
- He doesn´t really do any damage since he has the lowest “damage ratio” in the cast, relying on bleeding mobs.
- He is quite useless in the ruins, being the only hero who might be a hindrance.
- His abilities relies on him getting rapturous so you can get the best of him, but in doing so he will be afflicted, so be very careful with that.
The shieldbreaker
Class: Shieldbreaker (DLC Only)
Main role: Damage dealer
Secondary role: None
DOT: Yes (blight)
Crit buff: +15% PROT
Skills: the shieldbreaker is a dancer at heart but a goddess of war in disguise, moving around the battlefield and causing havoc wherever she goes. She can go and hit any foe she wants regardless of position for there is nothing that she cannot reach, or if the raw damage is not enough she can cause blight, so her foes suffer the aftermatch of her attacks. She can trivialize any mob whit PROT for her spear spares nothing, and will reach her foes´ hearts.
- Pierce: This skill is a godsent for being the most basic of all skills, being just a simple hit to the face; it has a lot of good ♥♥♥♥ going for it. For starters any shieldbreaker who is not completely faulty will start with this skill. What this skill does is it allows you to hit ANY rank you want, can be used on rank 3 to 1 and it moves you forward. While it has a damage penalty, it makes up for it by having a really good CRIT chance, and it also has the ability to pierce armor, nullifying any kind of PROT the enemy has. You might be wondering, what does this ♥♥♥♥ means? Well, for starters the shieldbreaker is not prone to shuffles or ambushes since she can relocate herself just fine (except in position 4, where you are mostly ♥♥♥♥♥♥) while keeping the damage threshold high and mighty, while also being able to literally ♥♥♥♥ the backrow of the enemy team. And if all that was not enough she can also say “♥♥♥♥ your PROT ♥♥♥” and deal the full damage to any mob, being the ultimate killing machine. If all that ♥♥♥♥ fails then my friend you are doing something very wrong.
- Puncture: While I don´t use this skill a whole lot, it is a very decent skill. For starters the shieldbreaker will use a snake to attack the enemy, moving her forward while moving the mob two rows and applying a speed debuff. What is interesting with this skill is that it completely and utterly ♥♥♥♥♥ on guards, since it can bypass them (ignored), it breaks them and it applies a debuff where the mob cannot be guarded anymore. Also this skill can
- Adder´s kiss: this skill is quite good for when you inevitably reach position 1 and wants to pull out. The shieldbreaker hits a mob with a snake and mover herself backwards, while damaging the enemy and causing blight. The only bad thing about this skill is that it only can reach rank 1 and 2.
- Impale: I will get a lot of ♥♥♥♥ for this, but this skill is kinda lame compared to her sisters, but here we go. The shieldbreaker will launch her spear to the enemy moving her backwards while dealing damage to all the mobs. This skill sucks because it has a rather severe damage and crit penalty, so use it only if you want to kill those mobs who survive with the slightest of health. Also don´t quote me on this, but as far as I can remember this skill used to have a blight chance, but so far I didn´t save evidence for it, neither I used this skill that much.
- Expose: With this skill the shieldbreaker will attack a mob and moves herself backwards while bypassing and disabling stealth from mobs if they were using it, and causing some serious debuffs. What this skill does is it disables the stealth on mobs, while doing some damage to them and applying some debuffs. This skills sucks early game since there isn´t any mob who uses stealth, so believe me when I say spare those coins for something more useful. As the game progress though and stealth becomes a thing (and at some point a nuisance) this skill might be worth getting so your heroes struggle less with stealthy mobs.
- Captivate: This is perhaps the only skill that doesn´t move the shieldbreaker from her place. The shieldbreaker will use some snakes to attack the enemy with a chance of blight; it also has a mark buff, dealing more damage to targeted mobs. This attack can only be used when the shieldbreaker is in the middle of the battlefield (rank 2 and 3) and it can reach the same rows on the enemy team. This skill is phenomenal even without the mark buff, so always try to use it whenever possible.
- Serpent way: With this skill the shieldbreaker will summon the power of the snakes, tits, anime and shields to protect her from harm´s way while moving herself forwards. With this skill the shieldbreaker will buff herself and will activate a unique “buff”; she will gain the ability to “block” two enemy attacks, denying any kind of physical damage. This ability however will not protect her against bleeds, blights or stress, so she is still vunerable to those. Be warned that this ability can only be used twice in each battle, so make the best of it.
Favorite position: Any, this all depend on your team´s formations and your needs.
Position that she can reach: Any position if you have the right skills.
Camping skills: When the shieldbreaker gets tired of being the most vanilla op hero and gets tired of carrying her massive ovaries across the battlefield and wants to rest, she likes to keep being an op vanilla character who will give me a hard time to give a proper explanation of her camping skills since her skills makes no sense and I lack the creativity to come with some witty explanation play with some snakes to gain some buffs, like those snake enchanters.
- Snake eyes: With this skill the shieldbreaker shows her team the power of slytherin the snakes, enabling them a 15% armor piercing to their attacks since the piece of ♥♥♥♥ cannot give them the full buff, the greedy ♥♥♥♥♥. This skill is kinda good if you are going to face a boss with high PROT.
- Snakeskin: with this skill the shieldbreaker will promote the incessant hunt of snakes, so she could use some cosmetic to gain some nice buffs. With this skills the shieldbreaker will get a 15% on PROT and HP, so she can endure a little bit more on the battlefield.
- Sandstorm: with this skill the shieldbreaker will use the power of anime and shukaku the sand so she can protect her allies. With this skill the shieldbreaker protect an ally, making them unable to be marked by enemies. It is a very decent skill, and can do wonders on certain battles like the swine pig, protecting them from Wilbur.
- Adder´s embrace: With this skill the shieldbreaker will spell out the name of the one who must not be named use some snakes to keep her warm (yes, I ran out of jokes years ago). With this skill the shieldbreaker will buff herself, gaining +20% blight chance and blight resist. This is kinda the weakest camping skill of the shieldbreaker since she has much better skills than this one, but still has its uses.
Pros:
- She is perhaps the best damage dealer on the entire game, being able to reach any position without any struggle.
- She struggle the less when she gets shuffled on the team, being able to relocate herself and being useful while doing so.
Cons:
- She struggles a lot when you put her on a team that doesn´t enjoy being moved around, being the nightmares of lepers, hellions, and all those heroes that needs to be in one place and one place only.
- She has a rather low HP threshold; while being the same as a highwayman or a grave robber, she might appears weaker and might die rather quickly if left unchecked.
- Until you manage to trigger all of her nightmares when camping, she can royally ♥♥♥♥ you if you didn´t expect or prepare for that. And even then after those nightmares the snakes can appear later on.
- Her skills are both melee and range type, making her a little hard to put trinkets or perks
.
Heroes: Positive Quirks
I was not going to write about this, but i feel i need to. Quirks in this game are “passives” (like in a mmorpg or like lol) that grants a hero either a slight bonus (more damage, more health, etc) or a downgrade (more stress, less damage, etc). Most heroes comes with a set of quirks that can be either useful or just can be a deal breaker over picking a hero, so before recluiting a hero always look at his skill set (the more skills he has you want the less money you need to use) and his quirks (there are some quirks that are straight bad or terrible on a hero).
The mechanics behind the quirks is that you can have up to 5 active quirks on one hero with the possibility to lock up to three quirks in the sanitarium. When a hero with 5 quirks receive a sixth one random quirk will dissapear and the new one will take it´s place, with the exception of locked quirks who won´t dissapear under any circunstance. Have in mind that the highest the resolve level of your hero the expensive it will take to lock the quirk, so do it early for maximum efficiency.
For the positive quirks they are more focused in giving you a slight edge over certain situations (quick reflexes, unyelding), or do an already useful mechanic (like camping or scouting) even more powerful, or just improving in flat numbers certain actions (more damage, more stress healed). It is up to you to decide what is your character going to do in order to decide which perk helps him to do the job better. Now while there are a bunch of quirks, all with different kind of bonuses, these are the ones i like to use:
- Early riser: It gives you +2 speed when torch is above 75, and any kind of “free” speed is good for any hero, specially with damage dealers, stunners and healers.
- Eldritch hater: It gives you + 15 damage and – 15% stress vs any eldritch type, and in this game most mobs that pose a threat (bosses and mobs) has this type, so you get this bonus a lot. Also in the darkest dungeon all mobs has this type, so it gives you an edge in here.
- Eldritch slayer: It gives you + 10 ACC and + 3 crits vs any eldritch type, so you don´t miss attacks against them in the more difficult dungeons. Also in the darkest dungeon all mobs has this type, so it gives you an edge.
- Beast hater: It gives you + 15 damage and – 15% stress vs any beast type, so it helps you against certain bosses to deal more damage.
- Beast slayer: It gives you + 10 ACC and + 3 crits vs any beast type, so you don´t miss in the hardest difficulties and crit more often, gaining some stress heal.
- Hard nogging: It gives you + 15% stun resist. You want to use this quirk with someone that cannot be allowed to be stunned under any situation (healers and stunners).
- Natural swing: It gives you + 5 ACC. This is more for the leper but it can be worth to be used in other heroes.
- On guard: It gives you + 4 speed and + 5 dodge in the first round of any combat. It is useful when used with stunners or debuffers, since they need to go first than the mobs so they can stop them from acting or debuff something (speed, ACC, damage).
- Quickdraw.: It gives you + 4 speed. This is a slight downgrade from on guard but still good. Lock it if you cant manage to get on guard.
- Quick reflexes: It gives you + 2 speed at any time. This skill is better for damage dealers and healers (but it can be good on stunners too) since they need to move faster than anyone to do their job better.
- Slugger: It gives you + 10% melee damage. This skill is good for damage dealers like the highwayman or the hellion since is a small boost for damage, but it can be quite obsolete late game since most mobs don´t die in one turn.
- Tough: It gives you 10% max heatlh. I love this quirk on healers and tanks, since the healers wants to focus on their allies as long as possible (and this quirk allows them to take a little bit more punishment) and in my tanks it makes them ever more tankier so the mobs have a harder time trying to kill them, they can do more ♥♥♥♥ before requiring healing and they don´t need to do damage.
- Hard skinned: It gives you 10% PROT. I love this quirk combined with tough. While 10% is nothing it can make a difference towards surviving a blow or being in deaths door. Use it with the same characters.
- Unerring: It gives you 10% ranged damage. This perk is mostly for the arbalest and the hound master but it can help them to do their jobs even better so i always look it. But it can become obsolete late game since the mobs won´t die on one hit (unless is a crit).
- Unyelding: It gives you 10% death blow resist. This is more for those heroes with lower health pool than anything, so you can decide to use it or miss it. I use it though with healers since they tend to be weak and targeted by the enemy a lot.
- Warrior of light: It gives you 10% damage when light is above 10%. The damage is for both ranged and melee so you can use it if you get it instead of their respective quirk.
- Fated: If you miss an attack it gives you a 10% of changing that into a hit. This is more for the
leper since he is a piece of ♥♥♥♥ and cannot land any attack in the hardest difficulties. - Nymphomanya: It gives you +20% stress healed when using the brothel. I always lock this quirk on my occultist or any hero that deserve it so they can provide some love in the brothel ( ͡° ͜ʖ ͡°).
Now while this is my list of what i consider the most useful quirks you can use whatever quirk you want. Just have in mind that the ones that gives you less stress using a certain activity or the ones who offers more scouting chances in X dungeons are not so good since you will be condemning that character to be good only on that dungeon (since in the other said hero won´t have a quirk). And also for the camping skills they are not good since camping should be used to buff your party and not healing.
Heroes: Negative quirks
Bad quirks are the ones that gives a hero a “downside” under certain circunstances (weak grip of life, calm), durung certaing actions (Nocturnal, the yips), performing certain mechanics out of combat (stress eater) or just being under a certan curio (♥♥♥♥♥♥♥ kleptos). These quirks have a little more impact than the positive ones since they have more punishing debuffs and sometimes they do things that takes away the control of your heroes and put it in the RNG jesus.
Like the positive quirks the negative ones can lock themselves (the risk rises as you complete dungeons with that character) and 3 can “normally” be locked in a character. The catch in here is that to remove a locked negative quirk takes more money that it would normally do if that quirk was “free” (not locked). Also there are certain curios that can lock a negative quirk even if it is already 3 locked, so be careful or you can find yourself with a character with more locked quirks.
As i said before there are some negative quirks that will affect negatively your character and you might want to take them out, but i will write a list of those that are the worst that you really want to take out as fast as possible:
- Nocturnal: It gives you – 2 speed when light torch is above 75. This perk is really bad in any character, and it affects you since in this guide we don´t do dungeons woth torchlight below 75.
- Shocker: It gives you – 10% stun resist. This perk is horrible since stuns is as effective against you as is effective against mob. So a hero without a turn is straight a bag full of nothing that weights you down.
- Mercurial: It gives you +5% affliction chance. You already have horrible odds againtst a resolve test, don´t make them worst. It can really ♥♥♥♥ you up an afflicted hero since the most dangeous thing in this game is when you don´t have your own heroes under your control. That´s what kills you.
- Winded: – 1 speed if heatlh is below 50%. This can be nothing in the early game since most of the mobs don´t do much damage (or at least damage that you can´t recover from), but in the hardest dungeons your health bar is like in dark souls; an ornament with numbers.
- Lazy eyes: – 5 ACC using ranged attacks. While the leper or the crusader laughs at this quirk, your arbalest will cry. You cannot let your arbalest have less acc, or she will bite you in the ass and miss more than a leper.
- The yips: – 5 ACC. This is worse than the other one since it affect every skill that affect mobs, and in the hardest difficulties you cannot allow that.
- Off guard: It gives you – 4 speed and – 5 dodge at the start of the fight. This ♥♥♥♥ just cannot be allowed to exist the momento you spot it. – 4 speed is a big hit in the balls and can ruin your entire round.
- Phengophobia: + 20% stress when torchlight is above 75. This is just horrible since your main strategy is to neglect as much stress as possible, and then comes this quirk and ♥♥♥♥♥ you. Also if you follow my guide (which you shouldn´t) you will find that some of the trinkets i suggest gives you more stress, and with this quirk your hero will become so stressed that he will become afflicted in no time.
- Slow draw: It gives you – 4 speed in the first turn. This is the same as off guard without the dodge penalty, but in the hardest difficulties it doesn´t really matter since they have a ♥♥♥♥ ton of acc so they don´t miss at all.
- Slow reflexes: It gives you – 1 speed. It might not sound so bad, but you cannot allow your characters to be slow at any time.
- Fragile: It gives you – 10% health. While it doesn´t sound so bad, you don´t want this quirk on your less tough heroes like the grave robber or vestal.
- Weak grip of life: It gives you – 10% blow death resist. Take it away as fast as possible, or you might find yourself with a dead hero.
- Light sensitive: It gives you – 10% damage when torchlight is above 10%. You cannot allow your heroes to become sloppy since you can get punished if they don´t kill fast.
- Any fear / phobia: It includes anything that gives you a debuff when facing a type (eldritch, beast, human, unholy). It includes every type since it makes you weaker against that certain type, making a hero weaker when heading towards a dungeon full of that type. The fear of eldritch can put you in a real bad spot in the darkest dungeon since all of the mob have this type, so your hero will become an stress sponge.
- Any treatment quirks: These quirks makes that a hero can only use one treatment facility to relieve stress. It can be bad since in the early game you are limited with only 1 room, and believe me when i say that the caretaker has the worst timing when using an activity.
- Any forced interaction quirks: These are the quirks that makes a hero to interact with a curio against your will. While sometimes it can be harmless, other times they can get a sickness or stress themselves or get a negative quirk without giving you a chance to do something, and these are the most annoying quirks since it is just so frustratring to lose control of a hero. Be also warned that the curious one is the most annoying of all of them since it triggers at almost anything letting you unable to interact with a curio the way you want (by either use an object or ignore it).
Trinkets: Introduction
The trinkets are items that provide certain bonuses to your heroes when equipped, but they also decrease other stats as “compensation”. Most of the time you want to equip trinkets on your heroes to improve their stats (be it more speed, damage, accuracy, more chances for anything, more hp or prot), so in important to know what do you want / need on a hero and search for a trinket that suits your needs.
There are times though where the bonus can´t compete against the drawback so be mindful about what you seek on the trinket and what are you prepared to pay for it. Despite that there are some stats that aren´t worth decreasing no matter the bonus gained:
- ACC: While it doesn´t sound much, as you progress through the dungeons the mobs become stronger and gain more dodge, so you cannot allow to decrease your accuracy unless the hero is not going to attack (a vestal for example).
- SPD: No matter what bonus the trinket gives decreasing your speed is never a good trade. On this game the turns are given according to the speed your character has against the mobs speed, so having less speed is giving the enemies an opportunity to strike your heroes, screwing you if they manage to hit your heroes hard.
- HP: While there are some heroes that don´t give a ♥♥♥♥ about -10% HP, there are others where 10% less HP makes them squishier than they already were. You don´t want to be against the odds and risk your heroes for a CRIT that depletes their entire life, to be just helpless and die in front of your own eyes.
With that said I want to write a guide where I divide the items by how early you can get it. Have in mind that this is for the purpose to help people in those stages of the game so they don´t feel pressured to get the stronger trinkets and so they can work with what they have. Also some of the trinkets that I put on later stages can be obtained earlier, but sometimes it requires beating a boss or is mere luck (they were obtained as a reward from a mission, most commonly boss missions). Also there are a LOT of trinkets, and most of them are useless even on the early stages, so I’m going to limit myself to write the ones I consider useful on the game. So this list is subjective and experience.
Trinkets: Early game Part 1

Buffs: +5 ACC melee
Debuffs: None
Class: All melee heroes
This is a good trinket if you want to buff the ACC of any melee hero, and it also doesn´t have any drawbacks so is a good trinket.

Buffs: +10% DMG melee skills
Debuffs: -4 DODGE
Class: All melee heroes
This is a good trinket if you need to buff the damage of your melee heroes, and the -4 dodge is nothing compared to the damage since on the early stages keeping the damage at bay is easy.

Buffs: +10% scouting chance /+10% trap disarm
Debuffs: -1 SPD
Class: All
I know, I know, I’m already contradicting myself for what I said, but on the early stages what mostly kills you is getting surprised by the enemy team because you didn´t get the scout chance. But think it this way, if you scout then you have higher chances to surprise your enemies, and if that happens then you go first regardless of speed, is a nice trade-off. Don’t hang me yet :c.

Buffs: +5 ACC
Debuffs: -2 DODGE
Class: All
A slight upgrade to the warrior´s cap since the ACC is not restricted to melee and ranged heroes can get the bonus, so is good to use.

Buffs: +10% DMG
Debuffs: -4 DODGE
Class: All
This is a slight upgrade to the warrior´s bracer since the DMG boost affects also range heroes, so you can use it on them.

Buffs: +15% DMG if in position 1
Debuffs: -3% virtue chance
Class: Leper
This is a nice trinket to use on the leper since he will be most likely on position 1, and on the early stages of the game his ACC problems aren´t that bad, so you can use this trinket without worrying too much of missing hits (but I’d still suggest you to give him some ACC).

Buffs: +15% bleed skill chance
Debuffs: None
Class: Hellion
The hellion benefits a lot from bleedings since she wants to inflict bleeds on her enemies. Also her crit buff receive a bonus against bleeding targets.

Buffs: -15% Stress
Debuffs: None
Class: Hellion
With this trinket you can at least decrease the amount of stress received on your hellion (which can be difficult to deal with at the very start, when you don´t have skills that aid you to control the stress).

Buffs: +10% DMG melee skills
Debuffs: -50% Healing skills
Class: Crusader
This is a nice trinket to have on your crusader early on since is most likely that your only crusader is reynauld, and he doesn´t have any healing skill learned. Also the crusader is more effective with his stress healer ability rather than the HP one.

Buffs: +10% Max HP
Debuffs: None
Class: Crusader
Another useful trinket for the crusader if you are going to face a dangerous mob (either a boss fight or the cove), and it doesn´t have drawbacks so is nice to have some more HP on your favor.

Buffs: +20% Stun skill chance
Debuffs: -2 DODGE
Class: Crusader
If you plan to use your crusader as a stunner then this trinket is a must; it makes the crusader a reliable stunner instead of praying to the RNG Jesus to aid you and stun the mobs. Is better to have the numerical advantage, even if is a little.

Buffs: +20% Blight / Stun skill chance
Debuffs: None
Class: Abomination
This trinket is a must on any abomination if you are not planning on using the transformation because it gives everything the abomination wants and needs, but without the ugly drawbacks.

Buffs: +30% move resist / +20% move skill chance
Debuffs: None
Class: Bounty hunter
This is an excellent skill to have if you plan to disrupt the enemy formation and want to do it with more security on the success rate, but it would be even better if you use a stun trinket.

Buffs: +8% CRIT
Debuffs: +5% Stress / -3% Virtue rate
Class: Highwayman
This is a good trinket if you lack another one that boosts damage or crits. With the new patch crits have been buffed a lot and the +5% stress is really nothing to worry about, besides the -3% virtue rate only matters if you get to 100 stress, which hopefully you are doing your best to not get to that point, so it doesn´t even matter.

Buffs: +15% DMG against eldritch / +8% CRIT against eldritch
Debuffs: None
Class: Occultist
This is an excellent trinket to use on the cove since most of the mobs in there are eldritch, also the occultist have a lot of crit mods on his skills, so adding more crits to him is the best way to go.

Buffs: +40% debuff skill chance / +20 move skill chance
Debuffs: -10% Max HP
Class: Occultist
I really should erase the HP part I wrote earlier… I’m going to get a lot of ♥♥♥♥ but whatever. This is an excellent skill to have on the occultist if you are planning on using debuffs and moving mobs, and the -10% HP can be take cared of with the help of a man at arms or houndmaster. Don’t kill me.
Trinkets: Early game part 2

Buffs: +20% Max HP
Debuffs: -10% DMG.
Class: Vestal
This is a good trinket to use if you lack any trinket that boost the healing rate. The vestal is already a class that should be used to deal damage, instead it should be used to stun and heal, that´s where the vestal shines the most.

Buffs: +4 DODGE / + 1 SPD
Debuffs: -20% Debuff resist
Class: Houndmaster
This is a decent trinket to use if you are planning to boost the speed and dodge of the houndmaster, and the debuff resist you can nullify it by bringing some medicinal herbs

Buffs: +25% stun skill chance
Debuffs: -1 SPD
Class: Houndmaster
I really shouldn´t write ♥♥♥♥ when I am going to just contradict myself… but whatever, this is my guide and I write the rules (please don´t lynch me). Besides, unless you are planning on using the houndmaster on rank 1 or 2 this trinket is useless. But if you are indeed planning on using the houndmaster on those ranks then this trinket can help you on stunning more often. The -1 SPD is really nothing since the houndmaster already have a lot of speed.

Buffs: +9% CRIT
Debuffs: None
Class: Jester
Remember what I said about crits? Well, this trinket is even better since it gives a lot of crit, but unfortunately the jester is mostly used to heal stress. Still a good trinket to use if you plan to use your jester to attack.

Buffs: +15% Stun skill chance
Debuffs: None
Class: Plague doctor
This is an excellent trinket to give to the plague doctor, especially since she has the best stun in the game.

Buffs: +3 CRIT
Debuffs: None
Class: Arbalest
While there are better trinkets that boost crits, this is a nice choice if you suddenly find yourself lacking said trinkets, besides it doesn´t have any drawback.

Buffs: +33% Healing skills
Debuffs: None
Class: Arbalest
This is an excellent trinket to have if your occultist is slacking on the job, since the healing of the arbalest boost the healing rate of that one hero, so you can help your allies if you are on a pinch.
Trinkets: Mid game part 1

Buffs: +10% stun skill chance / +20% stun resist
Debuffs: -4 DODGE
Class: All
This is a nice trinket to use if you want to stun mobs but you are being stunned a lot. Also it helps heroes who can guard heroes, since if they are stunned they stop protecting their allies, and you really don´t want that.

Buffs: +10 ACC Range skills
Debuffs: -2 DODGE
Class: ALL
This is a useful trinket if your arbalest is just missing a lot of her shots, or if your plague doctor just don´t want to do ♥♥♥♥. If they fail after using this trinket you might want to dismiss them.

Buffs: +4% CRIT / +5 DODGE if torchlight is above 75
Debuffs: -6% CRIT / -6 DODGE if torchlight is below 50
Class: All
Since on this guide I highly encourage you to play with high torchlight this trinket is useful, but if you have grown up and are ready to face the dungeons without torchlight then this trinket is garbage.

Buffs: +30% Debuff skill chance / +30% debuff resist
Debuffs: -4 DODGE
Class: All
If you are like me and loves to use below (man at arms), then this trinket is for you. While I don´t care about the debuff resist the improved debuff skill chance guarantees that the enemy will be debuffed (if they don´t dodge), so is a must on him or another hero who relies on debuffs.

Buffs: +15% Healing skills
Debuffs: None
Class: All
This is a good trinket to have if you lack the trinkets of your vestal or want to improve the self-healing of certain heroes (leper, abomination) so they don´t rely on your main healer.

Buffs: +20% Blight skill chance / +20% Blight resist
Debuffs: -20% Bleed resist
Class: All
This trinket is very useful on heroes that relies on blight to do damage (plague doctor, abomination) and grants them some resistances towards blights. Be careful though that they will most likely will bleed at any chance, so try to use these trinkets on maps where the bleeds are less common.

Buffs: +20% Bleed skill chance / +20% Bleed resist
Debuffs: -20% Blight resist
Class: All
The same as the blight amulet but with bleeds (yes, I’m a lazy ♥♥♥♥).

Buffs: +10% DMG / +5 ACC If torchlight is above 75
Debuffs: +10% Stress.
Class: All
This is one of the best trinkets you want to have since they can be used on any hero, buff everything you want / need and the drawbacks aren´t that high, you already are prepared to deal with stress. Be warned though that certain enemies can decrease the torchlight level when they attack, leaving this trinket useless, so always have an eye on your torchlight.

Buffs: +5% PROT / +10 DODGE If torchlight is above 75%
Debuffs: +10% Stress
Class: All
The same as the sun ring, but this trinket is more oriented towards defense, so is a good choice on support or squishy heroes that relies on dodges and has low HP.

Buffs: +8 ACC / + 3 CRIT
Debuffs: -10% Stress
Class: leper
With this trinket you give your leper the acc he desperately needs and also gives him crit, so use it with revenge and your leper will crit like a god. Also the debuff is barely noticeable since the leper can heal his stress.

Buffs: +10% CRIT / +2 SPD
Debuffs: -10% Virtue rate / -33% healing received
Class: Leper
This is an excellent trinket if you want to get rid of the leper make your leper more lethal and crit more often; with revenge expect a lot of crits and the extra speed will help your leper a lot. Just be careful since revenge leave your leper weak, and with the decreased amount of healing he will receive he can die quite fast; fortunately his massive HP pool help him on that.

Buffs: -25% Stress / +10 ACC if torchlight is above 75
Debuffs: None
Class: Hellion
This is an excellent trinket to help you keeping the stress on check if you are struggling with it while also giving the hellion some accuracy. Just be mindful that it requires high torchlight, so you need to pay attention to that.

Buffs: +33% Healing skills / +15% stress healed
Debuffs: -10% Damage
Class: Crusader
This is a decent trinket to have if you want to have a secondary healer, especially now since the crusader can heal on any position, and with the extra stress heal he won´t be having any stress problems. The decreased damage can be easily ignored since you can use your crusader for stuns.

Buffs: -40% stress inflicted on party / -40% on transformation stress
Debuffs: None
Class: Abomination
This is an excellent trinket to have for when you need to use the transformation ability of the abomination since it mitigates the stress penalty for using this skill. Have in mind though that in using this trinket you will handicap the abomination a little since he will be in the dungeon with only one usable trinket.

Buffs: +40% move skill chance / +30% stun skill chance
Debuffs: -15% DMG
Class: Man at arms
This is a god-like trinket for the man at arms since it not only boost his stun chance but also his move skill chance, excellent for people who likes to use rampant. Combine this with the debuff amulet and you have a nasty combination. The decreased damage can be easily omitted since you will most likely use guard or riposte, so don´t worry much about it.
Trinkets: Mid game part 2

Buffs: +8 DODGE / +2 SPD
Debuffs: -10 ACC Ranged skills
Class: Highwayman
This is a decent trinket to have if you like your highwayman to move fast and evade attacks, but also if you don´t rely on ranged skills. If you do though don´t worry, you can use other trinket to try and mitigate the accuracy penalty.

Buffs: +8 CRIT melee skills / +40% bleed skill chance
Debuffs: -1 SPD
Class: Highwayman
You know the drill; ♥♥♥♥ the police and the system. This trinket is good if you like some crits and bleeds on your highwayman, and he has a good amount of speed to compensate for the debuff. Besides if you have dismas (which you should) he will have quick reflexes, giving him +2 SPD.

Buffs: +20% DMG
Debuffs: +10% Stress
Class: Occultist
This is a nice trinket if you want your occultist to deal some damage on the battlefield. Just remember that giving him some accuracy can help him on hitting the enemies.

Buffs: +15% DMG / +10 PROT if in position 2 / +33% healing skills if in position 2
Debuffs: +15% Stress
Class: Vestal
This is an excellent trinket to have if you are planning on using your vestal as a fighting vestal… if it there´s such a thing. Just be careful since she will be sucking a lot of damage on position 2.

Buffs: -10% Stress / +33% healing skill
Debuffs: -10% Stun skill chance / -33% DMG
Class: Vestal
This is the best trinket you can give to your vestal. Yes, the -33% damage can be a deal breaker at first and she already had problems stunning mobs as it is, but bear in mind that the vestal´s skills are better suited to keep your party healed and the pettiest mobs stunned, so I consider this a good trade.

Buffs: +20% DMG / +30% Bleed skill chance
Debuffs: -20% Healing received / -50% healing skills
Class: Houndmaster
This is a good damage trinket for your houndmaster since it also buffs his bleed chance, which all his main attacks has, but sadly this makes him a little more weak since he won´t be receiving the same amount of heals and his own heal is left useless, but is a nice trade off if you need damage.

Buffs: +12 DODGE / +10 ACC range skills
Debuffs: +10% Stress
Class: Grave robber
This is perhaps the most useful trinket the grave robber has, but since the new patch changes came out she is better suited as a melee character. Regardless if you still want to use ranged skills (and improve her dodge rate) then by all means, this trinket if for you.

Buffs: +25% PROT
Debuffs: None
Class: Antiquarian
Simple, effective and accessible. I don´t know what else to say, it helps the antiquarian to live more if you don´t plan on using protect me, also no trinket can make her good.

Buffs: +50% Healing skill / +15% Max HP
Debuffs: None
Class: Antiquarian
The same as the carapace idol, but better. This is perhaps the combo you will be running on the antiquarian since it helps her a lot on surviving and… not being useless for when the combat comes.

Buffs: +10 ACC Ranged skills / +20% stun skill chance / +20% blight skill chance
Debuffs: +25% Stress
Class: Plague doctor
If heroes could be married with trinkets, the plague doctor would call this her husbando. This is the best trinket for her since it boosts everything she needs to become efficient at what she does… throwing bags of ♥♥♥♥ to monsters. Just be careful with the stress, she will suck stress even from the air.

Buffs: +8 ACC / +6 CRIT
Debuffs: -4 DODGE
Class: Arbalest
This is an useful trinket to use on your vestal if you need some accuracy and crits, and the decrease on dodge is almost nothing, so you won´t even notice.
Trinkets: Late game Part 1

Buffs: +20% DMG
Debuffs: -1 SPD / +10% Stress
Class: All
Ignoring the already lame and repetitive joke, this trinket is quite good since it has a massive damage buff, and the decreased speed can be easily countered with perks since you probable got already one that improves speed right?

Buffs: +10% PROT / +15% Max HP
Debuffs: -15% DMG / +10% Stress
Class: All
Personally I loved this trinket before the patch since protection was stackable and you gained more per use, but it is still a great trinket regardless. With this trinket you want to protect your party for any heavy hitters you might face (especially bosses), and the decreased damage is barely noticeable.

Buffs: +25% Virtue rate
Debuffs: None
Class: All
This is perhaps a gimmick trinket, since you are relying a little more on luck instead of skill. If you know that you are going to a quest with a lot of stress then this trinket might help your heroes to get virtuous instead of afflicted.

Buffs: +10 ACC / +5% CRIT
Debuffs: -8 DODGE
Class: All
This is like its brother the sun ring, but as you can see it trades damage for crit rate and instead of stress it decreases dodge. While personally I don´t mind trading dodge for more accuracy or crits, I also dislike decreasing the dodge rate of fragile heroes, so use this trinket on beefy heroes like the leper or crusader since they don´t truly rely on dodges to keep themselves alive.

Buffs: +15% Max HP / +8 DODGE
Debuffs: -2 ACC
Class: ALL
I personally love to use this trinket since it helps weaker classes to keep themselves alive while also improving their dodge rate, and the debuffs are barely noticeable (you already are stacking accuracy on a daily basis). This item is a rare drop so you can get it earlier, but I just got it by week 100 or something like that.

Buffs: +2 SPD / +15% DMG
Debuffs: +10% Stress
Class: All
Another item that I just got recently. The crescendo box helps you with the issue of speed, and is better suited on slower classes to make them act a little bit earlier than they should. And the increased damage helps you killing faster, but you need another trinket that improves accuracy so you don´t miss as often. This item is a rare drop so you can get it earlier, but I got it by week 138.

Buffs: +10 ACC / +10% PROT
Debuffs: +10% Stress
Class: ALL
This is a trinket that you cannot get until you do long champion quests. This item is great since it helps you with the accuracy and boosts survivability thanks to the protection.

Buffs: +15 ACC Ranged skills / +3 SPD
Debuffs: +10% Stress
Class: All
This is a trinket that you cannot get until you do a long champion quest. This item is excellent on the arbalest since it helps her not missing as often while making her a little bit faster, helping you on the rush at the beginning of the battle.
Trinkets: Late game part 2

Buffs: +10% DMG Melee skills / +10% CRIT Melee skills
Debuffs: +10% Stress
Class: All
This is a trinket that you cannot get until you do a long champion quest. This item is marvelous if you want to do some nasty damage with the aid of crits, this is because +10% crit is a lot, and thanks to the new patch stacking crits is easier.

Buffs: +10% DMG Ranged skills / +10% CRIT Ranged melee skills
Debuffs: +10% Stress
Class: All
This is a trinket that you cannot get until you do a long champion quest on the weald (is a suicide mission, believe me). This trinket is the same as her brother but with ranged heroes, helping your arbalest mostly. Be warned though that this trinket only appears as a reward on the weald, and this area on champion is unbelievably harder than any other since it has some nasty mob combination.

Buffs: +15 DODGE
Debuffs: +10% Stress
Class: All
This is a trinket that you cannot get until you do a long champion quest. This trinket do wonders on classes that rely on dodge rate to keep themselves alive. It works well on classes like the grave robber or occultist since they are quite weak and can tank so many hits after finding themselves on death´s door.

Buffs: +20 DMG vs Marked / + 10 ACC vs Marked / +5 CRIT against size 2 mobs
Debuffs: None
Class: All
This trinket is only obtainable after beating Vvulf. It appears this trinket was made it for the bounty hunter since he has the best mark in the game thanks to the debuff on PROT, he also benefits normally for marked mobs and his camping skills also helps him against size 2 mobs. But this trinket is also good on the arbalest or the houndmaster.

Buffs: +10 ACC if in position 4 / +3 SPD if in position 4 / -15% Stress if in position 4
Debuffs: None
Class: All
This trinket is only obtainable after beating the prophet on champion. This trinket is excellent on the arbalest or the houndmaster since these two loves to be on position 4. The increased accuracy helps them to hit more often and the improved speed makes them go first than most mobs, so this is an excellent trinket.

Buffs: +20% DMG vs Unholy type / +10% CRIT vs Unholy type
Debuffs: None
Class: All
This trinket is only obtainable after beating the necromancer on champion. If you are planning on raiding the ruins then this trinket is for you. It seems that the developers intended this trinket on the crusader since he was already strong against unholy types, and with this trinket he just ♥♥♥♥ on them. Also a good trinket if you want to do the Last Crusade formation.

Buffs: +10% DMG Ranged skills / +6% CRIT ranged skills
Debuffs: None
Class: All
This trinket is only obtainable after beating the brigand pounder on champion. This is yet another useful trinket on your ranged heroes since it boosts their damage and helps them get crits more often. It only needs a little accuracy to truly be useful.

Buffs: +20 DMG Ranged skills / +15 ACC Ranged skills
Debuffs: -10% DMG Melee skills / -6% CRIT Melee skills
Class: Highwayman
If you truly want to make your highwayman range only then this trinket is for you. It gives his ranged skills a big buff, helping him killing faster and truly never miss anything (if only missmas). Just be warned that with this trinket you are only going to be able to use range skills, melee is left quite useless.

Buffs: +30% Stun skill chance / +40% Debuff skill chance / +3% CRIT
Debuffs: -10% Virtue rate / +15% Stress
Class: Occultist
While I don´t really use my occultist to stun, the debuff skill chance is already good enough on certain bosses. Also the increased crit makes the occultist happier since he is a crit machine. Don´t worrt about the virtue rate though, if you are careful the occultist might not even get close to a resolve test.

Buffs: +25% If in position 4 / +30% Debuff skill chance
Debuffs: -50% healing skills
Class: Arbalest
This is a decent trinket for the arbalest since she is supposed to be on position 4. While I don´t use her for the debuffs the damage is certainly good, and she only needs some accuracy to do even more damage. About the debuff you shouldn´t use her as a primary healer since her heal is better suited to improve the heals, but nothing else.
Trinkets: Special ones
Disclaimer: These trinkets cannot be put under the previous categories since they can be obtained in the early game or later on. Also these trinkets work in any difficulty since the buffs they offer are so good to let them go unnoticed. But also since they are so good they can be quite difficult to obtain since you need to kill strong foes.

Buffs: +15% DMG / +2 SPD / +5 DODGE If torch is above 50
Debuffs: +10% Stress
Class: All
This trinket is only obtainable after beating a shambler. This trinket is just marvelous on almost any hero since it buffs almost everything you want, and the drawbacks are almost nothing when you compare the utility gained. Be aware though that this trinket is after defeating a shambler, and those ♥♥♥♥♥♥♥ are tough as ♥♥♥♥.

Buffs: +25% Healing skills / +25% Stress skills
Debuffs: +10% Stress
Class: All
This trinket is only obtainable after beating a shambler. While on vanilla there is like one or two heroes who can get both bonuses working (the houndmaster and probably the abomination), but if you like mods then try the lamia. The lamia is a class that benefit from this trinket since she can both heal HP and heal stress.

Buffs: +25 Trap disarm chance / +25% Scouting chance
Debuffs: +10 Stress
Class: All
This trinket is only obtainable after beating a shambler. This item is marvelous if you are having troubles with scouting and traps, since both of these cannot be upgraded raw (most of the perks focus on a map or you need to use camping points, which is kind of bad).

Buffs: +20% Virtue chance / +8% Deathblow resist
Debuffs: None
Class: All
This trinket is only obtainable after beating a shambler. This trinket is excellent if you want to rely on your luck and have a virtuous hero, and the +8% deathblow resist is kinda good if you ever go into death´s door. Then again if you don´t like to rely on gimmicks then this is not for you.

Buffs: +30% Healing skills
Debuffs: +20% Stress
Class: All
This trinket is only obtainable after beating a collector or gaining it at a secret room. This trinket will do wonders on your vestal or occultist since it boosts the amount of healing that they give, making your healings more stronger (vestal) or slightly more reliable (occultist). Be warned though that +20% stress is a lot to bear, making anyone who uses this trinket a time machine if you are not careful with the stress.

Buffs: +25% DMG
Debuffs: -10% Max HP / +20% Stress
Class: All
This trinket is only obtainable after beating a collector or gaining it at a secret room. This item is quite powerful since +25% extra damage can be a lot, especially on your assassins. Be careful though that the –10% HP can make them go to death´s door faster if you aren´t careful enough or reach a resolve test quite fast is you can´t manage the stress.
Mob fight: The basics
Now you have finished some dungeons and gather some heroes into your barracks, used some heirlooms to upgrade your hamlet. But if you still find yourself struggling in the fights then this section might prove itself useful.
Fights against most of the mobs in the darkest dungeon aren´t as hard as one might think, but if done wrong one will find itself dealing with a lot of stress or with a party that always is in a blink of death. The “current meta” in darkest dungeon about mob fighs says that one must kill the BACK ROW (position 3 and 4) as fast as we can while leaving the FRONT ROW (position 1 and 2) alive as long as we can so we can recover. We need to understand that each battle could be as long as two turns or 7 – 8 turns, so never desperate because that´s what gets you killed in this game.
To achieve this i will divide the battle on two phases:

Early stage: The early stage consist on the first three – four turns when one entered a battle. In these turns the top priority of most of your team is to kill as fast as possible position 3 and 4. This is because these position hold the most dangerous mobs in the enemy party (this is because they deal a lot of damage or are stress nukers), and if left unchecked they can give you hell. For the position 1 and 2 you want to let them left as unscratched as possible and stunned so they don´t do stuff (like attacking you with the chance to crit you or guardind his fellow mobs).
To achieve your task of killing the back row you can either attack them directly with a hero that can reach them (so is important to use heroes that can reliably reach position 3 and 4) or, if one has a hero that can move mobs, move the enemy team formation since most mobs in the back row are left useless in the front row or move the mobs from the front row to the back row, since they are also left useless since most of them cannot function in these positions. Just be warned that moving mobs might fail since they can resist it, so use trinkets that improve your chances of success.
Another valuable strategy is to simply kill the front row as fast as one can and remove the corpses, so the back row is left hopeless. Most of the mobs in the back row cannot use their stronger attacks in the front row and are left useless, so you can go and use this to your advantage to go to the other phase. Some however can still use his abilities in the position 2, so they need to ve moved to position 1 , or they can even use these positions regardless of position (only 1 that i am aware).
Late stage: The late stage consist on having the LAST 2 mobs (usually the front row) alive and stunned as long as possible while using this time to either heal or stress heal. This might be a boring phase, but it is important to left any battle with the best conditions one can achieve so one is not grinded by each figtht.
Also is important to leave 2 mobs alive since this game punish you if you have one alive for too long. Now before you get scared or confused let me explain: If you have 1 mob alive and you let pass two turns you will receive a warning from your heroes that exclaim “why are we delaying this battle for too long” or something like this, causing a slight stress penalty. This is your final warning because if you leave that mob alive for one last turn he / she / it will call for reinforcements, stressing your party.
This only happen if the mob is little (occupies one square), for those that uses two squares (two positions) can be used indefinitely and won´t trigger the reinforcements event. Besides you have two more turns to kill the last remaining mob… the “timer” starts the next turn after you are left with one last mob.
One last thing, not every hero is born the same, some of them are faster that others. This is important because you need heroes that can reliably go faster tham most mobs in the enemy team, so don´t expect your slower heroes (cough cough leper / crusader) to move first, they usually are last… So use these more “special” heroes to either stun or disrupt the enemy formation, and i wish you the best of luck out there.
Bosss fights: Introduction
Now, when you decide to embark to a dungeon where you can find and fight a boss you might be wondering… what do i need to fight this boss and where do i find it? Well, the first question i will answer it for each boss, since they all are different in a way and the second one is easier to answer with an image.

While the boss room is not shown in the image, there is an almost guarantee that the boss will be in the furthest room, so if you have doubts about the whereabouts of the boss always count the squares and the one who is the farthest will be the boss room.
Also have in mind that the difficulty of the boss comes from unpreparedness, and you will be punished from bringing a bad or terrible team to face a boss, so before entering a boss ytou have to make sure that you have a good team composition and they are equipped with the best trinkets you have and, in some cases, with the trinktets that a character might need in order to spam a centain ability.
Each region of the map has 2 bosses making a total of 8 bosses (not counting the darkest dungeon or Vvulf), each one with a different gimmick, and each reappear 3 times according to the difficulty of the dungeon… that means that there are a boss in apprentice, one in veteran and one in champion, with an increase in damage and health the more difficult the dungeon.
With nothing more to say, let´s jump to the bosses.
Boss fight: The necromancer
Now, the necromancer might be the first boss that anyone would dare to take on early on, this is because in the earliest stages of the game he is the easiest one to beat and doesn´t pose a real threat towards your party if done right. Saying that he becomes more stronger the more difficult the dungeon is, and due to his gimmick he might be a real threat is you go unprepared.
The necromancer has one turn per round, has the “status” of unholy / eldritch, it has an average size and will always start at rank 1. His gimmick is that whenever he attacks your party he gets to summon a skeleton and stress your party while moving himself back one position, making him difficult to reach by some heroes if you let him get away. The main strategy in this boss is to focus the necromancer and try to kill the skeletons he summons, that way he won´t be moving backwards and the number of skeletons will be low, which is also his main damage.

He has three abilities:
- The flesh is willing: With this attack he will attack you first two positions for a good portion of damage.
- The crawling death: With this attack he will attack your last two positions for good damage.
- Six feet under: While this attack doesn´t cause damage, it will stress your whole party for a good amount.
The necromancer appears in three difficulties:
- Apprentice: In this difficulty the skeletons summoned by the necromancer are very weak, so you can dispatch them quite easy.
- Veteran: In this difficulty the skeletons are still a little weak but he has a chance to summon a new mob, the skeleton that has armor and can guard his fellow skeletons. In this difficulty is a little harder to kill the skeletons in one hit so you might want to bring someone who can use riposte in order to grind the mobs and denying the necromancer to move back.
- Champion: In this difficulty the skeletons are more tough since the necromancer only summon useful skeletons, and have a low chance to bring a fatso skeleton, and beleive me he can weary your party if left unchecked. In this difficulty you really want to kill him as fast as you can since he can stress nuke your party and the skeletons will eat your party alive if you don´t kill them fast enough.
The necromancer is vunerable towards bleeds and blight damage, and he can be moved and stun quite easily, so it might be a good strategy to grind him down with stuns and DOT.
For the heroes you can use whatever you want as long as is not flawed (leper position 3) and make sure you have enough damage or otherwise you might found yourself surrounded by skeletons. This is a brief list for good heroes that you can use in this battle.
- Crusader: The crusader is good in this battle since he has a bonus damage aggainst unholy mobs, so he can deal a good amount of damage in this battle.
- Highwayman: The highwayman is good in this battle since he can use riposte to deal with the mobs that attack him, and he can also inflict bleeds to the necromancer.
- Vestal: The vestal is good to counter the damage deal to your party and she can also deal bonus damage towards unholy mobs, if you have the turns to spare.
- Plague doctor: The plague doctor is good enough in this battle since she can deal blight damage to the necromancer if you want to grind him.
- Occultist: The occultist is good in this battle if you want to move the necromancer to the front row, otherwise use another character.
- Man at arms: The man at arms is good in this battle if you want to either move a mob and stun it, guard a character or want to use riposte (or all of them).
With this i hope now you have an idea of what to expect from the necromancer and how to take him down.
Boss fight: The prophet
The prophet is perhaps the most difficult boss in the entire game if you go unprepared and without information about what does he do and his gimmicks. But worry not for i will help you with both of the problems.
The prophet has one turn per round, has the “status” of unholy, has an average size and is located in position 4. He has two gimmicks; The first one (which you can easily say is not a real gimmick… or his main gimmick) is that he has pew that are located in position 1, 2 and 3. The pews don´t have turns and won´t make any action, they are destructible and will give you some good loot if you manage to destroy each but it will take some time to do it since they are made to slow you down. His second gimmick is that at the beginning of the round he will cast one spell which will “mark” one or two heroes and at the end of the round will attack said marked heroes. Your main objective is to try to kill the prophet as fast as possible since he can deal obscene damage and guard any hero that is marked by him, and your possible secondary objective (if you have the time and guts) it to try to destoy the pews, that way it makes the prophet easier to hit and reach, and also gives you some loot.

The prophet has 4 skills which are:
- Calamitous prognostication: The blind ♥♥♥♥ will always start each round with this skill. This skill “marks” one or two of your positions (it doesn´t mark your heroes per se but the location where they are), setting things up for his other skill. Worry not though that this skill doesn´t do any damage “per se”.
- Eye on you: The prophet might want to get dirty with you so he will keep “an eye on you”, stressing one of your heroes and with a certain percentage to stun it. However this skill doesn´t make any damage so only worry about the stress.
- Fulminate: The prophey will blight your entire party so beware of that, specially when one of your heroes is low on health since is very easy for them to die.
- Rubble of ruin: This is his second ability that the prophet will use at the end of the round. He will attack the marked position for a very nasty portion of it´s health. The piece of ♥♥♥♥ will drop the ♥♥♥♥♥♥♥ ceiling at your heroes, so your health can dissapear quite fast if you don´t react fast.
The blind ♥♥♥♥ appears in three difficulties:
- Apprentice: In this difficulty he is way weaker than he should be, and his pew have a decent portion of life, so you should be able to do well even if you want to destroy the pews for some extra cash. Just don´t get overconfident.
- Veteran: In this difficulty the prophet hits harder and his pews can take a beating. It is not recommended to try to destroy the pews since now you might not have the damage or heals to kill the prophet and the pews fast enough.
- Champion: The prophet is at his peak and his pews most likely won´t be destoryed for they have a massive amount of health (or at least high enough to take a decent amount of turns). In here i discourage you to try and destroy the pews since he prophet can easily murder your party if left unchecked.
The nasty boy is weak towards both bleed and blights, so is a viable strategy to try and take grind him. Unfortunately the lazy ♥♥♥♥ don´t like to be moved so don´t try to waste your turns and shufflle him, and stuns or marks are not so worth to use a turn with.
For the heroes you want anything that can reach position 4 if you want to strictly focus on the prophet, someone who can guard your heroes and someone who can easily heal the damage the prophet can do, so i suggest:
- Arbalest: The arbalest easily can reach the prophet and deal good damage, so she is a must in this fight.
- Man At Arms: The man at arms can effectively guard one of your heroes from any harm and can mitigate most of the prophet damage, so he is really good in this fight.
- Occultist: The occultist is almost a god in this fight. If you want you can have two occultist and spam curse to mitigate the prophet´s damage to laughable numbers, or if you only want one this is still viable and he can easily (but hopefully) heal the damage done to your heroes.
- Houndmaster: Like the man at arms the houndmaster can guard one of your party members, but he is slighly less reliant since he is still squishy (he doesn´t receive prot for the guard). Also he can reach the prophet with no problem.
- Hellion: The hellion can easily reach the prophet with iron swan, but infortunately this is the only skill she can use against him (if the pews are left alone) so she won´t be able to bleed him.
Boss fight: The hag
The bloody hag is perhaps one of the most annoying fights that one wants to do and should be done with caution since she can kill one character without any possibility to help that character.
The hag has two turns per round, has the “status” of human, has a large size (she is kinda fatty) and will always be in position 3 and 4. She also has a cauldron, which uses position 1 and 2; it doesn´t attack or have a turn on it´s own but is in here where the hag will put the unlucky hero to cook him to perfection. The cauldrom also doesn´t take damage if a hero isn´t inside it and cannot be killed or moved…. making the hag quite difficult to reach. Her main gimmick is that she will put a random hero in the cauldrom and said hero will suffer damage per each character turn, wearing that character´s health low in no time making this particular battle a real battle against time if one wants to deny a hero´s demise. Your main objective against the hag is to kill her fat ass as fast as possible (and i mean it) before she can end cooking one of your heroes to perfection.

For her skills she has 4:
- Into the pot!: With this skill the hag will grab a hero and will put him / her into the pot. While in the pot the hero will suffer damage per turn of each character (even the hag), blowing away the health bar of the character in very few turns. When the health bat of the hero inside the pot reaches 0 he / she will free himself / herself and will be at death´s door. In this situation pray that is not the turn of the hag and your hero can heal himself or is your healer´s turn, or otherwise the hag might (and she loves to do this) use meat tendenizer, which might kill your hero without giving you a chance to save him. If you want to free the hero you can hit the cauldron until it reaches 0, freeing the hero.
- Meat tendenizer: This is an AOE attack that affects every hero. While this skill is farly weak you should be careful, or otherwise the hag might kill the unlucky hero that was freed from the cauldron a few moments ago.
- Season to perfection: This is an attack that can reach any position and deal´s laughable damage but causes stress and a debuff on the hero. This skill is meh, so don´t worry much about it.
- Taste the stew: This is the hag´s self heal. Whether she hit the character or not, she will heal herself for a good amount and will stress the hero if hitted. Be aware of this skill since it can drag the battle more than needed.
The hag appears in three difficulties:
- Apprentice: For the apprentice difficulties she is at her weakest, since she is not strong at all by herself, depending on the cauldron to kill a character. In this difficult if you have good dps then you might kill her before a hero comes from the cauldrom at death´s door.
- Veteran: In this difficulty she is a little bit more fat and more ugly, making her a little bit more tough with a decent hp pool, but the strategy is the same since the doesn´t have anything new in her kit.
- Champion: In this difficult it will be impossible to kill her before a hero comes out of the cauldron at death´s door, so have in mind that one of your heroes might not come back from this fight… And she is also a fatso and uglier than before.
The hag is weak towards bleedings so you might want to weary her using bleeds. She and the cauldron are very resistant towards move skills, so trying to move them is a bad strategy and will most likely waste turns. In this boss having a bad composition can result in a party wipe, so be aware of that.
For the heroes in this battle you WANT and NEED heroes that can reach position 3 and 4 safely, making some heroes like the crusader or the leper garbage tier against the hag. For the heroes i recomend are:
- Hellion: The hellion is a goddes of war and can reach the hag at any given time, and if she is shuffled then she can move herself without wasting any turn.
- Graverobber: The graverobber is good since most of her abilites can reach position 3 and 4 easily, making her a reliable source of damage.
- Arbalest: The arbalest is god tier in this battle since she can just eat the hag any day. Be aware though that since marks only last two turns marking the hag would result in a waste of turns.
- Vestal: The vestal is good in this fight since she can mitigate the damage that the hag tries to inflinct upon your party.
- Houndmaster: The houndmaster can be useful in this fight for two reasons: his main attack can inflict bleed on the hag and he can guard his ally when he comes out of the cauldron, saving him for a certain death (hopefully).
Disclaimer: You can bring heroes like the crusader or the leper IF your main strategy is to make them tank the cauldron damage by letting them be put inside it. Be aware though that the mechanic of into the pot! is ramdom and might not be worth trying it.
Boss fight: Brigand pounder
The brigand pounder can be a very terrifying boss at first, but with a proper party and the knowledge of his gimmick it can bleed and fall like any other mob.
The brigand pounder has one turn at the beginning of each round and, if left unchecked, at the last turn per round and has the “status” of ironwork, which is the only mob who has this type. He has two gimmicks, one is that he will call for reinforcements each turn, always calling a brigand matchman and a posibility of calling another human mob (these mobs belong to the brigand class). The other one actually needs the brigand matchman to be alive by the end of the round, where he will shoot the brigand pounder and will hit your party… and believe me, a hit from that cannon can be a guaranteed party wipe if you are careless. The brigand pounder will always start with a full party of mobs, but you want and need to focus on two: the brigand pounder itself and the brigand matchman.

You have two main objectives in this battle: Kill all the mobs in this battlle and keep dead the brigand matchman, so if you manage to be left only with the brigand matchman and the brigand pounder you already won the battle, you just have to keep killing the matchman and deal as much damage as you can to the tank.
For it´s skills they are:
- Reinforcements: as the name suggest, the brigand pounder calls for help. There is a 100% chance of it calling a brigand matchman if he is killed, and a percentage of calling another mob of the brigand class. The most important thing of this boss fight is to ALWAYS kill the Brigand matchman. This unique mob is perhaps even slower than the leper, so the game gives you plenty of chances to kill it fast (or at least in that turn).
- BOOOOOOOM!: If you are slow enough or lack the damage to make the deed and fail to kill the brigand matchman there is a good chance that the brigand pounder will shot at your party for massive damage, and believe me when i say that you don´t want that to happen.
- MISFIRE!: If you are slow enough or lack the damage to make the deed but are a lucky bastard there is a slight chance that the cannon will fail the attack and your party receives a sligth stress heal, but don´t rely on that or you could be killed.
Note: The harder the difficulty the more chance that the brigand pounder will use BOOOOOOOM! instead of MISFIRE!, so be aware of that.
The brigand pounder appears 3 times:
- Apprentice: In this difficulty the chances of MISFIRE! are at the highest, so even if you manage to screw yourself there is a chance that the game won´t be so merciless at you. Also the mobs in here won´t be so tough and the brigand matchman can be killed in one hit, making your life easier.
- Veteran: In this difficulty the chances of MISFIRE! diminish, so you cannot afford to let the brigand matchman to breath another turn. Also the mobs are a little bit more tough, making this fight a bit more hard.
- Champion: In this difficulty don´t expect the cannon to use MISSFIRE! since the chances are at it´s lowest, and the brigand matchman is more tough so it might take more time to kill him each turn. Also the mobs in this difficulty are more tough, and can deal quite a lot of damage.
The brigant pounder is not weak to almost anything since, well…. he is a cannon and cannons cannot bleed nor cannot suffer blights… but he can me moved, the question is… why would you want to move it? so in this battle you have to kill it old school, by beating the ♥♥♥♥ out of it…. you could use water to wet the gundpowder and let the cannon useless, but i guess that would be too easy and would make sense….
For the champions you can use whatever you want but you need a lot of damage to kill the matchman. For the champions i recommend:
- highwayman: thanks to the highwayman riposte you can deal extra damage to the other mobs without having to hit them directly while focusing the matchman. So is a win win.
- Hellion: The hellion can reliably hit the matchman wherever he is, making his life miserable.
- Arbalest: The arbalest can reach almost any position where the matchman is, just be aware that if he is in position 1 she cannot hit him reliably enough.
- Leper: This is perhaps one of the few battles where the leper is good. He can kill any mob in the battle or wipe out the corpses that block your way… Buf for the love of god don´t rely on him to make the deed against the matchman or it can backfire….
- Vestal: The vestal can mitigate any damage that the party suffers at the early stages of the battle.
MODS
- The Witcher: If you are using the witcher mod Geralt can kill the matchman in one hit or he can bring it to the front row while stunning him, so he is a god in here.
- The abysswalker: If you are using the abysswalker mod Artorias ♥♥♥♥ on this fight. if you use his second form he can wipe out the entire mob party, leaving you only with the bringant pounder. He is by far the best in this battle.
Boss fight: The swine king
The swine ♥♥♥♥ may be overwhelming at first, looking all ugly and… meaty. But worry not, this fight is in fact quite easy if you know how and what to do.
The swine king has one turn per round and has the “status” of beast. His main gimmick is that he spawns with another mob; Wilbur. Now this piece of ♥♥♥♥ is what makes this fight tough, because he provides aid to the swine pig in the form of marks and stuns, but we will get into that since it changes according to the difficulty you choose to do. Your main objective in this fight is to kill as fast as you can the swine king while stunning or just ignoring wilburg, or if you feel overconfident kill him first… But be warned that this will only makes things more difficult.

Wilbur will have up to one or two turns per round, this is according to the difficult you are playing and has ther “status” of beast. His main gimmick is that he will either stun one or two of your heroes or he will mark one or two of your heroes so the swine king will do aditional damage to them. Your main objective against wilbur is to let him be or stun him, otherwise try to kill him first if you feel overconfident…

For the skills of the swine king he has:
- Obliterate body: The swine king will chop one of your marked party members for a good amount. Be aware though that the swine king likes to crit often.
- Obliterate masses: The swine king will chop both position 1 and two if one of them are marked. Be aware though that the swine king can crit a lot against your party members.
- Enraged destruction: The swine ♥♥♥♥ will become angry that you are targeting wilbur, and will hit your entire party for massive damage and will add a chance to stun them. This attack can only be used if you are attacking wilbur.
- Wild flailing: This attack will only be used by the swine king if he doesn´t have any party member marked, but it can still do tons of damage, so dont get cocky.
For the skills of wilbur he has:
- Bit´o squeal: This attack will stun your party members at the beginning of the turn, ♥♥♥♥♥♥♥ you over if he manages to stun an important party member. Fortunately he can only use this ability in certain difficulties. If you are not careful though one of your heroes might die from this attack after the swine ♥♥♥♥ grind them to death´s door and there is an achievement for that… R.I.P Emma the hellion, you died a lame death :c.
- End this one: This “attack” will mark one of your party members, allowing the swine king to do massive damage to them.
- End these two: This “attack”will mark two of your party members, allowing the swine king to attack them for a lot of damage.
- Squeal: This attack can only be used yif wilbur is moved to the front row. He will stun your characters and do laughable damage.
The swine king and wilbur appears in 3 occasions:
- Apprentice: In this difficulty the swine king is at his weakest, allowing you to kill him more easily since he is only a meat bag. Also wilbur only has one turn and cannot use bit´o squeal, even though the game shows you that he has it.
- Veteran: In this difficulty the swine king has step up his game and can do more damage and can take a beating. Also wilbur will have two turns per round, and will start each round with bit´o squeal, so be aware that he can stun your party at the beginning of each round.
- Champion: The same gimmicks, the same ♥♥♥♥…. But with more health and more annoying.
The swine king is weak towards both bleeds or blights, so use that to grind him down. You can also use marks in this particular boss fight since he only has one turn per round, allowing you to use those marks more frequently and efficiently.
For the heroes you can use whatever you want as long as it is not flawed (leper rank 3) and doesn´t have riposte. Otherwise you might kill wilbur “by accident”.
- Leper: Gods knows i don´t like the leper… but he is quite good at damaging the swine king (if he can hit it). Also he can serve as a meatbag.
- Occultist: The occultist is god tier in this battle since he can debuff the damage of the swine king, making him do laughable damage (or at least more manageable damage) and can heal the party.
- Plague doctor: While i don´t use her a lot she can permastun wilbur making him unable to mark your party members and he can stun the swine king for a turn, giving you a breath in case you need it.
- Man at arms: The man at arms can guard the hero that is targeted to minimize the damage output of the swine king. Just be aware that if the man at arms and other character are marked he cannot guard the other hero.
Boss fight: The formless flesh
The formless flesh is as dangerous as ugly (and belive me, it can be a sight to behold), but with some preparations and a decent party, it will fall like any other boss in this game.
The formless flesh has 4 turns per round, has the eldritch “status”, it´s size is average (only occupies one slot) although it has 4 “parts” (the head, the heart, the spine and his anus) that occupies all the battlefield. As the name implies, the main gimmick of the formless flesh is to “change” forms on each slot, making this fight kinda unpredictable, sometimes for your own benefit and sometimes for your downfall. The main strategy here is to focus it´s heart, since it has no prot and is the weakest of all forms. For this explanation i will enter in detail for each form of this boss.

- Head: The head of the formless flesh has decent resistances and the second highest prot among the other parts. If the formless flesh has it´s head try to not focus it, it will be in vain since it has good prot and it can resist both bleeds and blights quite well. It´s only attack is Maus of life: The ♥♥♥♥ will bite one hero of position 1 or 2 for a good amount of damage and with some chance to inflict bleed.
- Heart: The heart of the formless flesh is the weakest among all forms, with no prot and low resistances. When the heart appears FOCUS IT as your life depend of it, since it will take full damage and can make the battle shorter. It´s only skill is sanguine stroke: With this skill the formless flesh will heal itself for a decent amount, making the fight longer than it should.
- Spine (or bone): The spine of the formless flesh is the most resistant and the one who has the highest prot among all the forms. Don´t focus this part since it will laugh at your punny damage and you will most likely waste turns. It´s only attack is Bone zephyr: With this skill the spine will slap the ♥♥♥♥ out of position 1, 2 or 3 for a decent amount of damage and with a chance of stun, so it can ♥♥♥♥ you up easily if it stuns someone useful in your team (like your dps).
- Anus (or butt): The anus of the formless flesh is the third less resistant among all the parts since it´s prot is not that high and it´s resistances aren´t that high. If you can (and there is no heart) try to focus this part since it will make the battle less harder. For it´s only attack it has Undulating invasion: It will cause itself a rectal prolapse, affecting position 3 or 4 for a decent amount of damage and with a chance to inflict a blight.
The formless flesh appears in three difficulties:
- Apprentice: In this difficulty the formless flesh is at it´s weakest, by not having a high prot and resistances you can take it quite easy, so go and put an end to it´s misery.
- Veteran:In this difficulty the formless flesh can be a challenge since it´s prot and resistances are higher and it can hurt a lot now, so go with careful:
- Champion: In this difficulty the formless flesh can be a dangerous foe, since now his prot is at it´s highest so it can tank a lot, it has an obscene pool of health and it´s resistances are high, making it a battle of endurance.
The formless flesh is kinda weak towards bleeding, so bring anything that can inflict bleed to make things faster.
The heroes that i recommend to use in this battle are:
- Leper: Yes, finally… a battle where the leper can kinda shine…. Thanks to his high damage and low rate of dodge of the heart the leper can hit hard in this part… if he can hit that is….
- Hellion: The hellion is very good in this battle since it can reach anywhere the heart decides to go, ensuring that you will always hit hard.
- Houndmaster: This is the only battle where hound´s harry becomes useful. Use this skill to inflict bleed to ALL of the parts of the formless flesh. While the damage is laughable, the bleeds are not,
making this battle a little more easy. - Jester: The jester can inflict bleed quite easily, so he can be useful here.
- Occultist: While the occultist cannot cause bleed, he does have a bonus aggainst eldritch, so he can do a lot of damage in this fight while also healing.
Boss fight: The siren
The siren is one of the two bosses of that annoying cove dungeon…. but as unexpected as one might think these bosses are easier than one might think.
The siren has two turns per round and has the status of “eldritch”. Her main gimmick is that she will “lure” one of your heroes to work for her, taking it from your party and fight for her for two turns; after those two turns that party member will “free” itself from the siren and will go to the fourth position. The main strategy here is to kill the siren as fast as possible since she can deal a lot of stress to your party, also if the manages to attract one of your dps heroes you are in for a lot of trouble. She can also summon mobs from the cove but this is rare to happen.

For her skills she has:
- Song of desire: This is her main skill and main gimmick. With this skill the siren will attempt to lure one of your heroes to her side and to do stuff for her. She will always use this skill on your first round and whenever a hero returns to your side or she fail to lure it. This skill is considered a debuff, so trinkets that improve your debuff resistance or holy water can do wonders against her.
- High tide: This skill, like the necromancer, can summon a cove mob to battle with the siren. Don´t worry though, the siren almost never use this skill so it won´t be like the necromancer.
- Pressure crash: With this skill the siren will hit every hero and will stress them. The damage is minimal so don´t worry much about it.
- Devour: With this skill the siren will try to french kiss all of your heroes, bleeding them and damaging for minimal damage.
The siren appears in three difficulties:
- Apprentice: In this difficulty this battle is a joke. You don´t even have to bring trinkets to improve your debuff resistances, you only need to use some holy waters and that´s it. Just grind her and before you know it she will fall.
- Veteran: In this difficulty she is still a joke, but the trick with the holy waters won´t work as before, so trying to use trinkets might prove useful since she can actualy lure heroes to her side in this difficulty.
- Champion: In this difficulty don´t even bother to use holy water if you think that might stop her from luring your heroes, since she will almost always succeed. But she is still weak, so just grind her over.
The siren is weak towards blight, so use this to your advantage.
For the heroes this battle is relatively easy so you can bring whatever you want, abything do well against the siren. Just be careful to not bring anything that she can use against you, or you might regret it later.
Boss fight: The drowned crew
The drowined ♥♥♥♥ is the second boss you fight in the cove, and while the first one was the siren, which lower the ribbon by a lot, don´t underestimate this boss, or otherwise you might end with some serious stress problems.
The drowned crew has two turns per round, has the “status” of unholy, his size is gigantic (he occupies 3 ranks) and will always start at position 1. It´s main gimmick is that it spawns another mob at the beginning of the fight; a drowned anchorman. This new mob is what will make your life a miserable hell if you can´t deal with him fast enough. Your main objective in this fight is to kill the drowned crew as fast as you can while hoping to god that the drowned anchorman doesn´t get a chance to hold a party member, or the fight might drag a lot. In this battle in particular is important to deal as much damage as humanly possible, otherwise you might end with a bunch of afflicted heroes.

The drowning crew has 4 abilities:
- All hands on deck!: The drowned crew captain will always start with this skill at the beginning of the round. He charges at you and hits one hero with his bell (he can target position 2, 3 or 4) and will summon the drowned anchorman. He will also pull that hero up to three ranks, so be careful because he can ruin your party composition easily.
- Mutiny: With this skill the drowned crew will charge at you, hitting you with the hope to give you a debuff (- DMG, – CRIT). It does little damage and if you use holy water the debuff most likely will be resisted, so don´t be worried about this skill.
- Drink with the dead: The pieces of ♥♥♥♥ will invite you for a few wine bottles, only to tell you is up to you to pay. With this attack the drowned crew will attack a hero (can reach position 2, 3 or 4) and will stress it, but overall a weak attack.
- Boarding clutch: With this skill the drowined crew will attack a hero (can reach position 2, 3 or 4). and hit him with its pole hook with a chance to inflict bleed. It is it´s main damage dealer skill but fortunately enough it does decent damage.
So far the drowned crew seems easy enough (and it is), but your main concern is not them but rather the mob he summons (the drowned anchorman). The drowned anchorman is the gimmick of the drowned crew and only has one turn per round, but he is a lot tougher that he looks; when summoned he will have a buff that makes him almost unkillable (+PROT, +blight and bleed resistances). It only has one skill:
- Heave to!: With this skill the drowned anchorman will throw it´s anchor to the hero who is in rank one and, if it hits, it will “lock” that hero. When locked the drowned crew will heal the drowned crew each turn for every character, and also the buffs the drowned anchor have will be passed to the drowned crew, making them more tougher. To the hero who is affected by this skill won´t be able to move any position and will gain stress each turn for every character (just like the hag´s gimmick), but that hero will still be able to act on his turn. To free the hero affected by heave to! you need to kill the drowned anchor or the drowned crew, but have in mind that the latter will be more tough since they will be recovering health per turn and have some buffs.
The drowned crew appears on three difficulties:
- Apprentice: In this difficulty you shouldn´t have any problem with this boss since the drowned anchorman can be killed fast enough to not let the drowned crew heal much health, also his debuff can be nullified with holy water, and his damage is very little.
- Veteran: While tougher, the drowned crew shouldn´t pose a threat to your team, just be aware that killing the drowned anchorman will be harder and can put you on a bad spot.
- Champion: In this difficulty is really importat that you finish the battle as fast as you can, for it can be dragged a lot if you get cocky and focus only the drowned crew. Also unless you want to let a hero reach 100 stress, try to free them from the drowned anchorman´s anchor, or otherwise you will find out that you cannot overrun the heals.
The drowned crew are weak towards blights and moderate resistant towards bleeds, so try to use blights if you want to grind them each turn. Don´t try to stun or mark them because they have two turns, and that might be a bad strategy, but if you manage to stun the drowned anchorman then that might be a better choice.
For this battle you can use anything you want to use as long as is not flawed (leper position 3). For this fight i recommend:
- Crusader: The crusader is a good choice in this battle because he can be used to stun the crowned anchorman. Also he has a bonus towards unholy types, so you can deal decent damage with him.
- Leper Amazingly the leper is good in this battle since the patch. Try to buff his damage and use Hew, you can grind both the drowned anchorman and the drowned crew.
- Vestal: I recommend the vertal over the occultist because this is a battle of endurance, the damage is low but constant so you need someone who can keep your party healthy as much as possible, and the occultist is better suited against heavy burst damage.
- Hellion: The hellios is good if you want to stun both the drowned crew and the drowned anchor, but thanks to the patch she might be a little less good of a pick.
- Abomination: The abomination is very good against this boss since his transformation allows him to attack both the drowned anchorman and the drowned crew at the same time thanks to rake. And thanks to the new patch he can also embark with religious people, so now you have more options to go and do as you please.
Miniboss fight: The collector
The collector is a very odd man who gets turned on by collecting the heads of your fallen heroes (but he only shows 3) but don´t worry, this “boss” becomes a nuisance after you get used to him (and believe me, he will appear a lot in your games).
The collector will have a very low appear once your item inventory has reached 65% of item capacity. After you defeat him he will drop an special trinket that can only be obtainable from him and a puzzling trapezohedron.

The collector has one turn per round, has the status of human / eldritch his size is average (he only occupies one rank) and he always starts at rank 1. His main gimmick is that he will summon the beheaded heads of 3 predetermined heroes to aid him in battle while pushing him to the fourth rank, making it hard to reach him. The main strategy on this fight is to entirely focus on The collector; thanks to the patch the mobs that he summon will disappear after he is killed, so you can completely ignore these mobs to just rush him.
He has 3 abilities that can be used during this battle:
- Collect call: This is the skill that the collector will use on his first round. He will summon three random heads that will fight alongside him. You can however stun the collector so you can deal damage early on so you have a slight advantage over him. Also the heads have the “eldritch” status, so anything that deals more damage against this class is very useful in here. The collector as the little ♥♥♥♥♥ he is can use this skill if you kill one of the heads, making it meaningless to focus them.
Collected highwayman: this is a beheaded highwayman who was, unfortunately, claimed by the collector so now it does his bidding. This is the most dangerous head of the three since it can deal quite a nasty damage and is relatively fast. If you manage to kill it though the collector loses a lot of his damage potential.
Collected man at arms: This is a beheaded man at arms who was, unfortunately, claimed by the collector so now it does his bidding. This is the “defensive” head of the three since it will guard one of its allies, granting it PROT so it can tank your damage and can stun one of your heroes. This head does not pose a real threat though since it doesn’t do any damage, but it can make the battle harder if it decides to guard the collector.
Collected vestal: This is a beheaded vestal who has, unfortunately, claimed by the collector so now it does his bidding. This is the “supportive” head of the three since it will buff and heal one of its allies, making them more dangerous or making the battle longer than it should. This head however doesn´t attack your heroes directly, so you can easily ignore it… if you don´t mind it buffing the other heads.
- Show collection: With this skill the little dirty ♥♥♥♥ will show you his tentacles collection of heads, dealing stress damage to your front rank and pitiful damage. It can easily make your heroes stressed enough to make them take a resolve test so always bring a stress healer.
- Life steal: With this skill the little ♥♥♥♥ will stare you to death, dealing damage to your front rank, with a chance of inflicting bleed and giving him a heal for that attack. This skill can easily save the collector from dying so it is advised to use DOTs to prevent this.
The collector appears in every difficulty, with only increasing his stats the more difficult the dungeon is. Unfortunately he cannot be avoided and you will find him at least twice per difficult dungeon.
The collector is weak towards both bleeds and blights, so trying to kill him with DOTs is a great idea since you never know when he is going to use life steal to save his sorry ass.
You cannot prepare for him since he can appear at any dungeon at any time, as long as the battle is on the corridors of the dungeon (he cannot appear on rooms). A team who relies on DOTs or marks however can quickly and easily dispatch him since he is a weakling, so good hunt and good luck.
Miniboss fight: The shambler
The shambler is a horrid eldritch creature that lurks around the darkness of the dungeons, hunting those foolish enough to wander around without torches. And once it founds you, be prepared for imminent doom.
The shambler has a chance to appear on corridor fights if your torchlight level is 0 (you are doing a torchless run) or if you trigger a specific curio (which by the way, you shouldn´t be doing that unless you have a death wish).

The shambles has one turn per round; it has the “eldritch” status, his size is large (he occupies two ranks) and he always start at rank 1. His main gimmick is that he will summon two minions to aid him in battle (how original) while also moving itself on the battlefield, making it quite unpredictable and, at times, hard to reach. The main strategy on this fight is to kill the shambler and minions as fast as humanly possible, this is a battle of speed where the one who can dish out the most damage will win, and the other will get a wipe out… or very wounded heroes (believe me when I say a good run against a shambler is one where every hero survived). Also bear in mind that the shambler will always surprise your team, shuffling them on your first turn, so have fun with that.

The shambler has three abilities:
- Undulating withdrawal: The shambler will show you its tentacles, summoning two shambler tentacles and moving the shambler to the back row. The shambler will always use this skill on the first round and while the skill itself doesn´t do much damage it can inflict blight, so he can easily kill your team with DOTs while keeping itself safe from your heroes´ reach.
- Obdurous advancement: The shambler will attack your team with its claws, moving itself forwards and can summon two shambler tentacles. This skill doesn´t do much damage but it can inflict bleed on your team, making sure to deal as much damage as possible through DOTs. Also if you have killed a shambler tentacle this skill will summon another one.
- Stentorious lament: The shambler will roar at your team, shuffling them across the battlefield. While this skill can easily disrupt your team formation and screw you over (and possibly getting you near your demise) this skill does not summon a shambler tentacle… so you don’t have to worry about that. Also the shambler hates this skill it almost never uses it, but god be merciful if it indeed decided to use it.
Shambler tentacle: The star of the battle. These little pieces of ♥♥♥♥ are quite weak at first but oh boy are they fast. They will most likely will attack first on any round, and after they attack they will get an ugly buff that boost its ACC, DMG, CRIT, SPD and PROT, so if you let them go wild they can be a real almost unkillable threat that will feast upon your heroes.
The shambler can appear at any difficulty and any dungeons if the requirements are met. I highly suggest you to take it on at the apprentice levels, once your heroes are at resolve 2 with enough gear and trinkets. This is because the shambler is way more manageable on this difficulty, otherwise prepare for a very hard battle and a lot of stress because he might be one of the hardest bosses in the game.
For a team composition I highly suggest you preparing well enough since this battle is hard. Heroes who can deal reliably DOTs or a mark composition can easily dispatch this creature, but be careful though since otherwise things can go bad really fast.
- Arbalest: The arbalest can easily dispatch the shambler since her damage comes from marks, and since this boss has only one turn per round means that marks are effective.
- Houndmaster: The same as the arbalest but with a dog, also since he gets a free treat per dungeon he can easily do massive damage to the shambler, or simply protect a teammate that might be almost dead.
- Vestal: While you can also use the occultist I consider the vestal more suited for this battle, since the occultist also brings uncertainty and unreliability, two things that cannot be tolerated on this fight. Also the vestal is perfect to keeping your party as healthy as possible.
- Bounty hunter: The same as the arbalest but at close quarters. Also his mark is better than the arbalest (the debuff grants less PROT instead of less DODGE).
- Highwayman: The highwayman doesn´t rely much on marks, so he can deal damage all the same, and thanks to his riposte (and thanks to the shambler attacks that affect all heroes) he can deal a respectable damage on this fight while remaining himself useful on any range.
Special town event: Wolves at the door
The Brigand Vvulf is a ruthless mercenary that plagues your town and has decided to raid it, destroying everything and everyone who decides to oppose it. This is your first real trial to decide if you can handle the bigger leagues or will put you on the benches.
The Brigand Vvulf´s event has a chance to appear when and after you have at least 4 heroes who have a resolve level of 5, so you need to be very careful to not level up your heroes very fast or you might lock yourself on an unwinnable run, for the “gimmick” of this event is, if you decide to ignore it and embark on a different mission, the Brigand Vvulf will destroy 3 random upgrades of your town buildings.
Have in mind though that you do NOT need to win this quest to prevent him from destroying your town, so you can sacrifice a team of “useless” heroes for that purpose, but you do need to kill him in order to stop this quest from appearing for after the Vvulf is dead, he will “never” appear again as a threat to your hamlet.

The Brigand Vvulf has two turns per round; he has the “human” status, his size is average (even though he is thick as ♥♥♥♥ boi) and he always start at rank 1. His main gimmick is that he starts the battle with a barrel of bombs (barrel o´ bombs) and will start each round “marking” a rank to deal damage at the end of the round (pretty much like the prophet gimmick), but unlike thie prophet you can actually try to destroy the barrel. DON´T do this though since the main gimmick of the barrel of bombs is that it has a riposte effect active at all times, so each time it takes damage that doesn´t destroy it it will riposte, dealing massive damage to the attacker.
The “secondary” gimmick of the Brigand Vvulf is that the sissy he won´t attack you alone, and it will
summon some mobs to aid him (and it will summon a barrel of bombs if you manage to destroy it [which I highly suggest you DON’T DO IT]). The main strategy of this battle is to focus only on Vvulf and completely ignore the other mobs, while also protecting your hero from the bombs that he summons (like the battle with the prophet but slightly harder). What you want to do is to kill it as fast as possible or otherwise the damage of the bombs will be unsustainable and believe me, it can happen fast if he manages to get a crit.
The Brigand Vvulf has five abilities:
- Bombs away: The Brigand Vvulf will launch a bomb to your team, he will always start the round with this skill, it doesn´t consume a turn and will “mark” a “position” on your team. This skill has a high accuracy so dodging is very, very hard but doesn´t deal damage (yet). The skill affects the “position” and not the hero, that means that moving a hero or defending it won´t remove the “mark” and only destroying the barrel can do that (which again I will say, DON´T do that).
- Time´s up!: The Brigand Vvulf will end each round with this skill as long as the barrel is still up. He will make the bomb explote, dealing massive damage to the hero who is in the marked position. The Brigand Vvulf won´t use this skill if the barrel is destroyed on that turn, but then again, DON´T do that.
- Get them!: The Brigand Vvulf will yell at one of your heroes with a chance to stun it, and will summon a brigand raider with a slight chance to summon a second brigand raider, and will summon a barrel of bombs if you destroyed one before. This skill deals very low damage and the only dangerous thing about it is how fast it can fill the battlefield with enemies, and how futile it makes destroying the bombs which makes the battle harder.
- Tower shield: The Brigand Vvulf is not a real ♥♥♥♥♥♥♥, showing some worry about his minions, protecting them with his THICK body and he has a chance to summon a brigand raider. This skill might sound like bad news to you, but actually this skill is what makes possible to classes like leper being able to hit the brigand if he moves beyond their reach. Also this skill doesn´t grant a buff to the Brigand Vvulf.
- Warcry: With this skill the Brigand Vvulf yells at your heroes, dealing stress damage to them. This skill is basically harmless since the stress damage is very low (the spooky bois deal more stress than him), and the Brigand Vvulf doesn´t summon a minion, so this skill gives you a break when he uses it.
Barrel o´ bombs: The barrel o´ bombs doesn´t have any turns, and doesn’t have any kind of skill, but will always have riposte, making it a horrible decision to try to destroy it. If “alive” it will allow the Brigand Vvulf to use “bombs away” and “time´s up!”.

The Brigand Vvulf only appear when the town event pops out, and when the requirements are met to trigger said event. This quest is not as hard as you might think, but you need to go convinced of your victory, for you cannot leave the quest unscratched, if you decide to dip the mission one of your heroes will die (just like a darkest dungeon quest). This quest is also a short one, meaning that you wont be able to camp before the boss and allowing you to use camping skills. Also in this quest there is not eldritch mobs, not monsters, only humans; so blights and bleeds are both effective.

For a team composition I really suggest you heavy hitters and a man at arms; this is perhaps where the man at arms is a MUST. The Brigand Vvulf is both weak towards bleeds and blights so you can also use DOTS.
- Man at arms: If all the text before this didn´t yell at you “USE A MAN AT ARMS” then my friend im afraid for what lies ahead. The MaA is a must on this fight since he has everything you can need; a skill to buff your team (Dodges, CRIT, ACC).
- Highwayman: The highwayman is also probably a must since his riposte helps you controlling the mobs that attacks him, while also being able to focus entirely on the Brigand Vvulf.
- Bounty hunter: The bounty hunter is also a nice option since he has a skill that deals extra damage towards humans, and can disrupt the enemy team. Bear in mind though that marks on the Brigand Vvulf is not a suitable option to fight him.
- Occultist: The occultist can help you at diminishing the damage threshold of the bombs, while also being able to give big heals (although unreliable).
- Vestal: While the vestal lacks the ability to debuff the Brigand Vvulf´s damage, she can help you keeping your team healthy longer than occultist can, but she cannot give you the big heals.
DLC Section: The crimson court
So you have decided that the vanilla game was not enough to satisfy your needs for darkness and despair, and decided to buy it´s dlc “the crimson court”. Well my dear friend you will not regret this and i will try to guide you so you can enjoy this new part of your journey. The crimson court is a DLC that gives you some good new features just like:
- An entirely new map with new trinkets and new mobs / bosses.
- An entirely new hero who might be into some deep masochistic ♥♥♥♥… and somehow a religious character.
- Districts: These are new buildings that gives your heroes or your estate new bonuses when builded.
- A new disease (hurray!!!!); The crimson curse who turns your already ♥♥♥♥♥♥ up heroes into some ♥♥♥♥♥♥ up drunk ♥♥♥♥♥ who cannot live without some blood.
In this dlc the main focus is the younger days of our ancestor (back when he was just a drunk ♥♥♥♥) and his story about how he found out about the darkest dungeon. Note that this is only told via cutscenes, we don´t get to travel in time, but still we get to hear the already sexy magestic voice of the ancestor, so that is nice in itself.
Your heroes will embark in a new location; the crimson court. In this new dungeon you will face the new mobs the bloodsuckers; aristocrats who are infected for the crimson court who wander around the courtyard. Also these new enemies have a new gimmick; they have an attack that will suck dry your heroes, with a chance to infect them with the crimson court (just like HIV). The crimson court is a disease that cannot be cured in the sanitarium, and can also be transmitted to your healthy heroes by sharing a building with a hero infected for the crimson court.
The crimson court (the disease) has some “states” that will have an impact in the performance of your affected hero. Think of these states has the hunger checks, since they will be appearing as you progress through the dungeon, or even in your hamlet, as the weeks progress your heroes might activate the next state.
- Passive: in this state your hero behaves as normal, has some debuffs (-10% max hp / -5% resistance towards stuns and bleeds) and some buffs (+1 SPD) and is the “initial state” in which any hero starts after adquiring the crimson court. If you give the blood to your hero in this state that hero will gain some buffs (+7 dodge / +3 SPD).
- Craving: in this state your hero began to ask you for the blood, since they get “hungry”. In this state your hero gets worse since his debuffs gets worse (-10% resistance towards stuns, bleeds and blights / -10% max hp / – 10% virtue chance) but gains a little buff (+2 SPD). This state can be a pain in the ass since your hero also can act by his own, like passing turns, interacting with curious by his own, or even attack comrades… so be very careful. Also if you give your hero the blood in this state that hero will enter in a new state.
- Wasting: In this state your hero is starting to die since he did not get the blood, and if in the next check he doesn´t receive the blood, that hero will die. This state also triggers some new animation, where your hero is surrounded by bugs, the debuffs becomes more severe (-10% resistance towards stuns, bleeds and blights / -20% max hp / -10% deathblow resist) and you lose the buffs (-4 SPD). In this state if you give him the blood your hero goes back to the passive state.
- Bloodlust: This state is activated when your hero is given the blood when he was in the craving state. That hero will receive some buffs (+25% damage / +4 SPD / +25 % stun resist / + 15% blight resist) but also will receive some minor debuffs (-10% bleed resist) and also the hero can act on his own, just like in craving state.


So, after all that rubbish you might be wondering… what is the blood and how do i get it? The blood is a vial that contains blood (duh). It can be acquired by killing bloodsuckers (or sometimes even normal mobs or curios like chests, but this is rare to happen), by doing some quests in the crimson court (collect X thing), or if you have the heirlooms to spare, by creating the sanguine vintner district; this district will give passively one the blood per week, so after a while you will have a lot of the blood that you will suddenly won´t know what to do with it. Have in mind that the blood occupies an slot in your inventory, so it can easily make you decide between bringing a vial with you or some nice juicy loot.
With all that down, i will write more for the missions and some other mechanics that are added to the game, but for now, have some fun reading.
Spoiler Section: Darkest dungeons
So here you are… all mighty and bloodied for all that slaughter you had to do in the name of justice… or whatever you use to justify all this suffering and massacre… But never forget that things can easily go wrong… heroes can become cowards in the heat of battle… Monsters can suddenly but surely crit you to death…. and you might find yourself that you are not the flame…. when you find yourself surrounded in all this madness… when you go to sleep to try to heal your already corrupted mind… rest assured that the eldritch will never rest in the deeps…. of the darkest dungeon.
Alrighty then… after all that cringeworthy weeabo pseudoedgy ♥♥♥♥, let´s get serious. Here you are, preparing to embark on your first mission of the darkest dungeons, and you might be wondering what horrible things await for you… Fortunately for you i will try to help you to go as prepared as possible because believe me… these dungeons are not easy at all and will most likely end in death if unprepared.

Disclaimer: If you want to go as virgin as possibly (and i encourage to do that) don´t read past this. You have been warned.
For startets let me make a list of the things that are different in the darkest dungeons compared to the other dungeons:

- In the darkest dungeons there is only one type of curio, and those are the ancestors belongings, with is a bag with some supplies and an ancient trinket thay you don´t have.
- Don´t bring shovels since there aren´t any blockages in the darkest dungeons, so save that money for anything more important.
- You CANNOT retreat unpunished from any of the darkest dungeons. If you suddenly found yourself in a position where you just simply can´t win and will most likely lose all your party you will need to “sacrifice” one of your heroes to hold the mobs of the darkest dungeons so the rest of the party can escape. This valiant hero is random so you don´t have any way to select the one who has to die. An advice is if you have to abandon a mission take away all the trinkets of all your heroes so you might not lose any.
- The maps are all predesigned, this means that no matter what the map will always be the same to all of us, so if you feel like cheating use any map on internet, they will not change any bit. Also the map is revealed to you as you progress.
- There aren´t any night ambushes, so you can save those camping points to something more important. Don´t worry about night ambushes since the mobs in here knows that they can bitchslap you any day, so they don´t feel the need to go and do it personally.
- In fact, you cannot scout the map at all, also you cannot be surprised nor surprise the mobs, so you can save those trinkets or camping skills since is irrelevant here.
- In here hunger checks happens less often, so you can be a greedy bastard and save some gold and bring less food.
- All of the mobs in the darkest dungeons has the type of “eldritch”, so be aware of perks / trinkets that affect that type.
- Almost every attack stress your heroes, so in the darkest dungeons is a battle for hp and stress.
- Once (and if) you manage to beat a mission of the darkest dungeons you receive an event where all of your hero´s stress go to 0, so if you have some heroes with stress and want to save some money go and do a darkest dungeon misision (lol).
- If (and hopefully) you fail a mission the next mission you embark (regardless if it is a darkest dungeon or a normal one) will receive extra resolve XP.
- After (and if) you manage to beat your very first darkest dungeon, a very ugly truth will be revealed to you… the world as you see it will change…
- After (and if) you manage to beat any darkest dungeon the heroes of that party will receive an special “gift”; never again. With this “gift” those heroes will be so perturbed and so damaged they will NEVER embark in another darkest dungeon mission (unless you play on radiant, but they will be so stressed that they will receive a resolve test). So be aware that you CANNOT use the same hero that already beat a mission. But with this “gift” any hero that embarks with those heroes with “never again” will receive extra XP resolve.
To finish all four darkest dungeon´s missions you need at least 16 heroes… if you want to go with full parties to all of the darkest dungeon´s missions. In the darkest dungeons mobs becomes more tankier and more deadlier, so having a slightly ♥♥♥♥♥♥ composition can result in a horrible embark. Prepare your heroes with the best trinkets and fully upgraded so they can stand a chance against the odds. You can go with a hero who doesn´t have a full upgraded armor – weapon – skills, just be warned that the mobs in the darkest dungeon are very unforgiving and things can go very ugly very fast.
For the supplies you really want to bring tons of food (so the hunger checks won´t ♥♥♥♥ you), bleeds and blights happen more often here so is worth bringing a lot of them since in here both of them deal a lot of damage, holy water becomes a must and torches are your allies in here.
With that large (and boring) list behind us i will write all four missions and, with some luck, you will be able to test your own resolve in here, and see if you have what it needs to conquer this marvelous game.
We are the flame
So you made it this far, and are ready to embark in the first mission of the darkest dungeon. Well my friend let me give you some tips so you can even the odds, because believe me when i say the best is yet to come.
On this mission you are tasked to kill a shuffling horror. The size of the dungeon is medium, so you will receive one firewood to camp, so as a recommendation don´t waste that firewood, use it only before the boss room or when stress is becoming a problem. The map is pretty simple, having to move forward to find the boss room. But be careful since the mobs on these dungeons are nothing you have seen before, and can prove themselves worthy of nightmares.
In this dungeon expect a lot of bleeds and stress per attack, so bring a lot of bandages and at least one hero that can heal stress, or otherwise don´t be mad when your heroes reach 100 stress. Also in these dungeons the map are predetermined, so they don´t change no matter what, so is recommended to search a map on the internet so you know what to expect, or you can go without spoiling the fun and go full yolo.
Boss fight: The shuffling horror
The shuffling horror is nothing more than a glorified shambler, who it seems it has been corrupted by the dungeon. When you enter the boss room you will also find a cultist priest. Don´t try to kill it because the shuffling horror will spawn another one, so is pretty much pointless.
The shuffling horror has the eldritch type, it has a gigantic size (it occupies 3 ranks) and it has 2 turns per round, making marks and debuffs pointless but blights and bleeds useful. Its main gimmick is that once per turn he will shuffle your entire party, making this fight unpredictable since you don´t know where your heroes will be moved. Also he will always spawn with a cultist priest, and will spawn another if killed so you must focus your attention on killing the shuffling horror. For his attacks he has:

- Lacerate: With this skill the shuffling horror will launch itself towards two heroes, damaging them and has a chance to bleed them. While it doesn´t do as much damage as one might think (other bosses do more nasty damage), this skill can easily eat the health bar of your heroes, so don´t neglect their health bars or you can easily be on death´s door.
- Echoing disassembly: This skill will only be used when the cultist priest is killed. The shuffling horror will attack all your party members, stressing them and lowering the torchlight, while also summoning another cultist priest or a defensive growth. This skill has a fairly CRIT mod so don´t focus the cultist priest yet, however annoying he might be.
- Undulations: With this skill the shuffling horror will roar at your party, shuffling them. This is its gimmick and will use it once per turn, so be ready and use heroes that aren´t affected by position.
The shuffling horror is weak towards bleedings, so trying to inflict them might prove a good strategy to grind him down, especially since it has two turns per rank making DOT useful.
Heroes:
In this dungeon you really don’t want to bring heroes that dislike being moved around, so you really need to bring heroes that can act and move at will regardless of position or you might be screwed big time. On this list i let you some heroes that I have found useful on this dungeon:
- Jester: In this dungeon stress plays a high role since almost every enemy attack is guaranteed to stress your party, so you need a good stress healer. Also the jester doesn´t give a ♥♥♥♥ about the gimmick of the shuffling horror.
- Vestal: While at first the vestal might look like a bad option, in fact she is pretty good on this dungeon since in the fight with the shuffling horror you want to keep your entire party alive and healthy as long as possible. Besides she can function in almost any position, so she is good to go.
- Abomination: With his transformation the abomination might prove himself useful, especially since he can buff his damage and can move himself if needed. Just be careful since his transformation might prove your perdition if you can´t control the stress.
- Hellion: The hellion exceed at this battle since she can inflict bleeds to the shuffling horrors while not giving a ♥♥♥♥ about its gimmick, making her a solid choice to use. Just be careful with her debuffs, you don´t want to waste her too fast and make her useless.
- Highwayman: The highwayman also exceed at this battle since he can inflict bleed to the shuffling horror but he also has riposte, and all of the shuffling horror´s skills attack your entire party, so your highwayman can riposte for days, making this fight less hard.
- Occultist: The occultist is a perfect choice to use in any dungeon of the darkest dungeons since he does more damage towards eldritch mobs, but he can also save you in a pinch if you need heals. But in my personal opinion he is better suited in the next mission.
- Bounty hunter: The bounty hunter is one of the best choices in this battle, since he can act in any position, his mark can debuff the shuffling horror´s PROT and he benefits tremendously from marks, so if you can stack damage on both stack and size you can do some serious damage towards the shuffling horror.
After you manage to kill the shuffling horror, you will be granted three talismans of the flame, which are going to be crucial for the incoming mission and, if you lack any, the shuffling horror will give you a random ancestral trinket (since he is a shamble at heart), so you can receive two ancestral trinkets on this mission.
Lightning the way (First part)
Congratulations on your first real “victory”, but don’t get cocky yet for this mission is the hardest you will have to take on. But if you manage to beat it, then you can consider the game defeated.
On this mission you are tasked to activate three iron crowns; for this you will have three hands of glory. The size of the dungeon is long so you will be granted two firewood, but uses them only when needed since you will be facing multiple “bosses” on this dungeon. This map is a little more complicated than the previous one, so I highly suggest you to search a map on the internet, so you spare yourself from a long, bloody and miserable campaign.
On this dungeon expect both bleeds, blights and debuffs so you need to bring a lot of bandages, anti-venom and holy water. Also there is a new gimmick; the bosses on this dungeon uses a skill called “revelation”, this skill hits really HARD but thankfully you can avoid the damage (both in HP and stress) by using the talismans of the flame, but since you only have three one of your heroes will have to enter the dungeon unprotected.

The Templars
On this dungeon you will face two new mini bosses; the Templar impaler and the Templar warlord. These half scorpion half human monsters shouldn´t be taken lightly since they can dish MASSIVE damage to your party with their normal skills or with revelation. They will guard each iron crown, so in total you will face one Templar impaler on one room, one Templar warlord on another room and both of them in another room, so you really want to keep your firewood for when you really need them.
Boss fight: The Templar impaler
The Templar impaler has the eldritch / beast type, it has a large size (it occupies two ranks) and it has two turns per round, so debuffs and marks are quite ineffective against it but bleeds do wonders. It´s main gimmick is that it has a skill named “revelation” which, if your heroes are not protected with the talismans of the light, will do some MASSIVE damage and will stress A LOT your heroes, so you really don´t want to be caught off guard by this skill. He also has the highest HP pool of the two Templars, making it a beefy boi. He also loves to be on the front row, so moving it to the back row can disrupt it a little so the fight is easier for you.
The main strategy against this boss is to try and move it away from the front row so he won´t be able to use one of its skills (stinger stab). Also try to stun it on its first turn, so in the next it will use revelation. By doing this you are almost guaranteed to have a run with no damage done to your heroes (assuming you have the talismans of the light and someone with guard). For the skills it has:

- Torment: With this skill the Templar impaler will attack both position 1 and 2 with its claws, doing quite a lot of damage and it has a good CRIT mod.
- Stinger stab: With this skill the Templar impaler will use its stinger to attack one of your heroes and inflict a nasty blight (like the bleed of mister crab… 10 damage per turn). Be aware though that the Templar impaler can only use this skill when he is in position 1 and 2 (which is redundant due to his size), so if you move him he won´t be able to use this skill.
- Body slam: With this skill the Templar impaler will charge at one of your heroes, moving it forward 2 ranks, dealing a lot of damage and with a chance of stun it.
- Revelation: With this skill the Templar impaler will give the “evil eye” to one of your heroes, and it can occur two things; if your hero has a talisman of the light (or is protected by one who has it) the skill will do no damage and will be a wasted turn by the templar impaler or… if your hero doesn´t have a talisman of the light (or is not being protected by one who has it) it will receive MASSIVE damage and will receive A LOT of stress. Believe me when I say you don´t want to get hit by this skill.
It will appear protecting one of the iron crowns with another two mobs in the back row that will love to move you, so is recommended to kill them first before giving your full attention to this boss, and will appear on another room protecting another iron crown with its brother, so this is your real test. Also this boss is weak towards bleeds but resistant towards blights, so try to grind him down with bleeds.
Lightning the way (second part)
Boss fight: The Templar warlord
The Templar warlord has the eldritch / beast type, it has a large size (it occupies two ranks) and it has two turns per round, so debuffs and marks are quite ineffective against it but bleeds do wonders. It´s main gimmick is that it has a skill named “revelation” which, if your heroes are not protected with the talismans of the light, will do some MASSIVE damage and will stress A LOT your heroes, so you really don´t want to be caught off guard by this skill. He has the lowest HP of the two Templars, so it is recommended to focus him down first. He also loves to be on the back row, so moving it is crucial to disrupt it.
The main strategy against this boss is to try and move it to the front row so it won´t be able to use two of its skills (stinger shoot and doomsday). Also try to stun it on its first turn, so in the next it will use revelation. By doing this you are almost guaranteed to have a run with no damage done to your heroes (assuming you have the talismans of the light and someone with guard). For the skills it has:

- Torment: With this skill the Templar warlord will attack both position 1 and 2 with its claws, doing quite a lot of damage and it has a good CRIT mod.
- Stinger shot: With this skill the Templar warlord will launch its stinger to attack one of your heroes and inflict a blight and debuffs (- DMG, – CRIT). Be aware though that the Templar warlord can only use this skill when he is in position 3 and 4 (which is redundant due to his size), so if you move him he won´t be able to use this skill.
- Doomsday: With this skill the Templar warlord will launch spikes towards your party, inflicting moderate damage and with a chance to blight. Be aware though that the Templar warlord can only use this skill when he is in position 3 and 4, so if you move it you will disrupt it a lot.
- Revelation: With this skill the Templar warlord will give the “evil eye” to one of your heroes, and it can occur two things; if your hero has a talisman of the light (or is protected by one who has it) the skill will do no damage and will be a wasted turn by the Templar warlord or… if your hero doesn´t have a talisman of the light (or is not being protected by one who has it) it will receive MASSIVE damage and will receive A LOT of stress. Believe me when I say you don´t want to get hit by this skill.
It will appear protecting one of the iron crowns with another two mobs in the front row that will attack your party and might even blight them, so is recommended to kill them first and dispose of the corpses before giving your full attention to this boss, and will appear on another room protecting another iron crown with its brother, so this is your real test. Also this boss is weak towards bleeds but resistant towards blights, so try to grind him down with bleeds.
Heroes:

In this dungeon you NEED a hero that can protect the poor soul who will go without a talisman of the flame, while also someone who can reliably stun the mini bosses so they use revelation, guaranteeing an easy run.
- Occultist: The occultist becomes important on this dungeon since he can heal your party against the massive damage these two monsters can dish, or he can lower their damage so you have to rely less on his heals.
- Man at arms: The man at arms becomes a must on this dungeon since he can (and must) protect the poor bastard who won´t be going without a talisman of the flame. Also he can use riposte so you can damage further its turn (especially thanks to the guard.
- Bounty hunter: The bounty hunter, with the proper trinkets, might be able to stun the Templars so you can easily dispatch them. Or if you don´t want to rely on a gimmick then he can also dish a lot of damage.
- Houndmaster: The houndmaster is especially good on this fight since he can protect the poor soul against revelation. He also deals extra damage towards beast types and, combined with the Scooby snacks, he can do good damage. He can also stress heal.
- Witcher (MOD only): While geralt is a mod, thanks to his stun you are almost guaranteed to stun the Templars on its first turn. Also his damage is ridiculously high, so he can make the fight even shorter.
Belly of the beast (Past 1)
If you have made it this far, congratulations! You have beated what is perhaps the hardest mission in the game, but don´t get confident yet for the next mission is quite hard if you go unprepared. On this mission you are tasked to activate a locus beacon, the size of this dungeon is exhausting (is one of a kind, really), which the game will give you the ridiculous amount of 4 firewood.
You must use the firewoods when you truly need them because, while most mobs on this dungeon are quite weak when compared to what you already faced, they will take its tool after a while, and you don´t really know how long will it take you to beat this dungeon. Also since this dungeon is big you will need to decide which provisions you need, and blights are more dangerous here than bleeds, so prioritizing antivenom is nice.
This is perhaps the easiest but the longest mission on the darkest dungeons´ set, and perhaps you already used the best of your heroes´ roster to beat the first two ones but don´t worry, they will be enough (but please don´t use an antiquarian, unless you want to cripple yourself to death). To fulfill the mission´s task you need to reach the center of the map, activate the beacon (which is a curio that doesn´t require anything to be activated).
What you really need to be careful is that both the Templar warlord and the Templar impaler are mobs that can spawn in your mission. They don´t use their revelation attack so you don´t have to worry about it, but they are still tough as ♥♥♥♥, and you can no longer cheese them with the stun strategy that once works against them on the previous mission, so be prepared.
Mini boss fight: Mammoth cyst.
While this mob will appear multiple times thorough the entire dungeon, it will pose a threat thanks to its gimmick, but don´t worry though he is weak compared to everything you already faced.
The mammoth cyst has the eldritch / beast type, it has a gigantic size (occupies the first three ranks); it has two turns per round and always spawn at rank 1. Its main gimmick is that it will summon another mob; the White Cell stalk. Its main gimmick is that he will summon a white cell stalk at the start of every turn, and will keep spawning them every time you kill one. The main strategy here is to stun and kill the white cell stalks since they have a different gimmick (the one that can be the difference between a short campaign or a prolonged vacation).
For its skills the mammoth cyst has:

- Bulging gaze: With this attack the mammoth cyst will give the “evil eye” to one of your heroes (they really have a thing for that) with a slight chance to affect another hero. This attack doesn´t do a lot of damage but it will eat the sanity of those affected by it (it will stress your heroes).
- Digestion: With this skill the mammoth cyst will show how a deep French kiss is performed, giving a lot of its fluids to one of your heroes and blighting it, with a slight chance to affect another hero. This attack can do a little more damage that bulging gaze but be careful with the blight, it can deal a lot of damage.
- Revivify: With this skill the little ♥♥♥♥ will heal itself for a good amount and buff itself (+25% DMG). While is not the worst thing in the world, the little ♥♥♥♥ will try to use this skill when his life is below 50%, making it annoying to fight against.
- Summon: With this skill the mammoth cyst will summon a white cell stalk to aid him in battle and do this dungeon longer that what it actually is.
Belly of the beast (Past 2)
Summoned monster: the white cell stalk
This is the mob that the mammoth cyst summons, and while its abilities are quite weak, he has one that can make your journey a living long hell.
The white cell stalk has the eldritch / beast type, it has a small size; it has one turn per round and will always be summoned at rank 4. Its main gimmick is that it will try to teleport the player to another room; while this doesn´t so bad, it can make this mission longer that it actually is. If the room where you are teleported is not explored yet (and it will almost always be the case since the dungeon is big) you will enter in battle with the mobs inside that room with no chance to retreat for said battle. Don´t worry though since the battle against the mammoth cyst and the white cell stalk won´t reset (they won´t be at full health), so if you manage to make your way to those rooms they will be as you left them.
Your main strategy here is to kill as fast as possible the white cell stalk and to stun it so it won’t be able to use “teleport” while damaging the mammoth cyst. or you can completely ignored the white cell stalk and focus on the mammoth cyst, but don´t be crying when you get teleported.
For its abilities it has:

- Teleport: This is the main gimmick of the entire dungeon; with this skill the white cell stalk will teleport you to a random room. If it is a battle room where you haven´t explored yet then you cannot retreat and you need to hold your ground. This ability is truly nasty but it is possible to finish the dungeon without being teleported.
- Reconstitute: With this skill the little bastard will heal the mammoth cyst (as if it needed more heals) or itself. This skill will be used more frequently as the mammoth cyst´s HP gets lower, starting at 50% of its HP pool and below.
- Displace: With this skill the white cell stalk will try to move one of your allies with a chance of debuffing them (- SPD). Overall I don´t remember at all being affected by this skill, so don´t worry about it.
For the party this mission is not particularly picky since you might already use your best heroes on previous missions .Have in mind though that, while this mission is easier than the previous ones, this one is a battle of endurance; meaning that the stress and damage will take its tool after a while, so learning to administrate the usages of the firewood will prove important here if you don´t want to find yourself in a pinch.
- Leper: The leper is particulary good against this boss (and not because he might be a leftover) because he has high damage and the mammoth cyst doesn´t have a lot of dodge rate (he is a massive tumor for Christ sake).
- Plague doctor: If you haven’t used her then she can be a good addition to this mission. She can easily stun both the mammoth cyst and the white cell stalk, giving you time to kill the latest while damaging the first, and she can heal your party´s bleeds and blights, so she can save you some money and some space in your inventory.
- Grave robber: With the grave robber you can easily reach the white cell stalk with her daggers (R.I.P. the massive range of lunge), so try to give her trinkets that boost mostly her damage, since the daggers gives a buff to her accuracy.
- Vestal: If you still have a vestal use her, in here the damage is not big, but in here all of your party members will suffer damage, so she can really help you at the endurance fight.
- Houndmaster: If you still have a houndmaster he can really kill both the mammoth cyst and the white cell stalk since he performs better against beast types. Also he can stress heal your party and protect them, which is nice.
Hell is in the heart
You made it; you beat all the odds and keep pushing forwards, you killed anything that stood on your way so you can purify this world from the evilness that is the darkness dungeon and what resides within it. But in this world there can be only darkness, so here is your reward.
Congratulations, you are on your last mission of this wonderful game, if you still have Dismas and Reynauld alive and haven´t use them yet now is the time, so in the old road they might find their redemption. On this mission you are tasked to kill 1 heart of darkness, the size of the dungeon is short so you don´t get to camp at all. In fact on this mission you won´t require shovels, torches, food or keys; save all that money for holy water,medical herbs, antivenom and bandages because you will need them.
On this mission there is not a single food check, so don´t bring food, there is not torchlight so torches are useless (but in the dungeon the “torchlight” is considered at 100, so trinkets and perks that works with high torchlights will work here), there is not removable obstacles that needs a shovel and there are not chests so the skull key is worthless. There is one hidden room however, try to search it if you need some inspiration before your grand finale. This mission is pretty straight forward, there is only one way to go, and there is only one destination to reach, and one boss that needs to die, so go for it champ.
If you want to evade any kind of spoilers and want to go as virgin as possible then this is your last warning, just let me tell you that any team composition will do well on this boss fight as long as is not flawed (leper rank 3).
Boss fight: The ancestor (coming soon)
Credits
With this i finish this ♥♥♥♥♥♥ guide with the hope that it actually helped someone to go through the game. I sincerely thanks and congratulate anyone who can read all this rubbish since it took me quite a while to write down the information and even more time to actually play and understand the game. I would like to thank to the people who helped me to do the guide…. but unfortunately i wrote everything since i am a lone ♥♥♥♥.
If anyone has something to ask, or want more info about anything and want me to write feel free to ask, it actualy encourages me to do so. And special thanks to the 9 people who add this guide to favorites, you bastards give me enough motivation to keep writing.
No matter how hard the game is, no matter how hard the situation went downhill; always remember. Stay calm, focus on the backrow, and never bring lepers.
BYE BYE.
