Overview
A guide to the realms; Part 2This is a guide to assist you across all of the Death realm incase it is needed. There are a few harder puzzles across this area and I will try to be as detailed as possible.This guide has been gone over 3 times to try make things clearer, some are just hard to explain, so please be less critical of me as I attempt to re-play the game and edit it once more. Part 1: https://steamcommunity.com/sharedfiles/filedetails/?id=1441539492
CROOKED badge
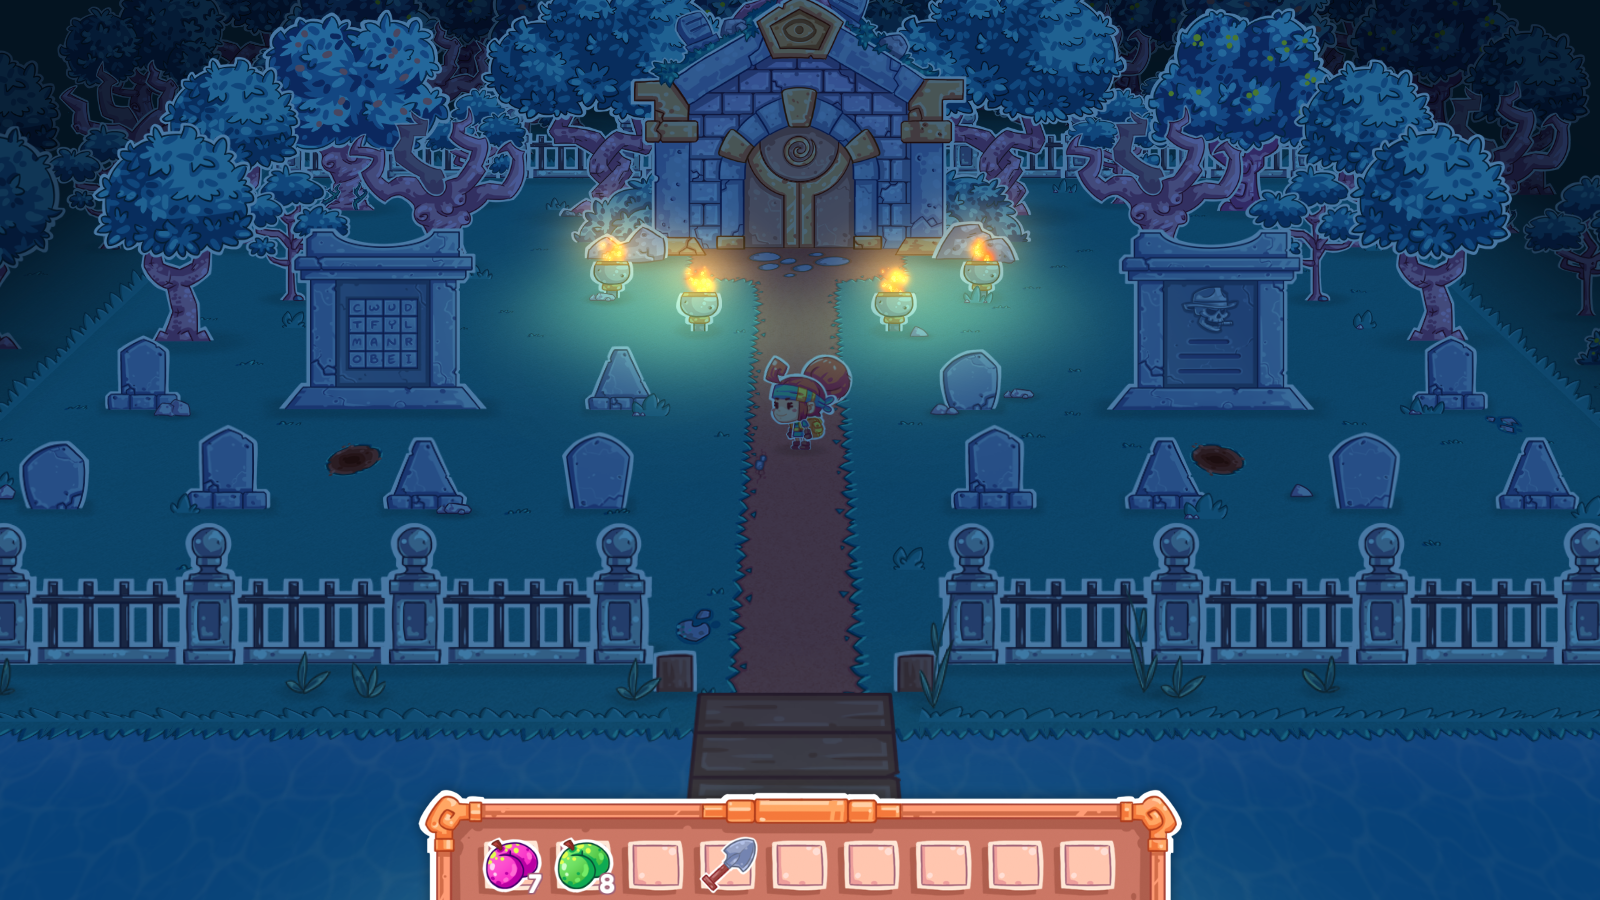
Da Hideout
The first thing you should do is walk to the ‘Vault’ and talk to the skeleton before it, the Vault is located in the only spot that casually has a skeleton standing before it, if that isn’t enough, run right. then up. you can’t miss him; retrive the note and go back to the board with the skeleton on it back where you spawned; look to the letters and the sheet.
You will notice there is a point where every line connects, that point matches up with a letter.
With this code, you want to go to the board to the right of it and put in letter by letter the password
If you cannot work it out, the pass is….
FEDORA
Walk down the staircase that just opened and you will be inside the skeleton mafia;talk to the mob boss, he will give you a key and ask you to break into “Da Vault”; Walk to the vault (The building behind where the skeleton was) with the newly earned key, unlock then walk inside.
Against the back wall there are a lot of numbers, The gold ones indicate ANGLES/ DEGREES.
To solve this puzzle, move the gold arrow to the degrees stated in the white; once at the correct angle, place the key in the corner of the white with the number it points to…
Top left: 2, Top Right: 3, Bottom Left: 5, Bottom Right: 1
Finally, walk through the newly opened path; this will lead you back to the skeleton mafia, talk to the mob boss.
SICKEST badge
Bronze Bull
To initiate this puzzle, Dig right before the BRONZE BULL grave, located at the back left of the area with the graveyard, you will receive a horn.
After receiving the horn, run down to the slab with the 4 stones on it; write down the colours it shows.
The colours it shows is as following if you do not wish to write it down or remember it…
Top two red, bottom left green, bottom right Yellow
Don’t forget to grab the horn back again.
From here run to the area to the right of the posesed girl, in here you place the bull horn in the middle of the circle and make the colours you wrote down out of the torches in the corners.
After run to the book and read it out.
The bronze bull will tell you the location of his shrine…
“My shrine is past he main graveyard gate, north-west of the big bells. If anybody gets in your way (The skeleton) I’ll SPOOK the ♥♥♥♥ out of ’em”
The next step is to run to the bronze bulls shrine, Talk to the skeleton and the bronze bull will scare him away.
Inside you will see a group or orbs in the middle that change colour when you click on them.
BEFORE YOU CAN FINISH THIS MISSION YOU WILL NEED TO LOCATE 2 ORBS.
Orb Locations
You will only need 2; but here is all locations, just in case.
-Dig in front of the grave with 3 circles on it in the graveyard.
-To the right of Gasil’s House is another grave with 3 circles.
-To the right of the Haunted Tower is the final grave
-Inside Sols tent, in the gold box
-Inside Gasil’s house, in their bedroom.
To solve this puzzle after returning the orbs, read the corner graves and pay attention to the colours and body parts.
You will notice the pattern of torches looks like a body.
ANSWER:
two bottom: Green, sides: Yellow, Middle: Red, Top: Blue
From here, Bring the Book you attain by finishing this puzzle and bring it back to the spot with the torches; give it to the bronze bull.
LMAO badge
The tower
To begin this quest, go to the haunted tower where Annie will interupt you and ask you to come inside; walk inside.
Using the slab in the back corner, go up the floors using; notice the cracks in the slab will form patterns you will need to make by walking over the spirals on the floor.
You can only have one of the sections per floor until you have all of the patterns on the wall.
The answer is the following….
Floor 1: The three across, 2 under
Floor 2: The three down, one across in the middle
Floor 3: The three across only
Floor 4: The three going down
On the top floor, match the pattern on the key (The ♥♥♥♥♥♥♥ bandersnatch logo)
MOTHER’S badge
Missing Son
To begin this quest, go to Gasil’s house and talk to Alma, she will explain her son Taki is missing.
Retrive the key from the attic (Go through the door in the room with the alchemy machine) it is on the floor behind a box.
Whilst there, write down the symbols on the wall.

After recieving this key, run to the building to the right of the haunted tower and us the key to enter. Using the symbols from the attic solve the problem…
Hint: The symbols show what shape should equal up to what the number should be; then add the numbers together.
Each symbol if you can’t work it out is the following number…
Triangle: 1
Circle: 2
Square: 3
so the answer to the puzzle is…
475698
The following room is an invisible maze, the screaming by the heads will indicate you taking the wrong path, if the candles are out. you cannot go through the door. messing up too many times will send you to the start.
The following is the path…

After finishing this puzzle; you will find Taki, and be teleported back to the house, talk to his mother.
ALCHEMY Badge
The Spiral Stone
To begin this quest, talk to Gasil in his house (By walking infrount of the alchemy machine);
From here go into the “Archive” besides his house ( as stated by Gasil saying “A child in the archive?” ) and you will spot a ring in the middle with the silly six; read from the book cases in the back and match the items with the alchemist going off the hints.
The recipe will show on the wall behind the head.
TO FIND AN ORB: Read the guide to get the SICKEST badge.
The bookcases read the following…
Joshua ‘Ol” gray = Josh was the oldest of the six alchemists. We’re talking pretty old too; even older than the second oldest alchemist, who is also really old. He loved to transmute caramel candies because he was so old.
Chadwick “Fuzzy Chin” Johnston = Chad believed himself to have the greatest beard of the six alchemists but really it was the same beard that two of the other guys had; He transmuted a hair comb so he could maintain his glorious mouth foliage.
Mathew “Vitamin D” McLaughlin = Matt prefered to perform all of his alchemy under the bright light of the sun even though it didn’t help.He was the first alchemist ever to transmute suntan lotion so he could work on his sick tan.
Robert “Baby Blues” Spineli = Everybody used to compliment Robbie on his beautiful blue eyes, which made the other alchemist with blue eyes pretty jealous. He transmuted boring glass eyes that he would tape over his regular eyes just to get a break from the compliments.
Zachary “Four eyes” Doofinus = Zach got beat up by the other alchemists for having impared vision; What a Loser! One day he got fed up and transmuted a handgun so they would all learn not to mess with him anymore.
Garrett “Pretty Boy” Garretson = Garrett prided himself on his well groomed and clean shaven appearance. He was a hit with the ladies but not so good at alchemy. It turns out he wasn’t an alchemist at all, but nobody figured that out until after this archive was built. He never transmuted anything, obviously.
The answers are…
Man in the red coat: Comb
Man in the light blue coat: Gun
Man in the brown coat: Eyeball
Man in the purple coat: Candy
Man in the green coat: Sunscreen
Man in the yellow coat: None
Bring back the head and an orb to the alchemy machine,.
Using the book to the right, match the noise coming from the switches to match the pattern on the page; place the items in the “Insert here” slab.
The switch positions are as following…
Red: Up, Yellow: Left, Green: Right
Once finished, Go to walk out and you will get your badge.
COMPOSER’S badge
Love Song
To begin this mission, grab the sheet music off the piano in Gasil’s house; Spucky will ask you to play it for him.
Possibly the quickest to finish, take the sheet music to the bells in the grave yard; Start from the top and use the bells to match the patterns…
1:Left Twice
2: Right Twice
3: Left twice
7: Middle bell once
8: Left bell again once
9: Middle bell again once
EXORCIST badge
The exorcism
To begin this quest, talk to the floating girl with glowing red eyes; Lily will announce she is posessed and needs an exorcism.
First. go into the mausoleum, and read the names of all the vases; try to see if there is a pattern.
Most notably, focus on the last names.
Look for patterns after reading them all; Particular reocuring letters; shapes, stripes spots…
Answer to part 1:
Last names beginning with ABC: Franklin Chandler,Joseph Anderson, Pater Banks
Break open the casket and recieve the straw doll.
Once at the end, read the back board and you will get this code.
1X 2Y 3Z 4X 1Y
2Z 4X 2Y 1Z 4Y
Go back and place back the vases to the line, then retry using the numbers; the letters equal the stripes, and the number refers to the shape.. (Tip: do the 2Y’s first because they are notably the only EXACT same vase.)
The answer is…
Nathan Stuart, David Fenwick, Steven Fletcher
This will now change the room to let you get the Holy Spirit.
Bring the Straw doll and the Holy Spirit to the alchemy machine in Gasil’s House, read the book to the right of the machine and change the switches until the noise matches the pattern on the page.
The switch positions are…
Red: Left, Yellow: Right, Green: left
Insert the straw doll and holy spirit into the machine.
After getting the Exorcism Doll; Bring it back to lily and give it to her.
PITY badge
Silver Fox
The silver fox puzzle begins after you dig up the tail from before his grave (Top right of the graveyard).
Soon after run down to the Area you began the realm realm and fill the pillars before the fox totems slots with orbs…
LOCATIONS OF ORBS CAN BE FOUND IN THE SICKEST BADGE SECTION.

Write down the pattern it produces…
If you don’t wish to write it or remember it, here it is…
2313431
After run to the slab in the grave yard and write down the 4 orb colours, of which should be
Purple Green
Blue Purple
Run to the ritual area and place down the tail in the circle, then adding the colours using the torches in the four corners (When purple, add red and blue; when green, add yellow and blue)
Go to the book and then proceed to read the chant.
Then run to the shrine (top right of the graveyard, talk to the skeleton blocking the path)
Using the number from you wrote down, go through the doors in order, the orbs being in line with where each door is.
This is the pattern you want to take,

Grab the DVD’s and bring it back to silver fox at the ritual area; give it to him to receive your badge.
SOL’S badge
This isn’t very much a puzzle done easily by formulated maths; though a hint is that the bottom right is only touchable by green lights.
You want to assure all of the orbs have 3 rings lit up at once.
If you have not been messing around with the puzzle or if you are prepared to do a hard restart; the answer to this puzzle from the complete beginning is….
Green, Purple, Yellow, Red, Blue, Yellow, Red, Blue
(thankyou to Rin Chan at [link] for this answer.
If not, I completed this pattern by mashing away within 2 mins; Good luck!
Credits
People who had pointed out aspects that I needed to change or assisted with the progress of this guide:
ordtixidor