
Overview
This guide will help you play NS2 completely offline vs bot ai, no internet needed at all! Applicable to Builds 327 and above!
Step 1: Disable your internet connection(s)

Step 2: Set Steam to offline mode.
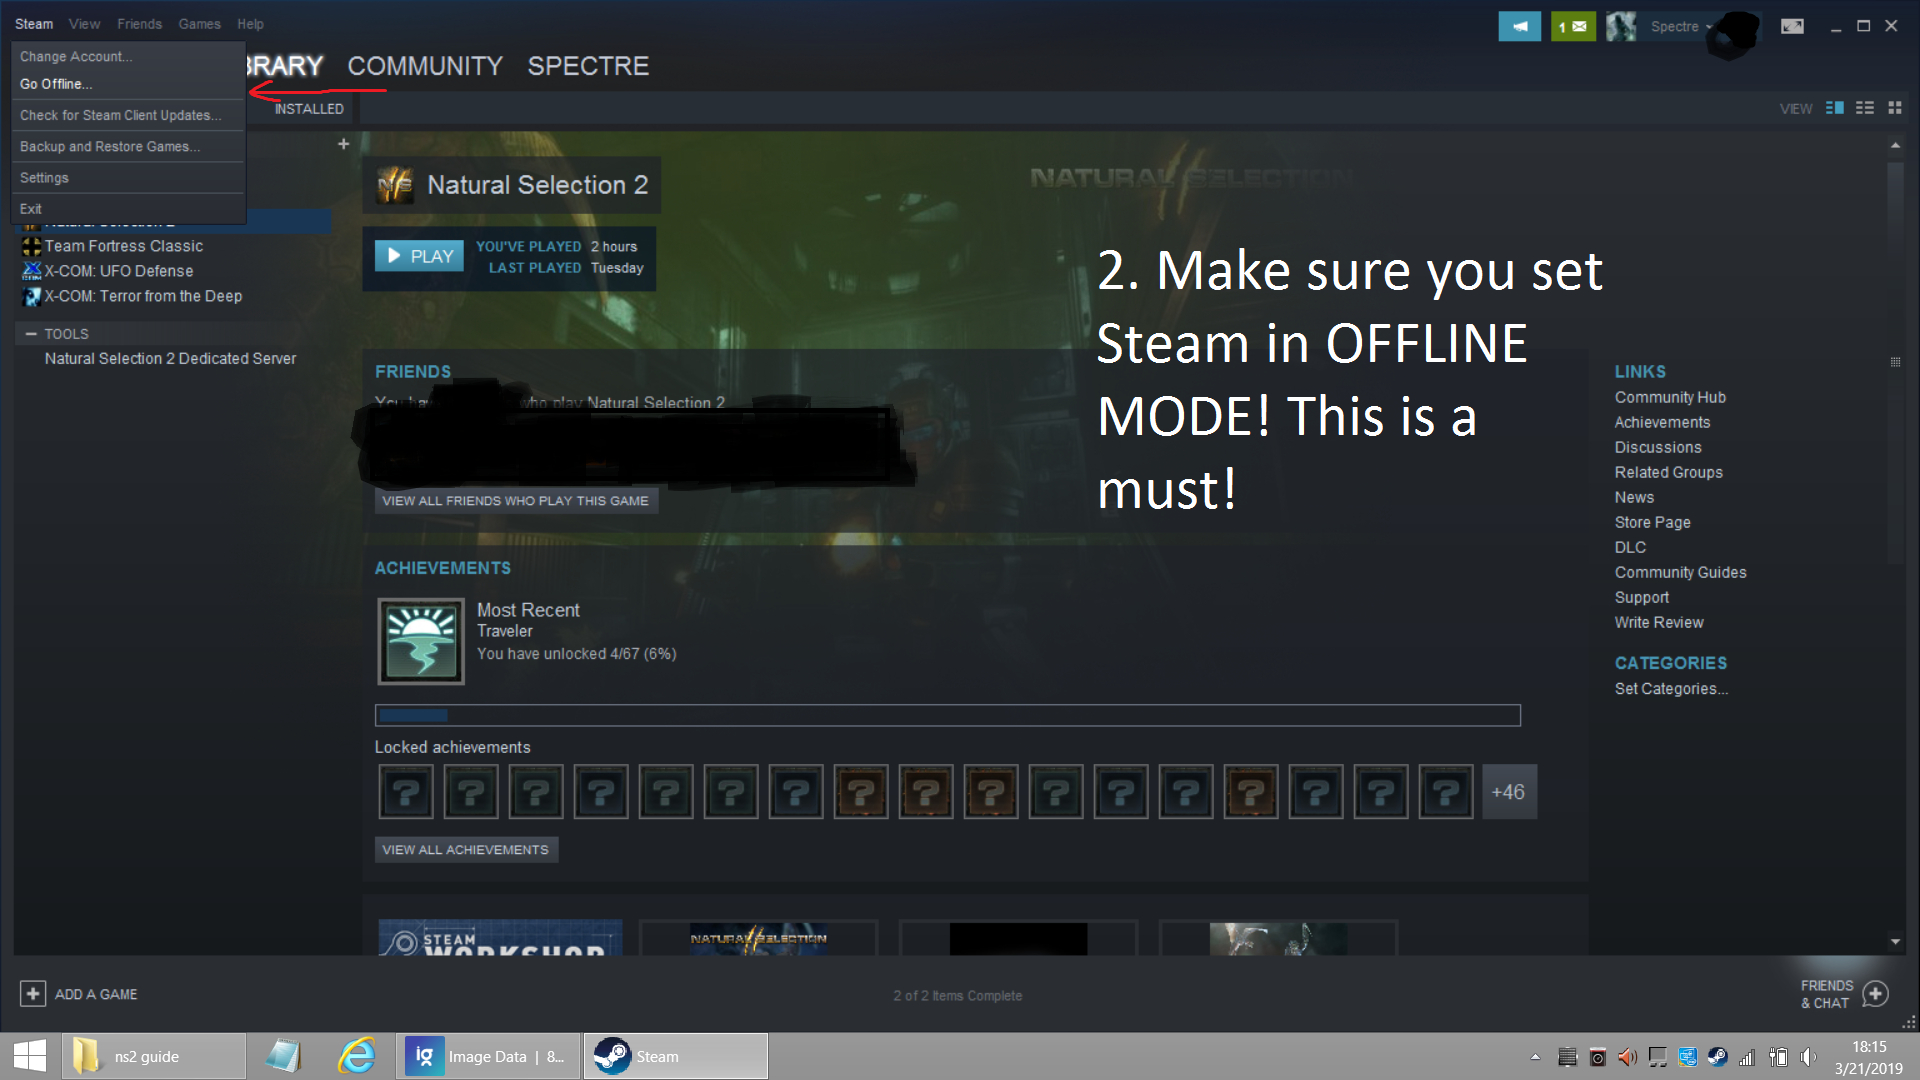

Step 3: Confirm you are in offline mode

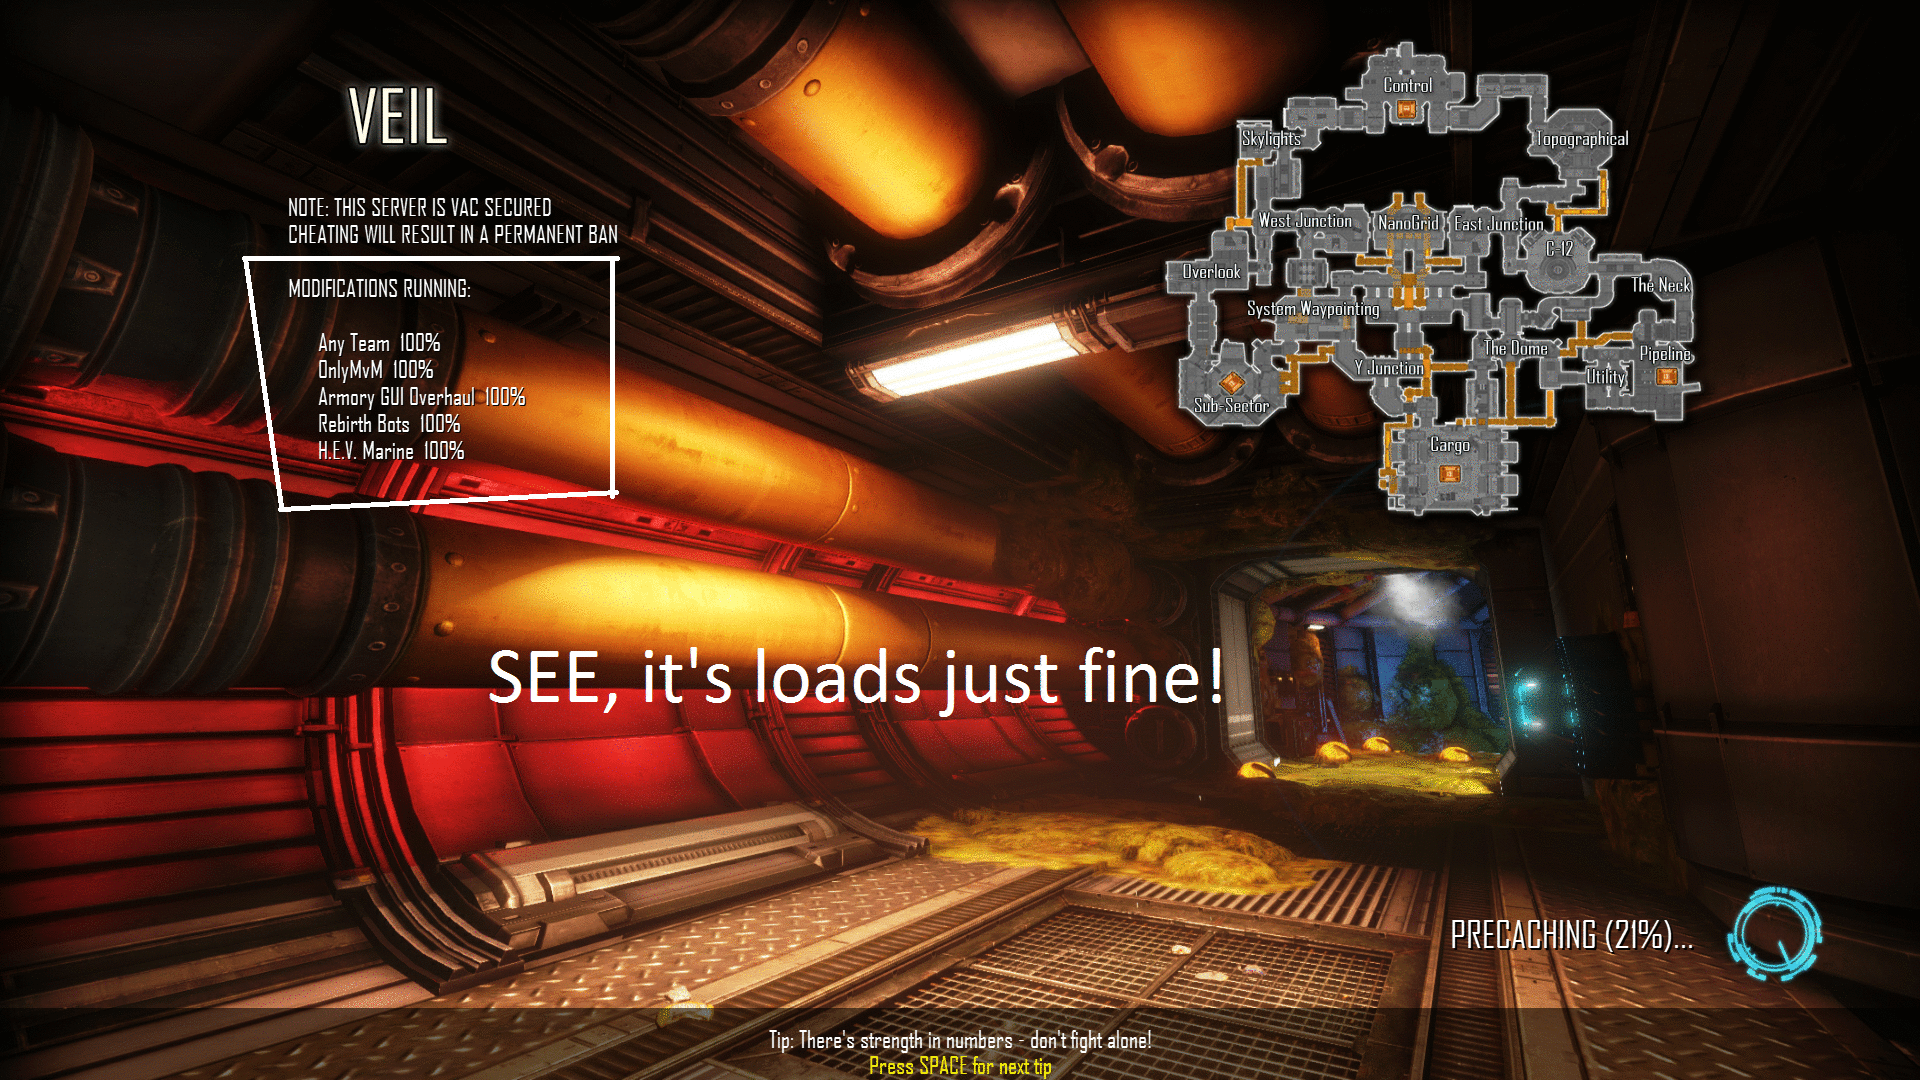
Step 4: Run NS2.
Easy, right?
Step 5: DO NOT host your listen server like this:
just don’t, okay?

Step 6: Instead, do what is mentioned in this picture:
Game will load up into the map of your choosing, this means it works! Have fun!

Step 7: Add some AI Bots
Fairly simple to do this. You just need a keyboard…..

7A. Remember that this will have to be done every time you “host” your offline server, I’m looking into a script which will make this a bit easier for ya’ll!
7B. You can also enter “autobuild” in case you wanna immediately start exo-stomping everything in the first few minutes (not fun imo, but to each their own).
Step 8: Adding mods
follow the next steps properly!

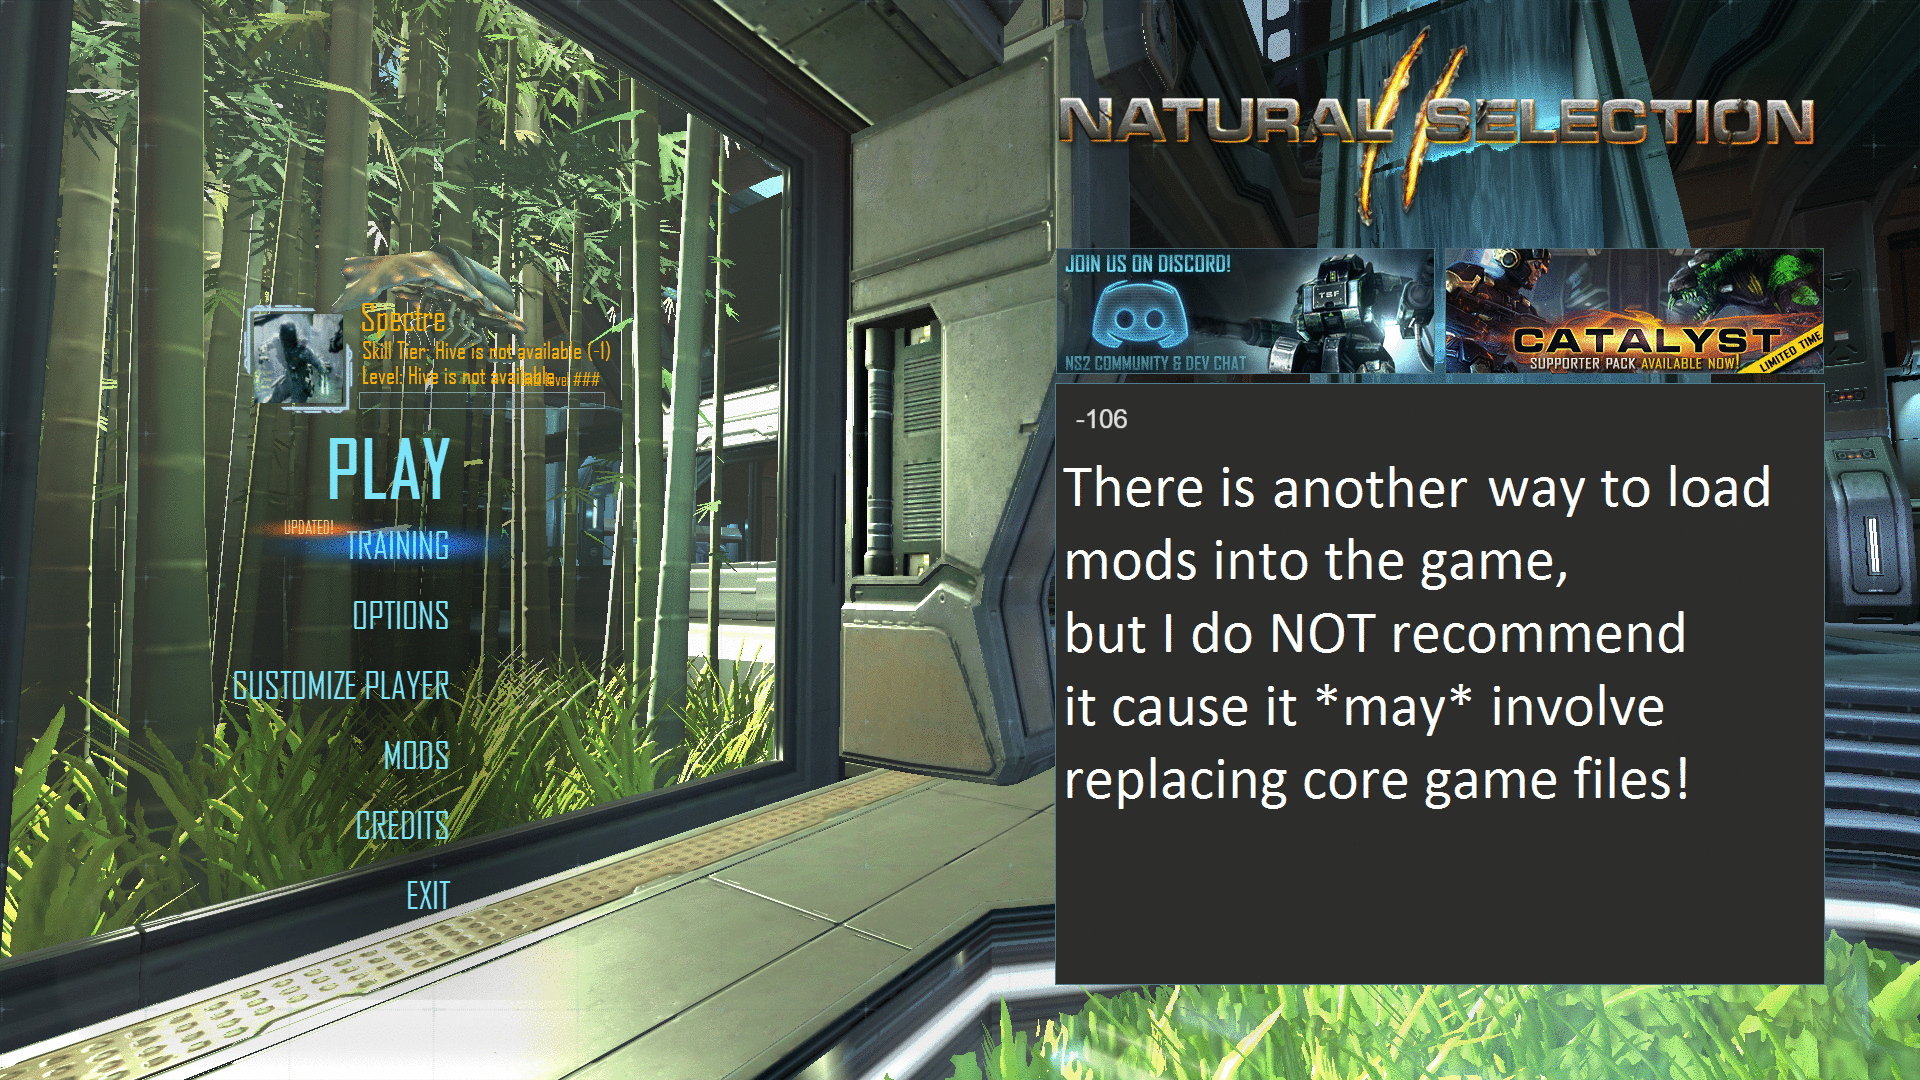
First, I’ll show you the recommended and better way (you’ll see why the other method isn’t recommended soon enough)

Step 9: Adding mods (Method 1):
remember to activate the mod(s) and run the map FROM the mods menu.

9A. You will be in your map with all the mods loaded, the best way to check if it’s all fine is to activate a skin mod like “Night Ops Marines”, go to marine team, press escape, click on “customize player” and voila!
9B. On disconnection from your offline listen server, the mods will get “unloaded”.
9C. *See Note 2 at the bottom*
[OPTIONAL] Step 10: Adding mods (Method 2):
10A. First, Navigate to this folder:
C:Users<YOURNAME>AppDataRoamingNatural Selection 2Workshop
10B. See all the folders with weird numbers and stuff? Those are your mod folders! Example- “m2e813610_1524433489”
10C. Open the folder you want, for this example, I’ll open folder “m652a2f4_1351820285” which is the HEV marine mod. Also, open the .modinfo file in the mod’s folder in notepad to know what the mod is.
10D. To find out which mod is which, go to
[link]
Enter the DECIMAL number from the URL of the mod ie:
[link]106078964
basically, the numbers after the “?id=”
and press “convert”
the HEX number or MOD ID for this particular mod is “652A2F4”.
10E. ALTERNATIVELY (and I don’t condone this btw, cause reasons), go to {LINK REMOVED}http://steamworkshop.download/
enter the mod’s steam url and press download, example:
{LINK REMOVED}http://steamworkshop.download/download/view/106078964
10F. it should download the same file(s) as the one(s) in the roaming folder.
10G. Open the mod folder, see the “models” folder?
10H. Good, now Open another tab and go to this folder:
C:Program Files (x86)SteamsteamappscommonNatural Selection 2
(or where ever it is you installed NS2).
10I. Go to the “ns2” folder, see a “models” folder? Great!
10J. Now, COPY/CUT the “models” folder from the HEV mod folder or whatever mod you want and PASTE it into the “ns2” folder, you will be asked whether you want to replace some files and/or merge some folders, click replace, and there, done, boot up the game, follow the above steps, and you’ll notice that you have a HEV marine instead of the default skin!
10K. *See Note 1 below*
10L. Okay, an additional step has to be completed if you want your mod(s) to show up.
10M. Navigate to:
C:Users”NAME”AppDataRoamingNatural Selection 2
10N. Open the file “ServerConfig.json” in notepad or notepad++ or whatever text editor(s) you use.
10O. Search for “consistency_enabled”
10P. Change it
from-
“consistency_enabled”:true,
to-
“consistency_enabled”:false,
10Q. Save the file, and done!
ALTERNATE method: OFFLINE DEDICATED SERVER
Okay, so far, I’ve shown you how to host an OFFLINE LISTEN SERVER, but now, I’m gonna show you how to host an OFFLINE DEDICATED SERVER.
The MAIN reasons for hosting an offline dedicated server are better performance and more control over certain options.
Follow these instructions properly!
{STEP 1} Download the Server Files
Just follow the pic.
(Sorry, I have no idea why this particular image looks messed up)

{STEP 2} After the download is complete, launch the server ONCE
This is done to generate the needed config files.

{STEP 3} Let the server do its “thing”
Like this:-

{STEP 4} Close the server
Step 4: Close the server, the 1st time run was necessary to generate the configs which have quite a few stuff that can be edited.
{STEP 5} Navigate to the installation directory of your NS2 dedi server

{STEP 6} Go to the “x64” folder
Step 6: Go to the “x64” folder, and “Create shortcut” of the “Server.exe”.

{STEP 7} Apply your first and most important command line option
Step 7: Okay, now right click on the new shortcut and click on “Properties” and add the
-file “filename.txt” in the “Target” box.
Press “Apply” and close the window.
NOTE– We will be using a .txt file to load server command line options, ALTHOUGH you can just add all the command line stuff in the “Properties” window of your shortcut, this isn’t ideal or recommended.
MOREOVER, using .bat files to launch your server ISN’T recommended either.

{STEP 8} Create a .txt file with the same file name given in STEP 7
Step 8: Create the .txt file and name it whatever you want, for this demonstration, I’ll create a file named “test.txt”.

{STEP 9} Open the .txt file and follow the given instructions/format
Step 9: Open the newly created .txt file and type in the following:
(remember, there should be one cmd option PER line.)
-name “TEST”
-ip 127.0.0.1
-port 27015
-limit 24
-map mapname
-hidden
-insecure
-modstorage “C:UsersYOURNAMEAppDataRoamingNatural Selection 2Workshop”
-mods “MOD IDs”
NOTE: This is for a very SIMPLE offline dedi server, if you want something online, lan party, more complex, more control, etc, see the “Extra mandatory reading” section.
Simple explanation of the ^above commands:-
- “-name” is Server Name.
- “-ip” is the server’s “ip address”. We’ll be using “localhost”(I think it’s called that) or 127.0.0.1
- “-port” is the port for the server, look, I’m not too good at this stuff, but, by default, ns2 dedi uses port 27015 (+1).
- “-limit” is player limit (including bots).
- “-map” can even be custom maps like ns2_origin, etc. Just make sure the mod map is “mounted”.
- “-hidden” is important, remember how we did listen servers?
- “-insecure” disables the VAC stuff, no reason to have it on while offline, unless you wanna VAC ban bots ;-P
- “-modstorage” can be any location if you decide to set stuff up differently, but best to stick to “appdata”
{STEP 10} Prepare to load some mods in!
Step 10: Now, let’s load some mods on our server! For this demonstration, we’ll be using the ‘Rebirth‘ mod and a custom map ‘ns2_origin’.
{STEP 11} Finding out Mod IDs
Step 11: First, we need to find out the IDs for said mods, so go to “C:UsersNAMEAppDataRoamingNatural Selection 2Workshop”
NOTE: I’m looking into making a .txt file which will be a universal mod “database” file with the mod ids and the mods, it obviously involves a lot of work and there’s a lot of stuff in the workshop which simply doesn’t work, is outdated, needs fixing, etc.
{STEP 12} Simple way to find out the IDs of installed/subbed mods and add them to server
Step 12: Okay, so the mods we want to use are:
“m34aa8aec_1551532524”—-> NS2:Rebirth
“m3334c994_1552897134”—-> NS2_Origin
Now, for the tricky part, see the characters BETWEEN the ‘m’ and the underscore (‘_’), THAT is your mod ID!
example: m3334c994_1552897134
The bold text is the mod ID!
Copy the mod ID to the -mods ” ” cmd line option in your server text file.
So, it’ll look something like this:
-mods “34aa8aec 3334c994”
NOTE: Each mod ID is separated by a single empty space! DO NOT use commas or semicolons or anything like that! It’s a bit different for *.json files, but one thing at a time.
{OPTIONAL STEP 13} Change the map to the mod map
Step 13. Change the “-map oldmapname” to “-map ns2_origin” (without quotes). This will load up that particular custom map along with any other mods specified.
(Only if you want custom mod maps, otherwise just specify a vanilla map and hop in!)
{STEP 14} Your server text file should look something like this:-

{STEP 15} Run your server
Step 15: Launch the Server using the created shortcut, if everything was done right, it should load up, do make sure you turn off your wifi, launch steam in offline mode, etc.

{STEP 16} Run NS2
Step 16: Run NS2 and open the command console with ‘`’ (‘~’ key, usually below the Escape key).
{STEP 17} Type the following into the command console
Step 17: Type the following:
“connect 127.0.0.1” (without the quotes)
press Enter
THERE, if everything was done correctly, it’ll load up and you’ll now join as a “client” on your very own offline dedicated server!
{STEP 18} Additional configuration
Step 18: Well, let’s do some configuring of the server files to get bots and other stuff!
Step 18a: Navigate to C:UsersNAMEAppDataRoamingNatural Selection 2
Step 18b: SEE all those *.json files? Those are the server config files! Well, actually, it’s a bit more complicated than that, but for now, we just want a simple offline dedicated server.
{STEP 19} The ServerConfig.json
Step 19: Open the ‘ServerConfig.json’ file with something like Notepad++ or whatever text editor you normally use.
There’s quite a few options in there, edit ANYTHING you want, it’s simple and understandable, so don’t worry.
{STEP 20} Adding Bots (commander and ground units) to your offline dedicated server
Step 20: Well, we want BOTS on our server, make the following changes:-
“rookie_only_bots”:1,
only applicable if ‘rookie only’ mode is enabled on your server.
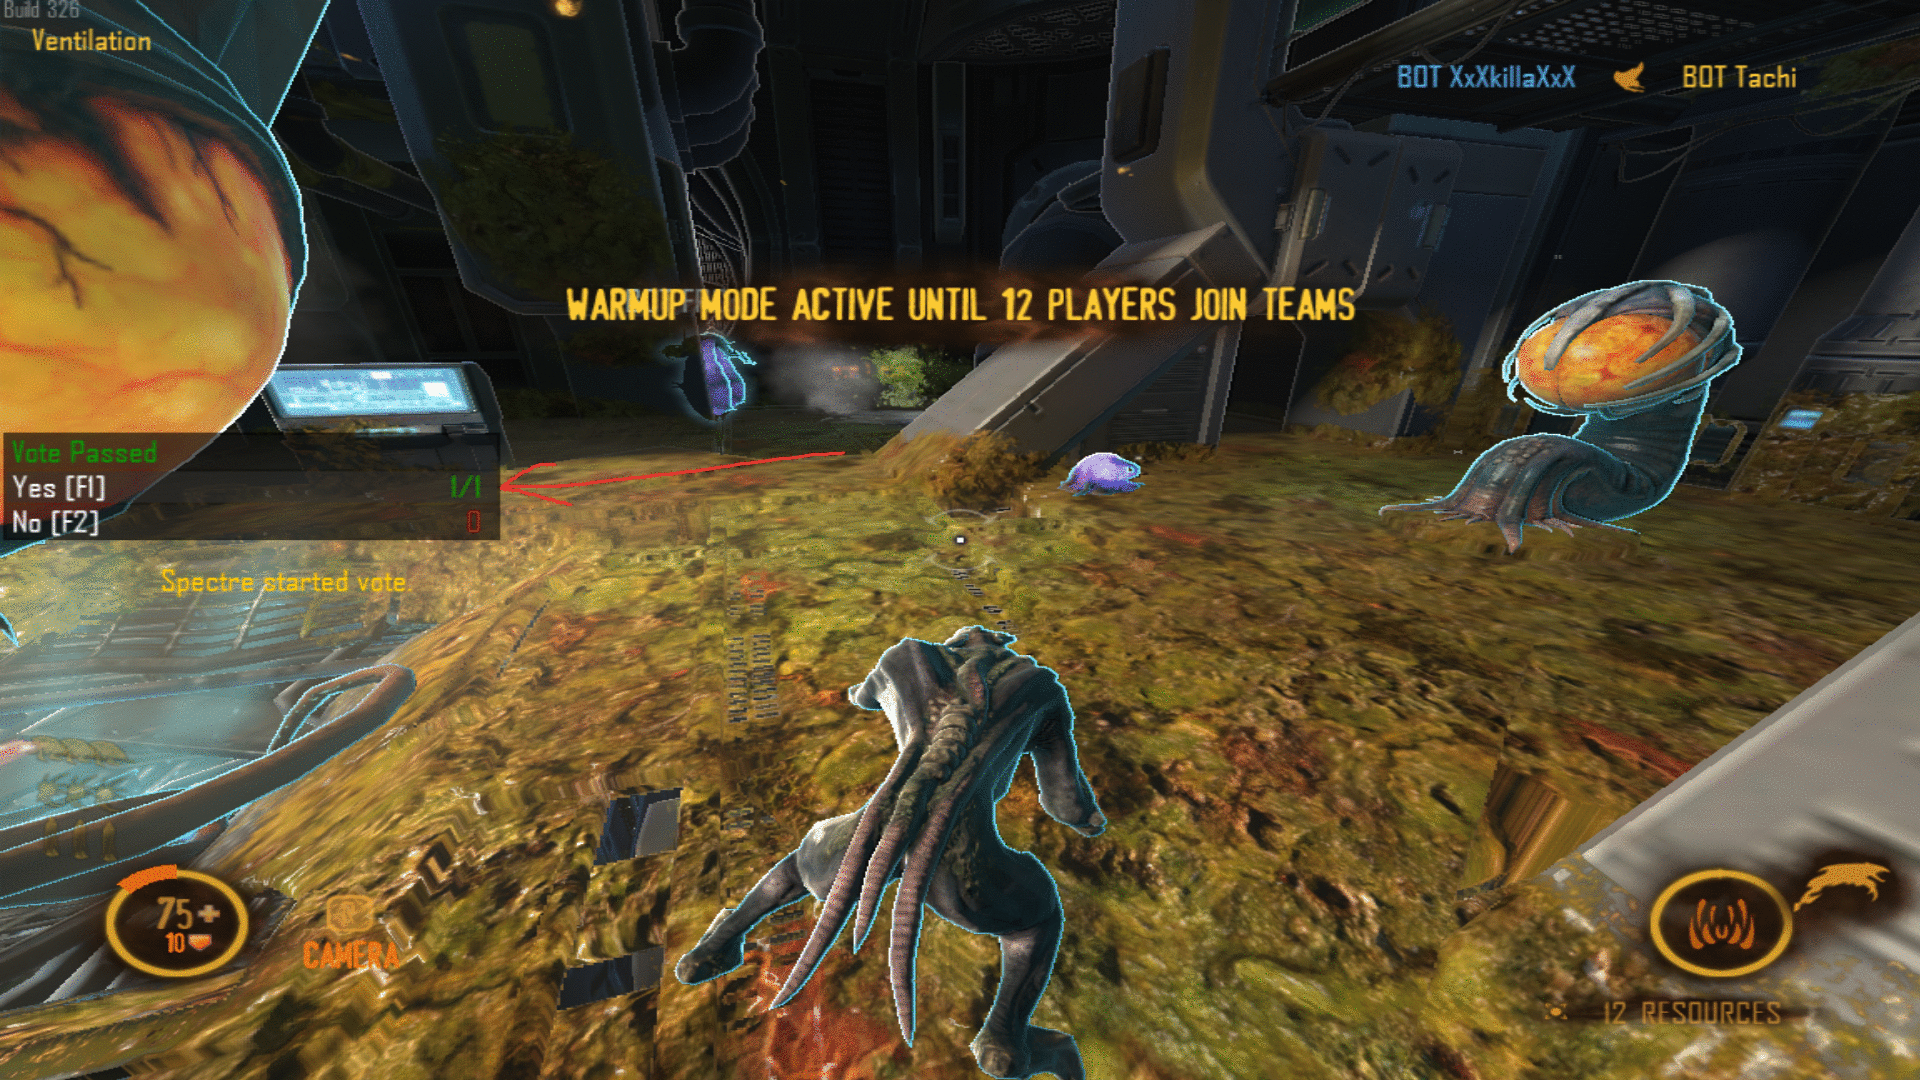
“auto_vote_add_commander_bots”:true,
unless you are playing “Combat”, you need Commander Bots for BOTH sides in order to begin the match. (see pics below)
“voteaddcommanderbots”:true,
This will allow you to add CMDR bots using the “Vote” menu.
Press “F1” to vote “yes” so the commander bots will be added in automatically, no need for console cmds. (see pics below)
“filler_bots”:10,
This is the total number of bots you want, it’s a bit wonky, so specify a number that is your TOTAL playercount, i.e. 10 filler bots would actually be 5v5 (9 bots plus you = 10). Confusing, but you’ll get used to it!
Also, since we’re offline, might as well set-
“consistency_enabled”:false,
Honestly, no point in having “consistency” enabled for offline servers, unless you actually like vanilla skins?

Feel free to edit anything else in the ServerConfig.json file, save it, load up your server, and jump in!
ALSO, feel free to poke around the other *.json files and edit them, take NOTE that certain mods like “Combat” generate .json files as well.
Things to consider:
Note 1: For obvious reasons, this method is absolutely NOT recommended.
Note 2: Okay, this is a bit complicated, but let’s say for example you activated “Night Ops Marines” skin mod, you play around on a map, disconnect, all the mods are forcibly unloaded, etc. BUT, BUT, this is where things get finnicky, let’s say you decide to play again with different mods, map, etc and you don’t choose the “Night Ops Marines” skin mod, you choose something else, you load into the map, and I GUARANTEE you will see the “Night Ops Marines” skin mod on some bots maybe (Even though you deactivated it).
The ONLY fix for this is to EXIT the game, and start it again. Not much of an issue if you use the same mods, but it’s good to know!
Note 3: Game modes, maps, etc all work fine afaik. Just don’t activate conflicting, non working mods, etc.
Note 4: Here’s a list of console commands for NS2[wiki.naturalselection2.com]
IMPORTANT– There is a ‘Windows Powershell’ script that will help you locate your installed mods, head over here for more info:
[link]
(Yuge thanks to the creators of that guide for the script!)
Once you have a list of your installed/subbed mods, it should be easy figuring out the rest, hopefully.
ANOTHER thing I wanted to tell you is, this method of downloading the dedi server as a “Steam Tool” differentiates from using SteamCMD to download the dedi server, now, I have neither the patience nor the time for SteamCMD, but AFAIK (and DO NOT take my word for this), there is no difference between the SteamCMD version of NS2 Dedicated Server and the “Steam Tool” version of it. It’s more convenient to download from Steam instead of SteamCMD IMO.
Extra mandatory reading:-
—> The “Dedicated_Server_Usage.txt” file in
“C:Program Files (x86)SteamsteamappscommonNatural Selection 2 Dedicated Server”
(or wherever ns2 dedi server was installed)
(good read, might learn something new)
—> [link]
(great wiki that should help you with some extra stuff NOT covered in this guide. MAYBE some of the info in that wiki could be outdated, IDK, honestly.)
—> Just google, yahoo, bing, etc “Natural Selection 2 Dedicated Server”. You might find something of interest to you or something not covered in either the guide, documentation, wiki, etc.
[MODS] Fixing some errors with workshop mods
IF you use a mod like NS2+/NinS2+ for your offline listen server, then follow these instructions:-
1. Go to “C:Users*************AppDataRoamingNatural Selection 2
2. download this file:
[link]
3. Save it as “NS2PlusServerConfig.json”
4. Cut/Copy the .json file to the location mentioned at step 1. Replace the .json file when prompted.
4a. It’s best to run the mod at least ONCE so the configs will be generated.
5. done, now have fun!
Issues with mods like nins2+/ns2+ have already been fixed in B327.
Conclusion:-
THERE, done, me first ever guide! Feel free to discuss about ns2 offline below, please no insults, flaming, trolling, comment wars, etc. Keep it clean. Also, kindly refrain from downvoting because you happen to dislike offline play and/or bots.
PS- This guide is simple and easy to follow, if something doesn’t work, comment here or add me, I’ll try to help in every way possible.
Credits:
First of all, special thanks to NIN, if it wasn’t for his help and his putting up with my pestering, I would have refunded the game (no, seriously!). He found out the console commands for me. So make sure to subscribe to all his mods and support him on Patreon[www.patreon.com] as well!
Ghoul says:-
“The server.exe exists also in the ns2 app (4920) /x64 folder so no need to download dedicated server (4940) app if you want to start a dedicated server ;)”
So, this ^ should save up a few GBs if you don’t wanna d/l the dedi server “tool”.
Also, thanks to all the mod makers for the great stuff you all create! Keep it up!