Overview
This guide will give an introduction on a trap type of my own invention. It utilizes a combination of a steel deadfall trap and an artificial roof collapse to give you the upper hand in a fight. It is fairly easy to do and even a tribal start can pull this trap off with ease.
What you need to make this trap
This trap is a low resource, double-proc trap that can be set up by anyone regardless of what type of start you decide to do. In order to set this trap up you will need 75 units of building blocks. It can be any type you wish but I recommend 70 steel units and 5 wooden units. And on top of the 75 units it takes to make this trap you will need atleast one of your colonists to have a ranged weapon equipped. Any weapon will do but I recommend either the pistol or a shortbow. The overall speed of your weapon (aim time + reload time) is the most desirable weapon for setting this trap off right.
How to set this trap up
The way I like to do this is to set up a kill zone of sorts. Any hallway that is 4×4 tiles will work, but anything 5+ works better. In my tutorial diagram I have a 6 tile wide hallway. After a hallway has been found/made, clear out the hallway of any debris or foliage so that the raiders have nothing to hide behind other than what you provide them.
Then place 1 tile walls in the middle of the hallway out of any material of your choosing. I prefer wood because it is the weakest, fastest and often most replaceable material but any of the other materials will work. Place the walls atleast 3 tiles apart minimum, although more is better. I like to make them 5 or 6 tiles apart in my play throughs. This set-up is large enough to catch raiders without “missing” them but small enough that I can fit multiple traps into a hallway.
Next up is to roof your pillars (walls) so that they are supported only by that one pillar. When roofing make sure that the roofing zone does not touch the side walls of your hallway or the roofing zone of the next pillar. If the two zones connect you will get “partial” collapses and will lead to inconsistent collapsing and a thinner margin of error for your shooters. Try to roof them the way I do in this screenshot:
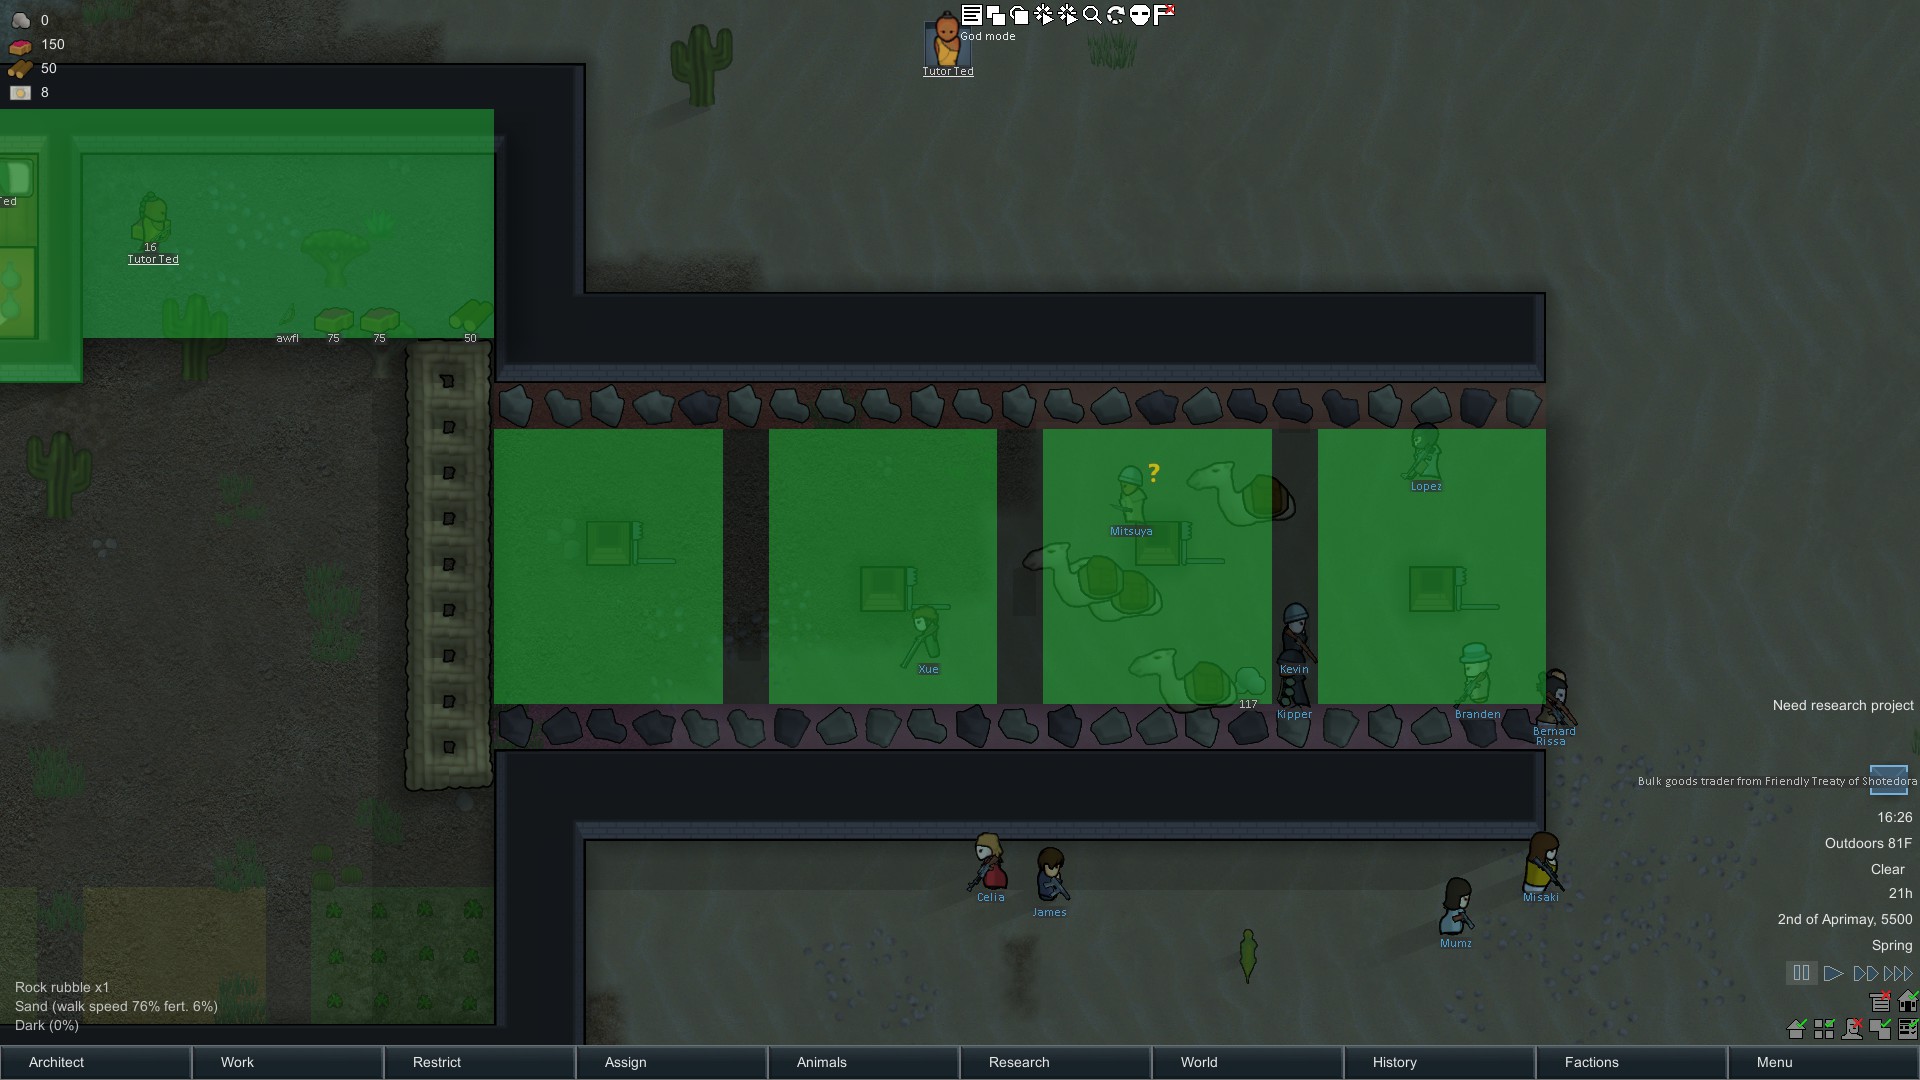
Once you are done buidling and roofing the walls you will want to place steel deadfall traps behind the wall where the raiders would “take cover” from. Steel is the optimal material as it deals the most damage but stone works almost as good (slower to build) and wood works the least best (lowest damage). Placing more deadfalls on the sides might also help with melee raiders who don’t take cover but only build on the sides of the walls if you have the excess materials.
With the steel deadfalls traps in place your set-up is now 50% ready. The roof collapse part will need to be preped by beating the wall to have less than 12% health. Highlight this part because it needs to be redone after every collapse: You need to unhome the tile that the pillar is located on. Doing so will prevent builders from repairing the pillar and “disarming” your roof collapse traps. Then you want to take someone and beat the crap out of the wall so that the health of the wall reaches below 12% health. 12% is the magic number because thats the exact damage one shortbow arrow causes. I strongly recommend slowing down the game speed to 1x speed so that you don’t cause the roof to collapse on yourself.
How to use this trap in combat
This trap is pretty straight forward in implementation: shoot out the pillar when an enemy is hiding behind it.
In the early raids you will often find that raiders will blindly charge you, ignoring the fact that they are in the crosshairs of your colonists. Until they get shot that is. So in the very early raids you place your colonists at your shooting position and shoot normally. If you cleared the area properly the raiders will run to take cover in the closest spot that they can get to (if they are shooters) which should be the rickety wooden pillar a few tiles behind them. You will take a pot shot at them as they run for the pillar and then when behind the pillar they will trigger the steel deadfall trap. This should hurt them pretty badly, sometimes severing a limb.
At this point when the steel deadfall trap has been triggered and the raider is lining up your colonists in his crosshairs you want to shoot out that wooden beam holding the roof over their head. It should come toppling down and should kill or down them if the combined damage of the steel deadfall and any earlier gunshots did any significant damage. If it doesn’t, well… they are out in the open with no cover. So your next volley should certainly finish them off.

In later raids the AI gets smarter. They take cover alot sooner, there are more of them and they bring better weaponry. So the double deadfall trap becomes more an auxillary component to your defense. At this stage of the game you trigger it when key targets enter under the roofing: raiders with shield belts, sniper rifles, rocket launchers, on go-juice or when a large group of them get underneath it. When enough raiders come through you won’t be able to repel a raid solely using this strategy but it should help ease their pressure by cherry picking the really dangerous enemies.
How it works against non-human enemies
The non-human vanilla enemies you will encounter will fall into one of three categories: Animals, Mechanoids & Bugs.
Animals rush you and often come bringing superior numbers. Manhunter packs can be handled very easily using the roof collapse section of this trap. They won’t take cover but may trip off one or two steel deadfalls you left lying on the sides of the pillar. But this is rare as most animals never trigger deadfall traps. The roof collapse section is very potent and will mass murder any small animals that come after you while the bigger ones it will dish out enough damage to slow their rush. Most things larger than a gazelle though probably won’t be downed or killed in just one roof collapse. But you can really thin out their numbers relatively quickly
Against mechanoids you have a 50/50 success rate with it. The scythers are fast and agile. Their charge lances give them a real long range, but if you have a sniper rifle they shouldn’t be too much trouble. They won’t die in one collapse but you can kite them down the hallway and systematically kill them off. Centipedes on the other hand don’t care much about this trap set up. For one, they don’t prioritize taking cover and often fire their weaponry as soon as they can regardless of how exposed they are. You may get off one MAYBE two roof collapses on a centipede before they get in range to retaliate. And they shrug off the damage pretty easily since roof collapses deal sharp damage and the armor plating on a centipede gives the largest bonus against that damage type. The only good thing about a centipede is that they are slow so guesstimating on when to trigger the trap should leave little room for error.
As a whole this trap set up is largely ineffective against bugs because a majority of the time the problematic bugs spawned inside your base due to an infestation. But assuming they are rushing you from their cave on the other side of the map and do come into your hallway in the correct direction you still won’t have much luck killing them. Since they are all melee they will rush you and ignore taking cover and so will path in such a way that they often won’t be in a position to trip your steel dead falls. Like centipedes their chitin exoskeletons provide great protection against sharp damage so a roof collapse will deal reduced damage to them. Even a scarab can shrug one of these roof collapses off and keep on charging. It can be a good way to attack multiple bugs at once but it won’t squash them in one fell swoop like it would a manhunter pack.
The pros and cons of this trap combo
Pros:
+ Deals MASSIVE damage in the early game
+ Can hit multiple enemies at once
+ Can “extend” the range of your shooters by up to 7 tiles
+ Doesn’t require using too many resources: 75 for the (no longer reusable) deadfall trap and 5 per pillar to make the roof collapse
+ Can be used very effectively by both spacers and tribals alike
+ Won’t cut-off or slow down colonists who use that hallway in their every day chores
+ Works very well in conjuction with other defense mechanisms
+ Colonists have an easy time shooting a large stationary pillar even with crappy guns and low skill
+ Can outright kill targets via decapitation (roof collapses ALWAYS target the neck and head area)
Cons:
– Can be tedious to make and set-up
– Needs to be rebuilt, reset and rezoned after every roof collapse
– Is prone to user error
– Not very effective/efficient on sea ice or in marshy biomes
– The aim time of colonists can cause traps to “miss” a target
– Raiders can shoot them out too, disarming the closer traps before they have a chance to go off
– Makes fighting difficult for your own melee fighters and animals (can be used against them)
– Deals sharp damage (easily mitigated by helmets and armor)
– Can kill raiders you want to capture

How big should I make my roof and where do I place my pillar?
How big you make your roof is largely up to you. The larger you make the roof the higher the success rate you will have of triggering them and the more enemies you can ensnare in one collapse. The smaller you make them the more traps you can set up in one particular area.
I recommend making the far range traps (20+ tiles from shooting positions) have large wide roofs because bullet travel time and aim time on the longer ranged weaponry makes guesstimating when to trigger the trap a lot harder. So in that respect a larger roof will help spread the damage around and give you a larger margin of error.
Mid range (10-20 tiles out) should be the smaller roofs. This is where most of the killing will take place and the more you have here the more often you can send the raiders scrambling for new cover, thus preventing them from firing back at you. They may opt to fire at you from open range but a combined volley from your shooters should put the ones stupid enough to make this decisions very quickly.
As short range (2-9 tiles) I recommend a short but wide roof. The only enemies who make it here are melee enemies. If they zerg rush you then a wide net to ensnare as much of them as possible would be ideal. It could give just enough damage to cut off the rush or atleast make it more manageable.
Pillar placement under the roof is purely out of preference:
If you place it in the middle you will be able to make the largest possible roof where you can have a 13×13 roof under one pillar that you couldn’t have than if you moved it elsewhere in the zone.
Placing it in the corners will allow you to keep the center of your hallway wide open and will persuade melee units to charge in the roof collapsed areas. Also prevents enemy raiders from accidentally shooting the pillar.
Placing it at the front will allow you to extend the range of your shooters the best, while also bringing enemy shooters closer to you increasing shot accuracy when the enemy shooter has to scramble for new cover.
Staggering it in different spots makes a maze for melee raiders and enemies to path through. It spreads the raiders out or can concentrate them into one area for optimal grenade usage. Downside is that there is a higher risk of an errant shot collapsing a roof prematurely.
The only spot I do not recommend is at the back of the zone as it places the pillar at the max distance to your shooter while giving no coverage of hitting the raider behind the pillar. Could spread the damage around to down rather than kill enemies but increases risk of endangering the colonists you already have.
How to improve upon the design
Some minor tweaks you can use to make this trap style work more efficiently:
Place chunks in the hallway to funnel raiders away from unroofed areas or to get shooters to “line up” in one area so you can trigger a long and wide roof to collapse.
Molotovs can also zone enemies to stay away from the unroofed gaps.
Setting down wooden floor and then burning it. Burnt flooring slows movement down even more than marsh, mud and water would (also decreases beauty much more)
Setting up your shooting range into a horse shoe shape and moving colonists onto the sides to pepper raiders from three directions when the roof collapses run out.
That same horse shoe shape set up can also be used to release your animals to converge on them from two sides and increase their ability to get in range without retaliation from enemy missiles.