Overview
Good start point for any new players to The Red Solstice, it will give you a bit of an edge as you develop your own play style and class preference.Also great for people trying to expand or share their knowledge.
Where to find information you need
This Guide is for the New Ones and the Veterans.
Guide is divided into sections, ordered by when those sections emerged.
Overview for Sections:
- Basic tips
- Classes and build overviews
- Bosses and advanced tips
- Sector Maps
- Items and tips for them
- Survival mode
—1. TIPS AND TRICKS for everyone —
General Tips
Ingame Interface


- ‘F’ flares, these regenerate so use them alot, more light, less misses for eveyone
- ‘U’ to see item names on the map
- ‘C’ to change fire modes
- ‘Q’ to cycle between weapons
- ‘X’ dumps 2 clips (150 ammo) or 1 specialized ammo on the ground
- ‘R’ Reloads, wasting any unused bullets left in the clip
- ‘N’ To Unlock Camera
- ‘ESC’ for map
- ‘left-ctrl + right click to get ai marines to follow you, same to follow team members
- ‘F1’ as leader to draw temporary lines on the ground
- ‘F2’ as leader to issue the “Follow Me” command
- ‘F3’ as leader to issue the “Hold Position” command
- Left-Ctrl+Q,W,E,A,S,D to use the corresponding item in that slot.
Note: Default key layout. These keys can be changed in the options menu.
- You have 3 lives (MIA-Status), but without live drone you could be revived only once during the reinforcement (Wave 9).
- The evac box can be blown up by explosives, take care!
- You can see the time remaining until evac on the icon above your armor bar
- If you are trying to shoot something, the brighter it is the higher the chance
- Your speed should be 4.20 or higher. If you are not a Marksman.
- Keep moving, you take more damage standing still (comment: Knockdown)
- Play a little solo and learn the map
- Keep in mind when building your character that you have a maximum of 15 points to spend on abilities (enough to max 3 only)
- You won’t miss in dark areas manually shooting with Left Shift.
- You get extra xp for every AI marine saved
- Kiteing enemies around turrets can be helpful and save ammo
- Don’t fire explosives at ticking nukes….. learnt that the hard way
- Slow bosses like behmoths can be outrun / kited around.
- Turn autofire on the ACE off when you go with your team, its a TK machine.
- Don’t waste your ammo. Turn autoaim off as much as you can.
- When using power ups make sure you choose complementary ones and don’t nerf yourself, no power ups can be preferable at low levels.
Aiming:
There are three ways to shoot your enemies:
- Auto aiming (pressing “e”) is incredibly inefficient and you shouldn’t be using it much.
This will reduce your movement speed and ammo-effectivity. - Clicking (LMB) on your enemy
This will add an chance to miss in the dark. - Manual targeting (Shift + LMB)
This will gives you a nice 60% damage boost, you should practice it.
If you would like any more basic information these guides does cover a few things I haven’t
[link]
[link]
Loot and Item Prioritization
Loot: Comes from one of few places.
- In the open: Many items will spawn on the map from the beginning of the game and will sit on the ground until picked up. All you have to do is click.
- In Lockers: In every Locker there is a chance of an item being pulled from it. Higher chances and better loot for higher quality.
- In Rubble: Always hold 75 Ammo, a chance at Power Cells or Disarm Tools. Always loot these!
Energy Batteries: These provide a .5% damage increase across the squad. As long as anyone picks these up everyone gets the long-term benefit. Don’t fight for these especially when there are lockers/power stations to get.
Who items go to:
- Ammunition – The life blood of any damage role and all marines early game. Ammunition should go first to damage dealers. Be sure to keep your Heavy Support stocked as well; they can spend a significant amount of ammunition in short periods of time to keep the group safe. Ammunition boxes max at 20 per stack. If your weapon can hold more ammunition it is generally wise to use it in order to make space for other items.
Press K to see status and Ammo readouts of your squad. If someone is low on ammo be sure to share by pressing X to drop 150 ammo – their damage may save your life.
- Specialized Ammunition(Spec) – Specialized Ammunition is used to reload secondary weapons (Shotgun[+8], Grenade Launcher[+4], LAW[+2]). Specialized Ammunition boxes max at 1 per stack.
It is important for all classes to have Specialized Ammo for their secondary weapon early game because their burst damage is very high and they can be used to clear groups of mobs and kill early dogs that could prove dangerous otherwise. It is better to use it then later drop it from your clip by switching to the secondary weapon and pressing the X button to drop 1 Specialized Ammunition (Shotgun[-8], Grenade Launcher[-4], LAW[-2]).
- Armor Augments:
- Armor Plate(AP) – Passively gives +30 max armor and grants immunity to Fractures (Orange). Two in-game.
- Health Booster(HB) – Passively gives +30 max health and grants immunity to Wounds (Red). Two in-game.
One of each Augment should go to whomever is Tanking – traditionally the Hellfire. This allows them to take hits with no risk of the worst ailments in the game while also boosting their survival stats. Once the Tank has one of each the second Armor Plate should go to whoever is the secondary Tank, or a member of the group that can’t afford to receive a Fracture at any time. The second Health Booster can be held by a secondary Tank or anyone aiming to prevent Wounds. - Weapon Upgrades
Each primary weapon has an upgrade aside from the LMGs and the Vindicator. Each provides a damage bonus and some provide extra effects. Upgrades will be referenced in Class priority – who gets the weapon first. FMJ users always get priority.- GAR – Assaults->any GAR user with Critical Strike Module
- Strike-V – Strike-V Marksman->Assault->anyone else.
- Minigun – Heavy Support. Only time another class gets this is if there is no Heavy.
- SMG – Assault with FMJ w/ Crit->Any class with FMJ w/ Crit-> FMJ->HP.
- ACE-43 – Terminator with Autocannon System
- Sniper
- Arclite – Hellfire with Arclite or Equalizer->Anyone else
- LAW – Someone who has practiced in Solo. A lot.
- Explosives(Bombs, Booms) – These are handed off to whomever is playing Demolition because they are able to protect their explosives meaning no one else can set them off, including enemy snipers, spit from Hellspawn, and the like. If there is no Demolition class in the squad it is common for one person to collect bombs to kill high health enemies in the early game.
Every single one of these items is capable of killing yourself or other players. It is important to have experience using them solo before using them in a team setting.
Most do high amounts of Explosive type damage, Plasma Explosives and Plasma fires doing Energy damage instead.
This category includes:- Satchels(Sats)
- Claymores(Clays)
- Explosive Bunks(Bunks)
- Plasma Explosives(Plasmas)
- Incendiary Explosives(Incendiaries)
- Plasma Fires
- Directional Primer Charges (Directionals, DPCs).
- Power Cells(Pcell, PC) – Restores a selected player’s Armor to maximum and converts weapon damage to Energy for 100 seconds. Power Cells max at 3 per stack.
These are used to give players a higher effective damage to enemies for a duration or to keep them alive when under heavy attack. These primarily go to your Tank and Damage roles as they will get far more use out of them.
When Tyler Hunt is with the team it is not uncommon for a player to Power Cell Tyler as his damage output is one of the highest in the game and he can single handedly kill most enemies when dealing energy damage.
- Stimulants(Stims) – Provide a passive 3% move-speed and 2% attack-speed bonus per stack held by the player and will allow slower classes to keep up with the rest of the group and damage classes to deal damage faster. When activated they provide an additional 25% move-speed and 10% attack-speed for a short duration.Stimulants only require 1 in a stack to provide the passive benefits.Stimulants max at 5 per stack.
If you have a Marksman on the team using a Stinger they should have first priority for Stimulants. Slow squad mates (less than 4.3 movement) and high damage dealers have second priority.
- Safety Zones(SZ) – When placed they generate energy over time to be used to call in supplies and stronger artillery barrages the higher their Total %. 96% is the cutoff for the highest tier of supply drops. The 1st, 3rd, and 4th Veteran always provide one Safety Zone each. When placed they start at 5%. When activated they reset to 0%. They must have at least 10% to activate.
These should be placed as soon after finding them as they can be. If you are unsure of where to place it, ask and someone will give you guidance. If these are placed before a radar is activated they get a bonus 20% immediately when the radar comes online.
- Disarm Tools(Disarms) – Used to disarm EMPs and Nukes in Secondary Missions so it is good to have one person with Disarm Tools or know where they are on the map in case an EMP mission spawns. The second Veteran always gives 1 Disarm Tool. Disarm Tools max at 4 per stack.
A disarmed EMP provides 3 Power Cells; a disarmed Nuke provides one SHIVA. These can also be used to remove a turret from its housing but that turret, if not already activated, will not count towards the objective of activating 20 turrets.The Demolition class has a native skill “Disarm” that acts as Disarm Tools for the purpose of disarming EMPs and Nukes(as well as Turrets at level 5 Stationary Explosive Module). If you have a Demolition in the squad you do not need Disarm Tools and they can be dumped unless you want to stack turrets. - Medical Supplies – Used to restore health and cure various ailments. These can be used by clicking the item and then clicking the player you want to use that item on except for Fibrins:
- Med-Kit: Heals 10 hp/s for 15 seconds. 150 hp total.
- Antivenom(AV) – Cure Poisons (Green).
- Medical Nanites(Nanites) – Cures Wounds (Red), Fractures (Orange), and heals 60 hp.
- Fibrin Bandage(Fibs) – Cures Wounds (Red). Heals 100 hp. Cannot target other players.
Even if you have a Medic on the team, carrying medical supplies can save their cooldowns for dangerous situations. Medical Nanites are highly valuable as they cure multiple ailments at once and are the only thing in the game that can cure Fractures aside from the First Aid-Module on the Medic, which triggers a 45s cooldown.
Leadership – Basics
Ingame use ‘Esc’ to access the ingame map
Leader Commands

- F1 – Move
- F2 – Follow Me (Recommend using this alot to guide your team)
- F3 – Hold Position
Points to consider
- Don’t take your group into large buildings when large bosses can spawn (Around wave 9)
- Move your group through areas with turrets to cut down enemy numbers
- Move your group to safety beacons if low on ammo
- Know whats done and what needs doing, ask if needbe
- Move your group through chokepoints (Checking for bosses) to funnel enemies
- Put yourself on follow while doing waypoints
As you can have two leaders it is a great idea to discuss who will be doing waypoints and the bulk of the leading before the game begins.
(These are default commands and can be changed ingame)
While Voice coms are highly recommended the storyline can be completed without them.
If you are interested in leading, a more in depth guide can be found here
[link]
If You Are New Read This At Least
Do
- If you are green, stick with the team
- Use Flares ‘F’, to watch where you are moving
- Loot, but don’t take to long
- Keep moving, if locker’s are out of the way don’t worry about them
- Follow Waypoints
- Follow the Leader
- Ask questions before you get ingame
- Ask questions ingame only if you have to
- Press esc and have a look at the map but not for to long
- If you need to type stick yourself on follow first (Left-Ctrl + Right click on team member)
- Make sure the medic is not to far away from you
- Have a read of your abilities and know what they do
- Have a look at the key bindings
- If it’s moving slower than you, you don’t have to shoot it
Don’t
- Get slower than 4.30 movement speed
- Use “auto-aim” nonstop
- Use explosives until you know how
- Use explosive abilites to close to team members (Partly due to lag)
- Reload when you have most of a clip left (Dumps ammo)
- Autofire on enemies in darkness (You’ll miss)
Also check out our Rookie School:
[link]
Always good to know:
[link]

—2. WEAPONS AND CLASSES —
Weapons – Recommendations
Gauss Assault Rifle (GAR)
Works well on Assault, Medic, Demolition, Recon, 2nd Heavy support
Not recommended on 1st Heavy support, Hellfire or Terminator
- Heavy weapons will always give your team more bite, so if you’re a class that can use them you should.
- However on the assault with the light weapons module this does respectable damage and will save you alot of ammo, so there’s a tradeoff.
- Your team should have at least one of these.
- There up to two Gar Boosters in combat.
.
Gauss Assault Rifle GL (Grenade Launcher)
Usable by Assault, Medic, Demolition, Recon, Heavy Support
- Not recommended due to the damage tradeoff with just using the normal GAR.
Gauss Assault Rifle MS (Module Shotgun)
Usable by Assault, Medic, Demolition, Recon
- Not recommended due to the damage tradeoff with just using the normal GAR.
Strike- V
Works well on Assault, Medic, Demolition, Recon
Not recommended on Terminator, Marksman
- Strike-V is a great weapon but due to having a minimum firing range can leave you vulnerable early game.
- Marksman should always run the Stinger as the trade off is hundreds of damage vs. thousands, Terminator should pretty much always run the ACE as it is amazing on the class.
- Your team should have at least one of these.
Sub Machine Gun
Works well on Medic, Demolition, Recon, Assault
Not recommended on Terminator
- You can do an insane damage with this weapon if you stack several SMGs on one target or use Light weapon Targeting and Critical System of the Assault.
- Due to the debuff this weapon gives your team, there should be at least one of these on a class that needs to be mobile.
Ace-43 (Autocannon)
Works well on Assault, Hellfire, Terminator
Not recommended on Heavy Support
- Heavy Support should always run the Minigun as this synergises well with their most important slow ability.
- Assault with the ACE-43 I find works well but don’t expect to be doing as much damage as the terminator with this.
- Your team should have at least one of these.
Minigun
Works well on Heavy Support, Assault*
Not recommended on Terminator, Hellfire
- Best suited for the Heavy Support.
- I find it chews through to much ammo on the Assault or Terminator but can be viable for assault on the lower difficulties (using ammonite for ammo).
- You should always manually fire this weapon on heavy.
- Hits everything in the cone of fire (Heavy only).
- Should be fired in bursts to apply the slow lategame and save ammo (Heavy Suppression ability).
- Your team should have at least one but no second of these.
Stinger 50 (Sniper Rifle)
Usable by Marksman Only and should always be used for the Marksman
- Manually aiming in normal fire mode can pierce through multiple enemies, this can be highly effective vs. multiple ‘dog’ enemies lategame.
Arсlite (Flame Thrower)
Usable by Heavy Support, Hellfire
Recommended on Hellfire
- Does an good amount of damage in an small cone.
- Stacks one Immolation per bullet. Each 10 Immolation increase damage by +1.
Vindicator
Usable by Heavy Support and Terminator (Level 18)
- Damages friendly armor
- Deals high energy damage but eats 35 ammo per shot
- Could be boosted by beta-4 (up to -10 ammo per shot) and vindicator energy system (up to extra -5 ammo per shot)
- Under effect of energize fires 1 overcharged shot ending energize.
- Overcharge kills instantly teammates on direct hit. Range of overcharge is higher then range of vindicator.
- Slows you down for ~3 seconds after each shot
Pistol
Usable by All Classes
- Use it when you are getting to slow if you are using another weapon.
SAR-58 (Shotgun)
Usable by All Classes
- Due to the low amount of shotgun ammo I will always recommend the FAS-18 over this.
M1GL (Grenade Launcher)
Usable by Assault, Medic, Demolition, Recon, Heavy Support, Hellfire
- If you really want to use a grenade launcher, use this.
FAS-18 (Shotgun)
Usable by All Classes
- Recommend this with all classes and all builds unless you have a reason not to run it, e.g your a demo and running a LAW / M1GL.
- More bang for your buck than the SAR, and works well when kiting enemies.
- You should always manually fire this weapon.
Law-57 (Rocket Launcher)
Works well on Demolition
Works ok on Heavy Support
- I find with Heavy Support this can work but it slows you down to much.
Secondary GAR (FMJ)
Usable by Terminator, Assault, Heavy support
- Good in combination with ACE and Vindicator
- You could take GAR(HP) as primary weapon and GAR(FMJ) as secondary
- Reduces speed by 5%
.
How to set up a class-build
- Choose your main aim / role and stick to it.
You will never be an efficient “Jack of all trades”. - Classes and roles:
Choosing your role for the mission. You should always have all types.- Support
- Assault
- Recon
- Medic
- Heavy Support (with teamboosters and GAR // supress with Minigun)
- Tank
- Hellfire
- Terminator
- Damage
- Assault
- Heavy Support
- Hellfire
- Marksman
- Demolition
- Terminator
Explanation: “Not recommanded class” / “Average class” / “Recommended class”
- Support
- Weapons:
- Support
- GAR / GAR-MS / GAR-GL
- SMG
- Damage
- Minigun
- ACE-43
- Arc(lite)
- Stinger
- Strike V
- SMG (Assault SMG build only!)
Explanation: “Not recommanded weapon” / “Average weapon” / “Recommended weapon”
- Support
- Boosters
- Don´t use at all:
- Movement Speed booster (maybe as medic but you need the damage)
- Energy Booster (Takes way to long to get Level 15 with it)
- Rarely used:
- HP booster (You better boost your armor)
- Ailment Resistance booster (You have a medic or medical stuff)
- Average used:
- Reload booster
- Attack speed booster (If your to slow with Ammunition Booster)
- Health regeneration booster (To survive smaller ailments)
- Most used:
- Tanking / Increasing Resistance:
- Armor (Resistance) Booster
- Armor Regeneration Booster
- Damage
- Ammunition booster
- Tanking / Increasing Resistance:
- Don´t use at all:
- Way to Drop
- Dropship
- All classes that belong to “Support”
- Medic
- Recon
- Demolition
- Heavy Support
- Marksman
- New People
- All classes that belong to “Support”
- Droppod
- Classes with an average speed and an good damage output
- Assault
- Hellfire
- Terminator
- Classes with an average speed and an good damage output
See “Droppoding” for more information.
- Dropship
Assault – Class

- Damage Dealer
- Looting
- Map cover
- Rookie friendly
- Has the biggest choice of weapons
- High survivability due to skills
- Multiple roles in combat
- Average Speed
- Active:
- Tactical Offence (at lvl 1)
- Degenerates 4 health per second
- Makes you unvulnerable for up to 11 seconds
- Vanguard (at lvl 2)
- Places a wall in front of you with 1000 armor which takes damage instead of you. You could detach from it. Cooldown depends on amount of damage shield took.
- Those skills have huge cooldowns, up to 120 seconds on Tactical Offence and 300 seconds on Vanguard.
- Tactical Offence (at lvl 1)
- Pros:
- Tactical Offence may rescue you in some situations
- Vanguard can take alot of damage
- If your team is in trouble just hit taunt, if your team still in trouble, try placing shield in front of mob.
- You could keep energy in other skills while not using it, and move points there when needed.
- Cons:
- Long Cooldowns
- Passive:
- +3% evasion chance per level
- Active:
- Razor Blade skill
- 5sec cooldown
- Deals 250-550 energy damage in an small cone infront of you.
- Razor Blade skill
- Pros:
- Evasion bonus works great with Evasion Boosters
- Energy Damage
- Cons:
- Close combat
- Small AoE
- Passive:
- +20 damage to shotguns per level (GAR-MS, FAS, SAR)
- Active:
- Grants shotgun skill
- 12-8 sec cooldown
- Deals 300-360 damage in an average cone
- Deals full damage in arc unlike other shotguns
- Grants shotgun skill
- Pros:
- Free shotgun shot
- Small Shotgun damage boost
- No Friendly Fire
- Cons:
- Low damage
Note:Good skill for new players, allows to kill swarmer horde with one shot.
- Passive:
- +50 – +350 damage for your grenade launchers (MIGL, GAR-GL)
- -0.5sec reload time on grenade launchers per level
- Active
- Grants Grenade skill
- 15sec cooldown
- Deals 600-1100 explosion damage
- Grants Grenade skill
- Pros:
- Medium AOE damage
- Cons:
- Friendly fire
- Passive:
- Adds 15% chance to do critical damage
- Increases Critical damage by 50% per level
- Pros:
- Adds significant damage
- Cons:
- None
Note:
- First level gives maximal boost (+15%*200%=30%), the rest gives only (+15%*50%=7.5%) boost per level, but for maximum damage you still need 5 levels in it.
- “Must-Have” for all damage dealers!
- Active:
- Morphine(lvl 1)
- Heals 40-90 health
- 45sec cooldown
- Advanced stimulants(lvl 2)
- Level 1 – 3:
- Increase movement speed for 10%
- attack speed for 35%
- Reduce health generation by 3 (May drain your health)
- 60sec cooldown and 35sec duration
- Level 4:
- Doesn´t degenerate health any more
- Level 5:
- Adds extra 10% attack speed
- Level 1 – 3:
- Emergency treatment(lvl 3)
- Removes any poisons and bleeds
- Costs 70 health
- 45sec cooldown
- Morphine(lvl 1)
- Pros:
- Increases your chance to survive
- Great skill for rookies
- Cons:
- Emergency Treatment may kill you if your not paying attentention
- Passiv:
- Adds +3 – +11 damage to light weapons (GARs, SMG, Strike-V, Pistol!)
- -0.75sec reload time per level
- Pros:
- Decent damage boost
- Reloadtime reduction!
- Cons:
- None
- Passive:
- +2 damage per level for heavy weapons (Minigun,ACE)
- -0.75 sec reload time per level
- +2% atk speed per level
- Pros:
- Must have if you are using an heavy weapon
- Cons:
- None
- Active:
- When running
- gives +1% – +5% movement speed
- +1 – +3 health regen
- -6 damage
- When standing
- gives +1% – +5% crit chance
- -3 health regen
- +4 – +12 damage
- When running
- Pros:
- Nice damage buff if needed
- Cons:
- Only usefull when bunkering down
- Draining your health
- Active:
- Grants T1 sensors skill
- 25sec cooldown
- 5-8sec duration
- +10 seismic damage per level
- +4% critical strike chance per level
- Grants T1 sensors skill
- Pros:
- Great for holer waves on several maps and against bosses
- Cons:
- Long cooldown
- Passiv:
- Converts 10%-30% of your weapon damage into energy damage
- Generates up to 1 bullet per second.
- Pros:
- Prevents enemies from respawning
- Cons:
- Really small damage boost
Assault – Endgame

(Creed)
Good build for extra ammo, reloading quickly and being a bullet hose.
Components
- Light Weapon Targeting System
(5 points) - Ammonite System
(Max asap) - Critical Strike Module
(1 point at the start, last points) - Shotgun Module or Grenade Module
(1 point)
Power Ups
- Ammunition Booster x3
Primary
- GAR
Secondary
- Fas-18
(Creed)
High single target damage output

Components
- Critical Strike Module
(1 point at start, Rest Points) - Shotgun Module
(1 point at start) - Light Weapons Targeting System
(Max First) - Combat Stimulants Module
(Max Second)
Power Ups
- Ammunition Booster x 3
Primary
- Strike-V
Secondary
- Fas-18
Use Steroids as often as you can to increase your damage output.
Medic – Class (Part 1)
Class Role: Cure ailments and Heal your squad
General
- Watch for debuffs you can fix, they appear near
each character or on right site. - The medic steroids device can save you or
someone else with the speed boost. - The Healgun heals for less than the Healing Device
but has a much lower cooldown and is ranged
(Can target health bars for faster heals) - The Life Drone resurrects people at their current level, 90secs. Remember, everyone has 3 lives total.
- Pharmacology module provides medical supplies.
First Aid Module
- On level 1 adds Heal ailment skill, on level 2 adds Blood Gen S skill.
- Heal ailment allows to heal poisons on lvl 1, bleeds on lvl 2 and fracture on lvl 3.
- Blood Gen works applies AoE medkit around medic with 70 sec cooldown.
- Heal ailment heals only 1 ailment for every marine in the area of effect. Ailments have a priority of healing so poison>bleed>fracture, fracture being healed last. If you have BOTH poison and fracture use antivenom first!
- Level 4 and 5 decrease cooldowns of other medical modules by 2 seconds per level (-4 total).
Those modules include : Heal gun, Healing Device, Medical Steroids(works twice as good for it for some reason, -8sec CD total) and First Aid Module itself. - Heal ailment has default cooldown of 45 sec, if you heal nothing. If there are a few different ailments healed, the one with higher cooldown will determine total cooldown. Poison – 20sec, Bleed – 30sec, Fracture – 40sec.
- Could be boosted by pharmacology module. With 5 lvl pharma and 5lvl first aid Blood gen has only 50 sec cooldown
Bread and Butter medic skill, get it, love it
Healing Device
- Enables Nano Heal which heals instantly, all marines around medic in certain radius.
- 90 sec cooldown
Higher cooldown than the healgun but heals for more, must have people grouped up on you.
Neutralizer
- Ranged shot (AoE) that decreases enemies damage and has an chance to make them attack each other.
Works well in crowded games. Not so useful on higher difficulties.
Pharmacology Module
- Provides resupply skill. Allows to resupply antivenom on lvl 1, steroids on lvl 2, medkits on lvl 3, fibrins on lvl 4 and nanites on lvl 5.
- Even if you have a few stack of steroids this module will resupply only one.
- This module has 80 sec default cooldown, any medical items resupplied increase cooldown.
Antivenom +40sec, Steroids +20sec, Medkits +40sec, Fibrins +60sec, Nanites +80sec. So you could use this module once per 320 sec and keep points in other places. Or generate steroids once per 100 sec. - Gives -5% cooldowns for first aim module per level.
Good if you need to keep points in other modules, like live drone.
Critical Shot System
- Plain DPS boost.
Only for Strike V Medic but better play an Medic than an damage dealer.
Medical Station Device
- The Medic places a device on the ground which releases healing agents that are easily absorbed by combat suits.
- On discharge: instant heal and MS buff is given to all players in radius, Discharge radius grows for 0.5m per minute.
- 70 sec cooldown
If you plan to bunker down: Good skill just to have 1 point in, can be placed then detonated with ‘GG’ for a quick area heal or left to tick away with a healing aura.
Steroids Device
- +6% – +14% atk speed, +3% – +11% movement speed.
- 50 sec cooldown, 35-75 sec duration.
Good ability to boost up when needed or later on if you have the spare module.
Medic – Class (Part 2)
Life Drone Device
- Places a drone that lasts up to 5 minutes. It will revive and heal allies.
- 90 sec cooldown
- Health of drone increases with every level (exact health unknown)
- Health 1 ailment every 10 seconds
- Detonate it to make it taunt creatures nearby. It will self-destruct after 10 sec.
Very handy when playing with newer players or older players. Anyone, really. Taunt allows to use it all the time.
You cannot remove points out of this component
Heal Gun Device
- 40-80 health in a gun charge within 3-3.8m aoe with some decent range
- 25-17 sec cooldown. Could be boosted by first aid module for further -4 sec cooldown (down to 13 sec)
Much like healing device but weaker and ranged, low cooldown.
Chemical Bomb Device
- Throws a chemical bomb that will slow enemies in radius and destroy dead bodies so they don’t revive.
- 10 sec cooldown
If you have the space, damage isn’t bad and that slow is great, this is the only way to kill enemies who resurrect permanently.
For more detailed information of running a medic I’d recommend checking out this (old) guide.
[link]
Medic – Endgame
META Build (Green’s Slut)

Full Medic healing and removing ailments/fracture goodness.
Components
- First Aid Module
(2 points at start, 3 points asap) - Heal Gun
(1 point early, max by endgame) - Lifedrone
(1 point when it is needed) - Combat Stims
( 1 point mid game)
Power Ups
- 3 x Armor
Primary
- SMG
Secondary
- FAS-18
Demolition – Class
Class Role: Setup Explosives and provide heavy fire support for your team.

- Everyone should look out for your explosives but
take care positioning them to - You should be planting explosives with skills and then disarming them for a supply of explosives
- 3 points in the Stationary Explosives Module now protects your explosives so only you can set them off!
- ‘G’ to skip to your last explosive then again to set it
off, “GG” - At rank 5 Stationary Explosives the disarm skill is
able to disarm turrets for repositioning
Critical Shot System
- Allows marines to hit vital areas.
My Thoughts: Alright ability, not for demo’s
Seismic Resonator Device
- A subsystem which allows recharging and use of the Seismic Resonator
My Thoughts: Kill enemies , especially burrowers without hurting your team, brilliant
Rocket Amplifier Module
- Grants rocket launcher and cluster rocket skills, increases rocket launcher weapon damage and radius.
- Can be boosted by the LAW upgrade.
My Thoughts: Skill is pretty handy, bring a LAW also.
Stationary Explosives Module
- Includes the upgrades needed for efficient use of various types of explosives in the field.
My Thoughts: Bread and butter skill for a demo.
Sentry Drone Device
- Sentry mine that will guard the area and damage any nearby enemies.
My Thoughts: Helpful skill for defensive situations especially but to weak.
Explosive Modulator System
- Increases damage and radius of explosives
My Thoughts: Bigger, wider explosions? sure, don’t mind if I do.
Works with Rocket Module but does not show increased AoE -> may cause teamkills
Mechanic System
- Reduces cooldown of all skills for demolition and entire squad.
- My Thoughts: Up to 30% cd reduction, more explosives, faster!
Directional Primer Charge Device
- Places a device that will cause huge cone explosions
My Thoughts: Wave of explosions out from the source, fan-freaking-tastic, AIM AWAY FROM FRIENDLIES!
Smart Grenade Device
- Nice damage, very low cooldown, can’t teamkill, causes huge damage on enemy armor.
- Can’t be used within 3m circle.
- Requires 5 energy points for full power and takes a lot of attention to use.
My Thoughts: Takes down high armored enemies in no time. Nice if you have no Recon (Designate) or Terminator (Energizer).
Improvised Explosive Device (Not Implemented Yet (25/7/14)
Wired Explosive Device (Not Implemented Yet (25/7/14)
Demolition – Endgame
The Build
Maximum explosives, the build that could beat solo MERCS.

Components
- Mechanic System (Keep it at 5 points for -30% cooldown bonus)
- Directional Primer Charge Device
- Rocket Amplifier module
- Stationary explosives module (At level 5 unlocks chain explosive detonator)
Power Ups
- Speed Booster x3
- OR Armor Booster x3
Primary
- SMG
Secondary
- MIGL
Recon – Class
Class Role: Do objectives, Loot, Call in strikes and supplies
General

- Light Armor
- Increased sight range (45m)
- Very fast
- Note: The SMG decreases enemy armor for 2 sec.
Critical Shot System
- Allows marines to hit vital areas.
My Thoughts: Alright ability, but not really for recon (mostly)
Flare Gun Device
- Upgrades a Personal Flare skill, converting it to
a Flare Gun when used outside buildings.
My Thoughts: Same as the item, brilliant, I love being able to see but possibly better abilities for a recon.
Ground Reconnaissance Module
- Holds information needed to request any type of ground support anywhere on the battlefield.
My Thoughts: Get three points in this at least, well placed artillery strikes and barrages can be pretty devastating.
Air Reconnaissance Module
- Holds information needed to request any type of air support anywhere on the battlefield.
- Enables strong Gunship attacks
My Thoughts: Nice in all reasons.
Speed Mechanism System
- A specially designed system to increase sprint duration and speed.
My Thoughts: There are better modules for recon. You are fast enough anyway.
Avoidance Device
- Active ability makes recon undetectable for a few seconds. Passive enables him to remain undetected as long as there are teammates nearby.
My Thoughts: As long as you are with your team this is fantastic, however underground enemies still target you. Stick one point in it and run around untargetable with your team.
(Great for getting objectives done or place artillery).
Designate System
- Improves designate so that the targeted creature has less armor, takes more damage, and is designated longer. (Stacks with SMG reduction)
My Thoughts: I can see this being very helpful late game if you have the room. One of the best skills for recon on Hard+ and against bosses.
Universal Locator
- Tracks movements of hostiles, higher levels show higher threats
My Thoughts: Your normal tracker is more than enough imo and this is a waste.
Usability Improvement System
- Reduces time it takes to use usable objects and increases number of found items.
My Thoughts: Unless you are going to max this early on I think its pretty average.
Seeker Mine Device
- Enables the Seeker Mine. When placed and activated it will target the nearest enemy.
My Thoughts: Good but it just doesn’t stack up to the strike abilites.
Orbital Targeting Device
- Enables recon to designate up to 3 targets for orbital seeker bombs.
My Thoughts: Massive cooldown, average damage. There are more useful components.
Recon – Endgame
META Build (Creed)
Support strikes and Support

Components
- Ground Reconnaissance Module
(3 points asap, max first) - Air Reconnaissance Module
(3 points next, 4 points lategame) - Designate Target
(Max lategame) - Avoidance Device
(1 point)
Power Ups
- None.
Primary
- SMG
Secondary
- Fas-18
Build 1 (Bonzai101)
Support strikes and deal decent damage yourself

Components
- Ground Reconnaissance Module
(3 points asap, max first) - Air Reconnaissance Module
(3 points next, 4 points lategame) - Designate Target
(Max lategame) - Crit shot systems
(1 point at start)
Power Ups
- Ammunition Booster x3
Primary
- Strike-V
Secondary
- Fas-18
Note: Only use the Strike-V build if there is not an Assault using the Strike-V
Heavy Support – Class (Part 1)
Class Role: Heavy Fire Support, Squad Damage Buff
General
- Using the Minigun with manual fire means you hit everything in its cone of fire, you do not get this with the ACE. That gives heavy support one of the best damage potentials in game when dealing with hordes.
- Cover people while they do their job, this is your main job.
- Don’t be afraid to ask for ammo.
- Has best area slow skill in game.
- Armory device allows to generate huge amounts of ammo.
- Safeguard removes need of managing light.
Critical Shot System
- Plain DPS boost.
First level gives maximal boost (+15%*200%=30%), the rest gives only (+15%*50%=7.5%) boost per level, which makes crit module the best 1-point skill.
Suppressive Fire Device
- Increases rate of fire by 35%-100% at cost of -40% movement speed.
- +1 cone degree per level
Very situational, wastes tons of ammo unless combined with wired armor.
Targeting Systems
- +12% – +36% damage aura.
Must have for heavy support, greatly increases teams damage output.
Ammunition Link System
- +100 ammo in clip per level (+20 ammo in GAR)
- On Level 3 you can change your ammo type.
- Energy cannot be removed from this component.
If you have huge reload time, this skill will help. Reloads should be timed so you reload when current wave is killed, or you are not in danger.
Beta IV Frequency System
- +4 – +20 clip size aura
- Increases minimal damage that could be dealt for a team. Good for those enemies having 80+ armor resistance or insurgents.
Shines only on veteran+ difficulties. Probably.
Heavy Support – Class (Part 2)
HSLF Speed Device
- Allows for second sprint-like ability at cost of armor. (+40%speed 18sec duration on level 5 at cost of 60% total armor)
Depleting armor on heavy support is generally not a good idea. Also heavy support usually manages to keep up with team so extra speed is not needed much.
Safeguard System
- Increases light radius. At lvl 5 highligts huge area around heavy support, so you dont need flaresflare guns any more.
- +1 cone degree per level
- -1 sec heavy weapon reload time per level
Great support skill, also increases cone radius.
Suppress Target Device
- Slows down enemies at cost of damage. -50% speed at cost of -15% damage at lvl5
- On level 4 you can suppress area without shooting.
- +1 cone degree per level
One of the best heavy support abilities, another must have skill.
Wired Armor System
- +6 – +14 armor granted for every teammate nearby.
- Allows to fire bullets at cost of armor. Depletes 11 – 7 armor per second.
Armor bonus is nice, while the skill is useless because of high armor cost.
Anti Armor Module
Two skills squeezed into one.
- 1st, 3rd and 5th levels: add skill that fires 3 rockets to targeted area, icreases LAW damage.
- 2nd and 4th : -0.75sec reload per level on light weapons, +3 damage per level
Armory Device
- You can not remove points out of that system
- Deploy armory that generates ammo, up to 8 ammo per second at lvl 5
- Maximum capacity at lvl5 : 1500 ammo in single armory
- Decreases reload time within 10m circle around armory. Up to -65% reload time
- You can’t place another armory within 250m circle. Go for hexagonal grid for maximal amount of armories per map! Or simply place them in prefered areas, such as crossroads and bunkers.
Going for 4 minigun assaults? Need ammo? Take armory device and problem is solved, generates huge amount of ammo at lvl 5.
Heavy Support – Endgame
META Build 1 (Creed)
High damage output, Suppression for lategame and large clip size

Components
- Critical Shot System
(1 point at start, last points) - Suppress Target Device
(Max Second) - Ammunition Link System
(1 point at start)
(3 by midgame to switch ammo type) - Targeting System
(Max First)
Power Ups
- Ammunition Booster x 1 (if you´re fine with being slow 3)
Primary
- Minigun
Secondary
- Fas-18
META Build 2 (Creed)
Small damage output, Suppression for lategame, Support

Components
- Critical Shot System
(1 point at start, last points) - Suppress Target Device
(Max Second) - Armory System
(1 point at start)
(up to 3 by midgame to place a lot armories early game) - Beta Frequenzy
(Max First)
Power Ups
- Ammunition Booster x 3
Primary
- GAR
Secondary
- Fas-18
Hellfire – Class
Class Role: Tanking, DPS, crowd control

General
- The Hellfire has fire immunity but can be hurt by
poison or explosions - Manually aiming with the flame thrower with
the cone is especially effective - Take heaps of care not to randomly set off barrels or demo explosives
- The Vanguard Device does not block ailments but
some items do (Combat Armor) - Ask your team for health booster (blocks bleeding)
and armor plate (blocks fracture) - Weapon Equalizer Device gives alot more ammo than stated, barrels give 25+ and Gas Cylinders gives 100+ ammo.
Napalm System
- Increases damage per enemy attacked. Works only with Arсlite
My Thoughts: More damage –> Must have!
Combat Armor System
- Various combat data packets that manipulate nanites to provide better protection for Hellfire and nearby combat suits.
My Thoughts: Armor increase is pretty negligible but ailment resistance is helpful.
Optimized Consumption System
- An armor component manufactured to connect with any flamethrower. Increase fuel efficiency, fire range and reduces reloadtime.
My Thoughts: Awesome for any damage builds
Burst Fire Device
- Sprays fire in a direct line in front of the marine, burning everything in its path, short duration
- Adds Immolation-Counters
Cooldown: 30 seconds
My Thoughts: Some nice single target burst damage.
Weapon Equalizer Device
- Active: Cooldown: 30 seconds
- Consumes barrels:
- Increases the normal damage of every weapon you take for an short duration. It also might change the type of damage you deal from “fire” to “toxic”.
- Level 1: Use flame barrel adds 10% damage, damage type change to fire
- Level 2: Use fuel cylinder adds 15% damage, damage type change to fire
- Level 3: Use toxic barrel adds 15% damage, damage type change to toxic
- Level 4: Grants additional flame barrel effect: Cause small burning that deal 48 damage per second and last for 15 sec per target hit
- Level 5: Grants additional toxic barrel effect: Cause small toxic clouds that hurt creatures for 88 damage per second.
- Adds some ammo per use. (Level 4 and Level 5 grants resupply 15/30 ammo from barrel.)
- Increases the normal damage of every weapon you take for an short duration. It also might change the type of damage you deal from “fire” to “toxic”.
- Consumes barrels:
Napalm Grenade Device
- Allows storage of standard napalm grenades.
Cooldown: 60 seconds
My Thoughts: Initial damaging explosion and then a burning patch of ground, If you use this, max it out as it is infinitely better with more points.
Napalm Wall System
- Leaves napalm wall behind Hellfire when activated, consumes 5 ammunition per second.
My Thoughts: To much ammo, low damage, get something else.
Fiery Shockwave Device
- The Hellfire will exhaust a huge napalm ring around himself, damaging and burning everything in the area, including friendlies. If the Hellfire dies during the initiation of the wave he will create and explosion.
- Adds Immolation
Cooldown: 25 seconds
My Thoughts: Great. (Longer cooldown than Burst but radial burst!)
Hellfire Vanguard Device
- Grants immunity to physical damage
- Taunts enemies
- Increases your damage
Cooldown: 45 seconds
My Thoughts: Taunt, immunity to damage, this is your bread and butter tanking large or groups of monsters ability.
Guardian Device
- Increases the armor regen of you and your team, depending on the number of marines
- Taunts enemies
Cooldown: 45 seconds
My Thoughts: Taunt and an insane armor regen boost. Awesome on high difficulties or Red Storm.
Phase Reaper Device
- Uppercut: Dealing one Sword damage (200-550 on level 5) and reduces enemies attack damage by (20%-40% on level 5)
Cooldown: 3 seconds - Phasecut: Deals two Sword damage at once (1100 on level 5)
Cooldown: 6 seconds
My Thoughts: If you know how to use it this component is realy worth a try. You´ll save alot of ammo but as you have to stop moving to use it might so you down.
For more information use this Guide:
[link]
Hellfire – Endgame
META Build (Creed)

Massive damage output, team-protection and tanking.
Components
- Hellfire Guardian Device
(5 points) - Consumption Module
(First point, 2 Points midgame) - Napalm System
(First point, Max ASAP) - Napalm Grenade (Defensive)
(1 point early, Last points)
Power Ups
- Ammunition x 3
Primary
- Arc(lite)
Secondary
- FAS-18
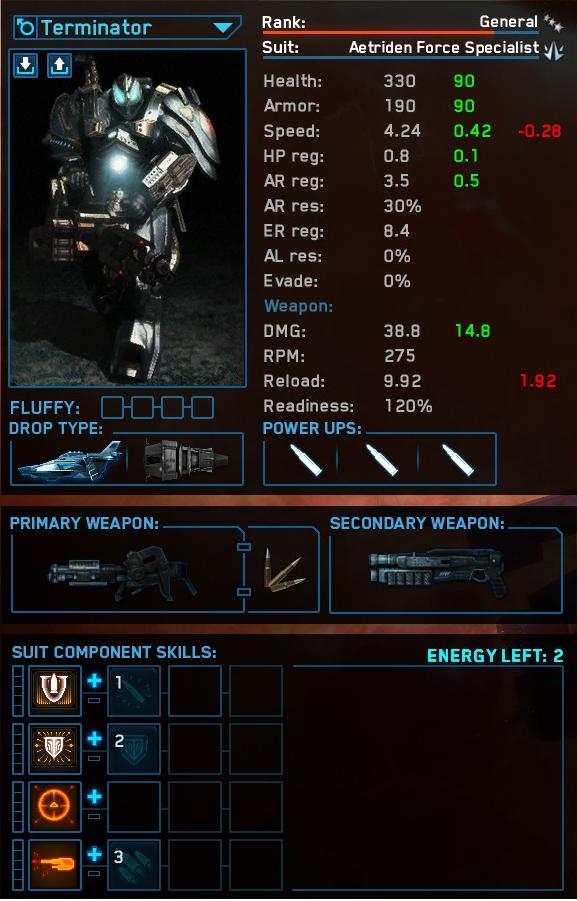
Terminator – Class
Class Role: Shielding, Squad Damage increases, 
General
- The ACE-43 secondary fire mode will save you
heaps of ammo but take care with the explosive shots. It also gives supreme DPS with crits AC module - Secondary GAR is nice
- Energize and Dio Striker are awesome team support skills
- Wherever you teleport, make sure you can get out
and link back up with the team. - Take care using explosive teleport near any team members.
- The Energy Discharge Module’s second ability at level
5 goes off like a mini nuke doing 30,000 damage but will kill you or leave you with 1 hp when coupled with energy shield device. Explosive teleport also grants ~1 sec of shield right after impact so you could use energy discharge with it and survive. - The Energy Shield Device can shield your whole team at level 5
- Don’t bother with vindicator. It is causing desync, has low range, damages friendly armor, has average damage and uses tons of ammo. New overcharge instead of damaging armor outright kills everyone including you.
Critical Shot System
- Plain DPS boost. (+60% DPS on level 5)
ACE autocannon mode crits are tearing dogs apart.
Autocannon Load Systems
- +10 base autocannon damage per level
- +1% attack speed per level
- On level 3 enables Overload that fires 3 explosive shells per shot with 3m radius each and with 100% increased attack speed. Works 3 seconds
- 20 sec cooldown on Overload
Fantastic ability, especially with the overload sub ability at 3 points.
Dio Striker 71 Module
- Grants skill that increases damage by 30% – 150% and has 11-18sec duration
- It affects only the mob you are currently targeting
- Does not work with manual aim
- 60 sec cooldown
Up to 150% damage (level 5) on your current target, good if you need to burn down something large. Or just a few fluffies.
X-ICS Module
- On level 1 enables teleport, on level 2 enables plasma gun.
- Teleport has range of ~10m and 90 sec cooldown. Level 3 reduces cooldown to 75 sec.
- Plasma gun deals ~2000 energy damage in ~5m AoE and has cooldown of 80 sec.
- Level 4 and 5 decrease cooldown of plasma gun only by 15 sec each (down to 50 sec on level 5)
Get it, get two points in it asap (Teleport and Plasma)
Teleportation Device
- Allows to use explosive teleport on level 1 and group teleport on level 2
- Increases range and decreases cooldown on all teleports, +4m – +12m range and 4 – 12sec lower cooldown.
- Explosive teleport deals 400 – 1600 energy damage in destination area. It also protects you with energy shield for ~1sec
- Group teleport allows to teleport up to 8 marines including you.
Good, combined with the X-ICS so you can teleport in then out again.
Vapour Exhaust Device
- Spawns energy vapours that deal damage and slow enemies down.
- Vapours deal 15 armor damage to all marines inside per second
- It has 7 – 15m radius, 40 – 64sec duration and deals 50 – 150 damage per second
- It reduces enemy speed (attack speed?) by 5% per level (up to 25%)
- It has 20sec cooldown, up to 3 vapours could exist at once at level 5.
Great for clearing trash mob behind
Armor Nanite Module
- On level 1 allows to Give Nanites
- On level 2 allows to Take Nanites
- On level 3 Give Nanites could activate turrets at cost of ALL armor
- Both Give Nanites have cooldown of 50 sec, Take Nanites has CD of 70 sec.
- Both skills try to transfer 50 nanites at once. Amount of nanites transfered successfully is determined by level.
- Transfers 50% – 90% of nanites (25-45 armor total at cost of 50 armor)
- Gives +0.2 armor regen and +3% armor resistance per level (up to +1 armor/sec and +15% armor res)
Good for building up defensive terminator. With 3 armor boosters, hellfire armor system and this skill terminator could easily hit 90% armor resistance cap on any map. Also it gives some support skills.
Energy Discharge Module
- Deals 500 – 1700 damage in 3-4m radius.
- Zeroes armor of anyone within radius. Teammates don’t like it.
- Has cooldown of 80 sec.
- On level 5 enables Self Destruct skill
- Self destruct should ONLY be used in combination with energy shield, you have chance to stay alive that way
- Self destruct deals 30000 damage and destroys your items. With shield on you will have 1hp after. Without shield, you die. 30000 damage is dealt only on top of you and damage drops drastically with distance.
- Self destruct has range of ~30m – 40m and cooldown of 5 min
- Any enviromental dangers (fire, toxic, parasite venom) will kill you instantly after self destruct
Quite useless, main skill removes armor of everyone and damage output is moderate while self-destruct will probably kill you.
Energy Shield Device
- Prevents all damage for 2-5 seconds
- Has 110sec – 70sec cooldown
- On level 5 shield is applied for all allies within 15m radius
Great at level 5 (especially when setting off a nuke) and as a last resort for staying alive.
Energizer Device
- Converts all damage in certain radius to energy damage for 5 – 17 sec
- 60sec cooldown
- Energized buff allows to overcharge vindicator. This allows to fire one overcharged shot which instantly ends energize buff.
- Overcharged vindicator shots deal ~2000 energy damage and leave plasma fire and toxic fields after shot. It kill teammates on direct hit, and removes armor of any marines nearby. Range of overcharge is bigger then range of vindicator, so unless you sprint away from charge you ll get some damage and your armor will be gone.
One of the best Terminator abilties, usually increases squad damage by 25%+.
Vindicator Energy System
- +50 damage on vindicator and -1 ammo needed to load it per level. (Up to +250 -5 ammo per level)
- Boosts overcharge: +500 energy damage, +1000 explosive damage and +1000 seismic damage on level 5.
Terminator – Endgame
META Build (Bonzai101 / Creed)
Balanced Terminator build, I’ve been playing around alot with this build and really enjoy it, Autocannon load for early game carnage then a few utility abilities for late game.
Components
- Critical Shot System
(First point, Remaining Points) - Autocannon Load System
(First Point, 3 ASAP) - Energy Shield Device
(5 points lategame) - Energizer Device
(1 point early game, 5 points lategame)
Power Ups
- Ammunition x 3
Primary
- Ace-43
Secondary
- Fas-18
Marksman – Class
Class Role: High Single Target Damage, Snares
General
- Great for shooting through walls at range and taking
out STROLs with rail mode - Stinger range is about 90m
- Stinger FMJ shots can pierce through multiple enemies
- Manually shooting medium sized monsters (dogs usually) is your main goal mid/late game
- If you can take out drillers before they reach the team and burrow do so
- Seismic pillar allow for area slow and unburrow. You could use them to slow down everything behind or to quickly deal with holersdriller
- Nano net, Nano trap are disabling high threats for a precious few seconds
- Insane damage when you manage to crit, otherwice damage is quite low. You have to rely on RNG.
Critical Shot System Marksman
- Greatly increases crit chance and crit damage. Up to 30% crit chance 500% crit damage at lvl5. Huge DPS boost, however unreliable because of low rate of fire stinger has.
Must have skill for marksman, level 5 always.
Advanced Targeting System
- Further increases crit chance and crit damage. Up to +15% more crit chance and +100% more crit damage. Useless without critical shot MM system.
Decent 1-point skill for those going for DPS, just for single energy point you get +5% crit chance! Consider it a lvl 6 critical shot system. However with strike-v you could get 55% passive crit chance with those. Hmmmm….
Nano Net Device
- Stops enemies for 2.5-5.5 sec.
- 20 sec cooldown, 2 sec if you miss
Good 1-point skill, could disable only one enemy
Nano Net Trap Device
- Stops enemies for 3-7 sec within 0.5m-4m radius.
- 80 sec cooldown
Very long cooldown makes this skill inferior to the nano net device.
Explosive Shell Container Device
- Adds 300-800 explosive damage for one bullet.
- 30 sec cooldown
Explosive damage can’t be boosted by crit, and it could ocassionally teamkill someone. There are a few better skills.
Occular implant Device
- +25 damage per level to mosters in area, +10%-30% crit chance and 100% hit chance for monsters under effect of ocular implant.
- Has 15 sec cooldown and 7-11 sec duration.
Great for dealing with bosses, fluffies, slashers and everything you don’t like. They have much higher chance to get critically hit a few times in a row.
Vital Spot Targeting Module
- Adds 2 skills : Aim head and Aim leg
- Aim leg gives 15% – 75% slow and 100-250 extra damage for the next shot.
- Aim head gives +5% – +25% crit chance and 100-500 damage for the next shot.
- Damage increase could be further boosted by crits.
- You could both aim leg and head resulting in insane damage boost, slow and increased crit chance in one go.
- Aim leg has 30 sec cooldown while Aim head has 35 sec cooldown.
Really good skill to kill singular high threats.
TacNet Bullet System
- +5% chance per level to disable respawn on creature
- +3% chance per level to spawn nano net
Useless with stinger and strike-v marksman is a downgrade by every stat.
Concealment Device
- Grants consealment skill. Use it on nearby to become invisible. You could shoot and every shot drains armor. If you loose all armor or try to move you teleport to the marine you used skill on.
- Up to 26% extra damage per shot at lvl 5. Drains 25 armor per shot on lvl 5
- 90 sec cooldown, ~300 sec duration.
Has huge cooldown and you are limited to a few shots with slightly increased damage. However ability to stay far behind your team could be usefull sometimes.
Marauder Device
- Grants skill with low duration and huge cooldown which does the following:
- +8 – +24m weapon range.
- +30 – +70 energy damage per bullet.
- +30% – +70% movement speed when shooting.
- Knocks down insurgents on every shot.
- Prevents armor reduction when used with consealment device.
- 35 sec cooldown, 5-9 sec duration.
It could be used as damage boost or as a skill to go with strike-v marksman. Combination consealmentmaraudercrits+stinger also could work quite well.
Seismic Pillar Device
- Allows placing seismic pillars that slow enemies down and unburrow them.
- At lvl5 pillars could connect within 35m radius and slow enemies down by 42%
- Great for crowd control and killing holers, drillers, sargon.
- You could place 2 pillars, then you have 30 sec cooldown.
- Every pillar could only connect to one other pillar. The pillar connected to will be the closest one.
Very nice marksman utility skill, it has nothing to do with marksman main role yet this skill is very handy.
Marksman – Endgame
Build 1 – Yegor(rus)
90% crit chance skillshots. 100% with savage burners! Up to 11k energy damage crits with rail mode. Use skillshots to oneshot hellspawns, fluffies, and cripple high threats. Lots of crit-boosting modules help to overcome the unreliable nature of RNG. Since marksman should take some energy batteries and power cells they allow to compensate for energy booster.
You shouldn’t get underleveled even on higher difficulties (works well even on aetriden) and skillshots allow to kill hellspawns quickly and damage other bosses severely.
Components
- Critical Shot System Marksman (+30% crit chance passive, 400% crit damage)
(1 points at start, max asap) - Advanced Targeting System (+5% crit chance passive, +20% extra crit damage)
(1 point) - Vital Targetting (+25% crit chance on head shot, +250/500 from legheadshot, could be used at once, that damage is boosted by crits)
(5 points endgame) - Ocular Implant (+30% crit chance in AoE, +125 damage per shot)
(5 after crit shot)
Power Ups
- Attack Speed Booster x 2 or nothing
- Energy Booster x 1
Primary
- Stinger
Secondary
- Pistol
—3. SETTING UP A GAME —
Extra Game Modes
Hardcore Mode
- Random High Level Threat or Boss on each wave
- Experience Gained Increased by 15%
- Thanatos could spawn wave 1
- Hellspawn could spawn wave 3
- A few waves of bloppers in a row could be just as deadly as Archlys wave 5
Bunker Mode (WIP)
- Protect the Orbital Beacon
- Random supply drops at beacon
Note: No more respawns after wave 9
Fast Mode
- Waves come 50% Faster
- Evacuation Experience Increased by 50%
- Monsters Health Reduced by 10%
Red Storm
While Active
- Reduces Marine armor over time and reduces move speed by 30% while outside
All the time
- While Inside Bullet Damage Increased by 15%
- Experience Gained Increased by 20%
- adds “Swarm”
Note: Try to stay in buildings, so its best played in science sector
Swarm
- Alot more zombies
- Monster Health reduced by 5%
- Experience Gained Increased by 6%
Tactical Mode
- Allows to play alone with up to three NPCs
Capture point (Will be released soon)
- Secure several (at least five) strategic points.
- Five different types of points granting different buffs
- Five difficulties (I-V)
- Shorter duration (possible) than primary (story) missions
(Duration: ~30min to end the game) - Allows you to play it for an longer duration
(Duration: ~endless) - Start with an increased energy level (Level 6)
- Increased enemies / wave strength especially while securing an strategic point (depending on point difficulty)
- Increased chance of getting bosses
- Strol Nests spawning every 4 minutes all over the map that spawn enemies. They can be closed by seismics (known from SP).
- Secured points have three levels:
- Will drop supply (has an chance for legendaries)
- Will drop three turrets (Srategic point difficulty 1-3) or at least one NPC (Srategic point difficulty 4 and 5)
- Grants an temporary Stats Boost (depends on type of strategic point):
- Increased sprint speed
- Increased weapon damage
- Increased RPM
- Increased health regeneration
- …
Tactical Mode
Note:
If you have problems with your NPCs wasting ammo on Fatties send them with the F1 order in front of you. Pressing F1 once will place red markers on the destination, meaning that NPCs will gun down everything on their way. Press F1 an 2nd time will mark destination with green telling you they go streight for it without using their weapons.
This feature is also implemented when pressing F2 but it needs some polish to clear out status of fire-order.
For the In Depth survival Guide scroll down.
Hard overview (Veteran)
What would you expect when playing veteran?
- Monsters have more HP (+30-40%)
- Some of them have higher armor (basic mob vs FMJ ammo)
- They deal more damage (+100-150%)
- You have less energy regeneration
- Zombies respawn all the time(immortals seemed easy to kill, huh? they are truly immortal now).
- 2 hellspawns on wave 15 (3 if you have forced evac)
Here are some classes you will die without on hard
- Hellfire with vanguard device, a team tank
- Marksman, kills lots of dogs
- Medic without life drone, you usually dont have time for that
- Demolition. Behemoth has 27k hp with 20 STROLs killed and Luganesh has 47k(~70k if you dont kill STROLs).There are also 3 hellspawns for him to deal with.
- Recon running designate
- Terminator running full DPS ACE, energize and shield
- Heavy Support with minigun suppress target(5) crits(2) damage aura(5) chain link(3)
Since your team is going to go in group after wave 4-5 its best to have all auras and team skills you can gather
- Hellfire +15%AR aura
- Heavy support +36% damage aura
- Medic’s combat stimulants
- Terminator:
- 6 seconds team shield (80sec CD)
- 17 seconds energy damage (60 sec CD)
- +150% target damage for 18 seconds (60 sec CD)
- Demolition -10% skill cooldown aura
First thing you want to do is turrets up so they kill some mob. Its important to get 20 STROLs early so enemies have less health and easier to kill. If you get all T3 up it would be easier to prepare for each mini wavedog on run.
Some people have to droppod so they cover bigger area (Assault Hellfire Terminator).Its risky so you have to be prepared and run in case things get sour.
You have to place safezones in nice places so you can use them later for ammo explosives and loot lockers while moving for supplies.
Don´t eat power cells and stack them on marksman (or heavy) so he has 100 seconds energizer per power cell, try to give him every energy battery he comes by for more damage. And give him stimulants for movement speed attack speed too
Missions and Gaining Experience (outdated)
Primary Missions
Either
- Tera 1 – 50xp
Investigate Scientist corpses when they become avaliable (Try the center scientist first) - Tera 2 – 60xp
Follow prompts and access consoles - Tera 3 – 70xp
Access PDA Once it becomes avaliable - Tera 4 – 1200xp
This will occur instead of evacuation at wave 15
Meet up and then Defend Tyler Hunt for designated time -> Access Reactor -> Evac
Note: If Tyler dies it will spawn multiple Hellspawn and most likely wipe your group.
Or
- Insurgents 1 – 60xp
Kill group of 3 Insurgent scouts, Access Communicationg Device - Insurgents 2 – 100xp (3 groups)
Kill increasingly harder groups of 3 Insurgents, Access Communication Devices - Insurgents 3 – Unstated xp amount
Kill Insurgent group including their leader Nyx
Note: Insurgent Commanders are pretty tough, vulnerable to fire and toxic
To unlock the Science sector you need to complete either of these sets on normal or above
Wave Activated Missions
- Early Evacuation(wave 9 or 11 in fast mode, first primary is not done)- Unstated xp amount
Get to Evac position, once you are a certain distance away Hellspawns will spawn, try not to leave anyone behind! - SHIVA(wave 8) – 1 Tac-Nuke Shiva
- Reinforcements(wave 9 if anyone is dead) – Dead Players revived
Access spotlight terminal, defend and stay in vicinity for 2 minutes. - Fluffy Hunt(before wave 2) – 1000xp
Defeat a large wave of Fluffies (Harder versions of Slashers)
Note: Fluffy hunt is activated by the HAL9k Terminal, must be activated before the start of wave 2, normal Plus, You need to be prepared for this one.
Secondary Missions
- Holer Nest – Players gain 2-4 damage
Destroy eggs at location - Snatcher Nest – Players gain 2-4 damage
Destroy eggs at location - Disarm EMP – 20XP, Lights remain going, if disarmed 3 power cells
Demolition disarm Skill or Disarm Tools - Disarm Nuke – 20xp, Tac Nuke SHIVA
Demolition disarm Skill or Disarm Tools - Reactor Overheat – 20xp, Players gain an energy level
2 Players must access the same console simultaneously - Hatchling – 65xp, 6 damage
Kill enemy hatchling, high damage, low health - Swarm Tunnels – Ceasing producing additional enemies
Use a Seismic Resonator on Emergence Hole
Note: The Emergence Hole graphic does not currently disappear but will be closed - Assault – Insurgent Commander drops 6 power cells
Kill insurgent forces at specified location including a commander
Note: Insurgent Commanders are pretty tough, vulnerable to fire and toxic
- Artillery Control – Artillery item received by hacking player
Kill Insurgents at location and then hack the artillery terminal.
Optional
- Strol Substance – 0.5% reduced enemy health per, 20x, 150xp and 20% reduced enemy health when completed
- Marine Sampling – Increased hp by 5, 10x, 100xp and 15hp when completed
- Veteran Soldier Sampling – 30 global xp per, 30 energy for the inspecting player
- Satelite Activation – 35 xp per, 3 of, activated detection radius
- Sentry Turret Activation – Activate 20x turrets, when completed activates all turrets, 150xp
- Ai Marine Rescue – Decent xp, have seen it’s 300ea but unconfirmed
- Evacuation – Evacuation dependant on wave level, higher the better
- Power Generators – 7xp in normal, increase armor resistance by 2% and turret hp by 15
- Healing
- Killing
- Looting
Please note: Xp is modified by ingame options chosen on the launch screen, hard mode, red storm, swarm etc.
Teamwork
- Move as a group (Especially important lategame)
- Focus fire snatchers especially if they have grabbed someone (Not with an autocannon)
- Do objectives and keep a good pace
- Communicate with the team, safety zones, explosives, objectives completed etc.
- If you are not grouped up for wave 4+ you are probably going to die
(Snatcher’s spawn on wave 5+) - Use flares to light up the darkness (Makes enemies easier to hit)
- A good leader makes all the difference
- Follow the leaders instructions
- The Leader should place waypoints on the map for the team to follow (esc for map)
- Your team should use mainly FMJ rounds (Higher damage to most lategame enemies)
- For quicker looting ignore basic lockers (Locker explanation further in)
- Know the map, know where you can get cornered and where theres a back exit
- Get teamspeak or the like if you want to get to wave 15
Unofficial teamspeak: ts.game-com.de - Try play a class that complements the group
- Drop items that are more useful for other classes, explosives etc.
Drop Podding
I see alot of people trying to do this, failing miserably and 
The keys to drop podding successfully are area awareness, abilites to increase your survivability, a bit of luck and having some clear goals.
The most common mistakes I see are
- Letting yourself get swarmed
- Getting caught in a dead end
- Drop podding with a bad net connection
- Wrong class selection
- Not regrouping before wave 5 due to Snatchers
Pro Tips
- Know the map really well
- Use the Environment, Barrels etc.
- Don’t take major risks
- Try to funnel enemies to take them out enmasse
- Think about using HP Regen Boosters
- Medkits, Medical Nanites(Fracture), Antivenom(Heavy poisons)
- Seeker bombs for snatchers
- Directional Primers for swarms, Satchels for dogs
- Never leave upgrades behind. If you are overloaded (4+ upgrades) return to team
- Know your limits
Goals
- 1: Radars
- 2: Strols
- 3: Power Stations
- 4: Turrets (Activating and looting for later)
- 4: Objectives (If soloable)
- 6: Veterans
- 7: Marines
- 8: Looting
Good Drop Podding Classes
- Terminator
- Hellfire
- Assault
- Heavy Support
Classes who should use dropship
- Medic
- Recon
- Demolition
- Marksman
More Infos can be found here:
[link]
Bunkering Down
Reasons to bunker down.
- If you have to wait for final mission to start and you already got all Marines / Vets and Strols.
- Team is to weak to circle over map.
- Kill Hellspawn (Anywhere on the map).
Should I bunker down?
- Reward:
- You can save ammo.
- Easier to survive higher waves and lower risk of players dying.
- Risks:
- People loose attention. This causes horrable deaths when leaving bunker.
- Breaking through enemies may cause panic and easily wipe out entire team.
- Achyls and Sargon (W13 bosses) wipe out the team easily while in bunker.
- Insurgents marksman (W13+) anoying and deadly for light classes.
Classes you want when bunkering down:
- Heavy Assault
- Supress enemies and slow them down.
- Weapon-cone reduces ammo consumption.
- Terminator
- Shield (for breaking through enemies)
- Energizer (for high threats)
- Demolition
- Producing and protecting explosives
- Recon
- Artillery skill
- Supply call
- Hellfire
- Napalm Grenade (to kill swarmers)
- Armor and taunt (for bloppers and high threats
Behavior during bunkering down
- Don´t stand outside of the bunker to get more kills.
- Turrets:
- Do not stand near your turrets as this can cause them to be damaged by Drillers and Bloopers who explode.
- Turrets up on ledges where possible.
- Explosives:
- Place traps for Hellspawn(s) or boss(es).
- Save explosives for last waves.
- Don´t waste ammo (Small fire burst on high threats)
- Hellfire paces an Napalm Grenade / Incendary explosives at entrance and stands in the fire. (This kills swarmers and saves ammo.)
Note: This is the SE Central Sector Bunker
Well placed turrets in SE Central Sector Bunker

Well placed explosives

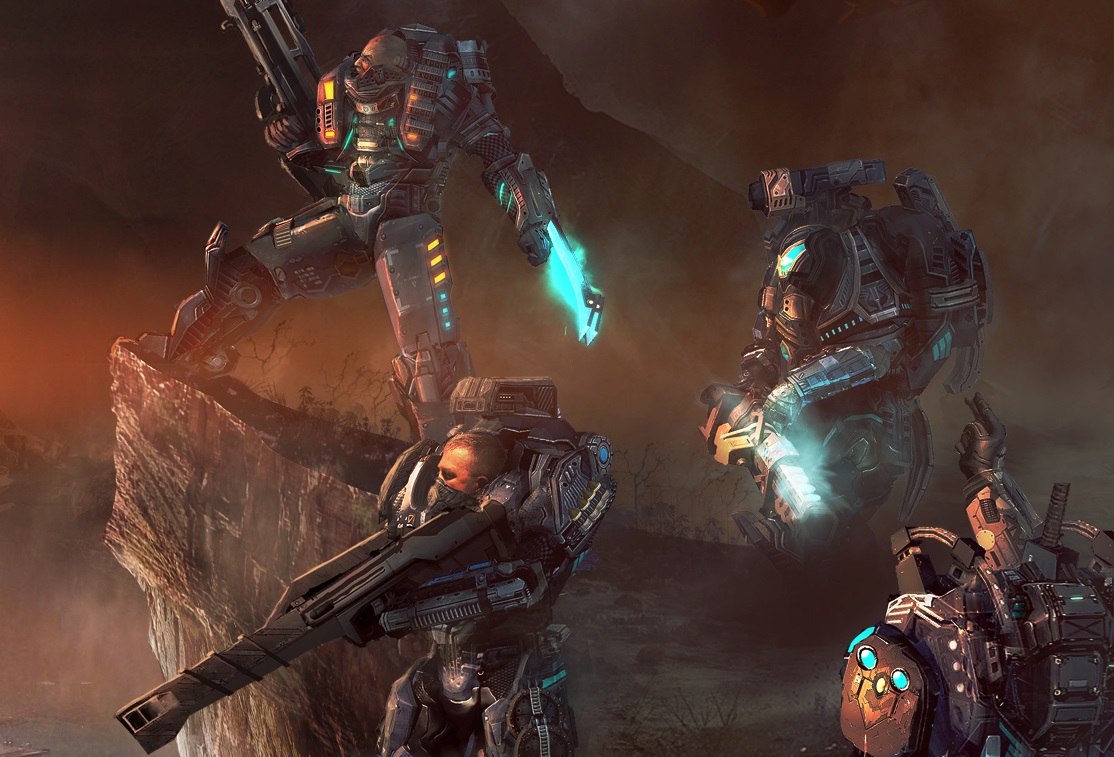
Fighting bosses. Horrors of Mars.
Fighting bosses
Chances of getting different bosses depend on your squad rating. If you have veteran squad chance of getting Ker/Archlys/Sargon is higher. You could meet them with any rating though.
- Fat pack
(wave 8-9 Luganesh and lots of Behemothes). They are very slow, so there is a variety of tactics how to deal with them. You keep moving and try to kite (most of) them to be in a single tight-packed group. Then you could either use SHIVA, or let marksman kill them all with piercing bullets. If they are packed really tight a demolition could kill all of them with a single explosive trap. - Hellspawn
The easiest big boss now. If your team has enough DPS and vanguard hellfire you could just gun him down. If you have some extra time, let demolition prepare an explosive trap to kill him. If he burrows use seismics.

Horrors of Mars
All those bosses are very hard to kill and have different abilities. They spawn randomly at wave 9 and 13. Fighting them in buildingsbunker is suicidal so take defensive position on the street.
If you are unlucky and boss came in the begining of the wave, you have to fight wave first. Fighting bosses is hard, and it gets impossible with slashers ripping your team apart.
Recon with designate is very usefull because all the bosses have high defence.
Ker
Big worm with many teeth. On wave 9 if you see a biosignature mission spawn far away from you on map, its Ker. It will move towards team and when it comes directly underneath some marine it unburrows. Dont try to run away from it, if you force Ker to chase you, it will eat someone from your team. Ker has a smoke field around it which slows players down and it constantly spawnes parasitesswarmers, it is highly resistant to hollow point damage and has AOE attack.
Here are some tips how to fight it:

- Ker is nuka-proof.
- Ker has same energy and FMJ resistance so energizer is wasted on it.
- Someone has to take care of horde it spawns. Heavy support with cone minigun or Hellfire. Napalm grenade help a lot.
- Someone has to run around it and evade AOE attacks so rest of the team could shoot it. Probably Hellfire.
- Ker has multiple hitboxes.4 Legs, 4 Shells and Main one. Each shell killed decreases total resistance up to -20 to everything when all are killed. If you have very high DPS go for main hitbox, otherwice you have to kill all 4 shells to make Ker vulnerable.
- Ker’s main attack is slamming itself on the ground disabling nearby marines. Experienced demolition could use it to prepare a trap and trick it into slamming right into it.
Archlys
Giand mutated ape. On wave 13 it comes and fights to death, wave 9 is special.
Archlys and Sargon has different spawn screams, so you could know what to wait. On wave 9 it spawns with the nest. It moves to your team, tries to disable one of marines and take it back to nest. If you deal enough damage it will retreat to the nest to heal.
Archlys is the easiest one to kill from the pack, those tips should help:
- Archlys is not nuka-proof. On wave 9 the easiest way to kill him is to wait for him to run away, and nuke him in nest if he didnt grab anyone.
- Archlys is extremally fast so anything that slows it down will help: HS suppress target device, MM nano netnano trap, strike-V with upgrade.
- Archlys has a leap AOE attack which might disable all your team at once. Try not to stand that close.
- It is possible to kill Archlys in one go if you stack debuffs on him and slow him down. DesignateEnegizerDio striker and nano nets should finish him off quickly.
- When you remove ~50% of it’s HP it will retreat to the nest, where it heals. You have to track him, kill him and destroy the nest. That part is buggy so sometimes it does not tries to attack you while in nest, but sometimes it gets into rage mode and kills the closest marine.
- If archlys grabbed one of marines he could be set free by destroying the eggs.
- Nest could spawn on the other side of map just to waste your time.
- It is possible to prepare an explosive trap, kite him to it and explode in one go.
- On wave 13 it comes to kill everything, so you need DPS and to slow him down.
Sargon
Holer King. On wave 9 the nest spawns. This nest keeps spawning sargon hatchilings horde. To fight Sargon you have to destroy some eggs in nest or wait for wave 10. On wave 13 he just comes to kill everyone. He burrows so you need seismic resonators to unburrow him. Moves very fast when burrowed.

- Nest spawns inside buildings, so its best to let marksman to kill some eggs or use primers, so you can fight him on street.
- You dont know where the nest is, so you have to track it killing Sargon hatchlings on the way. It could be on the other side of map, so you could have both Sargon and wave 10 if you dont hurry.
- Sargon is nuka-proof when burrowed.
- When Sargon is burrowed, smoke cloud on the ground slows down and damages marines.
- Seismic resonators are needed to unburrow it.
- When it is unburrowed it is just a matter of damage and time to kill it.
- Experienced demolition could kite Sargon into explosive trap, make him unburrow there and explode in one go.
Atrocity wave
Happens only on veteran difficulty or (possibly) with high-squad-rating team on soldier. Light goes off similary to red storm, every ~30 seconds there are ~50 swarmers unburrowing within 10m circle around your team. Dozens upon dozens of atrocities spawn around, around 20-30 total. This is a massive itemammo check, because you have to rip through ~300k health pool coming separately which is much more then any other boss.
- Always move, atrocities are slow and you could kite them all stacked for faster and cheaper killing.
- Watch your fire! Having 2 low-hp, fast and angry atrocities is far worse then having one dead and one slow and healthy one. Focus fire as a team.
- Kite them, to make them an easy target for explosive traps and artillery.
- If team is lacking DPS and had an unlucky spawn, run away together, group up and gun them down.
- Live drone, barricades and taunts could grant you some extra precious time.
Wave 15 tips. SOLAR doomray.
Normal difficulty
Remember your goals. Set up waypoints. Clear the map and objectives in order to succeed.
Take everything you can to boost damagedefence.
Team Setup
- Marksman, Does tons of damage to bosses, kills dogs in one shot and has piercing shots that can damage entire lines of enemies.
- Medic. Heals, revive drone, combat stimulants, crits, that class has most variety of builds. Hollow point GAR with crits module make medic self-sufficient up to wave 4, and allow to clear trash mob quickly.
- Hellfire. He is the living shield, taking all damage he can, keeping dogs away from his team with Vanguard device, ignores damage from hellspawn for 6 seconds. With new arсlite buff also is capable of doing decent damagedispatching the horde.
- Heavy Support. Suppress target is the best skill HS has, it divides all the threats by 2. They have 50% movement speed, 50% less attack speed, thus they deal less damage and you have more time for them. This is one of the most important skills, your team should always have one.
- Demolition. Stationary explosives, if collected from the beginning, will give enough damage to take out bosses with boomtraps in one go, Directional Primer charges help clearing the horde and rocket module gives a reliable way to kill slashersfluffies. The only class could be trusted with explosives (because they could be protected), anyone else could be blown up by no reason (hatchling spit, random barrel, ace, …)
- Terminator. Deals extreme damage with ACEcritsload system(use with care), provides team support skills: Energizer, Dio Striker, Energy Shield, Armor Nanite.
- Recon. Designate is very usefull against bosses. Suppliesartillerynapalm strikes, all that help.
- Damage inflicters. You might want extra DPS for your team to have an edge. Another demo, assault, heavy support. However this depends on the way team wants to make it, or experienced classes available.
- Recommend having at least 1 Ace and 1 Minigun as to not waste the upgrades.
General strategy
- Use droppods as much as you can and split up to get bigger area coverage. It would be perfect to get 20 STROLs down, 20 turrets and 3 radars up before wave 4. You should skip almost all lockers to do so.
- Creepers start spawning at wave 2. They are immune to autoaim and higly resistant to FMJ, and have around 2k hp. HellfireTerminator could deal with them using main weapon, other people going solo have to hope for seekerssatchels.
- Regroup at wave 4 or at least join in groups of 3+ people. First snatcher arrives at wave 5 and they will randomly unburrow from the ground. Then go looting and taking out the rest of stuff up to wave 9 when you get SHIVA and reinforcements.
- Wave 9 brings you first boss. If you notice a Behemoth on wave 8 it will definetly be a fat pack.
Otherwice it is KerArchlysSargon, see next section to find out how to fight them. - Wave 13 is the moment second boss comes. It could be KerArchlysSargon or hellspawn.Rarely nothing spawnes.To know how to fight them see next section
- Hellspawn and Thanatos arrive at wave 15.If you want to finish story line, you should do terra 3 or insurgents 2 mission up to that moment. Last mission will start shortly before evac at wave 15.
- Any minions you have with you including Tyler, to get them to stop shooting and move L-Ctril + Right click on yourself.
- Terra 4. Protect Tyler for a few minutes while he is doing nothing, then escort him to the SOLAR console.
- Insurgents 3. Go to point, kill Nyx, use reactor terminal.
- In any case you have to lead Tyler Hunt to the big building in the middle of map(central sector)
and activate reactor to complete Primary mission and get corresponding achievement.Shortly after that moment hellspawn arrives, gun it down or explode it with a trap. Hellspawn will always spawn in the location of EVAC ship. - Now the SOLAR. SOLAR is a doomray that damages anything it hits. It should not kill you instantly if you have armor on, but without armor you will die. It doesn’t present such a threat now, initially it was intended for SOLAR beam to instakill people.
F.L.U.F.F.Y hunt tips
To start F.L.U.F.F.Y. hunt secondary you need to activate HAL9K terminal on normal+ before wave 2 starts.
The terminal is located in the building below top radar(central sector) or in dumbbell-like building on the top of map(science sector). This will spawn 10-15 dogs(Devourer, Slasher, F.L.U.F.F.Y.) and will give 1000 exp if team survives up to wave 4.
General strategy
- Damage. 6+ FAS-18 and some heavy weaponsexplosive traps
- Living shields. Assault with vanguard(2 points to get 1000 Armor shield, can hold 5 dogs for some time) Hellfire with vanguard(6-8 seconds) Terminator with shield device(3-4.5 seconds)
- Room to stand must have only one entrance so you will have all your shields and explosives directed there.
- Medic with live drone to revive casualties
Tips
- Hellfire can use napalm grenades and stand in fire to deal extra damage while tanking.
- Terminator can stand on explosive trap so when ~5 dogs come on him he turns shield on and explode them all.
- Best place is the one having lockers around, so that they could be looted quickly for explosives
- Assault Shotgun Module helps a lot.
Other ways to get it done
Speedy terminator-kiter. If you manage to harvest enough power cells for terminator, he could be ready with 8th energy level when fluffy hunt starts.
Terminator – SMG – 3xSpeed Booster
X-ICS module(teleport), Teleportation device(another teleport), Energy Shield (unvulnerability), Energy Dischage (self destruct).
Terminator could kite every single dog in one place when using teleports smartly near buildings, so they all stack in one place. Then a combination of self-destruct +energy shield kills them all.
If you didn’t manage to harvest enough energy, don’t worry, you could still blow them all up at once since they are nicely stacked!
— 4. SECTOR MAPS —
Sector Overview

Central Sector Map (Outdated)
DISCLAIMER(3.24) Central and Science maps are due heavy changes. Those maps are outdated and the ones in game are outdated too. If you have any questions, please find magnum (the maps developer) and ask him.

Some buildings are death traps late game so its good to know your exits.
If you would like to know more about the map I recommend
[link]
Science Sector Map

- Small map
- A lot of buildings
- Extra 2 mini-bloppers every 1-2 min
- Enemies have
- +8% Energie damage resistance
- +12% Toxic damage resistance
- -20% Hollow Point damage resistance
- +15% EXP gained
- Recommend the South Bunker, as the single entrance funnels the enemies much better.
- +15% EXP gained
Industrial Sector Map

Military Sector Map

- Expect all the normal spawns such as you’ve seen in central sector and more
- On wave 5,10,15 extra 6 holers come
- Wave 11 is extra Hellspawn
- Wave 6 spawns Atrocity, Wave 11 spawns 2 of them
- A lot more slashers and devourers
- Fluffies spawn on waves 10-15
Transport Sector Map

Docks Sector Map

—5. AILMENTS AND ITEMS —
Ailments
Poisons / Venoms
Currently, only the Medic or the Anti-Venom item may cure poisons / venoms.
No item grants immunity to poisons or venoms.
Parasite Venom
- Causes 2 health degeneration for roughly 2 to 3 minutes.
Hydrocyanic Poisoning
- Slows the marine down for roughly 1 to 2 minutes.
- Reduces Attack Speed, Movement speed, hit Chance.
Sulfonal Poisoning
- Reduces Movement Speed, Attack Speed, and Health.
- Approximately 3.5 health degeneration.
Veratrum Poisoning
- Reduces Movement Speed, Attack Speed, and Accuracy.
Please note all ailments wear off over time so if you can keep healed you can survive
Wounds
Currently, only the Medic, the Medical Nanite item, and the Fibrin Bandage item may cure wounds.
The Health Booster item grants immunity to all wounds.
Open Wound
- Causes roughly 5 health degeneration for roughly 2 to 3 minutes.
Rupture Wound
- Causes 10 health degeneration while moving, no degeneration if standing still, for 1 to 2 minutes.
Septic Wound
- Causes roughly 11 health degeneration for roughly 2 to 3 minutes.
Fractures
Currently, only the Medic and the Medical Nanite item can cure Fractures.
The Armor Booster item grants immunity to all Fractures.
Fracture
- The only current fracture in the game, it slows players down by 40% for around 5 minutes.
Items – Lockers & Rubble (Outdated)
Any item is possible from any locker quality. Items listed are most commonly found in following lockers.
Basic Locker
- Nothing
- Stims x3(very rare)
- Shotgun Shells x8
- Magazines x1
- Rifle Grenades x4
- Anti Venom x2 (rare)
- Seismic Resonator x2
- Road Flares x4
- Chain Explosives
Average Locker
- Nothing
- Stims x3 (rare)
- Shotgun Shells x8
- Magazines x1
- Seismic Resonator x2
- Road Flares x4
- Flare Gun x4
- Claymores x3
- Satchels x3
- Medical Nanites x1 (rare)
- Medkits x2
- Fibrin Bandages x1 (rare)
Quality Lockers
- Stims x3
- Anti Venom x2
- Medkits x2
- Explosive Bunks x2
- Incendiary Explosives x3
- Claymore x3
Rubble
- Ammo x1
- Power Cells x1 (rare)
- Disarm Tools x2 (rare)
Items – Ammunition
Magazine
- Provides the marine with 75 rounds / bullets. Can hold up to 20 stacks in a single inventory slot.
Rifle Grenades
- Provides the marine with 4 grenades for the M1GL secondary weapon, or under-barrel grenade launcher of the GAR-GL. Can hold up to 8 rifle grenades in a single inventory slot.
Rockets
- Provides the marine with 3 rockets for the Law-57 secondary weapon. Can hold up to 6 rockets in a single inventory slot.
Shotgun Shells
- Provides the marine with 8 shotgun shells for the SAR-58 and FAS-18 secondary weapons, or the under-barrel shotgun of the GAR-MS. Can hold up to 8 shotgun shells in a single inventory slot.
Hollow Point Ammo vs. Full Metal Jacket
- Basically if it looks armored then Full Metal Jacket ammo will do more damage to that enemy.
Hollow Point Ammo works well vs. early game mobs and it can be advantageous having your non damage dealing classes running it for staying alive, recon, medic etc. - Ideally in your team you want a mix with mainly FMJ.
Items – Automatically Used
Energy Battery
- Provides 30 energy globally to the entire team.
- The marine who picks up the Energy Battery gains 2% increased weapon damage.
- 10 Experience.
- Best used on high damage weapons.
Weapon Upgrades
- Multiple weapon upgrades do not stack with each other.
- Weapon upgrades modify the base damage of the weapon.
ACE Upgrade
- Increases the ACE-43’s Auto damage by 8 and AC Mode damage by 30.
Arсlite Upgrade
- Increases the Arсlite’s damage by 5.
Gar Upgrade
- Increases the GAR’s damage by 12.
Minigun Upgrade
- Increases the Minigun’s damage by 12.
SMG Upgrade
- Increases the SMG’s damage by 12.
Sniper Upgrade
- Increases the Stinger 50’s auto damage by 50 and rail damage by 25
Strike-V Upgrade
- Increases the Strike-V minimum range damage by 10 and applies a 20% slow for 2 seconds to enemies hit by the Strike-V
Law Upgrade
- Law Rockets and the Demolition’s Rocket skill have a primer charge effect for 25 meters, dealing 600 damage.
Items – Usable
Medical Supplies
Antivenom
- Targetable: Cures all poison and venom ailments on targeted marine.
- Cannot be used on marines who are not poisoned.
- Maximum stack size of 4.
Fibrin Bandages
- Self-Use: Cures all wound ailments on self and restores 100 health instantly.
- Maximum stack size of 2.
Medkits
- Targetable: Restores 150 health over 15 seconds.
- Does not stack with Blood Gen-5.
- Maximum stack size of 5.
Medical Nanites
- Targetable: Instantly cures all wounds and fractures on targeted marine and heals 60 health.
- Maximum stack size of 3.
Stimulants
- Passive: Marine gains 2% increase movement speed and 1% increased attack speed. It gives +2%ms and +1%atkspd per stack regardless how much stims left in stack. Two [1/5]Stimulants stacks will give same passive boost as two full stacks.
- Self-Use: Marine gains 25% increased movement speed and 15% increased attack speed.
- Maximum stack size of 5.
Explosives
Chain Explosives
- Deals 1300 area Explosive damage in a modest area upon being detonated.
- Increases damage of other chain explosives by 20%.
- Must be detonated by other explosives.
- Maximum stack size of 100.
Directional Explosives
- Mission values###
Claymores
- Deals 1700 area Explosive damage in a small area upon being detonated.
- Detonates automatically when an enemy is near the explosive.
- Maximum stack size of 48.
Satchels
- Deals 1650 Explosive damage in a modest area upon being detonated.
- Can be manually detonated.
- Maximum stack size of 12.
Bunker Charge
- Deals 3500 Explosive damage in a large area upon being detonated.
- Must be detonated by other explosives.
- Maximum stack size of 8.
Incendiary Explosives
- Deals 500 Fire damage in a modest area upon being detonated.
- Creates a small patch of fire at the center of the explosive effect.
- Must be detonated by other explosives.
- Maximum stack size of 24.
Plasma Explosives
- Deals 2300 Energy damage in a modest area upon being detonated.
- Slows enemies in detonation by 60% for 4 seconds.
- Must be detonated by other explosives.
- Maximum stack size of 4.
Plasma Fire
- Deals 500 Energy damage in a modest area upon being detonated.
- Creates a patch of Plasma at the center of the explosive effect.
- Must be detonated by other explosives.
- Maximum stack size of 4.
Items – Utility
Flare Gun
- Provides vision in the targeted area for 7 seconds upon being used, increasing accuracy.
- Roughly 15 second cooldown.
- Maximum stack size of 20.
Road Flares
- Provides vision for one minute upon being placed, increasing accuracy.
- Maximum stack size of 10.
Power Cell
- Provides 70 energy to target marine.
- Target marine’s damage is converted to energy damage for 35 seconds.
- If used on a turret, the turret becomes active, gains 1 Plasma Gun charge and has its damage increased by 7.
- Power Cells are not found in any lockers.
- Maximum stack size of 3.
- Could overcharge vindicator once.
- Can be used to increase T3 radar aura by 30m
- Can charge safety beacon for 15%
Seismic Resonator
- Placed resonators prevent enemies from reviving within their radius. That means, if enemy die within circle he will not revive. However, placing resonators on corpse piles has no effect.
- Resonators deal 150 energy damage to above ground targets, and 1000 seismic damage to underground targets upon being detonated.
- Resonators are destoyed by energy, seismic and explosion damage, they also deal minor seismic damage to marines upon being detonated.
- Maximum stack size of 5.
Disarm Tools
- Allows the marine to disarm explosives, turrets, EMP bombs, and the Shiva. Doing so will consume a Disarm Tool.
- Maximum stack size of 4.
T3 Sensors
- Places a Sensor at target location.
- T3 Sensors detect enemies in a 25 meter radius.
- Each active Satellite increases this radius by 10 meters.
- If the T3 Sensor is placed on high ground, the radius is increased by 15 meters.
- The T3 Sensor may not be placed in buildings.
- Once three T3 Sensors are placed, they reveal all enemies within the triangle they form.
- T3 Sensors are indestructible.
- T3 Sensors are not found in lockers. There are 3 scattered around the map.
- Maximum stack size of 3.
- T3 sensors should be placed in a triangle shape, recommend SE corner, SW corner then Center North.
- If you stack 3 beacons on top of each other, it will lure insurgents in the sector starting tactical defence mission
Items – Special
Tac-nuke Shiva
- Obtained from the Wave 9 mission, SHIVA or from the Disarm Nuke when a player uses a Disarm Device or the Demolition’s Disarm skill.
- Current Information: (Needs confirmation and checking)
- The SHIVA explosion radius is estimated to be 75 meters.
- The SHIVA designating radius is estimated to be 40 meters.
- The SHIVA’s explosion delay is estimated to be 5 seconds.
As such extreme care needs to be used when setting off the Shiva, it is recommended this is done away from the team by a very fast character or by a Terminator with the Shield Device ready to go
Safety Beacon
- Safety Beacon’s cannot be placed inside buildings, on high ground, or within 100 meters of another Safety Beacon.
- Upon being placed, Safety Beacons create a red flare circle with an approximate 10 meter radius, indicating the safe zone where no artillery will land. Artillery will land in an estimated 50 meter radius around the Safety Beacon.
- Safety Beacons initially come with a 5% charge and can charge up to 100%.The higher the charge on the Safety Beacon, the longer the bombardment will last and better items will be provided. The artillery will not land within the red flare circle.
- Safety Beacons can only be activated by Officers and must have at least 10% charge to be activated. Upon being activated, the charge is reset to 0%, the artillery bombardment begins within a second, and players are energized for a short period of time.
- Notable aspects:
- Activating Radar Satellites (after you have placed the safety beacon within an range of 300m) increases the charge of all placed Safety Beacons by 25.
- Apparently, Safety Beacon’s charge faster with marines inside of the red flare circle.
- Drops: (Increases quantity at higher charge levels)
- Ammunition
- Chain Explosives
- Plasma Explosives (At higher charge levels)
- Stimulants (At higher charge levels)
- Fibrin Bandages (At higher charge levels)
- Maximum stack size of 3.
- On 100% charge it comes with: 14 ammo boxes, 5 stimulants, 6 bandages in one stack, 11 chain explosives and 6 plasma explosives. Also it provides energize buff that turns all damage into energy for short duration and allows to overcharge vindicator.
Note: Safety Beacons do not bombard inside buildings so placing them in doorways can be brilliant. The artillery splash damage can however so take care.
Artillery Targeting Device
- Reward for completing the Artillery Control mission.
- Can call down a potent Artillery Strike at targeted location. The barrage has a delay of 2 ~ 5 seconds before shelling occurs, and lasts for around 25 seconds.
- Roughly 40 second cooldown.
- Comes with 10 charges.
Evac
- Item found at the first mission location.
- The Evac item will activate the Evacuation 120 seconds after being used. The user has temporary VIP status and must be defended until Evacuation arrives. Should the user die, the Evacuation count-down will stop until the user is revived.
- It has 10 uses so you can abort it 5 times by pressing it again when EVAC is active.
Items – Legendary
These items only drop past Wave 13 in difficulties normal and above.
Nyx Vindicator Module
- Every 10th shot also has a 400 damage plasma cannon attack.
- Increases damage by 10%
- Only works with autoaiming, recommended on high ROF single target weapons. Works awesomely with arсlite or minigun.
Savage’s Burners
- Increases critical strike chance by 10%.
- Increases damage by 20%
- Bullets deal fire damage.
- Best suited for Heavy support.
Tokugawa Overload System
- 40% reduced cooldown duration. All cooldowns, including Sprint and cooldowns on items(artillery).
- Best suited for Medic! If you are running well on health, best for skill-wise support classes(Medic, Hellfire, Recon, Terminator)
Hunt’s Safety Protocol
- +500 damage on grenade launchers
- +200 damage on shotguns
- Spawns only on veteranaetriden difficulties
[M.E.R.C.S.]Combat Armor
- +50% damage
- +10% movement speed
- -30% reload speed
- -50 armor
- -50 health
- -3 health regeneration (but no less then 0, so you dont loose health with armor on)
- Spawns only on aetriden difficulty OR on tactical defence mission (mission spawns on soldier+).
- It gives you FLUFFY armor skin when in inventory
Special Forces
- Obtainable from supply crates, 0.1% chance (1/1000)
- One item is granted in survival. Four come along singleplayer.
- Activates after standing still for 5 seconds
- Adds 2 HP Regeneration when active
- +40% Damage when active
- +20% more damage on enemies within 10m when active
- +15% crit chance when active
- Reduces Reloadtime by 75% when active
- Does nothing when you move, usefull for bunkering and barely usefull for consealment marksman.
N’diaya Predator
- 50 charges of recon’s gunship drone skill with around 20 sec cooldown (reducing with time)
—6. SURVIVAL—
Leveling up Tactical Mode marines.
In the beginning you have only 3 rank0 marines to start with. Time to level them up!
First steps 0-30000 exp
When below 30000exp, your marines get full exp from recruit difficulty. You get max exp from evac on wave 15 so this is what we do!
Squad layout:
- You as your favourite class (DPS classes are the best here, Marksman, Heavy support and so on)
- 3x Assault with GARShotgun or MIGL
Light Weapon Targeting – 5
Critical Shot System – 5
Combat Stimulants – 5
Any component here
Later you could add some damagearmor boosters. Combat stimulants, along with items completely remove the need for medic, so you could focus on damage which is what you need on waves 10-15.
3 Assault clones reduce need for microcontrol greatly, all you need is to pick anyone to do anything.
30000 exp+
At this moment you get full exp for your marines only on soldier+ difficulties. On the good side, you will get full exp as well! Survival is a great and fastest way to level up your main character, as long as you manage to finish the game reliably. Average soldier survival game results in amazing 10000 exp! You could get 11000 exp easily by going SciencePrimaryFastSwarm combination. If you ever feel bored, add secondary missions in there.
As for builds, you could continue using assaults until you unlock SMG or go for other classes. I used assaults until they were Speciality rank 10 with all the skills unlocked. And then there is little you can’t do with 3 SMG assaults! 😀

Survival Tips & Tricks
Here are some general tips that should help greatly while playing survival:
Squad layout
- You will have tons of energy in survival. 3 energy boosters? Go for it!
- Loot every medical item you see and you don’t need medic at all.
- Marksman with stinger is a bad choice for tac mode marines because of autoaim. Strike-V Markmsman is nice.
- Hellfire with arсlite needs maneuvrening to be effective and bots don’t do it.
- Minigun in hands of bots is an enourmous ammo wasting facility.
- All active skills have to be used manually. So having demo bot will require insane amount of microcontrol.
- Don’t use ACE with bots. They can’t handle it.
- Marksman with stinger is a good choice for you! Amazing damage will help with bosses greatly.
- Heavy support with suppress target is also great! Cone fire kills everything, and slowing is vital.
Tips for field
- Take your time to kill the dog wave, for now you have legendary item that turns on when you stand still.
- First 3 waves is when your marines could defend themself with autoaim and skills. Use this time to clear whole subsectors with chain ordering. 1 bot could easily clear a few buildings during this time.
- Use ammunition supplies if you need ammo, or think that you re going to need it! Drop all your ammo on every character, and then ammunition supply will grant 4000 ammo to your squad!
- You could gun every fat boss down… No, really, now you have supplies for it.
- Your main goal is to clear 20 STROLs. And Finish all Primary missions. Idealy before wave 9. Sometimes you have to skip power stations energy batteries marines to do so.
- Easiest way to survive waves 10-15 is to be in bunker. With extra turrets if you have any.
- Overrun wave is constant DPS check. Find Tyler as soon as possible (he has great damage) and have some seekersexplosives for that evil wave.
- On wave 8-9 you always get fatty wave, but on wave 13 you could get Sargon or Archlys (or Hellspawn). Wave 15 is always Hellspawn+ Thanatos.
- Find Tyler as soon as possible, he greatly boosts damage of your squad
Item Management
- You have 3 marines to carry your stuff! Assign them roles for easier management, a guy with medical supplies, a guy with explosives, a guy with utility items.
- You really should look out for medkits and bandages, nothing is worse then getting a septic wound from random slasher without a bandage. Antivenom is even more valuable because you have 2 armor and 2 health boosters around the map to counter other ailments
- Have your explosives guy ready for bosses, if you have a hellspawnthanatoslots of dogs coming while you’re not really ready, hit tac mode and blow them up.
- WIth secondary missions on, you should carry some seismic resonators for Swarm Tunnels mission and disarm tools for nukesEMPs.
- You’d better carry 60-100 boxes of ammo all the time… Use ammunition supplies for that.
- Use safety zones as usual. You could bother with setting up 3 Elysium beacons, but you might not have enough time for that.
- It is better to use SHIVA by yourself, marines sometimes keep running with autoaim on. You could use F1 twice to make them not shoot though.
- Keep power cells, you will need them later for the moments when your armor went down. Or to turn your damage into energy for 100sec. If you cover entire map, you could get 6-7 power cells for the last waves!
- Having a stack of stims for every marine could help for the last run.
Aetriden difficulty!
Here are some more interesting tips and tricks, at this moment you should have fairly leveled marines capable of wielding SMG.
Science sector has the best bunker of all sectors out there, and it is also slightly smaller then central, so it is a good starting point. Well, the best part:
Main Character: Heavy support-Minigun(FMJ)-Pistol
Role: Crowd control, damage buff.
Boosters: Reload-Reload-Energy
Components:
- Suppress Target – 5
- Safeguard – 5
- Targeting System – 5
- Critical Shot System – 1
Additional info: Heavy support as main character allows you to slow everything down for -50% speed. For some reasons, it also means that they hit you 2 times less. Also, cone of fire allows you to clear entire swarms at once. Extra light ensures your followers never miss.
Bot 1: Terminator-SMG(FMJ)-Pistol (Could be replaced by SMG assault with Vanguard)
Role: Armor reduction, damage buff, team emergency escape, scout
Boosters: Ammuniton-Ammuniton-Ammuniton
Components:
- Dio Striker – 5
- Critical Shot System – 5
- X-ICS – 2
- Teleportation Device – 3 (4 when you meet Tyler)
Additional info: This suit allows your follower to be a perfect recon, with ability to teleport in and out of buildings instantly.Group teleport allows you to save yourself from nasty situations by teleporting over the walls. Dio is your main OH SHI~ button, it increases damage of all your squad by 150%! Just make sure they shoot the target terminator locked on.
Bot 2: Marksman-Strike-V(FMJ)-Pistol (Could be replaced by SMG assault with Vanguard)
Role: 100% crits. Enjoy.
Boosters: Attack Speed-Attack Speed-Energy
Components:
- Critical Shot System Marksman – 5
- Ocular Implant – 5
- Vital Spot Targeting System – 5
- Advansed Targeting System – 1
Additional info: This guy deals insane DPS, slows mob down(with upgrade) and is capable of severely wounding any boss you encounter, thank to legheadshot and ocular implant. Keep an eye on him being away from foes, or just make him target manually for most damage.
Bot 3: Assault-SMG(FMJ)-MIGL
Role: Secondary DPS, armor reduction, kill burrowers
Boosters: Ammuniton-Ammuniton-Ammuniton
Components:
- Critical Shot System – 5
- Light Weapon Targeting System – 5
- Ammonite – 1
- T1 Sensors – 4
Additional info: Straightforward DPS assault with SMG reducing armor of anything he shoots by 15. T1 sensors allow to quickly kill holersdrillers. Sargon fight becomes easy too. Ammonite on level 1 generates some ammo and prevents respawns.
— The End —
Bonus section: FLUFFY Gear
Right now there are two items, one could be seen in lobby (FLUFFY shotgun) and the other shows up in game (FLUFFY armor).
Some marines managed to kill a F.L.U.F.F.Y. test subject and used it’s thick armor to decorate this special shotgun, dedicated to killing these same test subjects. -In game description
Stats:
- Adds +150 damage vs fluffies on any distance inside weapon range
- Minimal damage this shotgun could produce is 30% of it’s base damage (other shotguns have 10% min)
- Movement reduction: 3%
- Damage: 475
- RPM: 66
- Reload: 2 sec
This weapon was a part of Kickstarter high tier rewards, but it also was granted to the first 8 people who managed to complete Military sector on aetriden difficulty. Some people have it for community service.
This armor changes player’s skin in game, it has 4 pieces. Equiping MERCS combat armor gives full armor skin. This armor is purely decorative.
This armor was a part of Kickstarter high tier rewards, but it was also granted as Event reward and for community service.
Thanks
Thanks to harukage, Lulero, Trunk Monkey, Madcow, Snug Snug, DI Beravin, Space Wolf Hudson, [JK] Mr Hyde, XperiaTizenan tkrEidion, Pilsner and Scar for your input on the initial build.
New maps courtesy of Johnny Cage and his assistants Kampf B-Meise, Alex, Saucisson Furtif and Grizzly<3, fantastic work guys.
Latest build (v3.81) done by Creed with the help of Yegor(rus), Greensslut and Wrecker!
Special Shout out to Tobo and Yegor(rus) who have made major contributions!!!!
If you have any thoughts, builds or anything to add please comment below or send me a message, cheers.
Updates
July 28, 2016
- Beginning of massive overhaul of information in all sections of the guide.
- Adding new sections, including a “Quick and Dirty: Before your First Game” section.
- Will be adding in all new weapons, relevant stats, and tables to match.
17/07/2015
- Revised terminatorvindicatorsome other skills.
09/06/2015
- Re-Released Guide
07/04/2015
- Added info on all legendary items
20/03/15
- Added some info on stimulants and seismic resonators unveiled with recent patches.
- General updates
29/01/15
- Updated wave 15bosses section
- New section on how to fight Horrors of Mars!
20/12/14
- Added Industrial Sector Map
24/11/14
- Added Leadership Section
- Added Weapon Recommendations Section
- Added to Yegor(rus)’s Horrors of mars section
14/11/14
- Modified existing builds
- Added build pics
- Made some general updates/changes based on Tobo’s recommendations