
Overview
Guide for casual, periodic players who end up with an unmanageable mess of workshop subscriptions (in any game). Missing mods and assets. Activated mods & assets not in-game. Where are my subscriptions? Where are DLC stored locally? How to restore. How to clean out old subscriptions. I’m using Loading Screen mod and my subscriptions disappear.
First Things First – Basic Housekeeping
Get your house in order first by making a list of your Subscriptions. You do this entirely in Steam, so there’s no need to have the game open – in particular, you do not need its Content Manager.
In the Steam Library, go to the Cities Skylines item and open the Workshop, like this:-
Once you’re in the Cities Skylines Workshop, click the dropdown to the right to view your Subscribed Items:-

You’ll see a list, it could be reeaally long (mine’s over 200 items) …

You can sort it via the options on the right – these will help you do your housekeeping. Mods that haven’t been updated in a year or more may no longer work and could be the target of your first unsubs. Assets stay current for longer, though if they don’t have the right thumbnails in game, you can either update them in the Editors or unsub those too. All that’s up to you and how much memory and storage your machine has. Or you can leave your unsubbing for later, once you’ve made a Collection.

Next Thing – Make a Collection
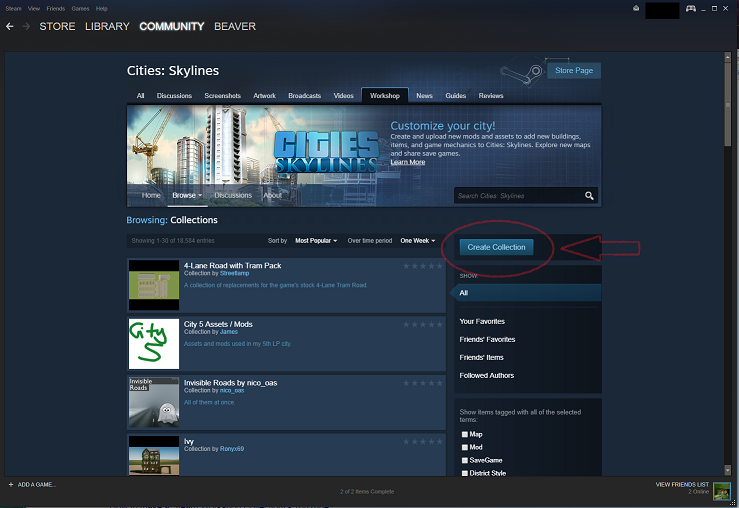
Go back to the Cities Skylines Workshop. Select Collections from the Browse drop-down.
This will open a filter with all the published Cities Skylines Collections; the button on the right offers the option to Create a Collection of your own.

You’ll need to fill out a few panels with details of your Collection; in particular you’ll need an image file (less than 2MB size, square, at least 195×195 pixels). All those details are up to you; it’s a personal list, but don’t be shy where Steam says “publish” as you can hide it forever. Experienced players will have several Collections for different maps, but essentially here the casual player is doing the equivalent of making a backup of their HDD so we can later proceed fearlessly.
A list of tags to check before Save and Continue:

On the next screen, you can see tabs of what you could include in your Collection.

We’re interested in the Subscribed Items list of course. This next task is a chore – there’s no way round it, so grit your teeth, gird up your loins and prepare for it 😉

Click the + and see checked items appear in the Items list below.

WARNING Even though you may have thousands of subscribed items, you have to maintain your concentration – if you go too fast, Steam may crap out and drop parts of the list. It is possible to quickly click your way through three or four at a time, but chances are good some will get dropped if you do it like this.
One by one, patience … until finally you reach the bottom of your list:-


Now, Find Your Published Content
Congratulations! You’re now a published member of the Community. But wait, where is it?
Go to your Profile, select Content from the drop-down, and then the Collections tab:-
Hey presto!

If you’re satisfied with your list, then this is your subscriptions backup and now that you have it you can be fearless about everything that follows.

However, if you want to edit your Collection, now is a good time to do that.
If you sort by author you can easily identify e.g., assets where you have only a single item from a creator, or where it was added so long ago that the LUTs aren’t right, and you can then consider whether you want to keep or delete it.

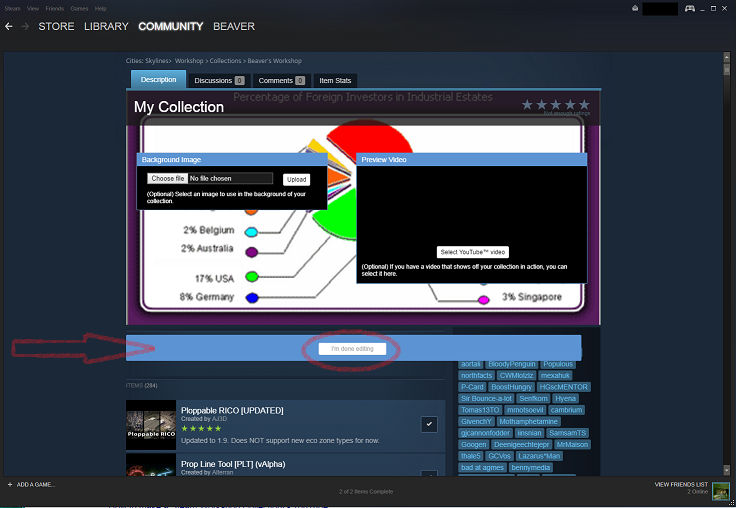
Once you’ve had your fill and have exhausted yourself, Save and Continue.

And then finally you’ve Done Editing.

Value Your Hard Work and Keep It Up-to-date
Since that took you so long, don’t just keep it on the shelf, make sure you keep it up to date. Steam makes it easy.
When you find a nice new asset that you fancy, other than the Subscribe button, there’s a smaller one that you need to use too:
Just add it to your Collection.

… and that’s that!

Meanwhile … Back on Your Machine
All of the above took place exclusively on Steam. Now we turn to your machine (in my case Windows 7, not iOS).
Before you do anything else, first LOG OUT OF AND CLOSE STEAM.
There are two locations locally that are important; the first contains content you’ve created or modified using the Asset Editor, here (location is in the Explorer top bar):-
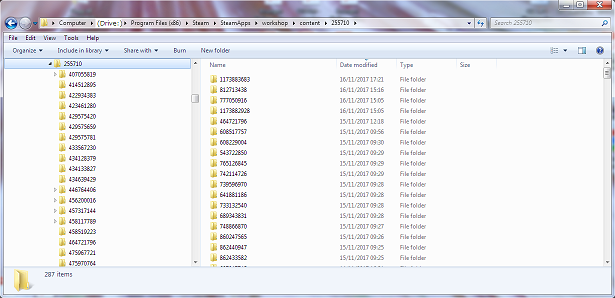
Wow, I have three of my own. Don’t worry about these, they don’t need to be subscribed to, and the Content Manager will enable or disable them just as it usually does after what we’re about to do. This is the place that counts:-

“255710” is the unique game identifier ascribed to Cities Skylines [see Note below] by Steam, and everything under that folder are the ID’s of assets and mods you’ve subscribed to at one time or another. There will be a lot of numbers. As you can see, I “only” have 287. Many folders will be empty. Suscribed items may be in full or empty folders, so all this tells us nothing. There are far too many long numbers to start writing down, so don’t even think of doing that. Ignore these contents!
But if you do need to find the ID of a particular asset or mod, then you can find it like this:-
If you use the Steam app, this is hidden. But if you use a browser (Chrome, Firefox, etc.) to access Steam, in the Steam Workshop, each asset’s ID appears twice on its page, the first at the top in the browser URL, the second, if you hover your mouse over the Change Note, appears bottom left.

IMPORTANT It may be that sometime in the past you have directly modified the contents of a subscribed item. For example, the Mod Achievement Enabler mod often requires you to add its Source to get it working. You’ll want to preserve these customisations, of course. So to protect these, you can take a backup by copying the entire file tree of 255710 to another location, e.g., your Desktop; mine was about 1GB in size. Another fearless action, my friend!
Once you’ve made this backup, go ahead and fearlessly delete all the subfolders under 255710.
NOTE:
This guide was written with Cities Skylines in mind, but it’s relevant to any game that needs many subscribed Workshop items. Depending on which game you’re doing this housekeeping on, just substitute the appropriate ID and everything else in this guide still applies. Some examples:
If you don’t know your game’s Steam ID, then go to your Steam Library and right-click on your game, and select Create Desktop Shortcut. Open the shortcut’s properties and you’ll see something like this:

Now, Last Step, Back in Steam
Log in to Steam, go to your profile, click Content, Collections and load up your subscription list:-
This is a second occasion when you need to be as patient with the process as possible – as last time, Steam can crap out on you during this process. If it does, just log off Steam, and log back in, reload your Collection, and Steam will show you an accurate list of your actual subscriptions. It’s just that it’s a long list, and we may get “click-happy” and go a little bit too fast in this next step.
In these following screens, I’m doing one unsubscribe/subscribe in order to point out the essential actions that you need to make sure happen for each and every subscribed item. So, what you’re now going to do fearlessly is to unsubscribe from every mod and asset in your Collection.
Step 1 – Click on the tick and see it turn into a plus
Step 2 – Unsub and ensure that Steam downloads nothing


If the unsubscribe worked, then you will see “Downloading” appear briefly at the bottom of the screen, followed by “1 of 1 Items Complete”
Unsubscribe will see a Download of zero bytes:-

Click through your entire list in this way, one by one, and unsub everything. Don’t worry, unsub-ing will not make the item disappear from your Collection.

LOG OUT FROM AND CLOSE STEAM
Step 3 – Resub and ensure that Steam downloads something
LOG IN TO STEAM
The re-subscription process is simply the reverse of Step 2.
Subscribe will see a Download of some size particular to that asset or mod:-
Step 4 – Optional

Last thing to do would be to restore anything customised from the backup you took, i.e., that Mod Achievements Enabler code you saved earlier.
—————————————-
And that’s it, you’re done! You now have a cleared and clean asset and mod folder, everything present and correct. You wll need to re-enable those you want from the in-game Content Manager.
In essence don’t ever use Content Manager to handle subscribe/unsubscribe, only enable/disable; do all subscribe/unsubscribe via the Steam Collections.
How I Got into a Subscription Mess in the First Place
I learned what’s in this Guide because ….
Recently I noticed that all of my Intersections (i.e., the Roundabout tab in Roads) had mysteriously disappeared. I went through a frantic series of WTF! Subscribes and Unsubscribes, trying to get back the missing Assets (parking and road grids mostly). In the process I discovered all about where Assets are stored and how to assess whether you’re actually Subscribed (i.e., Asset has been downloaded locally) or not.
In my case, the “problem” occured because I installed the Loading Screen mod. Its Options specify whether or not to load only the Assets in a saved game, or all Assets.
If I’d known this, I wouldn’t have gone on to write this guide. There was nothing wrong with my subscriptions, you see.

Lesson learned. It’s a complex and really useful mod, in fact it’s an essential tool in auditing your Subscriptions and most likjely of benefit to anyone reading this Guide. But at the time I hadn’t fully understood it – importantly, it selectively loads Mods and Assets according to the Options set in the screen above. But then it issues a report. The report highlights and links to what Assets or Mods are there and what aren’t. Often, I’ve found that an author will not fully document their Asset or Mod dependencies: the report reveals those undeclared Assets.
Anyway. long story, turned out that (through the Mod’s default Options) I didn’t have the first Option checked, and hence my Intersections, and probably a few others I didn’t notice, “vanished” in-game. Googling for a solution was unsuccessful; in the process, I noticed a lot of people asking related questions, but I still didn’t find the answer I needed … so here we are; I hope you found yours.