Overview
The ultimate guide to Bannerlord’s smithing system.
The Basics – What is Smithing?
Smithing, in Bannerlord, is a skill in the Endurance row that allows you to forge and smelt weapons within the game.
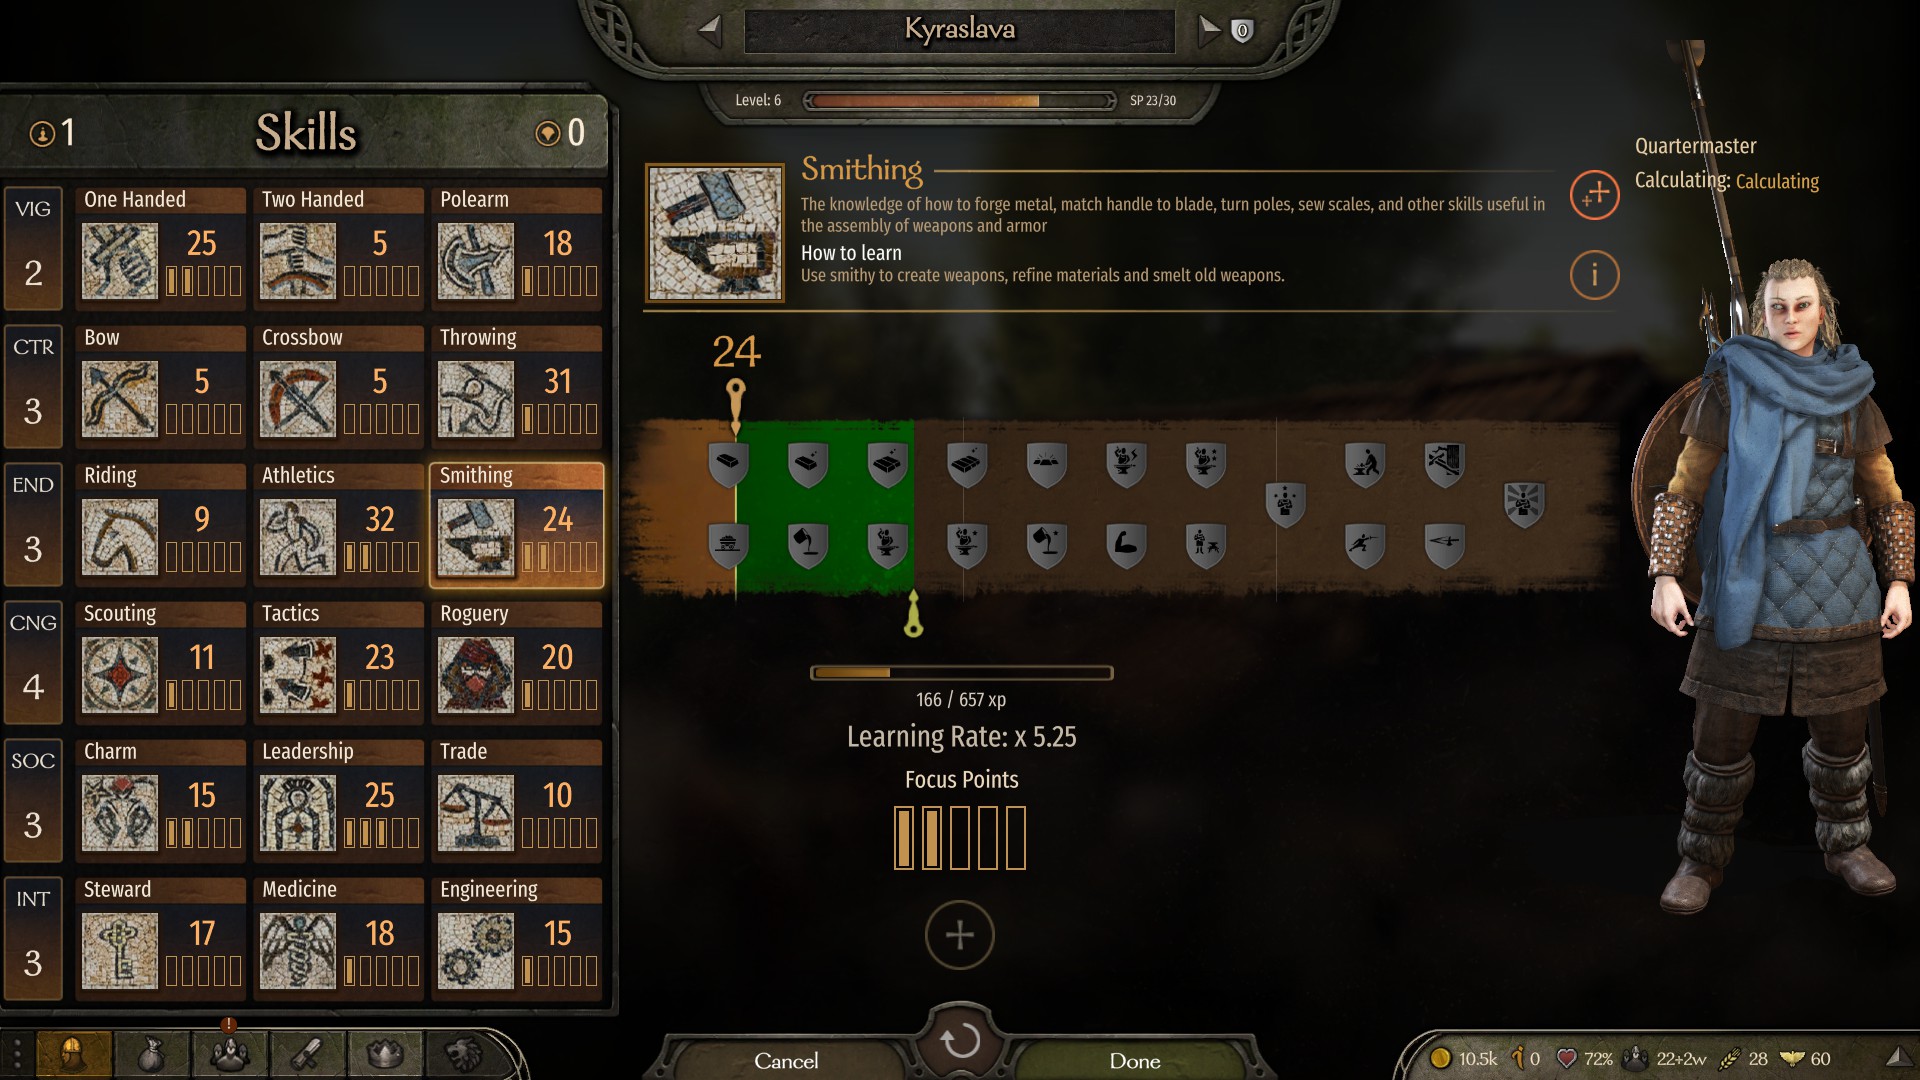
The skill tree’s perk options all have to do with modifying some part of the smithing process which we will discuss later in this guide. For example, the first perk you get to choose makes charcoal or iron production more plentiful and resource efficient. More on that later.
Where can I smith?
At every major city, there is a smithy. Click the option in the screenshot below to enter the smithy.
Another significant part of smithing is the smithing cooldown. You can only do a certain amount of actions in the smithy before you will have to wait to smith again. You cannot smelt an entire arsenal of weapons or craft twelve spears in one trip to the smithy. You have 100 stamina, and cannot smith if that stamina goes below 10. Refining takes 6, smelting takes 10, and crafting weapons is dependent on the difficulty. (thanks Dazzerix)

NOTE: REST IS ACTUALLY RESTING. You must “wait for some time” in the settlement/somewhere for it to regen. Only takes a few hours rest per action. You can walk across the continent but if you don’t actually rest you won’t get the cooldown. You regenerate all 100 stamina in approximately 16 hours in game time. Alternatively, the time it takes to regen full smith stamina is about 15 seconds of waiting in a town at full game speed. Or about 3/4 of a day.
To make it easy, start waiting when the Sun is in the middle of the “clock” at the bottom of the screen. When the moon passes by, that is half a day. Then wait until the middle of the gradient between day and night is in the middle of the clock. That is the remaining 1/4 of the day. (thanks Purpleclone!)
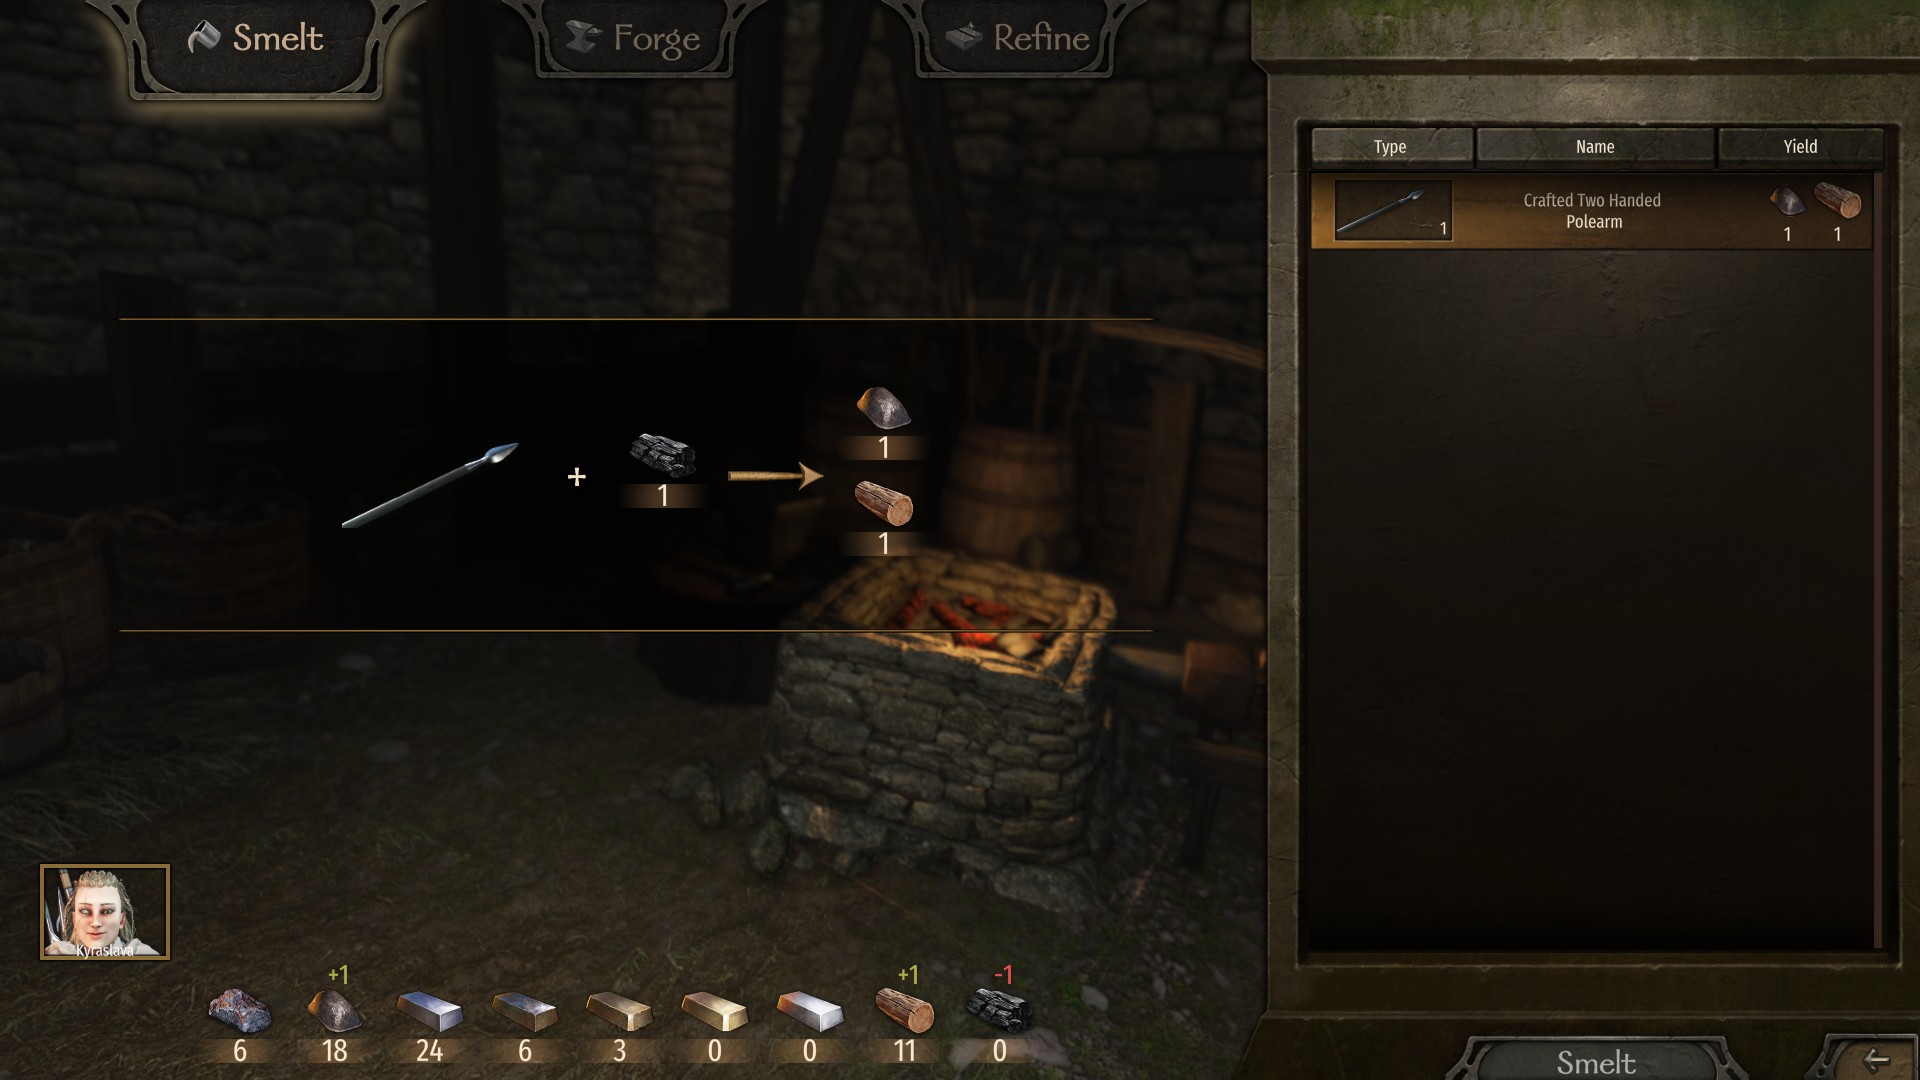
Smelting & Resource Procurement
You can’t make a sandwich without bread, and you can’t make a sword without iron. In Bannerlord, there are NINE different resources for smithing. In the screenshot, you can see them in order at the bottom of the screen.
- Iron Ore
- Crude Iron
- Wrought Iron
- Iron
- Steel *
- Fine Steel *
- Thamskene Steel *
- Hardwood
- Charcoal
The ones marked with a * can only be refined after getting the correct perk from the smithing tree. They can, however, be obtained through smelting.
In the refine portion of this guide, we will talk more about this resources in depth. However, to get these resources, there are three options:
– Buy them from a town who produces them for cheap OR buy them from a city.
– Ransack them from a caravan.
– Smelt weapons down into their original parts.
– Refine them from other resources.
You can always find hardwood and iron ore in the major cities to start your crafting journey. From there, you should be able to gain some basic levels in smithing.
Let’s take another look at the smelt screen.
To smelt it, click on the polearm on the right column, then click smelt at the bottom of the screen.
In smelting, you will gain the resources it mentions, but you also will gain experience in smithing and, if you smelt a decently high ranked item, like a tier 2 or 3 sword, you will get a part of a weapon which you can then use in smithing.
The Forge – The Actual Crafting Part
This is the forge tab. This is where you get to make your gear. You can make anything from swords to daggers to javelins and maces. You cannot make armor, shields, or bows/crossbows.
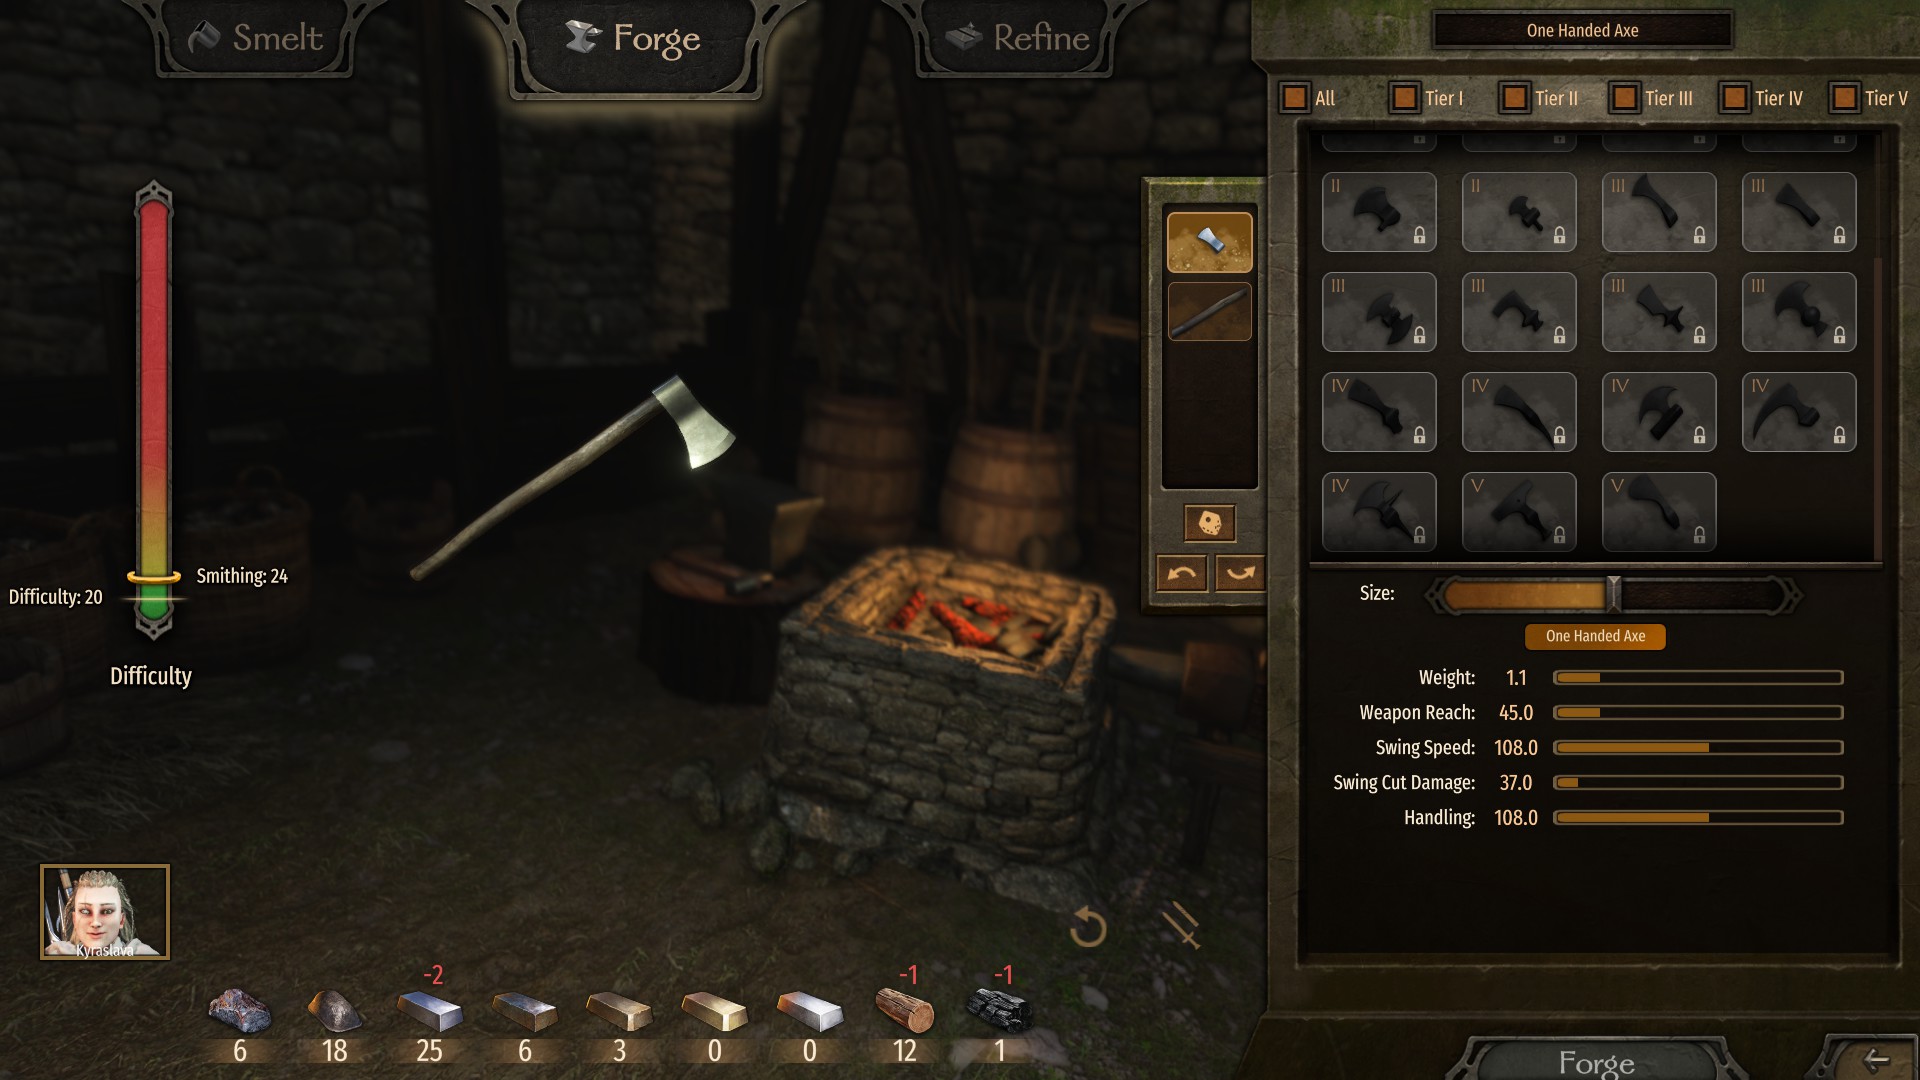
On the forge screen, you will see this meter on the left.
This meter tells us how hard it is to make a weapon. If your smithing skill, displayed on the right of the meter, is higher or equal to the difficulty, you will be able to make a decent or better version of the weapon you desire. If the weapon difficulty is higher than your smithing skill, you will still be able to try and make said weapon, but you will probably make one that is essentially worthless.

Each weapon has a different difficulty, based on these factors:
- Weapon class (axes and spears are very simple to make, swords are far harder)
- The tier of the weapon’s components you chose (tier 1 components, like a basic mallet head for a mace, are far easier to make than a tier IV ornate mace head).
- The size of the components you chose. The slider for each component, past the middle point, increases the difficulty. A medium or small sized axehead is easy, but making a bigger one increases the difficulty by 1-4 points.
At the bottom of the forge, you will see all of the resources you can use. This axe would expend 2 wrought iron and 1 hardwood, as well as 1 charcoal. Every weapon expends charcoal upon creation.
On the right of the forge you can see the components you have access to when making your weapons. You can filter them by tiers at the top. Currently, I only have one axe handle. You gain components by smelting or forging weapons, and components are gained randomly through these processes. Each component modifies the weapon in a certain way – the change are not just visual. For example, the pickaxe head gives more damage, but is harder to control and is slightly slower than the hatchet head.
Each tier requires different resources. Tier 1 requires wrought iron and/or crude iron, Tier 2 requires wrought iron and/or iron, as does Tier 3, and so on. Each component requires a different resource amount. At later tiers, like tier 5, you may require crude iron, steel, and thamaskene steel to make just one sword.
On the bottom left, you can see a portrait of your character. Click that to change the companion who is crafting the weapon. If you have a companion who is a good smith, make them craft it! They have a different stamina than you as well, so if you want them to refine ingredients to save your stamina, it is an option. However, you will not get that XP.
When you click smith, you will see the outcome, and be able to name the weapon if you wish. This outcome will vary based on your skill relative to the difficulty, with stats going up or down based on the difference.
Refine – You’ll be in this tab a lot.
The refine tab is where you are able to manipulate the resources you have gathered.
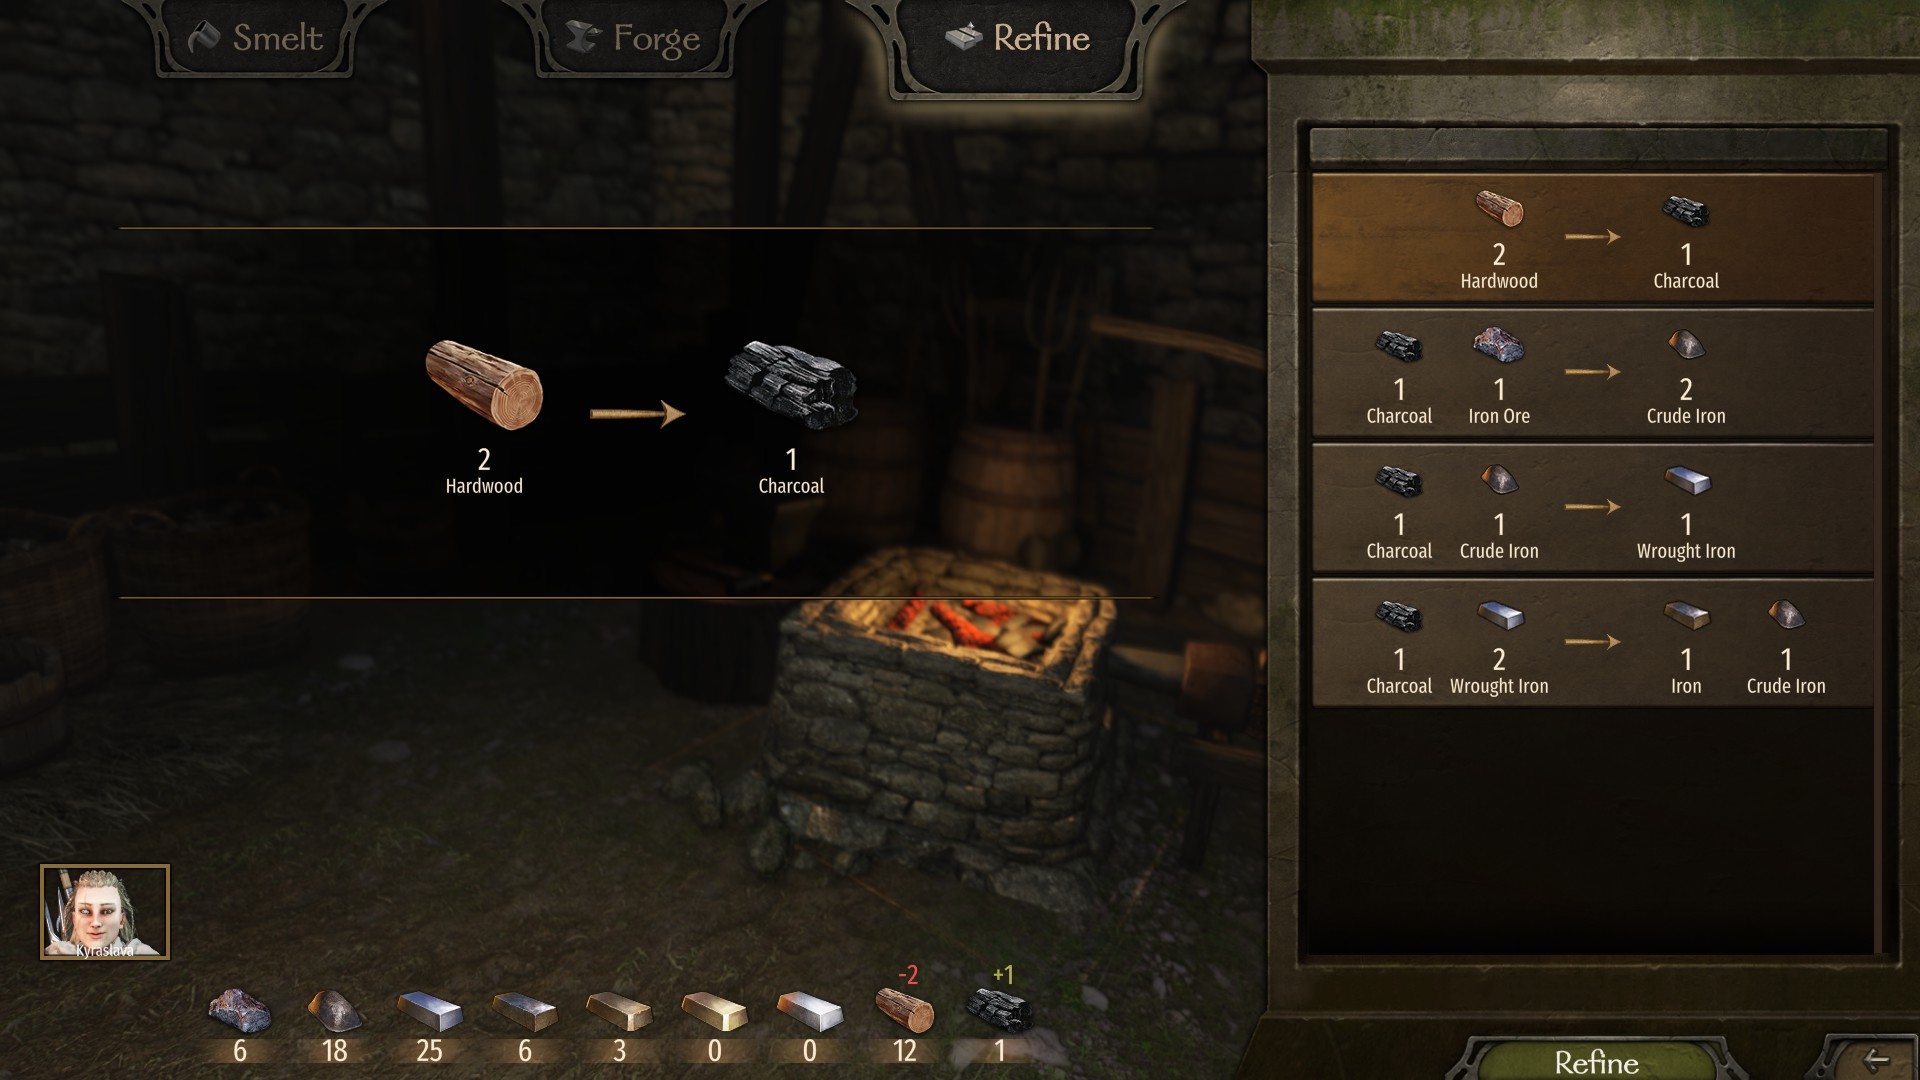
As you can see, I cannot refine steel into fine steel or Thamaskane steel in this tab. That is because my smithing level is too low. Eventually, you will be able to choose a perk which allows you to refine those higher quality steels.
You may recall earlier in the smelting tab that we smelted a spear that gave me one hardwood and one crude iron, at the expensive of one charcoal. However, one charcoal is worth two hardwoods. Is it worth it? Consider the following when smelting items…
- Are the raw resources worth more than the initial item? (for selling)
- Do I need the resources extracted more than I need the charcoal?
Often, the answer will be yes, but remember the smithing cooldown. Would you rather smelt that mediocre spear, or make an awesome sword at this moment? That is up to you.
PRO TIP: Get the 3 for 2 charcoal perk at the start of the smithing tree. It is currently OP.
The Testing Grounds – XP gains, random testing points.
This section is just a mess of everything you all + myself have tested.
71 XP for a super cheap two handed polearm (40 difficulty, 2 mats)
160 for pricier 1h sword (70 difficulty, 6 mats)
Crude Iron = 9 Base XP each
Wrought Iron = 18 Base XP each
Iron = 27 Base XP each
Steel = 63 Base XP each
Making 2 Hardwood into 1 Charcoal nets 14.96 Base xp.
Making 3 Hardwood into 2 Charcoal nets 30.11 Base xp.
So we can assume 1 Charcoal equals ~15 Base xp.
Conclusions: It seems like crafting is the best way to grind XP. Making ♥♥♥♥♥♥ swords, even if they turn out bad and useless, still generates good XP. Charcoal is also a great method with the 3 for 2 perk.
Let me know what else you’d like to know about smithing in the comments!