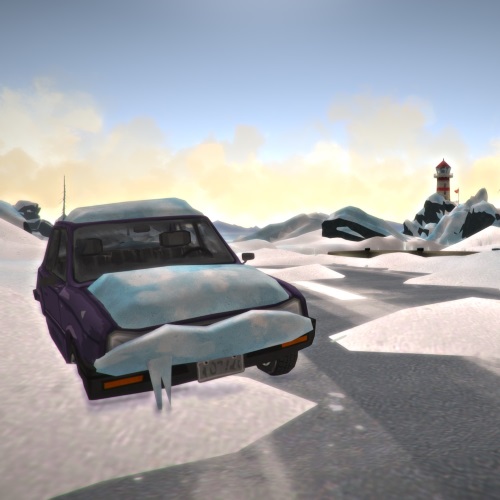
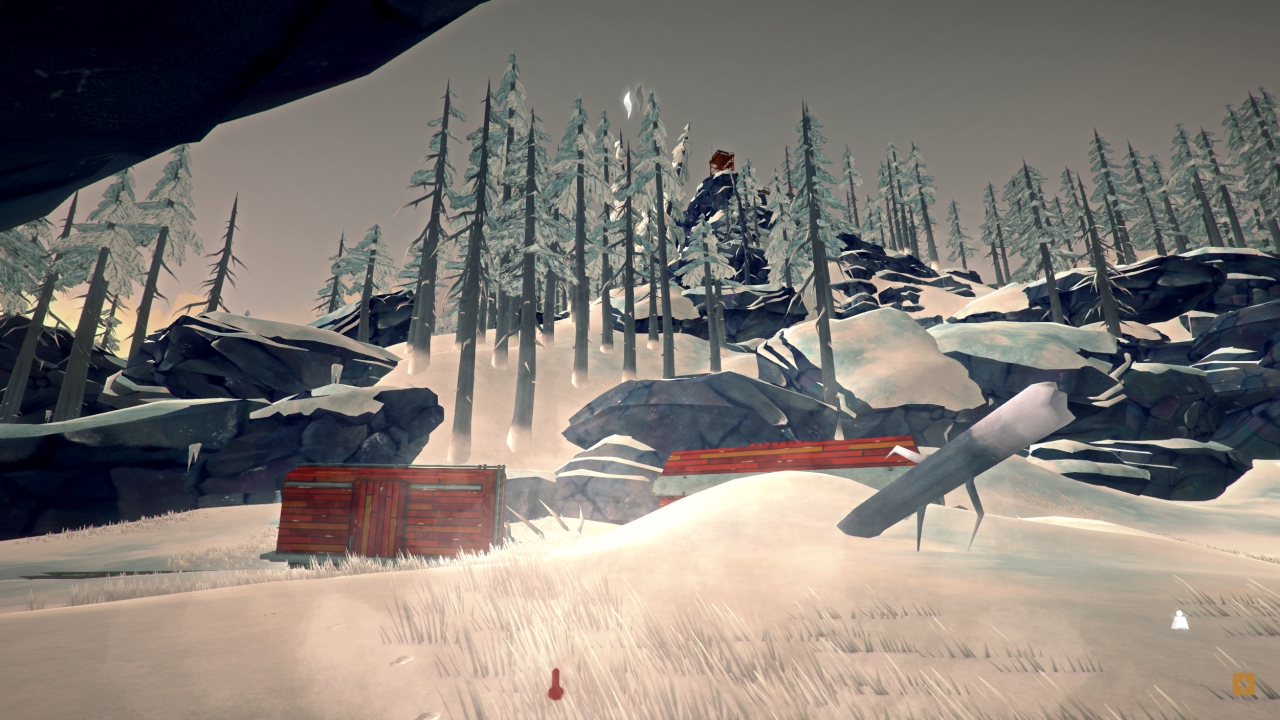
Overview
This guide describes all regions of TLD and most of the places in it. Its dedicated to all those who have lost themselves in this cold-white desert or want to know what to expect when they travel to a new region. Currently there are ten main regions and three transit regions.If you are looking for basic information about game mechanics, you are more likely to find it in our Survival Guide.
Updates
This guide deals primarily with the survival mode of the game.
In the future we’ll list changes here until they find their way into the guide. This will help you to get a fast view about the changes of an update. We’ll remove that some time later.
Most of the sections have version numbers, so you can see which section is up to date.
v1.77 – Bugfixes
v1.76
- Spray cans can now be used to place markers on buildings that appear on the map.
- Stones can now be used to build caches outside.
- There are now pictures that show special viewpoints where you can uncover large parts of the map. The size of the uncovered area when using charcoal now depends on the height the map is drawn.
- There is now an autorun (see keyboard layout).
- Aurorae should now appear in very old saves (before it was implemented in the game).
- Items that fall out of the map should now appear in the red boxes.
- As usual numerous bug fixes
Prologue
Your sharpest weapon and most important tool in The Long Dark is the expansive knowledge of any important place, which paths are viable to get you there and what hazards are to be expected.
In the first section, we will give you a few tips for navigating, afterwards we will introduce you to the different Regions.
But firstly, try to survive on your own! The frequent deaths in the beginning are part of the learning process!
This guide is basically a ‘walkthrough’ through the different regions. Do yourself a favour and try to explore the regions on your own. You only get to savour the joy of discovering something once. Don’t spoil it by looking into this guide to early. But if the lack of orientation irritates you or you’d like to know what you are getting yourself into, you’ve come to the right place.
Notice: We have not written about every single location in the game. You’ll have to find some places yourself. Especially if you want to get your ‘Locations Discovered’ statistic to 100%.
By the way there are about 286 and 290 locations to discover. This number varies because of the different amounts of destroyed ‘Coastal Houses’ in the →Coastal Highway region. Meanwhile, the two random bunkers also belong to these places. And while we’re on the topic of statistics: There are 6 safes, 4 forges and 10 containers (except the ones in the plane) to find.
The topographic background used in most of the region maps was created by delta. Thank you.
All information in this guide is based on (unless specified otherwise) Voyageur difficulty. I think that Stalker is something for people that know the regions in and out and therefore don’t need this guide. People on Interloper definitely don’t need this.
So when it comes to Stalker, expect more wolves and bears than mentioned here.
Many pictures here are from (very much) older versions of the game. So don’t be surprised if it looks completely different for you.
If you find any serious mistakes, please notify us.
Legend: I’ve tried to stick to the following format:
→Region
Named location
Item/Important
Notice/Reference
Section
—–
If you are familiar with german you can find the original guide here.
Navigation (v1.76)
Now, this one depends on whether or not you are familiar with the region.
If you are not: look for something that helps you with orientation; a river, a road, railroad track or something similar.
Firstly, this prevents you from walking in circles and secondly it raises the chances of finding a shack, a house or anything that might be of interest.
A good example would be the camp office. It is one the most popular places on →Mystery Lake. It is located next to the train tracks, so you’ll just have to follow them to get home.
If you can not see any rivers or roads, try to reach an elevated position to take a look around. However, keep in mind that the way up can be very exhausting. Also, pay attention to the things on the horizon.
If there is a blizzard going on or it is really foggy, this won’t be of much use. So if you can not orient yourself: pick a direction and stick with it as long as you can.
As we mentioned in the Survival Guide, you can also mark your path by laying out twigs or other things (old bows, burnt out flares).
With the new spray cans you can attach markers to almost everything. Some of them are also shown on the map.
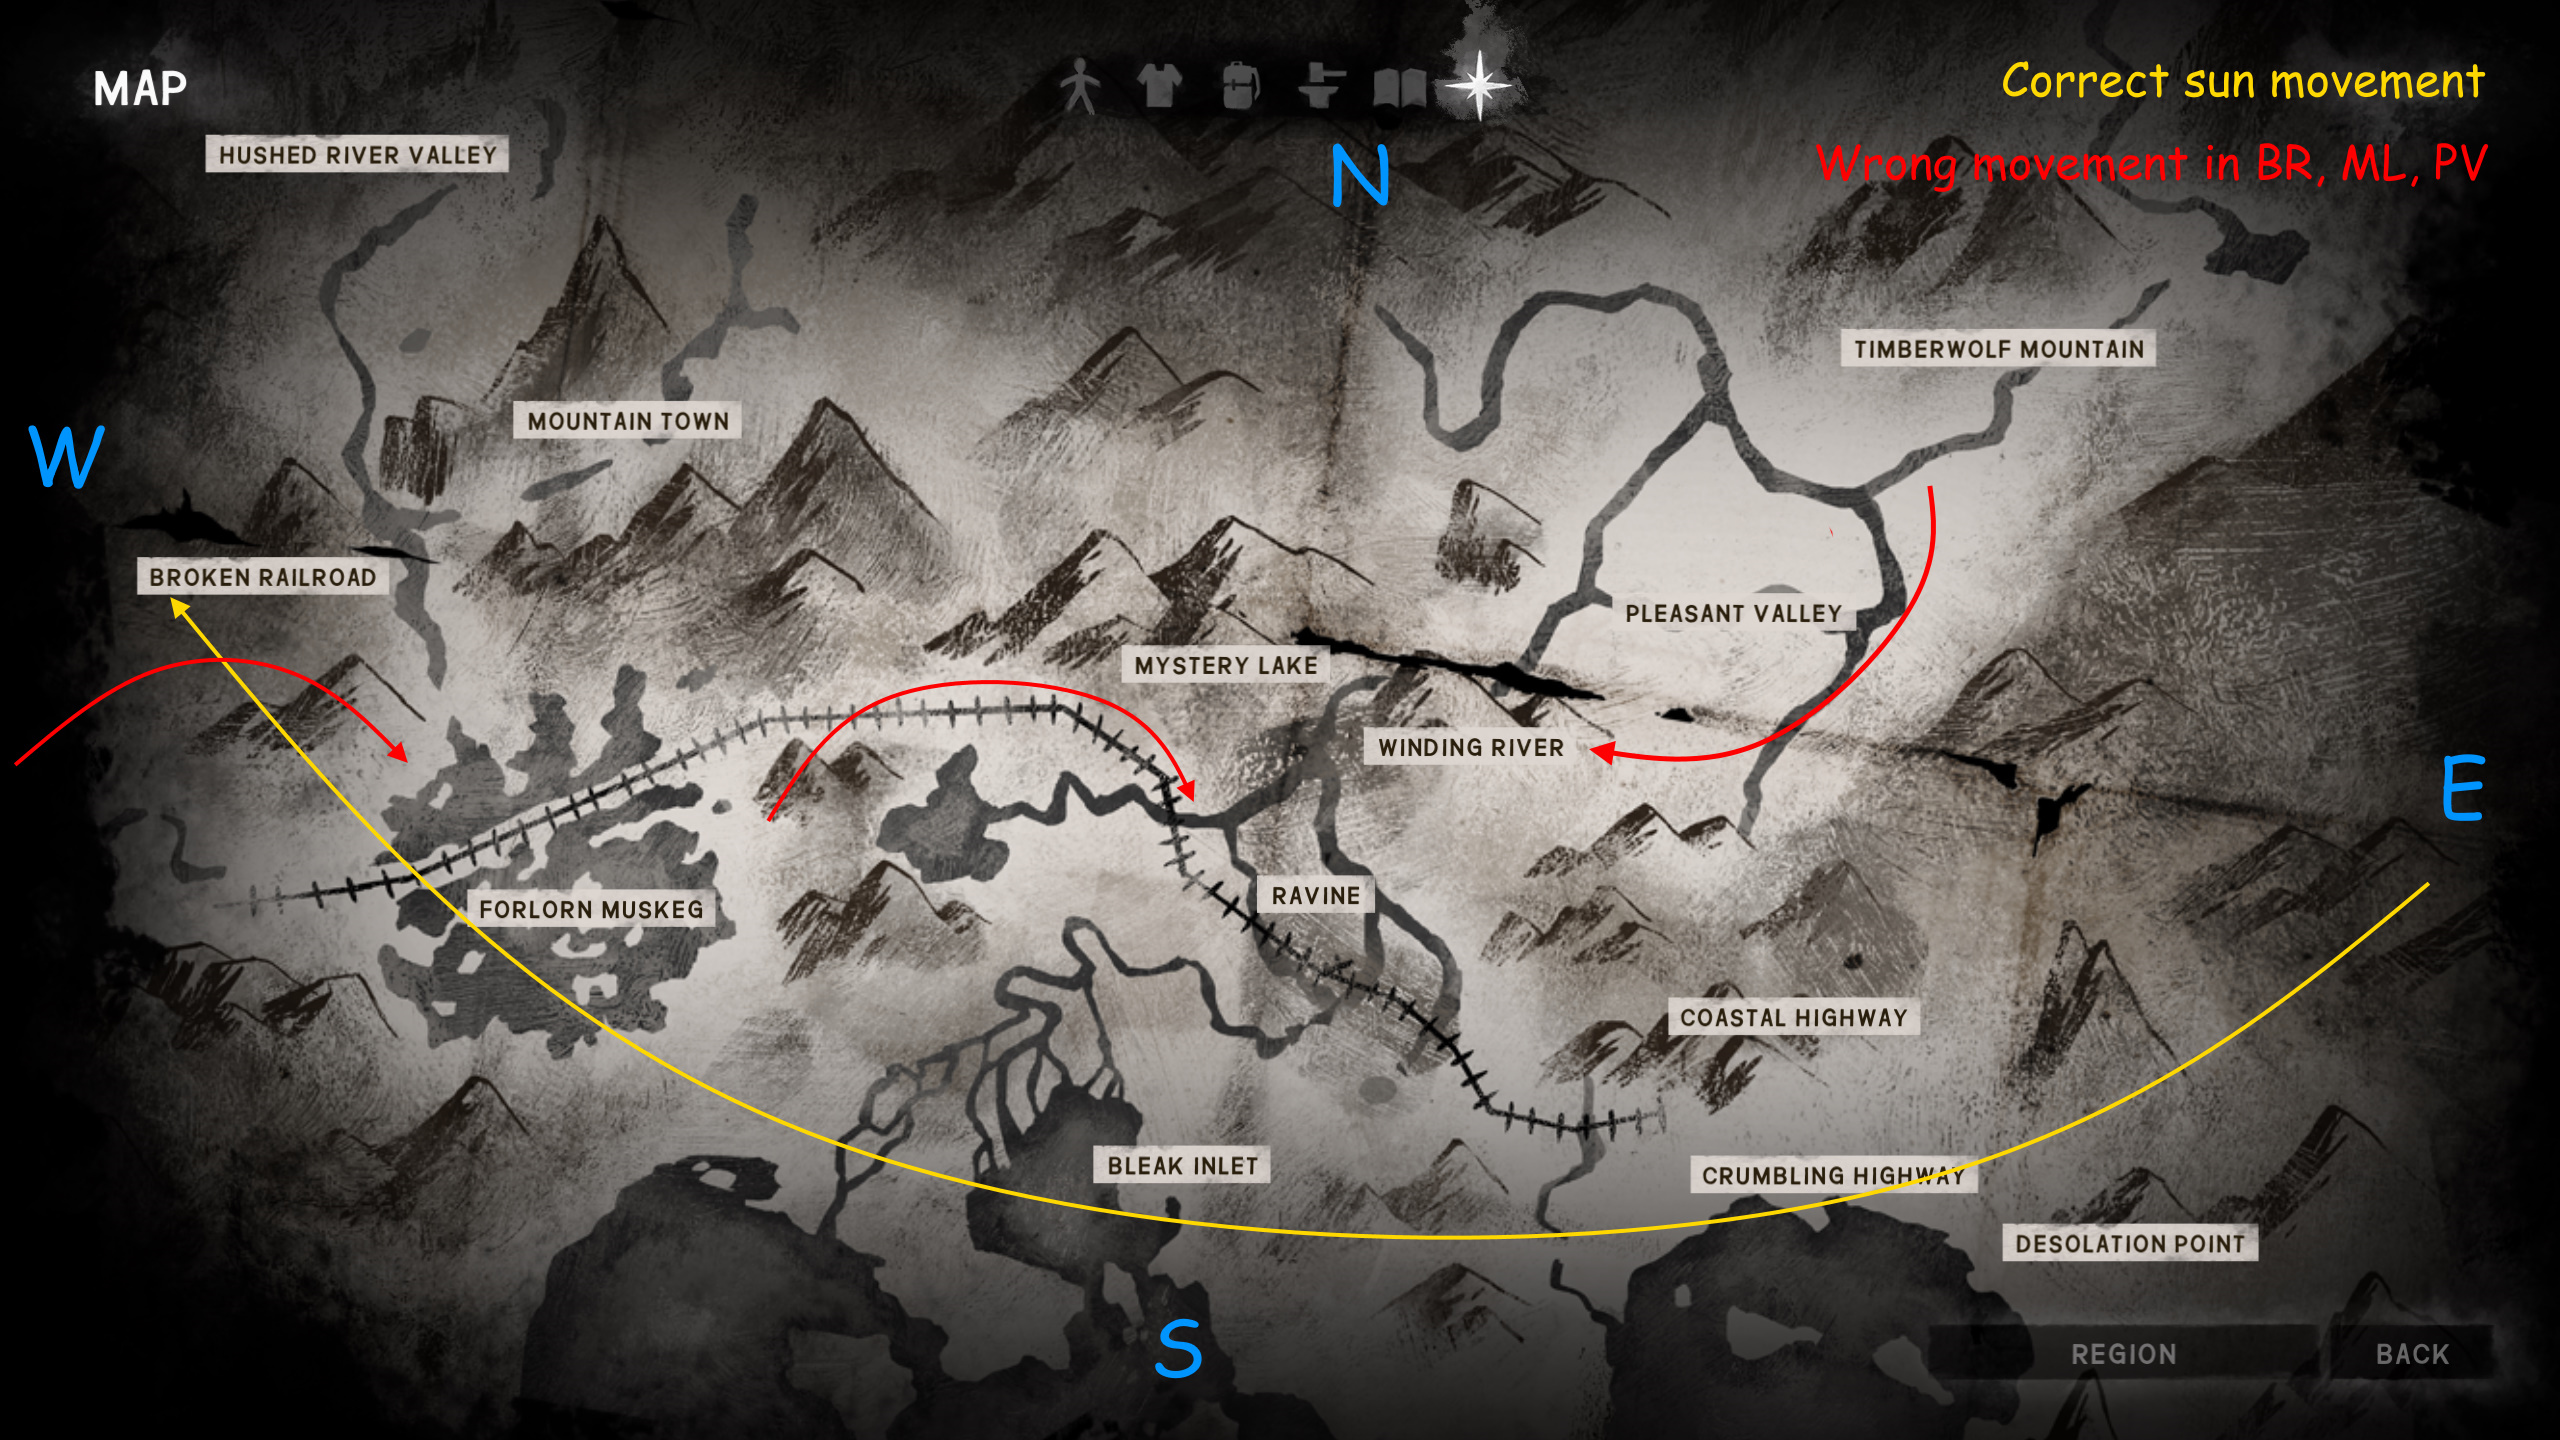
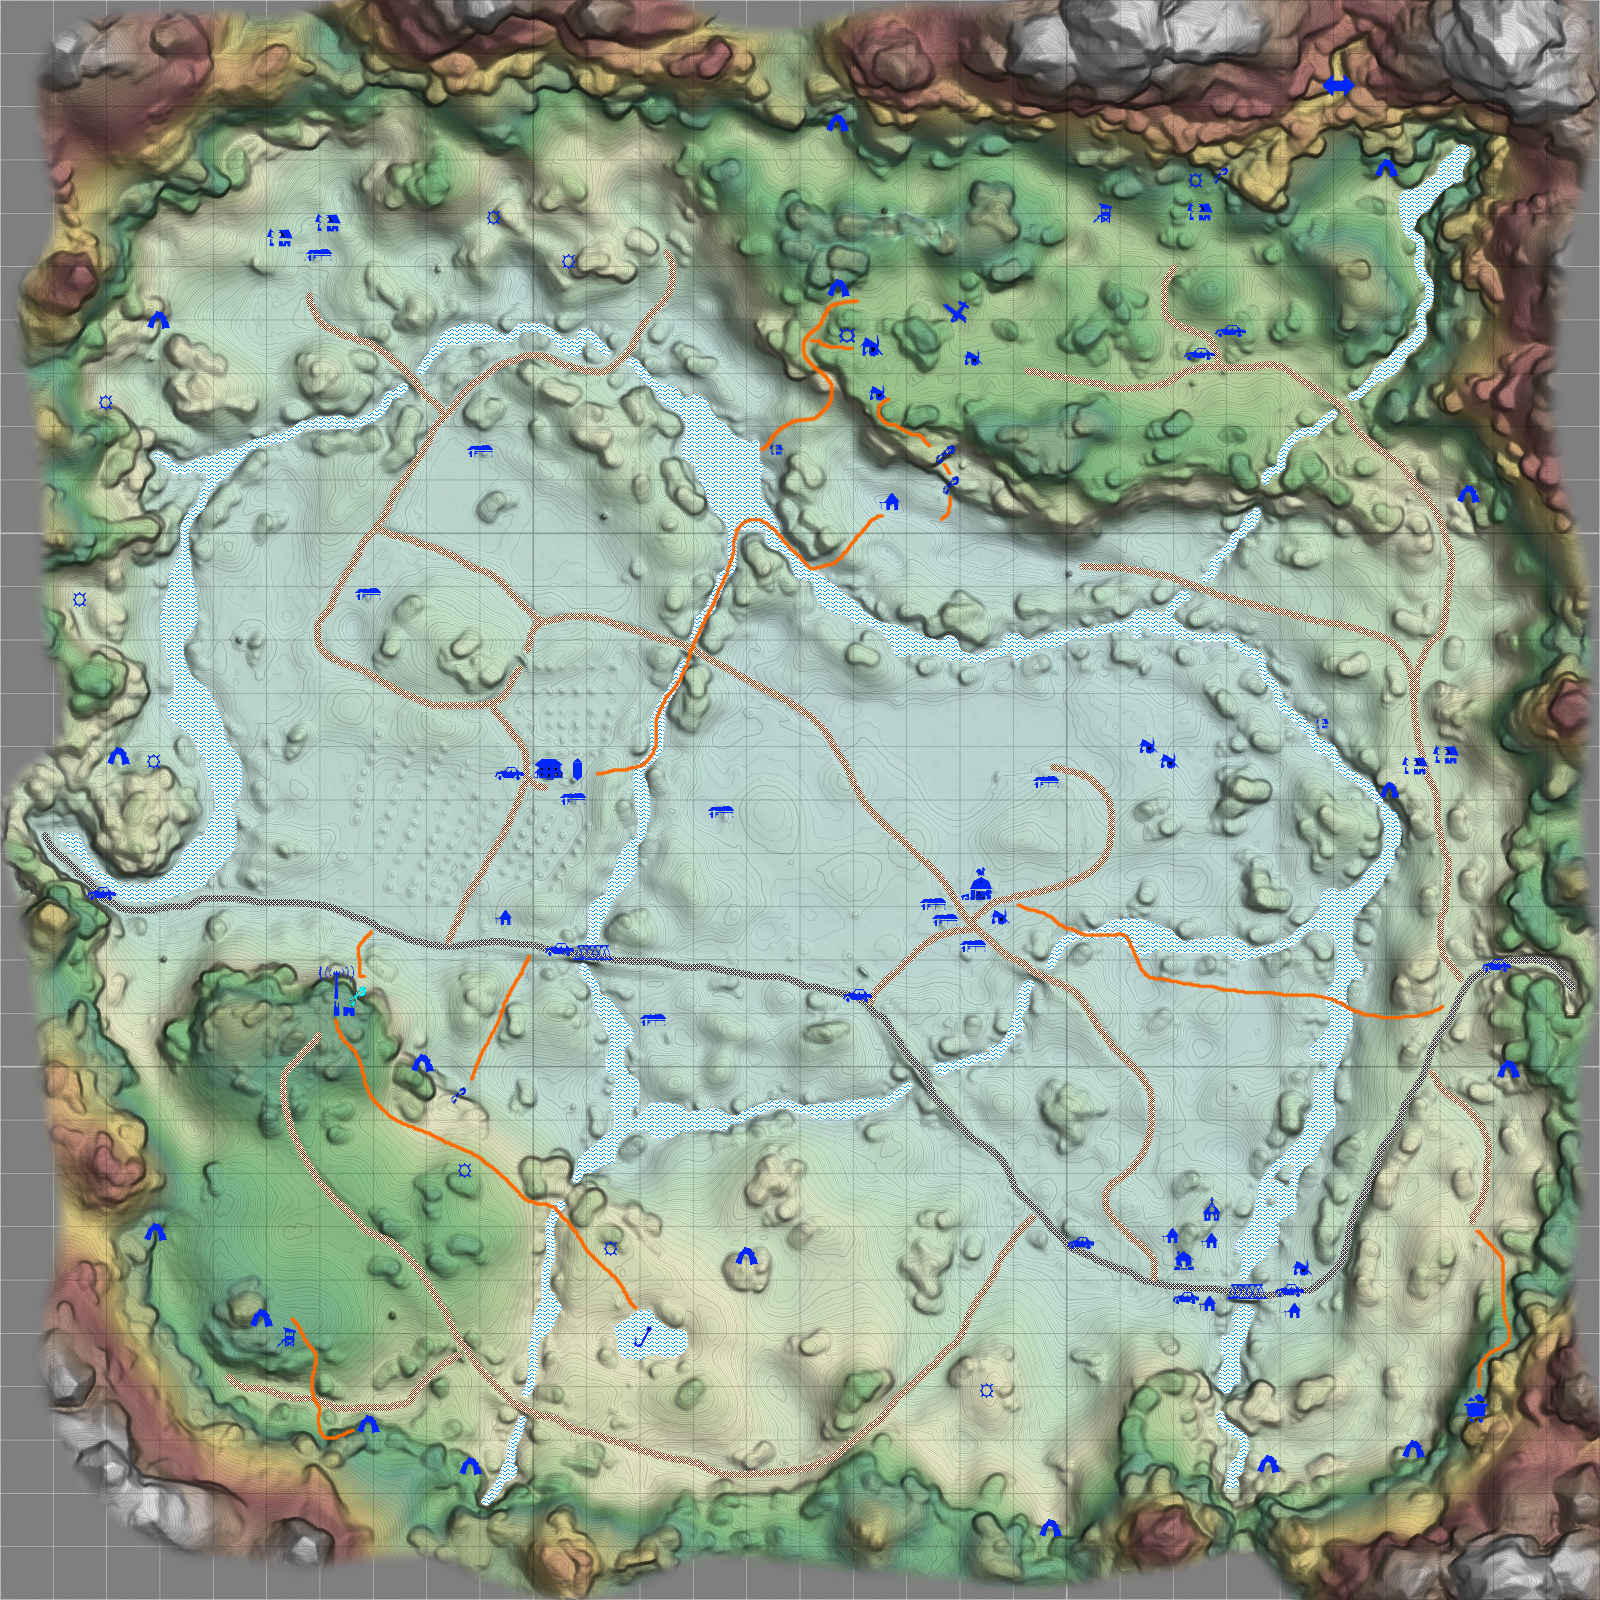
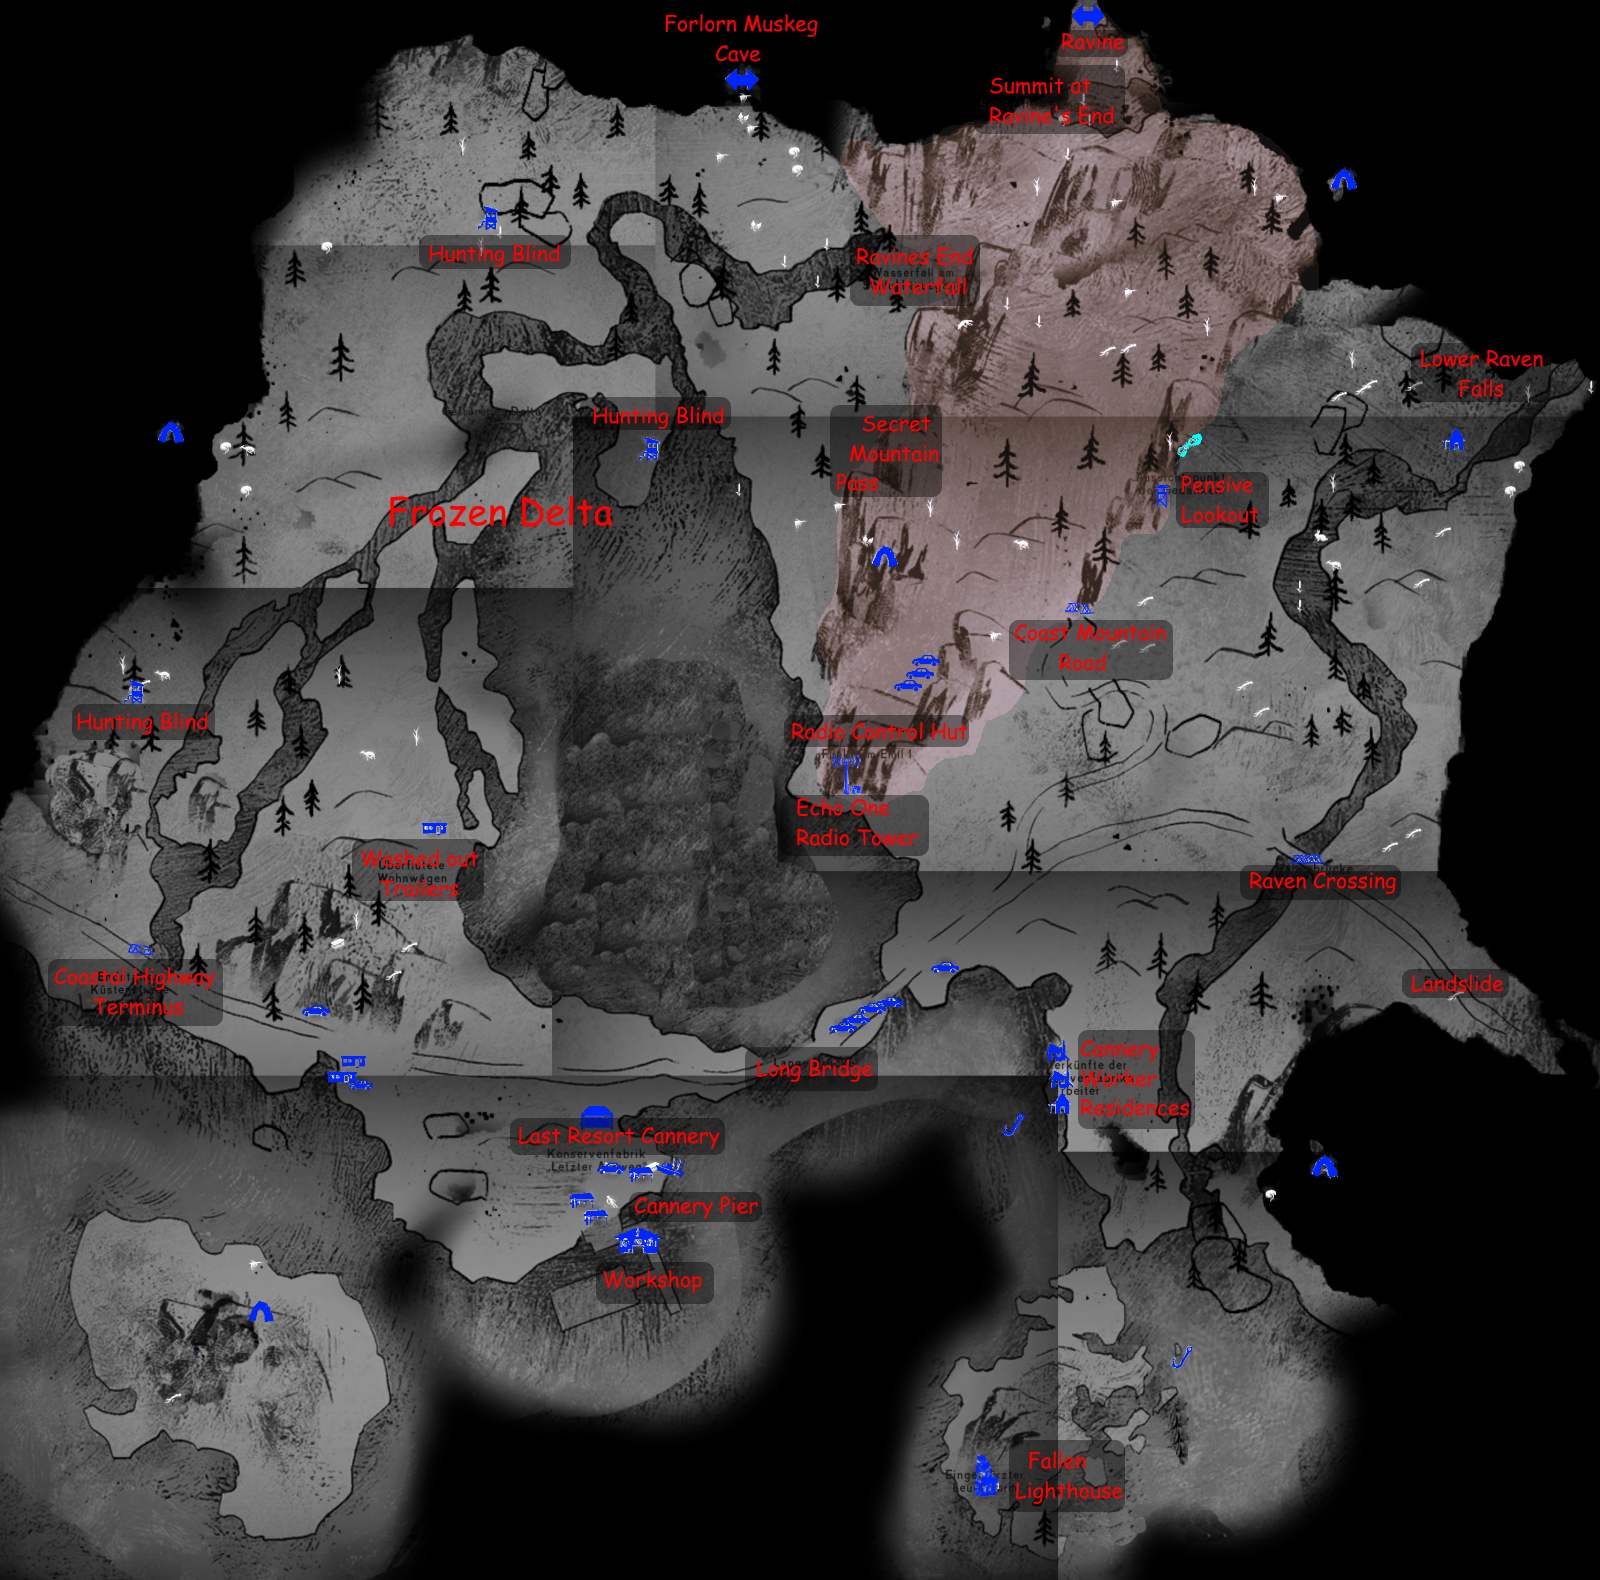
And while we’re at it, here is a map showing the location of the regions and the still confusing movement of the sun.
You can see this very nicely if you travel from ML or BR to FM under good weather conditions at noon. The sun then jumps by 180° to the other side of the railway line.
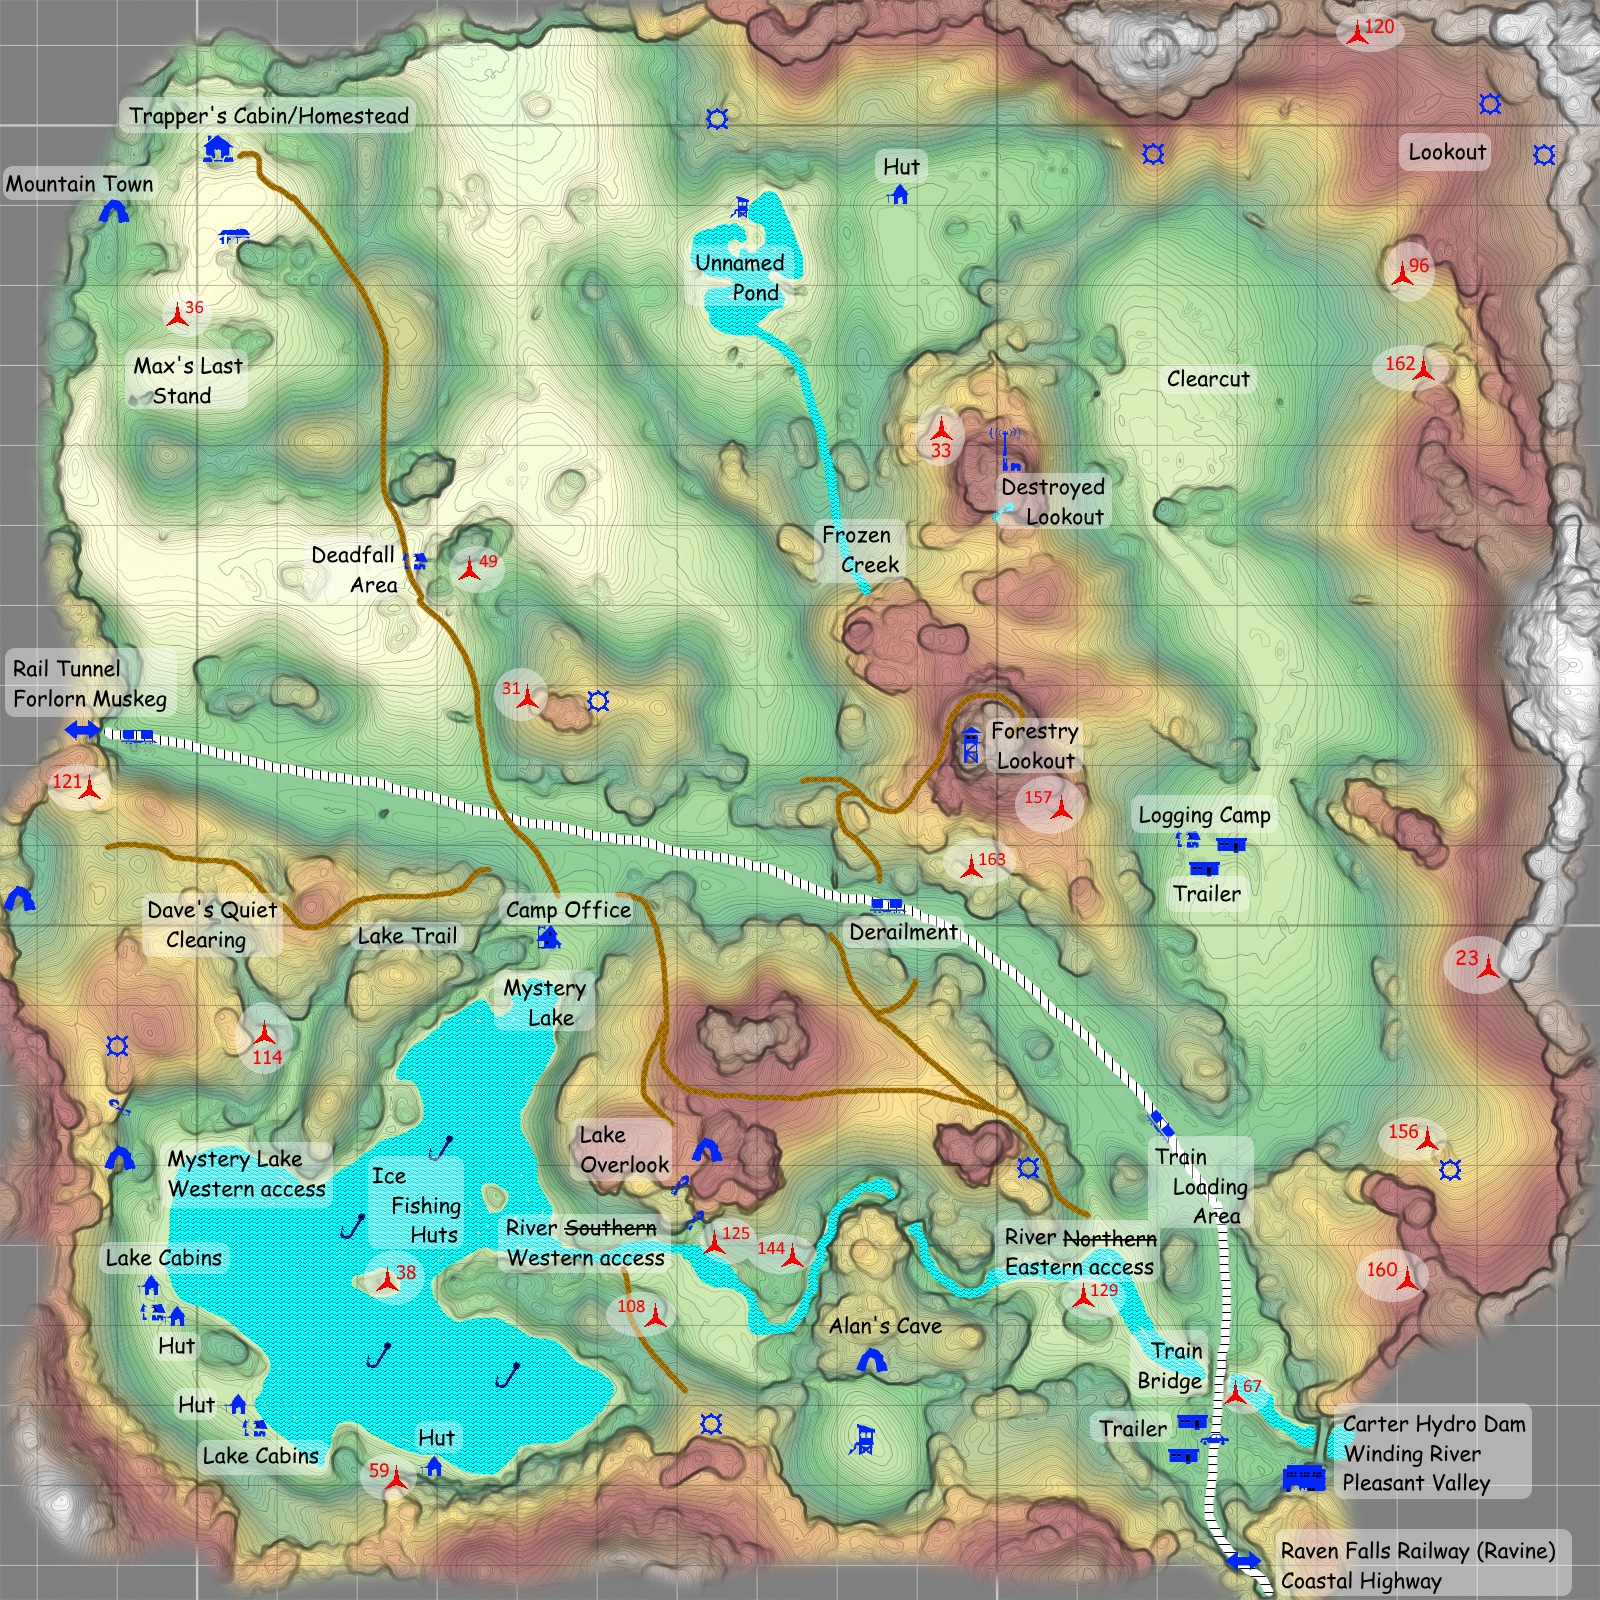
All maps in this guide are as far as possible north-south oriented. So don’t be surprised if the ingame maps look completely different.
Mystery Lake (v1.69)
The →Mystery Lake is the central region of the game. It was the first region in the game.
Here’s an overview of the most important locations on →Mystery Lake:
Camp Office: One of the most popular homes for beginners. Since it is located next to the lake and the rails, it is very easy to find. There are deer and rabbits nearby, loot in the Lakeside Cabins and an opportunity to go fishing in the ice fishing huts on the lake. The loot you can find around the lake should be able to get you through for a few days. Apart from that, the Camp Office has two ovens, a bed and a workbench.
To the west, next to the Western Access you’ll find a rope that leads to an elevated area, where you can find one of the nine possible bunker locations.
On the lake, you’ll find two little islands. If you walk to the south (left, when you are coming from the camp office) into the cove formed by the lake, you’ll find a single cabin (you can often spot a bear there). Behind the cabin, there’s a good chance of finding a rifle.
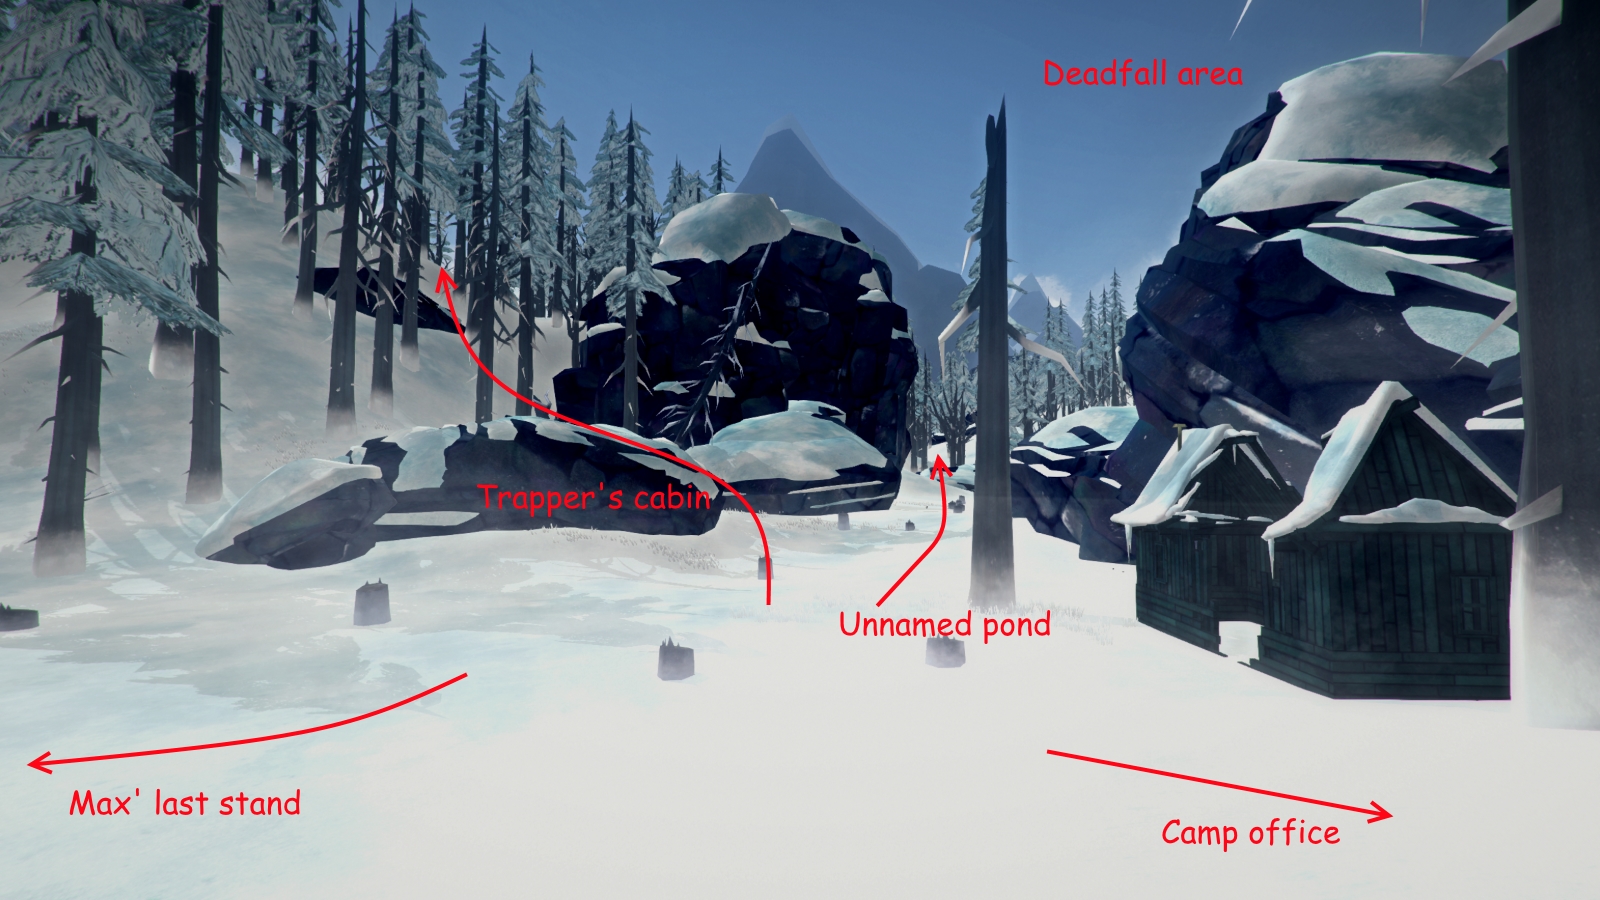
Trapper’s Homestead: One of the few places that has this ‘home’-feeling. This cabin is located deep in the forest, to the northwest, next to a big clearing close to the Unnamed Pond. This clearing is a great place to hunt and the cabin itself is stuffed with survival gear and (maybe) a rifle. Here you can also find the cave that leads to →Mountain Town.
The cabin is one of the popular bases in this region, but it has the disadvantage that it is quite secluded, which makes quick trips to other regions (except →Forlorn Muskeg and →Mountain Town) quite difficult.
The Nameless Pond: Located northwest of the Trapper’s Homestead and southwest of the Clear Cut you’ll find the nameless pond.
Destroyed Lookout: It is located on a mountain next to the Clear Cut, fairly close to the Logging camp. Here you can find a mountaineering rope, which you can place right here. This will take you to the spring of the Frozen Creek, therefore creating a shortcut back to the Camp Office.
Logging Camp: A small area with trailers, next to the Train Loading Area and halfway to the Clear Cut next to the Destroyed Lookout.
Derailment: These toppled railway cars are located on the train tracks between the Camp Office and Carter Hydro Dam. Be careful here! These waggons and the Train Loading Area a bit further down the rails belong to the wolves. Even though the train tracks are the fastest way to travel between the Camp Office, the Logging Camp and the dam, you should take a different route if you know the area. However, you should definitely check out the railway cars at least once, since they are a possible spawn for the rifle and other great loot.
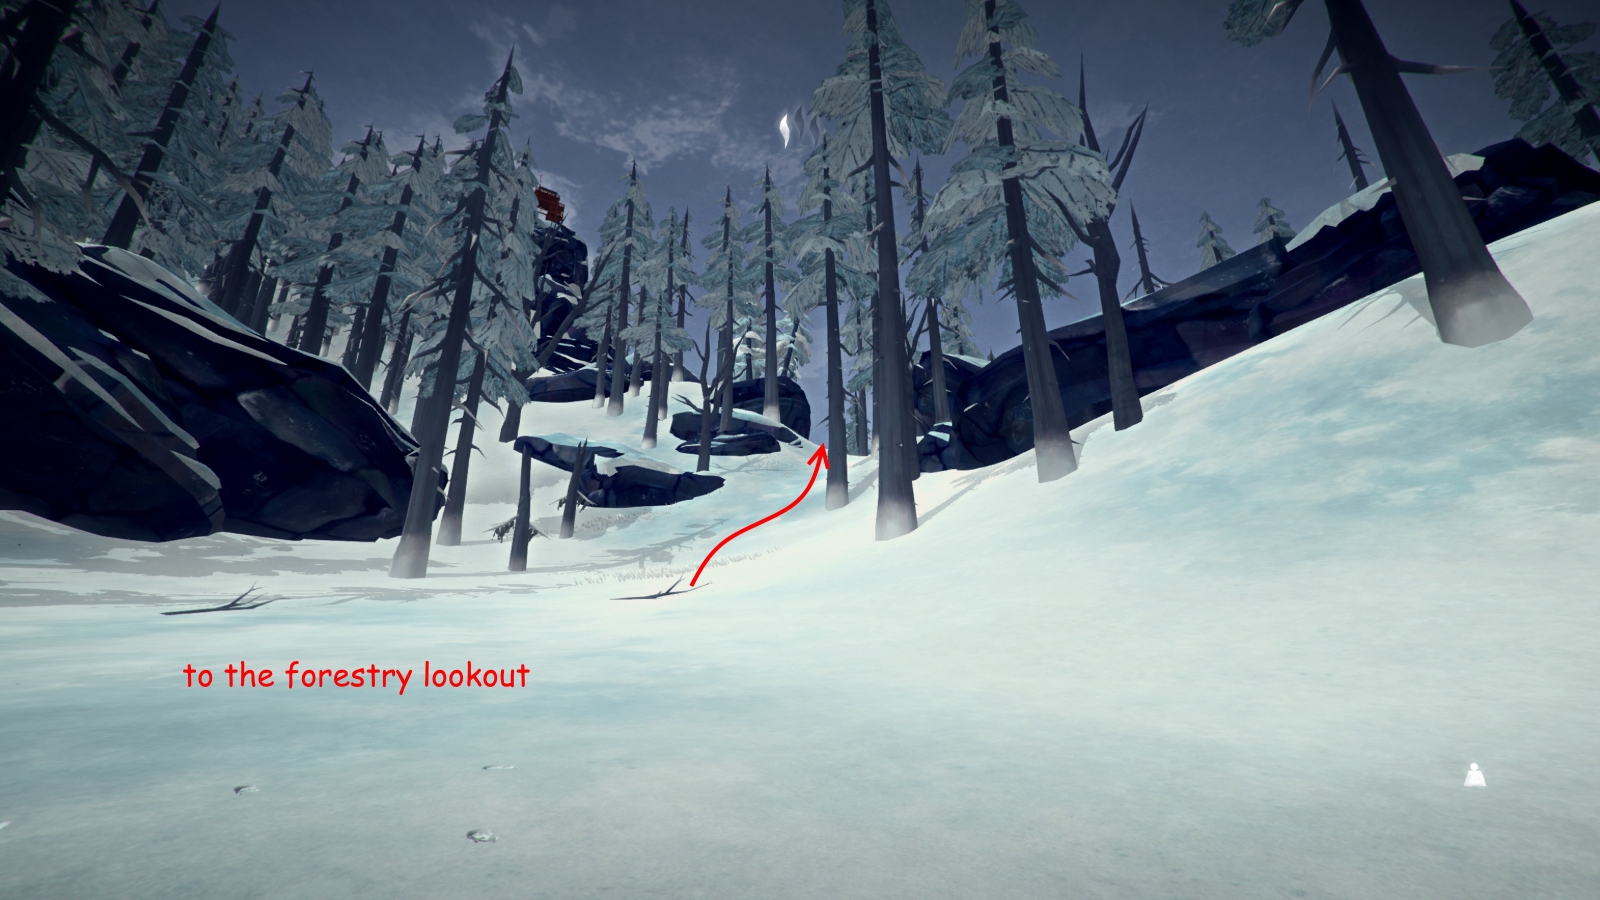
Forestry Lookout: It is located above the Derailment. The best way to get to it is to follow the train tracks from the Camp Office to the Derailment and then take the first turnoff on your left and go up the hill on your right.
Carter Hydro Dam: The best place to get loot at →Mystery Lake. The dam is located in the southeast of the region, where the train tracks lead to the →Ravine.
The dam used to be the home of Fluffy, a she-wolf.
But since the dam is filled with garbage, she moved out. If we can believe desperate cries for help, she has found a new home in one of the ice caves in the →Hushed River Valley.
About the dam itself: There are a lot of lockers inside, so you’ll better bring a prybar. On the other hand, there is a good chance of one laying around in there. In the main room, next to the turbines, there is a door that leads to the Lower dam and brings you closer to the Winding River and thusly to →Pleasant Valley.
I’d like to add one last thing: The most common route is the one from the Hydro Dam to the Camp Office to the Trapper’s Cabin and back. It is very easy to get from the dam to the office, either via tracks or via the river to the lake. The way from the office to the cabin is not so easy to remember and more dangerous.
Here’s the easy way:
The most important point here is the Dead Fall Area. Head out from the Camp Office, across the train tracks and into the forest to the left and soon you will be at the Dead Fall Area. From here you’ll head up this very steep hill. As soon as you are over the apex of the hill, you’ll see the small clearing that harbors the Trapper’s Cabin. When you are down there, remember the way you came down, so you can use this path again when you head back.
Next to the river that is connecting the dam and the lake, there is an ascencion point next to the rabbit clearing (using two ropes). In the cave that is there, you can often find a skill book; you’ll also have a great view over the lake when the weather is good. You are also able to reach this area from the Derailment and even the Camp Office. So if ropes aren’t your thing, these are your alternatives.
The train tracks leave the region next to the dam, leading to the →Ravine. On the opposite end of the region, close to the Camp Office, you can enter the Rail Tunnel to →Forlorn Muskeg.
Oh, and here’s the Lookout above the Clear Cut, which you can only discover by accident.
And here’s a view from the other side, from the Destroyed Lookout.

Mountain Town (v1.69)
→Mountain Town is the region where you start in story mode Episode 1. In survival mode the region around the city of Milton is fully accessible.
By the way, there are no cairns in this region. Close to the road in the north of the region is a trailer to be found. If you walk north east from there you can find the cave to the →Hushed River Valley
There is not much to say about the city itself. So I would like to talk about the surroundings here.
If you follow the road past the water tower and the Church, after a while you will reach the Spruce Falls Bridge. There’s always a bear roaming around here, the only one in this region.
Here, a path (mostly heading south) leads through a cave to the Crashed Plane, where you start in story mode.
Back in Milton:
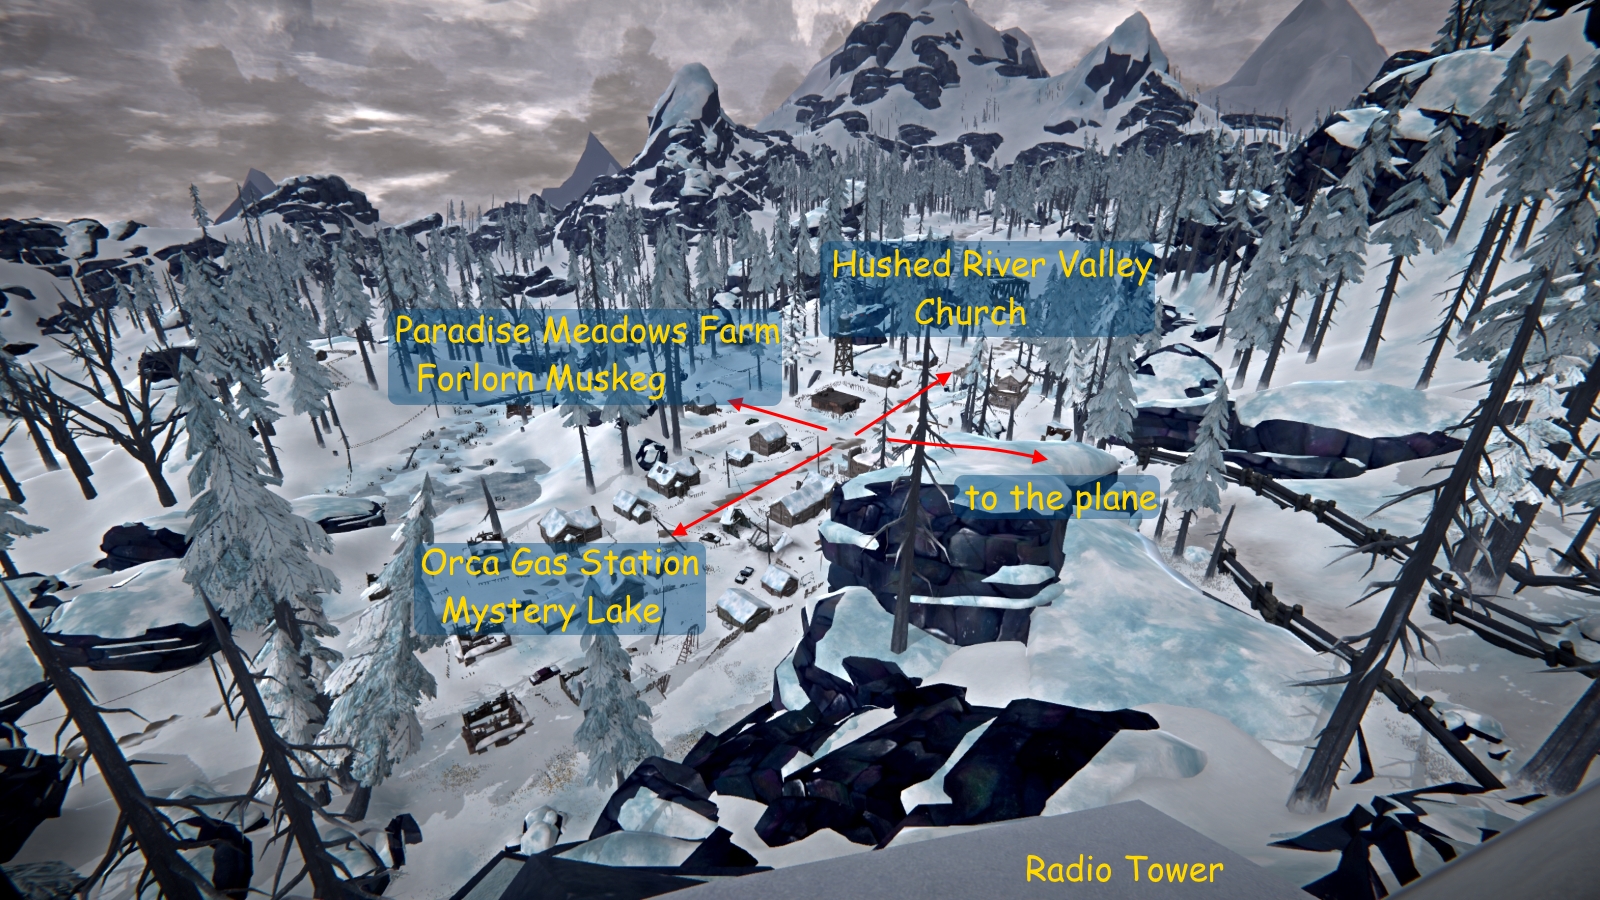
If you head up to the Radio Tower …

In the opposite direction over a river to the west you will come to the area of the Paradise Meadows Farm.
The main building is usually locked, but the key is always nearby.
(In the tractor, in the barn, behind the farm house, etc.)
In the barn is one of the two workbenches in this region, the other one can be found in the Trailer beside the road in the north.
If you go from here parallel to the river to the south, you will come to a place where you can descend into the big Milton Basin (which is not accessible in story mode). This is the way to →Forlorn Muskeg.
There is little to discover down there, but the probability of encountering a moose is high. There’s only one ruined building here.
Right in the south, under a large arch of rock, the path leads to the Marsh Ridge in the →Forlorn Muskeg
Back to the turnoff in Milton:
If you follow the road through the village in a southerly direction, you finally reach the Orca Gas Station. You’re gonna need a prybar to get in there.
From here the road continues to a collapsed tunnel. Shortly after the gas station, a path leads up to the Park of Milton and the Picnic Area.
Here you can climb down a rope to a small valley and climb up again on the other side. The trail then leads through a cave to →Mystery Lake directly next to the Trapper’s Cabin.

Forlorn Muskeg (v1.69)
Coming from →Mystery Lake you enter this region in the east. The railway line leads almost dead-straight to the west, dividing this big valley basin into a bigger southern one and smaller northern half.
A bit ahead you can see a derailed train (Poacher’s Camp). At the train carriages there is a lot of stuff, sometimes a sleeping bag.
The entire region consists of countless frozen ponds, mostly with a brittle ice surface. If you intend to stay longer here, it is advisable to mark the safe passages with sticks or other things.
We’ll first make a tour, always along the edge. When we arrive here again we follow the railway line.
Turn right (north) and follow the slope. After a while you can see a Shortwave Tower on the right. You can not get up here yet. A little further ahead you come to the Hat Creek where you can get to the tower.
From this place you have a nice view over the region and can also see the Derailed Train.
At the waterfall, on the right, there is a closed cave which, like all caves and mines, is a hose. You can not get lost in it. The cave leads through the mountain to Marsh Ridge. Inside you find a rope. Take it, you’ll be able to fix it right behind the exit at Marsh Ridge.
In the cave near the upper exit you can see an unreachable ledge.
You can also go directly from the Hat Creek to the upper cave exit (a bit tricky but feasible)
Close to the cave exit is the climb to →Mountain Town. A few steps further on is another cave. Here you can find a sleeping bag.
You can then attach the rope to the rock at the edge of the slope.
Now you can either walk the Hat Creek down or down the rope and then along the slope. You will finally arrive at the western end of the region, where the railway line will leave it in the direction of →Broken Railroad. Follow the map border under a rock arch.
Go up the slope to the left, as soon as it’s possible, then across the rock arch and over two tree trunks.
Note: There is an abbreviation that prevents you from the awkward snail noodle at the arch.
There is also no guarantee that this short path will survive the next updates.
Past a broken shortwave tower
and an open cave, on the left you can see the Old Spence Family Homestead. This is next to the cave at the shortwave tower the most important place here .There are tons of stuff to find, including a safe and the furnace.
The only downside to this place is: There is no place to dry. For this you must go back to one of the open caves. Unfortunately there are always many wolves.
Your path now leads to the Bunkhouses next to the ruined footbridge. There’s not much to find here, so just continue past an open cave. At a big boulder there is the cave to the lower part of the →Bleak Inlet.
A little further you will come to a wide bulge in the rock face.
Here, at the far end, a path leads up to the Muskeg Overlook and the large hollow tree.
Now here is another shortwave tower. (View from below)
But back to our route.
Go over the ice to the carcass and from there back to the edge. A little further ahead you finally come to the starting point of our trip.
Follow the railway line to the center of the region. At the derailed train (Poacher’s Camp) is a lot to be found. In the open wagon there is also a fire barrel which makes this place a good resting point. Sometimes here is a sleeping bag to be found.
A bear often comes by. Its cave is very close here at the rocks. It is (if i’ve counted correctly) one of three bears (Stalker) in this region; Here, by the way, simplest to kill.
You could now follow the railway line to the other side of the map, but I recommend you: Don’t ! There is nothing more to be found along the tracks, and the middle of the region is often teeming with wolves.
Avoid the larger ice surfaces. You can not cross a single one of them. Take the longer, but more secure ways across all the small islands.
In the middle of the ice surfaces you can still find the High Blind and the Low Blind.
The place Abandoned Camp (a snow shelter) can be at (as far as we know) eight different places in the region. Therefore no hints can be given here.
Broken Railroad (v1.76)
You can reach this region following the railway line from the →Forlorn Muskeg
After a short distance the tracks are blocked by a Landslide. Shortly before you can turn right down the slope to the river that runs through the region up to a canyon.
Here the path continues via a tree trunk to the other side of the fall site.
Now following the power cable you first come to a locomotive
then a road branches off to the right at a truck to the Maintenance Yard.
If you continue walking along the tracks instead, there is a Broken bridge, the western end of the region.
Follow the pylons from maintenance northwards to a lake. They lead you over a bridge to a fence where the path continues upwards.
Continuing along the pylons you will come to the Hunting Lodge, which is situated on a pond directly at the edge of a slope. Behind the lodge you can attach a rope that will take you down to the other side of the lake discribed above.
There is a bear in this region whose cave is located directly at the bottom of this slope.
The both buildings in this region are good bases and there are plenty of deer, but life here is quite strenuous due to the many wolves.
Meanwhile you can descend relatively safe into the canyon of the Broken Bridge.
There’s also some stuff down there, including wood and dead animals, so this isn’t a death trap anymore. But be careful between the tree trunks and ice plates, you can end up in a deadlock!
From the bridge at the fence you can see the Rickety Foot Bridge over the ravine dug by the river.
You can reach this bridge by turning right from the path to the Hunting Lodge. Go over a tree trunk to a cave and then turn right through a crevice.
At the end of the route you will find yourself at a cliff with the fixing point for a rope, close to the Maintenance Yard.
The Maintenance Shed you can find now another forge.

Hushed River Valley (V1.76)
Some general information in advance
There are no buildings and no workbench in this region. The next workbench can be found in the trailer at →Mountain Town.
There are no cairns, but you can find some secret stashes as in the story mode.
No fishing here. The ice surfaces are all safe.
There are two ice caves which, unlike the usual caves in TLD, have branches and several entrances. The missed She-wolf Fluffy has settled in one of them, so be warned.
Take off your clothes before you pass a waterfall.

When you come here, bring the following things with you if possible:
- Sleeping bag
- Some cloth
- a lot of charcoal (this makes mapping easier right from the entrance)
- lantern, enough fuel and some spray cans (makes marking the pathes in the caves easier)
- (alternatively a lot of torches, flares are hardly helpful ’cause they emit to little light)
- a rope (there is a place where you can attach one, but there is no rope to be found, except the many already attached ones)
- Cooking pot
- Hatchet (there are a lot of bushes blocking important routes and secrets)
At the beginning you should definitely explore the two ice caves and make markings in them. Something like that:
With the crossed stick I mark dead ends, while the other one shows the way through the cave. At the ways to the respective middle exits I put a stone beside the stick.
With the spray cans, however, these markings are much easier to accomplish.
Once Fluffy rests in peace and the caves are marked accordingly, you will have safe trails through large parts of the region.
You can find a lot of snow shelters here. I recommend dismantling them before leaving the respective place. You can’t keep them in good condition because they deteriorate quite quickly and then the building material is completely lost.
Since there is no cloth (except the clothing) in this region, this is an enormously important resource that should not be wasted. The next source of material can only be found in Milton.
The region basically consists of four separate areas that are only connected in a few places.
The area names used here are my creations, they are not in the game!
1. The area in the west, which stretches from the cave to →Mountain Town, around the Stairsteps Lake, the Hushed River and the area north of it.
The Hushed River forms here a border which can be crossed only at two points: At the Offset Falls and at the rope, where it is possible to reach the opposite edge via some tree trunks in the vicinity.
2. The High Plateau: It can only be reached via Ice Cave 1 or the very long rope right next to the cave exit. Here is one of the two possible places for the Signal Fire. Here you can mount a rope that allows a much shorter ascent. By the way, this is the only place where an additional rope can be attached.
3. The Valley: It is the lowest point in the region and can be reached via the rope directly at Many Falls Vista. The only other access point leads down two ropes from the Monolith Plane below the Pensive Vista.
4. The Monolith Plane: It can be reached from the Valley and via the rope in the far north and from the upper exit of Ice Cave 2, as well as via a narrow ridge at the upper exit of Ice Cave 1 .
The alternative location for the Signal Fire is easiest to reach from the upper exit of the Ice Cave 2. The Signal Fire is the only place in the game where you can find a Moose Hide Satchel.
Carter Dam & Environs (v1.69)
Transit zone: (Mystery lake <-> Pleasant valley)
If you are coming from →Pleasant valley you have to read this backwards, but i think thats no problem.
Let’s start at the Upper dam in the generator room, where all the scrap lies around. At the end of this hall is a door that leads you down to the Lower Dam. At the lower end of the stair, in the first room on the left is the door to the Winding river. This is an emergency exit, you can not open it from the outside! So what are you waiting for?
On the outside you are in half height of the dam. Look to the other side. At the broken window is the way back inside. To get there you must walk over the small ledge. ATTENTION: Somewhere a small part is missing!
There is also the problem that you are often pushed away from the dam. The problem has been around for a very long time and has been reported often. So it’s best to crawl all the way.
However, we want to go to the →Pleasant valley. Walk the path down to the river. Here is always (at least) a wolf patrolling. Follow the river. Where the terrain opens on the left you can find an open cave.
The river bifurcates here. Choose the right way. At the end of the seeming dead end is a small path leading to the other side of the obstacle. Head to the right. Follow the river to a gap in the left rockface. Here is the cave to the →Pleasant valley.
In opposite to the other caves and mines in this Cave system it’s very bright due to the many openings. In the central room you can always find a bedroll. There are countless of the cairns to be found here. The path leads over a ramp and some planks up to the →Pleasant valley.
Pleasant Valley Pt. 1 (v1.69)
On our own behalf: There is obviously an 8000 character limit for sections, so we had to split the texts for this and →Timberwolf Mountain.
First of all, the most important thing right here: Never walk for a longer time in the driveways!
Here’s the rather naked map. In the second section you can find the complete map.
The →Pleasant Valley is a beautiful, natural Region. But of ‘idyllic’ can hardly be a speech: The large distances between the buildings and the frequent storms are a real problem here. On the other hand, the valley is home to one of the best places to live:
The Farmhouse: It has everything the heart desires and is therefore also among most players the undisputed favorite in this region. It is characterized by its central location, as well as plenty of wood and animals in the surrounding area.
It lies along the road, behind the Heartbreak Bridge in the middle of a fruit plantation.
Pleasant valley outbuildings: They consist of a couple of sheds and the big red barn.
These buildings are surrounded by a large field full of hay bales. The field is separated from the adjacent long road by a fence and is located between Heartbreak Bridge and Contemplation Bridge. From here, a farm track parallel to the road leads to the Farmhouse.
In the barn itself there is a fire barrel, a workbench, a few lockers, but no bed. Of course you can sleep in the pickup truck.
Lonely Homestead: If you are going from the street to the Outside Buildings and walk past the barn, you will reach a birch forest and the there the Lonely Homestead. This forest is an important point of view here because you can recognize it even in bad weather immediately and due to its size its easy to find.
Note on the named waterfalls in this region: There are three named places at waterfalls whose names can be confusing. The place Upper Falls is located at the top of the waterfall at the Thomson’s Crossing.
Lower Falls and Cascading Falls are part of the river, which passes by the Pensive Pond, then falls down and flows under the Heartbreak Bridge. What the folks at Hinterland have thought of it is a mystery to me.
Pleasant Valley Pt. 2 (v1.69)
Signal Hill: On good conditions, it can be seen from almost any position.
There are many ways to get here from the Farmhouse. Cross the river behind the Heartbreak Bridge to the left of the waterfall, head up to the Pensive Pond and then follow the road. Or: A rope to the top near a bear cave is to be found on the right side of the waterfall. Or: From the Farmhouse follow the road to the west and before the Long Curve move up the steep slope. In addition, there is the possibility to attach a rope directly at the Signal Hill, which opens up an even shorter fourth path.
Next to the tower is the Radio Control Hut. Inside there is a bed, a workbench, some lockers, and outside a fire barrel.
If you follow the road leading directly from the hill to the south-east, there is an open cave and a Hunters Blind.
Right down the slope is a cave. It is the entrance to the → Carter Dam & Environs and thus the way to the →Mystery Lake. A little further down the road coming from the tower in front of a small bridge, a path branches off leading here.
Beyond this bridge to the left you’ll find the Pensive Pond, the Forest Cave and a Picnic Spot. The path leads along the map boundary until it joins the road between Contemplation Bridge and Thomson’s Crossing.
Pensive Pond: The ONLY place for fishing in this region.
A little funny story: When I came here and ran across the lake, a wolf came to notice me. Since I had no great desire for a wolf struggle, I crawled under the jetty and thought: Here I am safe. But when the wolf was on the jetty right above me, I was (probably from the devil himself) teleported directly into a wolf fight on the jetty! The error is still present! So do not look for shelter under a jetty!
Thomson’s Crossing: If you cross the Contemplation Bridge, the road continues to a small settlement at another bridge. This place is well suited as a base. The Community Hall has a lot of space and a large stove. However, a workbench is missing. The next one can be found in the Red Barn.
If you follow the road a little further, a path to the right leads to →Cinder Hills Coal Mine and thus to the →Coastal Highway.
Continue along the road, just before the End of the road turn left to the Derelict cabins.
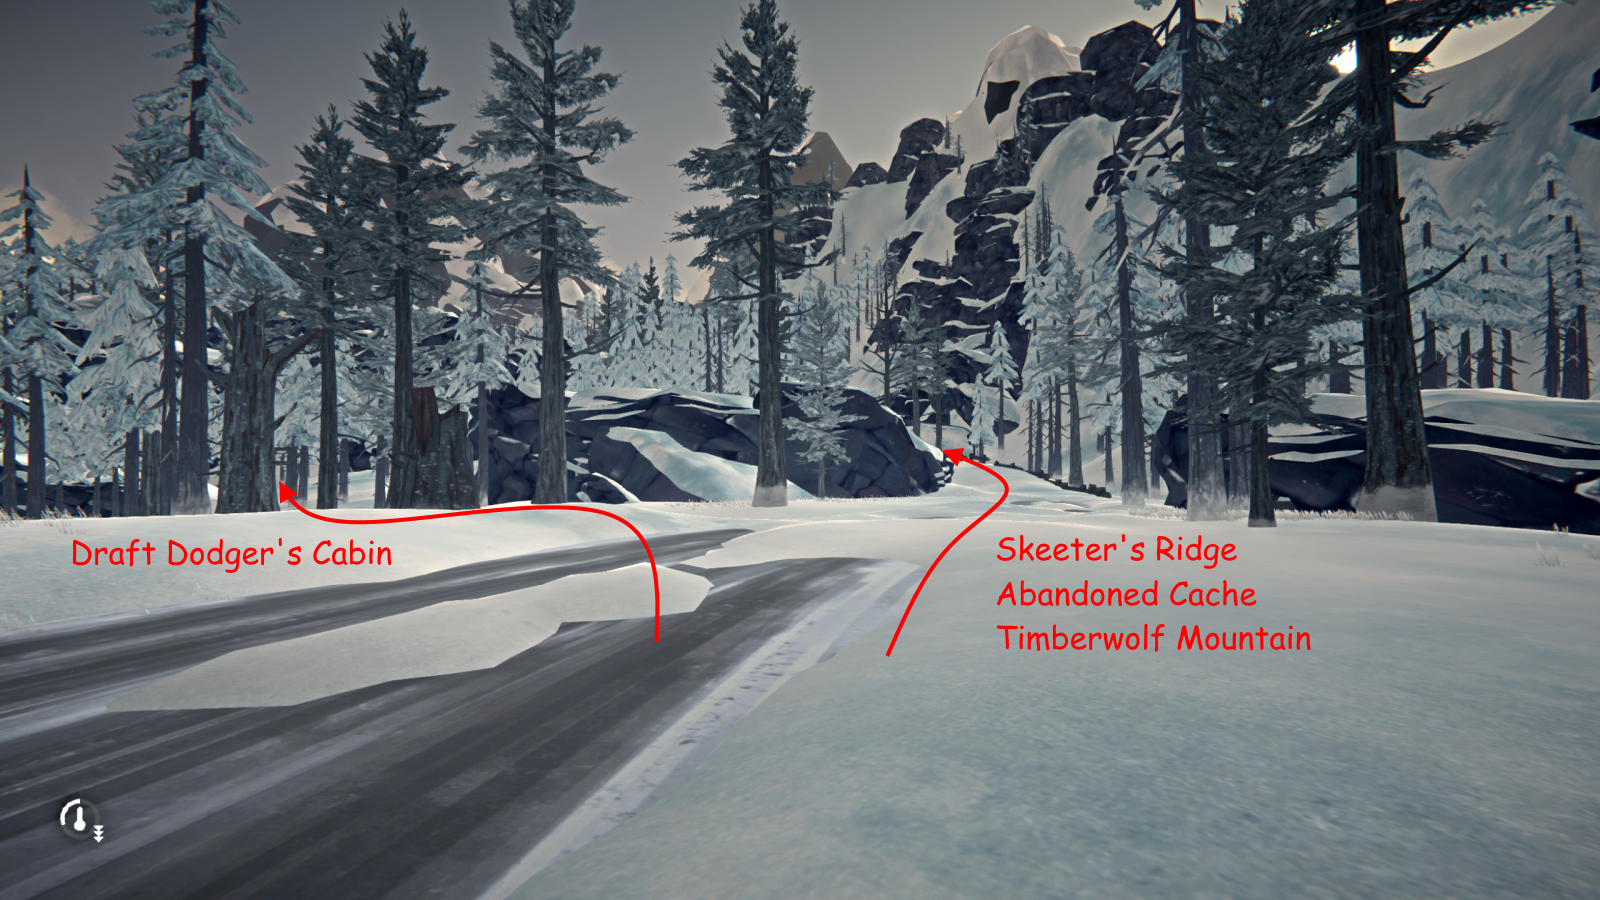
After passing the huts, the path split up.The right way leads to the upper bridge across the river towards Skeeters Ridge. At the Point of Disagreement, a path leads to the Prepper’s Abandoned Cache and to the Timberwolf Mountain. You can also get there to the Misty Falls Picnic Area and a closed cave.
The left-hand path leads over the lower bridge across the river and then almost directly to the Draft dodger’s cabin. Using the two ropes here you get directly to Skeeters Ridge.
Misty Falls Picnic Area: The river, which winds through the →Pleasant Valley, is fed from several sources. One of them is the misty fall. Its water flows into the river at approximately the Lonely Homestead. There is a picnic area and a closed cave. There is always a lot of usefull stuff to be found in this cave, so make sure you visit if you are nearby.
The easiest way to reach the picnic site is take the right turnoff after the Derelict Cabins and then follow the river or just before the ascent to the Timberwolf Mountain move up the steep slope to the right.
At the ascent to →Timberwolf Mountain there is always a large bunker (Prepper’s Abandoned Cache).
This bunker is an excellent base because it has everything necessary except a fire place. One of these is located in the destroyed hut.
Skeeters ridge: Be careful here!
Skeeters Ridge belongs to the wolves. One of the destroyed huts here has a Basement. To get to the Draft Dodger’s Cabin, you can slip down the two ropes directly behind the destroyed hut at the ledge.
Furthermore there are the wreck parts of a crashed passenger plane and a lot of stuff to find. The way through the fuselage leads to the center of the crash site. Nearby there is the Burned Ridge Cave. The way past it leads down to the river.
Three Strikes Farmstead: This small collection of buildings, or what is left of it, is beyond a small bridge when you follow the road from the Farmhouse to the northeast. Here is almost always a sleeping bag and a fire barrel. There are often many wolves here, so do not stay too long.

Ravine (v1.69)
actually →Raven Falls Railway Line ; Transit zone: (Mystery Lake <-> Coastal Highway & Bleak Inlet)
Coming from Mystery Lake, the Raven Falls Railway runs across a river that falls a little farther into the ravine. If you follow the tracks you come to a rockfall and some wagons wedged there. Here is no way round it. On the other side of the river there is an open cave in the northwest (before the railway line is crossing the river head to the right).
If you follow the rock wall, the terrain slopes to the left to the ravine.
At a corpse the canyon can be crossed over a tree trunk and the wagon behind it.
A little bit up the slope and you are back at the railway line. It leads from here without further obstacle to the →Coastal Highway. Near the track switch is an open cave.
And be careful when crossing the Raven Falls Trestle, always pay attention to your feet …
Directly by the tree trunk over the ravine there is a possibility to fasten a rope and descend to the Ravine Basin. In the crashed locomotive is always (except in the challenge Hopeless rescue) a flare gun to be found.
A little further the river leads past a cave to the upper part of the →Bleak Inlet. If you are coming here for the first time you should bring another rope with you. You’ll be happy if you have it with you.

Bleak Inlet (v1.67)
Before you go to →Bleak Inlet, you should ask yourself why you want to go there. The region is one of the most dangerous on Great Bear Island.
Good reasons would be:
- you’re out of whetstones and you want to sharpen your tools.
- you have only a few revolver or rifle ammunition left and need replenishment.
- you no longer have a rifle cleaning kit and have to repair your firearms.
- you are just curious and/or suicidal.

- hopefully you have always collected the shell casings when you have shot, they can not be crafted.
- you have collected all the stump remover and the fertilizer.
- you have a rope at your disposal, if you haven’t fixed a rope in the →Ravine yet, you need two of them. (Sometimes you can find a rope hanging at a hook at the lookout, seems to be random.)
- you should remove the batteries from all vehicles and cut them on the spot. This will give you the scrap lead you need for the bullets.
- you have already found and read at least one guidebook ‘Practical Gunsmithing‘.
When you start, be sure to bring a hacksaw, a crowbar, some marine flares and of course the parts you want to repair/sharpen with you.
Take all the stuff (except the ropes and the marine flares), travel to the cave at →Forlorn Muskeg to →Bleak Inlet and drop it off at the cave exit. (You will pick it up there later)
Now go back to →Mystery Lake, take the ropes and the flares with you and go to the →Ravine. Get down there and go to the exit to →Bleak Inlet.
You’re in the upper part of →Bleak Inlet. You’re probably gonna get in trouble here with a Timberwolf pack, so be ready.


Once at the bottom, turn east and go to the hut there. It is the only safe point in this part of the map. Then follow the river to the tree trunk. Leave the river here and follow the road over the Long Bridge until the entrance to the Last Resort Cannery appears on the left.

The gate is closed go through the destroyed building on the right. Shortly behind it is a trailer you can enter in case of emergency
Cross the big square diagonally until you reach the landing bridge. Here you will find a small room with a fire barrel, a sleeping place and the possibility to dry things.
Now you should get the stuff you left at the cave exit. Go to the left shore of the bay (view from the cannery) behind the bridge. There you can always walk along the shore to the other side of the bay.
The water inlets should be passed carefully, there are some places with thin ice. So don’t run!

There is of course a much shorter direct route, but it is much more dangerous.
There are only two other important places to visit in this region. On the one hand there is the Cannery Worker Residences. Here is the only fishing hut that is close enough to be used properly. And the Fallen Lighthouse, at the top you can find a distress pistol.
Coastal Highway (v1.69)
For beginners →Coastal Highway is a very good choice as start region. There are quite a lot of buildings here and therefor plenty of food and clothing. The region consists of a large, frozen bay, which is seamed by the eponymous road.
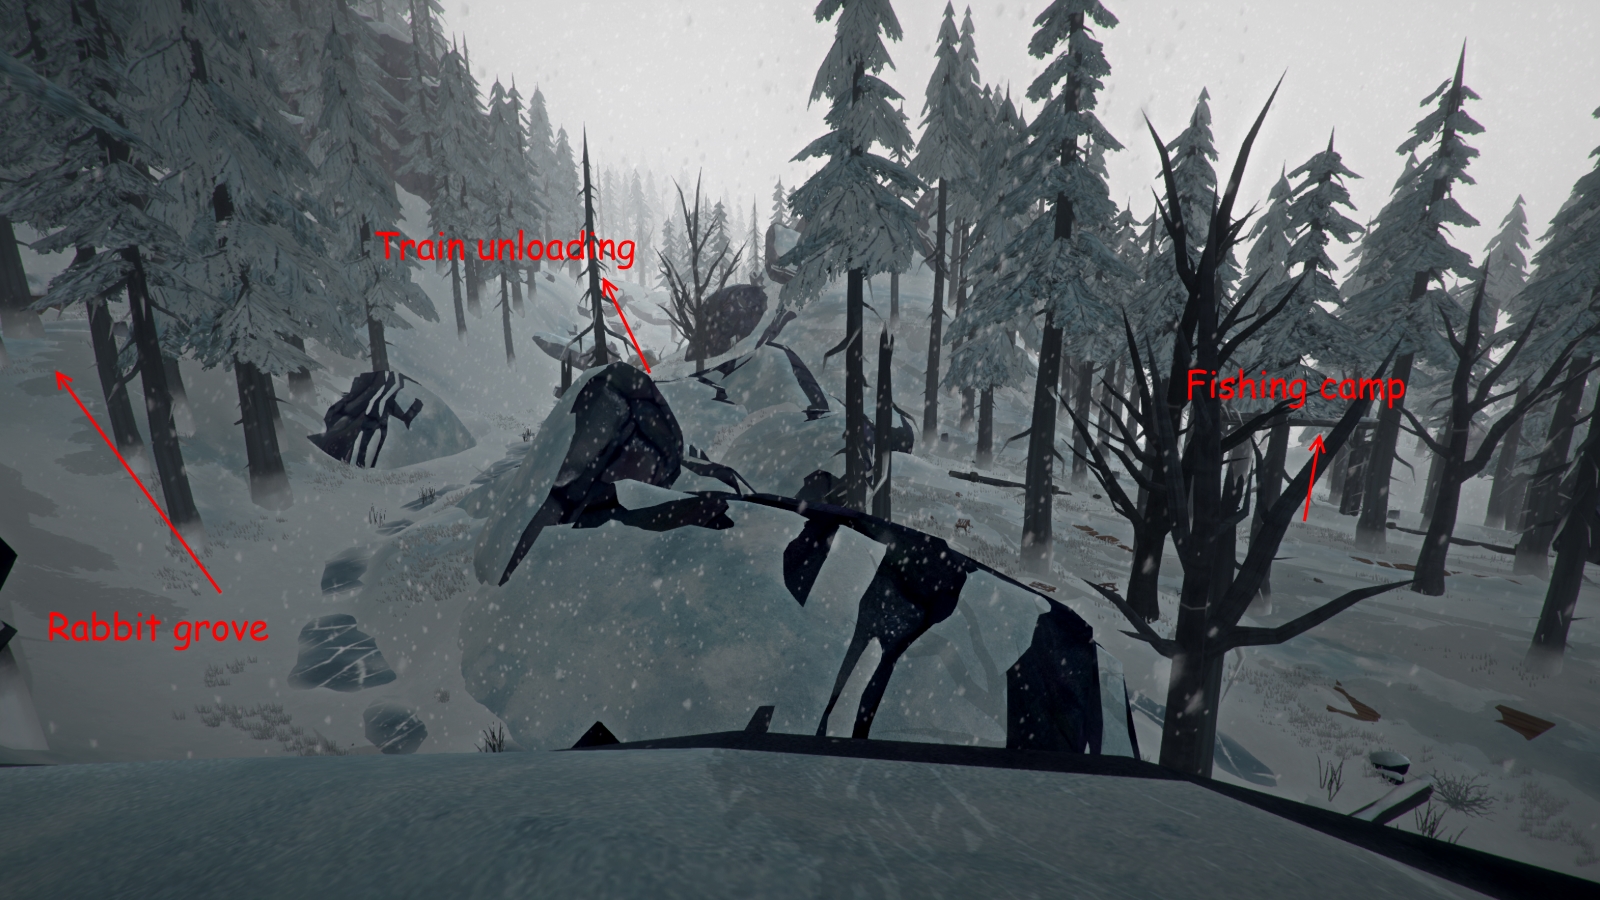
Bear Creek Campground: Coming from the →Ravine following the tracks to the Train Unloading you cross a bridge at a waterfall. Thats the source of the bear creek. A little further ahead after the Train Unloading is a bridge.
If you walk under it, you’ll come straight to the creek and to the Rabbit grove.
(From the exit of the →Ravin you can go directly there, if you don’t want to visit the Train Unloading)
Follow the brook for a while and you will first reach a small hut on the right side. The Rabbit Grove is next to the Jackrabbit Island the best place for hunting rodents.
On the Bear Creek Campground is rather little to be found. If you leave the campground through the gate a few steps further ahead you’ll find a corps with some goodies.
Following the river you reach the western end of →Coastal Highway.
Caution: Usually a bear is travelling here between his cave and the mouth of the creek at the road bridge. If you head to the right after the gate you’ll pass a hut. Down the slope you come to the Fishing Camp.
Fishing Camp: This collection of huts is a very good place to rest, as the fishermen’s huts are very close and so the food supply is guaranteed. Furthermore there is a Workbench; the only one at →Coastal Highway, except the two inside the Quonset Garage. If you work on this workbench you should be prepared for the bear that sometimes comes to a visit!
From here you can see the Jackrabbit island and the Log sort.
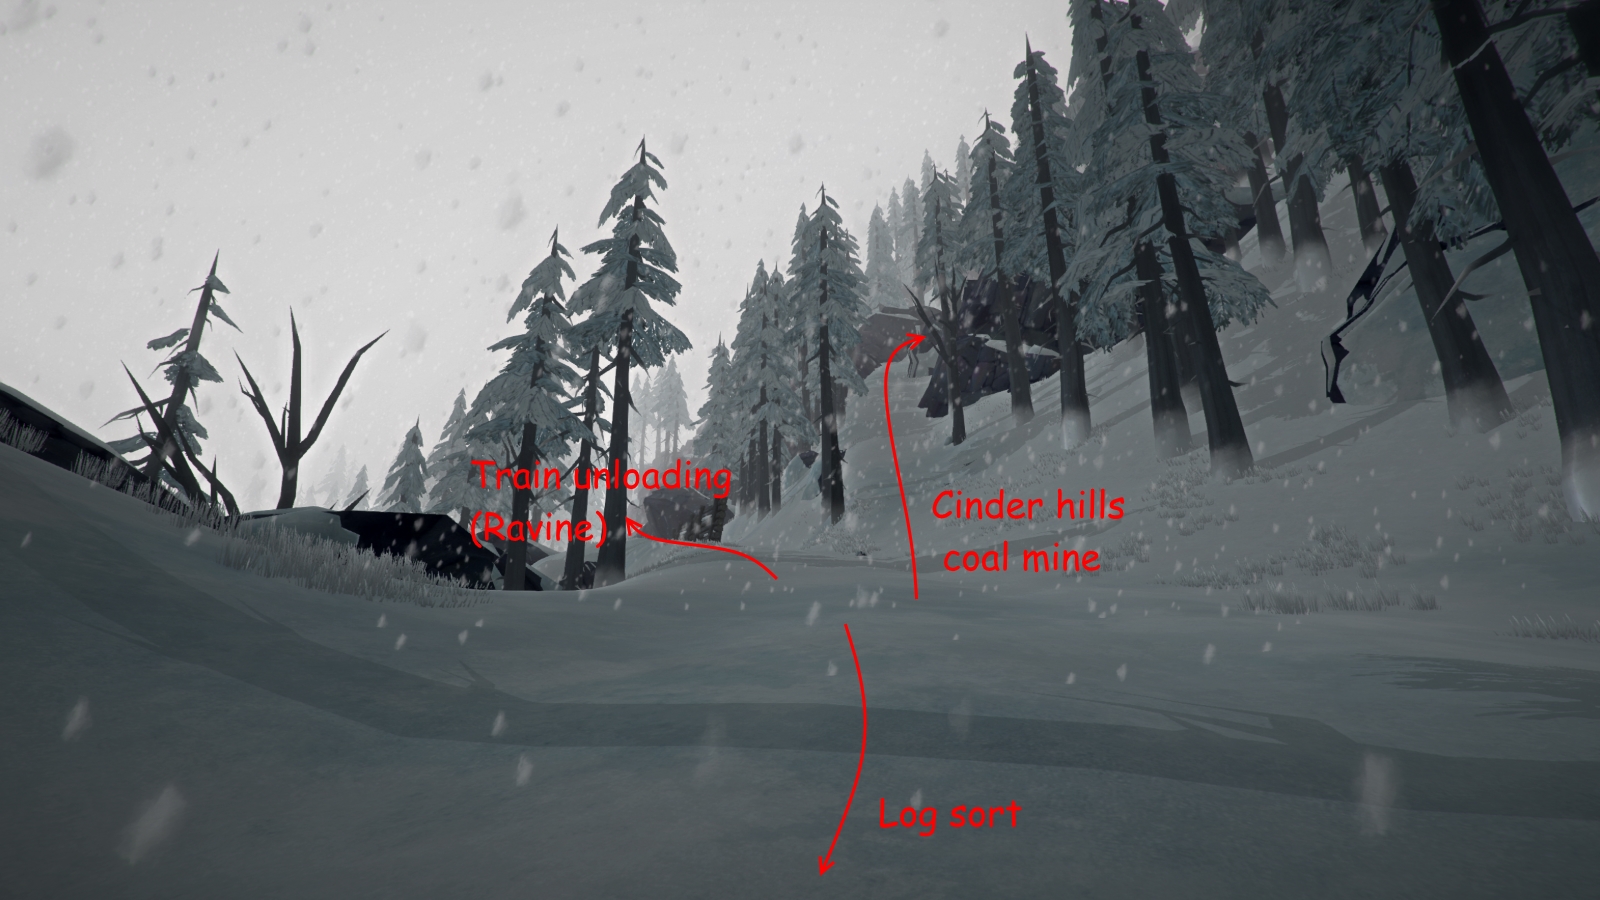
The Log Sort is quite right in the middle of the →Coastal Highway and is a good resting place before the journey to the →Pleasant Valley, because the road leading up the mountain (straight up the steep ramp) is the fastest way to the upper entrance of the →Cinder Hills Coal Mine.
Close to the street here is the lower entrance to the →Cinder Hills Coal Mine which leads to the elevator to the middle level of the mine. (see also in section Cinder Hills Coal Mine).
Abandoned Lookout: When you turn left from the exit of the →Cinder Hills Coal Mine you will come directly to the Abandoned Lookout.
Here is an oven and sometimes a rifle. If you have a rope, there is also the possibility to go directly down to the huts below this position.
From the mine to the right the steep ramp down and directly behind the trailer taking the small gap you come directly to the Log sort. Following the road to the east you get to the …
Coastal Townsite: This contemplative (dangerous) place is located at the road between the Log Sort and Commuter’s Lament.
The Coastal Townsite consists of several houses and the Quonset Garage, one of the best places to live in this region (except for Stalker).
In the many houses is mainly clothes and canned food to be found, so the →Coastal Highway is perfect for grooming food supplies. But you must always be careful, because the Coastal Townsite is often besieged by wolves and also a bear has its home above this place. Even a moose is sometimes seen here.
Jackrabbit Island: It is easy to see where this island has its name. This place is one of the best places for the rabbit hunt.
The house that is located here is a nice place to live, unfortunately it has no fire place. Right next door is a nameless island with the Misanthrope’s Homestead, which is similar to the building here.
I would not recommend staying here permanently since a bear has its cave right here on the shore. At a corpse you can sometimes find a rifle. Back on the mainland are the ….
Waterfront Cottages: These burned ruins are pretty much at the eastern end of the →Coastal Highway. Similar to the Coastal Townsite, there are always wolves sneaking around here.
From here, its only a small step to the Commuter’s Lament. It forms the last part of the →Coastal Highway and leads directly to the→Old Island Connector and thus to →Desolation Point.
There is often a rifle at the car here.
Here a few remarks: The area between →Cinder Hills Coal Mine and the Quonset Garage is quite extensive, at least as far as the paths are concerned. However, there are numerous abbreviations. You should take the time to find all of them, then you can travel much faster here. Its only dangerous near the Abandoned Lookout (wolves) and above the Coastal Townsite (bear).
If you want to go from one end of the road to the other, the route across the bay is, of course, the shortest, but it is also the most dangerous. If you follow the street instead you have the following advantages: On the road, you are faster, even under bad weather condition you do not have any orientation problems, you have to expect less wolves and every few hundred meters there are shelters (vehicles, buildings).
Cinder Hills Coal Mine (v1.69)
Transit zone: (Pleasant Valley <-> Coastal Highway)
Like all mines and (nearly) all caves a good place to rest, always warm, no foes, only for cooking you have to go to the entry area.
You can not get lost in it. In fact there are branches, but basically it is a hose. There is also a workbench here and what is much more important: A six pack of rifle bullets.
In →Coastal Highway at the Log Sort there is now the lower entry leading to the elevator.
During an Aurora you can take the elevator to the middle tier of the mine.
There are fire barrels, a sleeping bag, fuel and almost everything else you need to survive a few days.

Old Island Connector (v1.69)
Transit zone: (Coastal Highway <-> Desolation Point) also ‘Crumbling Highway’
Coming from →Coastal Highway you must crawl under a rock to follow the street. Here are only two or three wolves that can get you in trouble. Ahead you can see a car, on the left there are three destroyed houses. Behind one of them (Abandoned Harris Home) there is an easy to miss basement access.
In front of the coast is a peninsula with an open cave. Following the road you come to a place where its completely broken (Road Collapse). On the left is another open cave. At the end of the road is a pickup truck and the path to the No.3 Coal Mine.
In this mine, there are two spots you must crawl under.The Cave is a hose and you can not get lost. You’ll find also a workbench here.
Desolation Point (v1.69)
A small clear area and because of the furnace also quite important. I personally do not find this region bleak. Still, it is somewhat melancholic.
Abandoned Mine No. 5: The western access of this tunnel system is the first stop when coming from the →Old Island Connector. This mine is quite small and is mainly a save shortcut through half of the region. The eastern entrance is near the Whale Processing behind a small turnoff from the road.
Katies Secluded Corner: After you leave the No. 3 Coal Mine, you can see some crows circling on the right. There is Katies Secluded Corner. Here is always a bow and other useful stuff to be found.
At the exit of the No. 3 Coal Mine there is also the option of attaching a rope that takes you directly down to the road; but I think thats pretty pointless.
Stone Church: A little behind the western access of the Abandoned Mine No. 5 is the Stone church. This building is a good shelter in bad weather when the path to the lonely lighthouse is too far or dangerous. Inside the church there is a fire barrel and enough wood to keep you warm for a few nights.
Lonely Lighthouse: This cute little home is by far the most cozy interior and the best base at →Desolation Point, but it is quite dark in there. Unfortunately, there is no workbench.
Workbenches can be found in No. 3 Coal Mine and in the Whale Processing
The Riken: This shipwreck is easy to find from the lighthouse. It is located in the midst of the frozen bay, halfway to the Whale Processing. Inside there are a few boxes, metal shelves and beds. But the most important thing about this ship is the large furnace, which can reach temperatures high enough to produce tools and arrowheads. (for more information about forging, see the Survival Guide). Further forges can be found at →Forlorn Muskeg and →Broken Railroad.
Small Island: Close to the Riken a little further out lies the Small Island. Do not forget to visit it at least once. Its the ideal place for hunting (deer and rabbits, no wolves).
Whale Processing / Hibernia Processing: The factory is not a particularly inviting place, quite dark, dangerous holes in the floor and outside wolves always sneaking around.
But there is also everything that makes a proper base: Beds, lockers, a workbench and a fire barrel. But because of their unfavorable location its not recommendable to stay here for longer. In the adjoining buildings and the ward there are always locked cabinets, so make sure you bring a prybar with you when you come here. And nowhere else in the game are so many things to find in the weirdest places. So, in particular, examine the inside of the station for a thorough investigation.
From the lighthouse there are three ways leading here: Over the ice, walking the road or through the Abandoned Mine No. 5.
Broken Bridge and the cave at the Waterfall:
At the eastern end of the map is a destroyed, impassable bridge. Here lives the one and only bear in this region. If you go under the bridge to a waterfall you will find a cave on the left hand side.
ATTENTION! In it, you’ll met a wolf (Scruffy, Fluffy’s brother). Have a weapon ready when you enter it the first time. Here is almost always a rifle to be found.
Timberwolf Mountain Pt. 1 (V1.69)
→Timberwolf Mountain is the most difficult to put into words of all regions. Stay close to me so you don’t get lost. In contrast to the descriptions of the other regions we make individual trips here. The starting point is always, of course, the Mountaineer’s Hut at Crystal Lake.
Note: There are seven places where a rope hangs and four additional places where a rope can be fastened.
When you have climbed the rope in the →Pleasant Valley, you will come across the winding ravine here in the south-west to the region. Right in front of you is one of the Landing Gears of the airplane which marks this point very well.
Head to the right. There is more debris here. You come through a small depression and then go under one of the arched trees.To the left is the ONLY building of this region: The Mountaineer’s Hut.
The area you have traversed so far is free of wolves and bears but sometimes you can meet a moose here. This safe zone is quite large, ranging from the western edge of the map to almost the frozen river, which is coming from the north-west. Its one of the few real orientations here. Around the cottage there is enough wood, deer, rabbits and on the lake there is a fishing hut.
Before you go to expeditions put a few supplies here. Take a saw with your expeditions and do not grab to much of the stuff that you find, just take what you absolutely need. In the beginning, it is more important to be able to orient yourself and move fast.
1st Excursion: Around the lake
When you go past the hut (left) to the east, you will pass through another depression and then into a big basin. Here there is a lot of stuff to be found, but also many wolves and a bear and maybe a moose.
It is recommended to explore this part of the map completely. You will have to pass it frequently and it is good if you know how it is built up. The important places here are:
Seen from the central point of the basin (the red wing):
(For orientation: If you draw a line from the containers to the red wing, the containers are facing east and the wing facing west)
- Southeast towards the edge of the map: The open Forest Cave
- In the east the path towards the log across the Echo Ravine
- In the northeast the steep slope down into the Echo Ravine
- Directly to the left of the slope is a bear cave and
- to the left of the cave and the right of the slope are the slightly hidden paths to the Echo Peak East (west) and Echo Peak West (east).
- Quite far in the north you will see the first hanging rope and
- in the northwest you will return to the lake.
At the lake are some wolves at home and also the bear can be seen now and then on the eastern shore of the lake.
The really dangerous part, seen from the lake, is the inflow coming from the north. If you go up there for the first time, be sure to be in sight of the river. Up to three wolves and a bear drift here around and there is practically no shelter to find. If you are not familiar with the area, a storm can be your end.
My personal recommendation: For now, stay away from here. Admittedly there is a cave here, but you will hardly find it in a storm. And by the way, there’s almost nothing to find here.
2nd Excursion: Echo Ravine:
You don’t need to bring a rope for this trip (this saves 5 kg / 11 lbs). Let’s go! On the steep slope down into the Echo Ravine. Arrived at the bottom turn left. The right fork is a dead end, you can examine it on occasion.
After a short distance you will find the Chasm Cave. A little further on, a valley basin opens with stuff from the plane, guarded by two wolves.
Somewhere on the right hangs a rope (ignore it, it’s very long and leads to a place you can get to more easily). Follow the canyon.
On the further way you will find the first of two closed caves. These caves cross the mountain from east to west. But first, go through the ravine. You finally end up in the open Y-Cave (I named the cave that way because it is the only one of its kind in the whole game).
It is an important base point in this area. There is always a sleeping bag here. If you don’t really need it, leave it here. And deposit some durable food, bandages and stuff like that here.
The path to the left ends prematurely at an ascent to which we will attach a rope now. This is the short way to the Deer Clearing.
The way out of the cave to the right leads into a rather confusing part of the map.
But if you always keep to the right, you will eventually reach the upper end of the rope that we ignored before.
Go back to the exit of the Y-Cave this time keep left until you come to a climb (also to the Deer Clearing). Climb up here and take the rope. Now keep left along the edge of the slope until you reach the next fixing point. Here there are almost always wolves on the way! Attach the rope here and slide down. You have now opened the short way from the Y-Cave to the Deer Clearing.
Now walk out of the Y-cave as before and keep half right, just past the big boulder. (by the way, there are no enemies here so you can be completely relaxed). You’ll find an open cave. From here, always following your nose, you get to the tree trunk across the Echo Ravine. Go over and after a short distance you should know where you are.
3rd Excursion: The first ascent to the plane
Because of the many pictures we created a separate section for this.
The first ascent to the plane (V1.69)
Before you start: Bow, bedroll, coffee, hacksaw, first aid, recycled can, food and water for at least on day, as well as some flares/torches or a lantern are the minimum prerequisite so it does not end in a disaster. And of course your best clothes in perfect condition.
Your first way leads you eastwards. There are two ways to reach the first important point, the Deer Clearing.
Either through the Echo Ravine or the tree trunk over the ravine. If you have listened to what I have said so far, you know where that is.
No matter which way you choose, you finally come to the ascent to the Deer Clearing.
When you’re up, hold on to the right edge of the slope and then along the rock face to a cave. If the weather is good you can also go diagonally to the right across the clearing. Here you will find a cave.
Good: You have reached the northeastern corner of the map. This cave is a very good place to rest or spend a blizzard. There are wood and deer and the wolves do normally not come close. There are also some containers that want to be examined.
From the cave it goes up the wide slope on the right, up to a fallen tree which lies exactly in the direction of our path.
Here, up the narrow passage on the left …
…. and then where a fallen down tree points like a finger to the right move to the left behind the rock.
Climb up to the Secluded shelf. The path then leads through a cave.
Keep to the right in the cave. At some point a low passageway appears, slip through. Keep always to the right and you’ll get through it fast. Of course, you can also always turn to the left.
When you leave the cave, you’re almost there. Make sure that you are rested and absolutely fit, the last ascent is very strenuous!
To the left of the cave exit you can see a descent, which will be your way back later.
Turn right until the long rope comes up. There is an open cave where you maybe find a rope.
The last ascent can NOT be mastered at once, so take short breaks on the ledges. Only if you want to waste an emergency shot or a GO-Energy drink, you can do it at once.
If you have reached the Summit, you don’t need any more help. On the left there is an open cave which is a good place to stay overnight. Make sure to place a sleeping bag and a good supply of firewood in this cave. There are no animals up here. In the plane is always a flare gun to be found.
I’ll see you when we go back ….
The long rope down again and back to the cave you came here from. Now at the latest you should have a rope with you. From here a short distance further you will come to a descent. Climb down here. Keep left until another descent appears. Attach a rope here and slide down.
You’re at the middle part of the river that feeds the lake. Back to the hut it goes either always after the course of the river (hazardous) or it goes along the left rock face, past the Engine and further along the slope, then a steep slope down (I call that the ramp). Continue holding on the left wall or edge until a rope emerges. Taking this last descent then you will see the lake further south.
If you decide to follow the river: At the end, another descent is due. And here you are in what I call the dangerous zone. Follow the river to the hut, but if you get nabbed here, don’t say I didn’t warn you.
From now on, you can take the short way up. But no matter which route you take to the plane, you always have to climb up at least three ropes.
Timberwolf Mountain Pt. 2 (v1.69)
4th. Excursion: Danger zone
If you have a rope, take it with you. The frozen river is divided into three segments. Let’s investigate the two lower sections. Here we go.
From the hut over the lake, climb the rope on the right. Move to the left, there are two more containers from the aircraft. Head to the north you’ll find a cave. This is the ONLY shelter here in this area! If you continue here, you will come to the lower segment of the river, which I call the dangerous zone. In this area, you have to deal with many wolves and a bear.
On the left, the river leads under the arch down to the hut, and on the right you go up to a bear’s cave and the ascent to the middle part of the river. Go up there and follow the river to the entrance of a closed cave. This is the top exit of the cave coming from the Echo Ravine.
Further north (on the left, following river) you’ll find one of the containers and the rope you hopefully already hung there. Further south (right) is one of the aircraft’s engines. At this point to the west, high up the steep slope lies Andrés Peak, which is hardly worth the effort (like the two echo peaks).
From the engine further south, the path leads back to the lake (as described in’ The first ascent to the plane’). Here you can also mount a rope that leads directly down to the cave where you passed at the beginning of this excursion. Did you bring a rope? Then you can hang it up here and take the short way down. When you arrive at the bottom you will see that this is quite inappropriate as a way up. There’s a depression here and the rope is unnecessarily long. It’s only good for the way down. You can now go back to the cabin.
5th. Excursion: Indiana Jones Eric’s Falls and the last rope crusade
On our last trip we visit Eric’s Falls, the Waterfall Cave and the northern bear cave. If you still have a rope left, you can open another way to the plain below the summit.
Here we go: Use the short route I described in the section ‘The first ascent to the plane’.
If you are at the last rope before the plane (the very long one), you can build (left edge) an additional path here with a rope. Climb down.
Probably you will also meet the bear whose cave is here on the right (northern) rock wall.
(Through the big basin ahead, you can get to the Deer Clearing)
If you do not have a rope, go back down the cave to the Secluded Shelf. Climb down here and follow the gorge to the left to the upper part of the river.
Here you can already see the waterfall, the cave is almost directly to the right of it. This is the end of our last trip. You have seen all the important places and ways.
Now you can begin to gradually move all the loot down to the hut and, if necessary, to the Preppers Abandoned Cache at →Pleasant Valley.
Good luck.
Challenges I (v1.73)
Most of the challenges in TLD are designed for experienced players who know the maps inside out.
Here we go.
Hunted: Pt. 1
Unfortunately, this challenge is mainly a matter of luck and not skill/knowledge in TLD. The problem is, if it shreds you and you don’t have the medical supplies you need, or a storm is raging and you’re to far away from the next safe place, you can usually forget about it.
The most important things here are: Good clothes (as always in this game) and the full equipment of first aid. You can’t reach it until you get to the farmhouse. Take your time!
An important tool can be the trees that protrude diagonally out of the ground. Some of these things you can climb, but not wolves and bears.
The path to take is this:
- The basement at Skeeters Ridge
- Via the path from the Burned Ridge Cave down to the river.
- Following the river to the Farm House
- On the other side of the valley up to the cave to the Winding River (this is the most difficult, because longest part)
- Following the Winding River to the Carter Hydro Dam
(if you manage to keep the bear locked up here in the fenced area, you won’t have to worry for the rest of the way! Clearly a failure by hinterland not to remove the fence for the challenge). - Follow the rails to the locomotive and further to the Derailed Train (protection in the wagon!) and then to the Camp Office
- Take the short way to the Trappers Cabin (see here in this guide).
Of course, it would also be possible to walk along the Cinder Hills Coal Mine, the →Coastal Highway and the →Ravine. However, there are three quite long sections without a save position. I have to admit: I haven’t tried it out myself yet.
The only (temporarily) effective weapon against the old bear is the flare pistol, so that you can at least chase him away for a short time. So you’re going to have to divide up your ammunition.
Anything that increases your stamina is important and should be used, the faster you move, the less likely is the probability of an ugly encounter: light weight, coffee, shots are your aces.
Oh, and when you get out of a building and he is already visible, go right back in and wait a few (ingame) minutes and then go out again, with a bit of luck he has disappeared in the meantime.
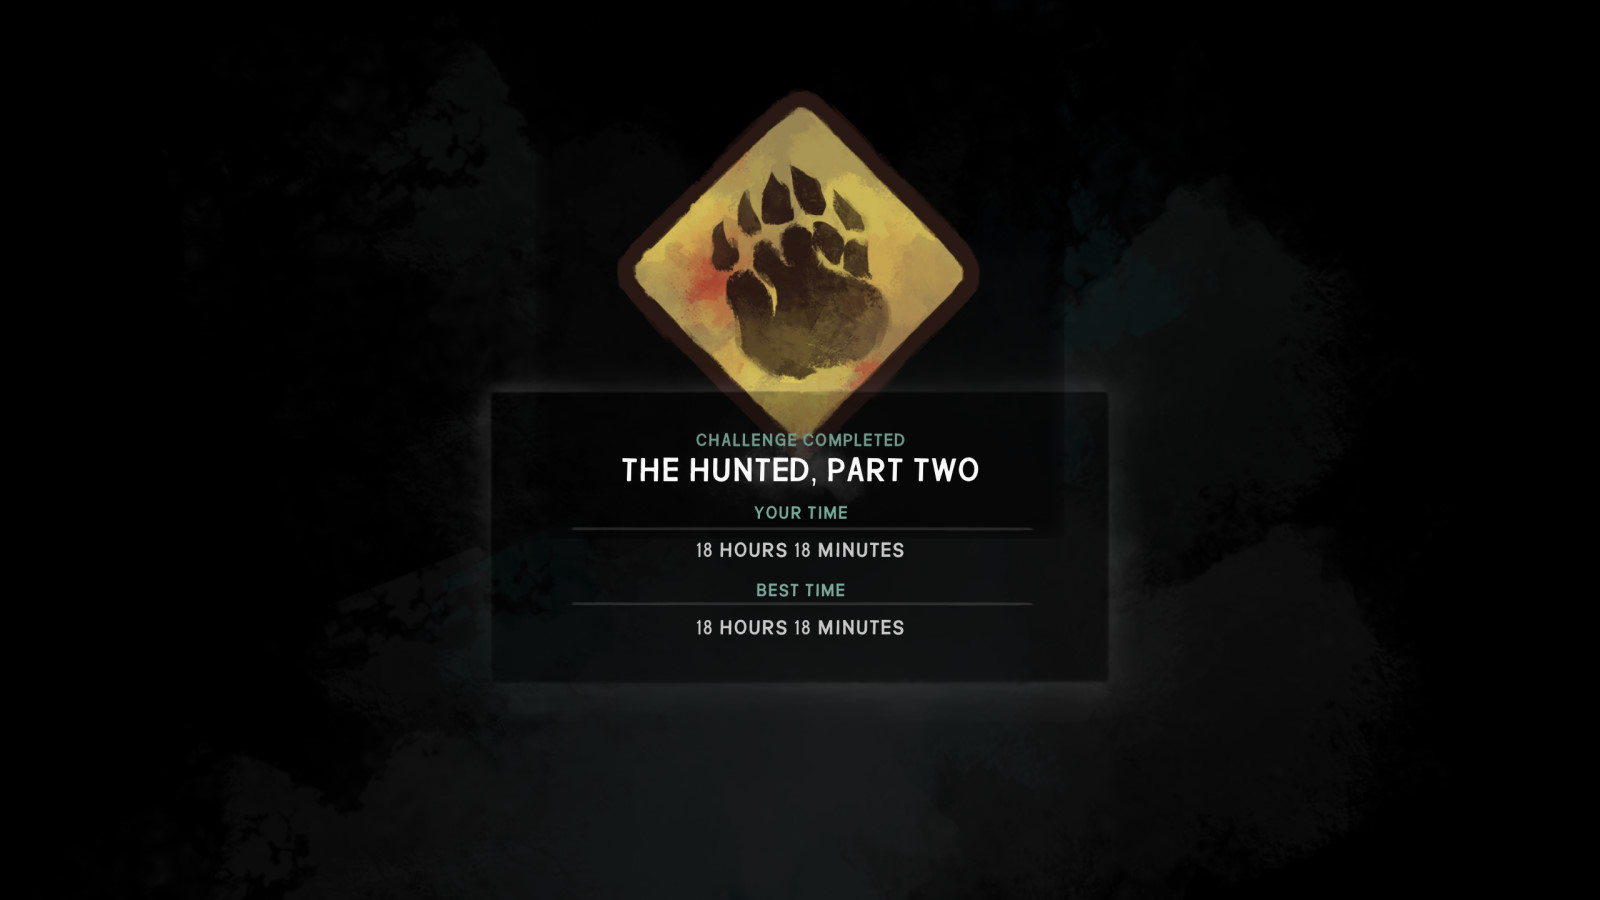
Hunted: Pt. 2
The bear is waiting outside the cabin until you get out. This will give you time to search the place and get yourself fixed up as much as you can. If you want to be on the safe side, take off all your clothes before you leave.
The route the bear takes is fixed. It leads over twelve positions to a new cave at the Mystery Lake. Additional ammunition was only found at the Camp Office. The track the bear leaves is much more durable than in normal game play, so you don’t have to hurry. As stupid as it sounds, don’t try to kill him! Save your ammo! Don’t shoot him unless he attacks you.
Hunted: Pt. 3
Inevitable, sometime.
We continue with ‘A nomad gets bored to death’.
Nomad
The challenge ‘Nomad’ is not a challenge in its current state. It doesn’t even deserve a star. The main problem is that you find far too much stuff. After a short time you have to leave stuff behind, because you don’t need much of it.
I haven’t killed anything in my entire passage. It feels like playing in Pilgrim. Here there is still a considerable need for improvement for Hinterland.
I chosed the following route:
- 1. Skeeters ridge (Pleasant Valley)
- 2. Mountaineer’s hut (Timberwolf Mountain)
- 3. Barn (Pleasant Valley)
- 4. Rural store (Pleasant Valley)
- 5. Radio control hut (Pleasant Valley)
- 6. Carter hydro dam (Pleasant Valley <-> Mystery Lake)
- 7. Forestry lookout (Mystery Lake)
- 8. Trapper’s cabin (Mystery Lake)
- 9. Camp office (Mystery Lake)
- 10. Abandoned mine (Pleasant Valley <-> Coastal Highway)
- 11. Abandoned lookout (Coastal Highway)
- 12. Quonset garage (Coastal Highway)
- 13. Abandoned Harris home (Old Island Connector)
- 14. Stone church (Desolation Point)
- 15. Lonely lighthouse (Desolation Point)
Next …
Whiteout
I liked it best so far, because experience in the game really makes the difference. My recommendations:
Using a lantern is taboo. The amount of fuel you will find in the region is just enough for the required 5 litres. There are lots of flares that can be used alternatively.
If you don’t get enough ammunition, take a trip to the Cinder Hills Coal Mine, there’s always a six-pack to find.
The main problem is probably the gun. As far as I can tell, there are only a few places of discovery (corpse on the Misanthrope’s Island, corpse near the waterfall of the bear creek, the vehicle at Commuter’s Lament and the fishing hut between the two islands).
At my first attempt I also had the problem that I didn’t find a hatchet. This makes it difficult to get enough wood/water. It is therefore advisable to take all water from the toilets and the wood found with you, at least until you have found a hatchet.
Challenges II (v1.74)
Let’s get to …
Hopeless rescue
I didn’t use any of the known glitches in my run. Basically, you can reach the →Pleasant Valley and →Timberwolf Mountain from →Mystery Lake
… either through the Carter Hydro Dam and the Winding River
… or through the →Ravine, →Coastal Highway and the →Cinder Hills Coal Mine.
Both ways have advantages and disadvantages.
The first one is longer and there is more to find (Dam/Farm House).
In the second one there is much less stuff to find, but it’s shorter and less dangerous and you can bunk stuff in the mine as you pass it twice.
Whether you create a good time depends mainly on what you find and your knowledge about the regions. Weapons are not needed, the rifle is too heavy anyway and a bow with arrows will be hard to find. The lighter you are, the better, especially at →Timberwolf Mountain.
Archivist
Basically the same thing as with Nomad. Go to the specified locations and read the messages on the computers. The maps are fully revealed here and the destinations are displayed on them.
The Aurora appears here practically every night when there is no storm. Even if there are several messages on the computer (e.g. in the Quonset Garage), it is enough to read one of them.
Sounds boring, it is.
(The Shortwave Tower at the waterfall in FM is here called North Tower.)
As the Dead sleep
You will start this challenge in the →Bleak Inlet.
The biggest difficulty is to get into the cave to the →Forlorn Muskeg without significant loss of condition.
In addition to the vanilla Interloper settings, the challenge has the following restrictions:
(of course I couldn’t check the whole regions for that!)
- No regeneration possible
- Fishing is not possible
- No magnifying glasses
- Preparation of birchbark tea not possible
- No bows
- No deer, rabbit or moose
My recommendation for the route:
BI ->FM ->ML ->RV
Here is the important distress pistol that helps you to keep obtrusive wolves away.
Conflicts are to be avoided at any case due to the missing regeneration.
->CH ->OIC ->DP ->OIC ->CH ->PV ->TM ->PV ->WR ->ML ->MT ->HRV ->MT
From →Mountain Town to →Hushed River Valley and back you have to do in one day ’cause there is no place to sleep. So be well prepared in Milton. The same applies to the last step from →Mountain Town to the →Broken Railroad.
(I did not take the risk of sleeping in a snow shelter.)
->FM ->BR
Of course you can also travel the entire route in reverse. It is then shorter, but also more difficult and more dangerous.
Those wretched cairns …
Actually I didn’t want to include any pictures of the cairns here, but there are some special candidates where some help is needed.
#160: →Mystery Lake, in the seemingly inaccessible area next to the dam.
(We start here with a view of the Train Loading Area.)
—
#110: →Raven Falls Railway (Ravine)
—
#73: →Pleasant Valley, behind the Lonely Homestead.
Has been simplified in the meantime, you can now climb the sloping rocky ridge!
Special (v1.76)
A. The safes:
Currently, there are six safes in the game. At
→Mystery Lake in the Trapper’s Cabin and inside the Carter Dam
→Forlorn Muskeg at the Old Familiy Spence Homestead
→Mountain Town in the bank in Milton
→Desolation Point inside the Whale Processing
→Bleak Inlet in the Last Resort Cannery
You can open it with a combination of three numbers, which is another one in every game. You turn the wheel (slowly) counter clockwise ’til the click, then clockwise and again counter clockwise. Then its open. If you make a mistake you have to start from scratch.
B. The bunkers:
There are numerous videos on the net that lead you to the possible positions (most of them are outdated!). So if you can not find them using our maps, this is your last option.
Some of the bunker positions are at difficult to reach places. It may take a long time to find one.
In the →Pleasant Valley and at the →Mystery Lake you can find a bunker at a random position. Additionally there is a bunker in the →Pleasant Valley near the rope to →Timberwolf Mountain which is always there.
C. Collectibles:
1. Buffer Memories (71). Region (Count) -> Place (Count)
(The old value (31) is still displayed in the game!)
- Mountain Town (13) : -> Milton Credit Union(5), Milton Post(4), Orca Gas Station(4)
- Mystery Lake(15) : -> Upper Dam(5), Lower Dam(5), Camp Office(5)
- Desolation Point (9) : -> Lonely Lighthouse(4), Whale Processing(5)
- Broken Railroad (9) : -> Maintenance Shed inside(4), outside(5)
- Coastal Highway (8) : -> Quonset Garage(3), Fishing Camp(5)
- Pleasant Valley (10) : -> Radio Control Hut(5), Rural Store(5)
- Forlorn Muskeg (3) : -> Shortwave Tower(3)
- Timberwolf Mountain (4) : -> Chasm Cave(4)
2. Cairns (165).
Many thanks to ProsPex for his great support.
- Broken Railroad (15)
17, 28, 29, 37, 39, 60, 64, 66, 81, 82, 88, 106, 123, 131, 161 - Desolation Point (12)
3, 22, 48, 50, 53, 90, 91, 93, 116, 122, 137, 139 - Coastal Highway (18)
13, 20, 21, 44, 47, 58, 70, 86, 98, 112, 113, 117, 118, 133, 140, 148, 149, 155 - Mystery Lake (21)
23, 31, 33, 36, 38, 49, 59, 67, 96, 108, 114, 120, 121, 125, 129, 144, 156, 157, 160, 162, 163 - Timberwolf Mountain (19)
5, 12, 26, 43, 45, 57, 77, 84, 89, 92, 99, 103, 105, 111, 115, 124, 136, 152, 159 - Pleasant Valley (28)
1, 4, 11, 16, 18, 25, 27, 30, 34, 42, 73, 75, 80, 83, 87, 95, 101, 109, 127, 128, 132, 138, 141, 146, 147, 154, 164 - Forlorn Muskeg (17)
6, 8, 9, 24, 35, 40, 52, 55, 74, 78, 85, 102, 119, 130, 134, 150, 158 - Ravine (10)
14, 15, 46, 71, 79, 110, 126, 135, 142, 145 - Winding River (6)
32, 51, 100, 107, 153, 165 - Winding River Cave (14)
2, 7, 10, 54, 56, 61, 62, 63, 65, 68, 69, 72, 104, 151 - Old Island Connector (5)
19, 41, 76, 94, 143
3. Notes (16).
- Forlorn Muskeg: At Fam. Spence Homestead
- Timberwolf Mountain: In the Mountaineer’s Hut
- Old Island Connector: In the car at Harris Homestead
- Desolation Point: On the workbench in Hibernia
- Desolation Point: In the Lighthouse
- Pleasant Valley: In the Red Barn
- Pleasant Valley: In the Farmhouse
- Coastal Highway: In the car on the bridge over the bear creek
- Coastal Highway: In the Lookout Tower
- Coastal Highway: In the Quonset Garage
- Mystery Lake: In the Camp Office
- Mystery Lake: In front of one of the Lake Cabins
- Mystery Lake: In the Trappers Cabin
- Bleak Inlet: In the Radio Control Hut (the code message)
- Bleak Inlet: 2x In the Cannery and/or the Residences
4. Polaroids (11).
The finding places are coincidental, therefore an enumeration here makes little sense.
D. Specialities: Only here
- Forlorn Muskeg: the big hollow tree, forge outside
- Timberwolf Mountain: aircraft containers, Y-Cave
- Old Island Connector: –
- Desolation Point: ship, lighthouse, Scruffy
- Mountain Town: water tower, locked building
- Pleasant Valley: static bunker, target for the bow
- Hushed River Valley: signal fire, moose hide satchel (loot), ice caves, Fluffy
- Coastal Highway: Mine with an elevator
- Ravine: no wolves and bears
- Broken Railroad: the large lokomotive
- Mystery Lake: dam, cairn outside the normally accessible area
- Carter Dam & Environs: –
- Bleak Inlet: Milling machine, ammunition workbench, Timberwolves, Fluffy’s sister.
E. Unused items
Wishes@Hinterland
This is a very personal wishlist to Hinterland:
- Craftable clothes for the head (done)
- Ability to remove destroyed snow shelters (done)
- The Hunted, Part 3
- extended skills for all actions: e.g. sharpening, repairing, crafting
- extended skill books for all skills
- Machines working while an aurora (done)
- The flashlight should keep its charge at the end of the aurora
- Ladders (maybe craftable)
- Outside: Craftable simple storage box (done)
- Interactive maps: to draw our own markers and text (done)
- Reduce the time to quarter by at least 25% and the weight of the meat bags by 25%.
- Shorter less tedious mouse movement to select and execute item related actions. So we don’t have to select the action on the top left and then move across the whole screen to execute it on the lower right.
- Fix sun movement in the corresponding regions! (currently BR, ML, PV, WR)
Improvement of the brachial errors in the German translation:
- Ledge (while climbing) Band -> Vorsprung, Absatz
- Chest (body) Truhe -> Brustkorb
- Engine (plane) Motor -> Triebwerk
- Trailer (immobile) Wohnwagen -> Baracke or Wohncontainer
- Locomotive Engine (train) Lokomotivenmotor -> Lokomotive or Lok
- Cat Tail (plant) Rohrkolbenpflanze -> Rohrkolben or Schilf
Epilogue
A word from the creators:
Since english is not our native language it’s often difficult to get a proper translation of what we are trying to say.
If there is something strange in the TLD-Guide, who you gonna call?
Please not the Ghost Busters, tell us whats wrong or misleading. Thank you.
Keep in mind that every improvement of this guide benefits every player who needs it.
RepConn and Gecko-[GER]
—
Apart of:
IFIYGD, delta, ProsPex and lindenparker
a lot of people don’t know that they worked indirectly on this guide and the Survival Guide.
It’s time to mention them here.
- [CBF]RAIN
- EN16M471C
- JayXL
- jswilliams
- ajb1978
- mf187doubleg
- Hotzn
- Alcator
- Pestilence (private profile)
- bethany (former forum mod ; private profile)
… and a few others whose names I can’t remember.

